Lynchburg College - Weebly
38
Lynchburg College Curriculum Unit: Magic Magnets Second Grade, Science Emily Britt Education 424: Science Instruction 19 February 2015
Transcript of Lynchburg College - Weebly

Lynchburg College
Curriculum Unit: Magic Magnets
Second Grade, Science
Emily Britt
Education 424: Science Instruction
19 February 2015

Curriculum Unit: Magic Magnets
Rationale
Science is a complicated subject. It is essential for all students to grasp the main conceptsand as a teacher, it is my duty to make this knowledge accessible. Many students react poorly toboring lecture therefore it is important to deliver scientific content in a way that makes itinteresting as well as sparks the imagination of my students. Students need to be inquisitive inorder motivate themselves to learn.
Major goals and objectives:
At the end of the unit, the students will be able to: Identify the north and south magnetic poles Determine the everyday uses of magnets Classify objects into two groups: magnetic and nonmagnetic Identify objects that contain iron Define magnetic field Identify the difference in repulsion and attraction field lines Describe the differences between a natural magnet, artificial magnet, and electromagnets Conduct an experiment using magnets Collect and organize data in a chart and bar graph Draw a conclusion about data collected Communicate results with their peers Explain the earth’s natural magnetic field Use a compass to find magnetic north
Virginia Standards of Learning
2.1 The student will demonstrate an understanding of scientific reasoning, logic, and thenature of science by planning and conducting investigations in which
a. observations and predictions are made and questions are formed;b. observations are differentiated from personal interpretation;c. observations are repeated to ensure accuracy;d. two or more characteristics or properties are used to classify items;e. conditions that influence a change are identified and inferences are made;f. data are collected and recorded, and bar graphs are constructed using numbered axes;g. data are analyzed, and unexpected or unusual quantitative data are recognized;h. conclusions are drawn;i. observations and data are communicated;j. simple physical models are designed and constructed to clarify explanations and show
relationships; andk. current applications are used to reinforce science concepts.

2.2The student will investigate and understand that natural and artificial magnets have certaincharacteristics and attract specific types of metals. Key concepts include
a. magnetism, iron, magnetic/nonmagnetic, poles, attract/repel; andb. important applications of magnetism.

Cur
ricu
lum
Uni
t: M
agic
Mag
nets
Stan
dard
s of
Lea
rnin
g O
bjec
tive
sL
esso
n1
Les
son
2L
esso
n3
Les
son
4L
esso
n5
Les
son
6
2.1
The
stu
dent
wil
l dem
onst
rate
an
unde
rsta
ndin
g of
sci
enti
fic
reas
onin
g, lo
gic,
and
the
natu
re o
fsc
ienc
e by
pla
nnin
g an
d co
nduc
ting
inve
stig
atio
ns in
whi
cha.
obse
rvat
ions
and
pre
dict
ions
are
mad
e an
d qu
esti
ons
are
form
ed;
XX
b.ob
serv
atio
ns a
re d
iffe
rent
iate
d fr
om p
erso
nal i
nter
pret
atio
n;X
c.ob
serv
atio
ns a
re r
epea
ted
to e
nsur
e ac
cura
cy;
X
d.tw
o or
mor
e ch
arac
teri
stic
sor
pro
pert
ies
are
used
to c
lass
ify
item
s;X
X
g.co
ndit
ions
that
infl
uenc
e a
chan
ge a
re id
enti
fied
and
infe
renc
es a
re m
ade;
X
h.da
ta a
re c
olle
cted
and
rec
orde
d, a
nd b
ar g
raph
s ar
e co
nstr
ucte
d us
ing
num
bere
d ax
es;
X
i.da
ta a
re a
naly
zed,
and
unex
pect
ed o
r un
usua
l qua
ntit
ativ
e da
ta a
re r
ecog
nize
d;X
X
j.co
nclu
sion
s ar
e dr
awn;
XX
k.ob
serv
atio
ns a
nd d
ata
are
com
mun
icat
ed;
XX
l.si
mpl
e ph
ysic
al m
odel
s ar
e de
sign
ed a
nd c
onst
ruct
ed to
cla
rify
exp
lana
tion
s an
d sh
owre
lati
onsh
ips;
and
XX
X
m.
curr
ent a
ppli
cati
ons
are
used
to r
einf
orce
sci
ence
con
cept
s.X
XX
2.2
The
stu
dent
wil
l inv
esti
gate
and
und
erst
and
that
nat
ural
and
art
ific
ial m
agne
ts h
ave
cert
ain
char
acte
rist
ics
and
attr
act s
peci
fic
type
s of
met
als.
Key
con
cept
s in
clud
ea.
mag
neti
sm, i
ron,
mag
neti
c/no
nmag
neti
c, p
oles
, att
ract
/rep
el; a
ndX
XX
XX
X
b.im
port
ant a
ppli
cati
ons
of m
agne
tism
.X
XX
X

Curriculum Unit: Magic Magnets
Overview of Content
Magnet: a piece of iron or steel that attracts certain metals Poles
Poles are either end of a magnet
North Pole and South Pole Like poles repel and opposite poles attract
Magnetic Force is stronger at the poles and gets weaker as you move farther awayfrom the poles.
If you cut a bar magnet in half, you get two new, smaller magnets, each with itsown north and south pole.
Magnetic field: the invisible push and pull from a magnet A magnet creates an invisible area of magnetism all around it
Magnets affect some metal items that are inside of its magnetic field. Items must contain iron, cobalt, nickel, or steel in order to be affected.
Earth’s Magnetic Field The north end of a magnetic compass always points roughly toward Earth's North
Pole and the south end of the compass needle always points toward Earth’s SouthPole. That is because Earth itself contains magnetic materials and behaves like agigantic magnet.
Types of Magnets Natural Magnets: Natural magnets are composed of a mineral called magnetite or
lodestone. This mineral is special because the domains are naturally facing the samedirection.
Artificial Magnets: Artificial magnets are composed of special minerals or metals.The domains of these materials have been turned the same way using a magnet orelectricity.
Electromagnet: An electromagnet is created with electricity is run through a coil.This creates a magnetic field around the coil.
Magnetic Domains: areas inside of an material where the magnetic charges are all facingthe same direction.
Magnets have important applications and uses in everyday life.

Curriculum Unit: Magic Magnets
List of Materials
Lesson 1o Plastic Cupo Paper clipo Cotton ballso Stringo 2 by 2 inch sheets of Glass Plastic Aluminum foil Copper Iron Paper (a sticky notes pad works well) A stick notes pad with a small sheet of iron in between the pages
o A strong magnet (rare earth magnet)o Handout: Magic Magnets: What is a Magnet?o Flipcharto Markero 1 bar magnets for each student with defined poleso Preferably by color (blue and red) and with a letter (N and S)o ELMO or other document projectoro SmartBoard
Lesson 2o Brown paper bag filled with 10 objects At least 2 different objects made of iron Wooden toothpick Penny Rubber bands Tin can Crayon Bobby pin Small rock Piece of plastic (like a counter) Glass marble A dime Steel wool Thread Aluminum foil
o Two bar or horseshoe magnetso Handout: Magic Magnets: Attract or Not Attract?
Lesson 3

o Two bar magnets per groupo One cut-able bar magnet per groupo Iron shavings in shakerso Wax papero Manila folder or light colored construction paper.o Handout: Magic Magnets: Magnetic Field
Lesson 4o artificial magnet and natural magneto ELMO or other document projectoro Handout: Magic Magnets: Types of Magnetso Iron Nailo 4 yards of insulated wireo 1 ½ volt dry cell batteryo 2 duct tape strips per group (1inch by 2 inch)o Paper clips, bolts, washers, etc.o Bar magnet
Lesson 5o Natural Magnet, Man-made Magneto Spring Clothespino 1 inch masking tapeo Scissorso Large Plastic Cupo Paper Clipso Handout: Magic Magnets: The Strongest Magnet Investigationo Handout: The Strongest Magnet Grapho Completed Strongest Magnet Graph for example
Lesson 6o Paper clipo Natural Magneto Foam Packing Peanuts (non-biodegradable)o Bowlo Watero Compasso 4 sentences strips: North, South, East, and Westo Handout: Magic Magnets: Compass and Eartho ELMO or other document projector

Curriculum Unit: Magic Magnets
Special Safety Concerns
Magnets should not be swallowed or inserted into any orifice of the body.
Lesson 4 involves a small electrical current. It is not enough to harm anyone but students shouldbe monitored closely and anyone not adhering to the rules will not be involved in theconstruction.

Curriculum Unit: Magic Magnets
Extension activities
Extension activities are for students that require a little extra challenge outside of the six plannedlessons or finish work more quickly.
Magnet Inventor:o Activity:
Design a new product that uses magnets Draw your invention Answer the following questions:
How does this invention use magnets? What does your invention do? How does it make life easier? Who would use your product?
Magnet Centers: When students complete their work during science, they can go to oneof 2 magnet centers.
o Center 1: Materials:
Computer Brainpopjr.com
Activity: Watch the BrianPop Jr video on magnets. Play the games that go along with the video
o Center 2: (Adapted from Teaching Science to Children (2005) Materials
Ring Magnets Peg that fits into the center of the ring magnets
Activity: Drop the rings onto the peg so that the rings float. If the rings stick together, try flipping the top ring over and placing
it on the peg. Answer the question: What causes the rings to float?
For meeting the ends of diverse learners:
Students with special needs:o Students with special needs will receive direct instruction from the teacher or
from an aide.o All instructions will be delivered orally.o Rather than writing, students can answer questions from handouts orally to the
teacher or to an aide. English as a second language learners
o Rather than writing answers students can have conversations that the teacher willlisten in to.

Curriculum Unit: Magic Magnets
Sources of information
AAAS. "How Strong Is Your Magnet?" Science NetLinks. American Association for theAdvancement of Science, n.d. Web. 18 Feb. 2015.
Fisk, Judy. "How to Make a Paper Clip Compass for Kids." EHow. Demand Media, 02 Aug.2011. Web.
Friedl, Alfred E., and Trish Y. Koontz. Teaching Science to Children: An Inquiry Approach. 6thed. New York City: McGraw-HIll, 2005. Print.
Pflugfelder, Bob. "Make an Electromagnet." Make an Electromagnet - Science Bob. ScienceBob, n.d. Web.

Lesson 1: Introduction to Magnets
Objectives:o Student will be able to Identify the north and south magnetic poles. Determine the everyday uses of magnets.
Essential Questions:o What is a magnet?o How are magnets used?o Where is a magnet the strongest?o What is a magnetic pole?o Which ends of the magnet repel and which ends attract?
Content Outlineo Magnet: a piece of iron or steel that attracts certain metals The Parts of a magnet:
Poles are either end of a magnet North Pole and South Pole
Like poles repel and opposite poles attracto Magnetic Force is stronger at the poles and gets weaker as you move farther away
from the poles.
Part 1: Discrepant Evento Adapted from Teaching Science to Children (2005)o Group: Whole Classo Materials: Plastic Cup Paper clip Cotton balls String 2 by 2 inch sheets of
Glass
Plastic Aluminum foil Copper
Iron Paper (a sticky notes pad works well)
Figure 1

A stick notes pad with a small sheet of iron in between the pages A strong magnet (rare earth magnet)
o Preparation: Place the magnet in the plastic cup and cover with the cotton balls covering it. Set up the event in a similar way to Figure 1 before students come to class or on a
desk away from student activity.
o Procedure:1 Ask students to gather around the set-up2 Ask students what they believe is holding the clip up.3 Next ask students to predict which sheets will make the paperclip fall.
Record predictions on a flipchart4 Carefully insert each sheet between the paperclip and the cup
Check the predictions that were correct and X the predictions that wereincorrect.
5 Guide students to a generalization of the relationship between the sheets thatcaused the clip to fall and those that did not.
Part 2:o Group: Whole Classo Strategy: teacher lead discussion
o Materials: Handout: Magic Magnets: What is a Magnet?: 1 copy per student Flipchart Marker
o Preparation: Draw a KWL chart on the flipchart.
o Procedure1 Give each student a copy of Magic Magnets: What is a Magnet?.2 Start first by asking students what they know about magnets
Write responses on the KWL chart.3 Next ask student what they would like to know about magnets.
Write responses on the KWL chart.4 Flip to the next blank page on the flipchart. Ask students where they see magnets
Prompt for other locations beside just refrigerator magnets

5 Tell students to write eight of the locations listed in their Magic Magnet Notes:What is a Magnet?
Part 3:o Group: Heterogeneous Pairso Strategy: Inquiryo Materials: 1 bar magnets for each student with defined poles
Preferably by color (blue and red) and with a letter (N and S) ELMO or other document projector SmartBoard
o Procedure:1 Group students into pairs2 Give each student a bar magnet3 Give each pair a handful of paperclips.4 Ask the pairs to investigate the magnets but to keep in mind these questions (write
them on the board):
How can we get our magnets to stick together? Where is the magnet to strongest?
5 Allow time for students to explore. Walk around and answer any questions or toguide pairings to knowledge.
6 After students have finished, come back together as a class and ask each pair totell something that they found out.
7 Complete the Magic Magnets: What are Magnets? Handout together as a class.Project blank copy onto SmartBoard using ELMO. Ask for student input oncompleting the Handout.
8 Students should glue completed Handout into their science notebook.
Part 4:o Start Unit Vocabulary Sheet
1 Flip to next page of flipchart2 Ask students to turn to the next blank page in their Science Notebooks.3 They should write Magnet Vocabulary at the top of the page.4 Write the definition on the poster paper as students write along.
Magnet: a piece of iron or steel that attracts certain metals.
Attract: to pull Repel: to push
5 Tear the paper from the flipchart and use a magnet to pin it to a blank spot on thewhite/chalk board.

6 Write terms on sentence strips and ask students were they should go on the WordWall. Add Magnet, Repel, and Attract to the word wall.
Assessment:o Completion of Magic Magnets: What are Magnets?: (See Completion Rubric)

Lesson 2: What materials are attracted to magnets?
Objectives:o The student will be able to Classify objects into two groups: magnetic and nonmagnetic Identify objects that contain iron.
Essential Questions:o What materials are attracted to magnets?o What do these items contain that makes them magnetic?
Activity:o Adapted from Teaching Science to Children (2005)o Group: Heterogeneous Groupso Strategy: Guided Investigationo Materials: Brown paper bag filled with 10 objects
At least 2 different objects made of iron Wooden toothpick
Penny Rubber bands
Tin can Crayon Bobby pin
Small rock Piece of plastic (like a counter)
Glass marble A dime Steel wool
Thread Aluminum foil
Two bar or horseshoe magnets Handout: Magic Magnets: Attract or Not Attract?
Procedure:1 Divide students into pairs. Give each pair a paper bag fill with 10 objects from the
above list2 Ask the students to empty out the contents of the bag onto the table and
investigate what is inside. Identify any objects that they do not recognize.

3 Ask students to classify or group the objects into two groups based on what theyknow about the materials Size, shape, material, weight, etc.
4 Give each pair the opportunity to share how they classified their objects.5 Next give each student one bar magnet and a copy of the Handout: Magic
Magnets Attract or Not Attract?6 Ask the class how the magnet could be used to classify the objects.7 Instruct the students to make new groups using the magnet. First they should
record their predictions on the Handout.8 As they test each object, they should record their results on the Handout.9 As pairs finish, they should answer the questions on the Handout.10 As a class, go over the objects that were magnetic and those that were not
magnetic.11 Students should glue their Handouts into their science notebook.
Assessmento Attract or Not Attract Handouts are graded using Completion Rubric

Lesson 3: Magnetic Fields
Objectives:o The student will be able to Define magnetic field Identify the difference in repulsion and attraction field lines
Essential Questions:o What is a magnetic field?o How can we see a magnetic field?o How is the magnetic field between two unlike poles different to that of two like
poles?
Content Outlineo Magnetic field: the invisible push and pull from a magnet
Activityo Group: Heterogeneous Pairso Strategy:o Materials: Two bar magnets per group One cut-able bar magnet per group Iron shavings in shakers Wax paper Manila folder or light colored construction paper. Handout: Magic Magnets: Magnetic Field
Procedure:1 Give each pair two bar magnets, a manila folder, wax paper, and a saltshaker of iron
shavings.2 Have students place a manila file folder on their desk or table, then place two bar
magnets on the manila folder with opposite ends together.3 Place a piece of wax paper on top of the magnet.4 Have students sprinkle iron filings all around the bar magnet. They may need to
gently tap the wax paper with their finger to get the best view of the magnetic fieldlines.
5 Have students draw what they see in their Handout6 Ask students the following questions: Are your lines of force greater at the ends or in the middle of the bar magnet?
(Answer: at the ends)
What assumption can you make about the strength of the magnetic field at thatlocation? (Answer: The magnetic field is strongest at the ends or at the poles. Thisis where the lines are concentrated and closer together.)
7 Have the students place the used iron filings back in the saltshaker after you modelthe best and cleanest way.
8 Have the students now place two bar magnets onto the manila file folder so that Northpoles are facing each other and are about an inch apart. Place the wax paper on top ofthe magnets.
9 Have students sprinkle iron filings around the north poles of the magnets10 Have students draw what they see. Ask the students if the magnets are attracting or repelling? (Answer: Repelling) How do you know? (Answer: The magnetic field lines are bending away from
each other.)11 Have the students place the used iron filings back in the saltshaker.12 Now ask the students what they think will happen when they cut a bar magnet in half.13 Tell each group to carefully cut the bar magnet in half at an angle .14 Have students place the cut bar magnet onto the manila folder so that one flat end is
close to one angled end.15 Have students sprinkle iron filings around the area between the two magnets. Ask the students what they see happening? (Answer: the magnetic fields are
bending away from each other) What can they infer about the two magnets? (That the diagonal end of one magnet
is now the north pole or south pole)16 Have the students clean up per your directions.17 Add the following terms to the Vocabulary Sheet and Word Wall Magnetic field: the invisible push and pull from a magnet
18 Students should glue their Handout into their science notebooks.
Assessment:o Handouts are graded using Completion Rubric

Lesson 4: Types of magnetics
Objective:o Student will be able to: Describe the differences between a natural magnet, artificial magnet, and
electromagnets.
Essential Questions:o Where do natural magnets come from?o How do we get artificial magnets?o What is an electromagnet?o What is a magnetic domain?
Content Outline:o Natural Magnets: Natural magnets are composed of a mineral called magnetite or
lodestone. This mineral is special because the domains are naturally facing the samedirection.
o Artificial Magnets: Artificial magnets are composed of special minerals or metals.The domains of these materials have been turned the same way using a magnet orelectricity.
o Electromagnet: An electromagnet is created with electricity is run through a coil. Thiscreates a magnetic field around the coil.
Part 1: Magnetic Domains and types of magnetso Group: Whole Classo Strategy: Direct Instructiono Materials: artificial magnet and natural magnet ELMO or other document projector Handout: Magic Magnets: Types of Magnets
o Procedure:1 Give each student a copy of Magic Magnets: Types of Magnets2 Project a copy onto the SmartBoard or other projection screen3 Have students complete the handout as you explain the concepts and complete the
one that is projected.
Part 2: Make an Electromagneto Adapted from http://www.sciencebob.com/experiments/electromagnet.phpo Group: heterogeneous pairs

o Strategy: Teacher guided groupo Materials (multiplied by 10) Iron Nail 4 yards of insulated wire 1 ½ volt dry cell battery 2 duct tape strips per group (1inch by 2 inch) Paper clips, bolts, washers, etc. Bar magnet
o Preparation Strip one inch of insulation off each end of the wire.
o Procedure1 Group students into pairs2 Give each student a nail, wire, a battery, metal materials, and two strips of duct
tape.3 Remind students that they will be working with a small electric current and that
they need to pay close attention and be careful.4 Instruct students to wrap the insulated wire in the same direction around the nail
50 times.
Model this step on your own nail.5 Check that the nails are wrapped properly.6 Have the students use the tape to attach one end of the battery to one of the
exposed ends of the wire.
Model this step7 Have students carefully attach the other end of the batter to the other end of the
wire.
Model this step8 Tell students to test the strength of the magnet by picking up paper clips, bolts,
and washers.9 Use another piece to carefully attach the other end of the battery to the other end
of the wire.10 Test the strength of the magnet by picking up paper clips, bolts, and washers.11 Give the pairs each a bar magnet.12 Ask the students to compare the strength of the electromagnet to that of the bar
magnet. Is one stronger?
13 Have students take apart their electromagnets and put the materials in the spaceyou designate.
14 Add the following terms to the Vocabulary List and the Word Wall

Magnetic domains: The areas inside of a material where the magnetic chargesare all facing the same direction.
Natural Magnet: A magnet that is found in the ground that is made ofLodestone.
Artificial Magnet: A magnet that is made by people out of special metals likeiron, cobalt, and nickel.
Electromagnet: A powerful magnet that is made by people that uses electricityto create a magnetic field.
15 Students should glue the Handout into their science notebooks.
o Assessment: Handout graded using Completion Rubric
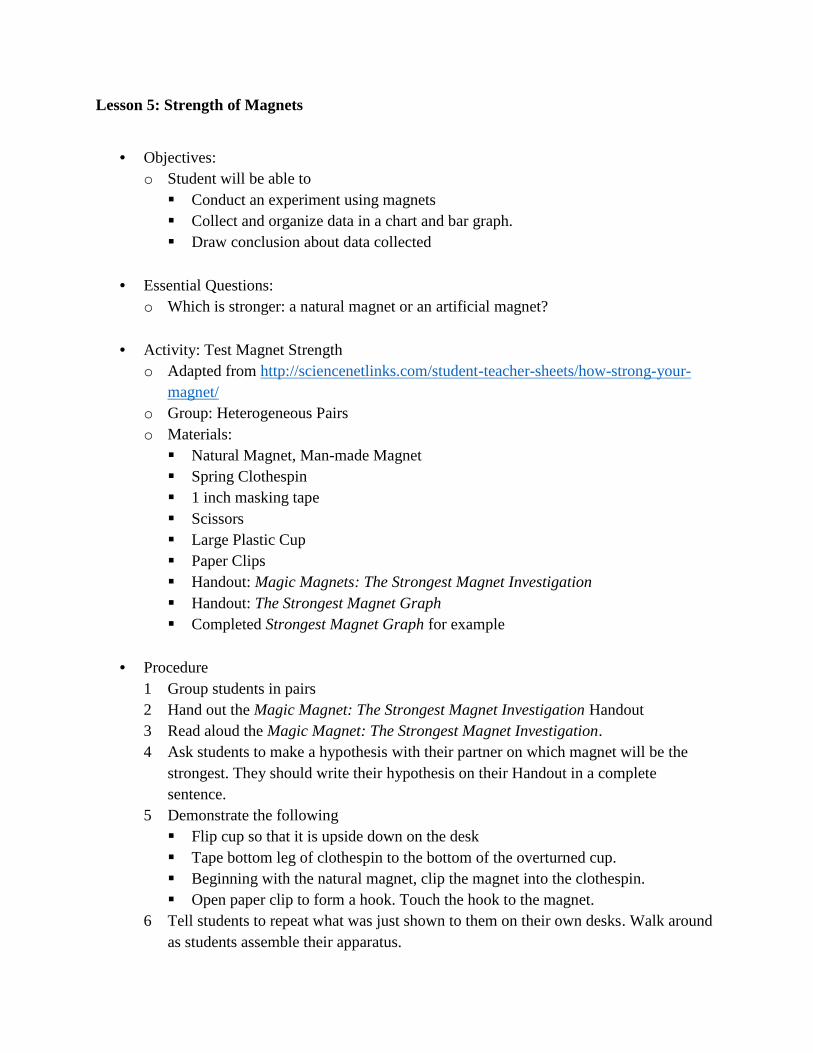
Lesson 5: Strength of Magnets
Objectives:o Student will be able to Conduct an experiment using magnets Collect and organize data in a chart and bar graph. Draw conclusion about data collected
Essential Questions:o Which is stronger: a natural magnet or an artificial magnet?
Activity: Test Magnet Strengtho Adapted from http://sciencenetlinks.com/student-teacher-sheets/how-strong-your-
magnet/o Group: Heterogeneous Pairso Materials: Natural Magnet, Man-made Magnet Spring Clothespin 1 inch masking tape Scissors Large Plastic Cup Paper Clips Handout: Magic Magnets: The Strongest Magnet Investigation Handout: The Strongest Magnet Graph Completed Strongest Magnet Graph for example
Procedure1 Group students in pairs2 Hand out the Magic Magnet: The Strongest Magnet Investigation Handout3 Read aloud the Magic Magnet: The Strongest Magnet Investigation.4 Ask students to make a hypothesis with their partner on which magnet will be the
strongest. They should write their hypothesis on their Handout in a completesentence.
5 Demonstrate the following Flip cup so that it is upside down on the desk Tape bottom leg of clothespin to the bottom of the overturned cup. Beginning with the natural magnet, clip the magnet into the clothespin. Open paper clip to form a hook. Touch the hook to the magnet.
6 Tell students to repeat what was just shown to them on their own desks. Walk aroundas students assemble their apparatus.

7 Repeat the instructions for the procedure.8 Instruct students to take turns carefully adding paper clips to the hook, one at a time.9 Students should count the number of paper clips that they can hang onto the hook
before the paper clips fall. They should record the number of paperclips onto the data sheet on the line Trial
One under Natural Magnet10 Repeat the procedure 3 times with the same magnet11 Next, exchange the natural magnet for the man-made magnet. Repeat Steps 5 through 7
12 Students should form a conclusion and answer the three questions listed on thehandout.
13 As groups finish their trials, instruct each pair on making their graph and show themthe sample graph that you have completed (attached) Give each group 1 graph. See Magnet Strength Graph attached. (completed and
uncompleted)14 When they have finished all trials tell students to fill in the graph with their data.
Encourage students to use colored crayons to make their graphs more appealing.15 Allow each group to share their results and graphs with the class.16 Ask these following questions:
Did we all have the same results? Why might we have gotten different results?
What can we conclude as a class about which magnet is stronger?17 Hang each graph on the unit bulletin board or in a prominent place around the
classroom.18 Students should glue their Handout into their science notebooks.
Assessmento Handout is graded for completion using Completion Rubrico Graph is graded for organization and accuracy (See Graph Rubric)
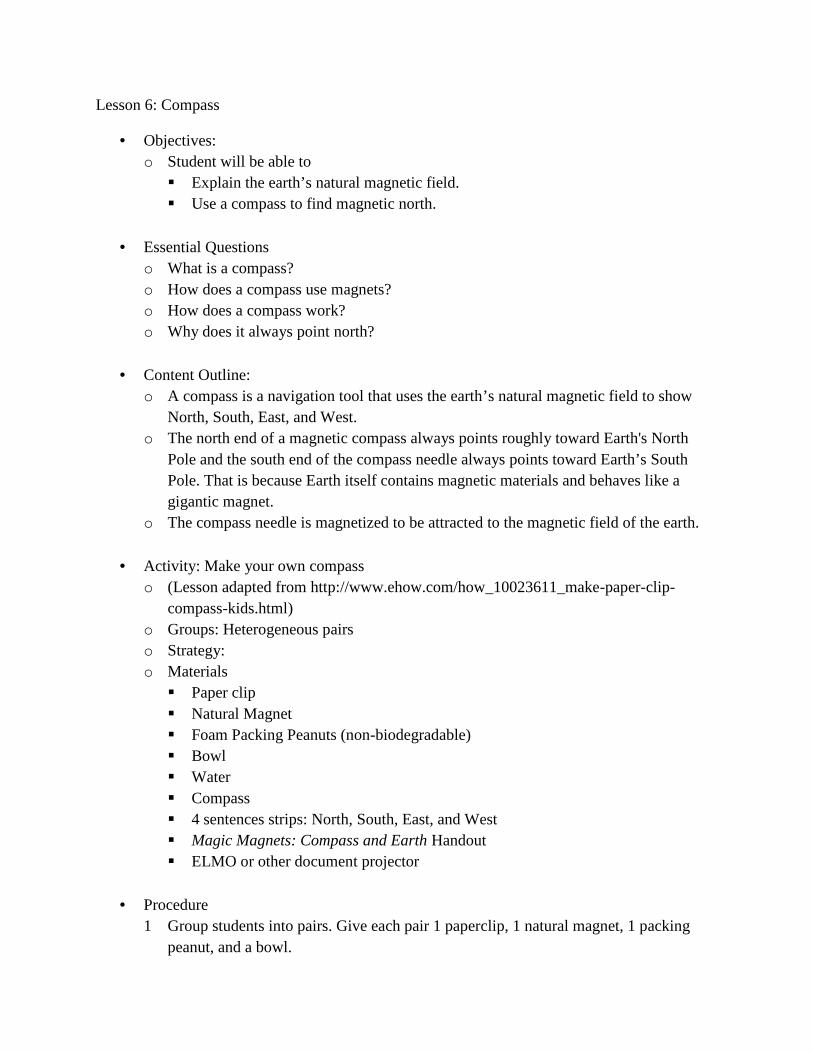
Lesson 6: Compass
Objectives:o Student will be able to Explain the earth’s natural magnetic field. Use a compass to find magnetic north.
Essential Questionso What is a compass?o How does a compass use magnets?o How does a compass work?o Why does it always point north?
Content Outline:o A compass is a navigation tool that uses the earth’s natural magnetic field to show
North, South, East, and West.o The north end of a magnetic compass always points roughly toward Earth's North
Pole and the south end of the compass needle always points toward Earth’s SouthPole. That is because Earth itself contains magnetic materials and behaves like agigantic magnet.
o The compass needle is magnetized to be attracted to the magnetic field of the earth.
Activity: Make your own compasso (Lesson adapted from http://www.ehow.com/how_10023611_make-paper-clip-
compass-kids.html)o Groups: Heterogeneous pairso Strategy:o Materials Paper clip Natural Magnet Foam Packing Peanuts (non-biodegradable) Bowl Water Compass 4 sentences strips: North, South, East, and West Magic Magnets: Compass and Earth Handout ELMO or other document projector
Procedure1 Group students into pairs. Give each pair 1 paperclip, 1 natural magnet, 1 packing
peanut, and a bowl.

2 Tell the students that one student from each pair needs to careful fill the cup all theway up to the top.
3 Now instruct students to unfold the paperclip as straight and long as possible. Model this to the students.
4 Have students grasp the magnet and rub it across the straightest part of the paperclip.Rub for 3 minutes Model this to the students
5 Next, tell students to take the packing peanut and carefully poke the straight end intothe peanut (long-ways). Make sure the paperclip is centered in the peanut. Model this to the students
6 Have the students place the peanut gently on the surface of the water. Wait a momentas the paperclip align itself with earth’s magnetic fields.
7 Once the paperclip stops moving, instruct students to blow gently on one end of thepaper to push it out of alignment. If the “compass” is working the needle shouldreturn to the same position.
8 Allow the pairs to use the compass to check their “compass”9 As a class, determine which part of the room is North, South, East, and West. Place the sentence strips on the walls in those areas.
10 Instruct students to clean up.11 Add the following term to the word wall and to the Vocabulary List Compass: a navigation tool that uses the earth’s natural magnetic field to show
North, South, East, and West.12 Students should respond to the following questions in the next blank page of their
science notebooks. What were the steps you used to create your compass? How could knowing how to make a compass help you in the real world?
Wrap-up:1 Give each student a Compass and Earth Handout.2 Project a blank copy onto the Smartboard using the ELMO3 Complete the Handout as a class. Ask for student input for completing.4 Students should glue the Handout into their science notebooks.
Assessmento Response in notebooks are collected and graded using Response Rubric.

Magic Magnets: Name:_______________________What is a Magnet?
Color the North squares red and theSouth squares blue. Place an X where
the two poles will repeal and a √ wherethe two poles will attract.
What is a magnet?
Where do we see magnets?1. 5.2. 6.3. 7.4. 8.
Draw a magnet. Color with green crayon where themagnetic force is the strongest.

Magic Magnets: Name:Attract or Not Attract?Directions:
1. List all of the objects found in your bag under the heading “Objects.”2. Next make a prediction. Put a check in the YES box if you think the
object will be attracted to the magnet and No, if it won’t.3. After testing, record your results
Prediction Result Prediction ResultsObject Yes No Yes No Object Yes No Yes No
What do the magnetic objects have in common?
What does an object need to have in order to be magnetic?

Magic Magnets: Magnetic Fields Name: _____________________________
What is a magnetic field?
What happened when you cut the magnet in half?
Draw what you see during the Magnetic Field ActivityRemember to color the north pole of your magnet red and the south pole, blue.
Two of the Same Poles Close Together Two Opposite Poles Close Together

Magic Magnets: Types of Magnets Name: _________________________
Draw the domains.Un-magnetized Rock vs Magnets
Where do natural magnets come from?
How do we make artificial magnets?
What is an electromagnet?

Magic Magnets:The Strongest Magnet Investigation
Name:____________________________________________
Directions: Put on your scientist hat and explore which magnet is stronger: an artificial magnet ora man-made magnet. Read the procedure very carefully!
Hypothesis: Which magnet do you think will be the strongest? Write in a complete sentence:
Procedure: 1. Set up the cup and clothespin by following Mrs. Britt.2. Clip the NATURAL magnet in the clothespin first.3. Take turns with your partner, carefully adding clips to the hook, one by one.4. Count the total number of clips before the hook falls. Write this number under Trial 1.5. Repeat steps 3 and 4 two more times and fill in Trial 2 and 3.6. Take the natural magnet out of the clothespin and place the ARTIFICIAL magnet in the clothespin.
Repeat steps 3 and 4 until you complete all three trials for the artificial magnet.7. Circle the winner of each trial.
Data Chart: Trial 1 Trial 2 Trial 3
Natural Magnet
Artificial Magnet
Conclusion: Which magnet was the strongest? Which magnet won most of the trials? Was your hypothesis correct? Write in threecomplete sentences.

Magic Magnets: Name:____________________________Compass and the EarthWhat is a compass?
When would you use a compass?
How does a compass work?
Draw a compass Color Earth’s Magnetic Field
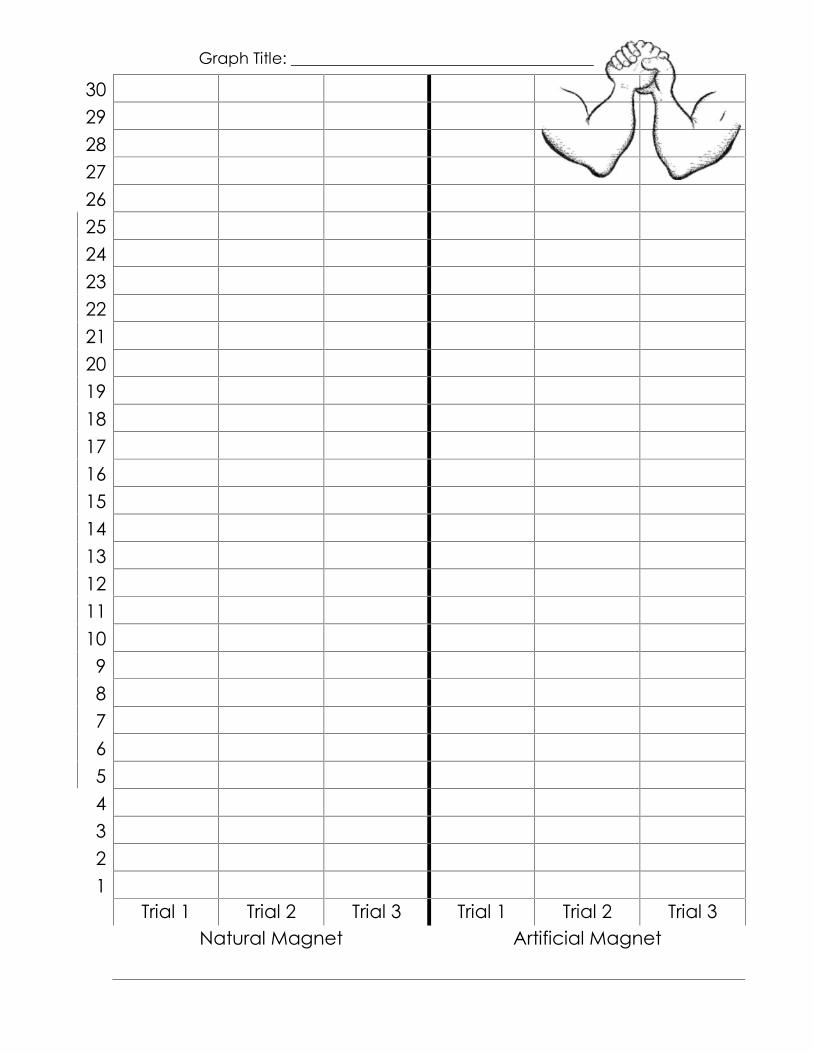
Graph Title: ______________________________________
302928272625242322212019181716151413121110987654321
Trial 1 Trial 2 Trial 3 Trial 1 Trial 2 Trial 3Natural Magnet Artificial Magnet

Graph Title: Which Magnet is the Strongest?3029282726
Num
ber
of P
aper
clip
s
25242322212019181716151413121110987654321
Trial 1 Trial 2 Trial 3 Trial 1 Trial 2 Trial 3Natural Magnet Artificial Magnet
Type of Magnet

Magic Magnets Unit Assessment Name: _______________________
Directions: Read each answer and terms carefully. Write the letter to theanswer in the blank next to the term. Use answers only once. Not all answerswill be used. (2 points each)
1. MagnetA. an instrument used for finding north,
south, east, and west.
2. RepelB. the magnetic pull of the earth
3. Magnetic Field
C. a piece of iron or steel that attractscertain metals
4. AttractD. to push
5. Compass
E. the invisible push and pull from amagnet
F. to pull
Directions: Write YES in the blank next to the objects that WILL be attractedto a magnet. (1 point each)
6. Paperclip7. Rubber band8. Sheet of paper9. Iron nail
Directions: Write ATTRACT between the two magnets that would beattracted to each other and REPEL between the two magnets that wouldrepel. (3 points each)
9.
______
10.
______N S N S N SS N
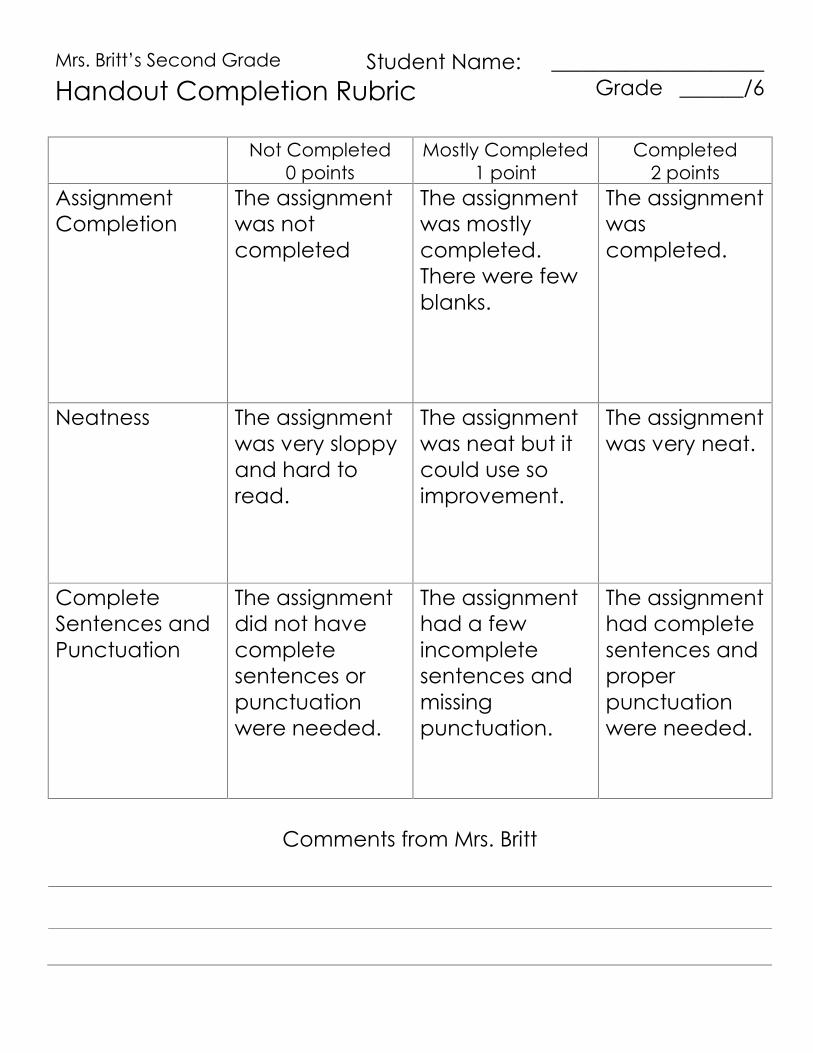
Mrs. Britt’s Second Grade Student Name: ____________________Handout Completion Rubric Grade ______/6
Not Completed0 points
Mostly Completed1 point
Completed2 points
AssignmentCompletion
The assignmentwas notcompleted
The assignmentwas mostlycompleted.There were fewblanks.
The assignmentwascompleted.
Neatness The assignmentwas very sloppyand hard toread.
The assignmentwas neat but itcould use soimprovement.
The assignmentwas very neat.
CompleteSentences andPunctuation
The assignmentdid not havecompletesentences orpunctuationwere needed.
The assignmenthad a fewincompletesentences andmissingpunctuation.
The assignmenthad completesentences andproperpunctuationwere needed.
Comments from Mrs. Britt
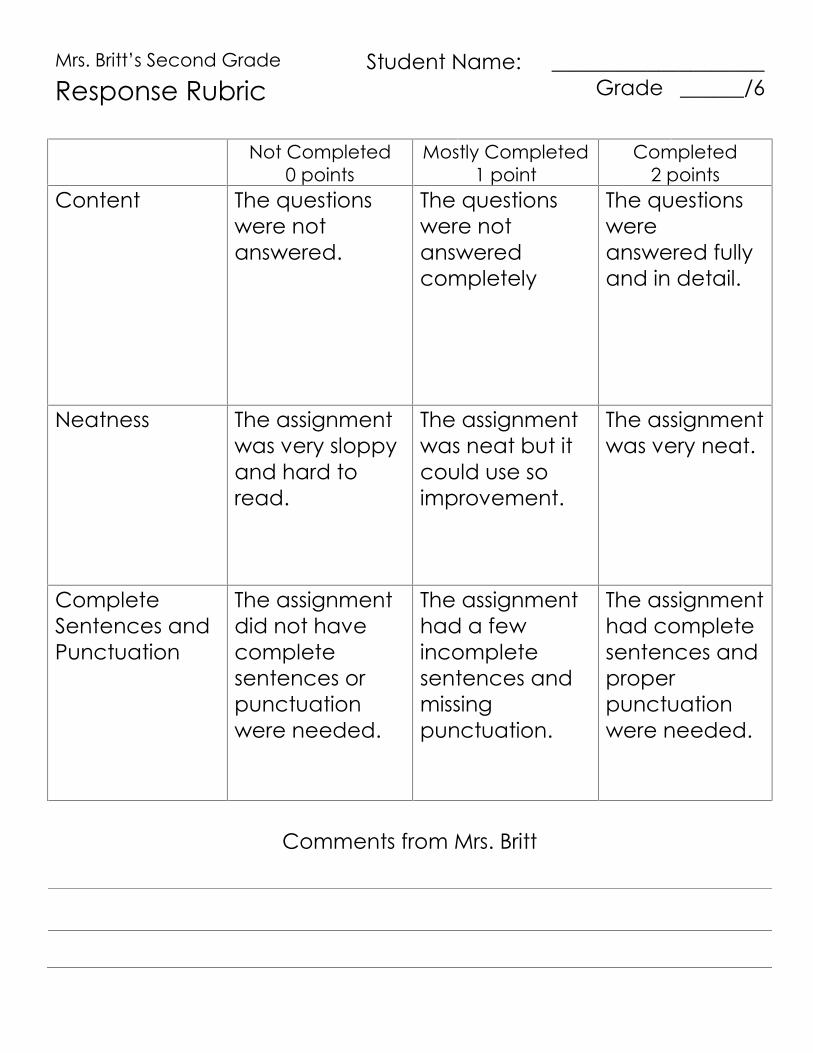
Mrs. Britt’s Second Grade Student Name: ____________________Response Rubric Grade ______/6
Not Completed0 points
Mostly Completed1 point
Completed2 points
Content The questionswere notanswered.
The questionswere notansweredcompletely
The questionswereanswered fullyand in detail.
Neatness The assignmentwas very sloppyand hard toread.
The assignmentwas neat but itcould use soimprovement.
The assignmentwas very neat.
CompleteSentences andPunctuation
The assignmentdid not havecompletesentences orpunctuationwere needed.
The assignmenthad a fewincompletesentences andmissingpunctuation.
The assignmenthad completesentences andproperpunctuationwere needed.
Comments from Mrs. Britt

Mrs. Britt’s Second Grade Student Name: ____________________Graph Rubric Grade ______/6
Not Completed0 points
Mostly Completed1 point
Completed2 points
Organization The data didnot match thedata chart orthe wronggraph was usedto the show thedata.
Some of thedata did notmatch the datachart or thewrong graphwas used toshow the data.
The correctgraph wasused to showthe data. Thedata wasshowncorrectly.
Neatness The graph wasfilled in sloppily.This made thegraph hard toread.
The graph wasneat but coulduseimprovement.
The assignmentwas very neat.The graph wasfilled in nicely.
Graph The graph didnot have propertitles for thegraph or the x-and y-axis.
The graph wasmissing sometitles.
The graph hada title, the xand y-axis hadtitles.
Comments from Mrs. Britt