Luxury A6 BW New branding 2015 - download.p4c.philips.com · 4 Lift the retaining ring out of the...
20
SW170 © & ™ Lucasfilm Ltd. © Disney
Transcript of Luxury A6 BW New branding 2015 - download.p4c.philips.com · 4 Lift the retaining ring out of the...
SW170
© & ™ Lucas!lm Ltd.
© Disney
1
5
6
7
8
10
11
12
9
2
4
3

empty page before TOC

English 6Bahasa Indonesia 12
English
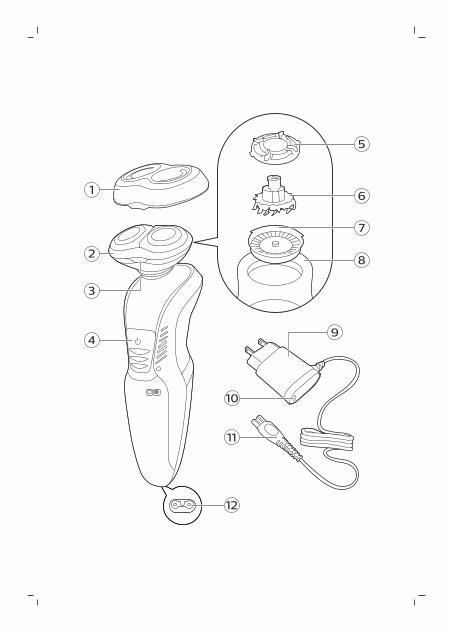
General description (Fig. 1)1 Protection cap2 Shaving unit with shaving head holder3 Shaving head holder release button4 On/off slide switch5 Retaining ring6 Cutter7 Guard8 Shaving head holder9 Supply unit10 Charging light11 Small plug12 Socket for small plug
ChargingCharge the shaver before you use it for the firsttime and when the appliance starts to work moreslowly.
Charging takes approx. 10 hours. A fully chargedshaver has a shaving time of up to 20 minutes. Note: You cannot use the shaver while it ischarging.
Note: Depending on your shaving/styling behaviorand beard type, the operating time may vary overtime.
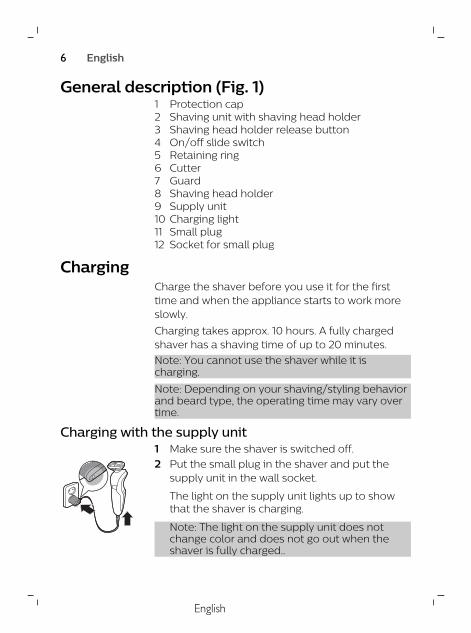
Charging with the supply unit1 Make sure the shaver is switched off.2 Put the small plug in the shaver and put the
supply unit in the wall socket.
The light on the supply unit lights up to showthat the shaver is charging.
Note: The light on the supply unit does notchange color and does not go out when theshaver is fully charged..
6 English
3 After charging, remove the supply unit from thewall socket and pull the small plug out of theshaver.
Using the shaverAlways check the shaver and all accessoriesbefore use. Do not use the shaver or anyaccessory if it is damaged, as this may causeinjury. Always replace a damaged part with one ofthe original type.This symbol indicates that the product can berinsed under running tap water.- Use this shaver for its intended household use
as described in this manual.- For hygienic reasons, the shaver should only be
used by one person.- Trimming is easier when the skin and hairs are
dry.Note: This shaver can only be used without cord.
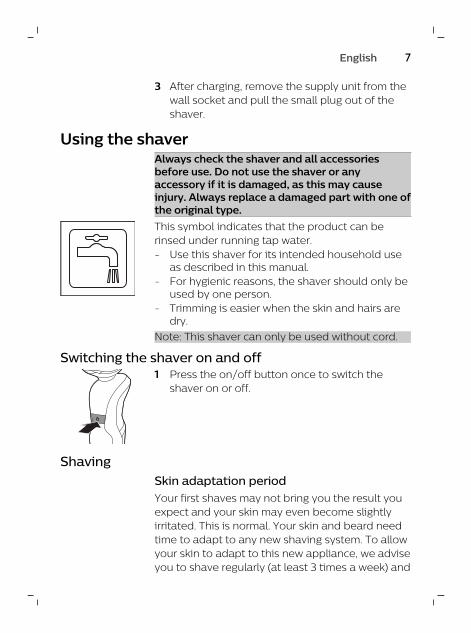
Switching the shaver on and off1 Press the on/off button once to switch the
shaver on or off.
ShavingSkin adaptation periodYour first shaves may not bring you the result youexpect and your skin may even become slightlyirritated. This is normal. Your skin and beard needtime to adapt to any new shaving system. To allowyour skin to adapt to this new appliance, we adviseyou to shave regularly (at least 3 times a week) and
7English
exclusively with this appliance for a period of 3weeks.- For the best results on skin comfort, pre-trim
your beard if you have not shaved for 3 days orlonger.
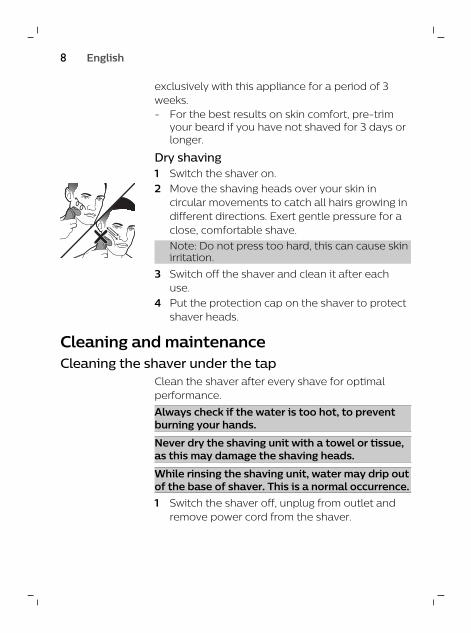
Dry shaving1 Switch the shaver on.2 Move the shaving heads over your skin in
circular movements to catch all hairs growing indifferent directions. Exert gentle pressure for aclose, comfortable shave.Note: Do not press too hard, this can cause skinirritation.
3 Switch off the shaver and clean it after eachuse.
4 Put the protection cap on the shaver to protectshaver heads.
Cleaning and maintenanceCleaning the shaver under the tap
Clean the shaver after every shave for optimalperformance.
Always check if the water is too hot, to preventburning your hands.
Never dry the shaving unit with a towel or tissue,as this may damage the shaving heads.
While rinsing the shaving unit, water may drip outof the base of shaver. This is a normal occurrence.1 Switch the shaver off, unplug from outlet and
remove power cord from the shaver.
8 English
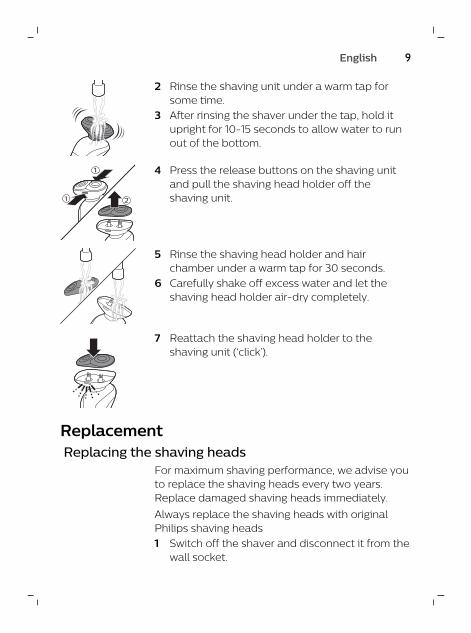
2 Rinse the shaving unit under a warm tap forsome time.
3 After rinsing the shaver under the tap, hold itupright for 10-15 seconds to allow water to runout of the bottom.
1
1 2
4 Press the release buttons on the shaving unitand pull the shaving head holder off theshaving unit.
5 Rinse the shaving head holder and hairchamber under a warm tap for 30 seconds.
6 Carefully shake off excess water and let theshaving head holder air-dry completely.
7 Reattach the shaving head holder to theshaving unit (‘click’).
Replacement Replacing the shaving heads
For maximum shaving performance, we advise youto replace the shaving heads every two years.Replace damaged shaving heads immediately.
Always replace the shaving heads with originalPhilips shaving heads1 Switch off the shaver and disconnect it from the
wall socket.
9English
1
1 2
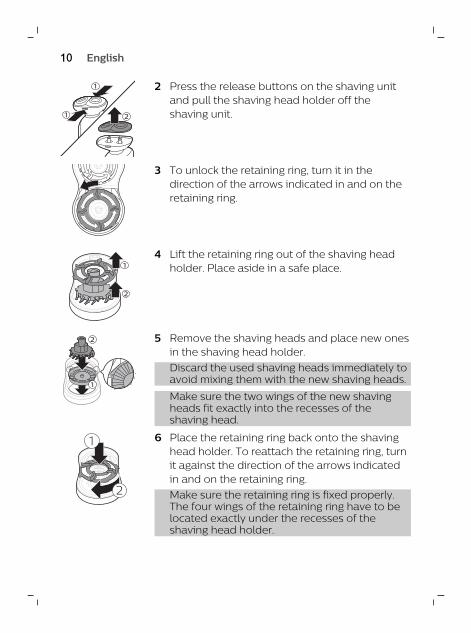
2 Press the release buttons on the shaving unitand pull the shaving head holder off theshaving unit.
3 To unlock the retaining ring, turn it in thedirection of the arrows indicated in and on theretaining ring.
2
1
4 Lift the retaining ring out of the shaving headholder. Place aside in a safe place.
1
2 5 Remove the shaving heads and place new onesin the shaving head holder. Discard the used shaving heads immediately toavoid mixing them with the new shaving heads.
Make sure the two wings of the new shavingheads fit exactly into the recesses of theshaving head.
1
2
6 Place the retaining ring back onto the shavinghead holder. To reattach the retaining ring, turnit against the direction of the arrows indicatedin and on the retaining ring.Make sure the retaining ring is fixed properly.The four wings of the retaining ring have to belocated exactly under the recesses of theshaving head holder.
10 English
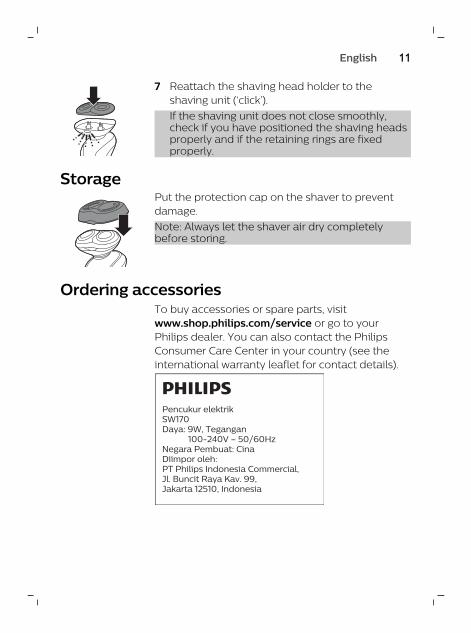
7 Reattach the shaving head holder to theshaving unit (‘click’).If the shaving unit does not close smoothly,check if you have positioned the shaving headsproperly and if the retaining rings are fixedproperly.
StoragePut the protection cap on the shaver to preventdamage.Note: Always let the shaver air dry completelybefore storing.
Ordering accessoriesTo buy accessories or spare parts, visitwww.shop.philips.com/service or go to yourPhilips dealer. You can also contact the PhilipsConsumer Care Center in your country (see theinternational warranty leaflet for contact details).
Pencukur elektrikSW170Daya: 9W, Tegangan 100-240V – 50/60HzNegara Pembuat: CinaDiimpor oleh: PT Philips Indonesia Commercial, Jl. Buncit Raya Kav. 99, Jakarta 12510, Indonesia
11English
Bahasa Indonesia
Keterangan umum (Gbr. 1)1 Tutup pelindung2 Unit alat cukur dengan pemegang kepala alat
cukur3 Tombol pelepas pemegang kepala alat cukur4 Sakelar geser on/off5 Cincin penahan6 Mata pisau7 Pelindung8 Penahan kepala pencukur9 Unit catu daya10 Lampu pengisian daya11 Steker kecil12 Soket untuk steker kecil
Pengisian dayaIsi ulang daya alat cukur sebelum Andamenggunakannya untuk pertama kali dan apabilakinerja alat melambat.
Pengisian baterai berlangsung kurang lebih 10 jam.Pencukur yang terisi penuh dapat digunakanselama 20 menit. Catatan: Anda tidak dapat menggunakan alatcukur ketika mengisi daya.
Catatan: Bergantung pada jenis jenggot danperilaku cukur/penataan Anda, waktu operasi alatbisa berbeda dari waktu ke waktu.
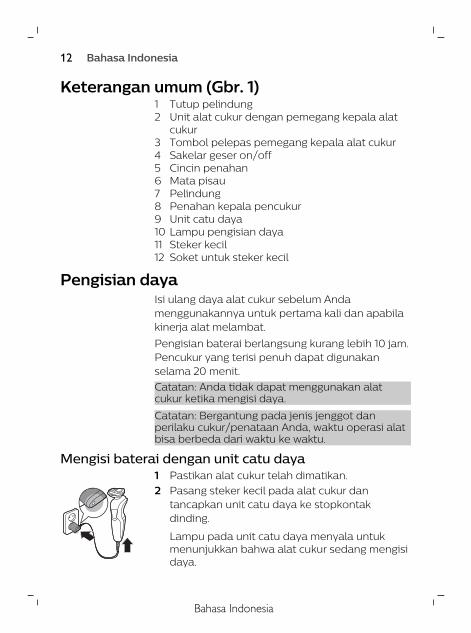
Mengisi baterai dengan unit catu daya1 Pastikan alat cukur telah dimatikan.2 Pasang steker kecil pada alat cukur dan
tancapkan unit catu daya ke stopkontakdinding.
Lampu pada unit catu daya menyala untukmenunjukkan bahwa alat cukur sedang mengisidaya.
12 Bahasa Indonesia
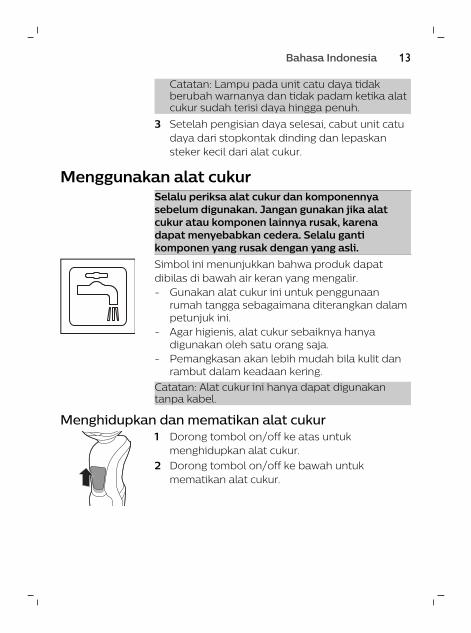
Catatan: Lampu pada unit catu daya tidakberubah warnanya dan tidak padam ketika alatcukur sudah terisi daya hingga penuh.
3 Setelah pengisian daya selesai, cabut unit catudaya dari stopkontak dinding dan lepaskansteker kecil dari alat cukur.
Menggunakan alat cukurSelalu periksa alat cukur dan komponennyasebelum digunakan. Jangan gunakan jika alatcukur atau komponen lainnya rusak, karenadapat menyebabkan cedera. Selalu gantikomponen yang rusak dengan yang asli.Simbol ini menunjukkan bahwa produk dapatdibilas di bawah air keran yang mengalir.- Gunakan alat cukur ini untuk penggunaan
rumah tangga sebagaimana diterangkan dalampetunjuk ini.
- Agar higienis, alat cukur sebaiknya hanyadigunakan oleh satu orang saja.
- Pemangkasan akan lebih mudah bila kulit danrambut dalam keadaan kering.
Catatan: Alat cukur ini hanya dapat digunakantanpa kabel.
Menghidupkan dan mematikan alat cukur1 Dorong tombol on/off ke atas untuk
menghidupkan alat cukur.2 Dorong tombol on/off ke bawah untuk
mematikan alat cukur.
13Bahasa Indonesia
MencukurMasa adaptasi kulitHasil cukuran pertama Anda mungkin tidakmemuaskan dan kulit Anda bahkan mengalamisedikit iritasi. Hal ini normal. Kulit dan jenggot Andaperlu waktu agar terbiasa dengan sistem pencukurbaru. Untuk membiasakan kulit Anda dengan alatbaru ini, kami sarankan Anda bercukur secara rutin(minimal 3 kali seminggu) dan hanya dengan alatini selama 3 minggu.
Untuk mendapatkan hasil terbaik padakenyamanan kulit, sebaiknya pangkaslah jenggotterlebih dahulu bila belum bercukur selama 3 hariatau lebih.
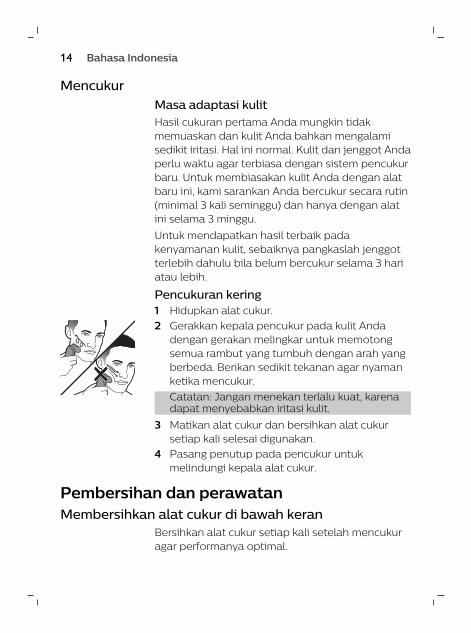
Pencukuran kering1 Hidupkan alat cukur.2 Gerakkan kepala pencukur pada kulit Anda
dengan gerakan melingkar untuk memotongsemua rambut yang tumbuh dengan arah yangberbeda. Berikan sedikit tekanan agar nyamanketika mencukur.Catatan: Jangan menekan terlalu kuat, karenadapat menyebabkan iritasi kulit.
3 Matikan alat cukur dan bersihkan alat cukursetiap kali selesai digunakan.
4 Pasang penutup pada pencukur untukmelindungi kepala alat cukur.
Pembersihan dan perawatanMembersihkan alat cukur di bawah keran
Bersihkan alat cukur setiap kali setelah mencukuragar performanya optimal.
14 Bahasa Indonesia
Selalu pastikan air tidak terlalu panas, untukmencegah luka bakar pada tangan Anda.
Jangan sekali-kali mengeringkan unit cukurdengan handuk atau kertas tisu, karena dapatmerusak kepala cukur.
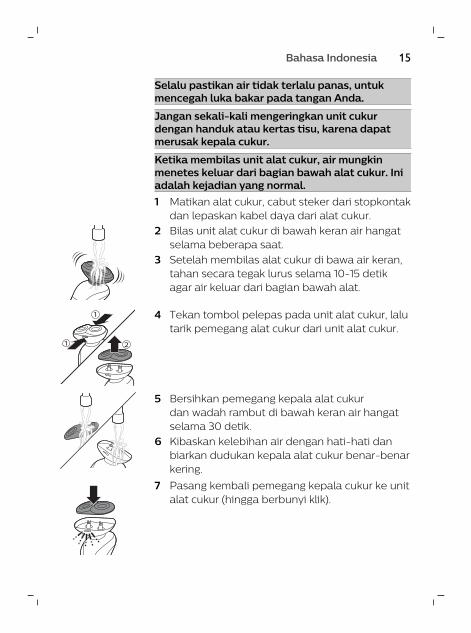
Ketika membilas unit alat cukur, air mungkinmenetes keluar dari bagian bawah alat cukur. Iniadalah kejadian yang normal.1 Matikan alat cukur, cabut steker dari stopkontak
dan lepaskan kabel daya dari alat cukur.2 Bilas unit alat cukur di bawah keran air hangat
selama beberapa saat.3 Setelah membilas alat cukur di bawa air keran,
tahan secara tegak lurus selama 10-15 detikagar air keluar dari bagian bawah alat.
1
1 2
4 Tekan tombol pelepas pada unit alat cukur, lalutarik pemegang alat cukur dari unit alat cukur.
5 Bersihkan pemegang kepala alat cukurdan wadah rambut di bawah keran air hangatselama 30 detik.
6 Kibaskan kelebihan air dengan hati-hati danbiarkan dudukan kepala alat cukur benar-benarkering.
7 Pasang kembali pemegang kepala cukur ke unitalat cukur (hingga berbunyi klik).
15Bahasa Indonesia
Penggantian Mengganti kepala alat cukur
Untuk memperoleh kinerja pencukuran maksimal,sebaiknya Anda mengganti kepala cukur setiapdua tahun. Segera ganti kepala cukur yang rusak.
Selalu ganti kepala cukur dengan kepala cukurPhilips yang asli1 Matikan alat cukur dan cabut steker dari
stopkontak listrik.1
1 2
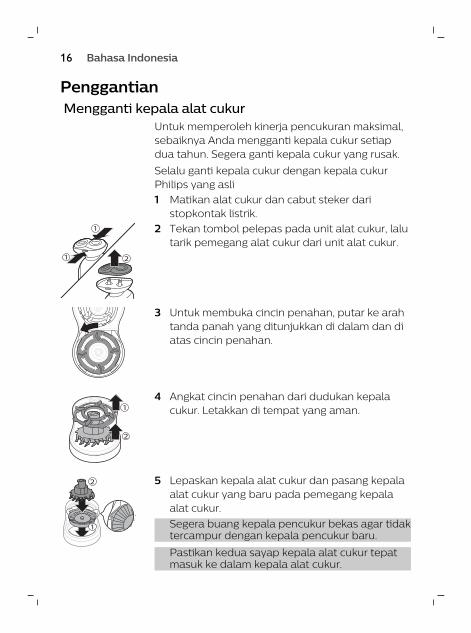
2 Tekan tombol pelepas pada unit alat cukur, lalutarik pemegang alat cukur dari unit alat cukur.
3 Untuk membuka cincin penahan, putar ke arahtanda panah yang ditunjukkan di dalam dan diatas cincin penahan.
2
1
4 Angkat cincin penahan dari dudukan kepalacukur. Letakkan di tempat yang aman.
1
2 5 Lepaskan kepala alat cukur dan pasang kepalaalat cukur yang baru pada pemegang kepalaalat cukur. Segera buang kepala pencukur bekas agar tidaktercampur dengan kepala pencukur baru.
Pastikan kedua sayap kepala alat cukur tepatmasuk ke dalam kepala alat cukur.
16 Bahasa Indonesia
1
2
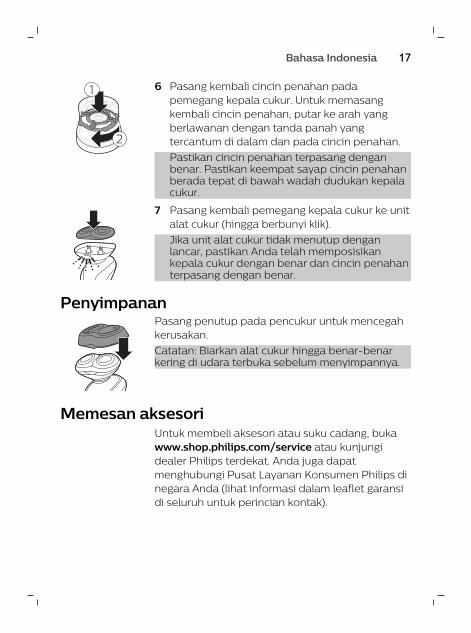
6 Pasang kembali cincin penahan padapemegang kepala cukur. Untuk memasangkembali cincin penahan, putar ke arah yangberlawanan dengan tanda panah yangtercantum di dalam dan pada cincin penahan.Pastikan cincin penahan terpasang denganbenar. Pastikan keempat sayap cincin penahanberada tepat di bawah wadah dudukan kepalacukur.
7 Pasang kembali pemegang kepala cukur ke unitalat cukur (hingga berbunyi klik).Jika unit alat cukur tidak menutup denganlancar, pastikan Anda telah memposisikankepala cukur dengan benar dan cincin penahanterpasang dengan benar.
PenyimpananPasang penutup pada pencukur untuk mencegahkerusakan.Catatan: Biarkan alat cukur hingga benar-benarkering di udara terbuka sebelum menyimpannya.
Memesan aksesoriUntuk membeli aksesori atau suku cadang, bukawww.shop.philips.com/service atau kunjungidealer Philips terdekat. Anda juga dapatmenghubungi Pusat Layanan Konsumen Philips dinegara Anda (lihat informasi dalam leaflet garansidi seluruh untuk perincian kontak).
17Bahasa Indonesia
Pencukur elektrikSW170Daya: 9W, Tegangan 100-240V – 50/60HzNegara Pembuat: CinaDiimpor oleh: PT Philips Indonesia Commercial, Jl. Buncit Raya Kav. 99, Jakarta 12510, Indonesia
18 Bahasa Indonesia

Empty page before back cover

© 2018 Koninklijke Philips N.V.
All rights reserved
4222.002.7427.2 (9/3/2018)
>75% recycled paper>75% papier recyclé