Luna SA Configuration Guide - SoftLayer ·...
153
SafeNet Network HSM Configuration Guide
Transcript of Luna SA Configuration Guide - SoftLayer ·...

SafeNet Network HSMConfiguration Guide

Document Information
Product Version 6.2
Document Part Number 007-011136-010
Release Date 18 December 2015
Revision History
Revision Date Reason
A 18December 2015 Initial release.
TrademarksAll intellectual property is protected by copyright. All trademarks and product names used or referred to are thecopyright of their respective owners. No part of this document may be reproduced, stored in a retrieval system ortransmitted in any form or by any means, electronic, mechanical, chemical, photocopy, recording or otherwise withoutthe prior written permission of Gemalto NV
AcknowledgementsThis product includes software developed by the OpenSSL Project for use in the OpenSSL Toolkit.(http://www.openssl.org)
This product includes cryptographic software written by Eric Young ([email protected]). This product includessoftware written by Tim Hudson ([email protected]).
This product includes software developed by the University of California, Berkeley and its contributors.
This product uses Brian Gladman’s AES implementation.
Refer to the End User License Agreement for more information.
Regulatory ComplianceThis product complies with the following regulatory regulations. To ensure compliancy, ensure that you install theproducts as specified in the installation instructions and use only SafeNet-supplied or approved accessories.
USA, FCCThis device complies with Part 15 of the FCC rules. Operation is subject to the following two conditions:
(1) This devicemay not cause harmful interference, and
(2) This devicemust accept any interference received, including interference that may cause undesired operation.
This equipment has been tested and found to comply with the limits for a “Class B” digital device, pursuant to part 15 ofthe FCC rules. These limits are designed to provide reasonable protection against harmful interference in a residentialinstallation. This equipment generates, uses and can radiate radio frequency energy and, if not installed and used inaccordance with the instructions, may cause harmful interference to radio communications. However, there is noguarantee that interference will not occur in a particular installation.
SafeNet NetworkHSMConfiguration GuideRellease 6.2 007-011136-010 Rev. A December 2015 Copyright 2015Gemalto NV All rights reserved. 2

If this equipment does cause harmful interference to radio or television reception, which can be determined by turningthe equipment off and on, the user is encouraged to try to correct the interference by one or more of the followingmeasures:
• Reorient or relocate the receiving antenna
• Increase the separation between the equipment and receiver
• Connect the equipment into an outlet on a circuit different from that to which the receiver is connected
• Consult the dealer or an experienced radio/TV technician for help
• Changes or modifications not expressly approved by SafeNet could void the user’s authority to operate theequipment.
CanadaThis class B digital apparatus meets all requirements of the Canadian interference- causing equipment regulations.
EuropeThis product is in conformity with the protection requirements of EC Council Directive 2004/108/EC. Conformity isdeclared to the following applicable standards for electro-magnetic compatibility immunity and susceptibility;CISPR22and IEC801. This product satisfies the CLASS B limits of EN 55022.
DisclaimerGemalto makes no representations or warranties with respect to the contents of this document and specificallydisclaims any implied warranties of merchantability or fitness for any particular purpose. Furthermore, Gemaltoreserves the right to revise this publication and tomake changes from time to time in the content hereof without theobligation uponGemalto to notify any person or organization of any such revisions or changes.
We have attempted tomake these documents complete, accurate, and useful, but we cannot guarantee them to beperfect. When we discover errors or omissions, or they are brought to our attention, we endeavor to correct them insucceeding releases of the product.
Gemalto invites constructive comments on the contents of this document. Send your comments, together with yourpersonal and/or company details to the address below.
Contact Method Contact Information
Mail Gemalto NV4690Millennium DriveBelcamp, Maryland 21017USA
Email [email protected]
SafeNet NetworkHSMConfiguration GuideRellease 6.2 007-011136-010 Rev. A December 2015 Copyright 2015Gemalto NV All rights reserved. 3
CONTENTS
PREFACE About the Configuration Guide 8Customer release notes 8Gemalto Rebranding 9Audience 9Document conventions 9
Notes 9Cautions 10Warnings 10Command syntax and typeface conventions 10
Support Contacts 11
1 [Step 1] Planning Your Configuration 13Appliance Roles 13
Named Administrative Users and Their Assigned Roles 14Implications of Backup and Restore of User Profiles 15Security of Shell User Accounts 15
HSMRoles and Secrets 16Crypto Officer & Crypto User 16
How the Roles are Invoked 19Bad Login Attempts 19
Domain Planning 19Characteristics of Cloning Domains 20
PED-authenticated HSM Planning 22SafeNet PED Planning 22What each PED prompt means 23HSM Initialization and the Blue SO PED Key 24HSMCloning Domain and the Red Domain PED Key 25Partition Owner/User and the black PED Key 25Remote PED Orange PED Key (RPK) 26Auditor 26Secure Recovery Purple PED Key (SRK) 26Other Considerations 27
Password-authenticated HSM Planning 27HSM Initialization 28HSMCloning Domain 28Application Partition Owner or Crypto-Officer/Crypto-User 28Application Partition Cloning Domain 28Auditor 28
Effect of PPSO on SafeNet Network HSM 29
2 [Step 2] Configure Your Network Settings 31Gather appliance network setting information 31
Client Requirements 31
SafeNet NetworkHSMConfiguration GuideRelease 6.2 007-011136-010Rev. A December 2015 Copyright 2015Gemalto NV All rights reserved. 4

Recommended Network Characteristics 32Bandwidth and Latency Recommendation 32About Latency and Testing 32
Power-up the HSM Appliance 32Power On Instructions for the SafeNet Appliance 33Power Off 34
Open a Connection 35First Login and Changing Password 36Set the System Date and Time 38
Timezone Codes 39Configure the IP Address and Network Parameters 40Make Your Network Connection 43Generate a New HSM Server Certificate 45
3 [Step 3] Initialize the HSM 47Password-Authenticated versus PED-Authenticated HSMs 47
Which kind do I have? 47What if I make amistake about the type of authentication I present? 47High-Level Configuration Steps 48
About Initializing a Password-Authenticated HSM 49Initializing a Password Authenticated HSM 49
About Initializing a PED-Authenticated HSM 51Recover the SRK 51Re-split the SRK 53Other Uses of the SRK 53Initializing a PED-Authenticated HSM 54Preparing to Initialize a SafeNet Network HSM [PED-version] 54Why Initialize? 56Start a Serial Terminal or SSH session 56Initialize the HSM 56Initialization - some additional options and description 63
4 [Step 4] Set the HSM Policies 69Set HSM Policies (Password Authentication) 69Set HSM Policies - PED (Trusted Path) Authentication 71
5 [Step 5] Create Application Partitions 75Choose Partition Type 75
Legacy-style Partitions 75Per-Partition SO (PPSO) Partitions 75
About Configuring Legacy Partitions 75Prepare to Create a Legacy Partition (Password Authenticated) 77
About HSM Partitions on the Initialized HSM 77Create (Initialize) a Password Authenticated Legacy-style Application Partition 78Partition creation audit log entry 80Next steps 80
Prepare to Create a Partition (PED Authenticated) 80About HSM Partitions on the Initialized HSM 80Create a PED Authenticated Legacy-style Application Partition (f/w pre-6.22.0) 83
SafeNet NetworkHSMConfiguration GuideRelease 6.2 007-011136-010 Rev. A December 2015 Copyright 2015Gemalto NV All rights reserved. 5

About Application Partitions on the Initialized HSM 83Partition creation audit log entry 89Create a PED Authenticated Legacy-style Application Partition (f/w 6.22.0 or newer) 90Partition creation audit log entry 95Record the Partition Client Password (PED-Auth HSMs) 96
About Configuring an Application Partition with Its Own SO 97Next step 99HSM SOConfigures PED-authenticated SafeNet Network HSM Partition with SO 99Preliminary 100Create the PPSOPartition 102HSM SOConfigures SafeNet Network HSM Password-authenticated Partition with SO 103Create the PPSOPartition 104
6 [Step 6] Set the Partition Policies for Legacy Partitions 107Displaying the Current Partition Policy Settings 107Changing the Partition Policy Settings 109
Policy setting example, SafeNet HSM with Password Authentication 109Policy setting example, SafeNet HSM with PED Authentication 110
RSA BlindingMode 110
7 [Step 7] Create a Network Trust Link Between the Client and the Appliance 111About Network Trust Links 111
The Host Trust Link (HTL) Option for VM Clients 111Creating a Network Trust Link 112
De-registereing and Re-registering Clients 118
8 [Step 8] Enable the Client to Access a Partition 119Creating an NTL Link Between a Client and a Partition 119
Assigning a Client to a Partition 119Verifying Your Setup 120Client Connection Limits 121Applications and Integrations 121
Creating an STC Link Between a Client and a Partition 121Creating an STC Link to a Legacy Partition 122Creating an STC Link to a PartitionWith SO 127
9 [Step 9] Configure PPSO Application Partitions 133Initialize the Partition SO and Crypto Officer Roles on a PW-Auth PPSOPartition 133Initialize the Crypto User Role on a PW-Auth PPSOPartition 135Initialize the Partition SO and Crypto Officer Roles on a PED-Auth PPSOPartition 136Initialize the Crypto User Role on a PED-Auth PPSOPartition 138
Crypto Officer or Crypto User Must Log In and Remain Logged In 139Activate a PED-Auth PPSOPartition for the Crypto Officer Role 139Activate a PED-Auth PPSOPartition for the Crypto User Role 141
10 [Step 10] Set the Partition Policies for PPSO Partitions 145Displaying the Current Partition Policy Settings 145Changing the Partition Policy Settings 146
SafeNet NetworkHSMConfiguration GuideRelease 6.2 007-011136-010 Rev. A December 2015 Copyright 2015Gemalto NV All rights reserved. 6

RSA BlindingMode 147
11 Optional Configuration Tasks 148Do not use "sysconf config factoryReset" After 6.x Update 148
[Optional] Configure for RADIUS Authentication 150RADIUS Configuration Summary 150Configuring RADIUS with Your SafeNet Appliance 150
SafeNet NetworkHSMConfiguration GuideRelease 6.2 007-011136-010 Rev. A December 2015 Copyright 2015Gemalto NV All rights reserved. 7
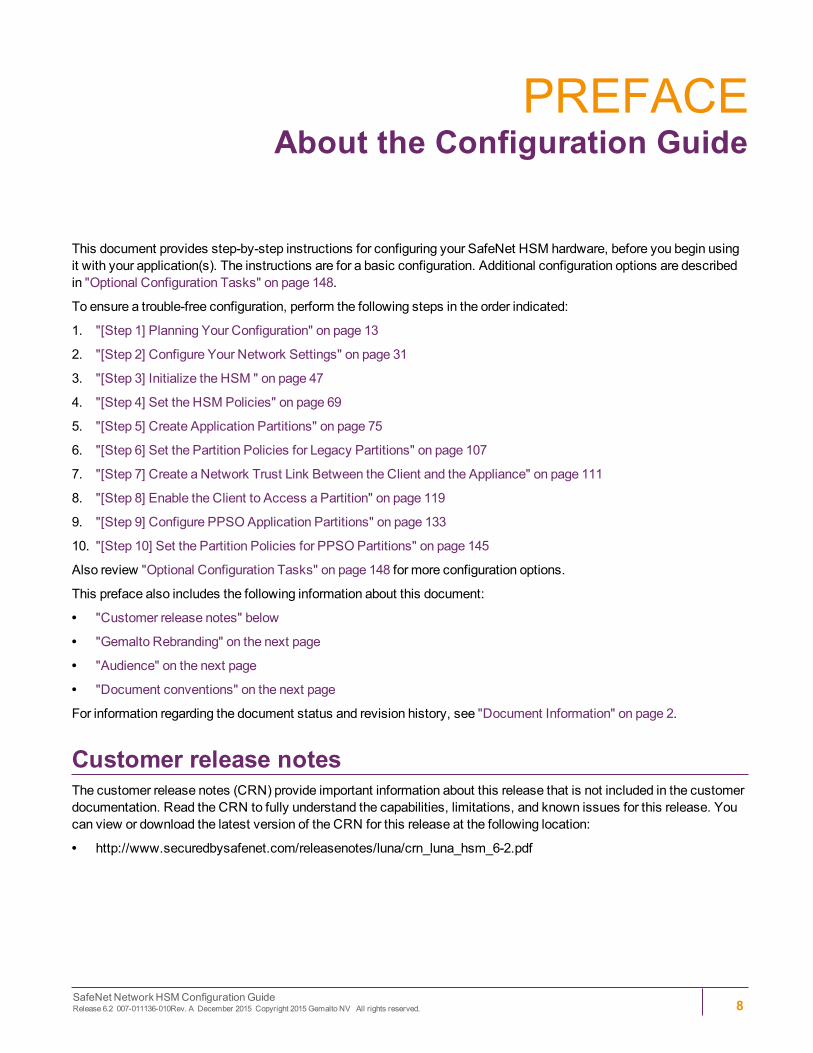
PREFACEAbout the Configuration Guide
This document provides step-by-step instructions for configuring your SafeNet HSM hardware, before you begin usingit with your application(s). The instructions are for a basic configuration. Additional configuration options are describedin "Optional Configuration Tasks" on page 148.
To ensure a trouble-free configuration, perform the following steps in the order indicated:
1. "[Step 1] Planning Your Configuration" on page 13
2. "[Step 2] Configure Your Network Settings" on page 31
3. "[Step 3] Initialize the HSM " on page 47
4. "[Step 4] Set the HSM Policies" on page 69
5. "[Step 5] Create Application Partitions" on page 75
6. "[Step 6] Set the Partition Policies for Legacy Partitions" on page 107
7. "[Step 7] Create a Network Trust Link Between the Client and the Appliance" on page 111
8. "[Step 8] Enable the Client to Access a Partition" on page 119
9. "[Step 9] Configure PPSOApplication Partitions" on page 133
10. "[Step 10] Set the Partition Policies for PPSOPartitions" on page 145
Also review "Optional Configuration Tasks" on page 148 for more configuration options.
This preface also includes the following information about this document:
• "Customer release notes" below
• "Gemalto Rebranding" on the next page
• "Audience" on the next page
• "Document conventions" on the next page
For information regarding the document status and revision history, see "Document Information" on page 2.
Customer release notesThe customer release notes (CRN) provide important information about this release that is not included in the customerdocumentation. Read the CRN to fully understand the capabilities, limitations, and known issues for this release. Youcan view or download the latest version of the CRN for this release at the following location:
• http://www.securedbysafenet.com/releasenotes/luna/crn_luna_hsm_6-2.pdf
SafeNet NetworkHSMConfiguration GuideRelease 6.2 007-011136-010Rev. A December 2015 Copyright 2015Gemalto NV All rights reserved. 8

PREFACE About the Configuration Guide
Gemalto RebrandingIn early 2015, Gemalto NV completed its acquisition of SafeNet, Inc. As part of the process of rationalizing the productportfolios between the two organizations, the Luna name has been removed from the SafeNet HSM product line, withthe SafeNet name being retained. As a result, the product names for SafeNet HSMs have changed as follows:
Old product name New product name
Luna SA HSM SafeNet Network HSM
Luna PCI-E HSM SafeNet PCI-E HSM
LunaG5HSM SafeNet USB HSM
Luna PED SafeNet PED
Luna Client SafeNet HSM Client
Luna Dock SafeNet Dock
Luna Backup HSM SafeNet Backup HSM
Luna CSP SafeNet CSP
Luna JSP SafeNet JSP
Luna KSP SafeNet KSP
Note: These branding changes apply to the documentation only. The SafeNet HSM softwareand utilities continue to use the old names.
AudienceThis document is intended for personnel responsible for maintaining your organization's security infrastructure. Thisincludes SafeNet HSM users and security officers, key manager administrators, and network administrators.
All products manufactured and distributed by Gemalto NV are designed to be installed, operated, andmaintained bypersonnel who have the knowledge, training, and qualifications required to safely perform the tasks assigned to them.The information, processes, and procedures contained in this document are intended for use by trained and qualifiedpersonnel only.
It is assumed that the users of this document are proficient with security concepts.
Document conventionsThis document uses standard conventions for describing the user interface and for alerting you to important information.
NotesNotes are used to alert you to important or helpful information. They use the following format:
SafeNet NetworkHSMConfiguration GuideRelease 6.2 007-011136-010 Rev. A December 2015 Copyright 2015Gemalto NV All rights reserved. 9

PREFACE About the Configuration Guide
Note: Take note. Contains important or helpful information.
CautionsCautions are used to alert you to important information that may help prevent unexpected results or data loss. They usethe following format:
CAUTION: Exercise caution. Contains important information that may help preventunexpected results or data loss.
WarningsWarnings are used to alert you to the potential for catastrophic data loss or personal injury. They use the followingformat:
WARNING! Be extremely careful and obey all safety and security measures. In thissituation you might do something that could result in catastrophic data loss orpersonal injury.
Command syntax and typeface conventionsFormat Convention
bold The bold attribute is used to indicate the following:• Command-line commands and options (Type dir /p.)• Button names (Click Save As.)• Check box and radio button names (Select the Print Duplex check box.)• Dialog box titles (On the Protect Document dialog box, click Yes.)• Field names (User Name: Enter the name of the user.)• Menu names (On the File menu, click Save.) (Click Menu > Go To > Folders.)• User input (In the Date box, type April 1.)
italics In type, the italic attribute is used for emphasis or to indicate a related document. (See theInstallation Guide for more information.)
<variable> In command descriptions, angle brackets represent variables. Youmust substitute a value forcommand line arguments that are enclosed in angle brackets.
[optional][<optional>]
Represent optional keywords or <variables> in a command line description. Optionally enter thekeyword or <variable> that is enclosed in square brackets, if it is necessary or desirable tocomplete the task.
{a|b|c}{<a>|<b>|<c>}
Represent required alternate keywords or <variables> in a command line description. Youmustchoose one command line argument enclosed within the braces. Choices are separated by vertical(OR) bars.
SafeNet NetworkHSMConfiguration GuideRelease 6.2 007-011136-010 Rev. A December 2015 Copyright 2015Gemalto NV All rights reserved. 10

PREFACE About the Configuration Guide
Format Convention
[a|b|c][<a>|<b>|<c>]
Represent optional alternate keywords or variables in a command line description. Choose onecommand line argument enclosed within the braces, if desired. Choices are separated by vertical(OR) bars.
Support ContactsContact method Contact
Address Gemalto NV4690Millennium DriveBelcamp, Maryland 21017USA
Phone Global +1 410-931-7520
Australia 1800.020.183
China (86) 10 8851 9191
France 0825 341000
Germany 01803 7246269
India 000.800.100.4290
Netherlands 0800.022.2996
New Zealand 0800.440.359
Portugal 800.1302.029
Singapore 800.863.499
Spain 900.938.717
Sweden 020.791.028
Switzerland 0800.564.849
United Kingdom 0800.056.3158
United States (800) 545-6608
Web www.safenet-inc.com
Support and Downloads www.safenet-inc.com/supportProvides access to the Gemalto Knowledge Base and quick downloads forvarious products.
Technical Support CustomerPortal
https://serviceportal.safenet-inc.comExisting customers with a Technical Support Customer Portal account can log in
SafeNet NetworkHSMConfiguration GuideRelease 6.2 007-011136-010 Rev. A December 2015 Copyright 2015Gemalto NV All rights reserved. 11

PREFACE About the Configuration Guide
Contact method Contact
to manage incidents, get the latest software upgrades, and access the GemaltoKnowledge Base.
SafeNet NetworkHSMConfiguration GuideRelease 6.2 007-011136-010 Rev. A December 2015 Copyright 2015Gemalto NV All rights reserved. 12

1[Step 1] Planning Your Configuration
Before initializing your HSM, we suggest taking amoment to consider the following available features and options.Somewould be inconvenient to change after your HSM is in service:
• "Appliance Roles" below
• "Crypto Officer & Crypto User" on page 16
• "Domain Planning" on page 19
• "SafeNet PED Considerations" on page 1
• "PED-authenticated HSM Planning" on page 22
• "Password-authenticated HSM Planning" on page 27
Appliance RolesSafeNet Network HSM offers administrative roles external to the contained HSM, to oversee themanagement of theappliance that hosts the HSM, including network setup, systemmonitoring, and other tasks.
Appliance Role Summary
For the SafeNet Network HSM networked-appliance HSM, the roles fall under twomain hierarchies:
• roles to access the appliance that contains the HSM and that provides the network connectivity; these areaccessed through SSH or local serial connection, via the LunaSH or "lunash" command line, and include
– the highest-level, full-access administrative role, called 'admin'
– themedium-level operational administrative role, called 'operator', and
SafeNet NetworkHSMConfiguration GuideRelease 6.2 007-011136-010Rev. A December 2015 Copyright 2015Gemalto NV All rights reserved. 13

1 [Step 1] Planning Your Configuration
– the lowest-level observation-only administrative role, called 'monitor'
• roles that access the HSM, described in "HSM Roles and Secrets" on page 16
Within the SafeNet appliance, those appliance-level and HSM-level roles interact, where the access level of the rolethat is currently logged into the appliance, and using LunaSH (lunash), sees either the full set or a subset of HSM-usingcommands.
Thus, someone logged into the appliance as 'monitor' can see only reporting-type commands for the appliance(commands that show lists and status of subsystems), and can see only reporting-type commands for the HSMwithinthe appliance.
Someone logged into the appliance as 'operator' can see and usemost of the commands that the 'admin' user canaccess, at both the appliance and the HSM levels.
Someone logged into the appliance as 'admin' can see and use all possible commands affecting both the appliance andthe contained HSM, including all commands that create andmodify other roles, and that initialize the HSM.
Named Administrative Users and Their Assigned RolesBy default, the appliance has
• one 'admin' user, with role "admin", always enabled, default password "PASSWORD"
• one 'operator' user, with role "operator", disabled until you enable, default password "PASSWORD"
• one 'monitor' user, with role "monitor", disabled until you enable, default password "PASSWORD"
Those three "built-in" accounts can be neither created nor destroyed, but 'admin' can enable or disable the other two asneeded.
You can leave that arrangement as-is, or you can create additional users with names of your own choice, and assignthem any of the roles (and the powers that go with those roles). The default password of any created user is"PASSWORD" (yes, all uppercase).
Thus, you could choose to have:
• multiple admin-level users, each with a different name,
• multiple operator-level users (or none, if you prefer), again each with a different name, and
• multiple monitor-level users (or none, if you prefer), each with a different name.
Administrative users' names can be a single character or as many as 128 characters, chosen from letters a-z, or A-Z,numbers 0-9, the dash, the dot, or the underscore. No spaces.
abcdefghijklmnopqrstuvwxyzABCDEFGHIJKLMNOPQRSTUVWXYZ0123456789-._
As with any secure system, no two users (regardless of role) can have the same name.
Abilities or Privileges of Created UsersNamed users empowered with the "admin" role can perform most actions that the original admin can perform.
User accounts granted the "operator" role have access to a reduced set of administrative commands.
User accounts granted the "monitor" role can take no actions on the appliance or HSM, and are restricted to commandsthat view, list or show.
The commands available to the roles are listed in "User Accounts and Their Privileges".
SafeNet NetworkHSMConfiguration GuideRelease 6.2 007-011136-010 Rev. A December 2015 Copyright 2015Gemalto NV All rights reserved. 14

1 [Step 1] Planning Your Configuration
Why Create Extra Administrative Users?One reason for creatingmultiple named users would be for the purpose of distinguishing individual persons' activities inthe logs.
For example, a user named 'john' running the lunash 'syslog tail' commandwould show in the April 13 log as:
Apr 13 14:17:15 172 -lunash: Command: syslog tail : john : 172.20.10.133/3107CommandResult : 0 (Success)
Perhaps you have people performing similar functions at physically separate locations, or youmight have staffassigned to teams or shifts for 24-hour coverage. It could be valuable (or required by your security auditors) to know andbe able to show which specific person performed which actions on the system.
Youmight find other uses. Please let us know.
Implications of Backup and Restore of User ProfilesThe commands "sysconf config backup" and "sysconf config restore" allow you to store a snapshot of theadministrative user database (the names and status of all named LunaSH users) that can later be restored if desired.
CAUTION:Restoring from backup restores the database of user profiles that existed before the backupwas made. This includes:- the set of users that existed when the backup was made- the passwords that users had at the time of the backup- the enabled/disabled status of users, at the time of the backup.
This means that:- you will lose any user accounts created since the backup,- passwords of existing users could be reverted without their knowledge,- enabled users might be disabled (therefor unable to perform their tasks)- disabled users might be enabled (therefore re-granted access that was suspended) and- any user accounts removed since that backup will be restored.
The first three could be administrative inconveniences. The fourth and fifth outcomes could beserious security issues.
Your records should indicate when user-profile changes weremade, and what those changes were, so any time thatyou restore a backup, be sure to reconcile the changed statuses and inform anyone who is affected. For example, usersneed to know to use their previous password, and to change it immediately.
Note: While the "built-in" 'admin', 'operator', and 'monitor' accounts are not deleted or added bya restore operation (those accounts are permanent), both their enabled/disabled status and theirpasswords are changed to whatever prevailed at the time the backup was originally taken.
Security of Shell User AccountsIn most cases anticipated by the design and target markets for SafeNet Network HSM, both the SafeNet NetworkHSM appliance and any computers that make network connections for administrative purposes, would reside inside
SafeNet NetworkHSMConfiguration GuideRelease 6.2 007-011136-010 Rev. A December 2015 Copyright 2015Gemalto NV All rights reserved. 15

1 [Step 1] Planning Your Configuration
your organization's secure premises, behind well-maintained firewalls. Site-to-site connections would be undertakenvia VPN. Therefore, attacks on the shell account(s) would normally not be an issue.
However, if your application requires placing the SafeNet appliance in an exposed position (the DMZ and beyond), thenplease see "About Connection Security" in the Overview document for some additional thoughts.
HSM Roles and SecretsSafeNet HSM products offer multiple identities, somemandatory, some optional, that you can invoke in different waystomap to roles and functions in your organization. The following topics offer some elements that youmight wish toconsider before committing to an HSM configuration.
Roles that access the HSM, the cryptographic engine within, or connected to, the host, include
• the 'HSM Administrator' or 'Security Officer' (SO) [Mandatory], responsible for initialization of the HSM, setting andchanging of global Policies (based on the HSM's Capabilities), creation and deletion of application partitions
• the 'Auditor' [Optional],responsible for managing HSM audit logging, at "arm's length" (independently) from otherroles on the HSM
• the 'application partition Security Officer' (SO) [Optional], responsible for creating other roles in the partition,resetting passwords, setting and changing partition-level Policies (based on the HSM's and the partition'sCapabilities)
• the 'application partition Crypto Officer' [Mandatory], responsible for creating the Crypto User role, and for creatingandmodifying cryptographic objects in the HSM partition (see "Crypto Officer & Crypto User" below)
• the 'application partition Crypto User', responsible for using cryptographic objects (encrypt/decrypt, sign/verify...)in the HSM partition
In addition to the HSM roles listed above, certain other HSM-wide secrets exist for special purposes. Those include:
• the cloning domain, which determines whether the "cloning" (secure copy of cryptographic objects) operation ispossible between two HSMs (whichmust share identical domain secrets) - applies to password-authenticatedHSMs and to PED-authenticated HSMs; cloning is used in some forms of backup, as well as in HA
• the Remote PED vector (PED-authenticated HSMs only), which permits establishing a secure path for the HSM toaccess remotely-located SafeNet PED and PED Keys
• the Secure Recovery vector (PED-authenticated HSMs only), which permits controlled recovery from a real tamperincident, and also allows the HSM to be placed in, and securely recovered from, an induced 'tamper' state (SecureTransport Mode), for themost secure possible transport and storage of a SafeNet HSM and its contents.
Crypto Officer & Crypto UserAn available security layer is required in some security and authentication schemes, as follows:
For those who need the additional distinction, the Partition Owner role (black PED Key) can optionally be subdividedinto two further roles:
- Crypto Officer - Crypto User
In the past, and continuing, the separation of roles on the SafeNet HSM follows the standard Cryptoki model:
• appliance admin
SafeNet NetworkHSMConfiguration GuideRelease 6.2 007-011136-010 Rev. A December 2015 Copyright 2015Gemalto NV All rights reserved. 16

1 [Step 1] Planning Your Configuration
This is the basic administrative access to the a SafeNet HSM appliance. When you connect via ssh (putty.exe orother ssh utility), the SafeNet HSM presents the "login as:" prompt. The only ID that is accepted is "admin".
Youmust be logged in as the appliance "admin" before you can access further authentication layers such as HSMAdmin, Partition Owner, Crypto Officer.
The appliance "admin" performs network administration and some other functions that do not require the additionalauthentication. Therefore, by controlling access to passwords (for a SafeNet HSM with Password Authentication)or to PED Keys (for a SafeNet HSM with Trusted Path Authentication), you can compartmentalize the variousadministrative and security roles.
• HSM Admin
HSM Admin has control of the HSMwithin the a SafeNet HSM appliance. To access HSM Admin functions, youmust first be logged in as appliance admin.
In addition to all the other appliance functions, a user who has authenticated with the HSM Admin password (for aSafeNet HSM with Password Authentication) or the HSM Admin (blue) PED Key (for a SafeNet HSM with TrustedPath Authentication) can:
– create and delete Partitions,
– create and delete Partition Owners (black PED Key holders on a SafeNet HSM with Trusted PathAuthentication only),
– backup and restore the HSM,
– change HSM Policies, etc.
• HSM Partition Owner (or User)
HSM Partition Owner has control of one or more Partitions (virtual HSMs) within the SafeNet HSM appliance. Toaccess HSM Partition Owner functions, youmust first be logged in as appliance admin.
In addition to all the other appliance functions, a user who has authenticated with the HSM Partition Owner (black)PED Key (for a SafeNet HSM with Trusted Path Authentication) can:
– modify partition policies
– activate a partition for use by Clients
– backup and restore Partition contents
Note: Both a SafeNet HSM with Password Authentication and a SafeNet HSM with TrustedPath Authentication have at least two layers of access control for an HSM Partition:- the appliance admin login- the Partition authentication
Note: SafeNetHSM with PED (Trusted Path) Authentication, splits the Partition accessinto two layers. The HSM Partition Owner (a concept that exists only for a SafeNet HSM withPED Authentication) first authenticates to the Partition with the appropriate black PED Key,then activates the Partition for Clients. Thereafter, each Client must further authenticate withthe Partition Password (generated by SafeNet PED when the Partition is created).
SafeNet NetworkHSMConfiguration GuideRelease 6.2 007-011136-010 Rev. A December 2015 Copyright 2015Gemalto NV All rights reserved. 17

1 [Step 1] Planning Your Configuration
Note: For SafeNet HSM with Password Authentication, the Partition Password is the onlylayer of authentication to a Partition. Therefore, any Client with that password has access tothe Partition. What prevents a Client frommanipulating objects on the Partition and performingPartition administration activities is the need to access the lunash command shell.
Note: Therefore, in both access-control models, a Client with the Password can connect andperform object generation and deletion, and can use objects (sign, verify, encrypt, decrypt), butthey cannot perform Partitionmanagement operations unless they can also login to LunaSH(lunash) as admin.
• Client
A Client is a "working" or "production" user of one or more SafeNet Network HSM Partitions, that connects from aclient computer (one that has set up a network trust link (NTL) by exchanging certificates and registering with theSafeNet Network HSM). If a Client can provide the Partition Password, it can generate, delete, and usecryptographic objects (keys and certificates) on the Partition, as long as the Partition is prepared to accept theconnection.
In the case of SafeNet Network HSMwith Password Authentication (assuming the HSM Partition has beenpreviously created with the Password), the appliance simply needs to be powered on.
In the case of SafeNet Network HSMwith Trusted Path Authentication (assuming the HSM Partition has beenpreviously created and the Client given the Partition Password), the Partitionmust also be activated by thePartition Owner. That is, a Client, even with the proper Password cannot access a SafeNet Network HSM Partitionunless that Partition has been placed in "activated" state by the HSM Partition Owner (using the black PED Key).
That authenticationmodel continues unaffected, for those who prefer it. However an optional, enhanced Cryptoki modelis also available, to separate the Partition Owner or Partition User role into a read-write entity and a separate read-onlyentity:
• appliance admin
(Same as appliance admin description above. No change.)
• HSM Admin
(Same as HSM Admin description above. No change.)
• Crypto Officer (full Read-Write access)
(same capabilities as HSM Partition Owner and Client in the default model)
As above for HSM Partition Owner, except that two separate Passwords can now (optionally) be associated withthe black PED Key. In both cases, the black PED Key must be presented, and the administrator at the lunashcommand-line can:
– modify partition policies
– activate a partition for use by Clients
– backup and restore Partition contents
The Partition Password is presented when a Client application needs to use the Partition. In this model, there aretwo Passwords. The Crypto Officer Partition Password allows the Client to perform any crypto-graphic operation,bothmanipulation (generation, deletion, wrap/unwrap), and use (encrypt/decrypt, sign/verify).
SafeNet NetworkHSMConfiguration GuideRelease 6.2 007-011136-010 Rev. A December 2015 Copyright 2015Gemalto NV All rights reserved. 18

1 [Step 1] Planning Your Configuration
The other password is used (along with the black PED Key) for the Crypto User. This is set by the HSM Adminwhen the Partition is created.
In operation, the Crypto Officer would log in at themanagement interface prompt for Partitionmaintenance tasks,
and/or
a Client application could connect to a registered Partition (authenticating with the Crypto Officer Password) inorder to generate andmanipulate cryptographic objects in the Partition.
• Crypto User (or restricted Client user - Read-only)
If the Partition has been readied for access by the black PED Key, a Client can connect with a Client application,authenticating with the Crypto User Password (a challenge secret, generated on command by the SafeNet PED,similar to the Crypto Officer or Partition Owner Password that is generated on the SafeNet PED when a Partition iscreated).
The Crypto User Client can thenmake use of cryptographic materials already in the Partition (signing, verifying,encrypting, decrypting), but cannot manipulate those objects (no generating or deleting or wrapping/unwrapping).
This distinction differs from the oldmodel, with just the one Partition Password, where Client users could not berestricted from generating and deleting keys and certificates.
Either model can be used. If you work in an environment that mandates the Crypto Officer / Crypto User distinction, it isavailable. If you have no need of the additional password, or if you have legacy applications that use the standardCryptoki roles, then simply do not activate the Crypto Officer / Crypto User roles.
How the Roles are InvokedBy default, the Crypto User role does not exist, and so the black PED Key owner is HSM Partition Owner. You create aCrypto User (the restricted Client user) with the "partition createUser" command.
Bad Login AttemptsBy default, both the Crypto Officer and the Crypto user canmake 10 consecutive failed login attempts before invokingconsequences. That is, the two bad-authentication counters are independent of each other.
Submissions of incorrect Partition Passwords (or Crypto Officer and Crypto User Passwords) are not counted asincorrect black PED Key attempts.
Note: The SafeNet HSMmust actually receive some information before it logs a failedattempt, so if youmerely forget to insert a PED Key, or provide a wrong-color key, then that isnot logged as a failed attempt. When you successfully login, the bad-attempt counter is reset tozero.
Domain PlanningThe cloning domain is a special-purpose secret that is attached to a partition on an HSM. It determines to which, andfrom which, other partitions (on the sameHSM or on other HSMs) the current partition can clone objects. Partitions thatsend or receive partition objects by means of the cloning protocol must share identical cloning domain secrets. This isimportant for:
• cloning in backup and restore operations and
• synchronization in HA groups.
SafeNet NetworkHSMConfiguration GuideRelease 6.2 007-011136-010 Rev. A December 2015 Copyright 2015Gemalto NV All rights reserved. 19

1 [Step 1] Planning Your Configuration
There is no provision to clone between an application partition and an HSM administrative partition, but you can applythe same domain secret for ease of administration. Password authenticated application partitions can clone partitioncontents one to the other, and PED authenticated application partitions can clone partition contents one to the other, butpassword authenticated HSMs (and their partitions) cannot perform cloning with PED-authenticated HSMs (and theirpartitions).
Cloningsource
Cloning target
HSMAdministratorpartition A,cloningdomain A
HSMAdministratorpartition B,cloningdomain B
applicationpartition 1,cloningdomain A
applicationpartition 1,cloningdomain B
applicationpartition 2,cloningdomain A
applicationpartition 2,cloningdomain B
HSMAdministratorpartition A,cloningdomain A
managementobjects
cannot clonedomains notmatched
N/A N/A N/A N/A
HSMAdministratorpartition B,cloningdomain B
cannot clonedomains notmatched
managementobjects
N/A N/A N/A N/A
applicationpartition 1,cloningdomain A
N/A N/A yes (usuallybackup andrestore)
applicationpartition 1,cloningdomain B
N/A N/A cannot clonedomains notmatched
yes (usuallybackup andrestore)
applicationpartition 2,cloningdomain A
N/A N/A yes (usuallybackup andrestore)
applicationpartition 2,cloningdomain B
N/A N/A yes (usuallybackup andrestore)
Characteristics of Cloning DomainsPassword authenticated HSMs have text-string cloning domains for the HSM SO space and for any partitions that arecreated on the HSM. HSM and Partition domains are typed at the command line of the host computer, when required.Password authentication cloning domains are created by you.
SafeNet NetworkHSMConfiguration GuideRelease 6.2 007-011136-010 Rev. A December 2015 Copyright 2015Gemalto NV All rights reserved. 20

1 [Step 1] Planning Your Configuration
PED authenticated cloning domains are created by a SafeNet HSM, which could be the current HSM, or it could be apreviously initialized HSM that you wish to be in a cloning group with the current HSM.
PED authenticated HSMs have cloning domains in the form of encrypted secrets on red PED Keys, for the HSMSO space and for any partitions that are created on the HSM. The following characteristics are common to domains onall SafeNet HSMs.
• The HSM SO-space domain can be created at the HSM (therefore unique) at HSM initialization time, or it can beimported, meaning that it is shared with one-or-more other HSMs.
• The application partition domain can be created by the current HSM at partition creation time for legacy-stylepartitions or Partition SO role-creation time for PPSO partitions (thereforemaking it unique), or it can be imported,meaning that it is shared with one-or-more other HSM partitions.
• The application partition domain can be the same as the HSM SO domain or can differ.
– For legacy-style partitions, where the HSM Administrator or Security Officer is also the SO of the applicationpartition, it is appropriate to have the same domain for the HSM and for the partition(s).
– For PPSO partitions, where the role of Security Officer for the application partition is deliberately separate fromthe role of HSM SO, it is appropriate that the HSM cloning domain and the application partition cloning domainwould be different, and controlled by different people.
• The application partition domain can be the same as the domain of another partition on the sameHSM (for HSMsthat support multiple partitions) or can differ.
For PED authenticated HSMs, the domain secret for the SO space or for an application partition can be a single redPED Key, or it can be split (by theMofN feature) over several red keys, which are then distributed among trustedpersonnel such that no single person is able to provide the cloning domain without oversight from other trustedpersonnel.
In scenarios wheremultiple HSM partitions are in use, it can be useful to segregate those partitions according todepartment or business unit, or according to function groups within your organization. This ensures that personnel in agiven group are able to clone or backup/restore only the contents of partitions sharing the domain for which they areresponsible. Other functional groups, even with access to the same SafeNet HSM hardware have cloning orbackup/restore access to their own domain partitions, but not to those of the first group... and vice-versa.
For Password authenticated HSMs, that sort of segregation is maintained entirely by procedure and by trust, as yourely on personnel not to share the domain text strings, just as you rely on them not to share other passwords.
For PED authenticated HSMs, the segregation is maintained by physical and procedural control of the relevant PEDKeys that each group is allowed to handle.
It can pay to pre-plan how you will divide and assign access to HSM SO space and Partitions. Cloning Domain is oneaspect of such access. There is rarely much call to store objects on the SO space, so the SO function is normallypurely administrative oversight, and the decisions are straightforward. Each SO takes care of just her/his ownHSM, oreach SO can have oversight of multiple HSMs.
Partition access can also be straightforward, if you have no particular need to segregate access by groups or byfunctions or by geography or other descriptors. But, because partitions contain the working keys, certificates, andobjects that are used in your business, it is more likely that some schememust be devised andmaintained to controlwho can do what with each HSM partition. Also, as mentioned previously, youmight wish to spread out and reinforceresponsibility by usingMofN to ensure that administrative partition access can never be achieved by a single personoperating alone. These considerations require that you plan how access controls are to be implemented and tracked,because the decisions must bemade before you create the partitions.
Have your naming conventions and allotments planned out ahead of HSM initialization and partition creation, includinga well-thought-out map of who should control cloning domain access for HSM SO spaces and for application partitions.
SafeNet NetworkHSMConfiguration GuideRelease 6.2 007-011136-010 Rev. A December 2015 Copyright 2015Gemalto NV All rights reserved. 21

1 [Step 1] Planning Your Configuration
PED-authenticated HSM PlanningPlanning for configuration of a PED-authenticated SafeNet HSM involves a number of layered, interlockingconsiderations that should be carefully thought through, in advance.
• Determine whether the HSM authentication secrets should fall under your organization's rules for password changecycles. For example, it could be amajor undertaking to change 'passwords' for all PED Keys and their backupcopies every couple of months.
• Determine your backup policy for PED Keys
– how many copies should exist of each PED Key,
– how they should be stored (on-site and off-site),
– who has control/oversight of the backup copies of your HSM authentication.
• Decide whether application partitions should be owned and administered by the HSM SO (pre-firmware 6.22.0legacy) or by a partition SO (with firmware 6.22.0 or newer, and the Per-partition SOCUF installed)
• Determine HSM and partition text labels, in keeping with your organization's requirements.
• Determine whether it is necessary or desirable to have split-secret, multi-person access control for any or all of theroles and secrets of the HSM, that is, whether MofN should be invoked.
• Determine whether it is necessary or desirable to invoke "something you know" secrets in addition to the"something you have" PED Key for any or all of the roles and secrets of the HSM, that is, whether PED PINsshould be invoked.
• If PED PINs are used, determine, in advance how your organization's security policy deals with the departure orreplacement of personnel who know the PED PINs.
• Determine which person or role within your organization will hold the PED Key(s) and passwords for each role
– the SO of the HSM,
– the SO of each application partition (optional),
– the Crypto Officer and Crypto User, and
– the Auditor (optional), as well as
– the Cloning Domain(s),
– the RPK (for optional Remote PED operation),
– the SRK for optional tamper response or Secure Transport.
• Determine how PED Keys should be physically identified (which one is which copy), especially if you have invokedMofN.
SafeNet PED PlanningPlan your PED Key options and choices before you begin the actions that will invoke PED Keys.
The various PED Keys contain secrets that are created by an HSM, and are imprinted on the PED Key at the time thata triggering action is called - for example,both the HSM and a blue SOPED Key are imprinted with the HSM SO secretat the time the HSM is initialized. With the exception of the purple SRK PED Key, all of the other PED Key types cantake a newly-created secret that is unique in the world at the time the HSM creates it.
Optionally, the PED dialog allows you to present a key with an existing secret (of the appropriate type for the currentaction) that was previously created by this HSM or by some other HSM. In that second case, the secret from the key is
SafeNet NetworkHSMConfiguration GuideRelease 6.2 007-011136-010 Rev. A December 2015 Copyright 2015Gemalto NV All rights reserved. 22

1 [Step 1] Planning Your Configuration
imprinted on the HSM, and that key can now unlock its function (example: allow the SO to log in) on both the previousHSM and the current HSM. This can be repeated for any number of HSMs that you wish accessible by the one secret.
What each PED prompt meansSome questions/prompts from the PED when any key/access secret is first invoked are:
Reuse - do you wish to have the current HSM generate this secret, and imprint it on the PED Key (the "No" or do notreuse option), or do you wish to accept a secret (of the correct type) from the currently inserted PED Key, and imprintthat secret onto the current HSM, making that secret common for this HSM and any others that recognize the samePED Key (the "Yes" or do reuse option)?
The decision is: do you wish this HSM to be accessed by the same secret that accesses this function/role on one ormore other HSMs?Or do you wish this HSM to have a new, unique secret that is recognized by no previous HSM.Sometimes, it is advantageous to have a single secret for a group of HSMs managed by a single person. Sometimes,security or operational rules require that each HSMmust have a different secret (for the role being configured).
The option to reuse an existing secret applies only within the same type of secret, so for example you cannot tell apartition to accept a secret from a blue SOPED Key. At partition creation, a partitionmust be imprinted either with aunique new key that also goes on a PED Key, or with a secret from an already-imprinted black PED Key.
The only exception, among the various PED Keys is the purple SRK PED Key, each of which is unique to its ownHSM. NoHSM can accept an SRV (the secret on the SRK) from outside. Each HSM creates its own.
MofN - do you wish to split the current secret over quantity N same-color PED Keys, such that quantity M of them willalways be needed to assemble the full secret and authenticate that role? You invokeMofN by providing theM value andthe N value using the PED Keypad, when prompted. You refuseMofN by setting theM value and the N value both to"1". MofN is themore secure choice, when you require multiple persons to be present (with their splits of the role secret)in order to access that role and perform its functions. NoMofN is themore convenient choice, as only one secret-carrying key must be carried and tracked, per role.
Overwrite - during create/initialize/imprint events, when the PED has received answers to its preliminary questions, itprompts you to insert a key and press [Enter] on the keypad. This is the first point at which it actually looks at theinserted key. The PED then tells you what is on the inserted key (could be blank, could be any of several authenticationsecrets) and asks if you wish to overwrite. This is an opportunity to reconsider the key that you have inserted, beforesomething irreversible happens. You can say "No" (don't overwrite what was found ), remove the key, and go back tobeing prompted to insert a key. If you say "Yes" to overwrite what the PED just told you is on this inserted key, the PEDgives you another chance to reconsider: "WARNING*** Are you sure...". The PED is very thorough about making surethat you do not accidentally overwrite a useful authentication secret.
PED PIN - At the point where it has been decided that you are not reusing key content, and you are or are not splittingthe new secret across multiple keys, and that you are absolutely certain that you wish to write a new secret on theinserted key, the PED prompts you to type a PED PIN. The PED is about to write onto the key a secret that was justgenerated by the HSM. If you simply press [Enter] on the PED keypad, without typing any digits, you are providing noPED PIN, and the secret that goes onto the key is the secret as provided by the HSM. If you type any digits, beforepressing [Enter] (minimum of 4 digits), then the typed digits (the new PED PIN) are XOR'd with the secret from theHSM, before the combined secret goes onto the PED Key. This means that the secret on the PED Key is not identicalto the secret from the HSM, so in future youmust always type those PED PIN digits to reverse the XOR and presentthe HSMwith the secret it is expecting. With a PED PIN applied, the secret for that role is now two-factor - somethingyou have (the version of the secret that is imprinted on the key) and something you know (the secret that you type in, tobe XOR'd with the contained secret), to make the final secret that unlocks the HSM.
At this point, the key is imprinted. Now the PED inquires if you wish to duplicate the key you just made.
SafeNet NetworkHSMConfiguration GuideRelease 6.2 007-011136-010 Rev. A December 2015 Copyright 2015Gemalto NV All rights reserved. 23

1 [Step 1] Planning Your Configuration
Duplicate - in general, you should always have duplicate keys for each role (or duplicate MofN sets, per role, if youchose to invoke theMofN split), so that you can have at least one off-site backup, and probably an on-site standby orbackup set as well. Your security and operational policies will dictate how many sets you need. When the PED promptsto inquire if you wish to duplicate the current PED Key, you should be ready with the knowledge if you already haveenough copies of that secret or if you need tomakemore. Themore youmake, themore youmust track. But youmusthave enough to satisfy your organization's operational and security protocols.
The above paragraphs explain themeanings of each of the prompts that you would see from SafeNet PED whileperforming an action (like initialization) that imprints PED Keys with secrets. The following sections discuss someimplications of the above choices for specific roles (PED Key colors).
HSM Initialization and the Blue SO PED KeyThe first action that invokes SafeNet PED (whichmust be connected, as described in the SafeNet PED option sectionof the hardware setup chapter) is HSM initialization.
When you initialize, you are creating an SO (security officer) identity and space on the HSM. Inmost cases, this is anadministrative position and the only keys or objects that are ever stored there are system keys, not user keys. The SOsets policy for the overall HSM, and creates partitions.
When creating an access secret for the SO, you are creating a secret for an administrator who sets up the HSM andthen rarely is needed thereafter. Youmight have a single person who has the job of overseeing several HSMs, in whichcase, only the first HSM creates a secret to imprint on a blue PED Key. The second, and all future HSMs to beadministered by that person (or role/job in your organization) would accept that secret from a provided blue PED Key,rather than creating their own unique SOPED Keys. In that situation, you would choose to "Reuse an existing keyset"when initializing every HSM after the first one.
Alternatively, youmight have a very compartmentalized organization where a separate individual must haveadministrative authority over each HSM, so in that case you would use blank blue keys each time you initialized a newHSM, and each HSMwould imprint its own uniquely generated SO secret onto a unique blue key. As well, you wouldhave the opportunity to apply PED PINs to any or all of the unique SOPED Keys.
Each person who is to act as SO for an HSMmust be able to access the appropriate blue PED Key when needed.Either they carry it with them, or they sign it out when they are using it and sign it back into a secure lockup. If PEDPINs are in use, then each SO and each SO backup/alternate personnel must know the PED PIN(s) for every HSM intheir charge.
If your organization enforces a policy of password changes at certain intervals, or at events like firings and personnelturnover, then you have options and requirements - youmight need to change the secret on the PED Key (hsmchangePw command) or youmight satisfy the password-changing requirement by simply changing the PED PIN.
Furthermore, when you initialize an HSMwith a new secret, you have the opportunity to split that secret using theMofNfeature. In this way, you ensure that a certain minimum number of personnel must be present with their blue PED Keyswhenever the SOmust log in. While making that choice, you should choose "M" to be the smallest number thatsatisfies the requirement. Similarly, "N" should be large enough to ensure that you have enough "spare" qualified SOsplit holders that you can assemble a quorum even when some holders are unavailable (such as for business travel,vacations, illness). Just as with a single, non-split SO secret, you can apply PED PINs to each blue key in anMofNset. Consider, before you do, how complicated your administration and key-handling/key-update procedures couldbecome.
Before you begin the HSM init process, have your blue PED Keys ready, either with an existing SO secret to reuse, orblank (or outdated secret) to be overwritten by a unique new SO secret generated by the HSM. At the same time, you
SafeNet NetworkHSMConfiguration GuideRelease 6.2 007-011136-010 Rev. A December 2015 Copyright 2015Gemalto NV All rights reserved. 24

1 [Step 1] Planning Your Configuration
must also have appropriate red PED Keys ready, because assigning/creating a cloning domain for the HSM is part ofthe HSM init process. See the next section, below.
HSM Cloning Domain and the Red Domain PED KeyAll the points, options, decisions listed above for the SO key apply equally to the Cloning domain key, with twoexceptions.
First, youMUST apply the same red key Cloning Domain secret to every HSM that is to :
• clone objects to/from each other
• participate in an HA group (synchronization uses cloning
• backup/restore.
By maintaining close control of the red PED Key, you control to which other HSMs the current HSM can clone.
Second, unlike the case of the blue SOPED Key secret and the black Partition Owner/User PED Key secret, there isno provision to reset or change a Cloning Domain. An HSM domain is part of an HSM until it is initialized. An HSMPartition domain is part of an HSM partition for the life of that partition. Objects that are created in an HSMwith aparticular domain can be cloned only to another HSM having the same domain.
Before you begin the HSM init process, have your red PED Keys ready, either with an existing cloning domain secret toreuse, or blank (or outdated secret) to be overwritten by a unique cloning domain secret generated by the HSM.
See "Domain Planning" on page 19.
Partition Owner/User and the black PED KeyAll the points listed above for the SO key apply equally to the black PED Key when an HSM partition is created.
The black PED Key Partition Owner/User secret secures the HSM partition to which it is applied, and all contents of thepartition.
The black PED Key for a partition (or a group of partitions) :
• allows the holder to log in as the Partition Owner/User to perform administrative tasks on the partition
• set the partition "open for business" by Activating the partition - when a partition is activated, applications canpresent the partition challenge secret andmake use of the partition
When a partition is created, after the black PED Key is imprinted, you are prompted to provide a domain for the newpartition.
At your option, your partition can:
• take on the sameCloning Domain (red PED Key) as the HSM in which it resides
• take on a new, unique Cloning Domain, generated by the HSM at partition creation (no other partition can shareobjects with this partition or be configured in HA with this partition, until the newly created domain is shared),
• take on a cloning domain (from an existing, imprinted red PED Key) that already holds the domain secret for anotherpartition - this is how you allow the new partition to accept objects from a Backup HSM or to be part of an HA group)
This is how you control which partitions (on the same or different HSMs) share a domain.
Regardless of whether the HSM (SO space) and the partition share a domain, it is not possible to copy/clone objectsbetween the two. A shared domain between partitions allows you to clone between/among those partitions, and tomake such partitions members of an HA group. All members of an HA groupmust share a common cloning domain.
SafeNet NetworkHSMConfiguration GuideRelease 6.2 007-011136-010 Rev. A December 2015 Copyright 2015Gemalto NV All rights reserved. 25

1 [Step 1] Planning Your Configuration
On an HSM that supports multiple partitions, all partitions could have the same domain, or all could have differentdomains, or some combination could be in effect.
Before you begin the HSM init process, have your black PED Keys ready, either with an existing Partition Owner orUser secret to reuse, or blank (or outdated secret) to be overwritten by a unique new partition Owner secret generatedby the HSM. At the same time, youmust also have appropriate red PED Keys ready, because assigning/creating acloning domain for the partition is part of the partition creation process. See the previous section, above.
Remote PED Orange PED Key (RPK)This key is not tied to a fundamental activity like initializing an HSM or creating a partition. Instead, if you don't expectto use the Remote PED option, you never need to create an orange PED Key.
If you do have a Remote capable SafeNet PED, and want to use it for remote authentication, rather than always havingthe PED locally connected to the HSM, then the HSM and the PED that is remotely hostedmust share a Remote PEDVector (RPV). The RPV is generated by the HSMwhen you instruct it to set a PED vector and imprinted onto an orangePED Key, or it is accepted from an existing Remote PED Key and imprinted onto the HSM.
When you invoke "ped vector set" or similar command, to create/imprint a Remote PED Vector, the PED promptsequence is similar to the sequence for the blue or black PED keys, with the same questions/choices for you tomakeabout "reuse" (or a fresh, new secret), about MofN, about duplicates, etc.
Before you begin the PED vector init process, have your orange PED Keys ready, either with an existing RPV secret toreuse, or blank (or outdated secret) to be overwritten by a unique new RPV secret generated by the HSM. The first timeyou set an RPV for an HSM, the PED must be locally connected. After that, you can take the orange PED Key (andyour other PED Keys for that HSM) to any host anywhere that has PedServer running and has a remote-capableSafeNet PED attached.
AuditorThe Audit role is completely separate from other roles on the HSM. It is optional for operation of the HSM, but might bemandatory according to your security regime. The Audit role can be created at any time, and does not require that theHSM already be initialized.
When you invoke audit init, to create/imprint an Audit role secret, the PED prompt sequence is similar to the sequencefor the blue or black PED keys, with the same questions/choices for you tomake about "reuse" (or a fresh, new secret),about MofN, about duplicates, etc.
Before you begin the Audit init process, have your white PED Keys ready, either with an existing Auditor secret toreuse, or blank (or outdated secret) to be overwritten by a unique new Auditor secret generated by the HSM.
Secure Recovery Purple PED Key (SRK)The Secure Recovery Vector is imprinted onto a purple Secure Recovery Key, only if you have invoked SRK. TheMaster Tamper Key and the recovery components (one of which can be brought outside the HSM and kept on a purplePED Key) are explained elsewhere. What you need to know is that there is no need to create a purple PED Key unlessyou :
• need to enforce acknowledgment of tamper events by your personnel, before returning the HSM to service, or
• wish to invoke Secure Transport Mode.
When you invoke SRK, to remove one of theMTK recovery secret splits from the HSM and imprint it onto a purple PEDKey, the PED prompt sequence DOES NOT include a "reuse" option. The purple PED Key is the only one that is uniqueto its HSM and cannot be reused. The secret is generated within the HSM and goes onto a purple PED Key (or several,
SafeNet NetworkHSMConfiguration GuideRelease 6.2 007-011136-010 Rev. A December 2015 Copyright 2015Gemalto NV All rights reserved. 26

1 [Step 1] Planning Your Configuration
if you chooseMofN), but there is no ability for the HSM to accept an already imprinted purple key secret that came fromanother HSM. SRKs are always unique. That is, you canmake as many copies as you wish, but they will work withonly one HSM in the world.
Other than that, the PED prompt sequence is similar to the sequence for the blue or black PED keys, with the samequestions/choices for you tomake about MofN, about duplicates, etc.
Before you begin the SRK process, have your purple PED Keys ready, either a blank key, or outdated secret, to beoverwritten by a unique new Secure Recovery Vector generated by the HSM.
Other ConsiderationsIn each case, have your materials and notes about your previously-made decisions on hand before you launch acommand that invokes key creation or imprinting.
Predetermine which of your personnel will have access to which PED Keys, how many people should be required toperform a given authentication action, whether they will carry their PED Key(s), or will need to retrieve them from asecure lockup for each occasion that they are used, how many backup sets you expect to maintain.
Keep inmind that backups are good, but each backup set must be updated if the operational or master set is changedfor any reason.
If your security policies do not require periodic changes to PED Key secrets (possible for any of the other PED Keys,but effectively impossible for red domain PED Keys), and if your physical and procedural security is strong enough,then it is quite possible to just create the set(s) of PED Keys that you need, and then not need to touch them again foryears.
By contrast, if your policies demand periodic change, or if you think youmight be forced to change PED Key secretsdue to personnel departures or other events, then have a clear plan in place about how you will deal with such situationsbefore you create your various PED Key sets.
Password-authenticated HSM PlanningPlanning for configuration of a password-authenticated SafeNet HSM is straightforward. LHSM-12627
• Determine whether the HSM authentication secrets should fall under your organization's rules for password changecycles.
• Decide whether application partitions should be owned and administered by the HSM SO (pre-firmware 6.22.0legacy) or by a partition SO (with firmware 6.22.0 or newer, and the Per-partition SOCUF installed)
• Determine HSM and partition labels, in keeping with your organization's requirements
• Determine passwords for each role
– the SO of the HSM,
– the SO of each application partition (optional),
– the Crypto Officer and Crypto User,
– and the Auditor (optional))
• Determine the cloning domain for each partition.
SafeNet NetworkHSMConfiguration GuideRelease 6.2 007-011136-010 Rev. A December 2015 Copyright 2015Gemalto NV All rights reserved. 27

1 [Step 1] Planning Your Configuration
HSM InitializationWhen you initialize, you are creating an SO (security officer) identity and attaching it to the Admin partition on the HSM.This is an administrative position and the only keys or objects that are ever stored there are system keys, not userkeys. The SO sets policy for the overall HSM, and creates partitions.
When creating an access secret for the SO, you are creating a secret for an administrator who sets up the HSM andthen rarely is needed thereafter. Youmight have a single person who has the job of overseeing several HSMs, in whichcase you could re-use the HSM SO password.
In the legacy model, the HSM SO is also the SO of an application partition that is created on the HSM. That means theSO can see application partition contents.
In the new, Per-Partition SO (PPSO)model, the SO of the partition is a completely separate role from the HSM SO. Aslong as they do not use the same secret, the HSM SO is completely excluded from the application partition. Thisseparation of roles is important in some organizations.
HSM Cloning DomainLike all secrets for a Password-authenticated SafeNet HSM, the cloning domain is a simple text string. It governswhether an HSM can clone its contents to another HSM (for backup, or for HA). There is no provision to change thecloning domain, without re-initializing, unlike a password for one of the roles, which can be reset or changed whendesired.
You have the option to use the same cloning domain for the HSM as for an application partition on that HSM, or differentdomain secrets, if desired.
Application Partition Owner or Crypto-Officer/Crypto-UserSafeNet HSM application partitions can have a single "Owner" role that has unrestricted administrative andcryptographic access to the partition, or you can choose to divide the access into an unrestricted Crypto Officer andrestricted Crypto User role.
A Password-authenticated HSM's application partition has a single text string for Owner or Crypto Officer that grantsboth administrative access and application access to the partition. It has a single text string for Crypto User that grantsboth restricted administrative access and restricted application access to the partition. This contrasts with a PED-authenticated application partition, where a black PED Key allows administrative access as Owner/Crypto Officer,while a separate challenge secret is used by unrestricted client applications, and a black PED Key allowsadministrative access as Crypto User, while a separate challenge secret is used by restricted client applications.
Application Partition Cloning DomainThe application partition requires a cloning domain, whichmust match the cloning domain of any other applicationpartition (on any HSM) to which it should be able to clone objects. The domain is required tomatch for backup or for HAgroup creation and operation.
See "Domain Planning" on page 19.
AuditorThe Audit role is completely separate from other roles on the HSM. It is optional for operation of the HSM, but might bemandatory according to your security regime. The Audit role can be created at any time, and does not require that theHSM already be initialized.
SafeNet NetworkHSMConfiguration GuideRelease 6.2 007-011136-010 Rev. A December 2015 Copyright 2015Gemalto NV All rights reserved. 28

1 [Step 1] Planning Your Configuration
Effect of PPSO on SafeNet Network HSMThe older way - The legacy pattern for SafeNet Network HSM configuration is that it is made known that an applicationpartition is needed and the appliance administrator, who is also the HSM SO does everything and hands the applicationowner the finished product, an address to connect and a text secret for crypto application access to the partition.
It is the HSM SO, connected to the appliance via SSH to a LunaSH (lunash:>) session, who
• configures everything related to the appliance outside the HSM,
• creates the appliance certificate
• initializes the HSM,
• creates the partition, complete with Crypto Officer /"Owner", and possibly Crypto User, if desired,
• adjusts Partition policies if necessary,
• guides the application owner through the NTLS certificate exchange and registration of client and partition, and
• communicates the partition's application access secret (sometimes called the challenge secret) to the remoteowner of the application that is to use the partition.
The various management functions (including the partition domain and the Crypto Officer authentication) might beretained by the HSM SO, or might be given to some other person, depending on the organization's requirements. Theadministrative functions were traditionally accessed via LunaSH (lunash:>). The HSM SO remains the ultimate ownerof the application partition, with visibility into the partition.
The newer way - For Per-Partition Security Officer (PPSO), the initial steps are the same to set up the appliance,create a certificate, and initialize the HSM. All these actions are identical to above, and are performed at the appliancevia SSH connection to a LunaSH session (lunash:>), as above. When someone wants a partition for use by anapplication,
• the application owner sends a request to the SafeNet Network HSM admin, via e-mail, attaching a client certificatethat they have generated
• the HSM SO creates an application partition, specifying that the partition is to have its own SO (partition create -haspso)
• the appliance admin (also the HSM SO) registers the received client certificate against the created partition; this isthe final action done in LunaSH.
• the created partition is an empty structure, with no identities associated
• the appliance admin sends the appliance server certificate to the client application owner, along with the contactinformation (IP or hostname) via return e-mail, including instructions for the succeeding steps (or directions to therelevant guide in these instructions).
• the client application owner has SafeNet HSM Client installed and uses the supplied utility to create the client endof the NTLS connection
• the client application owner uses lunacm to discover and select the cryptographic slot that represents the remote,empty partition to which they have been given access [the actions that follow are identical for a remote SafeNetNetwork HSM partition or for a locally installed/connected HSM partition]
• the client application owner uses the role command to create the Partition SO identity and cloning domain for thepartition
• the client application owner, logs in as the Partition SO and optionally uses the "partition changepolicy" commandto adjust any partition policies that need adjustment
SafeNet NetworkHSMConfiguration GuideRelease 6.2 007-011136-010 Rev. A December 2015 Copyright 2015Gemalto NV All rights reserved. 29

1 [Step 1] Planning Your Configuration
• the client application owner, logged in as the Partition SO, uses the role command to create the Crypto Officeridentity for the partition
• the client application owner optionally logs in as Crypto Officer and creates a Crypto User
• the client application owner provides either the Crypto Officer or Crypto User text string challenge secret to theapplication, which uses it to perform cryptographic operations against the currently-selected crypto slot.
SafeNet NetworkHSMConfiguration GuideRelease 6.2 007-011136-010 Rev. A December 2015 Copyright 2015Gemalto NV All rights reserved. 30

2[Step 2] Configure Your Network Settings
In this chapter you will gather the needed information and then set the values that allow your HSM appliance to workwithin your network, to connect to external services (like NTP), and prepare it to engage in secure communication links.
Gather appliance network setting informationBefore you begin, obtain the following information (see your network administrator for most of these items):
• New appliance admin Password
HSM Appliance Network Parameters• the IP address assigned to this device (if you are using static IP, which is recommended)
• the hostname for the HSM appliance (registered with network DNS)
• domain name
• default gateway IP address
• DNS NameServer IP address(es)
• Search Domain name(s)
• device subnet mask
• Ethernet device (use eth0, which is the uppermost network jack on the HSM appliance back panel, closest to the
power supply, and is labeled1 )
DNS Entries• Ensure that you have configured your DNS Server(s) with the correct entries for the appliance and the client.
If you are using DHCP, then all references to the Client and the HSM appliance (as in Certificates) should usehostnames.
Client Requirements• If you are using a client workstation with Linux or UNIX, then SSH (secure shell) and the scp utility, should be
installed and ready to use (normally they are provided with the operating system).
• If you are using aWindows-based workstation, then the freeware PuTTY utility suite is supplied in our SafeNetHSM Client Software, and is installed in c:\Program Files\SafeNet\LunaClient\putty.exe.The pscp utility is also included in SafeNet HSM Client Software installer, and is required for this installation.
Go to "Recommended Network Characteristics" on the next page
SafeNet NetworkHSMConfiguration GuideRelease 6.2 007-011136-010Rev. A December 2015 Copyright 2015Gemalto NV All rights reserved. 31

2 [Step 2] Configure Your Network Settings
Recommended Network CharacteristicsDetermine whether your network is configured optimally for use of SafeNet appliances.
Bandwidth and Latency RecommendationBandwidth
• Minimum supported: 10Mb half duplex
• Recommended: at least 100Mb full duplex - full Gigabit Ethernet is supported
Note: Ensure that your network switch is set to AUTO negotiation, as the SafeNet appliancenegotiates at AUTO. If your network switch is set to use other than automatic negotiation, thereis a risk that the switch and the SafeNet appliance will settle on amuch slower speed than isactually possible in your network conditions.
Network Latency
• Maximum supported: 500ms
• Recommended: 0.5ms
About Latency and TestingSafeNet appliance client-server communication uses timeouts less than 30 seconds to determine failure scenarios.Thus the appliance does not tolerate network configurations or conditions that introduce a greater delay - problems canresult, especially with HA configurations.
Here is a description of one common cause of such a situation, and what you can do about it.
When you disconnect the network cable between any SafeNet appliance and a switch, and then reconnect, trafficshould resume immediately, but with certain network switch configurations it might take 30 seconds for traffic toresume.
The problem here is at the switch (and not the SafeNet appliance). Seehttp://www.cisco.com/warp/public/473/12.html#bkg for some descriptions of Cisco switches. If the switch isconfigured to run the Spanning Tree Protocol on the port (which appears to be the default configuration, at least forCisco switches), then there is a delay of about 30 seconds while it runs through a series of discovery commands andwaits for responses. The switches can be configured to run in “PortFast” mode in which the Spanning Tree Protocol stillruns on the port, but the port is placed directly into 'forwardingmode' and starts the traffic flowing immediately.
With the switch introducing a connection detection delay of 30 seconds or greater, transient network failures lastingonly seconds are no longer tolerated. A simple test is to set up a ping stream and then disconnect and reconnect thenetwork cable. The ping traffic should resume after a 1 or 2 second delay. A greater delay indicates that a switch in thenetwork is not detecting the reconnection as quickly as is optimal. See the recommendations for network Bandwidthand Latency.
Go to "Power-up the HSM Appliance" below .
Power-up the HSM ApplianceInstructions on this page assume that the HSM appliance has been installed, including
• power connections [We suggest that each of the two power supplies be connected to an independent electrical
SafeNet NetworkHSMConfiguration GuideRelease 6.2 007-011136-010 Rev. A December 2015 Copyright 2015Gemalto NV All rights reserved. 32

2 [Step 2] Configure Your Network Settings
source, and that at least one of those sources should be protected by UPS (uninterruptible power supply) andgenerator backup.],
• connection to your network [gigabit or 100megabit ethernet], and
• a null-modem serial connection between the HSM appliance's serial Console Port and your administrationcomputer or a terminal [recommended option - this is for convenience, during initial setup, so your administrativeconnection remains active when you assign new IP addresses; later, you would need a local serial link if you everneed to log in to the Recover account].
The following instructions require the HSM appliance to be connected and running.
Power On Instructions for the SafeNet Appliance On the back panel, ensure that the power supplies are connected and working - the green LED on each power supplyshould glow steadily .
If the appliance does not immediately begin to start up, press and release the START/STOP switch near the center ofthe back panel (marked with the symbol below). The HSM appliance begins to power up.
If the appliance was deliberately powered down, using the START/STOP switch or the "poweroff" command, then itshould remain off until you press the START/STOP switch. However, if power was removed while the system was on(either a power failure, or the power cable was disconnected - not good practice), then the system should restart withouta button press. This behavior allows unattended resumption of activity after power interruption. [In most cases, it isassumed that this would never be needed, as you would install the appliance with its two power supplies connected totwo completely separate, independent power sources, at least one of which would be battery-backed (uninterruptiblepower supply) and/or generator-backed.]
SafeNet NetworkHSMConfiguration GuideRelease 6.2 007-011136-010 Rev. A December 2015 Copyright 2015Gemalto NV All rights reserved. 33

2 [Step 2] Configure Your Network Settings
The “Network” LEDs glow or blink to indicate the exchange of traffic. The network LEDs do not illuminate if there is nonetwork connection (check your network cable connections on the back panel and at hub or switch). Here is asummary.
Ethernet connectorLED
State Indicated Indication
NIC 1 (Right) Activity status Green (Blinking): NIC1 activity detected
Off: NIC1 is not active, or LAN cable has noconnection
NIC 1 (Left) Speed range Orange: 1G
Green: 100M
Off: 10M/No connection
NIC 2 (Right) Activity status Green (Blinking): NIC2 activity detected
Off: NIC2 is not active, or LAN cable has noconnection
NIC 2 (Left) Speed range Orange: 1G
Green: 100M
Off: 10M/No connection
The front-panel LCD ( See "Front-panel Display" ) begins showing activity, then settles into the ongoing system statusdisplay, once the appliance has completed its boot-up and self-test activity.
Power OffTo power-off the HSM appliance locally, press and release the START/STOP switch. Do not hold it in. The HSMappliance then performs an orderly shutdown (that is, it closes the file system and shuts down services in proper orderfor the next startup). This takes approximately 30 seconds to complete. In the unlikely event that the system freezesand does not respond to amomentary “STOP” switch-press, then press and hold the START/STOP switch for fiveseconds. This is an override that forces immediate shutoff.
SafeNet NetworkHSMConfiguration GuideRelease 6.2 007-011136-010 Rev. A December 2015 Copyright 2015Gemalto NV All rights reserved. 34

2 [Step 2] Configure Your Network Settings
CAUTION: Never disconnect the power by pulling the power plug. Always use theSTART/STOP switch.
To switch off the HSM appliance from the lunash command line, use the command:
lunash:> sysconf appliance poweroff
Next, see "Open a Connection" below.
Open a ConnectionPerform your initial configuration via direct serial connection to the SafeNet appliance. Once network parameters areestablished, you can switch to an SSH session over your network.
Direct administration connection via serial terminal is themethod for initial configuration for the following reasons:
• The specific IP address, randomly assigned to your SafeNet appliance by an automated testing harness duringfinal factory testing, is unknown.
• Configuring network settings via SSH, in addition to requiring the original IP address, necessarily involves losingthat connection when a new IP is set.
• A direct serial connection is the only route to log into the "recover" account, in case you ever lose the appliance'sadmin password and need to reset. Therefore, you should verify, before you need it, that the connection works -performing the appliance's network configuration is an ideal test.
• Similarly, if you ever need to issue the hsm factoryreset command, youmust be connected through a localserial console for that command to be accepted.
To open a connection1. Connect a null-modem serial cable (supplied) between the serial port on the HSM appliance front panel and a dumb
terminal or a PC (for example a laptop) that will serve as the administration computer.
Note: A standard null-modem serial cable with DB9 connectors is included with the HSMappliance, as is a USB-to-serial adapter if needed. For security reasons, the USB port on theSafeNet Network HSM appliance recognizes only SafeNet HSMs and peripheral devices -therefore it is prohibited from supporting general USB operations and thus does not accept aserial console link; the 9-pin serial connector must be used.
2. Use a terminal emulation package provided with your operating system. Set the Serial connection parameters:
– Serial port baud rate: 115200
– N,8,1 (no parity, 8 data-bits, one stop-bit)
– VT-100 terminal emulation
– hardware flow control selected.
3. When the connection is made, the HSM appliance login prompt appears. [DEFAULTHOSTNAME]lunash:> The[DEFAULTHOSTNAME] is replaced by the new hostname that you assign to your HSM appliance, later in theseinstructions. The prompt changes the next time you start a secure command-line interface connection.
SafeNet NetworkHSMConfiguration GuideRelease 6.2 007-011136-010 Rev. A December 2015 Copyright 2015Gemalto NV All rights reserved. 35

2 [Step 2] Configure Your Network Settings
Note: Youmight need to press [ENTER] several times to initiate the session. Youmust log in within two minutes of opening an administration session, or the connectionwill time out.
Now that you have established a connection, go immediately to the next page to log in as “admin” and begin configuring.
Next, see "First Login and Changing Password" below.
First Login and Changing PasswordFollowing the instructions in the previous pages, you have already:
• gathered the necessary network and security information
• made a connection (preferably serial) between your administration computer and your HSM appliance.
When you have connected to the HSM Server, the onboard secure Command Line Interface ( with the lunash:> prompt)is independent of the platform (Linux, BSD, Windows, Solaris, HP-UX or AIX) that you used to connect (however, weassume that most lab/server rooms have a Linux orWindows PC available)
Password defaults
Admin (appliance) default password PASSWORD (via local serial link or via SSH)
Operator (appliance) default password PASSWORD (via local serial link or via SSH)
Monitor (appliance) default password PASSWORD (via local serial link or via SSH)
Recover account (appliance) default password PASSWORD (accessed via local serial link only)
To login to the appliance1. At the prompt, log in as “admin”. The initial password is “PASSWORD” (without the quotationmarks).
login as: admin admin@<hostname>’s password: PASSWORD
2. For security, you are immediately prompted to change the factory-default password for the ‘admin’ account.
SafeNet Network HSM 5.4.0-14 [Build Time: 20131223 11:55]
Authorized Use Only
[localhost] ttyS0 login: adminPassword:You are required to change your password immediately (root enforced)Changing password for admin(current) UNIX password:
You can now choose the new password.
A valid password should be a mix of upper and lower case letters,digits, and other characters. You can use an 8 character longpassword with characters from at least 3 of these 4 classes.An upper case letter that begins the password and a digit thatends it do not count towards the number of character classes used.
Enter new password:Re-type new password:
SafeNet NetworkHSMConfiguration GuideRelease 6.2 007-011136-010 Rev. A December 2015 Copyright 2015Gemalto NV All rights reserved. 36

2 [Step 2] Configure Your Network Settings
Last login: Mon Jan 30 11:24:00 from 172.20.10.180
SafeNet Network HSM 5.4.0-14 Command Line Shell - Copyright (c) 2001-2013SafeNet, Inc. All rights reserved.
Command Result: 0 (Success)[local_host] lunash:>
(The above represents a local serial connection; text will differ slightly for an SSH connection)
Note: The username and passwords are case-sensitive.
Note: To protect the HSM appliance and its HSM from vulnerabilities due to weak passwords,new passwords must be at least eight characters in length, andmust include characters from atleast three of the following four groups:– lowercase alphabetic (abcd...xyz)– uppercase alphabetic (ABCD...XYZ)– numeric (0123456789)– special (non-alphanumeric, -_!@#$%&*...)
Note: Youmust login within twominutes of opening an administration session, or theconnection will time out.
3. Record the new password on a worksheet.
CAUTION: Keep your passwords secure, as you would for any device.
Note: If you forget your password, you can use a local serial connection to login to the Recoveraccount. See "Forgotten Passwords".
After successful login, the HSM appliance presents the lunash prompt. Just type "?" or "help" and press [Enter] for asummary of themain commands. Type "?" followed by any of the commands, with or without parameters, and press[Enter] to see a summary of sub-commands and parameters for that command.
Example – lunash Commandlunash:>?
The following top-level commands are available:
Name (short) Description--------------------------------------------------------------------------------help he Get Helpexit e Exit Luna Shellclient c > Clienthsm hs > Hsmhtl ht > Htlmy m > Mynetwork ne > Networkntls nt > Ntlspackage pac > Package
SafeNet NetworkHSMConfiguration GuideRelease 6.2 007-011136-010 Rev. A December 2015 Copyright 2015Gemalto NV All rights reserved. 37

2 [Step 2] Configure Your Network Settings
partition par > Partitionservice se > Servicestatus sta > Statusstc stc > Secure Trusted Channelsysconf sysc > Sysconfsyslog sysl > Syslogtoken t > Tokenuser u > User
Keywords which must be used as the first argument on the command line.
Type "help" (without the double quotes) followed by a command name for further information.For example: type "help help" for help on the help command.Note that a question mark ("?") can be used as an alias for "help".
Command Result : 0 (Success)
Go to "Set the System Date and Time" below
Set the System Date and TimeBefore proceeding with HSM andHSM Partition setup, ensure that the HSM Server’s system date, time and timezoneare appropriate for your network. Setting correct system time is important because the next step is to generate yourown server certificate. The certificate becomes valid at the time of its creation, which is recorded as part of thecertificate, as aGMT value. If your local time is set with an inappropriate local timezone, then the GMT time on thecertificate could be incorrect by several hours. When other systems (clients) attempt to reference your certificate, theymight find that it has not yet become valid.
To set the date and time1. First, verify the current date and time on the HSM Server, to see if they need to change.
At the lunash prompt, type the command:
lunash:> status date
which returns the current settings of date, time and timezone.
If desired,lunash:> status timeand/orlunash:> status zonecan also be used.
2. If the date, time, or timezone are incorrect for your location, change them using the lunash sysconf command.For example:lunash:> sysconf timezone set Canada/EasternTimezone set to Canada/Eastern
Note: Youmust set the timezone before setting the time and date, otherwise the timezonechange adjusts the time that you just set.
SafeNet NetworkHSMConfiguration GuideRelease 6.2 007-011136-010 Rev. A December 2015 Copyright 2015Gemalto NV All rights reserved. 38

2 [Step 2] Configure Your Network Settings
Note: For a new SafeNet Network HSM appliance, or for one that has been factory reset, thesteps occur in the order presented here [set the date and time, configure the IP, generate certs,connect, initialize the HSM...]. However, if the SafeNet Network HSM has been used before,then it might have been initialized with the option ."-authtimeconfig", which requires that theSO/HSM-Admin be logged in before you are allowed to set time/timezone. If that is the case,then you will need to log in with the old SO credentials, or initialize the HSM first, before youcan set time and timezone.
Timezone CodesA list of timezone codes is provided in theAppliance Administration Guide.
If a code is depicted in the list as amajor name (such as Canada) followed by a list of minor names (such as citynames), then you write themajor name, followed by a forward slash (“/”) followed by theminor name.
The code that youmust apply from the list in the appendix may not look exactly like the code displayed by“status date”. For example, “status date” shows EDT (i.e., Eastern Daylight Time), but to set that youmust type "EST5EDT", or “Canada/Eastern” or “America/Montreal” – a number of values produce the samesetting.
3. Use sysconf time to set the system time and date, <HH:MM YYYYMMDD> in the format shown.
Note that the time is set on a 24-hour clock (00:00 to 23:59).lunash:> sysconf time 12:55 20140410Sun April 10 12:55:00 EDT 2014
Possible alternate scenarioWhile attempting to set the time or zone, youmight encounter amessage saying that youmust log into the HSM first.lunash:>sysconf timezone set Europe/LondonThis HSM has been initialized to require that the SO is logged inprior to running this command.Verifying that the SO is logged in...The SO is not currently logged in. Please login as SO and try again.
That message appears only if the HSM has been previously initialized with the "-authtimeconfig" option set. The work-around at this stage is to run the command hsm init -label <yourlabeltext> without the "-authtimeconfig"option, which releases that flag. That is, you can just skip ahead in these instructions and perform your intendedinitialization out of order, and then set the appliance time and zone, and carry on.We chose an order for theseconfiguration instructions that is usually convenient and easy to understand, but having the system time set beforeinitializing is not required. You can perform those actions out of order. It is important to have the time set before youcreate certificates, later on.
SafeNet NetworkHSMConfiguration GuideRelease 6.2 007-011136-010 Rev. A December 2015 Copyright 2015Gemalto NV All rights reserved. 39

2 [Step 2] Configure Your Network Settings
Network Time Protocol [optional]To use NTP, add one or more servers to the HSM appliance's NTP server list, and then activate (enable) the servers.Use the sysconf ntp command as follows:
Add serverslunash:> sysconf ntp addserver <hostnameoripaddress>
Activate serverslunash:> sysconf ntp enable
Note: If you wish to use Network Time Protocol (NTP), youmust set the system time to within20minutes of the time given by the servers that you select. If the difference between NTPserver time and the HSM appliance time is greater than 20minutes, the NTP daemon ignoresthe servers and quits.
Drift correction for the system clockIf you require that your appliance's system clock be as correct as is practical, but are unable to use NTP for themostaccurate timekeeping possible, then youmight wish to use the system's clock-drift correction protocol. See "CorrectingTimeDrift" on page 1 in theAppliance Administration Guide for further information.
Go to "Configure the IP Address and Network Parameters" below.
Configure the IP Address and Network ParametersThe HSM appliance is pre-configured with network settings left over from ourmanufacturing process and notrecommended for your production network. The following procedure assumes that your network uses DNS. If you areconfiguring without a DNS server available, some of the commands on this and subsequent pages might be affected.
The SafeNet Network HSM supports port bonding, which allows you to bond eth0 and eth1 into a single port, bond0, toprovide redundancy. See "SafeNet Network HSM Appliance Port Bonding" on page 1 for configuration instructions.
Note: Use a locally connected serial terminal when changing the appliance IP address, toavoid SSH admin console disconnection due to the change.
1. Use the network show command to display the current settings, to see how they need to bemodified for yournetwork.lunash:>network show
Hostname: "mylunasa6"Domain: "amer.sfnt.local"
IP Address (eth0): 172.20.17.200HW Address (eth0): 00:15:B2:A1:AC:00Mask (eth0): 255.255.255.0Gateway (eth0): 172.20.17.10
Name Servers: 172.20.10.20 172.16.2.14Search Domain(s): amer.sfnt.local sfnt.local
SafeNet NetworkHSMConfiguration GuideRelease 6.2 007-011136-010 Rev. A December 2015 Copyright 2015Gemalto NV All rights reserved. 40

2 [Step 2] Configure Your Network Settings
Kernel IP routing tableDestination Gateway Genmask Flags Metric Ref Use Iface172.20.17.0 0.0.0.0 255.255.255.0 U 0 0 0 eth00.0.0.0 172.20.17.10 0.0.0.0 UG 0 0 0 eth0
Link statuseth0: Configured
Settings for eth0:Supported ports: [ TP ]Supported link modes: 10baseT/Half 10baseT/Full
100baseT/Half 100baseT/Full1000baseT/Full
Supports auto-negotiation: YesAdvertised link modes: 10baseT/Half 10baseT/Full
100baseT/Half 100baseT/Full1000baseT/Full
Advertised auto-negotiation: YesSpeed: 100Mb/sDuplex: FullPort: Twisted PairPHYAD: 2Transceiver: internalAuto-negotiation: onSupports Wake-on: pumbgWake-on: gCurrent message level: 0x00000007 (7)Link detected: yes
eth1: Not configured
Command Result : 0 (Success)
2. Use network hostname to set the hostname of the HSM appliance (use lowercase characters).lunash:> network hostname myluna3
Note: To access the HSM appliance, the hostnamemust be resolvable to an IP address onyour network. See your Network Administrator for assistance with completing this step.
Note: The net hostname command expects a single-word text string. If you supply a name thatincludes a space, all text after the space is ignored. For example, if you typed: nethostname host name the system would assign a hostname of “host”. Therefore, if youwant "host name", use "host_name" or "host-name" or "hostname" or similar.
Note: Enter ameaningful hostname to allow you to identify andmanagemultiple SafeNetappliances in your network.
3. Use network domain to set the name of the network domain in which the HSM Server (appliance) is to operate.lunash:> net domain safenet-inc.com
4. Use ‘network dns add nameserver’ to set the Nameserver IP Address (address for the local name server).lunash:> net dns add nameserver 192.168.1.3
SafeNet NetworkHSMConfiguration GuideRelease 6.2 007-011136-010 Rev. A December 2015 Copyright 2015Gemalto NV All rights reserved. 41

2 [Step 2] Configure Your Network Settings
(substitute an appropriate address for the example; ask your Network Administrator).
Note: Your network could havemultiple DNS name servers. Repeat this step for any additionalname servers.
Note: This commandmanually sets a DNS parameter for the HSM appliance. If you elect touse a DHCP server (see the net -interface command later in this section) rather than static IP,then this parameter is overwritten for the HSM appliance. In general, we strongly recommendagainst using DHCP for HSM appliances.
5. Use net dns add searchdomain to set the DNS Search Domain (the search list to be used for hostnamelookups).lunash:> net dns add searchdomain safenet-inc.com
Note: Setting the Search Domain is important so that you can use short names for your clientmachines.
Note: Your network could havemultiple DNS search domains. Repeat this step to add allsearch domains.
Note: This commandmanually sets a DNS parameter for the HSM appliance. If you elect touse a DHCP server (see the net -interface command later in this section) rather than static IP,then this parameter is overwritten for the SafeNet Network HSM.
6. Use network interface to change network configuration settings.
All of the network interface parameters are required for the IP setup of the ethernet device, andmust be setat the same time for the HSM appliance to connect with your network. lunash:>net interface -device eth0 -ip 192.168.11.82 -netmask 255.255.0.0 -gateway 192.168.1.1
Use addresses andmask values as provided by your network administrator.
Note: The first [top] ethernet port (eth0) and the [bottom] ethernet port (eth1) on the HSM
appliance's back panel, are labeled1 /2If you choose to configure the second ethernet port (eth1), repeat the network interface command, above,substituting ‘eth1’ and the appropriate address for that device. Even if you do not have a need for the second ethernetport, you should configure it, specifically to a test network (e.g., network interface –device eth1 –ip192.168.1.254 –netmask 255.255.255.0) so that it does not affect the behavior of other SafeNet features(e.g., remote PED).
SafeNet NetworkHSMConfiguration GuideRelease 6.2 007-011136-010 Rev. A December 2015 Copyright 2015Gemalto NV All rights reserved. 42

2 [Step 2] Configure Your Network Settings
Note: If either interface is configured to use DHCP, then the DNS parameters are overwrittenfor the entire HSM appliance. It is not possible to havemanual settings preserved for oneinterface, while DHCP-derived settings are used for the other. In general, we recommendagainst using DHCP for HSM appliances.
Note: If you have chosen to perform setup via ssh, rather than via the direct (serial)administrative connection, then you will likely lose your network connection at this point, as youconfirm the change of IP address from the default setting.
View the new network settings with network show.lunash:> network show
The network show command (described earlier) displays the current settings, so you can verify that they are nowcorrect for your environment before attempting to use them.
(Next, go to "Make Your Network Connection" below )
Make Your Network ConnectionIf you have been connecting via serial terminal, and the direct administration connection, to configure the HSM Server,you can now make an ethernet connection to your network.
To make a network connection to the appliance1. Connect the ethernet cable to the upper ethernet port on the HSM appliance back panel and use ssh to open a
session on the HSM appliance.
2. Login as admin.
3. Verify correctness of your network setup by pinging another server (with the lunashnet ping <servername> command) and having the other server ping this HSM appliance.Try pinging by IP address, if pinging by hostname is not successful. If your company uses nameservers, but youare unable to ping by hostname, then verify the “Name Servers” displayed by net show.
Note: Some networks might be configured to reject ICMP ping requests, to prevent certaintypes of network attacks. In such a case, the ping commandwill fail, even if the HSM applianceis correctly configured. Consult with your network administrator.
4. Verify your Client’s network configuration by attempting to ping the HSM appliance by hostname and by IPaddress, from the Client. Repeat for each Client where the Client Software was installed.
[OPTIONAL]Once you know your network setup is correct, you can invoke network time protocol. To use NTP,youmust add one or more servers to the HSM appliance's NTP server list, and then activate (enable) the servers.Use the sysconf ntp command as follows:
Add serverslunash:> sysconf ntp addserver <hostname-OR-ipaddress>
Activate serverslunash:> sysconf ntp enable
SafeNet NetworkHSMConfiguration GuideRelease 6.2 007-011136-010 Rev. A December 2015 Copyright 2015Gemalto NV All rights reserved. 43

2 [Step 2] Configure Your Network Settings
If you then check your NTP status with sysconf ntp status, youmight see immediate success (return code 0), or youmight get an error message like this...
[myLuna] lunash:>sysconf ntp status NTP is running NTP is enabled
Peers: ============================================================================== remote refid st t when poll reach delay offset jitter ============================================================================== *LOCAL(0) .LOCL. 10 l 8 64 1 0.000 0.000 0.000 time-c.timefreq .ACTS. 1 u 7 64 1 78.306 -55560. 0.000 ============================================================================== Associations: ============================================================================== ind assid status conf reach auth condition last_event cnt =========================================================== 1 21859 963a yes yes none sys.peer sys_peer 3 2 21860 9024 yes yes none reject reachable 2 ============================================================================== NTP Time: ============================================================================== ntp_gettime() returns code 0 (OK)time d1504c28.95777000 Wed, Apr 14 2014 12:22:00.583, (.583854), maximum error 7951596 us, estimated error 0 us ntp_adjtime() returns code 0 (OK) modes 0x0 (), offset 0.000 us, frequency 0.000 ppm, interval 1 s, maximum error 7951596 us, estimated error 0 us, status 0x1 (PLL), time constant 2, precision 1.000 us, tolerance 512 ppm, ==============================================================================
Command Result : 0 (Success)[myLuna] lunash:>[
Note: The return code "5 (ERROR)" indicates a gap between your system time and the NTPserver's time. You can expect one of two outcomes:
- if the initial time-gap between your appliance and the server is greater than twenty minutes,the appliance gives up and never synchronizes with that server
- if the initial time-gap is less than twenty minutes, the appliance synchronizes with the server,slowly, over several minutes; this ensures that there is no sudden jump in system time whichwould be unwelcome in your system logging.
When your connection is working , go to "Generate a New HSM Server Certificate" on the next page".
SafeNet NetworkHSMConfiguration GuideRelease 6.2 007-011136-010 Rev. A December 2015 Copyright 2015Gemalto NV All rights reserved. 44

2 [Step 2] Configure Your Network Settings
Generate a New HSM Server CertificateAlthough your HSM appliance camewith a server certificate, good security practice dictates that you should generate anew one.
To generate a new server certificate1. Use sysconf regenCert to generate a new Server Certificate:
The command sysconf regenCert (with no IP address appended) is suitable if your network is using DNS and,during the execution of the regeneration command, the HSM appliance is able to retrieve correct DNS informationabout itself. If DNS is not used, or it does not know about the HSM appliance, an invalid certificate will begenerated that prevents NTLS running later.
In situations where DNS is not used or contains unreliable information, use this form of the command "sysconfregenCert <ip_of_hsm_appliance>" to generate a usable NTLS certificate.
Sysconf regenCert (without the IP argument) populates the CN field of the server's certificate with the unqualifiedhostname of the appliance. If the appliance is set up correctly for use in a DNS environment, then it will work. Thecommand does not check.
Sysconf regenCert with the IP argument results in a certificate with the appliance's IP address in the CN field.
Using SafeNet Network HSMwith the link configured for IP-only speeds the NTLS client connection lookup, andbypasses such potential issues as transient DNS lookup failures and typing errors.lunash:>sysconf regencert
WARNING !! This command will overwrite the current server certificate and private key.All clients will have to add this server again with this new certificate.
If you are sure that you wish to proceed, then type 'proceed', otherwise type 'quit'
> proceedProceeding...
ERROR. Partition named "Cryptoki User" not found
'sysconf regenCert' successful. NTLS and STC must be (re)started before clients can connect.
Please use the 'ntls show' command to ensure that NTLS is bound to an appropriate networkdevice or IP address/hostnamefor the network device(s) NTLS should be active on. Use 'ntls bind' to change this binding ifnecessary.
Command Result : 0 (Success)
2. From the factory, the network trust link service (NTLS) is bound to the loopback device, by default. In order to usethe appliance on your network, youmust bind the NTLS to one of the two Ethernet ports, ETH0 or ETH1, or to ahostname or IP address. You can use the ntls show command to see current status.
Use ntls bind to bind the service:[luna23] lunash:>ntls bind eth0
Success: NTLS binding network device eth0 set.
NOTICE: The NTLS service must be restarted for new settings to take effect.
If you are sure that you wish to restart NTLS, then type 'proceed', otherwise
SafeNet NetworkHSMConfiguration GuideRelease 6.2 007-011136-010 Rev. A December 2015 Copyright 2015Gemalto NV All rights reserved. 45

2 [Step 2] Configure Your Network Settings
type 'quit'
> proceed
Proceeding...
Restarting NTLS service...
Stopping ntls: [ OK ]
Starting ntls: [ OK ]
Command Result : 0 (Success)
[luna23] lunash:>
Or, an example using an IP address:[myluna] lunash:>ntlsbind eth0 -bind 192.20.10.96Success: NTLS binding hostname or IP Address 192.20.10.96 set.NOTICE: The NTLS service must be restarted for new settings to take effect.If you are sure that you wish to restart NTLS, then type 'proceed', otherwise type 'quit'> proceedProceeding...Restarting NTLS service...Stopping ntls: [ OK ]Starting ntls: [ OK ]Command Result : 0 (Success)[myluna] lunash:>ntls showNTLS bound to network device: eth0 IP Address: "192.20.10.96" (eth0)Command Result : 0 (Success)
Note: The “Stopping ntls” operationmight fail in the above example, because NTLS is not yetrunning on a new HSM appliance. Just ignore themessage. The service starts again, whetherthe stop was needed or not.
If you have been following the instructions in these pages as part of setting up a new HSM appliance then the next stepis to initialize the HSM on your SafeNet Network HSM appliance. Choose one of the following links, according to thetype of HSM appliance that you have:
• "Initializing a Password Authenticated HSM" on page 49.
• "Initializing a PED-Authenticated HSM" on page 54.
SafeNet NetworkHSMConfiguration GuideRelease 6.2 007-011136-010 Rev. A December 2015 Copyright 2015Gemalto NV All rights reserved. 46

3[Step 3] Initialize the HSM
In this chapter you will initialize your HSM. To initialize an HSM is to prepare it for operation under the control of anHSM Security Officer or SO (the entity that administers the HSM).
Password-Authenticated versus PED-Authenticated HSMsThe HSM is available in PED-authenticated or password-authenticated versions. Follow the initialization steps in thischapter to initialize the type of HSM that you have purchased.
There is no externally visible difference between a password-authenticated or PED-authenticated HSM. For aninstalled HSM, you can determine its mode of authentication by attempting to log in. A PED-authenticated version willdirect you to the SafeNet PED. A Password Authenticated version will prompt you for the password. You cannotchange the authentication type of a SafeNet HSM. It is amanufacturing configuration, set at the factory. If you have aPED-authenticated version, you cannot access the HSM and partitions by means of passwords.
For password-authenticated HSMs, you authenticate to the HSM as Security Officer, or Crypto Officer, or User, etc.,by typing a password on your computer keyboard.
For PED-authenticated HSMs, you authenticate to the HSM as Security Officer, or Crypto Officer, or User, etc., bypresenting an iKey PED Key device that contains the authentication.
Which kind do I have?SafeNet HSMs are shipped from the factory as one or the other type. This is not a field-changeable setting. If you arenot sure which kind you have, verify the type of HSM with the command
hsm displayLicenses in lunash.
That command is one of several non-sensitive HSM commands that does not require HSM authentication. The outputlists the configuration packages (additions to the basic build) that make up your SafeNet HSM. Look for the term FIPS3appearing in that list to indicate that your SafeNet HSM is PED Authenticated - otherwise, your HSM is PasswordAuthenticated.
See a comparison of Password-authenticated versus PED-authenticated at "Comparing Password and PEDAuthentication" on page 1.
What if I make a mistake about the type of authentication I present?No harm. Offering the wrong kind of authentication is not harmful - the only result is a brief delay. However, offering thewrong authentication of the correct type starts the counter for "bad login" attempts. The following paragraphs offer alittle more detail.
As a general rule, when you attempt to login to the HSM or to issue any command that requires authentication, thecommand-line prompts you for the needed authentication. If yours is a Password Authenticated HSM, you are asked forthe password, and the command eventually times out if the password is not given. (Of course, if you provide a wrong
SafeNet NetworkHSMConfiguration GuideRelease 6.2 007-011136-010Rev. A December 2015 Copyright 2015Gemalto NV All rights reserved. 47

3 [Step 3] Initialize the HSM
password, that is applied against the count of bad login attempts. However, connecting a PED and offering a PED Keyto a Password Authenticated HSM has no effect; it is ignored.)
If yours is a PED Authenticated (Trusted Path) HSM, the prompt asks you to attend to the PED for further instructions.If a PED is not connected and/or you don't supply the appropriate PED Keys and keypad actions, the commandeventually times out. (If you do have a PED connected and supply the wrong PED Key [of the type requested], thenthat action is applied against the count of bad login attempts. However, if youmistakenly provide a password [at thecommand-line] for a PED Authenticated SafeNet HSM, that password is ignored and the bad-login-attempt count is notincremented.)
In either case, just wait for the timeout (a few minutes) to conclude, then begin again, using the correct authenticationmethod.
Note: We recommend that you read through the pages in the Configuration Guide at least oncein advance of starting the procedure, so that you can resolve any questions before beginningany time-limited operations. For a Password Authenticated SafeNet HSM, you should havepasswords already determined according to your organization's security policies. For a PEDAuthenticated SafeNet HSM, you should have a SafeNet PED connected, and an appropriateset of PED Keys available.
If this is your only PED Authenticated SafeNet HSM, then you should have received a PED and PED Keys along withthe HSM/appliance. If you have other PED Authenticated units at your location, then you can use a PED from one ofthem.
High-Level Configuration Steps1. Initialize the HSM. Choose one or the other of:
a. "About Initializing a Password Authenticated HSM"
b. "About Initializing a PED Authenticated HSM"
2. Change the HSM policies, if desired, as described in
"[Step 4] Set the HSM Policies" on page 69
If any of the policies you set are destructive, youmust re-initialize the HSM after setting the polices.
3. Create a partition on the HSM, as described in
"[Step 5] Create Application Partitions" on page 75
4. Change the partition policies, if desired, as described in "Setting SafeNet PCI-E HSM Partition Policies [Optional]"on page 1.
SafeNet NetworkHSMConfiguration GuideRelease 6.2 007-011136-010 Rev. A December 2015 Copyright 2015Gemalto NV All rights reserved. 48

3 [Step 3] Initialize the HSM
About Initializing a Password-Authenticated HSMIn this section, you initialize the HSM portion of the SafeNet appliance, and set any policies that you require. In normaloperation, you would perform these actions just once, when first commissioning your SafeNet appliance.
Note: Perform initialization only after you have set the system-level parameters (time, date,timezone, use of NTP (Network Time Protocol), etc.) , and configured network and IP settingsto work with your network.
Initialization prepares the HSM for use by setting up the necessary identities, ownership and authentication that are tobe associated with the HSM. Youmust initialize an HSM one time before you can generate or store objects, allowclients to connect, or perform cryptographic operations.
Once you have initialized an HSM, you would return to this section only to clear an entire HSM and all its contents andHSM Partitions, by re-initializing.
Go to "Initializing a Password Authenticated HSM" below.
Initializing a Password Authenticated HSMInitialize the HSM to set up the necessary identities, ownership and authentication on the HSM. This is required beforeyou can create Partitions and use the HSM.
Start the Initialization ProcessThe hsm init command takes several options.
See "hsm init" on page 1 in the Lunash CommandReference.
For an HSMwith Password Authentication, you need to provide a label, password, and cloning domain. The only onethat you should type at the command line is the label. The password and cloning domain can be typed at the commandline, but this makes them visible to anyone who can see the computer screen, or to anyone who later scrolls back inyour console or ssh session buffer.
If you omit the password and the domain, the system prompts you for them, and hides your input with "*" characters.This is preferable from a security standpoint. Additionally, you are prompted to re-enter each string, thus helping toensure that the string you type is the one you intended to type.
LabelThe label is a string of up to 32 characters that identifies this HSM unit uniquely. A labeling convention that conveyssome information relating to business, departmental or network function of the individual HSM is commonly used.
HSM passwordThe HSM password is a password for the HSM Security Officer (SO).
For proper security, it should be different from the appliance admin password.
It should employ standard password-security characteristics:
• at least 8 characters,
• not easily guessable (therefore, no words that occur in any dictionary)
• no dates like birthdays or anniversaries, no proper names
• should includemiXEd-CAse letters, numbers, special (non-alphanumeric, -_!@#$%&*...).
SafeNet NetworkHSMConfiguration GuideRelease 6.2 007-011136-010 Rev. A December 2015 Copyright 2015Gemalto NV All rights reserved. 49

3 [Step 3] Initialize the HSM
Cloning domainThe cloning domain is a shared identifier that makes cloning possible among a group of HSMs. Cloning is required forbackup or for HA. Cloning cannot take place between HSMs that do not share a common domain.
Always specify a cloning domain when you initialize a Password Authenticated SafeNet HSM in a productionenvironment. The HSM allows you to specify "defaultdomain" at initialization, the 'factory-default' domain. This isdeprecated, as it is insecure. Anyone could clone objects to or from such an HSM. The default domain is provided, forthe time being, for benefit of customers who have previously used the default domain. When you prepare a SafeNetHSM to go into service in a real "production" environment, always specify a proper, secure domain string when youinitialize.
Initialize a Password Authenticated HSMType the hsm init command at the prompt, supplying a text label for the new HSM.lunash:> hsm -init -label myLuna> Please enter a password for the security officer> ********Please re-enter password to confirm:> ********Please enter the cloning domain to use for initializing thisHSM :> ********Please re-enter domain to confirm:> ********CAUTION: Are you sure you wish to re-initialize this HSM?All partitions and data will be erased.Type 'proceed' to initialize the HSM, or 'quit'to quit now.>proceed‘hsm - init’ successful.
When activity is complete, the system displays a “success” message.
You have initialized the HSM and created an HSM SO identity, which is an additional capability set, overlaid on theHSM appliance administrator identity.
• Appliance “admin” alone can use lunash to perform some administrator operations on the HSM server, such asnetwork configuration, but cannot access the HSMwithout additional authentication
• HSM SO (equivalent to the Cryptoki “Security Officer” or “SO”) can administer the HSM, but requires that thesystem “admin” be logged in first (same ssh session), before HSM Admin can login.
In order to perform all possible administrative functions on the HSM appliance, youmust have both the “admin”password for lunash and the HSM Admin authentication.
You are ready to adjust HSM Policies (if desired) and begin creating HSM Partitions for your Client's applications touse.
"Set HSM Policies (Password Authentication)" on page 69
SafeNet NetworkHSMConfiguration GuideRelease 6.2 007-011136-010 Rev. A December 2015 Copyright 2015Gemalto NV All rights reserved. 50

3 [Step 3] Initialize the HSM
About Initializing a PED-Authenticated HSMIn this section, you initialize the HSM portion of the SafeNet appliance, and set any policies that you require. In normaloperation, you would perform these actions just once, when first commissioning your SafeNet appliance.
Note: Perform initialization only after you have set the system-level parameters (time, date,timezone, use of NTP (Network Time Protocol), etc.) , and configured network and IP settingsto work with your network.
...but there's an exception ...The statement above applies reliably to a new SafeNet Network HSM appliance, or one thathas been factory reset. One of the options when initializing an HSM is to forbid changing oftime/timezone without HSM login (hsm init -label myluna -authtimeconfig). Ifyoumake that choice, then it remains in force until you change it. Therefore, if you are followingthese steps for a SafeNet Network HSM appliance that is not fresh from the factory, or freshlyfactoryReset, then youmight need to take these instructions slightly out of order and performtime-related setting changes after you initialize, rather than before.
Initialization prepares the HSM for use by setting up the necessary identities, ownership and authentication that are tobe associated with the HSM. Youmust initialize an HSM one time before you can generate or store objects, allowclients to connect, or perform cryptographic operations.
If you have not used SafeNet HSMs and PED Keys before, please read the sub-section ""PED Key ManagementOverview" on page 1" in theAdministration Guide, before you start initializing.
Once you have initialized an HSM, you would return to this section only to clear an entire HSM and all its contents andHSM Partitions, by re-initializing.
If you received your SafeNet HSM in Secure Transport Mode, then a preliminary step is required before you caninitialize; see "Recover the SRK".
Otherwise, go directly to "Initializing a PED-Authenticated HSM" on page 1.
Recover the SRK
Note: This step is required only if your HSM was shipped in Secure Transport Mode. If not,then proceed to Initializing the HSM. You can read this page later if you choose to enable SRKand/or to invoke Secure Transport Mode at some future time.
PED-authenticated SafeNet HSMs can be shipped from the factory in Secure Transport Mode (your option, at the timeyou place your order). In this mode, and similar to the state following an HSM tamper event, theMaster Tamper Key(MTK) is invalidated.
Here is a brief summary of how MTK and STM (secure transport) are related.
By default, two pieces of data are stored separately on the HSM, that can be brought together by the HSM to recreatetheMaster Tamper Key, which encrypts all HSM content.
If the HSM has both recovery pieces of theMaster Tamper Key on-board, then:
1. It recovers theMTK automatically following any tamper event, when the HSM is restarted. The HSM can carry onimmediately.
SafeNet NetworkHSMConfiguration GuideRelease 6.2 007-011136-010 Rev. A December 2015 Copyright 2015Gemalto NV All rights reserved. 51

3 [Step 3] Initialize the HSM
2. You cannot place the HSM in Secure Transport Mode (a form of controlled, intentional tamper).
You have the option tomove one of the recovery pieces of theMaster Tamper Key off-board, in the form of the SecureRecovery Vector which gets imprinted on a purple Secure Recovery Key or SRK). If you choose to generate the SRK,then:
3. The HSM retains only one piece of the recovery data and does not recover theMTK automatically following atamper event, even after restart, until you provide the external piece (the purple key). This gives you control andoversight over tamper events. Your personnel must be aware andmust respond before the HSM is allowed torecover from a tamper.
4. With one of the pieces stored externally, you can set the HSM into Secure Transport Mode, and it can recover fromSTM only when that purple PED Key is presented - this is what we do at the factory if you request that we ship inSTM. Then we ship you the purple key by a separate channel.
Before you can begin configuring and using the HSM, youmust recover the SRK.
The SRK external secret is held on the purple SRK PED Key(s), shipped to you separately from the HSM.
With the SafeNet Network HSM powered and connected to a SafeNet PED, and also connected to a computer havingthe SafeNet Client software installed (using local serial connection, or ssh session over the network), log in asappliance 'admin'. Verify that the HSM is in "Hardware tampered" or "Transport mode" state.lunash:> hsm srk showSecure Recovery State flags:=============================== External split enabled: yesSRK resplit1 required: noHardware tampered: noTransport mode: yes
Command Result : No Errorlunash:>
Recover the srk with the command
lunash:> hsm srk transportMode recover
With the SafeNet HSM powered and connected to a SafeNet PED, verify that the HSM is in "Hardware tampered" or"Transport mode" state.
lunacm:> srk showSecure Recovery State flags:=============================== External split enabled: yesSRK resplit2 required: noHardware tampered: noTransport mode: yes
Command Result : No Errorlunash:>
1[ or "re-split" ] split the MTK secret into a new internal and external recovery vectors, and install the new external portion [theSecure Recovery Vector or SRV] on a new purple PED Key - renders the previous SRV, and any external split of the previousSRV on a purple (SRK) PED Key useless.2[ or "re-split" ] split the MTK secret into a new internal and external recovery vectors, and install the new external portion [theSecure Recovery Vector or SRV] on a new purple PED Key - renders the previous SRV, and any external split of the previousSRV on a purple (SRK) PED Key useless.
SafeNet NetworkHSMConfiguration GuideRelease 6.2 007-011136-010 Rev. A December 2015 Copyright 2015Gemalto NV All rights reserved. 52

3 [Step 3] Initialize the HSM
Recover the srk with the command
lunash:> hsm srk transportMode recover
Refer to the SafeNet PED and follow the prompts to insert the purple PED Key, enter responses on the PED keypad,etc. During the process, a validation string is shown. You should have received your HSM's validation string byseparatemail. Compare that to the string that you see during SRK recovery. They shouldmatch. If so, acknowledgethematch when requested, and the recovery process concludes with the SRK recreated on the HSM.
When the SRK has been used to recover theMTK on the HSM, the HSM is still in zeroized state, but you can nowcontinue to the next configuration step, initializing the HSM.
Urgent SRK ActionAs long as the SRK (purple PED Key) remains valid, it is tied to that HSM and there is risk if it is mishandled or lost. Ifyou do not need to have an external split (the SRV) of theMTK recovery key component, you should immediatelyperform an srk disable operation to bring the external split back into the HSM. Do not overwrite (or lose) the purplePED Key while it contains a valid SRV, unless you have copies.
Some security regimes require that the SRV remains external to the HSM, on an SRK (purple PED Key) to enforcespecific, hands-on, oversight and recovery actions, in the case of a tamper event at the HSM. In that case, keep theexternal split and handle with care (including having on-site and off-site backup copies, just as you would with theSecurity Officer (blue) PED Key). You are not "done" with a purple PED Key until its contents have been returned to itsHSM with srk disable.
Re-split the SRKYou have the option to re-split the SRK at any time - you need the current external SRK split (the purple PED Key(s)) toinitiate the action. The purpose would be to ensure that the SRK for your HSM is secure and that you have the onlycopies of the external portion of the secret. That is, by re-splitting at your convenience, you remove the risk thatsomebody kept a copy of the purple PED Key before they sent your HSM to you. Any copy of the previous secretbecomes useless when a re-split operation is performed. Similar logic applies if a copy of your new SRK goes missing(or is thought to have been compromised) - a re-split/regeneration of the secure recovery vector onto a new external key(SRK) or keys renders the lost/stolen/compromised SRK useless to anyone.
Other Uses of the SRKThe SRK is also used to recover from a real tamper event on the HSM or its appliance.
The steps are the same as above, except that the HSM resumes granting access with its contents intact - [re-]initialization is not required.
You can set the HSM to Secure Transport Mode before placing it into storage, or before shipping to your organization'sremote location, or before shipping to your customer (offering them the same Secure Shipping option as is availablefrom SafeNet).
If you have just received an HSM from SafeNet in Secure Transport Mode, and recovered from STM, your next stepshould be to initialize the HSM. Go to "Initializing a PED-Authenticated HSM" on the next page.
See also "re-split required".
To view a table that compares and contrasts various "deny access" events or actions that are sometimes confused,see "Comparison of destruction/denial actions".
SafeNet NetworkHSMConfiguration GuideRelease 6.2 007-011136-010 Rev. A December 2015 Copyright 2015Gemalto NV All rights reserved. 53

3 [Step 3] Initialize the HSM
Initializing a PED-Authenticated HSMYour SafeNet HSM arrives in "Zeroized" state, and in a default, pre-initialized condition (see below). It might also be inSecure Transport Mode, if you selected that option at purchase time.
In this section, you initialize the HSM portion of the SafeNet appliance, and set any policies that you require. In normaloperation, you would perform these actions just once, when first commissioning your SafeNet appliance.
Note: Perform initialization only after you have set the system-level parameters - time, date,timezone, use of NTP (Network Time Protocol), etc. - and configured network and IP settingsto work with your network.
Exception: The statement (above) applies to a new SafeNet Network HSM appliance, or onethat has been factory reset. One of the options when initializing an HSM is to forbid changing oftime/timezone without HSM login (hsm init -label myluna -authtimeconfig). Ifyoumake that choice, then it remains in force until you change it. Therefore, if you are followingthese steps for a SafeNet Network HSM appliance that is not fresh from the factory, or freshlyfactoryReset, then you will need to take these instructions slightly out of order and performtime-related setting changes after you initialize, rather than before.
Initialization prepares the HSM for use by setting up the necessary identities, ownership and authentication that are tobe associated with the HSM. Youmust initialize an HSM one time before you can generate or store objects, allowclients to connect, or perform cryptographic operations.
If you have not used SafeNet HSMs and PED Keys before, please read the sub-section "PED Key ManagementOverview" on page 1 in theAdministration Guide, before you start initializing.
Once you have initialized an HSM, you would return to this section only to clear an entire HSM and all its contents andHSM Partitions, by re-initializing.
Preparing to Initialize a SafeNet Network HSM [PED-version]The last thing that the production workers do, before placing your SafeNet Network HSM into its shipping carton, is topress the "Decommission" button on the back of the appliance. This sets the HSM in Factory Reset mode, ensuringthat when you receive it, it does not contain left-over objects and settings from factory burn-in and final-test. Dependingon the options that you chose when ordering, your SafeNet Network HSMmight also arrive in “Secure Transport Mode”.If the HSM is in Factory Reset mode only, then it is ready to be initialized by you. If the HSM is also in Secure TransportMode, then youmust run the hsm srk transportMode recover command.
How do you know?After making an SSH or serial connection, and logging on as 'admin', show the Secure Recovery State : [myluna] lunash:>hsm srk show
Secure Recovery State flags:===============================External split enabled: yesSRK resplit required: noHardware tampered: noTransport mode: no
Command Result : No Errorlunash:>
SafeNet NetworkHSMConfiguration GuideRelease 6.2 007-011136-010 Rev. A December 2015 Copyright 2015Gemalto NV All rights reserved. 54

3 [Step 3] Initialize the HSM
Show other HSM status info : [myluna] lunash:>hsm showAppliance Details:==================Software Version: 5.1.0-25HSM Details:============HSM Label: [none]Serial #: 700022Firmware: 6.2.1Hardware Model: Luna K6Authentication Method: PED keysHSM Admin login status: Not Logged InHSM Admin login attempts left: 3 before HSM zeroization!RPV Initialized: YesManually Zeroized: No
Partitions created on HSM:==========================Partition: 700022012, Name: mypar1Partition: 700022013, Name: mypar2Partition: 700022016, Name: mypar3FIPS 140-2 Operation:=====================The HSM is NOT in FIPS 140-2 approved operation mode.HSM Storage Informaton:=======================Maximum HSM Storage Space (Bytes): 2097152Space In Use (Bytes): 2097152Free Space Left (Bytes): 0Command Result : 0 (Success)[myluna] lunash:>
“Transport Mode” refers to a user-invoked tamper event, which preserves all contents of the HSM, but protects thembehind encryption until you run the recovery command. In addition, whether or not the HSM contains useful secrets,Transport Mode assures you that nobody has interfered with the HSMwhile it was in storage or in transit.
"Hardware tampered" refers to a state where a hardware intrusion or failure has been detected, such as tripping of adetector. Similar to the user-invoked Transport Mode, "Hardware tampered" requires you to unlock the HSMwith hsmsrk transportMode recover, before you can resume using it. On a PED-authenticated HSM (with SRKenabled), that requirement takes the HSM out of service and forces you to acknowledge that the tamper has occurredbefore the HSM can go back into service. On a password-authenticated HSM - or a PED-authenticated HSMwithoutSRK enabled - a tamper event is just a logged event that does not take the HSM out of service, even temporarily.
“Zeroized” state is different, and results from any of:
• Factory reset by command.
• The "Decommission" button being pressed.
• The HSM detecting 3 bad login attempts on the SO account.
This renders any HSM contents unrecoverable. At the factory, we would have created only unimportant test objects onthe HSM - if you have previously had the HSM in service, and then either "decommissioned" it or performed hsmfactoryreset your valid objects and keys are similarly rendered permanently unrecoverable and the HSM iscompletely safe to store or ship.
The above states are addressed by configuring and initializing your SafeNet Network HSM. Instructions start on thispage.
SafeNet NetworkHSMConfiguration GuideRelease 6.2 007-011136-010 Rev. A December 2015 Copyright 2015Gemalto NV All rights reserved. 55

3 [Step 3] Initialize the HSM
If you requested Secure Transport Mode shipment from SafeNet, then a couple of additional steps are required (alsoincluded in these instructions).
Why Initialize?Before you canmake use of it, the HSMmust be initialized. This establishes your ownership for current and future HSMadministration. Initialization assigns ameaningful label, as well as Security Officer authentication (PED Key) andcloning Domain (another PED Key), and places the HSM in a state ready to use.
Use the instructions on this page if you have a SafeNet HSM with PED authentication.
Note: Not the first time? SomeHSM Policy changes are destructive. A destructive policychange is one that requires the HSM to be initialized again, before it can be used. Thus if youintend to perform a destructive HSM Policy change, youmight need to perform this initializationstep again, after the Policy change.
Start a Serial Terminal or SSH sessionbash#: ssh 192.20.10.203login as: [email protected]'s password:________Last login: Fri Dec 2 20:16:54 2014 from 192.17.153.225SafeNet Network HSM 6.0.0 Command Line Shell - Copyright (c) 2001-2014 SafeNet, Inc. All rightsreserved.
[myluna] lunash:>
Initialize the HSM1. Have the Luna PED connected and ready (in local mode and "Awaiting command...").
2. Insert a blank PED Key into the USB connector at the top of the PED.
3. In a serial terminal window or with an SSH connection, log into LunaSH as the appliance administrator 'admin':lunash:>
4. Run the hsm init command, giving a label for your SafeNet Network HSM. [If Secure Transport Mode was set, youmust unlock the HSMwith the purple PED Key before you can proceed; see earlier on this page and the Recoverthe SRK page. ]
The following is an example of initialization dialog, with PED interactions inserted to show the sequence ofevents.
lunash:> hsm init -label myLunaHSM
The following warning appears:CAUTION: Are you sure you wish to re-initialize this HSM?All partitions and data will be erased.Type 'proceed' to initialize the HSM, or 'quit'to quit now.>Please attend to the PED.
SafeNet NetworkHSMConfiguration GuideRelease 6.2 007-011136-010 Rev. A December 2015 Copyright 2015Gemalto NV All rights reserved. 56

3 [Step 3] Initialize the HSM
Note: Respond promptly to avoid PED timeout Error. At this time, the PED becomes activeand begins prompting you for PED Keys and other responses. For security reasons, thissequence has a time-out, which is themaximum permitted duration, after which an error isgenerated and the process stops. If you allow the process to time-out, youmust re-issue theinitialization command. If the PED has timed out, press the [CLR] key for five seconds to reset,or switch the PED off, and back on, to get to the “Awaiting command....” state before re-issuinganother lunash command that invokes the PED.
See "Initialization - some additional options and description " on page 63 for additional information and a summaryof the options youmight choose or encounter during this process - this procedure (below) assumes a relativelystraightforward process.
SafeNet PED asks preliminary setup questions.
The simplest scenario is your first-ever HSM and new PED Keys. However, youmight have previously initializedthis HSM and be starting over. Or youmight have other HSMs already initialized and need to share theauthentication or the domain with your new HSM.
The HSM and PED need to know, prior to imprinting the first SO PED Key.
If you say [ NO ] (on the PED keypad), then you are indicating there is nothing of value on your PED Keys topreserve. On the assumption that you will now be writing onto a new blank PED Key, or onto one that contains oldunwanted authentication, SafeNet PED asks you to set MofN values.
If you say [ YES ], you indicate that you have a PED Key (or set of PED Keys) from another HSM and you wishyour current/new HSM to share the authentication with that other HSM. Authentication will be read from the PEDKey that you present and imprinted onto the current HSM.
and
SafeNet NetworkHSMConfiguration GuideRelease 6.2 007-011136-010 Rev. A December 2015 Copyright 2015Gemalto NV All rights reserved. 57

3 [Step 3] Initialize the HSM
SettingM and N equal to "1" means that the authentication is not to be split, and only a single PED Key will benecessary when the authentication is called for in future.
SettingM and N larger than "1" means that the authentication is split into N different "splits", of which quantity M ofthemmust be presented each time you are required to authenticate. MofN allows you to enforcemulti-personaccess control - no single person can access the HSMwithout cooperation of other holders.
SafeNet PED now asks you to provide the appropriate PED Key - a fresh blank key, or a previously used key thatyou intend to overwrite, or a previously used key that you intend to preserve and share with this HSM.
Insert a blue HSM Admin / SO PED key [ of course, the unlabeled PED Key is generically black - we suggest thatyou apply the appropriate color sticker either immediately before or immediately after imprinting the key; before, justto ensure it gets done, or after, as a helpful indicator as to which ones are imprinted (with which secret), and whichones still blank ] and press [Enter].
OR
SafeNet NetworkHSMConfiguration GuideRelease 6.2 007-011136-010 Rev. A December 2015 Copyright 2015Gemalto NV All rights reserved. 58

3 [Step 3] Initialize the HSM
Answer (press the appropriate button on the PED keypad)
– "NO" if the PED key that you provided carries SO authentication data that must be preserved. In that case, youmust havemade amistake so the PED goes back to asking you to insert a suitable key.
– "YES" if the PED should overwrite the PED Key with a new SO authentication.If you overwrite a never-used PED Key, nothing is lost; if you overwrite a PED Key that contains authenticationsecret for another HSM, then this PED Key will no longer be able to access the other HSM, only the new HSMthat you are currently initializing with a new, unique authentication secret - therefore "YES" means 'yes,destroy the contents on the key and create new authentication information in its place' - be sure that this iswhat you wish to do. (This will bematched on the SafeNet Network HSM during this initialization).
SafeNet PED makes very sure that you wish to overwrite, by asking again.
For any situation other than reusing a keyset, SafeNet PED now prompts for you to set a PED PIN. For multi-factorauthentication security, the physical PED Key is "something you have". You can choose to associate that with"something you know", in the form of amulti-digit PIN code that must always be supplied along with the PED Keyfor all future HSM access attempts.
Type a numeric password on the PED keypad, if you wish. Otherwise, just press [Enter] twice to indicate that noPED PIN is desired.
SafeNet NetworkHSMConfiguration GuideRelease 6.2 007-011136-010 Rev. A December 2015 Copyright 2015Gemalto NV All rights reserved. 59

3 [Step 3] Initialize the HSM
SafeNet PED imprints the PED Key, or the HSM, or both, as appropriate, and then prompts the final question forthis key:
You can respond [ YES ] and present one or more blank keys, all of which will be imprinted with exact copies of thecurrent PED Key's authentication, or you can say [ NO ], telling the PED tomove on to the next part of theinitialization sequence. (You should always have backups of your imprinted PED Keys, to guard against loss ordamage.)
To begin imprinting a Cloning Domain (red PED Key), youmust first log into the HSM, so in this case you cansimply leave the blue PED Key in place.
SafeNet PED passes the authentication along to the HSM and then asks the first question toward imprinting acloning domain:
If this is your first SafeNet HSM, or if this HSM will not be cloning objects with other HSMs that are alreadyinitialized, then answer [ NO ]. SafeNet PED prompts for values of M and N.
If you have another HSM andwish that HSM and the current HSM to share their cloning Domain, then youmustanswer [ YES ]. In that case, SafeNet PED does not prompt for M and N.
SafeNet NetworkHSMConfiguration GuideRelease 6.2 007-011136-010 Rev. A December 2015 Copyright 2015Gemalto NV All rights reserved. 60

3 [Step 3] Initialize the HSM
SafeNet PED goes through the same sequence that occurred for the blue SOPED Key, except it is now dealingwith a red Domain PED Key.
Insert a red HSMCloning Domain PED key [ of course, the unlabeled PED Key is generically black - we suggestthat you apply the appropriate color sticker either immediately before or immediately after imprinting the key;before, just to ensure it gets done, or after, as a helpful indicator as to which ones are imprinted (with which secret),and which ones still blank ] and press [Enter].
SafeNet NetworkHSMConfiguration GuideRelease 6.2 007-011136-010 Rev. A December 2015 Copyright 2015Gemalto NV All rights reserved. 61

3 [Step 3] Initialize the HSM
OR
Just as with the blue SOPED Key, the next message is:
When you confirm that you do wish to overwrite whatever is (or is not) on the currently inserted key, with a CloningDomain generated by the PED, the PED asks:
And finally:
Once you stop duplicating the Domain key, or you indicate that you do not wish tomake any duplicates (you shouldhave backups of all your imprinted PED Keys...), SafeNet PED goes back to "Awaiting command...".
Lunash says:
SafeNet NetworkHSMConfiguration GuideRelease 6.2 007-011136-010 Rev. A December 2015 Copyright 2015Gemalto NV All rights reserved. 62

3 [Step 3] Initialize the HSM
Command Result : No Errorlunash:>lmyluna] lunash:>hsm showAppliance Details: ================== Software Version: 5.1.0-25 HSM Details: ============ HSM Label: mylunahsmSerial #: 700022 Firmware: 6.2.1 Hardware Model: Luna K6 Authentication Method: PED keys HSM Admin login status: Logged In HSM Admin login attempts left: 3 before HSM zeroization! RPV Initialized: Yes Manually Zeroized: NoPartitions created on HSM: ==========================
FIPS 140-2 Operation: ===================== The HSM is NOT in FIPS 140-2 approved operation mode.HSM Storage Information: ======================== Maximum HSM Storage Space (Bytes): 2097152 Space In Use (Bytes): 0 Free Space Left (Bytes): 2097152Command Result : 0 (Success)[myluna] lunash:>
Notice that the HSM now has a label.
The next step is "Prepare to Create a Partition (PED Authenticated)" on page 80 on the HSM.
Initialization - some additional options and descriptionAnywhere there are choices, options abound. Rather than clutter themain initialization instruction page with a variety ofpossible paths and branches, this section presents some of the other situations that youmight encounter whileinitializing a SafeNet HSM. So, assume that you have issued the hsm init command. The system told you to attend tothe SafeNet PED, which you already had connected.
SafeNet PED demands the first "SO/HSM Admin" PED Key.
SafeNet NetworkHSMConfiguration GuideRelease 6.2 007-011136-010 Rev. A December 2015 Copyright 2015Gemalto NV All rights reserved. 63

3 [Step 3] Initialize the HSM
Insert the Blue PED Key
This table (below) summarizes the steps involving SafeNet PED immediately after you invoke the command "hsminit...".
The first column is the simplest, andmost like what you would encounter the very first time you initialize, using "freshfrom the carton" iKey PED Keys.
The next two columns of the table show some differences if you are using previously-imprinted PED Keys, choosingeither to reuse what is found on the key (imprint it on your new HSM - seeGroup PED Keys) or, in the third columnexample to overwrite what is found and generate a new secret to be imprinted on both the PED Key and the HSM.
Below the table are some expanded comments about the choices that youmight encounter.
"Fresh" PED Keys Pre-used PED Keys(reuse)
Pre-used PED Keys (overwrite)
SLOT 01SETTING SOPIN...Would you like toreuse an existingkeyset? (Y/N)
SLOT 01SETTING SOPIN...Would you like toreuse an existingkeyset? (Y/N)
SLOT 01SETTING SOPIN...Would you like toreuse an existingkeyset? (Y/N)
SafeNet NetworkHSMConfiguration GuideRelease 6.2 007-011136-010 Rev. A December 2015 Copyright 2015Gemalto NV All rights reserved. 64
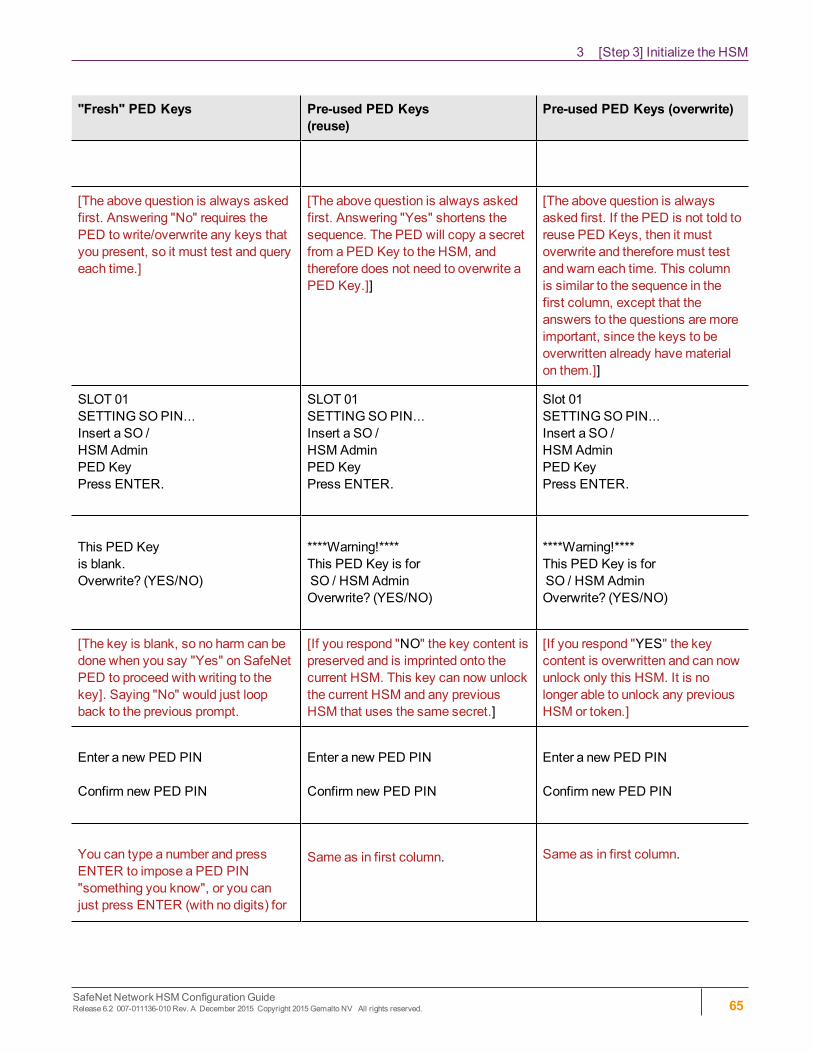
3 [Step 3] Initialize the HSM
"Fresh" PED Keys Pre-used PED Keys(reuse)
Pre-used PED Keys (overwrite)
[The above question is always askedfirst. Answering "No" requires thePED to write/overwrite any keys thatyou present, so it must test and queryeach time.]
[The above question is always askedfirst. Answering "Yes" shortens thesequence. The PED will copy a secretfrom a PED Key to the HSM, andtherefore does not need to overwrite aPED Key.]]
[The above question is alwaysasked first. If the PED is not told toreuse PED Keys, then it mustoverwrite and thereforemust testand warn each time. This columnis similar to the sequence in thefirst column, except that theanswers to the questions aremoreimportant, since the keys to beoverwritten already havematerialon them.]]
SLOT 01SETTING SOPIN...Insert a SO /HSM AdminPED KeyPress ENTER.
SLOT 01SETTING SOPIN...Insert a SO /HSM AdminPED KeyPress ENTER.
Slot 01SETTING SOPIN...Insert a SO /HSM AdminPED KeyPress ENTER.
This PED Keyis blank.Overwrite? (YES/NO)
****Warning!****This PED Key is forSO / HSM AdminOverwrite? (YES/NO)
****Warning!****This PED Key is forSO / HSM AdminOverwrite? (YES/NO)
[The key is blank, so no harm can bedone when you say "Yes" on SafeNetPED to proceed with writing to thekey]. Saying "No" would just loopback to the previous prompt.
[If you respond "NO" the key content ispreserved and is imprinted onto thecurrent HSM. This key can now unlockthe current HSM and any previousHSM that uses the same secret.]
[If you respond "YES" the keycontent is overwritten and can nowunlock only this HSM. It is nolonger able to unlock any previousHSM or token.]
Enter a new PED PIN
Confirm new PED PIN
Enter a new PED PIN
Confirm new PED PIN
Enter a new PED PIN
Confirm new PED PIN
You can type a number and pressENTER to impose a PED PIN"something you know", or you canjust press ENTER (with no digits) for
Same as in first column. Same as in first column.
SafeNet NetworkHSMConfiguration GuideRelease 6.2 007-011136-010 Rev. A December 2015 Copyright 2015Gemalto NV All rights reserved. 65

3 [Step 3] Initialize the HSM
"Fresh" PED Keys Pre-used PED Keys(reuse)
Pre-used PED Keys (overwrite)
no PED PIN (thus nothing toremember in future).
Are you duplicatingthis keyset? YES/NO
Are you duplicatingthis keyset? YES/NO
Are you duplicatingthis keyset? YES/NO
If you respond "YES", you can keepinserting additional blank (or old-to-be-reused) PED Keys to be imprintedwith this same secret. If you say"NO", you have just the one key withthat secret - don't lose it.
Same as in first column. Same as in first column.
Login SO / HSM Admin...Insert a SO/HSM AdminPED KeyPress ENTER
Login SO / HSM Admin..Insert a SO/HSM AdminPED KeyPress ENTER
Login SO / HSM Admin..Insert a SO/HSM AdminPED KeyPress ENTER
Having created/imprinted the HSMAdmin or SO secret, the HSM nowrequires you to login, in order to gofurther. This is a verification step.
Same as in first column. Same as in first column.
SETTINGDOMAIN...Would you like toreuse an existingkeyset? (Y/N)
SETTINGDOMAIN...Would you like toreuse an existingkeyset? (Y/N)
SETTINGDOMAIN...Would you like toreuse an existingkeyset? (Y/N)
The PED prompts in similar fashion tothe steps for the HSM Admin/SO keyabove (overwrite, copy, etc.).If asked to "Reuse Id", the best optionis to say "YES", unless you havegood reason to create a new domainnot shared with any previous HSM.
Here, your response to "Reuse ID?"might or might not be the same as youchose for the blue key, above. Youmight have good reason tomake thisHSM part of an existing Domain.
Here, your response to "ReuseID?" might or might not be thesame as you chose for the bluekey, above. Youmight have goodreason tomake this HSM part ofan existing Domain.
SafeNet NetworkHSMConfiguration GuideRelease 6.2 007-011136-010 Rev. A December 2015 Copyright 2015Gemalto NV All rights reserved. 66

3 [Step 3] Initialize the HSM
"Fresh" PED Keys Pre-used PED Keys(reuse)
Pre-used PED Keys (overwrite)
HSM Init process is finished. HSM Init process is finished. HSM Init process is finished.
Table 1: PED prompt sequences
Some additional comments about some of the choices:
Provide a PED PIN (optional)A PED PIN can be 4-to-16 digits, or can be no digits if a PED PIN is not desired .
Enter a PIN if you wish, and press [Enter] to inform SafeNet PED that you are finished entering PED PIN digits, or thatyou have decided not to use a PED PIN (no digits entered).
Confirm, by entering the same PIN (or nothing if you did not enter a PIN the first time), and pressing [Enter] again.(When you provide a PED PIN – even if it is the null PIN (by just pressing [Enter] with no digits) – SafeNet PED asksfor it a second time, to ensure that you entered it correctly.)
In future, every time you are required to present that PED Key, youmust also enter the PED PIN on the PED keypad - ifyou created a PED PIN at initialization time, then youmust provide that exact PED PIN along with the PED Key, inorder to gain access to the HSM. If you did not create a PED PIN when you initialized, then just press [Enter] at thePED prompt when you insert the requested PED Key during login.
When you are attempting to log in, the PED always asks for a PED PIN, regardless whether or not a real PED PIN isexpected. That's a security feature, similar to password-protected systems that tell you if you have entered incorrectcredentials, but don't specify if it was the login name or the password that was individually the faulty part.
Duplicating Your PED Key“Are you duplicating this keyset? (Y/N)”
If you respond “NO”, SafeNet PED imprints just the one blue HSM Admin key (or Domain key (see below) and goes onto the next step in initialization of the HSM.
If you respond “YES”, SafeNet PED imprints the first blue key and then asks for more blue PED Keys, until you haveimprinted (duplicated) as many as you require.
Note: It is recommended to have at least one full backup set of imprinted PED Keys, stored ina safe place, in case of loss or damage to the primary keys. Of course, a backup set does notneed to be stored in one location. Your security protocols might require that individual backupPED Keys be stored at separate locations according to role.
Note: You can alsomake additional copies of a PED Key at any time, using the PED's own"Admin" menu. This does not require you to log into the HSM or issue commands from theappliance - the PED needs to be connected only to have power supplied to it when you areusing the onboard PED menus. One implication of this ability is that youmust maintain strictoversight and control of your PED Keys at all times, so that you can be sure that you know howmany copies of a given PED Key exist, where they are, and in whose possession.
SafeNet NetworkHSMConfiguration GuideRelease 6.2 007-011136-010 Rev. A December 2015 Copyright 2015Gemalto NV All rights reserved. 67

3 [Step 3] Initialize the HSM
Creating a Cloning DomainYou create the domain for future cloning of the HSM, or you adopt the domain from a previous token or SafeNet HSM,so that the current SafeNet HSM (or token) can clone with the previous. A common domain (common between HSMand Backup HSM) is required for HSM backups.
If the red PED Key is blank, then SafeNet PED goes ahead and imprints a domain, which is matched on the HSM.However, if SafeNet PED detects that the red PED Key contains data, then SafeNet PED now needs to know:
a. If the domain data on the key should be preserved as valid, and recorded on the current HSM or token[What to do - This allows the PED Key to work with both the previous and the current HSM or token – that is, they willall share the same cloning/backup domain. Therefore, to preserve the existing domain answer “YES” to “...reuse anexisting keyset?”) ]
OR
b. If the domain data that was found on the red key must be overwritten with a new domain that is exclusive to thecurrent HSM or token[What to do - This prevents the red key from working with any previous HSM or token. To overwrite and create a newdomain that applies to only this HSM, answer “NO” to “... reuse an existing keyset?”) ].
About Backup HSMs - Always choose to 'reuse' when initializing a SafeNet Backup HSM, so that the backup HSMwill share the domain with the source SafeNet HSM, and so that the red Domain PED Key remains usable with theSafeNet HSM. (You do not want the red PED Key to be overwritten when creating a backup.)
At this point in the process of configuring your SafeNet HSM, you can :
optionally modify some of the HSM's Policy settings
or
go directly to "Creating HSM Partitions"
SafeNet NetworkHSMConfiguration GuideRelease 6.2 007-011136-010 Rev. A December 2015 Copyright 2015Gemalto NV All rights reserved. 68

4[Step 4] Set the HSM Policies
SafeNet HSMs are built on one of our general-purpose HSM platforms (hardware plus firmware), and then are loadedwith what we call "personality", to make them into specific types of HSM with specific abilities and constraints, to suitdifferent markets and applications.
The built-in attributes are called "Capabilities" and describe what the HSM can do as it comes to you from the factory.
Some capabilities are unalterable, except by re-manufacturing the HSM.
Many HSM capabilities can be altered by means of HSM Policies, which coincide one-for-one with the capabilities thatthey alter.
You can view the current HSM capabilities and policies with the hsm showpolicies command:
You can change a current HSM policy in LunaSH with the hsm changepolicy command.
This section describes how tomodify HSM Policies, and suggests some examples of changes best made before theHSM is further configured for use in your environment. Refer to the instructions for your HSM authentication type:
• "Set HSM Policies (Password Authentication)" below
• "Set HSM Policies - PED (Trusted Path) Authentication" on page 71
Set HSM Policies (Password Authentication)Set any of the alterable policies that are to apply to the HSM.
Note: Capability vs Policy InteractionCapabilities identify the purchased features of the product and are set at time of manufacture.Policies represent the HSM Admin’s enabling (or restriction) of those features.
1. Type the hsm showPolicies command, to display the current policy set for the HSM.[myluna] lunash:>hsm showPoliciesHSM Label: myhsmSerial #: 700022Firmware: 6.21.0.The following capabilities describe this HSM, and cannot be alteredexcept via firmware or capability updates.
Description Value============ =====Enable PIN-based authentication Allowed Enable PED-based authentication Disallowed Performance level 15Enable domestic mechanisms & key sizes Allowed Enable masking Allowed Enable cloning Allowed Enable special cloning certificate Disallowed
SafeNet NetworkHSMConfiguration GuideRelease 6.2 007-011136-010Rev. A December 2015 Copyright 2015Gemalto NV All rights reserved. 69

4 [Step 4] Set the HSM Policies
Enable full (non-backup) functionality Allowed Enable ECC mechanisms Allowed Enable non-FIPS algorithms Allowed Enable SO reset of partition PIN Allowed Enable network replication Allowed Enable Korean Algorithms Disallowed FIPS evaluated Disallowed Manufacturing Token Disallowed Enable Remote Authentication Allowed Enable forcing user PIN change Allowed Enable portable masking key Allowed Enable partition groups Disallowed Enable Remote PED usage Disallowed Enable external storage of MTK split Disallowed HSM non-volatile storage space 2097152 Enable HA mode CGX Disallowed Enable Acceleration Allowed Enable unmasking Disallowed
The following policies are set due to current configuration of this HSM and cannot be altered directly by the user.
Description ValuePIN-based authentication True
The following policies describe the current configuration of this HSM and may by changed by the HSM Administrator.Changing policies marked "destructive" will zeroize (erase completely) the entire HSM.
Description Value Code Destructive=========== ===== ==== ===========Allow masking On 6 YesAllow cloning On 7 YesAllow non-FIPS algorithms On 12 YesSO can reset partition PIN On 15 YesAllow network replication On 16 NoAllow Remote Authentication On 20 YesForce user PIN change after set/reset Off 21 NoAllow off-board storage On 22 YesAllow acceleration On 29 YesAllow unmasking On 30 Yes
Command Result : 0 (Success)[myluna] lunash:>
According to the above example, the fixed capabilities require that this HSM be protected with HSM PasswordAuthentication, meaning that the PED and PED Keys are not used for authentication, and instead values are typed froma keyboard.
The alterable policies have numeric codes. You can alter a policy with the hsm changePolicy command, giving thecode for the policy that is to change, followed by the new value.
Note: The FIPS 140-2 standardmandates a set of security factors that specify a restrictedsuite of cryptographic algorithms.
The SafeNet HSM is designed to the standard, but can permit activation of additional non-
SafeNet NetworkHSMConfiguration GuideRelease 6.2 007-011136-010 Rev. A December 2015 Copyright 2015Gemalto NV All rights reserved. 70

4 [Step 4] Set the HSM Policies
FIPS-validated algorithms if your application requires them.
The example listing above indicates that non-validated algorithms have been activated. TheHSM is just as safe and secure as it is with the additional algorithms switched off. The onlydifference is that an auditor would not validate your configuration unless the set of availablealgorithms is restricted to the approved subset.
2. In order to change HSM policies, the HSM SOmust first login.lunash:> hsm login
(If you are not logged in, the above command logs you in, prompting for the HSM Admin password. If you arealready logged in, the HSM tells you so, with an error message, that you can ignore.)
3. If you need tomodify a policy setting to comply with your operational requirements, type:lunash:> hsm changePolicy -policy <policyCode> -value <policyValue>
As an example, change code 15 from a value of 1 (On) to 0 (Off).
Example – Change of HSM Policylunash:> hsm changePolicy -policy 15 -value 0That command assigns a value of zero (0) to the policy for “HSM Admin can reset partition PIN”, turning it off.
Refer to the Reference section for a description of all and their meanings.
If you have been following the instructions on this page as part of setting up a new HSM system, then the next step is tocreate virtual HSMs or HSM Partitions on the HSM that you just configured. "Prepare to Create a Legacy Partition(Password Authenticated)" on page 77
Set HSM Policies - PED (Trusted Path) AuthenticationSet any of the alterable policies that are to apply to the HSM.
Note: Capability vs Policy InteractionCapabilities identify the purchased features of the product and are set at time of manufacture.Policies represent the HSM Admin’s enabling (or restriction) of those features.
1. Type the hsm showPolicies command, to display the current policy set for the HSM.lunash:> hsm showPolicies
HSM Label: mysahsmSerial #: 7000022Firmware: 6.22.0
The following capabilities describe this HSM, and cannot be alteredexcept via firmware or capability updates.
Description Value=========== =====Enable PIN-based authentication DisallowedEnable PED-based authentication AllowedPerformance level 15
SafeNet NetworkHSMConfiguration GuideRelease 6.2 007-011136-010 Rev. A December 2015 Copyright 2015Gemalto NV All rights reserved. 71

4 [Step 4] Set the HSM Policies
Enable domestic mechanisms & key sizes AllowedEnable masking DisallowedEnable cloning AllowedEnable special cloning certificate DisallowedEnable full (non-backup) functionality AllowedEnable non-FIPS algorithms AllowedEnable SO reset of partition PIN AllowedEnable network replication AllowedEnable Korean Algorithms AllowedFIPS evaluated DisallowedManufacturing Token DisallowedEnable Remote Authentication AllowedEnable forcing user PIN change AllowedEnable portable masking key AllowedEnable partition groups DisallowedEnable remote PED usage AllowedEnable External Storage of MTK Split AllowedHSM non-volatile storage space 16252928Enable Acceleration AllowedEnable unmasking AllowedEnable FW5 compatibility mode DisallowedMaximum number of partitions 100Enable ECIES support DisallowedEnable Single Domain AllowedEnable Unified PED Key AllowedEnable MofN AllowedEnable small form factor backup/restore DisallowedEnable Secure Trusted Channel AllowedEnable decommission on tamper DisallowedEnable Per-Partition SO AllowedEnable partition re-initialize Allowed
The following policies are set due to current configuration ofthis HSM and cannot be altered directly by the user.
Description Value=========== =====PED-based authentication TrueStore MTK Split Externally False
The following policies describe the current configuration ofthis HSM and may be changed by the HSM Administrator.
Changing policies marked "destructive" will zeroize (erasecompletely) the entire HSM.
Description Value Code Destructive=========== ===== ==== ===========Allow cloning On 7 YesAllow non-FIPS algorithms On 12 YesSO can reset partition PIN On 15 YesAllow network replication On 16 NoAllow Remote Authentication On 20 YesForce user PIN change after set/reset Off 21 NoAllow offboard storage On 22 Yes
SafeNet NetworkHSMConfiguration GuideRelease 6.2 007-011136-010 Rev. A December 2015 Copyright 2015Gemalto NV All rights reserved. 72

4 [Step 4] Set the HSM Policies
Allow remote PED usage On 25 NoAllow Acceleration On 29 YesAllow unmasking On 30 YesCurrent maximum number of partitions 100 33 NoForce Single Domain Off 35 YesAllow Unified PED Key Off 36 NoAllow MofN On 37 NoAllow Secure Trusted Channel Off 39 NoAllow partition re-initialize Off 42 No
Command Result : 0 (Success)
According to the above example, the fixed capabilities require that this HSM be protected at FIPS 140-2 level 3,meaning that the PED and PED Keys are required for authentication, and values typed from a keyboard are ignored.
The alterable policies have numeric codes. You can alter a policy with the hsm changePolicy command, giving thecode for the policy that is to change, followed by the new value.
Note: The FIPS 140-2 standardmandates a set of security factors that specify a restrictedsuite of cryptographic algorithms. The HSM is designed to the standard, but can permitactivation of additional non-FIPS-validated algorithms if your application requires them. Theexample listing above indicates that non-validated algorithms have been activated. The HSM isjust as safe and secure as it is with the additional algorithms switched off. The only differenceis that an auditor would not validate your configuration unless the set of available algorithms isrestricted to the approved subset.
2. In order to change HSM policies, the HSM SOmust first login.lunash:> hsm login
(If you are not logged in, the above command begins the login process, directing you to the PED. If you are alreadylogged in, the SafeNet Network HSM tells you so, with an error message, that you can ignore.)Control is passed to the PED, which prompts you for the blue PED Key.Insert the appropriate PED Key for this HSM, and press [ENT] on the PED keypad.
3. If you need tomodify a policy setting to comply with your operational requirements, type:lunash:> hsm changePolicy -policy <policyCode> -value <policyValue>
As an example, change code 15 from a value of 1 (On) to 0 (Off).
Example – Change of HSM Policylunash:> hsm changePolicy -policy 15 -value 0
That command assigns a value of zero (0) to the “HSM Admin can reset partition PIN” policy, turning it off.
WARNING! The above example is a change to a destructive policy, meaning that, ifyou apply this policy, the HSM is zeroized and all contents are lost. For this reason,you are prompted to confirm if that is what you really wish to do. You must now re-initialize the HSM.
While this is not an issue when you have just initialized an HSM, it may be a very
SafeNet NetworkHSMConfiguration GuideRelease 6.2 007-011136-010 Rev. A December 2015 Copyright 2015Gemalto NV All rights reserved. 73

4 [Step 4] Set the HSM Policies
important consideration if your HSM system has been in a “live” or “production”environment and the HSM contains useful or important data, keys, certificates.
If you have been following the instructions on this page as part of setting up a new HSM system, then the next step is tocreate virtual HSMs or HSM Partitions on the HSM that you just configured. Click the following link: Create Partition(Trusted Path Authentication)
SafeNet Network HSM 6 does not currently have a secure identity management (SIM) configuration. Certain HSMpolicy settings exist to enablemigration from SafeNet Network HSM 4.x to SafeNet Network HSM 5.x or 6.x,specifically the “Enablemasking” and “Enable portable masking key” values.
SafeNet NetworkHSMConfiguration GuideRelease 6.2 007-011136-010 Rev. A December 2015 Copyright 2015Gemalto NV All rights reserved. 74

5[Step 5] Create Application Partitions
This chapter describes how to create application partitions on the HSM.
Choose Partition TypeThe options are:
• Legacy-style application partitions are owned and administered by the HSM SO, who retains complete control.
• PPSO-style application partitions each have their own SO, independent of the HSM SO, and all control exceptpartition creation and deletion resides with the Per-Partition SO
Legacy-style PartitionsChoose the authenticationmethod that applies to your HSM.
See "Prepare to Create a Legacy Partition (Password Authenticated)" on page 77 .
See "Prepare to Create a Partition (PED Authenticated)" on page 80.
Per-Partition SO (PPSO) PartitionsFor an overview of the procedure to set up a PPSO partition, see "About Configuring an Application Partition with ItsOwn SO " on page 97. The selection of Password or PED authentication is done on that page.
About Configuring Legacy PartitionsBefore SafeNet HSM release 6.0, an HSM could have one kind of application partition. It was administratively ownedby the HSM SOwho created it, and was operationally managed by a unified Partition User entity (black PED Key forPED-authenticated HSMs) or by a Crypto Officer and Crypto User (again, the black PED Key for PED-auth HSMs)who simply split the role of Partition User into a role that could create, delete andmodify partition objects (the CO), anda role that could use partition objects but not create or change them (the CU).
SafeNet HSM release 6.0 introduced firmware 6.22.0, along with library updates and new commands and revisions ofpreviously existing commands in themajor management tools SafeNet Shell (lunash) for SafeNet Network HSM, andLunaCM for SafeNet USB HSM, SafeNet PCI-E HSM, and also for SafeNet Network HSM.
Now, the possibilities are:
• a pre-existing application partition, created with older tools on an HSMwith firmware older than version 6.22.0(before you updated to release 6.0 software and version 6.22.0 firmware)
– a legacy partition,
– the application partition is administratively owned by the HSM SO,
SafeNet NetworkHSMConfiguration GuideRelease 6.2 007-011136-010Rev. A December 2015 Copyright 2015Gemalto NV All rights reserved. 75

5 [Step 5] Create Application Partitions
– SafeNet PCI-E HSM and SafeNet USB HSM application partitions are seen by a client application like lunacmand operated using commands that were available before firmware 6.22.0 (those HSMs support only oneapplication partition, so it appears in lunacm that there is just one partition to which you log in as HSM SO foradministration, or as Crypto Officer (or Crypto User) for operation
– SafeNet Network HSM application partitions are seen, via NTLS, by a client application like lunacm, andoperated using commands that were available before firmware 6.22.0 (no administration can be done on suchslots/partitions from the client side, because the administrating authority is the HSM SOwho operates from theHSM administrative partition (at the SafeNet Network HSM, using lunash), and cannot be reached via a clientconnection)
– to create a new legacy application partition, or to destroy an existing one and create again, you can follow theconfiguration instructions in the original documentation that camewith your HSM and original software; nothinghas changed until you change HSM firmware
• an application partition created with version 6.0 or newer tools, on an HSMwith firmware 6.22.0 or newer, and withno partition SO specified
– a legacy-style partition
– the application partition is administratively owned by the HSM SO,
– SafeNet PCI-E HSM and SafeNet USB HSM application partition, as seen by lunacm, are operated usingcommands similar to those that were available before release 6.0, but with some changes, and with theaddition of role commands
– SafeNet Network HSM application partitions are seen, via NTLS, by a client application like lunacm, andoperated using commands similar to those that were available before firmware 6.22.0, but with some changes,and with the addition of role commands (no administration can be done on such slots/partitions from the clientside, because the administrating authority is the HSM SOwho operates from the HSM administrative partition,and cannot be reached via a client connection)
• an application partition created with version 6.0 or newer tools, on an HSMwith firmware 6.22.0 or newer, and withits own private SO as its administrative owner
– a PPSO partition
– the application partition is created or destroyed by the HSM SO, but the HSM SO has limited ability to touchthe partition, otherwise
– SafeNet PCI-E HSM and SafeNet USB HSM application partition, as seen by lunacm, are operated usingcommands updated for release 6.0, and with the new role commands
– SafeNet Network HSM application partitions are seen, via NTLS, by a client application like lunacm, andoperated using commands that are updated for release 6.0 and newer, including the new role commands (onlycreation of the empty PPSO application partitions is done at the SafeNet Network HSM, by the HSM SO usinglunash:> commands; PPSO partitions are turned over to the Partition SO and all further administration is donefrom the client side) .
This section is concerned with the first two types - pre-existing true legacy partitions and newly-created legacy-stylepartitions.
SafeNet NetworkHSMConfiguration GuideRelease 6.2 007-011136-010 Rev. A December 2015 Copyright 2015Gemalto NV All rights reserved. 76

5 [Step 5] Create Application Partitions
Prepare to Create a Legacy Partition (PasswordAuthenticated)This section is HSM Partition setup for Password Authentication. The activities in this section are required in threecircumstances.
• if you just prepared an HSM on the SafeNet appliance for the first time andmust now create your first HSMPartition, or
• if you have purchased a SafeNet appliance capable of supportingmultiple HSM Partitions and you wish to createthose additional partitions (this procedure creates one HSM Partition at a time, and you would need to repeat it oncefor each Partition, up to the number supported by your SafeNet HSM) , or
• if you have deleted an HSM Partition and wish to create a new one to replace it.
About HSM Partitions on the Initialized HSMAt this point, the SafeNet appliance should already:
• have its network settings configured by "[Step 2] Configure Your Network Settings" on page 31,
• have its HSM SO assigned by "About Initializing a Password-Authenticated HSM" on page 49.
Within the HSM, separate cryptographic work-spaces must be initialized and designated for clients. A workspace, orPartition, and all its contents are protected by encryption derived (in part) from its authentication. Only a Client thatpresents the proper authentication is allowed to see the Partition and to work with its contents.
In this section, you will:
• Create an HSM Partition
First, Establish a Connection to your SafeNet ApplianceIf you do not already have a connection open, connect your administration computer to the serial Console port of theSafeNet appliance and open a Terminal session, or use ssh to connect via the network.
Then, Login as HSM AdminTo create HSM Partitions, youmust login to the SafeNet HSM as HSM Admin. At the lunash prompt, type:lunash:> hsm login
Authenticate as HSM Admin by supplying the appropriate HSM Admin password when you are prompted— this isgenerally preferable to typing the password on the command line, because your response to the password prompt ishidden from view by “*” characters.
WARNING! If you fail three consecutive login attempts as HSM Admin, the HSM iszeroized and cannot be used — it must be re-initialized. Re-initializing zeroizes theHSM contents. Zeroizing destroys all key material. Please note that the SafeNet HSMmust actually receive some information before it logs a failed attempt, so if you justpress [Enter] without typing a password, that is not logged as a failed attempt. Also,when you successfully login, the counter is reset to zero.
If you are not sure that you are currently logged in as HSM Admin, perform an ‘hsm logout’.
SafeNet NetworkHSMConfiguration GuideRelease 6.2 007-011136-010 Rev. A December 2015 Copyright 2015Gemalto NV All rights reserved. 77

5 [Step 5] Create Application Partitions
Next, see "Create (Initialize) a Password Authenticated Legacy-style Application Partition " below.
Create (Initialize) a Password Authenticated Legacy-style Application PartitionHaving logged in, you can now use the ‘partition’ command.
When you issue the partition create command, to create an HSM Partition, youmust supply a label or name for the newPartition.
Note: Choose a partition name that is meaningful, in the context of your operations.Partition names must be unique in the HSM. You are not permitted to create two partitions withthe same label on one HSM. This will be the label seen by PKCS #11 applications.
Note: A partition name or a partition label can include any of the following characters :
!#$%'()*+,-./0123456789:=@ABCDEFGHIJKLMNOPQRSTUVWXYZ[]^_abcdefghijklmnopqrstuvwxyz{}~
No spaces, unless you wish to surround the name or label in double quotationmarks every timeit is used.No questionmarks, no double quotationmarks within the string.Minimum name or label length is 1 character. Maximum is 32 characters.
Valid characters that can be used in a password or in a cloning domain, when entered viaLunaSH [1]), are:
!#$%'*+,-./0123456789:=?@ABCDEFGHIJKLMNOPQRSTUVWXYZ[]^_abcdefghijklmnopqrstuvwxyz{}~
(the first character in that list is the space character)Invalid or problematic characters, not to be used in passwords or cloning domains are"&';<>\`|()
Valid characters that can be used in a password or in a cloning domain, when entered vialunacm, are:
!"#$%&\'()*+,-./0123456789:;<=>?@ABCDEFGHIJKLMNOPQRSTUVWXYZ[\\]^_`abcdefghijklmnopqrstuvwxyz{|}~
(the first character in that list is the space character)
Minimum password length is 7 characters;maximum is 255 characters in lunash or lunacm.
Minimum domain string length is 1 character; maximum domain length is 128 characters vialunash. No arbitrary maximum domain string length is enforced for domain strings entered vialunacm, and we have successfully input domain strings longer than 1000 characters in testing.
[1] LunaSH on the SafeNet Network HSM has a few input-character restrictions that are not
SafeNet NetworkHSMConfiguration GuideRelease 6.2 007-011136-010 Rev. A December 2015 Copyright 2015Gemalto NV All rights reserved. 78

5 [Step 5] Create Application Partitions
present in LunaCM, run from a client host. It is unlikely that you would ever be able to accessvia LunaSH a partition that received a password or domain via LunaCM, but the conservativeapproach would be to avoid the few "invalid or problematic characters" generally.
When labeling HSMs or partitions, never use a numeral as the first, or only, character in the name/label. Token backupcommands allow slot-number OR label as identifier which can lead to confusion if the label is a string version of a slotnumber.
For example, if the token is initialized with the label "1" then the user cannot use the label to identify the target forpurposes of backup, because VTL parses "1" as signifying the numeric ID of the first slot rather than as a text label forthe target in whatever slot it really occupies (the target is unlikely to be in the first slot), so backup fails.
CAUTION:Tips for using strong passwords:
– use at least eight characters (a Partition policy controls theminimum length)–mix the case of alphabetic characters– include at least one numeral– include at least one punctuation character or special character such as @#$%&, etc.– avoid words that can be found in the dictionary (any language)– avoid proper names (especially family and pets)– avoid birthdays and other easily identifiable dates.
For password-auth HSMs, valid characters that can be used in passwords are:!#$%'()*+,-./0123456789:=?@ABCDEFGHIJKLMNOPQRSTUVWXYZ[]^_abcdefghijklmnopqrstuvwxyz{}~(the first character in that list is the space character)Invalid characters, not to be used in passwords are "&';<>\`|Minimum password length is 7 characters. Maximum is 255 characters.
1. Create and name an HSM Partition. At the lunash prompt, for legacy (no partition SO) type:
lunash:> partition create -partition myPartition1for a partition with its own SO, type:
lunash:> partition create -partition myPartition1 -haspso
2. For legacy partition (owned by the HSM SO), continue at step 3, below.For partition with its own SO, go to "About Configuring an Application Partition with Its Own SO " on page 97.
3. Supply the appropriate new HSM Partition password when you are prompted (that is, don't supply the password asa command option—waiting to be prompted is generally preferable to typing the password on the command line,because a password that is typed in response to the prompt is hidden from view by “*” characters).NOTE: Youmay not set the Password to be "PASSWORD", which is reserved as the partition creation-timedefault, only, and is too easy to guess for a real, operational password.
4. Write down the application Partition password. This is the password that will be used:a) to authenticate the administrator performing Partitionmanagement tasks via lunash
SafeNet NetworkHSMConfiguration GuideRelease 6.2 007-011136-010 Rev. A December 2015 Copyright 2015Gemalto NV All rights reserved. 79

5 [Step 5] Create Application Partitions
b) to authenticate Client applications that wish to use the SafeNet HSM.
Repeat the above actions for each HSM Partition that you wish to create (to the limits of your SafeNet system'sconfiguration).
Partition creation audit log entryEach time a partition is created, an entry is added to the audit log. Any subsequent actions logged against the partitionare identified by the partition serial number that was generated when the partition was created.
Determining the serial number of a created partition from the audit logAn audit log entry similar to the following is generated when a partition is created on the HSM:5,12/12/17 16:14:14,S/N 150718 session 1 Access 2147483651:2669 SO container operation LUNA_CREATE_CONTAINER returned RC_OK(0x00000000) container=20 (using PIN (entry=LUNA_ENTRY_DATA_AREA))It is not obvious from this entry what the serial number is for the created partition. This information, however, can bederived from the log entry, since the partition serial number is simply a concatenation of the HSM serial number and thepartition container number, which are specified in the log entry, as highlighted below:5,12/12/17 16:14:14,S/N 150718 session 1 Access 2147483651:2669 SO container operation LUNA_CREATE_CONTAINER returned RC_OK(0x00000000) container=20 (using PIN (entry=LUNA_ENTRY_DATA_AREA))In the example above, the HSM serial number is 150718 and the partition container number is 20. Note that the partitioncontainer number is a three-digit number with leading zeros suppressed, so that the actual partition container number is020. To determine the partition serial number concatenate the two numbers as follows:150718020Use this number to identify the partition in subsequent audit log entiries.
Next stepsIf you have been following the instructions on these pages as part of setting up a new SafeNet appliance, then the nextstep is to adjust the Partition Policy settings for the new Partition that you just configured.
Youmight wish to adjust "[Step 6] Set the Partition Policies for Legacy Partitions" on page 107 (Optional).
Otherwise, go to "Creating an NTL Link Between a Client and a Partition" on page 119 .
Prepare to Create a Partition (PED Authenticated)This section is HSM application partition setup for PED Authenticated HSMs. The activities in this section are requiredin these circumstances.
• if you just initialized the HSM for the first time andmust now create your first application Partition, or
• if you have purchased a SafeNet HSM capable of supportingmultiple HSM Partitions and you wish to create thoseadditional partitions (this procedure creates one HSM Partition at a time, and you would need to repeat it once foreach Partition, up to the number supported by your SafeNet HSM) , or
• if you have deleted an HSM Partition and wish to create a new one to replace it.
About HSM Partitions on the Initialized HSMAt this point, the HSM should already:
SafeNet NetworkHSMConfiguration GuideRelease 6.2 007-011136-010 Rev. A December 2015 Copyright 2015Gemalto NV All rights reserved. 80

5 [Step 5] Create Application Partitions
• have its network settings configured (see "Configuring the SafeNet Appliance Network Settings" )
• have appliance and client-side certificates exchanged and registered (see "[Step 7] Create a Network Trust LinkBetween the Client and the Appliance" on page 111)
• have its HSM SO and its Cloning Domain assigned ( see " About Initializing a PED-Authenticated HSM" on page51 ).
Within the HSM, separate cryptographic work-spaces must be initialized and designated for client operations. Aworkspace, or Partition, and all its contents are protected by encryption derived (in part) from its authentication. Only aClient that presents the proper authentication is allowed to see the Partition and to work with its contents.
In this section, you will:
• Decide the type of application partition to create
• Create an HSM application partition
Establish a Connection to your HSM Appliance1. If you do not already have a connection open, connect your administration computer to the serial Console port of
the HSM appliance, and open a Terminal session, or use ssh to connect via the network (forWindows, we providePuTTy; for UNIX/Linux, your operating system provides the ssh client, either as part of the distribution, or as aseparate down-loadable utility).
Login as HSM SO1. To create HSM Partitions, youmust login to the HSM as HSM Security Officer or SO.
Ensure that the PED is connected to the PED port on your HSM host , and that the PED is powered on and"Awaiting command..."
Or, ensure that you have set up a Remote PED connection, and the PED is ready (see "Installing and Configuring aSafeNet Remote PED" on page 1 and "Configuring Remote PED" on page 1).
2. At the command prompt, type the login command.lunash:> hsm login
3. Authenticate as HSM SO:The PED prompts for the blue PED Key
Provide the blue HSM Admin PED Key that has been imprinted (initialized) for this HSM.
If you had set a PED PIN, you are prompted for that, as well.
4. At this point, you are about to create an application partition. The options are:
SafeNet NetworkHSMConfiguration GuideRelease 6.2 007-011136-010 Rev. A December 2015 Copyright 2015Gemalto NV All rights reserved. 81

5 [Step 5] Create Application Partitions
a. a legacy-style partition old firmware
- HSMs with firmware earlier than 6.22.0 (only legacy partitions possible),
- the HSM SO owns and administers the partition
- the remaining partition configuration steps are carried out at the command line, as you have been doing to thispoint - go to "Create a PED Authenticated Legacy-style Application Partition (f/w pre-6.22.0)" on the next page
b. a legacy-style partitionnewer firmware
- HSMs with f/w 6.22.0 or newer without PPSO capability installed (only legacy partitions possible),or HSMs with f/w 6.22.0 or newer, with PPSO capability installed, but you choose to create a legacy partition,rather than a PPSO partition
- the HSM SO owns and administers the partition
- the remaining partition configuration steps are carried out at the command line, as you have been doing to thispoint - go to "Create a PED Authenticated Legacy-style Application Partition (f/w 6.22.0 or newer)" on page 90
c. a PPSO or Per-Partition SO partition(optional in HSMs with firmware 6.22.0 or newer, and with the PPSO capability installed),
- each partition has its own SO, and the HSM SO has no access other than to delete the application partition
- the creation of an empty partition is performed next at the LunaSH command line, but subsequent steps areperformed at a registered SafeNet HSM Client computer, over NTL or STC link
- go to "HSM SOConfigures PED-authenticated SafeNet Network HSM Partition with SO " on page 99
If you don't remember whether you are logged in as HSM SO, you can use the hsm show command to find out:[mylunasa6] lunash:>hsm show
Appliance Details:==================Software Version: 6.0.0-33
HSM Details:============HSM Label: mysa6Serial #: 7000022Firmware: 6.22.0HSM Model: K6 BaseAuthentication Method: PED keysHSM Admin login status: Not Logged In (alternatively could show "Logged in")HSM Admin login attempts left: 3 before HSM zeroization!RPV Initialized: YesAudit Role Initialized: YesRemote Login Initialized: NoManually Zeroized: No
Partitions created on HSM:==============================Partition: 16298193222733, Name: mypsopar1Partition: 16298193222735, Name: mylegacypar1
Number of partitions allowed: 100Number of partitions created: 2
SafeNet NetworkHSMConfiguration GuideRelease 6.2 007-011136-010 Rev. A December 2015 Copyright 2015Gemalto NV All rights reserved. 82

5 [Step 5] Create Application Partitions
FIPS 140-2 Operation:=====================The HSM is NOT in FIPS 140-2 approved operation mode.
HSM Storage Information:========================Maximum HSM Storage Space (Bytes): 16252928Space In Use (Bytes): 325058Free Space Left (Bytes): 15927870
Command Result : 0 (Success)[mylunasa6] lunash:>
Create a PED Authenticated Legacy-style Application Partition (f/w pre-6.22.0)This section is HSM Application Partition setup for a SafeNet HSM with PED Authentication, where the partition is toremain under the ownership of the HSM Security Officer. The activities in this section are required in twocircumstances.
• if you just prepared an HSM for the first time andmust now create your first application Partition, or
• if you have deleted or zeroized an application Partition and wish to create a new one to replace it.
About Application Partitions on the Initialized HSMAt this point, the SafeNet HSM should already have its Security Officer assigned.
Within the HSM, a separate cryptographic work-spacemust be created. A workspace, or Partition, and all its contentsare protected by encryption derived (in part) from its authentication. Only a User who presents the proper authenticationis allowed to see the Partition and to work with its contents. That User (or Crypto Officer and Crypto User) andauthentication can be separate from the Security Officer identity, but the application partition is still ultimately ownedand administered by the HSM SO, who canmodify it at any time.
In this section, you will:
• Create an application Partition
• Set application Partition Policies (Optional)
These instructions assume that your SafeNet HSM is at a version lower than 6.22.0. The commands available at theSafeNet command line are the traditional ones that have been used with SafeNet HSMs. The outcome of this sequenceis the creation of a legacy-style application partition that is owned andmanaged by the HSM SO and does not have itsown independent SO.
If your HSM firmware is at version 6.22.0 or higher, then some of the commands have changed, and are the same asthose listed for creation of a PPSO application partition, in another section of this guide. That is, with the newerfirmware you can use the newer commands to create either a legacy-style partition or a PPSO partition. With the pre-6.22.0 firmware, you have only the older commands, and you can create only a legacy partition.
For the following procedure, youmust have previously initialized the HSM, and logged into the HSM as HSM SO.
Having logged in as HSM SO, you can now use the partition create command, to create an HSM Partition.
Youmust supply a label or name for the new Partition when you issue the command.
SafeNet NetworkHSMConfiguration GuideRelease 6.2 007-011136-010 Rev. A December 2015 Copyright 2015Gemalto NV All rights reserved. 83

5 [Step 5] Create Application Partitions
lunash:> partition create -partition <name-for-new-Partition>
(The angle brackets “<“ and “>” indicate that you fill in text of your choice. Do not type the brackets.)
Note: A partition name or a partition label can include any of the following characters :
!#$%'()*+,-./0123456789:=@ABCDEFGHIJKLMNOPQRSTUVWXYZ[]^_abcdefghijklmnopqrstuvwxyz{}~
No spaces, unless you wish to surround the name or label in double quotationmarks every timeit is used.No questionmarks, no double quotationmarks within the string.Minimum name or label length is 1 character. Maximum is 32 characters.
Valid characters that can be used in a password or in a cloning domain, when entered viaLunaSH [1]), are:
!#$%'*+,-./0123456789:=?@ABCDEFGHIJKLMNOPQRSTUVWXYZ[]^_abcdefghijklmnopqrstuvwxyz{}~
(the first character in that list is the space character)Invalid or problematic characters, not to be used in passwords or cloning domains are"&';<>\`|()
Valid characters that can be used in a password or in a cloning domain, when entered vialunacm, are:
!"#$%&\'()*+,-./0123456789:;<=>?@ABCDEFGHIJKLMNOPQRSTUVWXYZ[\\]^_`abcdefghijklmnopqrstuvwxyz{|}~
(the first character in that list is the space character)
Minimum password length is 7 characters;maximum is 255 characters in lunash or lunacm.
Minimum domain string length is 1 character; maximum domain length is 128 characters vialunash. No arbitrary maximum domain string length is enforced for domain strings entered vialunacm, and we have successfully input domain strings longer than 1000 characters in testing.
[1] LunaSH on the SafeNet Network HSM has a few input-character restrictions that are notpresent in LunaCM, run from a client host. It is unlikely that you would ever be able to accessvia LunaSH a partition that received a password or domain via LunaCM, but the conservativeapproach would be to avoid the few "invalid or problematic characters" generally.
1. Create the application Partition. Type:
lunash:> partition create -partition myPartition1(substitute the name of your choice for "myPartition1")Please ensure that you have purchased licenses for at least this number ofpartitions: -1If you are sure you wish to continue then type 'proceed', otherwise type 'quit'
SafeNet NetworkHSMConfiguration GuideRelease 6.2 007-011136-010 Rev. A December 2015 Copyright 2015Gemalto NV All rights reserved. 84

5 [Step 5] Create Application Partitions
> proceed Proceeding...
Please ensure that you copy the password from the SafeNet PED and that you keep it in a safe place. Luna PED operation required to create a partition - use User or Partition Owner(black) PED key.
2. The PED inquires if you intend to reuse a pre-existing imprinted black PED Key.
Respond "Yes" if you have a key from another HSM partition with a partition Owner ID already imprinted on it, thatyou wish to share/reuse. The authentication data on that PED Key will be preserved and used for this partition.Respond "No" if you have a fresh, never-imprinted key, or if you have a key previously imprinted with an ID that youdo not wish to preserve. The authentication data on that PED Key will be overwritten byfreshly-generatedauthentication data.(See "Shared or Group PED Keys" on page 1 for more detail)
3. The PED requests values for :
and
SafeNet NetworkHSMConfiguration GuideRelease 6.2 007-011136-010 Rev. A December 2015 Copyright 2015Gemalto NV All rights reserved. 85

5 [Step 5] Create Application Partitions
(enter "1" for both, unless you wish to invokeMofN split-secret, multi-person access control, "UsingMofN" on page1).
4. The PED then demands the black Owner PED key with themessage
Insert the black HSM Partition Owner PED key [ of course, the unlabeled PED Key is generically black - wesuggest that you apply the appropriate color sticker either immediately before or immediately after imprinting thekey; before, just to ensure it gets done, or after, as a helpful indicator as to which ones are imprinted (with whichsecret), and which ones still blank ] and press [Enter]. A unique Partition Owner PIN is to be imprinted on both thePED key and the HSM Partition.
5. The PED might continue with:
Decide whether this should be a group PED Key (see "What is a Shared or Group PED Key?" ), press [YES] or[NO] on the PED keypad, and press [Enter].
6. This is potentially serious business (if you unintentionally overwrite a PED Key that is needed for other purposes),so SafeNet PED asks onemore time if you truly intend to overwrite the key's content.
SafeNet NetworkHSMConfiguration GuideRelease 6.2 007-011136-010 Rev. A December 2015 Copyright 2015Gemalto NV All rights reserved. 86
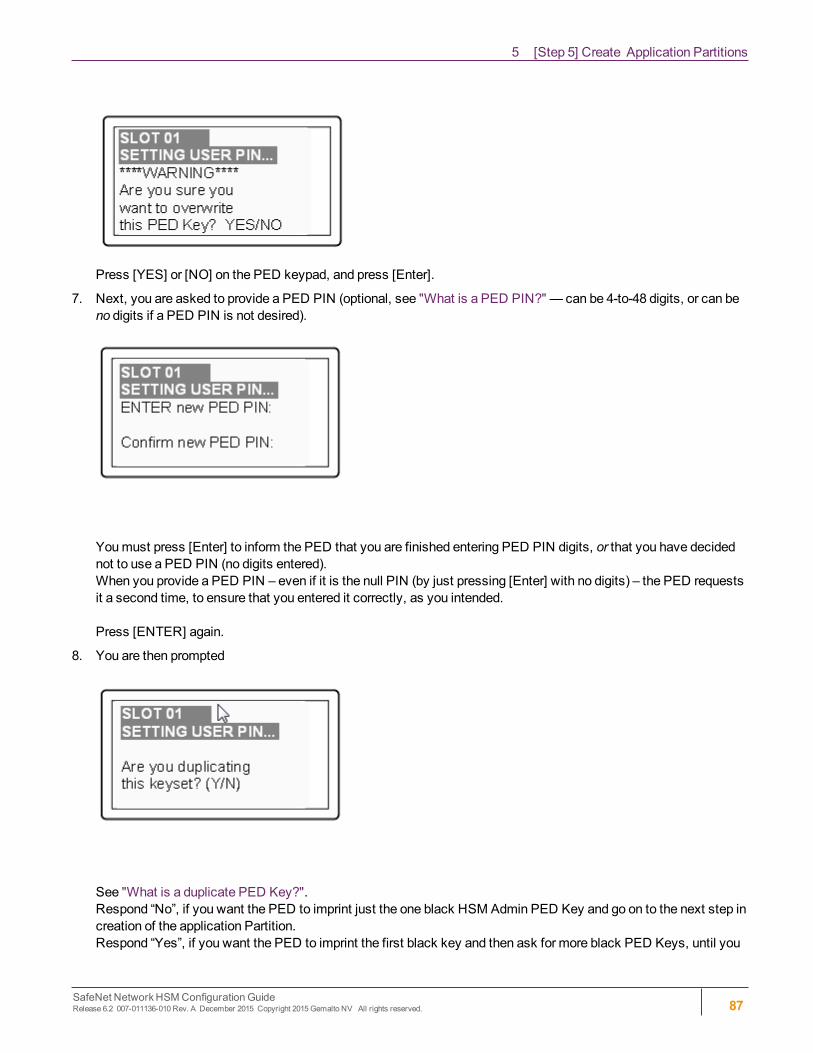
5 [Step 5] Create Application Partitions
Press [YES] or [NO] on the PED keypad, and press [Enter].
7. Next, you are asked to provide a PED PIN (optional, see "What is a PED PIN?" — can be 4-to-48 digits, or can beno digits if a PED PIN is not desired).
Youmust press [Enter] to inform the PED that you are finished entering PED PIN digits, or that you have decidednot to use a PED PIN (no digits entered).When you provide a PED PIN – even if it is the null PIN (by just pressing [Enter] with no digits) – the PED requestsit a second time, to ensure that you entered it correctly, as you intended.
Press [ENTER] again.
8. You are then prompted
See "What is a duplicate PED Key?".Respond “No”, if you want the PED to imprint just the one black HSM Admin PED Key and go on to the next step increation of the application Partition.Respond “Yes”, if you want the PED to imprint the first black key and then ask for more black PED Keys, until you
SafeNet NetworkHSMConfiguration GuideRelease 6.2 007-011136-010 Rev. A December 2015 Copyright 2015Gemalto NV All rights reserved. 87

5 [Step 5] Create Application Partitions
have imprinted (duplicated) as many as you wish. After each duplicate is made, the PED asks: Would you like tomake another duplicate set? Answer "Yes" until you have enough copies, and then press "No".
9. Having created the black key User or Crypto Officer, the HSM needs you to log in as that identity, and prompts:
Leave the black key inserted, and press Enter.
At the command-line session, the next part of the sequence is displayed
Luna PED operation required to generate cloning domain on the partition - useDomain (red) PED key.
and control once again goes to the SafeNet PED.
10. The PED inquires if you intend to reuse a previously imprinted red Domain PED Key.
Respond "Yes" if you have a key from another HSM partition with a cloning domain ID already imprinted on it, thatyou wish to share/reuse.Respond "No" if you have a fresh, never-imprinted key, or if you have a key previously imprinted with an ID that youdo not wish to preserve.
11. As it did for the black key, the PED now requests values for M and N. Again, enter 1 for each unless you wish toinvokeMofN splitting of the domain secret.
12. The PED then prompts for a red Domain PED key with themessage
SafeNet NetworkHSMConfiguration GuideRelease 6.2 007-011136-010 Rev. A December 2015 Copyright 2015Gemalto NV All rights reserved. 88

5 [Step 5] Create Application Partitions
Insert the red HSM Partition Domain PED key [ of course, the unlabeled PED Key is generically black - we suggestthat you apply the appropriate color sticker either immediately before or immediately after imprinting the key;before, just to ensure it gets done, or after, as a helpful indicator as to which ones are imprinted (with which secret),and which ones still blank ] and press [Enter]. A cloning domain is to be imprinted on both the PED key and theHSM Partition.
13. The PED goes through the same prompts as for the black PED Key. Respond as appropriate.
14. SafeNet PED presents the generated partition challenge secret (password), which youmust record:
We suggest recording the string in a text editor, which should bemore legible than handwriting. The hyphens areinserted for ease of reading, but are not part of the challenge secret. Remove them before pasting the recordedsecret.
CAUTION: We recommend that you have at least one backup set of imprinted PED Keys,stored in a safe place, in case of loss or damage to the primary keys.
Youmight wish to adjust "Partition Policies" on page 1 (Optional).
Otherwise, go to "Creating an NTL Link Between a Client and a Partition" on page 119 .
Partition creation audit log entryEach time a partition is created, an entry is added to the audit log. Any subsequent actions logged against the partitionare identified by the partition serial number that was generated when the partition was created.
SafeNet NetworkHSMConfiguration GuideRelease 6.2 007-011136-010 Rev. A December 2015 Copyright 2015Gemalto NV All rights reserved. 89

5 [Step 5] Create Application Partitions
Determining the serial number of a created partition from the audit logAn audit log entry similar to the following is generated when a partition is created on the HSM:5,12/12/17 16:14:14,S/N 150718 session 1 Access 2147483651:2669 SO container operation LUNA_CREATE_CONTAINER returned RC_OK(0x00000000) container=20 (using PIN (entry=LUNA_ENTRY_DATA_AREA))It is not obvious from this entry what the serial number is for the created partition. This information, however, can bederived from the log entry, since the partition serial number is simply a concatenation of the HSM serial number and thepartition container number, which are specified in the log entry, as highlighted below:5,12/12/17 16:14:14,S/N 150718 session 1 Access 2147483651:2669 SO container operation LUNA_CREATE_CONTAINER returned RC_OK(0x00000000) container=20 (using PIN (entry=LUNA_ENTRY_DATA_AREA))In the example above, the HSM serial number is 150718 and the partition container number is 20. Note that the partitioncontainer number is a three-digit number with leading zeros suppressed, so that the actual partition container number is020. To determine the partition serial number concatenate the two numbers as follows:150718020Use this number to identify the partition in subsequent audit log entiries.
Create a PED Authenticated Legacy-style Application Partition (f/w 6.22.0 ornewer)This section assumes that the HSM firmware is version 6.22.0 or newer, and that you are creating a legacy-styleapplication partition that will remain under administrative control of the HSM SO. (For instructions to create PPSOpartitions on an HSMwith firmware 6.22.0 or newer, or to create true legacy partitions on an HSMwith firmware olderthan 6.22.0, see the appropriate instruction sequences elsewhere in this document.)
For the following procedure, youmust have previously initialized the HSM, and logged into the HSM as HSM SO.
Having logged in as HSM SO, you can now use the partition create command, to create an HSM Partition.
Youmust supply a label or name for the new Partition when you issue the command.lunash:> partition create -partition <name-for-new-Partition>
(The angle brackets “<“ and “>” indicate that you fill in text of your choice. Do not type the brackets.)
Note: A partition name or a partition label can include any of the following characters :
!#$%'()*+,-./0123456789:=@ABCDEFGHIJKLMNOPQRSTUVWXYZ[]^_abcdefghijklmnopqrstuvwxyz{}~
No spaces, unless you wish to surround the name or label in double quotationmarks every timeit is used.No questionmarks, no double quotationmarks within the string.Minimum name or label length is 1 character. Maximum is 32 characters.
Valid characters that can be used in a password or in a cloning domain, when entered viaLunaSH [1]), are:
!#$%'*+,-./0123456789:=?@ABCDEFGHIJKLMNOPQRSTUVWXYZ[]^_abcdefghijklmnopqrstuvwxyz{}~
SafeNet NetworkHSMConfiguration GuideRelease 6.2 007-011136-010 Rev. A December 2015 Copyright 2015Gemalto NV All rights reserved. 90

5 [Step 5] Create Application Partitions
(the first character in that list is the space character)Invalid or problematic characters, not to be used in passwords or cloning domains are"&';<>\`|()
Valid characters that can be used in a password or in a cloning domain, when entered vialunacm, are:
!"#$%&\'()*+,-./0123456789:;<=>?@ABCDEFGHIJKLMNOPQRSTUVWXYZ[\\]^_`abcdefghijklmnopqrstuvwxyz{|}~
(the first character in that list is the space character)
Minimum password length is 7 characters;maximum is 255 characters in lunash or lunacm.
Minimum domain string length is 1 character; maximum domain length is 128 characters vialunash. No arbitrary maximum domain string length is enforced for domain strings entered vialunacm, and we have successfully input domain strings longer than 1000 characters in testing.
[1] LunaSH on the SafeNet Network HSM has a few input-character restrictions that are notpresent in LunaCM, run from a client host. It is unlikely that you would ever be able to accessvia LunaSH a partition that received a password or domain via LunaCM, but the conservativeapproach would be to avoid the few "invalid or problematic characters" generally.
1. Create and name an application Partition. Type:lunash:> partition create -partition mylegacypar1(substitute the name of your choice for "mylegacypar1")Please ensure that you have purchased licenses for at least this number of partitions: -1If you are sure you wish to continue then type 'proceed', otherwise type 'quit' > proceed Proceeding...
Please ensure that you copy the password from the Luna PED and that you keep it in a safe place. Luna PED operation required to create a partition - use User or Partition Owner (black) PEDkey.
2. The PED inquires if you intend to reuse a pre-existing imprinted black PED Key.
Respond "Yes" if you have a key from another HSM partition with a partition Owner ID already imprinted on it, thatyou wish to share/reuse.Respond "No" if you have a fresh, never-imprinted key, or if you have a key previously imprinted with an ID that you
SafeNet NetworkHSMConfiguration GuideRelease 6.2 007-011136-010 Rev. A December 2015 Copyright 2015Gemalto NV All rights reserved. 91

5 [Step 5] Create Application Partitions
do not wish to preserve.(See "Shared or Group PED Keys" on page 1 for more detail)
3. The PED requests values for :
and
(enter "1" for both, unless you wish to invokeMofN split-secret, multi-person access control, "UsingMofN" on page1).
4. The PED then demands the black Owner PED key with themessage
Insert the black HSM Partition Owner PED key [ of course, the unlabeled PED Key is generically black - wesuggest that you apply the appropriate color sticker either immediately before or immediately after imprinting thekey; before, just to ensure it gets done, or after, as a helpful indicator as to which ones are imprinted (with whichsecret), and which ones still blank ] and press [Enter]. A unique Partition Owner PIN is to be imprinted on both thePED key and the HSM Partition.
SafeNet NetworkHSMConfiguration GuideRelease 6.2 007-011136-010 Rev. A December 2015 Copyright 2015Gemalto NV All rights reserved. 92

5 [Step 5] Create Application Partitions
5. The PED might continue with:
Decide whether this should be a group PED Key (see "What is a Shared or Group PED Key?" ), press [YES] or[NO] on the PED keypad, and press [Enter].
6. This is potentially serious business (if you unintentionally overwrite a PED Key that is needed for other purposes),so SafeNet PED asks onemore time if you truly intend to overwrite the key's content.
Press [YES] or [NO] on the PED keypad, and press [Enter].
7. Next, you are asked to provide a PED PIN (optional, see "What is a PED PIN?" — can be 4-to-48 digits, or can beno digits if a PED PIN is not desired).
Youmust press [Enter] to inform the PED that you are finished entering PED PIN digits, or that you have decidednot to use a PED PIN (no digits entered).When you provide a PED PIN – even if it is the null PIN (by just pressing [Enter] with no digits) – the PED requestsit a second time, to ensure that you entered it correctly, as you intended.
Press [ENTER] again.
SafeNet NetworkHSMConfiguration GuideRelease 6.2 007-011136-010 Rev. A December 2015 Copyright 2015Gemalto NV All rights reserved. 93

5 [Step 5] Create Application Partitions
8. You are then prompted
See "What is a duplicate PED Key?".Respond “No”, if you want the PED to imprint just the one black HSM Admin PED Key and go on to the next step increation of the application Partition.Respond “Yes”, if you want the PED to imprint the first black key and then ask for more black PED Keys, until youhave imprinted (duplicated) as many as you wish. After each duplicate is made, the PED asks: Would you like tomake another duplicate set? Answer "Yes" until you have enough copies, and then press "No".
9. Having created the black key User or Crypto Officer, the HSM needs you to log in as that identity, and prompts:
Leave the black key inserted, and press Enter.
10. Next, the partition's cloning domainmust be set, The PED inquires if you intend to reuse a previously imprinted redDomain PED Key.
Respond "Yes" if you have a key from another HSM partition with a cloning domain ID already imprinted on it, thatyou wish to share/reuse.Respond "No" if you have a fresh, never-imprinted key, or if you have a key previously imprinted with an ID that you
SafeNet NetworkHSMConfiguration GuideRelease 6.2 007-011136-010 Rev. A December 2015 Copyright 2015Gemalto NV All rights reserved. 94

5 [Step 5] Create Application Partitions
do not wish to preserve.
11. As it did for the black key, the PED now requests values for M and N. Again, enter 1 for each unless you wish toinvokeMofN splitting of the domain secret.
12. The PED then prompts for a red Domain PED key with themessage
Insert the red HSM Partition Domain PED key [ of course, the unlabeled PED Key is generically black - we suggestthat you apply the appropriate color sticker either immediately before or immediately after imprinting the key;before, just to ensure it gets done, or after, as a helpful indicator as to which ones are imprinted (with which secret),and which ones still blank ] and press [Enter]. A cloning domain is to be imprinted on both the PED key and theHSM Partition.
13. The PED goes through the same prompts as for the black PED Key. Respond as appropriate.
14. Control returns to the command line:
'partition create' successful.
Command Result : 0 (Success)[myLuna] lunash:>
CAUTION: We recommend that you have at least one backup set of imprinted PED Keys,stored in a safe place, in case of loss or damage to the primary keys.
Youmight wish to adjust "[Step 6] Set the Partition Policies for Legacy Partitions" on page 107 (Optional).
Otherwise, go to "Creating an NTL Link Between a Client and a Partition" on page 119 .
Partition creation audit log entryEach time a partition is created, an entry is added to the audit log. Any subsequent actions logged against the partitionare identified by the partition serial number that was generated when the partition was created.
Determining the serial number of a created partition from the audit logAn audit log entry similar to the following is generated when a partition is created on the HSM:
SafeNet NetworkHSMConfiguration GuideRelease 6.2 007-011136-010 Rev. A December 2015 Copyright 2015Gemalto NV All rights reserved. 95

5 [Step 5] Create Application Partitions
5,12/12/17 16:14:14,S/N 150718 session 1 Access 2147483651:2669 SO container operation LUNA_CREATE_CONTAINER returned RC_OK(0x00000000) container=20 (using PIN (entry=LUNA_ENTRY_DATA_AREA))It is not obvious from this entry what the serial number is for the created partition. This information, however, can bederived from the log entry, since the partition serial number is simply a concatenation of the HSM serial number and thepartition container number, which are specified in the log entry, as highlighted below:5,12/12/17 16:14:14,S/N 150718 session 1 Access 2147483651:2669 SO container operation LUNA_CREATE_CONTAINER returned RC_OK(0x00000000) container=20 (using PIN (entry=LUNA_ENTRY_DATA_AREA))In the example above, the HSM serial number is 150718 and the partition container number is 20. Note that the partitioncontainer number is a three-digit number with leading zeros suppressed, so that the actual partition container number is020. To determine the partition serial number concatenate the two numbers as follows:150718020Use this number to identify the partition in subsequent audit log entiries.
Record the Partition Client Password (PED-Auth HSMs)The PED now generates and displays the Client Password (login secret), by which Clients will later authenticatethemselves to this HSM Partition.
Record the Login Secret Value from the PED screen – write it down legibly – because it will never be shown again. Thisis the HSM Partition password, used to authenticate Client applications that wish to use the HSM Partition on theSafeNet Network HSM.
Note: It might be best to use a text editor, because themajority of errors tend to occur whenreading hand-written values. The password/challenge secret is case-sensitive.
Note: The PED times out after eight minutes. Youmust complete recording the password andpress the ENTER button before time-out occurs.
When you press [ENTER] on the PED keypad, control returns to the command prompt, where a success message isdisplayed:'partition create' successfulAt the same time, SafeNet PED goes back to "Awaiting command...".
Next youmight need to adjust the Partition Policy settings for the new Partition. (Optional see "[Step 6] Set the PartitionPolicies for Legacy Partitions" on page 107 )
Otherwise, see "[Step 7] Create a Network Trust Link Between the Client and the Appliance" on page 111.
SafeNet NetworkHSMConfiguration GuideRelease 6.2 007-011136-010 Rev. A December 2015 Copyright 2015Gemalto NV All rights reserved. 96

5 [Step 5] Create Application Partitions
About Configuring an Application Partition with Its OwnSOWhen you are ready to create and configure an application partition, it is assumed that you have already initialized andconfigured the HSM that is to contain the application partition.
SafeNet HSMs have two types of partition spaces:
• HSM administrative partition - where HSM-wide policies are set and changed, application partitions arecreated/destroyed, HSM firmware and capabilities are updated, etc.
• Application partition - where cryptographic operations are performed by your applications
Starting with SafeNet HSM firmware version 6.22.0, the ability to have an independent Security Officer per partitionwas implemented, which results in some changes from previous handling. To distinguish the different styles of partitionwewill call them "legacy" and "PPSO" application partitions. The options, when running SafeNet HSM Client softwareat themost current release are:
HSMfirmwareversion
PPSO Capabilityapplied?
Ownership/oversight of partition (type) Commands visible inlunacm when this HSMpartition is the currentlyselected slot
<6.22.0 cannot legacy (see note 1) -• HSM SO has full ownership
of application partition andcontrols the applicationthroughout its life
All commands are as theywerebefore SafeNet HSMrelease 6.0and firmware 6.22.0
>=6.22 no legacy option (see note 2) -• HSM SO has full ownership
of application partition andcontrols the applicationthroughout its life
lunacm HSM and partitionlogincommands and others arereplacedby "role" commands; someothercommands have newoptions/parameters
>=6.22 yes PPSO option (see note 2) -• an application partition has its own SO
(which is the optional newer way toconfigure a new application partition)
• the HSM SO can create or delete thepartition, but has no visibility or controlin the partition through its life;complete separation of roles
lunacm HSM and partitionlogincommands, and others, arereplacedby "role" commands; someothercommands have newoptions/parameters
Note 1 - No choice. With older firmware, only legacy-style partitionmanagement is available.
Note 2 -With firmware 6.22.0 and newer, you can choose to create a partition to be owned/controlled by the HSM SO(legacy), or you can choose to create a partition to be owned andmanaged by its own SO (the PPSO option, invoked
SafeNet NetworkHSMConfiguration GuideRelease 6.2 007-011136-010 Rev. A December 2015 Copyright 2015Gemalto NV All rights reserved. 97

5 [Step 5] Create Application Partitions
HSMfirmwareversion
PPSO Capabilityapplied?
Ownership/oversight of partition (type) Commands visible inlunacm when this HSMpartition is the currentlyselected slot
when you specify "slot" while creating a partition in lunacm, or when you specify "haspso" while creating a partition inlunash).
To summarize, until firmware 6.22 (or newer) version of SafeNet HSM receives FIPS validation, and becomes thedefault version shipping from the factory, you could have a new SafeNet HSM, or one that you already owned, at afirmware version older than 6.22.0. If you install newer SafeNet HSM Client, the included lunacm utility version iscapable of supporting both the older command set or the newer command set, depending on the HSM firmware of thecurrently selected slot. That is, if you havemultiple SafeNet HSMs in, or connected to, your SafeNet HSM Client host,which could include:
• internally installed SafeNet PCI-E HSM,
• USB-connected SafeNet USB HSM, or
• network (NTLS- or STC-connected) SafeNet Network HSM partitions,
you could see different available command sets as you switch slots in lunacm, depending on the firmware version in thecurrently selected slot.
The high-level steps are summarized below, to go from a new or factory reset HSM to having a configured applicationpartition, ready for keys and objects and cryptographic operations. Normally, each set of actions would be performed bya different person with different responsibilities.
As the HSM Administrator or SO1. Complete the certificate exchanges and registrations necessary to create the secure link between Client and
application partitions on the appliance.
2. Initialize the HSM; create the SO role and the cloning domain for the HSM's administrative partition (see "HSMInitialization and Zeroization" on page 1).
3. Log into the administrative partition, as SO.
4. Create the empty application partition.
As the application partition Security Officer5. Select/set the slot to the newly created application partition.
6. Initialize the SO role and the cloning domain for the application partition.
7. Log into the application partition as SO.
8. Initialize the Crypto Officer role.
9. Log out.
As the application partition Crypto Officer10. Select/set the slot to the application partition.
11. Log into the application partition as Crypto Officer.
SafeNet NetworkHSMConfiguration GuideRelease 6.2 007-011136-010 Rev. A December 2015 Copyright 2015Gemalto NV All rights reserved. 98

5 [Step 5] Create Application Partitions
12. Initialize the Crypto User role.
Next step
Note: Before you begin configuring and initializing a PED-authenticated SafeNet HSM, westrongly urge that you familiarize yourself with the pages at "PED Authentication" on page 1.
Your responses to PED prompts are required duringmany of the steps. Most of the PED-prompt sequences require decisions that have serious implications for ongoing use of yourHSM. PED operations are subject to timeout restrictions for security reasons, meaning that, ifyour selections and actions are not prompt, the PED will quit the current sequence. In the eventof a timeout, youmust reissue the HSM command that called the PED.
For PED-authenticated SafeNet Network HSM, the first step is to initialize the HSM; see "HSM SOConfigures PED-authenticated SafeNet Network HSM Partition with SO " below.
For Password-authenticated SafeNet Network HSM, the first step is to initialize the HSM; see "HSM SOConfiguresSafeNet Network HSM Password-authenticated Partition with SO " on page 103.
HSM SO Configures PED-authenticated SafeNet Network HSM Partition withSOAn application owner/user has requested an application partition on the HSM, in which applications will runcryptographic operations. These instructions are the actions to be taken by the HSM Security Officer or SO. Theseinstructions assume a PED-authenticated SafeNet HSM supporting the creation of a partition with its own SecurityOfficer.
These instructions assume a SafeNet Network HSM. Initially it is accessed via SSH to create the partition usingLunaSH (lunash:>), to create the partition. After the PPSO partition is created, administrative access to that partitionmoves to a host computer where SafeNet HSM Client software is installed, and where administrative actions arecarried out through a Network Trust Link (NTL) via the lunacm tool.
You will need:
• The HSM has firmware 6.22.0, or newer, and the Per-Partition SO capability installed.
• The appliance is configured for network operation and server certificate was created.
• SafeNet Network HSM and your application host computer have exchanged certificates.
• The HSM is in initialized state.
• For PED-Authenticated SafeNet HSM only, a SafeNet PED and PED Keys with labels. These instructionsassume that you still have local physical access to your SafeNet Network HSM appliance, for local PEDconnection, or that your SafeNet PED is remotely connected and you have previously imprinted the HSM and anorange PED Key with a commonRemote PED vector. See "Configuring Remote PED" on page 1 and "Using theRemote PED Feature" on page 1.
SafeNet NetworkHSMConfiguration GuideRelease 6.2 007-011136-010 Rev. A December 2015 Copyright 2015Gemalto NV All rights reserved. 99

5 [Step 5] Create Application Partitions
Note: If you have an existing legacy partition that shares the HSM Administrator (SO) as itsSO, and you prefer that it have its own SO, it cannot be directly turned into a partition that hasits own SO. You will need to back up any contents, delete the partition, and re-create with anapplication partition SO.
You can create either type of partition. They can co-exist without conflict on the HSM.
Note: Updating from pre-6.22.0 firmware to firmware version 6.22.0 or newer is necessary tosupport the PPSO capability, but does not, itself, confer the capability. To enable creation ofapplication partitions with their own Per-Partition Security Officers, youmust acquire and installthe PPSO capability upgrade.
The PPSO capability Upgrade is destructive. Therefore, youmust back up any existingapplication partition on your HSM, before performing the upgrade, as all partitions and contentsare destroyed by the upgrade. After the upgrade is complete, you can create new partitions withPer-Partition SOs, or with legacy-style partitions where the HSM SO retains ownership, or amix of both, and then restore the pre-existing content to your new partitions from backup.
PreliminaryIf you are using a SafeNet PED connected locally to the SafeNet Network HSM, skip to step 4 below.
1. If necessary, have a SafeNet PED connected to a host computer (can be the same computer that acts as yourSafeNet HSM Client, but can be another host if desired), with the PED set to "Remote PED mode", and an orangePED Key ready, containing the sameRPV as your SafeNet Network HSM.
2. On the host computer, launch PedServer.exe.C:\Program Files\SafeNet\LunaClient>pedserver -mode start -ip 192.20.10.217 -port 1503Ped Server Version 1.0.5 (10005)
Failed to load configuration file. Using default settings.
Ped Server launched in startup mode.Starting background processBackground process startedPed Server Process created, exiting this process.
C:\Program Files\SafeNet\LunaClient>pedserver -mode showPed Server Version 1.0.5 (10005)
Failed to load configuration file. Using default settings.
Ped Server launched in status mode.failed to unlock: GetLastError(): 183 0xb7
Server Information:Hostname: MyRPEDhostIP: 172.20.10.217Firmware Version: 2.6.0-2PedII Protocol Version: 1.0.1-0Software Version: 1.0.5 (10005)
SafeNet NetworkHSMConfiguration GuideRelease 6.2 007-011136-010 Rev. A December 2015 Copyright 2015Gemalto NV All rights reserved. 100

5 [Step 5] Create Application Partitions
Ped2 Connection Status: ConnectedPed2 RPK Count 0Ped2 RPK Serial Numbers (none)
Client Information: Not Available
Operating Information:Server Port: 1503External Server Interface: YesAdmin Port: 1502External Admin Interface: No
Server Up Time: 52 (secs)Server Idle Time: 52 (secs) (100%)Idle Timeout Value: 1800 (secs)
Current Connection Time: 0 (secs)Current Connection Idle Time: 0 (secs)Current Connection Total Idle Time: 0 (secs) (100%)Total Connection Time: 0 (secs)Total Connection Idle Time: 0 (secs) (100%)
Show command passed.
C:\Program Files\SafeNet\LunaClient>
3. On the SafeNet Network HSM, start the PED client service, pointing to the PedServer that you just started.[mylunasa] lunash:>hsm ped connect -ip 192.20.10.217 -port 1503
Luna PED operation required to connect to Remote PED - use orange PED key(s).
Command Result : 0 (Success)[mylunasa] lunash:>hsm login
Luna PED operation required to login as HSM Administrator - use Security Officer (blue) PEDkey.
'hsm login' successful.
Command Result : 0 (Success)[mylunasa] lunash:>
4. Log into the SafeNet Network HSM, if not already logged in.[mylunasa] lunash:>hsm login
Luna PED operation required to login as HSM Administrator - use Security Officer (blue) PEDkey.
'hsm login' successful.
SafeNet NetworkHSMConfiguration GuideRelease 6.2 007-011136-010 Rev. A December 2015 Copyright 2015Gemalto NV All rights reserved. 101

5 [Step 5] Create Application Partitions
Command Result : 0 (Success)[mylunasa] lunash:>
Create the PPSO Partition1. Run partition create command, specifying a partition name, and being sure to include the "-haspso" parameter.
[mylunasa] lunash:>partition create -haspso -partition mypsopar1
Please ensure that you have purchased licenses for at least this number of partitions: 1
Type 'proceed' to create the uninitialized partition, or'quit' to quit now.> proceed
'partition create' successful.
Command Result : 0 (Success)[mylunasa] lunash:>
Note: The command parameters include an option "-label". This is not used when creatingPPSO partitions. If you include it, an error message appears, but the "-label" is ignored.
The "-partition <name>" parameter is required.
2. Verify that the partition has been created.[mylunasa] lunash:>hsm show
Appliance Details:==================Software Version: 6.0.0-22
HSM Details:============HSM Label: mysahsmSerial #: 7000022Firmware: 6.22.0Hardware Model: Luna K6Authentication Method: PED keysHSM Admin login status: Logged InHSM Admin login attempts left: 3 before HSM zeroization!RPV Initialized: YesAudit Role Initialized: NoRemote Login Initialized: NoManually Zeroized: No
Partitions created on HSM (1):==============================Partition: 16298193222733, Name: mypsopar1
SafeNet NetworkHSMConfiguration GuideRelease 6.2 007-011136-010 Rev. A December 2015 Copyright 2015Gemalto NV All rights reserved. 102

5 [Step 5] Create Application Partitions
FIPS 140-2 Operation:=====================The HSM is NOT in FIPS 140-2 approved operation mode.
HSM Storage Information:========================Maximum HSM Storage Space (Bytes): 2097152Space In Use (Bytes): 20971Free Space Left (Bytes): 2076181
Command Result : 0 (Success)[mylunasa] lunash:>
The PPSO partition now exists, and all future configuration andmanagement of that partition will be handed over to theperson who is to become the SO of the new partition. The HSM SO can delete the partition via lunash command, butcannot reach inside the new partition to perform any further administrative actions. This is an important difference fromlegacy-style partitions, where the HSM SO remains the administrative owner of the application partition and canperform any desired administrative function by means of lunash commands.
In a PPSO partition, the partition SO (and any additional roles that are created for the partition) performs all configurationandmanagement actions via a client connection using LunaCM.
The next step is "[Step 7] Create a Network Trust Link Between the Client and the Appliance" on page 111.
HSM SO Configures SafeNet Network HSM Password-authenticated Partitionwith SOAn application owner/user has requested an application partition on the HSM, in which applications will runcryptographic operations. These instructions are the actions to be taken by the HSM Security Officer or SO. Theseinstructions assume a Password-authenticated SafeNet HSM supporting the creation of a partition with its ownSecurity Officer.
These instructions assume a SafeNet Network HSM. Initially it is accessed via SSH to create the partition usingLunaSH (lunash:>), to create the partition. After the PPSO partition is created, administrative access to that partitionmoves to a host computer where SafeNet HSM Client software is installed, and where administrative actions arecarried out through a Network Trust Link (NTL) via the lunacm tool.
You will need:
• The HSM has firmware 6.22.0, or newer, and the Per-Partition SO capability installed.
• The appliance is configured for network operation and server certificate was created.
• SafeNet Network HSM and your application host computer have exchanged certificates.
• The HSM is in initialized state.
Note: If you have an existing legacy partition that shares the HSM Administrator (SO) as itsSO, and you prefer that it have its own SO, it cannot be directly turned into a partition that hasits own SO. You will need to back up any contents, delete the partition, and re-create with anapplication partition SO.
You can create either type of partition. They can co-exist without conflict on the HSM..
SafeNet NetworkHSMConfiguration GuideRelease 6.2 007-011136-010 Rev. A December 2015 Copyright 2015Gemalto NV All rights reserved. 103

5 [Step 5] Create Application Partitions
Note: Updating from pre-6.22.0 firmware to firmware version 6.22.0 or newer is necessary tosupport the PPSO capability, but does not, itself, confer the capability. To enable creation ofapplication partitions with their own Per-Partition Security Officers, youmust acquire and installthe PPSO capability upgrade.
The PPSO capability Upgrade is destructive. Therefore, youmust back up any existingapplication partition on your HSM, before performing the upgrade, as all partitions and contentsare destroyed by the upgrade. After the upgrade is complete, you can create new partitions withPer-Partition SOs, or with legacy-style partitions where the HSM SO retains ownership, or amix of both, and then restore the pre-existing content to your new partitions from backup.
Create the PPSO Partition1. Log into the SafeNet Network HSM, if not already logged in.
[mylunasa] lunash:>hsm login
'hsm login' successful.
Command Result : 0 (Success)[mylunasa] lunash:>
2. Run partition create command, specifying a partition name, and being sure to include the "-haspso" parameter.[mylunasa] lunash:>partition create -haspso -partition mypsopar1
Please ensure that you have purchased licenses for at least this number of partitions: 1
Type 'proceed' to create the uninitialized partition, or'quit' to quit now.> proceed
'partition create' successful.
Command Result : 0 (Success)[mylunasa] lunash:>
Note: The command parameters include an option "-label". This is not used when creatingPPSO partitions. If you include it, an error message appears, but the "-label" is ignored.
The "-partition <name>" parameter is required.
3. Verify that the partition has been created.[mylunasa] lunash:>hsm show
Appliance Details:==================Software Version: 6.0.0-22
SafeNet NetworkHSMConfiguration GuideRelease 6.2 007-011136-010 Rev. A December 2015 Copyright 2015Gemalto NV All rights reserved. 104

5 [Step 5] Create Application Partitions
HSM Details:============HSM Label: mysahsmSerial #: 7000022Firmware: 6.22.0Hardware Model: Luna K6Authentication Method: PasswordHSM Admin login status: Logged InHSM Admin login attempts left: 3 before HSM zeroization!RPV Initialized: YesAudit Role Initialized: NoRemote Login Initialized: NoManually Zeroized: No
Partitions created on HSM (1):==============================Partition: 16298193222733, Name: mypsopar1
FIPS 140-2 Operation:=====================The HSM is NOT in FIPS 140-2 approved operation mode.
HSM Storage Information:========================Maximum HSM Storage Space (Bytes): 2097152Space In Use (Bytes): 20971Free Space Left (Bytes): 2076181
Command Result : 0 (Success)[mylunasa] lunash:>
The PPSO partition now exists, and all future configuration andmanagement of that partition will be handed over to theperson who is to become the SO of the new partition. The HSM SO can delete the partition via lunash command, butcannot reach inside the new partition to perform any further administrative actions. This is an important difference fromlegacy-style partitions, where the HSM SO remains the administrative owner of the application partition and canperform any desired administrative function by means of lunash commands.
In a PPSO partition, the partition SO (and any additional roles that are created for the partition) performs all configurationandmanagement actions via a client connection using LunaCM.
The next step is "[Step 7] Create a Network Trust Link Between the Client and the Appliance" on page 111.
SafeNet NetworkHSMConfiguration GuideRelease 6.2 007-011136-010 Rev. A December 2015 Copyright 2015Gemalto NV All rights reserved. 105

SafeNet NetworkHSMConfiguration GuideRelease 6.2 007-011136-010Rev. A December 2015 Copyright 2015Gemalto NV All rights reserved. 106

6 [Step 6] Set the Partition Policies for Legacy Partitions
6[Step 6] Set the Partition Policies for
Legacy Partitions
At this point, you should have initialized the HSM and created one or more HSM Partitions. Before deploying thepartitions, review and set the policies that constrain the use of the HSM Partition by clients, as described in thefollowing sections:
• "Displaying the Current Partition Policy Settings" below
• "Changing the Partition Policy Settings" on page 109
• "RSA BlindingMode" on page 110
Note: This section applies to application partitions that are owned and administered by theHSM SO. If the application partition was created with its own Partition SO, then you cannot useLunaSH (lunash) to administer the partition. All administration of a PPSO partition is carried outby the Partition SO, via LunaCM, from a registered client computer.
Secure Trusted Channel Partition PolicyIf you want to use a Secure Trusted Channel (STC) to provide the network link between the partition and authorizedclients, youmust enable Policy 37: Force Secure Trusted Channel. See "Enabling or Disabling STC on a Partition" onpage 1 in theAdministration Guide for more information.
Displaying the Current Partition Policy SettingsFirst, display the policies (default) of the created legacy-style application Partition. In order to run the partitionshowPolicies command, you do not need to be logged into the HSM Partition. However, to change policies of eitherthe HSM or an individual Partition, youmust login as HSM SO.
To display the current partition policy settings1. Open a LunaSH session on the appliance.
2. Enter the following command to display current partition capability and policy settings. Capabilities are factorysettings. Policies are themeans of modifying the adjustable capabilities:
partition showpolicies -partition <partitIon_name>
For example:lunash:> partition showPolicies -partition mypartition
Partition Name: mypartitionPartition Num: 65038002
SafeNet NetworkHSMConfiguration GuideRelease 6.2 007-011136-010 Rev. A December 2015 Copyright 2015Gemalto NV All rights reserved. 107

6 [Step 6] Set the Partition Policies for Legacy Partitions
The following capabilities describe this partition and cannever be changed.
Description Value=========== =====Enable private key cloning AllowedEnable private key wrapping DisallowedEnable private key unwrapping AllowedEnable private key masking DisallowedEnable secret key cloning AllowedEnable secret key wrapping AllowedEnable secret key unwrapping AllowedEnable secret key masking DisallowedEnable multipurpose keys AllowedEnable changing key attributes AllowedEnable PED use without challenge AllowedAllow failed challenge responses AllowedEnable operation without RSA blinding AllowedEnable signing with non-local keys AllowedEnable raw RSA operations AllowedMax failed user logins allowed 10Enable high availability recovery AllowedEnable activation AllowedEnable auto-activation AllowedMinimum pin length (inverted: 255 - min) 248Maximum pin length 255Enable Key Management Functions AllowedEnable RSA signing without confirmation AllowedEnable Remote Authentication AllowedEnable private key unmasking AllowedEnable secret key unmasking AllowedEnable RSA PKCS mechanism AllowedEnable CBC-PAD (un)wrap keys of any size AllowedEnable private key SFF backup/restore DisallowedEnable secret key SFF backup/restore DisallowedEnable Secure Trusted Channel Allowed
The following policies are set due to current configurationof this partition and may not be altered directly by theuser.
Description Value=========== =====Challenge for authentication not needed False
The following policies describe the current configurationof this partition and may be changed by the HSM Administrator.
Description Value Code=========== ===== ====Allow private key cloning On 0Allow private key unwrapping On 2Allow secret key cloning On 4Allow secret key wrapping On 5Allow secret key unwrapping On 6
SafeNet NetworkHSMConfiguration GuideRelease 6.2 007-011136-010 Rev. A December 2015 Copyright 2015Gemalto NV All rights reserved. 108

6 [Step 6] Set the Partition Policies for Legacy Partitions
Allow multipurpose keys On 10Allow changing key attributes On 11Ignore failed challenge responses On 15Operate without RSA blinding On 16Allow signing with non-local keys On 17Allow raw RSA operations On 18Max failed user logins allowed 10 20Allow high availability recovery On 21Allow activation Off 22Allow auto-activation Off 23Minimum pin length (inverted: 255 - min) 248 25Maximum pin length 255 26Allow Key Management Functions On 28Perform RSA signing without confirmation On 29Allow Remote Authentication On 30Allow private key unmasking On 31Allow secret key unmasking On 32Allow RSA PKCS mechanism On 33Allow CBC-PAD (un)wrap keys of any size On 34Force Secure Trusted Channel Off 37
Command Result : 0 (Success)[myluna] lunash:>
Changing the Partition Policy SettingsHaving viewed the Policy settings, you can now modify a Partition Policy for a given Partition, if required.
To change a partition policy1. Open a LunaSH session on the appliance.
2. Enter the following command to change a Partition Policy:
partition changepolicy -partition <name of HSM Partition> -policy <policy_code> -value <new_ policy_value>
3. Refer to the example below that is applicable to your SafeNet appliance's HSM type.
Policy setting example, SafeNet HSM with Password AuthenticationThe default minimum password length is 7 characters (which the SafeNet HSM calculates as 255minus 248, where255 is themaximum length and 248 is the number that can be subtracted from themaximum to yield theminimumlength). Wewant theminimum Partition password length to be larger than 7 characters – for example, nine. To do that,we would need to change the number that is subtracted from 255 to be 246, instead of the current 248.
1. Login Before Changing Policies
2. Change the selected policy for a Partition labeled "myPartition1". Type:lunash:> partition changePolicy -partition myPartition1 -policy 25 -value 246'partition changePolicy' successful.Policy "Minimum pin length (inverted: 255 - min)" is now set to: 246lunash:>
3. Log out of the HSMwhenever you finish operations that require HSM login.lunash:> hsm logoutlunash:>
SafeNet NetworkHSMConfiguration GuideRelease 6.2 007-011136-010 Rev. A December 2015 Copyright 2015Gemalto NV All rights reserved. 109

6 [Step 6] Set the Partition Policies for Legacy Partitions
Policy setting example, SafeNet HSM with PED AuthenticationThis is just an example. You do not need to change this particular policy, or any other, except to configure the HSMPartitionmore appropriately for your use.
1. Login Before Changing Policies
2. Change a selected policy for a Partition labeled "myPartition1". Type:lunash:> partition changePolicy -partition myPartition1 -policy 22 -value 1(allows Activationmode to be on)partition changePolicy successfulPolicy allow Activation is now set to: 1
3. And change the other policy for the same Partition.lunash:> partition -changePolicy -partition myPartition1 -policy 23 -value 1(allows autoActivationmode to be on)partition changePolicy successfulPolicy allow autoActivation is now set to: 1
4. Log out of the HSMwhenever you finish operations that require HSM login.lunash:> hsm - logoutlunash:>
RSA Blinding ModeBlinding is a technique that introduces random elements into the signature process to prevent timing attacks on theRSA private key. Use of this techniquemay be required by certain security policies, but it does reduce performance.
The HSM Admin or Security Officer can turn this feature on or off.
If RSA blinding is enabled in Capabilities and allowed in Policies, the partition will always run in RSA blinding mode;performance will be lower than SafeNet published performance figures. This is because the deliberate introduction ofrandom elements causes the average signature to take longer to complete.
For maximum performance, you can switch RSA blindingmode off, at the cost of slight additional risk of so-calledtiming attacks on your keys. It is your decision whether your network and other security measures are sufficientlyrigorous that blinding is not needed.
SafeNet HSMs are normally shipped with the Capability set to allow switching blinding on or off, and with the Policy setto not use blinding, by default.
SafeNet NetworkHSMConfiguration GuideRelease 6.2 007-011136-010 Rev. A December 2015 Copyright 2015Gemalto NV All rights reserved. 110

7[Step 7] Create a Network Trust Link
Between the Client and the Appliance
The first step in preparing your clients to use the cryptographic resources provided by the HSM appliance is to create asecure network trust link (NTL) between the client and the appliance. After you create the NTL link between the clientand the appliance, you can configure links to individual partitions on the appliance using NTL or Secure TrustedChannel (STC), as described in "[Step 8] Enable the Client to Access a Partition" on page 119.
About Network Trust LinksNetwork Trust Links (NTL) are secure, authenticated network connections between the SafeNet Network HSM andClients. NTLs use two-way digital certificate authentication and TLS data encryption (version 1.2 is supported inSafeNet Network HSM 6.1) to protect sensitive data as it is transmitted between HSM Partitions on the SafeNetNetwork HSM andClients. NTLs consist of the following parts:
• the Network Trust Link Service (NTLS). The NTL server daemon runs on the SafeNet Network HSM appliance andmanages the NTL connections to the appliance. NTL uses port 1792 on the SafeNet Network HSM appliance.
• the Network Trust Link Agent (NTLA). The NTL agent runs on a SafeNet HSM client workstation andmanages theNTL connections to the workstation. The NTL agent is included in the SafeNet HSM client software.
• The Network Trust Link itself, an encrypted, secure communications channel between the Client’s NTLA and theHSM appliance's NTLS.
Network Trust Links use digital certificates to verify the identities of connecting clients. During the initial HSMappliance configuration (see "Generate a New HSM Server Certificate" on page 45), the appliance administratorgenerated a unique certificate that identifies the HSM appliance. Similarly, each Client must generate its own certificatethat identifies it uniquely. Both the Client and the HSM appliance use these certificates to verify the other’s identitybefore an NTL is created between them.
The Host Trust Link (HTL) Option for VM ClientsClients running on virtual machines (VMs) are subject to an attack in which a clone of the VM instance is used to gainaccess to the HSM. To remove this risk, and ensure the integrity of the client, you can optionally specify that you wantthe network trust link to require host trust link (HTL) client authentication. HTL uses a client-specific, one-time-token onthe client that is synchronized with the HSM server to ensure the integrity of the client, and prevent an unsynchronizedcloned VM image from connecting to the HSM. See "Host Trust Link Client Authentication" on page 1 in theAdministration Guide for more information.
Although designed for VM clients, you can use HTL to secure the client on any NTL link.
CAUTION: To avoid a VM clone attack, do not register a VM client without invoking the HTLoption.
SafeNet NetworkHSMConfiguration GuideRelease 6.2 007-011136-010Rev. A December 2015 Copyright 2015Gemalto NV All rights reserved. 111

7 [Step 7] Create a Network Trust Link Between the Client and the Appliance
Invoking HTLTo invoke the HTL option when creating an NTL, you do the following:
1. Specify the -htl option when using the vtl addserver command to register the SafeNet Network HSM appliancewith the SafeNet HSM client workstation.
2. Specify the -requirehtl option when using the LunaSH client register command to register the SafeNet HSMclient workstation with the SafeNet Network HSM appliance.
3. Generate a one-time token for the SafeNet HSM client workstation using the LunaSH htl generateott command
4. Use scp/pscp to export the one-time-token to the SafeNet HSM client workstation
5. Rename the one-time-token with the hostname/IP of the SafeNet Network HSM appliance and place it in the<luna_client_root>/htl directory. The HTL link is established automatically during the next HTL polling interval.
These steps are included as options in the procedure "To create a network trust link" below.
Creating a Network Trust LinkTo create an NTL, the Client and HSM appliancemust first exchange certificates. Once the certificates have beenexchanged, the Client registers the SafeNet Network HSM’s certificate in a trust list, and the SafeNet Network HSMappliance, in turn, registers the Client’s certificate in its list of clients. When the certificates have been exchanged andregistered at each end, the NTL is ready to use.
"Ready to use" means that an application at the client host (such as lunacm or your crypto-using application) can seethe registered SafeNet Network HSM application partition(s) as slot(s) in the client slot list, can select such registeredpartitions by slot number, and can then perform cryptographic operations in those slots after providing appropriatepartition authentication (Crypto Officer, Crypto User).
Note: Administration commands can take a few seconds to be noted by the NTLS. If you haveadded or deleted a client, wait a few seconds before connecting.
To create a network trust link
Note: Youmust have administrator (or root) access to perform this procedure. Read/writeaccess to the SafeNet HSM client installation directory is required for the certificate exchange.
1. Prepare the client workstation:
a. Install the SafeNet HSM client software. See "SafeNet Client Software Installation " on page 1 in theInstallation Guide for details.
b. Install an SSH client to provide secure shell access to the SafeNet appliance for certificate exchange andregistration. The PuTTY SSH client (putty.exe) is included in the SafeNet HSM client forWindows.
c. Ensure that the client workstation has network access to the SafeNet Network HSM appliance. The applianceauto-negotiates network bandwidth up to Gigabit Ethernet speeds. See "Recommended NetworkCharacteristics" on page 32 for more information.
2. Open a SafeNet HSM client session:
a. Open a command prompt or terminal window.
b. Go to the SafeNet HSM client installation directory:
SafeNet NetworkHSMConfiguration GuideRelease 6.2 007-011136-010 Rev. A December 2015 Copyright 2015Gemalto NV All rights reserved. 112

7 [Step 7] Create a Network Trust Link Between the Client and the Appliance
Windows C:\Program Files\SafeNet\LunaClient
Linux/AIX /usr/safenet/lunaclient/bin
Solaris/HP-UX /opt/safenet/lunaclient/bin
3. Use pscp (Windows) or scp (Linux/UNIX) to import the HSM Appliance Server Certificate (server.pem) from theSafeNet Network HSM appliance to the SafeNet HSM client workstation. See "Using the scp and pscp Utilities"on page 1 for details. You require the SafeNet Network HSM appliance admin password to complete this step:
If you are importingmultiple SafeNet Network HSM appliance's certificates to a client, we suggest that you importthe certificates and process each one as it arrives. The vtl addServer command (just ahead) copies, moves andrenames the current server.pem certificate to reflect the originating appliance's hostname or IP address, asappropriate, and you are always assured that the certificates that are registered in the .\cert\server folder areunique. In this method, each appliance server cert arrives in the SafeNet HSM Client folder as (the default)"server.pem" and is safely registered uniquely (in the server cert folder) before the next server.pem arrives andoverwrites any earlier version.
If you prefer to import server.pem certificates frommultiple appliances, before registering them, then youmustrename them as they arrive, to avoid overwriting and losing certificates that all arrive in the same folder with thesame default filename.
Windows Syntax: pscp [options] <user>@<host>:<source_filename> <target_filename>Example:To copy the server certificate from host myHSM to the current (.) directory, keeping thesame name:pscp admin@myHSM:server.pem .admin@myHSM's password:server.pem | 1 kB | 1.1 kB/s | ETA: 00:00:00 | 100%
Linux/UNIX Syntax:scp [options] <user>@<host>:<source_filename> <target_filename>Example: To copy the server certificate from host IP 192.168.0.123 to the current (.) directory,keeping the same name:
scp [email protected]:server.pem [email protected]'s password:server.pem | 1 kB | 1.1 kB/s | ETA: 00:00:00 | 100%
Note: Youmust accept the SSH certificate first time you open an scp or ssh link. You can uselunash:> sysconf fingerprint -ssh to check the certificate fingerprint.
Note: If the HSM appliance IP or hostname is changed, SSH will detect amismatch in theHSM appliance's server certification information and warn you of a potential security breach. Toresolve this issue, delete the server's certificate information from the client’s known host file at:/<user home dir>/.ssh/known_hosts2, and re-import the server certificate.
4. Register the HSM Server Certificate with the client, using the vtl addserver command. Use the -htl option if theclient is running in a VM, or if you want to the add extra client identity verification offered by HTL to the link (see"The Host Trust Link (HTL) Option for VM Clients" on page 111).
See "VTL" on page 1 in theUtilities ReferenceGuide for full command syntax:
SafeNet NetworkHSMConfiguration GuideRelease 6.2 007-011136-010 Rev. A December 2015 Copyright 2015Gemalto NV All rights reserved. 113

7 [Step 7] Create a Network Trust Link Between the Client and the Appliance
Non-VM clients (without HTL) vtl addServer -n <SA_hostname_or_IP> -c <server_certificate>
VM clients (with HTL) vtl addServer -n <SA_hostname_or_IP> -c <server_certificate> -htl
Note: If you specify the -htl option, youmust also specify the -requirehtl option when youregister the client with the server, in a subsequent step. If you do not, the server will rejectrequests to create the link, since it expects an HTL connection to be present.
Note: The vtl command is not interactive. It is called from the command line or a shell prompt,it completes its current task, and it exits back to the shell.
Examples:
The following command copies the server.pem file that was downloaded in the previous step, from <luna_install_dir> to <luna_install_dir>/cert/server, and registers themyLunaSA server certificate (<luna_install_dir>/cert/server/server.pem), with the client:bash-2.05# ./vtl addServer -n myLunaSA -c server.pemNew server myLunaSA successfully added to the server list.
The following command copies the server.pem file that was downloaded in the previous step, from <luna_install_dir> to <luna_install_dir>/cert/server, and registers the server certificate for the SafeNet Network HSM applianceat IP address 192.168.0.123 (<luna_install_dir>/cert/server/server.pem), with the client and specifies that the linkrequires HTL client integrity verification:bash-2.05# ./vtl addServer -n 192.168.0.123 -c server.pem -htlNew server 192.168.0.123 successfully added to the server list.
As shown, the server certificate from any SafeNet appliance arrives as the default named file server.pem. The vtladdserver command places a copy of the imported server.pem file in the ./cert/server folder, (re-)naming the newfile with the hostname (or IP) that you supply with -n in the command. In one example, above, the new copy wouldbe 192.168.0.123Cert.pem. In the other example, the new cert file would bemyLunaSACert.pem. Additionally,the command updates theCAFile.pem at that location, adding the new, named SafeNet Network HSM servercertificate to the list of certs that the client recognizes.
At aminimum you would have one named server certificate file along with theCAFile.pem containing a singleentry, whichmust match the certificate. You could have as many unique certificates in that folder as you haveSafeNet appliances, and theCAFile.pem would contain amatching entry for each cert. Server certificates that donot have an entry in theCAFile.pem are ignored. Entries in theCAFile.pem that do not correspond to a unique<servername>Cert.pem file are ignored.
The downloaded server.pem file, from the earlier step, is now redundant and can be deleted, or it will be replacedthe next time you download a server certificate from a SafeNet appliance.
5. Create a certificate and private key for the client, using the vtl createcert command. See "VTL" on page 1 in theUtilities ReferenceGuide for full command syntax:
vtl createcert -n <Luna_client_hostname_or_IP>
SafeNet NetworkHSMConfiguration GuideRelease 6.2 007-011136-010 Rev. A December 2015 Copyright 2015Gemalto NV All rights reserved. 114

7 [Step 7] Create a Network Trust Link Between the Client and the Appliance
Note: The client hostname or IP address must be an exact match for the client hostname, asreported using the hostname command. If you create a certificate using a hostname parameterthat is not an exact letter-casematch for the client’s hostname, you will be unable to create anNTLS link.
The certificate and private key are saved to the <luna_install_dir>/cert/client directory and are named <Luna_client_hostname_or_IP>.pem and <Luna_client_hostname_or_IP>Key.pem, respectively. The vtl createcertcommand displays the full path-name to the key and certificate files that were generated.
Example: The following command creates a certificate and private key for the client namedmyLunaClient:bash-2.05# ./vtl createCert -n myClient1Private Key created and written to: /usr/safenet/lunaclient/bin/cert/client/myClientKey.pemCertificate created and written to: /usr/safenet/lunaclient/bin/cert/client/myClient.pem
6. Export the client certificate to the HSM appliance, using pscp (Windows) or scp (Linux/UNIX). You require theSafeNet Network HSM appliance admin password to complete this step:
Note: Youmust scp to the admin account on the HSM appliance, or the client certificate willnot register correctly. The file arriving at the HSM is automatically placed in the appropriatedirectory. Do not specify a target directory.
Windows Syntax: pscp [options] <source_filename> <user>@<host>:[<target_filename>]Example:To copy the client certificate (myLunaClient.pem) to themyLunaSA appliance,keeping the same name:pscp myLunaClient.pem admin@myLunaSA:admin@myLunaSA's password: ******** myLunaClient.pem | 1 kB | 1.1 kB/s | ETA: 00:00:00 | 100%
Linux/UNIX Syntax:scp [options] <source_filename> <user>@<host>:[<target_filename>]Example: To copy the client certificate (myLunaClient.pem) to the SafeNet Network HSMappliance with IP 192.168.0.123, keeping the same name:scp myLunaClient.pem [email protected]:[email protected]'s password: ******** myLunaClient.pem | 1 kB | 1.1 kB/s | ETA: 00:00:00 | 100%
7. Register the client certificate with the HSM appliance using the LunaSH client register command. Use the -requirehtl, -ottexpiry, and -generateott options if the client is running in a VM, or if you want to the add extra clientidentity verification offered by HTL to the link (see "The Host Trust Link (HTL) Option for VM Clients" on page 111).You need an admin or operator-level account on the SafeNet Network HSM appliance to complete this step.
Note: Youmust specify the -requirehtl option if you used the -htl option when you registeredthe server with the client. If you do not, the server will reject requests to create the link, since itexpects an HTL connection to be present.
a. Use an SSH client to connect to the SafeNet Network HSM appliance and login using an admin or operator-level account.
b. Use the LunaSH client register command to register the client. See "client register" on page 1 in the LunaSHReferenceGuide for details.
SafeNet NetworkHSMConfiguration GuideRelease 6.2 007-011136-010 Rev. A December 2015 Copyright 2015Gemalto NV All rights reserved. 115

7 [Step 7] Create a Network Trust Link Between the Client and the Appliance
Non-VM clients(withoutHTL)
Byhostname
client register -client <client_name> -hostname <client_hostname>
(Use this version if the client certificate was created using the client's hostname.You will then need to run client hostip command tomap the hostname to an IPaddress. In the upcoming section [Step 8 Enable the Client to Access a Partition,see "Creating an NTL Link Between a Client and a Partition" on page 119 step 4under sub-section "Assigning a Client to a Partition".)
By IPaddress
client register -client <client_name> -ip <client_IP_address>
(Use this version if the client certificate was created using the client's IP addressas the certificate name. )
VM clients(with HTL)
Byhostname
client register -client <client_name> -hostname <client_hostname> -requirehtl [-ottexpiry<seconds>]-generateott
By IPaddress
client register -client <client_name> -ip <client_IP_address> -requirehtl [-ottexpiry<seconds>]-generateott
Note: The <client_name>, above can be any string that allows you to easily identify this client.Many people use the hostname, but the <client_name> can be any string that you findconvenient. This might sound a little redundant (naming the client twice in one command), but itbecomes especially useful if you are not using DNS - in that case, a well-considered <client_name> is likely going to be easier to remember or recognize than the client's IP address.
Note: If you are registering with HTL, you can omit the -ottexpiry parameter to use the defaultexpiry; the default, and other options, are configurable. You can also use the htl commands togenerate the one-time-token at a later time and configure the HTL options. See "htl" on page 1 inthe LunaSH ReferenceGuide for details). The one-time token is generated in the currentdirectory with filename <client_hostname_or IP>.ott.
Examples:
The following command registers the client at IP address 123.65.98.7 and assigns it a <client_name> ofStandard_Client:lunash:> client register -client Standard_Client -ip 123.65.98.7‘client register’ successful.Command Result : 0 (Success)
The following command registers the client at IP address 74.123.33.2, assigns it a <client_name> of VM_Client,specifies that it requires HTLwith the default expiry, and generates a one-time token for the client:lunash:> client register -client VM_Client -ip 74.123.33.2 -requirehtl -generateott‘client register’ successful.One-time token for client VM_Client is ready to use.Command Result : 0 (Success)
8. Restart the Network Trust Link service. After registering a client, with a hostname certificate, or after registering aclient with an IP certificate and thenmapping the client hostname to its IP, stop and start the NTL service, toensure that the new client is included.
lunash:>service restart ntls
SafeNet NetworkHSMConfiguration GuideRelease 6.2 007-011136-010 Rev. A December 2015 Copyright 2015Gemalto NV All rights reserved. 116
7 [Step 7] Create a Network Trust Link Between the Client and the Appliance
Note: TCPKeepAlive is a TCP stack option, available at the LunaClient, and at the SafeNetNetwork HSM appliance. For SafeNet purposes, it is controlled via an entry in theChrystoki.conf /crystoki.ini file on the LunaClient, and in an equivalent file on SafeNet NetworkHSM. For SafeNet HSM 6.1 and newer, a fresh client software installation includes an entry"TCPKeepAlive=1" in the "LunaSA Client" section of the configuration file Chrystoki.conf(Linux/UNIX) or crystoki.ini (Windows). Config files and certificates are normally preservedthrough an uninstall, unless you explicitly delete them.
As such, if you update (install) LunaClient software where you previously had an olderLunaClient that did not have a TCPKeepAlive entry, one is added and set to "1" (enabled), bydefault. In the case of update, if TCPKeepAlive is already defined in the configuration file, thenyour existing setting (enabled or disabled) is preserved.
On the SafeNet Network HSM appliance, where you do not have direct access to the filesystem, the TCPKeepAlive= setting is controlled by the lunash:> ntls TCPKeepAlive setcommand.
The settings at the appliance and the client are independent. This allows a level of assurance,in case (for example) a firewall setting blocks in one direction.
9. If you are not using the HTL option, this procedure is complete. You can use the LunaSH client list command toverify the client registration.
If you are using the HTL option, complete the remaining steps to import the HTL one-time token, rename it to usethe SafeNet Network HSM appliance name rather than the SafeNet HSM client workstation name, and activateHTL on the link by placing the token in the <Luna_install_dir>/htl directory.
10. Use pscp (Windows) or scp (Linux/UNIX) to import the one-time-token (<SA_appliance_hostname_or_IP>.ott)from the SafeNet Network HSM appliance to the SafeNet HSM client workstation. See "Using the scp and pscpUtilities" on page 1 for details. You require the SafeNet Network HSM appliance admin password to complete thisstep:
Windows Syntax: pscp [options] <user>@<host>:<source_filename> <target_filename>Example:To copy the HTL one-time token from host myLunaClient to the current (.) directory,keeping the same name:pscp admin@myLunaSA:myLunaClient.ott .admin@myLunaSA's password:myLunaClient.ott 100%|*******************************************************| 92800:00
Linux/UNIX Syntax:scp [options] <user>@<host>:<source_filename> <target_filename>Example: To copy the HTL one-time token from host myLunaClient to the current (.) directory,keeping the same name:scp admin@myLunaSA:myLunaClient.ott .admin@myLunaSA's password:myLunaClient.ott 100%|*******************************************************| 92800:00
SafeNet NetworkHSMConfiguration GuideRelease 6.2 007-011136-010 Rev. A December 2015 Copyright 2015Gemalto NV All rights reserved. 117

7 [Step 7] Create a Network Trust Link Between the Client and the Appliance
11. Rename the HTL one-time token with the IP address or hostname, as relevant, of your SafeNet Network HSMappliance, andmove it to the <Luna_client_install_dir>/htl directory to activate HTL on the link:
Windows UseWindows Explorer, or enter the following commands from a command prompt window:cd "C:\Program Files\SafeNet\LunaClient"move <client_hostname_or_IP>.ott .\htl\<SA_appliance_hostname_or_IP>.ott
Linux/AIX Enter the following commands from a terminal window:cd /usr/safenet/lunaclient/binmv <client_hostname_or_IP>.ott ./htl/<SA_appliance_hostname_or_IP>.ott
Solaris/HP-UX Enter the following commands from a terminal window:cd /opt/safenet/lunaclient/binmv <client_hostname_or_IP>.ott ./htl/<SA_appliance_hostname_or_IP>.ott
Example:bash-2.05# cd /usr/safenet/lunaclient/binbash-2.05# mv myLunaClient.ott ./htl/myLunaSA.ottbash-2.05# cd htlbash-2.05# lsmyLunaSA.ott
12. This part of the procedure is complete. After the token has beenmoved to its correct location and renamed to reflectthe SafeNet Network HSM hostname or IP, it will be used during the next HTL polling interval. This happensautomatically.
You can use the LunaSH client list command to verify the client registration, and the LunaSH htl show commandto confirm the status of the Host Trust Link. The HTL Status changes to "Up" and theOTT Status changes to "Inuse" after the client has successfully established a Host Trust Link.
Example:lunash:>client listregistered client 1: 74.123.33.2Command Result : 0 (Success)
lunash:>htl showHTL Grace period : 60 secondsDefault OTT expiry : 300 secondsClient Name HTL Status OTT Status OTT Expiry Time-----------------------------------------------------------------MyClient Up In Use 300 (default)Command Result : 0 (Success)
De-registereing and Re-registering ClientsIf you havemultiple HSM appliances connected and registered with a client and you de-register that client from one ofthe HSM appliances, then youmust also de-register that HSM appliance on the client side. Failure to do so will result ina “Broken pipe” error, which indicates an incomplete registration.
If you wish to de-register a client and then re-register with a new certificate, on the sameHSM appliance, then youmustcopy the certificate to the HSM appliance (HSM server) and stop and re-start the service called NTLS (see "service list"on page 1 and "service restart" on page 1). Before such a restart, any connection attempts fail, and “Error on SSLaccept” is logged.
SafeNet NetworkHSMConfiguration GuideRelease 6.2 007-011136-010 Rev. A December 2015 Copyright 2015Gemalto NV All rights reserved. 118

8[Step 8] Enable the Client to Access a
Partition
After creating the network trust link between the client and the appliance, you need to enable the client to access aspecific partition on the appliance. You can configure the client to access a partition using an NTL or STC connection,as follows:
NTLclient-partitonlinks
Assign the partition to a specific client using the LunaSH client assignpartition command. This allowsthe client to create NTL connections to the partition to perform cryptographic operations. See "Creating anNTL Link Between a Client and a Partition" below.
STCclient-partitonlinks
Enable Secure Trusted Channel (STC) on the client and partition. This disables the NTL connection to thepartition, and replaces it with an STC connection. See "Creating an STC Link Between a Client and aPartition" on page 121.
Creating an NTL Link Between a Client and a PartitionAfter you establish a network trust link between the client and the appliance, you can assign the Client to a specificPartition on the appliance to grant the client access to the partition. After you assign a client to a partition, the client canestablish NTL links to the partition, allowing you to do the following:
• see the partition as a slot in LunaCM,
• use the partition with your cryptographic applications.
Note: Youmust be connected to the HSM Server and logged in as “admin”.
Assigning a Client to a PartitionUse LunaSH client assignpartition command to assign a registered client to an HSM Partition. Youmight need to useyour client IP address as your client name, if you registered your client using an IP address.
This task is performed by the HSM SO, if you are not using STC. If you are configuring a PPSO partition, this is the finaltask you need to complete before handing off the partition to the partition owner.
To assign a client to a partition1. Launch LunaSH and log in as the HSM SO.
2. Enter the following command to assign a client to a partition:
SafeNet NetworkHSMConfiguration GuideRelease 6.2 007-011136-010Rev. A December 2015 Copyright 2015Gemalto NV All rights reserved. 119

8 [Step 8] Enable the Client to Access a Partition
client assignPartition -client <clientname> -partition <partition name>
For example:lunash:> client assignPartition -client ntl_client -partition ntl_partition'client assignPartition' successful.Command Result : 0 (Success)
3. Enter the following command to verify that the HSM Partition is assigned to the client.
client show -client <clientname>
For example:lunash:> client show -client ntl_clientClientID: ntl_clientHostname: Luna_ClientHTL Required: noOTT Expiry: n/aPartitions: ntl_partition
4. If you registered your client by host name, the appliance will need to use a DNS server to look up the deviceIP address. To ensure that the client is reachable in the event of a DNS failure, you can use the following commandtomap the client host name to its IP address, and save themapping locally on the appliance.
client hostip map -client <client_name> -ip <client_IP_address>
For example:lunash:> client hostip map -client ntl_client -ip 192.20.11.21Command Result : 0 (Success)
lunash:>client hostip show
Client Name Host Name Host IP----------------------------------------------------------------------ntl_client ntl_client 192.20.11.21Command Result : 0 (Success)
5. If you are configuring a PPSO partition, hand off possession of the partition to its new owner by providing thecontact information (IP address and partition name) and any necessary instructions. The receiving person willbecome the partition SO and begin configuring the partition for its application.
Verifying Your SetupBefore beginning to use a Client application with your newly configured partition, you can verify that the foregoing setuphas been properly performed.
This task is performed by the partition owner, from the SafeNet HSM client workstation used to deploy the partition.
1. On your Client computer, open a command-line console.
2. Go to the software directory (c:\Program Files\SafeNet\LunaClient forWindows, or/usr/safenet/lunaclient for Linux, Solaris or AIX, or /opt/safenet/lunaclient for HP-UX), and typevtl verify.
3. The response should be similar to:Slot Serial # Label==== ======== =====1 2279315 Partition1
SafeNet NetworkHSMConfiguration GuideRelease 6.2 007-011136-010 Rev. A December 2015 Copyright 2015Gemalto NV All rights reserved. 120

8 [Step 8] Enable the Client to Access a Partition
If you get an error message, then some part of the configuration has not been properly completed. Retrace theprocedure.
At this point, the client and HSM are configured and registered with each other. You can now begin to use theSafeNet Network HSMwith your application. You can use the “partition list” command for a list of HSMPartitions on the HSM, and the “client list” command for a list of the clients assigned to an HSM Partition.
4. Setup is complete. We suggest that you browse theAdministration Guide to develop a deeper understanding of theoptions and capabilities of your SafeNet Network HSM partition, and of the housekeeping tasks and utilities thatyoumight need.
Client Connection LimitsSee "Connections to the Appliance - Limits ", for a discussion of the limits for client connections to a SafeNet NetworkHSM appliance and HSM.
Applications and IntegrationsIf you have any of dozens of third-party applications, wemight already have performed system integration with it, andpublished an Integration Guide for the application or API that you wish to use. Contact SafeNet Customer Support forthe latest list of current integrations, or to request that one be developed.
Creating an STC Link Between a Client and a Partition
Note: Secure Trusted Channel requires firmware 6.22.0 or later.
If you require a higher level of security for your network links than is offered by NTL, such as in cloud environments, orin situations wheremessage integrity is paramount, you can use Secure Trusted Channel (STC) to provide very secureclient-partition links. STC offers the following features to ensure the security and integrity of your client-partitioncommunications:
• Privacy of all communicated data through the use of symmetric encryption, so that only the end-points can readany sensitive data.
• Integrity of the communicated data through the use of message authentication codes, so that not eavesdroppercould add, delete, modify or replay any command or response.
• Bi-directional authentication of both the HSM and the end-point, so that only authorized entities can establish anSTC connection, and there can be noman-in-the-middle attack.
See "Secure Trusted Channel (STC) Network Links" on page 1 in theAdministration Guide for more information.
Note: STC and NTL can co-exist on the same SafeNet Network HSM appliance, allowing youto configure some partitions to use STC, while other partitions use NTL. The client can alsosupport both STC and NTLS links. However, all links from a specific client to a specificSafeNet Network HSM appliance can be either NTL or STC, but not both.
To use STC, youmust enable the following policies:
• HSM policy 39: Allow Secure Trusted Channel. This policy enables STC on the HSM, so that you can configure the
SafeNet NetworkHSMConfiguration GuideRelease 6.2 007-011136-010 Rev. A December 2015 Copyright 2015Gemalto NV All rights reserved. 121

8 [Step 8] Enable the Client to Access a Partition
HSM such that some partitions to use STC, while other partitions use NTLS. This policy can only be set by theHSM SO.
• Partiton policy 37: Force Secure Trusted Channel. This policy forces the partition to use STC, and requires thatHSM policy 39 is also set. For legacy partitions, this policy can be only be set by the HSM SO. For partitions withSO, this policy can only be set by the partition SO.
The procedure for creating an STC link between a client and a partition differs depending on whether the partition is alegacy partition or a partition with SO, as follows:
Legacy partitions See "Creating an STC Link to a Legacy Partition" below
Partitions with SO See "Creating an STC Link to a PartitionWith SO" on page 127
Creating an STC Link to a Legacy PartitionThe procedure for creating an STC link to a legacy partition consists of the followingmajor steps:
1. Enable the STC policy on the HSM and partition.
2. Export the partition identity public key to a file on the appliance.
3. Create the client token and identity.
4. Exchange the partition and client identity public keys.
5. Register the client identity public key to the partition.
6. Register the partition identity public key with the client.
7. Enable and verify the STC link.
Step 1: Enable the STC policy on the HSM and partitionThis step is performed by the HSM SO. For more information, including detailed procedures, examples, and adescription of the impact of setting the policies, see "Enabling or Disabling STC on the HSM" on page 1, "Enabling orDisabling STC on a Partition" on page 1 and "Establishing and Configuring the STC Admin Channel on a SafeNetNetwork HSM Appliance" on page 1 in theAdministration Guide.
1. Launch LunaSH and log in as the HSM SO.
2. Enter the following command to ensure that policy 39: Allow Secure Trusted Channel is enabled on the HSM:
hsm showpolicies
If it is not enabled, enter the following command to enable the policy:
hsm changePolicy -policy 39 -value 1
3. (Optional) Enable the STC admin channel to provide STC on all links (NTLS and STC) on the portion of the link fromthe appliance to the HSM, as described in "Establishing and Configuring the STC Admin Channel on a SafeNetNetwork HSM Appliance" on page 1 in theAdministration Guide.
4. Enter the following command to ensure that policy 37: Force Secure Trusted Channel is enabled on the partition:
partition showpolicies -partititon <partition_name>
If it is not enabled, enter the following command to enable the policy:
partition changepolicy -partition <partition_name> -policy 37 -value 1
SafeNet NetworkHSMConfiguration GuideRelease 6.2 007-011136-010 Rev. A December 2015 Copyright 2015Gemalto NV All rights reserved. 122

8 [Step 8] Enable the Client to Access a Partition
Step 2: Export the partition identity public key to a file on the applianceThis step is performed by the HSM SO. Exporting the partition identity public key creates the partition identity if it doesnot already exist. The public key is exported to a file named <partition_serial_number>.pid on the appliance.
1. Enter the following command to export the partition's public key to a file:
stc partition export -partition <partition_name>
For example:lunash:>stc partition export -partition legacy_stcSuccessfully exported partition identity for partition legacy_stc to file 359693009023.pidCommand Result : 0 (Success)
Step 3: Create the client token and identityThis step is performed by the root user on the SafeNet HSM client workstation, using LunaCM.
1. Open a SafeNet HSM client session:
a. Open a command prompt or terminal window.
b. Launch LunaCM:
Windows C:\Program Files\SafeNet\LunaClient\bin\lunacm
Linux/AIX /usr/safenet/lunaclient/data/bin/lunacm
Solaris/HP-UX /opt/safenet/lunaclient/data/bin/lunacm
2. Initialize the STC client software token, or insert the STC client hardware token you have prepared for this client:
– If you are using an STC client software token, enter the following command to initialize the STC client token.
stc tokeninit -label <token_label>
For example:lunacm:> stc tokeninit -label mySTCclientTokenSuccessfully initialized the client token.
– If you are using an STC client hardware token (SafeNet eToken 7300), insert the token into an available USBport. Before you can use a hardware token, the tokenmust be initialized using the SafeNet AuthenticationClient on aWindows workstation, as described in "Using a Hard Token to Store the STC Client Identity" onpage 1 in theAdministration Guide.
In addition, youmust also install the SafeNet Authentication Client software (8.3 or higher) on the clientworkstation and add the following line to theSecure Trusted Channel section of the crystoki.ini (Windows)orChrystoki.conf (UNIX/Linux) file, to specify the path to the SafeNet Authentication Client eToken library:
Windows ClientTokenLib=C:\Windows\System32\eToken.dll
Linux/UNIX ClientTokenLib=<path_to_libeToken.so>For example, on CentOS, the path is /usr/lib/libeToken.so
3. Enter the following command to create a client identity on the token. The STC client identity public key isautomatically exported to the <luna_client_root_dir>/data/client_identities directory:
stc identitycreate -label <client_identity>
For example:lunacm:> stc identitycreate -label mySTCclientID
SafeNet NetworkHSMConfiguration GuideRelease 6.2 007-011136-010 Rev. A December 2015 Copyright 2015Gemalto NV All rights reserved. 123

8 [Step 8] Enable the Client to Access a Partition
Client identity successfully created and exported to file /us-r/safenet/lunaclient/data/client_identities/mySTCclientID
4. Exit LunaCM.
Step 4: Exchange the partition and client identity public keysThe STC identity public keys are exchanged as follows:
• the client identity public key is copied from the SafeNet HSM client data/client_identities directory to the SafeNetNetwork HSM appliance.
• the partition identity public key is copied from the appliance to the data/partition_identities directory on theSafeNet HSM client workstation.
Copying the public keys to or from the SafeNet Network HSM appliance is performed by the SafeNet Network HSMappliance administrator, using scp (UNIX/Linux) or pscp (Windows).
Copying the public keys to or from the SafeNet HSM client workstation is performed by the root user on the SafeNetHSM client workstation.
The following procedure assumes that you are able to perform both roles, that is, you can log in to the SafeNet HSMclient workstation as root, and you possess the SafeNet Network HSM appliance admin password so that you can usescp/pscp to transfer files directly between the SafeNet HSM client workstation and the SafeNet Network HSMappliance.
If your IT and security policies require separation of roles, the keys can be exchangedmanually, for example, usingemail with fingerprint verification, so that the root user on the SafeNet HSM client workstation is responsible for:
• providing the client identity public key to the SafeNet Network HSM appliance administrator.
• copying the partition identity public key to the data/partition_identities directory on the SafeNet HSM clientworkstation.
The SafeNet Network HSM appliance administrator is responsible for:
• using scp/pscp from a separate workstation to copy the client identity public key to the SafeNet Network HSMappliance.
• using scp/pscp from a separate workstation to copy the partition identity public key from the SafeNet NetworkHSM appliance and then providing it to the root user on the SafeNet HSM client workstation.
1. Log in to the SafeNet HSM client workstation as the root user.
2. Go to the SafeNet HSM client data/client_identities directory:
Windows cd C:\Program Files\SafeNet\LunaClient\data\client_identities
Linux/AIX cd /usr/safenet/lunaclient/data/client_identities
Solaris/HP-UX cd /opt/safenet/lunaclient/data/client_identities
3. Export the client identity public key to the HSM appliance, using pscp (Windows) or scp (Linux/UNIX). You requirethe SafeNet Network HSM appliance admin password to complete this step:
Note: Youmust scp to the admin account on the HSM appliance, or the client public key willnot register correctly. The file arriving at the appliance is automatically placed in the appropriatedirectory. Do not specify a target directory.
SafeNet NetworkHSMConfiguration GuideRelease 6.2 007-011136-010 Rev. A December 2015 Copyright 2015Gemalto NV All rights reserved. 124

8 [Step 8] Enable the Client to Access a Partition
Windows Syntax: pscp [options] <source_filename> <user>@<host>:[<target_filename>]Example:To copy the client identity public key (mySTCclientID) to themyLunaSA appliance,keeping the same name:pscp mySTCclientID admin@myLunaSA:admin@myLunaSA's password: ******** mySTCclientID | 1 kB | 1.1 kB/s | ETA: 00:00:00 | 100%
Linux/UNIX Syntax:scp [options] <source_filename> <user>@<host>:[<target_filename>]Example: To copy the client identity public key (mySTCclientID) to the SafeNet Network HSMappliance with IP 192.168.0.123, keeping the same name:scp mySTCclientID [email protected]:[email protected]'s password: ******** mySTCclientID | 1 kB | 1.1 kB/s | ETA: 00:00:00 | 100%
4. Go to the SafeNet HSM client data/partition_identities directory:
Windows cd C:\Program Files\SafeNet\LunaClient\data\partition_identities
Linux/AIX cd /usr/safenet/lunaclient/data/partition_identities
Solaris/HP-UX cd /opt/safenet/lunaclient/data/partition_identities
5. Use pscp (Windows) or scp (Linux/UNIX) to import the partition public key from the SafeNet Network HSMappliance to the data/partition_identities directory on the SafeNet HSM client workstation. See "Using the scpand pscp Utilities" on page 1 for details. You require the SafeNet Network HSM appliance admin password tocomplete this step:
Windows Syntax: pscp [options] <user>@<host>:<source_filename> <target_filename>Example:To copy the partition identity public key (359693009023.pid)from hostmyHSM tothe current (.) directory, keeping the same name:pscp admin@myHSM:359693009023.pid .admin@myHSM's password:359693009023.pid | 1 kB | 1.1 kB/s | ETA: 00:00:00 | 100%
Linux/UNIX Syntax:scp [options] <user>@<host>:<source_filename> <target_filename>Example: To copy the partition identity public key (359693009023.pid) from host IP192.168.0.123 to the current (.) directory, keeping the same name:
scp [email protected]:359693009023.pid [email protected]'s password:359693009023.pid | 1 kB | 1.1 kB/s | ETA: 00:00:00 | 100%
Step 5: Register the client identity public key to the partition
Note: Each client identity registered to a partition uses 2332 bytes of storage on the partition.Before registering a client identity to a partition, ensure that there is adequate free space.
This step is performed by the HSM SO. You can register multiple clients to a partition.
1. Launch LunaSH and log in as the HSM SO.
2. Enter the following command to register the client identity public key to the partition:
stc client register -partition <partition_name> -label <client_label> -file <client_public_key>
SafeNet NetworkHSMConfiguration GuideRelease 6.2 007-011136-010 Rev. A December 2015 Copyright 2015Gemalto NV All rights reserved. 125

8 [Step 8] Enable the Client to Access a Partition
For example:stc client register -partition mySTCpar -label myClient -file mySTCclientID
Step 6: Register the partition identity public key to the clientThis step is performed by the root user on the SafeNet HSM client workstation.
1. Log in to the SafeNet HSM client workstation as the root user.
2. Open a SafeNet HSM client session:
a. Open a command prompt or terminal window.
b. Launch LunaCM:
Windows C:\Program Files\SafeNet\LunaClient\bin\lunacm
Linux/AIX /usr/safenet/lunaclient/data/bin/lunacm
Solaris/HP-UX /opt/safenet/lunaclient/data/bin/lunacm
3. Enter the following command to register the partition identity public key to the client token:
stc partitionregister -file <partition_identity> [-label <partition_label>]
For example:lunacm:> stc partitionregister -file /usr/safenet/lunaclient/partition_iden-tities/359693009023.pid -label mySA_mySTCpartition
Step 7: Enable and verify the STC link
CAUTION: When you enable STC on the client, youmust specify the SafeNet Network HSMappliance that hosts the partition you want to link to. This forces the client to use STC for alllinks to the specified SafeNet Network HSM appliance. Any existing NTLS links to thespecified SafeNet Network HSM appliance will be terminated.
This step is performed by the root user on the SafeNet HSM client workstation.
1. Log in to the SafeNet HSM client workstation as the root user.
2. Open a SafeNet HSM client session:
a. Open a command prompt or terminal window.
b. Launch LunaCM:
Windows C:\Program Files\SafeNet\LunaClient\bin\lunacm
Linux/AIX /usr/safenet/lunaclient/data/bin/lunacm
Solaris/HP-UX /opt/safenet/lunaclient/data/bin/lunacm
3. Enter the following command to determine the server ID of the SafeNet Network HSM appliance that hosts thepartition:
clientconfig listservers
SafeNet NetworkHSMConfiguration GuideRelease 6.2 007-011136-010 Rev. A December 2015 Copyright 2015Gemalto NV All rights reserved. 126

8 [Step 8] Enable the Client to Access a Partition
For example:lunacm:> clientconfig listservers
Server ID Server Channel HTL Required0 192.168.0.123 STC No1 192.168.0.59 NTLS No
4. Enter the following command to enable the STC link:
stc enable -id <server_id>
For example:stc enable -id 0
You are about to enable STC to server mySA.This will initiate an automatic restart of this application. All sessionslogged in through the application will be closed.
Are you sure you wish to continue?Type 'proceed' to continue, or 'quit' to quit now -> proceed
Successfully enabled STC to connect to server mySA.
At this point, LunaCM restarts. If successful, the partition is listed in the list of available HSMs. You can use thestc identityshow command to list the partitions registered to the client token.
5. Enter the following command to verify the link. This command displays the status of the STC link for the currentslot:
stc status
For example:lunacm:> stc statusEnabled: YesStatus: ConnectedChannel ID: 2Cipher Name: AES 256 Bit with Cipher Block ChainingHMAC Name: HMAC with SHA 512 Bit
Creating an STC Link to a Partition With SOCreating an STC link to a partition with SO is performed entirely by the root user on the SafeNet HSM clientworkstation, using LunaCM. The procedure consists of the followingmajor steps:
1. Ensure that you have satisfied the prerequisite conditions.
2. Create the client token and identity.
3. Register the partition identity public key with the client.
4. Enable and verify the STC link.
5. Initialize the partition.
CAUTION: STC allows you to claim the partition as the holder of the partition public key, andcreates a one-time temporary STC link to allow you to register the client to the partition. You
SafeNet NetworkHSMConfiguration GuideRelease 6.2 007-011136-010 Rev. A December 2015 Copyright 2015Gemalto NV All rights reserved. 127

8 [Step 8] Enable the Client to Access a Partition
must complete all of the steps in this procedure in a single LunaCM session. If you do not, thepartition is locked, and will not be accessible. The only workaround is for the HSM SO to deletethe partition, create a new partition, and provide you with new partition public key so that youcan try again.
Step 1: Ensure that you have satisfied the prerequisite conditionsBefore attempting to create an STC link to a partition with SO, ensure that you have satisfied the followingprerequisites:
1. You have the STC partition identity public key for the partition. Before using the partition identity public key, it isrecommended that you confirm its authenticity by verifying its hash. You can verify the partition identity public keyhash after you register the partition identity public key to the client token, as outlined in the following procedure. TheHSM SO can use the LunaSH command stc partition show -partition <partition_name> to display the partitionidentity public key hash and provide it to you with the partition identity public key.
2. Confirm with the HSM SO that policy 39: Allow Secure Trusted Channel is enabled on the HSM.
Note: This procedure automatically registers the client identity to the partition. Each clientidentity registered to a partition uses 2332 bytes of storage on the partition. Before enabling theSTC link, ensure that there is adequate free space on the partition.
Step 2: Create the client token and identity
Note: This step is not required if you have already created a client token and identity. Verifyusing stc identityshow.
1. Open a SafeNet HSM client session:
a. Open a command prompt or terminal window.
b. Launch LunaCM:
Windows C:\Program Files\SafeNet\LunaClient\bin\lunacm
Linux/AIX /usr/safenet/lunaclient/data/bin/lunacm
Solaris/HP-UX /opt/safenet/lunaclient/data/bin/lunacm
2. Initialize the STC client software token, or insert the STC client hardware token (SafeNet eToken 7300) you haveprepared for this client:
– If you are using an STC client software token, enter the following command to initialize the STC client token.
stc tokeninit -label <token_label>
For example:lunacm:> stc tokeninit -label mySTCclientTokenSuccessfully initialized the client token.
– If you are using an STC client hardware token (SafeNet eToken 7300), insert the token into an available USBport. Before you can use a hardware token, the tokenmust be initialized using the SafeNet AuthenticationClient on aWindows workstation, as described in "Using a Hard Token to Store the STC Client Identity" on
SafeNet NetworkHSMConfiguration GuideRelease 6.2 007-011136-010 Rev. A December 2015 Copyright 2015Gemalto NV All rights reserved. 128

8 [Step 8] Enable the Client to Access a Partition
page 1 in theAdministration Guide.
In addition, youmust also install the SafeNet Authentication Client software (8.3 or higher) on the clientworkstation and add the following line to theSecure Trusted Channel section of the crystoki.ini (Windows)orChrystoki.conf (UNIX/Linux) file, to specify the path to the SafeNet Authentication Client eToken library:
Windows ClientTokenLib=C:\Windows\System32\eToken.dll
Linux/UNIX ClientTokenLib=<path_to_libeToken.so>For example, on CentOS, the path is /usr/lib/libeToken.so
3. Enter the following command to create a client identity on the token. The STC client identity public key isautomatically exported to the <luna_client_root_dir>/data/client_identities directory:
stc identitycreate -label <client_identity>
For example:lunacm:> stc identitycreate -label mySTCclientIDClient identity successfully created and exported to file /us-r/safenet/lunaclient/data/client_identities/mySTCclientID
Step 3: Register the partition identity public key to the client1. Enter the following command to register the partition identity public key to the client token:
stc partitionregister -file <partition_identity> [-label <partition_label>]
For example:lunacm:> stc partitionregister -file /usr/safenet/lunaclient/partition_iden-tities/359693009023.pid -label mySA_mySTCpartition
2. If you were provided with the partition identity public key hash, enter the following command to verify that thehashes match:
stc identityshow
For example:lunacm:> stc ids
Client Identity Name: myclientPublic Key SHA1 Hash: 5f3395af2ae01ac25c1a27dc25
Partition Name Partition Serial Number Partition Public Key SHA1 Hashpar_app3 124338921974 23159590be9b57fd0c9d8a84beeed04d4279c01cpar_app47 152943202231 de9f2c7fd25e1b3afad3e85a0bd17d9b100db4b3par_app12 150253010085 2fd4e1c67a2d28fced849ee1bb76e7391b93eb12
If the hashes do not match, enter the following command to deregister the partition identity public key, and contactyour HSM SO.
stc partitionderegister -serial <partition_serial_number>
SafeNet NetworkHSMConfiguration GuideRelease 6.2 007-011136-010 Rev. A December 2015 Copyright 2015Gemalto NV All rights reserved. 129

8 [Step 8] Enable the Client to Access a Partition
Step 4: Enable and verify the STC link
CAUTION: When you enable STC on the client, youmust specify the SafeNet Network HSMappliance that hosts the partition you want to link to. This forces the client to use STC for alllinks to the specified SafeNet Network HSM appliance. Any existing NTLS links to thespecified SafeNet Network HSM appliance will be terminated.
1. Enter the following command to determine the server ID of the SafeNet Network HSM appliance that hosts thepartition:
clientconfig listservers
For example:lunacm:> clientconfig listservers
Server ID Server Channel HTL Required0 192.168.0.123 STC No1 192.168.0.59 NTLS No
2. Enter the following command to enable the STC link:
stc enable -id <server_id>
For example:lunacm:> stc enable -id 0
You are about to enable STC to server mySA.This will initiate an automatic restart of this application. All sessionslogged in through the application will be closed.
Are you sure you wish to continue?Type 'proceed' to continue, or 'quit' to quit now -> proceed
Successfully enabled STC to connect to server mySA.
At this point, LunaCM restarts. If successful, the partition is listed in the list of available HSMs. The slot for thepartition is easily identified because it does not have a label, since it is not yet initialized. In the following example,the uninitialized PPSO partition is in slot 1:Available HSMs:Slot Id -> 0Label -> stc_legacySerial Number -> 359693009024Model -> K6 BaseFirmware Version -> 6.22.0Configuration -> Luna User Partition, No SO (PW) Signing With Cloning ModeSlot Description -> Net Token Slot
Slot Id -> 1Label ->Serial Number -> 359693009027Model -> K6 BaseFirmware Version -> 6.22.0Configuration -> Luna User Partition, No SO (PW) Signing With Cloning ModeSlot Description -> Net Token Slot
3. Enter the following command to set the current slot to the slot containing the new partition:
SafeNet NetworkHSMConfiguration GuideRelease 6.2 007-011136-010 Rev. A December 2015 Copyright 2015Gemalto NV All rights reserved. 130

8 [Step 8] Enable the Client to Access a Partition
slot set -slot <slot>
For example:lunacm:> slot set -slot 1
4. Enter the following command to verify the link:
stc status
For example:lunacm:> stc statusEnabled: YesStatus: ConnectedChannel ID: 2Cipher Name: AES 256 Bit with Cipher Block ChainingHMAC Name: HMAC with SHA 512 Bit
Step 5: Initialize the partitionWhen you initialize the partition, the following actions are performed automatically:
• the client identity public key is registered to the partition.
• partition policy 37: Force Secure Trusted Channel is enabled on the partition.
1. Set the current slot to the slot containing the uninitialized (unlabelled) partition.
2. Enter the following command to initialize the partition. On a password-authenticated HSM, you are prompted tospecify the partition SO password and domain you want to use for the partition. On a PED-authenticated HSM, youare prompted to attend to the PED to imprint (or provide) the partition SO PED key and domain PED key:
partition initialize -label <partition_label>
For example:lunacm:> par init -label stc_ppso
You are about to initialize the partition.All contents of the partition will be destroyed.Are you sure you wish to continue?Type 'proceed' to continue, or 'quit' to quit now ->proceed
Enter password for Partition SO: ********Re-enter password for Partition SO: ********
Option -domain was not specified. It is required.Enter the domain name: *******Re-enter the domain name: *******
Command Result : No Error
The slot now shows the label, indicating that it is initialized:lunacm:> slot list
Slot Id -> 0Label -> stc_legacySerial Number -> 359693009024Model -> K6 BaseFirmware Version -> 6.22.0Configuration -> Luna User Partition, No SO (PW) Signing With Cloning ModeSlot Description -> Net Token Slot
SafeNet NetworkHSMConfiguration GuideRelease 6.2 007-011136-010 Rev. A December 2015 Copyright 2015Gemalto NV All rights reserved. 131

8 [Step 8] Enable the Client to Access a Partition
Slot Id -> 1Label -> stc_ppsoSerial Number -> 359693009027Model -> K6 BaseFirmware Version -> 6.22.0Configuration -> Luna User Partition, No SO (PW) Signing With Cloning ModeSlot Description -> Net Token Slot
You can now create the Crypto Officer and Crypto User roles on the partition. See "[Step 9] Configure PPSOApplication Partitions" on page 133.
SafeNet NetworkHSMConfiguration GuideRelease 6.2 007-011136-010 Rev. A December 2015 Copyright 2015Gemalto NV All rights reserved. 132

9[Step 9] Configure PPSO Application
Partitions
This chapter describes how the partition owner (partition SO) configures a PPSO partition after receiving it from theHSM SO. The configuration tasks you need to perform depend on whether the partition is password-authenticated orPED-authenticated as follows:
Authentication Tasks
Password 1. "Initialize the Partition SO and Crypto Officer Roles on a PW-Auth PPSOPartition" below2. "Initialize the Crypto User Role on a PW-Auth PPSOPartition " on page 135
PED 1. "Initialize the Partition SO and Crypto Officer Roles on a PED-Auth PPSOPartition" on page136
2. "Initialize the Crypto User Role on a PED-Auth PPSOPartition " on page 1383. "Activate a PED-Auth PPSOPartition for the Crypto Officer Role" on page 139 or "Activate a
PED-Auth PPSOPartition for the Crypto User Role" on page 141
Initialize the Partition SO and Crypto Officer Roles on aPW-Auth PPSO PartitionThese instructions assume a Password-authenticated SafeNet HSM that has been initialized, and an applicationpartition has been created, capable of having its own Security Officer (see previous steps by HSM SO "HSM SO'sConfiguration Action for Password-auth Partition with SO, Local to Client" on page 1).
Step 1: Initialize the Partition SO roleThis step is perfomed by the root user on the SafeNet HSM client workstation. If you are using STC to provide theclient-partition link, do not perform this procedure, since you already initialized the partition when configuring the STClink. See "Creating an STC Link Between a Client and a Partition" on page 121 for more information.
1. Set the active slot to the created, uninitialized, application partition.Type slot set -slot <slot number>lunacm:> slot set -slot 0
Current Slot Id: 0 (Luna User Slot 6.22.0 (Password) Signing With CloningMode)
Command Result : No Error
lunacm:>
SafeNet NetworkHSMConfiguration GuideRelease 6.2 007-011136-010Rev. A December 2015 Copyright 2015Gemalto NV All rights reserved. 133

9 [Step 9] Configure PPSOApplication Partitions
2. Initialize the application partition, to create the partition's Security Officer (SO).Type partition init -label <a label>lunacm:> par init -label ppsopar
You are about to initialize the partition.All partition objects will be destroyed.
Are you sure you wish to continue?
Type 'proceed' to continue, or 'quit' to quit now -> proceed
Command Result : No Error
lunacm:>
Step 2: Initialize the Crypto Officer role1. The SO of the application partition can now assign the first operational role within the new partition.
Type role login -name Partition SOlunacm:> role login -name Partition SO
Command Result : No Error
lunacm:>
2. Type role init -name Crypto Officerlunacm:> role init -name Crypto Officer
Command Result : No Error
lunacm:>
3. The application partition SO can create the Crypto Officer, but only the Crypto Officer can create the Crypto User.Therefore, the SOmust log out to allow the Crypto Officer to log in.Type role logout
lunacm:> role logout
Command Result : No Error
lunacm:>
The next sequence of configuration actions is performed by the Crypto Officer, just created for the application partition.See "Initialize the Crypto User Role on a PW-Auth PPSOPartition " on the next page.
SafeNet NetworkHSMConfiguration GuideRelease 6.2 007-011136-010 Rev. A December 2015 Copyright 2015Gemalto NV All rights reserved. 134

9 [Step 9] Configure PPSOApplication Partitions
Initialize the Crypto User Role on a PW-Auth PPSOPartitionThese instructions assume
• a Password-authenticated SafeNet HSM has been initialized,
• an application partition has been created,
• a Crypto Officer has been created for the partition, and
• the Crypto Officer password has been conveyed to the person responsible for the Crypto Officer role. See "Initializethe Partition SO and Crypto Officer Roles on a PW-Auth PPSOPartition" on page 133.
As Crypto Officer, you can do the following:
• Create a Crypto User (limited access user) for the application partition
• Create, delete, change andmanipulate cryptographic objects on the application partition, either for your own use orfor use by the Crypto User.
To initialize the Crypto User role1. Set the active slot to the desired application partition, where the Crypto Officer was just created.
Type slot set -slot <slot number>lunacm:> slot set -slot 0
Current Slot Id: 0 (Luna User Slot 6.22.0 (PW) Signing With Cloning Mode)
Command Result : No Error
lunacm:>
2. Log in as the Crypto Officer.Type role login -name Crypto Officer
lunacm:> role login -name Crypto Officer -password $3cr3t
Command Result : No Error
lunacm:>
3. Create the Crypto User.Type role init -name Crypto User
lunacm:> role init -name Crypto User -password 0ther$ecret
Command Result : No Error
lunacm:>
SafeNet NetworkHSMConfiguration GuideRelease 6.2 007-011136-010 Rev. A December 2015 Copyright 2015Gemalto NV All rights reserved. 135

9 [Step 9] Configure PPSOApplication Partitions
The Crypto User can now log in to use applications to perform cryptographic operations using keys and objects createdin the partition by the Crypto Officer.
Initialize the Partition SO and Crypto Officer Roles on aPED-Auth PPSO PartitionThese instructions assume a PED-authenticated SafeNet HSM that has been initialized, and an application partitionhas been created, capable of having its own Security Officer (see previous steps by HSM SO "HSM Administrator's(SO's) Configuration Action for Partition with SO" on page 1).
You will need:
• AnHSM that has firmware 6.22.0, or later, and the Per-Partition SO capability installed.
• SafeNet PED and PED Keys with labels. These instructions assume that your SafeNet PED is available locally,but has a working Remote PED connection to the SafeNet Network HSM.
• These instructions assume that you have already made your decisions whether to use all-new, blank PED Keys, orto re-use any existing, imprinted PED Keys for any of the steps.
Step 1: Initialize the Partition SO roleThis step is performed by the root user on the SafeNet HSM client workstation. If you are using STC to provide theclient-partition link, do not perform this procedure, since you already initialized the partition when configuring the STClink. See "Creating an STC Link Between a Client and a Partition" on page 121 for more information, and skip ahead inthis page to "Step 2: Initialize the Crypto Officer role" on the next page.
1. Set the active slot to the created, uninitialized, application partition.Type slot set -slot <slot number>lunacm:> slot set -slot 0
Current Slot Id: 0 (Luna User Slot 6.22.0 (PED) Signing With Cloning Mode)
Command Result : No Error
lunacm:>
2. Initialize the application partition, to create the partition's Security Officer (SO).Type partition init -label <a label>lunacm:> par init -label ppsopar
You are about to initialize the partition.All partition objects will be destroyed.
Are you sure you wish to continue?
Type 'proceed' to continue, or 'quit' to quit now -> proceed
Please attend to the PED.
SafeNet NetworkHSMConfiguration GuideRelease 6.2 007-011136-010 Rev. A December 2015 Copyright 2015Gemalto NV All rights reserved. 136

9 [Step 9] Configure PPSOApplication Partitions
Respond to SafeNet PED prompts...
Command Result : No Error
lunacm:>
Step 2: Initialize the Crypto Officer role1. The SO of the application partition can now assign the first operational role within the new partition.
Type role login -name Partition SOlunacm:> role login -name Partition SO
Please attend to the PED.
Command Result : No Error
lunacm:>
2. Type role init -name Crypto Officerlunacm:> role init -name Crypto Officer
Please attend to the PED.
Respond to SafeNet PED prompts...
Command Result : No Error
lunacm:>
3. The application partition SO can create the Crypto Officer, but only the Crypto Officer can create the Crypto User.Therefore, the SOmust log out to allow the Crypto Officer to log in.Type role logout
lunacm:> role logout
Command Result : No Error
lunacm:>
At this point, the Crypto Officer, or an application using the CO's challenge secret/password can perform cryptographicoperations in the partition, as soon as the Crypto Officer logs in with role login -name Crypto Officer. However, theCrypto Officer can create, modify and delete crypto objects within the partition, in addition tomerely using existingcrypto objects (sign/verify). You can also create a limited-capability role called Crypto User that can use the objectscreated by the Crypto Officer, but cannot modify them. The separation of roles is important in some security regimesand operational situations, and where youmight be required to satisfy audit criteria for industry or government oversight.
The next sequence of configuration actions is performed by the Crypto Officer, just now created for the applicationpartition. See "Initialize the Crypto User Role on a PED-Auth PPSOPartition " on the next page.
SafeNet NetworkHSMConfiguration GuideRelease 6.2 007-011136-010 Rev. A December 2015 Copyright 2015Gemalto NV All rights reserved. 137

9 [Step 9] Configure PPSOApplication Partitions
Initialize the Crypto User Role on a PED-Auth PPSOPartitionThese instructions assume
• a PED-authenticated SafeNet HSM has been initialized,
• an application partition has been created,
• a Crypto Officer has been created for the partition, and
• the Crypto Officer PED Key has been conveyed to the person responsible for the Crypto Officer role. See "Initializethe Partition SO and Crypto Officer Roles on a PED-Auth PPSOPartition" on page 136.
As Crypto Officer, you can do the following:
• Create a Crypto User (limited access user) for the application partition
• Create, delete, change andmanipulate cryptographic objects on the application partition, either for your own use orfor use by the Crypto User
• Activate the partition for use by applications.
To create a Crypto User for the partition, you will need:
• SafeNet PED and the black Crypto Officer PED Key(s) assigned to you by the SO, as well as blank PED Key(s)with labels for the Crypto User that you are about to create. These instructions assume that your SafeNet PED islocally connected. These instructions assume that you have already made your decisions whether to use all-new,blank PED Keys, or to re-use any existing, imprinted PED Keys for any of the steps.
To create the Crypto User role on a PED-authenticated PPSO application partition1. Set the active slot to the desired application partition, where the Crypto Officer was just created.
Type slot set -slot <slot number>lunacm:> slot set -slot 0
Current Slot Id: 0 (Luna User Slot 6.22.0 (PED) Signing With Cloning Mode)
Command Result : No Error
lunacm:>
2. Log in as the Crypto Officer.Type role login -name Crypto Officer
lunacm:> role login -name Crypto Officer
Please attend to the PED.
Respond to SafeNet PED prompts...
Command Result : No Error
lunacm:>
SafeNet NetworkHSMConfiguration GuideRelease 6.2 007-011136-010 Rev. A December 2015 Copyright 2015Gemalto NV All rights reserved. 138

9 [Step 9] Configure PPSOApplication Partitions
3. Create the Crypto User.Type role init -name Crypto User
lunacm:> role init -name Crypto User
Please attend to the PED.
Respond to SafeNet PED prompts...
Command Result : No Error
lunacm:>
The Crypto User can now log in to use applications to perform cryptographic operations using keys and objects createdin the partition by the Crypto Officer.
It is possible for all three of Partition SO, Crypto Officer, and Crypto User to perform their functions against a SafeNetNetwork HSM partition, from the same SafeNet HSM Client host computer, simply taking turns at the keyboard and theSafeNet PED. It is also possible to work from different computers, as long as any such computer is a registered user ofthe partition - that is, a working network trust link (NTL) connection is required for each.
In addition, if those persons and their respective SafeNet HSM Client host computers are not co-located, then theymust arrange tomanage their sharing of the Remote PED. Either
• one personmust maintain the single Remote PED setup, and the others must coordinate closely with the PED-keeper when authentication to the HSM is required,
or
• all three can have their own separate PEDs and PedServer instances, but they must coordinate with the applianceadministrator to hsm ped disconnect any current Remote PED channel before hsm ped connect -ip <new-ip> -port <new-port> to establish a Remote PED session with one of the other PedServers.
Crypto Officer or Crypto User Must Log In and Remain Logged InAt this point, the Crypto User, or an application using the CU's challenge secret/password can perform cryptographicoperations in the partition, as soon as the Crypto User logs in with role login -name Crypto User.However, any eventthat causes that session to close, including action by the application, requires that the CU must log in again (with thegray PED Key), before the application partition can be used again. For an application that maintains an open session,that is not a handicap. For an application that opens a session for each action, performs the cryptographic action, thencloses the session, the CU must be constantly logging in and using the PED and PED Key.
To bypass this limitation, use the Activation feature. See "Activate a PED-Auth PPSOPartition for the Crypto OfficerRole" below or "Activate a PED-Auth PPSOPartition for the Crypto User Role" on page 141.
Activate a PED-Auth PPSO Partition for the Crypto OfficerRoleIn this section the Partition SO and the Crypto Officer configure the partition to allow Activation (caching of theauthentication), and then Activate it.
These instructions assume
SafeNet NetworkHSMConfiguration GuideRelease 6.2 007-011136-010 Rev. A December 2015 Copyright 2015Gemalto NV All rights reserved. 139

9 [Step 9] Configure PPSOApplication Partitions
• you are running lunacm on a SafeNet HSM Client host computer containing, or connected to, an HSMwith a PPSOapplication partition,
• that partition has a Crypto Officer created,
• that partition is the currently selected slot
As Crypto Officer of an application partition that is configured for Activation, you can log in once and have yourcredentials cached and ready in cache as your application opens and closes sessions, without need to re-log-in eachtime.
To activate a PED-authenticated PPSO application partition for the Crypto Officer role1. Set the active slot to the desired application partition, .
Type slot set -slot <slot number>lunacm:> slot set -slot 0
Current Slot Id: 0 (Luna User Slot 6.22.0 (PED) Signing With Cloning Mode)
Command Result : No Error
lunacm:>
2. Log in as the Partition Security Officer.Type role login -name Partition SO
lunacm:> role login -name Crypto Officer
Please attend to the PED.
Respond to SafeNet PED prompts...
Command Result : No Error
lunacm:>
3. Switch on the activation policy for the partition.Type partition changePolicy -slot <slot number> -policy <policy number> -value <policy value>
lunacm:> partition changePolicy -slot 0 -policy 22 -value 1Command Result : No Error
lunacm:>
4. Log in as the Partition Crypto Officer.Type role login -name Crypto Officer
SafeNet NetworkHSMConfiguration GuideRelease 6.2 007-011136-010 Rev. A December 2015 Copyright 2015Gemalto NV All rights reserved. 140

9 [Step 9] Configure PPSOApplication Partitions
lunacm:> role login -name Crypto Officer
Please attend to the PED.
Respond to SafeNet PED prompts...
Command Result : No Error
lunacm:>
Once the partition activation policy is set, the act of logging in by the Crypto Officer role is sufficient to cache the COblack PED Key credential. Now, only the partition challenge secret / password is required to be presented by yourapplication whenever it requires access. The CO credential remains cached until the HSM loses power, or youexplicitly log out as CO. The credential is re-cached the next time the CO logs in.
Note: You can stop the automatic caching of the CO credential by having the partition SOswitch off the activation policy (22); however doing so also ends activation of the Crypto Userrole, if that was in effect.
When the CO and CU roles were created, we said you could log in and start using the partition for cryptographicoperations by your application(s). Now, with activation in place, you can log in once and put your CO black PED Key oryour CU gray PED Key away in a safe place, and the cached credentials will continue to allow your application(s) toopen and close sessions and perform their operations within those sessions.
For SafeNet Network HSM and for SafeNet PCI-E HSM, you can also set partition policy 23 on (-value 1), forAutoactivation, which goes one step further and preserves the cached credentials through power outages up to 2 hoursin duration. Autoactivation does not exist for SafeNet USB HSM; therefore policy 23 cannot be switched on.
Activate a PED-Auth PPSO Partition for the Crypto UserRoleIn this section the Partition SO and the Crypto User configure the partition to allow Activation (caching of theauthentication), and then Activate it.
These instructions assume
• you are running lunacm on a SafeNet HSM Client host computer containing, or connected to, an HSMwith a PPSOapplication partition,
• that partition has a Crypto User created,
• that partition is the currently selected slot
• you have not already performed these actions for Crypto Officer
As Crypto User of an application partition that is configured for Activation, you can log in once and have yourcredentials cached, and ready in cache as your application opens and closes sessions, without need to re-log-in eachtime. If the Partition SO already set the Activation policy on behalf of the Crypto Officer, then it applies for both the COand the CU roles and you can skip to step 4.
SafeNet NetworkHSMConfiguration GuideRelease 6.2 007-011136-010 Rev. A December 2015 Copyright 2015Gemalto NV All rights reserved. 141

9 [Step 9] Configure PPSOApplication Partitions
To activate a PED-authenticated PPSO application partition for the Crypto User role1. Set the active slot to the desired application partition, .
Type slot set -slot <slot number>lunacm:> slot set -slot 0
Current Slot Id: 0 (Luna User Slot 6.22.0 (PED) Signing With Cloning Mode)
Command Result : No Error
lunacm:>
2. Log in as the Partition Security Officer.Type role login -name Partition SO
lunacm:> role login -name Crypto Officer
Please attend to the PED.
Respond to SafeNet PED prompts...
Command Result : No Error
lunacm:>
3. Switch on the activation policy for the partition.Type partition changePolicy -slot <slot number> -policy <policy number> -value <policy value>
lunacm:> partition changePolicy -slot 0 -policy 22 -value 1Command Result : No Error
lunacm:>
4. Log in as the Partition Crypto User.Type role login -name Crypto User
lunacm:> role login -name Crypto User
Please attend to the PED.
Respond to SafeNet PED prompts...
If the PED prompts for black PED Key, for the Crypto User login, substitute the gray-labeled PED Key, asappropriate.
Command Result : No Error
SafeNet NetworkHSMConfiguration GuideRelease 6.2 007-011136-010 Rev. A December 2015 Copyright 2015Gemalto NV All rights reserved. 142

9 [Step 9] Configure PPSOApplication Partitions
lunacm:>
Once the partition activation policy is set, the act of logging in by the Crypto User role is sufficient to cache the CU grayPED Key credential. Now, only the partition challenge secret / password is required to be presented by your applicationwhenever it requires access. The CU credential remains cached until the HSM loses power, or you explicitly log out asCU. The credential is re-cached the next time the CU logs in.
Note: You can stop the automatic caching of the CU credential by having the partition SOswitch off the activation policy (22); however doing so also ends activation of the Crypto Officerrole, if that was in effect.
When the CO and CU roles were created, we said you could log in and start using the partition for cryptographicoperations by your application(s). Now, with activation in place, you can log in once and put your CO black PED Key oryour CU gray PED Key away in a safe place, and the cached credentials will continue to allow your application(s) toopen and close sessions and perform their operations within those sessions.
For SafeNet Network HSM and for SafeNet PCI-E HSM, you can also set partition policy 23 on (-value 1), forAutoactivation, which goes one step further and preserves the cached credentials through power outages up to 2 hoursin duration. Autoactivation does not exist for SafeNet USB HSM; therefore policy 23 cannot be switched on.
SafeNet NetworkHSMConfiguration GuideRelease 6.2 007-011136-010 Rev. A December 2015 Copyright 2015Gemalto NV All rights reserved. 143

SafeNet NetworkHSMConfiguration GuideRelease 6.2 007-011136-010Rev. A December 2015 Copyright 2015Gemalto NV All rights reserved. 144

10 [Step 10] Set the Partition Policies for PPSOPartitions
10[Step 10] Set the Partition Policies for PPSO
Partitions
At this point, you should have initialized the partition and created the Crypto Officer role and, optionally, the Crypto Userrole. Before deploying the partitions, review and set the policies that constrain the use of the HSM Partition by clients,as described in the following sections:
• "Displaying the Current Partition Policy Settings" below
• "Changing the Partition Policy Settings" on the next page
• "RSA BlindingMode" on page 147
Note: This section applies to application partitions that are owned and administered by theHSM SO. If the application partition was created with its own Partition SO, then you cannot useLunaSH to administer the partition. All administration of a PPSO partition is carried out by thePartition SO, via LunaCM, from a registered client computer.
Displaying the Current Partition Policy SettingsFirst, display the policies (default) of the created legacy-style application Partition. In order to run the partitionshowPolicies command, you do not need to be logged into the HSM Partition. However, to change policies of eitherthe HSM or an individual Partition, youmust login as HSM SO.
To display the current partition policy settings1. Open a LunaCM session.
2. Enter the following command to display current partition capability and policy settings. Capabilities are factorysettings. Policies are themeans of modifying the adjustable capabilities:
partition showpolicies -partition <partitIon_name>
For example:lunacm:> partition showpolicies
Partition Capabilities0: Enable private key cloning : 01: Enable private key wrapping : 02: Enable private key unwrapping : 13: Enable private key masking : 04: Enable secret key cloning : 05: Enable secret key wrapping : 16: Enable secret key unwrapping : 17: Enable secret key masking : 010: Enable multipurpose keys : 1
SafeNet NetworkHSMConfiguration GuideRelease 6.2 007-011136-010 Rev. A December 2015 Copyright 2015Gemalto NV All rights reserved. 145

10 [Step 10] Set the Partition Policies for PPSOPartitions
11: Enable changing key attributes : 114: Enable PED use without challenge : 115: Allow failed challenge responses : 116: Enable operation without RSA blinding : 117: Enable signing with non-local keys : 118: Enable raw RSA operations : 119: Max non-volatile storage space : 320: Max failed user logins allowed : 1021: Enable high availability recovery : 122: Enable activation : 023: Enable auto-activation : 025: Minimum pin length (inverted: 255 - min) : 24826: Maximum pin length : 25528: Enable Key Management Functions : 129: Enable RSA signing without confirmation : 130: Enable Remote Authentication : 1
Partition Policies0: Allow private key cloning : 01: Allow private key wrapping : 02: Allow private key unwrapping : 13: Allow private key masking : 04: Allow secret key cloning : 05: Allow secret key wrapping : 16: Allow secret key unwrapping : 17: Allow secret key masking : 010: Allow multipurpose keys : 111: Allow changing key attributes : 114: Challenge for authentication not needed : 115: Ignore failed challenge responses : 116: Operate without RSA blinding : 117: Allow signing with non-local keys : 118: Allow raw RSA operations : 119: Max non-volatile storage space : 320: Max failed user logins allowed : 1021: Allow high availability recovery : 122: Allow activation : 023: Allow auto-activation : 025: Minimum pin length (inverted: 255 - min) : 24826: Maximum pin length : 25528: Allow Key Management Functions : 129: Perform RSA signing without confirmation : 130: Allow Remote Authentication : 0Command Result : No Error
Changing the Partition Policy SettingsHaving viewed the Policy settings, you can now modify a Partition Policy for a given Partition, if required.
To change a partition policy1. Open a LunaCM session.
2. Enter the following command to change a Partition Policy:
partition changepolicy -policy <policy_id> -value <policy_value>
SafeNet NetworkHSMConfiguration GuideRelease 6.2 007-011136-010 Rev. A December 2015 Copyright 2015Gemalto NV All rights reserved. 146

10 [Step 10] Set the Partition Policies for PPSOPartitions
RSA Blinding ModeBlinding is a technique that introduces random elements into the signature process to prevent timing attacks on theRSA private key. Use of this techniquemay be required by certain security policies, but it does reduce performance.
The Partiton Security Officer can turn this feature on or off.
If RSA blinding is enabled in Capabilities and allowed in Policies, the partition will always run in RSA blinding mode;performance will be lower than SafeNet published performance figures. This is because the deliberate introduction ofrandom elements causes the average signature to take longer to complete.
For maximum performance, you can switch RSA blindingmode off, at the cost of slight additional risk of so-calledtiming attacks on your keys. It is your decision whether your network and other security measures are sufficientlyrigorous that blinding is not needed.
SafeNet HSMs are normally shipped with the Capability set to allow switching blinding on or off, and with the Policy setto not use blinding, by default.
SafeNet NetworkHSMConfiguration GuideRelease 6.2 007-011136-010 Rev. A December 2015 Copyright 2015Gemalto NV All rights reserved. 147

11Optional Configuration Tasks
After completing the base configuration, you can also perform any of the following optional configuration tasks:
Configure the SafeNet Network HSM appliance to use a Network Time Protocol (NTP) serverYou can synchronize a SafeNet Network HSM appliance with a network time protocol (NTP) server. NTP provides areliable, consistent, and accurate timingmechanism for the appliance using Coordinated Universal Time (UTC), and isthe recommended option for providing an accurate date and time for the appliance. SafeNet Network HSM alsoprovides secure NTP. See "Timestamping – NTP and TimeDrift" on page 1 in theSafeNet Network HSM ApplianceAdministration Guide.
Configure multiple HSMs to operate in high-availability (HA) modeHigh Availability (HA)mode allows you to automatically replicate the data on a HSM/partition over two or more physicalHSMs to provide redundancy and load balancing. Applications using an HA HSM/partition do not access it directly.Instead, the HA software creates a virtual slot for the partition andmanages which physical HSM is actually used whenresponding to an application request. See "High-Availability (HA) Configuration andOperation" on page 1 in theAdministration Guide.
Configure SNMPYou can use the SafeNet SNMP MIB tomonitor the performance of your HSMs. See "SNMP Monitoring" on page 1 intheAdministration Guide.
Configure a remote PEDIf you are configuring a PED-authenticated HSM, you can configure it to use a remote PED, which allows you toauthenticate to the HSM from a remote location. See "Remote PED" on page 1 in theAdministration Guide.
Do not use "sysconf config factoryReset" After 6.x UpdateYou can still backup and restore system configuration data with other commands (see below), but youmust no longeruse the command sysconf config factoryReset.
Why Not?The command sysconf config factoryReset restores a collection of system settings to (as near as possible) thevalues that existed when the baseline configuration was recorded at the Gemalto-SafeNet factory. This includesvalues, pointers, and other settings.
Within amajor release (such as 5.0.x through 5.9.x), this works well as amethod of returning your appliance to thebaseline configuration. However, those settings are just the numbers and values that prevailed at that time. Therecorded baseline does not include files and folders. It assumes that they exist, so only the pointers to them arerecorded.
If your SafeNet Network HSMwas not received with appliance software version 6.x already installed, then you areprobably updating from version 5.x to version 6.x. This is amajor system change, which changes a number of
SafeNet NetworkHSMConfiguration GuideRelease 6.2 007-011136-010Rev. A December 2015 Copyright 2015Gemalto NV All rights reserved. 148

11 Optional Configuration Tasks
resources, file locations/names and other factors. This means that you shouldmake a new baseline configurationsummary, because some elements of the old one now point to resources, files, and other elements that no longer exist.If you run the SafeNet Shell (lunash) command sysconf config factoryReset -service all after such amajor update,but without creating a new baseline, the system can enter an indeterminate state and require return to Gemalto-SafeNetfor re-manufacture.
How to Create an Equivalent Configuration FallbackTo avoid such a situation, as described above, create a named backup configuration, and later restore from it, followingthese steps.
1. Once you update from SafeNet 5.x to SafeNet 6.0 or newer, use command sysconf config backup to create abaseline configuration backup.lunash:>sysconf config backup -description "This_is_your_6.0.0_backup"
Created configuration backup file: SA27_Config_20150505_1439.tar.gz
Command Result : 0 (Success)
2. To restore the new baseline backup use command sysconf config restore -file <name of the baseline> to restorethe configuration.lunash:>sysconf config restore -file SA27_Config_20150505_1439.tar.gz -service all -force
This command restores the previous configurations from the backup file: SA27_Config_20150505_1439.tar.gz
Force option used. Proceed prompt bypassed.
Created configuration backup file: SA27_Config_20150505_1443.tar.gz
Restore the ntls configuration: Succeeded.
Restore the network configuration: Succeeded.
Restore the syslog configuration: Succeeded.
Force option used. Proceed prompt bypassed.
All key and certificates files were deleted.You must restart NTP for the changes to take effect.
Check NTP status after restarting it to make sure that the client is able to start and syncwith the server.
Restore the ntp configuration: Succeeded.
Restore the snmp configuration: Succeeded.
Restore the ssh configuration: Succeeded.
Restore the users configuration: Succeeded.
Restore the system configuration: Succeeded.
You must either reboot the appliance or restart the service(s) for the changes to take
SafeNet NetworkHSMConfiguration GuideRelease 6.2 007-011136-010 Rev. A December 2015 Copyright 2015Gemalto NV All rights reserved. 149
11 Optional Configuration Tasks
effect.
Please check the new configurations BEFORE rebooting or restarting the services.
You can restore the previous configurations if the new settings are not acceptable.
Command Result : 0 (Success)
[Optional] Configure for RADIUS AuthenticationRADIUS (Remote Authentication Dial-In User Service) is a client/server protocol providing authentication,authorization, and accounting service to configured clients. The client passes user information to configured,designated RADIUS servers, and acts on the returned response. A RADIUS server receives user connection requests,authenticates the user if that user's profile exists on the server, and then returns the configuration information accordingto which the client can deliver service to the user.
While a proposal is being considered (by the custodians of the RADIUS standard) to switch to TLS communicationprotocol, RADIUS interaction currently takes place over UDP (User Datagram Protocol).
RADIUS Configuration SummaryConfiguration and identificationmust take place at both ends of the RADIUS transaction. These actions include:
On the RADIUS Server Side
• identify the client systems from which this server will accept requests and return service (this is recorded in theRADIUS server's configuration file)
• identify the users who will be covered by the service
On the RADIUS Client Side (Your SafeNet Network HSM)
• enable RADIUS
• add a RADIUS server, specifying it's IP address, and providing the access secret for that server
• check the status of SafeNet Network HSM appliance users
• add desired SafeNet Network HSM appliance users to the RADIUS list, enabling RADIUS authentication for thoseusers
• verify that RADIUS is enabled for any user on your SafeNet Network HSM that needs to use RADIUS
Configuring RADIUS with Your SafeNet Appliance
Follow these steps on the RADIUS Server:You can use any standards-compliant RADIUS server, either a commercial server or one of the free/open-sourceservers, like freeRADIUS or openRADIUS.
1. Add the client to the RADIUS server's configuration file, specifying:
– the address of the SafeNet Network HSM appliance,
– the secret or password that the client will use when connecting, and
– a short, user-friendly or business-relevant name for the client.
SafeNet NetworkHSMConfiguration GuideRelease 6.2 007-011136-010 Rev. A December 2015 Copyright 2015Gemalto NV All rights reserved. 150

11 Optional Configuration Tasks
You can edit the file directly, for someRADIUS implementations, or use the provided interface.
/etc/raddb/clients.conf:
client 172.20.17.174 {ipaddr = 172.20.17.174secret = testing123nas = othershortname = sa174
}client 172.20.22.106 {
ipaddr = 172.20.22.106secret = testing321nas = othershortname = sa22106
}
2. For each client, add the user name and the password for that user to the "users" file of the RADIUS server. .
/etc/raddb/users:
sauser162 Cleartext-Password := "userpw654"sauser171 Cleartext-Password := "userpw987"sauser172 Cleartext-Password := "userpw789"sauser173 Cleartext-Password := "userpw456"sauser174 Cleartext-Password := "userpw321"nagios Cleartext-Password := "nagiospw"audit Cleartext-Password := "userpin"someguy Cleartext-Password := "userpw"sauser106 Cleartext-Password := "userpw123"
A user can use RADIUS for a SafeNet Network HSM, only if that SafeNet Network HSM is registered as a client,and if that user is registered as a user in the appropriate files on the RADIUS server.
Follow these steps on the SafeNet Network HSM appliance:
Note: WithoutRADIUS, use the command user add user somename to add an applianceadministrative user on SafeNet Network HSM.
However, withRADIUS, use the command user radiusAdd -u somename to both create theuser on the appliance and add that user to the RADIUS list.
You cannot use user radiusAdd to convert an existing user from non-RADIUS to RADIUS. Ifa named user already exists, with a name you need to employ, then youmust user delete thatuser, before creating it again with user radiusAdd command.
1. On the SafeNet Network HSM appliance, enable RADIUS.
[1722022106] lunash:>sysconf radius enable
SafeNet NetworkHSMConfiguration GuideRelease 6.2 007-011136-010 Rev. A December 2015 Copyright 2015Gemalto NV All rights reserved. 151

11 Optional Configuration Tasks
Command Result : 0 (Success)
2. Add the server (by hostname or IP address), specifying the port to use, and the timeout value in seconds.
[1722022106] lunash:>sysconf radius add -s 172.20.15.182 -p 1812 -t 60
Enter the server secret:Re-enter the server secret:Command Result : 0 (Success)
3. Verify that the desired server has been added.[1722022106] lunash:>sysconf radius show
RADIUS for SSH is enabled with the following deployed servers:
server:port timeout------------- ----------
172.20.15.182:1812 60
Command Result : 0 (Success)
4. Check the user list to see which users exist, are enabled on the SafeNet appliance, and are RADIUS enabled.[1722022106] lunash:>user list
Users Roles Status RADIUS-------------------- -------- -------- --------
admin admin enabled noaudit audit enabled no
monitor monitor disabled nooperator operator disabled no
Command Result : 0 (Success)
5. Add a user, by name, as a RADIUS user.
[1722022106] lunash:>user radiusAdd -u someguy
Creating mailbox file: File existsStopping sshd: [ OK ]Starting sshd: [ OK ]
Command Result : 0 (Success)
6. Add the user's appliance role (in this example, we are giving him 'admin'-level access).
[1722022106] lunash:>user role add -u someguy -r admin
User someguy was successfully modified.
Command Result : 0 (Success)
7. Verify that the user exists, has the correct role on the SafeNet appliance, and is a RADIUS user for this appliance.
SafeNet NetworkHSMConfiguration GuideRelease 6.2 007-011136-010 Rev. A December 2015 Copyright 2015Gemalto NV All rights reserved. 152
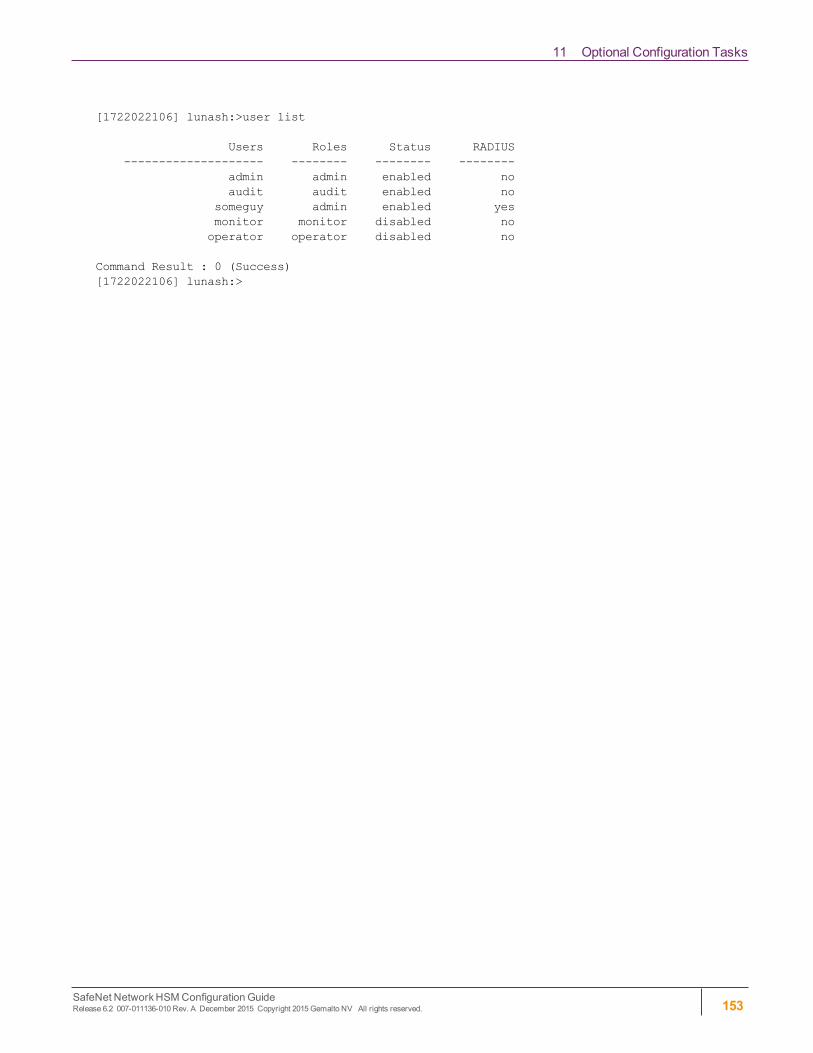
11 Optional Configuration Tasks
[1722022106] lunash:>user list
Users Roles Status RADIUS-------------------- -------- -------- --------
admin admin enabled noaudit audit enabled no
someguy admin enabled yesmonitor monitor disabled nooperator operator disabled no
Command Result : 0 (Success)[1722022106] lunash:>
SafeNet NetworkHSMConfiguration GuideRelease 6.2 007-011136-010 Rev. A December 2015 Copyright 2015Gemalto NV All rights reserved. 153