Lumex RA-915+ Mercury Analyzer Instructions and ... · Michigan Department of Community Health Page...
8
Michigan Department of Community Health Page 1 of 8 Division of Environmental Health April 2010 Lumex RA-915+ Mercury Analyzer Instructions and Troubleshooting ¾ Please do not contaminate the cloth case of the machine with mercury (Do not rest the case on an untested or contaminated surface). It is easier to carry the machine in the cloth case. The cloth case covers the screen, front panel, handle, and the test cell. Open the flaps over the front panel and the top display screen to access the buttons and attachment locations. Side view (with cloth case) Side view (without the cloth case)
Transcript of Lumex RA-915+ Mercury Analyzer Instructions and ... · Michigan Department of Community Health Page...

Michigan Department of Community Health Page 1 of 8 Division of Environmental Health April 2010
Lumex RA-915+ Mercury Analyzer Instructions and Troubleshooting
Please do not contaminate the cloth case of the machine with mercury (Do not rest the case on an untested or contaminated surface).
It is easier to carry the machine in the cloth case. The cloth case covers the screen, front panel, handle, and the test cell. Open the flaps over the front panel and the top display screen to access the buttons and attachment locations.
Side view (with cloth case)
Side view (without the cloth case)

Michigan Department of Community Health Page 2 of 8 Division of Environmental Health April 2010
Front panel of the RA-915+
Michigan Department of Community Health Page 3 of 8 Division of Environmental Health April 2010
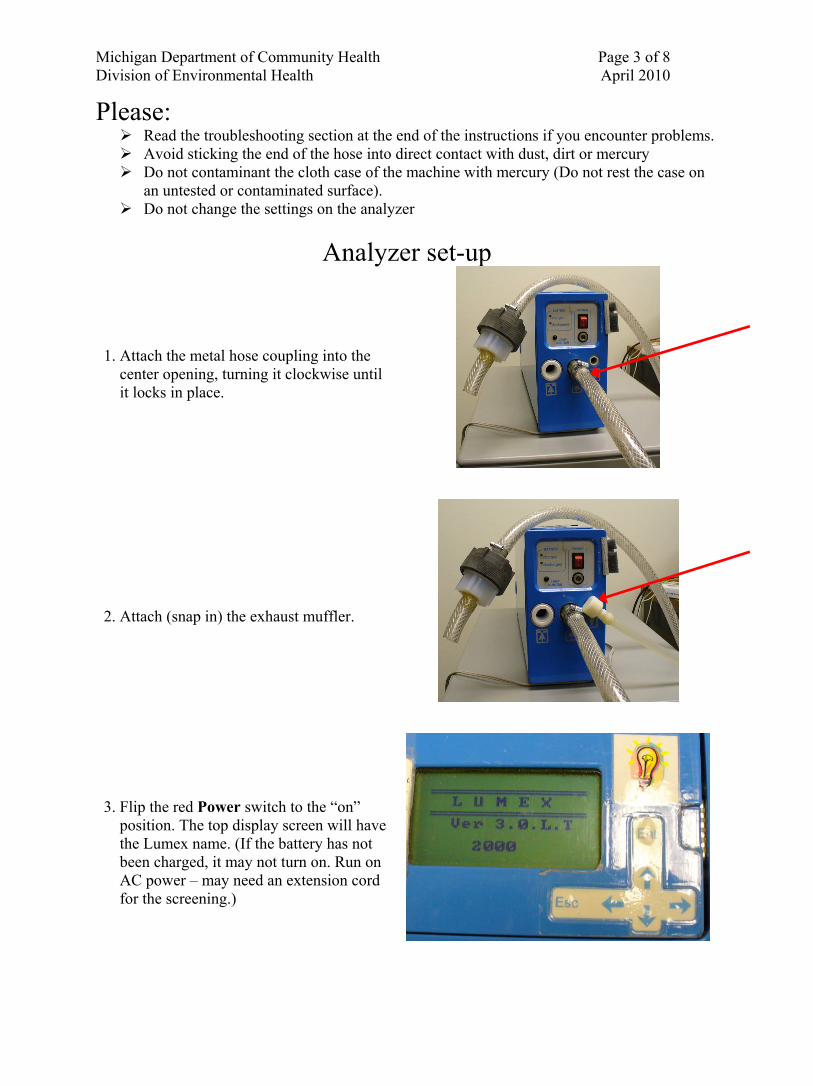
Please: Read the troubleshooting section at the end of the instructions if you encounter problems. Avoid sticking the end of the hose into direct contact with dust, dirt or mercury Do not contaminant the cloth case of the machine with mercury (Do not rest the case on
an untested or contaminated surface). Do not change the settings on the analyzer
Analyzer set-up
1. Attach the metal hose coupling into the center opening, turning it clockwise until it locks in place.
2. Attach (snap in) the exhaust muffler.
3. Flip the red Power switch to the “on” position. The top display screen will have the Lumex name. (If the battery has not been charged, it may not turn on. Run on AC power – may need an extension cord for the screening.)

Michigan Department of Community Health Page 4 of 8 Division of Environmental Health April 2010
4. Push the Enter (Ent) key. The screen will display a menu, and there will be an asterisk (*) at the top left hand side of the screen.
5. Ignite the ignition lamp by pushing the Lamp Ignition button located on the front panel (underneath the battery indicator lights) and holding it for 3 seconds or more. The asterisk will disappear from the screen when the lamp is ignited. The Lamp Ignition button is black and does not light up.
6. Wait 5 minutes for the machine to warm up and acclimate to the temperature in which you
will be using it.

Michigan Department of Community Health Page 5 of 8 Division of Environmental Health April 2010
Run Test
7. Use the Down arrow key to select the menu line for Test and then press the Enter (Ent) key. This test will check the serviceability of the machine. (Basically, the accuracy of repeated readings from a steady source of mercury [test cell].)
8. The machine will run a Baseline test. You should hear the air pump/compressor start at this time (a high-pitched whining sound). The Baseline test is the machine zeroing.
9. After Baseline test is finished, enter the test cell. Reach inside the analyzer’s cloth case and turn the Test cell switch at the rear side of the casing counterclockwise 90° (a quarter turn) to the “Test” position. Rotate it back and forth between positions a few times and then leave it set at the “Test” position (9B picture). It turns easily. See pictures below.

Michigan Department of Community Health Page 6 of 8 Division of Environmental Health April 2010
9A. Position of Red dot when “Off”
9B. Position of Red dot for “Test”
10. Then push the Enter (Ent) key and the machine will run a 10 second test and show various readings and a 10-second counter. The R value will be displayed as R(%)= __. The value must be 25 or less for the machine to be considered functioning properly. If R is greater than 25, wait 10 minutes and run the test again. See the Troubleshooting section for further details.
11. When the R value is acceptable, press the Escape (Esc) key and the machine will direct you to remove the test cell. Turn the Test cell switch clockwise (Picture 9A above) and press the Enter (Ent) key.
Michigan Department of Community Health Page 7 of 8 Division of Environmental Health April 2010
Run the analyzer for a mercury screening
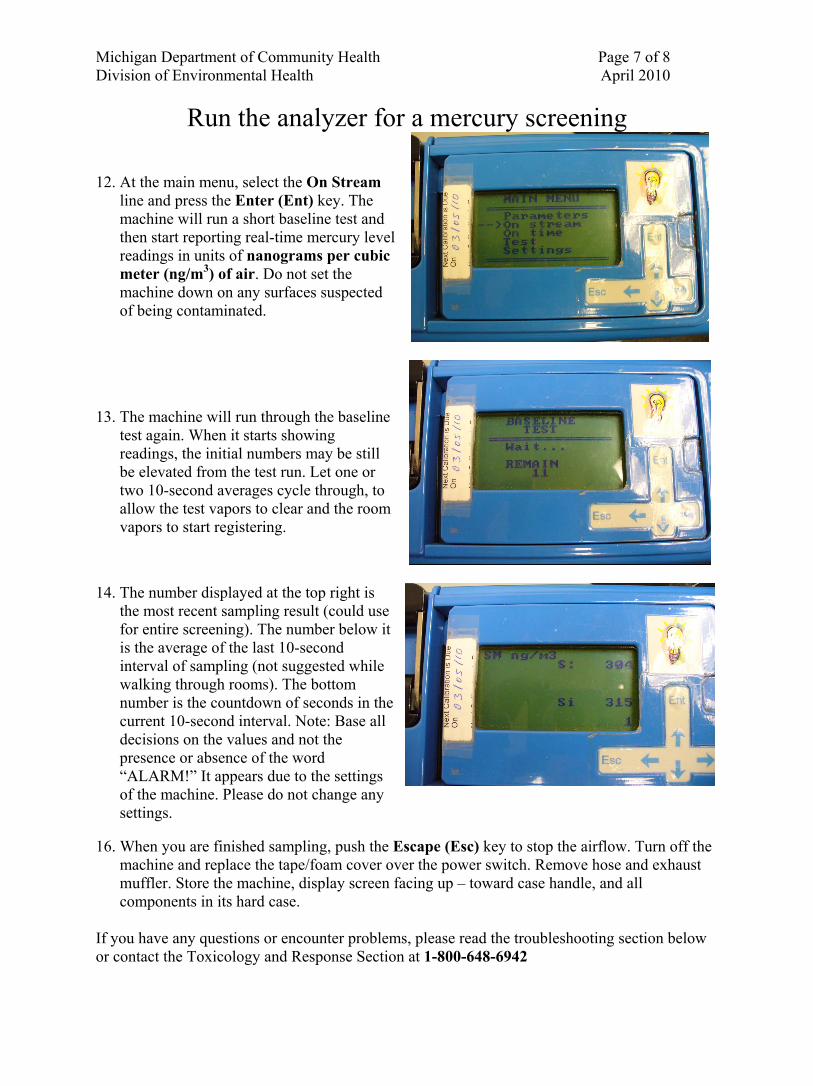
12. At the main menu, select the On Stream line and press the Enter (Ent) key. The machine will run a short baseline test and then start reporting real-time mercury level readings in units of nanograms per cubic meter (ng/m3) of air. Do not set the machine down on any surfaces suspected of being contaminated.
13. The machine will run through the baseline test again. When it starts showing readings, the initial numbers may be still be elevated from the test run. Let one or two 10-second averages cycle through, to allow the test vapors to clear and the room vapors to start registering.
14. The number displayed at the top right is
the most recent sampling result (could use for entire screening). The number below it is the average of the last 10-second interval of sampling (not suggested while walking through rooms). The bottom number is the countdown of seconds in the current 10-second interval. Note: Base all decisions on the values and not the presence or absence of the word “ALARM!” It appears due to the settings of the machine. Please do not change any settings.
16. When you are finished sampling, push the Escape (Esc) key to stop the airflow. Turn off the
machine and replace the tape/foam cover over the power switch. Remove hose and exhaust muffler. Store the machine, display screen facing up – toward case handle, and all components in its hard case.
If you have any questions or encounter problems, please read the troubleshooting section below or contact the Toxicology and Response Section at 1-800-648-6942

Michigan Department of Community Health Page 8 of 8 Division of Environmental Health April 2010
Troubleshooting: Problem Possible cause Correction
The lamp is not on.
Make sure the lamp is on. If the lamp is not on, the asterisk (*) is showing in the upper left corner of the main menu screen (See step #4 above.)
The test cell is not in the “test/on” position.
Check that the red dot is in the correct location. (See step #9 pictures.)
During the test, the R% value was above 25%.
The machine is not at a stable temperature.
Allow the machine to acclimate to the room’s temperature.
A temperature message appeared during the test.
The test cell was not within the appropriate temperature.
Allow the machine to acclimate to approximately room temperature (72°F).
The battery is not charged.
Try running the machine on AC power. You may need an extension cord for the screening.
The machine is too cold. Allow the machine to warm up
The machine is not turning on or staying on.
The battery will no longer hold a charge. Machine needs service.
The air pump did not come on.
The air pump should be on when from the time the “Baseline test” runs (see step #8).
Machine needs service.
The readings are strange (very low or negative numbers).
The temperature is too low for the machine to accurately measure mercury.
The room/screening area needs to be warmer.
There is no indication the machine is charging.
The green “charging” light only comes on when the power is on. (It may blink as it is charging.)
Flip the power switch to “on.”
Contact numbers:
MDCH 1-800-648-6942 National Response Center (NRC) – for reporting over > 1 pound of mercury spilled
1-800-424-8802
EPA On-Scene Coordinators (OSCs)
312-353-2318