Lumens v8 Training Guide - Augusoftproduction.augusoft.net/customercenter/docs... · Lumens v8...
32
Lumens v8 Training Guide Lumens v8 Training Guide – Page 1 – Last Updated 02/08/2017 8441 Wayzata Blvd., Suite 200 Minneapolis, MN 55426-1360 [email protected] ∙ augusoft.net (763) 331-8300 CONFIDENTIAL AND PROPRIETARY | © 2017 Augusoft, Inc. This information and content is intended for Augusoft Lumens ® customers only. Augusoft, the Lumens name and identifier(s) are registered trademarks of Augusoft. Augusoft reserves the right to alter product and service specifications described in this document. Use of the terms "partner" and "partnership" do not imply a legal partnership between Augusoft and any other party. Various trademarks are held by their respective owners. . Lumens v8 provides each Organization with the power to manage how they would like their site to look and feel. When combining colors, templates, and images these possibilities are endless. Lumens v8 also incorporates responsive design which automatically resizes the Lumens site to optimize it for the size of the user’s screen (optimizing the use of Lumens on both a desktop and mobile devices). This document is intended to help with the following: Explain the three main layout templates from which you have to choose and the ‘sub templates’ from which you have to choose from for courses page, class listing page, and class information page. Explain the methods and steps for updating the templates. Provide explanations of the graphics and color selections you will need to make for your organization’s Lumens site. Provide a list of what will and will not copy over from your Lumens v8 staging site to your Lumens v8 production site. Templates The first step is to select a main layout template for the site and the three subsequent page templates that are used for browsing course content. Select the overall site template, or ‘main’ layout template. Select the Course Template, Class Listing Template and Class Information Template, or ‘sub templates’. Below are the steps to make these template selections. You will want to do this in your staging site prior to the conversion. 1. To make your template selections, navigate to System Options > Site Configuration. (See screenshot of partial menu bar on left here.) 2. Once the Site Configuration page loads, notice that each of the tabs contain settings for a different type of site structure or design.
Transcript of Lumens v8 Training Guide - Augusoftproduction.augusoft.net/customercenter/docs... · Lumens v8...
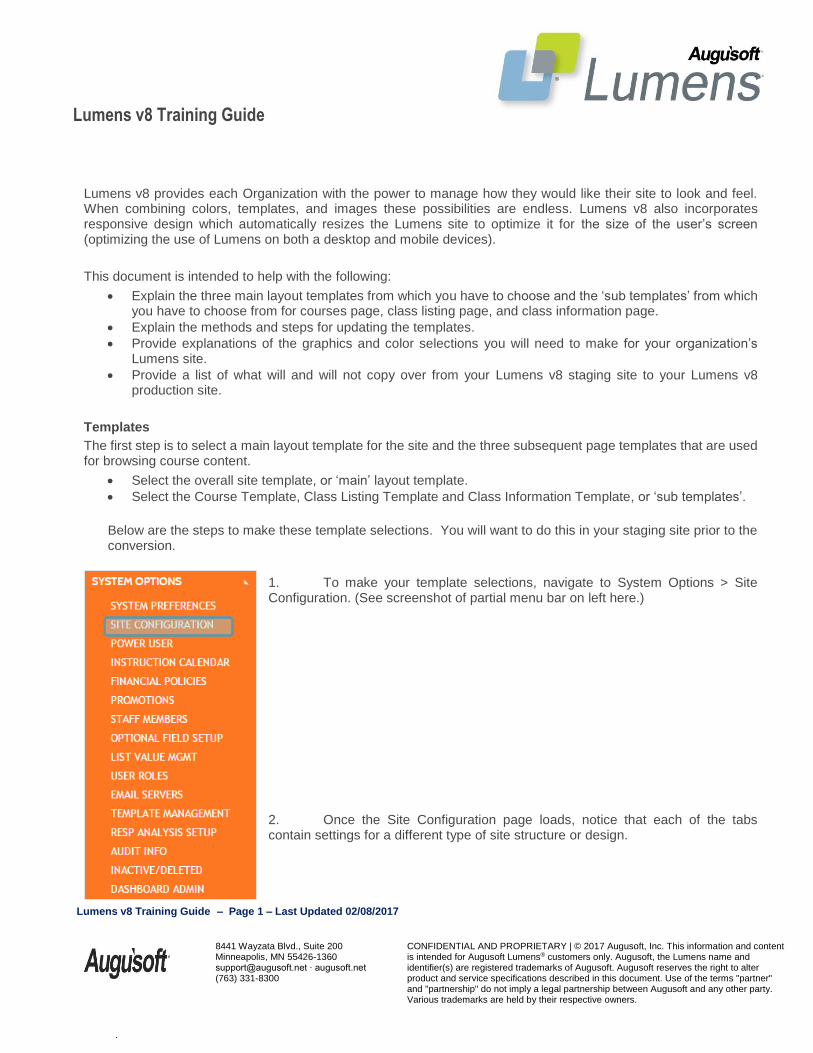
Lumens v8 Training Guide
Lumens v8 Training Guide – Page 1 – Last Updated 02/08/2017
8441 Wayzata Blvd., Suite 200 Minneapolis, MN 55426-1360 [email protected] ∙ augusoft.net (763) 331-8300
CONFIDENTIAL AND PROPRIETARY | © 2017 Augusoft, Inc. This information and content is intended for Augusoft Lumens® customers only. Augusoft, the Lumens name and identifier(s) are registered trademarks of Augusoft. Augusoft reserves the right to alter product and service specifications described in this document. Use of the terms "partner" and "partnership" do not imply a legal partnership between Augusoft and any other party. Various trademarks are held by their respective owners.
.
Lumens v8 provides each Organization with the power to manage how they would like their site to look and feel. When combining colors, templates, and images these possibilities are endless. Lumens v8 also incorporates responsive design which automatically resizes the Lumens site to optimize it for the size of the user’s screen (optimizing the use of Lumens on both a desktop and mobile devices).
This document is intended to help with the following:
Explain the three main layout templates from which you have to choose and the ‘sub templates’ from which you have to choose from for courses page, class listing page, and class information page.
Explain the methods and steps for updating the templates.
Provide explanations of the graphics and color selections you will need to make for your organization’s Lumens site.
Provide a list of what will and will not copy over from your Lumens v8 staging site to your Lumens v8 production site.
Templates
The first step is to select a main layout template for the site and the three subsequent page templates that are used for browsing course content.
Select the overall site template, or ‘main’ layout template.
Select the Course Template, Class Listing Template and Class Information Template, or ‘sub templates’.
Below are the steps to make these template selections. You will want to do this in your staging site prior to the conversion.
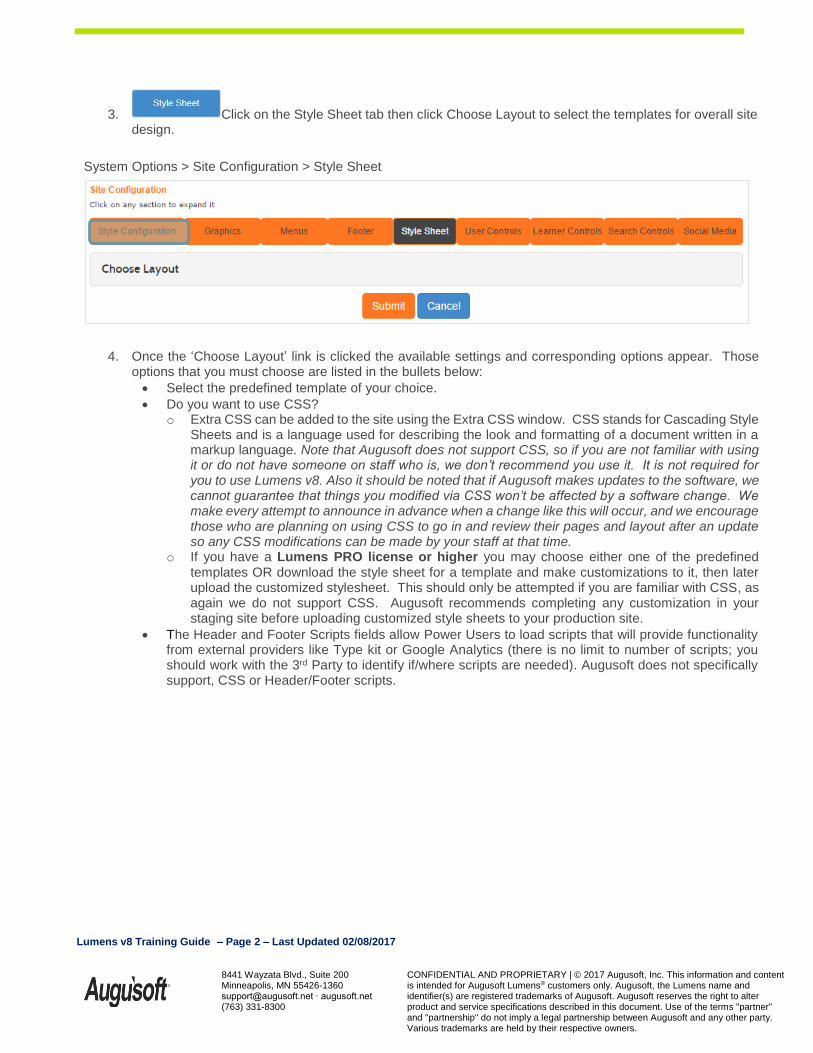
1. To make your template selections, navigate to System Options > Site Configuration. (See screenshot of partial menu bar on left here.)
2. Once the Site Configuration page loads, notice that each of the tabs contain settings for a different type of site structure or design.
Lumens v8 Training Guide – Page 2 – Last Updated 02/08/2017
8441 Wayzata Blvd., Suite 200 Minneapolis, MN 55426-1360 [email protected] ∙ augusoft.net (763) 331-8300
CONFIDENTIAL AND PROPRIETARY | © 2017 Augusoft, Inc. This information and content is intended for Augusoft Lumens® customers only. Augusoft, the Lumens name and identifier(s) are registered trademarks of Augusoft. Augusoft reserves the right to alter product and service specifications described in this document. Use of the terms "partner" and "partnership" do not imply a legal partnership between Augusoft and any other party. Various trademarks are held by their respective owners.
3. Click on the Style Sheet tab then click Choose Layout to select the templates for overall site design.
System Options > Site Configuration > Style Sheet
4. Once the ‘Choose Layout’ link is clicked the available settings and corresponding options appear. Those options that you must choose are listed in the bullets below:
Select the predefined template of your choice.
Do you want to use CSS? o Extra CSS can be added to the site using the Extra CSS window. CSS stands for Cascading Style
Sheets and is a language used for describing the look and formatting of a document written in a markup language. Note that Augusoft does not support CSS, so if you are not familiar with using it or do not have someone on staff who is, we don’t recommend you use it. It is not required for you to use Lumens v8. Also it should be noted that if Augusoft makes updates to the software, we cannot guarantee that things you modified via CSS won’t be affected by a software change. We make every attempt to announce in advance when a change like this will occur, and we encourage those who are planning on using CSS to go in and review their pages and layout after an update so any CSS modifications can be made by your staff at that time.
o If you have a Lumens PRO license or higher you may choose either one of the predefined templates OR download the style sheet for a template and make customizations to it, then later upload the customized stylesheet. This should only be attempted if you are familiar with CSS, as again we do not support CSS. Augusoft recommends completing any customization in your staging site before uploading customized style sheets to your production site.
The Header and Footer Scripts fields allow Power Users to load scripts that will provide functionality from external providers like Type kit or Google Analytics (there is no limit to number of scripts; you should work with the 3rd Party to identify if/where scripts are needed). Augusoft does not specifically support, CSS or Header/Footer scripts.

Lumens v8 Training Guide – Page 3 – Last Updated 02/08/2017
8441 Wayzata Blvd., Suite 200 Minneapolis, MN 55426-1360 [email protected] ∙ augusoft.net (763) 331-8300
CONFIDENTIAL AND PROPRIETARY | © 2017 Augusoft, Inc. This information and content is intended for Augusoft Lumens® customers only. Augusoft, the Lumens name and identifier(s) are registered trademarks of Augusoft. Augusoft reserves the right to alter product and service specifications described in this document. Use of the terms "partner" and "partnership" do not imply a legal partnership between Augusoft and any other party. Various trademarks are held by their respective owners.
Lumens v8 Training Guide – Page 4 – Last Updated 02/08/2017
8441 Wayzata Blvd., Suite 200 Minneapolis, MN 55426-1360 [email protected] ∙ augusoft.net (763) 331-8300
CONFIDENTIAL AND PROPRIETARY | © 2017 Augusoft, Inc. This information and content is intended for Augusoft Lumens® customers only. Augusoft, the Lumens name and identifier(s) are registered trademarks of Augusoft. Augusoft reserves the right to alter product and service specifications described in this document. Use of the terms "partner" and "partnership" do not imply a legal partnership between Augusoft and any other party. Various trademarks are held by their respective owners.
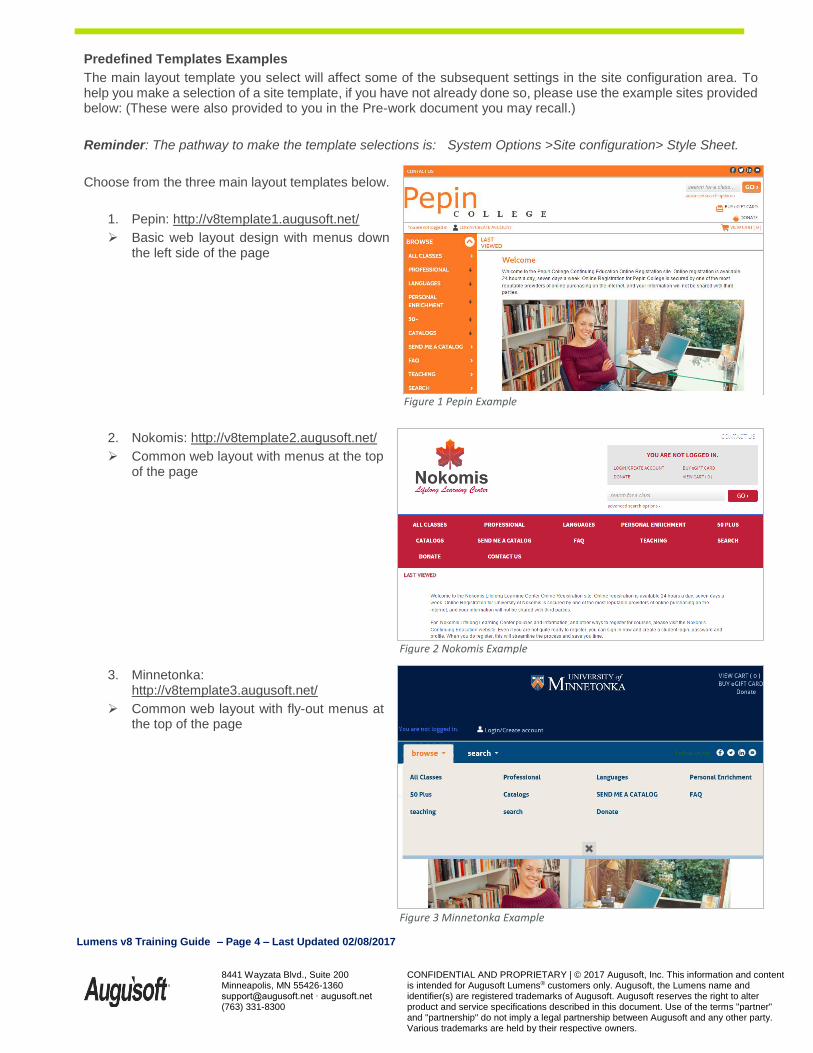
Predefined Templates Examples
The main layout template you select will affect some of the subsequent settings in the site configuration area. To help you make a selection of a site template, if you have not already done so, please use the example sites provided below: (These were also provided to you in the Pre-work document you may recall.)
Reminder: The pathway to make the template selections is: System Options >Site configuration> Style Sheet.
Choose from the three main layout templates below.
1. Pepin: http://v8template1.augusoft.net/
Basic web layout design with menus down the left side of the page
2. Nokomis: http://v8template2.augusoft.net/
Common web layout with menus at the top of the page
3. Minnetonka: http://v8template3.augusoft.net/
Common web layout with fly-out menus at the top of the page
Figure 1 Pepin Example
Figure 2 Nokomis Example
Figure 3 Minnetonka Example
Lumens v8 Training Guide – Page 5 – Last Updated 02/08/2017
8441 Wayzata Blvd., Suite 200 Minneapolis, MN 55426-1360 [email protected] ∙ augusoft.net (763) 331-8300
CONFIDENTIAL AND PROPRIETARY | © 2017 Augusoft, Inc. This information and content is intended for Augusoft Lumens® customers only. Augusoft, the Lumens name and identifier(s) are registered trademarks of Augusoft. Augusoft reserves the right to alter product and service specifications described in this document. Use of the terms "partner" and "partnership" do not imply a legal partnership between Augusoft and any other party. Various trademarks are held by their respective owners.
Note: Though it is not a new feature to Lumens some clients during the Lumens v8 conversion elect to remove from the Category menu items, the Browse menu. However, some find that they prefer to have them listed as an additional quick link to the classes that fall under a specific category. To add or remove them you would refer to your Power User menu and/or go to Power User>General Settings>Show Categories in Menu.
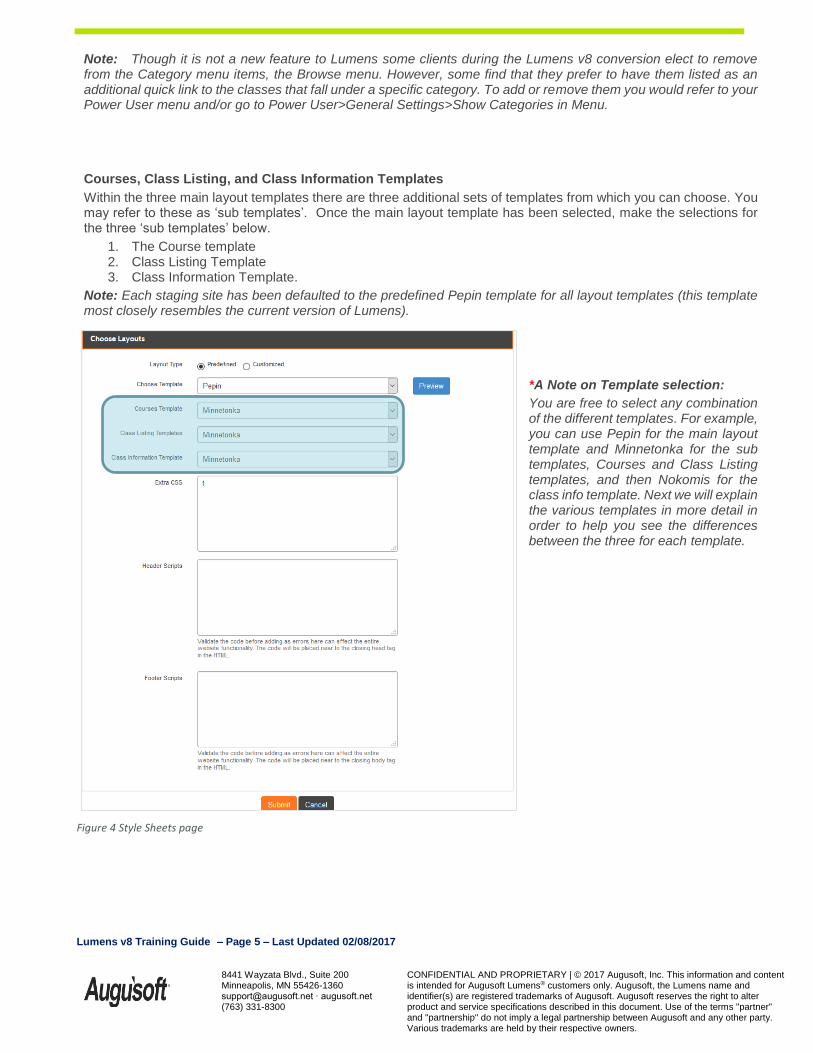
Courses, Class Listing, and Class Information Templates
Within the three main layout templates there are three additional sets of templates from which you can choose. You may refer to these as ‘sub templates’. Once the main layout template has been selected, make the selections for the three ‘sub templates’ below.
1. The Course template 2. Class Listing Template 3. Class Information Template.
Note: Each staging site has been defaulted to the predefined Pepin template for all layout templates (this template most closely resembles the current version of Lumens).
*A Note on Template selection:
You are free to select any combination of the different templates. For example, you can use Pepin for the main layout template and Minnetonka for the sub templates, Courses and Class Listing templates, and then Nokomis for the class info template. Next we will explain the various templates in more detail in order to help you see the differences between the three for each template.
Figure 4 Style Sheets page
Lumens v8 Training Guide – Page 6 – Last Updated 02/08/2017
8441 Wayzata Blvd., Suite 200 Minneapolis, MN 55426-1360 [email protected] ∙ augusoft.net (763) 331-8300
CONFIDENTIAL AND PROPRIETARY | © 2017 Augusoft, Inc. This information and content is intended for Augusoft Lumens® customers only. Augusoft, the Lumens name and identifier(s) are registered trademarks of Augusoft. Augusoft reserves the right to alter product and service specifications described in this document. Use of the terms "partner" and "partnership" do not imply a legal partnership between Augusoft and any other party. Various trademarks are held by their respective owners.
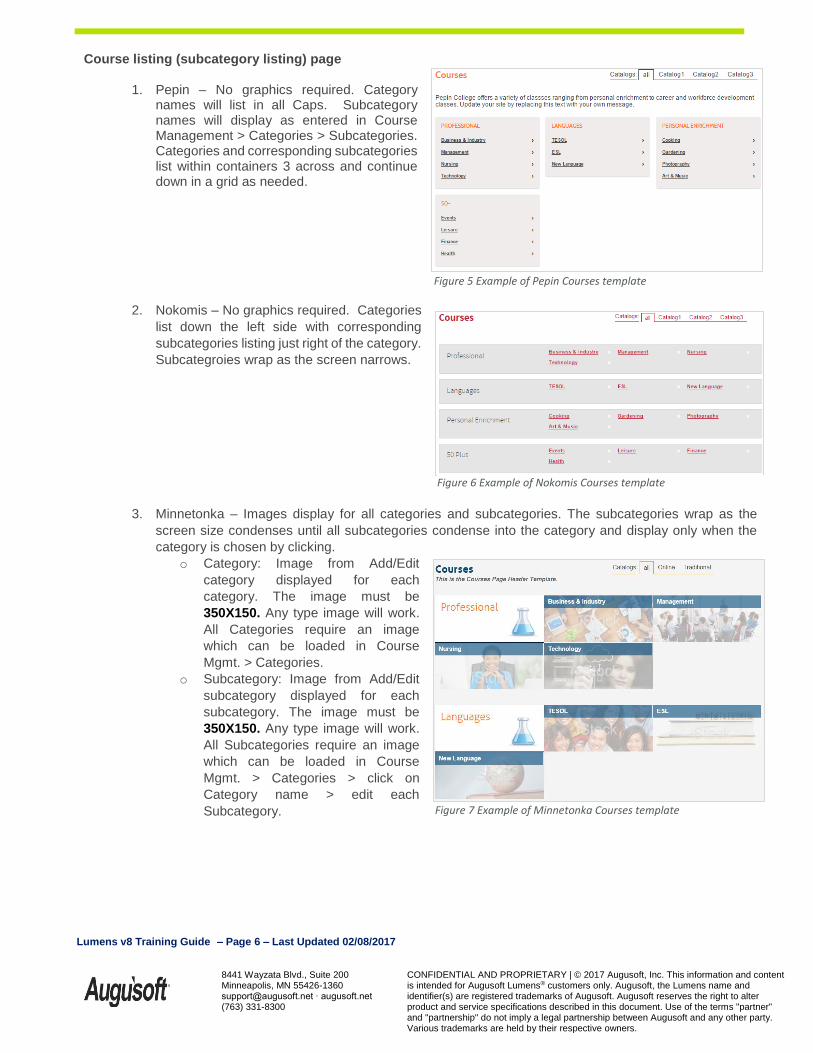
Course listing (subcategory listing) page
1. Pepin – No graphics required. Category names will list in all Caps. Subcategory names will display as entered in Course Management > Categories > Subcategories. Categories and corresponding subcategories list within containers 3 across and continue down in a grid as needed.
2. Nokomis – No graphics required. Categories
list down the left side with corresponding
subcategories listing just right of the category.
Subcategroies wrap as the screen narrows.
3. Minnetonka – Images display for all categories and subcategories. The subcategories wrap as the
screen size condenses until all subcategories condense into the category and display only when the
category is chosen by clicking.
o Category: Image from Add/Edit
category displayed for each
category. The image must be
350X150. Any type image will work.
All Categories require an image
which can be loaded in Course
Mgmt. > Categories.
o Subcategory: Image from Add/Edit
subcategory displayed for each
subcategory. The image must be
350X150. Any type image will work.
All Subcategories require an image
which can be loaded in Course
Mgmt. > Categories > click on
Category name > edit each
Subcategory.
Figure 5 Example of Pepin Courses template
Figure 6 Example of Nokomis Courses template
Figure 7 Example of Minnetonka Courses template
Lumens v8 Training Guide – Page 7 – Last Updated 02/08/2017
8441 Wayzata Blvd., Suite 200 Minneapolis, MN 55426-1360 [email protected] ∙ augusoft.net (763) 331-8300
CONFIDENTIAL AND PROPRIETARY | © 2017 Augusoft, Inc. This information and content is intended for Augusoft Lumens® customers only. Augusoft, the Lumens name and identifier(s) are registered trademarks of Augusoft. Augusoft reserves the right to alter product and service specifications described in this document. Use of the terms "partner" and "partnership" do not imply a legal partnership between Augusoft and any other party. Various trademarks are held by their respective owners.
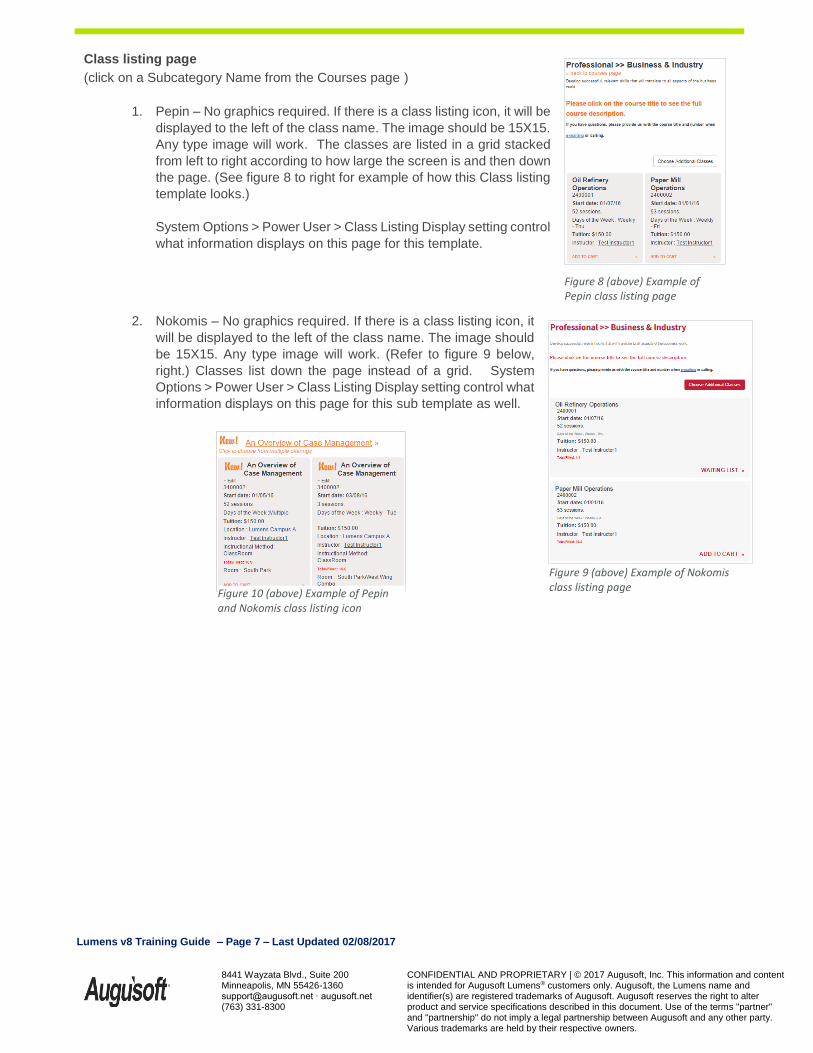
Class listing page
(click on a Subcategory Name from the Courses page )
1. Pepin – No graphics required. If there is a class listing icon, it will be
displayed to the left of the class name. The image should be 15X15.
Any type image will work. The classes are listed in a grid stacked
from left to right according to how large the screen is and then down
the page. (See figure 8 to right for example of how this Class listing
template looks.)
System Options > Power User > Class Listing Display setting control
what information displays on this page for this template.
2. Nokomis – No graphics required. If there is a class listing icon, it
will be displayed to the left of the class name. The image should
be 15X15. Any type image will work. (Refer to figure 9 below,
right.) Classes list down the page instead of a grid. System
Options > Power User > Class Listing Display setting control what
information displays on this page for this sub template as well.
Figure 8 (above) Example of Pepin class listing page
Figure 9 (above) Example of Nokomis class listing page
Figure 10 (above) Example of Pepin and Nokomis class listing icon
Lumens v8 Training Guide – Page 8 – Last Updated 02/08/2017
8441 Wayzata Blvd., Suite 200 Minneapolis, MN 55426-1360 [email protected] ∙ augusoft.net (763) 331-8300
CONFIDENTIAL AND PROPRIETARY | © 2017 Augusoft, Inc. This information and content is intended for Augusoft Lumens® customers only. Augusoft, the Lumens name and identifier(s) are registered trademarks of Augusoft. Augusoft reserves the right to alter product and service specifications described in this document. Use of the terms "partner" and "partnership" do not imply a legal partnership between Augusoft and any other party. Various trademarks are held by their respective owners.
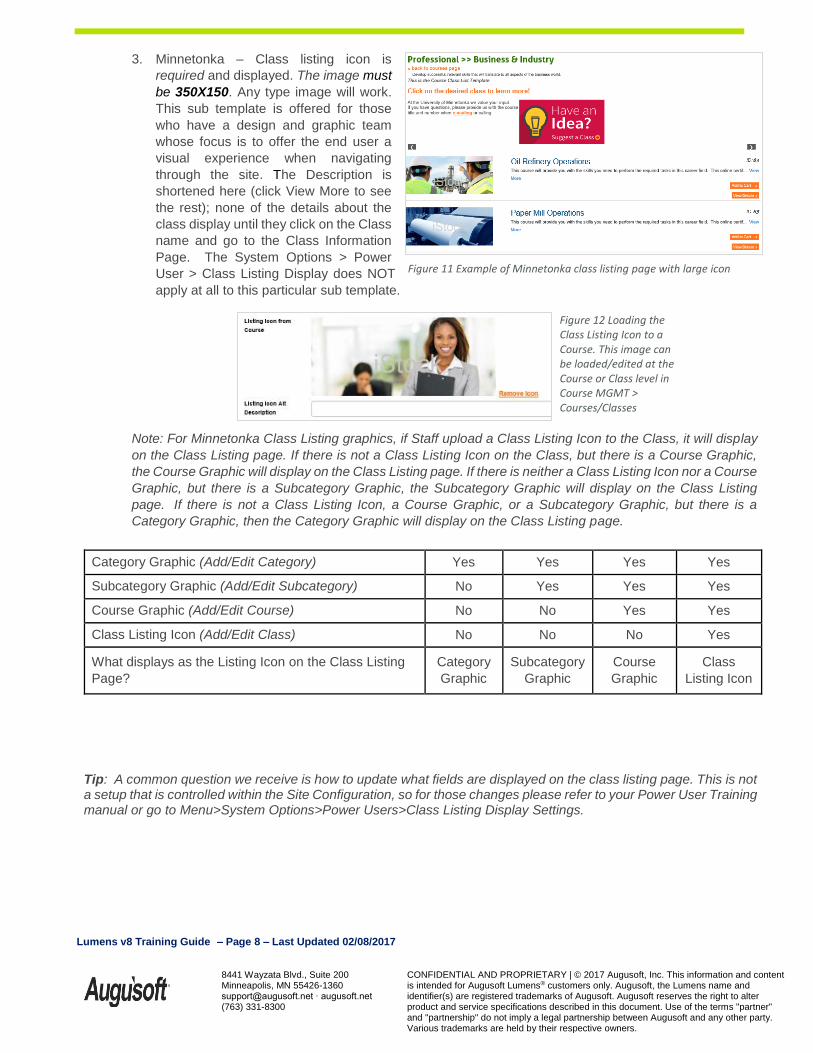
3. Minnetonka – Class listing icon is
required and displayed. The image must
be 350X150. Any type image will work.
This sub template is offered for those
who have a design and graphic team
whose focus is to offer the end user a
visual experience when navigating
through the site. The Description is
shortened here (click View More to see
the rest); none of the details about the
class display until they click on the Class
name and go to the Class Information
Page. The System Options > Power
User > Class Listing Display does NOT
apply at all to this particular sub template.
Note: For Minnetonka Class Listing graphics, if Staff upload a Class Listing Icon to the Class, it will display
on the Class Listing page. If there is not a Class Listing Icon on the Class, but there is a Course Graphic,
the Course Graphic will display on the Class Listing page. If there is neither a Class Listing Icon nor a Course
Graphic, but there is a Subcategory Graphic, the Subcategory Graphic will display on the Class Listing
page. If there is not a Class Listing Icon, a Course Graphic, or a Subcategory Graphic, but there is a
Category Graphic, then the Category Graphic will display on the Class Listing page.
Category Graphic (Add/Edit Category) Yes Yes Yes Yes
Subcategory Graphic (Add/Edit Subcategory) No Yes Yes Yes
Course Graphic (Add/Edit Course) No No Yes Yes
Class Listing Icon (Add/Edit Class) No No No Yes
What displays as the Listing Icon on the Class Listing
Page?
Category
Graphic
Subcategory
Graphic
Course
Graphic
Class
Listing Icon
Tip: A common question we receive is how to update what fields are displayed on the class listing page. This is not a setup that is controlled within the Site Configuration, so for those changes please refer to your Power User Training manual or go to Menu>System Options>Power Users>Class Listing Display Settings.
Figure 11 Example of Minnetonka class listing page with large icon
Figure 12 Loading the Class Listing Icon to a Course. This image can be loaded/edited at the Course or Class level in Course MGMT > Courses/Classes
Lumens v8 Training Guide – Page 9 – Last Updated 02/08/2017
8441 Wayzata Blvd., Suite 200 Minneapolis, MN 55426-1360 [email protected] ∙ augusoft.net (763) 331-8300
CONFIDENTIAL AND PROPRIETARY | © 2017 Augusoft, Inc. This information and content is intended for Augusoft Lumens® customers only. Augusoft, the Lumens name and identifier(s) are registered trademarks of Augusoft. Augusoft reserves the right to alter product and service specifications described in this document. Use of the terms "partner" and "partnership" do not imply a legal partnership between Augusoft and any other party. Various trademarks are held by their respective owners.
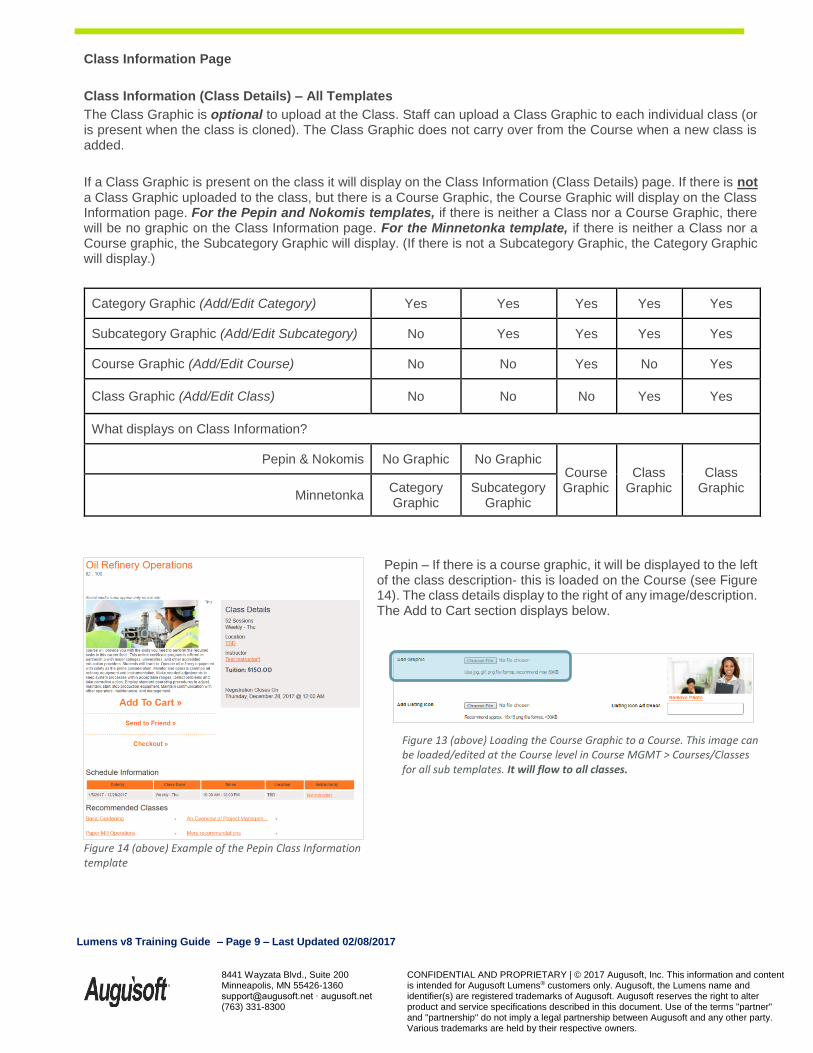
Class Information Page
Class Information (Class Details) – All Templates
The Class Graphic is optional to upload at the Class. Staff can upload a Class Graphic to each individual class (or is present when the class is cloned). The Class Graphic does not carry over from the Course when a new class is added.
If a Class Graphic is present on the class it will display on the Class Information (Class Details) page. If there is not a Class Graphic uploaded to the class, but there is a Course Graphic, the Course Graphic will display on the Class Information page. For the Pepin and Nokomis templates, if there is neither a Class nor a Course Graphic, there will be no graphic on the Class Information page. For the Minnetonka template, if there is neither a Class nor a Course graphic, the Subcategory Graphic will display. (If there is not a Subcategory Graphic, the Category Graphic will display.)
Category Graphic (Add/Edit Category) Yes Yes Yes Yes Yes
Subcategory Graphic (Add/Edit Subcategory) No Yes Yes Yes Yes
Course Graphic (Add/Edit Course) No No Yes No Yes
Class Graphic (Add/Edit Class) No No No Yes Yes
What displays on Class Information?
Pepin & Nokomis No Graphic No Graphic Course Graphic
Class Graphic
Class Graphic
Minnetonka Category Graphic
Subcategory Graphic
Pepin – If there is a course graphic, it will be displayed to the left of the class description- this is loaded on the Course (see Figure 14). The class details display to the right of any image/description. The Add to Cart section displays below.
Figure 14 (above) Example of the Pepin Class Information template
Figure 13 (above) Loading the Course Graphic to a Course. This image can be loaded/edited at the Course level in Course MGMT > Courses/Classes for all sub templates. It will flow to all classes.
Lumens v8 Training Guide – Page 10 – Last Updated 02/08/2017
8441 Wayzata Blvd., Suite 200 Minneapolis, MN 55426-1360 [email protected] ∙ augusoft.net (763) 331-8300
CONFIDENTIAL AND PROPRIETARY | © 2017 Augusoft, Inc. This information and content is intended for Augusoft Lumens® customers only. Augusoft, the Lumens name and identifier(s) are registered trademarks of Augusoft. Augusoft reserves the right to alter product and service specifications described in this document. Use of the terms "partner" and "partnership" do not imply a legal partnership between Augusoft and any other party. Various trademarks are held by their respective owners.
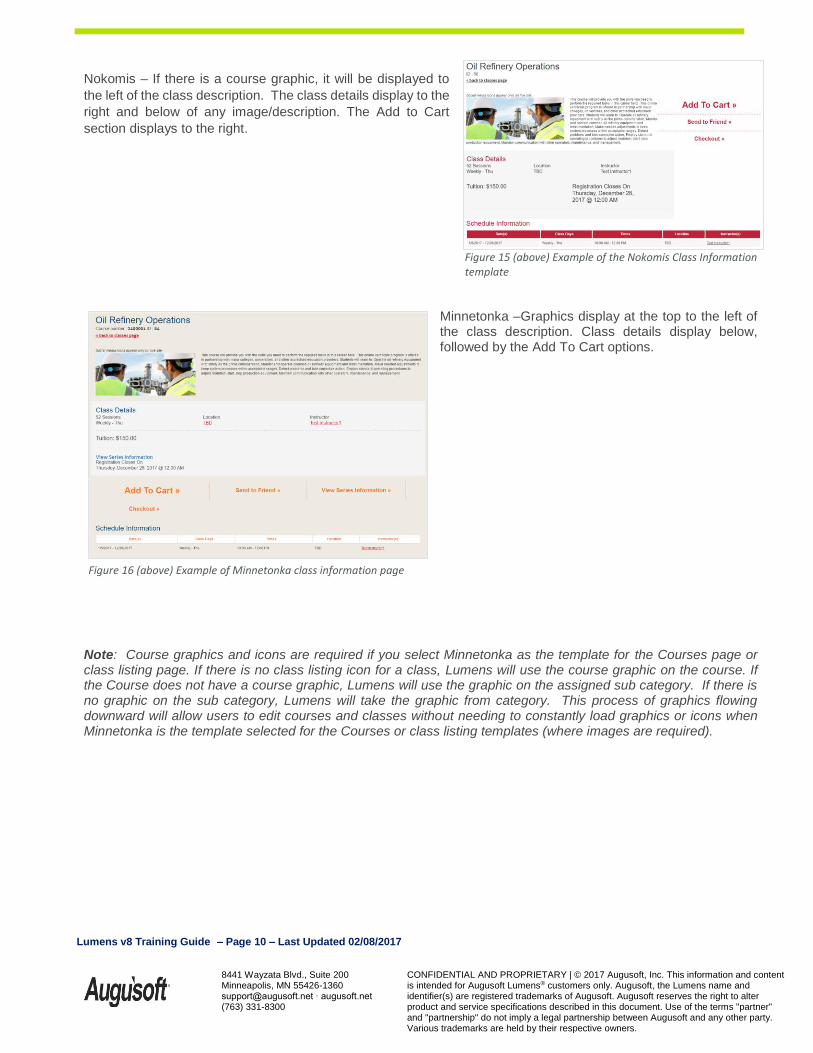
Nokomis – If there is a course graphic, it will be displayed to
the left of the class description. The class details display to the
right and below of any image/description. The Add to Cart
section displays to the right.
Minnetonka –Graphics display at the top to the left of the class description. Class details display below, followed by the Add To Cart options.
Note: Course graphics and icons are required if you select Minnetonka as the template for the Courses page or class listing page. If there is no class listing icon for a class, Lumens will use the course graphic on the course. If the Course does not have a course graphic, Lumens will use the graphic on the assigned sub category. If there is no graphic on the sub category, Lumens will take the graphic from category. This process of graphics flowing downward will allow users to edit courses and classes without needing to constantly load graphics or icons when Minnetonka is the template selected for the Courses or class listing templates (where images are required).
Figure 15 (above) Example of the Nokomis Class Information template
Figure 16 (above) Example of Minnetonka class information page

Lumens v8 Training Guide – Page 11 – Last Updated 02/08/2017
8441 Wayzata Blvd., Suite 200 Minneapolis, MN 55426-1360 [email protected] ∙ augusoft.net (763) 331-8300
CONFIDENTIAL AND PROPRIETARY | © 2017 Augusoft, Inc. This information and content is intended for Augusoft Lumens® customers only. Augusoft, the Lumens name and identifier(s) are registered trademarks of Augusoft. Augusoft reserves the right to alter product and service specifications described in this document. Use of the terms "partner" and "partnership" do not imply a legal partnership between Augusoft and any other party. Various trademarks are held by their respective owners.
Colors Selection
System Options > Site Configuration > Style Configuration
Style Configuration houses all the color and text fields for managing your links and controls around the site. Each section gives individual options, providing the flexibility to personalize each. Each template is loaded with default colors. If you are an existing customer your color settings will be mapped into Lumens v8 when you are upgraded.
Note: Where light colors or dark colors are used, consider how colors work together when making adjustments. This may affect the readability of site content.
Choose a common font/s
Browsers only recognize fonts that are installed on a user’s machine. In order to guarantee that the Lumens site is readable by the greatest number of users, you will need to specify common fonts in the font fields. For a list of the most common browser fonts, see: http://www.ampsoft.net/webdesign-l/WindowsMacFonts.html
The styles that are represented in the Style Configuration area have been carefully chosen to offer the maximum flexibility with the least disruption to site function.
Define Website Colors
Once the color code is entered a preview square next to the text field should display the color corresponding to the code entered.
All color fields in Lumens accept values in hexadecimal (which uses numbers 0-9, as well as letters A–F). There are also 16 color names that can be typed directly into this area and are recognized by all browsers. This webpage lists the acceptable color name values: http://www.december.com/html/spec/color16.html
Lumens v8 Training Guide – Page 12 – Last Updated 02/08/2017
8441 Wayzata Blvd., Suite 200 Minneapolis, MN 55426-1360 [email protected] ∙ augusoft.net (763) 331-8300
CONFIDENTIAL AND PROPRIETARY | © 2017 Augusoft, Inc. This information and content is intended for Augusoft Lumens® customers only. Augusoft, the Lumens name and identifier(s) are registered trademarks of Augusoft. Augusoft reserves the right to alter product and service specifications described in this document. Use of the terms "partner" and "partnership" do not imply a legal partnership between Augusoft and any other party. Various trademarks are held by their respective owners.
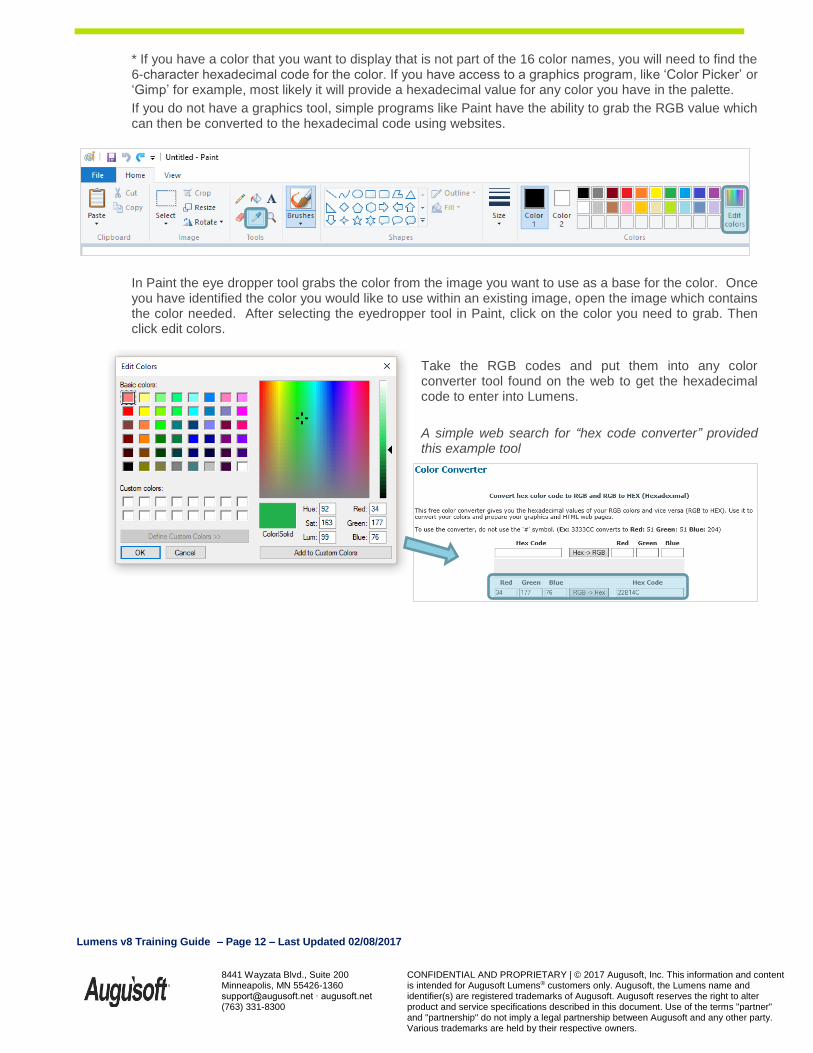
* If you have a color that you want to display that is not part of the 16 color names, you will need to find the 6-character hexadecimal code for the color. If you have access to a graphics program, like ‘Color Picker’ or ‘Gimp’ for example, most likely it will provide a hexadecimal value for any color you have in the palette.
If you do not have a graphics tool, simple programs like Paint have the ability to grab the RGB value which can then be converted to the hexadecimal code using websites.
In Paint the eye dropper tool grabs the color from the image you want to use as a base for the color. Once you have identified the color you would like to use within an existing image, open the image which contains the color needed. After selecting the eyedropper tool in Paint, click on the color you need to grab. Then click edit colors.
Take the RGB codes and put them into any color converter tool found on the web to get the hexadecimal code to enter into Lumens.
A simple web search for “hex code converter” provided this example tool
Lumens v8 Training Guide – Page 13 – Last Updated 02/08/2017
8441 Wayzata Blvd., Suite 200 Minneapolis, MN 55426-1360 [email protected] ∙ augusoft.net (763) 331-8300
CONFIDENTIAL AND PROPRIETARY | © 2017 Augusoft, Inc. This information and content is intended for Augusoft Lumens® customers only. Augusoft, the Lumens name and identifier(s) are registered trademarks of Augusoft. Augusoft reserves the right to alter product and service specifications described in this document. Use of the terms "partner" and "partnership" do not imply a legal partnership between Augusoft and any other party. Various trademarks are held by their respective owners.
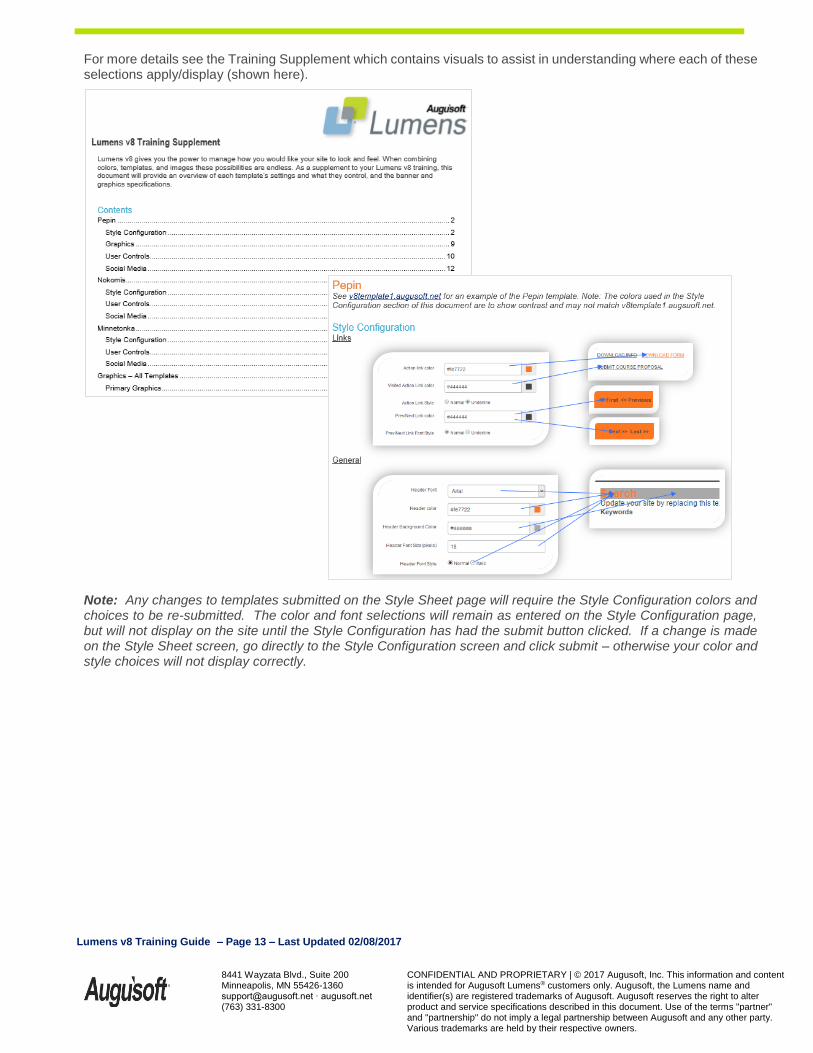
For more details see the Training Supplement which contains visuals to assist in understanding where each of these selections apply/display (shown here).
Note: Any changes to templates submitted on the Style Sheet page will require the Style Configuration colors and choices to be re-submitted. The color and font selections will remain as entered on the Style Configuration page, but will not display on the site until the Style Configuration has had the submit button clicked. If a change is made on the Style Sheet screen, go directly to the Style Configuration screen and click submit – otherwise your color and style choices will not display correctly.
Lumens v8 Training Guide – Page 14 – Last Updated 02/08/2017
8441 Wayzata Blvd., Suite 200 Minneapolis, MN 55426-1360 [email protected] ∙ augusoft.net (763) 331-8300
CONFIDENTIAL AND PROPRIETARY | © 2017 Augusoft, Inc. This information and content is intended for Augusoft Lumens® customers only. Augusoft, the Lumens name and identifier(s) are registered trademarks of Augusoft. Augusoft reserves the right to alter product and service specifications described in this document. Use of the terms "partner" and "partnership" do not imply a legal partnership between Augusoft and any other party. Various trademarks are held by their respective owners.
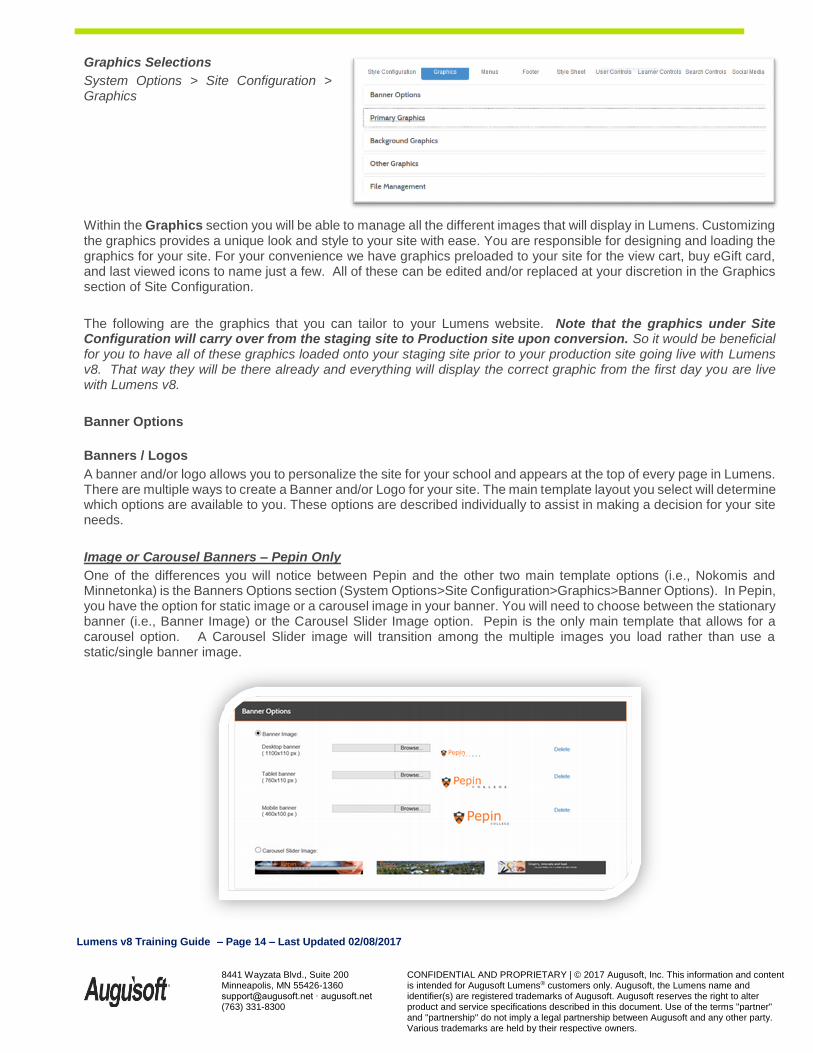
Graphics Selections
System Options > Site Configuration > Graphics
Within the Graphics section you will be able to manage all the different images that will display in Lumens. Customizing the graphics provides a unique look and style to your site with ease. You are responsible for designing and loading the graphics for your site. For your convenience we have graphics preloaded to your site for the view cart, buy eGift card, and last viewed icons to name just a few. All of these can be edited and/or replaced at your discretion in the Graphics section of Site Configuration.
The following are the graphics that you can tailor to your Lumens website. Note that the graphics under Site Configuration will carry over from the staging site to Production site upon conversion. So it would be beneficial for you to have all of these graphics loaded onto your staging site prior to your production site going live with Lumens v8. That way they will be there already and everything will display the correct graphic from the first day you are live with Lumens v8.
Banner Options
Banners / Logos
A banner and/or logo allows you to personalize the site for your school and appears at the top of every page in Lumens. There are multiple ways to create a Banner and/or Logo for your site. The main template layout you select will determine which options are available to you. These options are described individually to assist in making a decision for your site needs.
Image or Carousel Banners – Pepin Only
One of the differences you will notice between Pepin and the other two main template options (i.e., Nokomis and Minnetonka) is the Banners Options section (System Options>Site Configuration>Graphics>Banner Options). In Pepin, you have the option for static image or a carousel image in your banner. You will need to choose between the stationary banner (i.e., Banner Image) or the Carousel Slider Image option. Pepin is the only main template that allows for a carousel option. A Carousel Slider image will transition among the multiple images you load rather than use a static/single banner image.

Lumens v8 Training Guide – Page 15 – Last Updated 02/08/2017
8441 Wayzata Blvd., Suite 200 Minneapolis, MN 55426-1360 [email protected] ∙ augusoft.net (763) 331-8300
CONFIDENTIAL AND PROPRIETARY | © 2017 Augusoft, Inc. This information and content is intended for Augusoft Lumens® customers only. Augusoft, the Lumens name and identifier(s) are registered trademarks of Augusoft. Augusoft reserves the right to alter product and service specifications described in this document. Use of the terms "partner" and "partnership" do not imply a legal partnership between Augusoft and any other party. Various trademarks are held by their respective owners.
Banner images generally are created by a school’s graphic/design department and need to be sized accordingly. Customers that use the banners many times will also incorporate a logo to provide users a quick link to the Lumens home page or anther URL like your institution’s home page. (Note: this would be a page you would consider a “Home” page for your guests, learners, and users.) To accomplish this banner with logo, you will design your banner/s with an allotted space to accommodate a logo.
The exact height and width of the image to be uploaded can vary depending on the target device groups. Depending on the image (i.e., contents of the image) being uploaded the below sizes will need to be adjusted. The widths indicate approximate breakpoints (after margins and paddings of the containing elements of the banner) of the site; i.e. at what widths the image will change.
Total Width Height of Image Height of Canvas
Mobile 310 - 460px 100px 170px
Tablet 461 - 790px 110px 140px
Desktop 791 - 1110px 110px 140px
In the chart above, a width of 460px means 460 pixels will be the maximum available width of the banner before you reach a breakpoint at which point the device is no longer recognized as a mobile device but instead as a tablet. When this breakpoint is met, Lumens will show the image for the tablet. The minimum target width is set as 310 pixels for mobile devices; Lumens does not target mobile devices which go below that width.
A height of 100px means 100 pixels is the maximum available display region where the contents of the image will show without being hidden under something else. The total height of the banner remains 170 pixels for the mobile device; therefore, the 70 pixels at the bottom can be either white, transparent, or the same color as rest of the banner but will be hidden from view.
Tip: you may want to use a different image for the tablet and mobile devices as their screens are much smaller and may lose a lot of the details in the image at their viewing size.
Figure 17 (left)Example of a Banner image that did not have the correct canvas size with a buffer for the display size - part of the image was then covered by the bar containing links.
If you use these sizing guidelines and your image still doesn’t look right, please contact your conversion contact and they can help assess if this is something your staff needs to adjust due to sizing error or if it is a rare occurrence that needs tweaking on Augusoft’s side. During the initial upload there may be a need to have CSS code added by Augusoft to your staging site based on the content of the image. This is not uncommon and your conversion contact will help you determine if it is something that can be resolved by resizing your image or if our team needs to assist to provide specific changes to accommodate your image.
Note: The banner section requires that you have an image uploaded for all three sections to be sure that you have the correct size depending how a user is viewing your site - desktop, tablet and mobile. If you are not going to use the banner, then you will want to delete the image(s). This is also true for logos which are referred to in the Logos section.
Reminder: The Nokomis and Minnetonka main layout templates do not have access to Banner Options (i.e., Image or Carousel Slider Image Banners).
Lumens v8 Training Guide – Page 16 – Last Updated 02/08/2017
8441 Wayzata Blvd., Suite 200 Minneapolis, MN 55426-1360 [email protected] ∙ augusoft.net (763) 331-8300
CONFIDENTIAL AND PROPRIETARY | © 2017 Augusoft, Inc. This information and content is intended for Augusoft Lumens® customers only. Augusoft, the Lumens name and identifier(s) are registered trademarks of Augusoft. Augusoft reserves the right to alter product and service specifications described in this document. Use of the terms "partner" and "partnership" do not imply a legal partnership between Augusoft and any other party. Various trademarks are held by their respective owners.
Color Banners
For all three main layout templates, if you prefer to use a solid color as the background, you control the color of the banner’s background through System Options > Site Configuration > Style Configuration > Header > Banner Color. For Pepin, to use a solid color background, be sure to select the Banner Image radio button but do not upload any files.
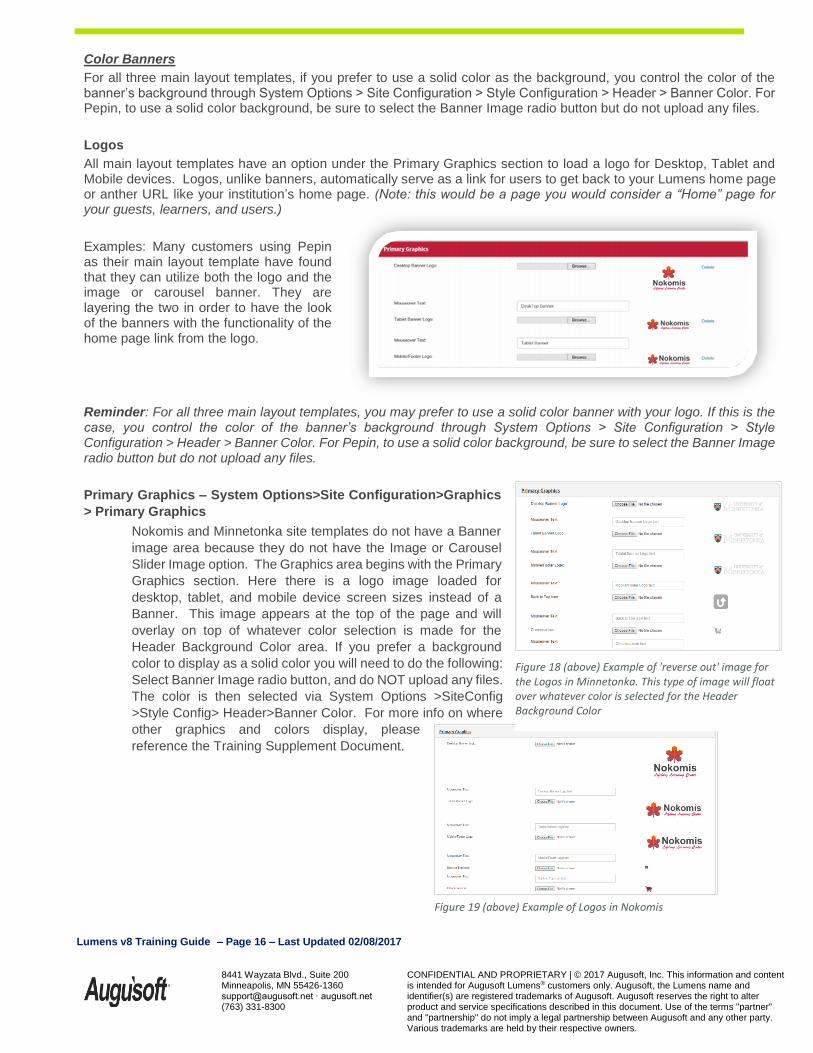
Logos
All main layout templates have an option under the Primary Graphics section to load a logo for Desktop, Tablet and Mobile devices. Logos, unlike banners, automatically serve as a link for users to get back to your Lumens home page or anther URL like your institution’s home page. (Note: this would be a page you would consider a “Home” page for your guests, learners, and users.)
Examples: Many customers using Pepin as their main layout template have found that they can utilize both the logo and the image or carousel banner. They are layering the two in order to have the look of the banners with the functionality of the home page link from the logo.
Reminder: For all three main layout templates, you may prefer to use a solid color banner with your logo. If this is the case, you control the color of the banner’s background through System Options > Site Configuration > Style Configuration > Header > Banner Color. For Pepin, to use a solid color background, be sure to select the Banner Image radio button but do not upload any files.
Primary Graphics – System Options>Site Configuration>Graphics
> Primary Graphics
Nokomis and Minnetonka site templates do not have a Banner
image area because they do not have the Image or Carousel
Slider Image option. The Graphics area begins with the Primary
Graphics section. Here there is a logo image loaded for
desktop, tablet, and mobile device screen sizes instead of a
Banner. This image appears at the top of the page and will
overlay on top of whatever color selection is made for the
Header Background Color area. If you prefer a background
color to display as a solid color you will need to do the following:
Select Banner Image radio button, and do NOT upload any files.
The color is then selected via System Options >SiteConfig
>Style Config> Header>Banner Color. For more info on where
other graphics and colors display, please
reference the Training Supplement Document.
Figure 19 (above) Example of Logos in Nokomis
Figure 18 (above) Example of 'reverse out' image for the Logos in Minnetonka. This type of image will float over whatever color is selected for the Header Background Color
Lumens v8 Training Guide – Page 17 – Last Updated 02/08/2017
8441 Wayzata Blvd., Suite 200 Minneapolis, MN 55426-1360 [email protected] ∙ augusoft.net (763) 331-8300
CONFIDENTIAL AND PROPRIETARY | © 2017 Augusoft, Inc. This information and content is intended for Augusoft Lumens® customers only. Augusoft, the Lumens name and identifier(s) are registered trademarks of Augusoft. Augusoft reserves the right to alter product and service specifications described in this document. Use of the terms "partner" and "partnership" do not imply a legal partnership between Augusoft and any other party. Various trademarks are held by their respective owners.
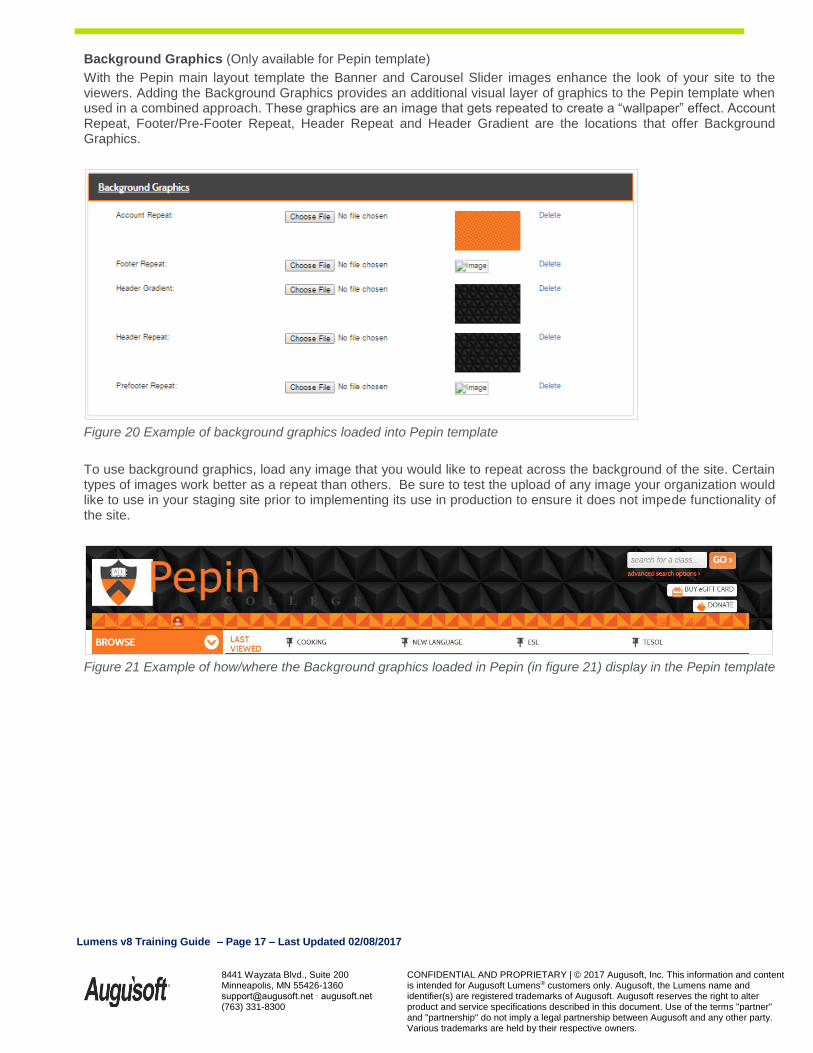
Background Graphics (Only available for Pepin template)
With the Pepin main layout template the Banner and Carousel Slider images enhance the look of your site to the viewers. Adding the Background Graphics provides an additional visual layer of graphics to the Pepin template when used in a combined approach. These graphics are an image that gets repeated to create a “wallpaper” effect. Account Repeat, Footer/Pre-Footer Repeat, Header Repeat and Header Gradient are the locations that offer Background Graphics.
Figure 20 Example of background graphics loaded into Pepin template
To use background graphics, load any image that you would like to repeat across the background of the site. Certain types of images work better as a repeat than others. Be sure to test the upload of any image your organization would like to use in your staging site prior to implementing its use in production to ensure it does not impede functionality of the site.
Figure 21 Example of how/where the Background graphics loaded in Pepin (in figure 21) display in the Pepin template
Lumens v8 Training Guide – Page 18 – Last Updated 02/08/2017
8441 Wayzata Blvd., Suite 200 Minneapolis, MN 55426-1360 [email protected] ∙ augusoft.net (763) 331-8300
CONFIDENTIAL AND PROPRIETARY | © 2017 Augusoft, Inc. This information and content is intended for Augusoft Lumens® customers only. Augusoft, the Lumens name and identifier(s) are registered trademarks of Augusoft. Augusoft reserves the right to alter product and service specifications described in this document. Use of the terms "partner" and "partnership" do not imply a legal partnership between Augusoft and any other party. Various trademarks are held by their respective owners.
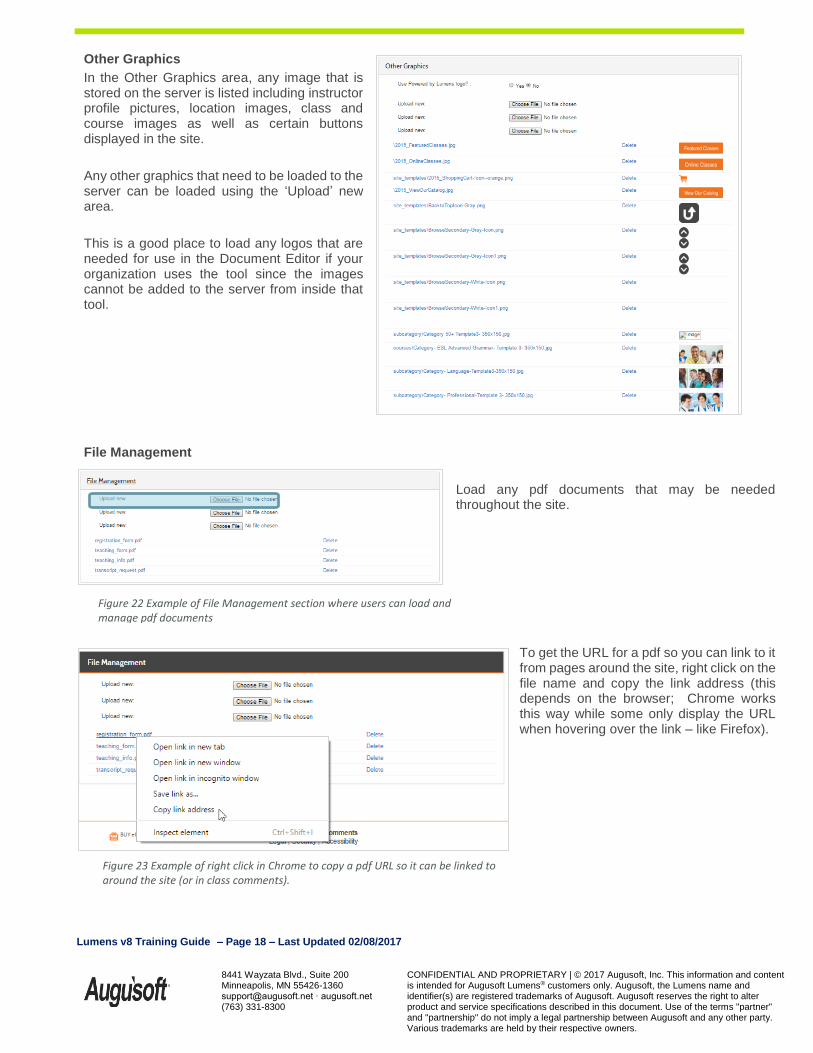
Other Graphics
In the Other Graphics area, any image that is stored on the server is listed including instructor profile pictures, location images, class and course images as well as certain buttons displayed in the site.
Any other graphics that need to be loaded to the server can be loaded using the ‘Upload’ new area.
This is a good place to load any logos that are needed for use in the Document Editor if your organization uses the tool since the images cannot be added to the server from inside that tool.
File Management
Load any pdf documents that may be needed throughout the site.
To get the URL for a pdf so you can link to it from pages around the site, right click on the file name and copy the link address (this depends on the browser; Chrome works this way while some only display the URL when hovering over the link – like Firefox).
Figure 23 Example of right click in Chrome to copy a pdf URL so it can be linked to around the site (or in class comments).
Figure 22 Example of File Management section where users can load and manage pdf documents

Lumens v8 Training Guide – Page 19 – Last Updated 02/08/2017
8441 Wayzata Blvd., Suite 200 Minneapolis, MN 55426-1360 [email protected] ∙ augusoft.net (763) 331-8300
CONFIDENTIAL AND PROPRIETARY | © 2017 Augusoft, Inc. This information and content is intended for Augusoft Lumens® customers only. Augusoft, the Lumens name and identifier(s) are registered trademarks of Augusoft. Augusoft reserves the right to alter product and service specifications described in this document. Use of the terms "partner" and "partnership" do not imply a legal partnership between Augusoft and any other party. Various trademarks are held by their respective owners.
Menus
System Options > Site Configuration > Menus
Menus area allows you to setup what menu items the users in your system will have access to depending on their
Role. There are two sections that you will need to review and manage under the Menus tab. Build Public Menu
Structures is the first section and houses the Guest (or public view), Learner, Member, Household, Instructor and
Company User menus. You will control which menus appear to each user type and can choose to use a two-level setup
for menus (e.g., for a Learner, you may wish to have a ‘Contact Us’ page show as a submenu of the ‘Learner Welcome’).
The second section All Menu Items is where you will manage all the menus for every role in the system including the
Admins and Staff.
First click on the Build Public Menu Structures option then
click on Guest as shown in Figure 24. Once you open the
Guest menu, click on the available menu items on the right
to drag and drop them into the trash icon to revove from
view to the [Guest]. Menu items then appear in black text
to the left.
Click on an item and change the level to make them pimary
vs. submenu items. This can be done for all public views
for the different user types in the system.
Open the All Menu Items area. Items are listed in
alphabetical order. The menu item can be deleted or
edited. Select the user type from the “select access level”
menu or choose to add a custom menu item as shown in
Figure 26.
Tip: Use the search to quickly find a specific menu item.
Figure 24 Build Menu
Figure 25 Editing the Guest menu items
Figure 26 All Menu Items area allows for removal or addition of menu items in the system
Lumens v8 Training Guide – Page 20 – Last Updated 02/08/2017
8441 Wayzata Blvd., Suite 200 Minneapolis, MN 55426-1360 [email protected] ∙ augusoft.net (763) 331-8300
CONFIDENTIAL AND PROPRIETARY | © 2017 Augusoft, Inc. This information and content is intended for Augusoft Lumens® customers only. Augusoft, the Lumens name and identifier(s) are registered trademarks of Augusoft. Augusoft reserves the right to alter product and service specifications described in this document. Use of the terms "partner" and "partnership" do not imply a legal partnership between Augusoft and any other party. Various trademarks are held by their respective owners.
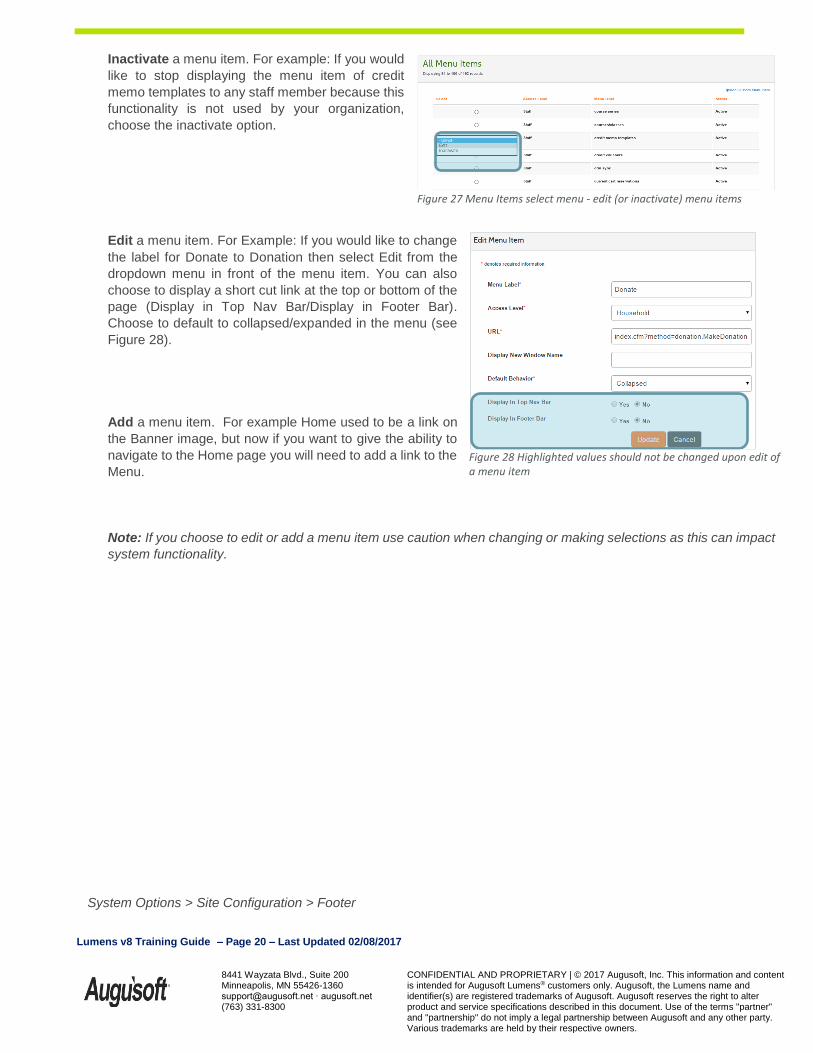
Inactivate a menu item. For example: If you would
like to stop displaying the menu item of credit
memo templates to any staff member because this
functionality is not used by your organization,
choose the inactivate option.
Edit a menu item. For Example: If you would like to change
the label for Donate to Donation then select Edit from the
dropdown menu in front of the menu item. You can also
choose to display a short cut link at the top or bottom of the
page (Display in Top Nav Bar/Display in Footer Bar).
Choose to default to collapsed/expanded in the menu (see
Figure 28).
Add a menu item. For example Home used to be a link on
the Banner image, but now if you want to give the ability to
navigate to the Home page you will need to add a link to the
Menu.
Note: If you choose to edit or add a menu item use caution when changing or making selections as this can impact
system functionality.
System Options > Site Configuration > Footer
Figure 27 Menu Items select menu - edit (or inactivate) menu items
Figure 28 Highlighted values should not be changed upon edit of a menu item
Lumens v8 Training Guide – Page 21 – Last Updated 02/08/2017
8441 Wayzata Blvd., Suite 200 Minneapolis, MN 55426-1360 [email protected] ∙ augusoft.net (763) 331-8300
CONFIDENTIAL AND PROPRIETARY | © 2017 Augusoft, Inc. This information and content is intended for Augusoft Lumens® customers only. Augusoft, the Lumens name and identifier(s) are registered trademarks of Augusoft. Augusoft reserves the right to alter product and service specifications described in this document. Use of the terms "partner" and "partnership" do not imply a legal partnership between Augusoft and any other party. Various trademarks are held by their respective owners.
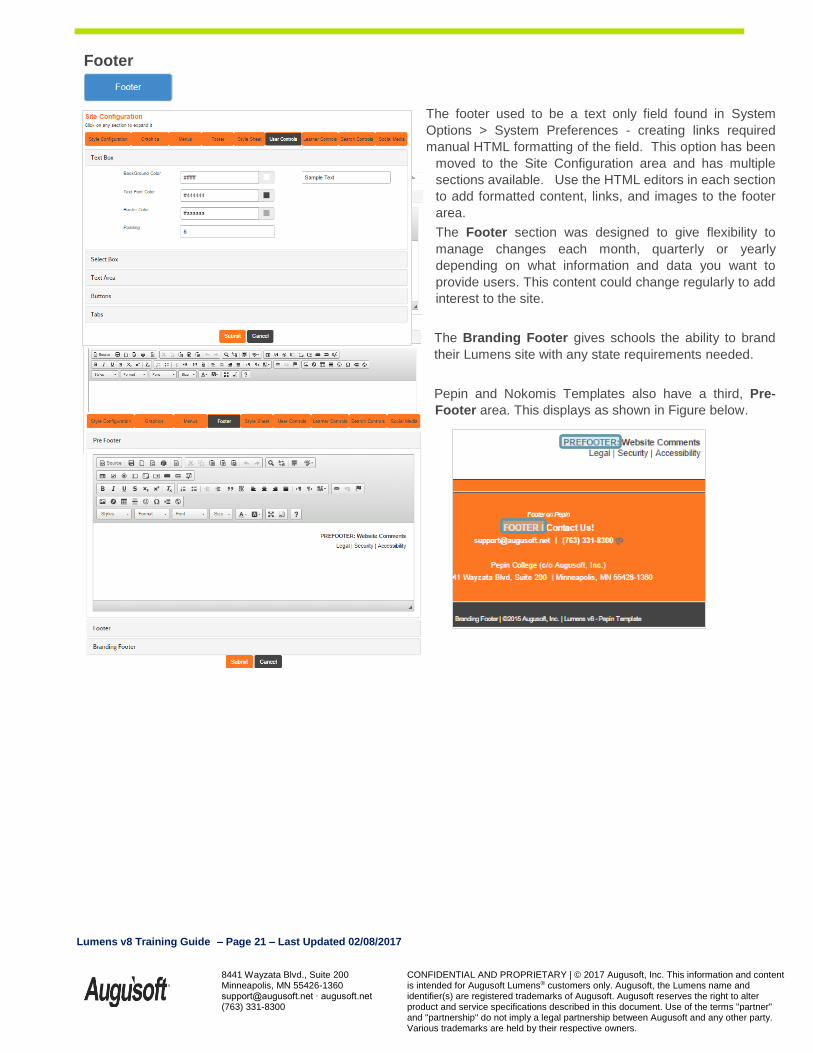
Footer
The footer used to be a text only field found in System
Options > System Preferences - creating links required
manual HTML formatting of the field. This option has been
moved to the Site Configuration area and has multiple
sections available. Use the HTML editors in each section
to add formatted content, links, and images to the footer
area.
The Footer section was designed to give flexibility to
manage changes each month, quarterly or yearly
depending on what information and data you want to
provide users. This content could change regularly to add
interest to the site.
The Branding Footer gives schools the ability to brand
their Lumens site with any state requirements needed.
Pepin and Nokomis Templates also have a third, Pre-
Footer area. This displays as shown in Figure below.
Lumens v8 Training Guide – Page 22 – Last Updated 02/08/2017
8441 Wayzata Blvd., Suite 200 Minneapolis, MN 55426-1360 [email protected] ∙ augusoft.net (763) 331-8300
CONFIDENTIAL AND PROPRIETARY | © 2017 Augusoft, Inc. This information and content is intended for Augusoft Lumens® customers only. Augusoft, the Lumens name and identifier(s) are registered trademarks of Augusoft. Augusoft reserves the right to alter product and service specifications described in this document. Use of the terms "partner" and "partnership" do not imply a legal partnership between Augusoft and any other party. Various trademarks are held by their respective owners.
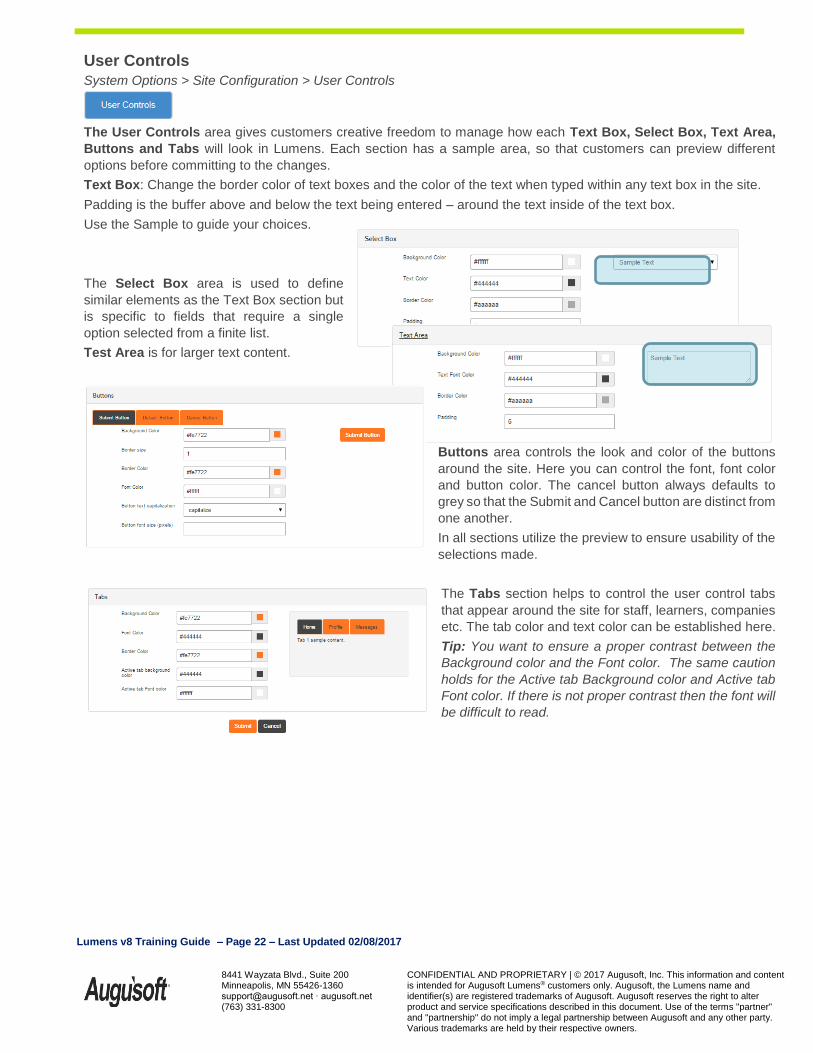
User Controls
System Options > Site Configuration > User Controls
The User Controls area gives customers creative freedom to manage how each Text Box, Select Box, Text Area,
Buttons and Tabs will look in Lumens. Each section has a sample area, so that customers can preview different
options before committing to the changes.
Text Box: Change the border color of text boxes and the color of the text when typed within any text box in the site.
Padding is the buffer above and below the text being entered – around the text inside of the text box.
Use the Sample to guide your choices.
The Select Box area is used to define
similar elements as the Text Box section but
is specific to fields that require a single
option selected from a finite list.
Test Area is for larger text content.
Buttons area controls the look and color of the buttons
around the site. Here you can control the font, font color
and button color. The cancel button always defaults to
grey so that the Submit and Cancel button are distinct from
one another.
In all sections utilize the preview to ensure usability of the
selections made.
The Tabs section helps to control the user control tabs
that appear around the site for staff, learners, companies
etc. The tab color and text color can be established here.
Tip: You want to ensure a proper contrast between the
Background color and the Font color. The same caution
holds for the Active tab Background color and Active tab
Font color. If there is not proper contrast then the font will
be difficult to read.
Lumens v8 Training Guide – Page 23 – Last Updated 02/08/2017
8441 Wayzata Blvd., Suite 200 Minneapolis, MN 55426-1360 [email protected] ∙ augusoft.net (763) 331-8300
CONFIDENTIAL AND PROPRIETARY | © 2017 Augusoft, Inc. This information and content is intended for Augusoft Lumens® customers only. Augusoft, the Lumens name and identifier(s) are registered trademarks of Augusoft. Augusoft reserves the right to alter product and service specifications described in this document. Use of the terms "partner" and "partnership" do not imply a legal partnership between Augusoft and any other party. Various trademarks are held by their respective owners.
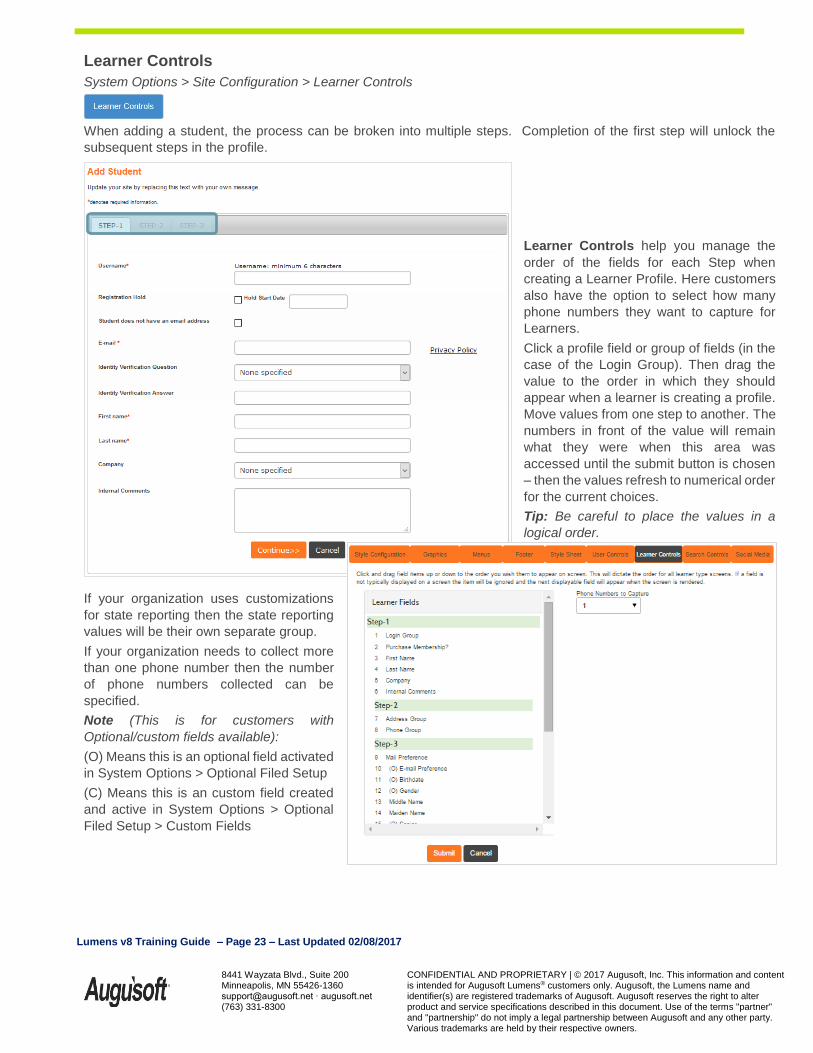
Learner Controls
System Options > Site Configuration > Learner Controls
When adding a student, the process can be broken into multiple steps. Completion of the first step will unlock the
subsequent steps in the profile.
Learner Controls help you manage the
order of the fields for each Step when
creating a Learner Profile. Here customers
also have the option to select how many
phone numbers they want to capture for
Learners.
Click a profile field or group of fields (in the
case of the Login Group). Then drag the
value to the order in which they should
appear when a learner is creating a profile.
Move values from one step to another. The
numbers in front of the value will remain
what they were when this area was
accessed until the submit button is chosen
– then the values refresh to numerical order
for the current choices.
Tip: Be careful to place the values in a
logical order.
If your organization uses customizations
for state reporting then the state reporting
values will be their own separate group.
If your organization needs to collect more
than one phone number then the number
of phone numbers collected can be
specified.
Note (This is for customers with
Optional/custom fields available):
(O) Means this is an optional field activated
in System Options > Optional Filed Setup
(C) Means this is an custom field created
and active in System Options > Optional
Filed Setup > Custom Fields
Lumens v8 Training Guide – Page 24 – Last Updated 02/08/2017
8441 Wayzata Blvd., Suite 200 Minneapolis, MN 55426-1360 [email protected] ∙ augusoft.net (763) 331-8300
CONFIDENTIAL AND PROPRIETARY | © 2017 Augusoft, Inc. This information and content is intended for Augusoft Lumens® customers only. Augusoft, the Lumens name and identifier(s) are registered trademarks of Augusoft. Augusoft reserves the right to alter product and service specifications described in this document. Use of the terms "partner" and "partnership" do not imply a legal partnership between Augusoft and any other party. Various trademarks are held by their respective owners.
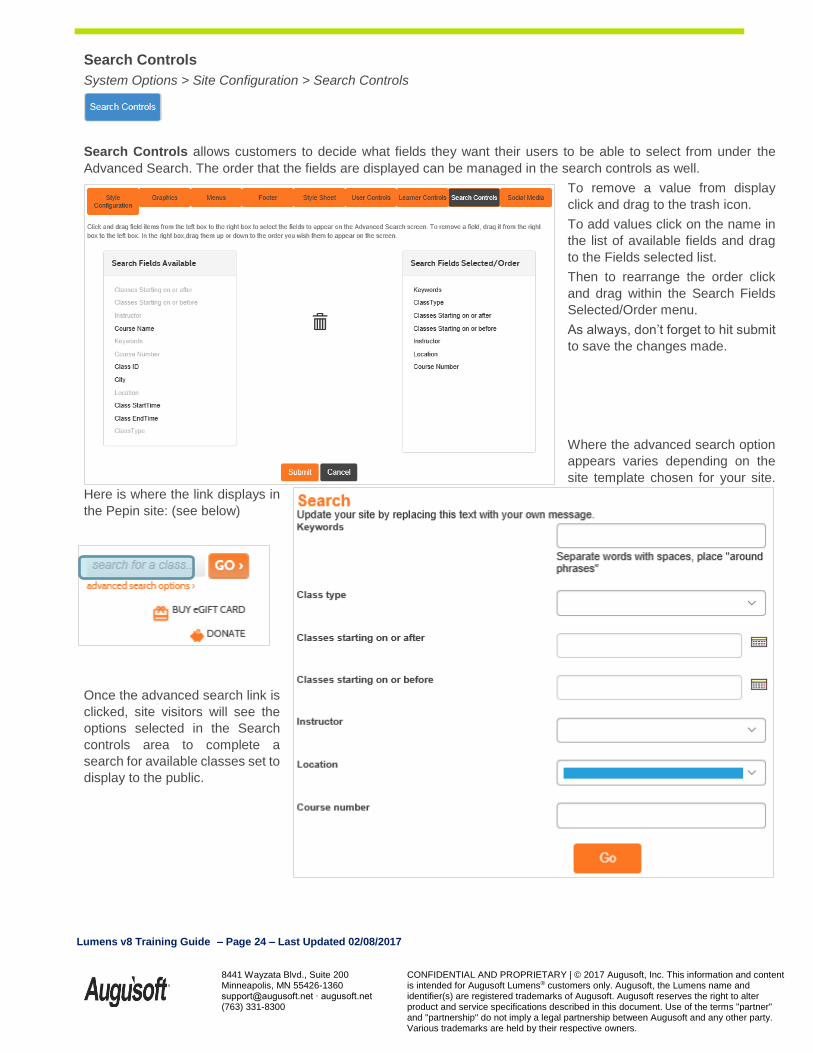
Search Controls
System Options > Site Configuration > Search Controls
Search Controls allows customers to decide what fields they want their users to be able to select from under the
Advanced Search. The order that the fields are displayed can be managed in the search controls as well.
To remove a value from display
click and drag to the trash icon.
To add values click on the name in
the list of available fields and drag
to the Fields selected list.
Then to rearrange the order click
and drag within the Search Fields
Selected/Order menu.
As always, don’t forget to hit submit
to save the changes made.
Where the advanced search option
appears varies depending on the
site template chosen for your site.
Here is where the link displays in
the Pepin site: (see below)
Once the advanced search link is
clicked, site visitors will see the
options selected in the Search
controls area to complete a
search for available classes set to
display to the public.
Lumens v8 Training Guide – Page 25 – Last Updated 02/08/2017
8441 Wayzata Blvd., Suite 200 Minneapolis, MN 55426-1360 [email protected] ∙ augusoft.net (763) 331-8300
CONFIDENTIAL AND PROPRIETARY | © 2017 Augusoft, Inc. This information and content is intended for Augusoft Lumens® customers only. Augusoft, the Lumens name and identifier(s) are registered trademarks of Augusoft. Augusoft reserves the right to alter product and service specifications described in this document. Use of the terms "partner" and "partnership" do not imply a legal partnership between Augusoft and any other party. Various trademarks are held by their respective owners.
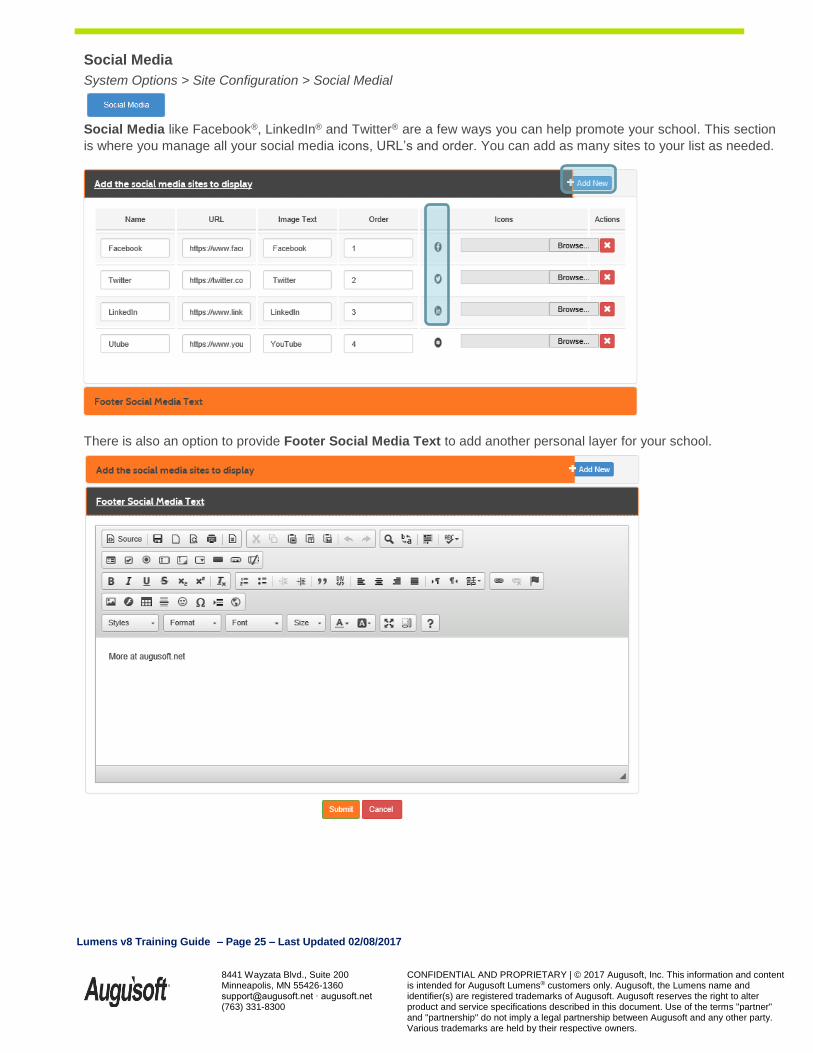
Social Media
System Options > Site Configuration > Social Medial
Social Media like Facebook®, LinkedIn® and Twitter® are a few ways you can help promote your school. This section
is where you manage all your social media icons, URL’s and order. You can add as many sites to your list as needed.
There is also an option to provide Footer Social Media Text to add another personal layer for your school.

Lumens v8 Training Guide – Page 26 – Last Updated 02/08/2017
8441 Wayzata Blvd., Suite 200 Minneapolis, MN 55426-1360 [email protected] ∙ augusoft.net (763) 331-8300
CONFIDENTIAL AND PROPRIETARY | © 2017 Augusoft, Inc. This information and content is intended for Augusoft Lumens® customers only. Augusoft, the Lumens name and identifier(s) are registered trademarks of Augusoft. Augusoft reserves the right to alter product and service specifications described in this document. Use of the terms "partner" and "partnership" do not imply a legal partnership between Augusoft and any other party. Various trademarks are held by their respective owners.
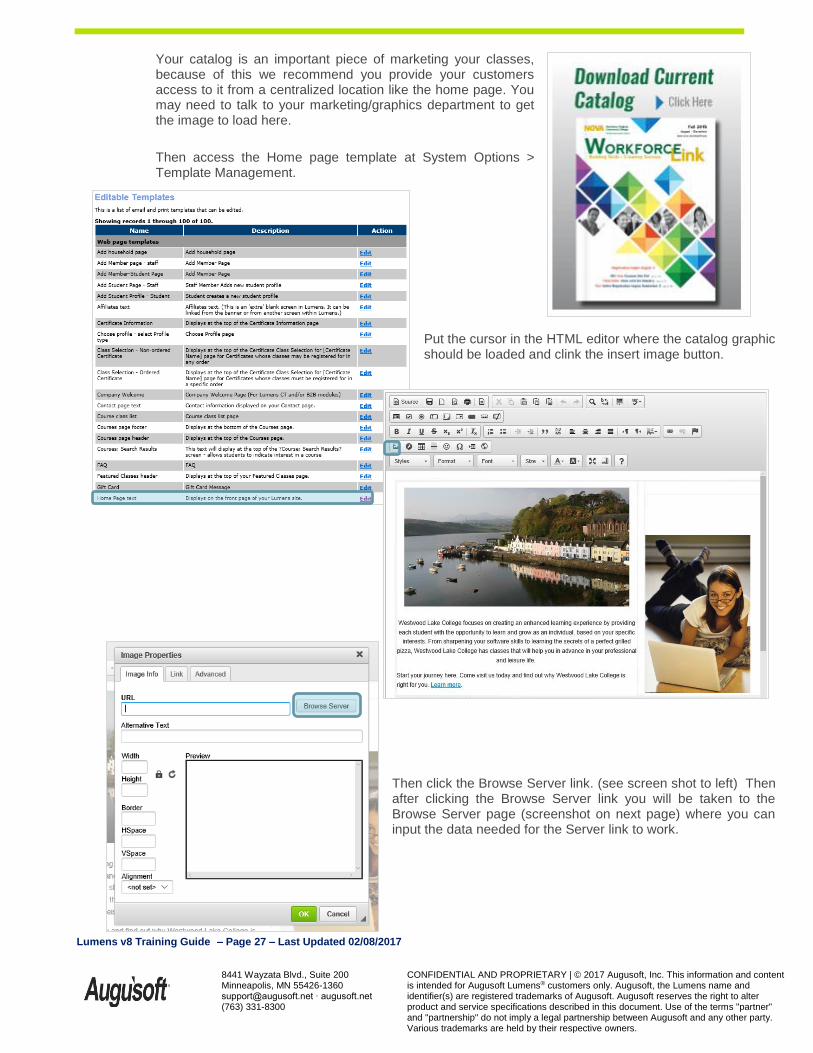
Template Management
System Options > Template Management
There are certain changes that you will want to make to any of the web page templates around your site.
1. First, check to ensure that any tables that might be created in your home page etc. have either been removed or work with the responsive design. If the content on the specific page in question does not resize as the browser window is decreased, a table is most likely restricting the responsive design and will need to be removed. Note: To reference how to remove a table, and or how to replace with a Div table instead, please see page 32 of this document for instructions.*
2. Catalog Graphics:
It may be that you have been including your catalog in pdf form on your home page using an alternate graphic that Augusoft loaded for you. Going forward you will have control of loading the image and corresponding Catalog pdf to your home page in the template management area.
Lumens v8 Training Guide – Page 27 – Last Updated 02/08/2017
8441 Wayzata Blvd., Suite 200 Minneapolis, MN 55426-1360 [email protected] ∙ augusoft.net (763) 331-8300
CONFIDENTIAL AND PROPRIETARY | © 2017 Augusoft, Inc. This information and content is intended for Augusoft Lumens® customers only. Augusoft, the Lumens name and identifier(s) are registered trademarks of Augusoft. Augusoft reserves the right to alter product and service specifications described in this document. Use of the terms "partner" and "partnership" do not imply a legal partnership between Augusoft and any other party. Various trademarks are held by their respective owners.
Your catalog is an important piece of marketing your classes, because of this we recommend you provide your customers access to it from a centralized location like the home page. You may need to talk to your marketing/graphics department to get the image to load here.
Then access the Home page template at System Options > Template Management.
Put the cursor in the HTML editor where the catalog graphic should be loaded and clink the insert image button.
Then click the Browse Server link. (see screen shot to left) Then after clicking the Browse Server link you will be taken to the Browse Server page (screenshot on next page) where you can input the data needed for the Server link to work.

Lumens v8 Training Guide – Page 28 – Last Updated 02/08/2017
8441 Wayzata Blvd., Suite 200 Minneapolis, MN 55426-1360 [email protected] ∙ augusoft.net (763) 331-8300
CONFIDENTIAL AND PROPRIETARY | © 2017 Augusoft, Inc. This information and content is intended for Augusoft Lumens® customers only. Augusoft, the Lumens name and identifier(s) are registered trademarks of Augusoft. Augusoft reserves the right to alter product and service specifications described in this document. Use of the terms "partner" and "partnership" do not imply a legal partnership between Augusoft and any other party. Various trademarks are held by their respective owners.
Click the Browse… button.
Find the graphic on your computer and click the Upload button. Then select the graphic from the list of available graphics to load it into the template; (clicking the name of the file will insert the image into the Home Page template wherever the cursor was before selecting the Insert Image option).
You will choose to link it to a pdf or URL allowing users to easily download or view the printable version.
3. Privacy Policy: A New Privacy Policy Template will need to be updated with your organizations policy. It should be used to display the organization’s privacy policy / policy for use of the student’s information. (Like a policy that states we will not sell their information to outside organizations or use your email and address information for purposes other than communication regarding registrations/classes.) This policy will display during the student profile creation as a link next to the email field.
Lumens v8 Training Guide – Page 29 – Last Updated 02/08/2017
8441 Wayzata Blvd., Suite 200 Minneapolis, MN 55426-1360 [email protected] ∙ augusoft.net (763) 331-8300
CONFIDENTIAL AND PROPRIETARY | © 2017 Augusoft, Inc. This information and content is intended for Augusoft Lumens® customers only. Augusoft, the Lumens name and identifier(s) are registered trademarks of Augusoft. Augusoft reserves the right to alter product and service specifications described in this document. Use of the terms "partner" and "partnership" do not imply a legal partnership between Augusoft and any other party. Various trademarks are held by their respective owners.
You may want to use the following list as a check list of sorts as you prepare your Lumens v8 staging site to copy over to Production. We recommend you review this list with your Conversion Contact during your post training check in call.
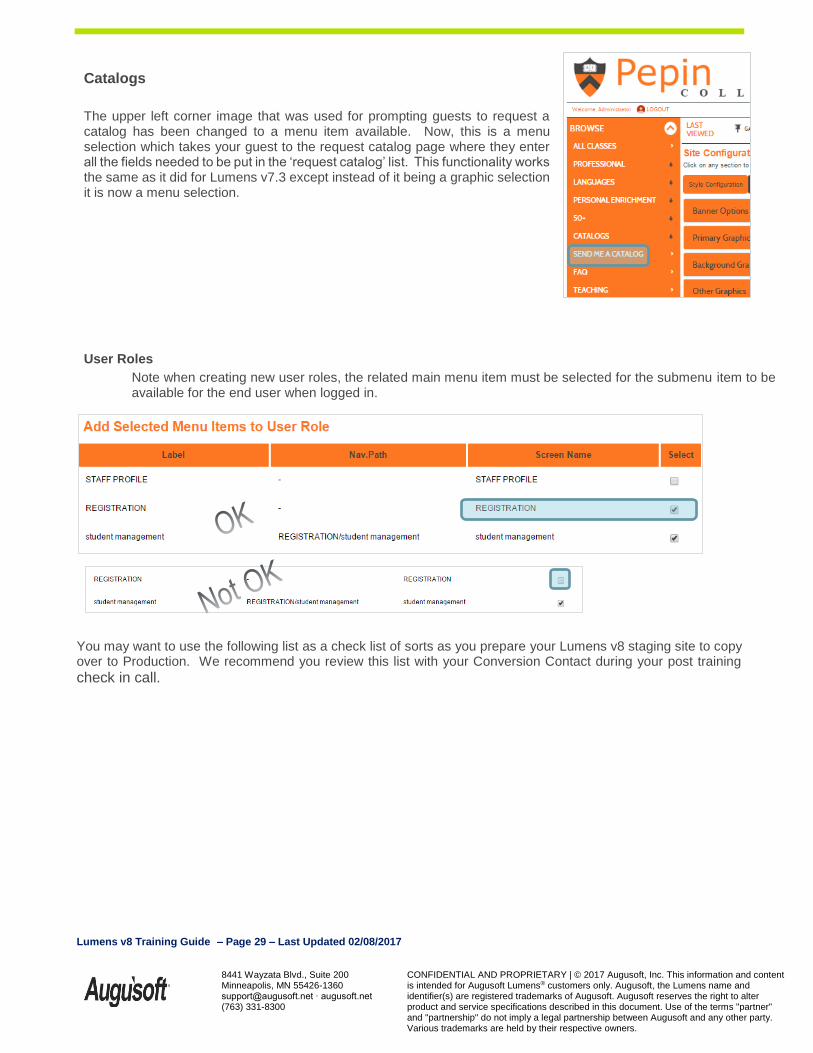
Catalogs
The upper left corner image that was used for prompting guests to request a catalog has been changed to a menu item available. Now, this is a menu selection which takes your guest to the request catalog page where they enter all the fields needed to be put in the ‘request catalog’ list. This functionality works the same as it did for Lumens v7.3 except instead of it being a graphic selection it is now a menu selection.
User Roles
Note when creating new user roles, the related main menu item must be selected for the submenu item to be available for the end user when logged in.
Lumens v8 Training Guide – Page 30 – Last Updated 02/08/2017
8441 Wayzata Blvd., Suite 200 Minneapolis, MN 55426-1360 [email protected] ∙ augusoft.net (763) 331-8300
CONFIDENTIAL AND PROPRIETARY | © 2017 Augusoft, Inc. This information and content is intended for Augusoft Lumens® customers only. Augusoft, the Lumens name and identifier(s) are registered trademarks of Augusoft. Augusoft reserves the right to alter product and service specifications described in this document. Use of the terms "partner" and "partnership" do not imply a legal partnership between Augusoft and any other party. Various trademarks are held by their respective owners.
Lumens v8: “What is copied?”
These items WILL be copied from Staging to Production when your Production update occurs:
Everything under System Options>Site Configuration.
o Style Configuration
o Graphics
o Menus
o Footer
o Style Sheet (even if you have uploaded a customized CSS)
o User Controls
o Learner Controls
o Search Controls
o Social Media
System Options > User Roles
o Reason: Any changes to the ‘Menus’ under Site Configuration can impact the user roles; therefore, the user roles need to be updated/copied. Once your staging site has been converted to Lumens v8 you should NOT edit User Roles in production, because they will be lost when the User Roles are copied from staging back to production. All changes to the user roles need to be made in the staging site once converted to Lumens v8.
Note: It is important to not make any changes to User Roles in production until after the conversion and your production site is updated. Otherwise those roles will be wiped out and not available. Please make sure even if you are not making any changes to user roles that you go in and check to make sure your Lumens v8 staging site has listed all the user roles as you would like them to be, as this is what will be copied over to your Lumens v8 production site.
These items WILL NOT be copied from Staging to Production when your Production update occurs:
System Options > Template Management changes
o Email and Web page templates functionality - These templates need to continue to be managed in your production site. As they are not a part of the Lumens v8 updates and changes. One thing that will need to be managed is the removal of any tables in those templates on the production site. The responsive design does not work with those table and the will break if left when the conversion takes place
Graphics for Categories, Subcategories, Courses, Classes
o Note: One exception is if you would like a default/placeholder graphic, you can request that we associate one so that the placeholder graphic displays on your production site once converted. Then you can go into production and upload chosen graphics at a later date.
Any other settings not previously listed (e.g., Power User settings)
Any other data
Lumens v8 Training Guide – Page 31 – Last Updated 02/08/2017
8441 Wayzata Blvd., Suite 200 Minneapolis, MN 55426-1360 [email protected] ∙ augusoft.net (763) 331-8300
CONFIDENTIAL AND PROPRIETARY | © 2017 Augusoft, Inc. This information and content is intended for Augusoft Lumens® customers only. Augusoft, the Lumens name and identifier(s) are registered trademarks of Augusoft. Augusoft reserves the right to alter product and service specifications described in this document. Use of the terms "partner" and "partnership" do not imply a legal partnership between Augusoft and any other party. Various trademarks are held by their respective owners.
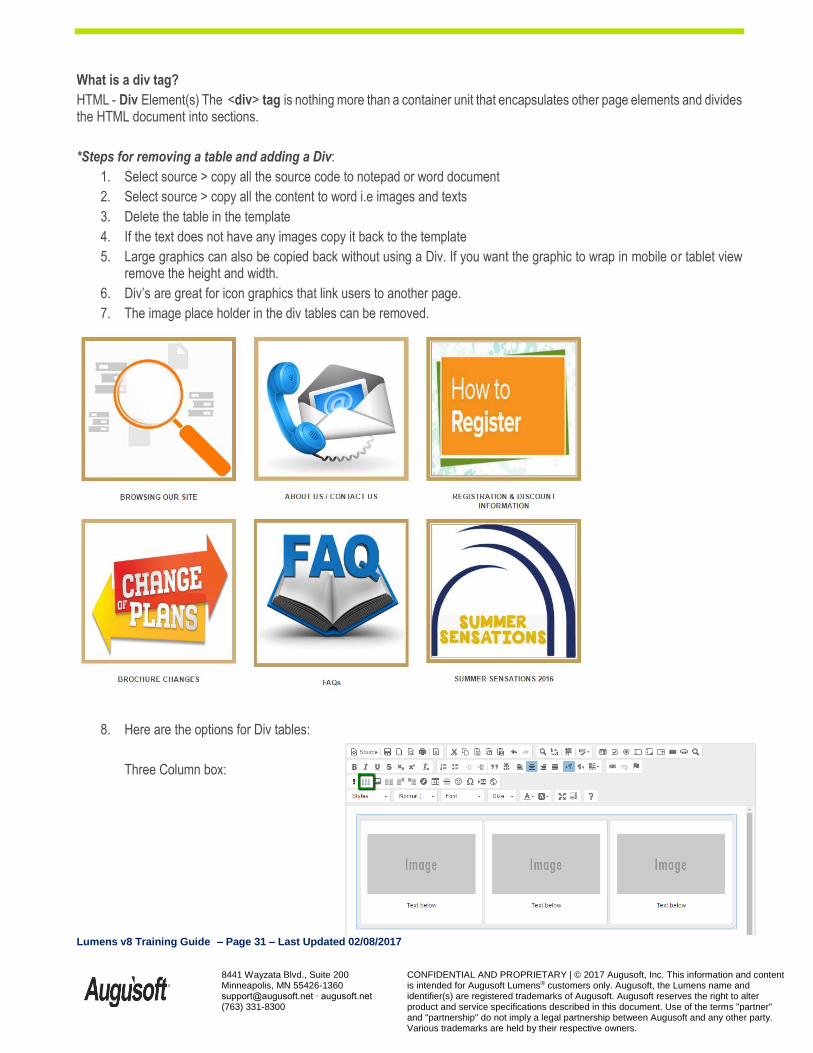
What is a div tag?
HTML - Div Element(s) The <div> tag is nothing more than a container unit that encapsulates other page elements and divides the HTML document into sections.
*Steps for removing a table and adding a Div:
1. Select source > copy all the source code to notepad or word document
2. Select source > copy all the content to word i.e images and texts
3. Delete the table in the template
4. If the text does not have any images copy it back to the template
5. Large graphics can also be copied back without using a Div. If you want the graphic to wrap in mobile or tablet view remove the height and width.
6. Div’s are great for icon graphics that link users to another page.
7. The image place holder in the div tables can be removed.
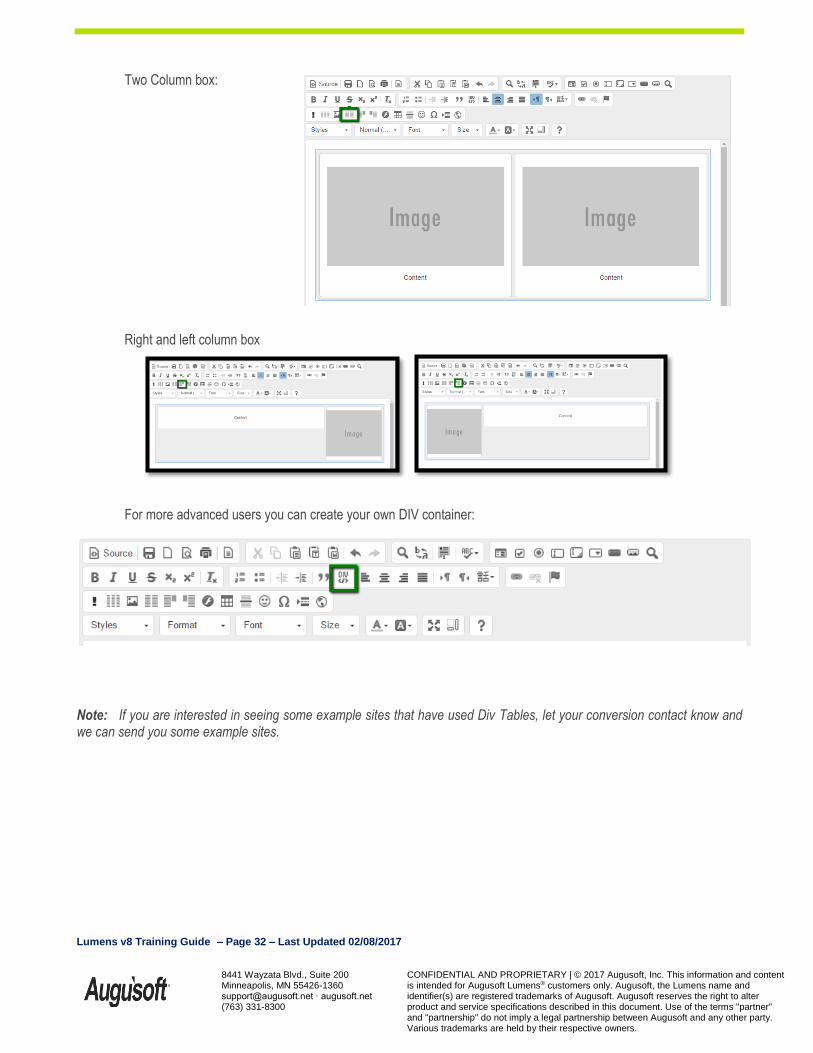
8. Here are the options for Div tables:
Three Column box:
Lumens v8 Training Guide – Page 32 – Last Updated 02/08/2017
8441 Wayzata Blvd., Suite 200 Minneapolis, MN 55426-1360 [email protected] ∙ augusoft.net (763) 331-8300
CONFIDENTIAL AND PROPRIETARY | © 2017 Augusoft, Inc. This information and content is intended for Augusoft Lumens® customers only. Augusoft, the Lumens name and identifier(s) are registered trademarks of Augusoft. Augusoft reserves the right to alter product and service specifications described in this document. Use of the terms "partner" and "partnership" do not imply a legal partnership between Augusoft and any other party. Various trademarks are held by their respective owners.
Two Column box:
Right and left column box
For more advanced users you can create your own DIV container:
Note: If you are interested in seeing some example sites that have used Div Tables, let your conversion contact know and we can send you some example sites.