LS2XER Scale User Manual-06
80
BARCODE LABEL SCALE USER MANUAL MODEL: LS2615ER LS215ER LS21530ER Pinnacle Technology Corp.
-
Upload
bobby-cheema -
Category
Documents
-
view
88 -
download
1
Transcript of LS2XER Scale User Manual-06

BARCODE LABEL SCALE USER MANUAL
MODEL: LS2615ER LS215ER LS21530ER
Pinnacle Technology Corp.

CONTENT
1 SUMMARIZATION.......................................................................................................................................... 1 2 SPECIFICATION .............................................................................................................................................. 2 3 APPEARANCE................................................................................................................................................. 3 4 INSTALLATION............................................................................................................................................... 4
4.1 Install display pole............................................................................................................................. 4 4.2 Earthing ............................................................................................................................................. 6 4.3 Power on/off ...................................................................................................................................... 7 4.4 Paper Installation ............................................................................................................................... 8
4.4.1 Label Paper Installation .......................................................................................................... 8 4.4.2 Receipt Paper Installation ..................................................................................................... 11
5 PRINTER REPLACEMENT........................................................................................................................... 13 6 SALES OPERATION...................................................................................................................................... 16
6.1 Weight Unit Selection...................................................................................................................... 16 6.2 Calculate by Weight......................................................................................................................... 16 6.3 Tare Operation ................................................................................................................................. 18 6.4 Calculate by Piece............................................................................................................................ 19 6.5 Discount........................................................................................................................................... 20 6.6 Change Price.................................................................................................................................... 21
7 SOME SIMPLE OPERATION........................................................................................................................ 22 7.1 Copy price label............................................................................................................................... 22 7.2 Print receipt...................................................................................................................................... 22 7.3 Normal Package............................................................................................................................... 22 7.4 Package by Fixed weight ................................................................................................................. 23 7.5 Package by Fixed Price.................................................................................................................... 24 7.6 Piece Together Usage....................................................................................................................... 24
8 FUNCTION SET............................................................................................................................................. 26 8.1 PLU Set............................................................................................................................................ 26 8.2 System Set ....................................................................................................................................... 27 8.3 Function Lock.................................................................................................................................. 29 8.4 Lock Scale ....................................................................................................................................... 29
9 COMMUNICATION SETUP.......................................................................................................................... 30 9.1 Interface Criterion of Link 32 based on TCP/IP Protocol................................................................ 31 9.2 Handshaking Flowchart of Label Scale and Background................................................................ 32 9.3 Making procedure of connector ....................................................................................................... 34
10 TROUBLESHOOTING .......................................................................................................................... 35 11 SOFTWARE DESCRIPTION ................................................................................................................. 38
11.1 Software installation ........................................................................................................................ 38 11.2 Use Link32....................................................................................................................................... 40
11.2.1 Communication Test .............................................................................................................. 40 11.2.2 Main table explanation .......................................................................................................... 41
11.3 Programming PLU Information....................................................................................................... 50 11.3.1 Programming Barcode .......................................................................................................... 50 11.3.2 Programming Message .......................................................................................................... 50
11.3.3 Programming Multi Label .................................................................................................... 51 11.3.4 Programming Rebate............................................................................................................. 52 11.3.5 Weight Unit Setting................................................................................................................ 52 11.3.6 Shelf Time Setting .................................................................................................................. 53 11.3.7 Import from Excel and Export to Excel............................................................................... 54 11.3.8 Preferences ............................................................................................................................. 56 11.3.9 Page setup ............................................................................................................................... 57 11.3.10 PLU Print ............................................................................................................................... 58 11.3.11 Programming hotkey ............................................................................................................. 59
11.4 Programming label........................................................................................................................... 64 11.4.1 General description................................................................................................................ 64 11.4.2 Create a new label.................................................................................................................. 67 11.4.3 Editing the label ..................................................................................................................... 68 11.4.4 Download label format .......................................................................................................... 70
12 APPENDIX ............................................................................................................................................. 71 12.1 Appendix 1: TXP (XU) File Format ................................................................................................ 71 12.2 Appendix 2: Barcode Coding List ................................................................................................... 72 12.3 Appendix3: Main difference between LB scale and LP scale: ........................................................ 73 12.4 Main difference between label scale and receipt scale .................................................................... 74 12.5 Appendix 4 Live Commodity Batch Management .......................................................................... 74

1
1 SUMMARIZATION
Simple and easy to operate
1. You can use single key to sell PLU quickly. Clerk can operate this scale without training. 2. This scale has 112 direct keys (224 hotkeys can be set) and can set hotkeys for most of the common goods.
Advanced function and endurance
1. Firmware program can be updated through PC in order to keep advanced and up to date. 2. FlashRom protection function assures the security of program and source. 3. Keyboard can be cleaned. It resists dirty with great validity. 4. Printer is designed elaborately and not easily subject to paper jam. 5. Barcode rotation can prolong the life of printer head. Printer core can be adjusted according to label paper. 6. Printer can load 1000 pieces of label paper while other printer can only load 800 pieces of label paper. 7. There are several package methods (fixed weight, and fixed price). Barcode printer is specially designed. 8. Piece together function, which can gather several kinds of commodity as required, such as fruit basket. 9. 12000 pieces of PLU can meet all kinds of demand. 10. Every piece of PLU can be set to use multiple labels. 11. Every piece of PLU can use single barcode format, which resolves the coding problems during selling. 12. Every piece of PLU can use single metric unit. 13. Numeric unit can be defined by user such as block, package and entries. 14. Sufficient PLU message includes barcode format, live commodity Code and package type and so on. 15. Label can be printed in rotated position. 16. Support Ean-8, Ean-13 code, and 18 code and resolve the coding problem of live commodity. 17. Special barcode type for the convenience of live commodity lot management.
Convenient, flexible and powerful software support
1. What you see in label designing is what you get. Label size can be selected. Volume of smallest area can be created according to user. Thus we can decrease cost greatly.
2. International design and supporting worldwide language make it unnecessary to add any accessory. 3. We can adjust the popular commodity at any time and improve the foregrounding working efficiency greatly. 4. Downloading data can be executed in scheduled time. 5. Background discounts fixedly. 6. Discount in different period of time. Ten discount modes can be defined and each mode has five periods of time using
different discount rate. 7. It supports broadcast downloading. 8. With the function of FTP and TCP/IP. The software supports Unix system and Internet. 9. We can set POS program parameters on PC. 10. Its management is separated into machine, commodity, and hotkey, which make usage of the scale optimum. 11. We can edit and print keyboard sheet quickly with this software. 12. Locking the POS function key can control its operation such as locking discount key and PLU edit key. Also it offers
function to unlock password. 13. It is managed by multi-user and records login information automatically in order to supervision. 14. It offers dynamic link library for the convenience of user’s second development.
2
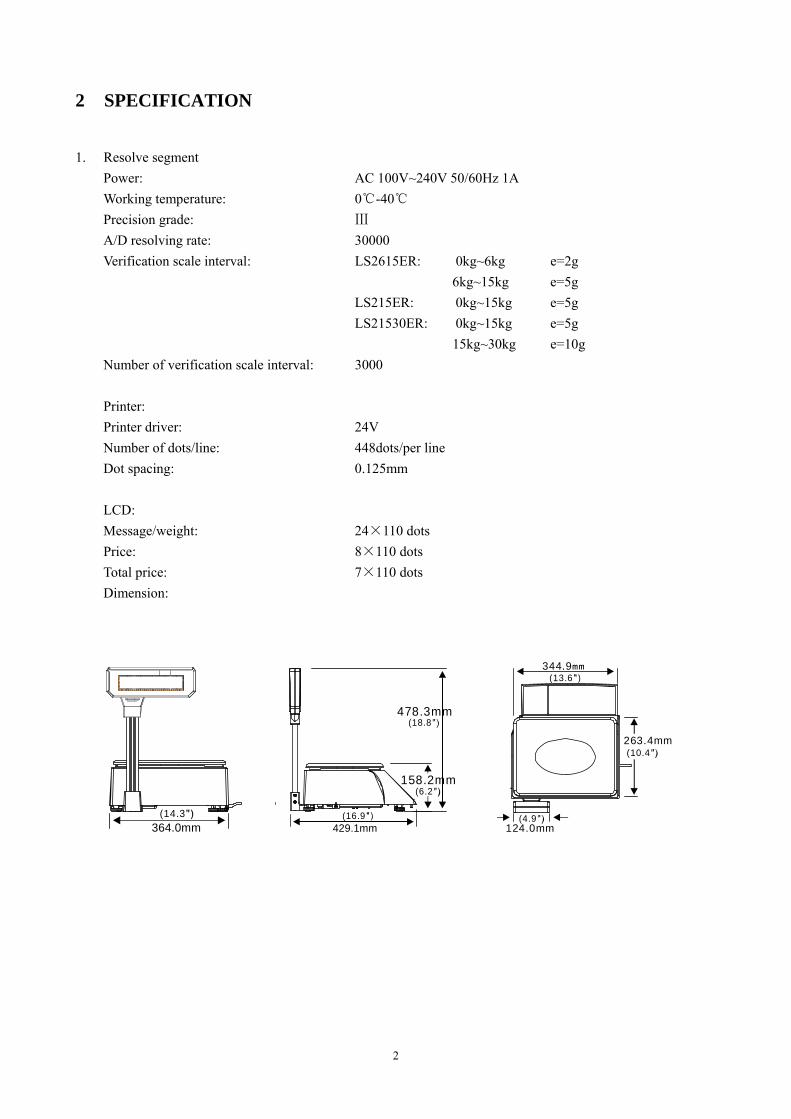
2 SPECIFICATION
1. Resolve segment Power: AC 100V~240V 50/60Hz 1A Working temperature: 0℃-40℃ Precision grade: Ⅲ A/D resolving rate: 30000 Verification scale interval: LS2615ER: 0kg~6kg e=2g 6kg~15kg e=5g
LS215ER: 0kg~15kg e=5g LS21530ER: 0kg~15kg e=5g
15kg~30kg e=10g Number of verification scale interval: 3000 Printer: Printer driver: 24V Number of dots/line: 448dots/per line Dot spacing: 0.125mm LCD: Message/weight: 24×110 dots Price: 8×110 dots Total price: 7×110 dots Dimension:
(14.3364.0mm
344.9mm
263.4mm
124.0mm
(13.6
(10.4
(4.9
(6.2
429.1mm
478.3mm
158.2mm
(16.9
(18.8
3
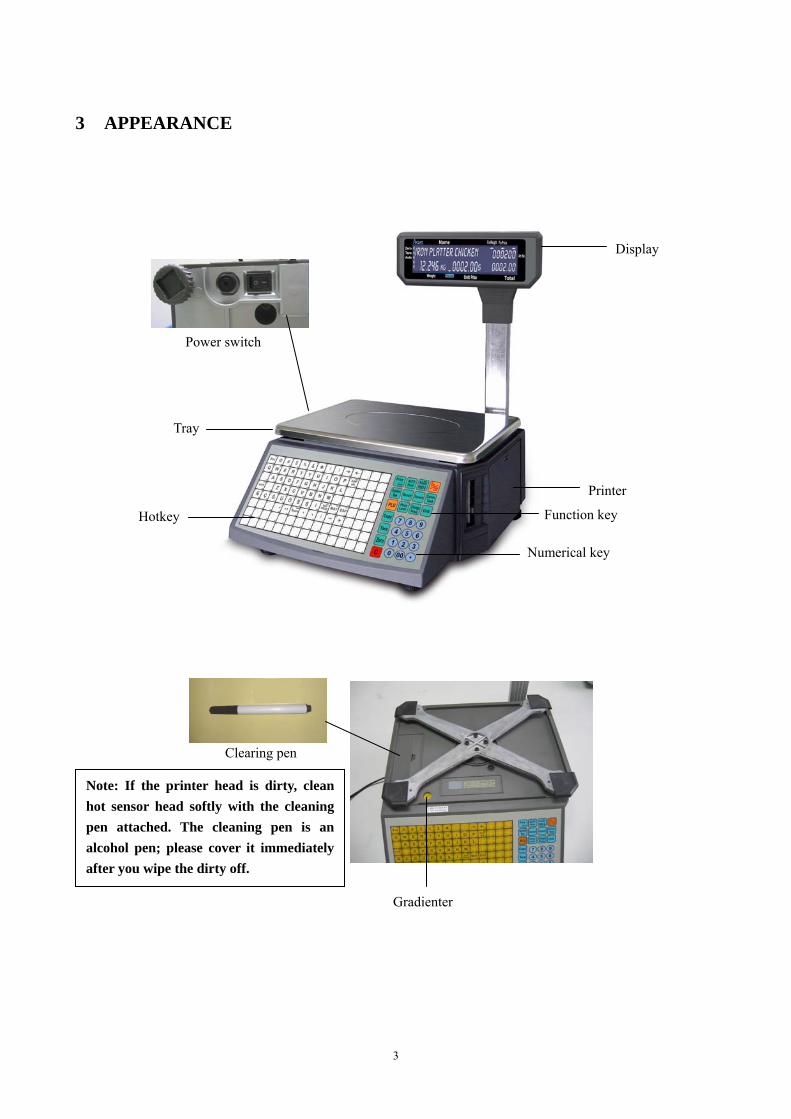
3 APPEARANCE
Gradienter
Printer
Display
Tray
Hotkey
Numerical key
Function key
Power switch
Clearing pen
Note: If the printer head is dirty, clean hot sensor head softly with the cleaning pen attached. The cleaning pen is an alcohol pen; please cover it immediately after you wipe the dirty off.
4
4 INSTALLATION
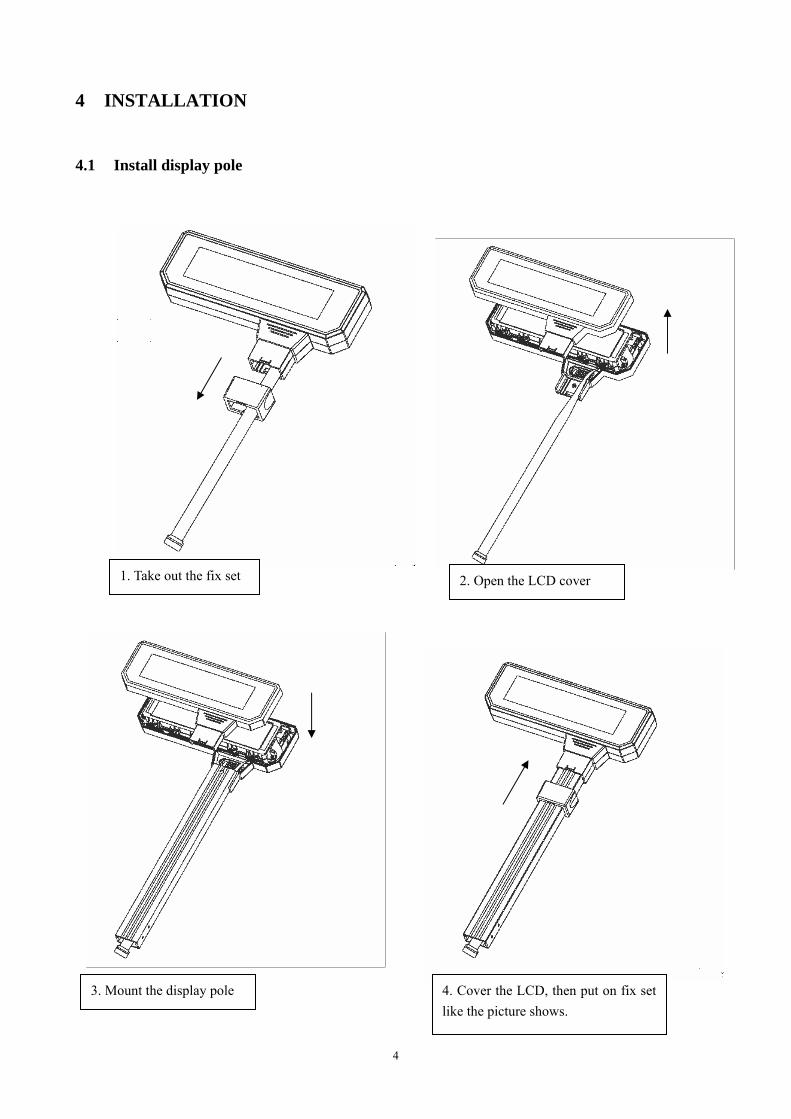
4.1 Install display pole
1. Take out the fix set 2. Open the LCD cover
3. Mount the display pole 4. Cover the LCD, then put on fix set like the picture shows.

5
5. Connect the line, and fix the 4 screws.

6
4.2 Earthing
NOTICE: We suggest you earth the scale in order to make sure the operator’s safety. In case of the electricity leak out, the operations on the scale is also safety.
Tighten the screw
Earthing
7
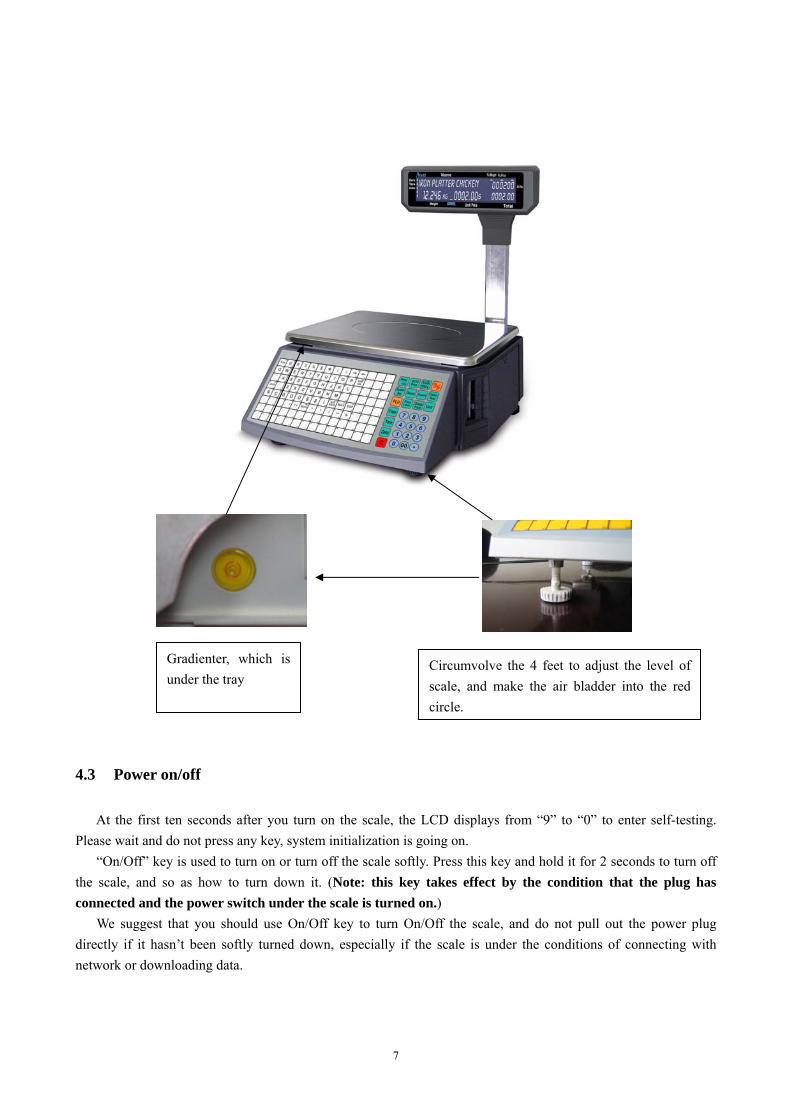
4.3 Power on/off
At the first ten seconds after you turn on the scale, the LCD displays from “9” to “0” to enter self-testing. Please wait and do not press any key, system initialization is going on.
“On/Off” key is used to turn on or turn off the scale softly. Press this key and hold it for 2 seconds to turn off the scale, and so as how to turn down it. (Note: this key takes effect by the condition that the plug has connected and the power switch under the scale is turned on.)
We suggest that you should use On/Off key to turn On/Off the scale, and do not pull out the power plug directly if it hasn’t been softly turned down, especially if the scale is under the conditions of connecting with network or downloading data.
Gradienter, which is under the tray
Circumvolve the 4 feet to adjust the level of scale, and make the air bladder into the red circle.
8
4.4 Paper Installation
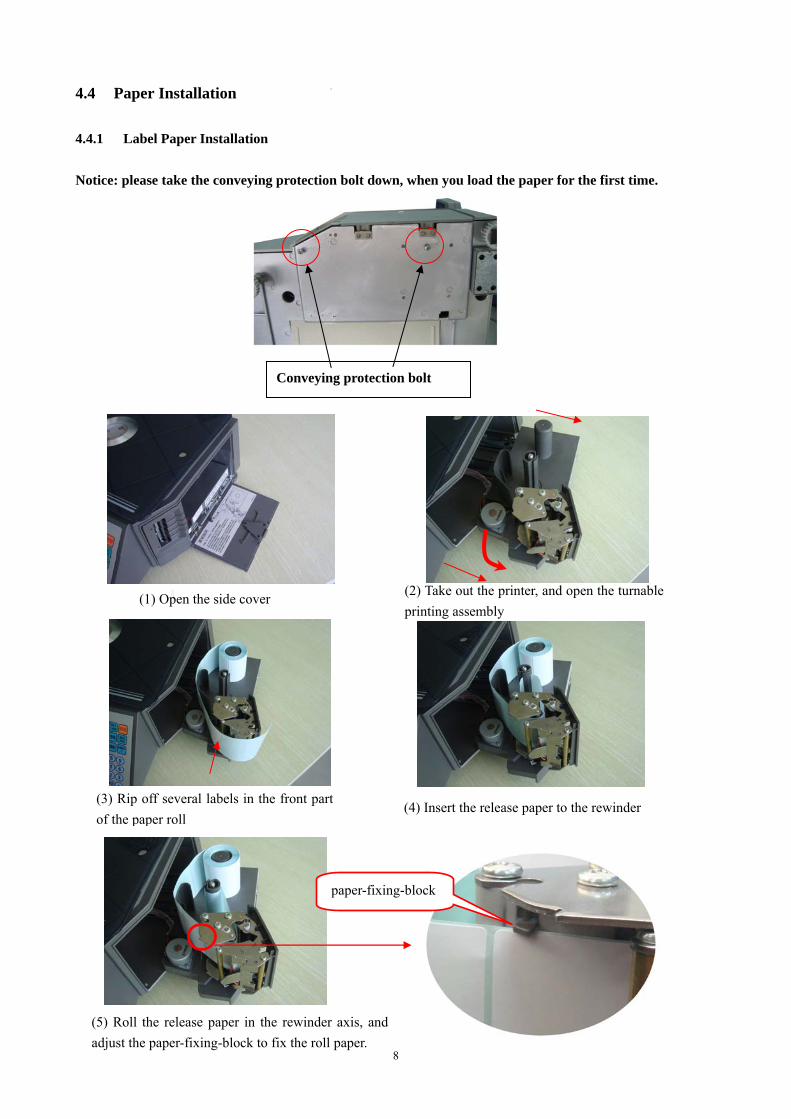
4.4.1 Label Paper Installation Notice: please take the conveying protection bolt down, when you load the paper for the first time.
(1) Open the side cover (2) Take out the printer, and open the turnable printing assembly
(3) Rip off several labels in the front part of the paper roll
(4) Insert the release paper to the rewinder
Conveying protection bolt
(5) Roll the release paper in the rewinder axis, and adjust the paper-fixing-block to fix the roll paper.
paper-fixing-block
9
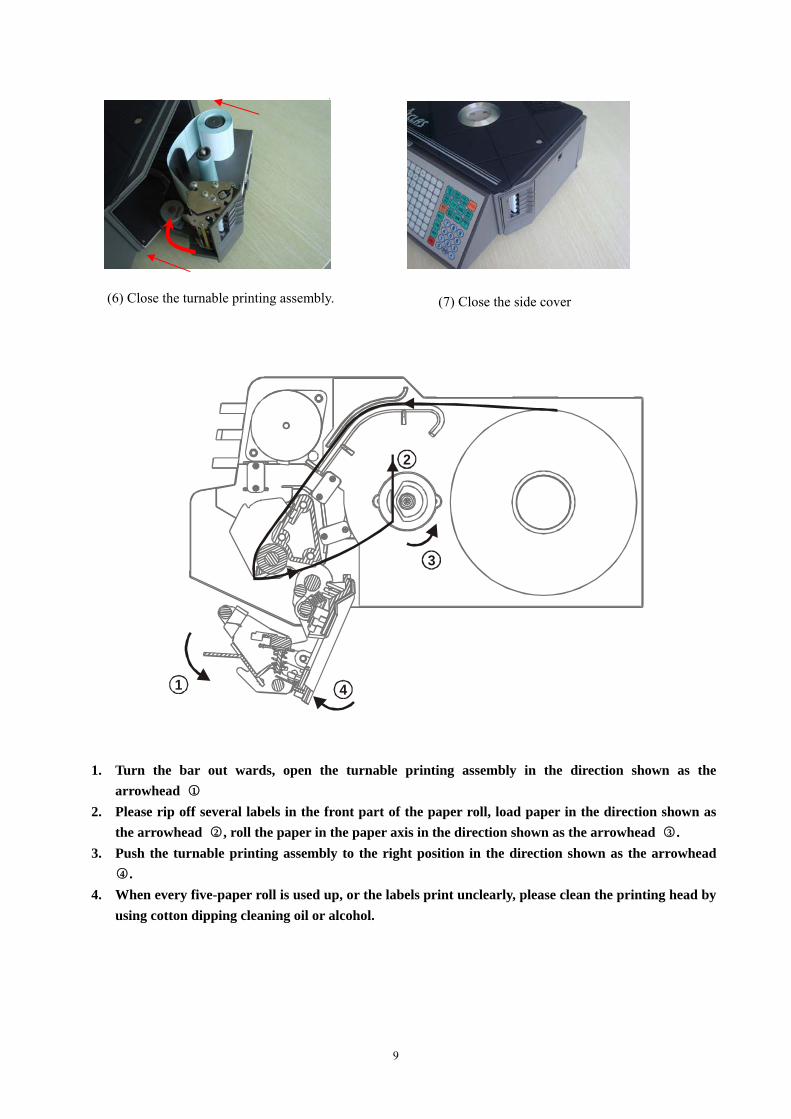
1. Turn the bar out wards, open the turnable printing assembly in the direction shown as the arrowhead ○1
2. Please rip off several labels in the front part of the paper roll, load paper in the direction shown as the arrowhead ○2 , roll the paper in the paper axis in the direction shown as the arrowhead ○3 .
3. Push the turnable printing assembly to the right position in the direction shown as the arrowhead ○4 .
4. When every five-paper roll is used up, or the labels print unclearly, please clean the printing head by using cotton dipping cleaning oil or alcohol.
1
2
3
4
(7) Close the side cover (6) Close the turnable printing assembly.
10
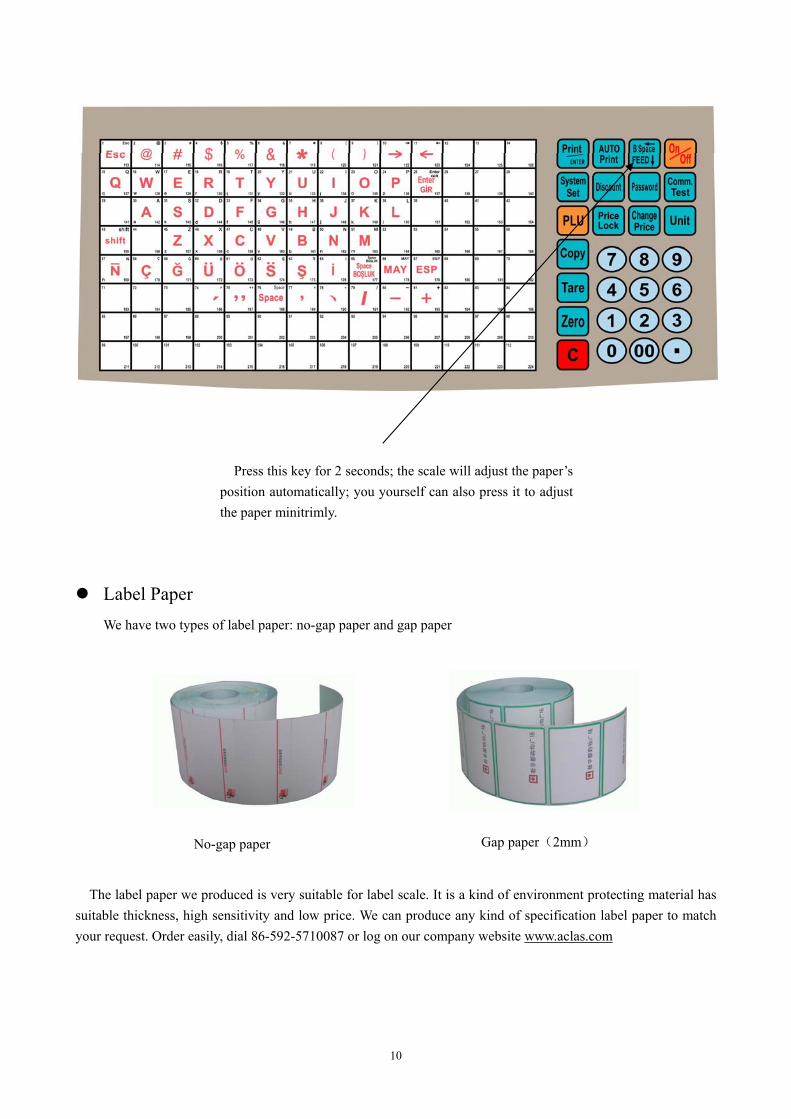
Label Paper We have two types of label paper: no-gap paper and gap paper
The label paper we produced is very suitable for label scale. It is a kind of environment protecting material has suitable thickness, high sensitivity and low price. We can produce any kind of specification label paper to match your request. Order easily, dial 86-592-5710087 or log on our company website www.aclas.com
Press this key for 2 seconds; the scale will adjust the paper’s position automatically; you yourself can also press it to adjust the paper minitrimly.
No-gap paper Gap paper(2mm)
11
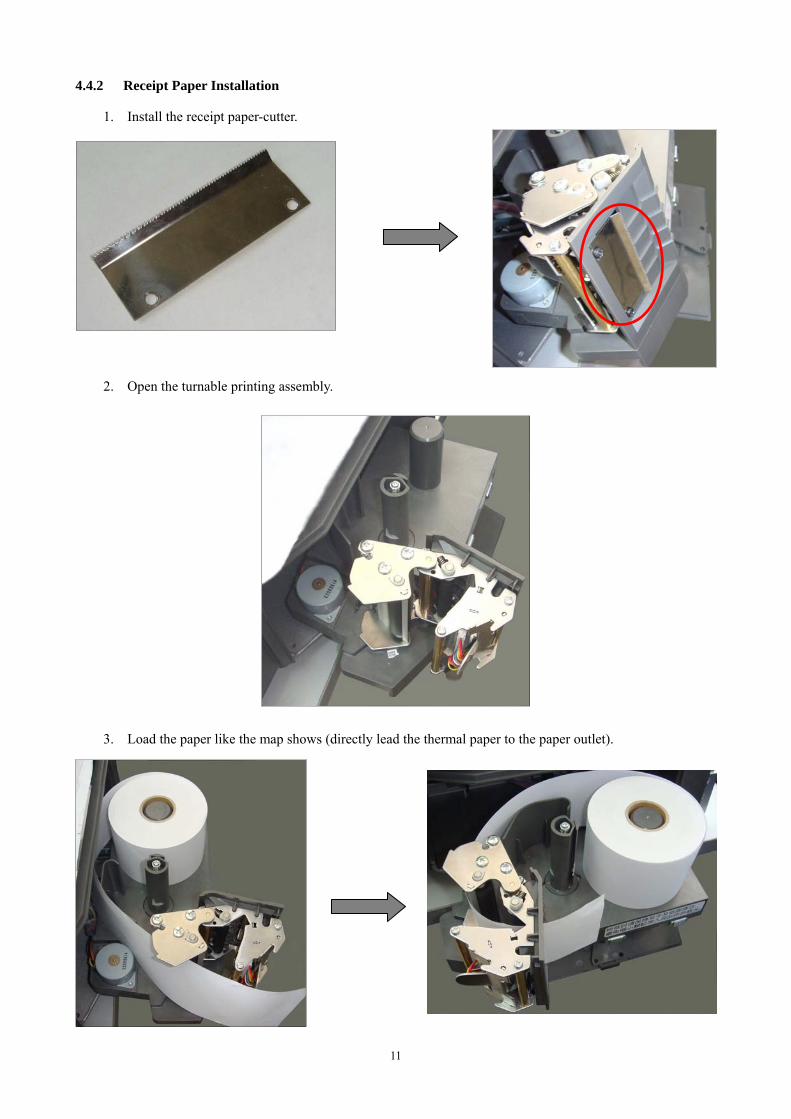
4.4.2 Receipt Paper Installation
1. Install the receipt paper-cutter.
2. Open the turnable printing assembly.
3. Load the paper like the map shows (directly lead the thermal paper to the paper outlet).
12
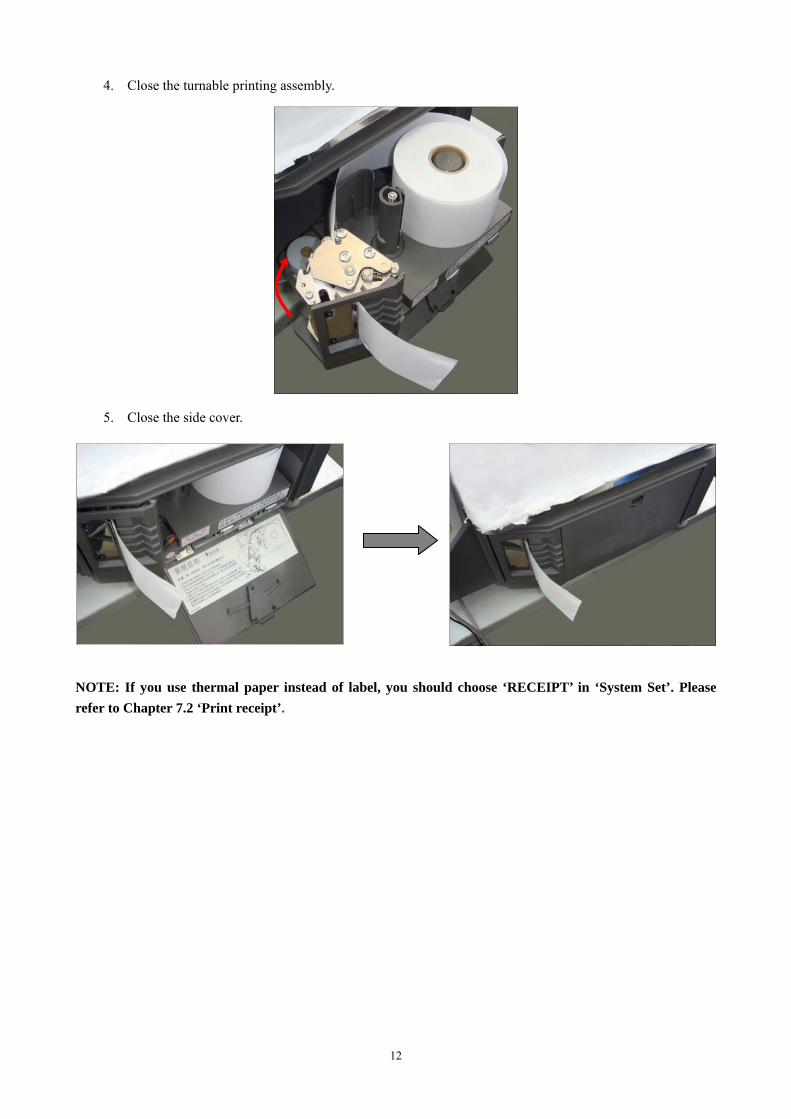
4. Close the turnable printing assembly.
5. Close the side cover. NOTE: If you use thermal paper instead of label, you should choose ‘RECEIPT’ in ‘System Set’. Please refer to Chapter 7.2 ‘Print receipt’.
13
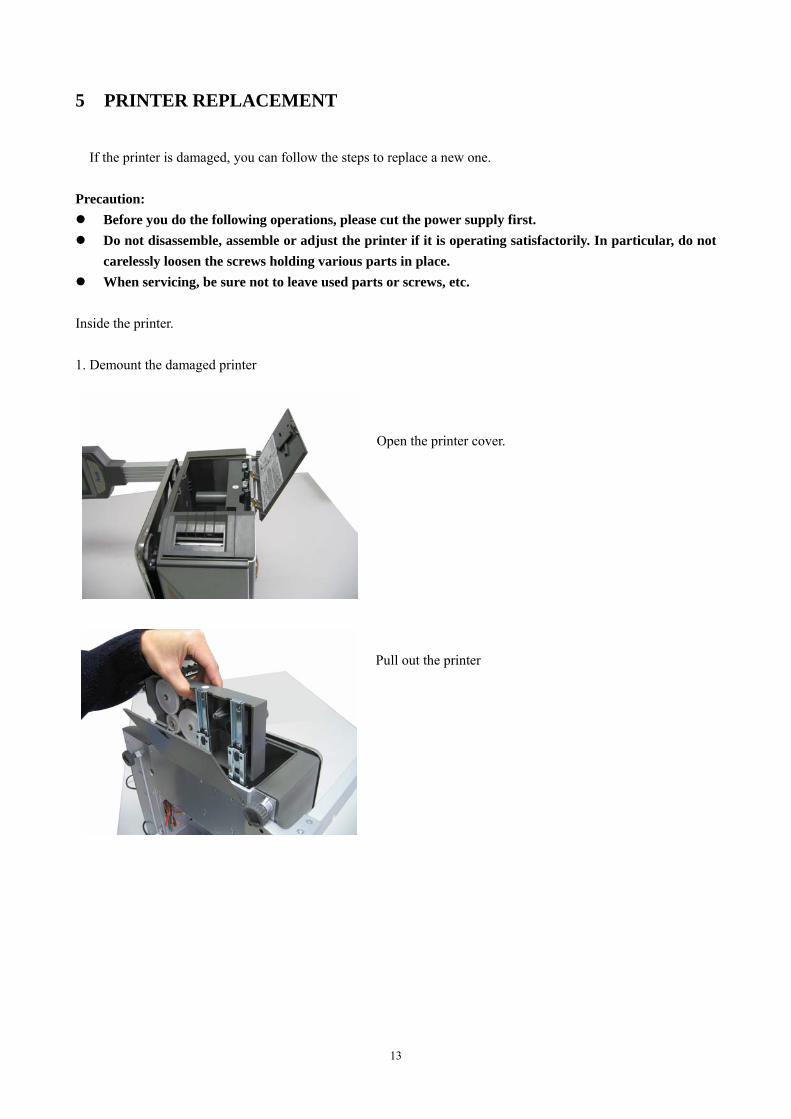
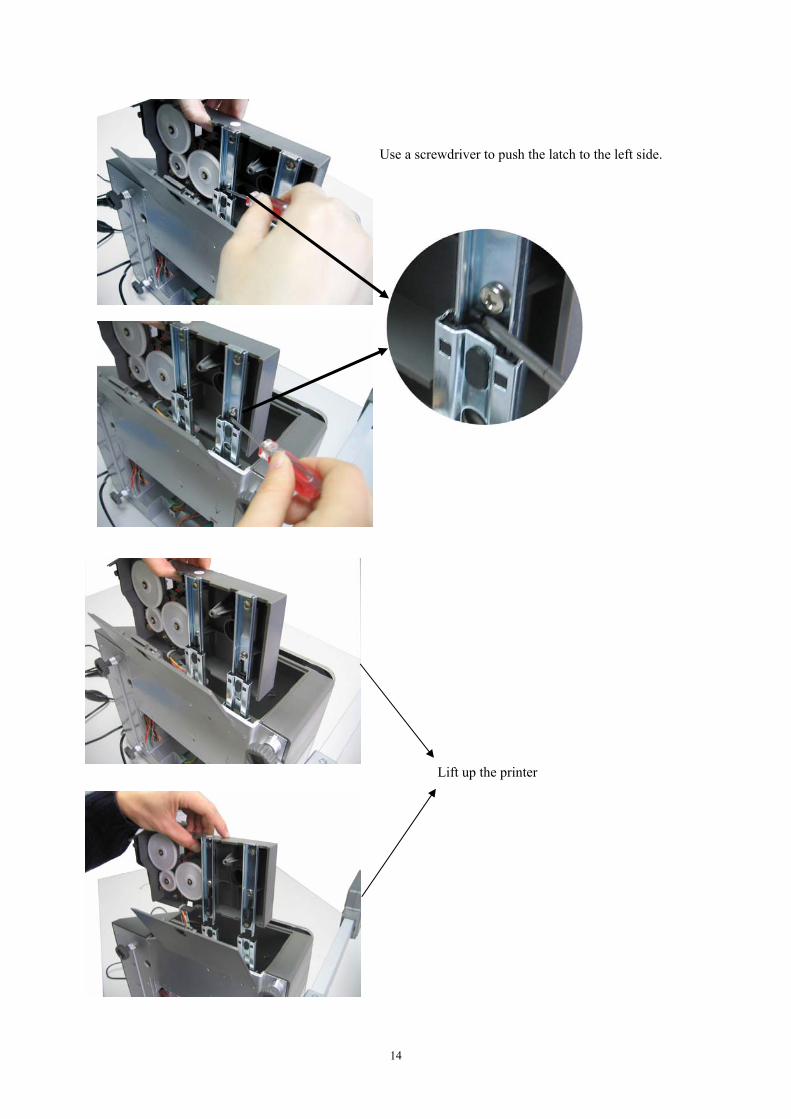
5 PRINTER REPLACEMENT
If the printer is damaged, you can follow the steps to replace a new one. Precaution:
Before you do the following operations, please cut the power supply first. Do not disassemble, assemble or adjust the printer if it is operating satisfactorily. In particular, do not
carelessly loosen the screws holding various parts in place. When servicing, be sure not to leave used parts or screws, etc.
Inside the printer. 1. Demount the damaged printer
Open the printer cover.
Pull out the printer
14
Use a screwdriver to push the latch to the left side.
Lift up the printer
15
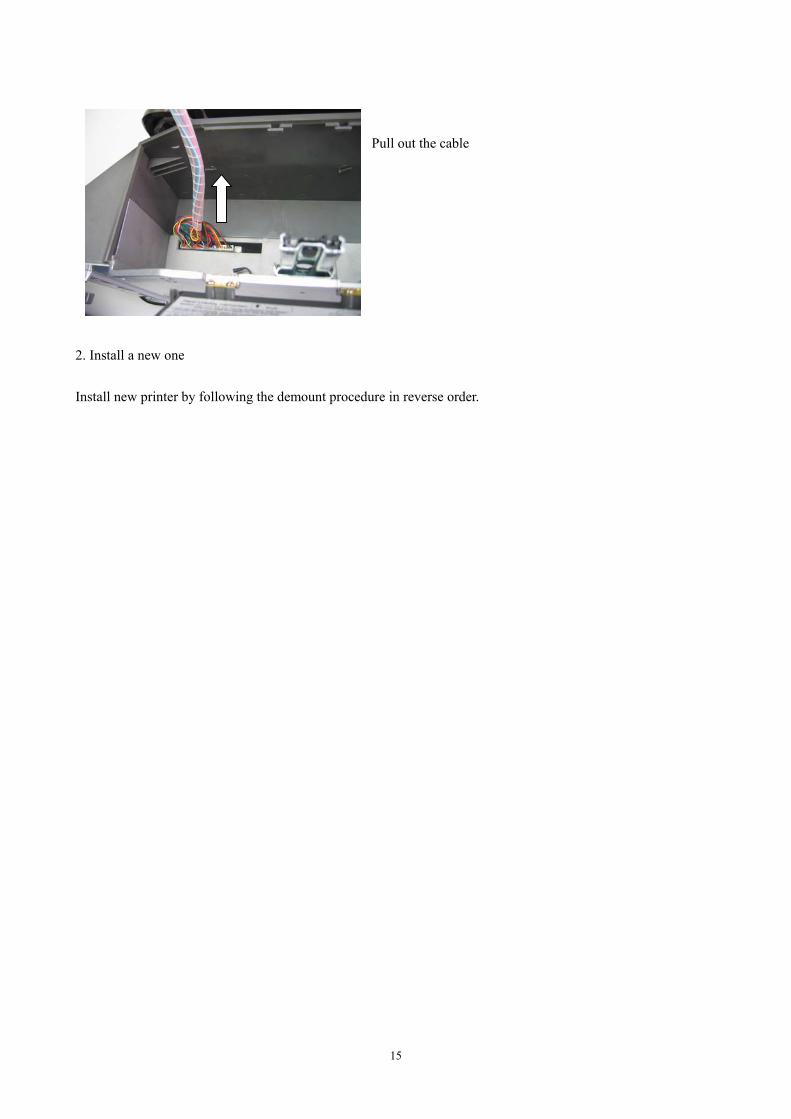
2. Install a new one Install new printer by following the demount procedure in reverse order.
Pull out the cable
16
6 SALES OPERATION
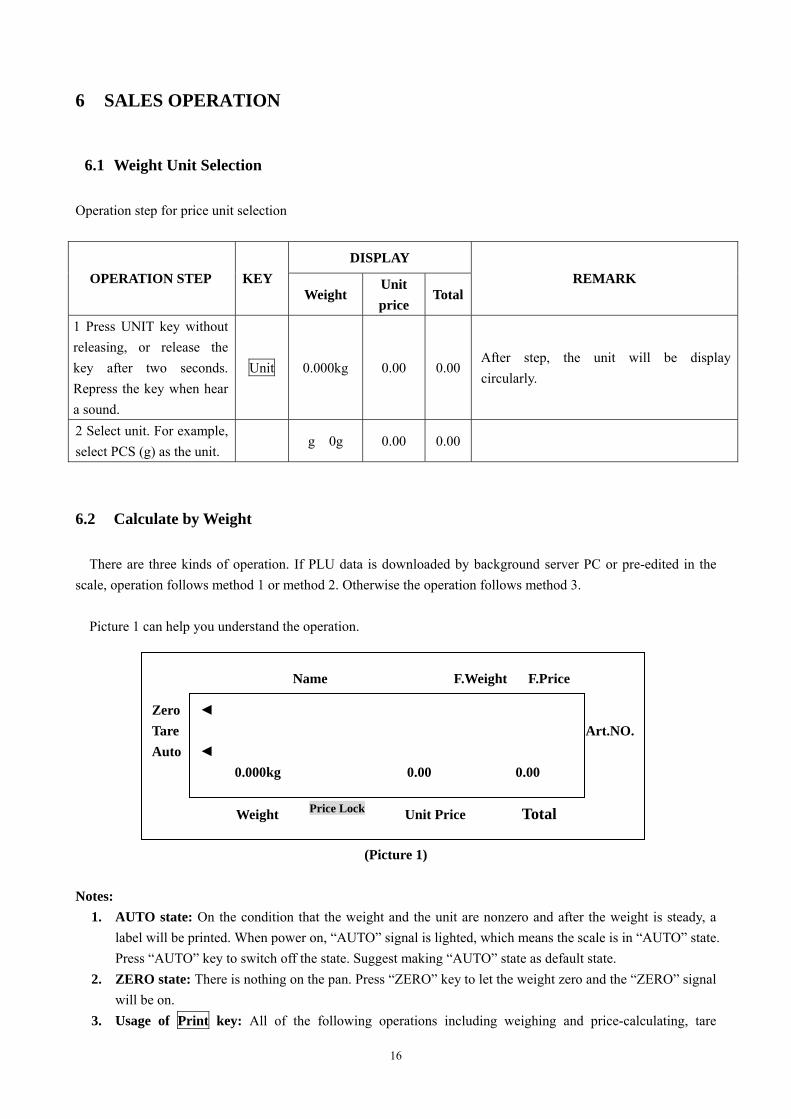
6.1 Weight Unit Selection
Operation step for price unit selection
DISPLAY OPERATION STEP KEY
Weight Unit price
TotalREMARK
1 Press UNIT key without releasing, or release the key after two seconds. Repress the key when hear a sound.
Unit 0.000kg 0.00 0.00After step, the unit will be display circularly.
2 Select unit. For example, select PCS (g) as the unit.
g 0g 0.00 0.00
6.2 Calculate by Weight
There are three kinds of operation. If PLU data is downloaded by background server PC or pre-edited in the scale, operation follows method 1 or method 2. Otherwise the operation follows method 3.
Picture 1 can help you understand the operation.
(Picture 1)
Notes: 1. AUTO state: On the condition that the weight and the unit are nonzero and after the weight is steady, a
label will be printed. When power on, “AUTO” signal is lighted, which means the scale is in “AUTO” state. Press “AUTO” key to switch off the state. Suggest making “AUTO” state as default state.
2. ZERO state: There is nothing on the pan. Press “ZERO” key to let the weight zero and the “ZERO” signal will be on.
3. Usage of Print key: All of the following operations including weighing and price-calculating, tare
ACLAS Name F.Weight F.Price
Zero Tare Art.NO. Auto Weight Unit Price Total Price Lock
◄ ◄ 0.000kg 0.00 0.00

17
package, granular price-calculating, and discount and changing price are in the “Auto” state. If the default state is not “Auto” state, the Auto arrow on the LCD won’t be lightening, you must press Print key in order to print the label.
METHOD 1: HOTKEY OPERATION Trade example: Some onions weighing 2.000kg are sold . Its hotkey is 01, and price is 0.500$/kg.
ARROW DISPLAY OPERATION STEP KEY Zero Auto Weight Unit
price Total REMARK
1. Press “ZERO” key to let the scale return to zero Zero 0.000kg 0.00 0.00 Ignore this step if the
scale is in “ZERO” status.
2. Put the onions 2.000kg on the pan. 2.000kg 0.00 0.00
3. Input the hotkey 01 of the onions through PLU keyboard 0 1 2.000kg 0.50 1.00
*4. Cancel “AUTO” state Auto 2.000kg 0.50 1.00This step is optional. If you want to switch off the “Auto” state, do this step.
*5. Set “AUTO” state Auto 2.000kg 0.50 1.00
Only after you take the above step 4 and want to set “Auto” state, take this step.
NOTES:
1) There are 224 hotkey. These hotkeys can be changed randomly and be printed in a sheet quickly by the background PC.
2) The above opreation is for the hotkeys from 1 to112. As to hotkeys from 113 to 224, the above operation step 3 should be changed as follows: Press “PLU” key and press the hotkey no. of the commodity. Other steps are the same.
METHOD 2: General operation step Trade example: Some onions weighing 2.000kg are sold. Their LFCODE is 10, unit price is 1.500$/kg.
ARROW DISPLAY OPERATION STEP KEY
Zero Auto Weight Unit price
Total REMARK
1. Press “ZERO” key to make the scale return to zero.
ZERO
0.000kg 0.00 0.00 Ignore this step if the scale is in “ZERO” status.
2. Put the onions weighing 2.000kg on the pan. 2.000kg 0.00 0.00
3. Press “PLU” key PLU Input PLU
No set
0.00
4. Input LFCODE 10 of the onions through small keyboard. 1 0
Input PLU index
10.00 0.0
5. Press PLU key. PLU 2.000kg 1.50 3.00 Ignore this step if the LFCODE has 6 digits.

18
METHOD 3: operation for PLU without settings.
ARROW DISPLAY
OPERATION SETP KEY Zero Auto Weight
Unit price
Total REMARK
1. Press “ZERO” key to make the scale return to zero state. Zero 0.000kg 0.00 0.00
Ignore this step if the scale is in “ZERO” status.
2. Press “UNIT” key without releasing to select a correct price unit such as kg.
Unit 0.000kg 0.00 0.00
3. Input unit price 2.000 through the small keyboard. 2 0 0 0.000kg 2.00 2.00
4. Put on the commodity weighing 1.0kg. 1.000kg 2.00 2.00
6.3 Tare Operation
It is only applicable to the commodity packed in package or container such as eggs, beans or fruit and so on. Please refer to picture 2.
(Picture 2)
MOTHOD: Operation for commodity separated from container or package. Trade example: A package of apples is sold. The hotkey of apples is 05, the net weight is 2.000kg and unit price is 6.000$/kg.
ARRPW DISPLAY
OPERATION KEY Zero Auto Tare Weight
Unit price
Total REMARK
1. Put the container or package weighing 1.000 kg on the pan.
1.000kg 0.00 0.00
2. Press “TARE” key. Tare 0.000kg 0.00 0.00
The “TARE” signal flashing means the scale is in the weight-deducting state.
ACLAS Name F.Weight F.Price
Zero Tare Art.NO. Auto Weight Unit Price Total Price Lock
◄ ◄ ◄ 0.000kg 0.00 0.00

19
3. Put a page of apples weighing 2.000kg on the
2.000kg 0.00 0.00
4. Key in the hotkey 05 of apple through PLU ke board
05 2.000kg 6.00 12.00
5. Take away the container and the apples on the tray, then press “TARE’ key.
Tare
0.000kg 0.00 0.00 This step is to leave the weight-deducting state. The arrow of “tare” disappears.
6.4 Calculate by Piece
There are two kinds of operation methods. The following operation of method 1 and method 2 is suitable for PLU already downloaded by background sever or pre-edited in the scale. The main picture is like picture 3.
(Picture 3)
Note: Before you taking these two operations, please make sure the PLU is pre-edited with piece calculation.(You can refer to chapter 11.3.5).
METHOD 1: Hotkey operation step Trade example: Ten pieces of cake are sold. The hotkey of cake is 05.
ARROW DISPLAY
OPERATION KEY Zero Auto Weight
Unit price
TotalREMARK
1. Input the number of the commodity through small keyboard. For example 10.
1 0 0.000kg 0.10 0.10
2. Press “UNIT” key. Unit 0.000kg 0.00 0.00The LCD returns to initial state after “unit” key is pressed.
3. Press the corresponding hotkey 05 of the cake through PLU keyboard.
05 K 0g 3.00 30.00
ACLAS Name F.Weight F.Price
Zero Tare Art.NO. Auto Weight Unit Price Total Price Lock
◄ ◄ 0.000kg 0.000 0.00
20
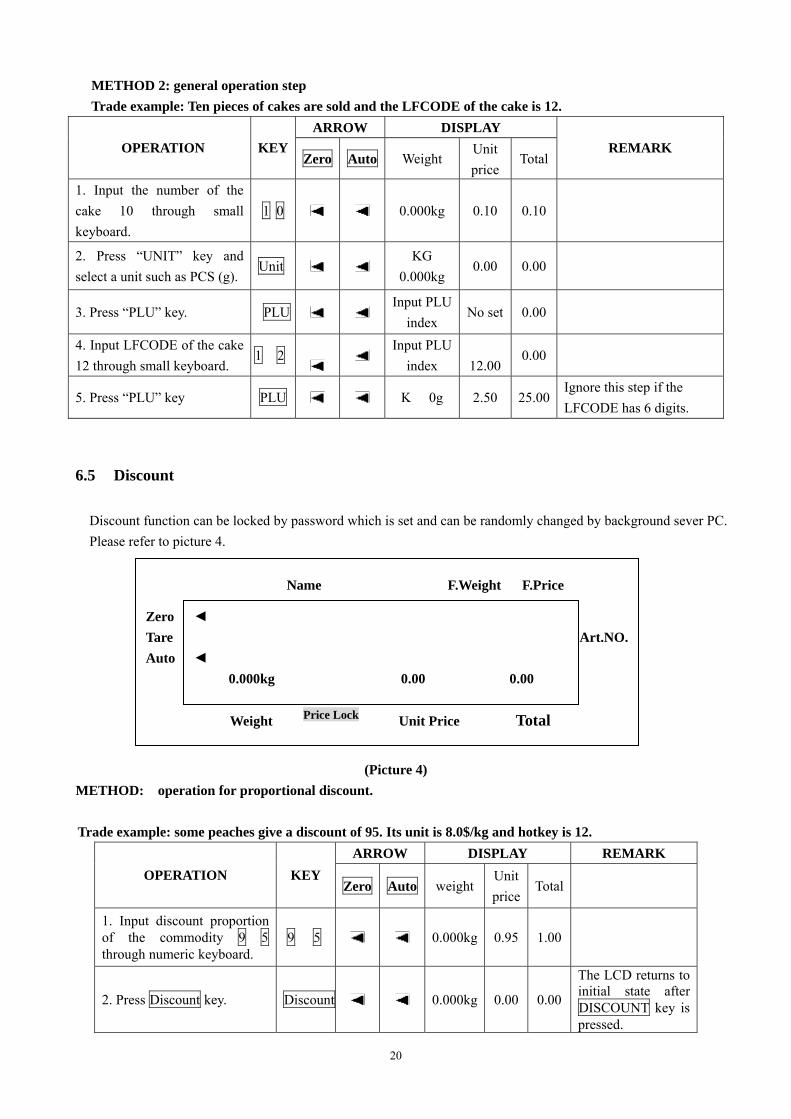
METHOD 2: general operation step Trade example: Ten pieces of cakes are sold and the LFCODE of the cake is 12.
ARROW DISPLAY OPERATION KEY
Zero Auto Weight Unit price
TotalREMARK
1. Input the number of the cake 10 through small keyboard.
1 0 0.000kg 0.10 0.10
2. Press “UNIT” key and select a unit such as PCS (g).
Unit KG
0.000kg 0.00 0.00
3. Press “PLU” key. PLU Input PLU
index No set 0.00
4. Input LFCODE of the cake 12 through small keyboard.
1 2
Input PLU index
12.00
0.00
5. Press “PLU” key PLU K 0g 2.50 25.00Ignore this step if the LFCODE has 6 digits.
6.5 Discount
Discount function can be locked by password which is set and can be randomly changed by background sever PC. Please refer to picture 4.
(Picture 4) METHOD: operation for proportional discount. Trade example: some peaches give a discount of 95. Its unit is 8.0$/kg and hotkey is 12.
ARROW DISPLAY REMARK OPERATION KEY
Zero Auto weightUnit price
Total
1. Input discount proportion of the commodity 9 5 through numeric keyboard.
9 5 0.000kg 0.95 1.00
2. Press Discount key. Discount 0.000kg 0.00 0.00
The LCD returns to initial state after DISCOUNT key is pressed.
ACLAS Name F.Weight F.Price
Zero Tare Art.NO. Auto Weight Unit Price Total Price Lock
◄ ◄ 0.000kg 0.00 0.00
21
3. Put the commodity weighing 1.000kg on the pan. 1.000kg 0.00 0.00
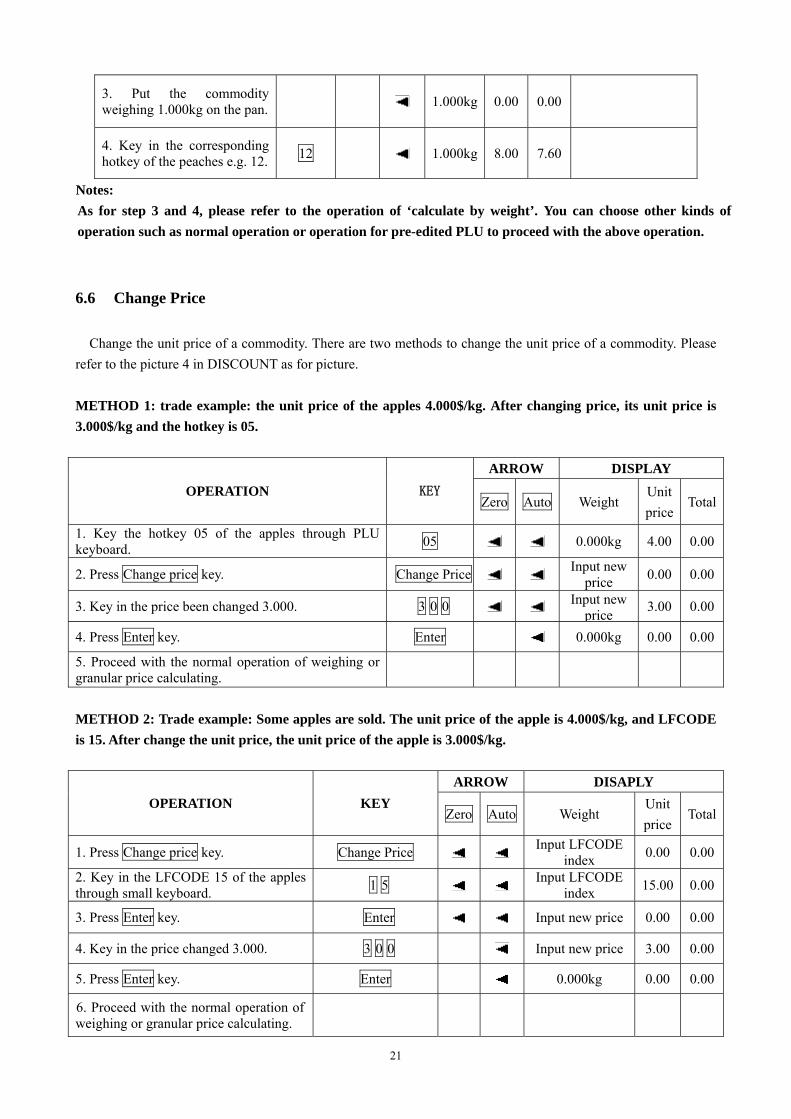
4. Key in the corresponding hotkey of the peaches e.g. 12. 12
1.000kg 8.00 7.60
Notes: As for step 3 and 4, please refer to the operation of ‘calculate by weight’. You can choose other kinds of operation such as normal operation or operation for pre-edited PLU to proceed with the above operation.
6.6 Change Price
Change the unit price of a commodity. There are two methods to change the unit price of a commodity. Please refer to the picture 4 in DISCOUNT as for picture.
METHOD 1: trade example: the unit price of the apples 4.000$/kg. After changing price, its unit price is 3.000$/kg and the hotkey is 05.
ARROW DISPLAY
OPERATION KEY Zero Auto Weight
Unit price
Total
1. Key the hotkey 05 of the apples through PLU keyboard. 05 0.000kg 4.00 0.00
2. Press Change price key. Change Price Input new price 0.00 0.00
3. Key in the price been changed 3.000. 3 0 0 Input new price 3.00 0.00
4. Press Enter key. Enter 0.000kg 0.00 0.00
5. Proceed with the normal operation of weighing or granular price calculating.
METHOD 2: Trade example: Some apples are sold. The unit price of the apple is 4.000$/kg, and LFCODE is 15. After change the unit price, the unit price of the apple is 3.000$/kg.
ARROW DISAPLY
OPERATION KEY Zero Auto Weight
Unit price
Total
1. Press Change price key. Change Price Input LFCODE index 0.00 0.00
2. Key in the LFCODE 15 of the apples through small keyboard. 1 5 Input LFCODE
index 15.00 0.00
3. Press Enter key. Enter Input new price 0.00 0.00
4. Key in the price changed 3.000. 3 0 0 Input new price 3.00 0.00
5. Press Enter key. Enter 0.000kg 0.00 0.00
6. Proceed with the normal operation of weighing or granular price calculating.
22
7 SOME SIMPLE OPERATION
7.1 Copy price label
1. Call PLU or input unit price in normal state and print a piece of label.
2. Press “Copy” key and input a number between 1 and 9, then the corresponding number pieces of label is printed. 3. Press Copy key and 0 key to print 1000 pieces of label continuously.
7.2 Print receipt
1. Reloaded the rolling paper and extend its head out of the outlet. Make sure not roll the paper head in the rewinder. Please refer to Chapter 4.4.2 Receipt Paper Installation.
2. Use key [→] or [←] to select the paper type as ‘RECEIPT’.
3. Press Enter key to confirm.
Note: If you want to use label paper again, you should enter this function to select the paper type as ‘LABEL’, and after setting you must restart the scale by press the on-off on the scale’s bottom (switch to ‘RECEIPT’ no need restart the scale).
7.3 Normal Package
This is suitable to quickly pack a same commodity (or different commodity with the same unit price) with different weight. (The Package Type is set as ‘Normal’ on the scale software ‘PLU manager’. 1. Start up the function of “Auto” and “Price lock” (these two indicator light are lighting)
2. Select PLU or input the unit price.
3. Put the commodity (to be packed) on the pan and the label will be printed automatically.
1. Put commodity 1 on the pan
2. After the label is printed automatically put commodity 2 on the pan at the same time, take away commodity 1. 3. Take away the label and stick it on commodity 1. The label of the commodity 2 will be printed out. 4. Put commodity 3 on the pan and take away commodity 2.
5. Take away the label and stick it on commodity 2, the next label will be printed.
Note: the operation of the right is suggested if you want to operate quickly.
6. Repeat as the above steps to overlap the time of waiting for printing label and sticking label.

23
7.4 Package by Fixed weight
Fix weight package, this function is available by setting on PC software first. For example: pack fish by the fixed weight 0.250kg, and the corresponding hotkey is 38. The operation processes are as follows:
1. Open ‘Start/Program/LB-MNV/PLU manager’ on you PC. Choose ‘Fixed weight’ in the column ‘Package Type’; input 0.250kg in the column ‘Package Weight’; input 5% in the column ‘Package Tolerance (%)’.
2. After setting, click in the toolbar to download it to the scale.
Note: Before operate on the scale, please press key Price Lock first, and the indicator light for ‘price lock’ will be lighting. The corresponding display is as Picture 5.
ARROW Display OPERATION KEY
Zero Auto Fix
Weight Weight
Unit Price
Total Remark
1. Put the fish on the pan. 0.255kg 0.00 0.00
2. Press the hotkey 38 of the fish via PLU keyboard.
3 8 0.255kg 70.00 17.85
Attention: The commodity can be sold at the condition that its weight is between the weight tolerance +5%kg while it is in Fixed Weight package mode.
Double-click and choose ‘fixed Weight’.
Double-click to set the fixed weight. Unit: kg.
i.e. weight tolerance +5%kg can be sold.
ACLAS Name F.Weight F.Price
Zero Tare Art.NO. Auto Weight Unit Price Total Price Lock
◄ ◄ 0.000kg 0.00 0.00
24
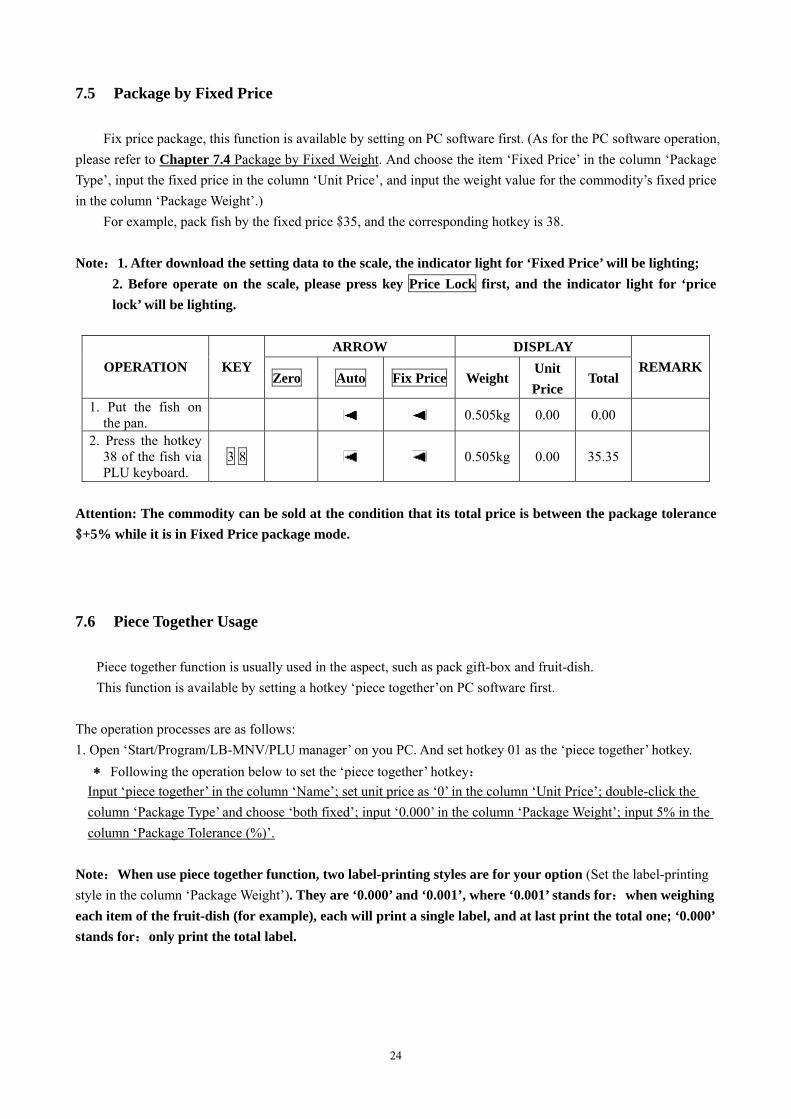
7.5 Package by Fixed Price
Fix price package, this function is available by setting on PC software first. (As for the PC software operation, please refer to Chapter 7.4 Package by Fixed Weight. And choose the item ‘Fixed Price’ in the column ‘Package Type’, input the fixed price in the column ‘Unit Price’, and input the weight value for the commodity’s fixed price in the column ‘Package Weight’.)
For example, pack fish by the fixed price $35, and the corresponding hotkey is 38.
Note:1. After download the setting data to the scale, the indicator light for ‘Fixed Price’ will be lighting; 2. Before operate on the scale, please press key Price Lock first, and the indicator light for ‘price lock’ will be lighting.
ARROW DISPLAY OPERATION KEY
Zero Auto Fix Price WeightUnit Price
Total REMARK
1. Put the fish on the pan. 0.505kg 0.00 0.00
2. Press the hotkey 38 of the fish via PLU keyboard.
3 8 0.505kg 0.00 35.35
Attention: The commodity can be sold at the condition that its total price is between the package tolerance $+5% while it is in Fixed Price package mode.
7.6 Piece Together Usage
Piece together function is usually used in the aspect, such as pack gift-box and fruit-dish. This function is available by setting a hotkey ‘piece together’on PC software first.
The operation processes are as follows: 1. Open ‘Start/Program/LB-MNV/PLU manager’ on you PC. And set hotkey 01 as the ‘piece together’ hotkey.
∗ Following the operation below to set the ‘piece together’ hotkey: Input ‘piece together’ in the column ‘Name’; set unit price as ‘0’ in the column ‘Unit Price’; double-click the column ‘Package Type’ and choose ‘both fixed’; input ‘0.000’ in the column ‘Package Weight’; input 5% in the column ‘Package Tolerance (%)’.
Note:When use piece together function, two label-printing styles are for your option (Set the label-printing style in the column ‘Package Weight’). They are ‘0.000’ and ‘0.001’, where ‘0.001’ stands for:when weighing each item of the fruit-dish (for example), each will print a single label, and at last print the total one; ‘0.000’ stands for:only print the total label.

25
2. After setting, click in the toolbar to download it to the scale.
Note:1. After download the setting data to the scale, the indicator light for ‘Fixed Weight’ and ‘Fixed Price’ will be lighting; 2. Before operate on the scale, please press key Price Lock first, and the indicator light for ‘price lock’ will be lighting.
For example:Package a fruit-dish (apple, grape, and orange)
PLU name:apple weight unit:kg unit price:10.00 $/kg hotkey 06 PLU name:orange weight unit:kg unit price:4.00 $/kg hotkey 07 PLU name:grape weight unit:kg unit price:20.00 $/kg hotkey 08
Suppose each of the three fruits is 1.000kg.
ARROW DISPLAY OPERATION KEY
Zero Auto Fix weightFix price
Weight Unit Price
Total REMARK
1. Press hotkey 01
2. Put the apple on the pan, and press hotkey 06
0 6 1.000kg 10.00 10.00
3. Put the orange on the pan, and press hotkey 07
0 7 1.000kg 4.00 4.00
4. Put the grape on the pan, and press hotkey 08
0 8 1.000kg 20.00 20.00
5. Press hotkey 01 3.000kg 34.00
Double-click and select ‘Both Fixed’.
i.e. weight tolerance +5%kg can be sold.
Set unit price as ‘0’
Set the label printing style in this column.
26
8 FUNCTION SET
8.1 PLU Set
Notes: This operation can be locked by password that is set in background PC changed randomly.
PLU Input 1.Press PLU key for 2 seconds. The display shows “PLU EDIT”, it means the system is in the state of editing PLU. 2. Key in LFCODE when the display prompt “LLFCODE?”, and press Enter to confirm. Then the display shows “NAME” and enter editing items: N/L/C/P/U/F/T/B/D/W/Y/M/G/I/R/S, you can use key ← and → to choose the item you want to edit, then press Enter. 3. Press Enter key. Input the corresponding data by sequence. Refer to the following notes.
4. Press S or Enter to save the above operation.
NOTES: the following is the sequence of PLU data input. When one item is input, press Enter to confirm. The system will shift to another item, and press Enter again to enter it. If no contents are inputted, press ESC to exit. 1) N---PLU NAME: Input PLU name not exceeding 36 characters directly through keyboard. And through the
numeric keyboard input the code of the input characters. The code is in the word stock table. 2) L---LFCODE: Input Life and Fresh Code within 6 digits. 3) C---PLU CODE: Input PLU code within 10 digits. 4) P---UNIT PRICE: Input PLU price. 5) U---UNIT: Select price unit from g, 10g, 100g, kg, Lb and Oz or PCS (g), PCS (kg), PCS (Lb) and PCS (Oz). 6) F---SHELF: Input the shelf-time of PLU: period from 0 to 365---means its unit is ‘day’; period from 1000 to
9999---means its unit is ‘hour’. e.g. input 60, which stands for its shelf-time is 60-day; input 1006, which means its shelf-time is 6-hour.
7) T---TARE: Input tare (not exceeding the maximum weight). 8) B---BAR CODE: Select barcode type from 1 to 99. 9) D---DEPARTMENT: Input department code from o to 99. 10) W---PACKING WEIGHT: Input the package weight. 11) Y---Packing Type: Use key “←”“→”to select (Normal; fixed weight; fixed price; both) weight and price. 12) M---MESSAGE1: Input the selected message No. (0~12000). 0-no use this message 13) G---MESSAGE2: reserved 14) I---LABEL SELECT (Set label of corresponding PLU) Use key “←”“→”to select (DEF, D0, D1,D0D1). 15) R---Set PLU discount (-10~125). 16) S---Save PLU revision.
PLU Data Revise 1. Press PLU key for two seconds. The display shows “PLU EDIT”, it means the system is in the state of editing PLU. 2. Key in LFCODE when the display prompt “LLFCODE?”, and press Enter to confirm. Then the display shows
27
“NAME” and enter editing items: N/L/C/P/U/F/T/B/D/W/Y/M/G/I/R/S, you can use key ← and → to choose the item you want to edit, then press Enter. 3. Key in the corresponding letter of the item to be modified, refer to the above notes, for example, key in N to modify name and P to modify price. 4. Input the new information.
5. Press S key to save the above results. Else they are abandoned.
8.2 System Set
Note: This operation can be locked by password set in background PC server and is changeable as will. 1. Press the System Set for two seconds to enter the system setting state.
2. Use “←” “→” to select the desired items as follows: T/A/L//S/N/J/X/W/K/Y/D/E/F/Y/G/Q/N/W/;/@/V Refer to the following notes. 3. Press Enter key to confirm.
Notes: 1. T---DATE: input date and time, use key “←” “→”to switch the two options. (Before you do it, you need to set
the date format) 2. A---ALIGN: Use arrow key to select one of the 17(-8~+8) values to adjust the label to the most suitable
printing state. 3. L---LABEL SELECT: Choose label type D0 or D1. (We only have such two label types presently.) 4. S---Paper: Using arrow to select paper type: label, receipt or no recycle. 5. N---DATE FORMAT: Set date format. 6. PRINT WEIGHT UNIT: This function is to set whether print the weight unit in the label. 7. PRINT PRICE UNIT: This function is to set whether print the price unit in the label. 8. J---PRICE FORMAT: Set decimal position for unit price in the label. 9. X---AMOUNT FORMAT: Set decimal position for total price in the label. 10. BARCODE SET: set barcode type; refer to Chapter 12.2 Appendix 2 for the barcode list details. 11. W---Print Time: This is to set whether print time in the label or not. 12. K---ROUND: set rounding; input a digit among 1 ~ 10, round off the last digit.
1: 0 off 1 up 2~4: Reserved 5: 4 off 5 up 6: 5 off 6 up 7: 6 off 7 up 8: 7 off 8 up 9: 8 off 9 up 10: All round off E.g.: if you input 5, then 2.45 will be rounded to 2.5, while 2.44 will be rounded to 2.4.
13. Y---YEAR FORMAT: Set year format, use key “←” “→”to select 2 digits or 4 digits. 14. D---DENSITY: Select printing density from “0” to “5” with arrow. This scale supports print density class 0 to
5. ‘0’ is the lightest one of all, and ‘5’ is the thickest of all. 15. Q---PRINT DELMARK: This function is to set whether print delete mark in the label or not.
28
16. G---SOURCE PRICE: This function is to set whether use the original price before discount as the sale price. 17. PRINT ITEM IN WEIGHT ITEM: Two items can be printed in the ‘weight column’: Weight and PCS. This
function is to set whether print Weight or PCS in the ‘weight column’. 18. E---MESSAGE 1: This is to set the message no. of MESSAGE 1. Input a number among 0~250. Each number
represents different message content. 19. F---MESSAGE 2: This is to set the message no. of MESSAGE 2. Input a number among 0~250. Each number
represents different message content. 20. Set ‘BARCODE LINE WIDTH’: only effective in 18-code barcode. Use arrow key to select width or narrow. 21. ;---ANTI WIND: Select anti-wind state. 22. @---IP: Input the scale IP address directly. Note: The scale IP and PC IP should be in the same network segment, namely, the first three fields of
scale IP should be accord with PC IP. E.g. my computer’s IP is ‘192.168.1.151’, therefore, in the next step, I should set the first three fields of scale IP to match with PC IP, namely, the first three fields of scale IP should be ‘192.168.1.’ and I set scale IP as ‘192.168.1.101’.
23. V---SPEED: Set print speed. Select print speed from “0” to “7” with arrow. ‘0’ is the fastest one of all, and ‘7’ is the slowest of all.
24. Rebate to 23 department: Whether to set the initial 2-digit department numbers of the discount PLU barcode as 23.
25. R---HOST IP: Input the host IP address directly, and press key [ENTER]. 26. stat. mode: Whether to set the system in stat. mode. Use arrow key to select “YES” or “NO”.
If you choose “YES”, the system will be in stat. mode, when you use the hotkey, the sale subtotal of this key will be printed on label. And if you choose “NO”, you can do hotkey operation as normal.
27. stat Warnning? : Whether to set the stat. Warnning. Use arrow key to select “YES” or “NO”. 28. prn Tubtot: Press [Enter] to print the total label. 29. Prn ALL stat. plu: This operation can print stat. data of each hotkey. 30. clr stat.: Press [Enter] to clear stat.. 31. Z---LABEL SELECT: This is to choose the label paper type. There are two types of label paper, one is
No-gap paper, and the other is gap paper. User key “←” “→” to select ‘YES’ or ‘NO’. ‘YES’ for No-gap paper, and ‘NO’ for gap paper. Gap paper is the default label paper type. Only when you install the No-gap paper into the scale, you need to set this item to ‘YES’.
29
8.3 Function Lock
PLU edit, Discount Program and tare functions can be locked by password and password of each function is independent and changeable. Password is set by background PC server and downloaded to every scale. Operation on the label scale is as followings: Note: Once you turn on the locked function, this function will be valid until the scale is warmly closed.
1. Turn on the scale.
Turn on the locked
function
2. Select the desired function key. Press Discount key two seconds to enter discount function, the system prompts to input
password, then input the safe password which is set by background PC server. Press PLU key for two second to enter PLU editing state, the system prompts to input
password, then input the safe password which is set by background PC server. Press System Set key for one second to enter program setting state, the system prompts to
input password, then input the safe password which is set by background PC server. Press Tare key for one second to enter tare state, the system prompts to input password, then
input the safe password which is set by background PC server. Press Change Price key for one second to enter change price state, the system prompts to
input password, then input the safe password which is set by background PC server. 1. Press On/Off key for two seconds to warmly close the scale. Lock these
functions again.
2. Press On/Off key to open the scale.
8.4 Lock Scale
You can lock the scale by password, so that other people can’t do any operation on the scale. Lock scale as the following method:
1. Press Password key until the word “PASSW” appears on the LCD display. 2. Input the eight-digit password by numeric keyboard. Lock the scale 3. Press Password key and after hearing a “beep” sound to show the password has been set.
1. Turn on the scale. 2. The LCD display “PASSW”.
Turn on the lock casually
3. Input the eight-digit password, then press Password key to turn on the lock. 1. Turn on the scale. 2. Press C key. 3. Press Password key for two seconds until the word “PASSW” appears on the LCD display.
Turn on the lock timelessly
4. Input the eight-digit password, then press Password key to turn on the lock.
30
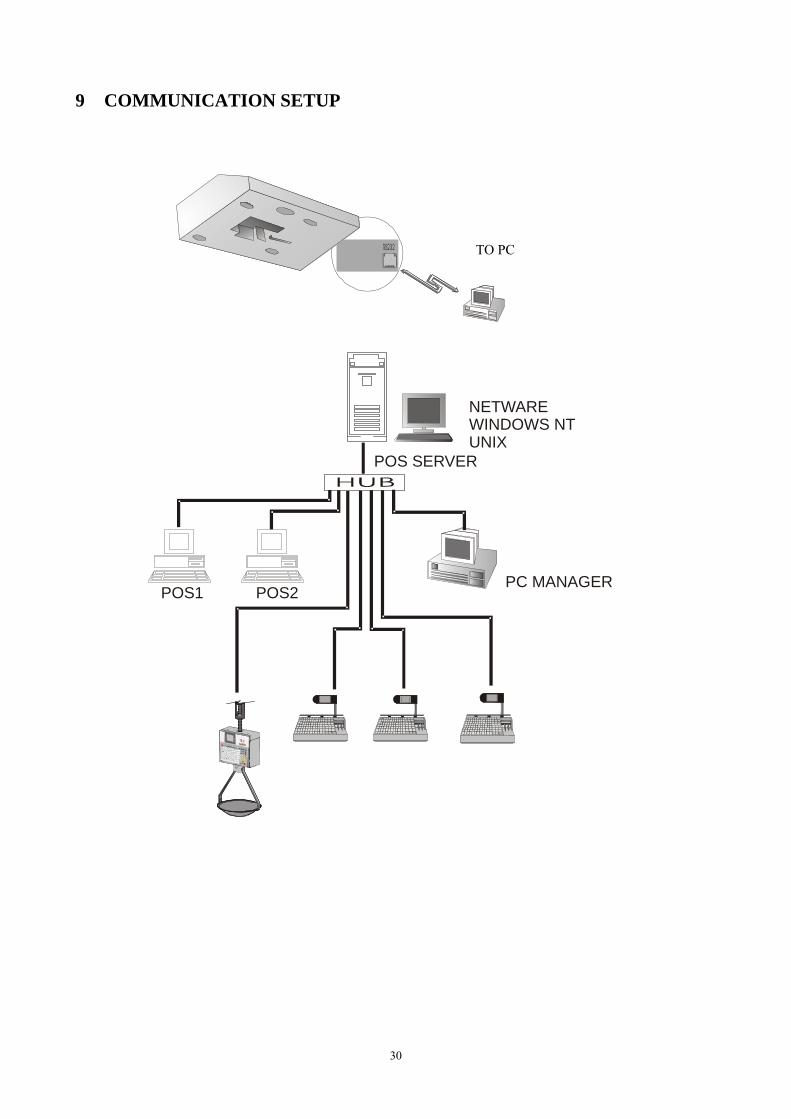
9 COMMUNICATION SETUP
PC MANAGER
POS SERVER
POS1 POS2
NETWAREWINDOWS NT UNIX
TO PC
31
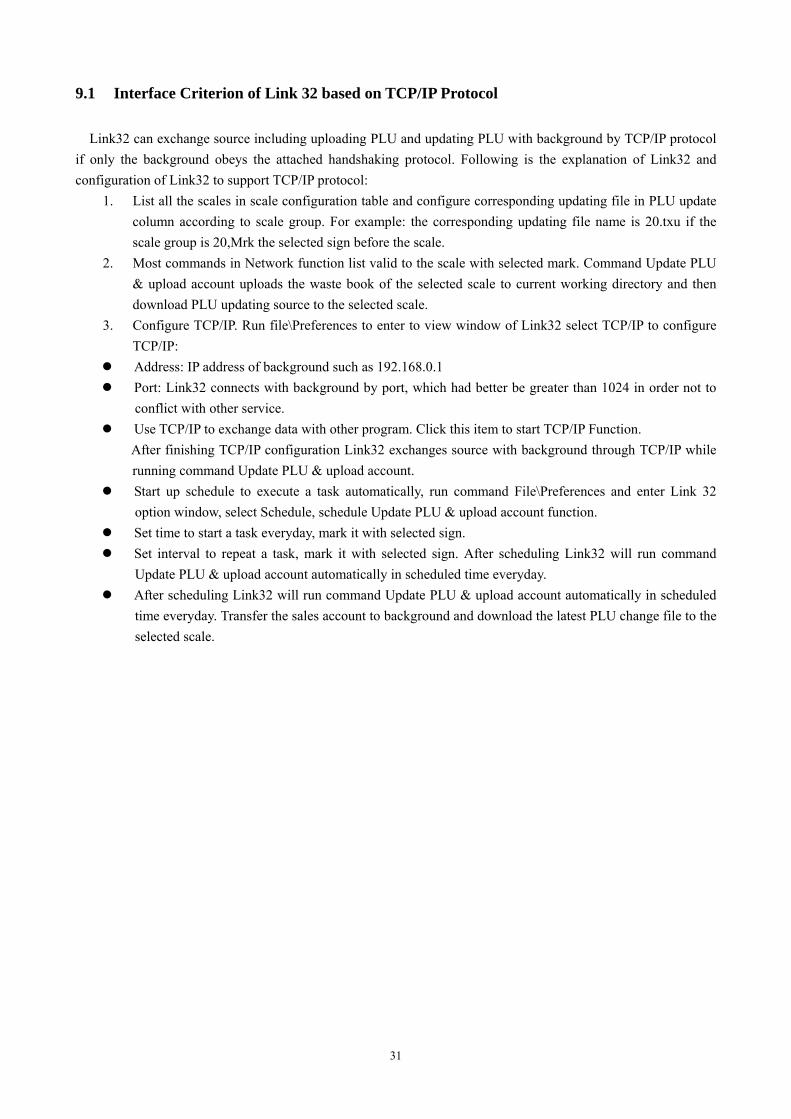
9.1 Interface Criterion of Link 32 based on TCP/IP Protocol
Link32 can exchange source including uploading PLU and updating PLU with background by TCP/IP protocol if only the background obeys the attached handshaking protocol. Following is the explanation of Link32 and configuration of Link32 to support TCP/IP protocol:
1. List all the scales in scale configuration table and configure corresponding updating file in PLU update column according to scale group. For example: the corresponding updating file name is 20.txu if the scale group is 20,Mrk the selected sign before the scale.
2. Most commands in Network function list valid to the scale with selected mark. Command Update PLU & upload account uploads the waste book of the selected scale to current working directory and then download PLU updating source to the selected scale.
3. Configure TCP/IP. Run file\Preferences to enter to view window of Link32 select TCP/IP to configure TCP/IP:
Address: IP address of background such as 192.168.0.1 Port: Link32 connects with background by port, which had better be greater than 1024 in order not to
conflict with other service. Use TCP/IP to exchange data with other program. Click this item to start TCP/IP Function.
After finishing TCP/IP configuration Link32 exchanges source with background through TCP/IP while running command Update PLU & upload account.
Start up schedule to execute a task automatically, run command File\Preferences and enter Link 32 option window, select Schedule, schedule Update PLU & upload account function.
Set time to start a task everyday, mark it with selected sign. Set interval to repeat a task, mark it with selected sign. After scheduling Link32 will run command
Update PLU & upload account automatically in scheduled time everyday. After scheduling Link32 will run command Update PLU & upload account automatically in scheduled
time everyday. Transfer the sales account to background and download the latest PLU change file to the selected scale.
32
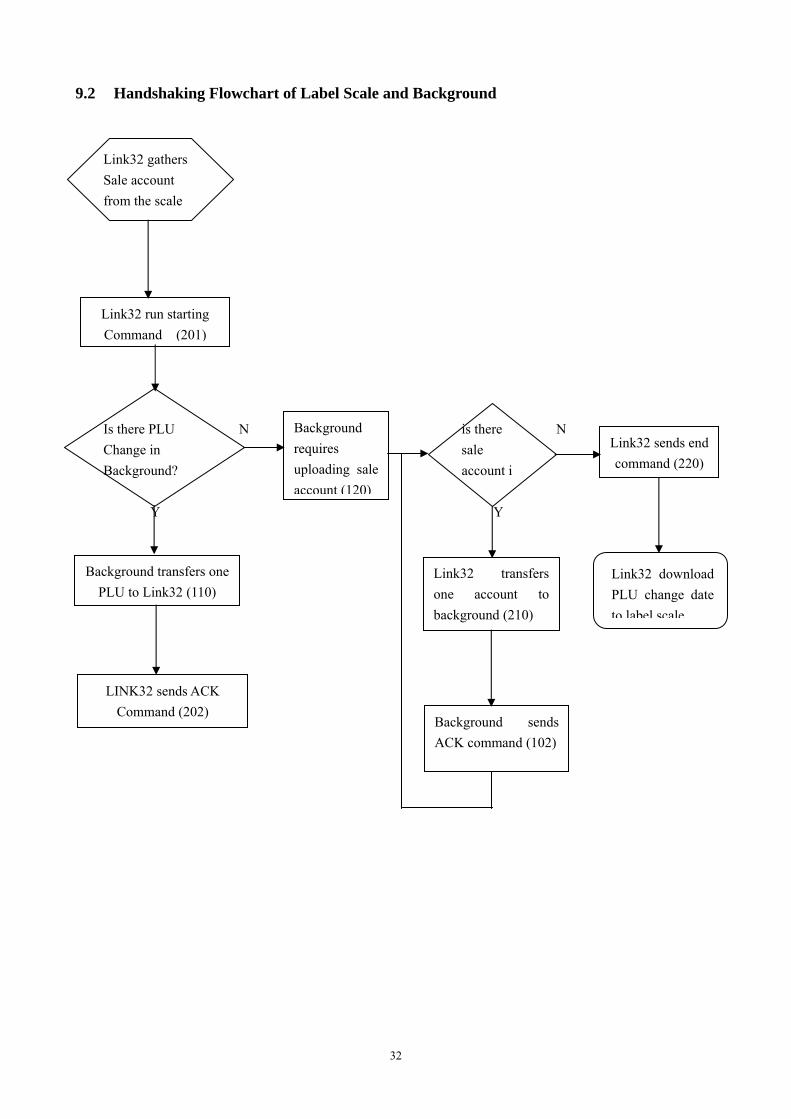
Link32 run starting Command (201)
Background transfers one PLU to Link32 (110)
LINK32 sends ACK Command (202)
Background requires uploading sale account (120)
Link32 sends end command (220)
Link32 transfers one account to background (210)
Background sends ACK command (102)
Link32 download PLU change date to label scale
9.2 Handshaking Flowchart of Label Scale and Background
Link32 gathers Sale account from the scale
Is there PLU N is there N Change in sale Background? account i
Y Y
33
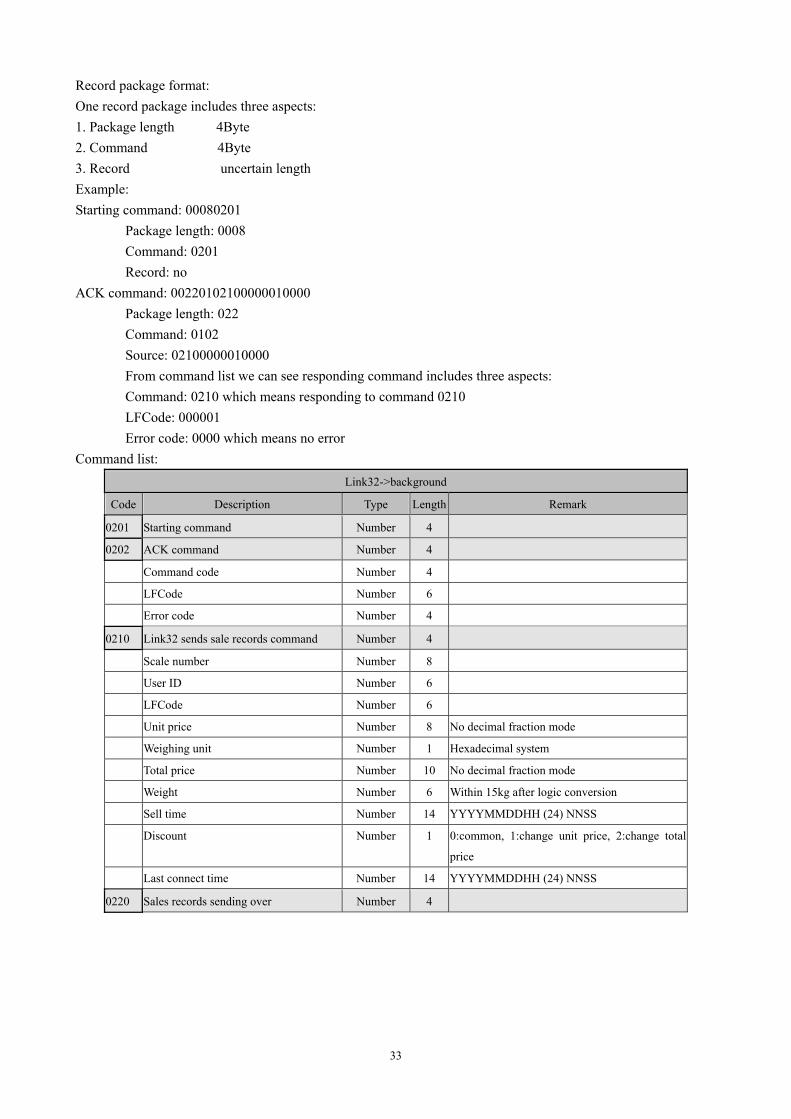
Record package format: One record package includes three aspects: 1. Package length 4Byte 2. Command 4Byte 3. Record uncertain length Example: Starting command: 00080201
Package length: 0008 Command: 0201 Record: no
ACK command: 00220102100000010000 Package length: 022 Command: 0102 Source: 02100000010000 From command list we can see responding command includes three aspects: Command: 0210 which means responding to command 0210 LFCode: 000001 Error code: 0000 which means no error
Command list: Link32->background
Code Description Type Length Remark
0201 Starting command Number 4
0202 ACK command Number 4
Command code Number 4
LFCode Number 6
Error code Number 4
0210 Link32 sends sale records command Number 4
Scale number Number 8
User ID Number 6
LFCode Number 6
Unit price Number 8 No decimal fraction mode
Weighing unit Number 1 Hexadecimal system
Total price Number 10 No decimal fraction mode
Weight Number 6 Within 15kg after logic conversion
Sell time Number 14 YYYYMMDDHH (24) NNSS
Discount Number 1 0:common, 1:change unit price, 2:change total
price
Last connect time Number 14 YYYYMMDDHH (24) NNSS
0220 Sales records sending over Number 4

34
9.3 Making procedure of connector
(1) Select a connector wire (8 pin) by length of L.
(2) Put A end of the connector wire at the edge of blade of pliers horizontally (note: point against the baffle to ensure 12mm peeling length), press the pliers and pull out the wire and the peeling length is about 12mm. 1.Connection order: green/white, green, orange/white, blue, blue/white orange, brown/white, white. 2. line Connection order: orange/white, orange, green/white, blue, blue/white, green, brown/white, white. (3) Plug peeling end (A) into 8 PIN PHONE connector as either Connection order above.
Make sure to plug to the end. (4) Plug wire connector with 8 pin into the position with logo 8P of pliers gently, then press the pliers forcefully. (5) When process end B of connecting wire, don’t twist wire and keep the wire with same color in the same position.
Protruding strip
Edge of peeling blade
Edge of cut blade
35
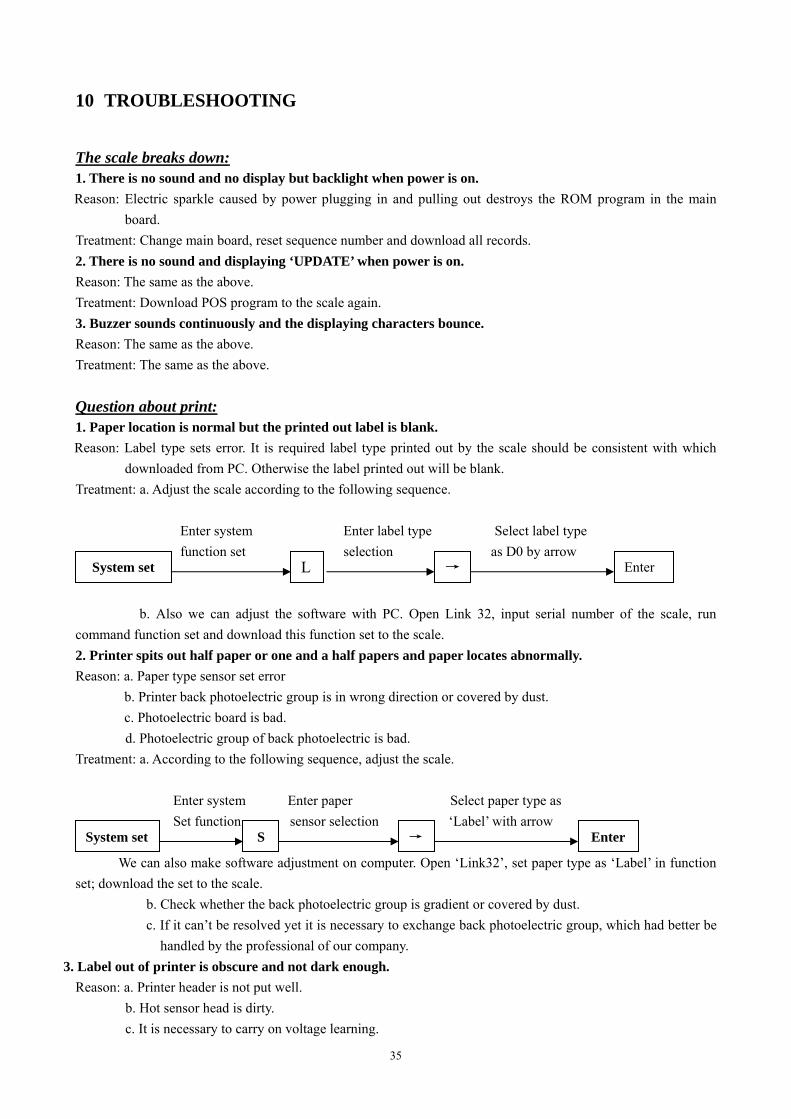
10 TROUBLESHOOTING
The scale breaks down: 1. There is no sound and no display but backlight when power is on. Reason: Electric sparkle caused by power plugging in and pulling out destroys the ROM program in the main
board. Treatment: Change main board, reset sequence number and download all records. 2. There is no sound and displaying ‘UPDATE’ when power is on. Reason: The same as the above. Treatment: Download POS program to the scale again. 3. Buzzer sounds continuously and the displaying characters bounce. Reason: The same as the above. Treatment: The same as the above. Question about print: 1. Paper location is normal but the printed out label is blank. Reason: Label type sets error. It is required label type printed out by the scale should be consistent with which
downloaded from PC. Otherwise the label printed out will be blank. Treatment: a. Adjust the scale according to the following sequence. Enter system Enter label type Select label type function set selection as D0 by arrow
b. Also we can adjust the software with PC. Open Link 32, input serial number of the scale, run command function set and download this function set to the scale. 2. Printer spits out half paper or one and a half papers and paper locates abnormally. Reason: a. Paper type sensor set error b. Printer back photoelectric group is in wrong direction or covered by dust. c. Photoelectric board is bad.
d. Photoelectric group of back photoelectric is bad. Treatment: a. According to the following sequence, adjust the scale. Enter system Enter paper Select paper type as Set function sensor selection ‘Label’ with arrow
We can also make software adjustment on computer. Open ‘Link32’, set paper type as ‘Label’ in function set; download the set to the scale.
b. Check whether the back photoelectric group is gradient or covered by dust. c. If it can’t be resolved yet it is necessary to exchange back photoelectric group, which had better be
handled by the professional of our company. 3. Label out of printer is obscure and not dark enough.
Reason: a. Printer header is not put well. b. Hot sensor head is dirty. c. It is necessary to carry on voltage learning.
System set L → Enter
System set S → Enter
36
Treatment: a. Place printer header in suitable position b. Clean hot sensor head softly with soft cloth dipped in alcohol.
4. Label printed out is half clear and half blur even blank. Reason: a. Printer header is not put well.
b. Hot sensor header is dirty. c. Printer header is distorted.
Treatment: a. Place printer header in suitable position. b. Clean hot sensor head softly with the cleaning pen attached. The cleaning pen is an alcohol pen;
please cover it immediately after you wipe the dirty off. c. If this problem can’t be resolved yet it is necessary to change the printer. The bad printer had better
to be handled by professional of our company. 5. There is strange letter on the label. Reason: LFZK has not been downloaded. Treatment: Download LFZK again. Questions about keyboard: 1. Display is normal but keyboard sounds continuously. Reason: There is a short circuit in keyboard. Treatment: change keyboard circuit. 2. Key doesn’t sound. Reason: a. Key wire is not inserted well.
b. Electric rubber of key press circuit board is not installed well. c. The replaced kit is bad.
Treatment: a. Check key wire and insert it again. b. Remove the electric rubber of key press and another location with rubber strip install again. c. If the problem can’t be resolved yet, the selected kit is bad. Questions about weighing: 1. The scale can’t weigh correctly. Reason: a. Rubber pad, which sustains the scale pan, touched the shell (upper cover).
b. Humidity or component aging or area difference makes the scale weigh incorrectly. c. Sensor is damaged by over loading.
Treatment: a. Check whether the upper covers are buckled well. If they still knock each other, install sensor sustainer again.
b. Study zero weight and full weight again. If it is still no use, change main board, OP board or even the sensor.
c. Change sensor and sustainer. Note: OP board and sensor should be returned to our company in principal if they can’t be used. 2. Zero state is not stable. Reason: a. It is affected by environment such as vibration, or magnetic field interference, or wind. b. Weighing circuit is affected with damp. Treatment: a. Remove interference. b. Change main board.
37
c. If the problem can’t be resolved. Return the whole scale to our company to repair. 3. The scale can’t weigh. Reason: Main board or OP board or sensor is bad. Treatment: a. Change main board. b. Check whether OP board is abnormal. Return the whole scale to our company. Questions about communication: 1. The scale can’t communicate. Reason: a. Communication port set error.
b. Serial number of the scale has not been set. c. Connecting head is not used correctly or Netware wire is obstructed. d. There is some wrong with power board or main board.
Treatment: a. Confirm the correct communication port. b. Confirm number set in Link32 is consistent with the number in the scale. c. Confirm the Netware wire is smooth and communication connecting header is used correctly. There
are two types of communication port RS-232 which uses 9-pin or 25-pin connecting port attached with the scale and RS-422 which uses RST-11A connecting head.
d. If the above are right, detect whether main board or power board is wrong and change the wrong main board or power board.
2. Downloading is stopped at 1/N (n represents some number) and computer shows message “communicate error!”
Reason: Main board is error, which may be caused by chip damage. Treatment: Change main board or chip (ROM). Question about display: Display can’t show all characters or even a character. Reason: a. Display pole has not been installed well, which causes the display and the machine in bad contact. b. Water flows into the base seat of display pole which makes link board short-circuit or rotten. c. Display is damaged. Treatment: a. Install display pole and fix the bolt. b. Change link board or display pole. c. Change display pole. Other question: Roll paper can’t be driven by print.
Reason: maybe roll paper doesn’t get well along with rotating axis. Or there is some matter with rotating axis. Reason: Maybe roll paper doesn’t get well along with rotating axis. Or there is some matter with rotating axis. Treatment: Install the printer again which had better be processed by our company.
38
11 SOFTWARE DESCRIPTION
11.1 Software installation
Double click lbmnXXXX.exe, and then appear:
Select next, and then appear:
39
Select installation catalog, then select next, then appear: select Next,then appear: Select Install. Finally, select ‘Finish’ to end installation.
40
11.2 Use Link32
11.2.1 Communication Test
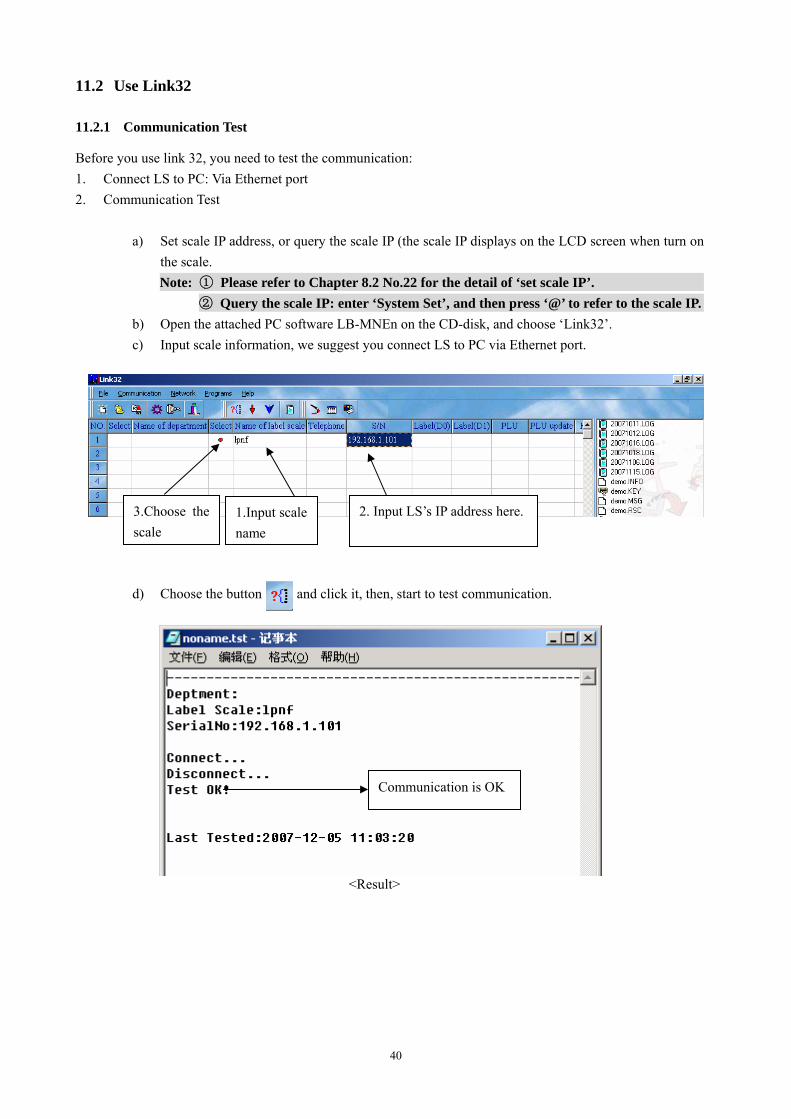
Before you use link 32, you need to test the communication: 1. Connect LS to PC: Via Ethernet port 2. Communication Test
a) Set scale IP address, or query the scale IP (the scale IP displays on the LCD screen when turn on the scale. Note: ① Please refer to Chapter 8.2 No.22 for the detail of ‘set scale IP’.
② Query the scale IP: enter ‘System Set’, and then press ‘@’ to refer to the scale IP. b) Open the attached PC software LB-MNEn on the CD-disk, and choose ‘Link32’. c) Input scale information, we suggest you connect LS to PC via Ethernet port.
d) Choose the button and click it, then, start to test communication.
<Result>
2. Input LS’s IP address here. 1.Input scale name
3.Choose the scale
Communication is OK

41
11.2.2 Main table explanation
A: Select the department name B: Input the department name C: Double click to select the scale name D: Enter Scale name E: This field is for communicating with other scales or PC by phone line (Modem). F: Enter Scale IP address for Ethernet communication, or input machine no. for COM communication. G&H: Set up new label format and download the label format to the scale.
1) Set up new label format: double click the column, input the filename in the popup window, click OK, then double click the filename to edit label and save it.
2) Download the label format to the scale: choose the column, double click the file on right. I: Set up new PLU file. J: Update PLU. K: Download the hotkeys to the scale. The operation is introduced in Chapter 11.3.10.
File menu
A B C D E F G H I J K
42
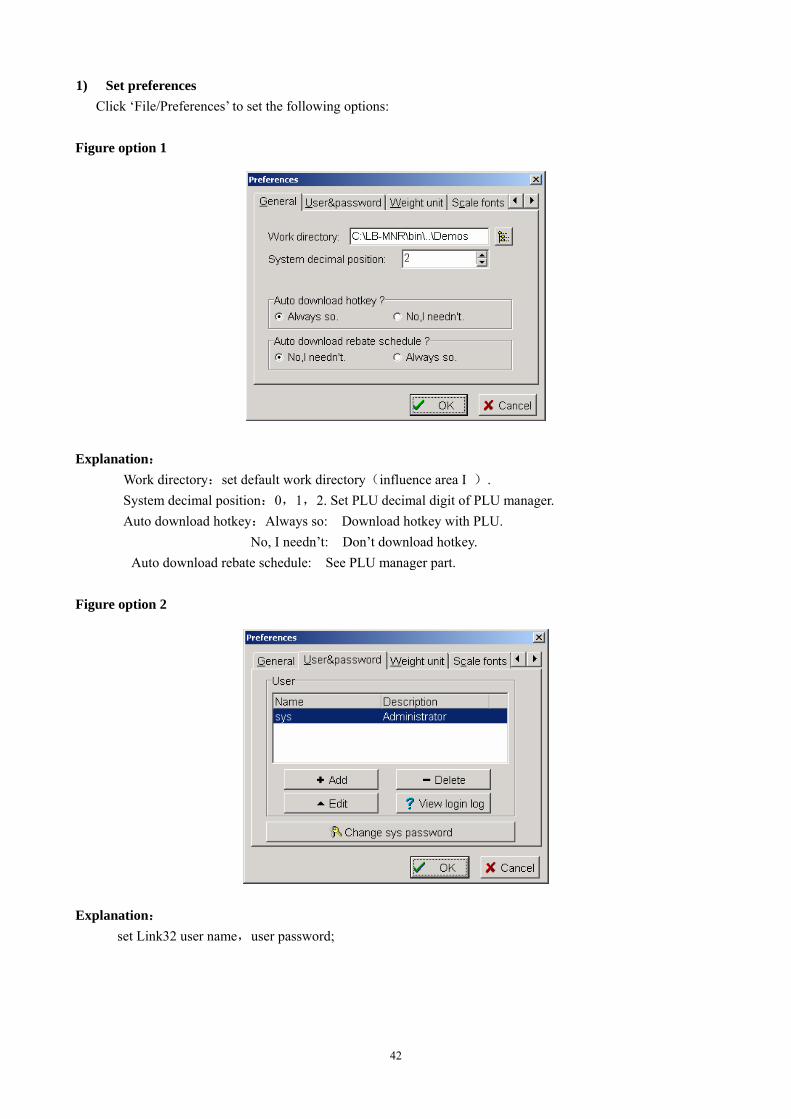
1) Set preferences Click ‘File/Preferences’ to set the following options:
Figure option 1 Explanation:
Work directory:set default work directory(influence area I ). System decimal position:0,1,2. Set PLU decimal digit of PLU manager. Auto download hotkey:Always so: Download hotkey with PLU.
No, I needn’t: Don’t download hotkey. Auto download rebate schedule: See PLU manager part.
Figure option 2 Explanation:
set Link32 user name,user password;
43
Figure option 3 Explanation:
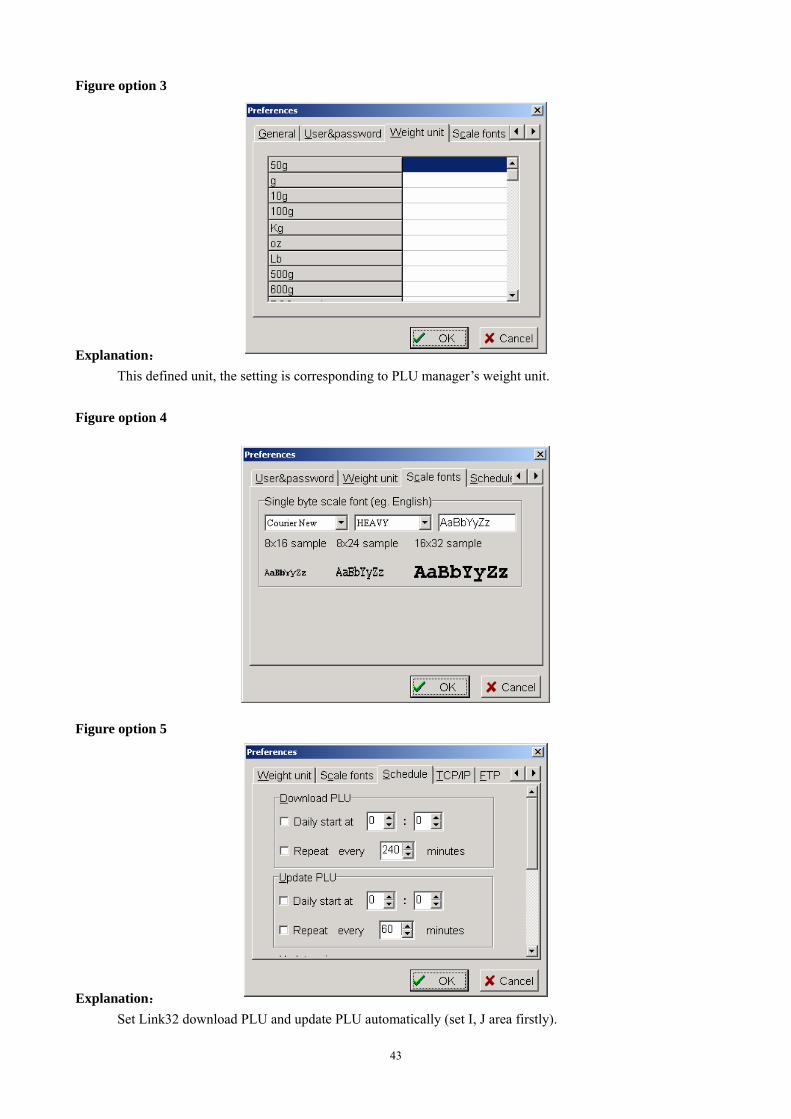
This defined unit, the setting is corresponding to PLU manager’s weight unit.
Figure option 4 Figure option 5 Explanation:
Set Link32 download PLU and update PLU automatically (set I, J area firstly).
44
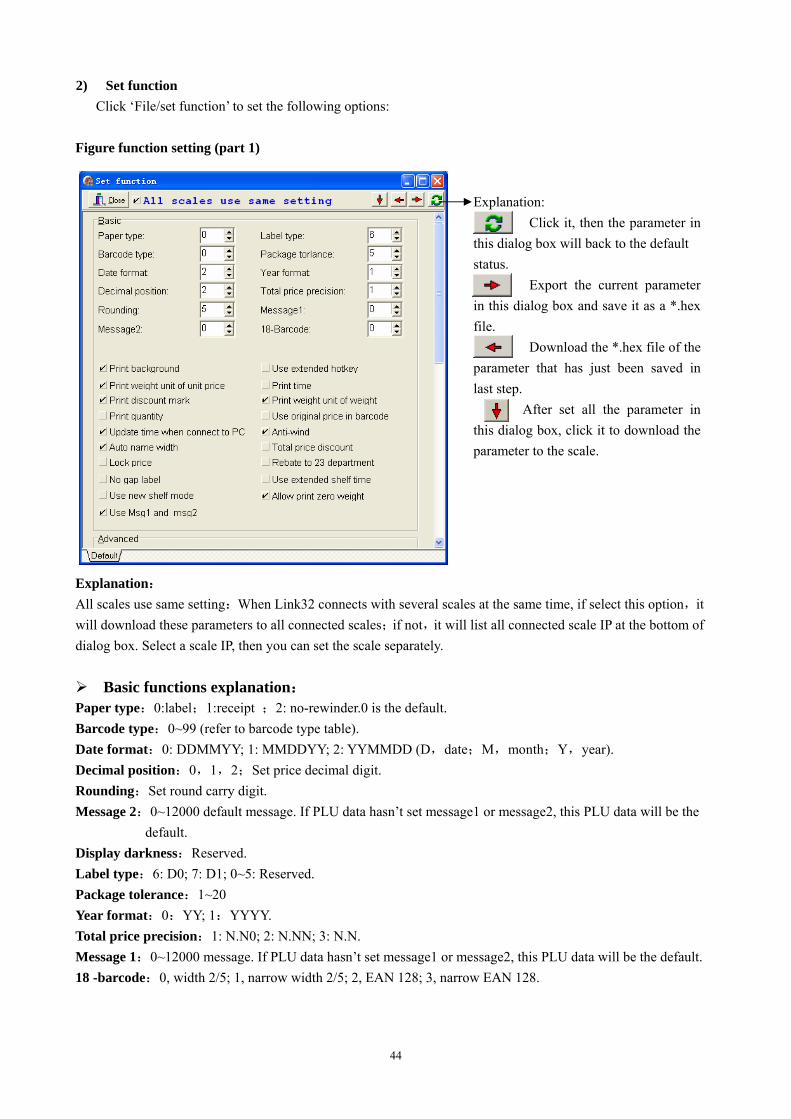
2) Set function Click ‘File/set function’ to set the following options:
Figure function setting (part 1) Explanation: All scales use same setting:When Link32 connects with several scales at the same time, if select this option,it will download these parameters to all connected scales;if not,it will list all connected scale IP at the bottom of dialog box. Select a scale IP, then you can set the scale separately.
Basic functions explanation: Paper type:0:label;1:receipt ;2: no-rewinder.0 is the default. Barcode type:0~99 (refer to barcode type table). Date format:0: DDMMYY; 1: MMDDYY; 2: YYMMDD (D,date;M,month;Y,year). Decimal position:0,1,2;Set price decimal digit. Rounding:Set round carry digit. Message 2:0~12000 default message. If PLU data hasn’t set message1 or message2, this PLU data will be the
default. Display darkness:Reserved. Label type:6: D0; 7: D1; 0~5: Reserved. Package tolerance:1~20 Year format:0:YY; 1:YYYY. Total price precision:1: N.N0; 2: N.NN; 3: N.N. Message 1:0~12000 message. If PLU data hasn’t set message1 or message2, this PLU data will be the default. 18 -barcode:0, width 2/5; 1, narrow width 2/5; 2, EAN 128; 3, narrow EAN 128.
Explanation: Click it, then the parameter in
this dialog box will back to the default status.
Export the current parameter in this dialog box and save it as a *.hex file.
Download the *.hex file of the parameter that has just been saved in last step. After set all the parameter in this dialog box, click it to download the parameter to the scale.
45
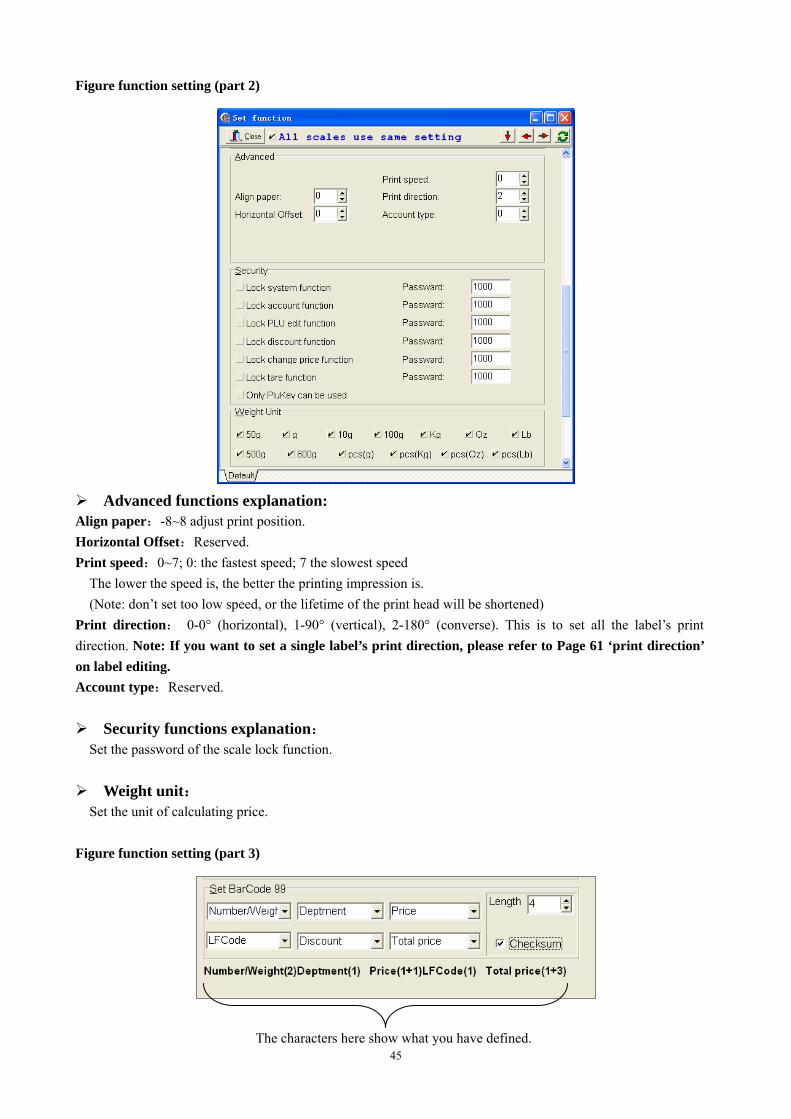
Figure function setting (part 2)
Advanced functions explanation: Align paper:-8~8 adjust print position. Horizontal Offset:Reserved. Print speed:0~7; 0: the fastest speed; 7 the slowest speed
The lower the speed is, the better the printing impression is. (Note: don’t set too low speed, or the lifetime of the print head will be shortened)
Print direction: 0-0° (horizontal), 1-90° (vertical), 2-180° (converse). This is to set all the label’s print direction. Note: If you want to set a single label’s print direction, please refer to Page 61 ‘print direction’ on label editing. Account type:Reserved.
Security functions explanation: Set the password of the scale lock function.
Weight unit: Set the unit of calculating price.
Figure function setting (part 3)
The characters here show what you have defined.

46
Set Barcode 99: Set the barcode format in this function. Set each item’s font length in the column ‘Length’. Among them,
‘Number/Weight, unit price, and total price’ are with another item ‘checksum’. You could tick it to get the checksum value. Note: If you want to use this kind of barcode, you should input ‘99’ at the ‘Barcode Type’ column in ‘PLU manager’.
Communication menu
Reserved for COM scale. Reserved for COM scale.
1) Set
In this popup window, you can set communication parameter for non-TCP/IP scale. 2) Detect port
You can detect port in this operation: input IP address of the label scale, and then press the “Detect” button

47
Network menu
Update software. Check connection. Factory checking, reserved. Download PLU,label,function parameter etc.
Download PLU. Download PLU hotkey. Update PLU. Reserved. Upload account. Update PLU & upload account. Sale report. Operator report. Reserved. View daily log.
1) downloading program: Set up connection first. Network update program (select *.hex file) 2) downloading PLU: Set up connection first. Network downloading PLU. 3) downloading label: Set up connection first. Network downloading data, select label (D0) and label (D1), confirm finally. 4) downloading hotkey: Set up connection firstly. Network downloading hotkey. 5) downloading function parameter:
Set up connection firstly. Network downloading data, select function setting, confirm finally.

48
6) Updating PLU information: Follow the steps to update PLU information:
a) Save the new PLU information as *.txu file. b) Open link32
c) Click ‘network’, choose ‘update PLU’ item.
Choose this type
The name must be the same with old PLU file
1.Input the scale IP
2.input the scale name
3.choose the scale 4.choose old PLU file
5.choose new PLU file
49
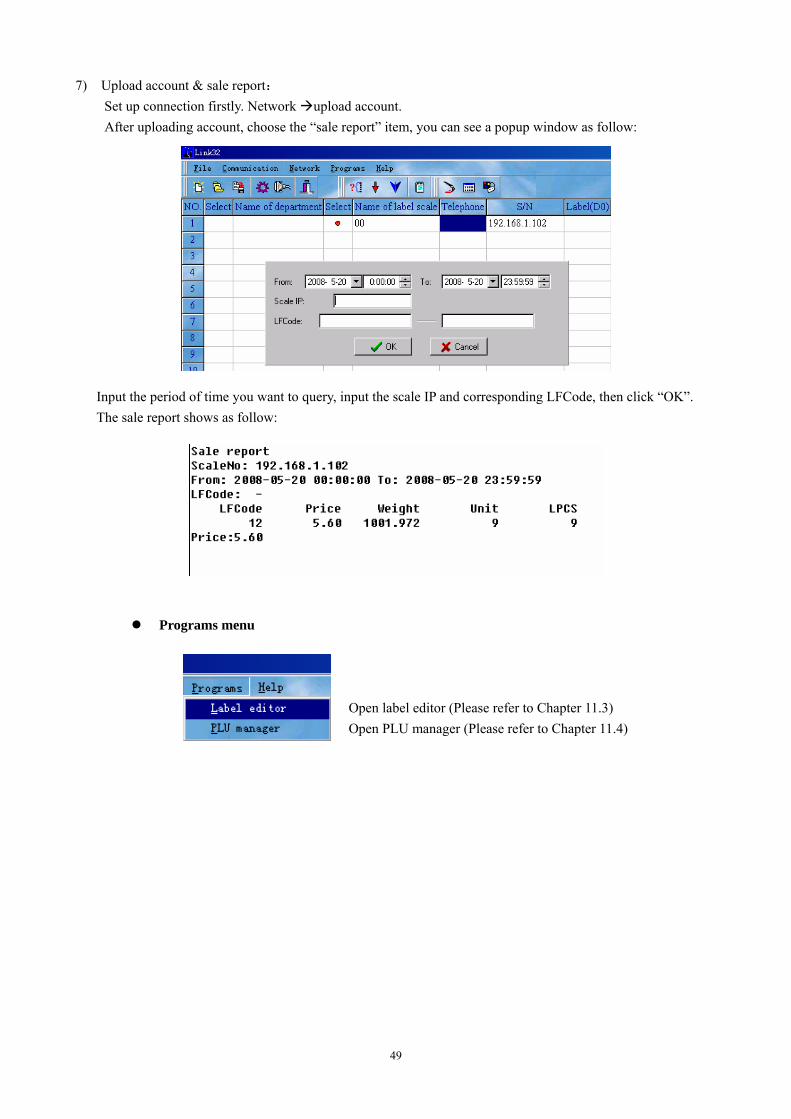
7) Upload account & sale report: Set up connection firstly. Network upload account. After uploading account, choose the “sale report” item, you can see a popup window as follow:
Input the period of time you want to query, input the scale IP and corresponding LFCode, then click “OK”. The sale report shows as follow:
Programs menu Open label editor (Please refer to Chapter 11.3) Open PLU manager (Please refer to Chapter 11.4)
50
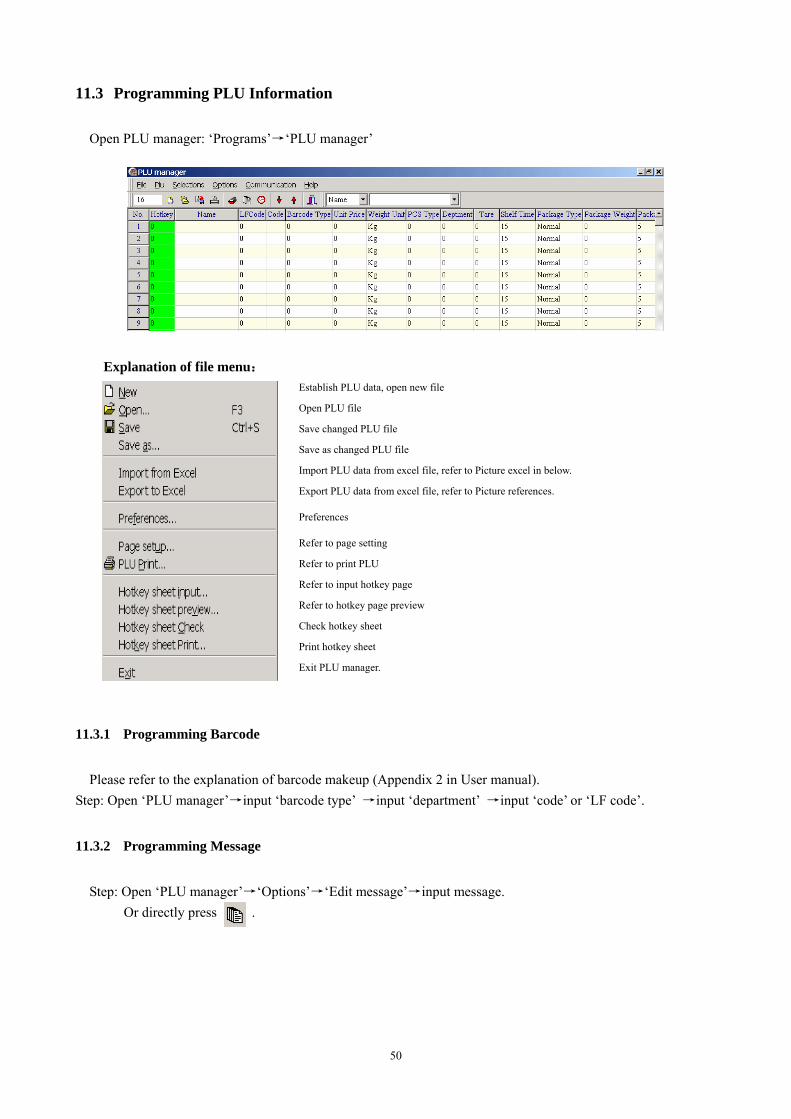
11.3 Programming PLU Information
Open PLU manager: ‘Programs’→‘PLU manager’
Explanation of file menu: Establish PLU data, open new file
Open PLU file
Save changed PLU file
Save as changed PLU file
Import PLU data from excel file, refer to Picture excel in below.
Export PLU data from excel file, refer to Picture references.
Preferences
Refer to page setting
Refer to print PLU
Refer to input hotkey page
Refer to hotkey page preview
Check hotkey sheet
Print hotkey sheet
Exit PLU manager.
11.3.1 Programming Barcode
Please refer to the explanation of barcode makeup (Appendix 2 in User manual). Step: Open ‘PLU manager’→input ‘barcode type’ →input ‘department’ →input ‘code’ or ‘LF code’.
11.3.2 Programming Message
Step: Open ‘PLU manager’→‘Options’→‘Edit message’→input message. Or directly press .
51
Note: 1. You should only input index code in the message edit field under PLU manager table. 2. Every PLU message is corresponding with the Index code entered. 3. You could edit 8 lines messages for each PLU.
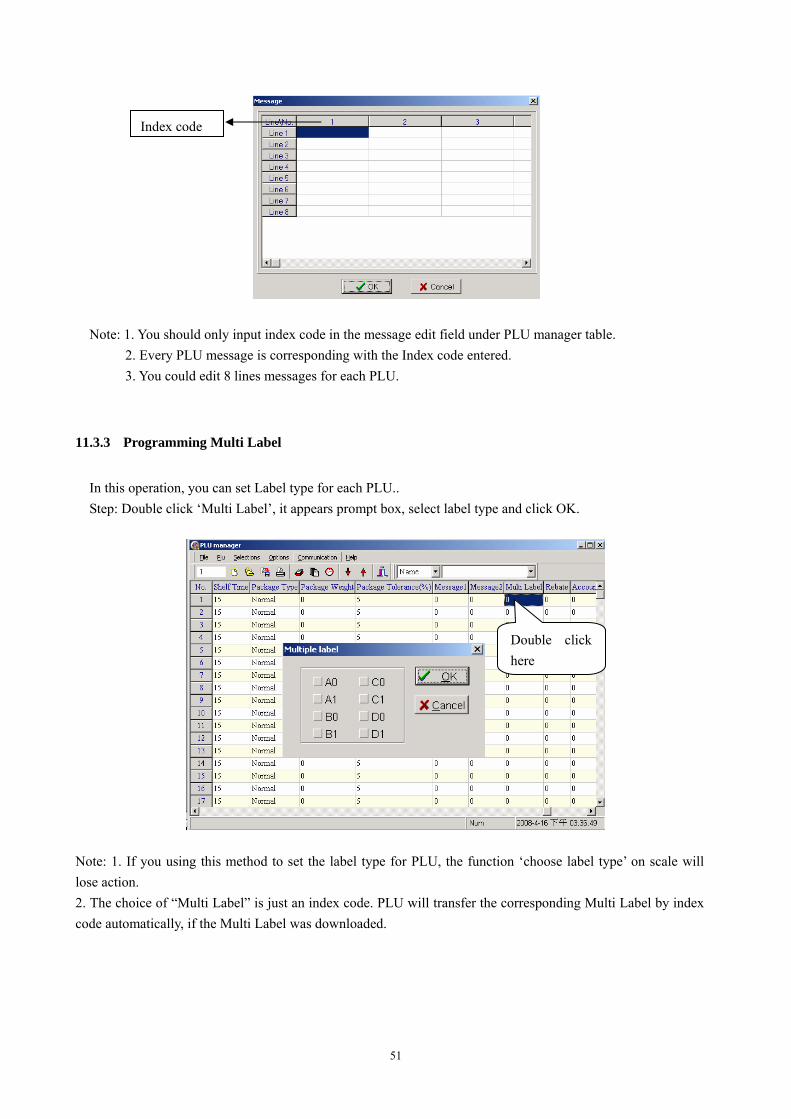
11.3.3 Programming Multi Label
In this operation, you can set Label type for each PLU.. Step: Double click ‘Multi Label’, it appears prompt box, select label type and click OK.
Note: 1. If you using this method to set the label type for PLU, the function ‘choose label type’ on scale will lose action. 2. The choice of “Multi Label” is just an index code. PLU will transfer the corresponding Multi Label by index code automatically, if the Multi Label was downloaded.
Index code
Double click here
52
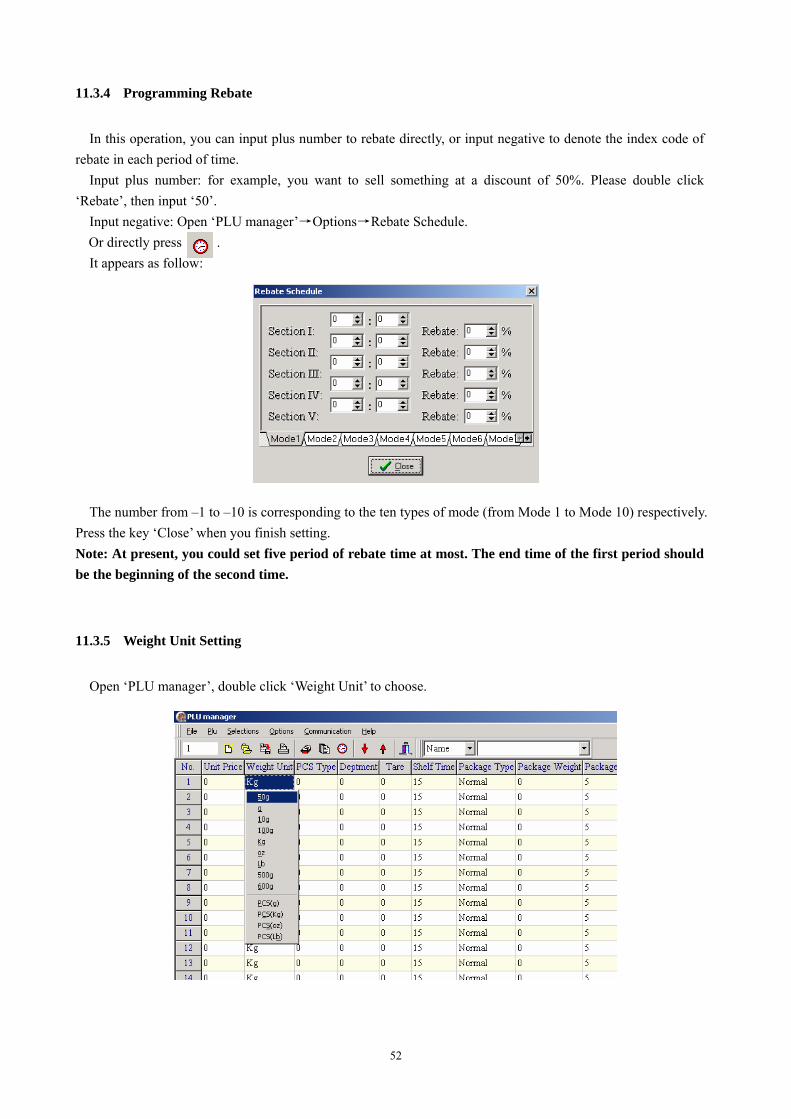
11.3.4 Programming Rebate
In this operation, you can input plus number to rebate directly, or input negative to denote the index code of rebate in each period of time.
Input plus number: for example, you want to sell something at a discount of 50%. Please double click ‘Rebate’, then input ‘50’.
Input negative: Open ‘PLU manager’→Options→Rebate Schedule. Or directly press . It appears as follow:
The number from –1 to –10 is corresponding to the ten types of mode (from Mode 1 to Mode 10) respectively. Press the key ‘Close’ when you finish setting. Note: At present, you could set five period of rebate time at most. The end time of the first period should be the beginning of the second time.
11.3.5 Weight Unit Setting
Open ‘PLU manager’, double click ‘Weight Unit’ to choose.
53
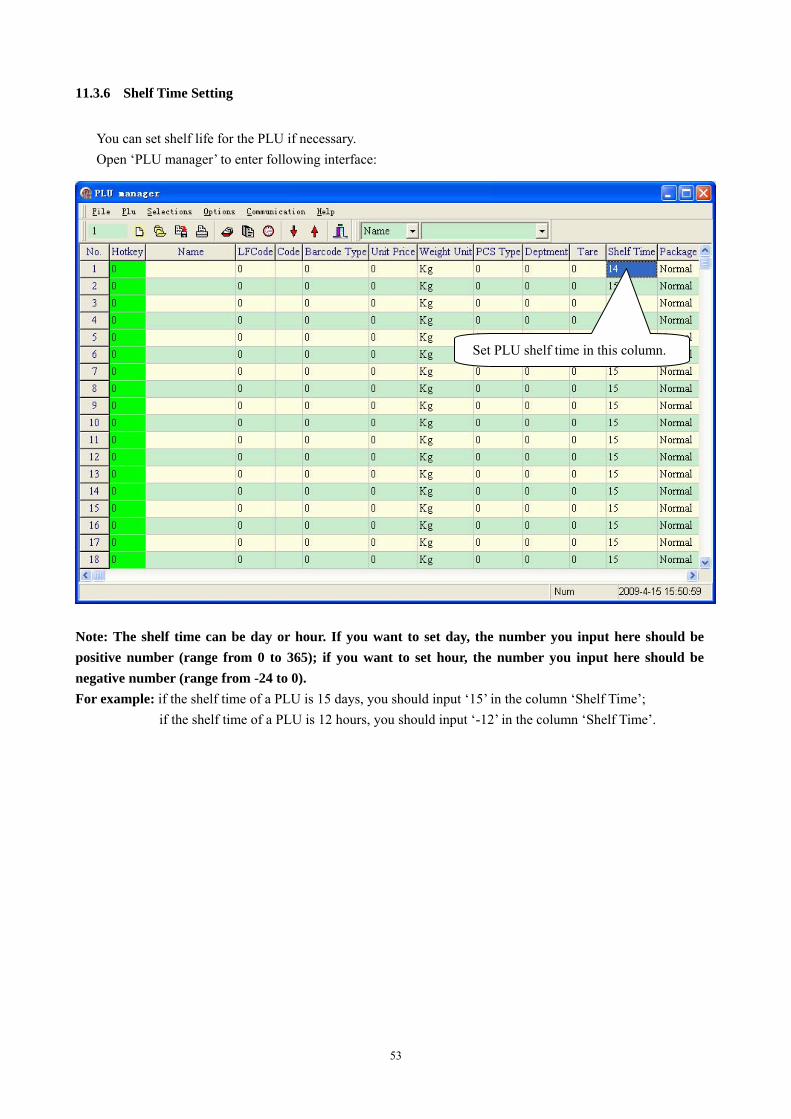
11.3.6 Shelf Time Setting
You can set shelf life for the PLU if necessary. Open ‘PLU manager’ to enter following interface:
Note: The shelf time can be day or hour. If you want to set day, the number you input here should be positive number (range from 0 to 365); if you want to set hour, the number you input here should be negative number (range from -24 to 0). For example: if the shelf time of a PLU is 15 days, you should input ‘15’ in the column ‘Shelf Time’; if the shelf time of a PLU is 12 hours, you should input ‘-12’ in the column ‘Shelf Time’.
Set PLU shelf time in this column.
54
11.3.7 Import from Excel and Export to Excel
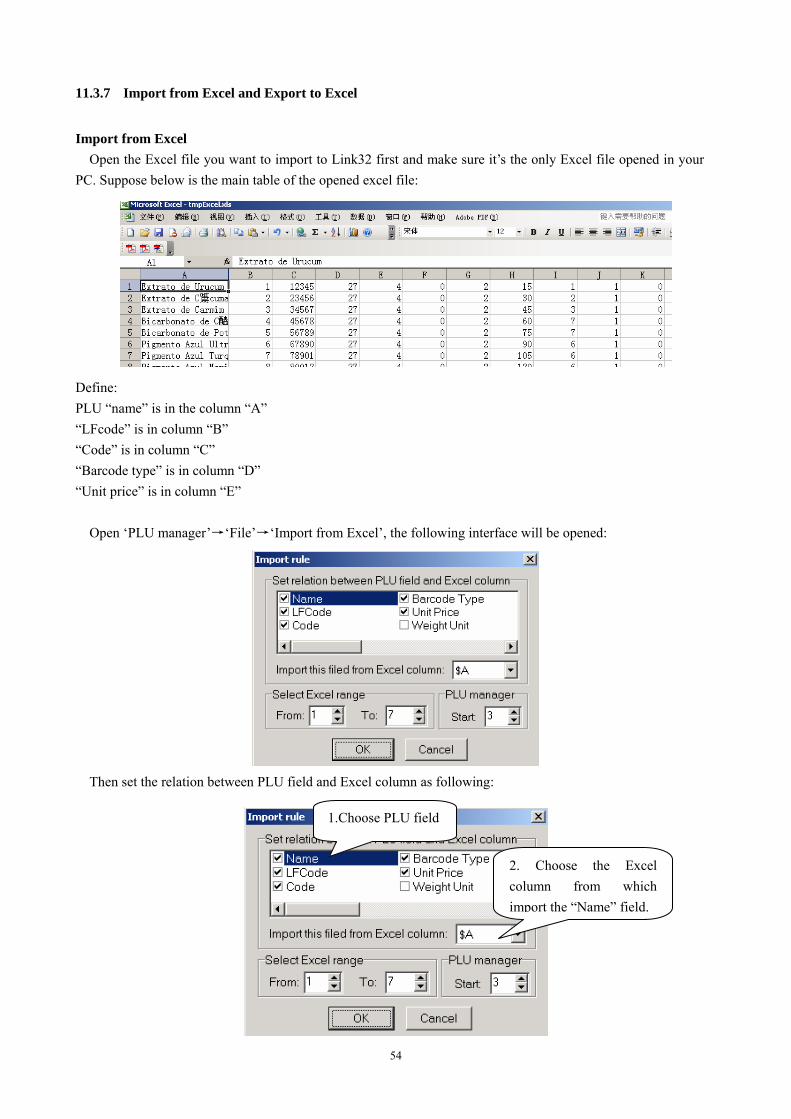
Import from Excel Open the Excel file you want to import to Link32 first and make sure it’s the only Excel file opened in your
PC. Suppose below is the main table of the opened excel file: Define: PLU “name” is in the column “A” “LFcode” is in column “B” “Code” is in column “C” “Barcode type” is in column “D” “Unit price” is in column “E”
Open ‘PLU manager’→‘File’→‘Import from Excel’, the following interface will be opened: Then set the relation between PLU field and Excel column as following:
1.Choose PLU field
2. Choose the Excel column from which import the “Name” field.
55
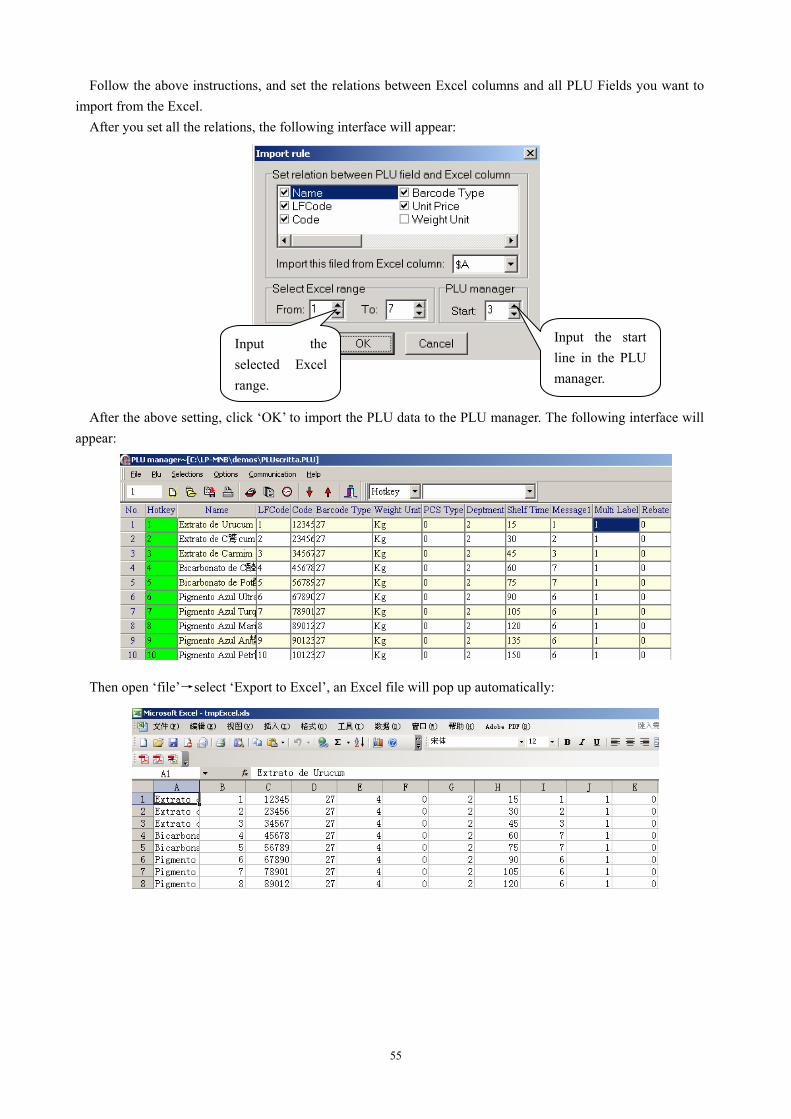
Follow the above instructions, and set the relations between Excel columns and all PLU Fields you want to import from the Excel.
After you set all the relations, the following interface will appear: After the above setting, click ‘OK’ to import the PLU data to the PLU manager. The following interface will
appear: Then open ‘file’→select ‘Export to Excel’, an Excel file will pop up automatically:
Input the selected Excel range.
Input the start line in the PLU manager.
56
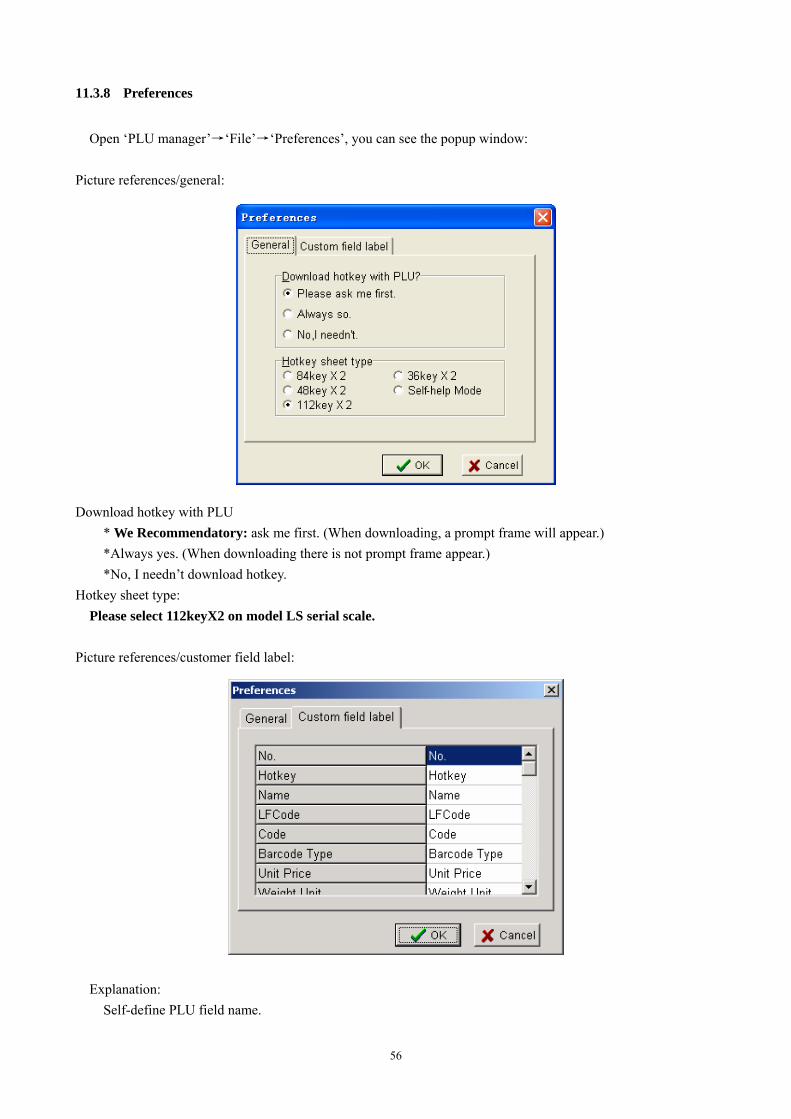
11.3.8 Preferences
Open ‘PLU manager’→‘File’→‘Preferences’, you can see the popup window: Picture references/general: Download hotkey with PLU * We Recommendatory: ask me first. (When downloading, a prompt frame will appear.) *Always yes. (When downloading there is not prompt frame appear.) *No, I needn’t download hotkey. Hotkey sheet type:
Please select 112keyX2 on model LS serial scale.
Picture references/customer field label:
Explanation: Self-define PLU field name.
57
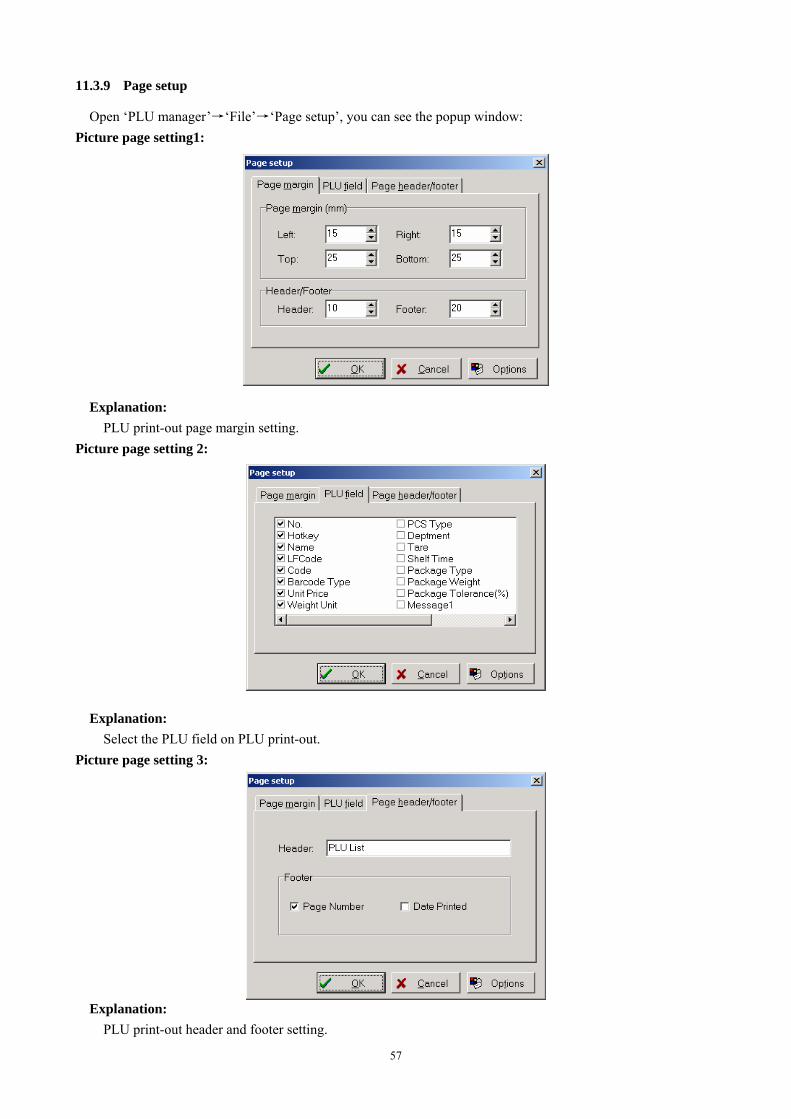
11.3.9 Page setup
Open ‘PLU manager’→‘File’→‘Page setup’, you can see the popup window: Picture page setting1:
Explanation: PLU print-out page margin setting. Picture page setting 2:
Explanation: Select the PLU field on PLU print-out. Picture page setting 3:
Explanation: PLU print-out header and footer setting.
58
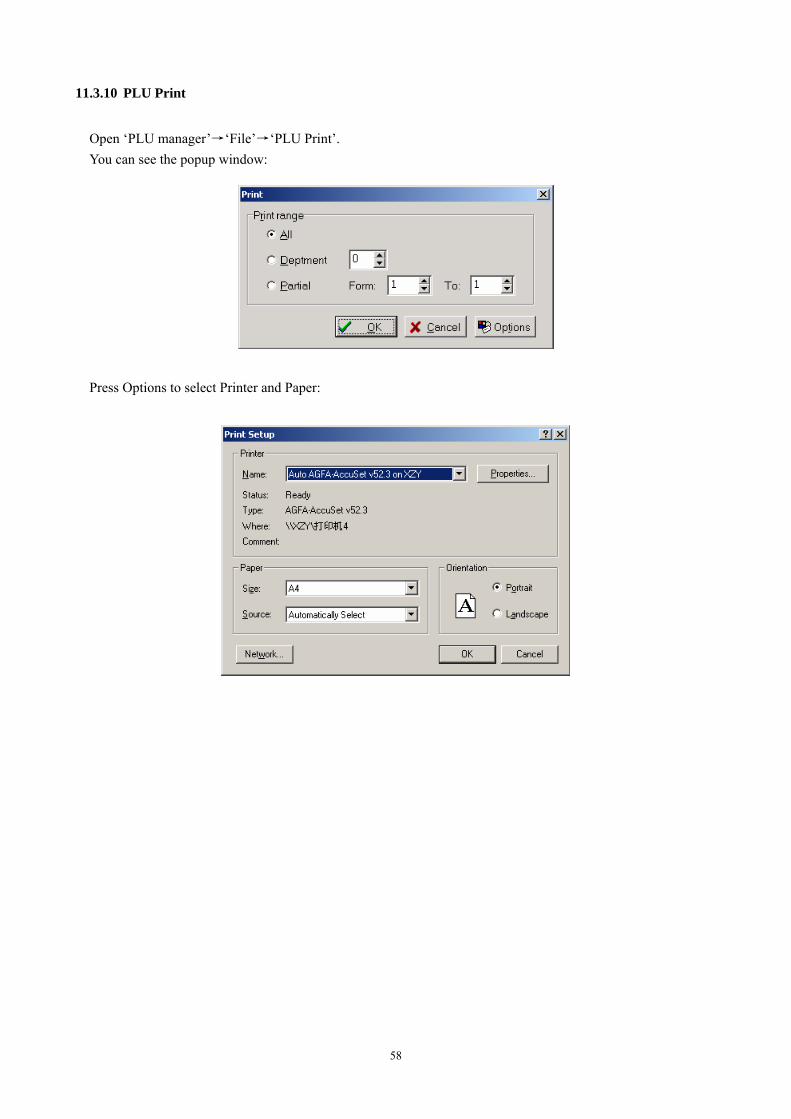
11.3.10 PLU Print
Open ‘PLU manager’→‘File’→‘PLU Print’. You can see the popup window:
Press Options to select Printer and Paper:
59
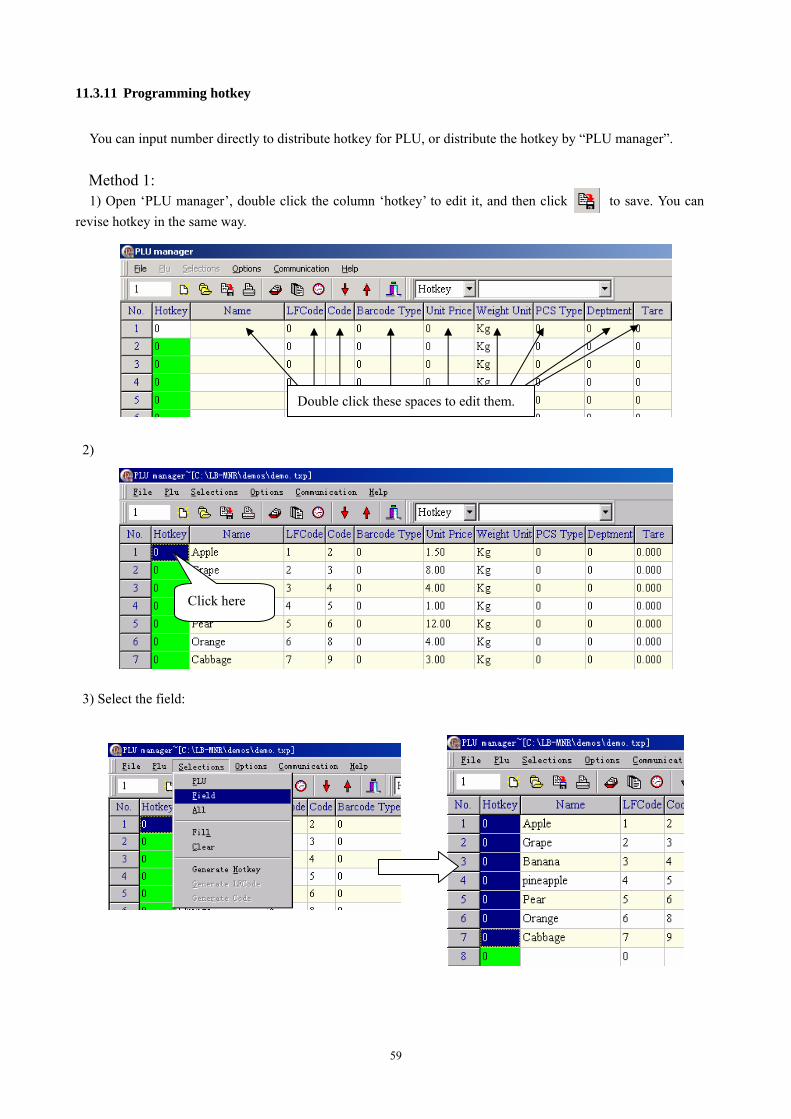
11.3.11 Programming hotkey
You can input number directly to distribute hotkey for PLU, or distribute the hotkey by “PLU manager”. Method 1: 1) Open ‘PLU manager’, double click the column ‘hotkey’ to edit it, and then click to save. You can
revise hotkey in the same way.
2) 3) Select the field:
Double click these spaces to edit them.
Click here
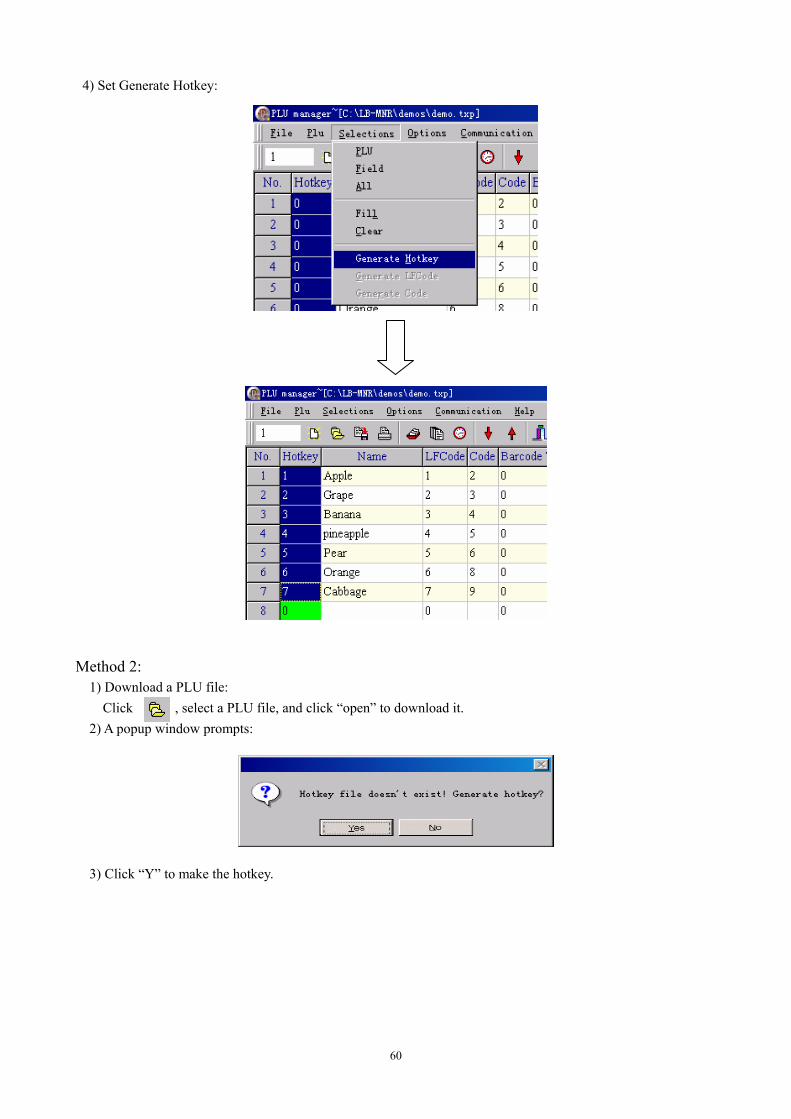
60
4) Set Generate Hotkey: Method 2:
1) Download a PLU file: Click , select a PLU file, and click “open” to download it. 2) A popup window prompts:
3) Click “Y” to make the hotkey.

61
Click ‘File/Preferences’ to enter the following setting interface: Click ‘File/Hotkey sheet input’ to set the hotkey table in the following interface: first page: Font --- set the characters’ font on hotkey table.
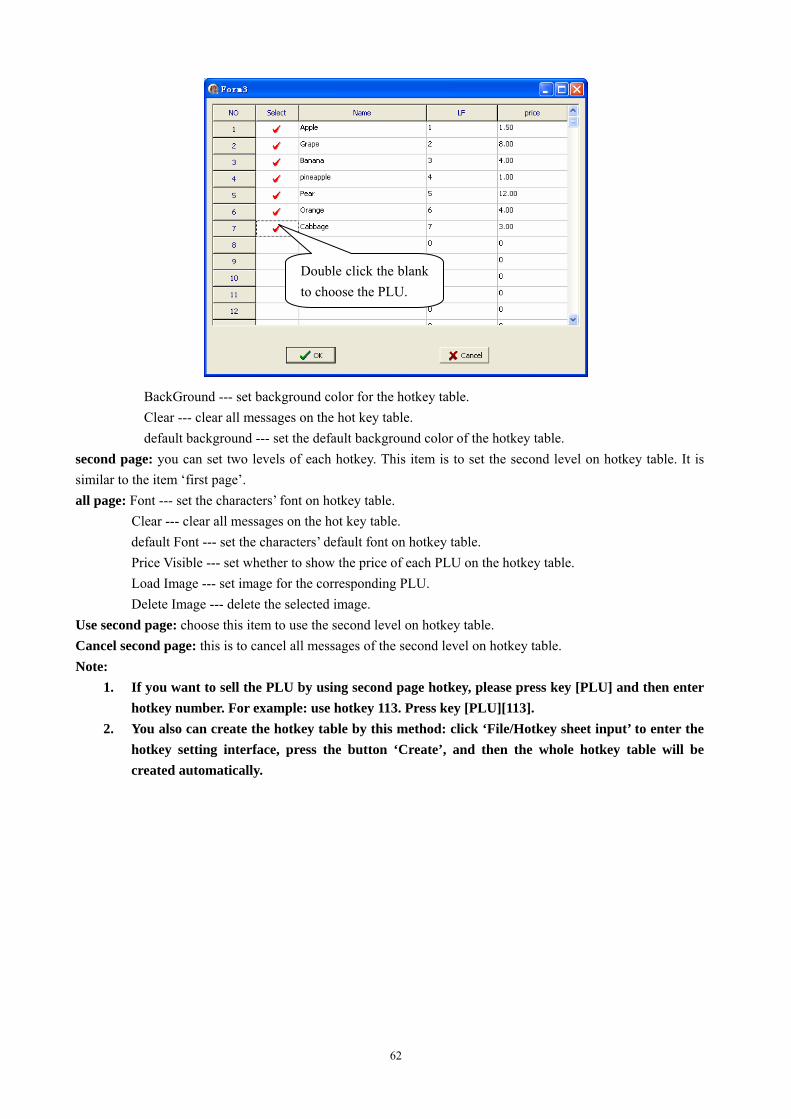
Load Plu --- click this item, you can choose the PLU in the pop-up window:
Select the correct hotkey sheet type.
62
BackGround --- set background color for the hotkey table. Clear --- clear all messages on the hot key table. default background --- set the default background color of the hotkey table.
second page: you can set two levels of each hotkey. This item is to set the second level on hotkey table. It is similar to the item ‘first page’. all page: Font --- set the characters’ font on hotkey table. Clear --- clear all messages on the hot key table. default Font --- set the characters’ default font on hotkey table. Price Visible --- set whether to show the price of each PLU on the hotkey table. Load Image --- set image for the corresponding PLU. Delete Image --- delete the selected image. Use second page: choose this item to use the second level on hotkey table. Cancel second page: this is to cancel all messages of the second level on hotkey table. Note:
1. If you want to sell the PLU by using second page hotkey, please press key [PLU] and then enter hotkey number. For example: use hotkey 113. Press key [PLU][113].
2. You also can create the hotkey table by this method: click ‘File/Hotkey sheet input’ to enter the hotkey setting interface, press the button ‘Create’, and then the whole hotkey table will be created automatically.
Double click the blank to choose the PLU.
63
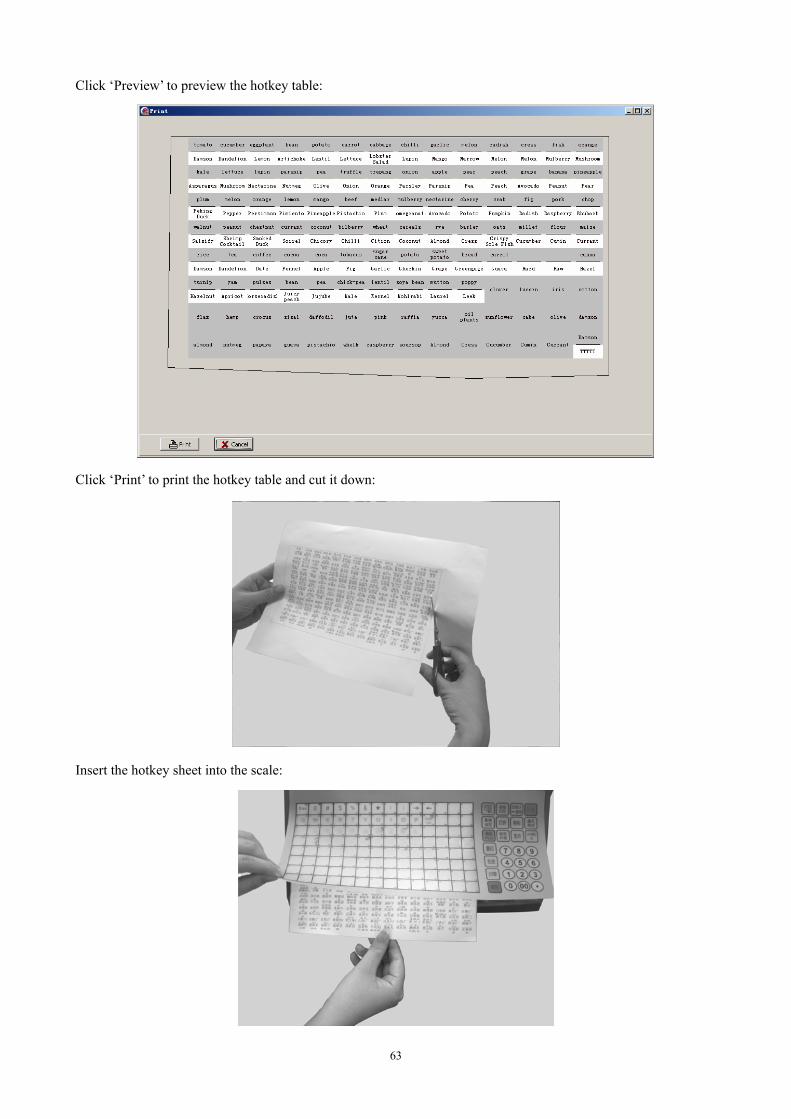
Click ‘Preview’ to preview the hotkey table: Click ‘Print’ to print the hotkey table and cut it down: Insert the hotkey sheet into the scale:
64
11.4 Programming label
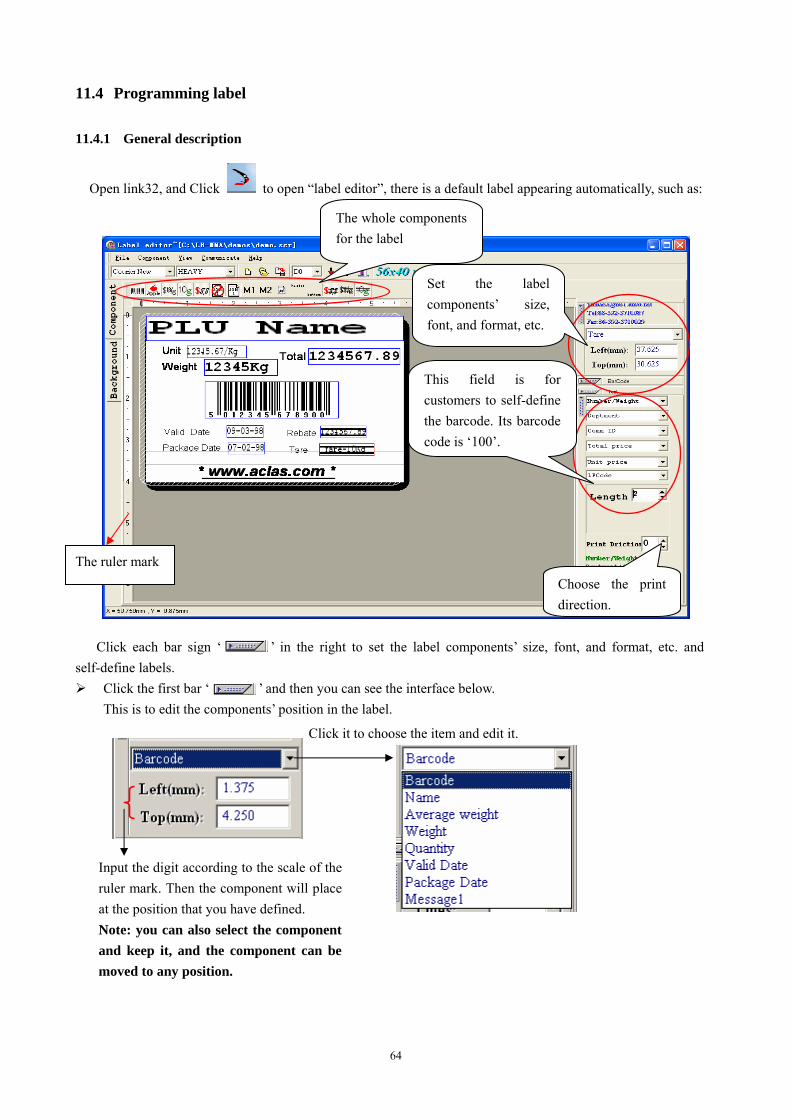
11.4.1 General description
Open link32, and Click to open “label editor”, there is a default label appearing automatically, such as:
Click each bar sign ‘ ’ in the right to set the label components’ size, font, and format, etc. and self-define labels.
Click the first bar ‘ ’ and then you can see the interface below. This is to edit the components’ position in the label.
The whole components for the label
Set the label components’ size, font, and format, etc.
This field is for customers to self-define the barcode. Its barcode code is ‘100’.
Choose the print direction.
The ruler mark
Click it to choose the item and edit it.
Input the digit according to the scale of the ruler mark. Then the component will place at the position that you have defined. Note: you can also select the component and keep it, and the component can be moved to any position.
65
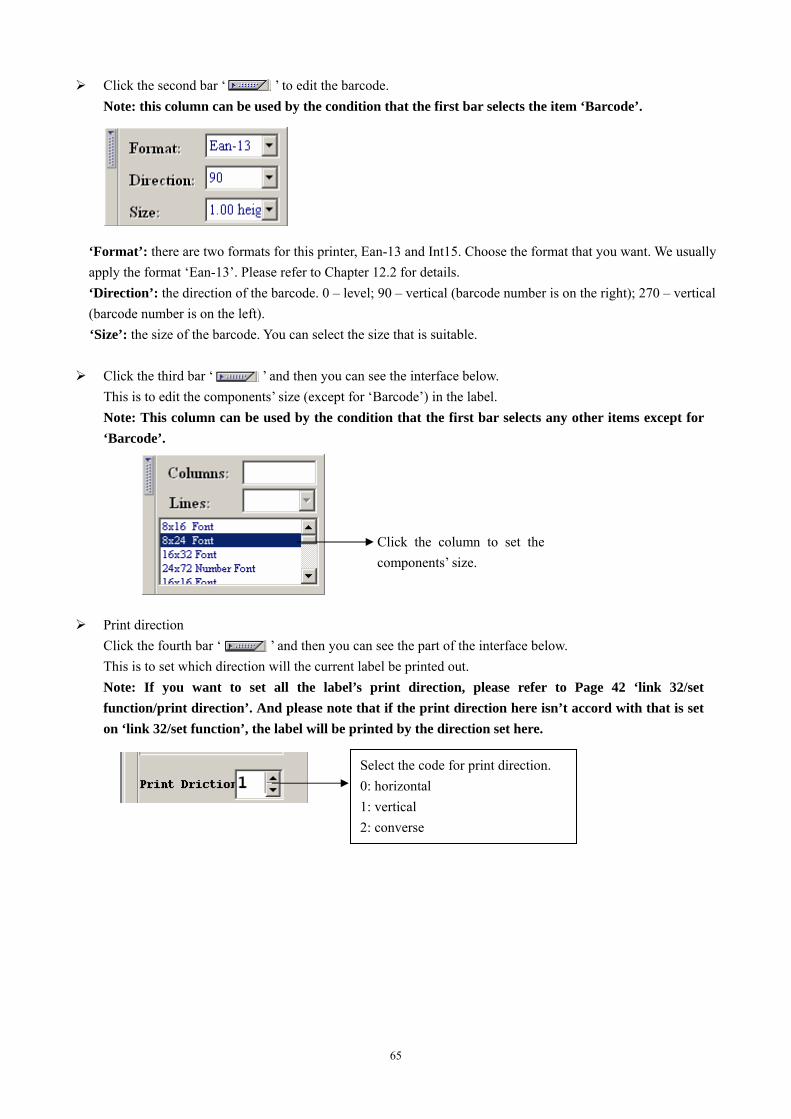
Click the second bar ‘ ’ to edit the barcode. Note: this column can be used by the condition that the first bar selects the item ‘Barcode’.
‘Format’: there are two formats for this printer, Ean-13 and Int15. Choose the format that you want. We usually apply the format ‘Ean-13’. Please refer to Chapter 12.2 for details. ‘Direction’: the direction of the barcode. 0 – level; 90 – vertical (barcode number is on the right); 270 – vertical (barcode number is on the left). ‘Size’: the size of the barcode. You can select the size that is suitable.
Click the third bar ‘ ’ and then you can see the interface below.
This is to edit the components’ size (except for ‘Barcode’) in the label. Note: This column can be used by the condition that the first bar selects any other items except for
‘Barcode’.
Print direction Click the fourth bar ‘ ’ and then you can see the part of the interface below. This is to set which direction will the current label be printed out. Note: If you want to set all the label’s print direction, please refer to Page 42 ‘link 32/set function/print direction’. And please note that if the print direction here isn’t accord with that is set on ‘link 32/set function’, the label will be printed by the direction set here.
Click the column to set the components’ size.
Select the code for print direction. 0: horizontal 1: vertical 2: converse
66
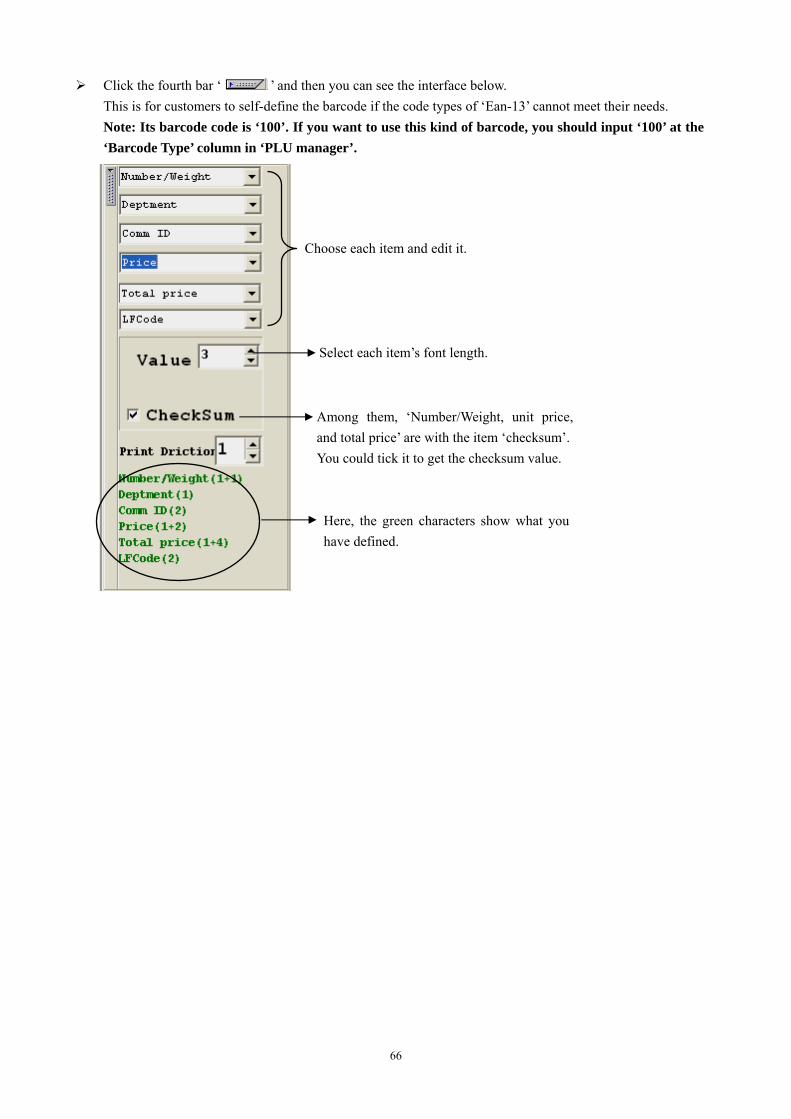
Click the fourth bar ‘ ’ and then you can see the interface below. This is for customers to self-define the barcode if the code types of ‘Ean-13’ cannot meet their needs. Note: Its barcode code is ‘100’. If you want to use this kind of barcode, you should input ‘100’ at the ‘Barcode Type’ column in ‘PLU manager’.
Choose each item and edit it.
Select each item’s font length.
Here, the green characters show what you have defined.
Among them, ‘Number/Weight, unit price, and total price’ are with the item ‘checksum’. You could tick it to get the checksum value.

67
11.4.2 Create a new label
Input width (no more than 56)
Input height (no more than 109)
68
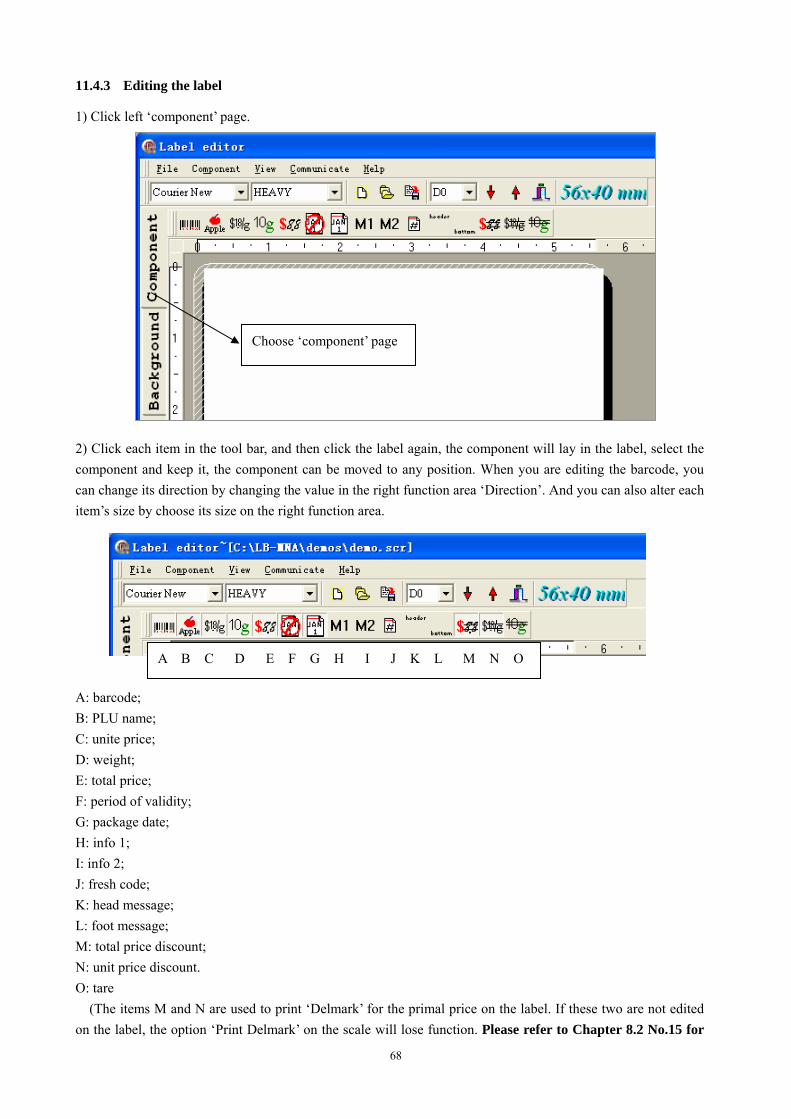
11.4.3 Editing the label
1) Click left ‘component’ page. 2) Click each item in the tool bar, and then click the label again, the component will lay in the label, select the component and keep it, the component can be moved to any position. When you are editing the barcode, you can change its direction by changing the value in the right function area ‘Direction’. And you can also alter each item’s size by choose its size on the right function area.
A: barcode; B: PLU name; C: unite price; D: weight; E: total price; F: period of validity; G: package date; H: info 1; I: info 2; J: fresh code; K: head message; L: foot message; M: total price discount; N: unit price discount. O: tare
(The items M and N are used to print ‘Delmark’ for the primal price on the label. If these two are not edited on the label, the option ‘Print Delmark’ on the scale will lose function. Please refer to Chapter 8.2 No.15 for
A B C D E F G H I J K L M N O
Choose ‘component’ page
69
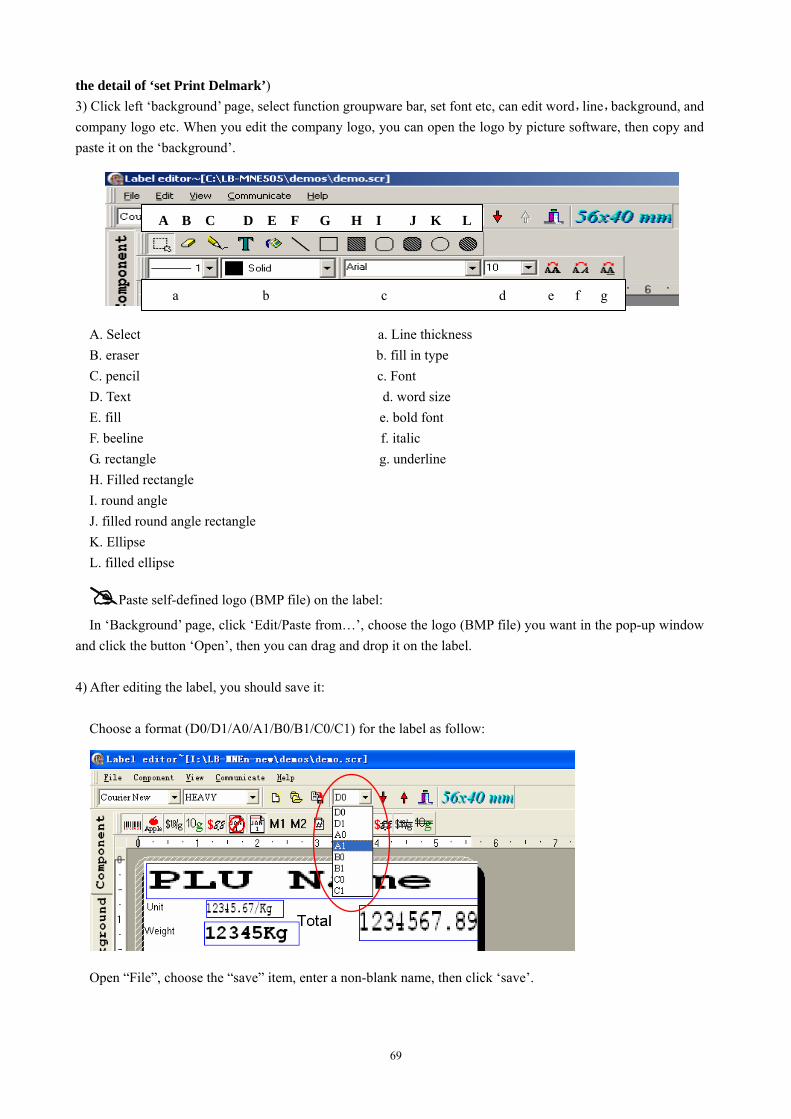
the detail of ‘set Print Delmark’) 3) Click left ‘background’ page, select function groupware bar, set font etc, can edit word,line,background, and company logo etc. When you edit the company logo, you can open the logo by picture software, then copy and paste it on the ‘background’.
A. Select a. Line thickness B. eraser b. fill in type C. pencil c. Font D. Text d. word size E. fill e. bold font F. beeline f. italic G. rectangle g. underline H. Filled rectangle I. round angle J. filled round angle rectangle K. Ellipse L. filled ellipse
Paste self-defined logo (BMP file) on the label:
In ‘Background’ page, click ‘Edit/Paste from…’, choose the logo (BMP file) you want in the pop-up window and click the button ‘Open’, then you can drag and drop it on the label. 4) After editing the label, you should save it:
Choose a format (D0/D1/A0/A1/B0/B1/C0/C1) for the label as follow: Open “File”, choose the “save” item, enter a non-blank name, then click ‘save’.
A B C D E F G H I J K L
a b c d e f g
70
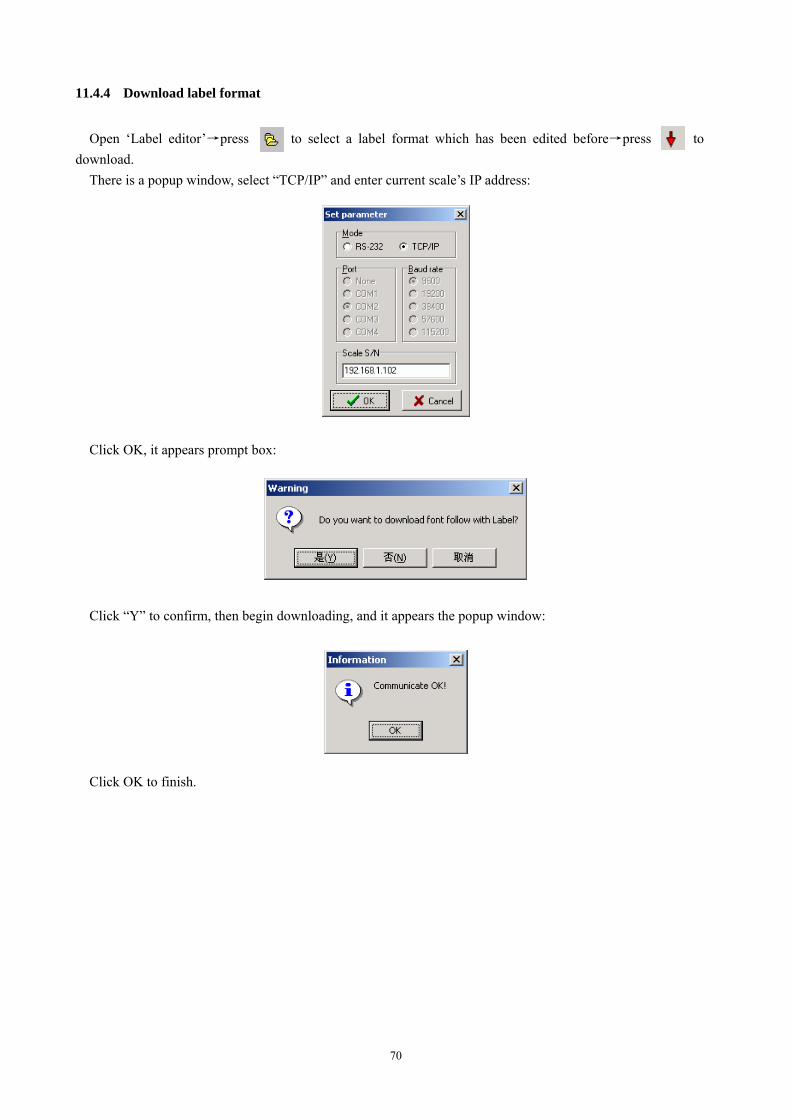
11.4.4 Download label format
Open ‘Label editor’→press to select a label format which has been edited before→press to download.
There is a popup window, select “TCP/IP” and enter current scale’s IP address:
Click OK, it appears prompt box: Click “Y” to confirm, then begin downloading, and it appears the popup window: Click OK to finish.
71
12 APPENDIX
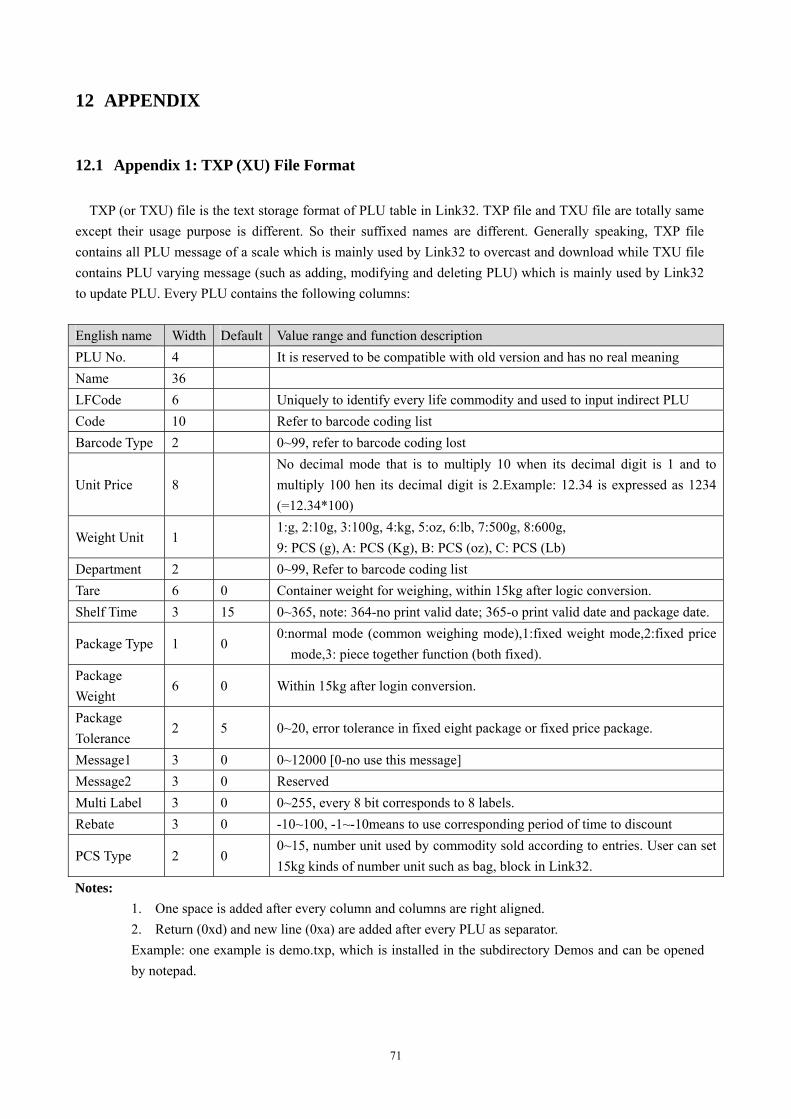
12.1 Appendix 1: TXP (XU) File Format
TXP (or TXU) file is the text storage format of PLU table in Link32. TXP file and TXU file are totally same except their usage purpose is different. So their suffixed names are different. Generally speaking, TXP file contains all PLU message of a scale which is mainly used by Link32 to overcast and download while TXU file contains PLU varying message (such as adding, modifying and deleting PLU) which is mainly used by Link32 to update PLU. Every PLU contains the following columns:
English name Width Default Value range and function description PLU No. 4 It is reserved to be compatible with old version and has no real meaning Name 36 LFCode 6 Uniquely to identify every life commodity and used to input indirect PLU Code 10 Refer to barcode coding list Barcode Type 2 0~99, refer to barcode coding lost
Unit Price 8 No decimal mode that is to multiply 10 when its decimal digit is 1 and to multiply 100 hen its decimal digit is 2.Example: 12.34 is expressed as 1234 (=12.34*100)
Weight Unit 1 1:g, 2:10g, 3:100g, 4:kg, 5:oz, 6:lb, 7:500g, 8:600g, 9: PCS (g), A: PCS (Kg), B: PCS (oz), C: PCS (Lb)
Department 2 0~99, Refer to barcode coding list Tare 6 0 Container weight for weighing, within 15kg after logic conversion. Shelf Time 3 15 0~365, note: 364-no print valid date; 365-o print valid date and package date.
Package Type 1 0 0:normal mode (common weighing mode),1:fixed weight mode,2:fixed price
mode,3: piece together function (both fixed). Package Weight
6 0 Within 15kg after login conversion.
Package Tolerance
2 5 0~20, error tolerance in fixed eight package or fixed price package.
Message1 3 0 0~12000 [0-no use this message] Message2 3 0 Reserved Multi Label 3 0 0~255, every 8 bit corresponds to 8 labels. Rebate 3 0 -10~100, -1~-10means to use corresponding period of time to discount
PCS Type 2 0 0~15, number unit used by commodity sold according to entries. User can set 15kg kinds of number unit such as bag, block in Link32.
Notes: 1. One space is added after every column and columns are right aligned. 2. Return (0xd) and new line (0xa) are added after every PLU as separator. Example: one example is demo.txp, which is installed in the subdirectory Demos and can be opened by notepad.
72
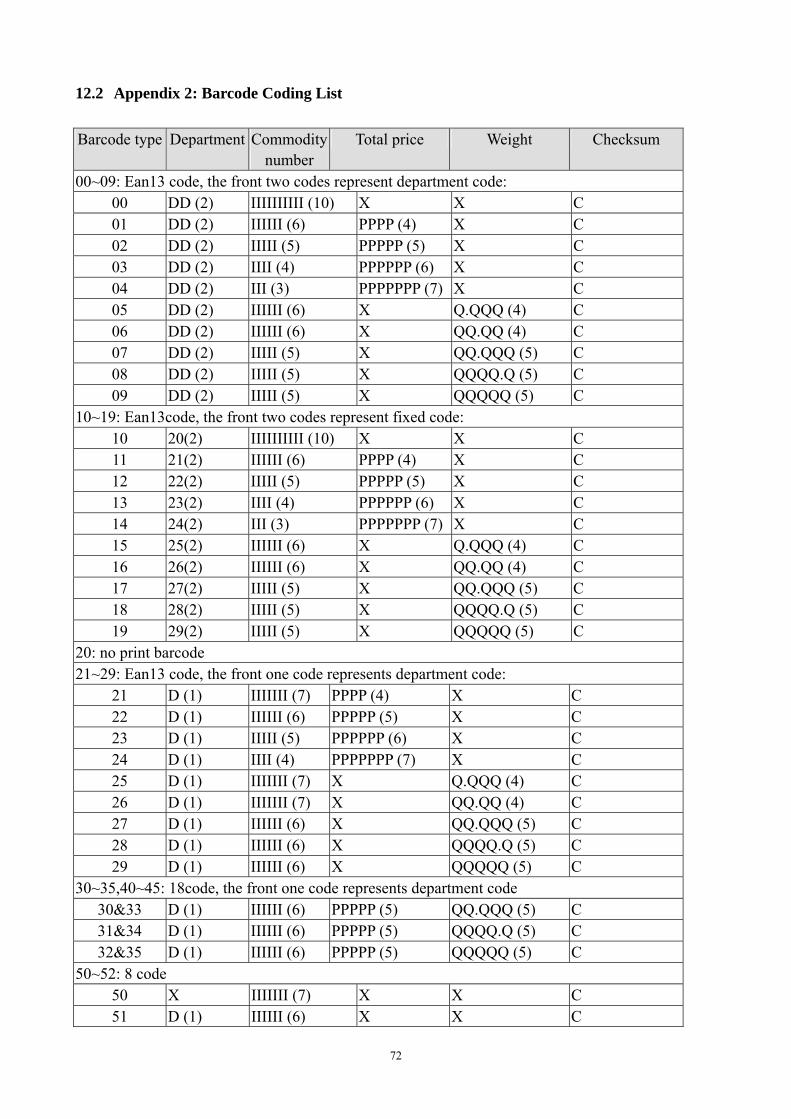
12.2 Appendix 2: Barcode Coding List
Barcode type Department Commodity number
Total price Weight Checksum
00~09: Ean13 code, the front two codes represent department code: 00 DD (2) IIIIIIIIII (10) X X C 01 DD (2) IIIIII (6) PPPP (4) X C 02 DD (2) IIIII (5) PPPPP (5) X C 03 DD (2) IIII (4) PPPPPP (6) X C 04 DD (2) III (3) PPPPPPP (7) X C 05 DD (2) IIIIII (6) X Q.QQQ (4) C 06 DD (2) IIIIII (6) X QQ.QQ (4) C 07 DD (2) IIIII (5) X QQ.QQQ (5) C 08 DD (2) IIIII (5) X QQQQ.Q (5) C 09 DD (2) IIIII (5) X QQQQQ (5) C
10~19: Ean13code, the front two codes represent fixed code: 10 20(2) IIIIIIIIII (10) X X C 11 21(2) IIIIII (6) PPPP (4) X C 12 22(2) IIIII (5) PPPPP (5) X C 13 23(2) IIII (4) PPPPPP (6) X C 14 24(2) III (3) PPPPPPP (7) X C 15 25(2) IIIIII (6) X Q.QQQ (4) C 16 26(2) IIIIII (6) X QQ.QQ (4) C 17 27(2) IIIII (5) X QQ.QQQ (5) C 18 28(2) IIIII (5) X QQQQ.Q (5) C 19 29(2) IIIII (5) X QQQQQ (5) C
20: no print barcode 21~29: Ean13 code, the front one code represents department code:
21 D (1) IIIIIII (7) PPPP (4) X C 22 D (1) IIIIII (6) PPPPP (5) X C 23 D (1) IIIII (5) PPPPPP (6) X C 24 D (1) IIII (4) PPPPPPP (7) X C 25 D (1) IIIIIII (7) X Q.QQQ (4) C 26 D (1) IIIIIII (7) X QQ.QQ (4) C 27 D (1) IIIIII (6) X QQ.QQQ (5) C 28 D (1) IIIIII (6) X QQQQ.Q (5) C 29 D (1) IIIIII (6) X QQQQQ (5) C
30~35,40~45: 18code, the front one code represents department code 30&33 D (1) IIIIII (6) PPPPP (5) QQ.QQQ (5) C 31&34 D (1) IIIIII (6) PPPPP (5) QQQQ.Q (5) C 32&35 D (1) IIIIII (6) PPPPP (5) QQQQQ (5) C
50~52: 8 code 50 X IIIIIII (7) X X C 51 D (1) IIIIII (6) X X C
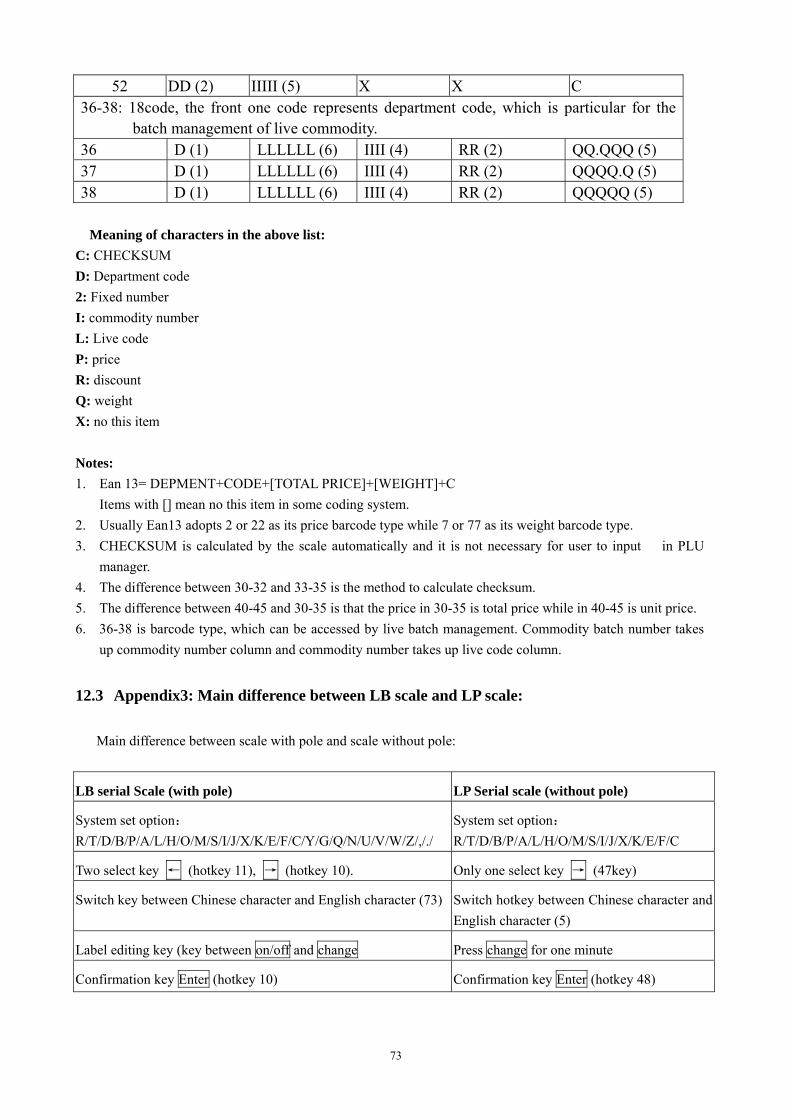
73
52 DD (2) IIIII (5) X X C 36-38: 18code, the front one code represents department code, which is particular for the
batch management of live commodity. 36 D (1) LLLLLL (6) IIII (4) RR (2) QQ.QQQ (5) 37 D (1) LLLLLL (6) IIII (4) RR (2) QQQQ.Q (5) 38 D (1) LLLLLL (6) IIII (4) RR (2) QQQQQ (5)
Meaning of characters in the above list: C: CHECKSUM D: Department code 2: Fixed number I: commodity number L: Live code P: price R: discount Q: weight X: no this item Notes: 1. Ean 13= DEPMENT+CODE+[TOTAL PRICE]+[WEIGHT]+C
Items with [] mean no this item in some coding system. 2. Usually Ean13 adopts 2 or 22 as its price barcode type while 7 or 77 as its weight barcode type. 3. CHECKSUM is calculated by the scale automatically and it is not necessary for user to input in PLU
manager. 4. The difference between 30-32 and 33-35 is the method to calculate checksum. 5. The difference between 40-45 and 30-35 is that the price in 30-35 is total price while in 40-45 is unit price. 6. 36-38 is barcode type, which can be accessed by live batch management. Commodity batch number takes
up commodity number column and commodity number takes up live code column.
12.3 Appendix3: Main difference between LB scale and LP scale:
Main difference between scale with pole and scale without pole:
LB serial Scale (with pole) LP Serial scale (without pole)
System set option:R/T/D/B/P/A/L/H/O/M/S/I/J/X/K/E/F/C/Y/G/Q/N/U/V/W/Z/,/./
System set option:R/T/D/B/P/A/L/H/O/M/S/I/J/X/K/E/F/C
Two select key ← (hotkey 11), → (hotkey 10). Only one select key → (47key)
Switch key between Chinese character and English character (73) Switch hotkey between Chinese character and English character (5)
Label editing key (key between on/off and change Press change for one minute
Confirmation key Enter (hotkey 10) Confirmation key Enter (hotkey 48)
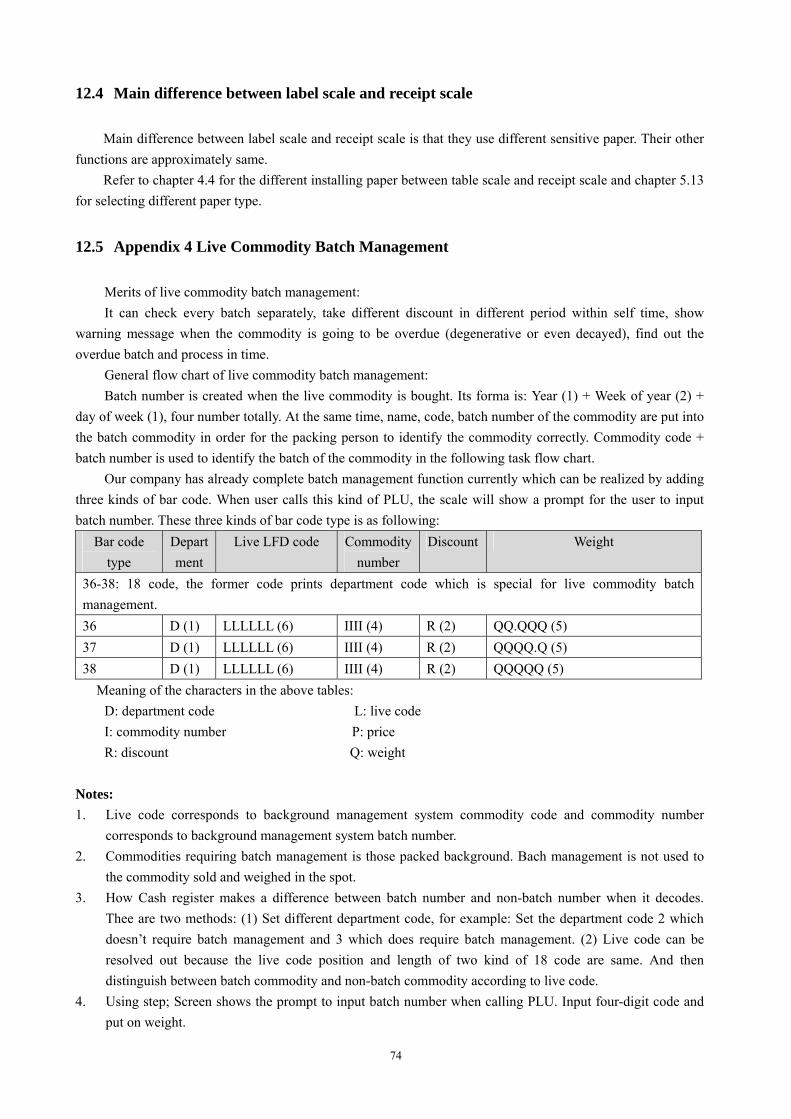
74
12.4 Main difference between label scale and receipt scale
Main difference between label scale and receipt scale is that they use different sensitive paper. Their other functions are approximately same.
Refer to chapter 4.4 for the different installing paper between table scale and receipt scale and chapter 5.13 for selecting different paper type.
12.5 Appendix 4 Live Commodity Batch Management
Merits of live commodity batch management: It can check every batch separately, take different discount in different period within self time, show
warning message when the commodity is going to be overdue (degenerative or even decayed), find out the overdue batch and process in time.
General flow chart of live commodity batch management: Batch number is created when the live commodity is bought. Its forma is: Year (1) + Week of year (2) +
day of week (1), four number totally. At the same time, name, code, batch number of the commodity are put into the batch commodity in order for the packing person to identify the commodity correctly. Commodity code + batch number is used to identify the batch of the commodity in the following task flow chart.
Our company has already complete batch management function currently which can be realized by adding three kinds of bar code. When user calls this kind of PLU, the scale will show a prompt for the user to input batch number. These three kinds of bar code type is as following:
Bar code type
Department
Live LFD code Commodity number
Discount Weight
36-38: 18 code, the former code prints department code which is special for live commodity batch management. 36 D (1) LLLLLL (6) IIII (4) R (2) QQ.QQQ (5) 37 D (1) LLLLLL (6) IIII (4) R (2) QQQQ.Q (5) 38 D (1) LLLLLL (6) IIII (4) R (2) QQQQQ (5)
Meaning of the characters in the above tables: D: department code L: live code I: commodity number P: price R: discount Q: weight
Notes: 1. Live code corresponds to background management system commodity code and commodity number
corresponds to background management system batch number. 2. Commodities requiring batch management is those packed background. Bach management is not used to
the commodity sold and weighed in the spot. 3. How Cash register makes a difference between batch number and non-batch number when it decodes.
Thee are two methods: (1) Set different department code, for example: Set the department code 2 which doesn’t require batch management and 3 which does require batch management. (2) Live code can be resolved out because the live code position and length of two kind of 18 code are same. And then distinguish between batch commodity and non-batch commodity according to live code.
4. Using step; Screen shows the prompt to input batch number when calling PLU. Input four-digit code and put on weight.

75

DPSB01001EV-044R-06