Lower Elementary Lessons for Classroom &...
72
Lower Elementary Lessons for Classroom & Garden Written by Ayana Crawford and Lauren Vejvoda Edited by Alice Bumgarner This series made possible through a grant from Blue Cross and Blue Shield North Carolina Foundation
Transcript of Lower Elementary Lessons for Classroom &...
Lower Elementary Lessons for Classroom & Garden
Written by Ayana Crawford and Lauren Vejvoda
Edited by Alice Bumgarner
This series made possible through a grant from Blue Cross and Blue Shield North Carolina Foundation

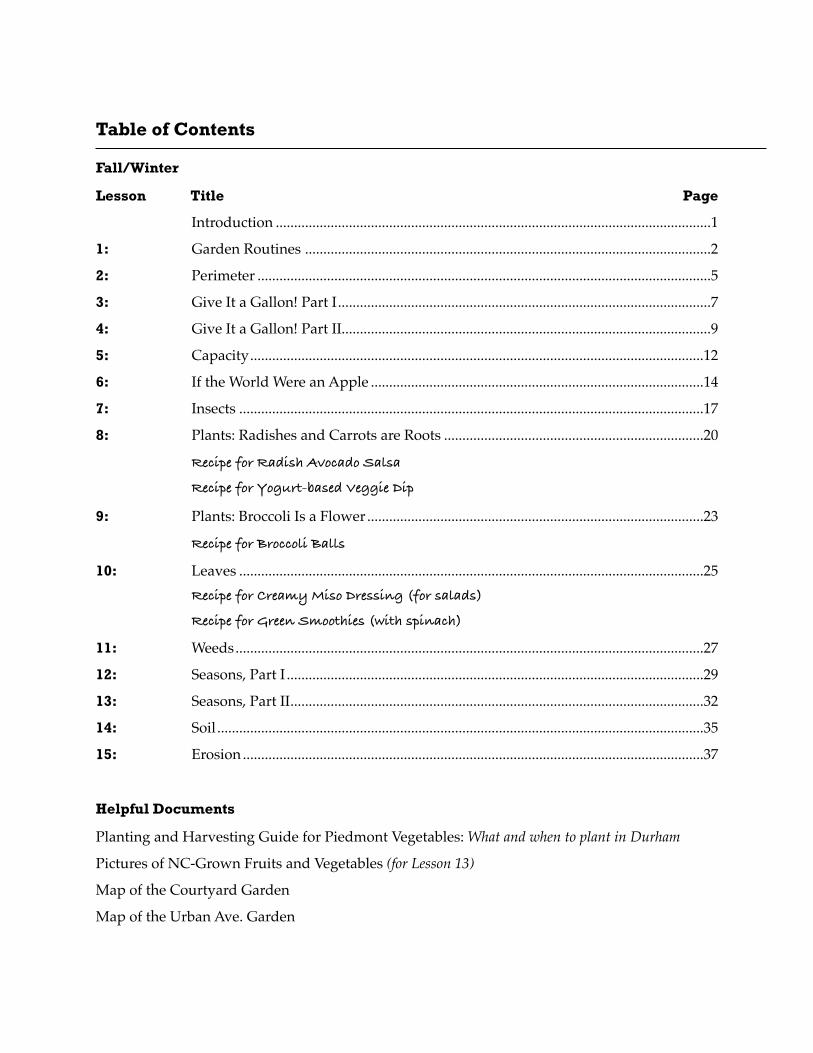
Table of Contents
Fall/Winter
Lesson Title Page
.......................................................................................................................Introduction 1
1: ...............................................................................................................Garden Routines 2
2: ............................................................................................................................Perimeter 5
3: ......................................................................................................Give It a Gallon! Part I 7
4: .....................................................................................................Give It a Gallon! Part II 9
5: ............................................................................................................................Capacity 12
6: ...........................................................................................If the World Were an Apple 14
7: ...............................................................................................................................Insects 17
8: .......................................................................Plants: Radishes and Carrots are Roots 20
Recipe for Radish Avocado Salsa
! Recipe for Yogurt-based Veggie Dip
9: ............................................................................................Plants: Broccoli Is a Flower 23
Recipe for Broccoli Balls
10: ...............................................................................................................................Leaves 25! Recipe for Creamy Miso Dressing (for salads)
! Recipe for Green Smoothies (with spinach)
11: ................................................................................................................................Weeds 27
12: ..................................................................................................................Seasons, Part I 29
13: .................................................................................................................Seasons, Part II 32
14: .....................................................................................................................................Soil 35
15: ..............................................................................................................................Erosion 37
Helpful Documents
Planting and Harvesting Guide for Piedmont Vegetables: What and when to plant in Durham
Pictures of NC-Grown Fruits and Vegetables (for Lesson 13)
Map of the Courtyard Garden
Map of the Urban Ave. Garden

Introduction
These 30 lessons for 1st, 2nd and 3rd graders assume a couple of things:
First, that your school has already carved out a space for a garden. We don’t delve into how to start or design a school garden, since plenty of other sources can guide you through that. We’re going to talk about how to use a garden, now that you have started one.
Second, we assume that you want to make a school garden relevant to the N.C. Standard Course of Study. We’ve tried to come up with lessons that help teachers teach the SCOS, while being meaningful for students in ways that extend beyond academics. While learning about soil and plant life cycles, for example, students will also experience the pleasure of digging in the garden, learn to understand growing seasons and where food comes from, taste some healthful vegetables, learn to exercise patience and caring and cooperation, etc.
These 30 lessons are designed to enhance teachers’ knowledge of their school garden and to offer quick, fun, relevant ways to use a garden weekly. Please feel free to do additional research or pursue other ideas and/or experiments in the garden. And ask your students what they want to learn about in the garden.
While reading these lesson please take into consideration:
• We welcome your help and feedback on these lessons to make them better or to add more to them in the future
• These lessons may be done with your whole class or in small groups• The lessons vary in length and include an estimated amount of time for inside and
outside activities and discussion. Feel free to break the lessons into smaller parts to fit your schedule
• The lesson have suggested months for teaching to help teachers sequence the lessons.• Each lesson follows the same format with the following sections:
✓ Objective✓ NC SCOS Correlation✓ Time✓ Materials✓ Vocabulary Focus✓ Lesson / Step-by-Step✓ Review / Journaling✓ Extensions
1 Lower El Lessons for Edible Garden

LOWER EL LESSON 1: Garden Routines
Objective:
This lesson will introduce your students to the garden. Teachers can use the garden however they would like. This lesson includes some suggestions for garden routines that you could set up in your classroom. The one thing that should be discussed during this lesson is the garden map and what the word edible means.
NC SCOS Correlation:
3rd grade, Objective 2.03:
• Determine the ability of soil to support the growth of many plants, including those important to our food supply.
Vocabulary Focus:
• Edible: You can eat it.
• Support: To help
Lesson / Step-by-Step:
1. First tell your students what the word edible means and explain we have a garden full of things that can be eaten. Go out to the garden and talk about the things we can eat and cannot eat in the garden.
Ask the students:
What is underneath all the plants? (Answer: soil)
Should we eat soil? Weeds? Mulch?
Should we eat something if we do not know what it is?
2. Point out some things that are edible and some things that are not. Take some time to discuss the characteristics or properties of things that are edible and not edible. For example, a tomato can be squished, while a rock cannot be squished. Mention that soil supports (or helps) all the plants in the garden, so they can grow.
TIME:
Suggested month: August or September
Inside: 5-10 min.
Outside: 10 min.
MATERIALS:
For the teacher:
• Excited attitude
• Index cards
• Pen or pencil
• Copy of the garden map
For the students:
• Clipboards
• Copy of the garden map
2 Lower El Lessons for Edible Garden
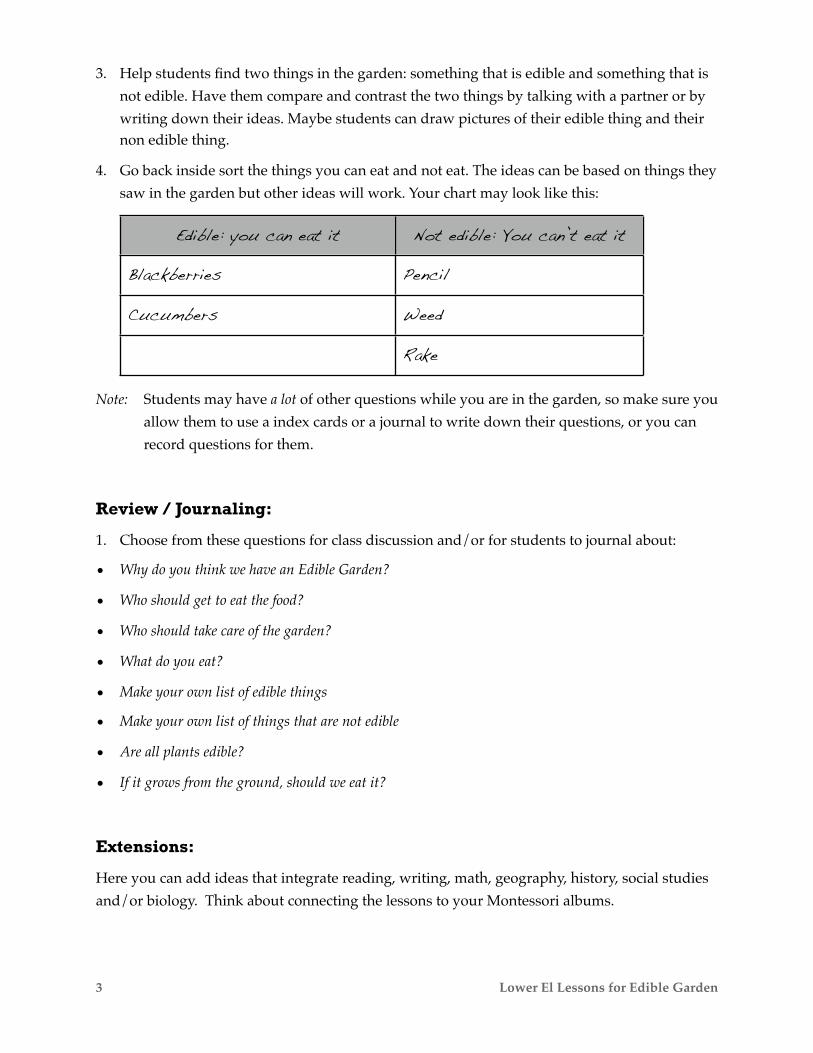
3. Help students find two things in the garden: something that is edible and something that is not edible. Have them compare and contrast the two things by talking with a partner or by writing down their ideas. Maybe students can draw pictures of their edible thing and their non edible thing.
4. Go back inside sort the things you can eat and not eat. The ideas can be based on things they saw in the garden but other ideas will work. Your chart may look like this:
Edible: you can eat it Not edible: You can’t eat it
Blackberries Pencil
Cucumbers Weed
Rake
Note: Students may have a lot of other questions while you are in the garden, so make sure you allow them to use a index cards or a journal to write down their questions, or you can record questions for them.
Review / Journaling:
1. Choose from these questions for class discussion and/or for students to journal about:
• Why do you think we have an Edible Garden?
• Who should get to eat the food?
• Who should take care of the garden?
• What do you eat?
• Make your own list of edible things
• Make your own list of things that are not edible
• Are all plants edible?
• If it grows from the ground, should we eat it?
Extensions:
Here you can add ideas that integrate reading, writing, math, geography, history, social studies and/or biology. Think about connecting the lessons to your Montessori albums.
3 Lower El Lessons for Edible Garden

1. Double Word Web Activity: What do you think of when I say garden? What do you think of when I say edible? Make connections between the word webs.
2. Project Idea: Use the Botanical Online website to print off research about plants that are edible and not edible. The term “not edible” could lead into a discussion/research about plants being poisonous.
Website: Botanical Online, http://www.botanical-online.com/medicinalplants.htm. This website contains great information for further research on medicinal plants, natural medicines and poisonous plants.
Garden EdiblePlants
Weeds Eating
4 Lower El Lessons for Edible Garden

LOWER EL LESSON 2: Perimeter
Objective:
Students will measure the perimeter of the garden or one part of the garden by using wooden stakes and yarn.
NC SCOS Correlation:
3rd grade Math, Competency Goal 2: The learner will recognize and use standard units of metric and customary measurement.
Objectives 2.01
• Solve problems using measurement concepts and procedures involving:
• Equivalent measures within the same measurement system.
Vocabulary Focus:
• Perimeter: The distance around an object
• Distance: How far or how long something is
Lesson / Step-by-Step:
1. Gather your students on the carpet in a group. Make sure there is enough space for you to walk around the entire group of students.
2. Discuss the definition of distance by talking directly in front of your students and then moving some distance away from them. Explain that you are now talking from a distance. You may want to get even further away from your students to model the concept of distance.
3. Measure the distance between you and various students, and have students make judgments about which distances are long or short, far away or close by. Name things in the school building or neighborhood that are far away from school or close by.
4. Next introduce the word “perimeter,” or the distance around an object. As you discuss the word “perimeter,” walk around your students. Walk in a series of straight lines, because
TIME:
Suggested month: Anytime
Inside: 10-15 min.
Outside: 10-15 min.
MATERIALS:
For the teacher:
• Yarn or string
• Wooden stakes
• Hammer
For the students:
• Helping hands
• Listening ears
5 Lower El Lessons for Edible Garden

perimeter is based on measuring polygons (closed figures) with straight sides (squares, rectangles, hexagons, etc.).
5. Have a group of students follow your perimeter path. Have each one explain what they just did, using the word “perimeter”: “We just walked the perimeter around our friends.”
6. Go outside and choose a section of the garden whose perimeter you’ll measure.
7. Use a hammer and wooden stakes to mark off the perimeter. Tie the yarn around the first stake, then keep it taut as you walk the perimeter. Once you reach the starting point, cut the yarn. You should have a piece of yarn that measures the distance of the perimeter.
8. Put away the stakes and hammer. Return to your room.
9. Use rulers inside the classroom to measure the yarn, then calculate the perimeter. Using rulers and yardsticks can also lead into creating math problems about measurement conversions.
Review / Journaling:
1. Have each student record the definition of perimeter and write one sentence about the perimeter of the garden. Some sample sentences are below:
• The perimeter of the garden is ____inches and I think that is _________ (encourage students to insert their opinion).
• The garden has a perimeter of ____inches and we used yarn to _____________ (possible answer: “show the perimeter or the distance around the garden”)
2. Have students use cubes or other manipulatives to re-create the perimeter that was measured with the class.
Extensions:
1. Integrate. Add ideas that integrate reading, writing, math, geography, history, social studies and/or biology. Think about connecting the lessons to your Montessori albums.
2. Differentiate. AIG: Compare and contrast circumference and perimeter. EC: Measure a smaller area to discover the perimeter.
3. Perimeter Lesson for 3rd grade: This lesson provides hands-on ways to teach perimeter, and it has some great questions using Bloom’s Taxonomy: http://www.athens.edu/vinsobm/lesson_15.htm
(Synthesis) List real-world uses for perimeter.
(Analysis) Identify whether a measurement situation calls for area or perimeter.
6 Lower El Lessons for Edible Garden

LOWER EL LESSON 3: Give It a Gallon! Part I
Objective:
In this lesson about capacity, students will learn that different sized plants and different qualities of soil (dry, moist, muddy or sandy) require different amounts of water. All plants do not need tons of water in order to survive. Students will also learn about overwatering and absorption.
NC SCOS Correlation:
Math SCOS 3rd grade, Objective 2.02
• Estimate and measure using appropriate units. Capacity (cups, pints, quarts, gallons, liters).
Science SCOS 3rd grade Objectives 2.01 and 2.02
• Observe and describe the properties of soil: Capacity to hold water.
• Investigate and observe that different soils absorb water at different rates. (Use this objective for an extension project or experiment.)
Vocabulary Focus:
• Absorb: To soak up
• Overwater: To give a plant too much water
• Amount: How much
Lesson / Step-by-Step:
1. Begin the lesson by showing the students the different capacity materials and explain that they are used to measure liquid, like water. As you tell the name of each capacity container, place them in order from largest to smallest: gallon, quart, pint and cup. (Note: If your students are familiar with gallon man, this would be a good place to review the relationship between the different units of capacity.)
2. Read question #12 from DPS 3rd Grade Science Assessment for Plants. Discuss the problem using the sample questions below. Write the problem on the board:
TIME:
Suggested month: Sept., Oct. or Nov.
Inside: >30 min. (or you may
combine Lesson 3 and 4 for
one 45-min. lesson)
MATERIALS:
For the teacher:
• Capacity materials:
1 gallon jug, 1 quart, 1 pint and 1 cup
7 Lower El Lessons for Edible Garden

Ricky decided to grow a sunflower plant over the summer. He planted the sunflower seed in a large pot with soil and placed it in a sunny spot outside his house. Ricky poured a gallon of water on his sunflower each day for three weeks. The sunflower never grew.
What is the best explanation for the death of the sunflower?
a. The sunflower was snowed on since it was placed outdoors.
b. There wasn’t a place for the sunflower to grow.
c. The sunflower seed was overwatered.
d. The sunflower did not get enough light or air.
3. Say:
“The sunflower never grew so it died. A plant needs sunlight, soil, air/oxygen and water to grow. I wonder what the plant did NOT have that caused it to die. Let’s read the problem a second time to answer these questions. We need to go back and read the problem again to find the answers to our questions.”
4. Write questions on the board and have students underline where they found the answer.
Did the plant have soil? Students should underline in a large pot with soil
Did the plant have sun? Students should underline placed it in a sunny spot
Did the plant have air/oxygen? Students should underline outside his house
Did the plant have water? Students should underline Ricky poured a gallon of water on his sunflower each day for three weeks
5. Eliminate answers A and B by finding words in the problem that tell that the plant had soil and sun. Discuss C and D.
6. Allow students to find that C is the correct answer. Tell students that “overwatering” means the plant got too much water. Tell them that the capacity materials we have can help use give plants just the right amount of water. Explain that the capacity can help us understand amounts of water we are giving the plants in the garden, but we can also watch the soil absorb the water so we know we gave the plant too little or too much water. Explain that absorb means to soak up or to take in.
This may be a good place to stop, and begin Lesson 4 the following day.
8 Lower El Lessons for Edible Garden
LOWER EL LESSON 4: Give It a Gallon! Part 2
Objective:
While helping students understand that capacity measures liquids, you will also show them what it means to have soil absorb water.
NC SCOS Correlation:
Math SCOS 3rd grade, Objective 2.02
• Estimate and measure using appropriate units. Capacity (cups, pints, quarts, gallons, liters).
Science SCOS 3rd grade Objectives 2.01 and 2.02
• Observe and describe the properties of soil: Capacity to hold water.
• Investigate and observe that different soils absorb water at different rates. (Use this objective for an extension project or experiment.)
Vocabulary Focus:
• Absorb: To soak up
• Overwater: To give a plant too much water
• Amount: How much
Lesson / Step-by-Step:
1. First, review the lesson from the previous day by explaining the words overwater and absorb again. Then fill up a gallon jug, gather the other capacity materials and head outside to the garden.
2. Choose the smallest plant you can find. Perhaps your students can help you by sharing their opinion about which is the smallest plant in the garden. Once you have found a small plant, yell, “Let’s give it a gallon!!!”
TIME:
Suggested month: Sept., Oct. or Nov.
Inside: 5 min. (review)
Outside: 25-30 min., or you
may combine Lesson 3 and 4 for one 45-min. lesson.
MATERIALS:
For the teacher:
• Capacity materials: 1 gallon jug, 1 quart,
1 pint and 1 cup
For the students:
• Optional: A set of capacity materials for each group of
3-4 students -- 1 gallon jug, 1 quart, 1 pint, and 1 cup
9 Lower El Lessons for Edible Garden

3. Begin to slowly pour the gallon of water at the base of the plant. Pour a little water at a time to see if it is absorbed into the soil, and how quickly it is absorbed. Pause and say,
“As I’m pouring this big gallon of water, I’m wondering if it will be too much. I’m going to continue pouring the water slowly and watching the soil absorb it. Since I may not need to use the whole gallon, I want to use some smaller containers. Which one should I use for this small plant?”
4. Lay out the units of capacity in front of the students. Ask students to look at the size of the plant and the dry or wetness of the soil to determine how much they should water.
5. Pour the water from the gallon jug into the cup or pint -- whichever students choose. Have students take turns pouring small amounts of water onto the soil. Prompt the students to watch how the soil absorbs the water. While students watch a plant being watered they can begin to think about the quality of the soil and how much water may be necessary. (Note: Lesson 14 covers soil quality in depth.)
6. Once the soil begins to puddle with water, tell students, “The soil cannot absorb any more water, and it’s time to stop watering -- or we may overwater or damage the plant, just like the sunflower in our example was overwatered.”
7. Take the students inside to do a review/journaling activity.
Review / Journaling:
1. What do you do when you overwater a plant?
Answer: You give it too much water.
2. What can happen if you overwater a plant?
Answer: It could die.
3. What should you do if the soil is not absorbing the water?
a. keep watering
b. pour the water very slowly
c. stop watering
Answer: C, because you do not want the plant to die like the sunflower plant in the science problem.
4. Use a Frayer model to take notes about the main points of the lessons
Definition of overwatering Sentence about the effects of overwatering
Picture of a plant that was overwatered Connections
10 Lower El Lessons for Edible Garden

Extensions:
1. Extension Question: Can too much rain overwater plants? What happens?
Answer: puddles, mud, erosion
2. Have students put the same amount of different soil types (sand, clay, humus) into clear cups. Have the students slowly pour a cup or less of water into each type of soil. Have the students use a timer to tell how long it takes for each type of soil to absorb the water.
If students are still struggling with the idea of soil absorbing water, you could use cotton balls in one cup and pieces of paper in another cup to model how absorption works.
Web Resources:
1. Illinois State Museum of Geology: A good lesson plan that demonstrates the effects that occur with each type of weathering and erosion. A good extension for explaining different processes of weathering and erosion.
http://geologyonline.museum.state.il.us/tools/lessons/6.3/lesson.html
2. How and Why Does Overwatering Kill Plants: A great article for the teacher to read to have more background information.
http://gardenofeaden.blogspot.com/2009/03/how-and-why-does-overwatering-kill.html
3. Soil-Net: A great worksheets to help students understand and journal about watering soil.
http://www.soil-net.com/sm3objects/activities/Activity_Watering.pdf
11 Lower El Lessons for Edible Garden

LOWER EL LESSON 5: Capacity
Objective:
This lesson is an introductory lesson to explain that capacity means how much something can hold. That something can be a sponge, a cup, a milk carton or soil. The next lesson will relate capacity to the amount of water that soil can hold.
NC SCOS Correlation:
Science SCOS 3rd grade, Objective 2.01
• Observe and describe the properties of soil, including the texture, color and capacity to hold water.
Vocabulary Focus:
• Capacity: means how much something can hold inside or how much ________ can hold inside. An object has to be dry or empty so that you can fill it with something.
Students sometimes think that you can fill anything, a couch, a stapler, etc. While those items can be filled with things (people or staples), for the purpose of this lesson we want students to think of capacity as how much is held inside an object like a sponge or cup.
Lesson / Step-by-Step:
1. Show students the sponge and say, “I have a sponge, but I don’t know how much water it can hold. So I’m going to use a measuring cup to find out how much water the sponge can hold.”
2. Slowly pour a cup or two of water -- or less, if you have a small sponge -- onto the sponge. You may want to demonstrate to students how the sponge keeps water inside of it by wringing out the sponge one or two times.
3. Once your sponge cannot hold any more water, walk around with the tray and explain to students:“You saw me pour water onto the sponge and the sponge soaked up the water. We would see water on the tray if the sponge could not hold it. Right now, we do not see water on the tray because it is all inside the sponge. Capacity means how much something can hold inside.”
TIME:
Suggested month: Anytime
Inside: 30 min.
MATERIALS:
For the teacher:
• A sponge
• Measuring cup(1 or 2 cups)
• Plastic tray
• Large pitcher of water
For the students:
• 5-10 sponges
• 5-10 measuring cups
• 5-10 plastic trays
12 Lower El Lessons for Edible Garden

4. After everyone has seen the dry tray with the sponge in the middle, repeat the definition of capacity and begin to show and tell more about the capacity of the sponge.
5. Say, “Let’s squeeze the sponge over the measuring cup to see how much water it can hold. Capacity means how much something can hold inside. How much water do you think the sponge can hold?” Take some estimates from students. Then say, “Let’s find out”
6. Squeeze the sponge over the measuring cup to show the capacity of the sponge. Don’t worry too much about students understanding exactly how many ounces or cups the sponge can hold. Assign a general amount to the sponge’s capacity, such as “It can hold a lot” or “It can hold a little.”
7. Put students in groups of two to three. Each group needs a sponge, a tray and a measuring cup. Use the large pitcher of water to fill up the students’ measuring cups. Instruct the students to slowly pour water onto the sponge. Allow them time to explore and squeeze the sponge to recognize that it has space inside to hold water.
Review / Journaling:
1. Use the Frayer model to help students take notes about the experiment
Definition Sentence about what they understand about capacity. Their sentence can be general or specific to what they did in the lesson.
Picture of experiment Questions or other thoughts about capacity (also can include connections)
Extensions:
1. Math Extension Question: What is the capacity of your hands? Have students take turns pouring small amounts of water in each other’s hands. Make sure they measure the amount of water they are pouring.
2. Reading/Writing Extension Question: Record the steps of the sponge activity to practice retelling. Pair students together to help each other write the steps of the experiment. Use three to four index labeled “First,” “Next,” “Then” and “Last” to help students describe the experiment. Have the student read their steps to another small group of students to re-teach the lesson. Allow student to perform the sponge activity many times while they record the steps.
13 Lower El Lessons for Edible Garden
LOWER EL LESSON 6: If the World Were an Apple
Objective:
The teaching point for this lesson is to teach students to learn the importance of topsoil, the amount of topsoil we have and why we should care for it.
The two big questions this lesson will answer are: Why is topsoil important in our world? How does healthy topsoil affect our lives?
Worldwide, 25 billion tons of agricultural topsoil are swept away every year -- that’s 7% of the world’s good growing land every decade. In these activities students will come to appreciate how little topsoil there is in the world and how it can easily be lost through erosion. In the garden, students will discover techniques to build soil health and protect soil from erosion.
Lesson 15 on Erosion is an excellent one to do after this lesson.
NC SCOS Correlation:
Science SCOS 3rd grade, Objective 2.03
• Determine the ability of soil to support the growth of many plants, including those important to our food supply.
Vocabulary Focus:
• Topsoil: Top layer of soil
• Erosion: When soil or rocks are moved from one place to another. (Erosion also happens water and wind wear away the soil.)
Lesson / Step-by-Step:
1. Say, “All around the world, topsoil is being swept away every year by erosion. Topsoil is the top layer of soil that has important nutrients. Erosion is when water and wind wear away soil.”
TIME:
Inside: 10-15 min.
Outside: 10 minutes
(optional) to observe places where erosion has
happened, if present.
MATERIALS:
For the teacher:
• Apple
• Sharp knife
14 Lower El Lessons for Edible Garden
2. Write both of the above vocabulary words, with definitions, on the board.
3. Say, “Topsoil is essential because we need it to grow crops and plants so we can eat. Erosion can take away the topsoil that we need.”
4. Ask the students the following discussion questions:
What else do you know about soil?
What is it? Why do you think plants need it? How does it help humans?
5. Say, “During this activity I want you to think of the world as this apple. I am going to cut it into smaller parts to show you how much topsoil there is on Earth.”
6. Begin the “If the Earth Were an Apple” activity. Show the students the apple and give the following demonstration:
Let’s say this apple is the Earth.
Cut the apple into quarters and set three of the quarters aside.
Three quarters of this apple represent all the oceans on earth. The remaining quarter represents all the land on earth.
Cut the remaining quarter in half and set one piece aside.
One half of the land is unfit for humans; it is either too hot, like a desert, or too cold, like the north and south poles.
Cut the remaining piece into quarters and set three of them aside.
Of the land that humans can live on, only this small piece is land that we can grow food on. The rest is too rocky, or there isn’t enough sun for plants to grow.
Peel the remaining piece.
This thin peel represents the thickness of the soil in which we grow our food. It is only about three feet deep. This tiny portion is the only area out of the whole Earth where all the right conditions exist to grow food. Enough food has to be produced on this small bit of land to feed ALL of the people on Earth.
Review / Journaling:
• Why is topsoil important in our world? (Possible answers: We use topsoil to grow food and plants; plants convert carbon dioxide into oxygen for us to breathe.)
• How does healthy topsoil affect our lives? (Answer: Without healthy topsoil we would not be able to grow food to eat.)
15 Lower El Lessons for Edible Garden

• With so little soil in the world, what should people be doing to take care of it? (Answer: Plant cover crops to minimize erosion; make sure the soil stays moist but not muddy; dry and dusty soil will blow away.)
• Brainstorm some favorite foods with your students, and then try to connect those foods to crops. For example, if students like pizza or peanut butter and jelly sandwiches, then they are eating food that came from the ground and from good topsoil.
Pizza / tomatoes
Peanut butter / peanuts
Jelly / grapes, strawberries or raspberries
Bread / wheat
Some students may have fun choosing foods and deciding which ones include crops.
**This lesson was adapted from Evergreen’s Patterns Through the Seasons: A year of school garden activities (2003).
Extensions:
1. Youtube video of Ms. Vejvoda teaching “Topsoil and Erosion” lessonshttp://www.youtube.com/watch?v=cLcpHJQbcJY
2. Video: “How to Find Good Topsoil.” Explains definition of topsoil and how to find good topsoil in a store or by mixing compost with the topsoil in your garden. http://www.ehow.com/video_4992707_good-topsoil.html
3. Soil Test Kits and Information on Soil Care: Learn more about what to add to soil to keep it healthy and order a soil kit or pH test kit to learn more about the soil in your garden.http://www.planetnatural.com/site/xdpy/sgc/Soil%20Care/Soil%20pH%20&%20Test%20Kits
16 Lower El Lessons for Edible Garden

LOWER EL LESSON 7: Insects
Objective:
Students should understand that some insects can help plants while others can harm them. There are many different insects and different ways they can help or harm plants. This lesson focuses on one insect-plant relationship.
In this lesson there are brief descriptions of a ladybug and an aphid and how they help or harm plants.
The insects described in the lessons are common in North Carolina and can be found in the Edible Garden on many days.
NC SCOS Correlation:
Science SCOS 3rd grade, Objectives 1.02 and 1.01
• Observe that insects need food, air and space to grow.
• Observe and describe how environmental conditions determine how well plants survive and grow in a particular environment.
Vocabulary Focus:
• Survival: to continue growing or living; to not die
• Help: to make better
• Harm: to hurt
• Pest: an insect that eats part of or all of a plant or fruit
Lesson / Step-by-Step:
1. Say, “Just like people have basic needs, such as food and water, so do plants. For plants to continue to grow they need soil, sun, oxygen and water. When something continues growing we call it survival. Some plants have to work to survive because things, such as pests, can harm them. When a plant is harmed, this means part of the plant is eaten or something is taken away from the plant.”
TIME:
Suggested month: Sept/October
Inside: 15-20 min.
Outside: 5-7 min. exploration
for ladybugs or other insects.
MATERIALS:
For the teacher:
• Internet access
• Projector for video
(ladybug eating an aphid)
For the students:
• Journals
17 Lower El Lessons for Edible Garden

1. Pause to write definitions on the board of survival, harm, pest and help. Ask students ways that they can help or harm plants in the garden. Also ask students how they can help plants survive. Next continue discussing how insects harm plants.
2. Say, “An insect called an aphid loves to eat plants. Aphids are sap-sucking insects. They land on plant stems, push through the stem with their needle-like mouth, and drink the sugary liquid (sap) that the plant pushes up the stem to feed its growing leaves and flowers. Since the stem helps the plant get water and nutrients, if the aphids keep sucking on the stem then…oh no, the stem cannot do its job. The aphids take away the nutrients that the plant needs, therefore the aphids affect the plants survival.”
3. Continue: “But don’t worry, because these rude aphids can be stopped!! Ladybugs help plants by eating aphids. Ladybugs, depending on their size, can eat about 25 to 50 aphids a day.”
4. Check out video of a ladybug eating an aphid (great close up video): http://www.youtube.com/watch?v=G3p4tCDJLuA&feature=related
5. Say, “As you can see from the video, the aphid is a pest that harms plants by sucking out the nutrients (sugary sap) that need to go to the leaves and flower of the plant. Notice that the aphids are crawling on the stem and leaves of the plant to suck the sugary sap. It is a good thing that the ladybug eats the aphid pests and saves the day!”
6. After the lesson, go outside to search for ladybugs or any insects that are on plants. Have student use magnifying glasses to describe how the insects are interacting with the plants. Are the insects eating the plants? Crawling? Sucking on the plants? Watching how insects interact with plants can be difficult to see, which is why online videos are a great way to see interactions up close. (Some links to videos are located in the Extensions/Project ideas section.)
Review / Journaling:
As you discuss these questions with your students (or have them journal), some students’ answers may relate to what they learned in the lesson and others may have extensions and connections to other things.
What do plants need to survive?
What do insects need to survive?
What things can harm plants?
What can help plants survive?
How do aphids harm plants?
How do ladybugs help plants?
18 Lower El Lessons for Edible Garden

What is a pest? How is an aphid a pest?
What other insects do you think are pests? Why?
Extensions:
1. Virtual Insect Website: Shows 3-D models of different insects. Also provides more links to learn about insects such as ants, grasshoppers, flies, bees and more.http://home.comcast.net/~sharov/3d/virtual.html
2. National Agriculture Library: “Insects: The good, the bad and the unusual” -- GREAT resource for research on insects.http://insects.about.com/gi/o.htm?zi=1/XJ&zTi=1&sdn=insects&cdn=education&tm=13&f=00&tt=14&bt=0&bts=0&zu=http%3A//www.nal.usda.gov/outreach/bugscolor.pdf
3. Plant Pest Identification Guide: Great color photos of plant pests.http://vegipm.tamu.edu/imageindex.html
4. National Geographic Video featuring Wasps versus Aphids: This video is a little graphic because it shows how wasps kills the aphids slowly and painfully. http://www.youtube.com/watch?v=rLtUk-W5Gpk
5. Project idea: Compare and contrast the needs of plants and insects. Students could explore/research different relationships between plants and insects, such as symbiotic or parasitic.
19 Lower El Lessons for Edible Garden

LOWER EL LESSON 8: Plants: Radishes and Carrots are Roots
Objective:
This lesson is part of a series of lessons that explains how humans eat different parts of plants.
For this lesson students need to use their prior knowledge of plant parts to connect to a new idea. Students may know that plants have a flower, stem, leaves and roots, but it’s important that students do not visualize plants as having flowers, stems, leaves and roots that all look EXACTLY the same.
The teaching point for this lesson is we eat the roots of some plants. Radishes and carrots are roots, since they grow underneath the ground and we pull them from the ground.
It is important that students understand the parts of the plant before this lesson. Make sure the radishes and carrots are ready to harvest before teaching this lesson.
NC SCOS Correlation:
Science SCOS 3rd grade, Objective 2.03
• Determine the ability of soil to support growth of many plants, including those important to our food supply.
Vocabulary Focus:
• Roots: grow under ground; roots suck water and minerals from the soil for the plant.
Lesson / Step-by-Step:
1. Say, “Radishes and carrots are roots because they grow under the soil. We do not see radishes and carrots growing above the ground like flowering plants or fruit. Radishes grow really fast, so in about 25-30 days after you plant radish seeds, they should be ready to harvest. Carrots take about two to three months to grow.”
TIME:
Suggested month: Oct or Nov, when carrots or
radishes are ready to harvest
Inside: 5-10 min.
Outside: 10 min.
MATERIALS:
For the teacher:
• Chart paper with a diagram of the parts of a flowering plant (like the
example below)
• Blank chart paper to draw
a diagram of a radish and carrot
For the students:
• Optional: Parts of plant worksheet to fill out
20 Lower El Lessons for Edible Garden
1. Continue, “Let’s go outside and pull up some radishes and carrots from under the soil! First we will draw/sketch what the radishes and carrots look like BEFORE we pull them out of the ground. Then we will come back inside and sketch what they looked like underground.”
2. Have students take their journals out to the garden. Help students pull up a few carrots and radishes. Take one of each back to the classroom.
3. Students will compare and contrast the plant parts shown on the worksheet that follows with the carrot and radish they pulled from the ground.
Review / Journaling:
First label the Plant Parts diagram/worksheet with the students. Then have the students draw/sketch a radish and carrot as they look in the ground. Help students add to the drawings they did in the garden by showing them how to draw the root vegetables underneath their drawing of the leaves of both vegetables.
How are the roots similar?
How are the roots different?
Extensions:
1. My First Garden Vegetable Dictionary: A kid-friendly garden dictionary.
2. Information about radishes http://urbanext.illinois.edu/firstgarden/planning/dictionary/veggies/radish.cfm
3. Information about carrotshttp://urbanext.illinois.edu/firstgarden/planning/dictionary/veggies/carrot.cfm
4. Time lapse video of radish seeds sprouting.http://www.youtube.com/watch?v=d26AhcKeEbE&NR=1
5. Quick Facts about Radishes: Includes how radishes grow, storage tips and nutrition facts, plus a video on how to make radish roses for a garnish. http://www.kids-cooking-activities.com/radish-facts.html
6. Detailed facts about radishes.http://www.kiddiegardens.com/growing_radishes.html
7. Build your own root box! Students can see the roots growing. http://web2.airmail.net/kboyle/Rootbox.htm
21 Lower El Lessons for Edible Garden

LOWER EL LESSON 9: Broccoli Is a Flower
Objective:
This lesson is parts of a series of lesson that explains that humans eat different parts of a plant. Students will learn that broccoli is an edible flowering plant, and they will compare and contrast it to other flowering plants in the garden.
NC SCOS Correlation:
Science SCOS 3rd grade, Objectives 1.06 and 2.03
• Observe, describe and record properties of germinating seeds.
• Determine the ability of soil to support the growth of many plants, including those important to our food supply.
Vocabulary Focus:
• Flower: Part of the plant that grows above the ground
Lesson / Step-by-Step:
1. Tell students, “During the last lesson we talked about how roots are underneath the soil, and we cannot see them unless we pull up the plant. We saw that carrots and radishes are root vegetables that grow underneath the ground. Today we are going to see a vegetable that grows ABOVE the ground where we can see it growing. It’s broccoli!
2. Continue: “Let’s look at our diagram from the last lesson. What part of the plant is broccoli? Roots? Stem? Leaves? Flower?” (Take some guesses and have students explain why they think their guess is correct.)
3. Then say, “Broccoli is the flowering part of the plant, and we can eat it! Who remembers the word that means you can eat it?” (Answer: edible) ”It is important to remember that you cannot eat all flowers, and all flowers are not vegetables. Broccoli is a flower AND it is a vegetable. Let’s go pick some broccoli! First we will sketch the broccoli and then we will harvest it.”
TIME:
Suggested month: Oct or Nov, when broccoli is
ready to harvest
Inside: 10 min.
Outside: 15 min.
MATERIALS:
For the teacher:
• Chart paper with plant diagram from Lesson 8: Roots
• Bucket of assorted colored pencils to take out into the
garden
For the students:
• Journals
• Pencils
• Green-colored pencils
23 Lower El Lessons for Edible Garden

4. Have student take their journals, a pencil and a green colored pencil out to the garden to sketch the broccoli. If the students finish sketching the broccoli, have them sketch other flowering plants. You can use their sketches to compare and contrast broccoli to other flowering plants.
5. When you’re finished sketching, cut some of the broccoli by choosing one of the large branches and cutting it near the base. Try to leave at least one flowering branch, so the plant has a chance to continue growing. Take it back to the room to wash, cut and eat as a snack with yogurt dip (see recipe following Lesson 8) or Ranch dressing. Or use one of the other broccoli recipes that follow this lesson.
Review / Journaling:
When you return to the classroom choose a broccoli sketch to tape to the board next to the diagram of plant parts. Next have students come and tape their other sketches of flowering plants in the garden. Leave room underneath each sketch to compare and contrast the sketches.
Which part of the plant is broccoli?
How is the broccoli different from other flowering plants?
24 Lower El Lessons for Edible Garden


LOWER EL LESSON 10: Leaves
Objective:
This lesson is parts of a series of lesson that explains that humans eat different parts of a plant. The teaching point is for students to understand that we can eat the leaves of some plants. Lettuce is a leaf that we can eat.
It is important that students can harvest the lettuce as part of this lesson, so make sure the lettuce is ready to be harvested. This lesson is also an opportunity to review the two previous lessons (about vegetables that are roots or flowers) to assess understanding.
NC SCOS Correlation:
Science SCOS 3rd grade, Objectives 1.06 and 2.03
• Observe, describe and record properties of germinating seeds.
• Determine the ability of soil to support the growth of many plants, including those important to our food supply.
Vocabulary Focus:
• Leaves: The part of the plant that grows off the stem; can be different sizes; some leaves are edible.
Lesson / Step-by-Step:
1. Say, “Let’s look at the diagram from our other lessons about roots and flowers.” Ask:
“Which vegetables are roots?” (Answer: carrots and radishes)
“Which vegetable in the garden is also a flower?” (Answer: broccoli)
“We can eat different parts of certain plants. The past few lessons we have learned about vegetables such carrots, radishes and broccoli, which are all edible plant parts.”
2. Continue: “In a moment we are going to go out to the garden to see lettuce. Lettuce leaves are edible. You cannot eat the leaves of all plants but lettuce leaves are edible. Lettuce is
TIME:
Suggested month: Oct./Nov., or when lettuce is
ready to harvest
Inside: 10 min.
Outside: 10 min.
MATERIALS:
For the teacher:
• Chart paper with plant diagram from Lessons 8 and 9
For the students:
• Journals
• Pencils
• Rulers
25 Lower El Lessons for Edible Garden

used to make salads, and there are different sizes and types of lettuce leaves. Lettuce leaves are usually big.”
3. Tell students what will happen next: “Let’s head out to the garden and look at the lettuce leaves. We are going to measure the lettuce leaves and choose some other leaves on other plants to measure.”
4. While out in the garden, pull a few lettuce leaves and measure their length and width. Then ask a few students to go find some leaves that are bigger or smaller than the lettuce leaves, and to measure those leaves’ length and width. Perhaps the students can carry a lettuce leaf around the garden to compare it to other leaves. It may also be fun to trace different leaves or do leaf rubbings to compare and contrast leaf sizes. Make sure students notice how the lettuce leaves compare to other leaves.
5. Take any harvested lettuce leaves back to the classroom to wash and make a small salad for students to enjoy, using any additional ingredients they like (carrots, cucumbers, etc.). Recipe for a kid-friendly salad dressing follows this lesson.
Review / Journaling:
“Now that we have see lettuce and some other leaves let’s create a Leaf Line by putting our leaves in order from smallest to largest. Underneath each leaf we will write the length in inches.”
Display the different sizes of leaves using actual leaves or leaf rubbings. Use an index card to record the length and width of the leaves.
Extensions:
1. Project Idea: Leaf collecting. See this website for fun ideas and activities to do with leaves.http://www.thekidsgarden.co.uk/LeafCollecting.html
2. Video about different types of lettuce. Explains sizes, taste and uses for different types of lettuce. Length: 1 minute.http://www.youtube.com/watch?v=A7t_1b1ntL4
3. Fresh for Kids (http://www.freshforkids.com.au/veg_pages/lettuce/lettuce.html): Website provides more information about different types of lettuce, why lettuce is good for you, and how it is grown and harvested. Includes a great snack idea: Lettuce Cups. Tear off and wash 6 large lettuce leaves. Place a spoonful of chicken or ham salad in the middle of each one. Roll up and chill. Great for school lunches or a snack.
4. After harvesting lettuce leaves, turn them into a salad. Have students make the following recipe for a kid-friendly salad dressing.
26 Lower El Lessons for Edible Garden


LOWER EL LESSON 11: Weeds
Objective:
This lesson explains how weeds affect plant survival. Students may be familiar with weeding a garden but they may not know why weeds need to be pulled out of the ground.
The teaching point for this lesson is that weeds take water and nutrients from the soil that the plants need. Plants will grow slower or not at all because the weeds compete with the plants for the water and nutrients in the soil. As weeds grow and their roots extend deeper into the soil, they take more and more of the water and nutrients that plants need to survive.
Before teaching this lesson, make sure there are weeds in the garden to pull up to show the students.
NC SCOS Correlation:
Science SCOS 3rd grade, Objectives 1.01 and 1.02
• Observe and measure how the quantities and qualities of nutrients, light, and water in the environment affect plant growth.
• Observe and describe how environmental conditions determine how well plants survive and grow in a particular environment.
Vocabulary Focus:
• Weed: A plant that grows where it is not wanted and takes nutrients and water from other plants.
Lesson / Step-by-Step:
1. Say, “In our garden we need to pull the weeds. Why are weeds bad for our garden?”
2. Take a few ideas and then write the definition of weeds on the board.
3. Continue: “Weeds are plants that grow where they are not wanted. Weeds take nutrients and water from the soil that the other plants need to survive. Think about your favorite drink or snack sitting in front of you, and you are so excited to eat it. Oh no! All of a sudden someone else snatches your snack or drink away from you before you can drink it.
TIME:
Suggested month: Anytime
Inside: 10-15 min.
Outside: 10 min.
MATERIALS:
For the students:
• Journals
• Pencils
• Optional: Hand shovels
27 Lower El Lessons for Edible Garden

“Weeds do the same thing. They grow near plants, so they can take the water and nutrients from the soil before the plants can get to it.
4. Tell students what will happen next: “Let’s head outside to the garden to pull up some weeds. You will notice that weeds have roots just like plants, and that they use their roots the same way plants do -- to get water and nutrients to grow and survive. If garden weeds continue to grow, the plants around weeds will not be able to grow as strong.”
5. Take students outside and show them where different patches of weeds are located. Have students pull up the weeds and look at the roots.
They may need to use a hand shovel to dig out the weed from its roots -- which can grow very deep or run sideways. It may be helpful to observe the plants around the weeds to see if they differ in size from places in the garden where there are no weeds. After students have pulled up some weeds, collect them and take them inside.
Review / Journaling:
To review the concept of weeds, have students complete a Frayer model graphic organizer. Give each student a weed so they can draw a picture of it on their Frayer model.
Picture of a weed Definition of a weed
How do weeds affect plants? Other questions or connections
Here is a good picture of a weed that shows how the roots get bigger as the weeds grow. What might happen to the plants around weeds as the weeds get bigger?
28 Lower El Lessons for Edible Garden
Extensions
1. Research weeds on this website that shows how to identify weeds and how weed seeds travel. Includes some fun activities.http://www.thekidsgarden.co.uk/KidsWeedsWildflowers.html
2. U.S. Forest Service: includes pictures of different weeds, a glossary of forest terms and coloring pages and activities for kids.http://www.fs.fed.us/wildflowers/kids/coloring/colornoxiousweeds.shtml
3. Informative article called “Why Weeds Grow” includes information on why weeds are good and how weeds are indicators of certain soil deficiencies. http://www.malcolmbeck.com/books/gv_method/WhytheWeedsGrow.htm
4. Project Idea: Testing how soil absorbency is affected by weeds. First find a few patches of weeds and take a soil sample from each patch. Next, find places in the garden without weeds and take soil samples from those places. Make sure to label each soil sample and where it came from. Next, one at a time pour the same amount of water on each soil sample and use a timer to record how long it takes each soil sample to absorb the water. Perhaps some soil samples will not absorb any water. Record your results and make some conclusions about whether or not weeds affect soil absorbency.
29 Lower El Lessons for Edible Garden

LOWER EL LESSON 12: Seasons, Part I
Objective:
This lesson begins by having students realize that seasons last about three months, and that they have a beginning and an end. The teaching point for this lesson is to introduce the length of the seasons and discuss the different things that occur during each season. The next lesson will teach more about the planting seasons.
The teacher will need to know that the seasons in North Carolina are as follows:
Spring: March, April, MaySummer: June, July, AugustFall: September, October, NovemberWinter: December, January, February
In this lesson, the teacher will cut up a calendar and sort the months according to their season. The students can help the teacher brainstorm the activities, holidays and weather within each season.
NC SCOS Correlation:
Science SCOS 3rd grade, Objective 1.02
• Observe and describe how environmental conditions determine how well plants survive and grow in a particular environment.
2nd grade, Objectives 2.06 and 2.03
• Observe and record weather changes over time and relate to time of day and time of year.
• Describe weather using quantitative measures of: Temperature, Wind direction, Wind speed and Precipitation.
Vocabulary Focus:
• Season: Months of time when similar weather occurs
TIME:
Suggested month: Mid-Oct (or anytime there is
a season or season change that your students can observe)
Inside: 20 min.
Outside: Varies depending on
how long you’d like students to observe the features of a
season, such as hot weather, fallen leaves, icy wind, etc.
MATERIALS:
For the teacher:
• A calendar (one that can be cut)
• Butcher paper
• Markers
• Glue
For the students:
• Optional: calendars for each student
30 Lower El Lessons for Edible Garden

• Weather: How it feels outside
• Planting (optional, will be mentioned in next lesson): To put seeds in the ground
Lesson / Step-by-Step:
1. Say, “Today we are going to discuss how long each season is and what occurs in each season. A season lasts for months and similar weather occurs during a season.” Write the definition of season on the board.
2. Continue: “There are four seasons in a year: summer, fall, winter and spring. I have a large piece of paper which we will use to show which seasons occur during which months. We will also record other information about the seasons on our large piece of paper, such as the weather, holidays and activities that happen during each season.”
3. Create a large table with butcher paper. Write the four seasons -- summer, fall, winter and spring -- across the top. In each column, paste the months from your calendar to show the three-month length of each season.
4. Ask the following questions to add information to the table:
“What are some activities we can do outside during fall? Winter? Spring? Summer?”
“What are some holidays that occur in fall? Winter? Spring? Summer?” (Allow students to look at the calendar in each column to look for holidays.)
“In our garden we have lots of plants growing right now, but our garden does not look exactly the same all year long. Why it that?”Possible answers may include “harvesting plants, plants dying, planting new plants.”
“The seasons change, so the weather changes too. Weather is how it feels outside. What is the weather like during each season? How does the weather affect plants?” Write the definition of weather on the board. Possible answers may include that plants die when it gets cold, or that plants can also die in the summer due to too much heat.
Review / Journaling:
“We are going to keep adding to our table because during our next lesson we are going to talk about the different plants, fruits and vegetables that can grow in North Carolina during fall, winter, spring and summer. For example, we may really want to plant watermelon in our garden, but we need to find out if right now is the planting season for watermelon. If this isn’t a planting season for watermelon, it will not grow.
“Now let’s review what we learned about seasons today:
How would you explain or define what a season is?
31 Lower El Lessons for Edible Garden

About how long does each season last?
How are plants and seasons connected? (This question will be revisited in the next lesson.)
Extensions:
1. Project Idea: Create seasons booklets, or a journal about the seasons throughout the year. Draw or take a few pictures of the Edible Garden each month of one season and compare and contrast the pictures. Draw or take pictures of the garden every season to compare and contrast all the pictures. Record temperatures and/or rainfall during each season.
2. Project Idea: Collect soil samples from each season and compare and contrast how the samples look, feel and/or their soil absorbency.
3. Great book selections to begin the lesson or use as a follow-up:The Reasons for Seasons by Gail GibbonsFour Seasons Make a Year by Anne RockwellThe Four Seasons by Mary RiusFour Seasons Series by Nuria Roca
4. InstructorWeb.com includes information used in this lesson about seasonshttp://www.instructorweb.com/lesson/seasons.asp
5. PBS Kids Video on “Why Leaves Change Color in the Fall”:http://pbskids.org/dragonflytv/show/leaves.html
6. Research climate zones and frost-free dates on this website:http://urbanext.illinois.edu/firstgarden/fundamentals/startplant.cfm
32 Lower El Lessons for Edible Garden
LOWER EL LESSON 13: Seasons, Part II
Objective:
This lesson is a follow up to the Seasons Part 1 lesson. Now the teacher will introduce the concept of planting seasons. Students may have lots of ideas about things they want to plant in the garden, but it is important to teach them that we cannot grow everything at the same time, because certain plants grow during certain seasons. Although we could plant a fruit or vegetable seed anytime, we might not see it grow, since the season (and conditions) may not be right.
NC SCOS Correlation:
Science SCOS 3rd grade, Objective 1.02
• Observe and describe how environmental conditions determine how well plants survive and grow in a particular environment.
2nd grade, Objective 2.06
• Observe and record weather changes over time and relate to time of day and time of year.
Vocabulary Focus:
• Seasons: Months of time when similar weather occurs
• Planting: To put seeds in the ground
• Weather: How it feels outside
Lesson / Step-by-Step:
1. Say, “During the last lesson we talked about how each season was about three months long. We also wrote on our table about the different weather that occurs during each season. Weather can affect how plants grow, because some plants do not like too much heat or cold.”
2. Continue: “Every few months different things can be planted in our Edible Garden. This is because the season changes. Certain plants grow in certain seasons. Think about your
TIME:
Suggested month: Anytime
Inside: 15 min.
MATERIALS:
For the teacher:
• Seasons chart from the previous lesson
• Pictures of fruit and
vegetable plants that grow in N.C.
• Glue
For the students:
• Journals
• Pencils
33 Lower El Lessons for Edible Garden

favorite season. You may get excited about all the things you can do during your favorite season. Plants get ‘excited’ too, because they have their season to grow.”
3. Bring out pictures of vegetable and fruit plants. Say, “I have some pictures of plants that you are going to help me sort into different categories. I don’t know the planting season for every plant. But I did some independent research of my own to find out the planting season for some of the vegetables and fruits that grow in our state of North Carolina. If you are really interested in planting seasons, we can do more research together.”
4. Go through the pictures one by one, asking students to guess when the plants can be grown and harvested. Paste them onto the seasons chart from Lesson 12.
Review / Journaling:
To review the concept of seasons, have students complete a Frayer model graphic organizer.
Definition in your own words Facts/characteristics
Examples Other questions or connections
Extensions:
Project Idea: Try planting things out of their planting seasons to show students firsthand that the plants will not grow.
34 Lower El Lessons for Edible Garden

LOWER EL LESSON 14: Soil
Objective:
The teaching point for this lesson is for students to understand what soil is made of and to explore the different types of soil.
Soil is a big part of what helps plants grow well. It has been said that poor gardeners grow good weeds, good gardeners grow good vegetables, and excellent gardeners grow good soil. To “grow” healthy soil in our school garden, we will need to first determine the existing quality of the soil.
Activities in this lesson introduce students to the composition and characteristics of soil. There is some difficult vocabulary in this lesson which may require review or further hands on work with materials.
You can split this lesson into two parts -- 1) collecting soil samples and 2) doing the shake test. The shake test is when the teacher fills the soil sample vials with a little water so the students can shake them. Once the students stop shaking the vials and let everything settle, they can see the layers in the soil. The students can then compare the layers they are seeing to the pre-made samples of clay, sand, silt and humus.
Extension activities provide a variety of simple tests students can use to determine the health of their garden soil. Feel free to try all or some of the activities.
NC SCOS Correlation:
Science SCOS 3rd grade, Objectives 2.01, 2.02, 2.03 and 2.04
• Observe and describe the properties of soil:
Color.
Texture.
Capacity to hold water.
• Investigate and observe that different soils absorb water at different rates.
• Determine the ability of soil to support the growth of many plants, including those important to our food supply.
TIME:
Suggested month: November
Inside: 25-30 min.
Outside: 10-15 min. to collect
soil samples
MATERIALS:
For the teacher:
• Water pitcher
• Choose spots to collect soils samples from
• Make labels (or use masking tape) to put on
the soil samples vials to tell their location (courtyard garden, garden
beds, by the slide, etc)
• Samples of clay (5)
• Sample of sand (5)
• Sample of silt (5)
• Sample of humus (5)
For the students:
• Hand shovels
• Vials with tops to collect soil samples
• Shovels to dig in the soil to collect soil samples
35 Lower El Lessons for Edible Garden

• Identify the basic components of soil:
Sand.
Clay.
Humus.
Vocabulary Focus:
• Soil: Dirt that has minerals (like sand, silt and clay) humus, water and air.
• Decaying: To break down into parts; rot
• Decomposing: To break up into separate parts; to cause to rot
• Organic: Natural; already exists in nature; not made by humans
Lesson / Step-by-Step:
1. Tell students they’ll be collecting soil samples. Say, “Today we are going on a soil hunt to learn about the soil in our garden and playground. First we are going to talk about what is in soil.”
2. Explain the four main ingredients of soil to students, and write them on the board:
Minerals These are basically ground up rock. The biggest particles are called SAND, medium particles are SILT and the smallest particles are CLAY.
Humus Decaying organic matter made of decomposing plants and animals.
Water and Air These make up the spaces in the soil, allowing room for roots to grow and for soil creatures to move around
3. To collect soil samples from the garden and playground area, students will work in groups or individually. You will first need to prepare labeled soil vials for groups or individuals.
4. Tell students how to collect a sample. Say, “It is important that you use a small hand shovel to dig into the soil to collect your sample. As you are digging, notice the different colors, layers and things you find in the soil. We will share what we saw when we come back inside. Now let’s head outside to collect our soil samples!”
5. Go outside and demonstrate how to collect a soil sample by breaking through the hard layer of dirt or layer of grass to get a soil sample. Dig about four to five inches into the soil.
6. Send each group or person to a different area of the grounds with a labeled soil vial. Once every person or group has a soil sample, go back inside.
7. Gather the class together and ask them to list what they saw in the soil as they were digging and collecting samples.
**This may be a good time to pause to continue the rest of the lesson another day.**36 Lower El Lessons for Edible Garden

8. Review the four main ingredients of soil.
9. Explain to students how they’ll be doing the shake test. Say, “We are going to try to separate the layers in our soil sample by adding water and shaking our vials. It is VERY important that you make sure the top is tight on your vial before shaking it. Hold the top on with your fingers or palm while shaking it. First, please take the top off your vial and I will come around with a little bit of water. Once I give you water make sure your top is on tight and then you may shake your vial. Do not lose control while shaking your vial or I will take it and keep it and you can observe someone’s else vial when everyone is done shaking.”
10. Put water in each vial and then allow students to shake their vials for a few minutes.
11. Say, “Now stop shaking your vial and place it on the table. DO NOT touch it but observe the soil beginning to settle or stop moving.”
12. Distribute samples of clay, sand, silt and humus to each table. Say, “While you are observing your soil samples, I am going to give each table a sample of the ingredients in soil. Do not open these soil samples. See if you can match their color to your soil sample to see if you have sand, silt, clay or humus in your soil.”
Review / Journaling:
What are the different ingredients in soil?
How were the soils in different parts of the schoolyard the same or different?
What things did you notice as your were digging to collect your soil sample?
Did you find all the ingredients in soil within your soil sample?
Extensions:
Make Your Own Soil Challenge, in which the students to make soil. Begin by sending each group of students to collect one ingredient (twigs, small rocks, sand, leaves, etc.).
When all the ingredients have been gathered together, ask students to work in their groups to use some of each of the ingredients to make soil by hand. This may involve such tasks as breaking leaves up and trying to crush rocks.
Compare the ‘soil’ the students have made with some real soil. Is it really possible to make soil with your hands? Why not?
In nature, it takes over 100 years to make just an inch of soil. There are many tiny creatures in soil, including bacteria and fungi that are constantly working to decompose nutrients to make soil. In one handful of soil, there are more tiny creatures than there are people in the entire world. Our hands could never do as much work as they do.
37 Lower El Lessons for Edible Garden

LOWER EL LESSON 15: Erosion
Objective:
The teaching point for this lesson is for students to understand what erosion means, how it happens, and how it affects the soil around us that we need for growing food.
It takes over 100 years to produce just an inch of soil, and in many parts of the world existing soil is lost up to 18 times faster than new soil is formed.
This activity will demonstrate to students how this important resource can be lost through erosion by rain and wind when the garden is left bare for the winter.
This is a good follow-up to Lesson 6, “If the Earth Were an Apple.”
NC SCOS Correlation:
Science SCOS 3rd grade, Objective 2.02
• Investigate and observe that different soils absorb water at different rates.
Vocabulary Focus:
• Erosion: when soil or rocks are moved from one place to another. (Erosion also happens when water and wind wear away the soil.)
Lesson / Step-by-Step:
1. Say, “Today we are going to do some experiments together using wind, water and soil to learn about erosion. In the winter, there is usually plenty of rain and wind. What do you think the rain and wind will do to the soil? When soil or rocks are moved from one place to another by rain or wind, we call this erosion.”
2. Ask the students to make predictions about what will happen when the wind blows across the tray filled with sod and the tray filled with soil. Hold the tray filled with sod over one of the empty trays. Invite a few students to blow across the sod-filled tray to simulate wind.
TIME:
Suggested month: Anytime
Inside: 5-10 min.
Outside: 20-30 min.
MATERIALS:
For the teacher:
• Four waterproof trays
(could be seeding trays, cookie sheets, old baking pans)
• Sod (soil with grass growing in it) to fit snugly
in one of the trays. If one isn’t already prepared, dig up a patch of sod from the
grounds and leave it in the tray for subsequent
classes.
• Loose soil for another tray
• Watering can
38 Lower El Lessons for Edible Garden

Notice how much soil collects in the empty tray. Now do the same thing with the tray filled with loose soil.
3. Next lean the sod- and soil-filled trays on an angle against a wall, with the base of each resting inside one of the empty trays, to catch residual water and soil.
4. Ask the students to make predictions about what will happen to the soil in each tray when water is poured across the top of them.
5. Pour an equal amount of water over the two trays for five seconds and observe the runoff that has collected.
6. Ask: Which tray lost the most soil? What happens to soil when the wind blows on it or it gets rained on??
7. When you’re finished with this activity, return the soil to one of the vegetable beds or to the compost pile.
**This lesson was adapted from Evergreen’s Patterns Through the Seasons: A year of school garden activities (2003).
Review / Journaling:
What is erosion?
How does it happen?
How does erosion affect our lives?
How do you think we can prevent erosion? (This is a good question for further research; some answers are located in the next section.)
Extensions:
1. Watch YouTube video of Ms. Vejvoda teaching Topsoil and Erosion lessonhttp://www.youtube.com/watch?v=cLcpHJQbcJY
2. Video project: Have students walk around the school grounds and identify evidence of soil erosion. Use a video camera. How could the examples of erosion be prevented?
3. Research answers to these questions: What might prevent soil from eroding? What could we do in our garden to prevent erosion, particularly in the winter when not as many plants are growing?
Answer:
1. COVER CROPS (We may have a marked cover crop in the garden.)
One of the ways students can protect their garden soil during the winter is to plant a cover crop. Cover crops are usually non-edible crops and often include a mix of different
39 Lower El Lessons for Edible Garden
plants with roots that can keep soil from washing away during heavy rains and draw nutrients from deep down in the soil. Planting a cover crop also provides competition for weeds; well-established cover crop will shade out weeds entirely. In the spring, the cover crop is pulled up and added to the compost or cut down, left to dry and dug into the soil.
2. OVERWINTERING CROPS (In our garden, wheat, garlic and onions are sometimes grown. They are examples of overwintering crops; we’ll harvest them in the spring/summer.)
In addition to planting cover crops, a portion of the garden can be set aside for planting overwintering crops. These crops start their growth slowly in the fall and winter and do the rest of their growing when the weather warms up the following year.
3. MULCH (In our garden, we have several beds heavily mulched.)
Another way for students to protect the soil in the garden is to cover it with mulch. Mulch is a layer of organic matter put on the surface of the soil and may include materials such as straw, hay, leaves or compost.
A useful analogy is the annual shedding of leaves in the forest, creating a layer of leaf litter on the forest floor. Both fallen leaves and mulches provide a layer of insulation, suppress weeds, decompose to add nutrients and organic matter to the soil and provide a place for helpful insects to hide. Just like the forest floor doesn’t turn itself over, there is no need to dig mulch into the soil. Natural processes help to incorporate the mulch into the soil, and any mulch that hasn’t decomposed by the spring can be raked up and added to the compost.
40 Lower El Lessons for Edible Garden

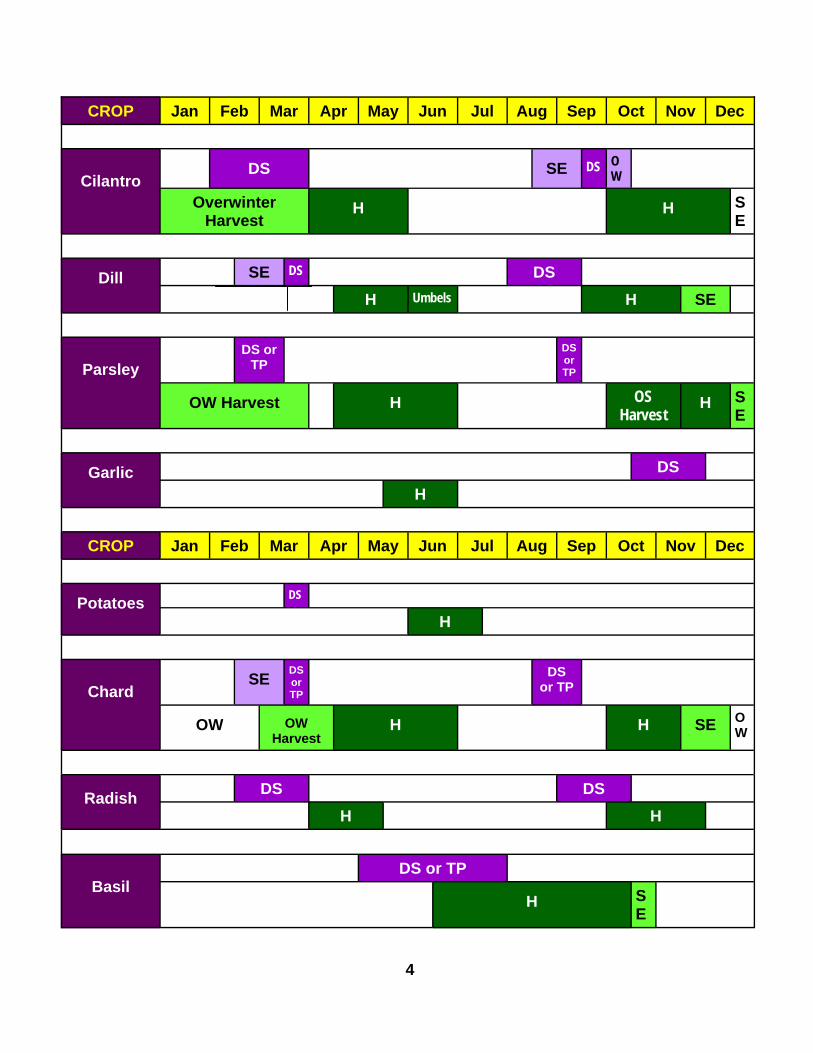
Planting and Harvesting Guide for Piedmont Vegetables and Herbs
Created by Doug Jones, Piedmont Biofarm
Debbie Roos, North Carolina Cooperative Extension, Chatham County Center
Read First: How to Use this Guide: see page 6
SE = Season Extension DS = Direct Seed H = Harvest TP = Transplant OW = Overwinter OS = Oversummer
Planting date if using season extension Planting date if not using season extension
Harvesting date if using season extension Harvesting date if not using season extension
Crop Jan Feb Mar Apr May Jun Jul Aug Sep Oct Nov Dec
Salad Mix
SE DS SE DS OW
OW Overwinter Harvest
H SE H SE
OW
Lettuce SE TP SE TP H SE H SE

Crop Jan Feb Mar Apr May Jun Jul Aug Sep Oct Nov Dec
Arugula DS DS
H H SE
Spinach
SE DS SE DS OW
OW Overwinter Harvest
H H SE
Kale
DS or TP
DS or TP
Overwinter Harvest H
H SE
Mustard DS DS
Overwinter Harvest
H H SE
Crop Jan Feb Mar Apr May Jun Jul Aug Sep Oct Nov Dec
Collards
TP Sen-posai
DS or TP
Overwinter Harvest
H Senposai H
Broccoli TP TP
H H SE
Cabbage
TP TP
Overwinter Harvest
H H
Pac Choi
SE TP
TP
H H SE
2

CROP Jan Feb Mar Apr May Jun Jul Aug Sep Oct Nov Dec
Brussels Sprouts
SE TP
SE H H SE
Green Onions
SE TP TP
H H
Bulb
Onions
SE TP
H green
H mature
Leeks
DS or TP
TP
Overwinter Harvest
H H SE
CROP Jan Feb Mar Apr May Jun Jul Aug Sep Oct Nov Dec
Parsnips
DS DS
Overwinter Harvest
H SE
Carrots
DS SE DS
OW
Overwinter Harvest
H H SE
Beets
SE DS SE DS
OW
OW OW Harvest H H SE O
W
Peas DS
H
3
CROP Jan Feb Mar Apr May Jun Jul Aug Sep Oct Nov Dec
Cilantro
DS SE DS OW
Overwinter Harvest
H H SE
Dill SE DS DS
H Umbels H SE
Parsley
DS or TP
DS or TP
OW Harvest H OS Harvest
H SE
Garlic DS
H
CROP Jan Feb Mar Apr May Jun Jul Aug Sep Oct Nov Dec
Potatoes DS
H
Chard
SE DS or TP
DS or TP
OW OW Harvest
H H SE OW
Radish DS DS
H H
Basil
DS or TP
H SE
4

CROP Jan Feb Mar Apr May Jun Jul Aug Sep Oct Nov Dec
Tomatoes SE TP
H SE
Peppers SE TP
H SE
Eggplant SE TP
H SE
Snap Beans
SE DS
H SE
CROP Jan Feb Mar Apr May Jun Jul Aug Sep Oct Nov Dec
Lambs-quarters
DS
H
Cucumbers DS or TP
H
Summer Squash
DS or TP
H
Cantaloupe
DS or TP
H
Water-melon
DS or TP
H
5

CROP Jan Feb Mar Apr May Jun Jul Aug Sep Oct Nov Dec
Winter Squash
DS or TP
H
Sweet Potato
TP
H
Okra
DS or TP
H
CROP Jan Feb Mar Apr May Jun Jul Aug Sep Oct Nov Dec
How to Use this Guide This is a planting and harvesting guide, not a schedule. Please use these dates as a starting point and adjust according to the conditions on your farm. These dates are not set in stone! Weather and crop conditions vary from year-to-year, and from farm-to-farm.
Doug Jones, the farm manager for Central Carolina Community College's Sustainable Farming Program in Pittsboro, developed on paper a planting and harvesting guide for his favorite vege-table crops, based on his experiences at the Land Lab. The Land Lab is CCCC's five-acre out-door classroom for research, demonstration, and crop production and is located about 1 mile west of downtown Pittsboro in Chatham County. Debbie recognized Doug's guide as a valuable tool and spent many hours working with him to flesh it out, adding additional crops and also planting and harvesting dates for growers using season extension techniques. Debbie then adapted and formatted the guide to make it easy to read (hopefully!) on the web. Our hope is that local growers will use this guide to try new crops and extend their season so we can pro-duce for our expanding local markets like Chatham Marketplace and our farmers' markets.
The key at the top of the chart explains the colors and abbreviations. You can click on the crop name for more notes and a text description of planting and harvesting dates. Season extension techniques can be used to protect from both cold and heat and include row covers, high tunnels, shade, micro-sprinklers, etc. See below for more information on season extension techniques.
The planting windows and harvest times assume succession plantings - every 1-2 weeks.
6

For More Information:
• Learn all about season extension: http://chatham.ces.ncsu.edu/growingsmallfarms/SeasonExtensionOctober2005a.pdf
• Resources and Suppliers for Season Extension: http://chatham.ces.ncsu.edu/growingsmallfarms/2005SeasonExtensionResources.pdf
• Consult the Vegetable Variety List for information on recommended varieties: http://chatham.ces.ncsu.edu/growingsmallfarms/varietylist.html
For more information on crop production, seed sourcing, pest management, marketing, local farms, and much more, visit Chatham County Cooperative Extension's Growing Small Farms website at http://chatham.ces.ncsu.edu/growingsmallfarms
We would really like your feedback on this guide. We plan to continue fine-tuning and expand-ing it. Please email Debbie Roos at [email protected] with any comments, questions, or suggestions.
Crop Notes
Salad Mix
• Mild Salad Mix – lettuces, baby kale, baby chard, baby mild mustard • Spicy Salad Mix – arugula, cress, spicy mustards • Direct-seed February 1-March 15 if using season extension techniques, for harvest April 1-
June 15 (up until mid-July if season extension techniques such as micro-sprinklers and shade are employed). If not using season extension, plant March 15-May 1. If not using shade cloth, harvest ends around mid-June.
• Direct-seed August 1-October 1 for harvesting September-December. Must use season ex-tension (shade cloth, heat-tolerant varieties, micro-sprinklers) if planting in August. If not us-ing season extension to manage heat, start harvesting in mid-October. Harvest of spicy salad mix ends sooner due to pest pressure unless you use a row cover.
• Extend season of fall planting by using row covers Dec 1-15. • Direct-seed mix for overwintering in early November and protect with row covers or tunnels
or both. Harvest begins Feb. 1 with overwintered salad mix. Lettuce (head)
• Transplant February 15-March 15 if using season extension for harvest beginning April 1. • Transplant March 15-April 15 if not using season extension. • Harvest period for spring plantings runs April 1-June 1 if using season extension as weather
warms. Lettuce harvested after June 1 will be bitter; use shade May 15-June 1.
7
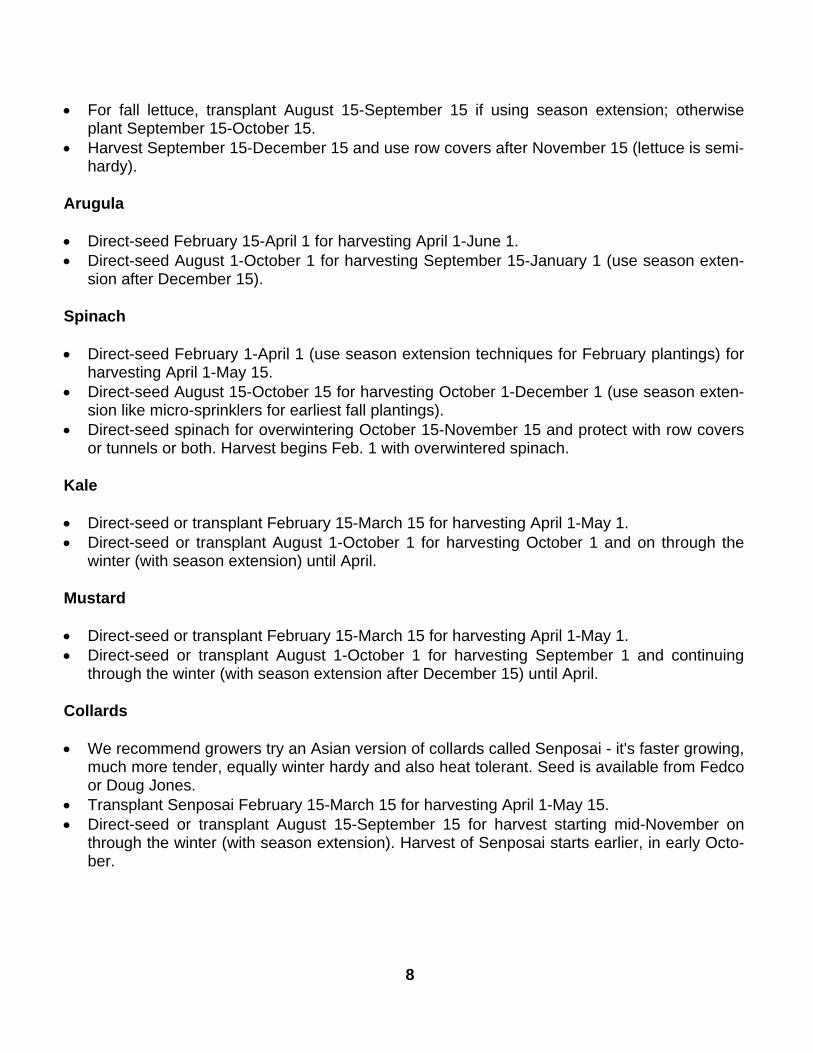
• For fall lettuce, transplant August 15-September 15 if using season extension; otherwise plant September 15-October 15.
• Harvest September 15-December 15 and use row covers after November 15 (lettuce is semi-hardy).
Arugula
• Direct-seed February 15-April 1 for harvesting April 1-June 1. • Direct-seed August 1-October 1 for harvesting September 15-January 1 (use season exten-
sion after December 15). Spinach
• Direct-seed February 1-April 1 (use season extension techniques for February plantings) for harvesting April 1-May 15.
• Direct-seed August 15-October 15 for harvesting October 1-December 1 (use season exten-sion like micro-sprinklers for earliest fall plantings).
• Direct-seed spinach for overwintering October 15-November 15 and protect with row covers or tunnels or both. Harvest begins Feb. 1 with overwintered spinach.
Kale
• Direct-seed or transplant February 15-March 15 for harvesting April 1-May 1. • Direct-seed or transplant August 1-October 1 for harvesting October 1 and on through the
winter (with season extension) until April. Mustard
• Direct-seed or transplant February 15-March 15 for harvesting April 1-May 1. • Direct-seed or transplant August 1-October 1 for harvesting September 1 and continuing
through the winter (with season extension after December 15) until April. Collards
• We recommend growers try an Asian version of collards called Senposai - it's faster growing, much more tender, equally winter hardy and also heat tolerant. Seed is available from Fedco or Doug Jones.
• Transplant Senposai February 15-March 15 for harvesting April 1-May 15. • Direct-seed or transplant August 15-September 15 for harvest starting mid-November on
through the winter (with season extension). Harvest of Senposai starts earlier, in early Octo-ber.
8

Broccoli
• Transplant February 15-March 15 for harvesting April 15-June 1. • Transplant August 15-September 15 for harvest October 15-December 15 (use season ex-
tension after December 1). • If plants are well-hardened, may not need row covers in spring; best to use mid-maturing
(not earliest, not latest) varieties in both the spring and fall planting windows so crop will ma-ture in time.
• Note: cauliflower is a difficult crop for the Piedmont so is not included here. It has a nar-rower range of heat and cold tolerance than broccoli so it is less reliable. The developing head is not adapted to our extreme temperature fluctuations and the head quality becomes really poor as it warms up.
Cabbage
• Transplant February 15-April 1 for harvesting May 1-June 15. • Transplant August 15-September 15 for harvest starting October 15 and on through the win-
ter (use season extension after December 15) up until mid-March. • If plants are well-hardened, may not need row covers in spring; best to use mid-maturing
(not earliest, not latest) varieties in both the spring and fall planting windows so crop will ma-ture in time.
Pac Choi
• Also called Bok Choy or Pak Choi • Transplant March 1-April 1 for early March plantings) for harvesting April 15-May 15. • Transplant August 15--October 1 for harvesting October 1-December 15 (use season exten-
sion after November 15). Brussels Sprouts
• Transplant July 15-September 1 (use season extension techniques for cooling July 15-August 15).
• If planted July 15-August 15, harvest starts November 15 and continues through the winter (use season extension December 1-February 1).
• If planted in late August, harvest begins in February (use season extension December 1-February 1).
Green Onions
• Use onion sets (bulbs). • Transplant February 1-April 1 for harvesting April 15-June 15 (use season extension for
February plantings). • Transplant August 15-September 15 for harvesting October 1-December 1. • Onions are hardy but season extension gives them earliness.
9

Bulb Onions
• Transplant February 15-April 1 (use season extension for February plantings). • Harvest fresh onions (green tops) May 15-June 15; harvest mature onions (dry bulbs) June
15-July 15. • Onions are hardy but season extension gives them earliness. • The earlier you get transplants into the ground, the bigger the bulb will be. To grow your
own seedlings, direct-seed into flats about two months before planting. Leeks
• Direct-seed or transplant April 1-May 1; transplant May 1-15. Direct-seeding will present more challenges with weeds.
• Harvest October 1-March 15. Use season extension Dec. 15-March 1. Use hardy varieties for late harvest, summer varieties for early harvest.
Parsnips
• Direct-seed April 15-May 15 for harvest starting in early November (100 day crop). One of the riskiest crops to establish in hot weather - needs 8-10 days to germinate.
• Direct-seed August 15-September 15 for overwintering. For fall planting, use micro-sprinklers to help with germination.
• Harvest starting November 1 and going through the winter until mid-March (use season ex-tension after December 15).
• Parsnips do not develop sweet flavor until the ground is cold so don't rush harvest. Carrots
• Direct-seed February 1-March 15 for harvesting May 1-June 15. • Direct-seed August 1-October 1 for harvest starting October 15 and continuing through the
winter (with season extension after December 1). For late summer planting, use micro-irrigation and shade to cool crop. Plantings September 15-October 1 will be for overwinter-ing.
• If using season extension, harvest January 15-April 1 (certain varieties bolt earlier than oth-ers). Carrot greens are very cold hardy but carrot shoulders will rot if the ground freezes. If you have a good canopy of carrot greens, it will help protect the shoulders; can use heavy row covers or a double layer of lighter weight row cover.
Beets
• Direct-seed February 1-April 15 for harvesting April 1-June 15. Harvest small beets April 1 and full-sized beets April 15. The February plantings will require protection with season ex-tension.
• Direct-seed August 1-October 1 for harvest starting October 1-December 15 (with season extension after November 15). For late summer planting, use micro-irrigation and shade to cool crop. Plantings September 15-October 1 will be for overwintering.
• If using season extension, harvest overwintered crop March 1-April 1.
10
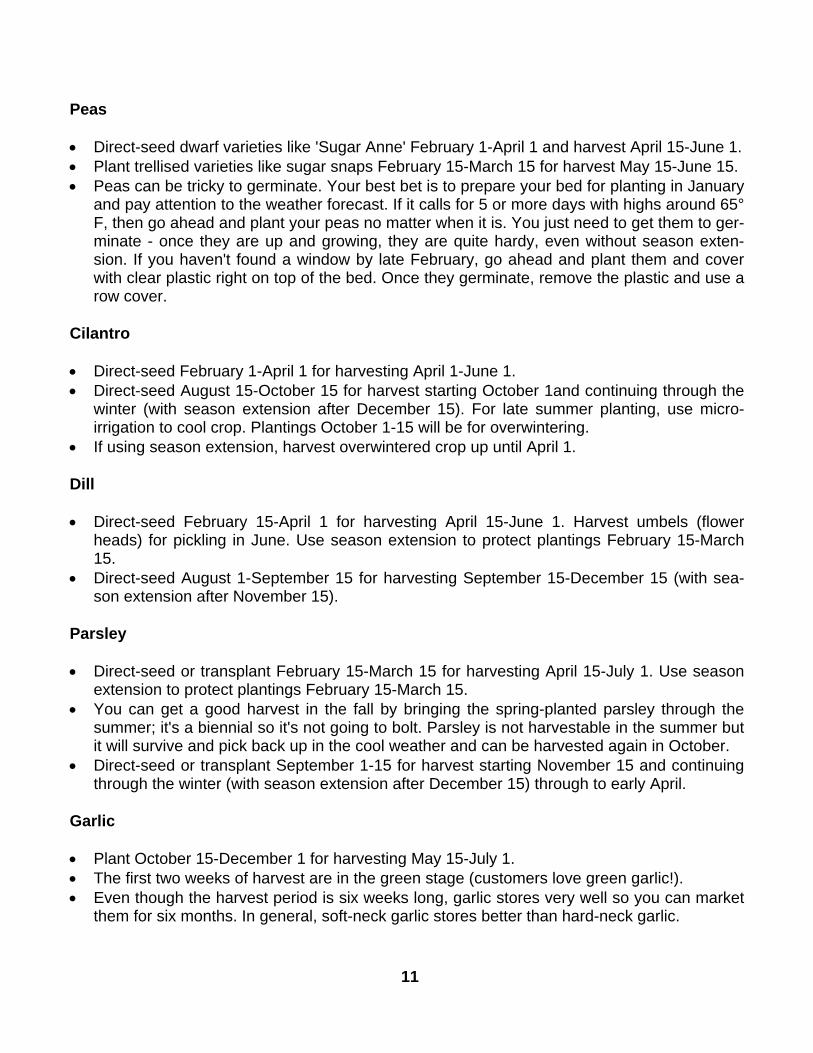
Peas
• Direct-seed dwarf varieties like 'Sugar Anne' February 1-April 1 and harvest April 15-June 1. • Plant trellised varieties like sugar snaps February 15-March 15 for harvest May 15-June 15. • Peas can be tricky to germinate. Your best bet is to prepare your bed for planting in January
and pay attention to the weather forecast. If it calls for 5 or more days with highs around 65° F, then go ahead and plant your peas no matter when it is. You just need to get them to ger-minate - once they are up and growing, they are quite hardy, even without season exten-sion. If you haven't found a window by late February, go ahead and plant them and cover with clear plastic right on top of the bed. Once they germinate, remove the plastic and use a row cover.
Cilantro
• Direct-seed February 1-April 1 for harvesting April 1-June 1. • Direct-seed August 15-October 15 for harvest starting October 1and continuing through the
winter (with season extension after December 15). For late summer planting, use micro-irrigation to cool crop. Plantings October 1-15 will be for overwintering.
• If using season extension, harvest overwintered crop up until April 1. Dill
• Direct-seed February 15-April 1 for harvesting April 15-June 1. Harvest umbels (flower heads) for pickling in June. Use season extension to protect plantings February 15-March 15.
• Direct-seed August 1-September 15 for harvesting September 15-December 15 (with sea-son extension after November 15).
Parsley
• Direct-seed or transplant February 15-March 15 for harvesting April 15-July 1. Use season extension to protect plantings February 15-March 15.
• You can get a good harvest in the fall by bringing the spring-planted parsley through the summer; it's a biennial so it's not going to bolt. Parsley is not harvestable in the summer but it will survive and pick back up in the cool weather and can be harvested again in October.
• Direct-seed or transplant September 1-15 for harvest starting November 15 and continuing through the winter (with season extension after December 15) through to early April.
Garlic
• Plant October 15-December 1 for harvesting May 15-July 1. • The first two weeks of harvest are in the green stage (customers love green garlic!). • Even though the harvest period is six weeks long, garlic stores very well so you can market
them for six months. In general, soft-neck garlic stores better than hard-neck garlic.
11
Potatoes
• Plant potatoes March 15-April 1 for harvesting June 1-July 15. Chard
• Direct-seed or transplant February 15-April 1 for harvesting April 15-July 1. Use season ex-tension to protect plantings February 15-March 15.
• Direct-seed or transplant August 15-September 15 for harvest October 1-December 15 (use season extension after November 15).
• Protect the crop through the winter and harvest again starting March 1 (overwintered harvest will overlap with harvest from spring plantings).
Radish
• Direct-seed February 15-April 1 for harvesting April 1-May 15. • Direct-seed or transplant September 1-October 15 for harvest October 1-December 1. Basil
• Direct-seed or transplant May 1-August 1 for harvesting June 15-November 1 (use season extension after October 15).
• The earliest harvest presumes a transplanted crop. Tomatoes
• Transplant April 1-June 15 (use season extension for first half of April until weather warms) for harvesting May 15-November 1 (use season extension after October 15).
• Expect yield to decline towards the end of summer. Peppers
• Transplant April 15-June 15 (use season extension for second half of April until weather warms) for harvesting July 1-November 15 (use season extension after October 15).
• It possible to plant up until June 15 and still get a good crop but yields will generally be greater from earlier plantings.
Eggplant
• Transplant April 15-June 15 (use season extension for second half of April until weather warms) for harvesting July 15-November 1 (use season extension after October 15).
• Later plantings can provide insurance for summer flea beetle problems; need to use row cov-ers on eggplant for first six weeks after planting for protection against flea beetles and potato beetles.
12

Snap Beans
• Direct-seed April 1-August 15 (use season extension for month of April until weather warms) for harvesting June 1-November 1 (use season extension after October 15).
• The soil needs to be warm for germination. For plantings in April, plant under clear plastic and remove after the beans germinate.
Lambsquarters
• Direct-seed May 1-July 15 for harvesting June 1-September 15. • This is one of the few greens that tastes delicious and produces through the summer with
minimal insect problems. A great summer green! • Seed available from Seeds of Change, Sow Organic Seed Co. Cucumbers
• Direct-seed or transplant May 1-August 1 for harvesting June 15-October 15. • For both cucumbers and summer squash, the most reliable crops are the early ones. Typi-
cally productivity declines rapidly after mid-summer. Early plantings produce for about one month; later plantings for shorter periods.
Summer Squash
• Direct-seed or transplant May 1-August 1 for harvesting June 15-October 15. • For both cucumbers and summer squash, the most reliable crops are the early ones. Typi-
cally productivity declines rapidly after mid-summer. Cantaloupe
• Direct-seed or transplant May 1-July 1 for harvesting July 1-October 15. Watermelon
• Direct-seed or transplant May 1-July 1 for harvesting July 1-October 15. • Watermelons tend to be more tolerant of diseases than cantaloupes on average; therefore,
watermelons are usually more reliable for a late summer crop. • Watermelons usually store very well, as long as a month if kept cool. Winter Squash
• Direct-seed or transplant May 1-July 15 for harvesting July 1-October 15. • The species moschata (butternut) is the most reliable due to vine borer resistance.
13
Sweetpotato
• Transplant May 15-July 1 for harvesting September 15-November 1. • Even though the harvest period is six weeks long, sweetpotatoes store very well so you can
market them for six months total. You need to cure sweetpotatoes at relatively warm tem-peratures for a couple of weeks after harvest (can place in a greenhouse).
Okra
• Direct-seed or transplant May 1-June 1 for harvesting August 1-November 1.
For more information on small farms and organic production, visit Chatham County Cooperative Extension’s
Growing Small Farms website www.growingsmallfarms.org
Over 300 pages with hundreds of links and photos
and lots of locally-relevant content!
Featuring: Grower Resource List
Organic Pest Management Local Crop Problems
Farm Photo of the Week Plow Sharing Newsletter
Enhancing Sustainability Workshops Farm Planning and Recordkeeping
Organic Certification Guide Community Supported Agriculture
Planting and Harvesting Guide Local Farm Profiles
Farmer Listservs Season Extension Pastured Poultry
Beekeeping …and much more!
14

Planting Season Sorting Cards
Pictures of NC fruits, vegetables and/or plants that you can sort in
a variety of waysRefer to Lesson 13

Watermelon Turnips
Swiss Chard Tomatoes

Sweet Potatoes Summer Squash
Rutabagas Spinach

Sweet Peppers Pumpkin
Potatoes Radish

Lettuce Okra
Onions Peas (podded)

Corn Eggplant
Cucumbers Kale

Cantaloupe Cauliflower
Carrots Collards
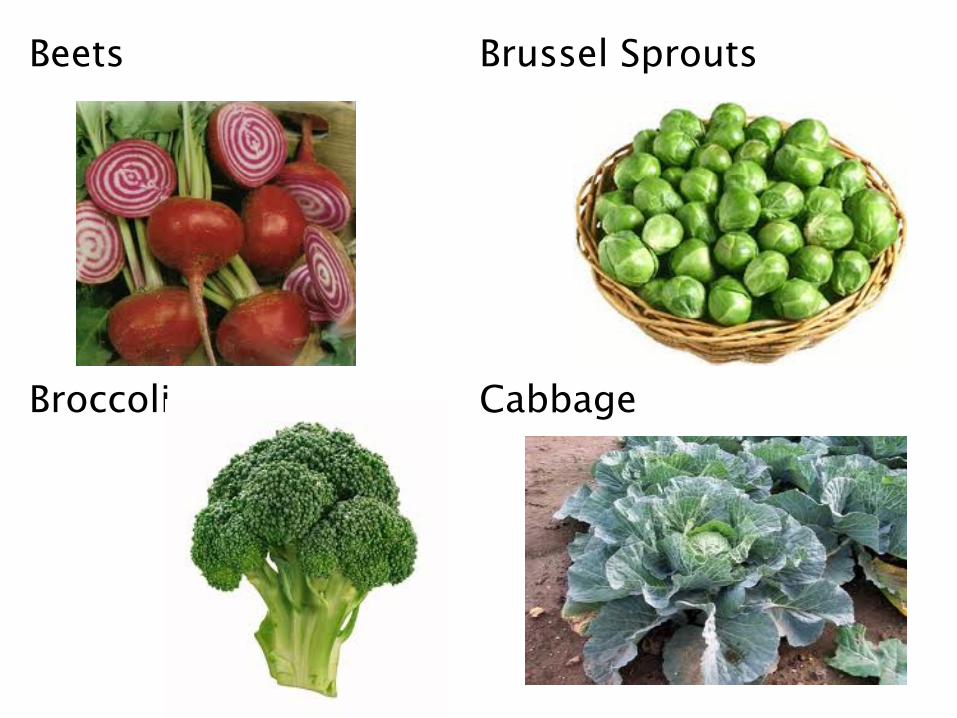
Beets Brussel Sprouts
Broccoli Cabbage

Asparagus Pole Beans
Snap beans