
Lotus Notes Course Outline Database - Kwantlen Polytechnic
24
Course Outline Database Manual A supplement to the Course Outline Manual A publication of The Senate Subcommittee on Course Curriculum Kwantlen Polytechnic University June 2010
Transcript of Lotus Notes Course Outline Database - Kwantlen Polytechnic

Course Outline Database
Manual A supplement to the
Course Outline Manual
A publication of The Senate Subcommittee on Course Curriculum
Kwantlen Polytechnic University June 2010


Table of Contents
THE LOTUS NOTES COURSE OUTLINE DATABASE .................................................... 2
Security of the database ............................................................................. 2
GETTING STARTED ........................................................................................... 3
Getting Access ............................................................................................ 3 Finding the database .................................................................................. 4 Creating shortcuts ....................................................................................... 5 Granting access .......................................................................................... 6
THE COURSE OUTLINE LIBRARY .......................................................................... 8
Using the Course Outline Library ................................................................ 8 Searching the Course Outline Library ......................................................... 9
WORKING IN THE COURSE OUTLINE FORM ........................................................... 10
Edit mode .................................................................................................. 10 Creating a new course outline .................................................................. 10 Comment fields ......................................................................................... 11 Revising an existing, approved course outline .......................................... 11 Discontinuing a course outline .................................................................. 12 Date fields in the database ....................................................................... 13 Formatting in the course outline form ........................................................ 14 Adding page numbers to a course outline ................................................. 15
THE COURSE OUTLINE SUMMARY FORM ............................................................. 16
Working in the Course Outline Summary Form......................................... 17
SHARING A COURSE OUTLINE DURING DEVELOPMENT ............................................ 18
SUBMITTING A COURSE OUTLINE FOR REVIEW ....................................................... 19
THE SIGNATURE PROCESS ................................................................................. 19
DOCUMENT HISTORY ...................................................................................... 21
FINDING THE URL FOR A COURSE OUTLINE ........................................................... 21
WEB ACCESS ................................................................................................ 21
SYMBOLS USED IN THE WORKING DATABASE ......................................................... 21

2
The Lotus Notes Course Outline Database
As of January 2008, course outlines at Kwantlen Polytechnic University are created in the Lotus Notes Course Outline databases.
‘Working’ databases are provided for each division within Kwantlen, and departmental databases are created on request to the University Secretariat. (At the time of printing, there are 70+ ‘working’ databases) (see Working in the Course Outline Form, p. 10)
All approved and signed course outlines are stored in the read-only Course Outline Library. (see p. 8)
At the time of printing, course outlines under development as well as approved course outlines can be viewed via the Internet, but access to working in course outlines is only through Lotus Notes, either on location at Kwantlen or from remote sites on computers equipped with Lotus Notes. NOTE: Webmail does not provide access to working databases.
The course outline form consists of fields to be filled in, and features additional comment fields for users during the development process.
Special features:
1. The Course Outline Summary Form is included in the form. (see p. 15)
2. Date fields in the form are functional. (see Date fields in the database, p. 13)
3. The signature process is electronic rather than on paper, and results in an approved course outline being published to the read-only Course Outline Library.
Security of the database
1. Access to the database is via Lotus Notes and therefore is password-protected. In addition, access to working in the database is granted to individuals by the dean’s assistant (or other designated person) in a division.
Anyone with access to Lotus Notes can view course outlines under development, but only those individuals who have been granted ‘working’ access are able to create or revise outlines. Development of a Web interface to allow faculty to work in the database from home without Lotus Notes is no longer under consideration as Kwantlen will be moving to Outlook for its email system, and the Course Outline database system will be replaced within two years of writing this.

3
Getting started
Getting Access
To gain working access to the database for your department/division, ask your dean’s assistant (or designated person) to add your name to the course outline profile. This is a simple process and can be done within minutes.
The dean’s assistant has the highest level of access to the database, and will assign roles to users. There are varying levels of access, depending on a person’s role. There are required, pre-set, and optional roles.
Required roles:
1. Developer
2. Department Chair
3. Divisional Dean
4. Senate Chair
Required roles are key to the electronic signature process. See Signature Process, p. 19.
Pre-set roles:
1. Publisher (designated person in Enrolment and Registrar Services)
2. Editor (designated person who will preview outlines prior to approval by divisional curriculum committees)
Optional roles:
1. Reviewer (a person designated to receive notification when an outline is due for review – if no reviewer is designated, the notification will go by default to the Dean Assistant role)
2. Department curriculum committees
3. Divisional curriculum committees
4. Senate curriculum sub-committee
2, 3, and 4 above are set up to make it possible to notify these groups via an automated message to review course outlines in a ‘working’ database, should they so choose.

4
Finding the database
Open Lotus Notes. On the icon bar on the left of the screen, select ‘Databases’, and then choose ‘Browse for a database’.
In the ‘Open Database’ dialogue box, under ‘Server’, select ‘appserver1/SVR/kwantlen/Ca (single-click). If that option does not appear, select ‘other’ and then select ‘appserver1/SVR/kwantlen/ca’ when it appears.
Under ‘Database’, scroll down to the yellow folder icons and select ‘apps’, and then select ‘crsoutline’ (double-click).
Select the database you wish to open and double-click. You now have the option to create a new course outline, revise an existing one, or just view an outline.
The Course Outline Library is found through the same pathway, but one step prior the working databases. Under ‘Database’, it is the first item (see also Course Outline Library, p. 8):

5
Creating shortcuts
When a database is open, right-click with the mouse on the white tab, in this case ‘English – Courses in Development’, and drag-and-drop it to the narrow grey icon sidebar on the left of the screen to create a shortcut. The icon will be the former Kwantlen logo, the blue triple K.

6
Granting access
The person with the role of ‘Dean Assistant’ in the database (not necessarily her/his job title) has the highest level of access, which includes the right to grant access to others, e.g. developers, department chairs, and deans. To grant access, open the required database (normally by department). In the top menu bar (grey), click on ‘Actions’, then ‘Tools’, and then ‘Setup Course Outline Profile.’
On the left, scroll down to where you see ‘Developer(s): Required’ and locate the drop-down arrow, and then select the name of the person you want to add. Click on ‘Add’, and then ‘OK’ (see below). NOTE: Typing the name into the field will NOT give the person access.

7
Follow the same procedure when adding names for all the required roles, and afor any optional roles you wish to use. (see also Optional Roles, p. 3)
You can also remove names of people who no longer need to be in a particular role without affecting existing outlines.
NOTE: After adding or removing a name in the Course Outline Profile, save and close both the profile page and the database for it to take effect.

8
The Course Outline Library
The Course Outline Library houses all currently approved outlines, as well as archived and discontinued outlines. It is read-only.
To find and open the Course Outline Library, see p. 4.
Using the Course Outline Library
Become familiar with (shift and – ) and (shift and +), which will collapse and expand the views in the database, and is particularly useful in the Library.
The view below is obtained with shift –
The view below is obtained with shift +

9
Searching the Course Outline Library
The Library has the advantage of being fully searchable. For example, if you search by using ‘ENGL 1100’ under ‘Current Outlines’, you would get the current version of ENGL 1100 and well as all current course outlines that cite ENGL 1100 as a prerequisite or corequisite. Or, if you searched by a particular book title, you would get a list of all course outlines that include that book title as a resource.
Click on the magnifying glass in the grey icon bar at the top to open the ‘search’ window (or use ctrl f)

10
Working in the Course Outline Form
Edit mode
To work in the form, you must be in edit mode. When you choose ‘Create New Course Outline’, you will be in edit mode by default. To work on an existing outline, get into edit mode by double-clicking anywhere in the form or by clicking on ‘Edit Document’ in the blue menu bar. You will see corners appear at the start and end of each field.
NOTE: If you have more than one role, such as ‘developer’ and ‘department chair’, the ‘edit’ option is not visible in the blue menu bar as seen below on the left. If you know you have access and do not see the ‘edit’ option, get into edit mode by double-clicking anywhere in the document or via the top grey menu bar as seen below on the right, and selecting ‘edit’.
Creating a new course outline
Open your ‘working’ database. (See Finding the database, p. 4)
To create a new course outline, single-click on ‘Create New Course Outline’ in the dark blue menu bar. This will open the course outline form. Notice that the Summary Form appears immediately below the logo and COURSE OUTLINE. (See The Course Outline Summary Form p. 15.)
Next, fill out the various text fields and tables as appropriate. For general information about developing and revising course outlines, please refer to the Course Outline Manual.

11
Throughout the form you will see small green arrows (twisties), which are toggle switches to open or close a section or a field. When a twistie points to the right, the section is closed; when it points down, it is open. Click on a twistie to open or close a field.
Twistie:
Comment fields
Below many of the fields in the course outline form, you will see ‘Comment’ fields. These fields are useful for making comments during the development phase, particularly if several people are working together on an outline. The comment fields will be hidden when the course outline has gone through the complete approval process and has been published to the read-only Library.
Information in the comment fields will print from the working databases if the comment fields are open.
The ‘General Comments’ field at the end of the form is particularly useful for entering information about edits made at any time, or to explain edits that interrupt the signature process.
Revising an existing, approved course outline
To revise an existing approved course outline, locate it in the Approved Outlines view of your working database.
If there are several versions of the approved outline in the Approved Outlines view, be sure to select the most recent version and open it. Then choose ‘Save as
Note the icon (checkbox with green arrow), which designates that a course outline has been approved and sent to the Library.

12
Revision’ from the blue menu bar. This will create a new version with a higher version number than the original, and will also place it in the ‘Under Development’ view.
As soon as you have saved an approved outline as a revision, it is advisable to clean out the summary form by removing any checkmarks and other information that applied to the former version. If the former version was approved with Q-status, DO NOT remove the date of Q-status approval unless the revisions are so extensive that the outline should be re-submitted for Q-status approval.
As part of the revision process, fill out the summary form as a record of the types of revisions made. Do this in the working summary form that is an integral part of the outline, not the two-column summary form designed for printing. (See p. 15.) It is also advisable to remove previous signatures and dates from the last page of the outline.
When the review process is finished and the outline is signed off and published to the Library, it will appear along with the previous version until the implementation date of the newly-published version, at which time the previous version will be moved to the ‘Archived’ view. Approved, published outlines will be available in read-only format to the full Kwantlen community in the Course Outline Library. See p. 8.
Discontinuing a course outline
To discontinue a course outline, open the current ‘approved’ version in your working database, get into edit mode, open the working summary form by clicking on the green ‘twistie’ (not the print layout summary form in the dark blue menu bar).
Check the checkbox by ‘This course is being discontinued’, enter the date to discontinue the course by using the calendar (or enter the date this way: mm/dd/yyyy).
Provide a rationale in the text field provided if appropriate.
When you save the changes, the ‘Discontinued’ date field on p. 1 of the actual course outline will automatically be filled out.
The Course Outline Library sends out an agent on a weekly basis to search through the working databases for any new entries in the ‘Discontinued’ fields and sends an automated message about any new entries to designated people, at present the Senate administrative assistant and the ‘Publisher’. Therefore, designated persons in deans’ offices no longer need to print and submit summary forms to the Senate office for discontinued courses.

13
Date fields in the database
A special feature of the database is that the implementation, review, and discontinuation dates are in a functional calendar. This allows the database to do the following:
Implementation date: When a revised course has been sent to the Library, it will co-exist there with its previous version until the implementation date of the newer version, at which time the previous version will be moved to the archive view. Note ACCT 1110, 1210, and 2293.
Review date: The database will send an automated message to the designated ‘reviewer’ eight months prior to the review date with a reminder that the course outline is due for review. If no reviewer is selected, the notification will be sent by default to the ‘Dean Assistant’ role.
Discontinued date: Please see ‘Discontinuing a Course Outline’ on page 12.
NOTE: Please note that all date fields must either be filled out by selecting a date in the actual calendar that pops up, or by entering the dates in this format: mm/dd/yyyy.
You will notice that date fields are set to display only month and year, but in the background, they work with mm/dd/yyyy.

14
Formatting in the course outline form
The Learning Objectives/Outcomes, Content, Essential Skills, and Learning Activities will require bulleting. The content may also require numbering if that is your practice.
Use the bulleting or numbering icon in the top grey menu bar.
For multilevel numbering or bulleting, press the F8 key to indent, or use the icon next to the pen icon in the middle of the grey bar above. Or to create custom indents, click on the diamond on the far left of the top grey menu bar,
which opens the text properties dialogue box (see below):
The arrows, the third option from the left, allows you to set specific values for indents in the box labelled ‘Left’.
For formatting text, use the tab with the letter ‘a’.
For alignment, use the second tab.
NOTE: You can also open the text properties dialogue box by using Ctrl k.

15
Adding page numbers to a course outline
You can add page numbers to a course outline for printing purposes by taking the following steps in your working database (it is not necessary to open an outline):
In the top grey menu bar, select ‘File’ and then ‘Document Properties.’ Then choose the printer icon as seen below, and select ‘Footer’.
In the ‘Header/Footer Text’ field, type ‘Page’, add a space, and click on the icon with the number ‘1’, which will insert ‘&P’ in the field, which gives you the page number. You can also add ‘of’ and a space and add the total number of pages by clicking on the icon with the numbers ‘1-1’, which will add ‘&Q’.
You can also add the course acronym and number by clicking on the ‘tab’ icon twice, which will add two vertical lines, and then click on the ‘title’ icon, which will add ‘&W’.
To verify that it has worked, open an outline and look at it in print preview.
‘tab’ icon
‘title’ icon

16
The Course Outline Summary Form
The Course Outline Summary Form provides important information for the Office of Enrolment and Registrar Services and for the Senate Subcommittee on Course Curriculum. It also serves as a permanent record of which areas of an outline have been revised.
The summary form is attached to the course outline form. The summary form has two views, one for working in, and one for printing only.
This view is for printing only. Open this view by clicking on ‘Summary’ on the blue menu bar :
This is the working view. Open this view by clicking on the green arrow or the words Course Outline Summary.

17
Working in the Course Outline Summary Form
Note: You must be in edit mode to work in the summary form.
It is essential to fill out the summary form accurately for several reasons:
It indicates if the outline is new or revised, and if revised, provides a permanent record of which areas in the outline have been revised.
Certain checkboxes selected will impact the approval signature process. When you check any checkbox under ‘Revisions requiring only divisional curriculum committee approval’, that main checkbox will automatically be filled in. Likewise for revisions requiring Senate approval. When Senate approval is not required, the signature process will bypass the Senate Vice Chair, and the outline will be sent from the dean to the publisher.
You can fill out the summary form at any point in the development/revision process. (A revised course outline will become a numbered version of an existing outline.)
18
Sharing a Course Outline during Development
If you want others to look at a course outline for any number of reasons, e.g., a co-developer, you can send one or more persons a link to the course outline.
There are two ways to send a link to a course outline. One is automated (1) and sends an email message with predetermined text, and the other is via a new email (2) and allows you to send a personalized message.
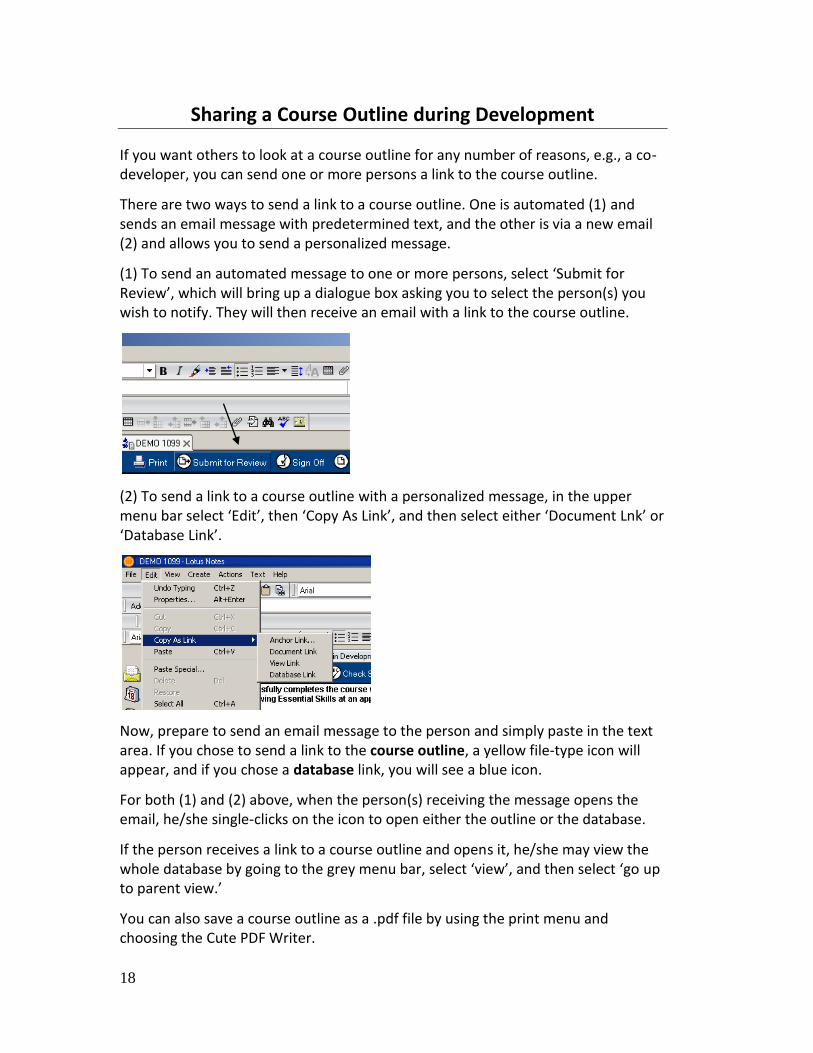
(1) To send an automated message to one or more persons, select ‘Submit for Review’, which will bring up a dialogue box asking you to select the person(s) you wish to notify. They will then receive an email with a link to the course outline.
(2) To send a link to a course outline with a personalized message, in the upper menu bar select ‘Edit’, then ‘Copy As Link’, and then select either ‘Document Lnk’ or ‘Database Link’.
Now, prepare to send an email message to the person and simply paste in the text area. If you chose to send a link to the course outline, a yellow file-type icon will appear, and if you chose a database link, you will see a blue icon.
For both (1) and (2) above, when the person(s) receiving the message opens the email, he/she single-clicks on the icon to open either the outline or the database.
If the person receives a link to a course outline and opens it, he/she may view the whole database by going to the grey menu bar, select ‘view’, and then select ‘go up to parent view.’
You can also save a course outline as a .pdf file by using the print menu and choosing the Cute PDF Writer.

19
Submitting a course outline for review ‘Review’ in this case means review by an individual or a group, such as a curriculum committee. A course outline can be sent for review in two different ways.
1. As per ‘Sharing a course outline during development’
2. Using the blue menu bar. On the blue menu bar, select ‘Submit for review’. This will open a dialogue box which will allow you to select individuals to send the outline to. Click in the column to the left of the names, and click ‘ok’, and a ‘Submit for review’ dialogue box appears, where you select ‘yes’ or ‘no’ or ‘cancel’. If you select ‘yes’, an email is automatically sent, in which the subject line will say ‘Course outline: (acronym and number) submitted for review, and the course outline acronym, number, and descriptive title will appear in the text area, along with ‘This course outline has been submitted to you for review.’ You will also receive a confirmation email that it has been sent.
The signature process When a course outline has been approved by Senate (or when a revised outline requiring only approval by the divisional curriculum committee has been approved by that committee), signatures of the course developer, the department chair, the dean, and the Senate chair (when required) must be obtained.
For individuals assigned the roles mentioned above, the menu bar will provide an option to ‘Sign Off’.
Use this function to create your electronic signature in place of signing a printed copy. It is preferable that course outlines are not signed before they are submitted for Senate approval (if they require Senate approval). If they are signed before they are submitted for Senate approval, you must sign them again after Senate approval if any revisions were required by Senate.

20
When the course developer knows the course outline has been fully approved, he/she will click on the ‘Sign Off’ option, which will open a dialogue box. In the dialogue box, please select the role you have, e.g., ‘developer’, and be sure to press OK.
That will bring up a dialogue box that asks you to select the ‘Department Chair’ who should sign the outline. Select the name of the person and click on ‘OK’.
That will trigger an automated email message to the next person on the approval list. The process will be repeated until a message has been sent to the Publisher with the notification to publish the outline to the Library.
When the course outline has been published to the Library, it will move from the ‘Under Development’ view to the ‘Approved’ view in the working database.
NOTE: Please be aware that anything you see in the signature area will be replaced by your new signature.

21
Document History ‘Document History’ at the end of the outline records the date, time, name of the user, and the action taken by the user. ‘Approved’ indicates signature. See sample below:
See also ‘General comments’ in the section on ‘Comment fields’ on p. 11.
Finding the URL for a course outline To find the URL for a course outline, open a course outline in the Library. (Please note, you will not find the URL in your working database.) In the blue menu bar, click on ‘Open course outline in browser.’ You will see something like this: http://appserver1.kwantlen.ca/apps/crsoutline/crslibrary.nsf/0/MFAB1106?OpenDocument&Login
Starting at the right of the URL as shown, delete up to ‘6’ in this case, which will give you the URL: (http://appserver1.kwantlen.ca/apps/crsoutline/crslibrary.nsf/0/MFAB1106)
You can use this to link to the course outline for whatever applications you need.
Web Access NOTE: At this time, the Web-interface has not yet been developed, which means that users will not be able to work in the database from home unless they have Lotus Notes installed on their home computers.
Faculty are also not yet able to work in the database via Webmail on campus. They must be in Lotus Notes.
Symbols used in the working database New - indicates a new outline under development.
Revised - indicates a previously published course outline which is under revision
Published - indicates that a course outline has been approved and published to the read-only Course Outline Library.

22
Rejected - indicates that a course outline was rejected during the publishing process. This only occurs if a duplication is detected.
Cancelled - indicates that a course outline has been cancelled during the approval process.