Long Distance Wifi Antenna - Home - PulseTV · Long Distance Wifi Antenna Software Installation:...
15
Long Distance Wifi Antenna Software Installation: Compatibility: Window Xp, Vista, 7 Minimum USB2.0 interface required. IMPORTANT NOTE: Install software CD according to instructions below, BEFORE antenna is plugged in. Always avoid connecting via a USB hub or an extension cable. 1) Insert software CD into your computer’s disk drive. The setup software will start automatically after a few seconds. An Autoplay window (shown below) will pop-up, click on open folder to view files. If Autoplay window does not appear click on START menu then my choose "My Computer" and double click the CD-ROM drive. 1
Transcript of Long Distance Wifi Antenna - Home - PulseTV · Long Distance Wifi Antenna Software Installation:...

Long Distance Wifi Antenna Software Installation:
Compatibility: Window Xp, Vista, 7
Minimum USB2.0 interface required.
IMPORTANT NOTE: Install software CD according to instructions below, BEFORE antenna is
plugged in. Always avoid connecting via a USB hub or an extension cable.
1) Insert software CD into your computer’s disk drive. The setup software will start automatically after
a few seconds. An Autoplay window (shown below) will pop-up, click on open folder to view files.
If Autoplay window does not appear click on START menu then my choose "My Computer" and
double click the CD-ROM drive.
1

2) Then double-click the setup icon. If a window pops up asking if you allow this program to run, click
"Yes"
Setup
2

3) The license agreement window will appear, click ''I accept the terms of the license agreement'',
then click ''Next ''.
3

4) The InstallShield Wizard window will appear, click “Install driver and Ralink WLAN Utility”,
then click '' Next '' to continue.
4

6) Then click "Install" to begin the installation For Windows XP select Ralink Configuration
Tool then click "Next" then click "Install"
7) Wait until the installation is finished
8) Then click '' Finish" to exit the setup.
9) Connect the USB cable of Wireless Wifi Antenna into the USB port of the computer.
5

For Windows XP network connection skip to page 10.
1. Click on Start menu, and type in ''Network and Sharing Center '' in
the “search program and files” text box (circled on the image to the
right) then click on the “Network and Sharing Center” option.
2. Then select “set up a new connection or network” option.
3. Select the first option to connect to the internet (set up wireless,
broadband, or dial-up connection to the internet) shown on the
image below, then click on ''Next''
6
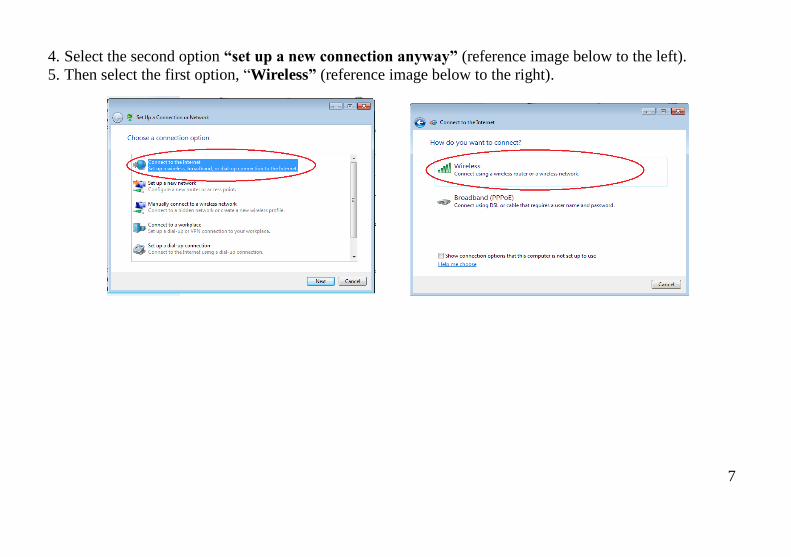
4. Select the second option “set up a new connection anyway” (reference image below to the left).
5. Then select the first option, “Wireless” (reference image below to the right).
7

6. A pop-up menu will appear listing all the available wi-fi connections, if not click on icon
(located on the lower right task bar) to find Menu and list available wifi connections.
7.Select the connection that you will set up with your wireless antenna.
8

8. Click “CONNECT” on the wi-fi connection and enter your security code to connect to the internet.
IMPORTANT: Make sure you Do Not already have a wireless card installed in your computer. If so
you have to disable the built in wireless card or else the antenna and the internal wireless card
could have conflicting signals.
9. You may unplug the LAN line from your computer and go online to confirm that the wireless antenna is
working. 9

Set up Network Connection for Windows XP
1. After installation of the software plug in the USB wire of the antenna into a USB port of your computer
2. The computer should recognize the device and install the drivers automatically
3. To set up the network connection look for the Ralink icon in the lower right task bar
4. Right click on the icon and select "launch configuration utility". If you can not
locate the icon then "click" the start button, select "All Programs" and then
select "Ralink Wireless" then select "Ralink Wireless Utility".
Click start
10
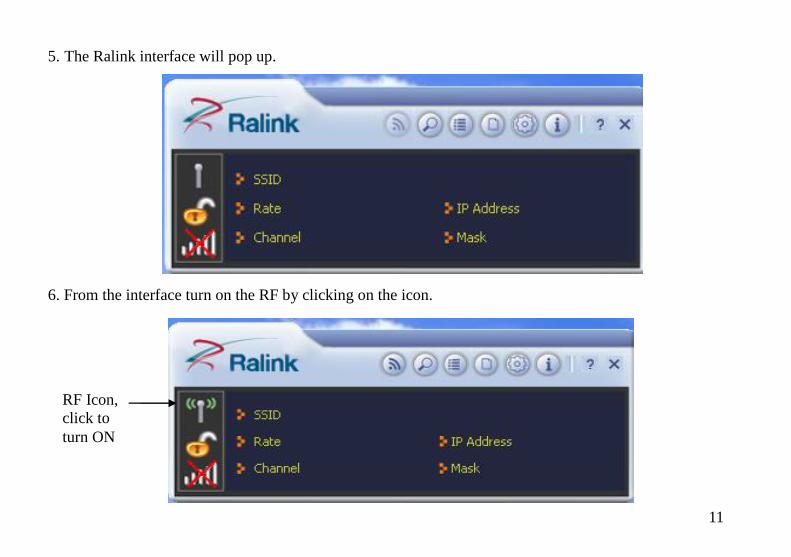
5. The Ralink interface will pop up.
6. From the interface turn on the RF by clicking on the icon.
RF Icon,
click to
turn ON
11

7. Next click on the magnifying glass to list the available networks
Magnifying glass List of available
networks
12

8. Choose the network you want to connect to from the list of available networks and "double click". The
profile settings window will pop up. Make sure the settings are correct and "click" the next arrow.
Next Arrow Icon Click if settings are
correct.
13

9. Enter the security key then click the next arrow again.
10. You now should be connected to the internet. Make sure you Do Not already have a wireless card
installed in your computer. If so you have to disable the built in wireless card or else the antenna and the
internal wireless card could have conflicting signals.
Enter in security
key
Next arrow click
once the security key
is entered
14

Appendix : Federal Communication Commission
This device complies with part 15 of the FCC Rules. Operation is subject to the following two conditions:
1. This device may not cause harmful interference, and
2. This device must accept any interference received, including interference that may cause undesired operation.
(a) Where special accessories, such as shielded cables and/or special connectors, are required to comply
with the emission limits, the equipment must be marketed with, i.e., shipped and sold with, those special
accessories. The instruction manual shall include appropriate instructions on the first page of the text
describing the installation of the device.
(b) “CAUTION: Changes or modifications not expressly approved by the party responsible for compliance
could void the user’s authority to operate the product.”
(c) “NOTE: This equipment has been tested and found to comply with the limits for a Class B digital device,
pursuant to Part 15 of the FCC Rules. These limits are designed to provide reasonable protection
against harmful interference in a residential installation. This equipment generates, uses and can
radiate radio frequency energy and, if not installed and used in accordance with the instructions, may
cause harmful interference to radio communications. However, there is no guarantee that interference
will not occur in a particular installation. If this equipment does cause harmful interference to radio or
television reception, which can be determined by turning the equipment off and on, the user is
encouraged to try to correct the interference by one or more of the following measures:
- Reorient or relocate the receiving antenna.
- Increase the separation between the equipment and receiver.
- Connect the equipment into an outlet on a circuit different from that to which the receiver is connected.
- Consult the dealer or an experienced radio/TV technician for help.”
Manufactured for Jobar International Inc.
Carson, CA 90745
15