Logging into Rehab Optima Web Addition - Contract … Optima PRN guide… · . Logging into Rehab...
19
www.optimahcs.com Logging into Rehab Optima: Start by logging onto Rehab Optima via a facility computer. Look for the Rehab Optima icon on the facility computer’s desktop. Click on the icon, it will bring you to a login screen. The first time you login and periodically thereafter based on your system’s configuration settings, Rehab Optima will inform you that your password has expired, click on the “OK” button to update your password. The “Change Password” dialog box requires that you enter a new password twice and choose the “OK” button. The required format for your new password is managed by your corporate office. If your password change does not meet the minimum requirements, you will receive a message indicating the exact specifications required for acceptance. Rehab Optima will confirm the successful change of your password with the “Change Password” dialog box, choose OK to continue. 3
Transcript of Logging into Rehab Optima Web Addition - Contract … Optima PRN guide… · . Logging into Rehab...
www.optimahcs.com
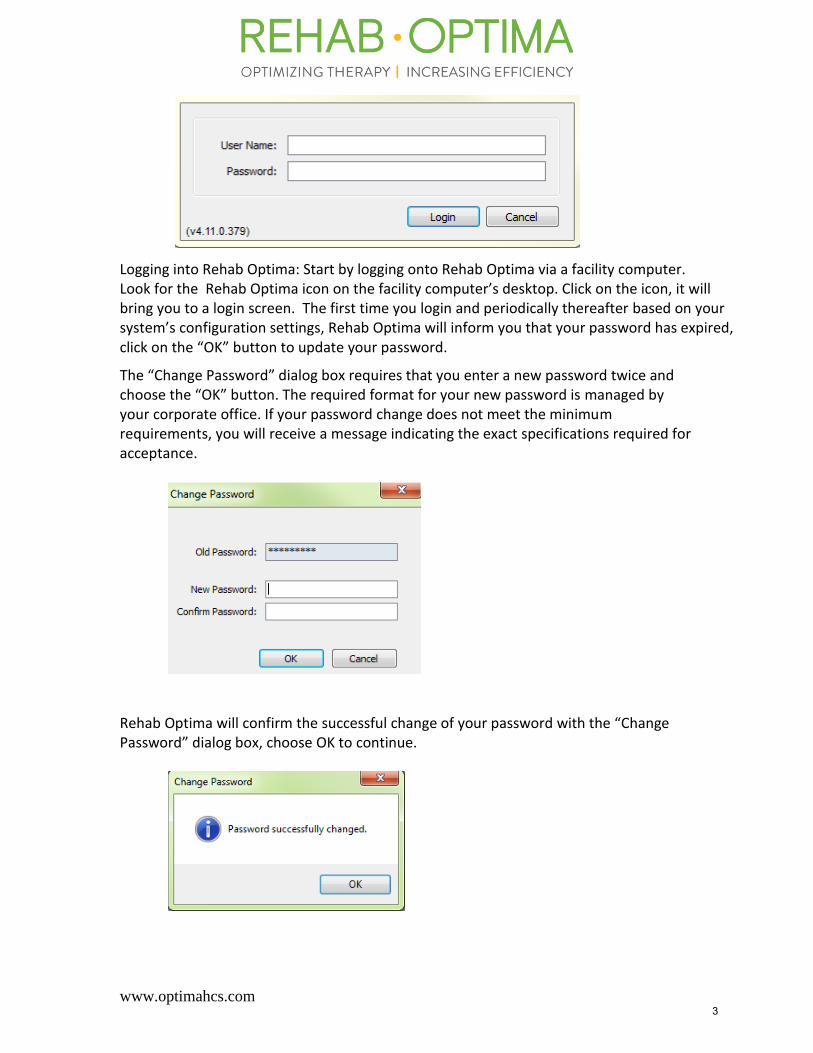
Logging into Rehab Optima: Start by logging onto Rehab Optima via a facility computer. Look for the Rehab Optima icon on the facility computer’s desktop. Click on the icon, it will bring you to a login screen. The first time you login and periodically thereafter based on your system’s configuration settings, Rehab Optima will inform you that your password has expired, click on the “OK” button to update your password.
The “Change Password” dialog box requires that you enter a new password twice and choose the “OK” button. The required format for your new password is managed by your corporate office. If your password change does not meet the minimum requirements, you will receive a message indicating the exact specifications required for acceptance.
Rehab Optima will confirm the successful change of your password with the “Change Password” dialog box, choose OK to continue.
3

www.optimahcs.com
5. When you have successfully logged into Rehab Optima, the system will take you directly to the facility you have been granted access.
If your job role requires you to have access to more than one facility, you will be presented with the “Select Site of Service” dialog box. Choose the “Site of Service” from the drop down menu and click on the “Login to Site” button.
*NOTE* Optima Healthcare Solutions support cannot reset your password. Please contact your corporate administrator to have passwords reset. If you enter in the incorrect username and/or password, you will receive a prompt when signing in that you have entered an Invalid User Name or Password.
User Rights are determined by your corporation. Toolbar Items and tabs available are based on the Security right that is assigned to a user by their corporation. Any changes to rights cannot be made by Optima Healthcare Solutions.
4
www.OptimaHCS.com
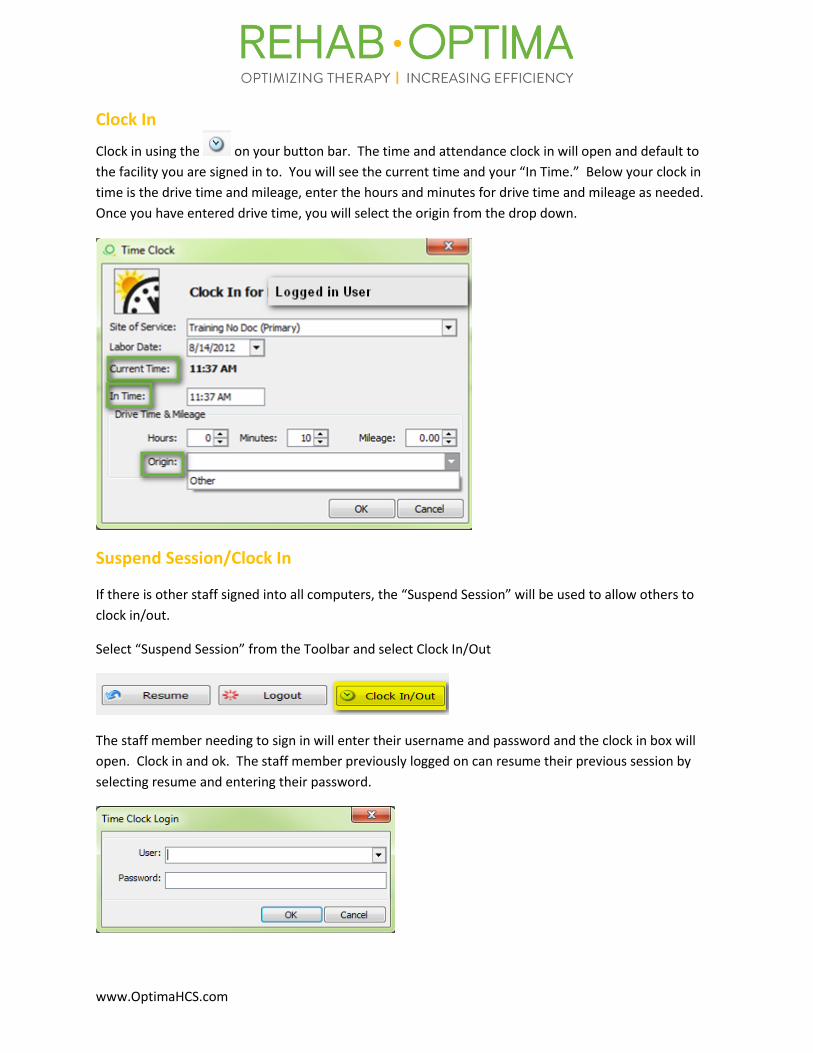
Clock In
Clock in using the on your button bar. The time and attendance clock in will open and default to
the facility you are signed in to. You will see the current time and your “In Time.” Below your clock in
time is the drive time and mileage, enter the hours and minutes for drive time and mileage as needed.
Once you have entered drive time, you will select the origin from the drop down.
Suspend Session/Clock In
If there is other staff signed into all computers, the “Suspend Session” will be used to allow others to
clock in/out.
Select “Suspend Session” from the Toolbar and select Clock In/Out
The staff member needing to sign in will enter their username and password and the clock in box will
open. Clock in and ok. The staff member previously logged on can resume their previous session by
selecting resume and entering their password.
www.OptimaHCS.com
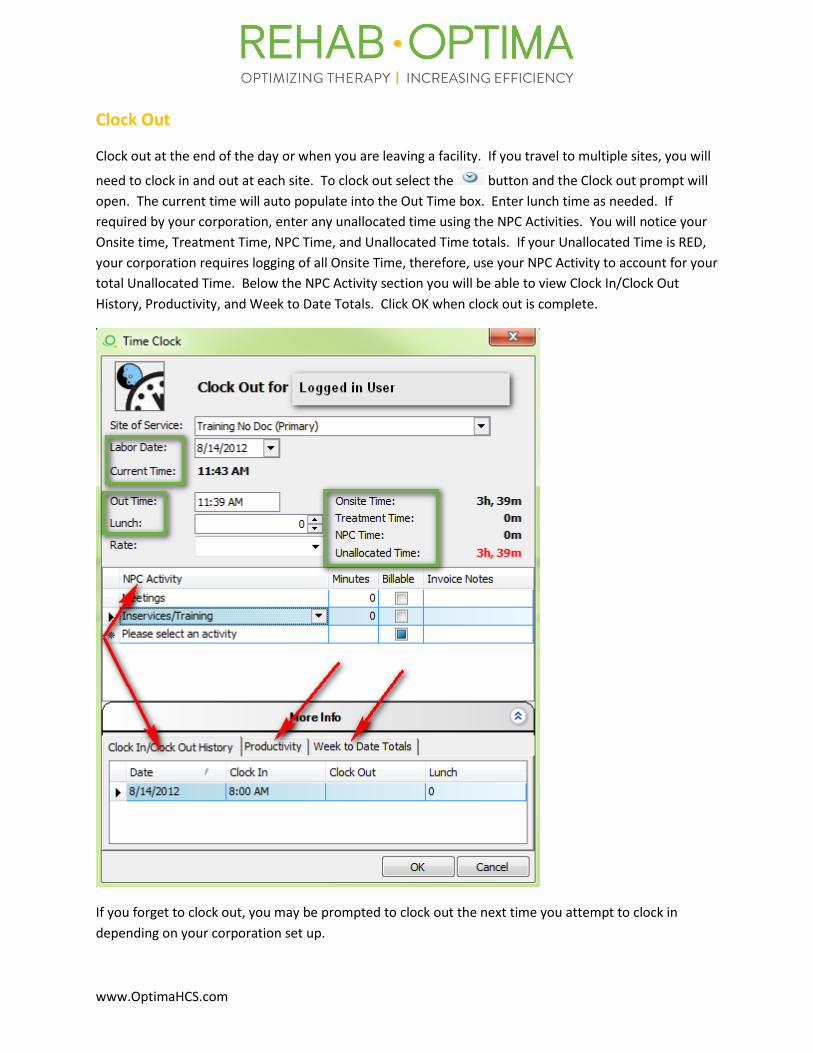
Clock Out
Clock out at the end of the day or when you are leaving a facility. If you travel to multiple sites, you will
need to clock in and out at each site. To clock out select the button and the Clock out prompt will
open. The current time will auto populate into the Out Time box. Enter lunch time as needed. If
required by your corporation, enter any unallocated time using the NPC Activities. You will notice your
Onsite time, Treatment Time, NPC Time, and Unallocated Time totals. If your Unallocated Time is RED,
your corporation requires logging of all Onsite Time, therefore, use your NPC Activity to account for your
total Unallocated Time. Below the NPC Activity section you will be able to view Clock In/Clock Out
History, Productivity, and Week to Date Totals. Click OK when clock out is complete.
If you forget to clock out, you may be prompted to clock out the next time you attempt to clock in
depending on your corporation set up.
www.OptimaHCS.com
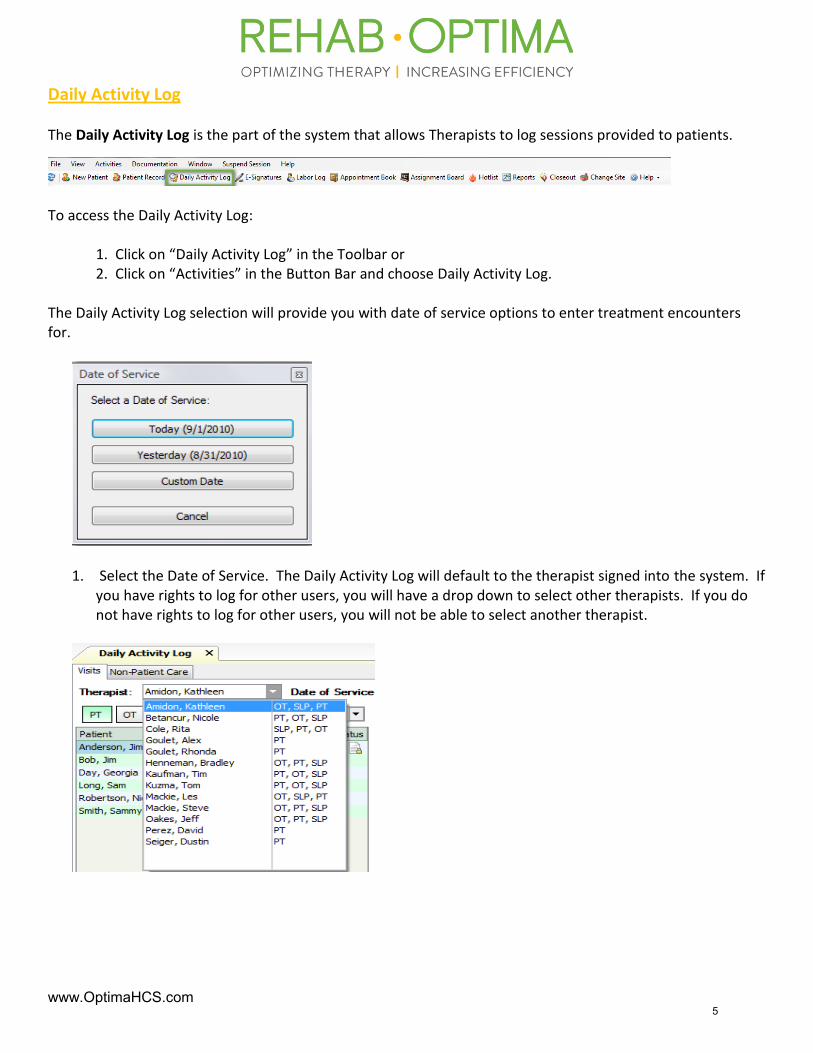
Daily Activity Log The Daily Activity Log is the part of the system that allows Therapists to log sessions provided to patients.
To access the Daily Activity Log: 1. Click on “Daily Activity Log” in the Toolbar or 2. Click on “Activities” in the Button Bar and choose Daily Activity Log. The Daily Activity Log selection will provide you with date of service options to enter treatment encounters for.
1. Select the Date of Service. The Daily Activity Log will default to the therapist signed into the system. If you have rights to log for other users, you will have a drop down to select other therapists. If you do not have rights to log for other users, you will not be able to select another therapist.
5
www.OptimaHCS.com
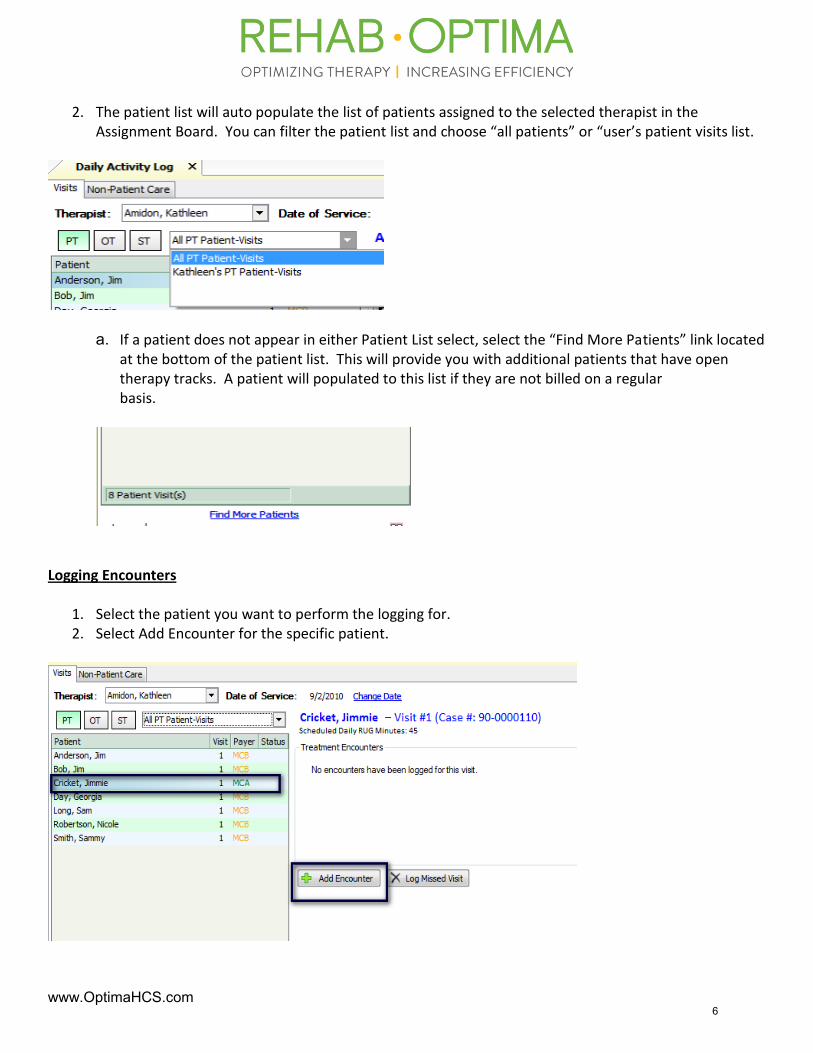
2. The patient list will auto populate the list of patients assigned to the selected therapist in the
Assignment Board. You can filter the patient list and choose “all patients” or “user’s patient visits list.
a. If a patient does not appear in either Patient List select, select the “Find More Patients” link located at the bottom of the patient list. This will provide you with additional patients that have open therapy tracks. A patient will populated to this list if they are not billed on a regular basis.
Logging Encounters
1. Select the patient you want to perform the logging for. 2. Select Add Encounter for the specific patient.
6
www.OptimaHCS.com
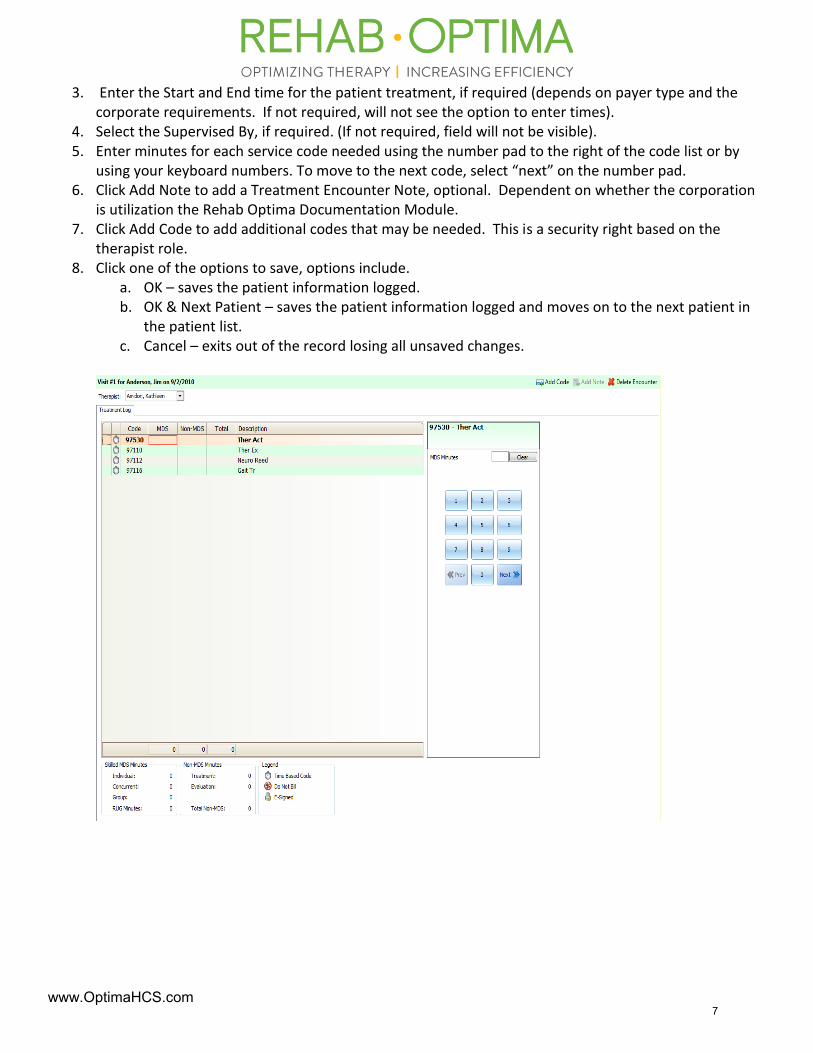
3. Enter the Start and End time for the patient treatment, if required (depends on payer type and the corporate requirements. If not required, will not see the option to enter times).
4. Select the Supervised By, if required. (If not required, field will not be visible). 5. Enter minutes for each service code needed using the number pad to the right of the code list or by
using your keyboard numbers. To move to the next code, select “next” on the number pad. 6. Click Add Note to add a Treatment Encounter Note, optional. Dependent on whether the corporation
is utilization the Rehab Optima Documentation Module. 7. Click Add Code to add additional codes that may be needed. This is a security right based on the
therapist role. 8. Click one of the options to save, options include.
a. OK – saves the patient information logged. b. OK & Next Patient – saves the patient information logged and moves on to the next patient in
the patient list. c. Cancel – exits out of the record losing all unsaved changes.
7

www.OptimaHCS.com
Logging a Missed Session
If the patient was not treated on a day that was scheduled for treatment, a Missed Visit is logged.
1. Select the Patient from the Patient List. 2. Select the “Log Missed Visit” button. 3. Select the Reason for the Missed Visit. 4. Enter any additional comments as needed. 5. Click one of the options to save, options include.
a. OK – saves the patient information logged. b. OK & Next Patient – saves the patient information logged and moves on to the next patient in
the patient list. c. Cancel – exits out of the record losing all unsaved changes.
8
www.OptimaHCS.com
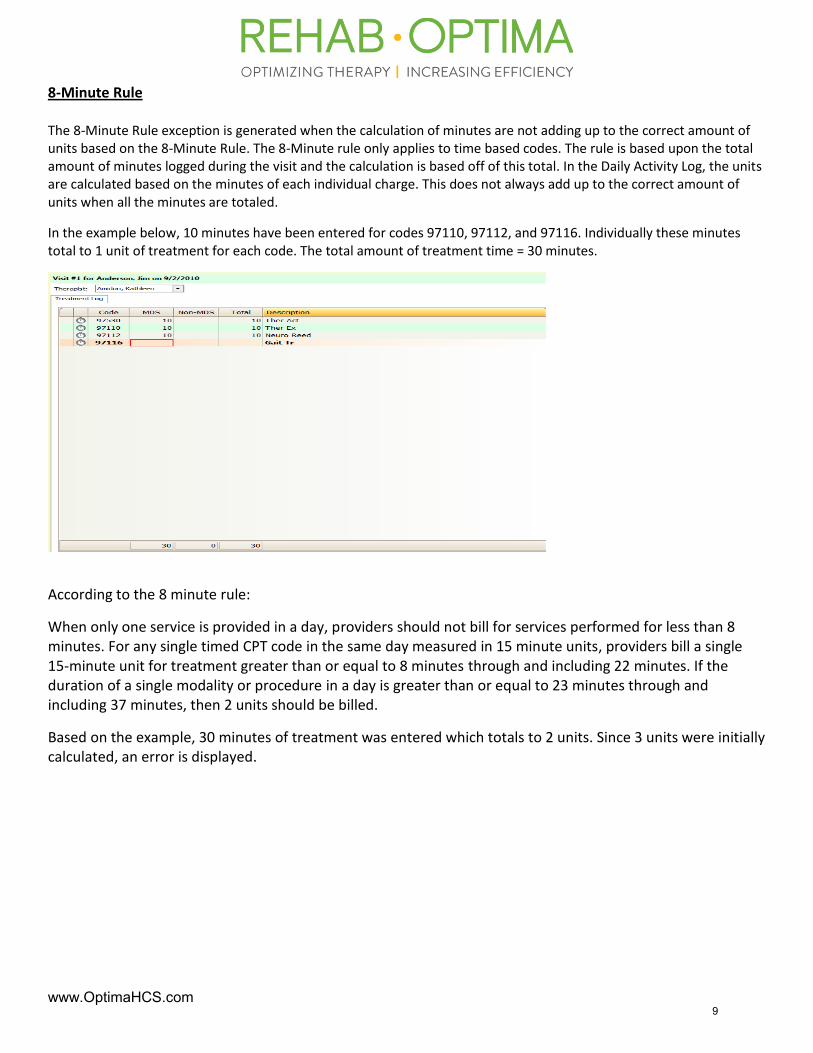
8-Minute Rule The 8-Minute Rule exception is generated when the calculation of minutes are not adding up to the correct amount of units based on the 8-Minute Rule. The 8-Minute rule only applies to time based codes. The rule is based upon the total amount of minutes logged during the visit and the calculation is based off of this total. In the Daily Activity Log, the units are calculated based on the minutes of each individual charge. This does not always add up to the correct amount of units when all the minutes are totaled.
In the example below, 10 minutes have been entered for codes 97110, 97112, and 97116. Individually these minutes total to 1 unit of treatment for each code. The total amount of treatment time = 30 minutes.
According to the 8 minute rule:
When only one service is provided in a day, providers should not bill for services performed for less than 8 minutes. For any single timed CPT code in the same day measured in 15 minute units, providers bill a single 15-minute unit for treatment greater than or equal to 8 minutes through and including 22 minutes. If the duration of a single modality or procedure in a day is greater than or equal to 23 minutes through and including 37 minutes, then 2 units should be billed.
Based on the example, 30 minutes of treatment was entered which totals to 2 units. Since 3 units were initially calculated, an error is displayed.
9
www.OptimaHCS.com
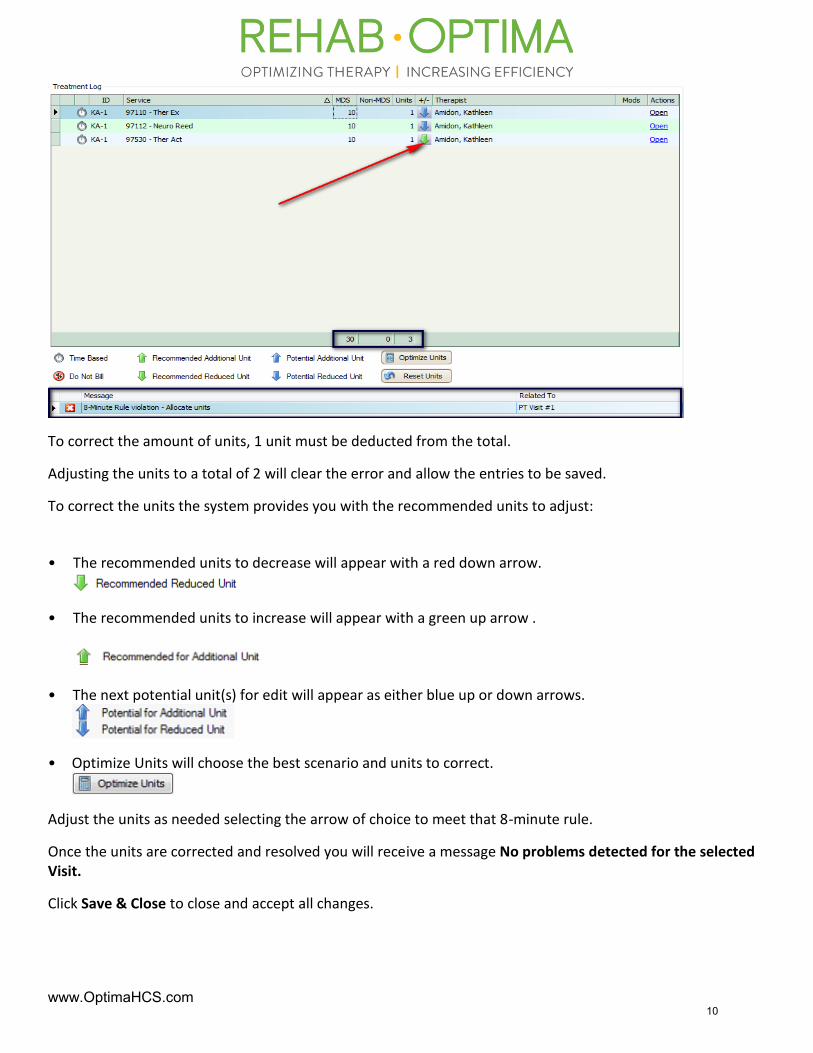
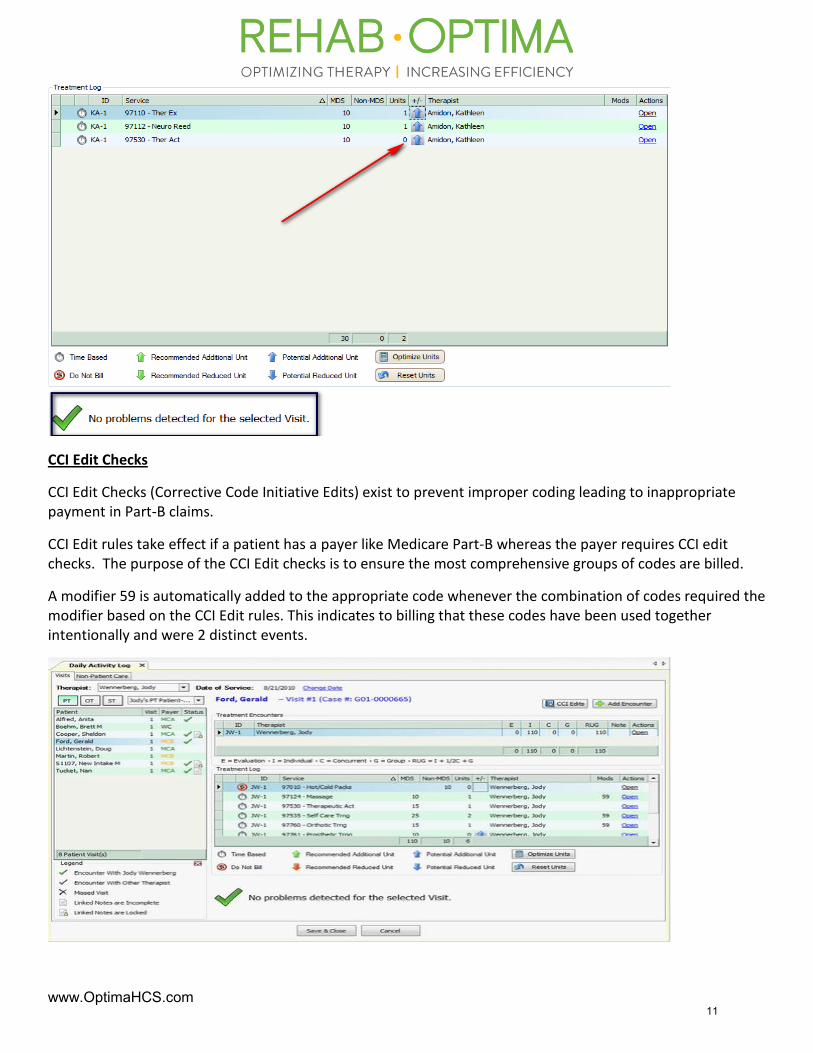
To correct the amount of units, 1 unit must be deducted from the total.
Adjusting the units to a total of 2 will clear the error and allow the entries to be saved.
To correct the units the system provides you with the recommended units to adjust:
• The recommended units to decrease will appear with a red down arrow.
• The recommended units to increase will appear with a green up arrow .
• The next potential unit(s) for edit will appear as either blue up or down arrows.
• Optimize Units will choose the best scenario and units to correct.
Adjust the units as needed selecting the arrow of choice to meet that 8-minute rule.
Once the units are corrected and resolved you will receive a message No problems detected for the selected Visit.
Click Save & Close to close and accept all changes.
10
www.OptimaHCS.com
CCI Edit Checks
CCI Edit Checks (Corrective Code Initiative Edits) exist to prevent improper coding leading to inappropriate payment in Part-B claims.
CCI Edit rules take effect if a patient has a payer like Medicare Part-B whereas the payer requires CCI edit checks. The purpose of the CCI Edit checks is to ensure the most comprehensive groups of codes are billed.
A modifier 59 is automatically added to the appropriate code whenever the combination of codes required the modifier based on the CCI Edit rules. This indicates to billing that these codes have been used together intentionally and were 2 distinct events.
11
www.OptimaHCS.com
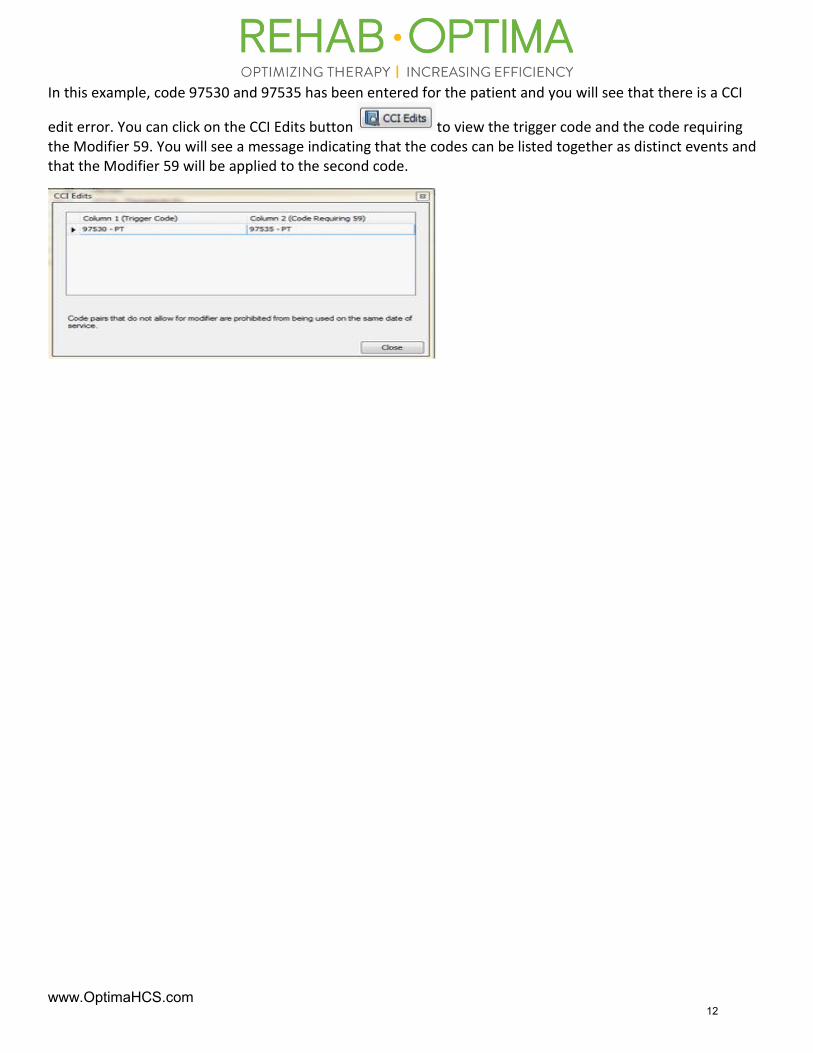
In this example, code 97530 and 97535 has been entered for the patient and you will see that there is a CCI
edit error. You can click on the CCI Edits button to view the trigger code and the code requiring the Modifier 59. You will see a message indicating that the codes can be listed together as distinct events and that the Modifier 59 will be applied to the second code.
12
www.OptimaHCS.com
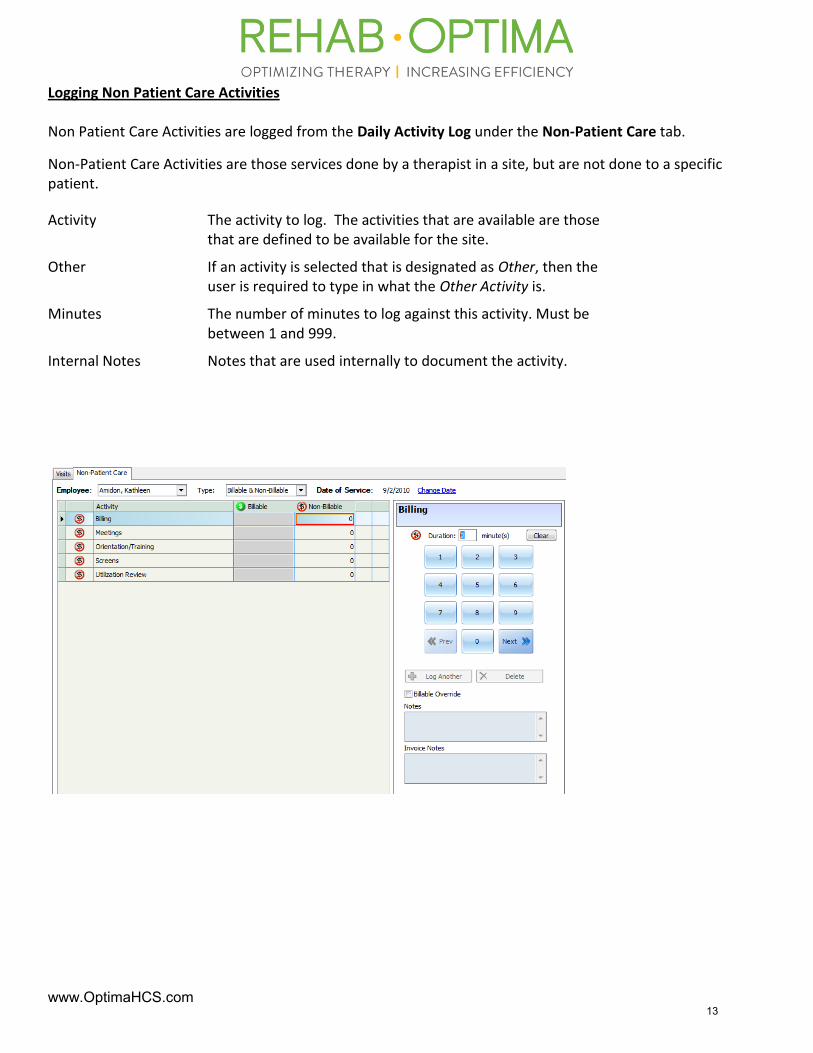
Logging Non Patient Care Activities Non Patient Care Activities are logged from the Daily Activity Log under the Non-Patient Care tab.
Non-Patient Care Activities are those services done by a therapist in a site, but are not done to a specific patient.
Activity The activity to log. The activities that are available are those that are defined to be available for the site.
Other If an activity is selected that is designated as Other, then the user is required to type in what the Other Activity is.
Minutes The number of minutes to log against this activity. Must be between 1 and 999.
Internal Notes Notes that are used internally to document the activity.
13
www.OptimaHCS.com
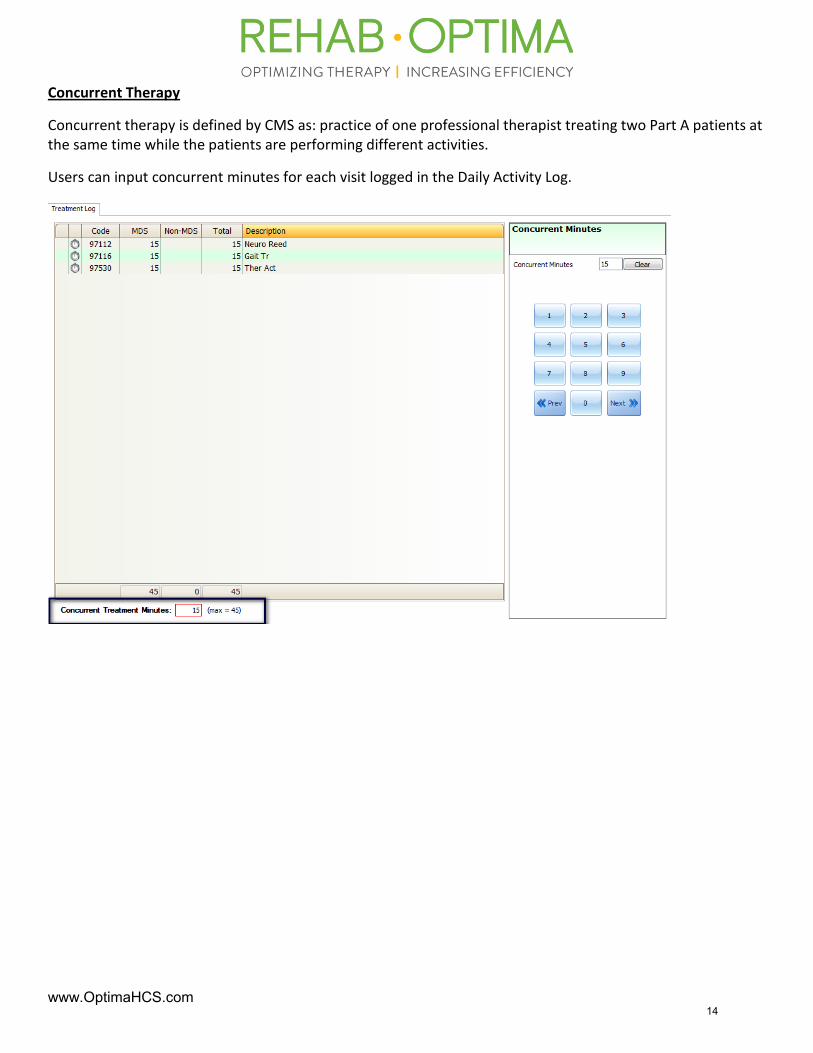
Concurrent Therapy
Concurrent therapy is defined by CMS as: practice of one professional therapist treating two Part A patients at the same time while the patients are performing different activities.
Users can input concurrent minutes for each visit logged in the Daily Activity Log.
14

www.OptimaHCS.com
E-signatures for Patient Charges
Prior to accessing the E-Signature Module, each user must have an E-Signature defined within their profile to show how the therapist's name should be displayed in printed documents. If this signature entry is missing, the following message will appear when trying to access the E-Signature module.
Clicking on Yes will open the Personal Profile for the user. Within this form, the following field needs to be defined.
E-Signatures is displayed in two sections:
Section 1 – displays all the patients and the dates of service requiring an E-signature. Section 2 – displays all the codes and minutes charged for the date of service selected in the first section.
The E-signature module will auto open when the user closes the Daily Activity Log. A user can also open the E-signature module from selecting the E-signatures tab in the Toolbar.
15
www.OptimaHCS.com
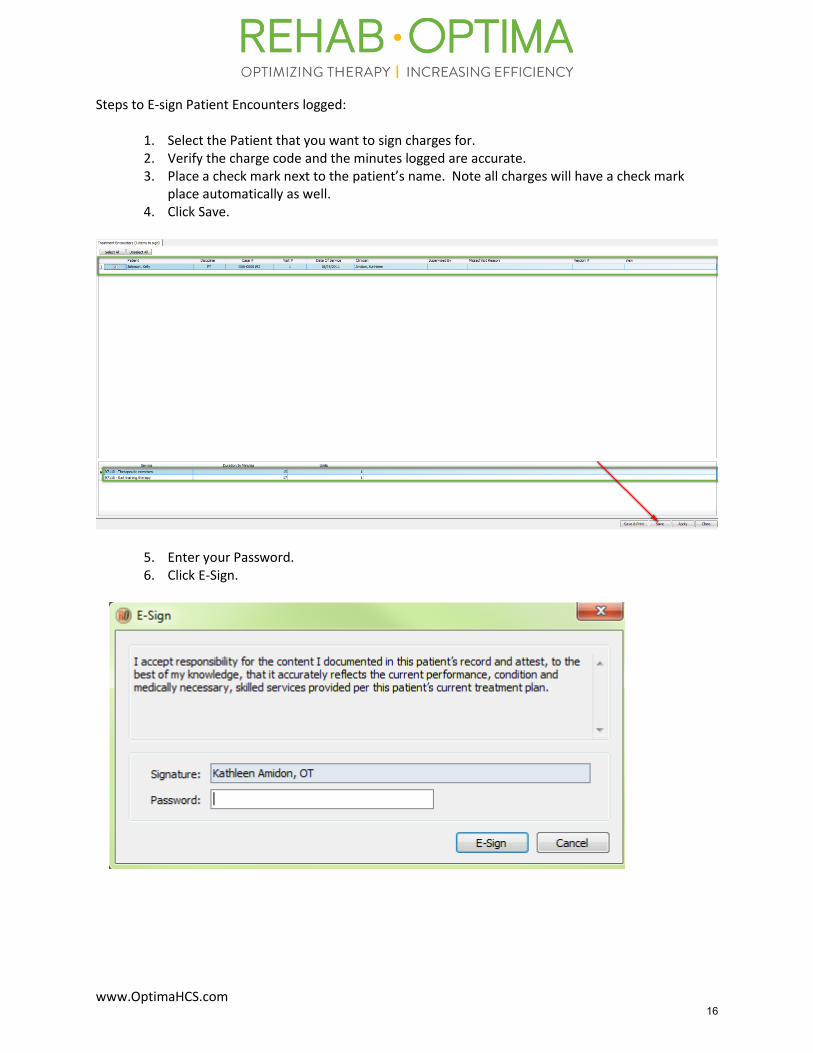
Steps to E-sign Patient Encounters logged:
1. Select the Patient that you want to sign charges for. 2. Verify the charge code and the minutes logged are accurate. 3. Place a check mark next to the patient’s name. Note all charges will have a check mark
place automatically as well. 4. Click Save.
5. Enter your Password. 6. Click E-Sign.
16
www.OptimaHCS.com
Weekly Progress Report When a Progress Report is due, it will be noted in red in the Case Manager discipline therapy card. Select the “create” link to the right of the document. The New document box will open with the from and thru dates of the progress report period. These are auto populated according to the guidelines set up by the corporation. Click the Add button.
Once document is open, it has a Similar “look” as Evaluation form
3 tabs are included in the progress note: General, Plan of Treatment – Goals, and Assessment.
General Tab:
Progress Report Coverage Period (as calculated from SOC) is listed at the top right of the document. A user can change the thru date to an earlier date if completing early - due dates of future documents may change dependent upon completion of prior form and Workflow.
System recognizes logged in user as the Responsible Therapist
Items on General tab Populate from previous document: Hospitalization, Type of Therapy and diagnosis as indicated on Evaluation/previous document(s).
Move on to the next tab:
Plan of Treatment / Goals tab
User can change/update frequency, duration, intensity and/or Treatment Approaches.
Follow the same methods as on Evaluation to Add Goals; refer back to Evaluation – Plan of Treatment - Goals video if needed for review of process.
Goals hi-lited in pink/red color requires updating.
Status of goal must be indicated.
Objective levels must be updated.
On the first STG, click Update.
After clicking Update, the user can:
Preview previous levels, however, can only change previous values if user clicks on edit previous values button. If changes are made the user will need to go into previous documents and also change the values. The change will not auto populate into past created/saved documents.
Update STG Status and Current level of function on the goal. The STG Status option will be dependent on whether template or custom goals were created. The User will have additional upgrade and downgrade options if template goals are created.
If status is indicated as Downgrade, when click Next Goal, a box will appear, providing the user the opportunity to immediately downgrade the goal. Once completed, the goal will be marked as Downgrade, it retains its number, turns to white, and a new goal with a sub-number is established and green in color.
If a goal is indicated as Upgrade or Goal Met Upgrade, it will be assigned a number associated with the original goal (e.g., 3.1, 3.2, etc.) until met.
If a goal is indicated as Upgrade or Goal Met Upgrade, when click Next Goal, a box will appear, providing the user the opportunity to immediately upgrade the goal
Click red links to update targets. Indicate new target date. Click OK.
17
www.OptimaHCS.com
Click Next Goal to Update all other goals. Once the last goal is updated the Next goal tab will be disabled, select OK to close the last updated goal. You will then see all updates and any new goals listed in your document.
Additional NOTES:
Selecting Exclude will exclude the goal from future documents, only if it has been marked as EXCLUDE on ALL documents it has been included on.
Selecting Medical Hold will inactivate a goal. The goal must be reentered as a new goal if needed in the future.
Adding Goals on Weekly Progress Reports
Click on the Add goal or Add STG/LTG buttons. The list of FD / PI from the evaluation/previous documents will appear.
Goals can be created as “custom” OR “build” goals, just like on Evaluation.
Complete Assessment Tab of the Document.
Information on various items in the assessment section of the Progress Report may carryover from the previous document. Users are able to make changes as needed to those areas.
● After all required responses are met, mark the document complete and Save. User will return to the Case Manager where the newest document completed will be listed for printing.
18
www.OptimaHCS.com
Adding Re-Certifications:
A user creates this documents from Case Manager by clicking the create link next to the Document Due.
The New document tab will open with the Recertification Dates auto filled according to the corporation guidelines in the system. Click the Add Button.
The document will open to the general tab, move onto the Plan of Treatment – Goals tab and update both ST and LT goals. Required updates to goals will be noted in Pink/red color. Select the Update button on each goal and update using the same process as in the Progress Report.
To Add new goals, select the Add goal buttons for each ST/LT additions needed. The FD/PI list will not auto populate in the New goal box as previously seen in the Progress Report. User may select to reload the list using the ‘Current Document’ drop down and select ‘all documents’. Select and create goals as previously instructed.
If the FD/PI list is not needed, select the Skip FD/PI to receive the Template Categories available. User may also select the Custom Goal tab.
Move on to the ASSESSMENT Tab, enter all information in each section as needed/required. Select sections will auto populate information from previous documents, make changes as needed.
Re-Certifications optionally include Functional Outcome data collection.
Select the Plan of Treatment – Other tab and complete the items. Mark document as complete and save. Document will be listed in Case Manager, print as needed.
Adding Discharge Summaries: . ● When a patient is being discharged from therapy, select the End Track button in your therapy track. You will confirm the end date that is auto filled according to your last billed date in the express log, select the reason and destination (if not required you will not see these items) and click OK. Your discharge summary will open for completion.
Select the ‘Status at Discharge’ tab. All ST and LT goals will require updating. The goal status selections available are Goal Met or Discontinued. Select the correct response and input the patients current status. Follow the process for each goal.
Select the ‘Assessment’ tab and enter all information needed in each section as needed/required.
Discharge Summaries require Functional Outcome data collection. These are the same items that were optional in the Recertification.
If discrepancies in data collected on the Outcome data exist on any document, the user is prompted to correct the discrepancies prior to completing and saving the document. For example, if a user documents Bed Mobility as Max(A) while in the Assessment tab, but updated the ST and/or LT goal value as Bed Mobility TD+, when the user attempts to save the document, the Measurement Resolution error will populate. The user must select which level is accurate. Once selected (e.g., Max(A)), the system will apply that level to each area where the discrepancy existed. The document cannot be completed and saved until the discrepancy is corrected.
Completing a Discharge Summary Ends a therapy track. Print as needed using the print link.
19