
Livetrack Reader Manual
32
Livetrack Reader Manual
Transcript of Livetrack Reader Manual
Livetrack Reader Manual
Getting started
Supplied accessories Battery installation Charging the battery Reading a tag
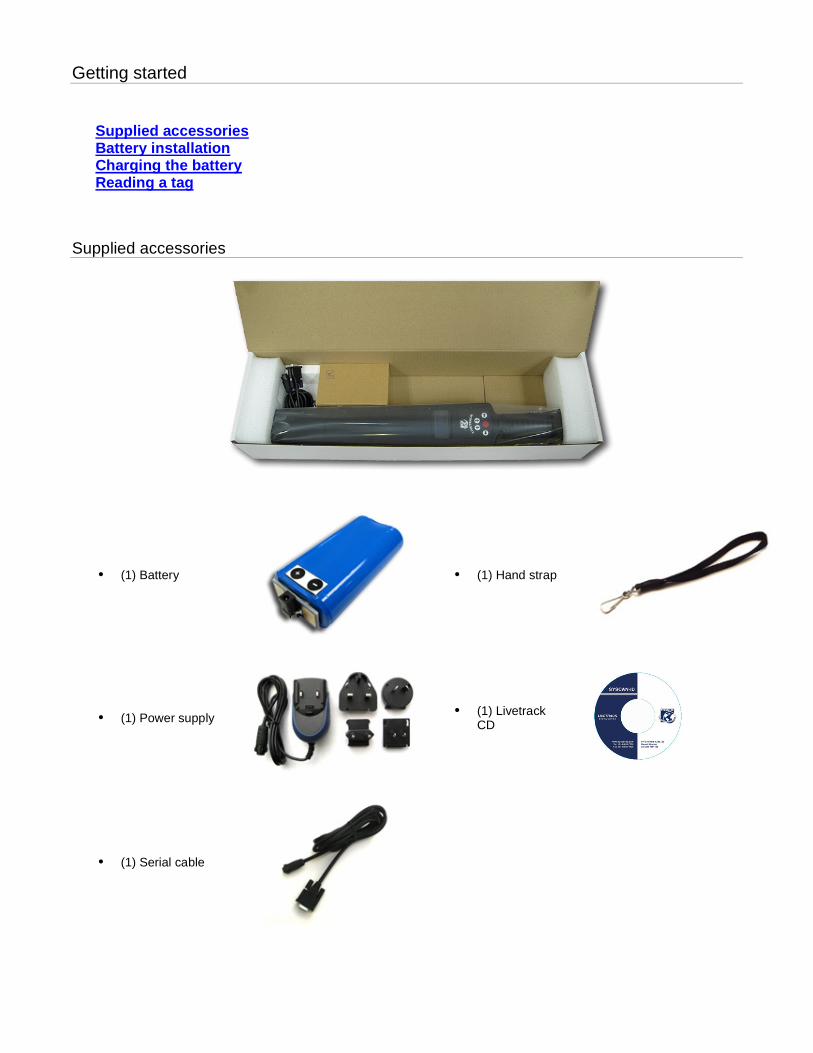
Supplied accessories
• (1) Battery
• (1) Hand strap
• (1) Power supply
• (1) Livetrack CD
• (1) Serial cable

Battery installation
• Lift to unclip both side of the end cap.
• Pull end cap down and be careful with the internal cable.
• Insert battery by aligning the + and the -. Put end cap back.
Charging the battery
• Connect the power supply cable on the reader first.
• Connect the power supply in a wall plug.
• Charging
• Fully Charged
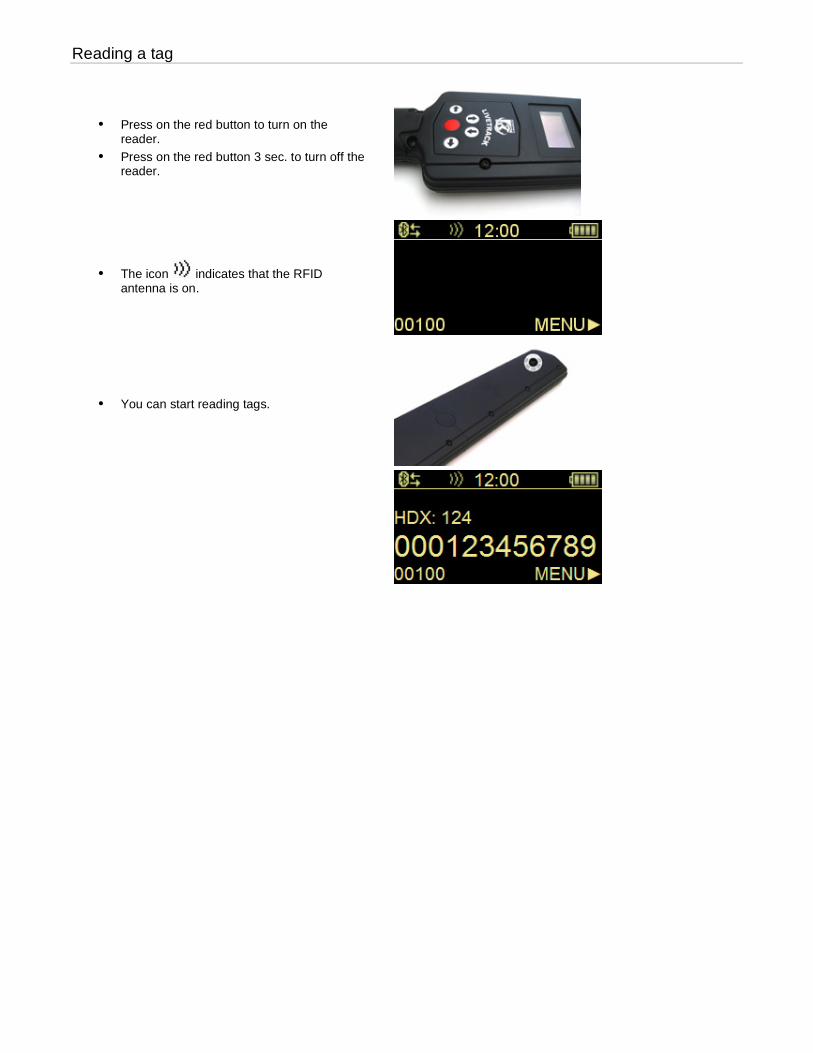
Reading a tag
• Press on the red button to turn on the reader.
• Press on the red button 3 sec. to turn off the reader.
• The icon indicates that the RFID antenna is on.
• You can start reading tags.

Nomentclature
Reader Connector Indicator icons
Reader
1. RFID reading zone 2. Display screen 3. ON/OFF button 4. Control buttons 5. Handle/Battery compartment 6. Battery compartment door 7. Charge/Serial connector
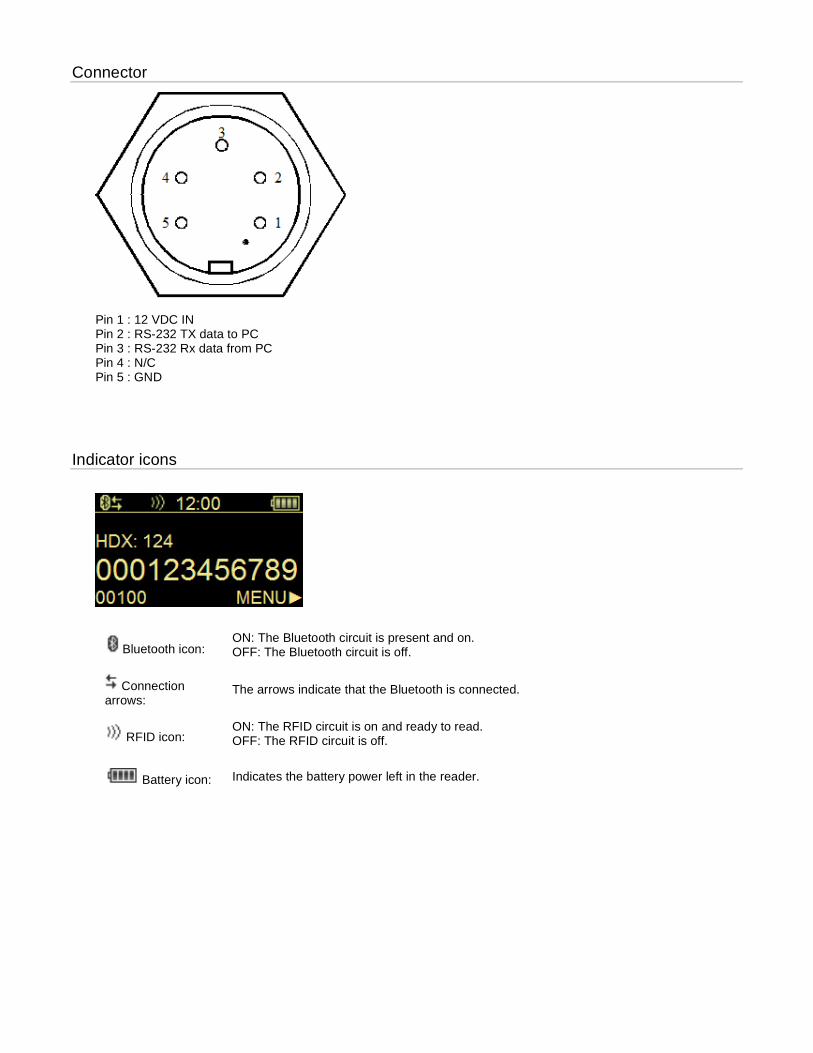
Connector
Pin 1 : 12 VDC IN Pin 2 : RS-232 TX data to PC Pin 3 : RS-232 Rx data from PC Pin 4 : N/C Pin 5 : GND
Indicator icons
Bluetooth icon: ON: The Bluetooth circuit is present and on. OFF: The Bluetooth circuit is off.
Connection arrows:
The arrows indicate that the Bluetooth is connected.
RFID icon: ON: The RFID circuit is on and ready to read. OFF: The RFID circuit is off.
Battery icon: Indicates the battery power left in the reader.

Menus
Counter
MENU > COUNTER >
The counter is the number of tags read after it has been reset. Reset the counter by pressing the red button.
Separator
MENU > SEPARATOR >
Insert a separator by pressing the red button. A separator is a fake tag with a 000 000 000 000 000 ID and can be used to separate batches of reads. The separator will not affect the tag counter but will affect the memory count.
Info menu
MENU > INFO MENU >
The INFO MENU contains information about the reader including: BAT : Actual battery voltage. SER : Serial number of the reader. VER : Firmware version. MEM: Number of tags in memory. B9600: Signifies a Bluetooth module at baud rate 9600.
User menu
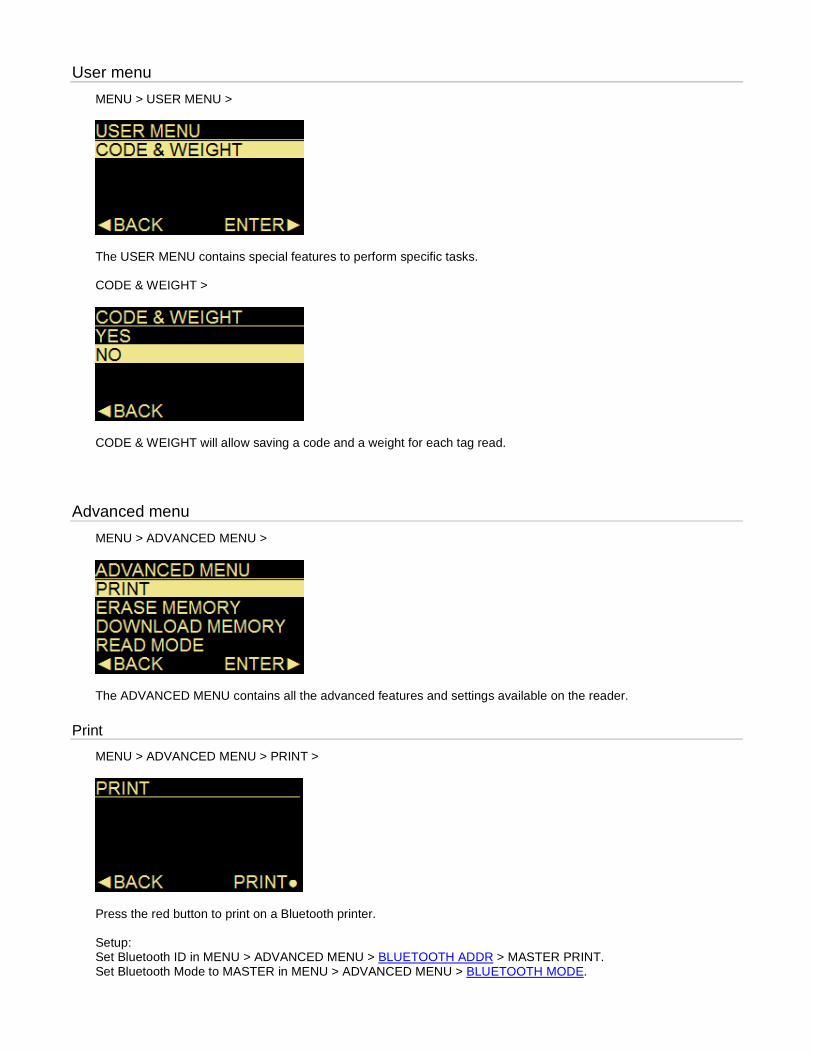
MENU > USER MENU >
The USER MENU contains special features to perform specific tasks. CODE & WEIGHT >
CODE & WEIGHT will allow saving a code and a weight for each tag read.
Advanced menu
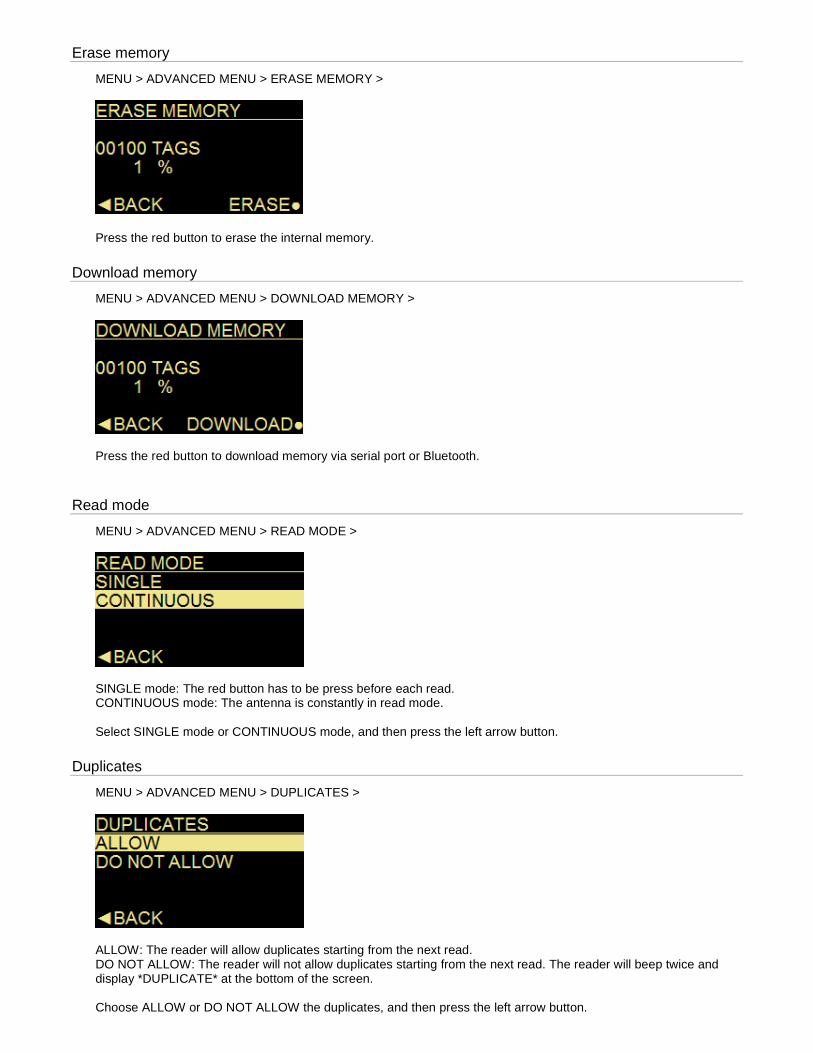
MENU > ADVANCED MENU >
The ADVANCED MENU contains all the advanced features and settings available on the reader.
MENU > ADVANCED MENU > PRINT >
Press the red button to print on a Bluetooth printer. Setup: Set Bluetooth ID in MENU > ADVANCED MENU > BLUETOOTH ADDR > MASTER PRINT. Set Bluetooth Mode to MASTER in MENU > ADVANCED MENU > BLUETOOTH MODE.
Erase memory
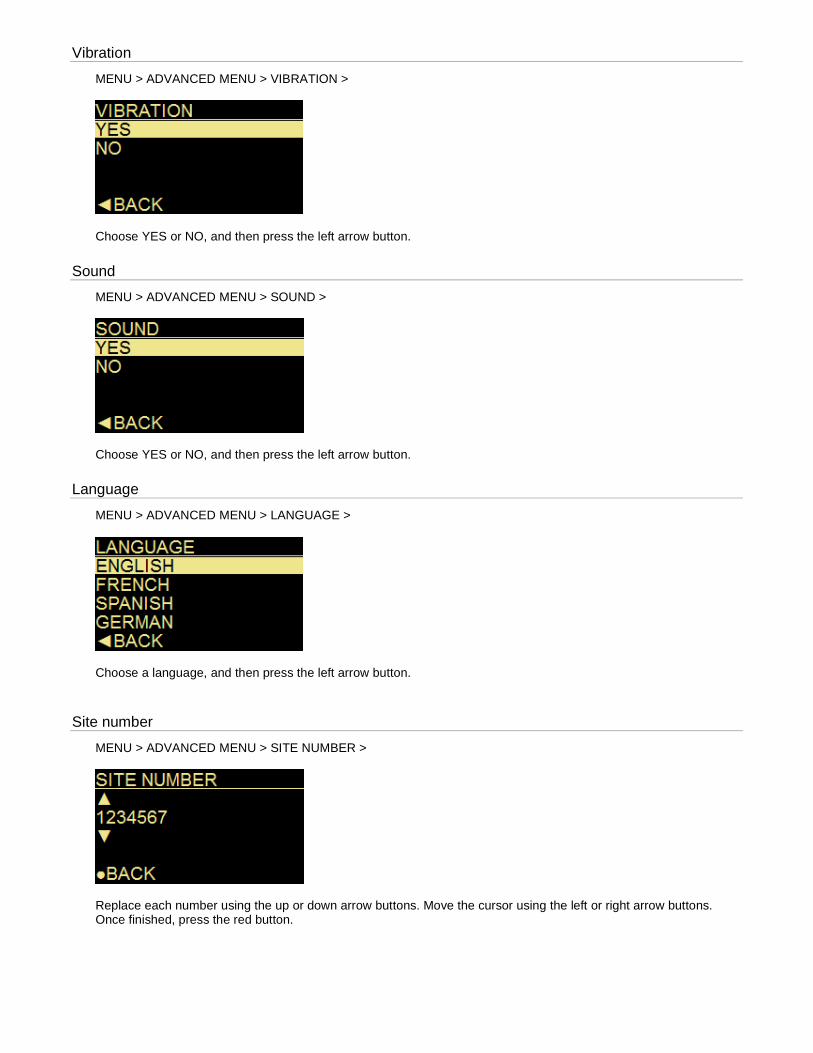
MENU > ADVANCED MENU > ERASE MEMORY >
Press the red button to erase the internal memory.
Download memory
MENU > ADVANCED MENU > DOWNLOAD MEMORY >
Press the red button to download memory via serial port or Bluetooth.
Read mode
MENU > ADVANCED MENU > READ MODE >
SINGLE mode: The red button has to be press before each read. CONTINUOUS mode: The antenna is constantly in read mode. Select SINGLE mode or CONTINUOUS mode, and then press the left arrow button.
Duplicates
MENU > ADVANCED MENU > DUPLICATES >
ALLOW: The reader will allow duplicates starting from the next read. DO NOT ALLOW: The reader will not allow duplicates starting from the next read. The reader will beep twice and display *DUPLICATE* at the bottom of the screen. Choose ALLOW or DO NOT ALLOW the duplicates, and then press the left arrow button.
Vibration
MENU > ADVANCED MENU > VIBRATION >
Choose YES or NO, and then press the left arrow button.
Sound
MENU > ADVANCED MENU > SOUND >
Choose YES or NO, and then press the left arrow button.
Language
MENU > ADVANCED MENU > LANGUAGE >
Choose a language, and then press the left arrow button.
Site number
MENU > ADVANCED MENU > SITE NUMBER >
Replace each number using the up or down arrow buttons. Move the cursor using the left or right arrow buttons. Once finished, press the red button.
Bluetooth mode
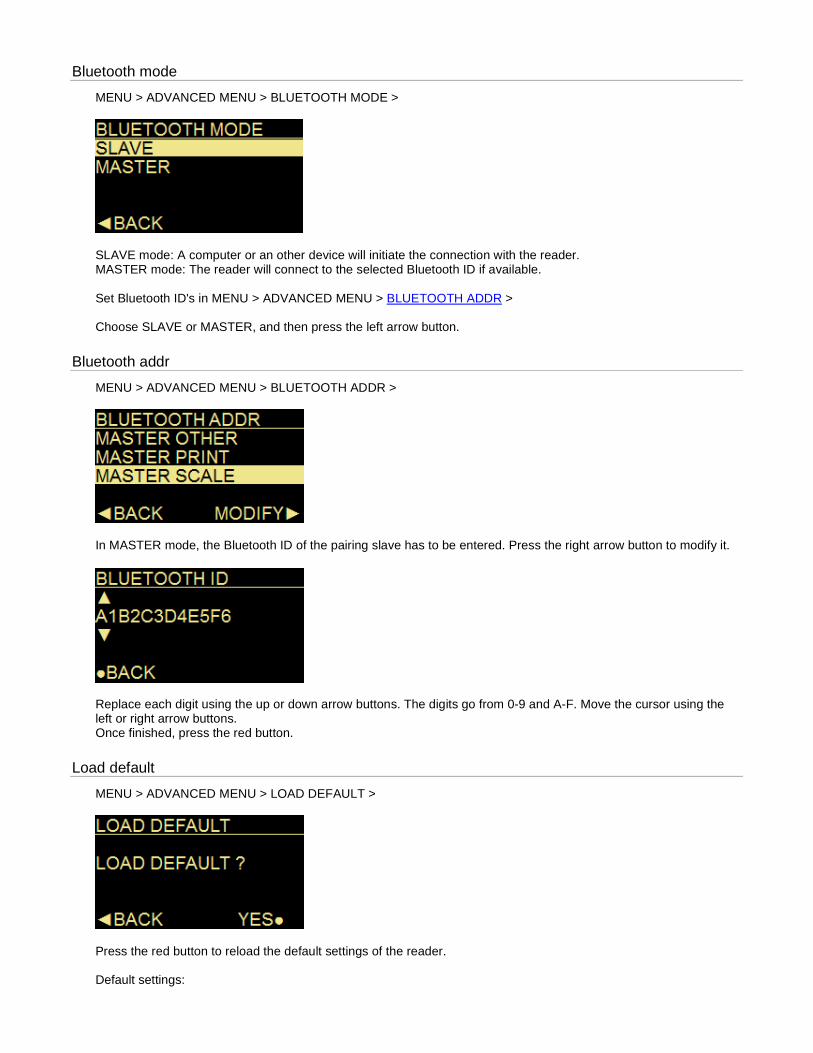
MENU > ADVANCED MENU > BLUETOOTH MODE >
SLAVE mode: A computer or an other device will initiate the connection with the reader. MASTER mode: The reader will connect to the selected Bluetooth ID if available. Set Bluetooth ID's in MENU > ADVANCED MENU > BLUETOOTH ADDR > Choose SLAVE or MASTER, and then press the left arrow button.
Bluetooth addr
MENU > ADVANCED MENU > BLUETOOTH ADDR >
In MASTER mode, the Bluetooth ID of the pairing slave has to be entered. Press the right arrow button to modify it.
Replace each digit using the up or down arrow buttons. The digits go from 0-9 and A-F. Move the cursor using the left or right arrow buttons. Once finished, press the red button.
Load default
MENU > ADVANCED MENU > LOAD DEFAULT >
Press the red button to reload the default settings of the reader. Default settings:

READ MODE Continuous
DUPLICATES Allow Duplicates
VIBRATION Yes
SOUND Yes
LANGUAGE English
SITE NUMBER 0000000
BLUETOOTH MODE Slave
OUTPUT MENU All selected
Turn off delays 0120, 0060, 0120
Output menu
MENU > ADVANCED MENU > OUTPUT MENU >
The format of the transmitted packet contains four sections. Select (>) or unselect ( ) by using the up and down arrow buttons and pressing the red button. Once finished, press the left arrow button.
Set time & date
MENU > ADVANCED MENU > TIME & DATE >
Replace each number using the up or down arrow buttons. Move the cursor using the left or right arrow buttons. Once finished, press the red button.
Line feed
MENU > ADVANCED MENU > LINE FEED >
Choose CR to add a carriage return or CR/LF to add a carriage return and line feed when transmitting data. Once finished, press the left arrow button.
Tag type
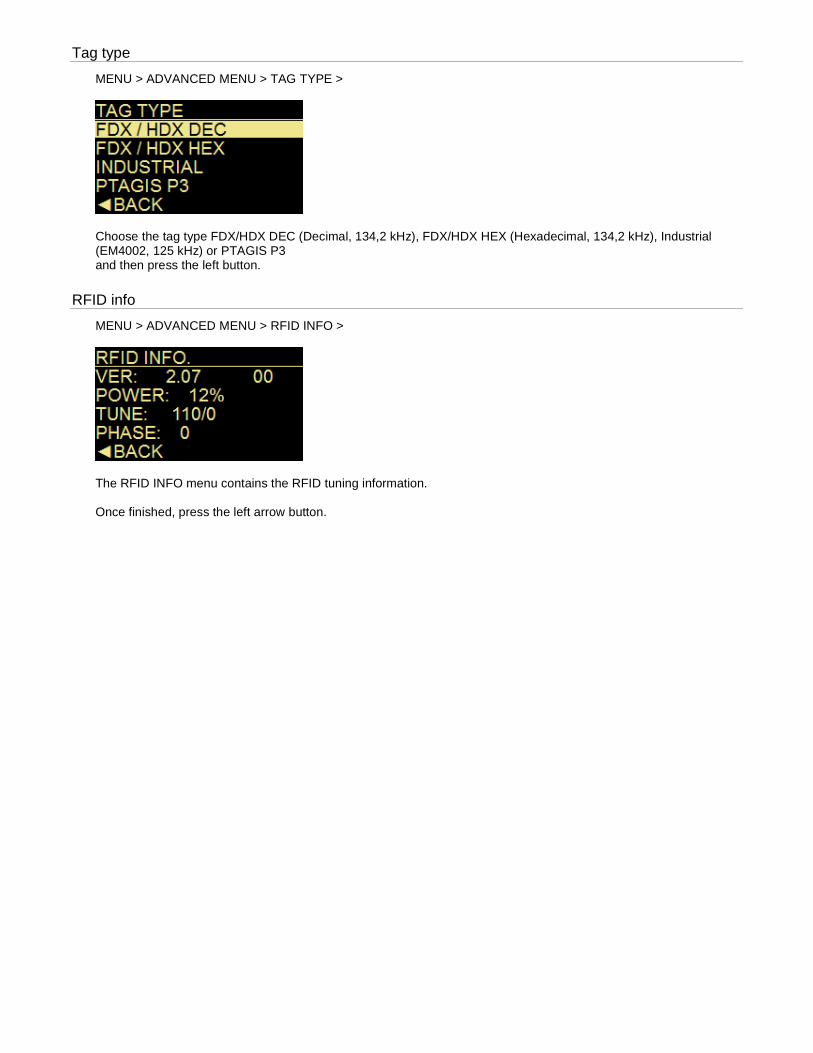
MENU > ADVANCED MENU > TAG TYPE >
Choose the tag type FDX/HDX DEC (Decimal, 134,2 kHz), FDX/HDX HEX (Hexadecimal, 134,2 kHz), Industrial (EM4002, 125 kHz) or PTAGIS P3 and then press the left button.
RFID info
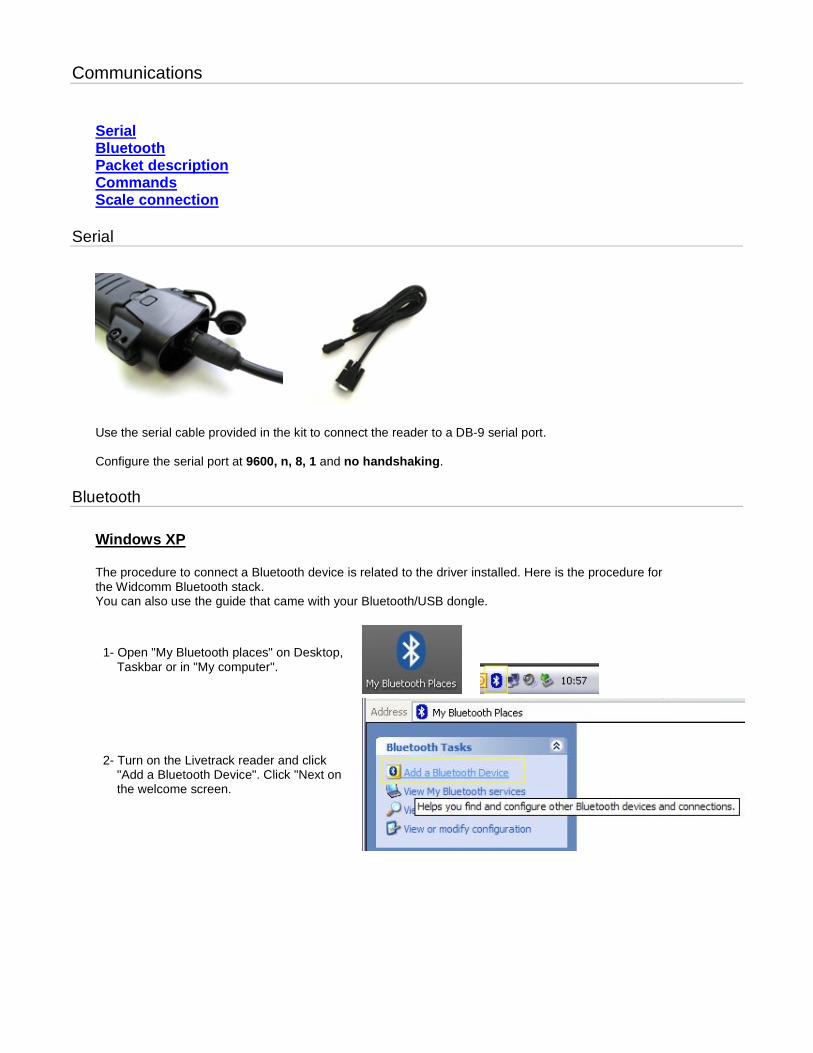
MENU > ADVANCED MENU > RFID INFO >
The RFID INFO menu contains the RFID tuning information. Once finished, press the left arrow button.
Communications
Serial Bluetooth Packet description Commands Scale connection
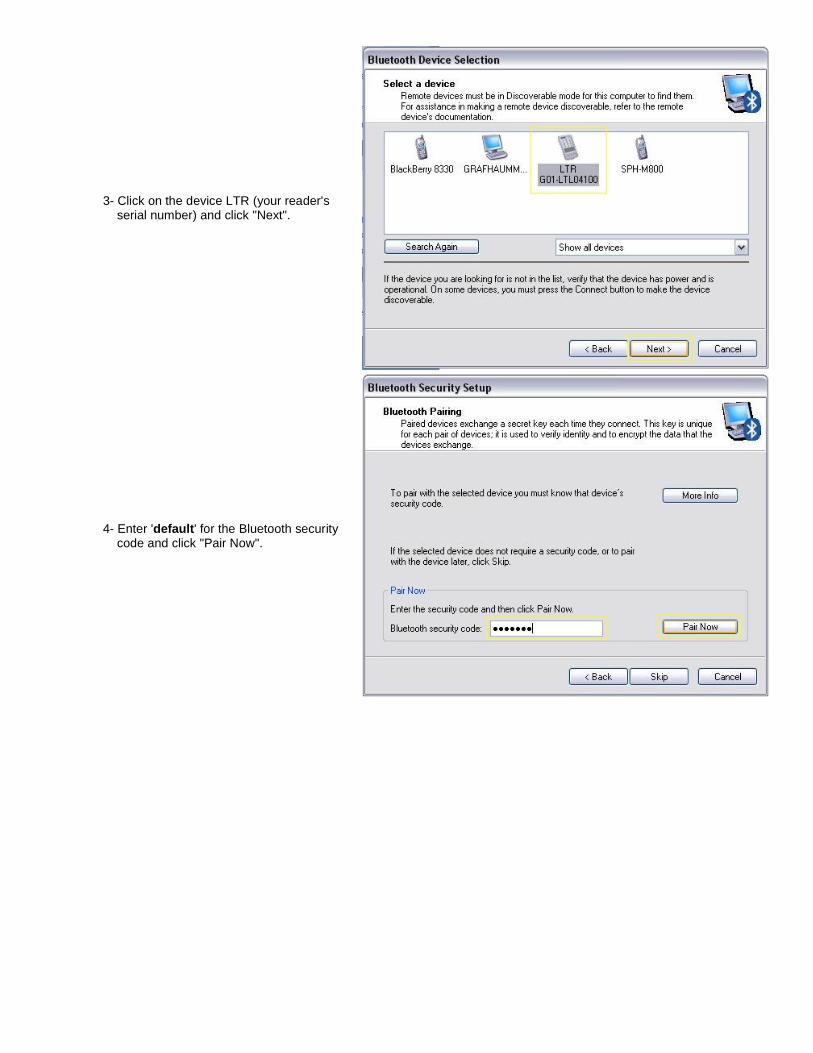
Serial
Use the serial cable provided in the kit to connect the reader to a DB-9 serial port. Configure the serial port at 9600, n, 8, 1 and no handshaking .
Bluetooth
Windows XP The procedure to connect a Bluetooth device is related to the driver installed. Here is the procedure for the Widcomm Bluetooth stack. You can also use the guide that came with your Bluetooth/USB dongle.
1- Open "My Bluetooth places" on Desktop, Taskbar or in "My computer".
2- Turn on the Livetrack reader and click "Add a Bluetooth Device". Click "Next on the welcome screen.
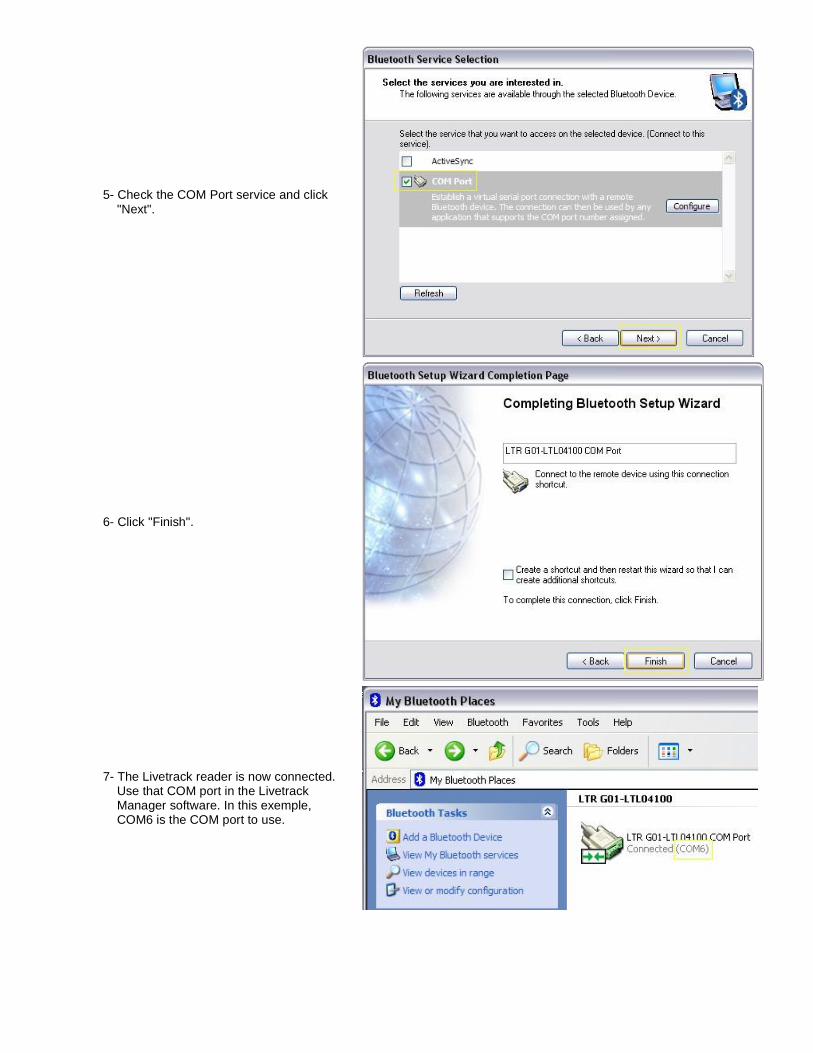
3- Click on the device LTR (your reader's serial number) and click "Next".
4- Enter 'default ' for the Bluetooth security code and click "Pair Now".
5- Check the COM Port service and click "Next".
6- Click "Finish".
7- The Livetrack reader is now connected. Use that COM port in the Livetrack Manager software. In this exemple, COM6 is the COM port to use.
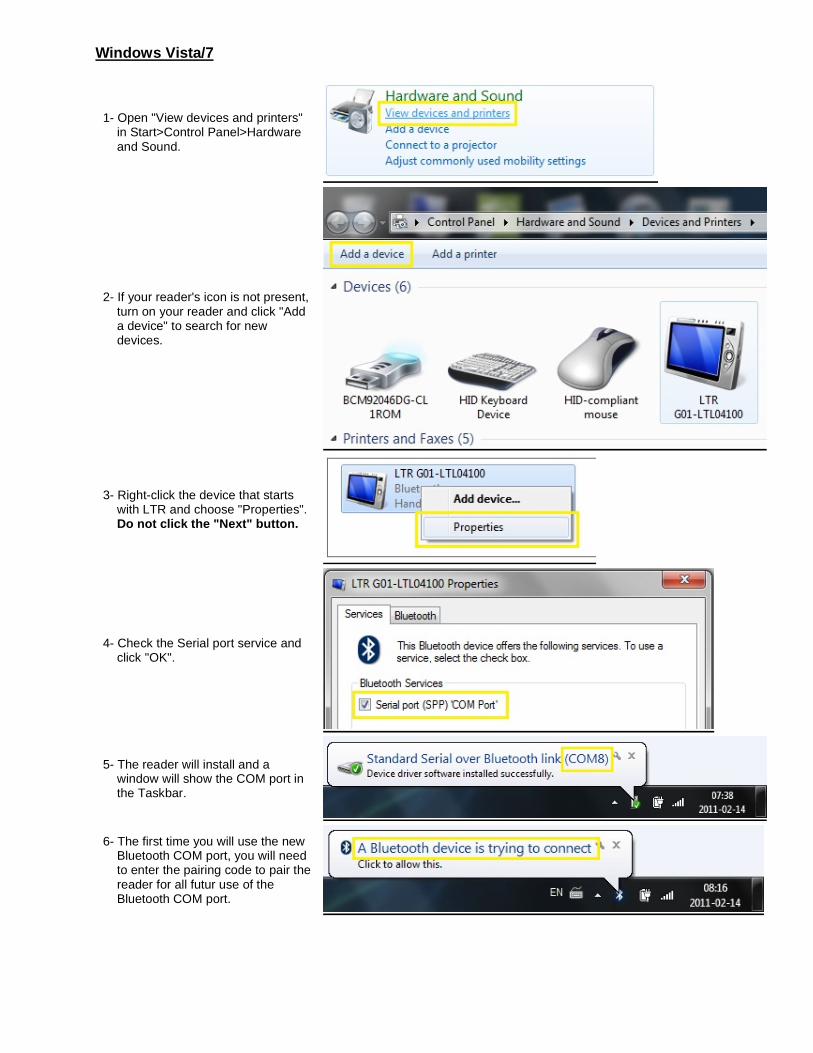
Windows Vista/7
1- Open "View devices and printers" in Start>Control Panel>Hardware and Sound.
2- If your reader's icon is not present, turn on your reader and click "Add a device" to search for new devices.
3- Right-click the device that starts with LTR and choose "Properties". Do not click the "Next" button.
4- Check the Serial port service and click "OK".
5- The reader will install and a window will show the COM port in the Taskbar.
6- The first time you will use the new Bluetooth COM port, you will need to enter the pairing code to pair the reader for all futur use of the Bluetooth COM port.
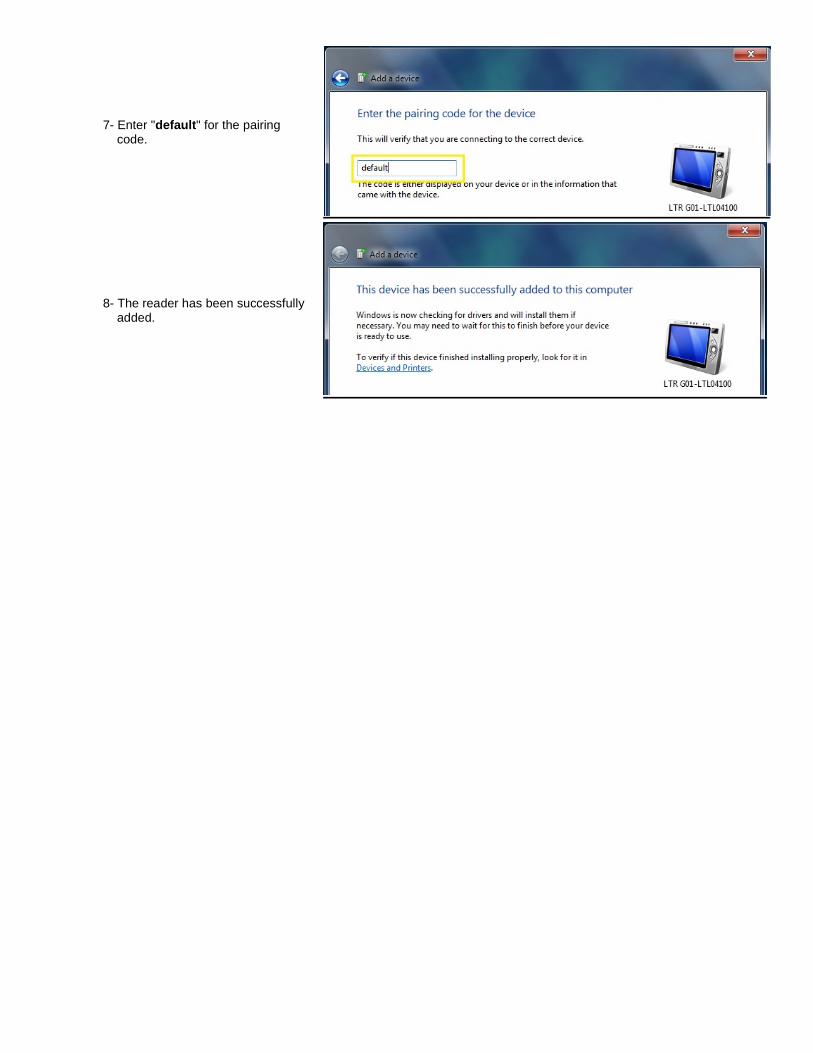
7- Enter "default " for the pairing code.
8- The reader has been successfully added.
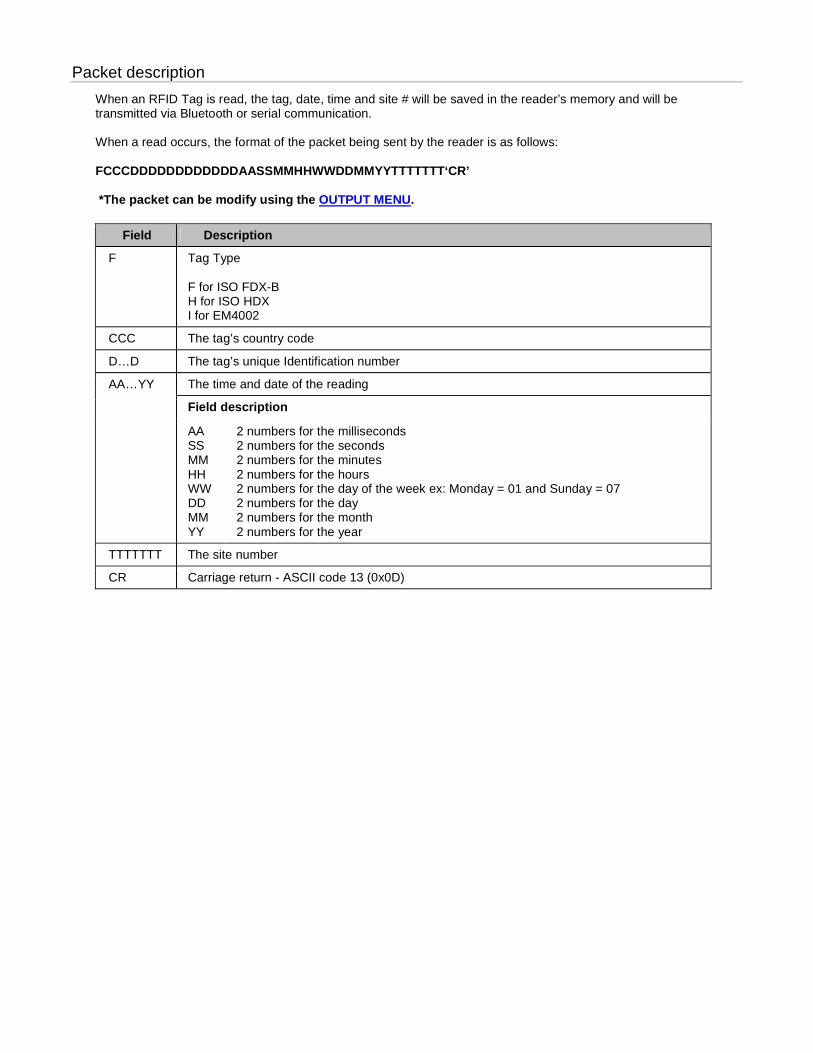
Packet description
When an RFID Tag is read, the tag, date, time and site # will be saved in the reader’s memory and will be transmitted via Bluetooth or serial communication. When a read occurs, the format of the packet being sent by the reader is as follows: FCCCDDDDDDDDDDDDAASSMMHHWWDDMMYYTTTTTTT‘CR’ *The packet can be modify using the OUTPUT MENU.
Field Description
F Tag Type F for ISO FDX-B H for ISO HDX I for EM4002
CCC The tag’s country code
D…D The tag’s unique Identification number
The time and date of the reading
Field description
AA…YY
AA SS MM HH WW DD MM YY
2 numbers for the milliseconds 2 numbers for the seconds 2 numbers for the minutes 2 numbers for the hours 2 numbers for the day of the week ex: Monday = 01 and Sunday = 07 2 numbers for the day 2 numbers for the month 2 numbers for the year
TTTTTTT The site number
CR Carriage return - ASCII code 13 (0x0D)
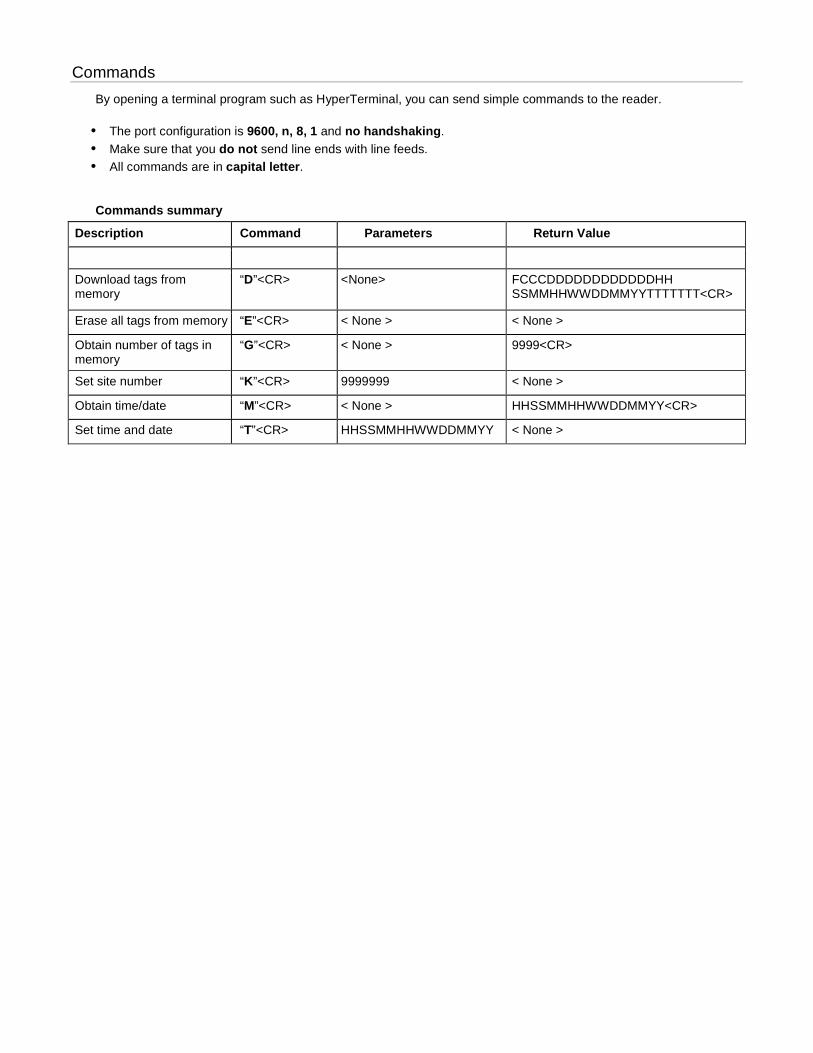
Commands
By opening a terminal program such as HyperTerminal, you can send simple commands to the reader.
• The port configuration is 9600, n, 8, 1 and no handshaking . • Make sure that you do not send line ends with line feeds. • All commands are in capital letter .
Commands summary
Description Command Parameters Return Value
Download tags from memory
“D”<CR> <None> FCCCDDDDDDDDDDDDHH SSMMHHWWDDMMYYTTTTTTT<CR>
Erase all tags from memory “E”<CR> < None > < None >
Obtain number of tags in memory
“G”<CR> < None > 9999<CR>
Set site number “K”<CR> 9999999 < None >
Obtain time/date “M”<CR> < None > HHSSMMHHWWDDMMYY<CR>
Set time and date “T”<CR> HHSSMMHHWWDDMMYY < None >

Scale connection
The LiveTrack reader is compatible with most scale heads on the market today. Including: Gallagher Reliable Scales Avery Weigh-Tronix Tru-Test WW Paul Scales Digi-Star Tru-Test Toledo Vesta 1. Make sure you have an EID compatible scale (see Manufacturer). 2. Simply configure the scale to receive the EID from the reader (see your Manufacturer’s documentation). 3. If you are using a Bluetooth connection, make sure you have a Bluetooth compatible scale and LiveTrack reader. 4. Select only the TAG ID from the OUTPUT MENU. The menu should look like this when done with the
configuration.
Serial connection: Simply plug the serial cable that came with your LiveTrack reader into the input port on your scale. When reading a tag the EID tag number should appear on your scale, some scales only display a part of the number. Bluetooth connection: Configure the Bluetooth scale ID in MENU > ADVANCED MENU > BLUETOOTH ADDR > MASTER SCALE. Set the Bluetooth mode to MASTER in MENU > ADVANCED MENU > BLUETOOTH MODE > MASTER.
Specifications
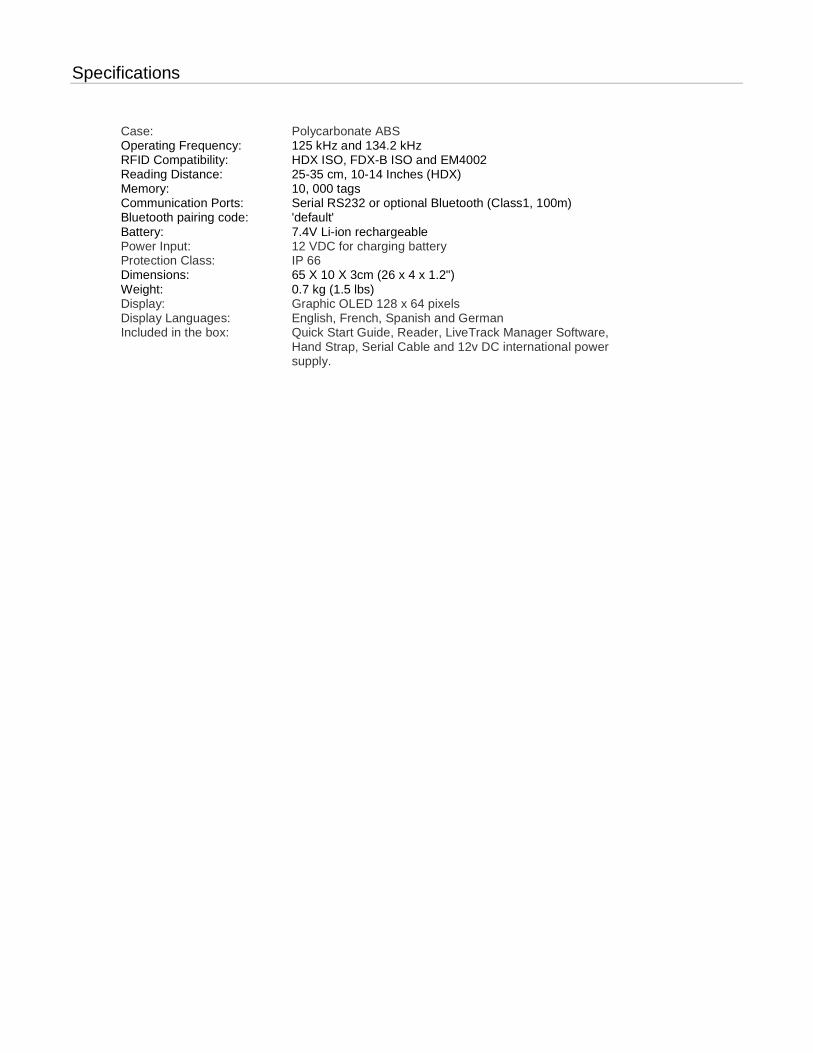
Case: Operating Frequency: RFID Compatibility: Reading Distance: Memory: Communication Ports: Bluetooth pairing code: Battery: Power Input: Protection Class: Dimensions: Weight: Display: Display Languages: Included in the box:
Polycarbonate ABS 125 kHz and 134.2 kHz HDX ISO, FDX-B ISO and EM4002 25-35 cm, 10-14 Inches (HDX) 10, 000 tags Serial RS232 or optional Bluetooth (Class1, 100m) 'default' 7.4V Li-ion rechargeable 12 VDC for charging battery IP 66 65 X 10 X 3cm (26 x 4 x 1.2") 0.7 kg (1.5 lbs) Graphic OLED 128 x 64 pixels English, French, Spanish and German Quick Start Guide, Reader, LiveTrack Manager Software, Hand Strap, Serial Cable and 12v DC international power supply.

Livetrack Manager 4.0
With the Livetrack Manager software you can do:
• Configure all options of the Livetrack reader. • Synchronize the time and date with the computer. • Get information like serial number, firmware version and battery voltage. • Download complete list of tags. • Remove duplicates in the list. • Save list of tags in .txt or .csv. • Erase the memory. • Input tag ID in any program in real time using the Virtual keyboard feature. • And more....

Connection
Serial connection
Bluetooth connection
Search button
Connect on open
Serial
• Connect the Livetrack reader using the serial cable.
• Turn on the reader.
• Select the COM port. (If you don't know the COM port, use the "Search" button.)
• Click the "Connect" button.
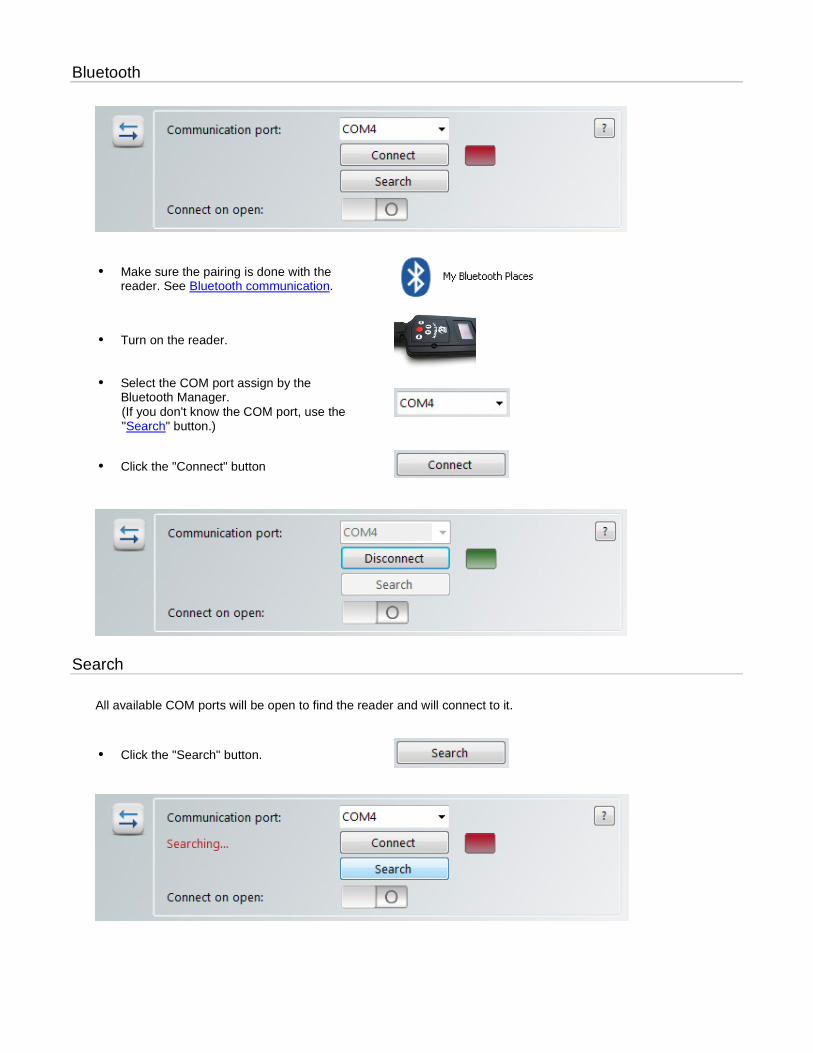
Bluetooth
• Make sure the pairing is done with the reader. See Bluetooth communication.
• Turn on the reader.
• Select the COM port assign by the Bluetooth Manager. (If you don't know the COM port, use the "Search" button.)
• Click the "Connect" button
Search
All available COM ports will be open to find the reader and will connect to it.
• Click the "Search" button.
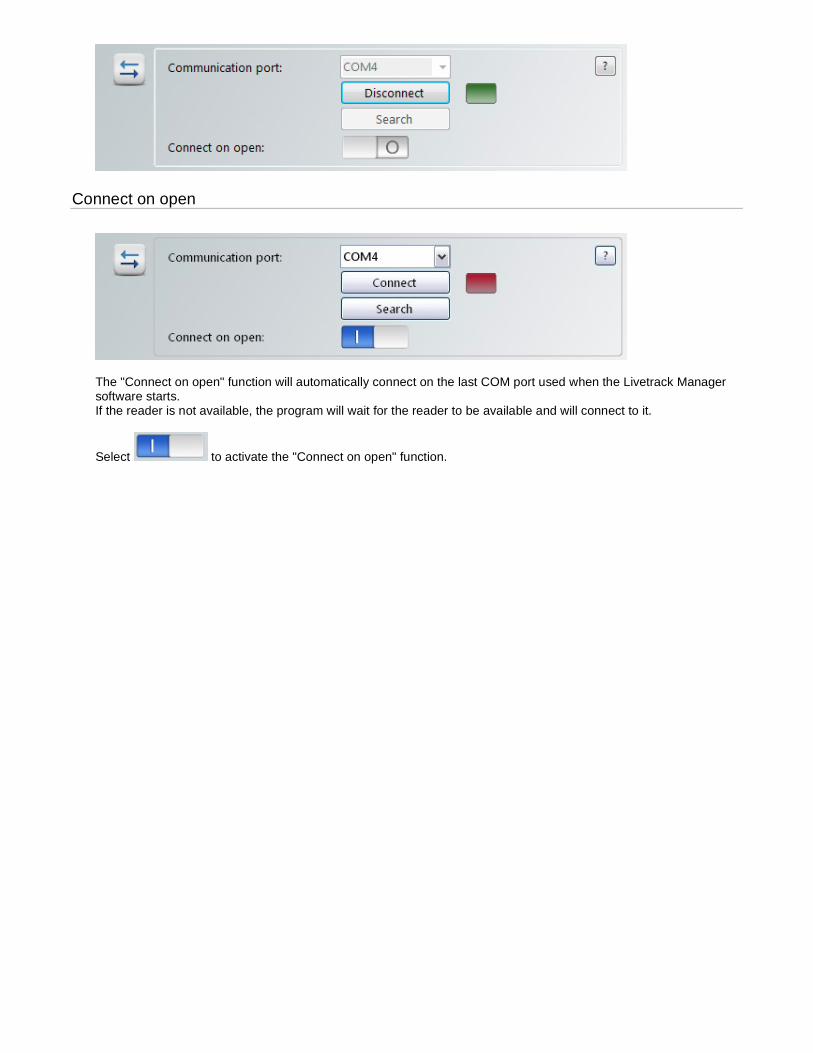
Connect on open
The "Connect on open" function will automatically connect on the last COM port used when the Livetrack Manager software starts. If the reader is not available, the program will wait for the reader to be available and will connect to it.
Select to activate the "Connect on open" function.

Information
Serial number: The serial number of the reader.
Firmware: The firmware version of the reader.
Battery: The battery voltage. (Min: 7.00V and Max: 8.40V)
Date: The date that will be use to log the reads.
Time: The time that will be use to log the reads.
Synchronize button: Adjust the time and date of the reader using the current time and date of the computer.
Settings
General Bluetooth Turn off delays String format Reset to default
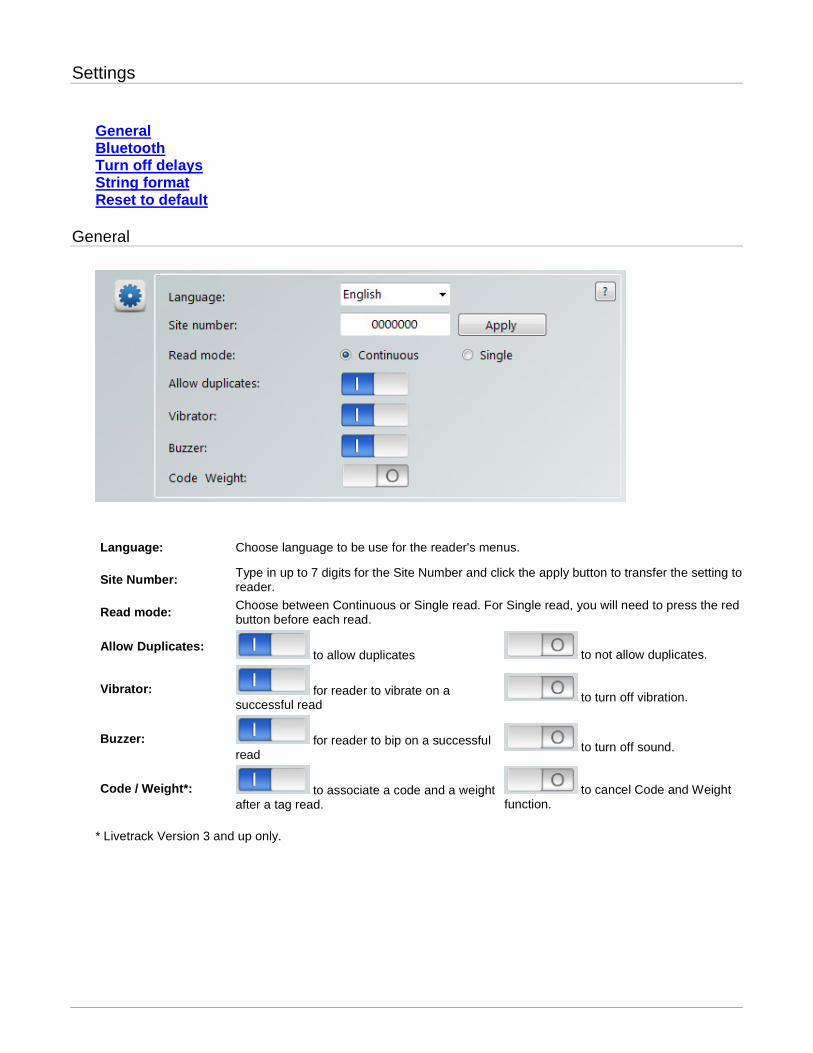
General
Language: Choose language to be use for the reader's menus.
Site Number: Type in up to 7 digits for the Site Number and click the apply button to transfer the setting to reader.
Read mode: Choose between Continuous or Single read. For Single read, you will need to press the red button before each read.
Allow Duplicates: to allow duplicates to not allow duplicates.
Vibrator: for reader to vibrate on a successful read
to turn off vibration.
Buzzer: for reader to bip on a successful read
to turn off sound.
Code / Weight*: to associate a code and a weight after a tag read.
to cancel Code and Weight function.
* Livetrack Version 3 and up only.
Bluetooth
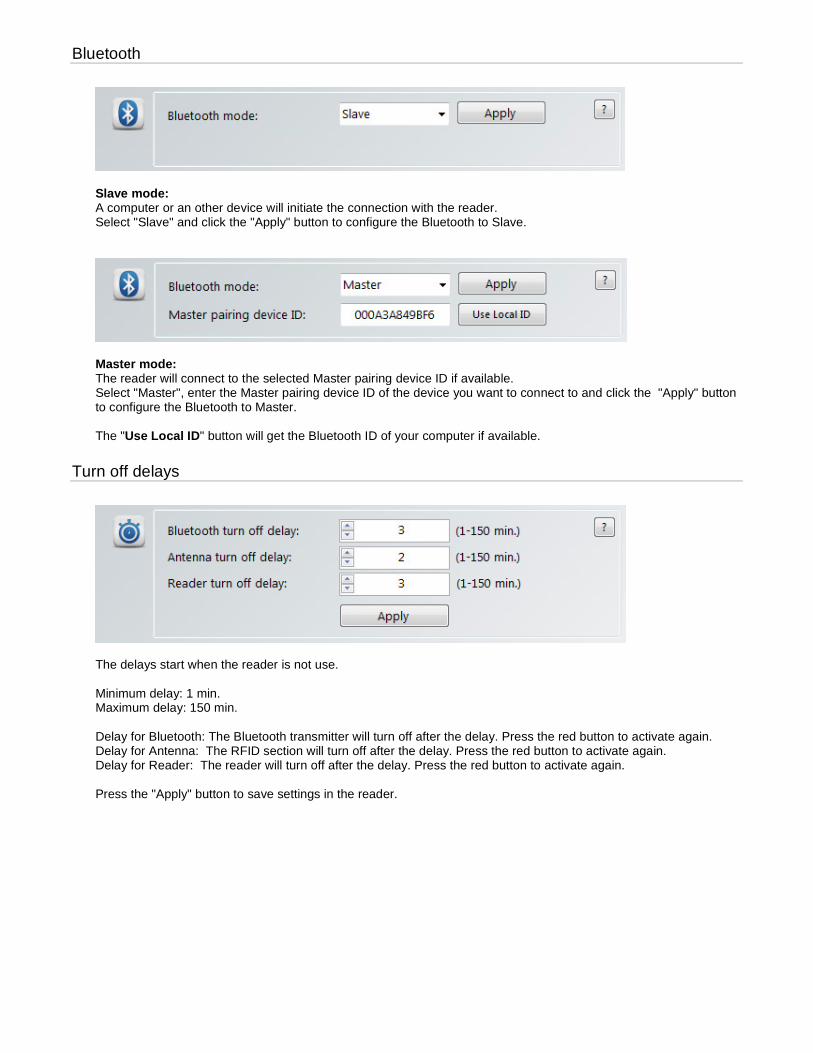
Slave mode: A computer or an other device will initiate the connection with the reader. Select "Slave" and click the "Apply" button to configure the Bluetooth to Slave.
Master mode: The reader will connect to the selected Master pairing device ID if available. Select "Master", enter the Master pairing device ID of the device you want to connect to and click the "Apply" button to configure the Bluetooth to Master. The "Use Local ID " button will get the Bluetooth ID of your computer if available.
Turn off delays
The delays start when the reader is not use. Minimum delay: 1 min. Maximum delay: 150 min. Delay for Bluetooth: The Bluetooth transmitter will turn off after the delay. Press the red button to activate again. Delay for Antenna: The RFID section will turn off after the delay. Press the red button to activate again. Delay for Reader: The reader will turn off after the delay. Press the red button to activate again. Press the "Apply" button to save settings in the reader.
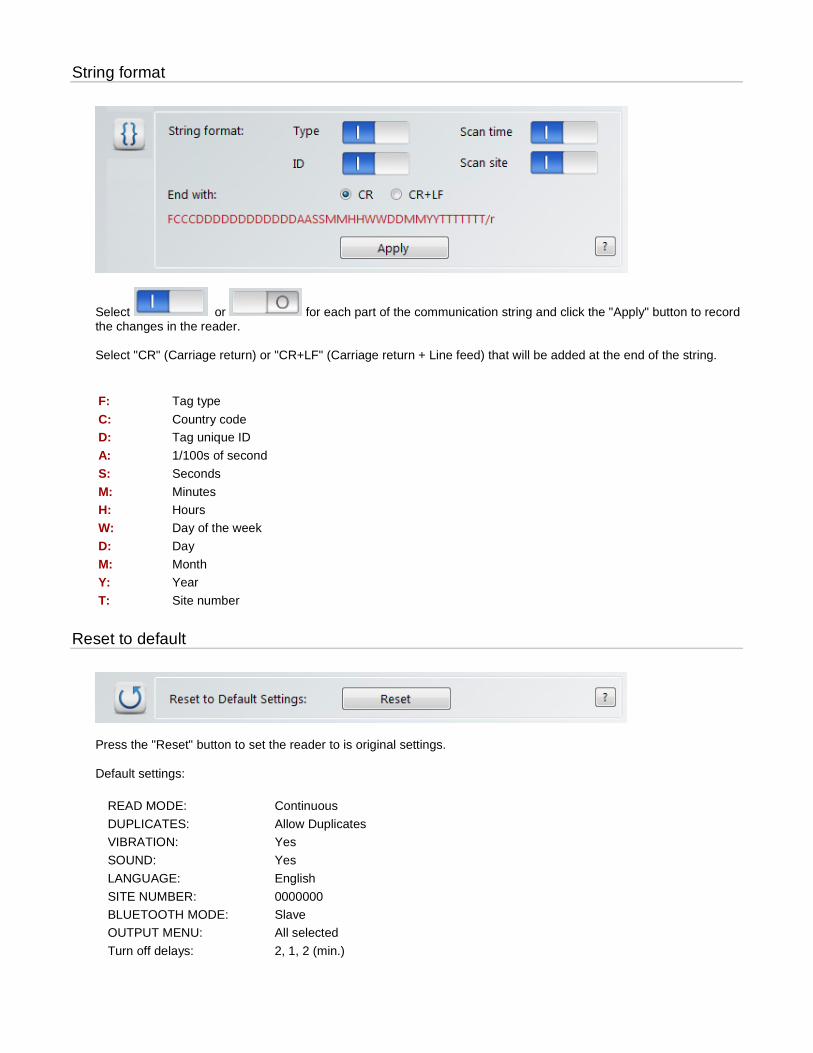
String format
Select or for each part of the communication string and click the "Apply" button to record the changes in the reader. Select "CR" (Carriage return) or "CR+LF" (Carriage return + Line feed) that will be added at the end of the string.
F: Tag type
C: Country code D: Tag unique ID
A: 1/100s of second
S: Seconds
M: Minutes
H: Hours
W: Day of the week
D: Day
M: Month
Y: Year
T: Site number
Reset to default
Press the "Reset" button to set the reader to is original settings. Default settings:
READ MODE: Continuous
DUPLICATES: Allow Duplicates
VIBRATION: Yes
SOUND: Yes
LANGUAGE: English
SITE NUMBER: 0000000
BLUETOOTH MODE: Slave
OUTPUT MENU: All selected
Turn off delays: 2, 1, 2 (min.)
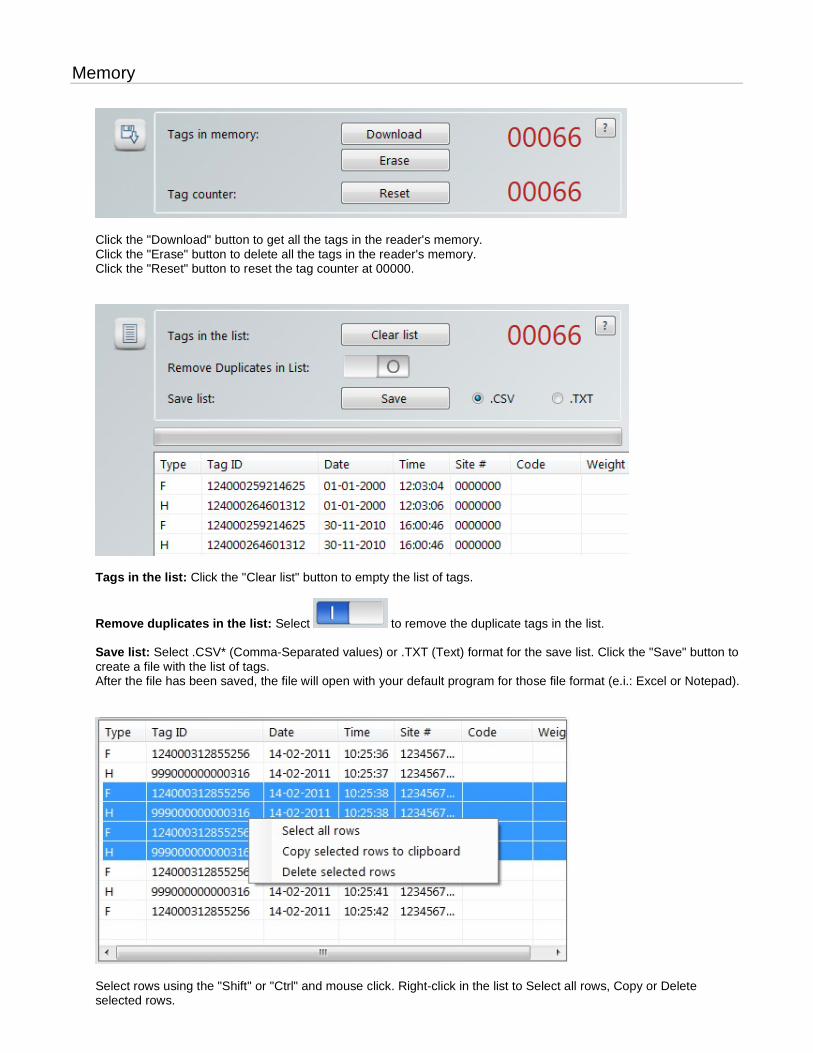
Memory
Click the "Download" button to get all the tags in the reader's memory. Click the "Erase" button to delete all the tags in the reader's memory. Click the "Reset" button to reset the tag counter at 00000.
Tags in the list: Click the "Clear list" button to empty the list of tags.
Remove duplicates in the list: Select to remove the duplicate tags in the list. Save list: Select .CSV* (Comma-Separated values) or .TXT (Text) format for the save list. Click the "Save" button to create a file with the list of tags. After the file has been saved, the file will open with your default program for those file format (e.i.: Excel or Notepad).
Select rows using the "Shift" or "Ctrl" and mouse click. Right-click in the list to Select all rows, Copy or Delete selected rows.
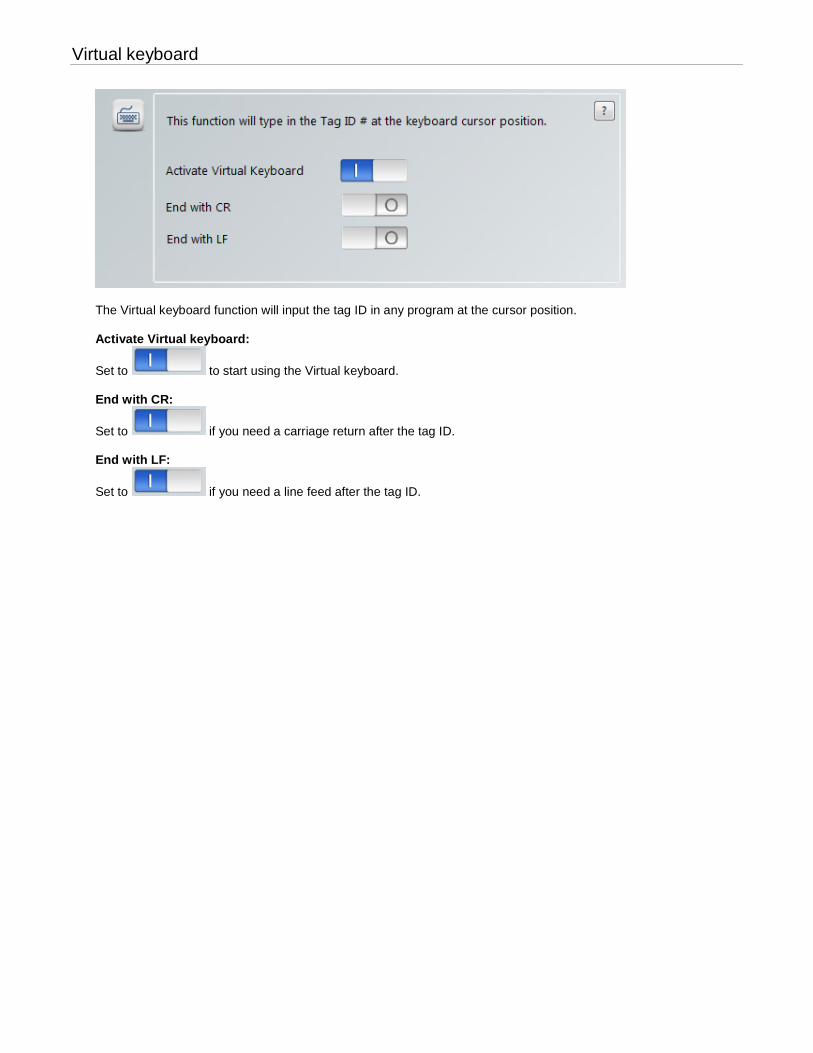
Virtual keyboard
The Virtual keyboard function will input the tag ID in any program at the cursor position. Activate Virtual keyboard:
Set to to start using the Virtual keyboard. End with CR:
Set to if you need a carriage return after the tag ID. End with LF:
Set to if you need a line feed after the tag ID.


![EID Reader Manual Installation - moe.gov.ae Card Reader... · MOE-SD Team - Copy Rights Ministry of Education (MOE) EID Reader Manual Installation [FAQ, Perquisite & Guides] Document](https://static.fdocuments.net/doc/165x107/5c97f51509d3f2720a8d3368/eid-reader-manual-installation-moegovae-card-reader-moe-sd-team-copy.jpg)
![EID Reader Manual Installation Card Reader... · EID Reader Manual Installation [FAQ, Perquisite & Guides] Document Details EID Reader Manual Installation and Troubleshooting Software](https://static.fdocuments.net/doc/165x107/5e2b1bd34debb043f0778de5/eid-reader-manual-installation-card-reader-eid-reader-manual-installation-faq.jpg)


