LiveLink Exporter Guide - Tzunami Deployerdownload2.tzunami.com/Deployer2.5/Exporters... · To...
20
Tzunami Deployer LiveLink Exporter Guide Version 2.5
Transcript of LiveLink Exporter Guide - Tzunami Deployerdownload2.tzunami.com/Deployer2.5/Exporters... · To...
Tzunami Deployer LiveLink Exporter Guide
Version 2.5
© Copyright 2010. Tzunami Inc. All rights reserved.
All intellectual property rights in this publication are owned by Tzunami, Inc. and protected by United States copyright laws, other applicable copyright laws and international treaty provisions. Tzunami, Inc. retains all rights not expressly granted. No part of this publication may be reproduced in any form whatsoever or used to make any derivative work without prior written approval by Tzunami, Inc.
No representation of warranties for fitness for any purpose other than what is specifically stated in this guide is made either by Tzunami, Inc. or by its agents.
Tzunami, Inc. reserves the right to revise this publication, and/or make improvements or changes in the product(s) and/or the program(s) described in this documentation at any time without prior notice.
Any software on removable media described in this publication is furnished under a license agreement included with the product as a separate document. If you are unable to locate a copy, please contact Tzunami, Inc. and a copy will be forwarded to you.
Tzunami is either a registered trademark or a trademark of Tzunami, Inc. in the United States and/or other countries.
All other brand or product names are trademarks or registered trademarks of their respective companies.
For further information, you can contact Tzunami Inc at:
Tzunami Inc., 500 108th Ave NE, Suite 800
Bellevue, WA 98004, USA
Email: [email protected], [email protected]
Web: http://www.tzunami.com
i
Table of Contents
1 About LiveLink Exporter ............................................................................................ 1
Supported Types ...................................................................................................................................... 1
Security ...................................................................................................................................................... 2
Credentials ................................................................................................................................................. 2
2 Installing the Exporter ................................................................................................ 3
3 Exporting from LiveLink ............................................................................................. 5
4 Command-line Export............................................................................................... 13
5 Best Practices ........................................................................................................... 14
6 Extending the Exporter License ............................................................................... 16

1
1 About LiveLink Exporter
LiveLink Exporter enables migrating LiveLink content into SharePoint Server 2010/SharePoint Foundation 2010 (SPS2010/SPF2010), Microsoft Office SharePoint Server 2007/Windows SharePoint Services 3.0 (MOSS/WSS3.0), or Microsoft SharePoint Portal Server 2003/Windows SharePoint Services 2.0 (SPS2003/WSS2.0) using Tzunami Deployer.
To load LiveLink content into Tzunami Deployer, you must first extract the content, using LiveLink Exporter, into TDX (Tzunami Deployer Export) and STDX (Separate Tzunami Deployer Export) files. You can then load this TDX file into a Deployer project.
Note: When working with Deployer on several machines, you can run an export on one machine and load the exported data on another. LiveLink Exporter is an extension module of Tzunami Deployer. You can work with this module independently of Tzunami Deployer.
Supported Types
The following items are exported from LiveLink:
• Enterprise Workspaces.
• Discussions (Topics and Replies).
• Tasks (Tasks Lists, Tasks Groups, Tasks, and Milestones).
• Channels and News.
• Projects.
• Folders.
• Documents, Text Documents, and Compound Documents.
• Links.
If any of these items have attachments, the exporter scans them, looking for Documents and Text Documents, and exports them as well. When the item is deployed to SharePoint, it is deployed together with its attachments.
Note: Compound Documents and Tasks Groups are converted to Folders.
2 1 About LiveLink Exporter
Security
In addition to the structure and items, LiveLink Exporter extracts security information. The following permissions are used in the exporter:
• See.
• See Content.
• Modify.
• Edit Attributes.
• Delete Versions.
• Add Items.
• Delete.
• Reserve.
• Edit Permissions.
Each item is assigned an ACL defining the permissions of the various members according to the roles they were assigned.
Note: The exporter automatically creates four default roles that are used during the deployment process. The roles include Reader (See and See Content permissions), Contributor (See, See Content, Modify, and Edit Attributes, and Add Items permissions), WebDesigner (See, See Content, Modify, Edit Attributes, Delete Versions, Add Items, Delete, and Reserve permissions), and Administrator (user has full permissions).
Credentials
The exporter uses two different sets of credentials that may differ according to the configuration of the LiveLink Server farm:
• LiveLink credentials used for the LiveLink API. These are the same credentials that users use to log-in in order to access the LiveLink portal. The account provided to the LiveLink Exporter should have, at least, the following LiveLink permissions:
o Log-in enabled
o Public Access enabled
o System administration rights
• HTTP tunneling credentials, used when the HTTP tunneling option is selected. These credentials are for the HTTP Web server that performs the tunneling, that is, one of the front-end web servers of the LiveLink farm.
3
2 Installing the Exporter
LiveLink Exporter requires that the latest version of Microsoft Visual J# Redistributable Package is installed and configured on the machine that is used to run the exporter. The latest version can be downloaded from Microsoft at http://msdn.microsoft.com/en-us/vjsharp/bb188598.aspx.
To install LiveLink Exporter, you must first install Tzunami Deployer. For instructions on installing Tzunami Deployer, refer to the Tzunami Deployer Installation Guide.
To install LiveLink Exporter:
1. Unpack the exporter zip file and run setup.exe. The Welcome screen of the setup wizard appears. Follow the instructions in the wizard.
2. In the Select Installation Folder screen, select an installation folder for LiveLink Exporter. Make sure you install LiveLink Exporter in the Tzunami Deployer installation directory.
You are asked to confirm the installation. After your confirmation, LiveLink Exporter is installed.

5
3 Exporting from LiveLink
The exporter enables you to export LiveLink content to a TDX file.
Note: When exporting, keep the following in mind: Export in small chunks. When exporting from your source system, perform the export in small chunks of about 40K-50K files each that have a common business logic or some other logic. Ensure consistency. Make sure that the content of the different exports does not overlap and that, while exporting, no changes are made to the source data.
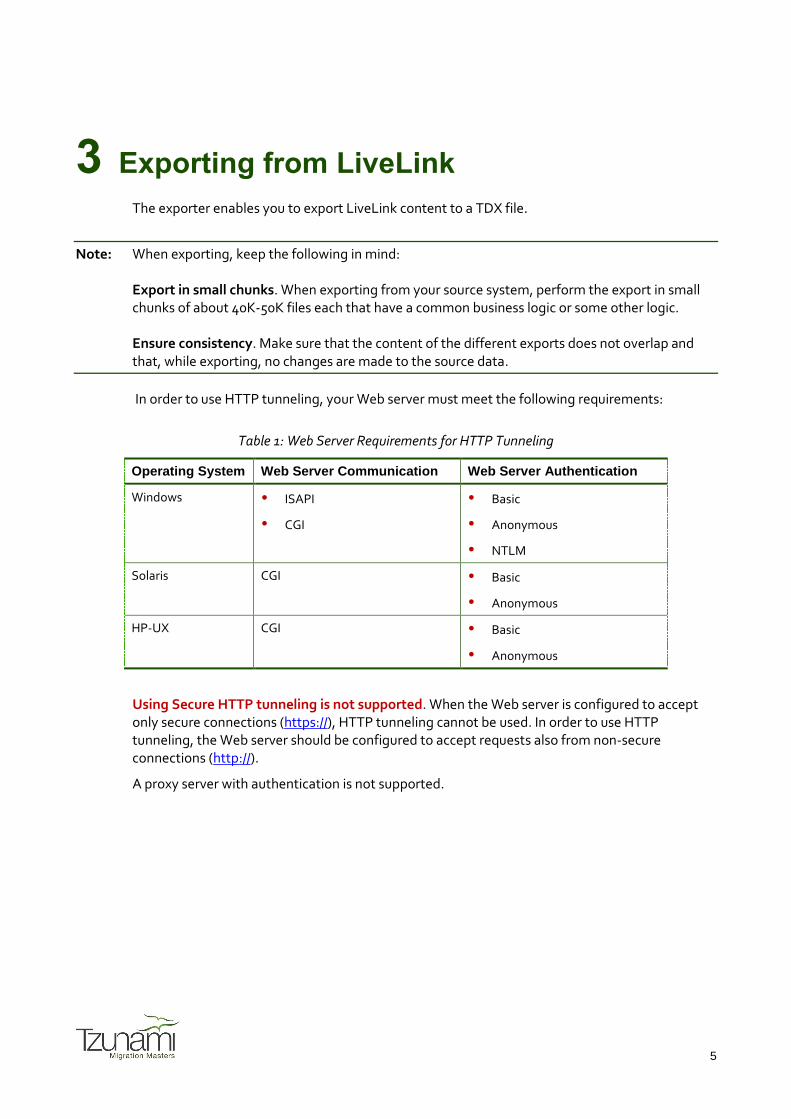
In order to use HTTP tunneling, your Web server must meet the following requirements:
Table 1: Web Server Requirements for HTTP Tunneling
Operating System Web Server Communication Web Server Authentication
Windows ISAPI
CGI
Basic
Anonymous
NTLM
Solaris CGI Basic
Anonymous
HP-UX CGI Basic
Anonymous
Using Secure HTTP tunneling is not supported. When the Web server is configured to accept only secure connections (https://), HTTP tunneling cannot be used. In order to use HTTP tunneling, the Web server should be configured to accept requests also from non-secure connections (http://).
A proxy server with authentication is not supported.

6 3 Exporting from LiveLink
Depending on your connection method, the port and server values may differ according to the following information:
Table 2: LiveLink Server and Port Definitions
HTTP Tunneling
Proxy Server
LiveLink/Front-End/Proxy Server Port
Disabled Disabled The host name or IP address of the LiveLink server. Note that this entry should not contain URL protocol headers, such as http:// or https://.
In a single server installation environment, this should be the same as the host name of the Web server. That is, the host name used to access the LiveLink portal through the Web interface.
The port number on which the LiveLink server listens. The default is 2099.
Enabled Disabled The host name or IP address of the machine on which the Web server is running. Note that this entry should not contain URL protocol headers, such as http:// or https://.
In a single server installation environment, this should be the same as the LiveLink server.
The port number of the Web server (usually 80). If the port number is different, it appears in the URL used to access the LiveLink Portal. For example, http://llserver:888/livelink/livelink.exe.
Enabled Enabled The host name or IP address of the machine on which the Web proxy server is running. Note that in this case the host name and the port number of the Web server used for tunneling is obtained from the Livelink CGI URL entry.
The port number of the Web proxy server.
To export to a TDX file:
1. In Tzunami Deployer, right-click in the LiveLink tab source store area and select Export LiveLink to TDX.
The Welcome screen of the Export Wizard appears.
2. Select one of the following export options:
• Full Export – Downloads the binary files from the LiveLink server to the file system and stores them in the FileStore folder, in the same location as the TDX file.
• Lite Export – No files are downloaded at the export stage. The files are only downloaded when they are needed, in the commit stage.
7
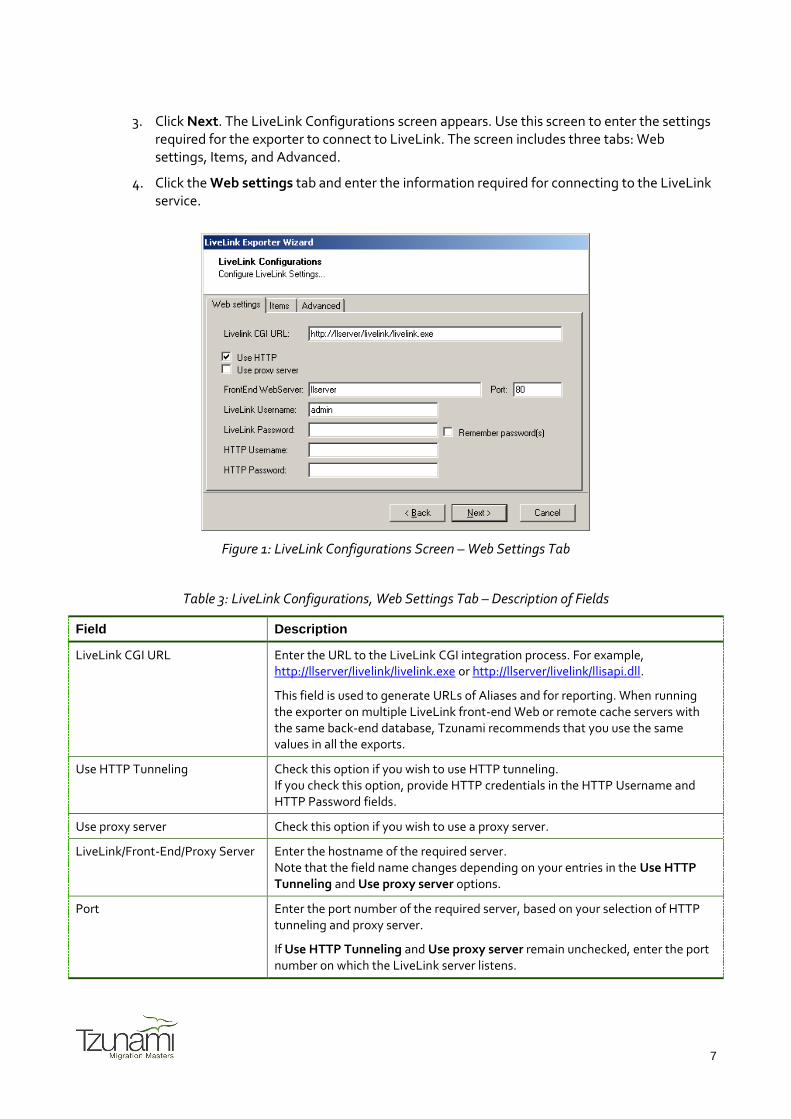
3. Click Next. The LiveLink Configurations screen appears. Use this screen to enter the settings required for the exporter to connect to LiveLink. The screen includes three tabs: Web settings, Items, and Advanced.
4. Click the Web settings tab and enter the information required for connecting to the LiveLink service.
Figure 1: LiveLink Configurations Screen – Web Settings Tab
Table 3: LiveLink Configurations, Web Settings Tab – Description of Fields
Field Description
LiveLink CGI URL Enter the URL to the LiveLink CGI integration process. For example, http://llserver/livelink/livelink.exe or http://llserver/livelink/llisapi.dll.
This field is used to generate URLs of Aliases and for reporting. When running the exporter on multiple LiveLink front-end Web or remote cache servers with the same back-end database, Tzunami recommends that you use the same values in all the exports.
Use HTTP Tunneling Check this option if you wish to use HTTP tunneling. If you check this option, provide HTTP credentials in the HTTP Username and HTTP Password fields.
Use proxy server Check this option if you wish to use a proxy server.
LiveLink/Front-End/Proxy Server Enter the hostname of the required server. Note that the field name changes depending on your entries in the Use HTTP Tunneling and Use proxy server options.
Port Enter the port number of the required server, based on your selection of HTTP tunneling and proxy server.
If Use HTTP Tunneling and Use proxy server remain unchecked, enter the port number on which the LiveLink server listens.
8 3 Exporting from LiveLink
Field Description
LiveLink Username Enter the username for the LiveLink user account that has access to the LiveLink server. When using HTTP tunneling, the LiveLink username is case sensitive.
LiveLink Password Enter the password for the account specified in LiveLink Username.
Remember password(s) Check this option if you wish to save LiveLink password and HTTP password for next login
HTTP Username This field only appears if you select Use HTTP Tunneling. Specify the HTTP username for an account known to the Web server.
HTTP Password This field only appears if you select Use HTTP Tunneling. Enter the HTTP password for the account specified in HTTP Username.
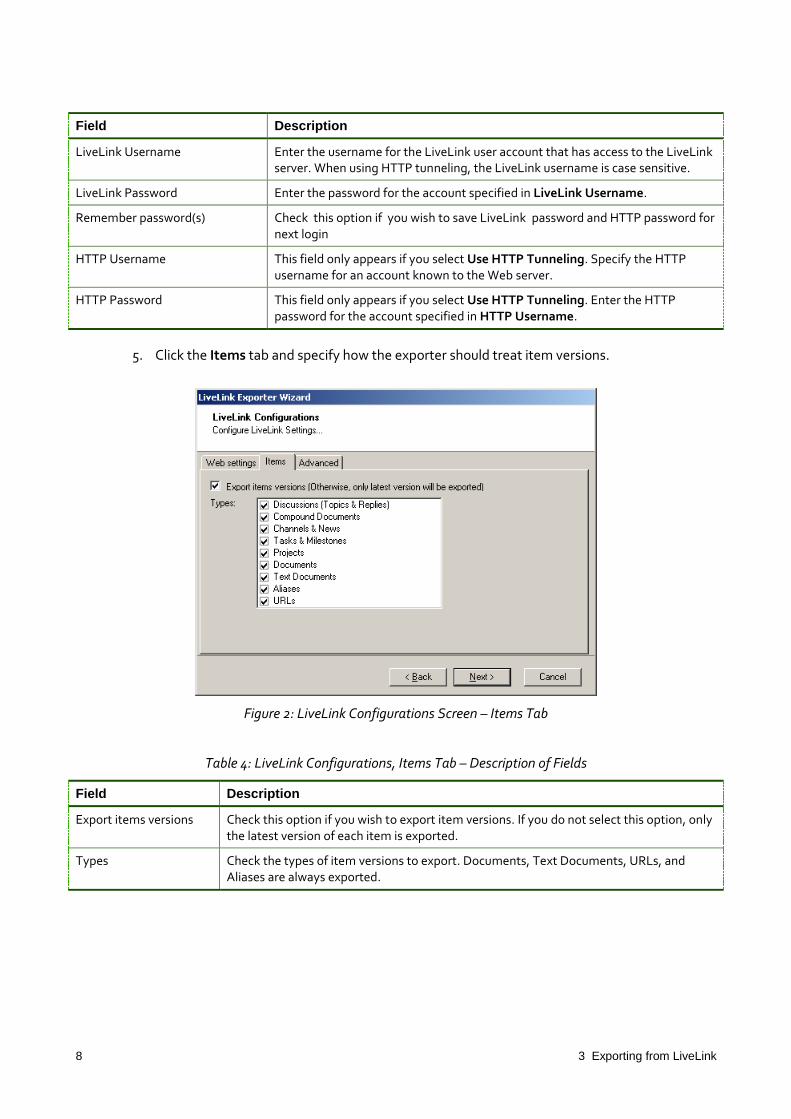
5. Click the Items tab and specify how the exporter should treat item versions.
Figure 2: LiveLink Configurations Screen – Items Tab
Table 4: LiveLink Configurations, Items Tab – Description of Fields
Field Description
Export items versions Check this option if you wish to export item versions. If you do not select this option, only the latest version of each item is exported.
Types Check the types of item versions to export. Documents, Text Documents, URLs, and Aliases are always exported.
9
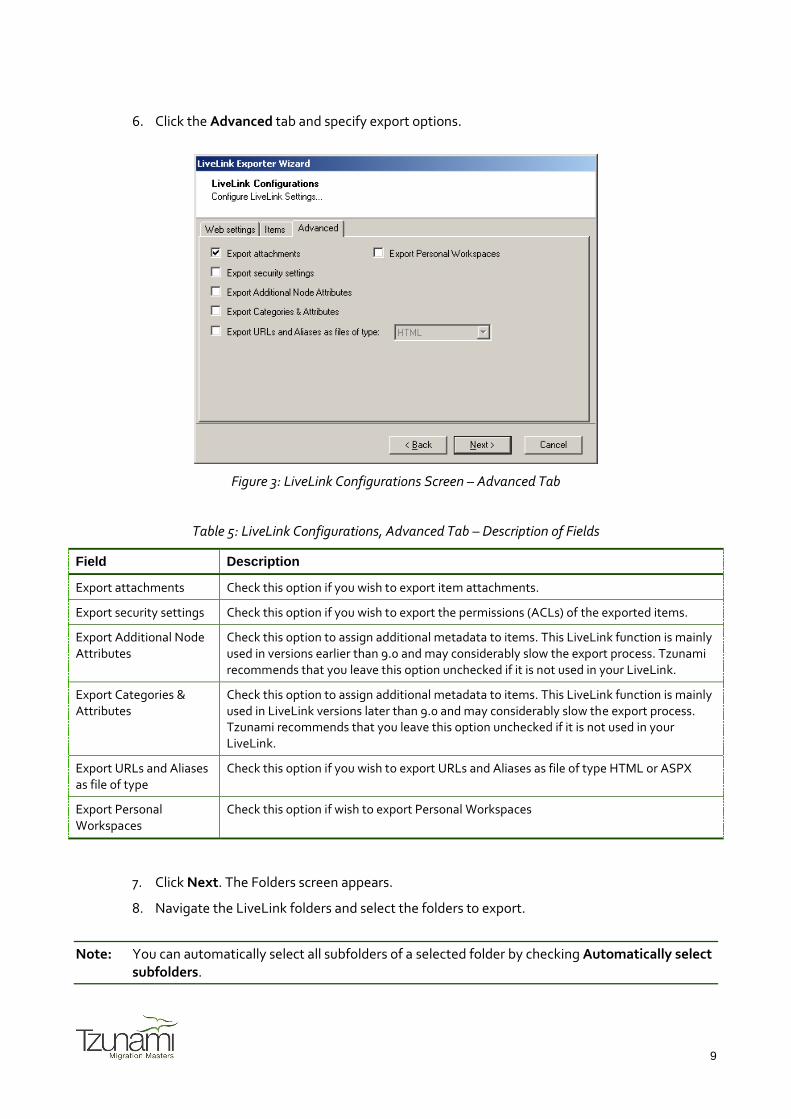
6. Click the Advanced tab and specify export options.
Figure 3: LiveLink Configurations Screen – Advanced Tab
Table 5: LiveLink Configurations, Advanced Tab – Description of Fields
Field Description
Export attachments Check this option if you wish to export item attachments.
Export security settings Check this option if you wish to export the permissions (ACLs) of the exported items.
Export Additional Node Attributes
Check this option to assign additional metadata to items. This LiveLink function is mainly used in versions earlier than 9.0 and may considerably slow the export process. Tzunami recommends that you leave this option unchecked if it is not used in your LiveLink.
Export Categories & Attributes
Check this option to assign additional metadata to items. This LiveLink function is mainly used in LiveLink versions later than 9.0 and may considerably slow the export process. Tzunami recommends that you leave this option unchecked if it is not used in your LiveLink.
Export URLs and Aliases as file of type
Check this option if you wish to export URLs and Aliases as file of type HTML or ASPX
Export Personal Workspaces
Check this option if wish to export Personal Workspaces
7. Click Next. The Folders screen appears.
8. Navigate the LiveLink folders and select the folders to export.
Note: You can automatically select all subfolders of a selected folder by checking Automatically select subfolders.
10 3 Exporting from LiveLink
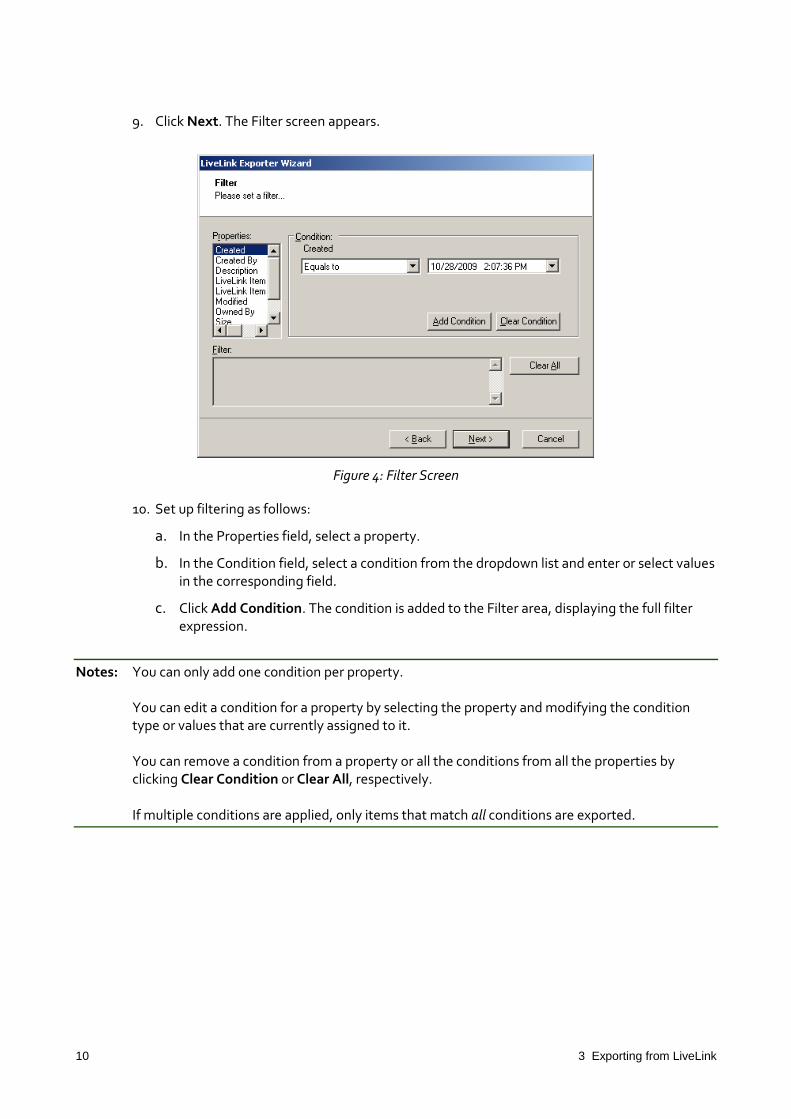
9. Click Next. The Filter screen appears.
Figure 4: Filter Screen
10. Set up filtering as follows:
a. In the Properties field, select a property.
b. In the Condition field, select a condition from the dropdown list and enter or select values in the corresponding field.
c. Click Add Condition. The condition is added to the Filter area, displaying the full filter expression.
Notes: You can only add one condition per property. You can edit a condition for a property by selecting the property and modifying the condition type or values that are currently assigned to it. You can remove a condition from a property or all the conditions from all the properties by clicking Clear Condition or Clear All, respectively. If multiple conditions are applied, only items that match all conditions are exported.
11
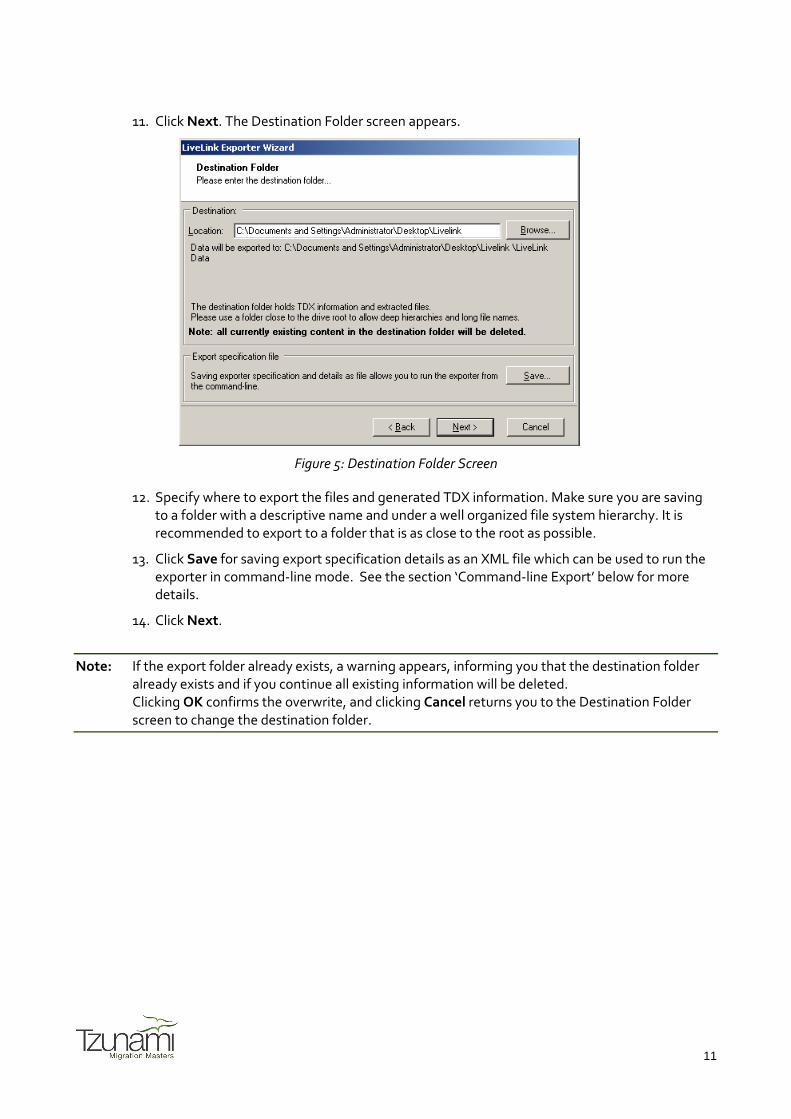
11. Click Next. The Destination Folder screen appears.
Figure 5: Destination Folder Screen
12. Specify where to export the files and generated TDX information. Make sure you are saving to a folder with a descriptive name and under a well organized file system hierarchy. It is recommended to export to a folder that is as close to the root as possible.
13. Click Save for saving export specification details as an XML file which can be used to run the exporter in command-line mode. See the section ‘Command-line Export’ below for more details.
14. Click Next.
Note: If the export folder already exists, a warning appears, informing you that the destination folder already exists and if you continue all existing information will be deleted. Clicking OK confirms the overwrite, and clicking Cancel returns you to the Destination Folder screen to change the destination folder.
12 3 Exporting from LiveLink
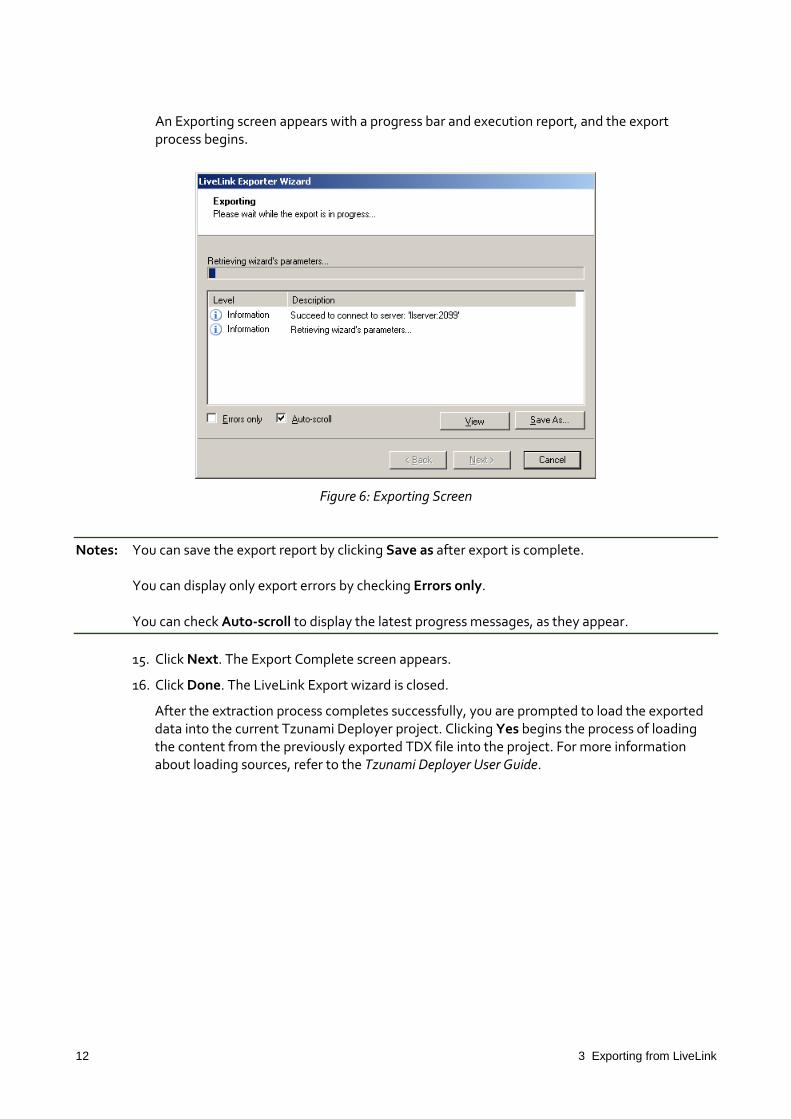
An Exporting screen appears with a progress bar and execution report, and the export process begins.
Figure 6: Exporting Screen
Notes: You can save the export report by clicking Save as after export is complete. You can display only export errors by checking Errors only. You can check Auto-scroll to display the latest progress messages, as they appear.
15. Click Next. The Export Complete screen appears.
16. Click Done. The LiveLink Export wizard is closed.
After the extraction process completes successfully, you are prompted to load the exported data into the current Tzunami Deployer project. Clicking Yes begins the process of loading the content from the previously exported TDX file into the project. For more information about loading sources, refer to the Tzunami Deployer User Guide.
13
4 Command-line Export
Tzunami Exporter for LiveLink provides ability to run export sessions non-interactively using command line instructions. This allows administrators to plan and schedule long running migration jobs through scripts, batch files and schedulers according to needs and organizational timetables. To run the exporter in batch mode you will need exporter specification file explained in the ‘Choose Destination Folder’ step of the export wizard. The file contains all the export option details including:
Source ECM connectivity information (Server Address, User Name, Password etc.)
Items to export
Destination and Log Folder
Filter
Exporter specific options
This file can be edited to suit your needs however the XML schema of the file should not be altered. It is recommended that you generate a sample specifications file in the Destination Folder selection step of the export wizard and use it as a template to create your own specification file.
Once the specification file is ready, you can run the exporter from command line using command:
TzunamiExporter.exe [-r <ResultFile>] -s <ExportSpecificationsFile>
-r Outputs export results into an XML file [Optional]
-s XML file containing export specifications
Based on your needs you can create number of specification files and use them to run multiple export sessions as batch commands.
Note: You will need to provide absolute path for TzunamiExporter.exe and ExportSpecificationsFile in the command if you are not running from the exporter installation directory.
14 5 Best Practices
5 Best Practices
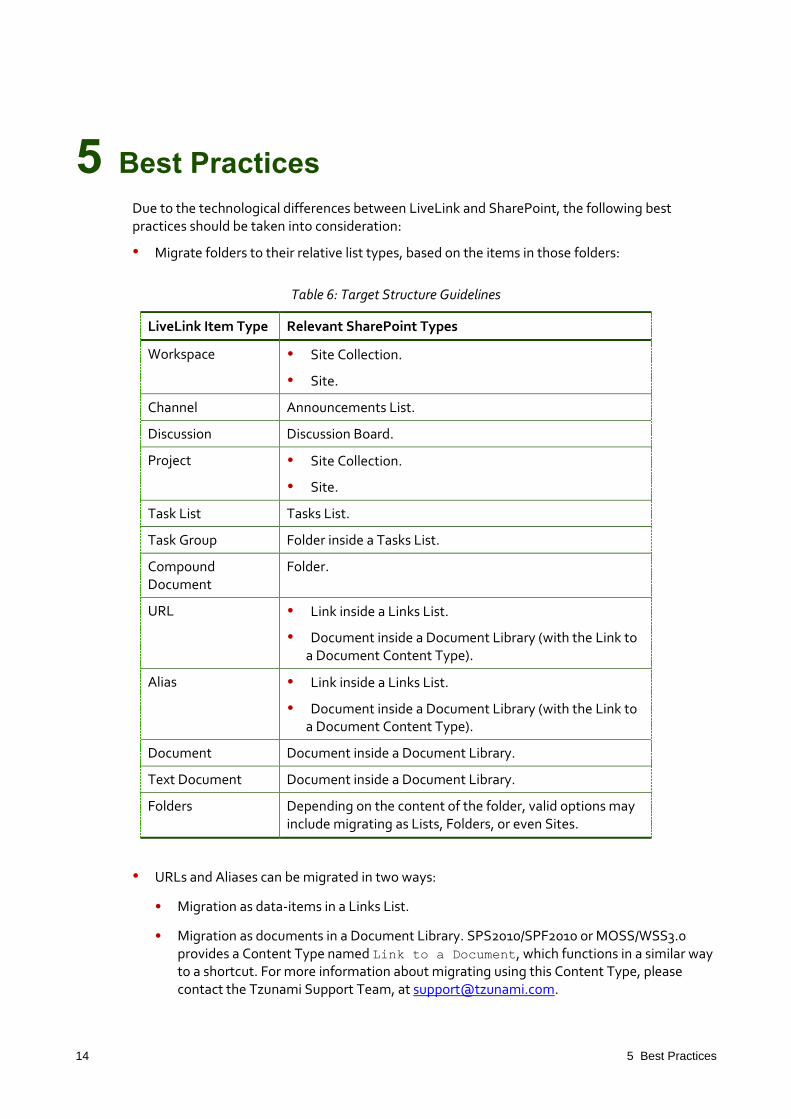
Due to the technological differences between LiveLink and SharePoint, the following best practices should be taken into consideration:
• Migrate folders to their relative list types, based on the items in those folders:
Table 6: Target Structure Guidelines
LiveLink Item Type Relevant SharePoint Types
Workspace Site Collection.
Site.
Channel Announcements List.
Discussion Discussion Board.
Project Site Collection.
Site.
Task List Tasks List.
Task Group Folder inside a Tasks List.
Compound Document
Folder.
URL Link inside a Links List.
Document inside a Document Library (with the Link to a Document Content Type).
Alias Link inside a Links List.
Document inside a Document Library (with the Link to a Document Content Type).
Document Document inside a Document Library.
Text Document Document inside a Document Library.
Folders Depending on the content of the folder, valid options may include migrating as Lists, Folders, or even Sites.
• URLs and Aliases can be migrated in two ways:
• Migration as data-items in a Links List.
• Migration as documents in a Document Library. SPS2010/SPF2010 or MOSS/WSS3.0 provides a Content Type named Link to a Document, which functions in a similar way to a shortcut. For more information about migrating using this Content Type, please contact the Tzunami Support Team, at [email protected].
15
• Attributes (derived from Categories or from Additional Node Attributes) can be added to the items as part of the deployment. Note that in LiveLink, each item can be assigned several categories while in SPS2010/SPF2010 or MOSS/WSS3.0 each item can only have one Content Type. For more information about adding attributes, refer to the Tzunami Deployer User Guide.
• Top-level folders should be deployed as Sites and Sub-sites, in order to better organize the content in a SharePoint-oriented structure.
16 6 Extending the Exporter License
6 Extending the Exporter License
Tzunami LiveLink Exporter uses a default license that can be used for evaluation purposes. This license is limited in the number of items that are exported. If the license does not match your evaluating needs, contact [email protected] for an extended license. For this purpose you will need to provide the Product Serial Code, and then enter the License Key you receive back from the Tzunami.
To retrieve the Tzunami Product Serial Code:
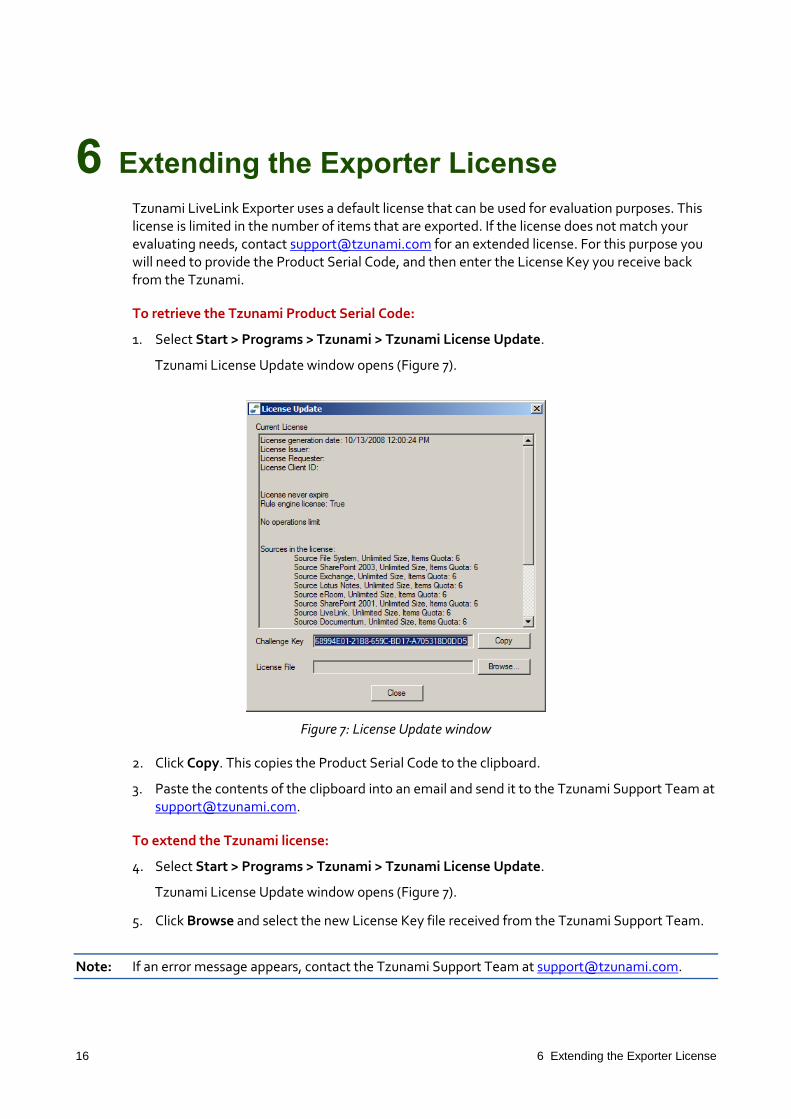
1. Select Start > Programs > Tzunami > Tzunami License Update.
Tzunami License Update window opens (Figure 7).
Figure 7: License Update window
2. Click Copy. This copies the Product Serial Code to the clipboard.
3. Paste the contents of the clipboard into an email and send it to the Tzunami Support Team at [email protected].
To extend the Tzunami license:
4. Select Start > Programs > Tzunami > Tzunami License Update.
Tzunami License Update window opens (Figure 7).
5. Click Browse and select the new License Key file received from the Tzunami Support Team.
Note: If an error message appears, contact the Tzunami Support Team at [email protected].