Live Person Sales Force Integration
24
Implementation Guide Integrating LivePerson with Salesforce V 9.3 August 5, 2010
Transcript of Live Person Sales Force Integration
Integrating LivePerson with Salesforce
V 9.3
August 5, 2010
Implementation Guide
Data Sh
IntroductionWhen visitors browse your website and click to chat, you want to be able to help them as quickly as possible. Integrating LivePerson with Salesforce allows you to provide personalized assistance to your visitors whenever they need it. You can access, update or edit customer information directly from the Agent Console. That means your agents will not need to add customer data twice, or switch between applications.
Follow the steps in this guide to integrate the LivePerson and Salesforce applications.
Note: LivePerson can be integrated with both the Professional and Enterprise editions of SalesForce.
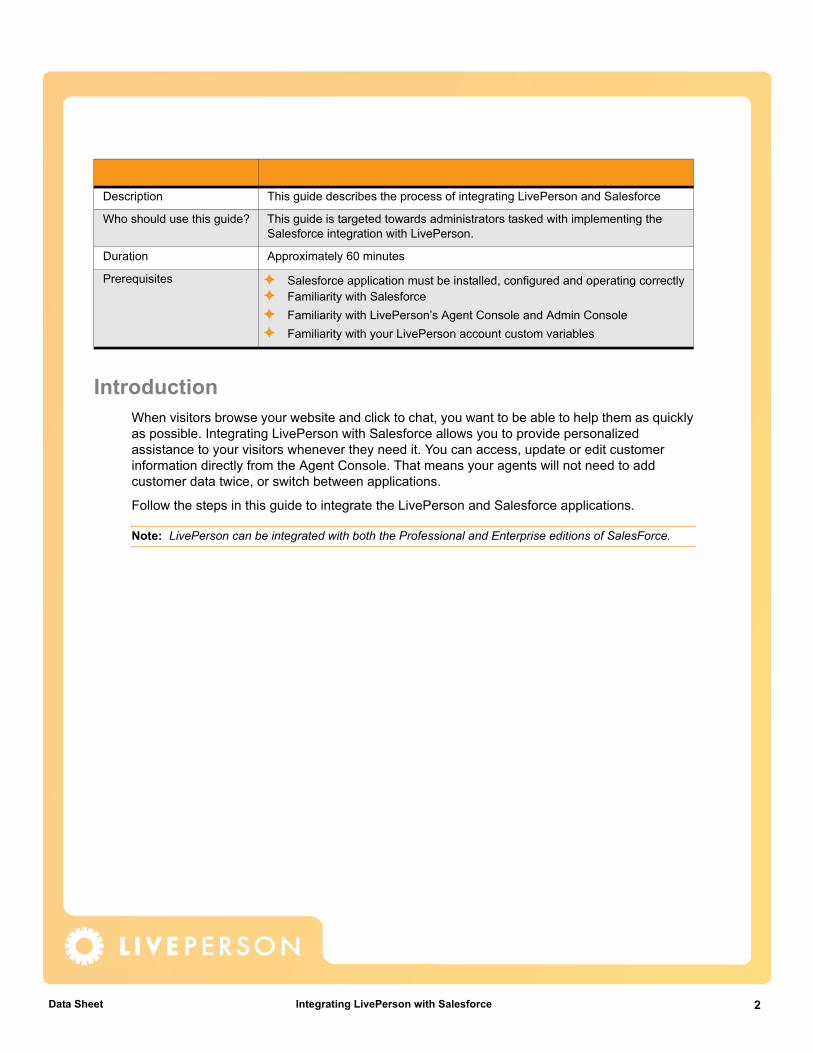
Description This guide describes the process of integrating LivePerson and Salesforce
Who should use this guide? This guide is targeted towards administrators tasked with implementing the Salesforce integration with LivePerson.
Duration Approximately 60 minutes
Prerequisites Salesforce application must be installed, configured and operating correctlyFamiliarity with SalesforceFamiliarity with LivePerson’s Agent Console and Admin ConsoleFamiliarity with your LivePerson account custom variables
2eet Integrating LivePerson with Salesforce
Data Sh
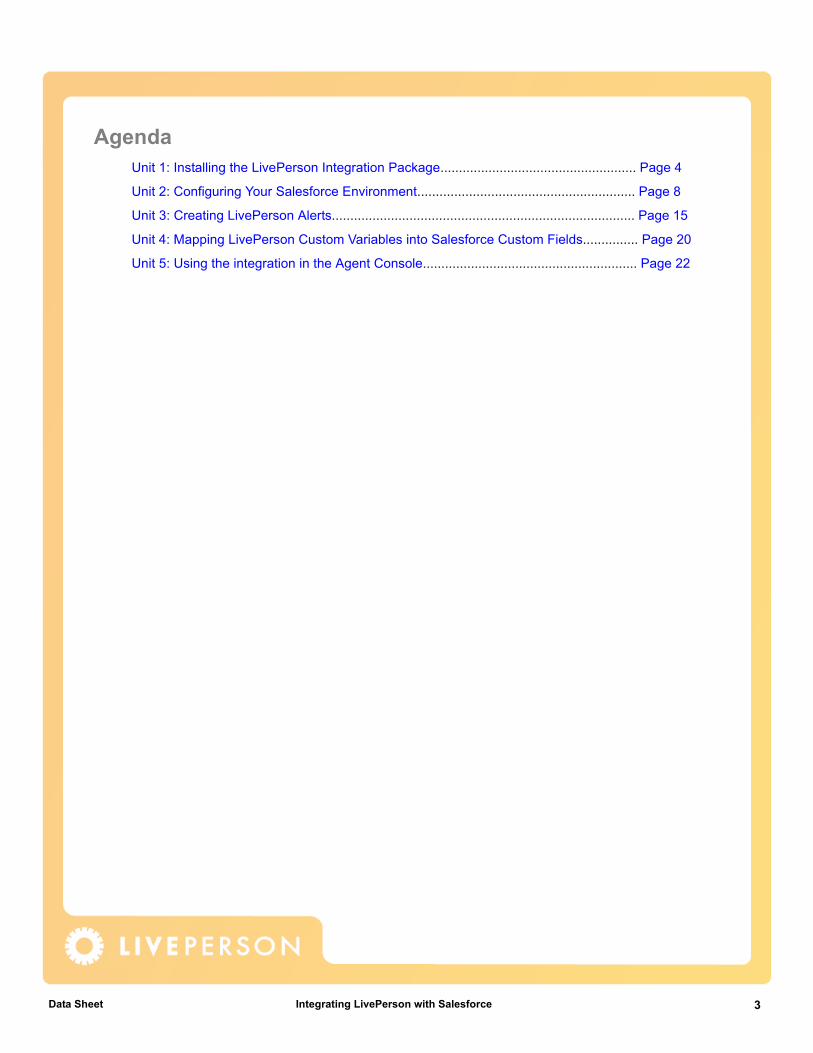
AgendaUnit 1: Installing the LivePerson Integration Package..................................................... Page 4
Unit 2: Configuring Your Salesforce Environment........................................................... Page 8
Unit 3: Creating LivePerson Alerts.................................................................................. Page 15
Unit 4: Mapping LivePerson Custom Variables into Salesforce Custom Fields............... Page 20
Unit 5: Using the integration in the Agent Console.......................................................... Page 22
3eet Integrating LivePerson with Salesforce
Data Sh
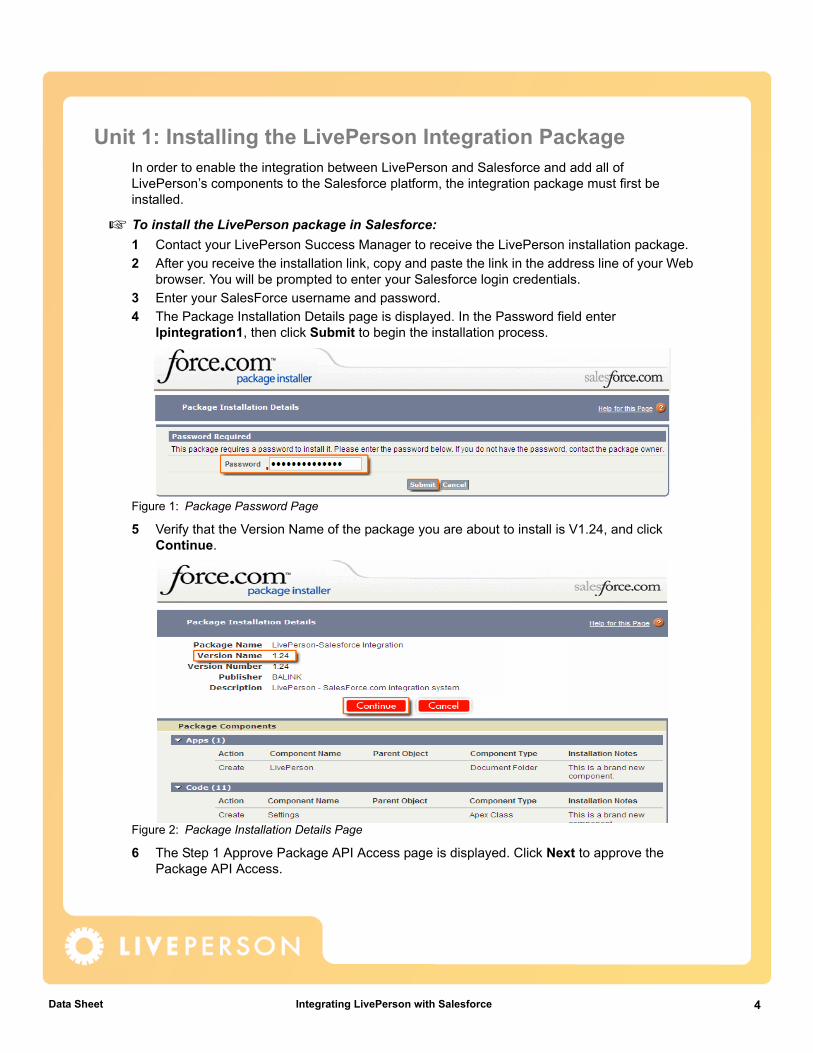
Unit 1: Installing the LivePerson Integration PackageIn order to enable the integration between LivePerson and Salesforce and add all of LivePerson’s components to the Salesforce platform, the integration package must first be installed.
To install the LivePerson package in Salesforce: 1 Contact your LivePerson Success Manager to receive the LivePerson installation package.2 After you receive the installation link, copy and paste the link in the address line of your Web
browser. You will be prompted to enter your Salesforce login credentials.3 Enter your SalesForce username and password.4 The Package Installation Details page is displayed. In the Password field enter
lpintegration1, then click Submit to begin the installation process.
Figure 1: Package Password Page
5 Verify that the Version Name of the package you are about to install is V1.24, and click Continue.
Figure 2: Package Installation Details Page
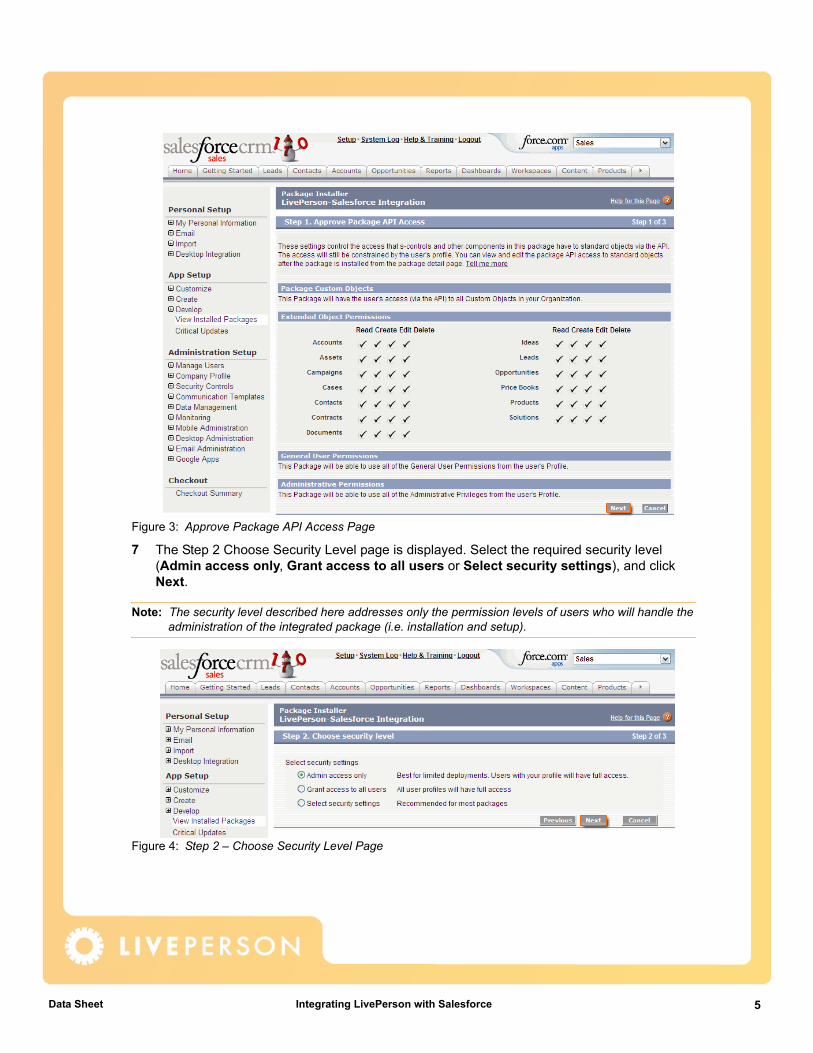
6 The Step 1 Approve Package API Access page is displayed. Click Next to approve the Package API Access.
4eet Integrating LivePerson with Salesforce
Data Sh
Figure 3: Approve Package API Access Page
7 The Step 2 Choose Security Level page is displayed. Select the required security level (Admin access only, Grant access to all users or Select security settings), and click Next.
Note: The security level described here addresses only the permission levels of users who will handle the administration of the integrated package (i.e. installation and setup).
Figure 4: Step 2 – Choose Security Level Page
5eet Integrating LivePerson with Salesforce
Data Sh
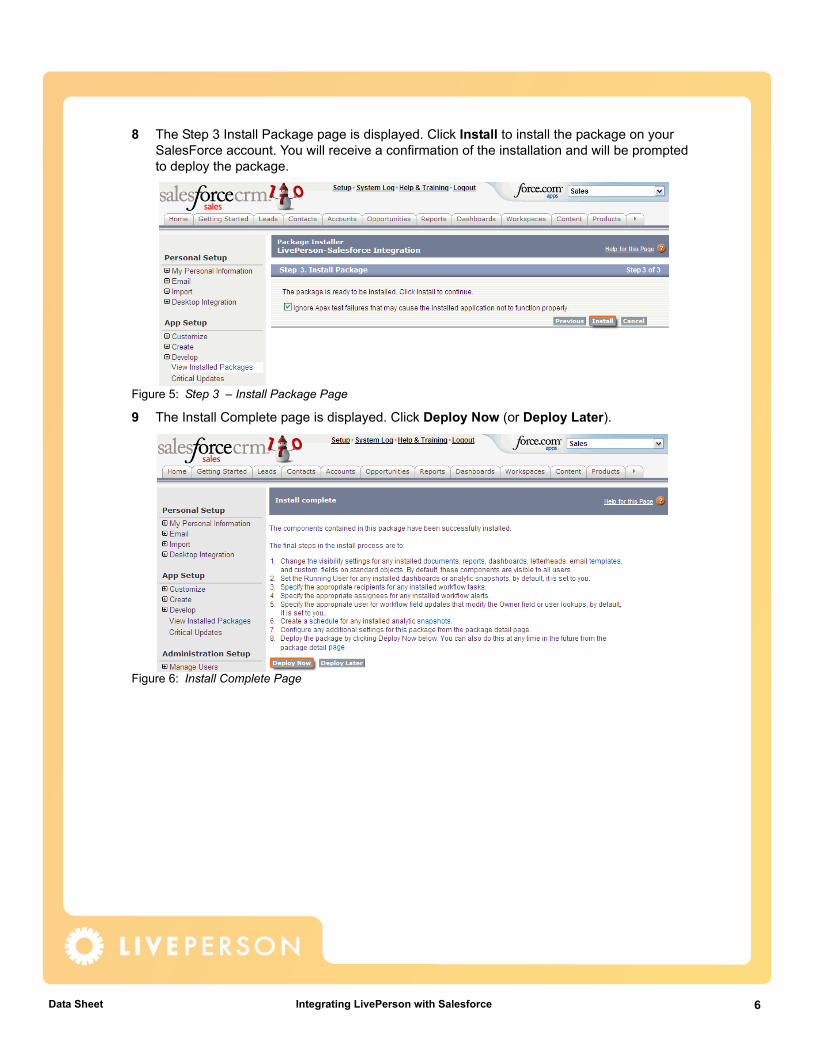
8 The Step 3 Install Package page is displayed. Click Install to install the package on your SalesForce account. You will receive a confirmation of the installation and will be prompted to deploy the package.
Figure 5: Step 3 – Install Package Page
9 The Install Complete page is displayed. Click Deploy Now (or Deploy Later).
Figure 6: Install Complete Page
6eet Integrating LivePerson with Salesforce
Data Sh
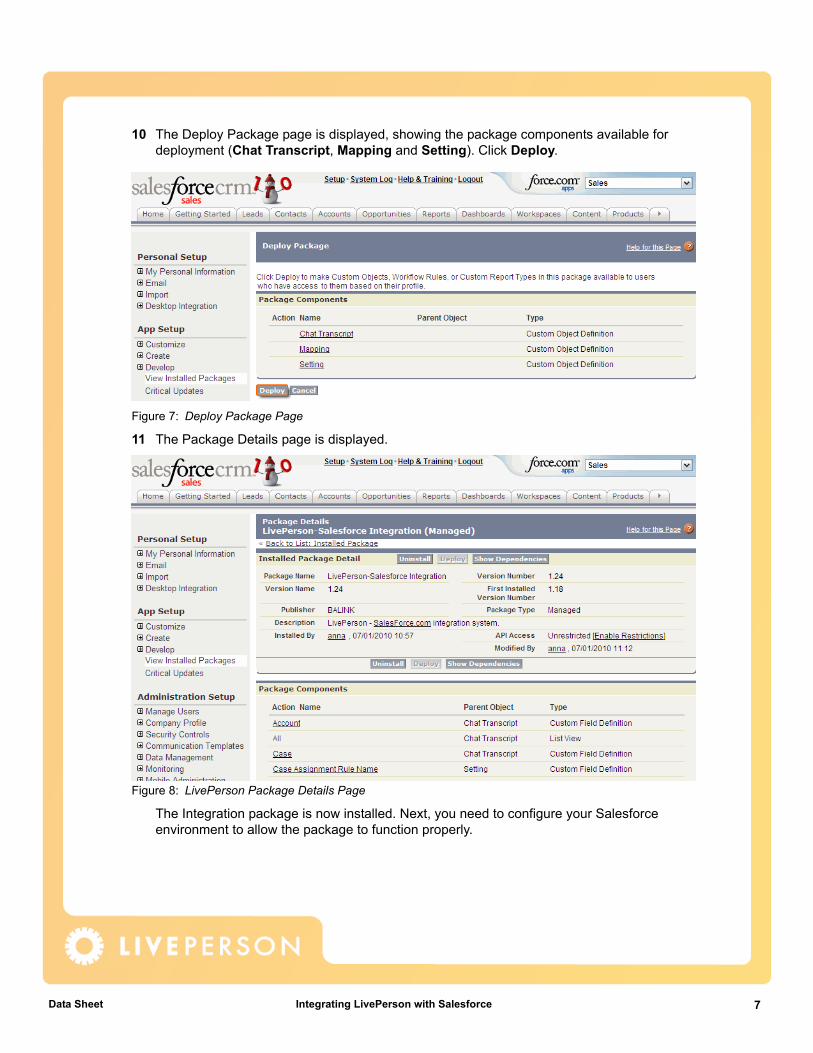
10 The Deploy Package page is displayed, showing the package components available for deployment (Chat Transcript, Mapping and Setting). Click Deploy.
Figure 7: Deploy Package Page
11 The Package Details page is displayed.
Figure 8: LivePerson Package Details Page
The Integration package is now installed. Next, you need to configure your Salesforce environment to allow the package to function properly.
7eet Integrating LivePerson with Salesforce
Data Sh
Unit 2: Configuring Your Salesforce Environment
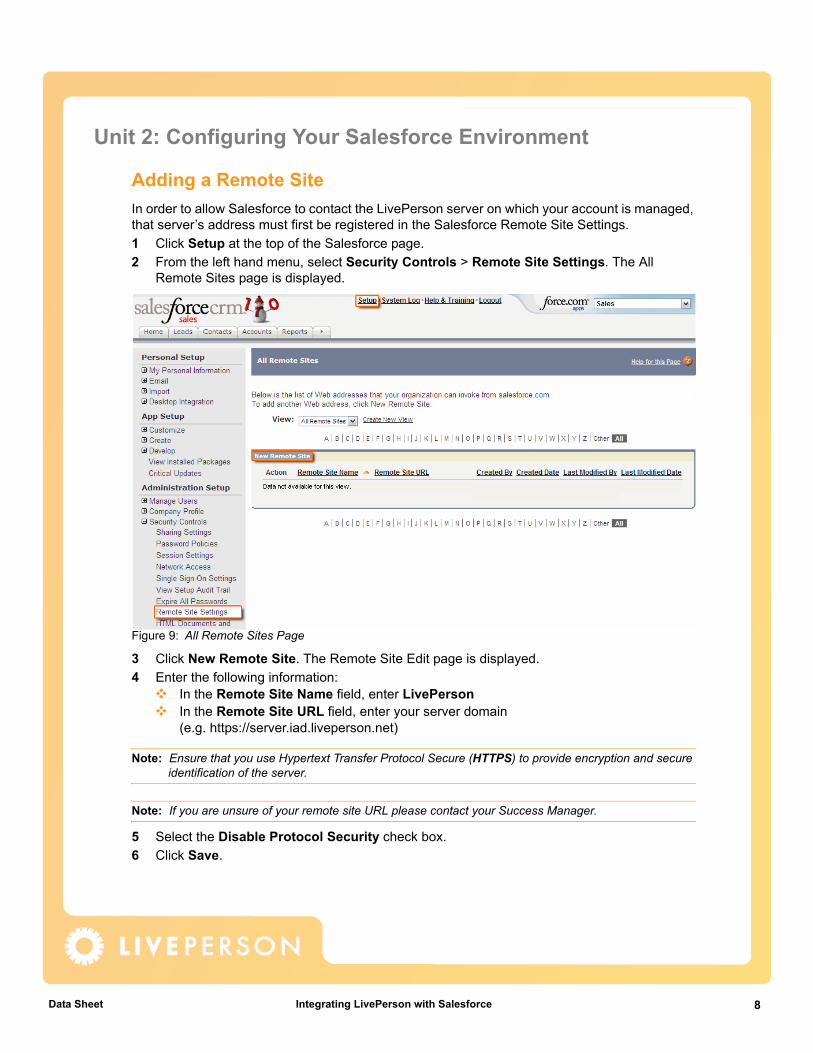
Adding a Remote SiteIn order to allow Salesforce to contact the LivePerson server on which your account is managed, that server’s address must first be registered in the Salesforce Remote Site Settings.1 Click Setup at the top of the Salesforce page.2 From the left hand menu, select Security Controls > Remote Site Settings. The All
Remote Sites page is displayed.
Figure 9: All Remote Sites Page
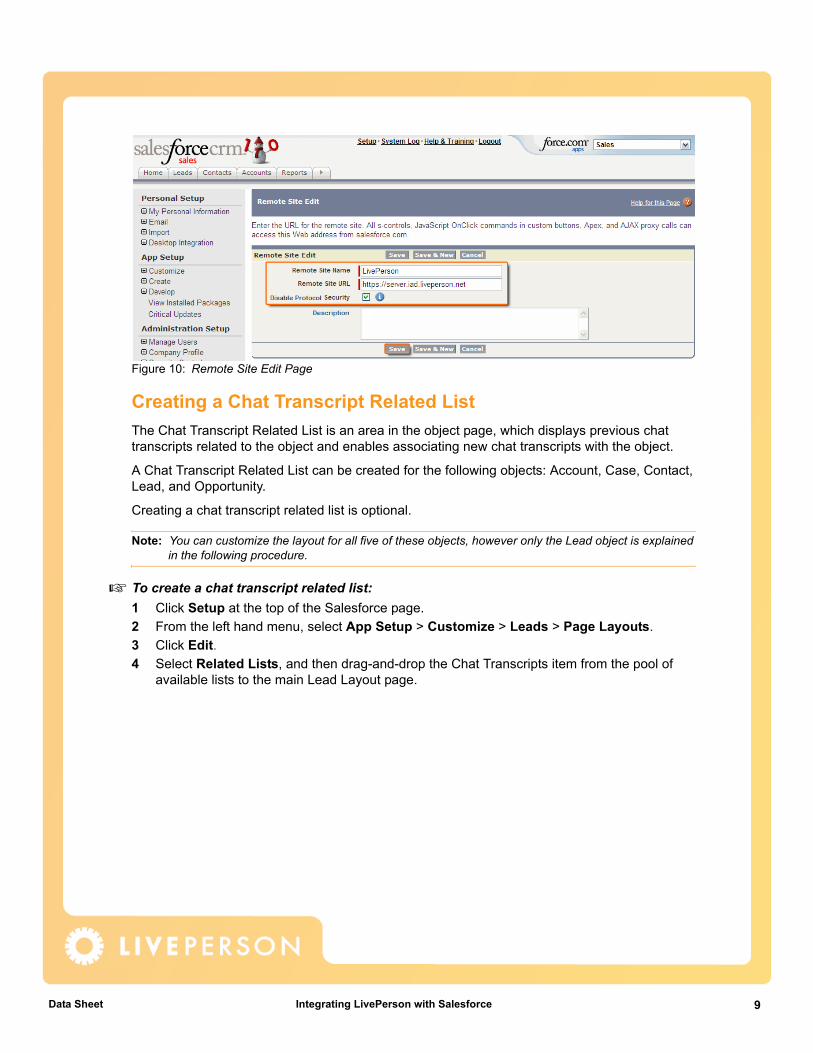
3 Click New Remote Site. The Remote Site Edit page is displayed.4 Enter the following information:
In the Remote Site Name field, enter LivePerson In the Remote Site URL field, enter your server domain (e.g. https://server.iad.liveperson.net)
Note: Ensure that you use Hypertext Transfer Protocol Secure (HTTPS) to provide encryption and secure identification of the server.
Note: If you are unsure of your remote site URL please contact your Success Manager.
5 Select the Disable Protocol Security check box.6 Click Save.
8eet Integrating LivePerson with Salesforce
Data Sh
Figure 10: Remote Site Edit Page
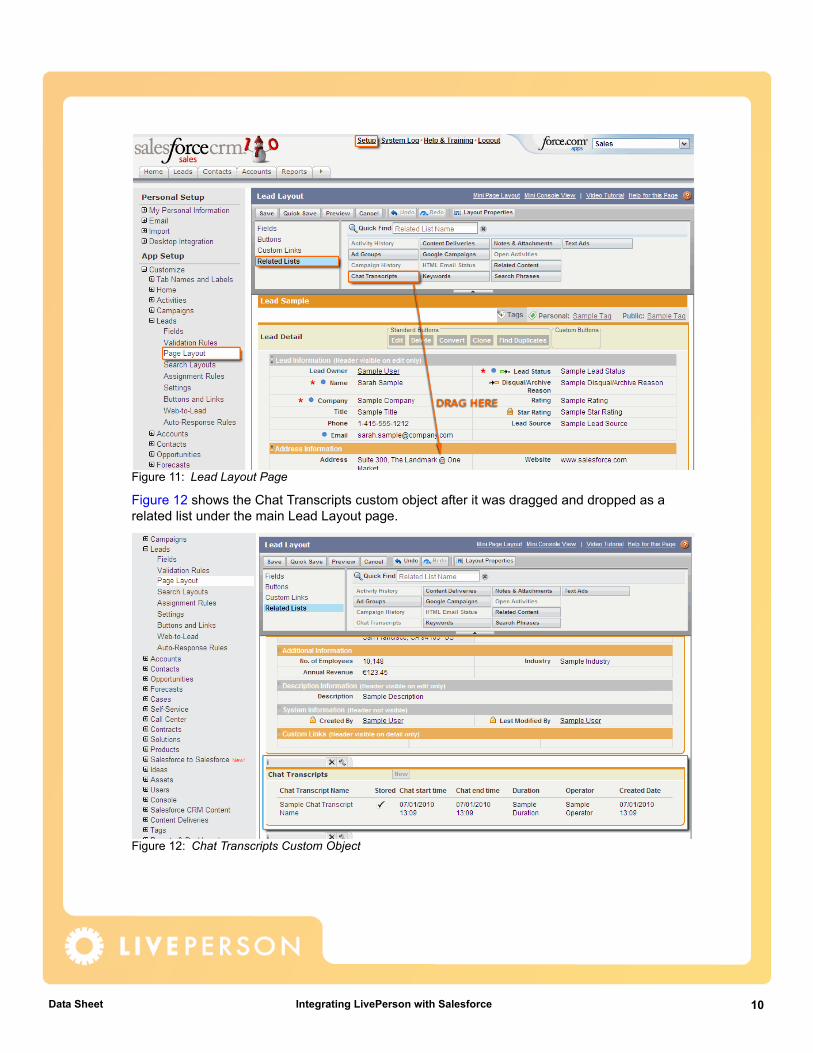
Creating a Chat Transcript Related ListThe Chat Transcript Related List is an area in the object page, which displays previous chat transcripts related to the object and enables associating new chat transcripts with the object.
A Chat Transcript Related List can be created for the following objects: Account, Case, Contact, Lead, and Opportunity.
Creating a chat transcript related list is optional.
Note: You can customize the layout for all five of these objects, however only the Lead object is explained in the following procedure.
To create a chat transcript related list:1 Click Setup at the top of the Salesforce page.2 From the left hand menu, select App Setup > Customize > Leads > Page Layouts.3 Click Edit.4 Select Related Lists, and then drag-and-drop the Chat Transcripts item from the pool of
available lists to the main Lead Layout page.
9eet Integrating LivePerson with Salesforce
Data Sh
Figure 11: Lead Layout Page
Figure 12 shows the Chat Transcripts custom object after it was dragged and dropped as a related list under the main Lead Layout page.
Figure 12: Chat Transcripts Custom Object
10eet Integrating LivePerson with Salesforce
Data Sh
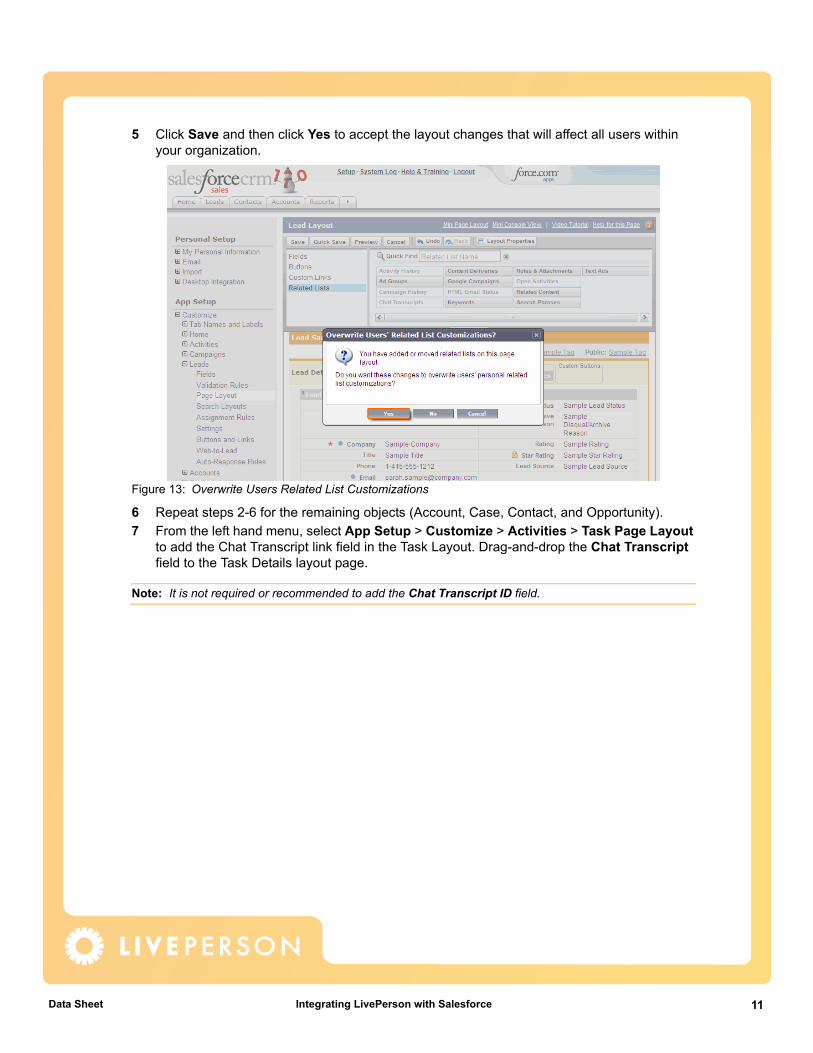
5 Click Save and then click Yes to accept the layout changes that will affect all users within your organization.
Figure 13: Overwrite Users Related List Customizations
6 Repeat steps 2-6 for the remaining objects (Account, Case, Contact, and Opportunity).7 From the left hand menu, select App Setup > Customize > Activities > Task Page Layout
to add the Chat Transcript link field in the Task Layout. Drag-and-drop the Chat Transcript field to the Task Details layout page.
Note: It is not required or recommended to add the Chat Transcript ID field.
11eet Integrating LivePerson with Salesforce
Data Sh
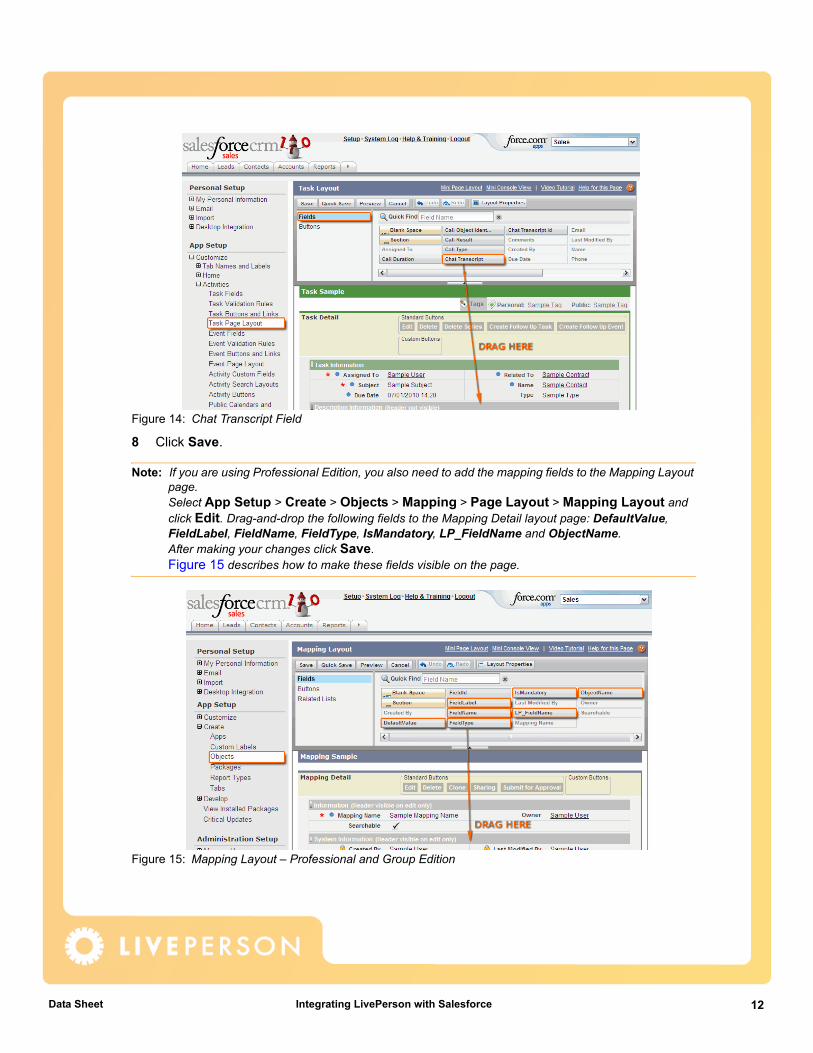
Figure 14: Chat Transcript Field
8 Click Save.
Note: If you are using Professional Edition, you also need to add the mapping fields to the Mapping Layout page. Select App Setup > Create > Objects > Mapping > Page Layout > Mapping Layout and click Edit. Drag-and-drop the following fields to the Mapping Detail layout page: DefaultValue, FieldLabel, FieldName, FieldType, IsMandatory, LP_FieldName and ObjectName. After making your changes click Save. Figure 15 describes how to make these fields visible on the page.
Figure 15: Mapping Layout – Professional and Group Edition
12eet Integrating LivePerson with Salesforce
Data Sh
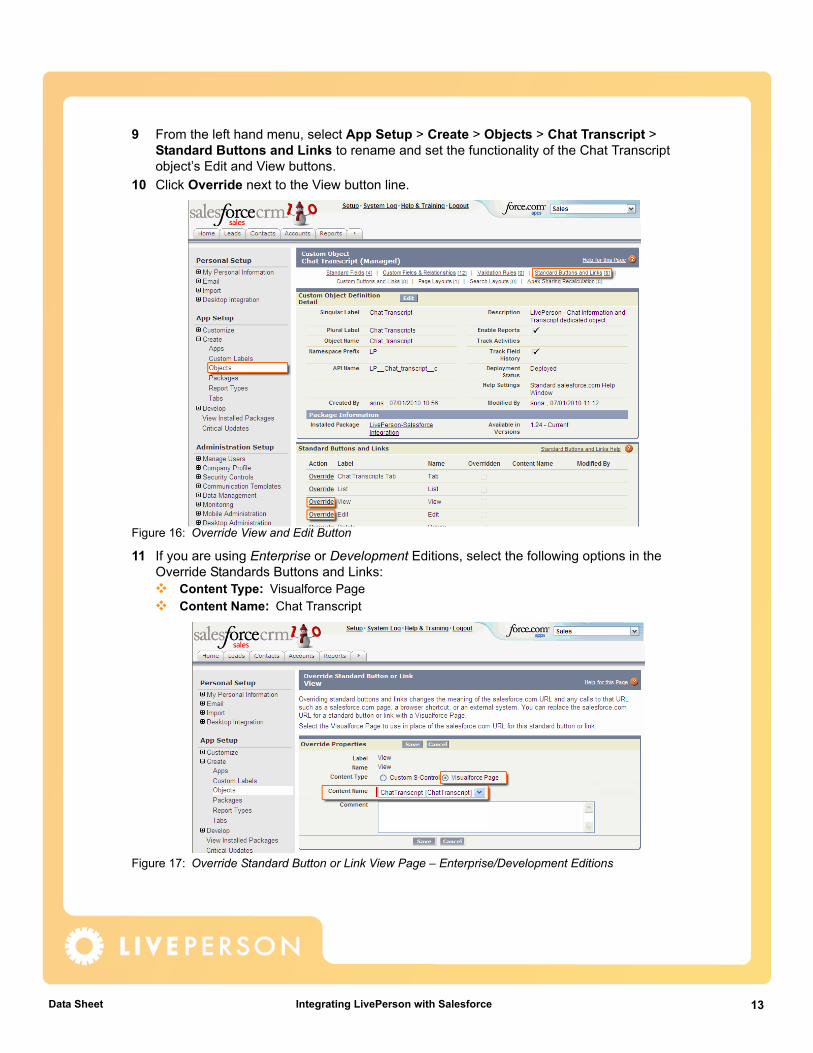
9 From the left hand menu, select App Setup > Create > Objects > Chat Transcript > Standard Buttons and Links to rename and set the functionality of the Chat Transcript object’s Edit and View buttons.
10 Click Override next to the View button line.
Figure 16: Override View and Edit Button
11 If you are using Enterprise or Development Editions, select the following options in the Override Standards Buttons and Links:
Content Type: Visualforce PageContent Name: Chat Transcript
Figure 17: Override Standard Button or Link View Page – Enterprise/Development Editions
13eet Integrating LivePerson with Salesforce
Data Sh
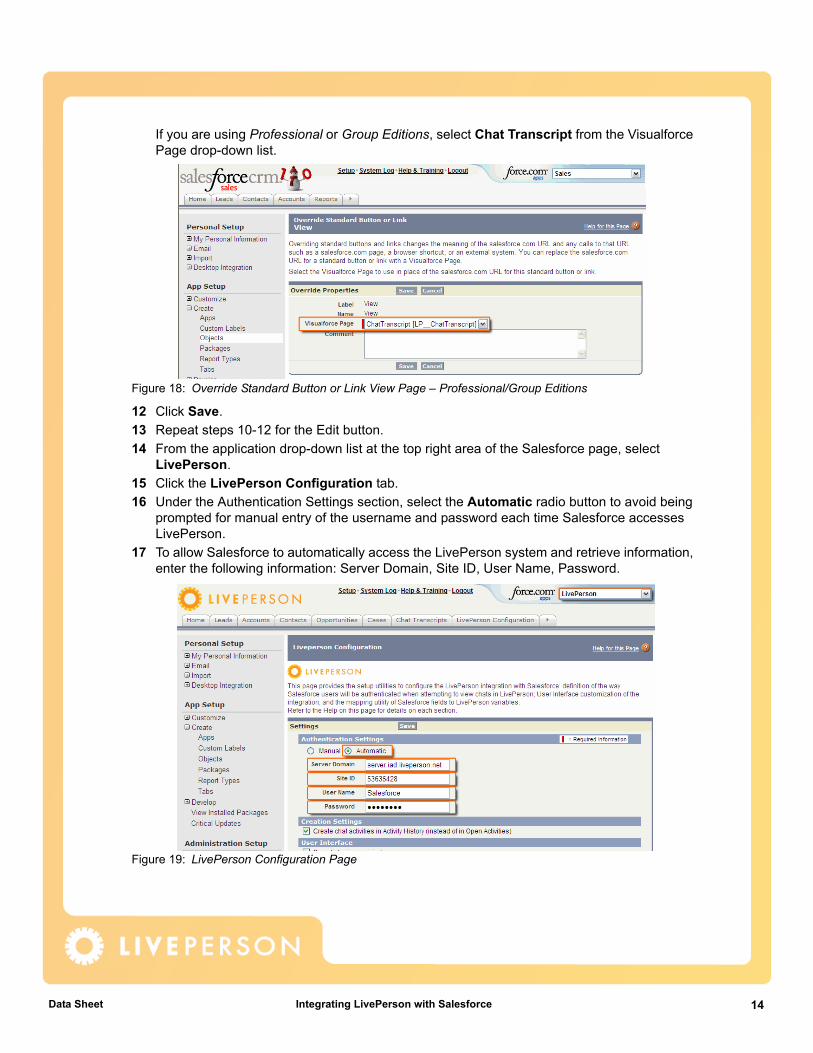
If you are using Professional or Group Editions, select Chat Transcript from the Visualforce Page drop-down list.
Figure 18: Override Standard Button or Link View Page – Professional/Group Editions
12 Click Save.13 Repeat steps 10-12 for the Edit button.14 From the application drop-down list at the top right area of the Salesforce page, select
LivePerson.15 Click the LivePerson Configuration tab.16 Under the Authentication Settings section, select the Automatic radio button to avoid being
prompted for manual entry of the username and password each time Salesforce accesses LivePerson.
17 To allow Salesforce to automatically access the LivePerson system and retrieve information, enter the following information: Server Domain, Site ID, User Name, Password.
Figure 19: LivePerson Configuration Page
14eet Integrating LivePerson with Salesforce
Data Sh
Unit 3: Creating LivePerson AlertsTo allow agents to update information in SalesForce directly from the LivePerson Agent Console, a link needs to be implemented in the Alert tab. This link maps LivePerson variables into Salesforce fields and essentially identifies which field in SalesForce should receive the value of which LivePerson variable.
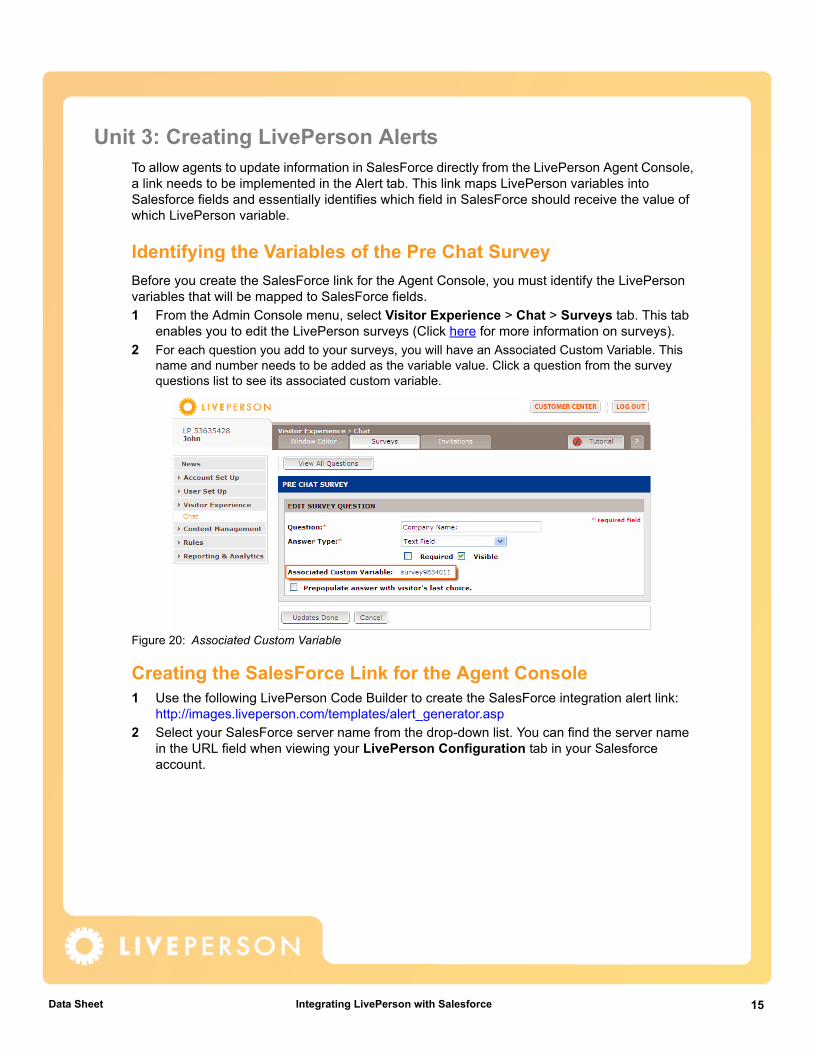
Identifying the Variables of the Pre Chat SurveyBefore you create the SalesForce link for the Agent Console, you must identify the LivePerson variables that will be mapped to SalesForce fields.1 From the Admin Console menu, select Visitor Experience > Chat > Surveys tab. This tab
enables you to edit the LivePerson surveys (Click here for more information on surveys).2 For each question you add to your surveys, you will have an Associated Custom Variable. This
name and number needs to be added as the variable value. Click a question from the survey questions list to see its associated custom variable.
Figure 20: Associated Custom Variable
Creating the SalesForce Link for the Agent Console1 Use the following LivePerson Code Builder to create the SalesForce integration alert link:
http://images.liveperson.com/templates/alert_generator.asp2 Select your SalesForce server name from the drop-down list. You can find the server name
in the URL field when viewing your LivePerson Configuration tab in your Salesforce account.
15eet Integrating LivePerson with Salesforce
Data Sh
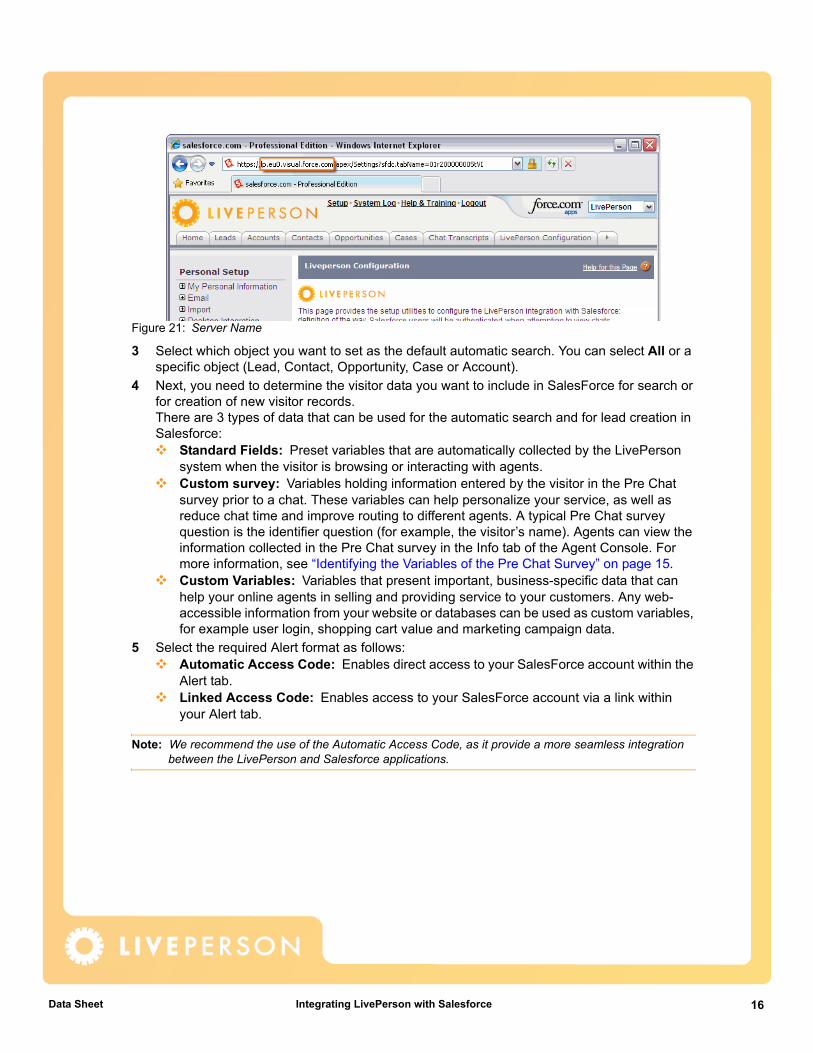
Figure 21: Server Name
3 Select which object you want to set as the default automatic search. You can select All or a specific object (Lead, Contact, Opportunity, Case or Account).
4 Next, you need to determine the visitor data you want to include in SalesForce for search or for creation of new visitor records. There are 3 types of data that can be used for the automatic search and for lead creation in Salesforce:
Standard Fields: Preset variables that are automatically collected by the LivePerson system when the visitor is browsing or interacting with agents.Custom survey: Variables holding information entered by the visitor in the Pre Chat survey prior to a chat. These variables can help personalize your service, as well as reduce chat time and improve routing to different agents. A typical Pre Chat survey question is the identifier question (for example, the visitor’s name). Agents can view the information collected in the Pre Chat survey in the Info tab of the Agent Console. For more information, see “Identifying the Variables of the Pre Chat Survey” on page 15.Custom Variables: Variables that present important, business-specific data that can help your online agents in selling and providing service to your customers. Any web-accessible information from your website or databases can be used as custom variables, for example user login, shopping cart value and marketing campaign data.
5 Select the required Alert format as follows:Automatic Access Code: Enables direct access to your SalesForce account within the Alert tab.Linked Access Code: Enables access to your SalesForce account via a link within your Alert tab.
Note: We recommend the use of the Automatic Access Code, as it provide a more seamless integration between the LivePerson and Salesforce applications.
16eet Integrating LivePerson with Salesforce
Data Sh
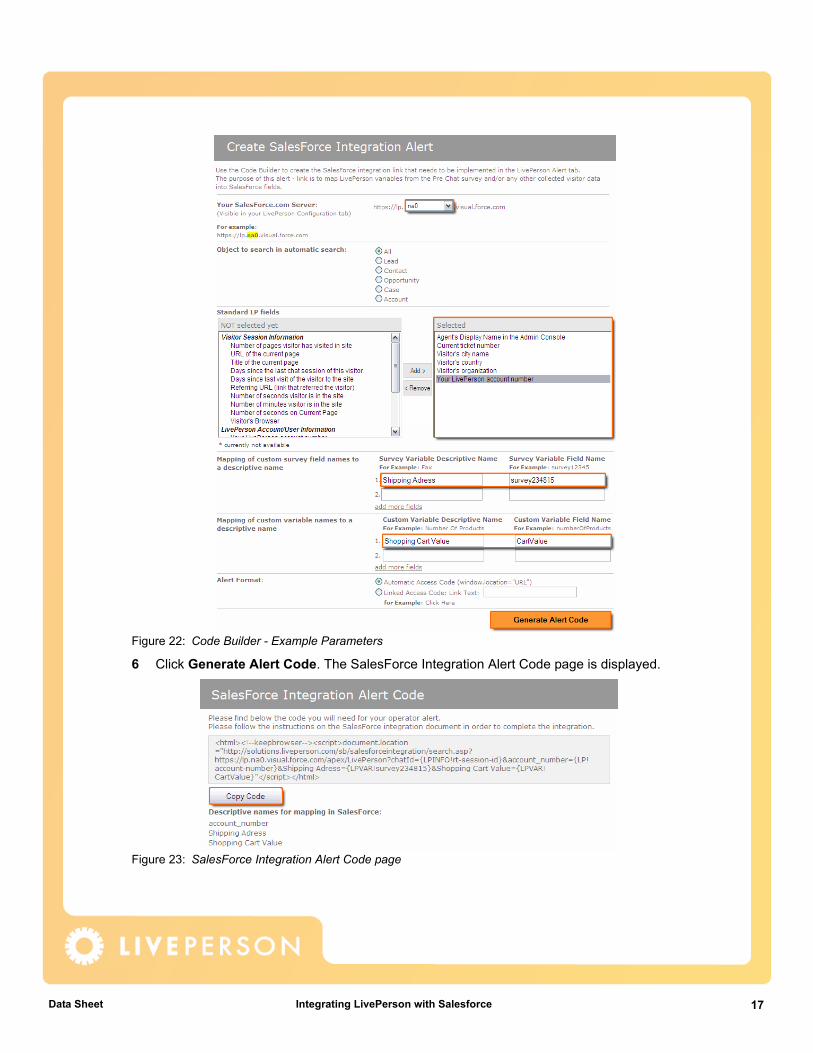
Figure 22: Code Builder - Example Parameters
6 Click Generate Alert Code. The SalesForce Integration Alert Code page is displayed.
Figure 23: SalesForce Integration Alert Code page
17eet Integrating LivePerson with Salesforce
Data Sh
Note: The descriptive names for mapping in SalesForce are displayed below the generated code. The descriptive names are the variable names that need to be mapped in your SalesForce account. For information on adding the values of variables into your Salesforce fields, see “Unit 4: Mapping LivePerson Custom Variables into Salesforce Custom Fields” on page 20.
7 Click Copy Code and paste the code into the HTML field of the rule’s action (see Figure 25). For more information, see “Adding an Operator Alert rule” on page 18.
After you finish adding all your parameters to the link, you need to add a rule that will create an alert in your Agent Console when a visitor requests a chat.
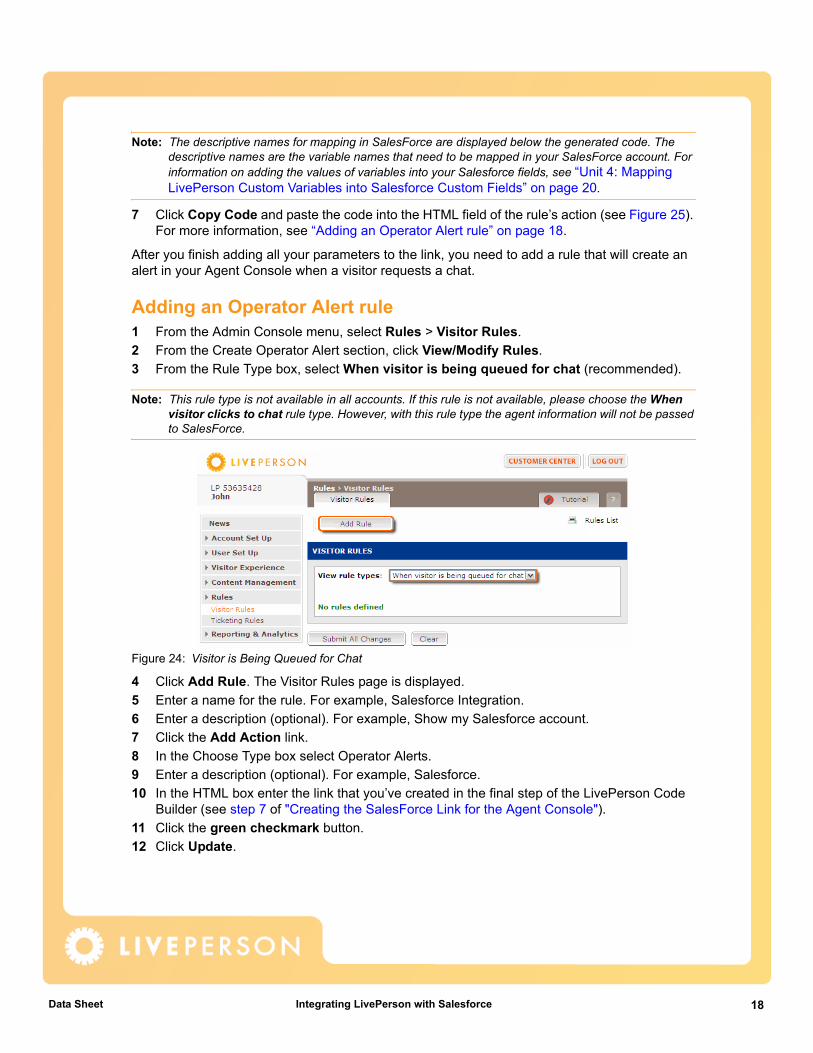
Adding an Operator Alert rule1 From the Admin Console menu, select Rules > Visitor Rules.2 From the Create Operator Alert section, click View/Modify Rules.3 From the Rule Type box, select When visitor is being queued for chat (recommended).
Note: This rule type is not available in all accounts. If this rule is not available, please choose the When visitor clicks to chat rule type. However, with this rule type the agent information will not be passed to SalesForce.
Figure 24: Visitor is Being Queued for Chat
4 Click Add Rule. The Visitor Rules page is displayed.5 Enter a name for the rule. For example, Salesforce Integration.6 Enter a description (optional). For example, Show my Salesforce account.7 Click the Add Action link.8 In the Choose Type box select Operator Alerts.9 Enter a description (optional). For example, Salesforce.10 In the HTML box enter the link that you’ve created in the final step of the LivePerson Code
Builder (see step 7 of "Creating the SalesForce Link for the Agent Console").11 Click the green checkmark button.12 Click Update.
18eet Integrating LivePerson with Salesforce
Data Sh
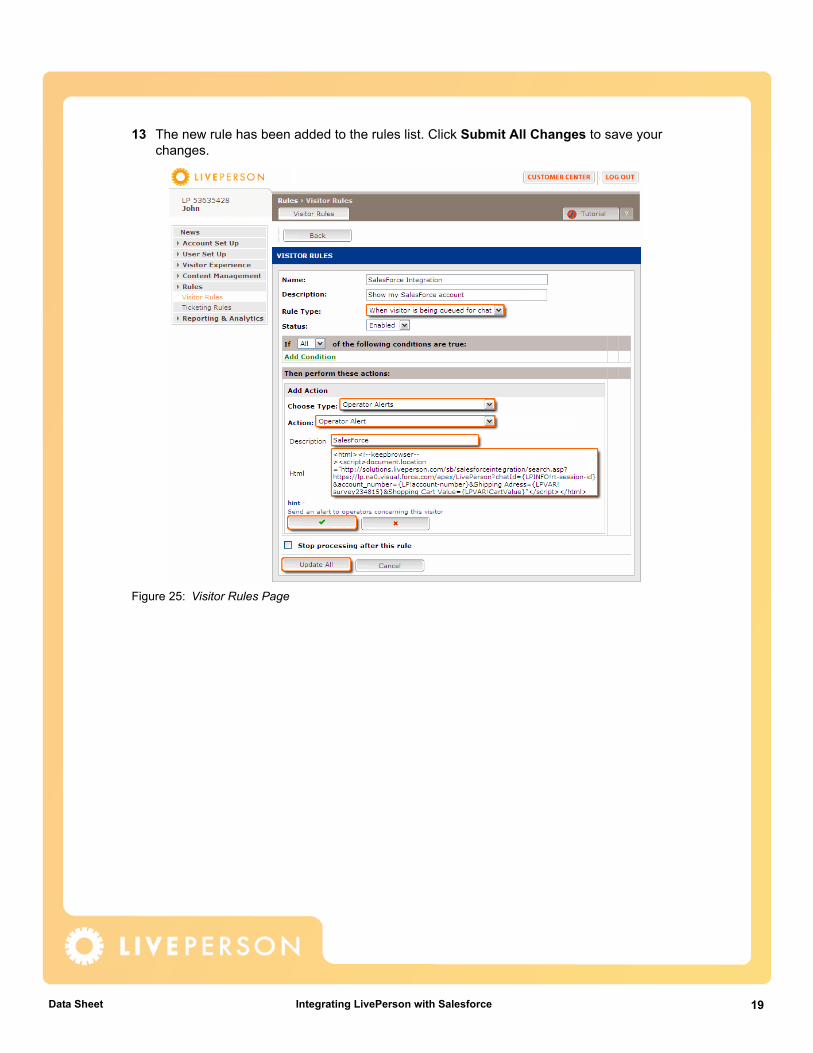
13 The new rule has been added to the rules list. Click Submit All Changes to save your changes.
Figure 25: Visitor Rules Page
19eet Integrating LivePerson with Salesforce

Data Sh
Unit 4: Mapping LivePerson Custom Variables into Salesforce Custom Fields
After creating the LivePerson alert that enables you to access your Salesforce account from the Agent Console, to automatically search the visitor data in Salesforce and to create visitor records in Salesforce, you also need to ensure that the collected visitor data is displayed in the right fields in Salesforce.
To map LivePerson custom variables into SalesForce custom fields:1 Access the field mapping area in Salesforce - Select the LivePerson Configuration tab and
then click the Edit button next to the relevant Salesforce object.
Figure 26: LivePerson Configuration
2 Choose the contact fields that you would like to map (mark them and click Add).3 Specify whether you wish the integration to inherit the assignment rules already defined in
your Salesforce account, and if yes, whether to use the active rule or one of the non-active rules.
Note: The Salesforce Assignment Rules determine how to route (to which user to assign) the newly created object, be it a lead or any of the other available objects.
20eet Integrating LivePerson with Salesforce
Data Sh
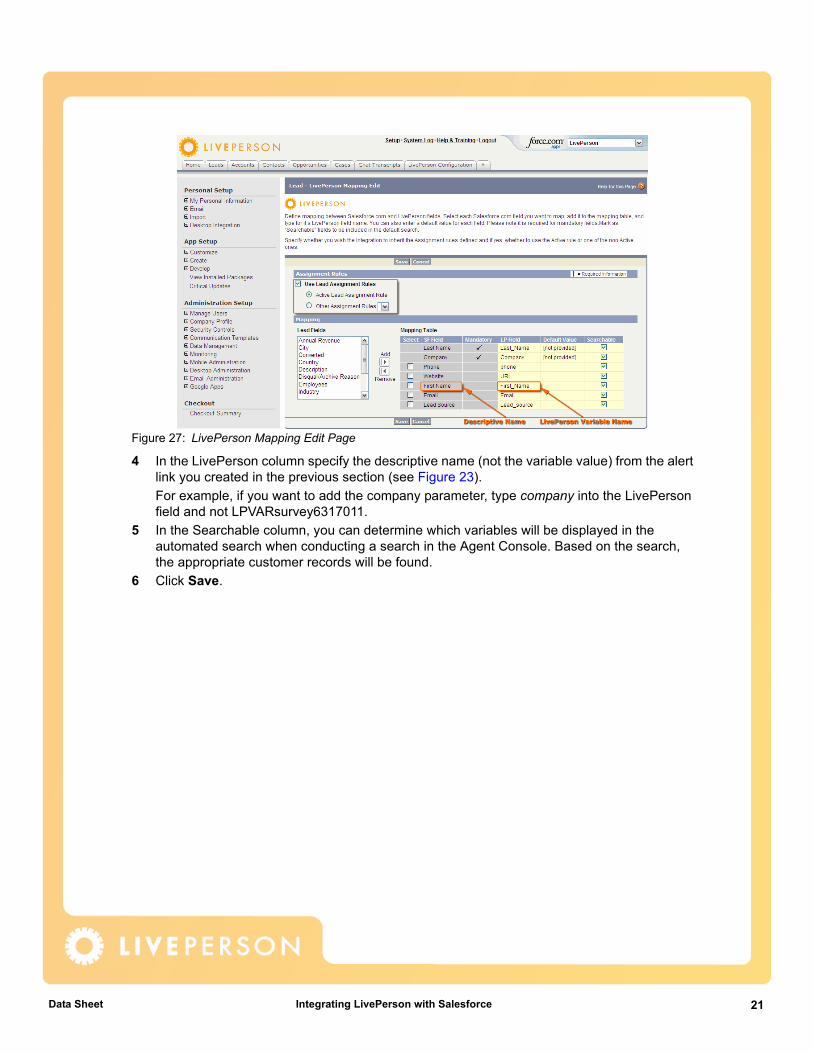
Figure 27: LivePerson Mapping Edit Page
4 In the LivePerson column specify the descriptive name (not the variable value) from the alert link you created in the previous section (see Figure 23).For example, if you want to add the company parameter, type company into the LivePerson field and not LPVARsurvey6317011.
5 In the Searchable column, you can determine which variables will be displayed in the automated search when conducting a search in the Agent Console. Based on the search, the appropriate customer records will be found.
6 Click Save.
21eet Integrating LivePerson with Salesforce
Data Sh
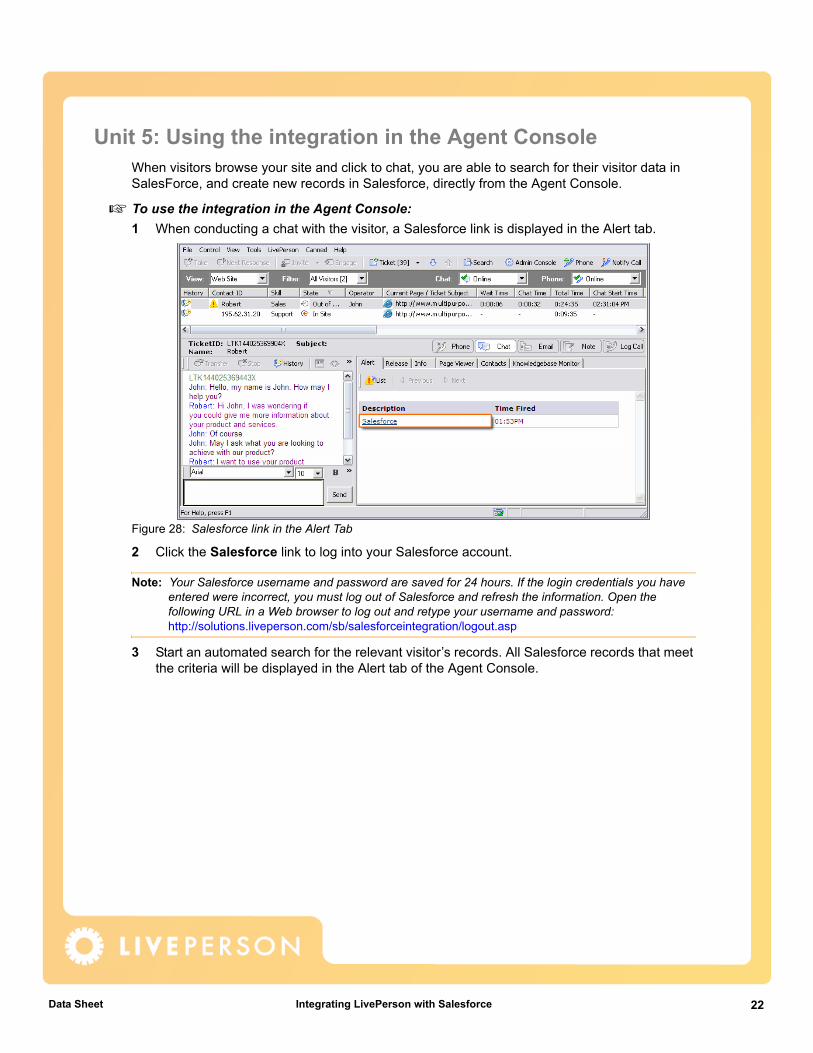
Unit 5: Using the integration in the Agent ConsoleWhen visitors browse your site and click to chat, you are able to search for their visitor data in SalesForce, and create new records in Salesforce, directly from the Agent Console.
To use the integration in the Agent Console:1 When conducting a chat with the visitor, a Salesforce link is displayed in the Alert tab.
Figure 28: Salesforce link in the Alert Tab
2 Click the Salesforce link to log into your Salesforce account.
Note: Your Salesforce username and password are saved for 24 hours. If the login credentials you have entered were incorrect, you must log out of Salesforce and refresh the information. Open the following URL in a Web browser to log out and retype your username and password: http://solutions.liveperson.com/sb/salesforceintegration/logout.asp
3 Start an automated search for the relevant visitor’s records. All Salesforce records that meet the criteria will be displayed in the Alert tab of the Agent Console.
22eet Integrating LivePerson with Salesforce
Data Sh
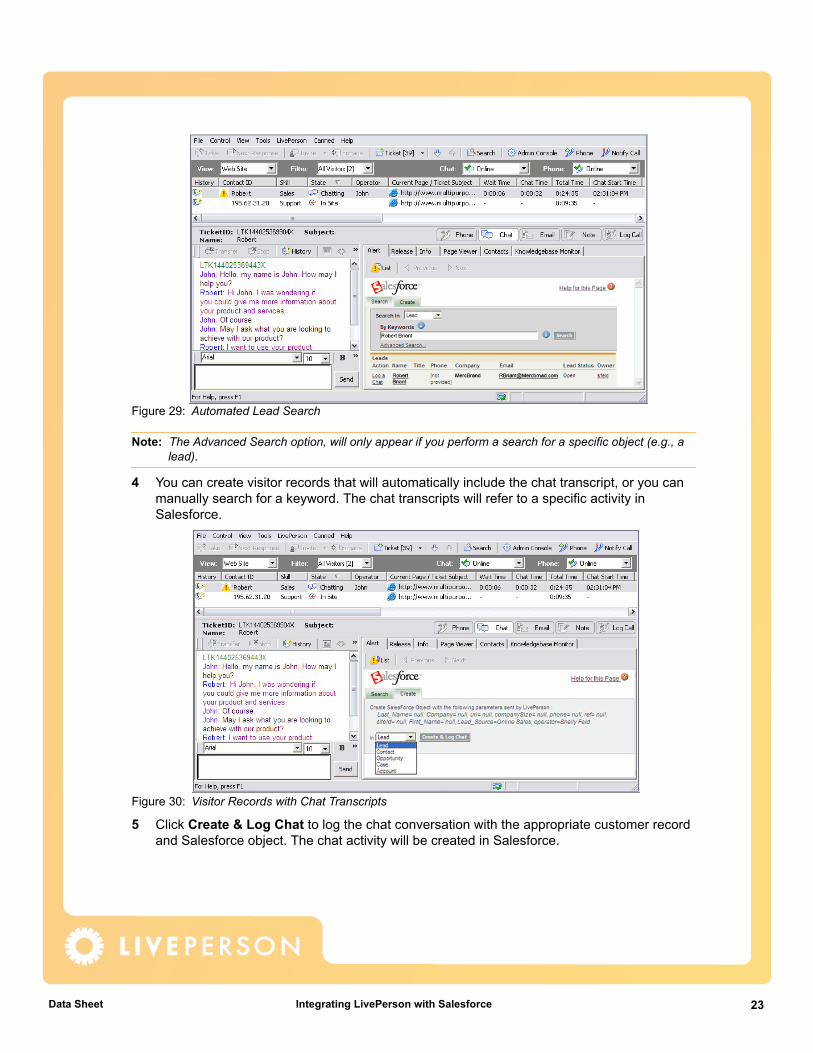
Figure 29: Automated Lead Search
Note: The Advanced Search option, will only appear if you perform a search for a specific object (e.g., a lead).
4 You can create visitor records that will automatically include the chat transcript, or you can manually search for a keyword. The chat transcripts will refer to a specific activity in Salesforce.
Figure 30: Visitor Records with Chat Transcripts
5 Click Create & Log Chat to log the chat conversation with the appropriate customer record and Salesforce object. The chat activity will be created in Salesforce.
23eet Integrating LivePerson with Salesforce
Data Sh
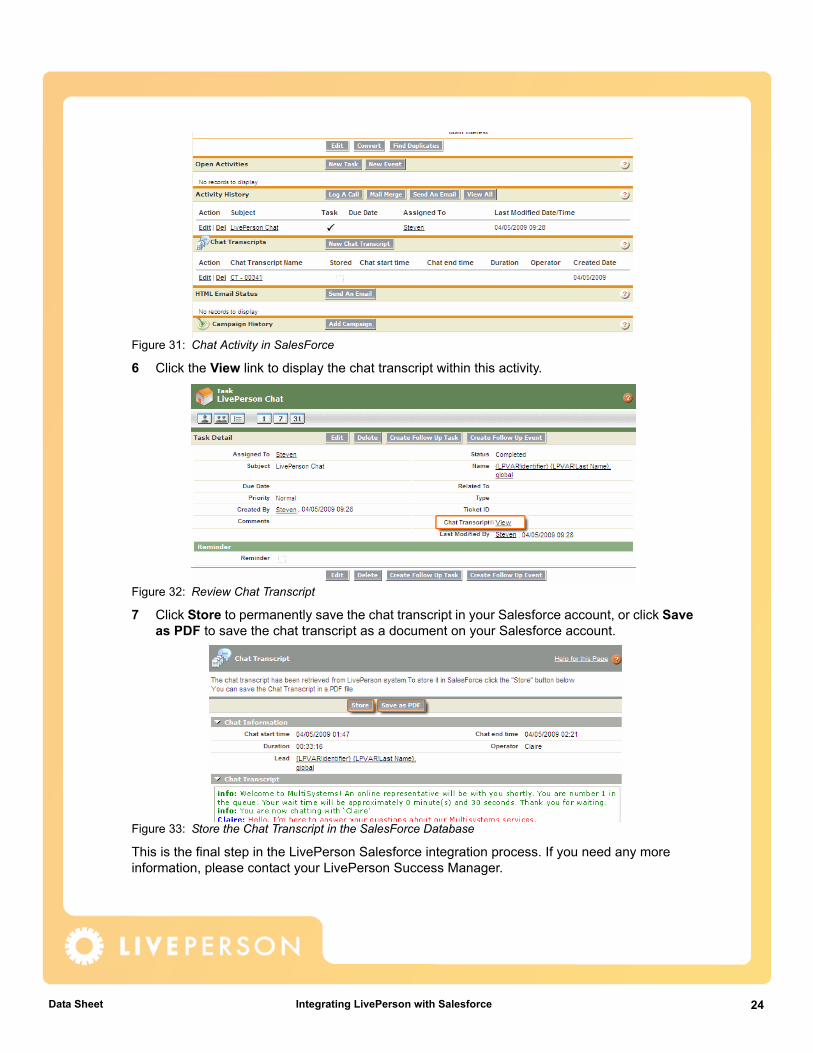
Figure 31: Chat Activity in SalesForce
6 Click the View link to display the chat transcript within this activity.
Figure 32: Review Chat Transcript
7 Click Store to permanently save the chat transcript in your Salesforce account, or click Save as PDF to save the chat transcript as a document on your Salesforce account.
Figure 33: Store the Chat Transcript in the SalesForce Database
This is the final step in the LivePerson Salesforce integration process. If you need any more information, please contact your LivePerson Success Manager.
24eet Integrating LivePerson with Salesforce