Liquid-Liquid Centrifugal Separator · until enough heavy phase is retained in the unit to fill the...
41
Liquid-Liquid Centrifugal Separator V- 02 OPERATING MANUAL Model: Material: Unit Serial #: Company: CINC Corporate Headquarters: 3535 Arrowhead Drive Carson City, NV 89706 Phone: 775- 885- 5080 Fax: 775- 885- 5087 http://www.cinc- co.com e- mail: cinc@cinc- co.com
Transcript of Liquid-Liquid Centrifugal Separator · until enough heavy phase is retained in the unit to fill the...

Liquid-Liquid Centrifugal Separator V-02 OPERATING MANUAL
Model: Material:
Unit Serial #: Company:
CINC Corporate Headquarters: 3535 Arrowhead Drive Carson City, NV 89706 Phone: 775-885-5080
Fax: 775-885-5087 http://www.cinc-co.com
e-mail: [email protected]

Table of ContentsTable of ContentsTable of ContentsTable of Contents
V-02 Operating Manual – REV 2/15/99 Page 2 of 41
INTRO DUCTIO N - CINC V-02 SEPARATO R 4
CONTROL PAD 5INLET/OUTLET PORTS 5CUTAWAY VIEW OF THE CINC V-02 CENTRIFUGAL SEPARATOR 6RUN PARAMETERS AND TECHNICAL DATA FOR V-02 7WARRANTY 7
INSTALLING YO UR V-2 SEPARATO R 9
FLOW CONNECTION DIAGRAM 10
START-UP 11
OPERATING THE AC INVERTER DRIVE CONTROL PANEL 11V-2 MINI CONTROLLER OPERATING INSTRUCTIONS 12POWER REQUIREMENTS: 12RUNNING YOUR V-2 MINI CONTROLLER: 12RUNNING YOUR V-2 SEPARATOR: 13
SHUT DO WN 14
TURNING OFF YOUR V-2 SEPARATOR 14
TROUBLE SHOOTING 15
SEPARATION - OPTIMIZING RUN CONDITIONS AND WEIR SIZING 15MECHANICAL 15ELECTRICAL 16
MAINTENANCE 17
SEAL 17BEARINGS 17ROTOR 17HEAVY PHASE WEIR CHANGE 18REPLACING ROTOR BEARINGS 20

Table of ContentsTable of ContentsTable of ContentsTable of Contents
V-02 Operating Manual – REV 2/15/99 Page 3 of 41
REPLACE MOTOR 23
RO TO R CLEANING 24
CHANGING STANDARD/LOW MIX MODE BOTTOM PLATE 28ASSEMBLY DIAGRAM 1 REV-B - WITH OBSERVATION WINDOW OPTION 30ASSEMBLY DIAGRAM 2 REV-B 31ASSEMBLY DIAGRAM 3 REV-B 32V-02 PARTS LIST 33V-02 316L SPARE PART KIT DESCRIPTION 34
TECHNICAL APPENDIX 35
THEORY OF CENTRIFUGAL SEPARATION 35CINC V-2 FREQUENCY TO RPM CONVERSION TABLE 36RPM VS. G-FORCE CORRELATION CHART 37RESIDENCE TIME VS. FLOWRATE 38LINEAR VELOCITY CHART 41

IntroductionIntroductionIntroductionIntroduction
V-02 Operating Manual – REV 2/15/99 Page 4 of 41
Introduction - CINC V-02 Separator
The CINC Model V-2 centrifugal separator uses centrifugal force to separateimmiscible liquids of different densities. The unit is comprised of a metalhousing and stand, with inlet and outlet ports, an observation window, arotor (its only moving part), and a motor connected to the rotor v ia aflexible, direct coupling.
Motor Mount
Heavy PhaseOutlet
MotorStainless
Steel Stand
Light PhaseOutlet
Drain
Inlet
Inlet

IntroductionIntroductionIntroductionIntroduction
V-02 Operating Manual – REV 2/15/99 Page 5 of 41
Control Pad
An AC inverter drive controller (control pad displayed here) prov ides forprecise control of the rotor.
Inlet/Outlet Ports
Inlets: One or two fluid streamsare introduced into the annularmixing zone. For processeswhere the two liquid phases arealready mixed, either inlet maybe used. The second inlet isintended for use in theintroduction of a second liquidphase for extraction or washingprocesses.
Outlet: Outlet ports allow fordirect gravity outflow of the twoseparated liquid phases from theCINC unit. Control Pad
Heavy PhaseOutlet
Inlet
Inlet
Light PhaseOutlet

IntroductionIntroductionIntroductionIntroduction
V-02 Operating Manual – REV 2/15/99 Page 6 of 41
Cutaway View of the CINC V-02 Centrifugal Separator
The process fluids are homogenized in the annular mixing zone, and thendirected by the bottom vanes towards the rotor inlet. For applicationswhere premixing is not beneficial, an inner sleeve is installed which limitscontact of the process fluids with the rotating rotor. This is referred to as the“low-mix” or “low-shear” modification.
The self-pumping rotor moves fluids axially up its diameter, where thegenerated centrifugal force (100 - 400 g’s) separates the two liquid phasesas they flow through the rotor.
Collector
Heavier PhaseOutlet
Heavier Phase:Weir Adjustable
Diverter Disk
Separation Vanes (4)
Housing
Heavier or MixedPhase Inlet
Vapor Space
Interface
Bottom Vanes
Rotor Inlet
Rotor
Collector
Lighter or MixedPhase Inlet
Annular Mixing Zone
Lighter Phase:Weir
Lighter PhaseOutlet

IntroductionIntroductionIntroductionIntroduction
V-02 Operating Manual – REV 2/15/99 Page 7 of 41
The efficiency of the flow and phase separation is a result of the unique,patented rotor and weir design. The adjustability of both the rotor RPM andthe heavy phase weir diameter allows the unit to be optimized for the rapid,efficient separation of any two immiscible fluids. These two parameters arereadily optimized for a process dependent upon the ratio, flow rate, densitydifference and v iscosity of the process fluids.
Run Parameters and Technical Data for V-02
Rotor Diameter 5 cm (2 in)
Liquid Throughput (total) Up to 2000 mL/min (0.03 - 0.53GPM)
Size Footprint 23 x 23 cm (9 x 9 in)Height 56 cm (22 in)Weight 11.3 kg (25 lbs)
Fittings/Connections (std) Inlets 3/8” NPTOutlets 3/8” NPTDrain port 1/8” NPT
Power Requirements Standard - 220V (1 or 3 Ø) power supplyOptional - 110V
Normal amperage draw 0.2 - 0.4 A
Rotor RPM Operating Range 2000 - 6000 RPM (100-900 Gs)
Warranty
The separator workmanship and materials are warranted for a period of twoyears from the date of delivery. This warranty covers parts and labor forrepair or replacement, as deemed appropriate by CINC. This warranty is

IntroductionIntroductionIntroductionIntroduction
V-02 Operating Manual – REV 2/15/99 Page 8 of 41
voided if the separator is damaged; is not properly maintained; or is used inan application for which it was not originally sold. Internal parts are notwarranted for replacements as necessary from corrosion or wear from solids.Seals and bearings are warranted for a period of 90 days from the date ofdelivery. See your purchase agreement for specific terms and conditions.

InstallationInstallationInstallationInstallation
V-02 Operating Manual – REV 2/15/99 Page 9 of 41
Installing your V-2 Separator
Uncrate your unit. Verify that the package is complete and that nodamage has occurred during shipping.
The CINC units are mounted on a stand assembly that is ready to beanchored at the operation site. The unit should be placed on a surface thatis fairly level, and has sufficient strength to support the assembly. Standardinstallation procedures should be followed for operating rotationalequipment.
Install inlet, outlet, and drain fittings. Also install the fluid lines inaccordance with the Flow Connection Diagram on the following page.
The electrical connections are specified in the TECHNICAL section in thismanual. Although the motor controller has built-in over-voltage protection,CINC recommends the use of a surge-protected, dedicated circuit with itsown breaker, magnetic contactor or fused disconnect for the power supplyof this unit. A qualified electrician should be consulted to verify that theproper power will be supplied.
! The outlet lines for the CINC unit m ust allow unrestrictedgravity outflow. Please take precautions to insure thatnothing will inhibit the flow of fluids from the unit through theoutlet hoses. This includes avoiding the restriction of theoutlets by using fittings, bushings, or hose with sm aller ID’sthan the CINC outlets.
! Observe all good chem ical industry practices for the safeinstallation and operation of rotational and flow equipm ent.

InstallationInstallationInstallationInstallation
V-02 Operating Manual – REV 2/15/99 Page 10 of 41
Flow Connection Diagram

Start-UpStart-UpStart-UpStart-Up
V-02 Operating Manual – REV 2/15/99 Page 11 of 41
Start-Up
Operating the AC Inverter Drive Control Panel
1) Depress the DSPL button until the FREF (green LED), is illuminated onthe display section. At this point, simply depress the arrow up (/\), orarrow down ( \/ ) to change to the desired frequency (refer to theFREQUENCY TO RPM CONVERSION TABLE in the Technical Appendixsection of this manual. Once your desired frequency is set, press theENTER button.
2) To turn the motor on, depress the RUN button. The unit will ramp up tothe set frequency (the ramp-up time has been preset at the factory).To stop the unit, depress the STOP/RESET button, and the unit will rampdown to a complete stop (the ramp down time has also been presetat the factory). You can change frequencies while the unit is runningby following the prev ious instructions above.
Pressing the DSPL button will toggle through a series of menus. Thedisplayed screen is indicated by a lit LED next to the function, on thepanel directly below the displaywindow. The only features thatwill be needed for normal usageare:
FREF - When this LED is lit,the displayed value is the setfrequency the controller hasbeen programmed to run.
FOUT - Displays the actualfrequency that the drive iscurrently running.
IOUT - Displays the amperagedraw of the motor under currentrun conditions

Start-UpStart-UpStart-UpStart-Up
V-02 Operating Manual – REV 2/15/99 Page 12 of 41
All other menu features allow access to the programmable featuresof this controller. These have all been preset at the factory andSHOULD NOT BE CHANGED. If there are any other questions about theinverter drive controller, please consult the controller manual, or callCINC.
NOTICE!THE PARAMETERS IN THIS UNIT HAVE BEEN PRESET AT THE FACTORY FOR
MAXIMUM EFFICIENCY AND SAFETY.
V-2 Mini Controller Operating Instructions
Power Requirements:
The EMS Mini Controller is a 200 volt class controller that can be run on 200volt single phase or 200 volt three phase (50 or 60 Hz), with a voltage rangeor 200 volts to 230 volts. The unit comes with a standard 230 volt singlephase NEMA 6-15P plug. An optional 110VAC controller is available.
Running Your V-2 Mini Controller:
1) Verify that your unit is powered with an appropriate power source.
2) Depress the DSPL button until the FREF (green LED) is illuminated on thedisplay panel. At this point you can simply press the arrow up (/\), orarrow down (\/) to change the frequency. Please refer to theFrequency to RPM Conversion Table in the TECHNICAL APPENDIX.Once the desired frequency is set, press the ENTER button.
! Due to the small size of the V-2 controller, it is not possible to programthe panel to display the motor RPM’s directly, which is possible for thelarger CINC units. Therefore, the only display available is in Hz. Aconversion chart has been supplied for reference. Please refer to theTechnical Appendix section in this manual.

Start-UpStart-UpStart-UpStart-Up
V-02 Operating Manual – REV 2/15/99 Page 13 of 41
3) To run, press the RUN button. The unit will ramp up to the setfrequency. (Remember, the ramp up time has been pre-set at thefactory.) The frequency can be changed while the unit is running byfollowing step 2 (above) of these instructions.
NOTICE!THE PARAMETERS IN THIS UNIT HAVE BEEN PRESET AT THE FACTORY FOR
MAXIMUM EFFICIENCY AND SAFETY.
Running Your V-2 Separator:
1. Check to insure all fitt ings and hoses are installed properly.
2. Verify all valves are in the proper positions.
3. Make sure the drain port valve is closed.
! If the unit is not originally primed with the heavy phase liquid, somelight phase liquid may be observed exiting the heavy phase outputuntil enough heavy phase is retained in the unit to fill the heavy phaseunderflow. To avoid this, always make sure that a all of the fluid in theannulus at start-up is the heavy phase.
4. After setting the frequency on the controller (refer to Operating theAC Inverter Drive Control Panel), start the rotor motor by depressingthe run button the VFD Control Panel. Typical rotor speeds for theCINC V-2 unit are 2000 - 4000 RPM (33.6 - 67.1 Hz).
5. Turn on the feed pumps. For the CINC model V-2, the operating flowrates are 0.1 to 2.0 LPM total flow (0.03 to 0.53 GPM).
6. Observe effluent qualities of separated phases. If the desired phaseseparation is not observed, please refer to Separation section in theTROUBLESHOOTING Section of this manual

Shut-DownShut-DownShut-DownShut-Down
V-02 Operating Manual – REV 2/15/99 Page 14 of 41
Shut Down
Turning Off Your V-2 Separator
1. Turn the feed pump(s) off.
2. Wait for the output flows to stop.
3. Turn the unit power off by depressing the STOP button on the ControlPanel. (refer to Operating the AC Inverter Drive Control Panel).
4. If desired, drain the CINC separator by opening the drain valve. This isrecommended if the unit will remain idle for more than 4 hours or isbeing used with corrosive fluids.
If the CINC unit is going to be idle for more than 8 hours, or used with verycorrosive fluids, it is recommended to clean the unit after each use.
! Observe all good chem ical industry practices for the safe installationand operation of rotational and flow equipm ent.

TroubleshootingTroubleshootingTroubleshootingTroubleshooting
V-02 Operating Manual – REV 2/15/99 Page 15 of 41
Trouble ShootingIf after rev iewing this table you cannot identify and solve any difficulties youmay be having with the operation of your CINC unit, please call fortechnical assistance at 800-380-CINC, or 775-885-5080.
Separation - Optimizing Run Conditions and Weir Sizing Indication Possible Cause Corrective Action Reference
Heavy phasecontamination in lightphase output
Fluid interface too close to lightphase weir in rotor – interfaceneeds to move away from center ofrotor
Increase RPM – if large change in RPM isnecessary, a weir change is indicated –change to a looser weir (larger ID)
Heavy Phase WeirChangeprocedure
Light phasecontamination in heavyphase output
Fluid interface too close to heavyphase underflow in rotor –interface needs to move closer tocenter of rotor
Lower RPM – if large change in RPM isnecessary, a weir change is indicated –change to a tighter weir (smaller ID)
Heavy Phase WeirChangeprocedure
Contamination seen inboth phases
Dispersion band too wide, fluidsare not separating fast enough,need more g• seconds.
Longer contact times or larger g-force isnecessary for the fluids in the rotor. Firstattempt to lower the flow rate through the unit. Ifthis does not help, increase the RPM (a tighterweir (smaller ID) may then be necessary).
Heavy Phase WeirChangeprocedure
Inconsistent Quality ofphase separation
Vapor locking due to inadequateventing
Ensure system is installed per the installationdrawing.Check for liquid locking in the discharge linescausing fluid to back-up into the vent(s).
Installationinstructions
Heavy phasedischarge flow falls offand light phase flowincreases
Solids build-up in rotor restrictingheavy phase under-flow
Clean rotor Cleaningprocedures
MechanicalIndication Possible Cause Corrective Action Reference
Excessive vibration. Solids may be building up in therotor.
Clean the rotor Cleaningprocedure
CIP Nozzle may be plugged. CIP System Backflushing Cleaningprocedure
Inspect bearings fordeterioration/failure
Replace bearing and inspect seal Procedure forspecificbearing/sealreplacement.
Bearing noise Bearing(s) failing Replace bearing and inspect seal Procedure forspecificbearing/sealreplacement.
Liquid seeping/leakingfrom lower bearinghousing
Rotary seal failing Replace rotary seal and replace lowerbearing
Replacing rotaryseal procedure
Liquid seeping/leakingfrom upper bearinghousing
Upper Seal Failing Replace upper seal and replace upperbearing
Replacing UpperBearing/Sealprocedure
Liquid seeping/leakingfrom a sub-assemblymating surface of thehousing
O-ring failure Replace O-ring – ensure replacement O-ring is compatible with the fluids beingprocessed
Assemblydrawings.
Parts list

TroubleshootingTroubleshootingTroubleshootingTroubleshooting
V-02 Operating Manual – REV 2/15/99 Page 16 of 41
ElectricalIndication Possible Cause Corrective Action Reference
Display on InverterDrive Controller is notlit.
Power connections to inverter drivehave been connected improperly,damaged, or loose.
Check all wiring, plug-ins, and fuses/circuitbreakers.
Lack of proper input voltage Check input power for proper voltage Electricalspecifications ininstallationsection
Inverter Drive Controller bad Replace Inverter DriveController Manual
NOTE: If the Inverter Drive Controller displays an error message refer to the Inverter Drive Controller manual for code definition.Inverter DriveController shuts offmotor and displays anerror messageindicating an “OverLoad”.
Defective Motor Remove motor and hand turn the motorshaft. If binding replace motor.
Replacing DriveMotor procedure
Improper Assembly Remove motor and hand turn the rotor shaft.Check bearing locknut to ensure propertightening.
Maintenanceprocedurereassembly
Rotor bearings/seals problemcausing increased motor load.
Remove motor and hand turn the rotor. Ifrotor does not turn freely checkbearings/seals replace as necessary.
Maintenanceprocedure forspecificbearing/sealreplacement.
Rotor overloaded with solidsincreasing motor load.
Clean rotor Cleaningprocedures
Inverter DriveController shuts offmotor and displays an“Under Voltage” errormessage.
An extreme surge or dip in thepower feed has caused thecontroller to automatically shutdown.
Check to make sure power supply is reliableand has not been interrupted. Refer tocontroller manual or call CINC if unsure ofproblem or controller message display.
Motor does not STARTwhen button isdepressed
Power connections to motor havebeen connected improperly, havebeen damaged, or a looseconnection.
Check all wiring, plug-ins, and fuses/circuitbreakers and correct problem found.
Controller not in correct MODE ofoperation
Place into correct MODE Controller Manual
Motor does not STARTwhen button isdepressed
Motor bad Replace motor Replacing DriveMotor procedure
Motor runs excessivelyhot, or above specifiedamperage range(normal amperagedraw for your unit islisted in the installationsection.
Check amperage draw on motor, ifover amperage rating, removemotor from unit and run uncoupled.
If amperage draw is still high, motor is badand should be replaced.
ControllerManual.
Replacing DriveMotor procedure
If amperage draw is within suggested rangeand rotor hand turns freely, rotor could beloaded with solids and need cleaning.
Cleaningprocedures
If amperage draw is within suggested rangeand rotor does not hand turn freely, rotor isbinding either because of improperassembly or bad bearing.
Maintenanceprocedure forspecificbearing/sealreplacement.

MaintenanceMaintenanceMaintenanceMaintenance
V-02 Operating Manual – REV 2/15/99 Page 17 of 41
Maintenance
Seal
The lip seal is designed to protect the bearings from vapors and splashedfluids. The seal is designed to operate without serv ice. However, if the sealis damaged and liquid or corrosion is present inside the bearing housing, thebearings and seal should be replaced.
Bearings
The sealed bearings are designed to operate without serv ice or lubrication.However, it is good practice to periodically check for bearing noise, andchange bearings if noise or v ibration indicates a problem.
Rotor
The rotor is designed to operate for the life of the unit. If the rotor needs tobe taken out for any reason, it can be removed and replace by referring tothe Assembly Diagrams the Rotor Cleaning procedure.

MaintenanceMaintenanceMaintenanceMaintenance
V-02 Operating Manual – REV 2/15/99 Page 18 of 41
Heavy Phase Weir Change
Please refer to the Assem bly Diagram s #s 1, 2, & 3 for identification of listedparts.
1. DISCONNECT POWER SUPPLY TO UNIT!
2. Remove screws that attach the motor mount to the bearing housing,then remove the motor and motor mount assembly. (See Assem blyDiagram #1)
3. Loosen set screw and remove coupling half from rotor shaft. (SeeAssem bly Diagram #2)
4. Remove screws that attach the bearing housing to the rotor housing,then lift the bearing housing and rotor assembly from the unit.
5. Grip the rotor with one hand, loosen and remove the bearing nut witha 7/8” box-end wrench (note orientation of the nut) and separate therotor from the bearing housing.
! USE OF PLIERS, VICE OR OTHER TOOL MAY CAUSE DAMAGE TO THE ROTORAND WILL VOID THE WARRANTY.
6. Remove rotor cover from rotor. (See Assem bly Diagram #3)
7. Remove the heavy phase weir ring and O-ring from the rotor. Cleanand inspect the O-ring, replace if damaged. (See Assem bly Diagram#3)
Reassembly1. Wipe the weir and the weir installation area clean. Place the weir O-
ring and weir into position on the rotor. (See Assem bly Diagram #3)
2. Re-install the rotor cover. (See Assem bly Diagram #3)

MaintenanceMaintenanceMaintenanceMaintenance
V-02 Operating Manual – REV 2/15/99 Page 19 of 41
3. Check the under side of the bearing housing to see that the seal ring isin position in the seal, and pushed up against the bearing. (SeeAssem bly Diagram #2)
4. Ensure the Weir, Weir O-Ring and Rotor Cover are in the properposition then, while holding the rotor in the upright position, align andinsert rotor into the bearing housing. (See Assem bly Diagram #3)
5. Hold the rotor by hand and thread the rotor bearing nut (tapered endof the nut should face the bearing) onto the rotor shaft, and tightensecurely (10-15 ft/lbs).
6. Wipe the under side of the bearing housing and the mating surface ofthe housing clean. Check to see that the O-ring is in place. Align andinsert the rotor and bearing housing assembly into the housing. Installscrews and tighten securely. (See Assem bly Diagram #1)
7. Install rotor coupling onto rotor shaft. Align set screw with flat onrotor shaft and tighten. (See Assem bly Diagram #2)
8. Rotate the rotor by hand to verify that it rotates freely.
9. Install rubber coupling flex sleeve onto the rotor coupling .
Align and install the motor and motor mount assembly onto the upperbearing housing. Install screws and tighten securely.
Reconnect power supply to unit.

MaintenanceMaintenanceMaintenanceMaintenance
V-02 Operating Manual – REV 2/15/99 Page 20 of 41
Replacing Rotor Bearings
Please refer to the Assem bly Diagram s #s 1, 2, & 3 for identification of listedparts.
1. DISCONNECT POWER SUPPLY TO UNIT!
2. Remove screws that attach the motor mount to the bearing housing,then remove the motor and motor mount assembly.
3. Loosen set screw and remove coupling half from rotor shaft.
4. Remove screws that attach the bearing housing to the rotor housing,then lift the bearing housing and rotor assembly from the unit.
5. Grip the rotor with one hand, loosen and remove the bearing nut witha 7/8” box-end wrench (note orientation of nut) and separate therotor from the bearing housing.
! USE OF PLIERS, VICE OR OTHER TOOL MAY CAUSE DAMAGE TO THEROTOR AND WILL VOID THE WARRANTY.
6. Remove the bearing retainer snap ring.
7. Place the bearing housing on support blocks, and apply sufficientpressure against the seal ring to remove the bearing assembly.
Reassembly1. Wipe all the bearing assembly components and the bearing housing
clean.
2. Check the seal at this time for wear or damage. If the seal appearsdamaged or cracked it should be replaced.
! PLEASE NOTE THE POSITION AND DIRECTION OF THE EXISTING SEALBEFORE REMOVING.

MaintenanceMaintenanceMaintenanceMaintenance
V-02 Operating Manual – REV 2/15/99 Page 21 of 41
3. If necessary to replace the seal, do so now. Insert new seal until itrests firmly against shoulder in the upper bearing housing.
4. Insert the seal ring into the seal from the top (bearing side of housing).
5. Apply a light coating of grease to all components and then install onebearing , the inner and outer bearing spacers, followed by the bearingpre-load spring, and the second bearing into the bearing housing (SeeAssem bly Diagram s).
6. Apply a light amount of downward pressure to the top bearing toexpose the snap ring groove and install the bearing retainer snap ring.Assure that it is fully seated in the snap ring groove of the housing bypressing the upper bearing down against the pre-load spring.
7. Check the under side of the bearing housing to see that the seal ring isin position in the seal, and pushed up against the bearing.
8. Ensure the weir, weir o-ring and rotor cover are in the proper position(See Assem bly Drawing #3) then, while holding the rotor in the uprightposition, align and insert rotor into the bearing housing.
9. Hold the rotor by hand and thread the rotor bearing nut (tapered endof the nut should face the bearing onto the rotor shaft, and tightensecurely, 10-15 ft/lbs).
10. Wipe the under side of the bearing housing and the mating surface ofthe housing clean. Check to see that the O-ring is in place.
11. Align and insert the rotor and bearing housing assembly into thehousing. Install screws and tighten securely. Install rotor coupling ontorotor shaft. Align set screw with flat on rotor shaft and tighten.
12. Rotate the rotor by hand to see that it rotates freely.

MaintenanceMaintenanceMaintenanceMaintenance
V-02 Operating Manual – REV 2/15/99 Page 22 of 41
13. Install rubber coupling flex sleeve onto the rotor coupling.
14. Align and install the motor and motor mount assembly onto the upperbearing housing. Install screws and tighten securely.
15. Reconnect power supply to unit.

MaintenanceMaintenanceMaintenanceMaintenance
V-02 Operating Manual – REV 2/15/99 Page 23 of 41
Replace Motor
Please refer to the Assem bly Diagram s #s 1, 2, & 3 for identification of listedparts.
1. Disconnect power supply to unit.
2. Remove motor power cable connector from the motor.
3. Remove screws that attach the motor mount to the upper bearinghousing.
4. Remove motor mount assembly.
5. Remove the screws that attach the motor to the motor mount.
6. Loosen the set screws on the motor coupling half, and remove thecoupling.
Reassembly1. Turn the replacement motor upside down and install the coupling with
key on the motor shaft. Check that the top of the coupling is flushwith the end of the motor shaft and, tighten the set screws securely.
2. Place the motor mount on the motor, install screws and securely.
3. Wipe the top of the bearing housing and the bottom of the motormount flange clean.
4. Carefully place the motor mount assembly over the bearing housing,aligning and engaging the coupling and flex sleeve. At this time besure the motor mount is fully contacting the bearing housing.
5. Install the motor mount screws and tighten securely.

MaintenanceMaintenanceMaintenanceMaintenance
V-02 Operating Manual – REV 2/15/99 Page 24 of 41
6. Re-connect motor power cable connector to the motor.
7. Resume operations per the procedures in the “Start-up” section.
Rotor CleaningPlease refer to the Assem bly Drawing #s 1, 2, & 3 for identification of listedparts.
1. Disconnect power supply to Unit!
2. Remove screws that attach the motor mount to the bearing housing,then remove the motor and motor mount assembly.
3. Loosen set screw and remove coupling half from rotor shaft.
4. Remove screws that attach the bearing housing to the rotor housing,and then lift the bearing housing and rotor assembly from the unit.
5. Grip the rotor with one hand, loosen and remove the bearing nut witha 7/8” box-end wrench and separate the rotor from the bearinghousing.
! NOTE THE PROPER ORIENTATION OF THE BEARING NUT.
6. Remove rotor cover from rotor.
7. Remove the heavy phase weir ring and O-ring from the rotor. Cleanand inspect the O-ring, replace it if damaged.
8. Hold the rotor sleeve in one hand and the rotor head in the otherhand, and then unscrew the rotor assembly – right hand thread. (Seephoto below.)

Maintenance
V-02 Operating Manual – REV 2/15/99 Page 25 of 41
! USE OF PLIERS, VICE OR OTHER TOOL MAY CAUSE DAMAGE TO THEROTOR AND WILL VOID THE WARRANTY.
9. Remove the Vane package from the rotor sleeve, now the rotorhead, sleeve and vane package can be cleaned.
10. The rotor head should be carefully inspected for any build up ofprocessed materials, especially in the heavy phase under flows andthe light phase discharge channels. (See photos.)
11. Clean and inspect the rotor sleeve O-ring, replace it if damaged.(See photo.)
12. Ensure the mating threads of both the rotor head and sleeve areclean prior to re-assembly.
Reassembly
1. Insert the vane package into the rotor sleeve, align the index nub ofthe vane package with the index slot in the rotor sleeve. Whenproperly aligned the top of the vane package will sit slightly lowerthan the top of the rotor sleeve and will not be able to be rotatedwithin the rotor sleeve. (See photos following.)

Maintenance
V-02 Operating Manual – REV 2/15/99 Page 26 of 41
INDEX NUB OF VANE PACKAGE FULLYENGAGED & SITTING BELOW UPPEREDGE OF ROTOR SLEEVE.
INDEX NUB ON VANE PACKAGELAYING UPPER EDGE OF ROTOR SLEEVEPRIOR TO INDEXING.
INDEX NOTCH IN ROTOR PRIOR TOINDEX OF VANE PACKAGE.

MaintenanceMaintenanceMaintenanceMaintenance
V-02 Operating Manual – REV 2/15/99 Page 27 of 41
2. Place the rotor head on top of the rotor sleeve and screw themtogether by hand until they are full seated. (See photos on previouspage.)
! USE OF PLIERS, VICE OR OTHER TOOL MAY CAUSE DAMAGE TO THEROTOR AND WILL VOID THE WARRANTY.
3. Wipe the weir and the weir installation area clean. Place the weir O-ring and weir into the position on the rotor.
4. Re-install the rotor cover.
5. Check the under side of the bearing housing to see that the seal ring isin position in the seal, and pushed up against the bearing.
6. Ensure the weir, weir O-ring and rotor cover are in the proper position(Reference Assem bly Diagram #3) then, while holding the rotor in theupright position, align and insert rotor into the bearing housing.
7. Hold the rotor by hand and thread the rotor bearing nut (tapered endof the nut should face the bearing) onto the rotor shaft, and tightenbearing nut securely (10-15 ft/lbs), with 7/8” box-end wrench.
! USE OF PLIERS, VICE OR OTHER TOOLS THE ROTOR MAY CAUSE DAMAGETO THE ROTOR AND WILL VOID THE WARRANTY.
8. Wipe clean the under side of the bearing housing and the matingsurface of the housing. Check to see that the O-ring is in place. Alignand insert the rotor and bearing housing assembly into the housing.Install screws and tighten securely.
9. Install rotor coupling onto rotor shaft. Align set screw with flat onrotor shaft and tighten.
10. Rotate the rotor by hand to verify that it rotates freely.
11. Install rubber coupling flex sleeve onto the rotor coupling.

MaintenanceMaintenanceMaintenanceMaintenance
V-02 Operating Manual – REV 2/15/99 Page 28 of 41
12. Align and install the motor and motor mount assembly onto the upperbearing housing. Install screws and tighten securely.
13. Reconnect the power supply.
Changing Standard/Low Mix Mode Bottom Plate
1. DISCONNECT POWER SUPPLY TO UNIT!
2. Block in all process fluids.
3. Drain liquid from separator.
4. Should flushing be required, see the “Cleaning Procedures” section ofthe manual.
5. Remove the bottom plate mounting screws and bottom plateassembly.
6. Clean and inspect the bottom plate o-ring and mating surfaces. If theo-ring is damaged replace it at this time.
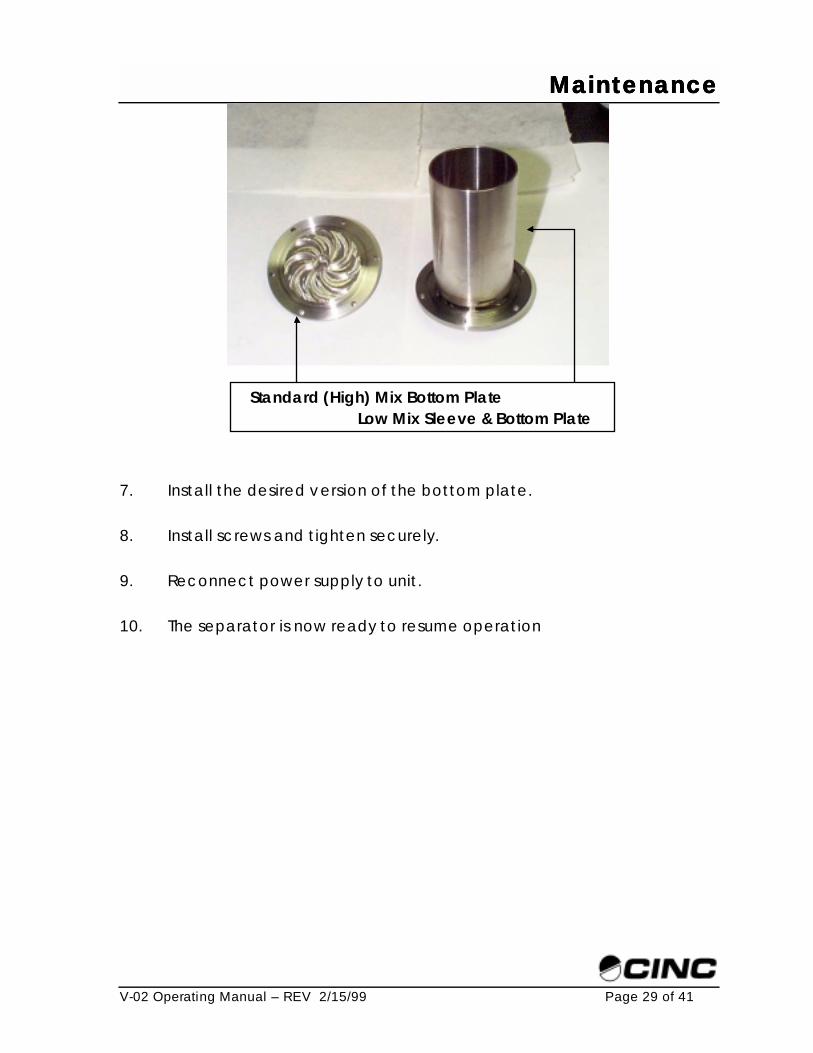
Note: The bottom plate assembly is either a low mix or standard mix version, refer to the Photo for identification.
MaintenanceMaintenanceMaintenanceMaintenance
V-02 Operating Manual – REV 2/15/99 Page 29 of 41
7. Install the desired version of the bottom plate.
8. Install screws and tighten securely.
9. Reconnect power supply to unit.
10. The separator is now ready to resume operation
Standard (High) Mix Bottom PlateLow Mix Sleeve & Bottom Plate

MaintenanceMaintenanceMaintenanceMaintenance
V-02 Operating Manual – REV 2/15/99 Page 30 of 41
Assembly Diagram 1 REV-B - with Observation Window Option

MaintenanceMaintenanceMaintenanceMaintenance
V-02 Operating Manual – REV 2/15/99 Page 31 of 41
Assembly Diagram 2 REV-B

MaintenanceMaintenanceMaintenanceMaintenance
V-02 Operating Manual – REV 2/15/99 Page 32 of 41
Assembly Diagram 3 REV-B

MaintenanceMaintenanceMaintenanceMaintenance
V-02 Operating Manual – REV 2/15/99 Page 33 of 41
V-02 Parts List
MODEL V02 SEPARATOR PARTS LISTRef # Part Description Qty Req’d CINC Part
Number1 Motor 1 As required
2 Socket Head Cap Screw, 8-32 X .38, Motor Mount andUpper Bearing Housing
12 9700174
3 Upper Bearing Housing 1 0212020
4 O-ring, 2-041, Housing 1 9700201
5 Housing 1 0212040
6 Gasket (Optional) 1 0210400
7 Observation Window (Optional) 1 0210210
8 Bezel (Optional)
9 Socket Head Cap Screw, 4-40 X .25, Bezel (Optional) 4 9700172
10 Bottom Plate 1 0210030
10-A Bottom Plate - Low Mix, (Optional) 1 0210031
10-B Low Mix Seal (Optional) 1 9702004
11 Socket Head Cap Screw, 6-32 X .38, Bottom Plate 6 9700173
12 O-ring, 2-038, Bottom Plate 1 9700202
13 Socket Head Cap Screw, 1/4-20 X .75, Motor Mount toMotor
4 9700008
14 Motor Mount 1 0210160
15 Motor Coupling 1 As required
16 Rotor Coupling 1 As required
17 Bearing Locknut 1 0212552
18 Bearing 2 9700120
19 Outer Bearing Spacer 1 0212551
20 Seal 1 9702099
21 Seal Ring 1 0212280
22 Inner Bearing Spacer 1 0212550
23 Bearing Preload Spring 1 9700121
24 Bearing Retainer Snap Ring 1 9702017
25 Coupling Flex Sleeve 1 As required
26 Rotor Cover 1 0212310
27 Weir 1 0212320
28 O-Ring, 2-033, Weir 1 9700236
29 Rotor Head 1 0212110
30 Vane Package 1 As required
31 Rotor Sleeve 1 0212140

MaintenanceMaintenanceMaintenanceMaintenance
V-02 Operating Manual – REV 2/15/99 Page 34 of 41
V-02 316L Spare Part Kit Description
Qty. Description
3 6-32 Socket Head Caps Screw 3/8 Long3 8-32 Socket Head Caps Screw 3/8 Long1 Bottom Plate O-ring, Parker 2-038, Teflon1 Housing O-ring, Parker 2-041, Teflon2 Rotor Head and Sleeve O-ring, Parker 2-033, TeflonEncapsulated Viton1 Seal Ring1 Motor - Rotor Flex Sleeve Coupling1 Bearing Retainer Ring2 Rotor Bearing1 Bearing Lock Nut1 Bearing Preload Spring1 Upper Seal1 Low Mix Seal if Applicable1 Spacer, Inner1 Spacer, Outer

Technical AppendixTechnical AppendixTechnical AppendixTechnical Appendix
V-02 Operating Manual – REV 2/15/99 Page 35 of 41
Technical Appendix
Theory of Centrifugal Separation
The separation performance of the CINC separator is measured by theeffluent quality of one or both of the output fluid phases. There are severalparameters that need to be considered in optimizing the performance ofthe CINC unit for a specific process. These parameters include v iscosity anddensity of the two liquid phases (at the process temperature), the inputratios, the total flow rate, and the rotor speed (RPM).
How efficiently two fluids will separate in a centrifuge is best described byStokes Law:
Vd ( )
18c
2H L 2r=
−•
ρ ρη
ωavg
where: Vc = the centrifugal settling velocityd = liquid droplet diameterρH = density of heavy phaseρL = density of light phaser = radial distance of liquid from rotor axisω = angular velocity (RPM of rotor)ηavg = average v iscosity of processed fluids
The settling velocity, Vc , is an important parameter in phase separation, asit is a measure of how rapidly two immiscible phases will separate. From thisequation, the parameters that will result in the most efficient phaseseparation (largest Vc) can be evaluated. Parameters that would increaseVc include: larger droplet size, increasing the density difference betweentwo phases, high RPM, and low v iscosity. The converse is also true - lessefficient phase separation is observed in systems with: smaller droplet size,small density differences, low RPM, and v iscous fluids. One parameter thatthe operator can readily control when optimizing the CINC equipment is theRPM. Another is fluid residence time while in the rotor, which is directlycontrolled by feed rate. Lowering the feed rate can improve the quality of

Technical AppendixTechnical AppendixTechnical AppendixTechnical Appendix
V-02 Operating Manual – REV 2/15/99 Page 36 of 41
both separated phases by allowing more time to achieve efficientseparation.
Because the CINC separator was originally designed to operate as acontactor, fluids are premixed in the annulus between the housing and thespinning rotor. Although higher RPM’s (ω) result in more g-forces inside therotor, they also result in more mixing in the annulus, and therefore smallerdroplet size (d). As a result of this, an increase in RPM’s will sometimes resultin no improvement to separation efficiency (Vc does not increase), as theincreased angular momentum (ω) is being offset by a decreasing dropletsize (d). Therefore, if better phase separation is needed, increasing the rotorspeed will sometimes be of benefit (greater g-forces generated), butsometimes not (smaller droplet size). This must be determined for each setof application conditions and the fluids processed.
To improve separation for shear sensitive fluids, or in applications where pre-mixing is of no benefit, CINC has developed a low-mixing option thatminimizes mixing in the annulus. This option, referred to as the low-mixingsleeve, allows operation at higher RPM’s with minimal increase in mixing. Thelow mixing sleeve is recommended for applications where separation is themost important (e.g. oil/water separation, phases already premixed, shearsensitive fluids).
The following conversion table is for your reference. A laminated copy ofthis chart is included in the control box accompanying your separator.
CINC V-2 Frequency to RPM Conversion Table
HZ. RPM HZ. RPM HZ. RPM HZ. RPM33.6 2,000 50.3 3,000 67.1 4,000 83.7 5,00035.2 2,100 52.1 3,100 68.7 4,100 85.4 5,10036.9 2,200 53.6 3,200 70.4 4,200 87.1 5,20038.6 2,300 55.3 3,300 72.1 4,300 88.7 5,30040.3 2,400 57.1 3,400 73.7 4,400 90.4 5,40041.9 2,500 58.6 3,500 75.3 4,500 92.1 5,50043.6 2,600 60.3 3,600 77.1 4,600 93.7 5,60045.3 2,700 62.1 3,700 78.7 4,700 95.4 5,70047.1 2,800 63.6 3,800 80.4 4,800 97.1 5,80048.6 2,900 65.3 3,900 82.1 4,900 98.7 5,900

Technical AppendixTechnical AppendixTechnical AppendixTechnical Appendix
V-02 Operating Manual – REV 2/15/99 Page 37 of 41
RPM vs. G-Force Correlation Chart
RPM vs. G-Force Correlation
0
100
200
300
400
500
600
700
800
900
1000
0 1000 2000 3000 4000 5000 6000
RPM
G-Force (At the Wall)
V20
V16V10 V05
V02

Technical AppendixTechnical AppendixTechnical AppendixTechnical Appendix
V-02 Operating Manual – REV 2/15/99 Page 38 of 41
Residence Time vs. Flowrate
Residence Time vs. Flowrate (V-02)
0
10
20
30
40
50
60
70
0.03
2
0.04
7
0.06
3
0.09
4
0.12
5
0.18
8
0.25
0.37
5
0.5
Flow rate (GPM)
Res
iden
ce t
ime
(Sec
on
ds)
V-02 Res . Time Seconds
Residence Time vs. Flowrate (V-05)
0
10
20
30
40
50
60
70
80
90
100
0.32
0.47
0.63
0.94
1.25
1.88 2.
5
3.75
5
Flow rate (GPM)
Res
iden
ce t
ime
(Sec
on
ds)
V-05 Res . Time Seconds

Technical AppendixTechnical AppendixTechnical AppendixTechnical Appendix
V-02 Operating Manual – REV 2/15/99 Page 39 of 41
Residence Time vs. Flowrate (V-10)
0
10
20
30
40
50
60
70
803.
75 5.6
7.5
11.2
5 15
22.5
26.3 30
Flow rate (GPM)
Res
iden
ce t
ime
(Sec
on
ds)
V-10 Res . Time Seconds
Residence Time vs. Flowrate (V-16)
0
10
20
30
40
50
60
70
80
90
100
12.5 25 37.5 50 62.5 75 88 100
Flow rate (GPM)
Res
iden
ce t
ime
(Sec
on
ds)
V-16 Res . Time Seconds

Technical AppendixTechnical AppendixTechnical AppendixTechnical Appendix
V-02 Operating Manual – REV 2/15/99 Page 40 of 41
Residence Time vs. Flowrate (V-20)
0
20
40
60
80
100
120
25 50 75 100 125 150 175 200
Flow rate (GPM)
Res
iden
ce t
ime
(Sec
on
ds)
V-20 Res . Time Seconds

Technical AppendixTechnical AppendixTechnical AppendixTechnical Appendix
V-02 Operating Manual – REV 2/15/99 Page 41 of 41
Linear Velocity Chart
Linear Velocity on Outside Diameter of Linear Velocity on Outside Diameter of Linear Velocity on Outside Diameter of Linear Velocity on Outside Diameter of Rotor (Correlation to Mixing)Rotor (Correlation to Mixing)Rotor (Correlation to Mixing)Rotor (Correlation to Mixing)
0
50
100
150
200
250
300
0 1000 2000 3000 4000 5000 6000
RPM
Lin
ear
Vel
oci
ty
(Fee
t/S
eco
nd
)
500 g Line
200 g Line
V-36 V-20V-16
V-10
V-05
V-02