Lil Cupcake - · PDF fileLil’ Cupcake Good Cookie Creations, May 2012 These...
7
Lil’ Cupcake Good Cookie Creations, May 2012 These instructions are geared toward a beginning doll maker. As such, there are a lot of instructions. Feel free to read or not read as your level requires. List of supplies: freezer paper (waxy on one side, paper on the other) ¼ yard of alovasuede, doesuede, buttersuede, microsuede or the costume suede you find around Halloween thread to match sewing machine with ball point needles (ball point needles are good for knits) 2 small shank buttons (the kind that look like mushrooms) safety pins round toothpick safety eyes doll jointing needle (needs to be long enough to fit through your doll’s body) waxed dental floss stuffing (Poly-fil brand is the best, hands down) Flat head screwdriver (or favorite stuffing tool) A note about fabrics: You may not be able to find any of the listed fabrics where you live. If you cannot find any of the brand names listed above, what you are looking for is a firm, one-way knit. Some knits are really stretchy – you don’t want this, as it will deform the legs and face of Cupcake. Minimal stretch is best. You might be able to use very thin wool felt, but it’s a pain to turn. If you see a lovely piece of suede, check the cut end. If there are strings hanging off the cut edge, it’s a woven, and it’s a pain to use. Run away! Printing the pattern: This pattern uses the freezer paper method of doll making. Cut out an 8.5 x 11 or A4 sized rectangle off of your freezer paper to feed into your printer and print the pattern onto the matte side. You could also print onto normal paper and trace the pieces onto the freezer paper. Whatever the method you use, you want to have all the pieces transferred onto freezer paper. Why freezer paper: There are many crafty uses to freezer paper, and this is because you can iron the waxy side to fabric and then remove it without damage to the fabric. Freezer paper is great for stencils, quilting, and doll making. Instead of cutting out a pattern and then sewing it, freezer paper allows you to first sew, then cut, making your sewing lines much more accurate. It is especially good for fine details like fingers and noses. It also stabilizes the fabric that you are working with, and you can re-use the pattern when you are finished sewing.
-
Upload
nguyenthuan -
Category
Documents
-
view
216 -
download
0
Transcript of Lil Cupcake - · PDF fileLil’ Cupcake Good Cookie Creations, May 2012 These...

Lil’ Cupcake Good Cookie Creations, May 2012
These instructions are geared toward a beginning doll maker. As such, there are a lot of instructions. Feel free to read or not read as your level requires.
List of supplies: freezer paper (waxy on one side, paper on the other)
¼ yard of alovasuede, doesuede, buttersuede, microsuede or the costume suede you find around Halloween
thread to match
sewing machine with ball point needles (ball point needles are good for knits)
2 small shank buttons (the kind that look like mushrooms)
safety pins
round toothpick
safety eyes
doll jointing needle (needs to be long enough to fit through your doll’s body)
waxed dental floss
stuffing (Poly-fil brand is the best, hands down)
Flat head screwdriver (or favorite stuffing tool)
A note about fabrics: You may not be able to find any of the listed fabrics where you live. If you cannot find any of the brand names listed above, what you are looking for is a firm, one-way knit. Some knits are really stretchy – you don’t want this, as it will deform the legs and face of Cupcake. Minimal stretch is best. You might be able to use very thin wool felt, but it’s a pain to turn. If you see a lovely piece of suede, check the cut end. If there are strings hanging off the cut edge, it’s a woven, and it’s a pain to use. Run away!
Printing the pattern: This pattern uses the freezer paper method of doll making. Cut out an 8.5
x 11 or A4 sized rectangle off of your freezer paper to feed into your printer and print the pattern onto the matte side. You could also print onto normal paper and trace the pieces onto the freezer paper. Whatever the method you use, you want to have all the pieces transferred onto freezer paper.
Why freezer paper: There are many crafty uses to freezer paper, and this is because you can
iron the waxy side to fabric and then remove it without damage to the fabric. Freezer paper is great for stencils, quilting, and doll making. Instead of cutting out a pattern and then sewing it, freezer paper allows you to first sew, then cut, making your sewing lines much more accurate. It is especially good for fine details like fingers and noses. It also stabilizes the fabric that you are working with, and you can re-use the pattern when you are finished sewing.
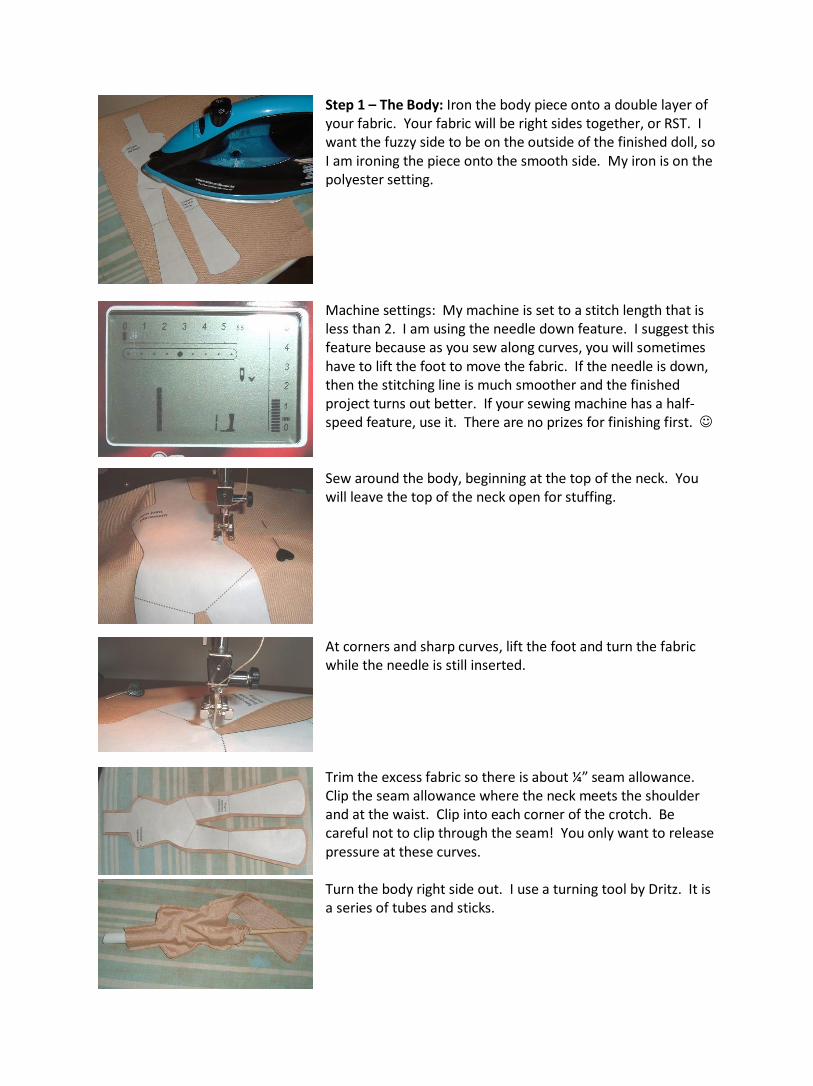
Step 1 – The Body: Iron the body piece onto a double layer of your fabric. Your fabric will be right sides together, or RST. I want the fuzzy side to be on the outside of the finished doll, so I am ironing the piece onto the smooth side. My iron is on the polyester setting. Machine settings: My machine is set to a stitch length that is less than 2. I am using the needle down feature. I suggest this feature because as you sew along curves, you will sometimes have to lift the foot to move the fabric. If the needle is down, then the stitching line is much smoother and the finished project turns out better. If your sewing machine has a half-speed feature, use it. There are no prizes for finishing first. Sew around the body, beginning at the top of the neck. You will leave the top of the neck open for stuffing. At corners and sharp curves, lift the foot and turn the fabric while the needle is still inserted. Trim the excess fabric so there is about ¼” seam allowance. Clip the seam allowance where the neck meets the shoulder and at the waist. Clip into each corner of the crotch. Be careful not to clip through the seam! You only want to release pressure at these curves. Turn the body right side out. I use a turning tool by Dritz. It is a series of tubes and sticks.

Mark the knee and hip sewing lines. I used a pen with disappearing ink. Stuff the bottom half of the legs. You want to really pack the stuffing in here. Make sure you don’t stuff past the knee line. Sew across the knee joint. It would be good to use the zipper foot that comes with your machine here. Do this for both legs.
After you have the knee joint sewn, stuff the thighs lightly. If you put too much stuffing in the thighs, it affects how she sits. Sew across the hip joints.
After you sew the hip joints, you can add some pellets for weight, or just continue stuffing with Poly-fil. Pack the body tightly, especially the shoulders and neck. To add support to a floppy neck, cut a toothpick in half and insert it into the stuffed neck. This will help with a large head of thick yarn hair. Whipstitch the neck opening closed.
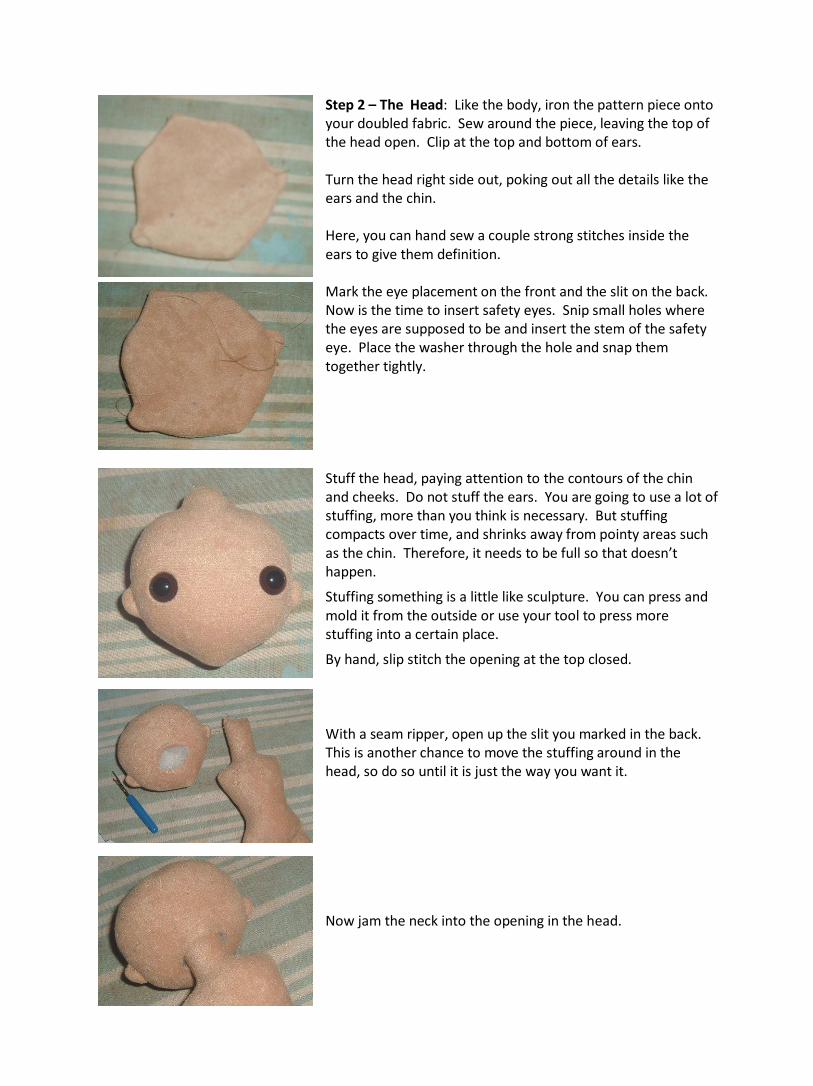
Step 2 – The Head: Like the body, iron the pattern piece onto your doubled fabric. Sew around the piece, leaving the top of the head open. Clip at the top and bottom of ears. Turn the head right side out, poking out all the details like the ears and the chin. Here, you can hand sew a couple strong stitches inside the ears to give them definition. Mark the eye placement on the front and the slit on the back. Now is the time to insert safety eyes. Snip small holes where the eyes are supposed to be and insert the stem of the safety eye. Place the washer through the hole and snap them together tightly. Stuff the head, paying attention to the contours of the chin and cheeks. Do not stuff the ears. You are going to use a lot of stuffing, more than you think is necessary. But stuffing compacts over time, and shrinks away from pointy areas such as the chin. Therefore, it needs to be full so that doesn’t happen.
Stuffing something is a little like sculpture. You can press and mold it from the outside or use your tool to press more stuffing into a certain place.
By hand, slip stitch the opening at the top closed. With a seam ripper, open up the slit you marked in the back. This is another chance to move the stuffing around in the head, so do so until it is just the way you want it. Now jam the neck into the opening in the head.

Beginning at the back, hand sew the head to the neck. In the front, you want to make sure you are sewing the head on so she is looking straight ahead (not up) which means you are not going to follow the edges of the opening. You will be sewing lower down on her neck. This is when they start talking to you. What’s that you say? Why, no, I’m not crazy. I swear!
Step 3 – The Arm: Just like the body and head, iron the arm piece to doubled fabric and sew around it, leaving it open between the notches. Do this twice, and cut them out, leaving a ¼” seam allowance. Clip in between the thumb and the hand. Turn right side out, making sure to poke out the thumb. Mark the elbow joint line. Stuff the lower arm and sew across the elbow joint. Find the shank buttons. These are going to be an invisible button joint, so the resulting product is safe for babies.
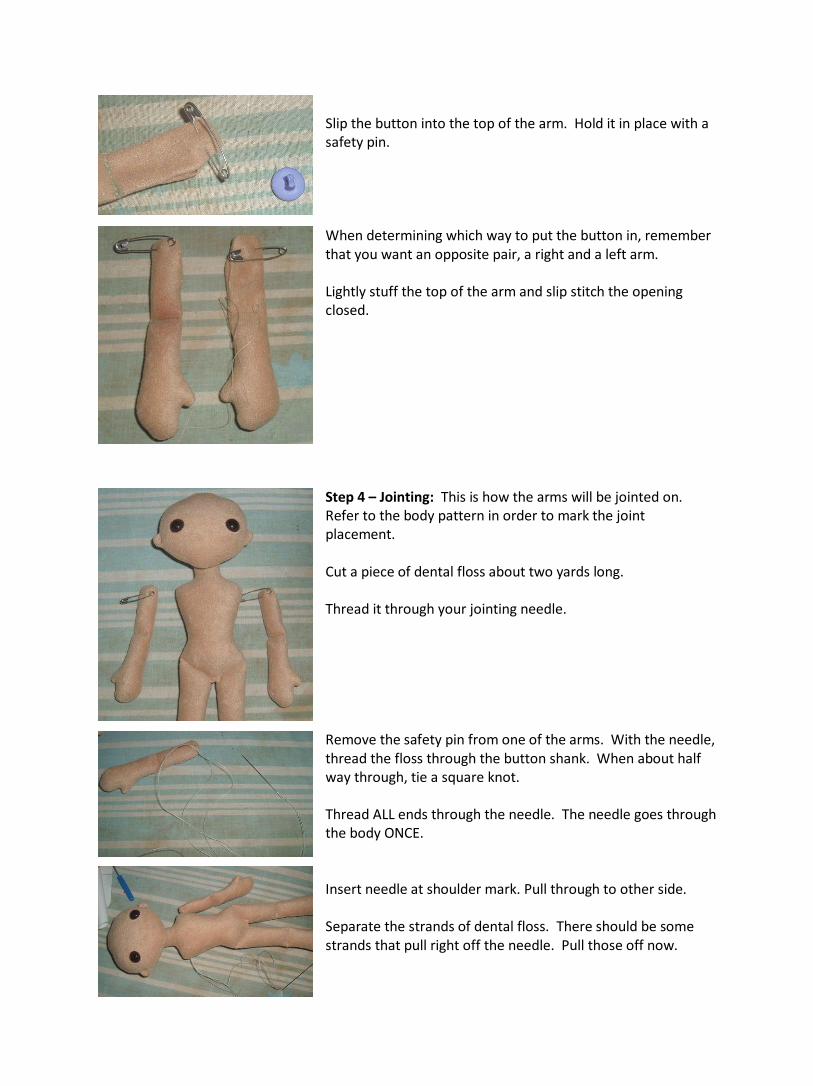
Slip the button into the top of the arm. Hold it in place with a safety pin. When determining which way to put the button in, remember that you want an opposite pair, a right and a left arm. Lightly stuff the top of the arm and slip stitch the opening closed.
Step 4 – Jointing: This is how the arms will be jointed on. Refer to the body pattern in order to mark the joint placement. Cut a piece of dental floss about two yards long. Thread it through your jointing needle. Remove the safety pin from one of the arms. With the needle, thread the floss through the button shank. When about half way through, tie a square knot. Thread ALL ends through the needle. The needle goes through the body ONCE. Insert needle at shoulder mark. Pull through to other side. Separate the strands of dental floss. There should be some strands that pull right off the needle. Pull those off now.
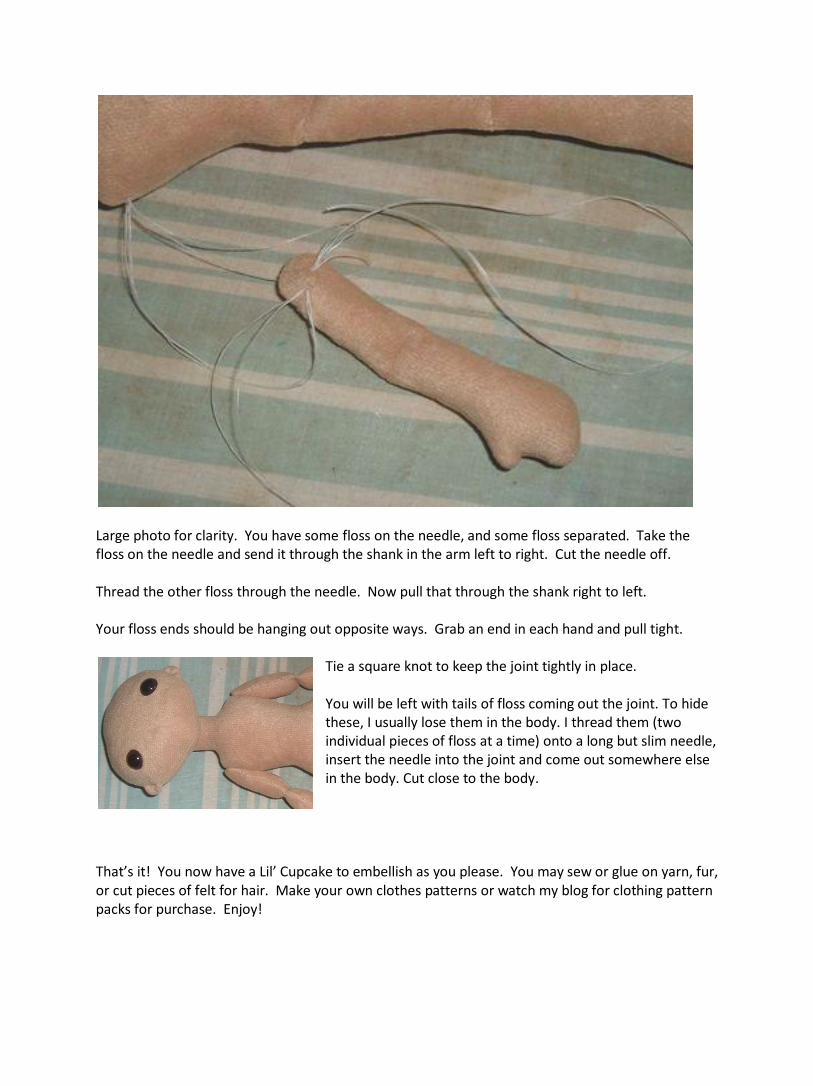
Large photo for clarity. You have some floss on the needle, and some floss separated. Take the floss on the needle and send it through the shank in the arm left to right. Cut the needle off. Thread the other floss through the needle. Now pull that through the shank right to left. Your floss ends should be hanging out opposite ways. Grab an end in each hand and pull tight.
Tie a square knot to keep the joint tightly in place. You will be left with tails of floss coming out the joint. To hide these, I usually lose them in the body. I thread them (two individual pieces of floss at a time) onto a long but slim needle, insert the needle into the joint and come out somewhere else in the body. Cut close to the body.
That’s it! You now have a Lil’ Cupcake to embellish as you please. You may sew or glue on yarn, fur, or cut pieces of felt for hair. Make your own clothes patterns or watch my blog for clothing pattern packs for purchase. Enjoy!