LifePort Kidney Perfusion Reference Guide - uadonacion.organos.ua.es/submenu5/maquina/For Hard Copy...
75
LifePort Kidney Perfusion Reference Guide 1 Step by Step Perfusion Guide and Alert Guide
Transcript of LifePort Kidney Perfusion Reference Guide - uadonacion.organos.ua.es/submenu5/maquina/For Hard Copy...

LifePort Kidney Perfusion Reference Guide
1
Step by Step Perfusion Guide
and Alert Guide

2
LifePort Kidney Transporter Components
Ice
ContainerPump
DeckErgonomic
Handles
Insulating
Cover
Safety
Latch
Control
Panel
Outer
Display
Needleless Port
Bubble Detectors
Pressure Sensor
Cable
Infusion Pump
Tubeframe Locking Arm
Spring Latch ArmPerfusion Circuit
Bubble Trap
Ice Container Lid
Ice Container
Perfusion Circuit
Outer LidSterile Barrier
Vent
Tubeframe

LifePort Kidney Transporter Use Steps
3
Activity Steps
Prepare LifePort Kidney Transporter 1 - 11
Initialize LifePort Kidney Transporter 12 - 18
Prepare the kidney 19 - 20
Place cannulated kidney into LifePort Kidney Transporter 21 - 23
Connect kidney and start pumping 24 – 27
What to do after pumping begins 28 – 33
Removing a kidney from LifePort Kidney Transporter;
removing used Perfusion Circuit after a case34 - 45

Prepare the device
• Step 1: Remember to bring necessary supplies
• One Perfusion Circuit per kidney plus one spare
• One 1 Liter bag KPS-1, per kidney, cooled ideally to 3°C - 6°C, plus one spare
• Set of all types/sizes of cannula (at least two/type)
• One additional drape per kidney (for removing kidney after perfusing)
4

5
Prepare the device
Step 2: Prepare Ice Container
A. B. C. D.
E. F. G.
Load ice Load more icePress to
compact ice
Add water
Top with ice Add more water Replace Ice
Container Lid• Use crushed ice (3kg) and cold water (between 1.5 - 2 Liters)
• Use small amount of ice at first to be able to push into hollow sides
• Push the ice as far as you can throughout interior. Press to compress.
• Well-packed ice is important for 24-hour autonomy

6
Step 3: Using aseptic technique (not scrubbed), open Perfusion Circuit
Prepare the device
Step 4: Using aseptic technique (scrubbed), remove Perfusion Circuit
from tray and unpack components.
Circulating nurse leaves
Perfusion Circuit on
sterile table after
unpacking it from outer
packaging.
Scrubbed nurse (or
surgeon) removes
Perfusion Circuit from
tray and removes white
banding.
Scrubbed nurse (or surgeon) removes outer lid from Perfusion
Circuit, then inner lid, then takes out the kidney cradle.

Prepare the device
7
Step 5: Using aseptic technique (not scrubbed), add KPS-1®.
Circulating nurse connects
dispensing line to KPS-1 bag.
KPS-1 is poured into Perfusion
Circuit (Organ Chamber).
Step 6: Using aseptic technique (scrubbed), replace Inner and Outer Perfusion
Circuit Lids.
Surgeon/scrubbed nurse closes both inner and outer lids of
the Perfusion Circuit. (Note that the KPS-1 is in the chamber.)

Prepare the device
8
Step 7: Using aseptic technique, hand over Perfusion Circuit. Note: Exterior is
no longer sterile.

Prepare the device
9
Step 8: Place the Perfusion Circuit into the Ice Container well. Snap the
Tubeframe into place at 90º angle.
Step 9: Install the Tubeframe onto the LifePort Kidney Transporter.
Pump tube Spring Latch Arm
Pumphead
After Tubeframe is securely snapped
into place, rotate it downward toward
the Pump Deck. Open Pumphead
Raceway.
Stretch the pump tube around the
Pumphead Raceway
Raceway
Close Pumphead Raceway and
secure with Spring Latch Arm.
Raceway
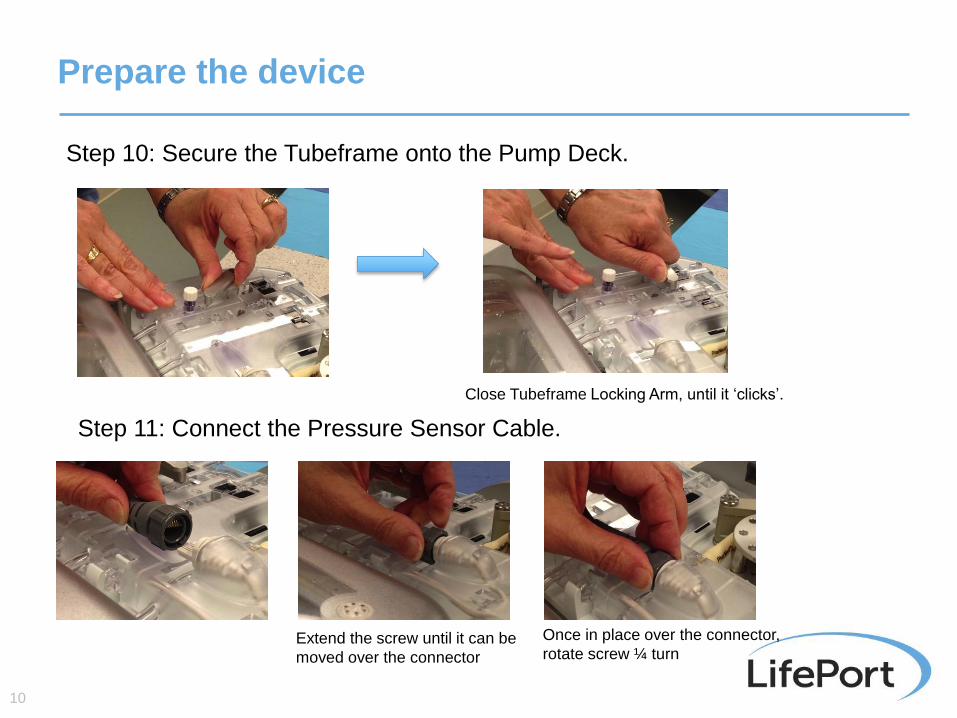
Prepare the device
10
Step 10: Secure the Tubeframe onto the Pump Deck.
Close Tubeframe Locking Arm, until it ‘clicks’.
Step 11: Connect the Pressure Sensor Cable.
Extend the screw until it can be
moved over the connector
Once in place over the connector,
rotate screw ¼ turn

Initialize LifePort Kidney Transporter
11
Step 12: Power on LifePort Kidney Transporter.
IMPORTANT: Turn LifePort Kidney Transporter on only after installing
Perfusion Circuit.

Initialize LifePort Kidney Transporter
12
Step 13: Delete oldest case from memory if requested. (Press STOP to erase
data file.)
Step 14: Check temperature and ready status. Temperature must be below 8ºC.

Initialize LifePort Kidney Transporter
13
Step 15: Press WASH to remove air from Perfusion Circuit.
Step 16: Gently lift LifePort Kidney Transporter and “rock-and roll” to remove
all air from filter and Bubble Trap.

Initialize LifePort Kidney Transporter
14
Step 17: Add donor and kidney data using the 5-way keypad. Keep in WASH
mode until kidney is ready for connection to LifePort Kidney Transporter.
(Organ ID should be entered before pressing INFUSE.)

Initialize LifePort Kidney Transporter
15
Step 18: Close LifePort Kidney Transporter Cover and latch to preserve
temperature until kidney is ready.

Prepare the kidney: Introduction
16
• Ideally, leave a sufficient patch
• Use the cannulation decision trees to choose a cannula (following pages)

17
Cannula Decision Tree
Do you have one
artery or two?
See next page
Use the following
cannula, based on the
diameter of the vessel
Do you have a
patch or no patch?
2 arteries 1 artery
Patch
No patch or small
patch
Use the following
cannula, based on the
diameter of the vessel
• SealRing Cannula, 7x20
• SealRing Cannula, 10x35
• Universal SealRing Cannula, 3mm
• Universal SealRing Cannula, 5mm
• Universal SealRing Cannula, 7mm
• Universal SealRing Cannula, 9mm
• Straight Cannula, 3mm
• Straight Cannula, 5mm
• Straight Cannula, 8mm
• Universal SealRing Cannula, 3mm
• Universal SealRing Cannula, 5mm
• Universal SealRing Cannula, 7mm
• Universal SealRing Cannula, 9mm

18
Cannula Decision Tree
If there are two arteries,
what is the distance
between them?
Use the following
cannula, based on the
diameter of the vessel
Treat each artery as a
single. Refer to prior page
and use the appropriate
cannula based on the
anatomy and diameter of
the vessel/s
Two options:
Cut the patch in two OR
keep the patch intact
< 3cm > 3cm
If cut If not cut
Use 2 Straight cannula or
2 Universal SealRing
cannula or one of each
based on anatomy.
• Straight Cannula, 3mm
• Straight Cannula, 5mm
• Straight Cannula, 8mm
• Universal SealRing Cannula, 3mm
• Universal SealRing Cannula, 5mm
• Universal SealRing Cannula, 7mm
• Universal SealRing Cannula, 9mm
• SealRing Cannula, 7x20
• SealRIng Cannula, 10x35
Connect cannula with a
coupler before
perfusing.
(Connect one cannula
to LifePort Kidney
Transporter and the
Coupler; connect the
other cannula to the
Coupler and seal off the
other end)
• Straight Cannula, 3mm
• Straight Cannula, 5mm
• Straight Cannula, 8mm
• Universal SealRing Cannula, 3mm
• Universal SealRing Cannula, 5mm
• Universal SealRing Cannula, 7mm
• Universal SealRing Cannula, 9mm
• SealRing Cannula, 7x20
• SealRIng Cannula, 10x35

Prepare the kidney: Option A, SealRing Cannula
19
Step 19, Option A: If aortic patch is present, cannulate using SealRing cannula
(sizes 7x20, 10x35)
Cover plastic opening of cannula leaving no space for leakage.

Prepare the kidney: Option A, SealRing Cannula
20
Step 19, Option A (continued): Close the cannula without moving the patch –
keep close to the kidney. Clamp in place using the flexible straps.
Clamp to ensure that cannula
fits snugly and there are no
leaks
Optionally, you may use a syringe to check for
leakage if desired after cannula is closed (first remove
cap and air from cannula).

Prepare the kidney: Option B, Straight Cannula
21
Step 19, Option B: If aortic patch is not present, cannulate using the Straight cannula
(sizes 3mm, 5mm, 8mm)
Note ridge in cannula

22
Prepare the kidney: Option B, Straight Cannula
Step 19, Option B (continued): Place cannula in renal artery – be careful of
any atherosclerotic plaques at the orifice.
Artery with no aortic patch Place tie in ridge of cannula.
Alternative option: Attach cannula to
renal artery with vessel loop or
other atraumatic tie.

23
Prepare the kidney: Option C, Universal SealRing
Cannula
Step 19, Option C: Use Universal SealRing Cannula for either ‘patch’ or ‘no
patch’ situations (sizes 3mm, 5mm, 7mm, 9mm)

24
Step 19, Option C (continued): To use the Universal SealRing Cannula with an
aortic patch, thread the artery through the cannula, then fold the cannula
gasket gently over the orifice.
Prepare the kidney: Option C, Universal SealRing
Cannula
View the vessel Open the SealRIng and position the vessel inside the ring
Close the ring around the vessel. Lower the seal, bringing it to rest inside
the vessel opening. Secure with straps. Use sight glass to verify vessel is
in place and not occluded.

25
Step 19, Option C (continued): To use the Universal SealRing Cannula with no
patch, thread the artery through the cannula, then close the cannula gasket
gently over the orifice.
Prepare the kidney: Option C, Universal SealRing
Cannula
View the vessel
Open the SealRIng and position the vessel inside the ring
Close the ring around the vessel. Lower the seal, bringing it to rest inside
the vessel opening. Secure with straps. Use sight glass to verify vessel is
in place and not occluded.

26
Step 19, Option C (continued): Once the cannula is in place, you may test
closure seal with a syringe (optional).
Prepare the kidney: Option C, Universal SealRing
Cannula

Prepare the kidney: Option D, Coupler
27
Step 19, Option D: If there are multiple arteries, use a Coupler to join
multiple cannula
Note two cannula and a coupler

Prepare the kidney
28
Step 20: Place cannulated kidney into cradle
• Place kidney into cradle
• Place cannula in Cannula Mount
• Secure Mesh Organ Restraint
• Note: Install artery straight and with vein on top so
that effluent can be seen after infusion starts. Click in
one side of the cannula only, so that air can be
removed later. (See Step 24.)

Transfer kidney to LifePort Kidney Transporter
29
Step 21: Using aseptic technique (not scrubbed), remove non-sterile Outer
Perfusion Circuit Lid
Step 22: Using aseptic technique (scrubbed), unfold the Sterile Drape (included
in LifePort Perfusion Kit), creating a sterile field.
Unfold drape in step by step fashion as shown or, alternatively unfold drape completely
before laying on top of device.

Transfer kidney to LifePort Kidney Transporter
30
Step 23: Using aseptic technique (scrubbed), remove Inner Perfusion Circuit
Lid – keeping within sterile field. Bring kidney to open Perfusion Circuit.
Place cradle inside cassette.

Connect kidney and start perfusion
31
Step 24: Using aseptic technique (scrubbed), install one side of cannula on
cannula support, leaving cannula inclined. Connect Infuse Line to cannula.
Infuse LineConnect to tip of cannula
NOTE: Leaving cannula on an angle helps
to remove air during the PRIME mode.

Connect kidney and start perfusion
32
Step 25: Using aseptic technique (scrubbed), remove cannula End Cap and
press PRIME button to de-air final section of tubing + cannula
Press PrimeRemove End Cap
Step 26: Using aseptic technique (scrubbed), replace the End Cap to close the
Perfusion Circuit. The LifePort Kidney Transporter should automatically stop and
‘beep’ because it will sense high pressure. Press STOP to clear the message.
NOTE: If pump does not
automatically Stop and
Beep, it means there is a
leak!

Connect kidney and start perfusion
33
Step 27: Using aseptic technique (scrubbed), start to infuse the kidney.
Press Infuse
Press the UP/DOWN arrow button to choose
pumping pressure (default is 30mmHg).Then start to perfuse the kidney by pressing
INFUSE. Case recording will begin.

What to do after perfusion begins
34
Step 28: Check that the artery is straight (no kinks, twists or occlusions) and
the vein is positioned on top of the organ.
Straight artery
Vein on top
Adjust the height of the Cannula Mount, if required, and/or rotate the cannula to assure no kinks, twists
or occlusions. Liquid must be able to freely pass through the vasculature, but perfusionist should avoid
placing too much tension on the artery.
Step 29: Check that pressure is achieved.

What to do after perfusion begins
35
Step 30: Do a visual inspection.
• Look for leaks around the gasket
• Is the artery filling
• Are the side branches closed
• Are there expected amounts of fluid exiting the kidney
• Is the color of the kidney becoming blanched, as expected

What to do after perfusion begins
36
Step 31: Using aseptic technique (scrubbed), close the Inner Perfusion
Circuit Lid.
Step 32: Using aseptic technique (scrubbed), remove drape (scrubbed); replace
Outer Perfusion Circuit Lid (not scrubbed)
Remove drape without touching
Inner Perfusion Circuit Lid
Replace Outer Perfusion Circuit Lid
– non sterile

What to do after perfusion begins
37
Step 33: Using aseptic technique (not scrubbed), close and latch LifePort
Kidney Transporter Cover.
Optionally, attach a tag or easily
removable label on the exterior of the
pump for identification purposes. Do not
make any marks on the LifePort unit
itself.
LifePort Kidney Transporter is designed for unattended use, with no need for
continuous monitoring.

Checklist for Transporting LifePort
• Check ice (replenish if needed)
• Check batteries
• Add extra drape
• Power cord
• Contact details
• Crossmatch samples
• Donor paperwork
• Shipping information
38

LifePort Kidney Transporter Cover
39
Retractable
handle storage
Storage for power cable
& extra battery
Sealable crossmatch
specimen compartment
Shipping
documents
Access to
batteries & power

40
Removing kidney from LifePort Kidney Transporter
Step 34: Using aseptic technique (not scrubbed), unlatch and remove LifePort
Kidney Transporter Cover.
Step 35: Using aseptic technique (not scrubbed), power off and begin removing
kidney.
Power off LifePort Kidney Transporter. Remove Outer Perfusion Circuit Lid.

41
Removing kidney from LifePort Kidney Transporter
Step 36: Using aseptic technique (scrubbed), place sterile drape over LifePort
Kidney Transporter, creating a sterile field.
Step 37: Using aseptic technique (scrubbed), continue to remove kidney from
cassette.
Open Inner Perfusion Circuit Lid. Disengage Pump Tubing from cannula.

42
Removing kidney from LifePort Kidney Transporter
Step 38: Using aseptic technique (scrubbed), finish removing kidney from
cassette.
Lift Organ Cradle from Perfusion
Circuit, draining excess fluid. Place on sterile field. Unhook Mesh
Organ Restraint.
Detach and remove cannula.

43
Removing Perfusion Circuit from LifePort Kidney
Transporter after a case
Step 39: Using aseptic technique (scrubbed), remove drape and discard
appropriately.
NOTE: One may take a
perfusate sample for
culturing before
disposing the Perfusion
Circuit if desired.
Step 40: Using aseptic technique (not scrubbed), begin removing Perfusion Circuit.
Unscrew the Pressure Sensor Cable. Unlatch the Pumphead Raceway using
the Spring Latch Arm.

Removing Perfusion Circuit from LifePort Kidney
Transporter after a case
44
Step 41: Using aseptic technique (not scrubbed), disconnect Pump Tube.
Open Pumphead Raceway. Remove the Pump Tube from
around the Pumphead Raceway.
Step 42: Unlatch the Tubeframe Locking Arm by turning it 90⁰.
Turn the locking arm 90 degrees to
unlock - until it can slide though the
opening in the Perfusion Circuit.

Removing Perfusion Circuit from LifePort Kidney
Transporter after a case
45
Step 43: Rotate the Tubeframe to 90⁰ and lift the Tubeframe off the Pump
Deck. Discard appropriately.
Note that locking arm slides
through cut-out in perfusion
circuit.

46
After a case
Step 45: Clean LifePort Kidney Transporter between cases according to
LifePort Kidney Transporter 1.1 Operator’s Manual.
NOTE: User may choose to leave lid and
ice container slightly open between cases to
ventilate
Step 44: Discard all disposable materials and biohazard waste in an
appropriate manner. The perfusate, Perfusion Circuit and cannual are single
use devices and should go into medical waste disposal. Clean LifePort
Kidney Transporter between cases according to LifePort Kidney Transporter
1.1 Operator’s Manual.

LifePort Kidney Transporter Alerts
47

NOTE:
• Alerts are often solved with common sense. Most often related to
• Detailed overviews, probable causes, corrective actions listed in LifePort Kidney
Transporter 1.1 Operator’s Manual
• Do not hesitate to call the Helpline if questions: _____________
Types of Alerts
Alert Related to: Pages
Temperature 49-52
Installation 53-54
Resistance 55-59
Bubbles 60-61
Batteries 62-63
Memory 64
48

• TEMPERATURE related alerts are the most important to
address in a timely fashion
• “Check Ice” alert will appear when temperature is between
5°C and 8°C
• YELLOW ALERT
• To correct, replenish the ice
• Press screen toggle button to clear
Temperature related alerts
49 Do not hesitate to call the Helpline if questions.

• “Too Warm Add Ice” alert will appear when temperature is
>8°C
• RED ALERT - requires immediate intervention
• LifePort stops completely
• To correct, CHANGE ICE ASAP
• Press Stop to clear after temperature has dropped < 8°C
• Press Infuse
Temperature related alerts
50 Do not hesitate to call the Helpline if questions.

Temperature related alerts
51
• “Too Cold” indicates a temperature < 0.5ºC
• YELLOW ALERT
• To correct, move device to a warmer environment
Note: Never put Ice Container
in freezer. Only use ice and
water mixture.
Do not hesitate to call the Helpline if questions.

Temperature related alerts
52
• “Near Freezing” alert indicates a temperature < 0.1ºC
• RED ALERT - requires immediate intervention
• To correct, pour a little room-temperature water into the ice
container and move device to a warmer environment
Do not hesitate to call the Helpline if questions.

• “Load Perfusion Circuit” alert will appear if the Tubeframe
has not been installed correctly
• To correct, make sure Tubeframe fits nicely into hinges
and Tubeframe Locking Arm has been rotated 90°
Installation related alerts
53 Do not hesitate to call the Helpline if questions.

• “Connect Pressure Sensor” or “Pressure Sensor Failure”
alerts appear when the device is not able to detect the
pressure sensor
• To correct, switch off LifePort Kidney Transporter, re-install
Perfusion Circuit and connect pressure sensor cable
before powering the LifePort Kidney Transporter again
Installation related alerts
Note: Make sure the Perfusion Circuit is
installed and the pressure sensor is
connected before powering on LifePort
Kidney Transporter
54 Do not hesitate to call the Helpline if questions.

Low resistance alerts
• “Kidney Not Connected” may appear when the device detects
low resistance/high flow
• To correct, check for
• Tubeframe not installed properly
• Small leakages at cannula, artery or Perfusion Circuit
• Cannula - recannulate
• Lateral branch - close
• Biopsy site - close
• Wash line - reinstall Perfusion Circuit
55 Do not hesitate to call the Helpline if questions.

Low resistance alerts
• Alert may read “Cannot Reach Pressure” when the device
detects low resistance/high flow
• To correct, check for
• small leakages at cannula, artery or Perfusion Circuit
• Cannula - recannulate
• Lateral branch - close
• Biopsy site - close
• Wash line - reinstall Perfusion Circuit
• If no leak
• Artery filled during perfusion?
• Liquid coming out of vein?
• If none of the above work, lower the set pressure
• Press STOP and reduce pressure by 5mmHG using the arrow
keys; press INFUSE to re-start perfusion.
56 Do not hesitate to call the Helpline if questions.

High resistance alerts
• Alert may read “High Resistance”
• To correct, check for
• Perfusion Circuit properly installed?
• Twists/kinks in artery?
• Vein on top?
• Intake line is not occluded?
• Early in perfusion process (kidney is “tight”)?
• If still high after 1 hour, check other donor data
57 Do not hesitate to call the Helpline if questions.

High resistance alerts
• “Kidney High Resistance” alert may appear if high resistance
is detected.
• To correct
• Loosen Mesh Organ Restraint
• Check for kinks or twists, adjust Cannula
Mount
• Check for possibility of clots
• Position vein on top
• Make sure Intake line is not occluded
• Make sure Perfusion Circuit is installed correctly
• Restart perfusion once or twice to see if kidney opens up
• Report parameters to supervising physician
58
Note: If early in the perfusion process, kidney may be “tight”
until vasculature opens up a bit. User might wait to see if
kidney opens up and may want to check donor history.

High resistance alerts
• “Too Much Pressure” alert may appear if high resistance is
detected.
• To correct
• Check for venous, arterial occlusions
• Check for proper valve function in wash and Infuse Lines
59
NOTE: “Too Much
Pressure” usually happens
when the system is sensing
a sudden pressure peak - to
be expected when replacing
cap during Prime Mode.
Do not hesitate to call the Helpline if questions.

Bubble alerts
• “Purging Bubbles” alert will appear if LifePort Kidney
Transporter has detected air in first Bubble Detector and
begins to purge bubbles automatically through the Wash Line.
(There is no risk that air will enter renal artery.)
• To correct
• Let LifePort Kidney Transporter complete the cycle. Every 10
minutes, LifePort Kidney Transporter performs a hygienic Wash
cycle for 10 seconds
• Tilting LifePort Kidney Transporter toward you during WASH
Mode to guide air out of filter will limit air being released from
filter later on
• If cycle continues much beyond 15 seconds, press STOP, repeat
rock-’n’-roll movement, press INFUSE
60 Do not hesitate to call the Helpline if questions.

Bubble alerts
• “Bubbles in Infuse Line” alert will appear if LifePort Kidney
Transporter has detected air in second Bubble Detector. “Bubbles in
Infuse Line” will stop the device.
• RED ALERT - requires immediate intervention
• To correct
• Check Perfusion circuit for leaks and/or loose fittings
• Open Perfusion Circuit (STERILE)
• Open cannula (STERILE)
• Press PRIME – wait until bubbles are gone
• Press INFUSE
• Infuse Line has to be de-aired via PRIME mode after cannula cap has been
removed under sterile conditions
• DO NOT USE PRIME MODE without removing cannula cap first
61

• “Low Battery” alert will appear if the batteries are running
low. “Low Battery” indicates that only 4 hours of battery life
are remaining: two for infusion and two for temperature
recording
• To Correct
• Charge the Lifeport, plug in the device into external
power supply, or change batteries
Battery related alerts
62 Do not hesitate to call the Helpline if questions.

• “Shutdown Low Battery” alert will appear before LifePort
shuts down completely
• To correct
• Plug LifePort Kidney Transporter into external power supply
or exchange batteries
Note: Might take up to 5 hours to fully recharge batteries
Battery related alerts
63 Do not hesitate to call the Helpline if questions.

• Alert may read “Ready to erase file” if there is no room to
store a new file.
• To correct• Press STOP. Oldest case will be deleted from LifePort Kidney
Transporter’s internal memory
64
Memory related alerts
NOTE: LifePort Kidney
Transporter can save
up to 5 cases in its
internal memory. If 5
cases are stored in the
device, you must
remove one to free up
memory space to start
another.

Perfusion Helpline service
• Call if in doubt or have any clinical or technical question
• Call handled by experienced perfusionists
• Multiple languages: English, Spanish, Portuguese, French,
and Dutch
65
Geography Telephone
North America +1.866.682.4800
South America +55.0800.940.0057
Europe +32.2715.0005
France +33 9 67 23 00 16
Spain +34 910 911 616

LifePort Kidney Transporter Maintenance,
Service and Support
66

LifePort Kidney Transporter maintenance
• Remember to use sterile drape to both place the kidney in the
LifePort Kidney Transporter and remove kidney from Perfusion
Circuit.
• This maintains aseptic conditions as well as avoids any spilling of
perfusion fluids on Pump Deck.
• Be sure to discard used KPS-1® solution and disposable Perfusion
Circuit in the appropriate manner after every use
• LifePort Kidney Transporter can be cleaned with a 70% isopropanol
solution after each case
• LifePort Kidney Transporter requires no preventive maintenance
• Keep LifePort Kidney Transporter plugged in when stored to prevent
batteries from draining
• Annual LifePort Kidney Transporter inspection available upon
request
67

LifePort Kidney Transporter warranty
• Warranty covers manufacturers defects for two years
• Covers any malfunction which would be observed during
correct use of the device for the first two years after
installation
• Warranty does not cover any malfunction as result of
malpractice
• Warranty does not cover any accidental damage
68

What to do if LifePort does not seem to be
functioning as it should
• CALL THE HELPLINE. Help is available 24/7.
69
Geography Telephone
North America +1.866.682.4800
South America +55.0800.940.0057
Europe +32.2715.0005
France +33 9 67 23 00 16
Spain +34 910 911 616

Service and support for repairs
• In order to be eligible for product replacement, ALWAYS contact
Organ Recovery Systems Perfusion Helpline DURING the case. Our
experienced perfusionists will be able to discriminate product
defects from user errors.
• Customers must keep any defective pieces and return to ORS
for a replacement.
• If you have a LifePort Kidney Transporter or disposable that needs
repair, follow the Organ Recovery Systems Product Return Process
• To start the process, fill out a Product Return Report form and send it to
Organ Recovery Systems
70

Service and support for repairs
• LifePort Kidney Transporter Loaner units are available and
shipped from the closest Organ Recovery Systems company
office
• Next day delivery for customers with Protection Plan
• Without Protection Plan, fees for repair and use of loaner are
charged per incident
71

LifePort Kidney Transporter Protection Plan
• Recommended insurance plan for entire LifePort Kidney
Transporter fleet covering up to a fixed number of incidents
during a 12 month timeframe
• Covers costs for spare parts and labor after accidental
damage
• Includes free use of loaner device until center’s unit has been
repaired
• Excludes theft or loss; excludes damage resulting from
deliberate malpractice (e.g. not using drapes)
72

INSERT A TAB: One-Page Summary
Instructions for LifePort
73

74
Person who assembles the
reference notebooks should
insert here the 1-page guides:
1- Perfusion on LifePort
2-How to fill the ice container
3-How to add ice
4-How to remove a kidney

www.organ-recovery.com
São Paulo
921 Gomes de Carvalho Street
Suite 84
São Paulo, SP 04547-003
Brazil
tel: +55 11 3586 6259
fax: +55 11 3586 6259 x18
Perfusion Helpline: 0800 940 0057
Brussels
DaVincilaan 2
Box 6
1935 Zaventem
Belgium
tel: +32 2715 0000
fax: +32 2715 0009
Perfusion Helpline: +32 2715 0005
Chicago
One Pierce Place
Suite 475W
Itasca, IL 60143
USA
tel: +1 847 824 2600
fax: +1 847 824 0234
Perfusion Helpline: +1 866 682 4800
Insert Arena or Marketing Number