Life Sized Portraiture Armature Making Process For Yenni ... · Life Sized Portraiture Armature...
11
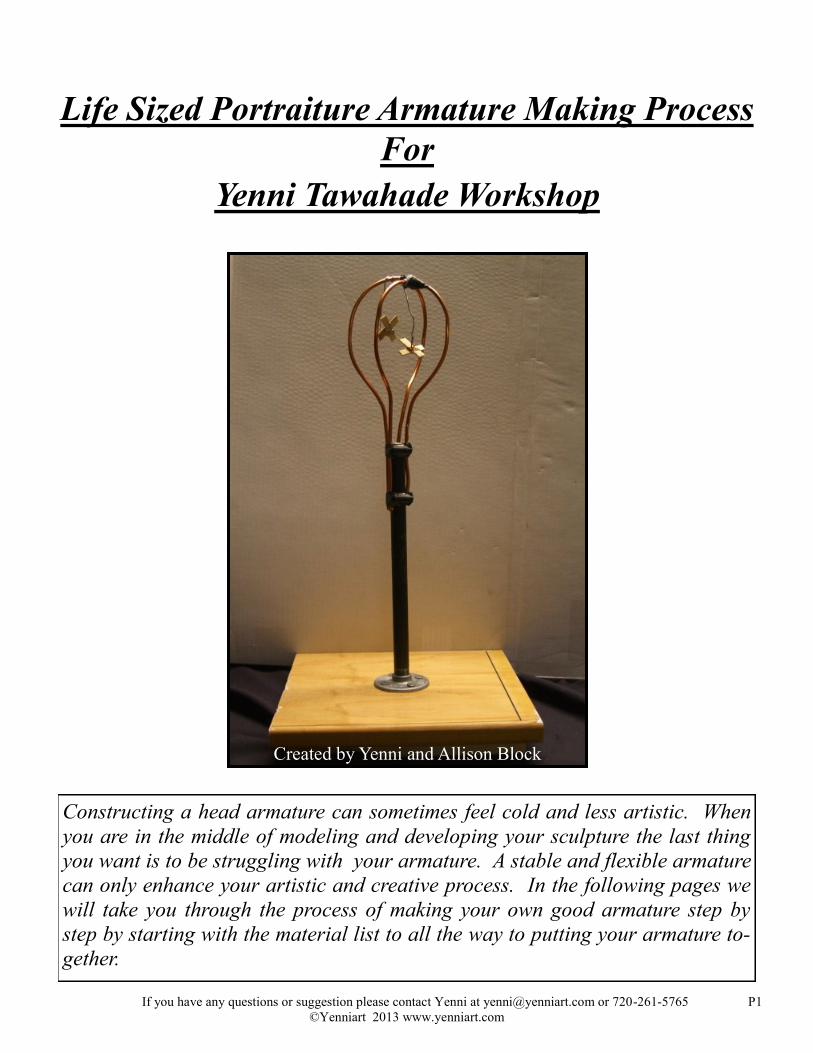
If you have any questions or suggestion please contact Yenni at [email protected] or 720-261-5765 P1 ©Yenniart 2013 www.yenniart.com Life Sized Portraiture Armature Making Process For Yenni Tawahade Workshop Constructing a head armature can sometimes feel cold and less artistic. When you are in the middle of modeling and developing your sculpture the last thing you want is to be struggling with your armature. A stable and flexible armature can only enhance your artistic and creative process. In the following pages we will take you through the process of making your own good armature step by step by starting with the material list to all the way to putting your armature to- gether. Created by Yenni and Allison Block
Transcript of Life Sized Portraiture Armature Making Process For Yenni ... · Life Sized Portraiture Armature...
If you have any questions or suggestion please contact Yenni at [email protected] or 720-261-5765 P1
©Yenniart 2013 www.yenniart.com
Life Sized Portraiture Armature Making Process
For
Yenni Tawahade Workshop
Constructing a head armature can sometimes feel cold and less artistic. When
you are in the middle of modeling and developing your sculpture the last thing
you want is to be struggling with your armature. A stable and flexible armature
can only enhance your artistic and creative process. In the following pages we
will take you through the process of making your own good armature step by
step by starting with the material list to all the way to putting your armature to-
gether.
Created by Yenni and Allison Block
If you have any questions or suggestion please contact Yenni at [email protected] or 720-261-5765 P2
©Yenniart 2013 www.yenniart.com
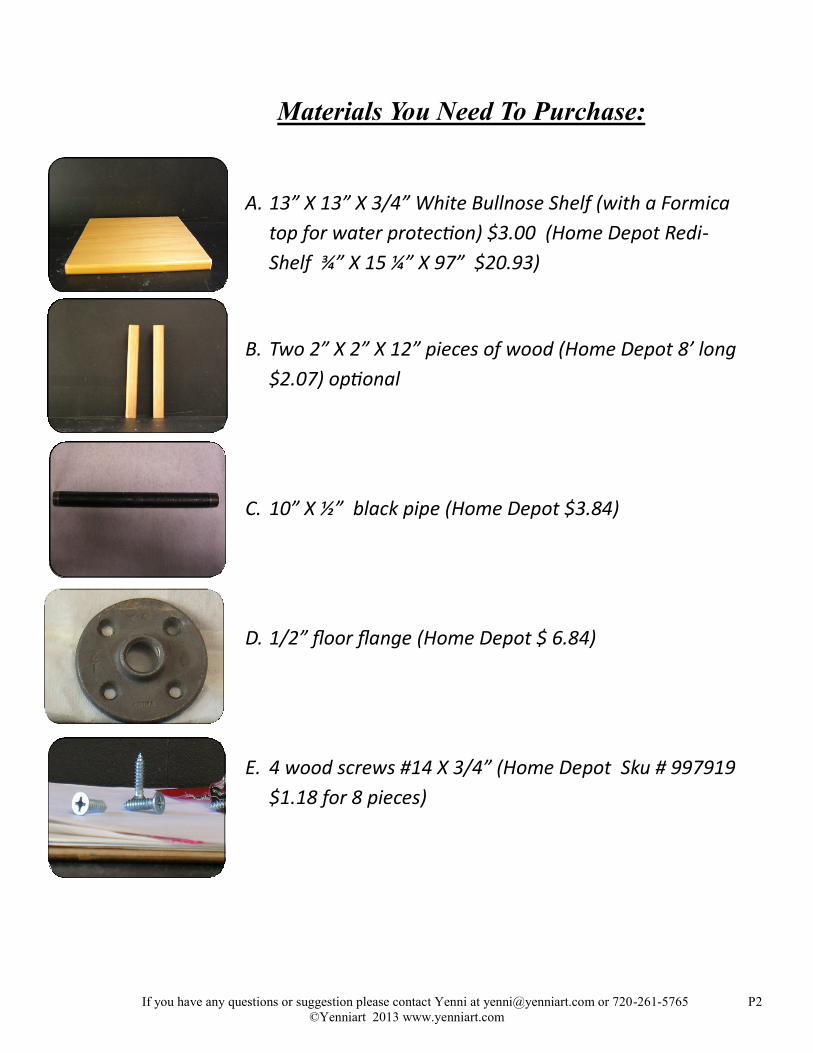
Materials You Need To Purchase:
A. 13” X 13” X 3/4” White Bullnose Shelf (with a Formica
top for water protection) $3.00 (Home Depot Redi-
Shelf ¾” X 15 ¼” X 97” $20.93)
B. Two 2” X 2” X 12” pieces of wood (Home Depot 8’ long
$2.07) optional
C. 10” X ½” black pipe (Home Depot $3.84)
D. 1/2” floor flange (Home Depot $ 6.84)
E. 4 wood screws #14 X 3/4” (Home Depot Sku # 997919
$1.18 for 8 pieces)
If you have any questions or suggestion please contact Yenni at [email protected] or 720-261-5765 P3
©Yenniart 2013 www.yenniart.com
I recommend that you buy all your armature making materials from Home
Depot as a one stop shop (the prices listed are as of 09/09/2013).
Next we will show you the step by step process of building a head armature.
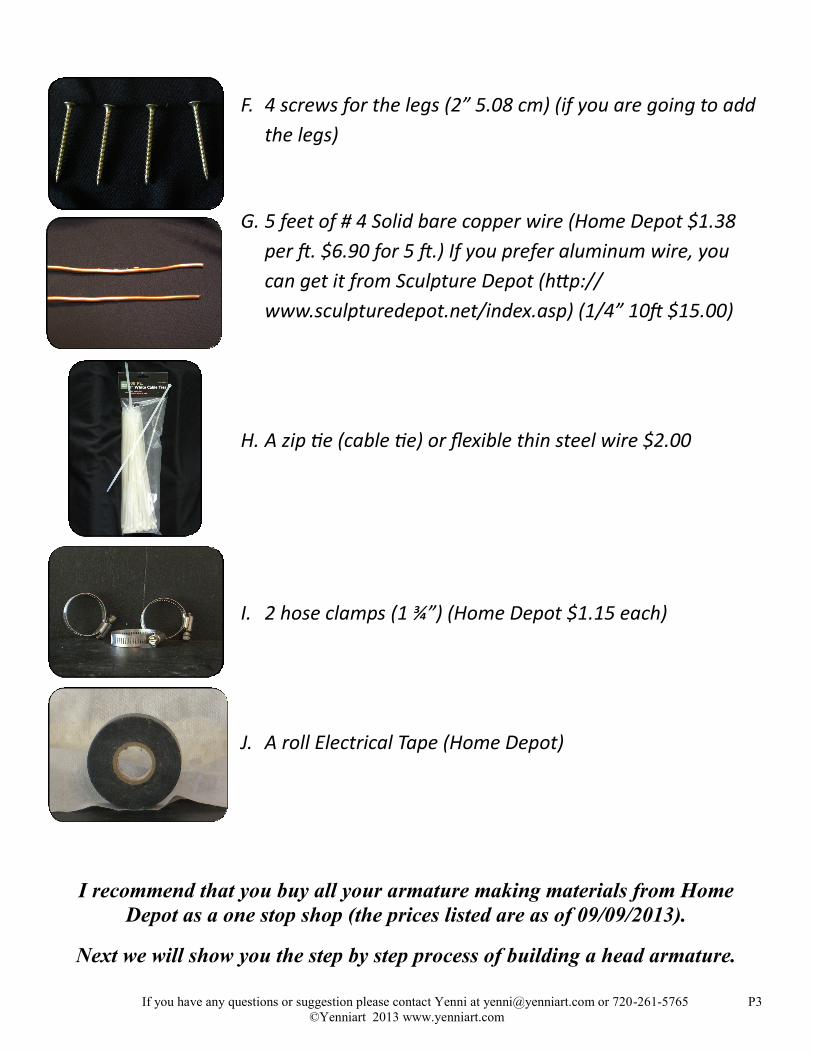
F. 4 screws for the legs (2” 5.08 cm) (if you are going to add
the legs)
G. 5 feet of # 4 Solid bare copper wire (Home Depot $1.38
per ft. $6.90 for 5 ft.) If you prefer aluminum wire, you
can get it from Sculpture Depot (http://
www.sculpturedepot.net/index.asp) (1/4” 10ft $15.00)
H. A zip tie (cable tie) or flexible thin steel wire $2.00
I. 2 hose clamps (1 ¾”) (Home Depot $1.15 each)
J. A roll Electrical Tape (Home Depot)
If you have any questions or suggestion please contact Yenni at [email protected] or 720-261-5765 P4
©Yenniart 2013 www.yenniart.com
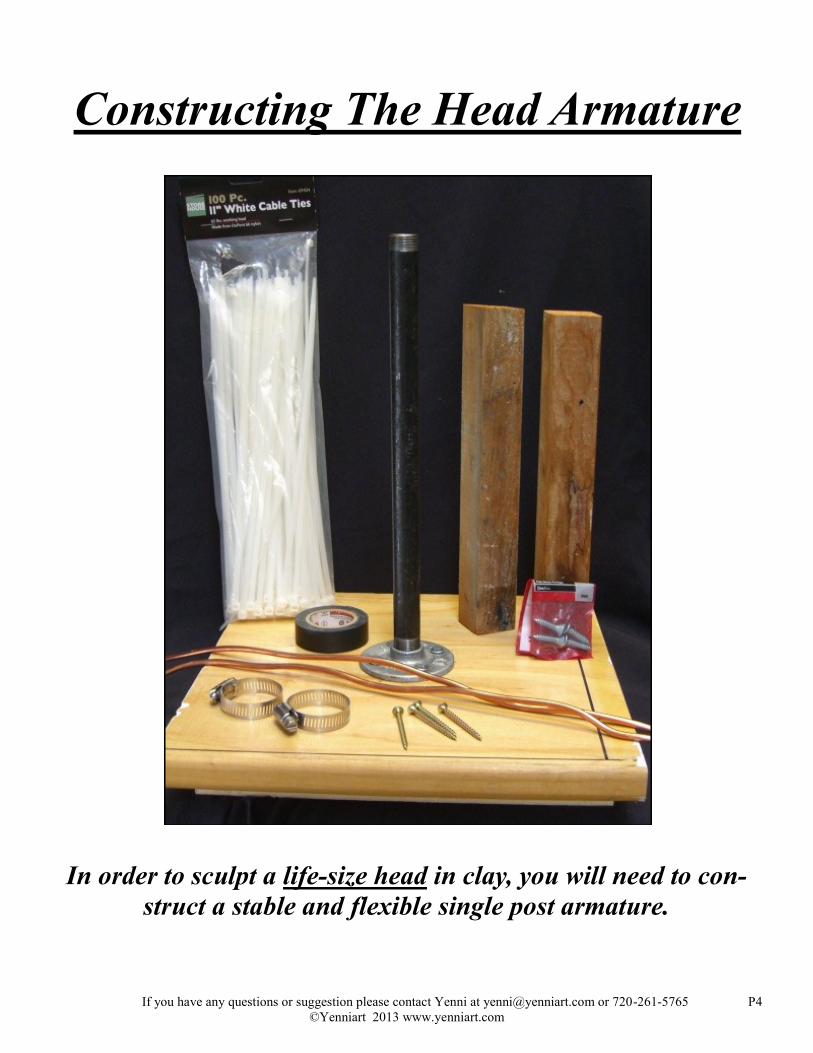
Constructing The Head Armature
In order to sculpt a life-size head in clay, you will need to con-
struct a stable and flexible single post armature.
If you have any questions or suggestion please contact Yenni at [email protected] or 720-261-5765 P5
©Yenniart 2013 www.yenniart.com
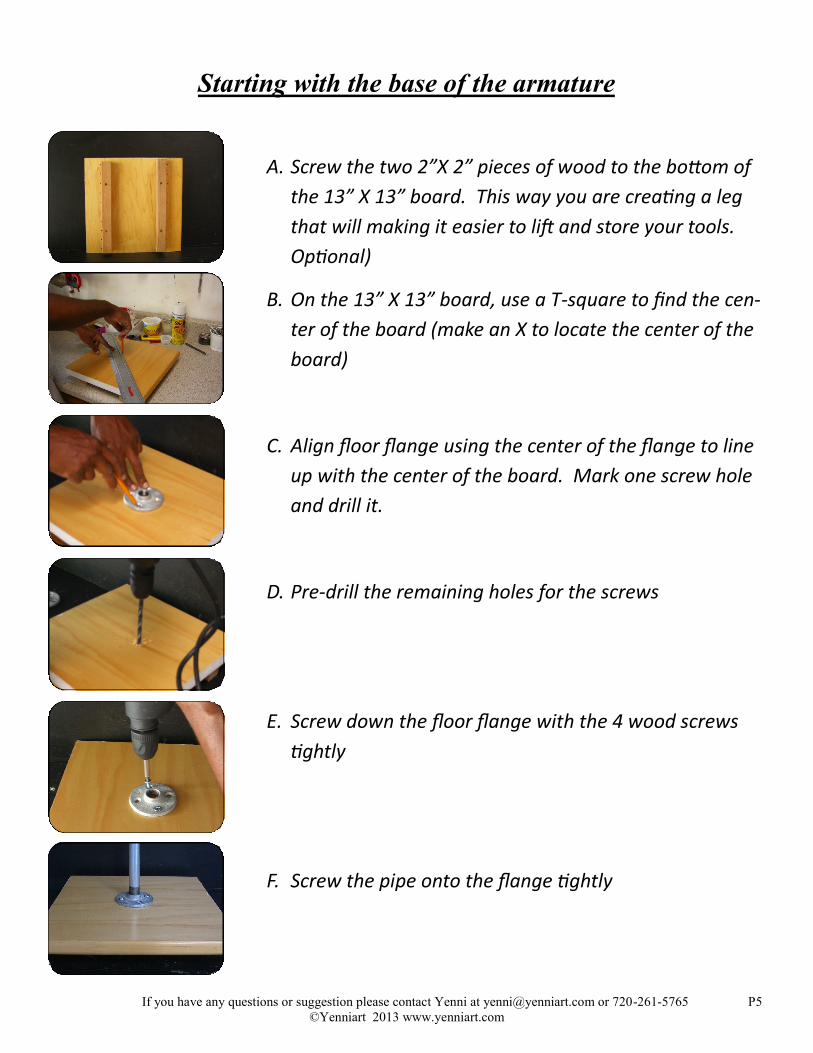
A. Screw the two 2”X 2” pieces of wood to the bottom of
the 13” X 13” board. This way you are creating a leg
that will making it easier to lift and store your tools.
Optional)
B. On the 13” X 13” board, use a T-square to find the cen-
ter of the board (make an X to locate the center of the
board)
C. Align floor flange using the center of the flange to line
up with the center of the board. Mark one screw hole
and drill it.
D. Pre-drill the remaining holes for the screws
E. Screw down the floor flange with the 4 wood screws
tightly
F. Screw the pipe onto the flange tightly
Starting with the base of the armature
If you have any questions or suggestion please contact Yenni at [email protected] or 720-261-5765 P6
©Yenniart 2013 www.yenniart.com
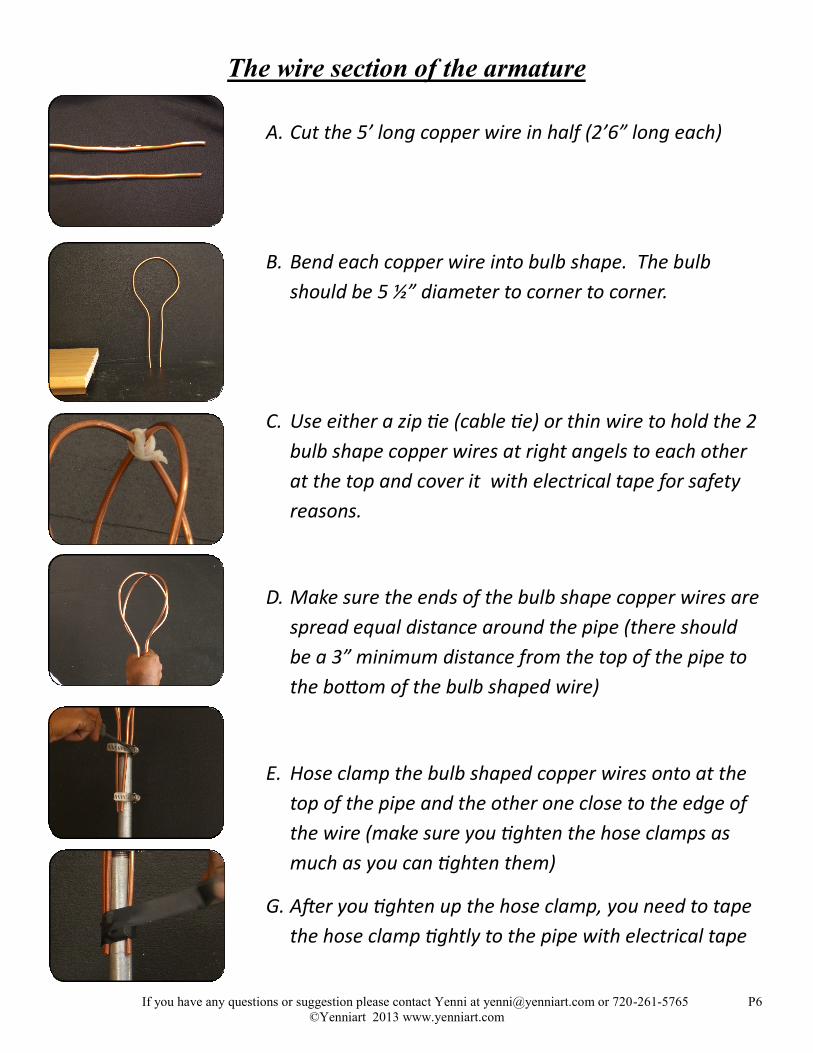
A. Cut the 5’ long copper wire in half (2’6” long each)
B. Bend each copper wire into bulb shape. The bulb
should be 5 ½” diameter to corner to corner.
C. Use either a zip tie (cable tie) or thin wire to hold the 2
bulb shape copper wires at right angels to each other
at the top and cover it with electrical tape for safety
reasons.
D. Make sure the ends of the bulb shape copper wires are
spread equal distance around the pipe (there should
be a 3” minimum distance from the top of the pipe to
the bottom of the bulb shaped wire)
E. Hose clamp the bulb shaped copper wires onto at the
top of the pipe and the other one close to the edge of
the wire (make sure you tighten the hose clamps as
much as you can tighten them)
G. After you tighten up the hose clamp, you need to tape
the hose clamp tightly to the pipe with electrical tape
The wire section of the armature
If you have any questions or suggestion please contact Yenni at [email protected] or 720-261-5765 P7
©Yenniart 2013 www.yenniart.com
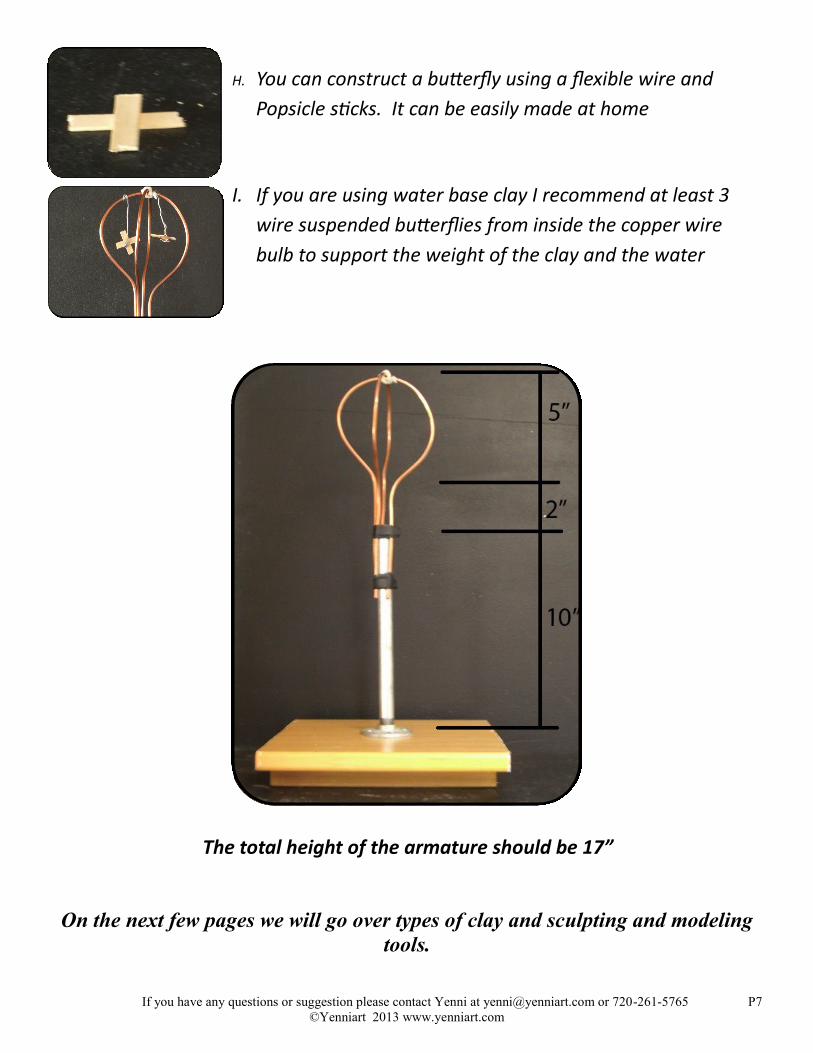
H. You can construct a butterfly using a flexible wire and
Popsicle sticks. It can be easily made at home
I. If you are using water base clay I recommend at least 3
wire suspended butterflies from inside the copper wire
bulb to support the weight of the clay and the water
The total height of the armature should be 17”
On the next few pages we will go over types of clay and sculpting and modeling
tools.
If you have any questions or suggestion please contact Yenni at [email protected] or 720-261-5765 P8
©Yenniart 2013 www.yenniart.com
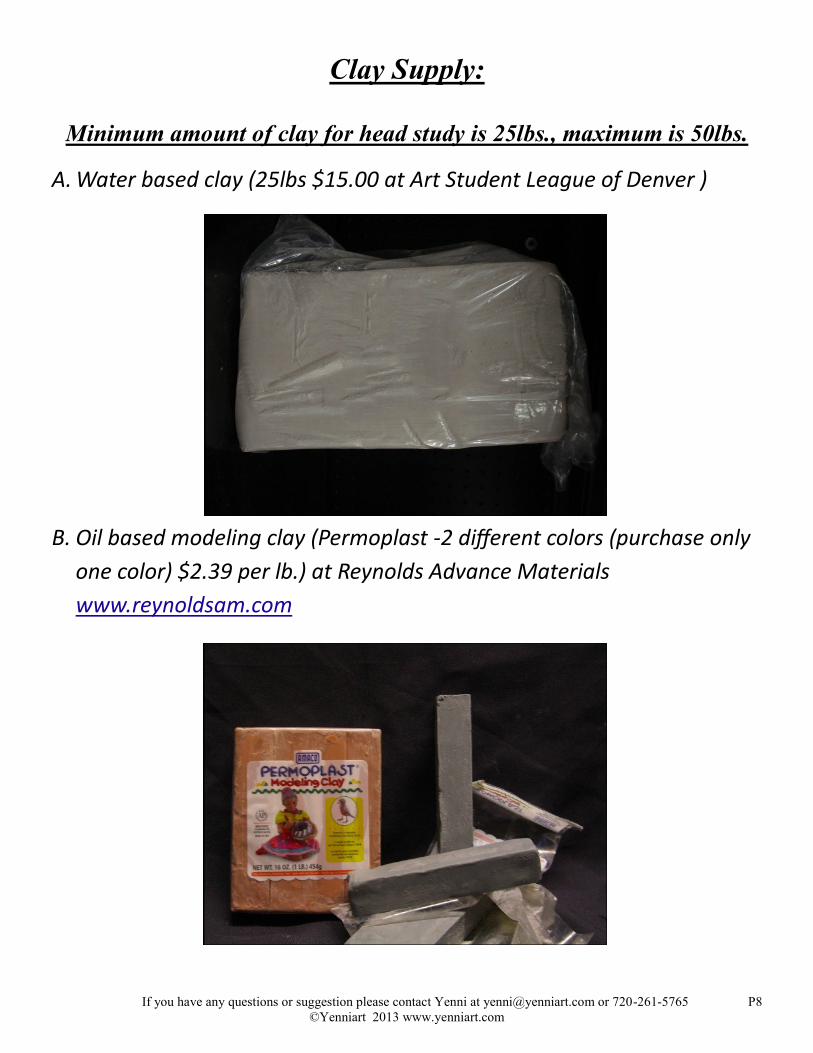
Clay Supply:
Minimum amount of clay for head study is 25lbs., maximum is 50lbs.
A. Water based clay (25lbs $15.00 at Art Student League of Denver )
B. Oil based modeling clay (Permoplast -2 different colors (purchase only
one color) $2.39 per lb.) at Reynolds Advance Materials
www.reynoldsam.com
If you have any questions or suggestion please contact Yenni at [email protected] or 720-261-5765 P9
©Yenniart 2013 www.yenniart.com
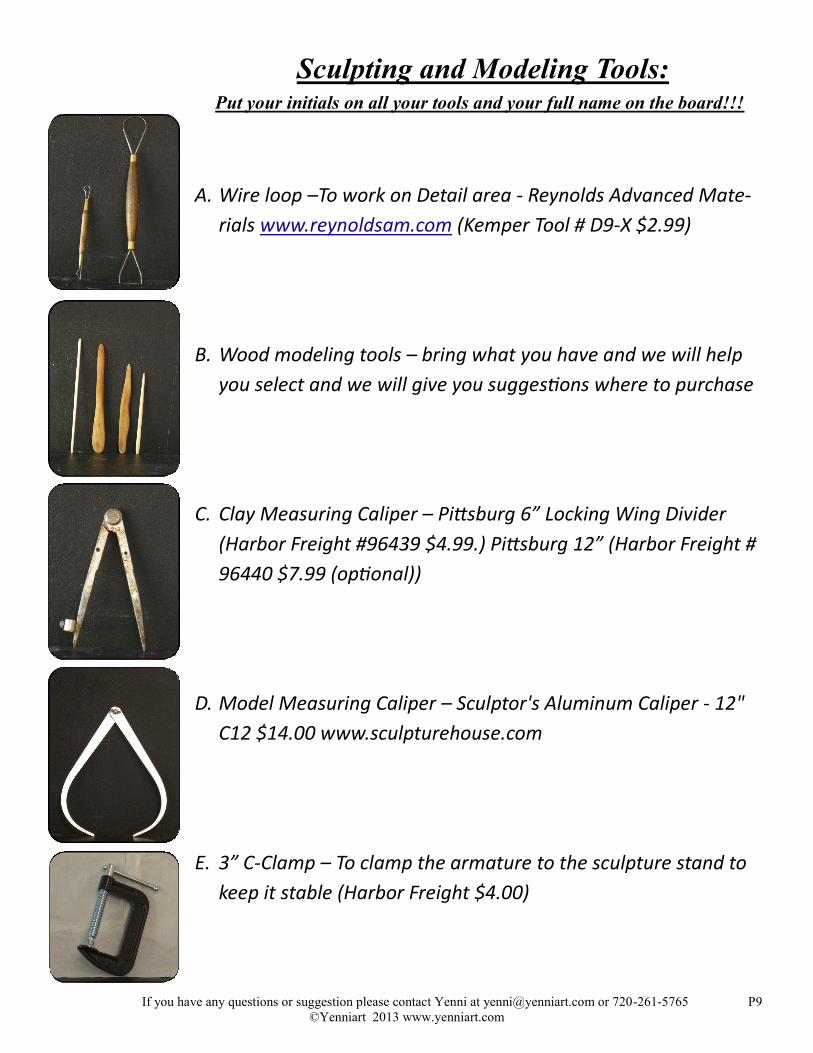
Sculpting and Modeling Tools:
A. Wire loop –To work on Detail area - Reynolds Advanced Mate-
rials www.reynoldsam.com (Kemper Tool # D9-X $2.99)
B. Wood modeling tools – bring what you have and we will help
you select and we will give you suggestions where to purchase
C. Clay Measuring Caliper – Pittsburg 6” Locking Wing Divider
(Harbor Freight #96439 $4.99.) Pittsburg 12” (Harbor Freight #
96440 $7.99 (optional))
D. Model Measuring Caliper – Sculptor's Aluminum Caliper - 12"
C12 $14.00 www.sculpturehouse.com
E. 3” C-Clamp – To clamp the armature to the sculpture stand to
keep it stable (Harbor Freight $4.00)
Put your initials on all your tools and your full name on the board!!!
If you have any questions or suggestion please contact Yenni at [email protected] or 720-261-5765 P10
©Yenniart 2013 www.yenniart.com
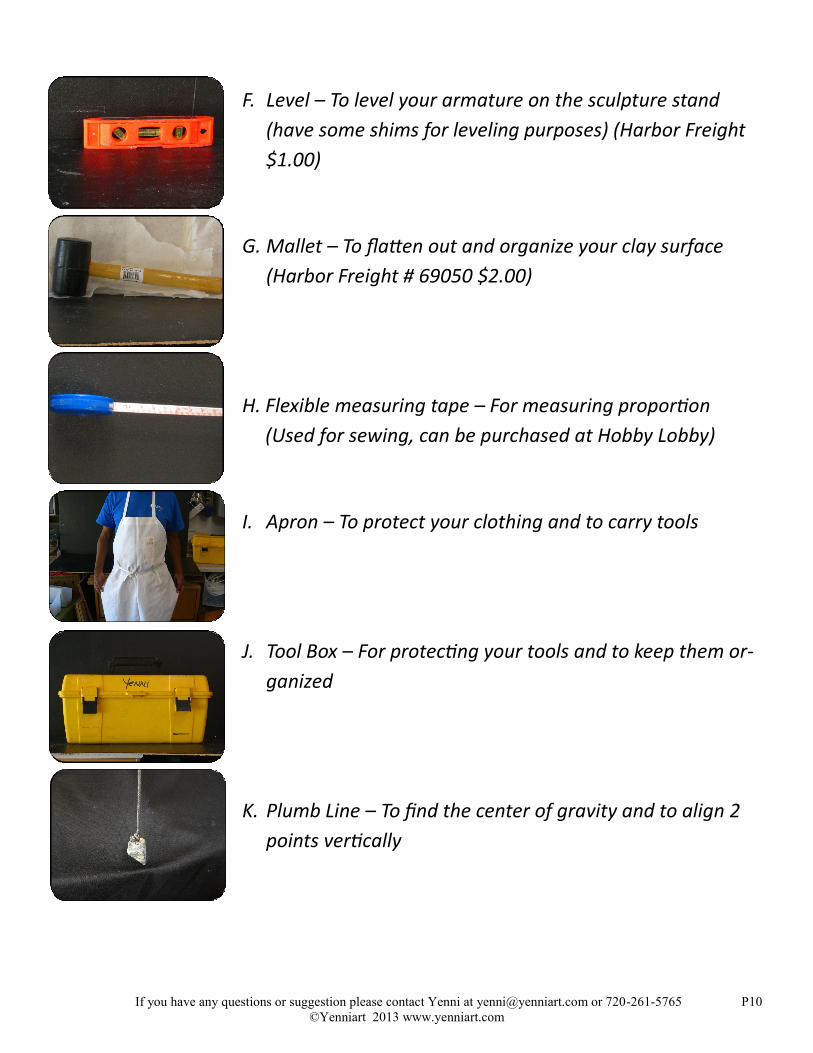
F. Level – To level your armature on the sculpture stand
(have some shims for leveling purposes) (Harbor Freight
$1.00)
G. Mallet – To flatten out and organize your clay surface
(Harbor Freight # 69050 $2.00)
H. Flexible measuring tape – For measuring proportion
(Used for sewing, can be purchased at Hobby Lobby)
I. Apron – To protect your clothing and to carry tools
J. Tool Box – For protecting your tools and to keep them or-
ganized
K. Plumb Line – To find the center of gravity and to align 2
points vertically
If you have any questions or suggestion please contact Yenni at [email protected] or 720-261-5765 P11
©Yenniart 2013 www.yenniart.com
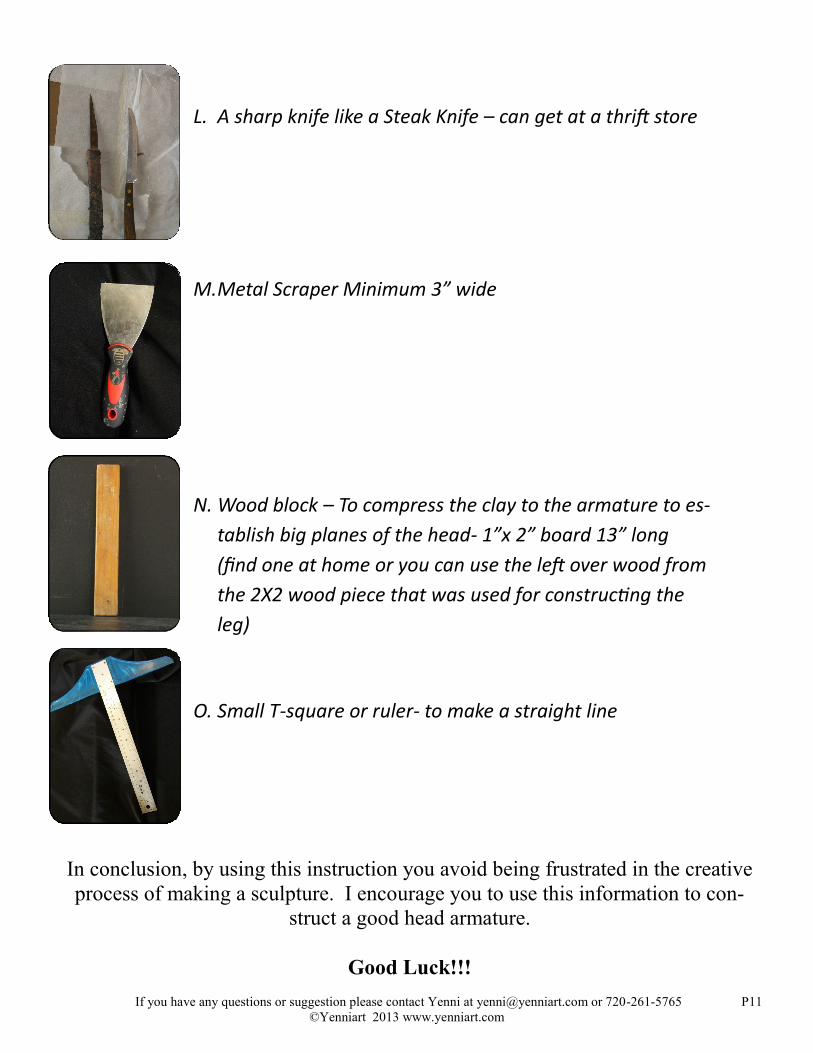
L. A sharp knife like a Steak Knife – can get at a thrift store
M. Metal Scraper Minimum 3” wide
N. Wood block – To compress the clay to the armature to es-
tablish big planes of the head- 1”x 2” board 13” long
(find one at home or you can use the left over wood from
the 2X2 wood piece that was used for constructing the
leg)
O. Small T-square or ruler- to make a straight line
In conclusion, by using this instruction you avoid being frustrated in the creative
process of making a sculpture. I encourage you to use this information to con-
struct a good head armature.
Good Luck!!!