Lexis AdvAnce® Quick RefeRence Guide
20
LEXIS ADVANCE ® QUICK REFERENCE GUIDE Lexis Advance ® This Guide shows you where to find—and how to use—Lexis Advance ® features you’ll use often. Keep this Guide handy for reference. On the road? Need the facts? You can gain access to Lexis Advance with current smartphones, tablets and laptops at lexisadvance.com. Lexis Advance screens adapt automatically. Download other Lexis Advance how-to literature, videos, tips and more! The Lexis Advance Support & Training site can help you with sign-in issues and update you on new Lexis Advance enhancements. Please note: All screens shown may change slightly as new sources, features and enhancements are added. Sign in: lexisadvance.com | Learn more: lexisnexis.com/advancesupport Start your search: home page 2 Start your search: Explore Content to find sources to search 3 Advanced Search: build a search and search by segment 3 Browse Sources: find specific sources to search 4 Browse Topics: find and search by legal topic 5 Browse Practice Centers: link to practice/jurisdiction sources 5 Filter: refine your search up-front and save browsing time 6 Search results: find the most relevant documents fast 7 Folders: save documents, select text, searches, etc. 8 Search Term Maps: visualize your research and assess relevance faster 9 Cases: get more than full text 10 – 11 Tables of Contents (TOCs): search or browse hierarchical sources 12 Indices: search or browse source indices 12 Shepard’s ® Citations Service 13 Shepard’s Graphical: map the appellate history 14 Shepard’s Graphical: spot trends in citing references 15 Deliver: print, download and email 16 Get updates automatically: create an alert 17 – 18 History: view searches and much more in the list view 19 History: use the map to expand your research 20
Transcript of Lexis AdvAnce® Quick RefeRence Guide
LEXIS ADVANCE®
QUICK REFERENCE GUIDE
Lexis Advance®
This Guide shows you where to find—and how
to use—Lexis Advance® features you’ll use often.
Keep this Guide handy for reference.
On the road? Need the facts? You can gain access
to Lexis Advance with current smartphones,
tablets and laptops at lexisadvance.com.
Lexis Advance screens adapt automatically.
Download other Lexis Advance how-toliterature, videos, tips and more!The Lexis Advance Support & Training site can
help you with sign-in issues and update you on
new Lexis Advance enhancements.
Please note: All screens shown may change slightly as new sources, features and enhancements are added.
Sign in: lexisadvance.com | Learn more: lexisnexis.com/advancesupport
Start your search: home page 2
Start your search: Explore Content to find sources to search 3
Advanced Search: build a search and search by segment 3
Browse Sources: find specific sources to search 4
Browse Topics: find and search by legal topic 5
Browse Practice Centers: link to practice/jurisdiction sources 5
Filter: refine your search up-front and save browsing time 6
Search results: find the most relevant documents fast 7
Folders: save documents, select text, searches, etc. 8
Search Term Maps: visualize your research and assess relevance faster 9
Cases: get more than full text 10 – 11
Tables of Contents (TOCs): search or browse hierarchical sources 12
Indices: search or browse source indices 12
Shepard’s® Citations Service 13
Shepard’s Graphical: map the appellate history 14
Shepard’s Graphical: spot trends in citing references 15
Deliver: print, download and email 16
Get updates automatically: create an alert 17 – 18
History: view searches and much more in the list view 19
History: use the map to expand your research 20
2
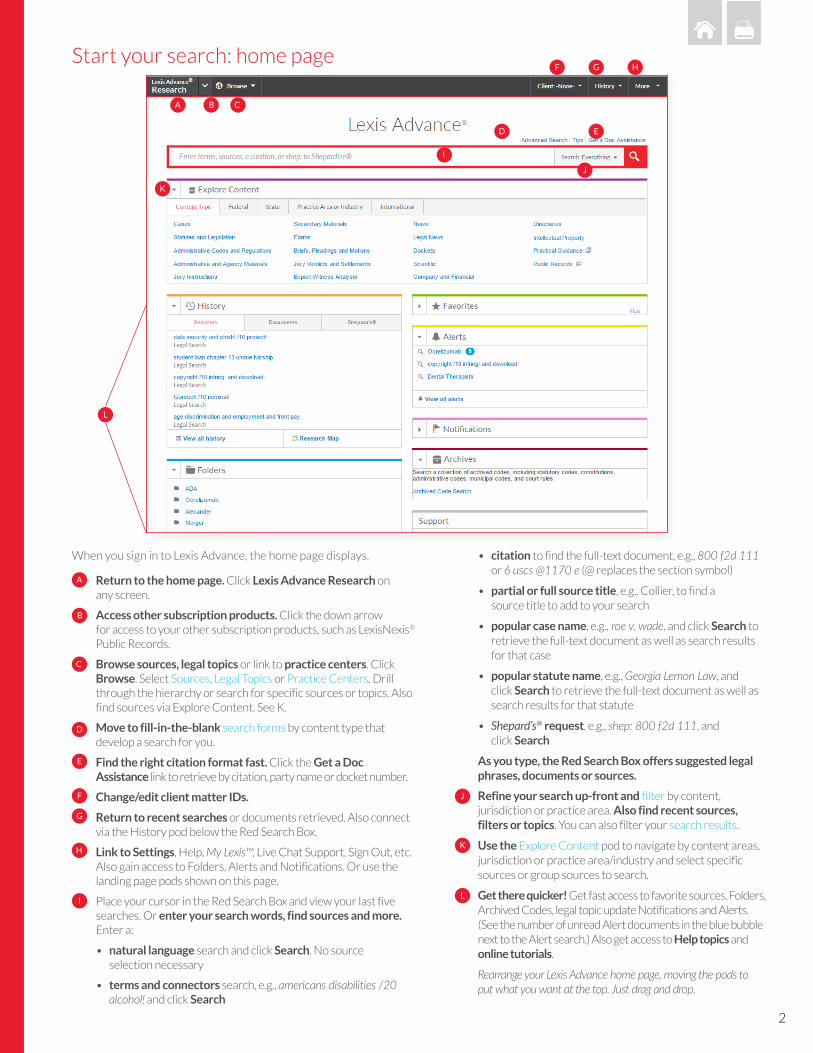
When you sign in to Lexis Advance, the home page displays.
Start your search: home page
A B C
I
J
D
F
E
G H
K
Return to the home page. Click Lexis Advance Research on any screen.
Access other subscription products. Click the down arrow for access to your other subscription products, such as LexisNexis® Public Records.
Browse sources, legal topics or link to practice centers. Click Browse. Select Sources, Legal Topics or Practice Centers. Drill through the hierarchy or search for specific sources or topics. Also find sources via Explore Content. See K.
Move to fill-in-the-blank search forms by content type that develop a search for you.
Find the right citation format fast. Click the Get a Doc Assistance link to retrieve by citation, party name or docket number.
Change/edit client matter IDs.
Return to recent searches or documents retrieved. Also connect via the History pod below the Red Search Box.
Link to Settings, Help, My Lexis™, Live Chat Support, Sign Out, etc. Also gain access to Folders, Alerts and Notifications. Or use the landing page pods shown on this page.
Place your cursor in the Red Search Box and view your last five searches. Or enter your search words, find sources and more. Enter a:
• natural language search and click Search. No source selection necessary
• terms and connectors search, e.g., americans disabilities /20 alcohol! and click Search
• citation to find the full-text document, e.g., 800 f2d 111 or 6 uscs @1170 e (@ replaces the section symbol)
• partial or full source title, e.g., Collier, to find a source title to add to your search
• popular case name, e.g., roe v. wade, and click Search to retrieve the full-text document as well as search results for that case
• popular statute name, e.g., Georgia Lemon Law, and click Search to retrieve the full-text document as well as search results for that statute
• Shepard’s® request, e.g., shep: 800 f2d 111, and click Search
As you type, the Red Search Box offers suggested legal phrases, documents or sources.
Refine your search up-front and filter by content, jurisdiction or practice area. Also find recent sources, filters or topics. You can also filter your search results.
Use the Explore Content pod to navigate by content areas, jurisdiction or practice area/industry and select specific sources or group sources to search.
Get there quicker! Get fast access to favorite sources, Folders, Archived Codes, legal topic update Notifications and Alerts. (See the number of unread Alert documents in the blue bubble next to the Alert search.) Also get access to Help topics and online tutorials.
Rearrange your Lexis Advance home page, moving the pods to put what you want at the top. Just drag and drop.
L
I
A
B
C
H
D
E
F
G
K
J
L
3
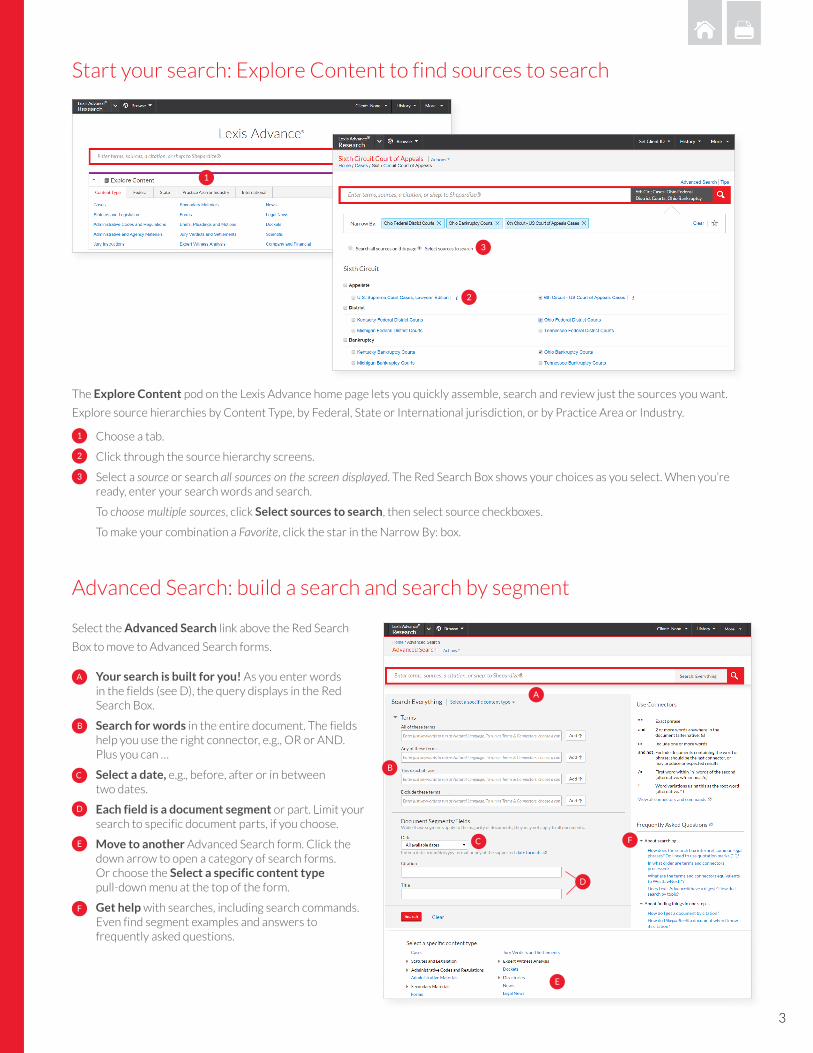
The Explore Content pod on the Lexis Advance home page lets you quickly assemble, search and review just the sources you want.
Explore source hierarchies by Content Type, by Federal, State or International jurisdiction, or by Practice Area or Industry.
Start your search: Explore Content to find sources to search
Advanced Search: build a search and search by segment
Choose a tab.
Click through the source hierarchy screens.
Select a source or search all sources on the screen displayed. The Red Search Box shows your choices as you select. When you’re ready, enter your search words and search.
To choose multiple sources, click Select sources to search, then select source checkboxes.
To make your combination a Favorite, click the star in the Narrow By: box.
1
2
3
1
3
2
Select the Advanced Search link above the Red Search
Box to move to Advanced Search forms.
Your search is built for you! As you enter words in the fields (see D), the query displays in the Red Search Box.
Search for words in the entire document. The fields help you use the right connector, e.g., OR or AND. Plus you can …
Select a date, e.g., before, after or in between two dates.
Each field is a document segment or part. Limit your search to specific document parts, if you choose.
Move to another Advanced Search form. Click the down arrow to open a category of search forms. Or choose the Select a specific content type pull-down menu at the top of the form.
Get help with searches, including search commands.Even find segment examples and answers to frequently asked questions.
A
B
C
D
E
F
A
B
C
E
F
D
4
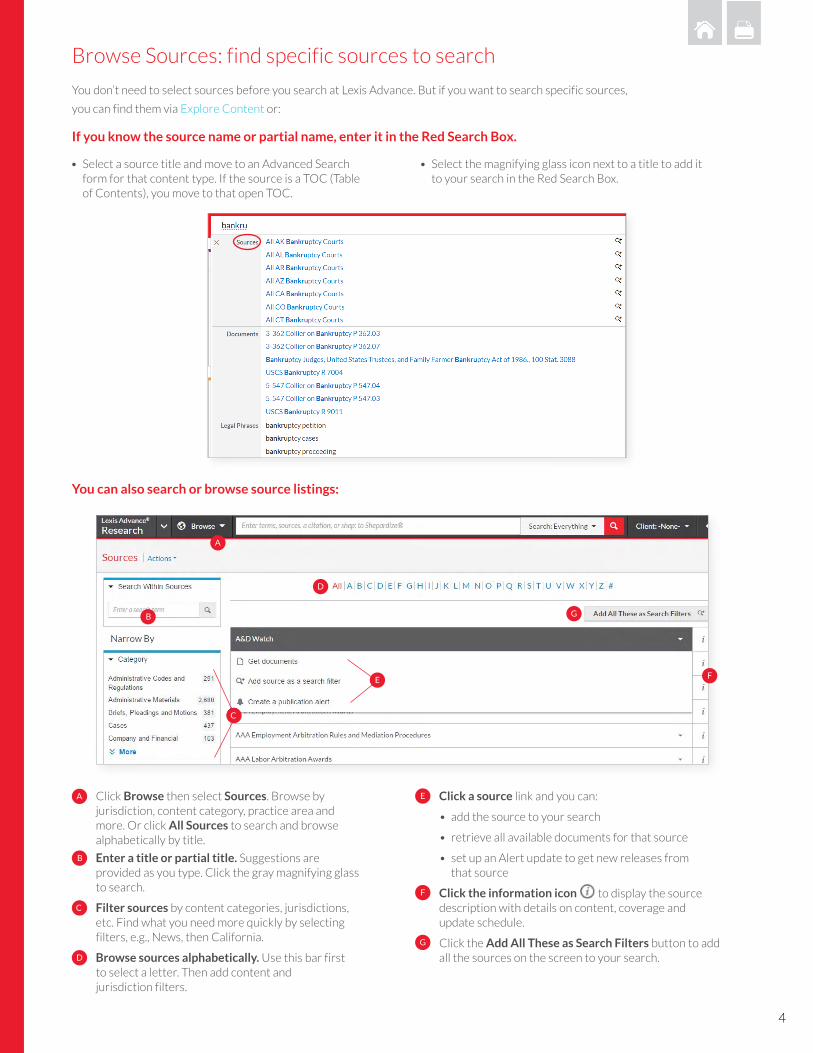
You don’t need to select sources before you search at Lexis Advance. But if you want to search specific sources,
you can find them via Explore Content or:
If you know the source name or partial name, enter it in the Red Search Box.
• Select a source title and move to an Advanced Search form for that content type. If the source is a TOC (Table of Contents), you move to that open TOC.
• Select the magnifying glass icon next to a title to add it to your search in the Red Search Box.
Browse Sources: find specific sources to search
A
B
C
D
F
G
You can also search or browse source listings:
Click Browse then select Sources. Browse by jurisdiction, content category, practice area and more. Or click All Sources to search and browse alphabetically by title.
Enter a title or partial title. Suggestions are provided as you type. Click the gray magnifying glass to search.
Filter sources by content categories, jurisdictions, etc. Find what you need more quickly by selecting filters, e.g., News, then California.
Browse sources alphabetically. Use this bar first to select a letter. Then add content and jurisdiction filters.
Click a source link and you can:
• add the source to your search
• retrieve all available documents for that source
• set up an Alert update to get new releases from that source
Click the information icon to display the source description with details on content, coverage and update schedule.
Click the Add All These as Search Filters button to add all the sources on the screen to your search.
A
B
C
D
E
F
G
E
5
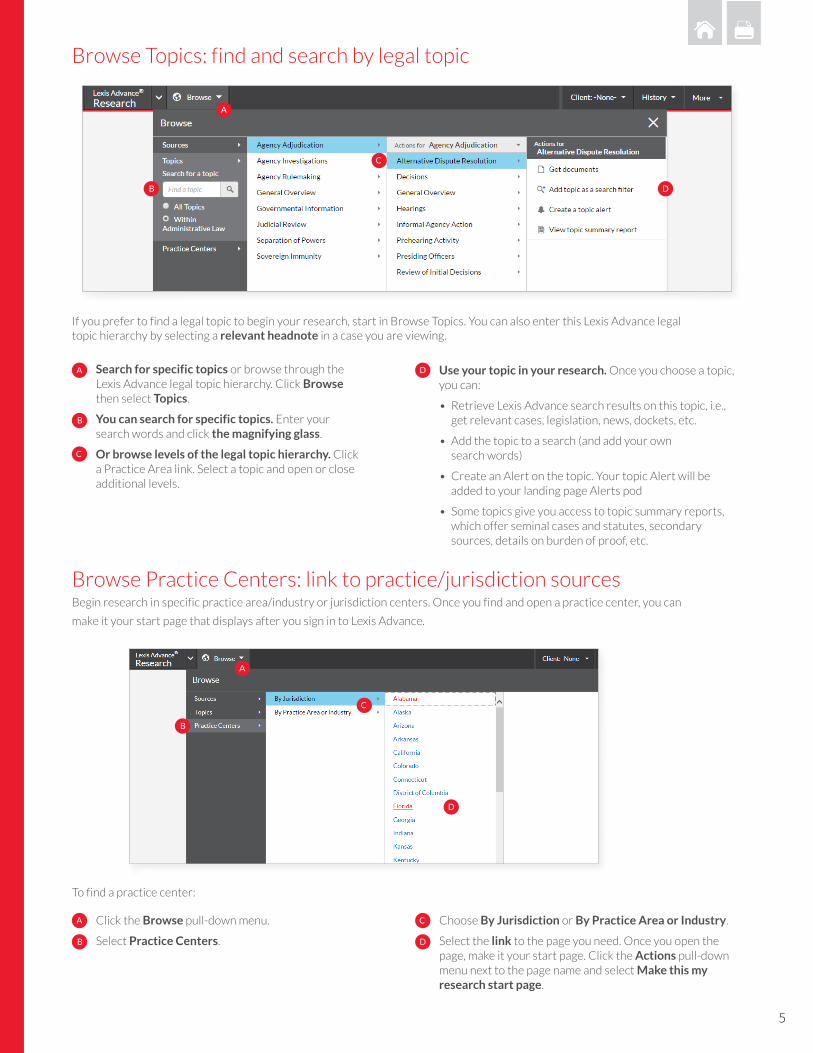
If you prefer to find a legal topic to begin your research, start in Browse Topics. You can also enter this Lexis Advance legaltopic hierarchy by selecting a relevant headnote in a case you are viewing.
Browse Practice Centers: link to practice/jurisdiction sources
To find a practice center:
Begin research in specific practice area/industry or jurisdiction centers. Once you find and open a practice center, you can
make it your start page that displays after you sign in to Lexis Advance.
Click the Browse pull-down menu.
Select Practice Centers.
Search for specific topics or browse through the Lexis Advance legal topic hierarchy. Click Browse then select Topics.
You can search for specific topics. Enter your search words and click the magnifying glass.
Or browse levels of the legal topic hierarchy. Click a Practice Area link. Select a topic and open or close additional levels.
A
B
C
D
A
B
C
D
A
B
C
D
Choose By Jurisdiction or By Practice Area or Industry.
Select the link to the page you need. Once you open the page, make it your start page. Click the Actions pull-down menu next to the page name and select Make this my research start page.
Use your topic in your research. Once you choose a topic, you can:
• Retrieve Lexis Advance search results on this topic, i.e., get relevant cases, legislation, news, dockets, etc.
• Add the topic to a search (and add your own search words)
• Create an Alert on the topic. Your topic Alert will be added to your landing page Alerts pod
• Some topics give you access to topic summary reports, which offer seminal cases and statutes, secondary sources, details on burden of proof, etc.
A
B
C
D
Browse Topics: find and search by legal topic
6
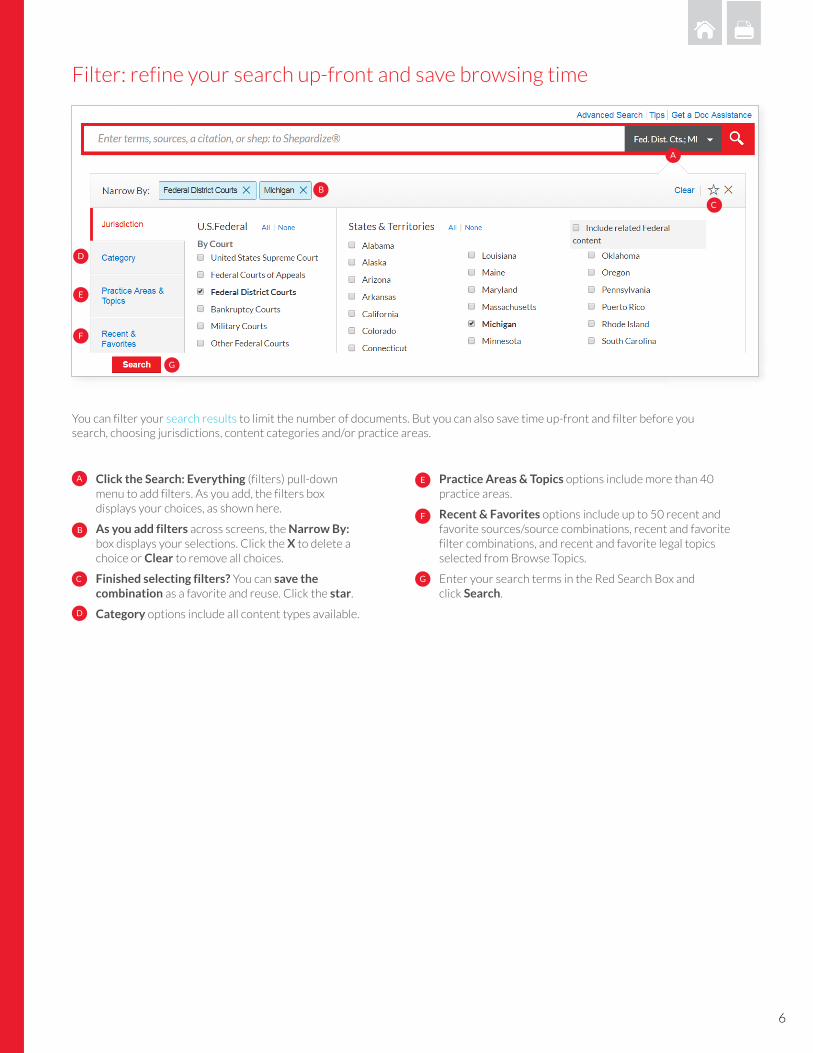
Filter: refine your search up-front and save browsing time
Click the Search: Everything (filters) pull-down menu to add filters. As you add, the filters box displays your choices, as shown here.
As you add filters across screens, the Narrow By: box displays your selections. Click the X to delete a choice or Clear to remove all choices.
Finished selecting filters? You can save the combination as a favorite and reuse. Click the star.
Category options include all content types available.
You can filter your search results to limit the number of documents. But you can also save time up-front and filter before yousearch, choosing jurisdictions, content categories and/or practice areas.
A
B
C
D
Practice Areas & Topics options include more than 40 practice areas.
Recent & Favorites options include up to 50 recent and favorite sources/source combinations, recent and favorite filter combinations, and recent and favorite legal topics selected from Browse Topics.
Enter your search terms in the Red Search Box and click Search.
E
F
G
A
B
C
D
G
E
F
7
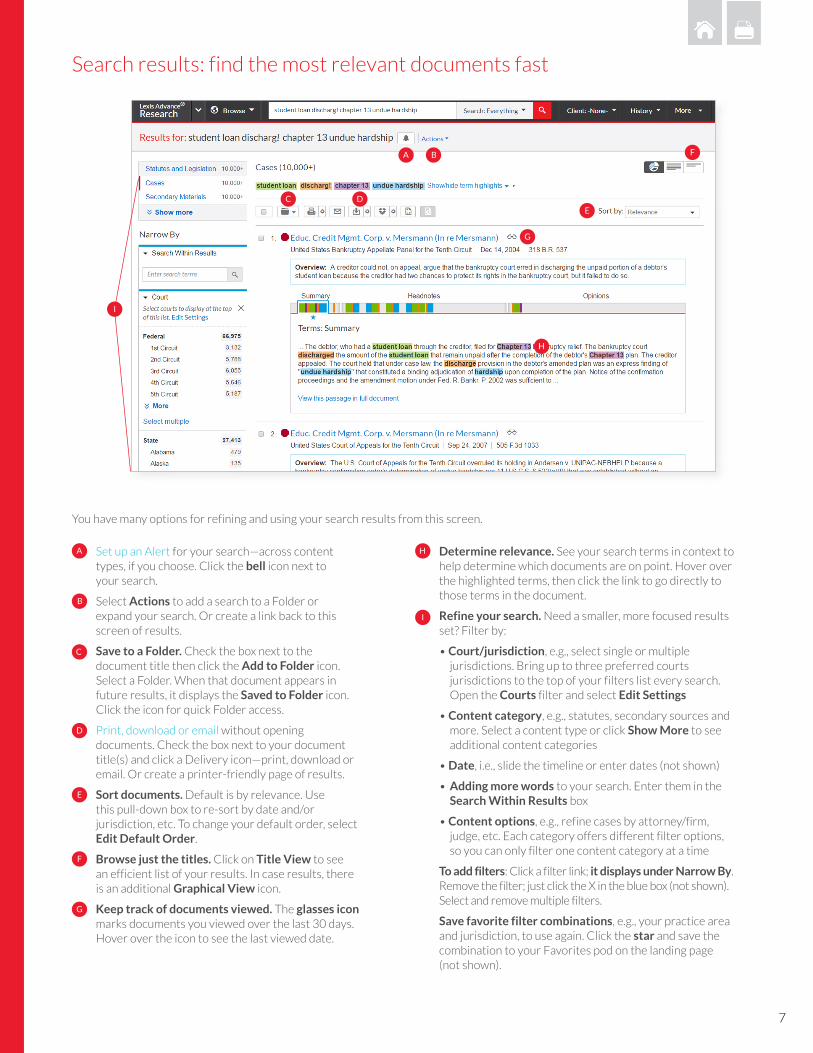
Search results: find the most relevant documents fast
You have many options for refining and using your search results from this screen.
Set up an Alert for your search—across content types, if you choose. Click the bell icon next to your search.
Select Actions to add a search to a Folder or expand your search. Or create a link back to this screen of results.
Save to a Folder. Check the box next to the document title then click the Add to Folder icon. Select a Folder. When that document appears in future results, it displays the Saved to Folder icon. Click the icon for quick Folder access.
Print, download or email without opening documents. Check the box next to your document title(s) and click a Delivery icon—print, download or email. Or create a printer-friendly page of results.
Sort documents. Default is by relevance. Use this pull-down box to re-sort by date and/or jurisdiction, etc. To change your default order, select Edit Default Order.
Browse just the titles. Click on Title View to see an efficient list of your results. In case results, there is an additional Graphical View icon.
Keep track of documents viewed. The glasses icon marks documents you viewed over the last 30 days. Hover over the icon to see the last viewed date.
A
B
C
D
E
F
G
I
H Determine relevance. See your search terms in context to help determine which documents are on point. Hover over the highlighted terms, then click the link to go directly to those terms in the document.
Refine your search. Need a smaller, more focused results set? Filter by:
• Court/jurisdiction, e.g., select single or multiple jurisdictions. Bring up to three preferred courts jurisdictions to the top of your filters list every search. Open the Courts filter and select Edit Settings
• Content category, e.g., statutes, secondary sources and more. Select a content type or click Show More to see additional content categories
• Date, i.e., slide the timeline or enter dates (not shown)
• Adding more words to your search. Enter them in the Search Within Results box
• Content options, e.g., refine cases by attorney/firm, judge, etc. Each category offers different filter options, so you can only filter one content category at a time
To add filters: Click a filter link; it displays under Narrow By. Remove the filter; just click the X in the blue box (not shown). Select and remove multiple filters.
Save favorite filter combinations, e.g., your practice area and jurisdiction, to use again. Click the star and save the combination to your Favorites pod on the landing page (not shown).
A B
C D
F
E
H
G
I
8
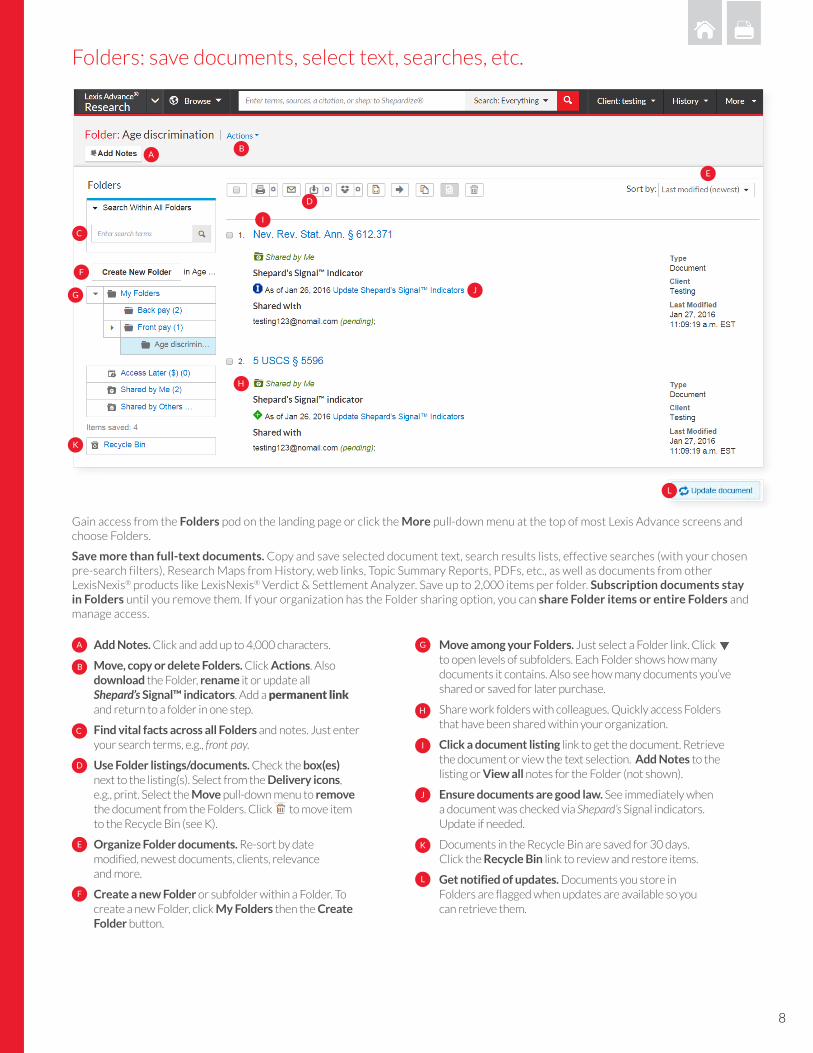
Folders: save documents, select text, searches, etc.
Gain access from the Folders pod on the landing page or click the More pull-down menu at the top of most Lexis Advance screens and choose Folders.
Save more than full-text documents. Copy and save selected document text, search results lists, effective searches (with your chosen pre-search filters), Research Maps from History, web links, Topic Summary Reports, PDFs, etc., as well as documents from other LexisNexis® products like LexisNexis® Verdict & Settlement Analyzer. Save up to 2,000 items per folder. Subscription documents stay in Folders until you remove them. If your organization has the Folder sharing option, you can share Folder items or entire Folders and manage access.
AB
C
D
E
F
H
I
GJ
Add Notes. Click and add up to 4,000 characters.
Move, copy or delete Folders. Click Actions. Also download the Folder, rename it or update all Shepard’s Signal™ indicators. Add a permanent link and return to a folder in one step.
Find vital facts across all Folders and notes. Just enter your search terms, e.g., front pay.
Use Folder listings/documents. Check the box(es) next to the listing(s). Select from the Delivery icons, e.g., print. Select the Move pull-down menu to remove the document from the Folders. Click to move item to the Recycle Bin (see K).
Organize Folder documents. Re-sort by date modified, newest documents, clients, relevance and more.
Create a new Folder or subfolder within a Folder. To create a new Folder, click My Folders then the Create Folder button.
A
B
C
D
Move among your Folders. Just select a Folder link. Click to open levels of subfolders. Each Folder shows how many documents it contains. Also see how many documents you’ve shared or saved for later purchase.
Share work folders with colleagues. Quickly access Folders that have been shared within your organization.
Click a document listing link to get the document. Retrieve the document or view the text selection. Add Notes to the listing or View all notes for the Folder (not shown).
Ensure documents are good law. See immediately when a document was checked via Shepard’s Signal indicators. Update if needed.
Documents in the Recycle Bin are saved for 30 days. Click the Recycle Bin link to review and restore items.
Get notified of updates. Documents you store in Folders are flagged when updates are available so you can retrieve them.
E
F
G
H
I
J
K
L
L
K

9
Search Term Maps: visualize your research and assess relevance faster
See your color-coded search terms fast.
Move among top search term passages. Select color markers to view search terms in context. The star indicates the best cluster of search terms. Also click on a text passage to navigate to that passage in the full-text document.
Focus on specific search terms. Select the Show/hide term highlights link to select and focus on specific terms. (To turn the display to one color, slide the Multicolor icon toggle.)
Switch between Search Term Maps graphical view and the standard (Full) or Title Only view. To turn off Search Term Maps, click the More pull-down menu in the black header at the top of the screen, and then click Settings. Under General, un-check the Graphical View box (not shown).
Print/deliver or save results lists.
Lexis Advance® Search Term Maps are included with every Lexis Advance case law search. This proprietary, patent-pending innovation adds unique color coding to your search terms and phrases so you can quickly spot patterns and dense concentrations of terms—even before you review the full text.
When you view case law research results:
The Search Term Location Bar in search results previews top passages in the document—including in the case summary, headnotes and opinion—so you can quickly determine if you should review the full-text document.
When you view a full-text case:
The Search Term Location Bar in the full-text view displays a complete map of the search terms found in the case.
A
B
C
D
E
Hover over color markers or clusters to see which terms are depicted and the location of those terms, e.g., opinion. The best cluster/star indicator also displays. Click on color markers to move to those terms in full text. Or slide the blue window “scroller” to move through the document.
Navigate to specific search terms. Click All terms. See your color-coded terms/phrases and how many instances exist within the document. Select a term/phrase, and the Search Term Location Bar highlights that color only (not shown).
Add search words. Click Search Document and enter your search terms. All added search words display in teal in your Search Term Location Bar. Click color markers or use the scroller to navigate.
A
B
C
D
E
B
C
A
A
B C
10
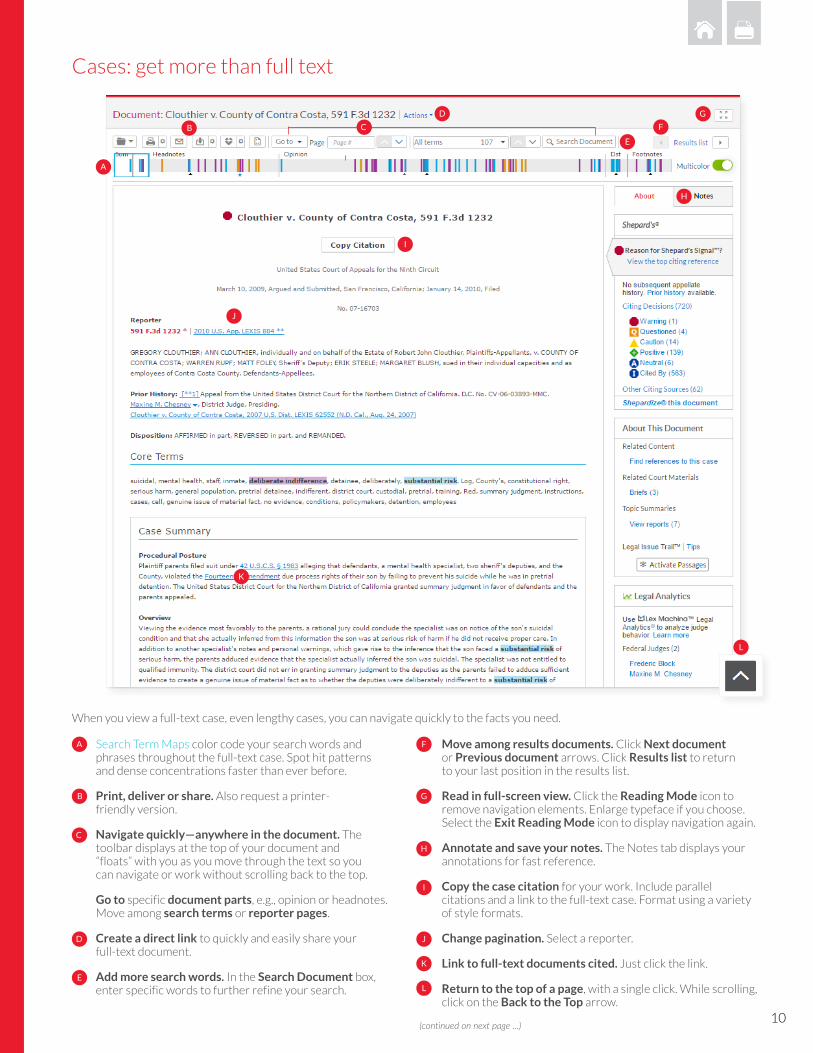
Cases: get more than full text
When you view a full-text case, even lengthy cases, you can navigate quickly to the facts you need.
(continued on next page ...)
A
B
E
F
H
G
I
D
J
L
Search Term Maps color code your search words and phrases throughout the full-text case. Spot hit patterns and dense concentrations faster than ever before.
Print, deliver or share. Also request a printer- friendly version.
Navigate quickly—anywhere in the document. The toolbar displays at the top of your document and “floats” with you as you move through the text so you can navigate or work without scrolling back to the top.
Go to specific document parts, e.g., opinion or headnotes. Move among search terms or reporter pages.
Create a direct link to quickly and easily share your full-text document.
Add more search words. In the Search Document box, enter specific words to further refine your search.
A
B
C
E
F
H
D
G
I
J
K
L
Move among results documents. Click Next document or Previous document arrows. Click Results list to return to your last position in the results list.
Read in full-screen view. Click the Reading Mode icon to remove navigation elements. Enlarge typeface if you choose. Select the Exit Reading Mode icon to display navigation again.
Annotate and save your notes. The Notes tab displays your annotations for fast reference.
Copy the case citation for your work. Include parallel citations and a link to the full-text case. Format using a variety of style formats.
Change pagination. Select a reporter.
Link to full-text documents cited. Just click the link.
Return to the top of a page, with a single click. While scrolling, click on the Back to the Top arrow.
C
K
11
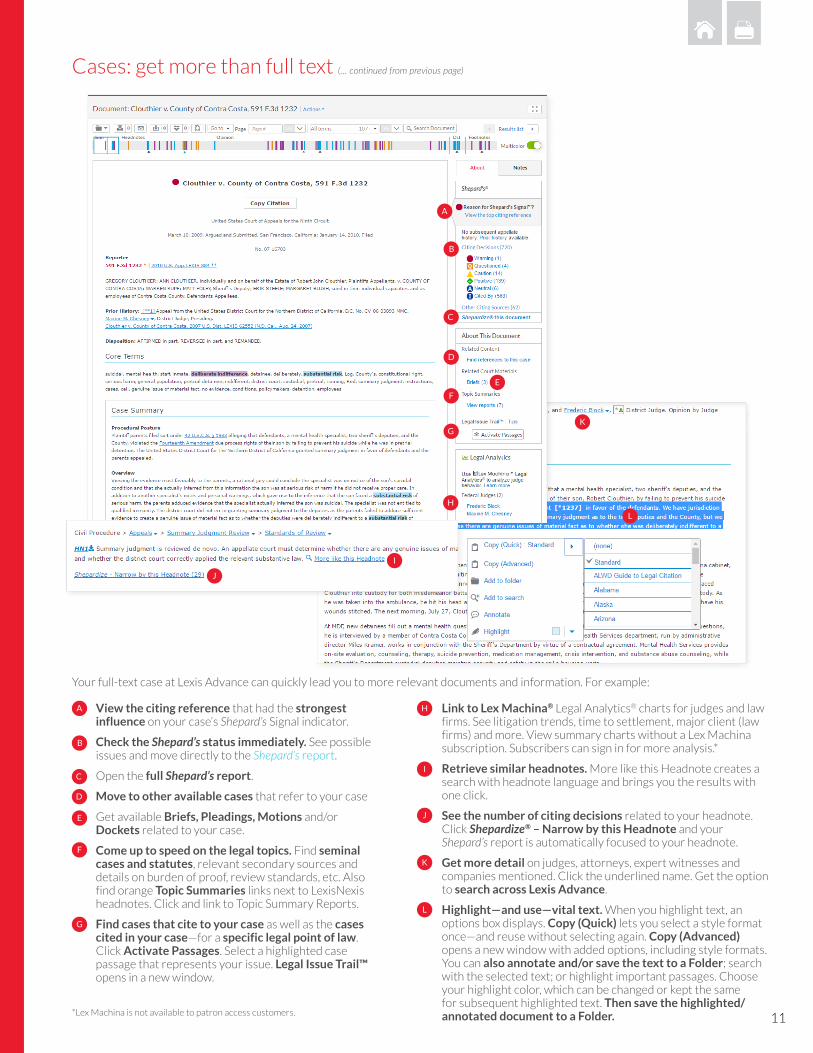
Cases: get more than full text (… continued from previous page)
Your full-text case at Lexis Advance can quickly lead you to more relevant documents and information. For example:
View the citing reference that had the strongest influence on your case’s Shepard’s Signal indicator.
Check the Shepard’s status immediately. See possible issues and move directly to the Shepard’s report.
Open the full Shepard’s report.
Move to other available cases that refer to your case
Get available Briefs, Pleadings, Motions and/or Dockets related to your case.
Come up to speed on the legal topics. Find seminal cases and statutes, relevant secondary sources and details on burden of proof, review standards, etc. Also find orange Topic Summaries links next to LexisNexis headnotes. Click and link to Topic Summary Reports.
Find cases that cite to your case as well as the cases cited in your case—for a specific legal point of law. Click Activate Passages. Select a highlighted case passage that represents your issue. Legal Issue Trail™ opens in a new window.
A
B
C
E
F
H
D
G
I
J
K
L
Link to Lex Machina® Legal Analytics® charts for judges and law firms. See litigation trends, time to settlement, major client (law firms) and more. View summary charts without a Lex Machina subscription. Subscribers can sign in for more analysis.*
Retrieve similar headnotes. More like this Headnote creates a search with headnote language and brings you the results with one click.
See the number of citing decisions related to your headnote. Click Shepardize® – Narrow by this Headnote and your Shepard’s report is automatically focused to your headnote.
Get more detail on judges, attorneys, expert witnesses and companies mentioned. Click the underlined name. Get the option to search across Lexis Advance.
Highlight—and use—vital text. When you highlight text, an options box displays. Copy (Quick) lets you select a style format once—and reuse without selecting again. Copy (Advanced) opens a new window with added options, including style formats. You can also annotate and/or save the text to a Folder; search with the selected text; or highlight important passages. Choose your highlight color, which can be changed or kept the same for subsequent highlighted text. Then save the highlighted/annotated document to a Folder.
A
B
E
F
H
G
D
L
C
K
I
J
*Lex Machina is not available to patron access customers.
12
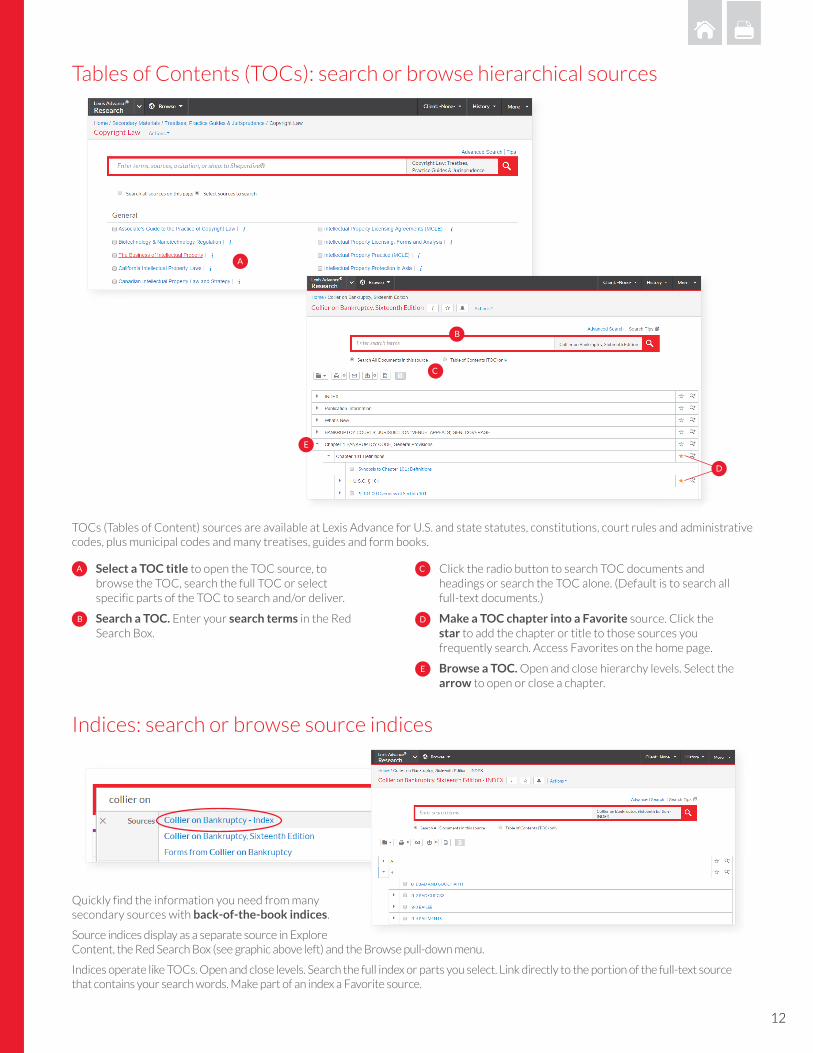
TOCs (Tables of Content) sources are available at Lexis Advance for U.S. and state statutes, constitutions, court rules and administrative codes, plus municipal codes and many treatises, guides and form books.
Select a TOC title to open the TOC source, to browse the TOC, search the full TOC or select specific parts of the TOC to search and/or deliver.
Search a TOC. Enter your search terms in the Red Search Box.
A
B
Click the radio button to search TOC documents and headings or search the TOC alone. (Default is to search all full-text documents.)
Make a TOC chapter into a Favorite source. Click the star to add the chapter or title to those sources you frequently search. Access Favorites on the home page.
Browse a TOC. Open and close hierarchy levels. Select the arrow to open or close a chapter.
C
D
E
Tables of Contents (TOCs): search or browse hierarchical sources
Indices: search or browse source indices
C
B
E
D
A
Quickly find the information you need from many secondary sources with back-of-the-book indices.
Source indices display as a separate source in Explore Content, the Red Search Box (see graphic above left) and the Browse pull-down menu.
Indices operate like TOCs. Open and close levels. Search the full index or parts you select. Link directly to the portion of the full-text source that contains your search words. Make part of an index a Favorite source.
13
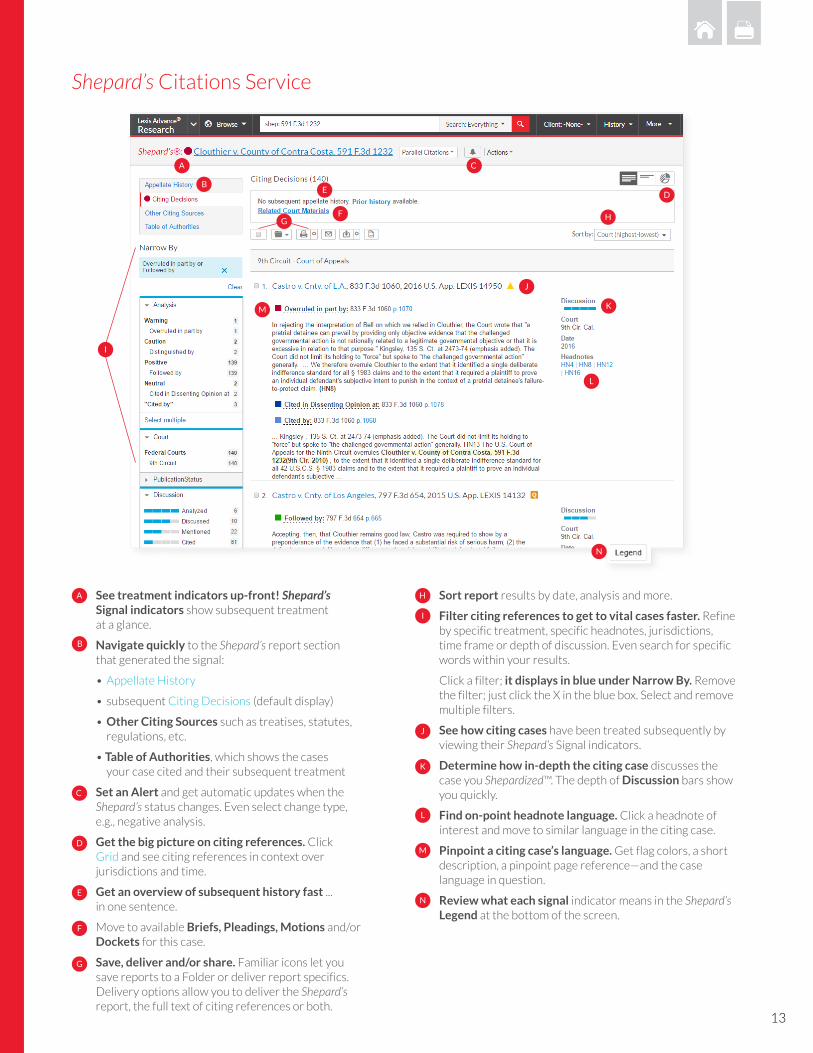
Shepard’s Citations Service
See treatment indicators up-front! Shepard’s Signal indicators show subsequent treatment at a glance.
Navigate quickly to the Shepard’s report section that generated the signal:
• Appellate History
• subsequent Citing Decisions (default display)
• Other Citing Sources such as treatises, statutes, regulations, etc.
• Table of Authorities, which shows the cases your case cited and their subsequent treatment
Set an Alert and get automatic updates when the Shepard’s status changes. Even select change type, e.g., negative analysis.
Get the big picture on citing references. Click Grid and see citing references in context over jurisdictions and time.
Get an overview of subsequent history fast ... in one sentence.
Move to available Briefs, Pleadings, Motions and/or Dockets for this case.
Save, deliver and/or share. Familiar icons let you save reports to a Folder or deliver report specifics. Delivery options allow you to deliver the Shepard’s report, the full text of citing references or both.
A
B
Sort report results by date, analysis and more.
Filter citing references to get to vital cases faster. Refine by specific treatment, specific headnotes, jurisdictions, time frame or depth of discussion. Even search for specific words within your results.
Click a filter; it displays in blue under Narrow By. Remove the filter; just click the X in the blue box. Select and remove multiple filters.
See how citing cases have been treated subsequently by viewing their Shepard’s Signal indicators.
Determine how in-depth the citing case discusses the case you Shepardized™. The depth of Discussion bars show you quickly.
Find on-point headnote language. Click a headnote of interest and move to similar language in the citing case.
Pinpoint a citing case’s language. Get flag colors, a short description, a pinpoint page reference—and the case language in question.
Review what each signal indicator means in the Shepard’s Legend at the bottom of the screen.
A
B
C
DE
J
H
I
G
K
M
N
L
C
D
E
F
HF
I
J
K
L
M
N
G
14
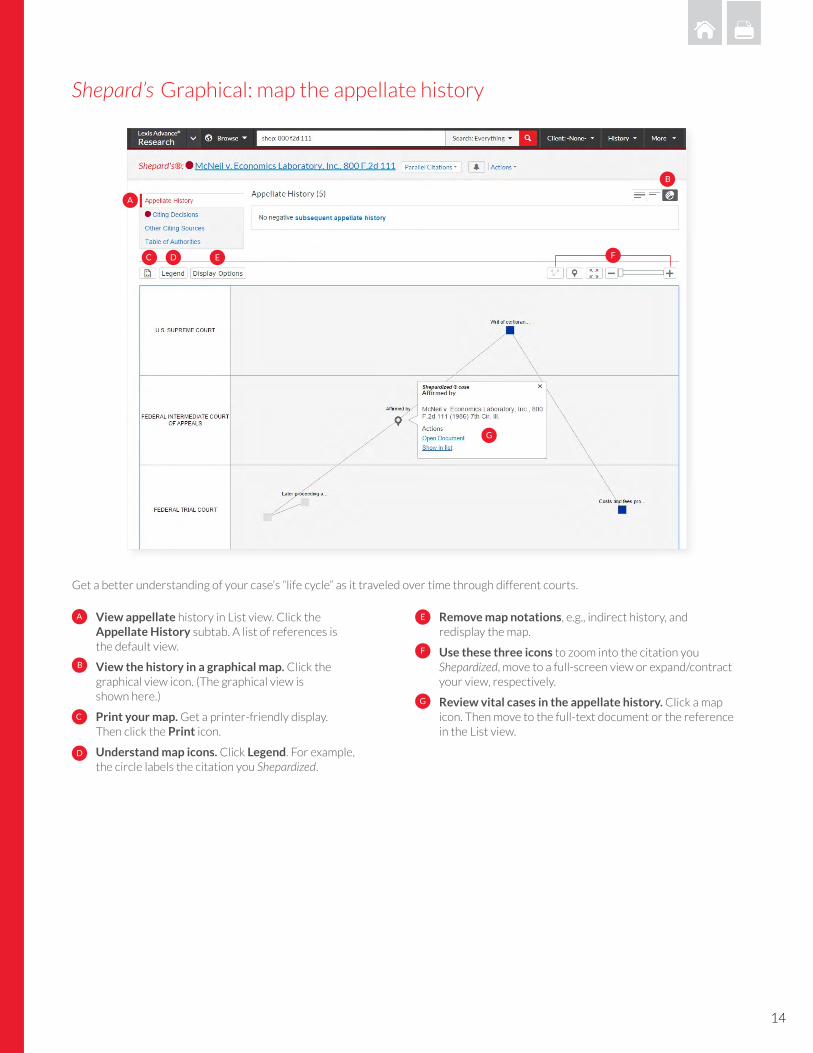
Shepard’s Graphical: map the appellate history
Get a better understanding of your case’s “life cycle” as it traveled over time through different courts.
View appellate history in List view. Click the Appellate History subtab. A list of references is the default view.
View the history in a graphical map. Click the graphical view icon. (The graphical view is shown here.)
Print your map. Get a printer-friendly display. Then click the Print icon.
Understand map icons. Click Legend. For example, the circle labels the citation you Shepardized.
A
B
Remove map notations, e.g., indirect history, and redisplay the map.
Use these three icons to zoom into the citation you Shepardized, move to a full-screen view or expand/contract your view, respectively.
Review vital cases in the appellate history. Click a map icon. Then move to the full-text document or the reference in the List view.
A
C D E F
G
G
C
D
E
F
B
15
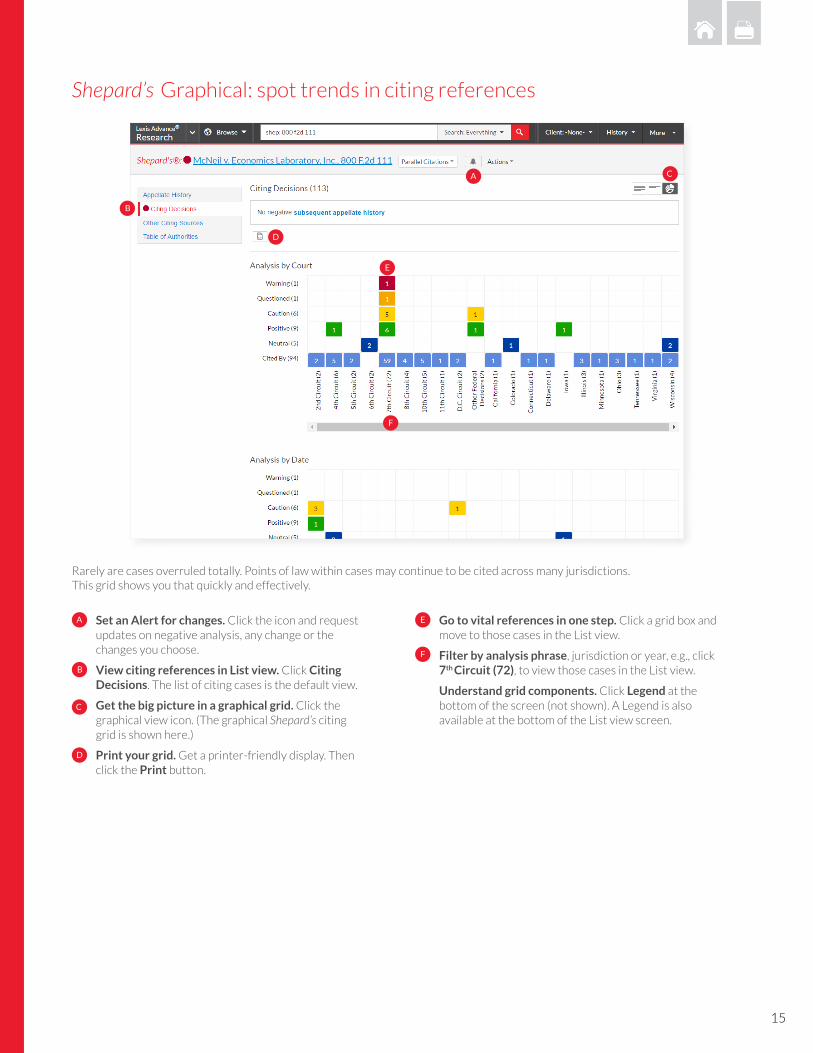
Shepard’s Graphical: spot trends in citing references
Rarely are cases overruled totally. Points of law within cases may continue to be cited across many jurisdictions. This grid shows you that quickly and effectively.
Set an Alert for changes. Click the icon and request updates on negative analysis, any change or the changes you choose.
View citing references in List view. Click Citing Decisions. The list of citing cases is the default view.
Get the big picture in a graphical grid. Click the graphical view icon. (The graphical Shepard’s citing grid is shown here.)
Print your grid. Get a printer-friendly display. Then click the Print button.
A
B
Go to vital references in one step. Click a grid box and move to those cases in the List view.
Filter by analysis phrase, jurisdiction or year, e.g., click 7th Circuit (72), to view those cases in the List view.
Understand grid components. Click Legend at the bottom of the screen (not shown). A Legend is also available at the bottom of the List view screen.
A
B
D
E
F
C
D
E
F
C
16
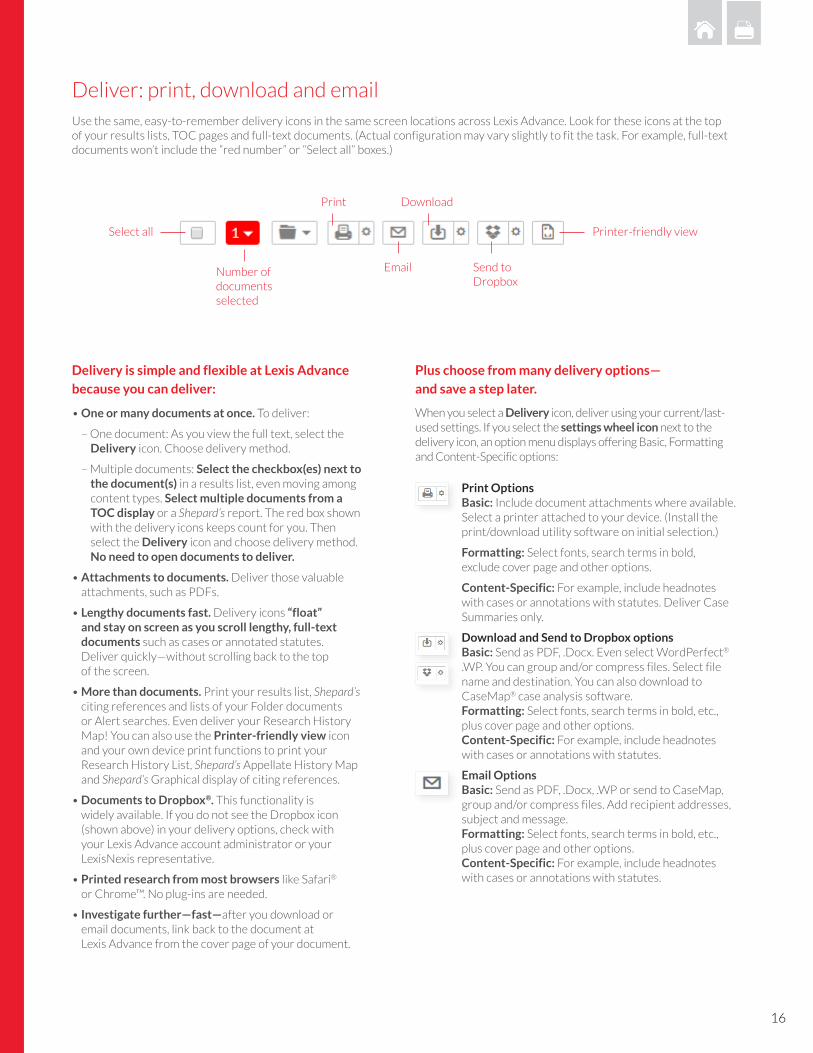
Deliver: print, download and email Use the same, easy-to-remember delivery icons in the same screen locations across Lexis Advance. Look for these icons at the top of your results lists, TOC pages and full-text documents. (Actual configuration may vary slightly to fit the task. For example, full-text documents won’t include the “red number” or “Select all” boxes.)
Delivery is simple and flexible at Lexis Advance
because you can deliver:
• One or many documents at once. To deliver:
– One document: As you view the full text, select the Delivery icon. Choose delivery method.
– Multiple documents: Select the checkbox(es) next to the document(s) in a results list, even moving among content types. Select multiple documents from a TOC display or a Shepard’s report. The red box shown with the delivery icons keeps count for you. Then select the Delivery icon and choose delivery method. No need to open documents to deliver.
• Attachments to documents. Deliver those valuable attachments, such as PDFs.
• Lengthy documents fast. Delivery icons “float” and stay on screen as you scroll lengthy, full-text documents such as cases or annotated statutes. Deliver quickly—without scrolling back to the top of the screen.
• More than documents. Print your results list, Shepard’s citing references and lists of your Folder documents or Alert searches. Even deliver your Research History Map! You can also use the Printer-friendly view icon and your own device print functions to print your Research History List, Shepard’s Appellate History Map and Shepard’s Graphical display of citing references.
• Documents to Dropbox®. This functionality is widely available. If you do not see the Dropbox icon (shown above) in your delivery options, check with your Lexis Advance account administrator or your LexisNexis representative.
• Printed research from most browsers like Safari® or Chrome™. No plug-ins are needed.
• Investigate further—fast—after you download or email documents, link back to the document at Lexis Advance from the cover page of your document.
Plus choose from many delivery options—
and save a step later.
When you select a Delivery icon, deliver using your current/last-used settings. If you select the settings wheel icon next to the delivery icon, an option menu displays offering Basic, Formatting and Content-Specific options:
Print Options Basic: Include document attachments where available. Select a printer attached to your device. (Install the print/download utility software on initial selection.)
Formatting: Select fonts, search terms in bold, exclude cover page and other options.
Content-Specific: For example, include headnotes with cases or annotations with statutes. Deliver Case Summaries only.
Download and Send to Dropbox options Basic: Send as PDF, .Docx. Even select WordPerfect® .WP. You can group and/or compress files. Select file name and destination. You can also download to CaseMap® case analysis software. Formatting: Select fonts, search terms in bold, etc., plus cover page and other options. Content-Specific: For example, include headnotes with cases or annotations with statutes.
Email Options Basic: Send as PDF, .Docx, .WP or send to CaseMap, group and/or compress files. Add recipient addresses, subject and message. Formatting: Select fonts, search terms in bold, etc., plus cover page and other options. Content-Specific: For example, include headnotes with cases or annotations with statutes.
Printer-friendly view
Email Send toDropbox
Download
Number ofdocumentsselected
Select all
17
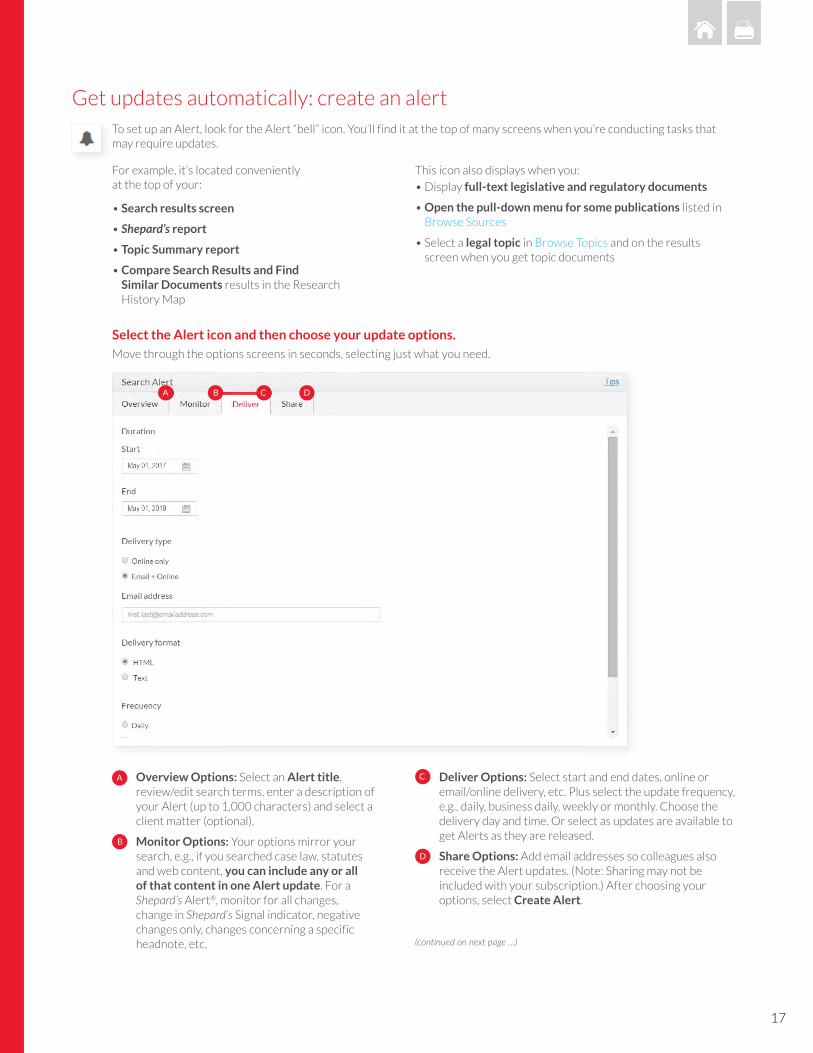
Get updates automatically: create an alert
To set up an Alert, look for the Alert “bell” icon. You’ll find it at the top of many screens when you’re conducting tasks that may require updates.
Select the Alert icon and then choose your update options.
Move through the options screens in seconds, selecting just what you need.
For example, it’s located conveniently at the top of your:
This icon also displays when you:
• Search results screen
• Shepard’s report
• Topic Summary report
• Compare Search Results and Find Similar Documents results in the Research History Map
• Display full-text legislative and regulatory documents
• Open the pull-down menu for some publications listed in Browse Sources
• Select a legal topic in Browse Topics and on the results screen when you get topic documents
A B C D
Overview Options: Select an Alert title, review/edit search terms, enter a description of your Alert (up to 1,000 characters) and select a client matter (optional).
Monitor Options: Your options mirror your search, e.g., if you searched case law, statutes and web content, you can include any or all of that content in one Alert update. For a Shepard’s Alert®, monitor for all changes, change in Shepard’s Signal indicator, negative changes only, changes concerning a specific headnote, etc.
A
B
C
D
Deliver Options: Select start and end dates, online or email/online delivery, etc. Plus select the update frequency, e.g., daily, business daily, weekly or monthly. Choose the delivery day and time. Or select as updates are available to get Alerts as they are released.
Share Options: Add email addresses so colleagues also receive the Alert updates. (Note: Sharing may not be included with your subscription.) After choosing your options, select Create Alert.
(continued on next page …)
18
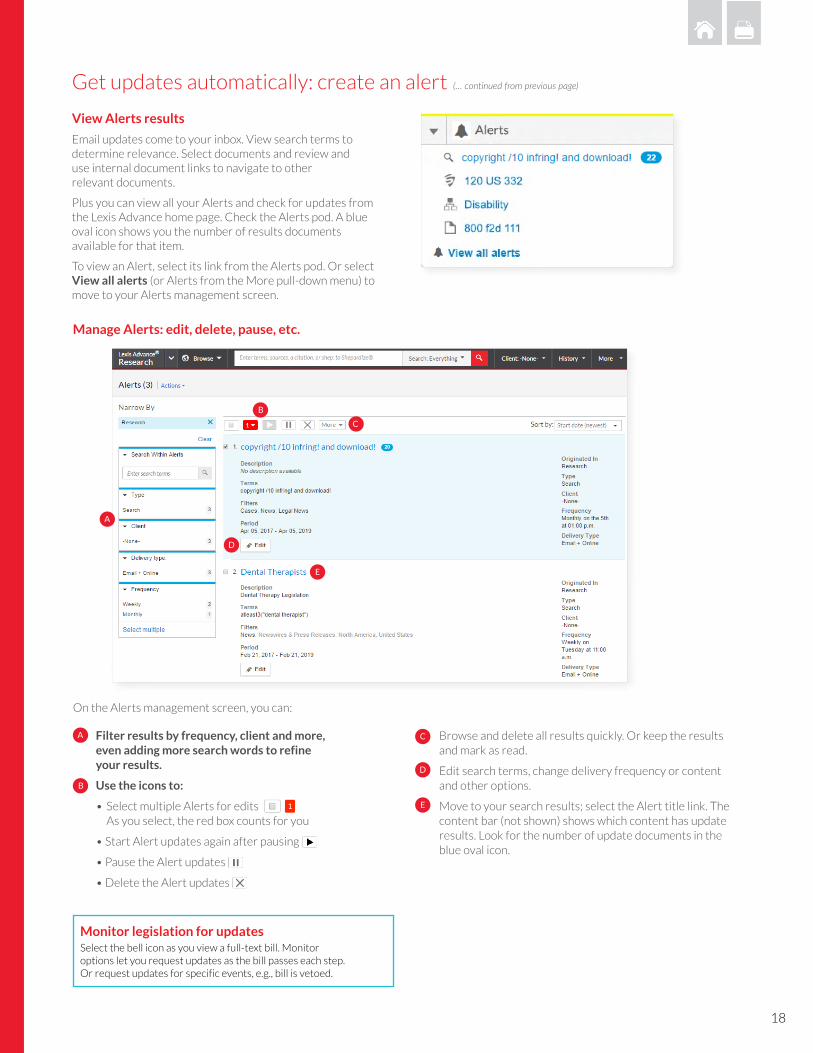
View Alerts results
Email updates come to your inbox. View search terms to determine relevance. Select documents and review and use internal document links to navigate to other relevant documents.
Plus you can view all your Alerts and check for updates from the Lexis Advance home page. Check the Alerts pod. A blue oval icon shows you the number of results documents available for that item.
To view an Alert, select its link from the Alerts pod. Or select View all alerts (or Alerts from the More pull-down menu) to move to your Alerts management screen.
Manage Alerts: edit, delete, pause, etc.
A
B
C
D
E
A
B
Browse and delete all results quickly. Or keep the results and mark as read.
Edit search terms, change delivery frequency or content and other options.
Move to your search results; select the Alert title link. The content bar (not shown) shows which content has update results. Look for the number of update documents in the blue oval icon.
E
D
CFilter results by frequency, client and more, even adding more search words to refine your results.
Use the icons to:
• Select multiple Alerts for edits As you select, the red box counts for you
• Start Alert updates again after pausing
• Pause the Alert updates
• Delete the Alert updates
Monitor legislation for updatesSelect the bell icon as you view a full-text bill. Monitoroptions let you request updates as the bill passes each step.Or request updates for specific events, e.g., bill is vetoed.
On the Alerts management screen, you can:
(… continued from previous page)Get updates automatically: create an alert
19
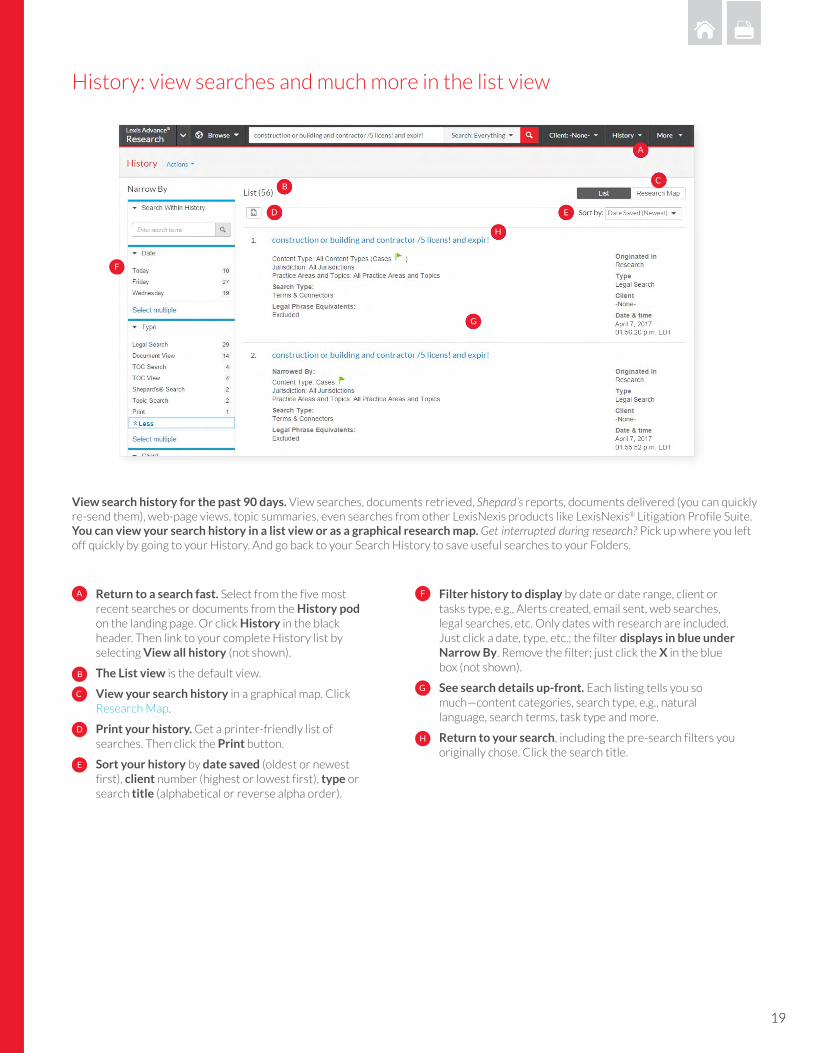
History: view searches and much more in the list view
View search history for the past 90 days. View searches, documents retrieved, Shepard’s reports, documents delivered (you can quickly re-send them), web-page views, topic summaries, even searches from other LexisNexis products like LexisNexis® Litigation Profile Suite. You can view your search history in a list view or as a graphical research map. Get interrupted during research? Pick up where you left off quickly by going to your History. And go back to your Search History to save useful searches to your Folders.
Return to a search fast. Select from the five most recent searches or documents from the History pod on the landing page. Or click History in the black header. Then link to your complete History list by selecting View all history (not shown).
The List view is the default view.
View your search history in a graphical map. Click Research Map.
Print your history. Get a printer-friendly list of searches. Then click the Print button.
Sort your history by date saved (oldest or newest first), client number (highest or lowest first), type or search title (alphabetical or reverse alpha order).
A
B
Filter history to display by date or date range, client or tasks type, e.g., Alerts created, email sent, web searches, legal searches, etc. Only dates with research are included. Just click a date, type, etc.; the filter displays in blue under Narrow By. Remove the filter; just click the X in the blue box (not shown).
See search details up-front. Each listing tells you so much—content categories, search type, e.g., natural language, search terms, task type and more.
Return to your search, including the pre-search filters you originally chose. Click the search title.
A
BC
D E
F
H
G
G
H
F
C
D
E
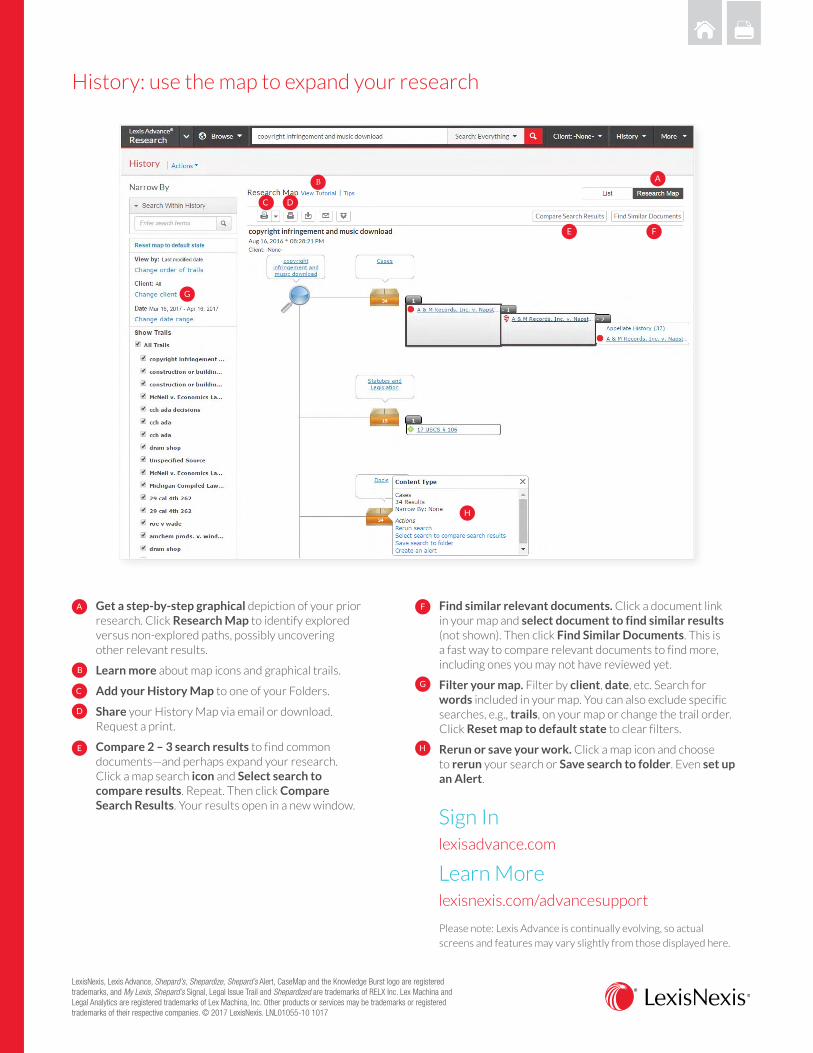
History: use the map to expand your research
AB
Get a step-by-step graphical depiction of your prior research. Click Research Map to identify explored versus non-explored paths, possibly uncovering other relevant results.
Learn more about map icons and graphical trails.
Add your History Map to one of your Folders.
Share your History Map via email or download. Request a print.
Compare 2 – 3 search results to find common documents—and perhaps expand your research. Click a map search icon and Select search to compare results. Repeat. Then click Compare Search Results. Your results open in a new window.
A
B
Find similar relevant documents. Click a document link in your map and select document to find similar results (not shown). Then click Find Similar Documents. This is a fast way to compare relevant documents to find more, including ones you may not have reviewed yet.
Filter your map. Filter by client, date, etc. Search for words included in your map. You can also exclude specific searches, e.g., trails, on your map or change the trail order. Click Reset map to default state to clear filters.
Rerun or save your work. Click a map icon and choose to rerun your search or Save search to folder. Even set up an Alert.
H
GC
D
E
F
E
Please note: Lexis Advance is continually evolving, so actual
screens and features may vary slightly from those displayed here.
Sign Inlexisadvance.com
Learn Morelexisnexis.com/advancesupport
LexisNexis, Lexis Advance, Shepard’s, Shepardize, Shepard’s Alert, CaseMap and the Knowledge Burst logo are registered trademarks, and My Lexis, Shepard’s Signal, Legal Issue Trail and Shepardized are trademarks of RELX Inc. Lex Machina and Legal Analytics are registered trademarks of Lex Machina, Inc. Other products or services may be trademarks or registered trademarks of their respective companies. © 2017 LexisNexis. LNL01055-10 1017
F
G
H
DC