LEVEL III RECORDS STAFF TRAINING MANUAL
21
Page 1 of 21 LEVEL III RECORDS STAFF TRAINING MANUAL
Transcript of LEVEL III RECORDS STAFF TRAINING MANUAL

Page 1 of 21
LEVEL III RECORDS
STAFF TRAINING MANUAL
Page 2 of 21
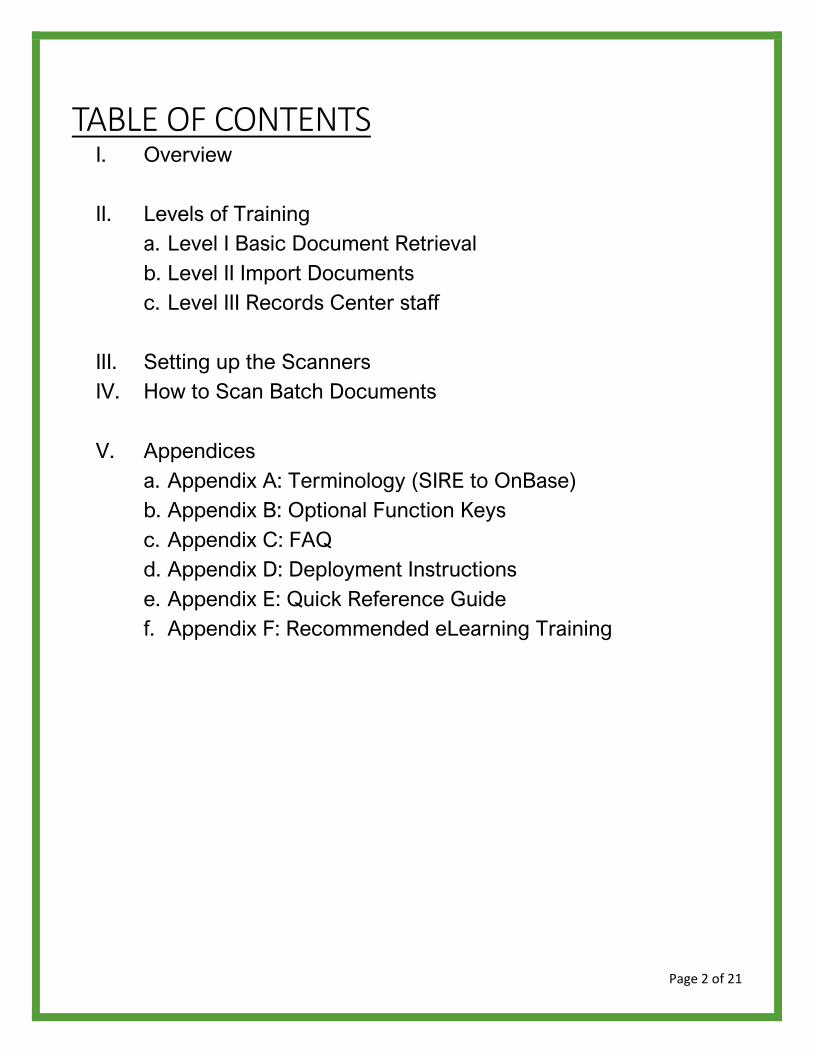
TABLE OF CONTENTS I. Overview
II. Levels of Training
a. Level I Basic Document Retrieval b. Level II Import Documents c. Level III Records Center staff
III. Setting up the Scanners IV. How to Scan Batch Documents
V. Appendices a. Appendix A: Terminology (SIRE to OnBase) b. Appendix B: Optional Function Keys c. Appendix C: FAQ d. Appendix D: Deployment Instructions e. Appendix E: Quick Reference Guide f. Appendix F: Recommended eLearning Training

Page 3 of 21
I. OVERVIEW
What is OnBase? The SIRE application, which is our current electronic document management system used to manage approved plans and documents, was purchased by Hyland in 2012. Over time, Hyland made the decision to create an upgrade path to their more feature rich product called OnBase.
Here are what users can expect with OnBase:
▪ New Interface and Layout
▪ New Search Functions
▪ Customizable Queries
▪ Ability to View, Add and Delete Notes
▪ Alternative Ways to Navigate Documents
▪ Training and Materials
OnBase is a single stabilized platform that will aid in productivity for our users. There are several features included with OnBase that will not immediately be available. We will be rolling out additional features as we learn and grow with OnBase.
This manual covers the "basics" of OnBase including document retrieval, navigation and important things to know when working within OnBase. All users will have Level 1 access in OnBase. Depending upon roles and skills needed, applicable staff will then progress to Level II. Only Records Center Staff will be trained to Level III.

Page 4 of 21
II. LEVELS OF TRAINING
Level I Basic Document Retrieval
The Basic Document Retrieval training is focused the learning the foundation of OnBase, basic features, document retrieval, and entry level options.
Our level I users may include:
a. PDD staff b. Water division staff c. Streets division staff d. Public Works division staff e. Fire division staff f. CED division staff g. Human Resources division staff h. Maricopa County staff
Level II Import Documents
Import Documents training will explain how to import documents in OnBase. This may be an import from a printer, scanner or any personal computer device.
Level III Records Center Staff
Records Center staff training will encompass the structure and foundation for how our records and documents are managed within OnBase for the City of Phoenix.

Page 5 of 21
III. SETTING UP THE SCANNERS A. Notify the System Administrator that a new scanner needs to be set up. B. Scanner setup on Unity Client:
C. Create a New Scan Format by Clicking on the Wheel.
D. For Angela I created ‘Records Scanner1’. Source Type is ‘Twain’
E. Press OK.

Page 6 of 21
F. If you get next screen, for Document Type, don’t change anything. Just press OK.
G. Press Ok on below screen.
H. You should see this in your scanner selection at the top.
I. Now try scanning a document by pressing scan on the top left corner.

Page 7 of 21
J. Batch Name in below screen will be today’s date and the scanner login ID.
K. Press Scan and your scan should be successful.

Page 8 of 21
IV. HOW TO BATCH SCAN DOCUMENTS
Importing & scanning documents into OnBase is quite simple!
1. Login to OnBase. 2. There are new icons from the "Home" menu bar.
3. Trash Can - Allows you to view what has been deleted. This will allow you
to restore a deleted document if needed.
4. Batch Scanning - Scan a batch of papers. Separate documents using the barcode sheets.
5. Select Batch Scanning icon. The following screen appears: Select the scan queue where the documents are to be scanned to.
The example above is Permit Plan Spec.
Page 9 of 21
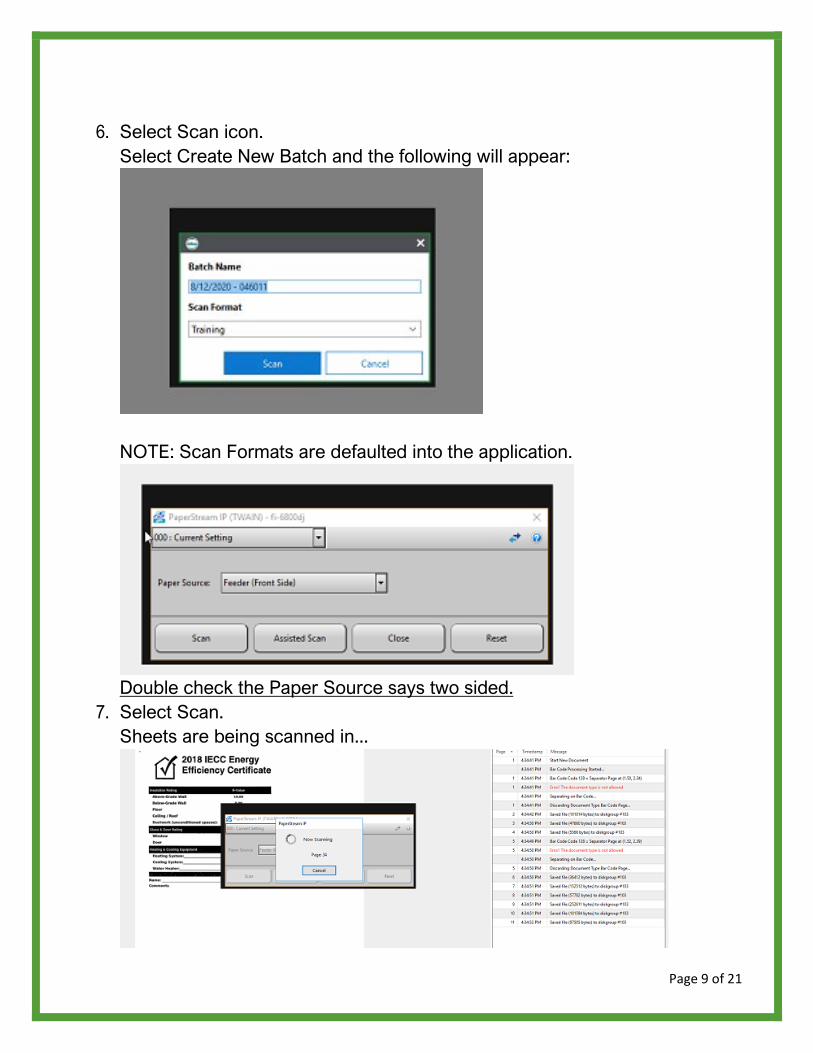
6. Select Scan icon.
Select Create New Batch and the following will appear:
NOTE: Scan Formats are defaulted into the application.
Double check the Paper Source says two sided.
7. Select Scan. Sheets are being scanned in...

Page 10 of 21
There will be an error page prior to seeing the "separation page" as the documents are being scanned.
When scanning is complete the following pop up completion box appears:
8. Select done.
Batches are all under 500 pages. (max for scanners) Once its scanned, select done. On the right are scanned pages.

Page 11 of 21
9. Select go to batch icon at the top. 10. Locate your batch on the right and highlight.
11. Select "Start Processing".
A new tab opens - "batch indexing tab".
There are 5 documents to index. Bottom left. (The previous scan of documents had 4 bar code separations which made 5 total documents.)
12. Now add keywords. - Enter the permit number, Then tab/ Enter. If there are multiple permit numbers an additional box pops to select the correct permit type.

Page 12 of 21
Highlight the one you need then enter. The remaining keywords enter automatically:
Select Index or Alt I or Alt X. There are banner scan sheets in between each batch.
13. After reviewing the pages for clarity of the document. 14. Select Index and the next pending folder appears with its pages and repeat
that process. When done with the last folder. The following appears:
15. Select Save and Transition: New Tab, Batch Processing.
Page 13 of 21
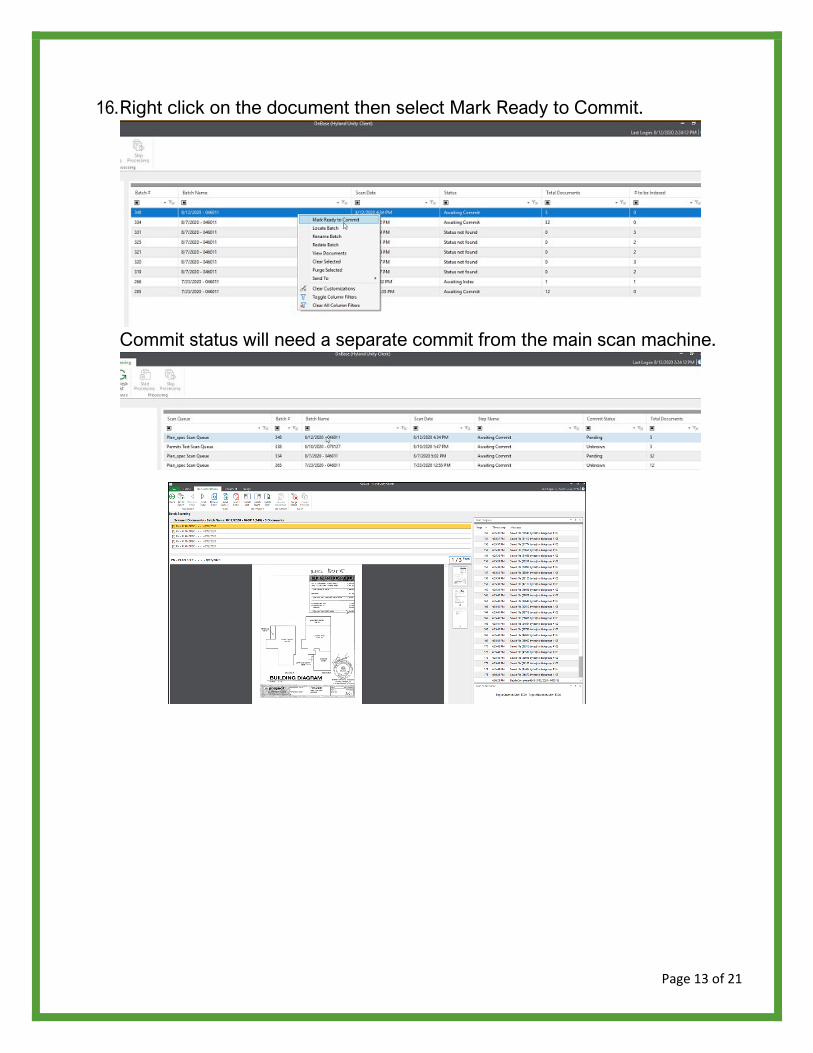
16. Right click on the document then select Mark Ready to Commit.
Commit status will need a separate commit from the main scan machine.
Page 14 of 21
APPENDICES
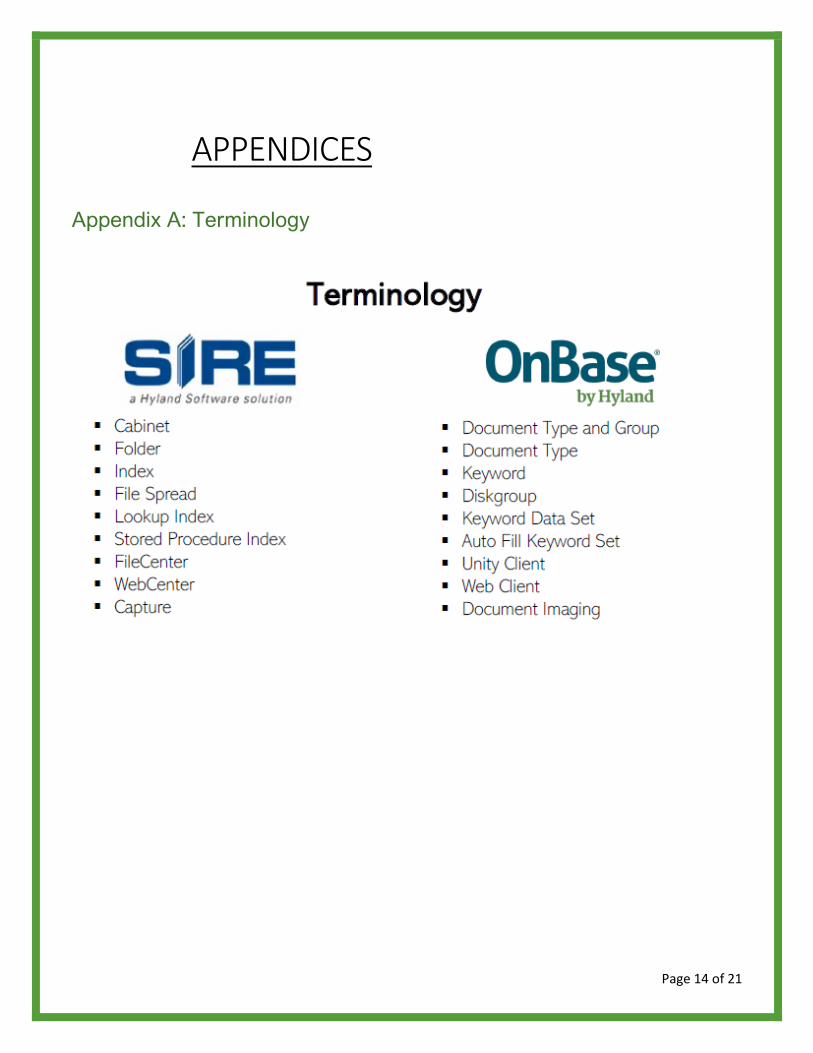
Appendix A: Terminology

Page 15 of 21
Appendix B: Optional Function Keys
Document Viewer Ctrl + H Opens the Document History dialog box. Ctrl + P Opens the Print pane. Ctrl + K Opens the Add/Modify Keywords pane. Ctrl + W Opens the Cross-References pan e. Ctrl + U Toggles the thumbnail display. Ctrl + 0 Toggles text overlay when working with
image documents. Ctrl + Mouse Wheel Up or Ctrl and+
Zooms in on the document. Note: Ctrl + is not usable when working within a text document. Use the Ctrl Mouse Wheel Up shortcut to zoom in on text documents.
Ctrl + Mouse Wheel Down or Ctrl and-
Zooms out on the document. Note: Ctrl - is not usable when working within a text document. Use the Ctrl Mouse Wheel Down shortcut to zoom out on tex documents.
Mouse Wheel Up/ Page Up/ Up Arrow
Navigates up through pages in a multi- page document.
Mouse Wheel Down/ Page Down/ Down Arrow
Navigates down through pages in a multi-page document.
Ctrl + Page Up or F11
Displays the previous page in a multi- page document.
Ctrl + Page Down or F12
Displays the next page in a multi-page document.
Ctrl + Home Displays the first page in a multi-page document.
Ctrl + End Displays the last page in a multi-page document.
Ctrl + Shift + Page Up
Displays the previous document in the Document Search Results list.
Ctrl + Shift + Page Down
Displays the next document in the Document Search Results list.
Ctrl + G Opens the Go to Page dialog box. Ctrl + Right Arrow
Rotates the currently selected pages 90 degrees clockwise.
Ctrl + Left Arrow Rotates the currently selected pages 90 degrees counterclockwise .
Global Alt When on the Home tab, shows shortcut
keys for the ribbon tabs and File m menu. Note: The functionality of shortcuts using Alt may vary depending upon the active window, tab, or pane.
F1 Accesses the help files . Alt+Space Opens the system menu for minimizing,
maximizing, and restoring the program. Alt+ F4 Closes the program.
Main Window Ctrl + M Opens the Home layout. Ctrl + Q Opens the Custom Queries layout. Ctrl + R Opens the Document Retrieval layout. Ctrl + E Opens the Forms layout. Ctrl + N Opens the current layout in a new
window. FS Opens the Import layout.
Document Viewer Ctrl + Down Arrow
Rotates the currently selected pages 180 degrees.

Page 16 of 21
Appendix C: FAQ
Frequently Asked Questions
What is OnBase?
OnBase is a records management system that contains the Planning and Development's plans and documents.
How do I login into OnBase?
OnBase uses your normal City username and password to login.
What if I don't have access to files/ documents that I need?
Complete a helpdesk Remedy ticket for additional access requests.
How do I import/ scan documents into OnBase?
The Records Center staff and a few other Planning & Development teams have this function. If you don't have access to import documents to OnBase, please contact the Records Center staff.
Can I delete files?
The Records Center staff are the only users authorized to delete files.
Can I send files to the public?
The only team authorized to send Public Record Request information to the public is the Records Center. Please direct any requests to the Records Center staff.
NOTE: Contact Records Centers staff at 602-262-7800 or [email protected] and they will assist you.
Page 17 of 21
Frequently Asked Questions (continued)
Do we have to click "logout" in OnBase like we did in SIRE?
No, When opening OnBase from KIVA you no longer have to "logout" in the new application - OnBase.
Are there additional cabinets in OnBase?
No, there are no additional Document Type Groups (OnBase language). OnBase is organized just like SIRE with the same names.
Can you open documents in a new window?
Yes, it's quite easy - just double click the document.
Will OnBase increase the time it takes to get documents imported to the application for users to view?
While the application is very user friendly, it takes staff to import the documents.
Additional Questions?
Contact Records Centers staff at 602-262-7800 or [email protected] and they will assist you.

Page 18 of 21
Appendix D: Deployment Instructions
SIRE to ONBASE Deployment Instructions
The OnBase application should be installed on your Desktop Computer. If you do not see the OnBase icon on your desktop, follow the instructions below.
Every current user of SIRE will receive an available application "HYLAND UNITY CLIENT" in their software center. Hyland Unity Client is "OnBase". (See Below) (A) Look for the Hyland Unity Client listed in your Applications of Software Center.
(B) Check the status of this application if the status does not say "installed", please try to install by double clicking the application.
(C) When prompted click "Yes". This should install the client on your desktop and may take up to 30 minutes. Once this is installed the application will open at the login page with the ONE domain and the username will be prepopulated. The user will need to type in their active directory (AD) password [this is your daily workstation password that you sign in with every day to access the City of Phoenix network].
(D) See below for login screenshots of OnBase:

Page 19 of 21
Appendix E: Quick Reference Guide
Group. Select a Document Type.
Note: The information contained in the panel may dynamically
you selected. If desired, you can specify a date range to only return documents that were created or imported between a certain range of dates. A list of keyword fields displays below the date range.
Enter values for the keywords that are displayed. You can enter as much or as little information you know. Note: Some searches require you to enter at least one keyword value. Search requirements are determined by your system administrator.
When you have entered all search criteria, click the Find button at the bottom of the panel.
You can retrieve documents in the Unity Client based on the document's keyword values, the text contained within the document, or the note information contained on a document. The following example is for keyword values.
1. In the Documents ribbon group on the Home tab, click
Retrieval.
Document Retrieval
6. Double-click a document from the list to open it.
The Search Results are displayed in a list on the right side of the screen.
Send to Mail Recipient Selecting one of the two Mail Recipient options will allow you to send the selected or open item to a user outside of OnBase . Note: A functional, supported email client is required to send OnBase items externally.
the document(s) to a new message dialog in your configured external email client.
Selecting Send to Mail Recipient (as Link) opens a blank email message containing a link to the item(s) or XML file that references the content in OnBase,
Internal mail messages can be sent by clicking on the "mailbox" icon including attachments as well as external mail messages. must be OnBase users.
Selected Users are the users sharing the envelope with you.
allowed to view the envelope contents. Adjust user permissions as needed.
Select an envelope to view its contents. If you would like to share an envelope with other users, select the desired envelope and click Share Envelope.
Envelopes are collections of documents that you can compile and share with other OnBase users. Any document can be put into an envelope, regardless of content or Document Type.
Envelopes
Page 20 of 21
QUICK REFERENCE GUIDE (continued)
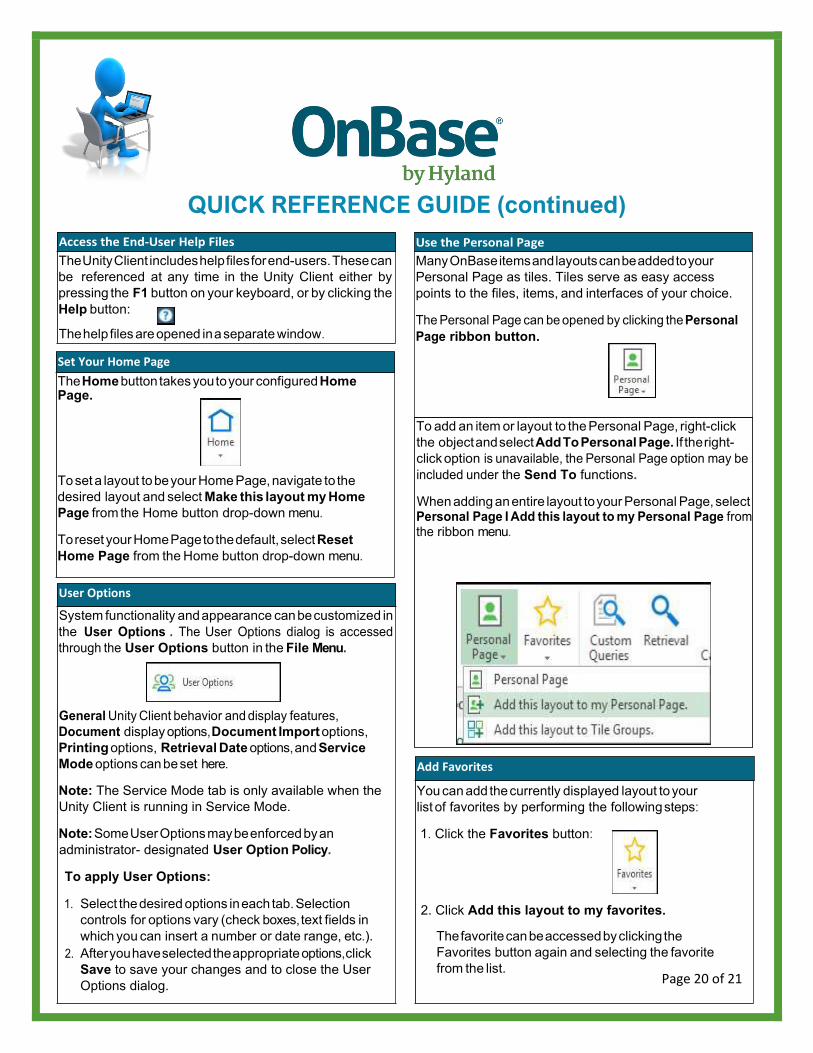
The help files are opened in a separate window.
The Unity Client includes help files for end-users. These can be referenced at any time in the Unity Client either by pressing the F1 button on your keyboard, or by clicking the Help button:
To set a layout to be your Home Page, navigate to the desired layout and select Make this layout my Home Page from the Home button drop-down menu.
To reset your Home Page to the default, select Reset Home Page from the Home button drop-down menu.
The Home button takes you to your configured Home Page.
Set Your Home Page
2. Click Add this layout to my favorites.
The favorite can be accessed by clicking the Favorites button again and selecting the favorite from the list.
You can add the currently displayed layout to your list of favorites by performing the following steps:
1. Click the Favorites button:
Add Favorites
Many OnBase items and layouts can be added to your Personal Page as tiles. Tiles serve as easy access points to the files, items, and interfaces of your choice.
ribbon button.
To add an item or layout to the Personal Page, right-click the object and select Add To Personal Page. If the right-click option
the Send To functions.
When adding an entire layout to your Personal Page, select
ribbon menu.
display options, Document Import options, Printing options, Retrieval Date options, and Service Mode options can be set here.
Note: The Service Mode tab is only available when the Unity Client is running in Service Mode.
Note: Some User Options may be enforced by an administrator- designated User Option Policy.
To apply User Options:
Select the desired options in each tab. Selection controls for options vary (check boxes, text fields in which you can insert a number or date range, etc.). After you have selected the appropriate options, click Save to save your changes and to close the User Options dialog.
System functionality and appearance can be customized in the
User Options button in the File Menu.
User Options

Page 21 of 21
Appendix F: Recommended eLearning Training
RECOMMENDED eLEARNING TRAINING Available July 27 through September 25, 2020
Click the following links to the correct eLearning Module
Level I
OnBase Essentials
Level II
OnBase Essentials
Intro to Document Imaging
Level III
OnBase Essentials
Intro to Document Imaging
Managing Daily Tasks in OnBase