Lessons - Genee Worldsupport.geneeworld.com/Guide/Lesson_Ideas.pdfin schools using a visualiser and...
37
A collection of lesson ideas including resource materials for use with a Genee Vision visualiser Created by John Sutton and John Nelson Education Consultants Lessons ® ®
Transcript of Lessons - Genee Worldsupport.geneeworld.com/Guide/Lesson_Ideas.pdfin schools using a visualiser and...

A collection of lesson ideas including resource materials for use with a Genee Vision visualiser
Created by John Sutton and John Nelson
Education Consultants
Lessons®
®
The following collection of lesson resource materials have been compiled by John Nelson and John Sutton. All lessons have been taught successfully in schools using a visualiser and are intended to give ideas as to how the visualiser can be used effectively as a tool to enhance teaching and learning.
Lesson content is aimed at KS1 and KS2 but many of the ideas and techniques shown could be altered to suit KS3 or KS4.
*All references to specific functionality of the visualiser are highlighted in red.
Index Rocks Page 3 Teeth Page 7 Flowering Plants Page 13 Minibeasts Page 17 Measuring Page 22 Sentence Construction Page 26 Feelings Page 31
Lessons®

Based on QCA Science Unit 3D – Rocks and Soils
WALT – Lesson Objective:To understand that rocks can be grouped by observable characteristics.
Expected outcomes:• The children will know a range of key vocabulary associated with identifying rocks• The children will have an understanding of how to identify a rock• The children will understand that rocks can be classified in different ways
Introduction Question to assess prior knowledge – do they know any terms i.e sedimentary, hard, soft, permeable, non permeable, rough, smooth?Place pictures of rocks under visualiser. Use zoom feature to examine the rocks closely. What can you see? What are the differences? What can we observe from the drawings? What can’t we assess from the drawings? Use the capture facility to take snapshots of examples to compare later.
Main part of lesson • Introduce lesson objective by capturing using title grab facility• Introduce some key vocabulary using post it notes and the visualiser. Place underneath the visualiser and play game where you remove one of the words use the freeze facility and ask which is missing• Now place a rock sample underneath the visualiser and use split screen function to examine in more detail, what can we see now?• Place several rock samples underneath visualiser and ask a child to categorise, group and explain why they categorised in the way they did. • Use Windows Movie Maker with the visualiser selected as an input device to record as assessment evidence
Activity Distribute worksheet and discuss by placing an example underneath the visualiser.
Plenary – 15 minutesInvite children to share their work using the visualiser.Play a game – match the description to the rock title using the visualiser.
Resources:Visualiser, a range of rock samples, pictures of rocks, post it note pad, prepared task sheet, Powerpoint slides, flipchart slides in SMART notebook.
Related websites:http://www.coppschool.lancsngfl.ac.uk/classwork_class3.htmhttp://www.bbc.co.uk/schools/scienceclips/ages/7_8/rocks_soils_fs.shtml
Lesson 1 - Rocks 1

Name_________________________________________
Objective- To understand that rocks can be grouped by observable characteristics
a) Fill in the blanks:There are many different types of r _ _ _ _.
Rocks like flint and marble are h _ _ _ and s _ _ _ _ .
Some rocks like chalk are s _ _ _ .
Some rocks are permeable which means they allow _ _ _ _ _ to soak through.
Some rocks are impermeable which means that they do _ _ _ allow _ _ _ _ _ to soak through.
Pebbles are sm _ _ _ smooth pieces of r _ _ _.
b) Add as many words as you can to the end of this sentence:
We can group and classify rocks by looking at - ………………………
………………………………………………………………………………………………………………
………………………………………………………………………………………………………………
………………………………………………………………………………………………………………
………………………………………………………………………………………………………………
………………………………………………………………………………………………………………
Resource Sheet 1 1

c) Draw pictures of 4 different rocks in the spaces below and write as many words as you can next to your drawing which would help describe the rock:
Rock 1 Rock 2
Description Description
Rock 3 Rock 4
Description Description
Resource Sheet 2 1

QuartzFlint
SlateMarble
GypsumGranite
Resource Sheet 3 1

Based on QCA Science Unit 3A – Teeth and Eating
WALT – Lesson Objective:To be able to identify three types of teeth and explain their function.
Expected outcomes:• The children will understand why we have teeth• The children will know a range of key vocabulary associated with teeth• The children will have an understanding of how to identify a tooth• The children will understand that different types of teeth have different functions
Introduction Question to assess prior knowledge – do they know any terms i.e canine, incisor, molar? Why do we have teeth? What is their purpose? Why do some animals have different types of teeth?
Main part of lesson 1) Place some examples of teeth underneath visualiser and examine closely using the zoom facility2) Place reference material underneath the visualiser so that it can be shared with the whole class. Enlarge and scroll so that everybody in the class can view it3) Introduce some key vocabulary using post its and visualiser. Place underneath & visualiser and play game where you freeze the image then remove one of the words and ask which is missing.4) Now place a tooth or picture of a tooth underneath the visualiser and use split screen function to examine in more detail. What can we see now?5) Place several teeth or pictures of teeth underneath visualiser and ask a child to categorise, group and explain why they categorised in the way they did. Use Windows Movie Maker to record as assessment evidence6) Use the capture facility to take a picture of a child’s mouth showing the teeth and if possible drop into the VWB area 7) Annotate to identify the type of tooth
Activity Distribute worksheet and discuss by placing an example underneath the visualiser.
Plenary Invite children to share their work using the visualiser.Play a game – match the description to the tooth to its function using the visualiser.
Resources:Visualiser, a range of teeth samples or pictures of teeth, post it note pad, prepared task sheet.
Related websites: www.kidshealth.org
Lesson 2 - Teeth 2

Name_______________________________________________
Learning objective- to be able to identify different types of teeth, state their function and draw a picture of them
a) Fill in the blanks:
Teeth help you to _ _ _, _ _ _ _ and _ _ _ _ _ your food before you swallow it.Humans are o _ ni _ _ _ _ _ so their teeth are designed to eat most types of food.We have _ _ _ sets of teeth during our lives. First we have about 20 _ _ _ _ teeth which are replaced by about 32 p _ _ _ _ _ _ _ t teeth.
Complete the following:b) The reason why we have different types of teeth is because:
………………………………………………………………………………………………………………………………
………………………………………………………………………………………………………………………………
………………………………………………………………………………………………………………………………
………………………………………………………………………………………………………………………………
Resource Sheet 1 2

Resource Sheet 2Task: Draw pictures of 3 different types of teeth& label them to show what the teeth are made of.
Below are examples of children’s work that were collected using the capture frame facility on the Genee Vision.
2

Resource Sheet 3
Visual Resources – What kind of teeth can you see?
2

Used for crushing & grinding
Molar
Used for stabbing & gripping food
Canines
Used for snipping & cutting food.
Incisors
Resource Sheet 4
Activity for use with plenary activity.
2

Snapshots of resource materials which were captured using the visualiser and inserted into SMART notebook
Resource Sheet 5
The camera was used to capture a picture of a pupil’s mouth and teeth. This was inserted into SMART notebook and labelled
This image of a text book was taken using the Genee Vision Visualiser, so the whole class could see the diagram
2

Based on QCA Science Unit 5B – life cycles
WALT – Lesson Objective:To be able to name the main parts of a flower and describe the function of a flower.
Expected outcomes:• The children will know a range of key vocabulary associated with the parts of a flower• The children will have an understanding of how to identify the parts of a flower• The children will understand the main function of the flower
Introduction Questions as to prior knowledge. What terms do the children mention? What do they understand about the function of a flower?(Use title grab to display lesson objective)Main part of lesson 1) Place a reference book underneath the visualiser and read about the parts of a plant using the scroll and freeze functions 2) Introduce some key vocabulary using post its and visualiser, place under neath the visualiser and play game where you press freeze then remove one of the words and ask which is missing 3) Now place a flower underneath the visualiser and use split screen function to examine in more detail. What can we see now? Use the B&W button to add and remove the colour to emphasise why flowers are brightly coloured 4) If a whiteboard is available take a snapshot of the flower and insert into VWB area and label up the parts of the flower
Activity Children to draw and name the parts of the flower using the flowers provided.While children are working use the camera to record in Movie Maker
Plenary Use split screen function to display and compare children’s work and real flower.Play a game – match the description to the function. Play back recording mode.Capture children’s work as evidence.
Resources: Flowers. Prepared resource sheets.
Lesson 3 - Flowering Plants 3

Resource Sheet 1
Name____________________________
Objective- To be able to name and describe the functions of the main parts of a flower.
a) Fill in the blanks:A p _ _ _ _ won’t live for ever. It has to make _ _ _ plants.This process is called r _ _ _ _ _ _ _ _ _ _ n.The job of making new plants is done by the _ _ _ _ _ _ s.The flowers contain the pollen and eggs which make s _ _ _ s.The seeds _ _ _ _ into new _ _ _ _ _ _ .
b) In your own words describe why you think flowers are
brightly coloured and smell nice …………………………………………………
…………………………………………………………………………………………………………
…………………………………………………………………………………………………………
…………………………………………………………………………………………………………
…………………………………………………………………………………………………………
………………………
c) What happens when flowers are not brightly colouredand do not smell?
............................................................................................................
............................................................................................................
3

Resource Sheet 2
d) In the space below draw a picture of a flower and label as many parts as you can:
Examples of childrens’ work
3
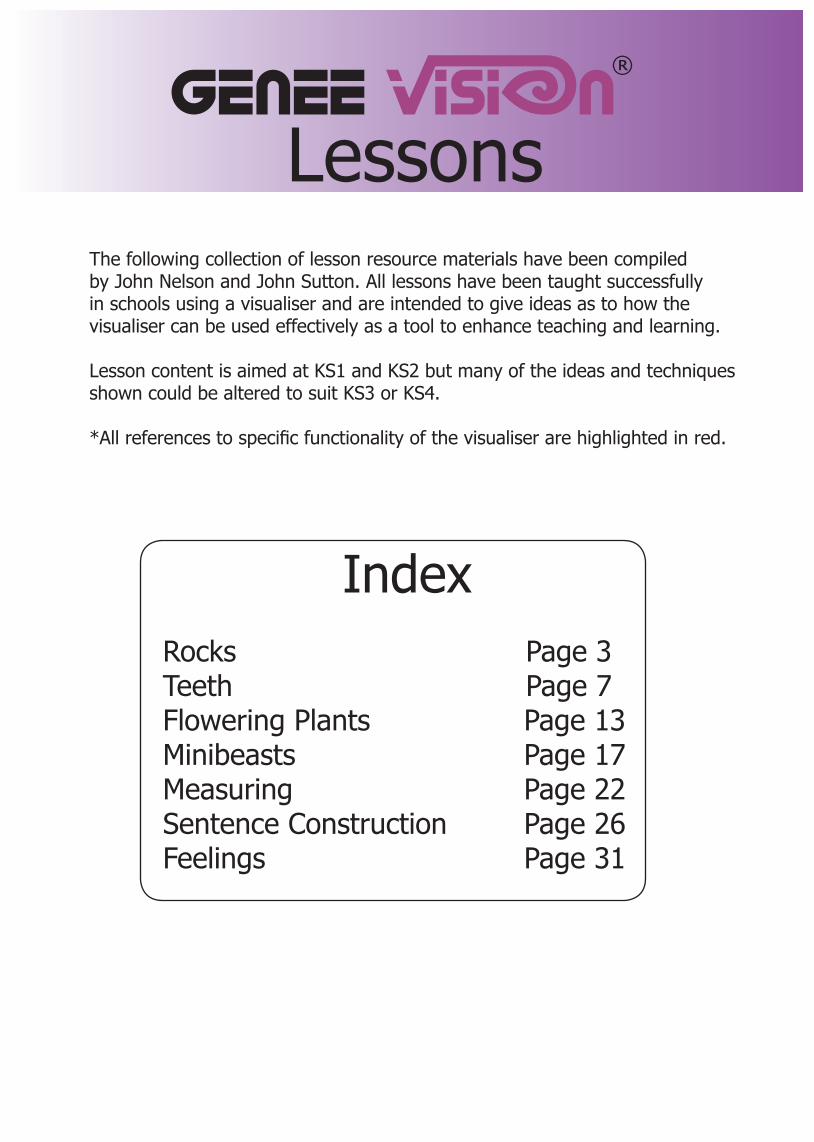
Resource Sheet 3 3Examples of snapshots taken using the Genee Vision Visualiser, during the lesson

Lesson 4 - Minibeasts 4Based on QCA Science Unit 2B – Plants and animals in the local environment
WALT – Lesson Objective:To be able to identify different types of minibeasts.
Expected outcomes:• The children will be able to recognise a range of different minibeasts• The children will know a range of key vocabulary associated with minibeasts• The children will have an understanding of how to identify a minibeasts.• The children will be able to sequence a simple life cycle.
Introduction Use title grab facility to display lesson objectiveQuestion to assess prior knowledge – do they know any terms i.e, wings thorax, abdomen what minibeasts have they heard of and where do they think they might find some.
Part 1 of lesson 1) Place reference material underneath the Visualiser showing a range of different pictures of minibeast so that it can be shared with the whole class. Enlarge and scroll so that everybody in the class can view it.
2) Play a game whereby the image is frozen and one title of a minibeasts is covered up. Can the children identify the minibeasts? Now cover the picture and the name. Can they say which picture has been covered up and spell the name?
3) Now place some minibeasts underneath the Visualiser, butterfly, spider and worm. Use the zoom facility to take a closer look and also split screen to freeze one half of image and zoom in on the other half. Also capture some images of the minibeasts using video cap and Movie Maker. If time and space allows could use the visualiser like a video camera and ask some children to demonstrate how a worm moves on the floor.• Complete the minibeasts parts activity.

Lesson 4 - Minibeasts 4Part 2 of lesson
To be able to identify and sequence the stages of a simple life cycle.
• Ask children what they understand about life cycles and display the pictures of the caterpillars• Complete the activity where the stages of the life cycle have to be put into the correct order• Explain that they are going to make a caterpillar and then we are going to use the visualiser to animate their model, (Show example that John Nelson has produced)
Activity Children to go away and make their caterpillar using card provided
Plenary Show examples of the work children have completed using the visualiser. Using an example that a child has completed use 2 Animate software to animate their model and drop the Gif into SMART software.
Resources:Visualiser, life cycle activity, minibeasts parts activity, strips of card to make caterpillar models.

Lesson 4 - Minibeasts 4Caterpillar Template
Cut these out, colour them in and animate them.

Cranefly Spider Snail
Beetle Woodlouse Worm
Resource Sheet 1 4

Resource Sheet 2 4

Examples of caterpillars made by Year 2 children at Devonshire Infant School.
These caterpillars were made into animated GIFs using the Genee Vision Visualiser and 2Simple 2Animate software.
Resource Sheet 3 4

WALT – Lesson Objective:To be able to measure accurately and record using the appropriate unit.
Expected outcomes:The children will be able to name standard units of measurementThe children will be able to select and name the most appropriate unit of measurement for a range of objects and situations
Introduction:• Use title grab feature to display lesson objective• Talk with the children about different units of measurement and how they equate to each other.• Ask them to show how long they think a centimetre / millimetre / metre is, using their hands / fingers to demonstrate.• Identify and discuss which would be the most suitable units to use to measure picture examples projected from desktop (Resource sheet1) ready for IWB annotation
Main Activity:Modelling the measurement, drawing and then, sharing of prescribed length lines, using the Visualiser.• (From Resource sheet 2, freeze the title / aim.), on the live Visualiser plate, demonstrate how to accurately use a ruler to draw a specified length line using both mm and cm (using the zoom to emphasise accuracy with mm etc.)• Display appendix sheet 2 (no need for photocopying!) on the Visualiser and ask the children to draw their lines on plain paper – lines differentiated by slight increase in difficulty as they progress further down the list
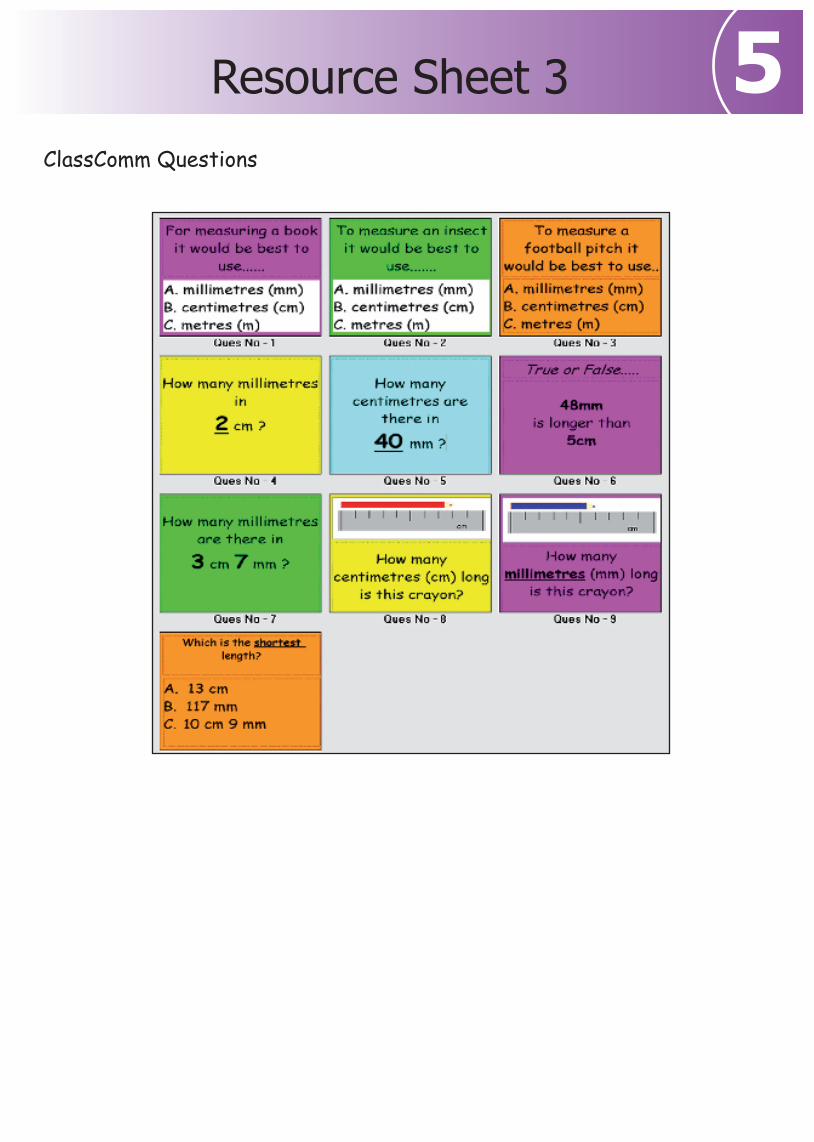
Plenary:• Ask selected pupils to share / demonstrate their work on the Visualiser.Extension ActivityClassComm Measurement Quiz.• 10 slides (see samples in Appendix 3) to review / recap / assess the pupils’ learning
Resources: Rulers, prepared resources.
Lesson 5 - Measuring Length 5

Choose suitable units for measuring
mm (millimetres) or cm (centimetres) or m (metres)
Resource Sheet 1 5

Aim:Measure accurately using millimetres (mm) and centimetres (cm)
a) 7 cm
b) 50 mm
c) 13 cm
d) 110 mm
e) 35 mm
f) 8.5 cm
g) 125mm
h) 6cm 5mm
i) 108 mm
j) 11cm 2mm
Resource Sheet 2 5
5Resource Sheet 3
ClassComm Questions

WALT – Lesson Objective:To understand how to correctly construct a sentence
Expected outcomes:The children will be able to construct an accurate sentence independentlyThe children will be able to recognise and discuss inaccuracies within a sentence
Introduction:• Choose an appropriate printed passage to display on the Visualiser.• Discuss the different types of words and their functions in a sentence.• Annotate chosen sentences directly or by capturing the image onto the IWB• (Print and cut out Resource Sheet 1) ask individual children to pair & match the cut-out word meanings on the Visualiser
Main Activity:Use the Visualiser to model the sentence construction exercise, (cut out one block from Resource Sheet 2 into their separate word cells.)• Explain the word-type columns on a complete sheet, then, using the cut-out sheet, demonstrate how the children can choose one word from each column to form a ‘silly’ (but correct) sentence. • Ask the children (working in pairs) to construct their own sentences, either writing them down or sticking the cells onto paper (differentiation?).• Encourage the children to illustrate their favourite sentences showing understanding of the words used
6Lesson 6 - Sentence Construction

Plenary Activity:Ask selected pupils to share their work on the Visualiser (try showing the picture only to see if the other children can guess the sentence).
Extension Activity:10 slides for use with ClassComm Interactive Response System (see samples in Resource Sheet 3) to review / recap / assess the pupils’ learning.
Resources:A prepared example of text, printed resources as shown.
6Lesson 6 - Sentence Construction

noun naming word
adjective describing word
verb doing word
6Resource Sheet 1

6Resource Sheet 2 1
That
ele
phan
t2
eats
3 in
visi
ble
4 so
cks
1 M
y co
mpu
ter
2 ha
tes
3 pl
asti
c4
tom
atoe
s
1 Th
is b
aby
2 pa
ints
3 sp
otty
4 wo
rms
1 O
ur t
each
er2
squa
shes
3 sm
elly
4 ca
rava
ns
1 Th
at e
leph
ant
2 ea
ts3
invi
sibl
e4
sock
s
1 M
y co
mpu
ter
2 ha
tes
3 pl
asti
c4
tom
atoe
s
1 Th
is b
aby
2 pa
ints
3 sp
otty
4 wo
rms
1 O
ur t
each
er2
squa
shes
3 sm
elly
4 ca
rava
ns

6Resource Sheet 3
ClassComm Questions

WALT – Lesson Objective:To explore own feelings and those of others.
Expected outcomes:• The children will be able to name different types of feelings.• The children will be able to describe examples of when people have different feelings
Introduction:• Talk with the children about feelings and emotions• Use the Visualiser to show different faces from Resource Sheets 1 and 3 – identify the emotions being shown• Point the Visualiser camera at individual pupil faces and ask them to form an emotional expression• Capture and insert into VWB area or a page of Word as on Resource Sheet 3
Main Activity:Group discussion:.• From Resource Sheet 2, freeze the title / aim, then… Zoom in on the ‘school gate’ picture and ask the children what they think is happening
Paired activity: • Children work in pairs, taking on different roles from the picture, and record their feelings on the printed sheet (Resource Sheet 2)
Plenary:• Children use the Visualiser to present their recording sheets to the class group
Extension Activity• ClassComm Survey• 10 slides (see samples in Resource Sheet 3) to survey the children’s thoughts/feelings
7Lesson 7 - Feelings

7Resource Sheet 1Use these templates to show a range of different emotions.

7Pupil Resource SheetUse these templates to show a range of different emotions.

7Resource SheetFacial Expressions

7Resource Sheet
ClassComm Questions

As teachers we have been totally inspired by the flexibility and adaptability of the visualiser which has allowed us to deliver in ways that would otherwise have been impossible. We believe that this piece of equipment truly integrates ICT within the classroom providing the teacher with a very simple to use but effective means of delivery.
We hope that the lesson material contained in this booklet will help give guidance and examples on ways to make effective use of the visualiser within a teaching and learning situation. The examples shown are for guidance only and could be adapted or changed for use within a variety of class abilities and year groups.
If you are inspired by what you see and you have ago at creating your own lesson featuring the visualiser then we would love to hear from you.
Even if you have just found the visualiser to be such a fantastic tool and you would like to share some of your success stories we would love to hear from you and be able to share your success with others.
Contact us on:Email: [email protected] Phone: 07841 743426
Email: [email protected] Phone: 07793 917035
Content by John Sutton and John NelsonDesign by David Fradgley
Contact Us