Lesson Plan: Weed Watchers - Florida Exotic Pest Plant …Manatee… · • 1 set of Invasive Plant...
39
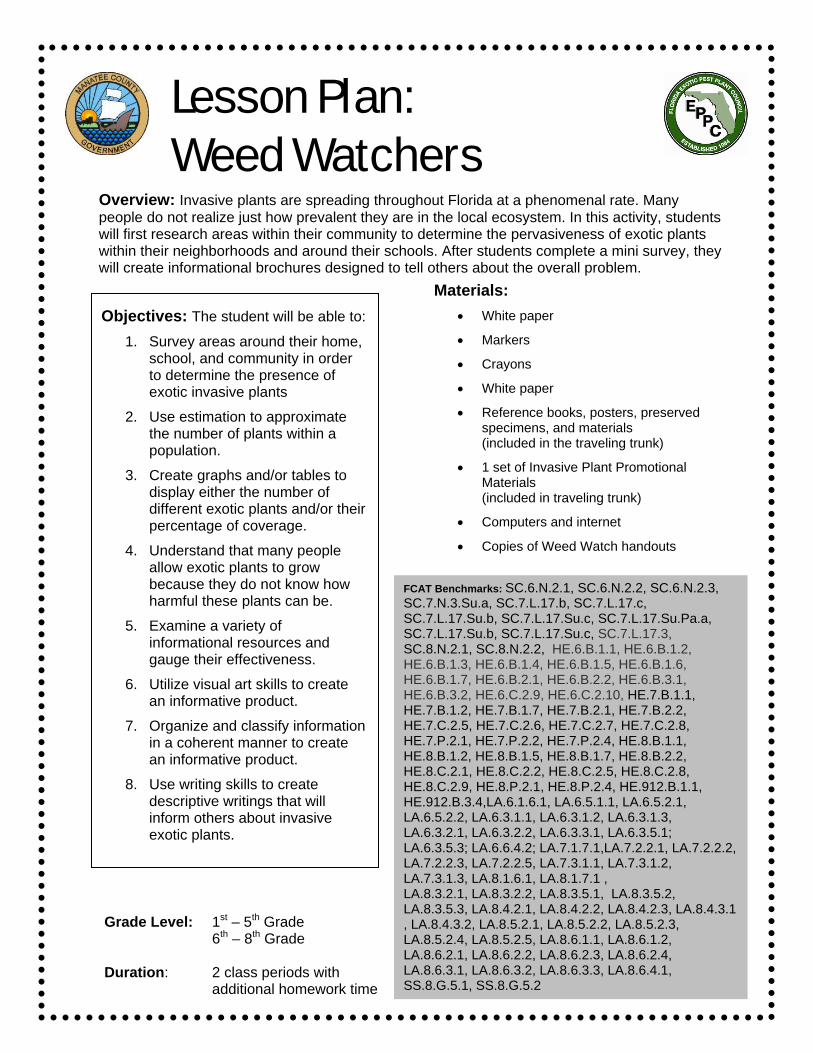
Overview: Invasive plants are spreading throughout Florida at a phenomenal rate. Many people do not realize just how prevalent they are in the local ecosystem. In this activity, students will first research areas within their community to determine the pervasiveness of exotic plants within their neighborhoods and around their schools. After students complete a mini survey, they will create informational brochures designed to tell others about the overall problem. Lesson Plan: Weed Watchers Objectives: The student will be able to: 1. Survey areas around their home, school, and community in order to determine the presence of exotic invasive plants 2. Use estimation to approximate the number of plants within a population. 3. Create graphs and/or tables to display either the number of different exotic plants and/or their percentage of coverage. 4. Understand that many people allow exotic plants to grow because they do not know how harmful these plants can be. 5. Examine a variety of informational resources and gauge their effectiveness. 6. Utilize visual art skills to create an informative product. 7. Organize and classify information in a coherent manner to create an informative product. 8. Use writing skills to create descriptive writings that will inform others about invasive exotic plants. Materials: • White paper • Markers • Crayons • White paper • Reference books, posters, preserved specimens, and materials (included in the traveling trunk) • 1 set of Invasive Plant Promotional Materials (included in traveling trunk) • Computers and internet • Copies of Weed Watch handouts Grade Level: 1 st – 5 th Grade 6 th – 8 th Grade Duration: 2 class periods with additional homework time FCAT Benchmarks: SC.6.N.2.1, SC.6.N.2.2, SC.6.N.2.3, SC.7.N.3.Su.a, SC.7.L.17.b, SC.7.L.17.c, SC.7.L.17.Su.b, SC.7.L.17.Su.c, SC.7.L.17.Su.Pa.a, SC.7.L.17.Su.b, SC.7.L.17.Su.c, SC.7.L.17.3, SC.8.N.2.1, SC.8.N.2.2, HE.6.B.1.1, HE.6.B.1.2, HE.6.B.1.3, HE.6.B.1.4, HE.6.B.1.5, HE.6.B.1.6, HE.6.B.1.7, HE.6.B.2.1, HE.6.B.2.2, HE.6.B.3.1, HE.6.B.3.2, HE.6.C.2.9, HE.6.C.2.10, HE.7.B.1.1, HE.7.B.1.2, HE.7.B.1.7, HE.7.B.2.1, HE.7.B.2.2, HE.7.C.2.5, HE.7.C.2.6, HE.7.C.2.7, HE.7.C.2.8, HE.7.P.2.1, HE.7.P.2.2, HE.7.P.2.4, HE.8.B.1.1, HE.8.B.1.2, HE.8.B.1.5, HE.8.B.1.7, HE.8.B.2.2, HE.8.C.2.1, HE.8.C.2.2, HE.8.C.2.5, HE.8.C.2.8, HE.8.C.2.9, HE.8.P.2.1, HE.8.P.2.4, HE.912.B.1.1, HE.912.B.3.4,LA.6.1.6.1, LA.6.5.1.1, LA.6.5.2.1, LA.6.5.2.2, LA.6.3.1.1, LA.6.3.1.2, LA.6.3.1.3, LA.6.3.2.1, LA.6.3.2.2, LA.6.3.3.1, LA.6.3.5.1; LA.6.3.5.3; LA.6.6.4.2; LA.7.1.7.1,LA.7.2.2.1, LA.7.2.2.2, LA.7.2.2.3, LA.7.2.2.5, LA.7.3.1.1, LA.7.3.1.2, LA.7.3.1.3, LA.8.1.6.1, LA.8.1.7.1 , LA.8.3.2.1, LA.8.3.2.2, LA.8.3.5.1, LA.8.3.5.2, LA.8.3.5.3, LA.8.4.2.1, LA.8.4.2.2, LA.8.4.2.3, LA.8.4.3.1 , LA.8.4.3.2, LA.8.5.2.1, LA.8.5.2.2, LA.8.5.2.3, LA.8.5.2.4, LA.8.5.2.5, LA.8.6.1.1, LA.8.6.1.2, LA.8.6.2.1, LA.8.6.2.2, LA.8.6.2.3, LA.8.6.2.4, LA.8.6.3.1, LA.8.6.3.2, LA.8.6.3.3, LA.8.6.4.1, SS.8.G.5.1, SS.8.G.5.2
-
Upload
nguyenminh -
Category
Documents
-
view
214 -
download
0
Transcript of Lesson Plan: Weed Watchers - Florida Exotic Pest Plant …Manatee… · • 1 set of Invasive Plant...
Overview: Invasive plants are spreading throughout Florida at a phenomenal rate. Many people do not realize just how prevalent they are in the local ecosystem. In this activity, students will first research areas within their community to determine the pervasiveness of exotic plants within their neighborhoods and around their schools. After students complete a mini survey, they will create informational brochures designed to tell others about the overall problem.
Lesson Plan: Weed Watchers
Objectives: The student will be able to:
1. Survey areas around their home, school, and community in order to determine the presence of exotic invasive plants
2. Use estimation to approximate the number of plants within a population.
3. Create graphs and/or tables to display either the number of different exotic plants and/or their percentage of coverage.
4. Understand that many people allow exotic plants to grow because they do not know how harmful these plants can be.
5. Examine a variety of informational resources and gauge their effectiveness.
6. Utilize visual art skills to create an informative product.
7. Organize and classify information in a coherent manner to create an informative product.
8. Use writing skills to create descriptive writings that will inform others about invasive exotic plants.
Materials: • White paper
• Markers
• Crayons
• White paper
• Reference books, posters, preserved specimens, and materials (included in the traveling trunk)
• 1 set of Invasive Plant Promotional Materials (included in traveling trunk)
• Computers and internet
• Copies of Weed Watch handouts
Grade Level: 1st – 5th Grade 6th – 8th Grade Duration: 2 class periods with
additional homework time
FCAT Benchmarks: SC.6.N.2.1, SC.6.N.2.2, SC.6.N.2.3, SC.7.N.3.Su.a, SC.7.L.17.b, SC.7.L.17.c, SC.7.L.17.Su.b, SC.7.L.17.Su.c, SC.7.L.17.Su.Pa.a, SC.7.L.17.Su.b, SC.7.L.17.Su.c, SC.7.L.17.3, SC.8.N.2.1, SC.8.N.2.2, HE.6.B.1.1, HE.6.B.1.2, HE.6.B.1.3, HE.6.B.1.4, HE.6.B.1.5, HE.6.B.1.6, HE.6.B.1.7, HE.6.B.2.1, HE.6.B.2.2, HE.6.B.3.1, HE.6.B.3.2, HE.6.C.2.9, HE.6.C.2.10, HE.7.B.1.1, HE.7.B.1.2, HE.7.B.1.7, HE.7.B.2.1, HE.7.B.2.2, HE.7.C.2.5, HE.7.C.2.6, HE.7.C.2.7, HE.7.C.2.8, HE.7.P.2.1, HE.7.P.2.2, HE.7.P.2.4, HE.8.B.1.1, HE.8.B.1.2, HE.8.B.1.5, HE.8.B.1.7, HE.8.B.2.2, HE.8.C.2.1, HE.8.C.2.2, HE.8.C.2.5, HE.8.C.2.8, HE.8.C.2.9, HE.8.P.2.1, HE.8.P.2.4, HE.912.B.1.1, HE.912.B.3.4,LA.6.1.6.1, LA.6.5.1.1, LA.6.5.2.1, LA.6.5.2.2, LA.6.3.1.1, LA.6.3.1.2, LA.6.3.1.3, LA.6.3.2.1, LA.6.3.2.2, LA.6.3.3.1, LA.6.3.5.1; LA.6.3.5.3; LA.6.6.4.2; LA.7.1.7.1,LA.7.2.2.1, LA.7.2.2.2, LA.7.2.2.3, LA.7.2.2.5, LA.7.3.1.1, LA.7.3.1.2, LA.7.3.1.3, LA.8.1.6.1, LA.8.1.7.1 , LA.8.3.2.1, LA.8.3.2.2, LA.8.3.5.1, LA.8.3.5.2, LA.8.3.5.3, LA.8.4.2.1, LA.8.4.2.2, LA.8.4.2.3, LA.8.4.3.1 , LA.8.4.3.2, LA.8.5.2.1, LA.8.5.2.2, LA.8.5.2.3, LA.8.5.2.4, LA.8.5.2.5, LA.8.6.1.1, LA.8.6.1.2, LA.8.6.2.1, LA.8.6.2.2, LA.8.6.2.3, LA.8.6.2.4, LA.8.6.3.1, LA.8.6.3.2, LA.8.6.3.3, LA.8.6.4.1, SS.8.G.5.1, SS.8.G.5.2
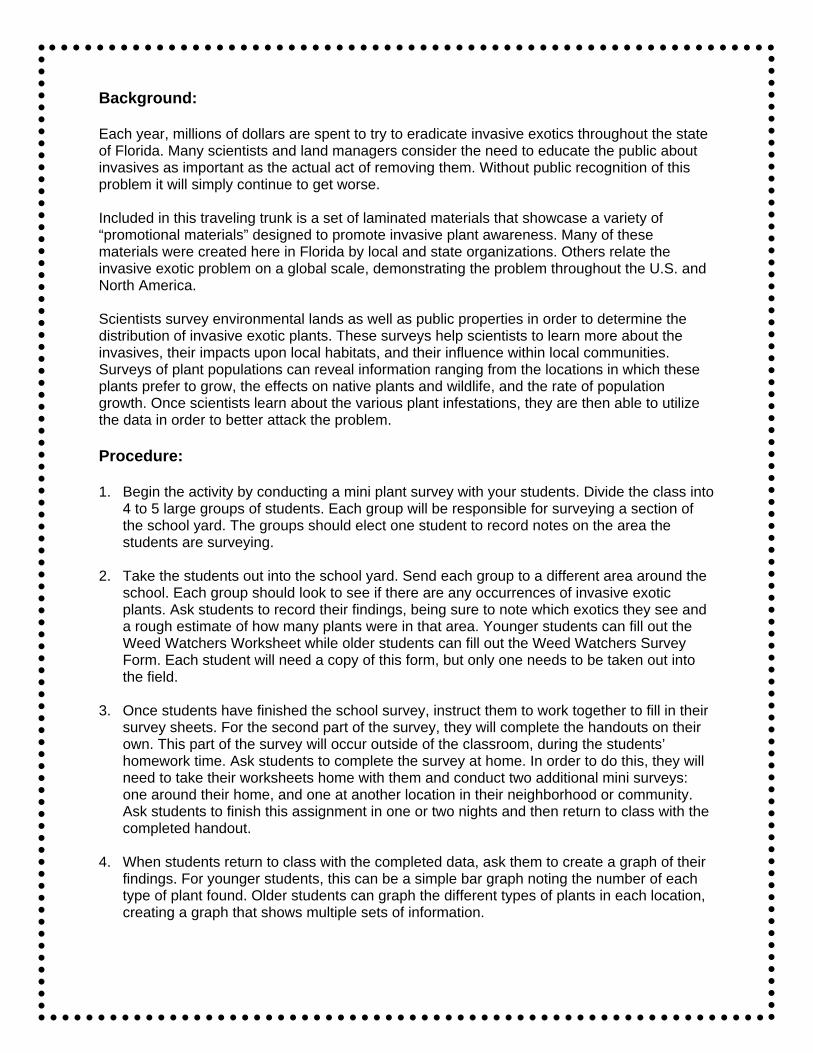
Background: Each year, millions of dollars are spent to try to eradicate invasive exotics throughout the state of Florida. Many scientists and land managers consider the need to educate the public about invasives as important as the actual act of removing them. Without public recognition of this problem it will simply continue to get worse. Included in this traveling trunk is a set of laminated materials that showcase a variety of “promotional materials” designed to promote invasive plant awareness. Many of these materials were created here in Florida by local and state organizations. Others relate the invasive exotic problem on a global scale, demonstrating the problem throughout the U.S. and North America. Scientists survey environmental lands as well as public properties in order to determine the distribution of invasive exotic plants. These surveys help scientists to learn more about the invasives, their impacts upon local habitats, and their influence within local communities. Surveys of plant populations can reveal information ranging from the locations in which these plants prefer to grow, the effects on native plants and wildlife, and the rate of population growth. Once scientists learn about the various plant infestations, they are then able to utilize the data in order to better attack the problem. Procedure: 1. Begin the activity by conducting a mini plant survey with your students. Divide the class into
4 to 5 large groups of students. Each group will be responsible for surveying a section of the school yard. The groups should elect one student to record notes on the area the students are surveying.
2. Take the students out into the school yard. Send each group to a different area around the
school. Each group should look to see if there are any occurrences of invasive exotic plants. Ask students to record their findings, being sure to note which exotics they see and a rough estimate of how many plants were in that area. Younger students can fill out the Weed Watchers Worksheet while older students can fill out the Weed Watchers Survey Form. Each student will need a copy of this form, but only one needs to be taken out into the field.
3. Once students have finished the school survey, instruct them to work together to fill in their
survey sheets. For the second part of the survey, they will complete the handouts on their own. This part of the survey will occur outside of the classroom, during the students’ homework time. Ask students to complete the survey at home. In order to do this, they will need to take their worksheets home with them and conduct two additional mini surveys: one around their home, and one at another location in their neighborhood or community. Ask students to finish this assignment in one or two nights and then return to class with the completed handout.
4. When students return to class with the completed data, ask them to create a graph of their
findings. For younger students, this can be a simple bar graph noting the number of each type of plant found. Older students can graph the different types of plants in each location, creating a graph that shows multiple sets of information.

5. After students turn in their worksheets and surveys, the next part of the lesson will begin.
Show the students examples of various types of “promotional” materials (brochures, fliers, etc.) that focus on promoting the dangers of invasive exotic plants. One set of laminated materials are included in the traveling trunk as well as additional master copies which can be copied and distributed to students for further examination. As a class, discuss these materials and their functions. Who are these resources for? What is their objective? Why are they important? Explain that many people do not know which types of plants are invasive exotics. Ask students to think about their survey areas and to consider whether the people living near these areas realize the plants are exotic. Explain that many organizations strive to educate others about these plants using materials just like the ones you have shown to the class.
6. Now students will use their recent observations to create their own informational brochure.
Pass out the white paper and art materials. Ask students to select one of the exotic plants they found during their survey. They will now create an educational brochure designed to inform the public about this plant. Encourage students to utilize the information they collected during their data surveys. Brochures should not only inform the reader about the specific plant’s characteristics, but also tell a bit about its growth patterns and the negative effect it has on the local habitat.
a. If students have already completed the “Wanted!” lesson plan, encourage them to
select a different invasive plant, other than the one profiled for that assignment.
b. Younger students may make a flier instead of a full brochure. 7. Once students complete their individual brochures, you may choose to end the assignment.
Or, the class can evaluate the effectiveness of each brochure by creating a “focus group.” Explain that creating an informational brochure is more than just putting words on paper. Even something as “simple” as a brochure must be tested to see whether or not it will be effective. To demonstrate the idea of testing a product, divide the class into three teams that will act as “focus group reviewers.” Ask each team to review a set number of brochures. Teams should consider: design, layout, and the information that is presented. Is it clear and easy to read? Does it communicate the message clearly? Ask the focus groups to score each brochure on a sliding scale and then re-group to discuss the results. What worked well? What could be improved? How might the information be presented in a different manner? Once the class ends its discussion, consider re-creating the brochures with these new ideas.
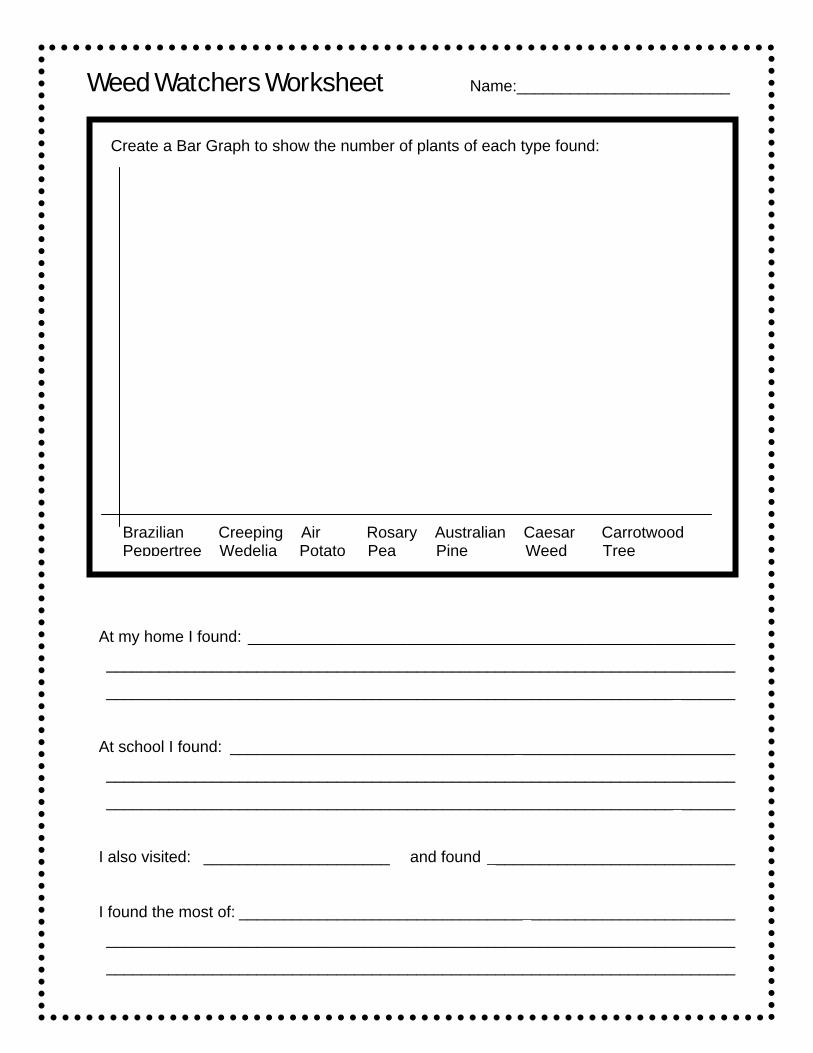
Weed Watchers Worksheet Name:________________________
At my home I found: ________________________________________________________
________________________________________________________________________
________________________________________________________________________
At school I found: __________________________________________________________
________________________________________________________________________
________________________________________________________________________
I also visited: _____________________ and found _____________________________
I found the most of: _________________________________________________________
________________________________________________________________________
________________________________________________________________________
Brazilian Creeping Air Rosary Australian Caesar Carrotwood Peppertree Wedelia Potato Pea Pine Weed Tree
Create a Bar Graph to show the number of plants of each type found:
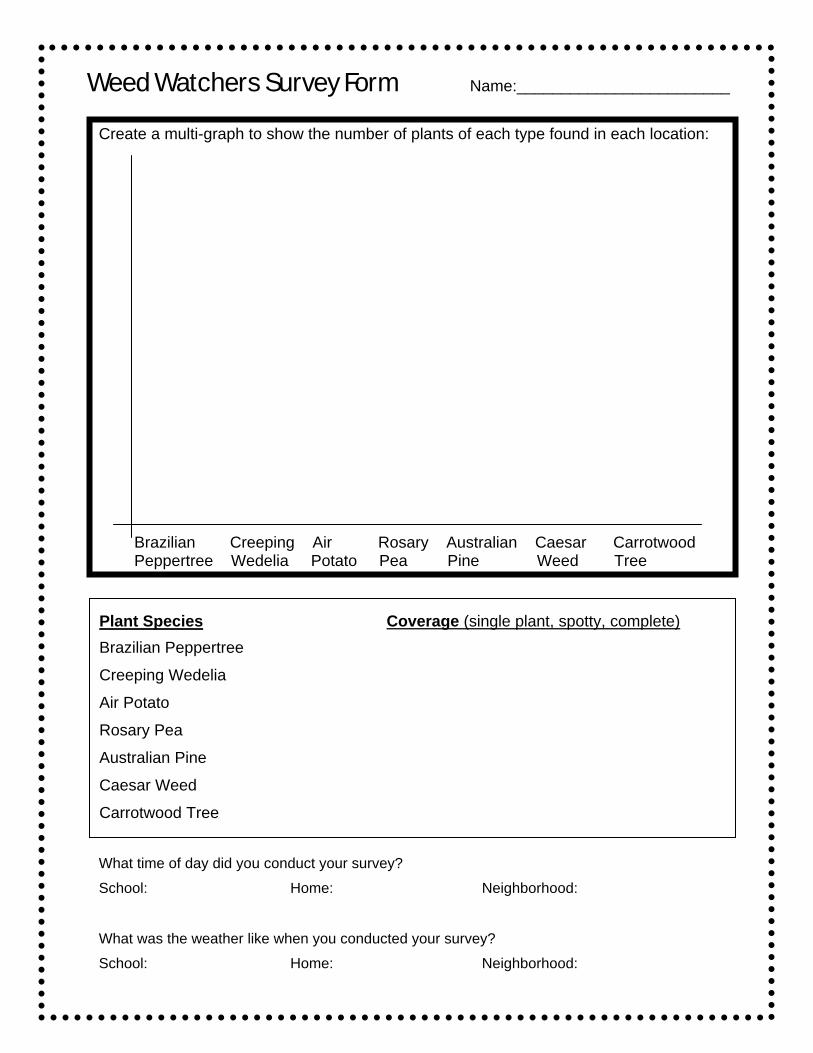
Weed Watchers Survey Form Name:________________________
Create a multi-graph to show the number of plants of each type found in each location:
Brazilian Creeping Air Rosary Australian Caesar Carrotwood Peppertree Wedelia Potato Pea Pine Weed Tree
Plant Species Coverage (single plant, spotty, complete) Brazilian Peppertree
Creeping Wedelia
Air Potato
Rosary Pea
Australian Pine
Caesar Weed
Carrotwood Tree
What time of day did you conduct your survey?
School: Home: Neighborhood: What was the weather like when you conducted your survey?
School: Home: Neighborhood:
Extension Activities:
• Extend the lesson and assign each student specific locations to survey. This could incorporate local geography – require that students survey around a specific geographic location, such as a waterway, forest, hill, lowland, etc. Alternately, ask students to record their findings for one week as they travel through their community, noting a different location’s exotic plant population during each day.
o If this activity is extended in this manner, students can create journal entries to record their adventures as they seek out locations to survey. To turn this into a creative writing project, ask students to write about each location, using descriptive language to detail each place.
• Take this project to the next level by transforming the brochure into a full marketing campaign. Ask students to think of ways they can communicate messages about invasive plants and why it is important to eradicate them. Students can create an entire crusade to promote exotic eradication, creating banners, buttons, signs, and even mock television commercials to get their message out to the public.
• Work to make a difference in your school and community! Follow the notes (available within the traveling trunk) to learn how to remove invasive exotic plants and challenge students to do so at the locations where the exotics were found. Invite other classes to participate with you – this can become a school-wide project. Consider working with a local government or conservation agency to set up a field trip to visit a natural area to further help with exotic removal.
References: Brochures: Teaching Pre-K through 8’s directions on making brochures; includes layout and design information. http://www.teachingk-8.com/archives/how_to/how_tocreate_exciting_brochures.html Graphs: Kidzone “create-a-graph,” a wonderful resource that will help kids create graphs with a given set of data. http://nces.ed.gov/nceskids/createagraph/default.aspx How to Read Graphs: An online lesson to help students learn how to read bar and line graphs. http://www.myschoolhouse.com/courses/O/1/17.asp Invaders Survey: Plant life’s surveys of invasive plants; great examples to show older students. http://www.plantlife.org.uk/PlantInvaders/index.asp
Overview: When learning about invasive and exotic plants, we frequently focus on the negative impacts these plants have on Florida’s environment. But it’s important to remember that each of these plants is, in its own habitat, a native species and many can play a vital role in other cultures and ecosystems. In this lesson plan, students will explore the ways in which harmful invasives can actually be helpful.
Lesson Plan: Friend or Foe?
Objectives: The student will be able to:
1. Know that every exotic invasive in Florida is also a native in its own home country.
2. Understand that humans use plants for a variety of different reasons.
3. Know that some invasive plants are poisonous.
4. Understand that even if a plant is poisonous it can still have value.
5. Learn that invasive plants can play a vital role in other cultures and that they can have many uses, including serving as food, providing shelter, materials for arts and crafts, and food for other animals.
6. Research the backgrounds of different exotic plants, learning more about where each plant comes from and how it is used by the indigenous people and wildlife in that location.
7. Utilize presentation skills by developing a short skit that will “promote” their invasive plant’s uses, demonstrating argumentative and persuasive speaking techniques.
Materials: • Reference books, posters,
preserved specimens, and materials (included in the traveling trunk)
• Various props (students can make them, bring from home, etc)
• Computers and internet • Pencils and/or pens • Construction paper • Tape • Scissors • Markers
Grade Level: 6th – 8th Grade Duration: 2-3 class periods
FCAT Benchmarks, continued: HE.7.B.1.2, HE.7.B.1.7, HE.7.B.2.1, HE.7.B.2.2, HE.7.C.2.5, HE.7.C.2.6, HE.7.C.2.7, HE.7.C.2.8, HE.7.P.2.1, HE.7.P.2.2, HE.7.P.2.4, HE.8.B.1.1, HE.8.B.1.2, HE.8.B.1.5, HE.8.B.1.7, HE.8.B.2.2, HE.8.C.2.1, HE.8.C.2.2, HE.8.C.2.5, HE.8.C.2.8, HE.8.C.2.9, HE.8.P.2.1, HE.8.P.2.4, HE.912.B.1.1, HE.912.B.3.4,LA.6.1.6.1, LA.6.5.1.1, LA.6.5.2.1, LA.6.5.2.2, LA.6.3.1.1, LA.6.3.1.2, LA.6.3.1.3, LA.6.3.2.1, LA.6.3.2.2, LA.6.3.3.1, LA.6.3.5.1; LA.6.3.5.3; LA.6.6.4.2; LA.7.1.7.1,LA.7.2.2.1, LA.7.2.2.2, LA.7.2.2.3, LA.7.2.2.5, LA.7.3.1.1, LA.7.3.1.2, LA.7.3.1.3, LA.8.1.6.1, LA.8.1.7.1 , LA.8.3.2.1, LA.8.3.2.2, LA.8.3.5.1, LA.8.3.5.2, LA.8.3.5.3, LA.8.4.2.1, LA.8.4.2.2, LA.8.4.2.3, LA.8.4.3.1 , LA.8.4.3.2, LA.8.5.2.1, LA.8.5.2.2, LA.8.5.2.3, LA.8.5.2.4, LA.8.5.2.5, LA.8.6.1.1, LA.8.6.1.2, LA.8.6.2.1, LA.8.6.2.2, LA.8.6.2.3, LA.8.6.2.4, LA.8.6.3.1, LA.8.6.3.2, LA.8.6.3.3, LA.8.6.4.1, SS.8.G.5.1, SS.8.G.5.2
FCAT Benchmarks: SC.6.N.2.1, SC.6.N.2.2, SC.6.N.2.3, SC.7.N.3.Su.a, SC.7.L.17.b, SC.7.L.17.c, SC.7.L.17.Su.b, SC.7.L.17.Su.c, SC.7.L.17.Su.Pa.a, SC.7.L.17.Su.b, SC.7.L.17.Su.c, SC.7.L.17.3, SC.8.N.2.1, SC.8.N.2.2, HE.6.B.1.1, HE.6.B.1.2, HE.6.B.1.3, HE.6.B.1.4, HE.6.B.1.5, HE.6.B.1.6, HE.6.B.1.7, HE.6.B.2.1, HE.6.B.2.2, HE.6.B.3.1, HE.6.B.3.2, HE.6.C.2.9, HE.6.C.2.10, HE.7.B.1.1
Background: Invasive plants are all about perspective. In Florida we consider these exotic plants to be an awful blight upon our natural landscape. But, in other locations around the world, many of these plants are purposely raised for food, shelter, crafts, and even simply for their beauty. While a number of invasive plants introduced into Florida were “accidental arrivals,” coming in with shipments of goods from other locations, many more were purposefully brought to the state. Examples include: Air Potato: In Africa, these plants are cultivated for their tubers. In Florida, some argue that the plants have a bitter taste and may even be poisonous. It is thought that the plant was introduced in order to serve as a food source. Australian Pine: These tall trees were planted by farmers to help stop erosion along the shoreline and to help stabilize soil along ditches and other irrigation canals. It was also believed that these trees would be useful in providing shade and lumber. Brazilian Pepper: Once called “Florida Holly,” this tree was considered a wonderful landscape plant and was highly recommended for its lovely red berries. The plant was also considered to be good for birds as they were frequently seen devouring its berries. Although the plant is related to poison ivy, people occasionally use the seeds of the berries to make sauces and salsas. Many parts of this plant may be irritating and even POISONOUS to sensitive individuals, but the dried berries and/or seeds are frequently used. Cogon Grass: This grass was brought in to serve as a food for cattle and other farm animals. In Florida, however, the cattle were more interested in native plant foods. Creeping Wedelia: Also called “creeping daisy,” this plant has lovely yellow flowers and it was introduced into Florida to serve as an ornamental plant. Unfortunately it has grown out of control but, in its home in Asia, this plant is a folk remedy for colds and the flu and also for reproductive issues. Rosary Pea: The seeds of this poisonous plant are bright red with black marks and were a favorite of various Native Indian tribes for use in jewelry. This plant is POISONOUS, so it really should not be eaten, but was frequently used for decorative purposes.
Procedure:
1. Start this lesson with the following Warm-Up Activity: Ask each student what he or she did in the morning before coming to school. Who ate breakfast? What did they eat? Ask students how different plants were used in their meal. What types of chairs did you sit on during breakfast? Did you eat at a table? Were these items made of wood? Then ask what students are wearing. Is anyone wearing cotton or other natural fibers? Where do these items come from? Then hold up a piece of paper and a pencil. How are these items made? Ask students how often they use these items. Then ask them to give examples of other ways they utilize plants in their daily lives. Brainstorm a list of different ideas of how plants can be used by both humans and animals. Examples may include food, medicine, crafts, housewares, makeup, for heat (firewood), and even decoration.
2. Ask students to think about the invasive plants you have been studying. Can anyone
think of any uses of these plants? What could you do with an air potato? Is guinea grass good for anything? Explain that, while we may consider these plants to be pests, in other areas of the world many of these same “bad” plants were actually “good.” Some were used for food, some for decoration, and some for craft purposes. In fact, in Florida many of these plants were intentionally introduced to be used for these purposes but, unfortunately, did not work out quite as planned.
3. Now the students will learn about how exotic invasive plants can be useful and
important in their native lands and will present their findings to the class. Write the names of the invasive plants (listed in the background section of this lesson plan) on the board. Ask each student to select a plant off the list.
4. Once each student has selected a plant, record their assignments. Each student will
need to research the life history of their chosen plant, paying special attention to the various uses of their plant. Ask students to consider the medicinal and traditional value of their selection in addition to possibilities as food sources. Allow students access to reference material and class time in order to research their plants, or assign this activity to students as homework.
5. After the students have researched their plants, it is time for them to present their
findings. Their challenge will be to “market” their plant to their audience. Just like television advertisers have to plan and then create an advertisement to sell a product, the students will develop an advertisement or infomercial to tell others about their invasive plant. Each student should plan out a short skit detailing the wonderful benefits of their plant. As with any product, such as a new medication that is advertised, students should be sure to tell their audience any dangers associated with their product (such as whether it is poisonous, may cause a rash, etc.). Give students plenty of time to come up with an idea and to make props, too. Encourage students to think about advertisements they have seen and to consider what makes them want to like or buy something. Challenge students to attempt to act happy or excited about their plant when presenting it and to use different arguments, descriptive terms, and persuasive speaking techniques.
6. When everyone has finished planning it is time to present the skits!

Extension Activities:
• Advertisers frequently use “test markets” in order to determine whether or not a particular advertisement is effective. Set up your own test market by using other students. Have your class present their skits to students in other classes and ask the audience members to score each skit on a scale of 1 to 5 (1 being the least likely to buy, 5 being the absolutely will buy it). Student presenters can then review their scores to find out the effectiveness of their method of presentation. Afterwards, you may choose to ask students to change their approach and to try this activity again, seeking to improve their presentation skills.
• Consider involving an audiovisual club or class at your school and have the children’s skits filmed. Then have a “movie day” where students can watch themselves and evaluate their performance.
• Develop an entire marketing campaign around each plant. Ask students to develop promotional materials such as fliers, posters, and brochures that advertise the plants and its good benefits.
• Hold a debate about each plant after the students present their skits. Ask the original presenter to debate the positives of the plant and select a student to challenge them and present the negative aspects of that particular plant.
References & Resources: Air Potato Q & A: Questions and answers about the edible-ness of air potato. http://www.walterreeves.com/landscaping/article.phtml?cat=10&id=33 Australian Pines for Erosion Control: Brief 1926 article on the benefits of using this tree for erosion control. http://www.bonsai-bci.com/species/australian%20pine.html Australian Pine Uses: Short description of different medical and practical uses for this tree. http://zipcodezoo.com/Plants/C/Casuarina_equisetifolia.asp Brazilian Pepper as a Cooking Ingredient: Images of “pink peppercorns.” http://www.saunalahti.fi/~marian1/gourmet/i_spices.htm Rosary Pea Medicinal Uses: Short description of different uses for rosary pea. http://www.tropilab.com/paternosterbean.html Science Buzz on Rosary Pea: Short article on the use of rosary pea as beads. http://www.smm.org/buzz/museum/object/2002_01_necklace_rosary_pea_jobs_tears_beads Wedelia: Information on creeping daisy. http://www.magnoliagardensnursery.com/productdescrip/Wedelia_Tri.html
Overview: For centuries, scientists have collected and preserved plant specimens in order to study nature’s green species. In this lesson plan students will study plants by collecting and sorting plants, creating their own herbariums, and working to identify each individual find.
Lesson Plan: Lasting Impressions
Objectives: The student will be able to:
1. Go on a nature walk and spend time collecting plants.
2. Determine a theme for their own personal herbariums and collect plants accordingly.
3. Sort plants according to size, shape, color, leaf shape, habitat, function, genus, family, type, etc.
4. Utilize a plant press to create preserved specimens, learning proper preservation techniques.
5. Utilize the internet and other resources in order to identify unknown collected specimens.
6. Create herbarium pages for a minimum of 5 plant specimens, exhibiting display and classification abilities.
7. Develop, organize, and manufacture their personal herbariums.
8. Construct a plant press (optional).
Materials: • Plant presses (included in kit)
• Wax paper (included in kit)
• Paper
• Pencils
• Ziploc bags (or brown bags)
• Plants and their parts
• Internet and other resources
• Glue
• Copies of herbarium pages
To Make Plant Presses: • 4 Sheets cardboard (per press)
• Newspaper
• Large rubber bands
Grade Level: 1st – 5th Grade 6th – 8th Grade Duration: One week
FCAT Benchmarks: SC.1.L.14.1, SC.1.L.14.2, SC.1.N.1.2, SC.1.N.1.3, SC.3.L.14.1, SC.3.L.14.2, SC.3.L.15.2, SC.3.L.17.1, SC.3.L.17.2, SC.3.N.1.3, SC.4.N.1.6, SC.5.L.17.1, LA.1.2.2.1, LA.1.4.2.1, LA.1.4.2.3, LA.2.4.2.2, LA.2.4.2.3, LA.2.5.1.1, LA.2.6.1.1, LA.3.4.2.2, LA.4.1.6.1, LA.5.1.6.1, LA.5.2.2.1, LA.5.3.5.2, LA.6.1.6.1, LA.6.1.6.5, LA.6.3.5.2, LA.6.4.2.2, LA.6.5.1.1, LA.6.6.3.2, LA.7.1.6.1, LA.7.3.5.2, LA.7.4.2.2, LA.7.5.1.1, LA.7.6.4.1, LA.8.1.6.1, LA.8.1.7.1, LA.8.2.2.1, LA.8.3.5.2, LA.8.4.2.2, LA.8.6.4.1, LA.8.6.4.2
Background: A herbarium is a collection of carefully dried plants and is a resource that scientists can use to learn more about plants. Museums and botanical gardens around the world have extensive herbariums that their staff refer to in order to study plants. This method can also be employed in the classroom to reveal the hidden world of plants to students. In past times, before photographs, television, and the internet, herbariums were the only physical record of botanicals. Aside from the herbariums, scientists used botanical illustrations to learn about plants, but a two-dimensional drawing or painting cannot compare to a preserved physical specimen. Warm-Up Activity: In this optional activity students will build their own personal plant press. (This activity is optional, as it can be materials-intensive). This warm-up activity is highly recommended as it will make the collecting process much easier if each child can use their own individual plant press. Follow the directions included with this lesson plan in order for the students to create their own personal plant press. (Directions are presented in a handout form – if necessary, students can take the handout home and complete the plant press as a homework assignment). These presses can be plain or students can get creative and decorate the cardboard covers. If the cardboard and newspaper is not readily available at school, ask students to recycle by bringing in these materials from home. Procedure: 1. Begin by asking students to brainstorm ideas on how they could study a plant. What’s the
best way to study something that grows in another country? What about something that grows only in extreme conditions, or something that is only available during certain times of the year?
2. Now the students will head off on a nature walk. This part of the lesson should take roughly
15 to 30 minutes, giving the students a good amount of time to spend outdoors. Take the class outside to search for various plants and plant parts. Tell the students that their “mission” will be to collect plants and their parts. Students may collect as you are walking along, or you may choose to travel to a specific area and collect within the boundaries of that location. In either case, be sure to review the following plant collection guides:
a. Always be sure to take only what is necessary – if you are just collecting leaves or flowers, only take one or two; if you are collecting the entire plant, only collect one.
b. Inspect the plant to be sure that it is free of wildlife. Do not take the plant if it has insects living on it or near it, or if it shows signs of wildlife damage.
c. If the plant is the only one of its type, leave it. Do not collect the entire plant but, instead, take only a leaf and/or flower.
d. Be aware of your surroundings. Try not to do too much damage to other plants while you are collecting specimens.
e. Be mindful of each plant’s protective covering – watch out for thorns, spines, prickly seeds, and itchy hairs.
3. Once you go over the “rules” it is time for students to collect their specimens. This part of the
lesson can be accomplished in several different themed formats:
a. Younger students may choose to collect according to: i. Color (flowers of all the same color) ii. Shape (leaves of similar shape or flowers of similar shape) iii. Type (all leaves, all flowers) iv. Size (all small plants, all medium size plants)
b. Older students may choose to collect according to:
i. Genus (plants in the same genus) ii. Family (plants in the same family) iii. Habitat (plants found living within the same habitat area) iv. Function (all medicinal plants, all invasives, all natives) v. Type (all shrubs, all trees, all herbs, all vines, all groundcover) vi. Specific scientific characteristics (all plants with opposite leaves, all plants with
palmate edges) vii. Plants that attract certain types of wildlife (insects, butterflies, hummingbirds) viii. Seasonality (annual vs. perennial)
Teachers can either tell the students specifically what type of theme to follow or may allow their class to select its own theme. Individual students may also be allowed to select a topic which they would like to explore further. Each student will need a minimum of 5 plants.
4. As students collect their plants, have them carefully store their finds in plastic or paper bags.
They should also fill out their Herbarium ID Sheets (see handout) for each collected specimen.
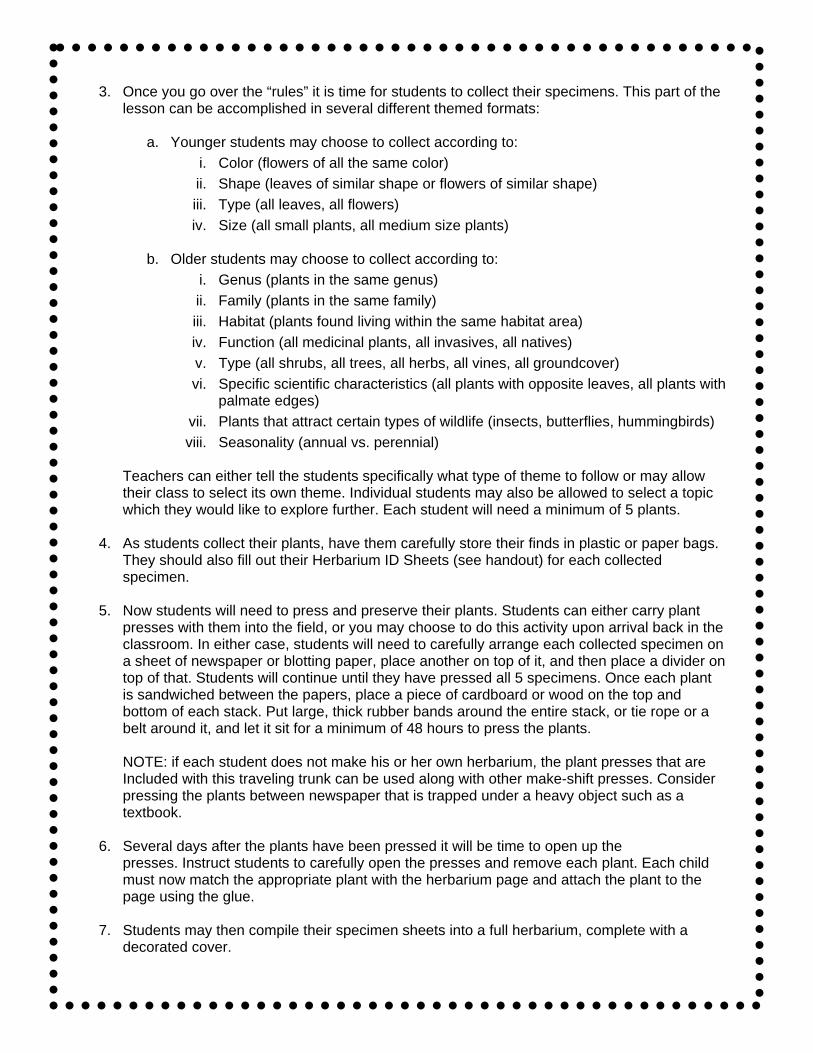
5. Now students will need to press and preserve their plants. Students can either carry plant
presses with them into the field, or you may choose to do this activity upon arrival back in the classroom. In either case, students will need to carefully arrange each collected specimen on a sheet of newspaper or blotting paper, place another on top of it, and then place a divider on top of that. Students will continue until they have pressed all 5 specimens. Once each plant is sandwiched between the papers, place a piece of cardboard or wood on the top and bottom of each stack. Put large, thick rubber bands around the entire stack, or tie rope or a belt around it, and let it sit for a minimum of 48 hours to press the plants.
NOTE: if each student does not make his or her own herbarium, the plant presses that are Included with this traveling trunk can be used along with other make-shift presses. Consider pressing the plants between newspaper that is trapped under a heavy object such as a textbook.
6. Several days after the plants have been pressed it will be time to open up the presses. Instruct students to carefully open the presses and remove each plant. Each child must now match the appropriate plant with the herbarium page and attach the plant to the page using the glue.
7. Students may then compile their specimen sheets into a full herbarium, complete with a
decorated cover.
Extension Activities:
• Consider compiling all of the students’ pages into a class herbarium. This can also become a resource for the entire school if the class donates it to the library.
• Is your class computer-savvy? Use students’ work and talents in order to create an online class herbarium.
• Make art with your plant presses! In Victorian times, people frequently pressed flowers and leaves and used them to make decorative artwork. After compiling herbariums, return outdoors to collect more flowers and leaves. This time, once you press the plants, use them to make art. Bookmarks and cards are just a few examples of the different crafts which can utilize pressed plants.
References: Herbarium and Plant Collection Process: Fun Science’s extensive resource on creating herbariums. http://www.funsci.com/fun3_en/herb/herb.htm Making Plant Presses: An alternate way to create a personal plant press. http://biology.arizona.edu/sciconn/lessons2/Barber/Activity3a.htm Phone Book Plant Press: Directions on making a plant press from a phone book. http://www.familyeducation.com/article/0,1120,1-9891,00.html Plant Press Directions: Texas Junior Naturalist’s directions on making a plant press. http://www.tpwd.state.tx.us/learning/junior_naturalists/press.phtml Pressed Plant Bookmarks: How to create pressed plant bookmarks. http://www.ornatebirdgarden.com/html/herbalcraftsbookmarks.html Stationary: Create beautiful stationary using pressed plants. http://www.enchantedlearning.com/crafts/plants/pressedflowers/ Super Quick Plant Press: How to press plants quickly with an iron and then turn them into cards. http://www.marthastewart.com/good-things/pressed-plant-cards
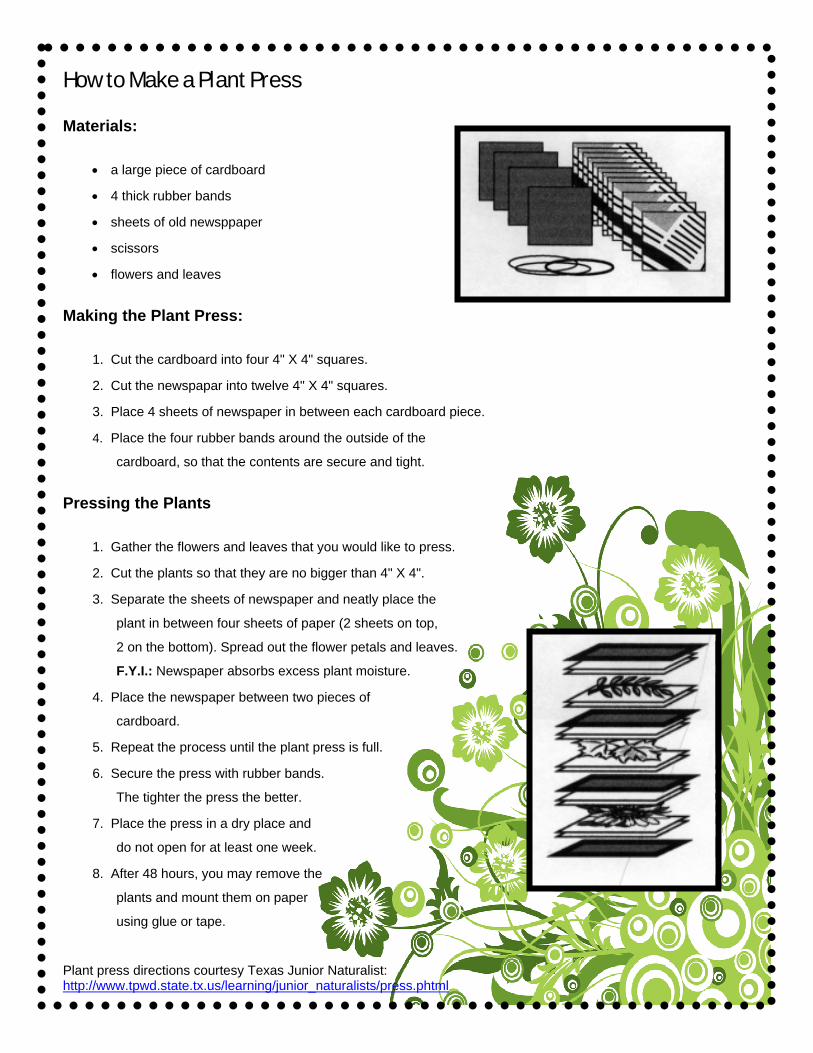
How to Make a Plant Press
Materials:
• a large piece of cardboard
• 4 thick rubber bands
• sheets of old newsppaper
• scissors
• flowers and leaves
Making the Plant Press:
1. Cut the cardboard into four 4" X 4" squares.
2. Cut the newspapar into twelve 4" X 4" squares.
3. Place 4 sheets of newspaper in between each cardboard piece.
4. Place the four rubber bands around the outside of the
cardboard, so that the contents are secure and tight.
Pressing the Plants
1. Gather the flowers and leaves that you would like to press.
2. Cut the plants so that they are no bigger than 4" X 4".
3. Separate the sheets of newspaper and neatly place the
plant in between four sheets of paper (2 sheets on top,
2 on the bottom). Spread out the flower petals and leaves.
F.Y.I.: Newspaper absorbs excess plant moisture.
4. Place the newspaper between two pieces of
cardboard.
5. Repeat the process until the plant press is full.
6. Secure the press with rubber bands.
The tighter the press the better.
7. Place the press in a dry place and
do not open for at least one week.
8. After 48 hours, you may remove the
plants and mount them on paper
using glue or tape. Plant press directions courtesy Texas Junior Naturalist: http://www.tpwd.state.tx.us/learning/junior_naturalists/press.phtml
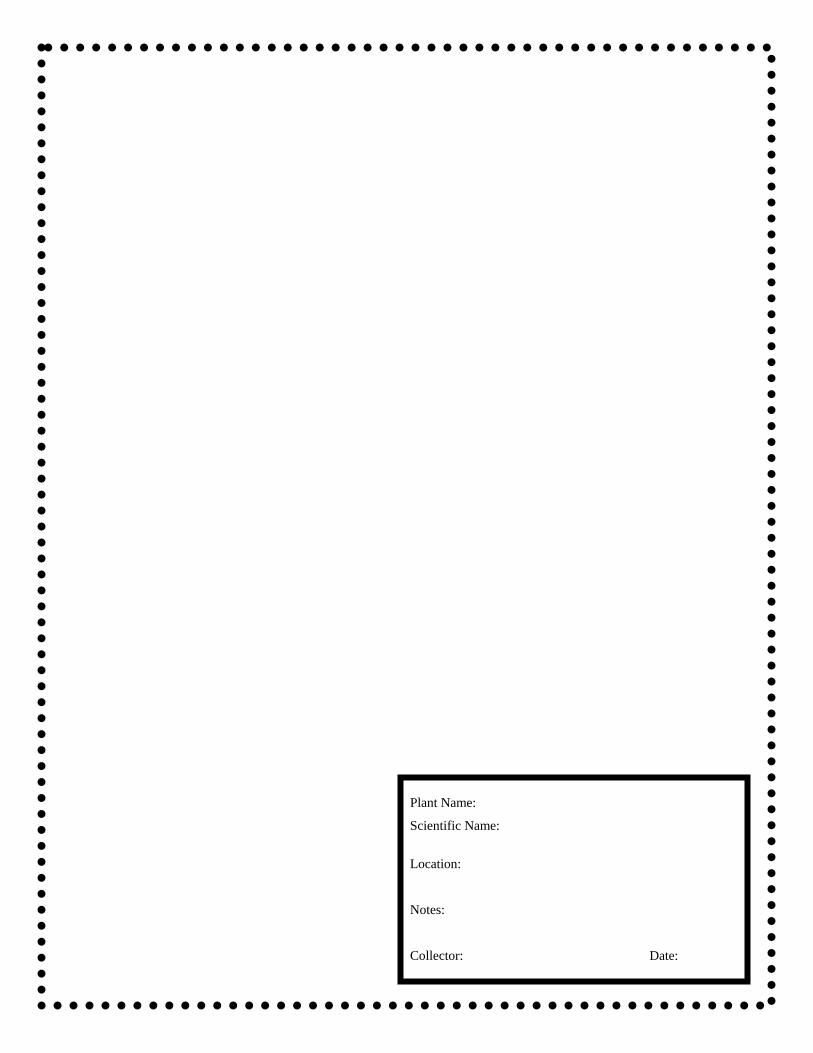
Plant Name:
Scientific Name:
Location: Notes: Collector: Date:

Overview: Invasive plants are a big problem in Florida and an easy solution isn’t available. Students will learn how to recognize common invasives found in South Florida, why they are invasive, methods of controlling them, and why that isn’t always easy.
Lesson Plan: Neighborhood Watch
Objectives: The student will be able to:
1. Learn what makes a plant invasive.
2. Define competition.
3. Understand the origins of many local invasive species and their degree of invasiveness.
4. Identify several common local invasive plants.
5. Understand why, even though a plant has proven to be invasive, some people are averse to controlling them.
Materials: • Uno card game
(found in Traveling Trunk)
• Invasive and native plant identification cards (found in Traveling Trunk)
Grade Level: 1st – 5th Grade 6th – 8th Grade Duration: 2-3 class periods
FCAT Benchmarks: SC.6.N.2.1, SC.6.N.2.2, SC.6.N.2.3, SC.7.N.3.Su.a, SC.7.L.17.b, SC.7.L.17.c, SC.7.L.17.Su.b; SC.7.L.17.Su.c, SC.7.L.17, Su.Pa.a, SC.7.L.17.Su.b, SC.7.L.17.Su.c, SC.7.L.17.3, SC.8.N.2.1, SC.8.N.2.2, HE.6.B.1.1, HE.6.B.1.2, HE.6.B.1.3, HE.6.B.1.4, HE.6.B.1.5, HE.6.B.1.6, HE.6.B.1.7, HE.6.B.2.1, HE.6.B.2.2, HE.6.B.3.1, HE.6.B.3.2, HE.6.C.2.9, HE.6.C.2.10, HE.7.B.1.1, HE.7.B.1.2, HE.7.B.1.7,.7.B.2.1, HE.7.B.2.2, HE.7.C.2.5, HE.7.C.2.6, HE.7.C.2.7, HE.7.C.2.8, HE.7.P.2.1, HE.7.P.2.2, HE.7.P.2.4, HE.8.B.1.1, HE.8.B.1.2, HE.8.B.1.5, HE.8.B.1.7; HE.8.B.2.2, HE.8.C.2.1, HE.8.C.2.2, HE.8.C.2.5, HE.8.C.2.8, HE.8.C.2.9, HE.8.P.2.1, HE.8.P.2.4, HE.912.B.1.1, HE.912.B.3.4, LA.6.1.6.1, LA.6.5.1.1, LA.6.5.2.1, LA.6.5.2.2, LA.6.3.1.1, LA.6.3.1.2, LA.6.3.1.3, LA.6.3.2.1, LA.6.3.2.2, LA.6.3.3.1, LA.6.3.5.1, LA.6.3.5.3, LA.6.6.4.2, LA.7.1.7.1, LA.7.2.2.1, LA.7.2.2.2, LA.7.2.2.3, LA.7.2.2.5, LA.7.3.1.1, LA.7.3.1.2, LA.7.3.1.3, LA.8.1.6.1, LA.8.1.7.1, LA.8.3.2.1, LA.8.3.2.2, LA.8.3.5.1, LA.8.3.5.2, LA.8.3.5.3, LA.8.4.2.1, LA.8.4.2.2, LA.8.4.2.3, LA.8.4.3.1, LA.8.4.3.2, LA.8.5.2.1, LA.8.5.2.2, LA.8.5.2.3, LA.8.5.2.4, LA.8.5.2.5, LA.8.6.1.1, LA.8.6.1.2, LA.8.6.2.1, LA.8.6.2.2, LA.8.6.2.3, LA.8.6.2.4, LA.8.6.3.1, LA.8.6.3.2, LA.8.6.3.3, LA.8.6.4.1, SS.8.G.5.1, SS.8.G.5.2

Background: Florida’s mild climate makes it a nice place for people, and plants, to live. Invasive plants were most commonly introduced by humans, but not all plants introduced by us are invasive. When the first settlers came here, many of them brought plants from home to make their landscape more familiar, better match their ideal of beauty, or for food. Some of these plants weren’t suited to this new environment, but others flourished. Many of these “naturalized” plants found their own niche without seriously impacting the environment in a negative way. For example, citrus trees, synonymous with Florida, are actually Asian in origin. Though some in central Florida may disagree, citrus trees have integrated into Florida without overwhelming ecosystems. Unfortunately, many more of these exotic plants have become invasive, outcompeting native plants and destroying habitats. One of the best examples of an invasive in South Florida is the Brazilian pepper tree. It was brought to Florida as a substitute for the northern ilex holly. Having a Christmas “just like back home” came with a price as the plant spread out of control and is now destroying mangrove communities with impunity.
Several common highly invasive plants in South Florida are:
Dioscorea bulbifera - air potato Casuarina equisetifolia - Australian pine Schinus terebinthifolius - Brazilian pepper Cupaniopsis anacardioides – carrotwood Imperata cylindrica - Cogon grass Hydrilla verticillata – hydrilla Abrus precatorius - rosary pea Eichhornia crassipes - water hyacinth Pistia stratiotes - water lettuce
The primary problem with invasive plants is that they out-compete natives. They can do this by taking up soil nutrients quicker, shading out other plants, or poisoning the soil around them so that others cannot grow. When natives lose the battle, it results in a monoculture of the invasive plant. A monoculture is considered to be where only one species of plant grows in a large area. Though these plants pose a huge threat to Florida’s ecosystems, many people still resist their removal. Some think the economic cost is too great; others believe the beauty or usefulness of the plant outweighs its destructive nature.

Procedure: 1. Start this lesson with the following Warm-Up Activity: Ask each student to describe a plant
they have in their backyard or near their house. Be detailed. Does it have flowers? What do they look like? What shape are its leaves? How tall is it? Is there a lot of it? How likely is it that the plant they are describing is a native one? Explain that many plants used as landscaping are not native to Florida. Why can this be bad?
2. Ask students to think about other reasons someone would bring a plant to Florida. Can
anyone name a plant brought to Florida for food? For animals to eat? Explain that plants that did not originally grow in Florida were brought here for many different reasons, while some were not intentionally brought here at all. Not all of these became invasive. Explain the differences between exotics, naturalized plants, and invasives. Ask for reasons why some plants grow in Florida but do not take over and invade other habitats. Explain that some of these plants are missing things they would get at their place of origin, such as special pollinators or environmental conditions. Discuss natural predators and competition.
3. Students will now divide up into groups and be given Uno decks. Explain that they will be
playing Reverse Uno – whoever has the most cards when the deck is empty wins. The green cards represent food, the yellow cards represent sunlight, the blue cards represent water, and the red cards represent pollinators. Students will be playing as exotic invasives. When a winner is determined, count up the number of each color they gained. Explain that since they got mostly yellow (for example) that they shaded out other plants and were able to grow bigger/ faster than the others.
4. Explain that the winners out-competed the native plants. This ability is what makes invasive
plants so destructive. When they do this, it isn’t just the native plants that suffer. The animals that depend on those natives for food or shelter will also be affected. Some plants can only grow in the presence of others of a certain type. If one of those is displaced by an invasive, both natives will suffer. Some plants are poisonous to wildlife so are destructive in that way. Now that we know why a plant is considered invasive, how will we recognize those common to our area?
5. The students will now have an invasive plant “lineup.” Be the detective running the lineup,
getting students into the mood of a “police show” format. Choose 4 students and pass out plant identification pictures, allowing 3 natives to 1 invader or naturalized plant. Ask the rest of the group if they can guess which plant is the invader. If they are incorrect, have each student with a card say the name of their plant. If the students still can’t guess, the invader has to confess. After the invasive plant is determined, the student with that card will read off its identifying characteristics and habitat preference. Repeat until all students have had a turn.
6. Now that students can identify common invasive and naturalized plants, talk about methods
of control. Ask them what difficulties might arise from attempting this? Why might people not want to control invasive plants? Explain that some people feel the benefits from their plants (aesthetics, shade, habitat, etc.) outweigh the dangers. Many people are unaware of the full extent an invasive plant can damage the environment. Others don’t know how to identify them. By learning about invasive plants and educating others, students can help control the spread of exotics even if they can’t go out and remove them themselves.
7. This lesson plan intersects well with the “wanted poster” lesson plan found in this Traveling
Trunk.
Extension Activities:
• Go on a campus field trip, pointing out locations of invasives and good uses of native plants. Have students create a removal plan if possible.
• Assign each student a plant to research. Have them create a report on the origins and spread of their plant, and focus on the plant’s natural competitors. Present their findings to the class.
• Have students identify the invasives in their own yard/neighborhood.
References & Resources: List of all plants introduced to Florida with images. http://www.flmnh.ufl.edu/herbarium/cat/imagesearch.asp?srchproject=IN List of Schedule 1 (very invasive) and Schedule 2 (less damaging to habitat) plants. http://www.fleppc.org/list/05List.htm Management plans for several common South Florida invasives. http://www.fleppc.org/publications.htm Plant Substitution Guide. http://www.fleppc.org/Misc/AlterNative2.pdf
Overview: Invasive plants are a big problem in Florida and an easy solution isn’t available. Students will learn how to recognize common invasives found in South Florida, why they are invasive, methods of controlling them, and why that isn’t always easy.
Lesson Plan: Neighborhood Watch
Objectives: The student will be able to:
1. Learn what makes a plant invasive.
2. Define competition.
3. Understand the origins of many local invasive species and their degree of invasiveness.
4. Identify several common local invasive plants.
5. Understand why, even though a plant has proven to be invasive, some people are averse to controlling them.
Materials: • Uno card game
(found in Traveling Trunk)
• Invasive and native plant identification cards (found in Traveling Trunk)
Grade Level: 1st – 5th Grade 6th – 8th Grade Duration: 2-3 class periods
FCAT Benchmarks: SC.6.N.2.1, SC.6.N.2.2, SC.6.N.2.3, SC.7.N.3.Su.a, SC.7.L.17.b, SC.7.L.17.c, SC.7.L.17.Su.b; SC.7.L.17.Su.c, SC.7.L.17, Su.Pa.a, SC.7.L.17.Su.b, SC.7.L.17.Su.c, SC.7.L.17.3, SC.8.N.2.1, SC.8.N.2.2, HE.6.B.1.1, HE.6.B.1.2, HE.6.B.1.3, HE.6.B.1.4, HE.6.B.1.5, HE.6.B.1.6, HE.6.B.1.7, HE.6.B.2.1, HE.6.B.2.2, HE.6.B.3.1, HE.6.B.3.2, HE.6.C.2.9, HE.6.C.2.10, HE.7.B.1.1, HE.7.B.1.2, HE.7.B.1.7,.7.B.2.1, HE.7.B.2.2, HE.7.C.2.5, HE.7.C.2.6, HE.7.C.2.7, HE.7.C.2.8, HE.7.P.2.1, HE.7.P.2.2, HE.7.P.2.4, HE.8.B.1.1, HE.8.B.1.2, HE.8.B.1.5, HE.8.B.1.7; HE.8.B.2.2, HE.8.C.2.1, HE.8.C.2.2, HE.8.C.2.5, HE.8.C.2.8, HE.8.C.2.9, HE.8.P.2.1, HE.8.P.2.4, HE.912.B.1.1, HE.912.B.3.4, LA.6.1.6.1, LA.6.5.1.1, LA.6.5.2.1, LA.6.5.2.2, LA.6.3.1.1, LA.6.3.1.2, LA.6.3.1.3, LA.6.3.2.1, LA.6.3.2.2, LA.6.3.3.1, LA.6.3.5.1, LA.6.3.5.3, LA.6.6.4.2, LA.7.1.7.1, LA.7.2.2.1, LA.7.2.2.2, LA.7.2.2.3, LA.7.2.2.5, LA.7.3.1.1, LA.7.3.1.2, LA.7.3.1.3, LA.8.1.6.1, LA.8.1.7.1, LA.8.3.2.1, LA.8.3.2.2, LA.8.3.5.1, LA.8.3.5.2, LA.8.3.5.3, LA.8.4.2.1, LA.8.4.2.2, LA.8.4.2.3, LA.8.4.3.1, LA.8.4.3.2, LA.8.5.2.1, LA.8.5.2.2, LA.8.5.2.3, LA.8.5.2.4, LA.8.5.2.5, LA.8.6.1.1, LA.8.6.1.2, LA.8.6.2.1, LA.8.6.2.2, LA.8.6.2.3, LA.8.6.2.4, LA.8.6.3.1, LA.8.6.3.2, LA.8.6.3.3, LA.8.6.4.1, SS.8.G.5.1, SS.8.G.5.2
Background: Florida’s mild climate makes it a nice place for people, and plants, to live. Invasive plants were most commonly introduced by humans, but not all plants introduced by us are invasive. When the first settlers came here, many of them brought plants from home to make their landscape more familiar, better match their ideal of beauty, or for food. Some of these plants weren’t suited to this new environment, but others flourished. Many of these “naturalized” plants found their own niche without seriously impacting the environment in a negative way. For example, citrus trees, synonymous with Florida, are actually Asian in origin. Though some in central Florida may disagree, citrus trees have integrated into Florida without overwhelming ecosystems. Unfortunately, many more of these exotic plants have become invasive, outcompeting native plants and destroying habitats. One of the best examples of an invasive in South Florida is the Brazilian pepper tree. It was brought to Florida as a substitute for the northern ilex holly. Having a Christmas “just like back home” came with a price as the plant spread out of control and is now destroying mangrove communities with impunity.
Several common highly invasive plants in South Florida are:
Dioscorea bulbifera - air potato Casuarina equisetifolia - Australian pine Schinus terebinthifolius - Brazilian pepper Cupaniopsis anacardioides – carrotwood Imperata cylindrica - Cogon grass Hydrilla verticillata – hydrilla Abrus precatorius - rosary pea Eichhornia crassipes - water hyacinth Pistia stratiotes - water lettuce
The primary problem with invasive plants is that they out-compete natives. They can do this by taking up soil nutrients quicker, shading out other plants, or poisoning the soil around them so that others cannot grow. When natives lose the battle, it results in a monoculture of the invasive plant. A monoculture is considered to be where only one species of plant grows in a large area. Though these plants pose a huge threat to Florida’s ecosystems, many people still resist their removal. Some think the economic cost is too great; others believe the beauty or usefulness of the plant outweighs its destructive nature.
Procedure: 1. Start this lesson with the following Warm-Up Activity: Ask each student to describe a plant
they have in their backyard or near their house. Be detailed. Does it have flowers? What do they look like? What shape are its leaves? How tall is it? Is there a lot of it? How likely is it that the plant they are describing is a native one? Explain that many plants used as landscaping are not native to Florida. Why can this be bad?
2. Ask students to think about other reasons someone would bring a plant to Florida. Can
anyone name a plant brought to Florida for food? For animals to eat? Explain that plants that did not originally grow in Florida were brought here for many different reasons, while some were not intentionally brought here at all. Not all of these became invasive. Explain the differences between exotics, naturalized plants, and invasives. Ask for reasons why some plants grow in Florida but do not take over and invade other habitats. Explain that some of these plants are missing things they would get at their place of origin, such as special pollinators or environmental conditions. Discuss natural predators and competition.
3. Students will now divide up into groups and be given Uno decks. Explain that they will be
playing Reverse Uno – whoever has the most cards when the deck is empty wins. The green cards represent food, the yellow cards represent sunlight, the blue cards represent water, and the red cards represent pollinators. Students will be playing as exotic invasives. When a winner is determined, count up the number of each color they gained. Explain that since they got mostly yellow (for example) that they shaded out other plants and were able to grow bigger/ faster than the others.
4. Explain that the winners out-competed the native plants. This ability is what makes invasive
plants so destructive. When they do this, it isn’t just the native plants that suffer. The animals that depend on those natives for food or shelter will also be affected. Some plants can only grow in the presence of others of a certain type. If one of those is displaced by an invasive, both natives will suffer. Some plants are poisonous to wildlife so are destructive in that way. Now that we know why a plant is considered invasive, how will we recognize those common to our area?
5. The students will now have an invasive plant “lineup.” Be the detective running the lineup,
getting students into the mood of a “police show” format. Choose 4 students and pass out plant identification pictures, allowing 3 natives to 1 invader or naturalized plant. Ask the rest of the group if they can guess which plant is the invader. If they are incorrect, have each student with a card say the name of their plant. If the students still can’t guess, the invader has to confess. After the invasive plant is determined, the student with that card will read off its identifying characteristics and habitat preference. Repeat until all students have had a turn.
6. Now that students can identify common invasive and naturalized plants, talk about methods
of control. Ask them what difficulties might arise from attempting this? Why might people not want to control invasive plants? Explain that some people feel the benefits from their plants (aesthetics, shade, habitat, etc.) outweigh the dangers. Many people are unaware of the full extent an invasive plant can damage the environment. Others don’t know how to identify them. By learning about invasive plants and educating others, students can help control the spread of exotics even if they can’t go out and remove them themselves.
7. This lesson plan intersects well with the “wanted poster” lesson plan found in this Traveling
Trunk.

Extension Activities:
• Go on a campus field trip, pointing out locations of invasives and good uses of native plants. Have students create a removal plan if possible.
• Assign each student a plant to research. Have them create a report on the origins and spread of their plant, and focus on the plant’s natural competitors. Present their findings to the class.
• Have students identify the invasives in their own yard/neighborhood.
References & Resources: List of all plants introduced to Florida with images. http://www.flmnh.ufl.edu/herbarium/cat/imagesearch.asp?srchproject=IN List of Schedule 1 (very invasive) and Schedule 2 (less damaging to habitat) plants. http://www.fleppc.org/list/05List.htm Management plans for several common South Florida invasives. http://www.fleppc.org/publications.htm Plant Substitution Guide. http://www.fleppc.org/Misc/AlterNative2.pdf
Overview: Invasive plants are so devastating partly because they can spread so quickly in the right environment. This spread can be due to fast vegetative growth but is also related to how the plant’s seeds are dispersed. In this lesson plan, students will learn about seed anatomy and the various methods of seed dispersal.
Lesson Plan: Sowing the Seeds
Objectives: The student will be able to:
1. Define dispersal
2. Understand the different methods of seed dispersal.
3. Identify several invasive plants and their method of seed dispersal.
4. Identify and label the parts of a seed.
Materials: • Socks
• Magnifiers
• Various seeds (found in trunk)
• Fruit (cherries, strawberries, tomato, apple, etc.) brought in by students
• Corn, lima, and kidney beans (soaked for 1 day)
• Bowl of water
• Paper, paperclips, and scissors
• Fan or windy day
Grade Level: 1th – 5th Grade 6th – 8th Grade Duration: 3 -4 class periods
FCAT Benchmarks: SC.1.L.14.1, SC.1.L.14.2, SC.1.L.14.3, SC.1.N.1.1, SC.1.N.1.2, SC.1.N.1.3, SC.1.N.1.4, SC.1.P.8.1, SC.1.P.12.1, SC.1.P.13.1, SC.2.E.7.4, SC.2.L.16.1, SC.2.N.1.1, SC.2.N.1.2, SC.2.N.1.5, SC.2.P.8.1, SC.3.L.14.1, SC.3.L.14.2, SC.3.L.15.2, SC.3.N.1.3, SC.3.N.3.3, SC.4.L.17.2, SC.4.N.1.1, SC.4.N.1.6, SC.4.N.1.7, SC.4.N.1.8

Background: Invasive plants have spread across Florida in several ways, but one of the most important methods is through seed dispersal. Plants have three main ways of distributing their seeds in the environment.
Many seeds are dispersed by the wind. This can be achieved by being very light and fuzzy, like dandelion seeds, or aerodynamically shaped, like maple seeds. An invasive plant that uses this method is Cogon grass.
Other seeds are spread by animals. Some seeds have Velcro-like hairs, while others have thorns. These projections allow seeds to stick in fur, hair, or flesh, and be carried long distances. Sandspurs, beggarweed, and the invasive puncture vine are all plants that spread their seeds in this way.
Another common method of dispersal through animals is by fruit. Many plants encase their seeds in flesh that is appealing to animals. The animal eats the fruit and its seeds along with it. Usually these seeds are coated so they pass unharmed through the animal’s digestive tract. When they come out the other end they are deposited – with a convenient packet of fertilizer – in a new location. Brazilian pepper is a prime example of an invasive plant that has spread using this method.
Some seeds travel by water. Coconut palms grow near the ocean so that when their seeds drop they are carried out to sea by the tide. They can cross an entire ocean before reaching land. This seafaring seed has spread around the world using this technique. Another good example is the red mangrove. Its seeds, called propagules, disperse in the same way.
There are variations on these methods, and some less common ones such as the force method of dispersal. Some plants have explosive seed pods that shoot their seeds out with great force when triggered by touch or other stimuli. Other plants only release their seeds after or during exposure to fire. Not all seeds use just one method. Australian pine, for example, uses wind, animals (by fruit), and water. This makes it a particularly effective colonizer. Procedure: 1. Begin by asking students if they can name some seeds they see/eat in everyday life. How
did those seeds get there? Explain that humans are frequently the way seeds get from one place to another, and that is how most invasive plants came to Florida. Explain to students that humans are not the only way seeds can move from place to place. Ask students why a seed would need to move away from its parent plant. What are some ways that they do this?
2. Start with wind dispersal. Ask students if they can name any seeds that disperse using the
wind. What physical characteristics help them do this? Pass out scissors, paper, and paperclips. Ask students to design a seed that moves using the wind. Craft paper “wings” and use the paperclip as the “seed.” Give younger students a pattern to follow. Have students stand on a chair and drop their seeds in front of a fan. Which ones go farther?
3. Students will now explore the “burr” method of dispersal. Have each student put a pair of
white socks on over their shoes. Lead students on a nature walk around the schoolyard. Encourage them to rub their feet in different areas and types of vegetation. When they return, remove the socks and examine them for seeds. Discuss the different characteristics of the seeds. Ask if they are fuzzy? Sticky? Sharp? How might these characteristics help the seed? Ask the students to name some seeds they’ve come in contact with that disperse using this method.
4. Next, students will explore seeds that use fruit as their dispersal method. Ask students if
they ate fruit in the past day or so. Did it have a seed inside? How many? Explain that plants use fruit to entice animals to eat their seeds. Have each student dissect their fruit to find the seed. Discuss seed placement and fruit size. How do these variables affect the seed’s movement? Why are some seeds edible to some animals but not others?
5. Finally, discuss water dispersal. Can anyone name seeds that do this? Where are plants
that use this method likely to be found? Place beans and other seeds in a bowl of water along with the sea beans and propagules found in the traveling trunk. Which float? What are some disadvantages of this method?
6. What’s in a seed? Pass out soaked beans and magnifiers to students. Ask them to
describe their seed. What might the parts of the seed be for? Name and explain the parts of a seed, then have them draw a picture of their seed with correct labels. Have representatives draw each type of seed on the boards and compare.
Extension Activities:
• Collect seeds from school grounds. Classify each seed according to dispersal method.
• After fruit dissection have students combine their fruits to make a salad. Discuss differences in size and color between fruits.
• Sprout different types of seeds (beans, radishes, squash, avocado, etc) in the classroom. Discuss sprouting method, timing, and differences in form.
References & Resources: Images of seeds and explanations of their dispersal methods http://www.cas.vanderbilt.edu/bioimages/pages/fruit-seed-dispersal.htm Detailed list of wind dispersal types http://waynesword.palomar.edu/plfeb99.htm A nice overview of dispersal methods and representative plants http://theseedsite.co.uk/dispersal.html Videos of wind and force dispersal http://www.mbgnet.net/bioplants/seed.html Illustration of the parts of a seed http://theseedsite.co.uk/seedparts.html
Overview: Invasive plants pose a threat to Florida’s native flora and fauna and could be likened to dangerous criminals in terms of the negative effect their presence can have on the ecosystem. This interdisciplinary lesson plan will introduce students to some of Florida’s “Most Wanted” exotic plants through research. It also provides them the opportunity to share their knowledge with others in an artistic manner by creating “wanted posters” that highlight a specific species of invasive plant.
Lesson Plan: Wanted!
Objectives: The student will be able to:
1. Understand the difference between invasive, exotic, and native plants.
2. Learn that invasive plants in Florida crowd out native species and compete with them for the components of habitat.
3. Research different species of invasive plants common in Florida and the Manasota area using a wide variety of reference materials.
4. Take notes on a class lecture and on researched material.
5. Utilize visual art skills in order to create an informative product.
6. Organize and classify information in a coherent manner to create an informative product.
7. Use writing skills to describe the assigned plant and illustrate the “danger” each one can pose.
8. Work together as a team in order to complete this assignment.
Materials: • Poster board (one sheet per group)
• Markers
• Crayons
• White paper
• Reference books, posters, preserved specimens, and materials (included in the traveling trunk)
• Copies of Invasive Plant Color Sheets (for younger students)
• Examples of historical wanted posters
• Computers and internet
Grade Level: 1st – 5th Grade 6th – 8th Grade
Duration: 2 class periods
FCAT Benchmarks: SC.6.N.2.1, SC.6.N.2.2, SC.6.N.2.3, SC.7.N.3.Su.a, SC.7.L.17.b, SC.7.L.17.c, SC.7.L.17.Su.b, SC.7.L.17.Su.c, SC.7.L.17.Su.Pa.a, SC.7.L.17.Su.b, SC.7.L.17.Su.c, SC.7.L.17.3, SC.8.N.2.1, SC.8.N.2.2, HE.6.B.1.1, HE.6.B.1.2, HE.6.B.1.3, HE.6.B.1.4, HE.6.B.1.5, HE.6.B.1.6, HE.6.B.1.7, HE.6.B.2.1, HE.6.B.2.2, HE.6.B.3.1, HE.6.B.3.2, HE.6.C.2.9, HE.6.C.2.10, HE.7.B.1.1, HE.7.B.1.2, HE.7.B.1.7, HE.7.B.2.1, HE.7.B.2.2, HE.7.C.2.5, HE.7.C.2.6, HE.7.C.2.7, HE.7.C.2.8, HE.7.P.2.1, HE.7.P.2.2, HE.7.P.2.4, HE.8.B.1.1, HE.8.B.1.2, HE.8.B.1.5, HE.8.B.1.7, HE.8.B.2.2, HE.8.C.2.1, HE.8.C.2.2, HE.8.C.2.5, HE.8.C.2.8, HE.8.C.2.9, HE.8.P.2.1, HE.8.P.2.4, HE.912.B.1.1, HE.912.B.3.4, LA.6.1.6.1, LA.6.5.1.1, LA.6.5.2.1, LA.6.5.2.2, LA.6.3.1.1, LA.6.3.1.2, LA.6.3.1.3, LA.6.3.2.1, LA.6.3.2.2, LA.6.3.3.1, LA.6.3.5.1; LA.6.3.5.3; LA.6.6.4.2; LA.7.1.7.1,LA.7.2.2.1, LA.7.2.2.2, LA.7.2.2.3, LA.7.2.2.5, LA.7.3.1.1, LA.7.3.1.2, LA.7.3.1.3, LA.8.1.6.1, LA.8.1.7.1 , LA.8.3.2.1, LA.8.3.2.2, LA.8.3.5.1, LA.8.3.5.2, LA.8.3.5.3, LA.8.4.2.1, LA.8.4.2.2, LA.8.4.2.3, LA.8.4.3.1 , LA.8.4.3.2, LA.8.5.2.1, LA.8.5.2.2, LA.8.5.2.3, LA.8.5.2.4, LA.8.5.2.5, LA.8.6.1.1, LA.8.6.1.2, LA.8.6.2.1, LA.8.6.2.2, LA.8.6.2.3, LA.8.6.2.4, LA.8.6.3.1, LA.8.6.3.2, LA.8.6.3.3, LA.8.6.4.1, SS.8.G.5.1, SS.8.G.5.2
Background: Invasive plants present a huge threat to Florida’s native ecosystems and the flora and fauna which inhabit them. Many local and state organizations are working hard to combat this threat and remove exotics from the state, but these same groups have acknowledged the fact that this will be a very long, hard battle, and that, at this point, exotics may be a permanent part of the landscape. Public education is now considered to be one of the best weapons against the spread of exotic plants and animals. Native: Native plants (and wildlife) are those that are a natural part of Florida’s diverse habitats. These plants are normally found in Florida and, along with the native wildlife, play key roles in the local ecosystem. Exotic: Exotic plants (and wildlife) are those that are not normally found in Florida. They can be from international lands, such as countries on other continents, or from as close as another state in the U.S. In either case, these plants are not a part of the state’s natural system that has developed over centuries. Unfortunately, in Florida, people have imported many different types of plants to assist in the fight against erosion, provide food, and create elaborate landscapes, leading to a number of invasive plant problems. Exotic plants are not necessarily invasive. Invasive: Invasive plants are fast-growing, typically have few predators or other biological controls, and flourish in Florida’s moist, warm climate. Usually invasive plants are exotic (see below) but sometimes the native plants that flourish in a habitat where they would not normally be found can also become invasive. Exotic Invasive: Exotic invasive plants are the focus of this traveling trunk. In the past 30 years it has become clear that these plants pose a great threat to natural Florida habitats. In many areas of the state, exotic invasives have taken over habitat, crowding out native plants, and have completely transformed the landscape. Procedure: 1. “Wanted” is designed to move students beyond the simple ‘sight and identify’ format
introduced in the previous lesson plan with the goal of expanding student knowledge and familiarity with invasive plants and their characteristics.
2. Begin by dividing students into teams. Explain that each team is now on a mission: there
are dangerous aliens on the loose! It will be each team’s mission to help others learn about these aliens, what they look like, and how they behave. It’s also important that each team explains why the aliens are not good to have living in Florida even though they seem very harmless. Ask students to brainstorm ideas regarding how they can inform others about the aliens. What could they do to let others know about the invaders?
3. Explain that the aliens the class members are fighting are actually plants. Ask students to
brainstorm reasons why plants might be “dangerous aliens.” What makes a plant an alien? Discuss the definitions of exotic and native plants and exotic invasives. Explain the detrimental role these plants can have on Florida’s habitats. Encourage older students to take notes at this time.
4. Tell the students that each team will now help to fight the alien invaders by making posters
to inform the public about these threatening plants. Assign each team a plant from the list below:
a. Brazilian Peppertree b. Australian Pine c. Carrotwood Tree d. Caesar Weed e. Rosary Pea f. Guinea Grass g. Cogon Grass h. Natal Grass i. Balsam Apple
5. Provide each team with reference materials. (Computers with internet access would be
very useful for this part of the activity.) Each team must now research their chosen plant and determine what type of information they would like to present to the public. Younger students may utilize the plant fact sheets included in the trunk; however, it is suggested that older students be required to research this information on their own.
a. Older students may use this time to look at the various items in the traveling
trunk, such as books and posters, and take notes and make observations. Items should be shared throughout the room, so students will need to write down any pertinent information they would like to use later.
b. Younger students may use this time to observe the preserved specimens for identification clues, such as size, shape, and color. Teachers may also copy relevant parts of the various book resources in the trunk to give to early readers.
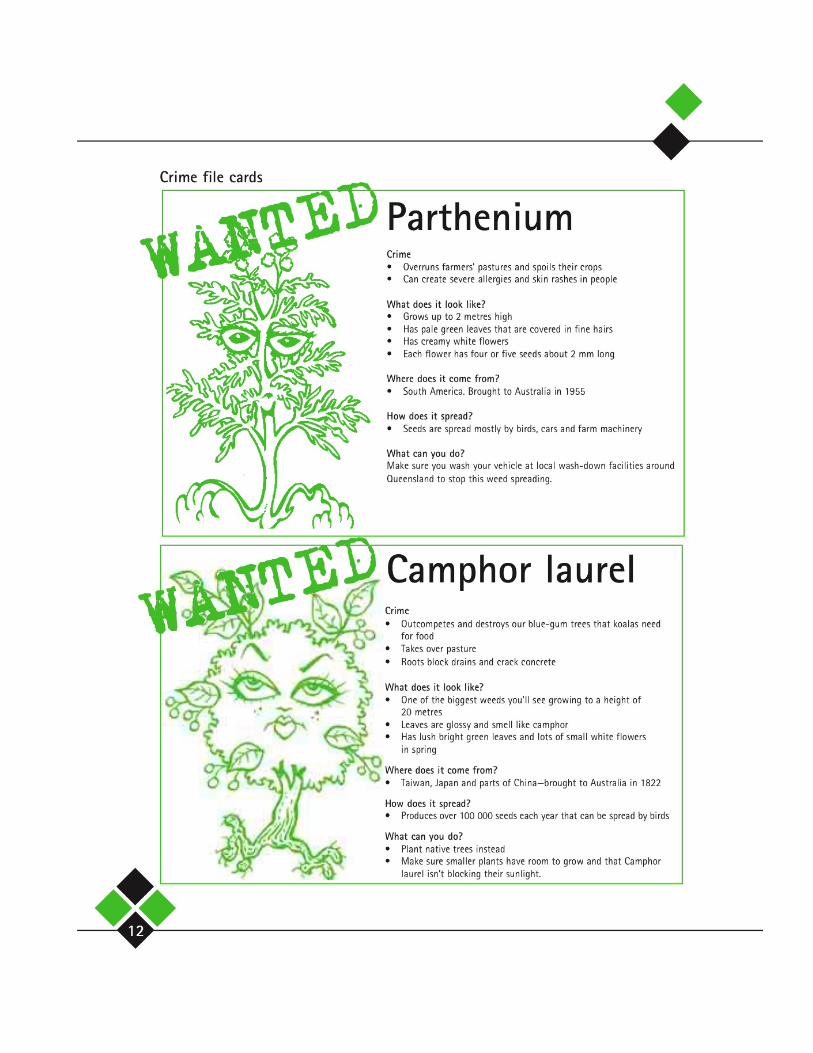
6. Now students will make their “Wanted” posters. Show students examples of historical
wanted posters and explain that, long before television and computers, police posted posters of dangerous criminals. These posters helped inform the public about the dangerous person and helped them to “be on the lookout” for him or her. To help inform others about invasive plants, the students will now create their own “Wanted” posters.
7. Pass out the poster board, white paper, markers, and crayons. Please ask students to
refrain from drawing or writing in any of the reference materials. Encourage students to draw pictures of their plants, remembering to make them as realistic as possible so others will be able to identify the plant by its appearance. Students must also include habitat information and the “behavioral characteristics” of the plant so that others may more easily identify the plant. Encourage students to utilize their notes in order to add this information to their posters.
8. After each group has completed their poster, ask them to share with the class. Students
should be able to describe their invasive plant, what it looks like, where it lives, and what type of damage it can have on the local environment.
9. Once the teams have shared their posters, set up a “rogue’s gallery” of invasive plants.
You may also want to consider inviting in other classes to see the invasives and to learn more about these plants. Another alternative is to set up the posters in the library, media center, or in any bulletin boards found throughout the school. Try involving the students, too – they may have some great ideas as to where the posters can be exhibited.
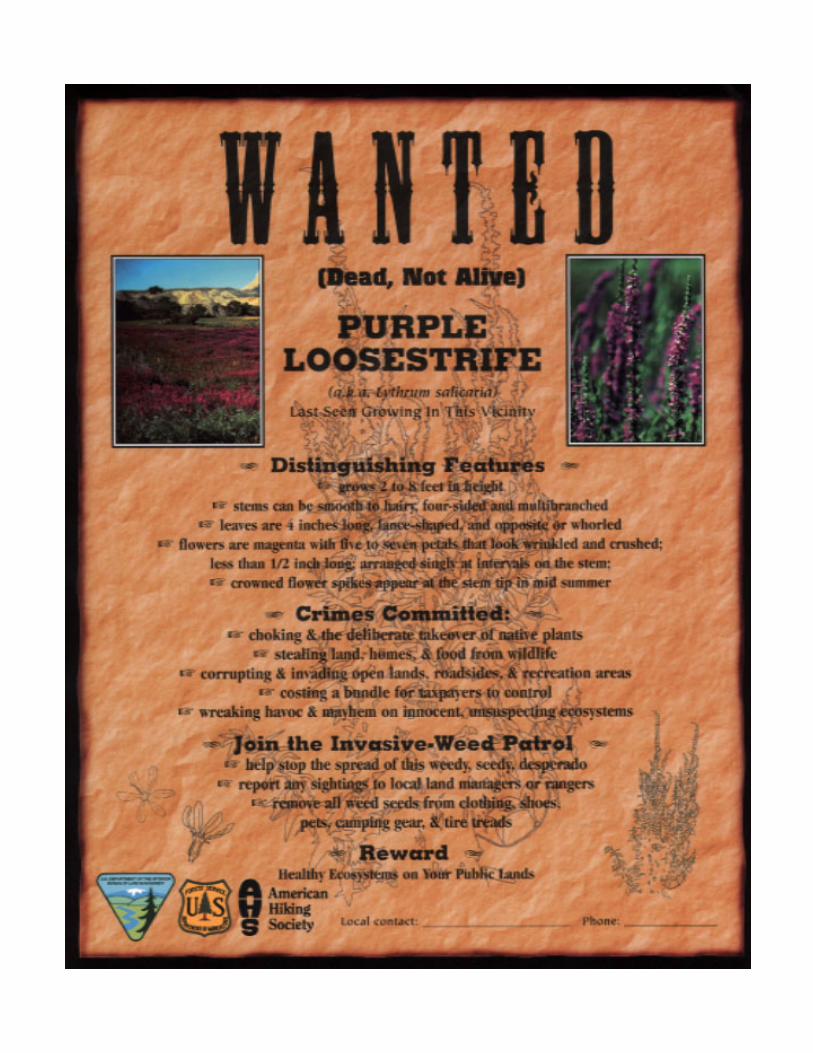
Suggested Information to Include on “Wanted” Posters: Students can, of course, decide to include whatever type of pertinent information on their wanted posters that they would like. However, the list below can be used as a rough guide for ideas or as a firmer checklist of material that must be included on each poster.
• Plant Name (scientific and common – either could be listed as “alias”) - Any other common names or slang terms for the plant
• Place of Origin (country/state it originally came from)
• Where is it wanted (usually stated as “in the county of ___” or “in the state of ___”)
• What does it look like (physical characteristics)
• Why is it wanted (why is this plant a problem)
• Accomplices (what types of animals help spread the plant or how do humans help spread the plant)
• Warning (usually stated as “Warning! Plant seeds are poisonous” etc.)
• What can you do (description of how the invasive plant can be combated) Extension Activities:
• Turn this activity into a photography class by asking students to capture photographs of their “most wanted.” Students can use digital or disposable cameras to take images, upload them to a computer, and then incorporate them into their posters.
• Take the entire class’s poster set and transform them into a set of flash cards for the school to use to learn about invasive plants. If you have a school or class website, this set of informational cards could also be uploaded for the general public to view.
• Translate the posters into a foreign language, such as Spanish or German, so that visitors to the area can also learn about these invasive plants.
References: WANTED: The Bureau of Land Management’s Wanted Posters (example included with this lesson plan). http://www.blm.gov/education/weeds/weedposters/ Wanted Weed Posters: The Blue Mountains Natural Resources Institute’s Online “Wanted Posters” will give students an idea of what type of information to include on their posters. http://www.fs.fed.us/pnw/bmnri/weeds.htm Least Wanted (Alien Plant Invaders of Natural Areas): Plant Conservation Alliance’s “wanted poster style” website with lots of fact sheets on invasive plants. This is a great resource for this project. http://www.nps.gov/plants/alien/factmain.htm
Overview: Plants may elude to be simple in physical structure; however, they have complex biological systems similar to humans! All internal and external structures that make up plants are integral for plant life and also give hints for identifying species. In this lesson plan, students will learn the basic anatomy of plants and how to utilize these characteristics when identifying plant species.
Lesson Plan: Plant Anatomy and Identification
Objectives: The student will be able to:
1. Know the basic types of roots: taproot, fibrous, adventitious, aerial, and tuberous.
2. Know the basic leaf shapes.
3. Understand the different plant growth durations: annual, perennial, evergreen, and deciduous.
4. Be able to identify key characteristics necessary for identification.
5. After completing this lesson, students will have an understanding of how species keys and guides work, as well as be able to use a plant identification guide in the field.
6. Practice sketching plants for identification purposes.
7. Participate with classmates cooperatively and strive for group achievement.
Materials: • Reference books, posters, preserved
specimens, and materials (included in the Traveling Trunk)
• Computers and internet
• Loose-leaf paper
• 3-ring hole punch
• Ribbon/string/yarn
• Pencils
• Colored pencils
• Glue
Grade Level: 6th-8th grade Duration: 1-2 class periods
FCAT Benchmarks: SC.K.N.1.1, SC.K.N.1.2, SC.K.N.1.3, SC.K.N.1.4, SC.K.N.1.5, SC.K. P.9, SC.K.L.14.2, SC.K.L.14.3, SC.N.1.1, SC.N.1.2, SC.N.1.3, SC.N.1.4, SC.1.P.8.1, SC.1.L.14.1, SC.1.L.14.2, SC.1.L.14.3, SC.2.N.1.1, SC.2.N.1.2, SC.2.N.1.3, SC.2.N.1.4, SC.2.N.1.5, SC.2.N.1.6, SC.2.L.16.1, SC.3.N.1.1, SC.3.N.1.2, SC.3.N.1.3, SC.3.N.1.4, SC.3.N.1.5, SC.3.N.1.6, SC.3.N.1.7, SC.3.L.15.2, SC.4.N.1.1, SC.4.N.1.2, SC.4.N.1.3, SC.4.N.1.4, SC.4.N.1.5, SC.4.N.1.6, SC.4.N.2, SC.4.P.8.1, SC.4.L.16.1, SC.4.L.16.2, SC.4.L.16.3, SC.4.L.16.4, SC.6.L.14.ln.a, SC.6.L.14.ln.b, SC.6.L.14.ln.d, SC.6.L.14.Su.a, SC.6.L.14.Su.b, SC.6.L.14.Su.c, SC.6.L.14.Pa.b, SC.6.L.15.1
Background: In order for students to be able to properly identify plant species, this lesson will review the key characteristics found in plants that allow accurate species identification. Further in this program, students will learn more specifically about invasive and exotic plants. Roots: Tap root: main root that constantly enlarges and grows downward
Fibrous root: thin, thread-like roots where no main root is present Adventitious root: a root growing from something (for example, a stem) other than root tissue Tuberous root: an enlarged root that also acts as food storage for the plant Aerial root: adventitious root that starts above ground and grows towards the ground Leaf Shapes: Ovate: egg-shaped with the larger end at the bottom Elliptic: shaped like an ellipse where both ends are tapered Oblong: tapered at both ends where the sides are parallel Lanceolate: broad at the base and tapers to a long, thing point Linear: very long and thin Orbicular: nearly circular Cordate: heart-shaped with the broader part at the bottom Hastate: leaf that has two straight basal lobes Sagittate: leaf that has two basal lobes that point backwards Peltate: leaf that has the stem attach to the back of the leaf Perfoliate: leaf that appears to have the stem run through it Terete: circular in cross-section Parts of a Leaf: Petiole: the stalk of the leaf Blade: the flat, expanded portion of the leaf Growth Forms: Herb: no woody tissue Shrub: woody with multiple stems at the base; less than 25’ tall Tree: woody with typically one stem and more than 25’ tall Vine: woody or herbaceous, stem climbing or twining Duration: Annual: plant that lives for one season or year; lives to reproduce than dies Biennial: plant that lives for two seasons or years Perennial: plant that lives for several years or seasons Evergreen: having leaves persistently for more than two seasons Deciduous: having leaves that die and fall during cold or dry seasons
Procedure: 1. Start this lesson with the following Warm-Up Activity: Ask students what physical
characteristics enable them to identify people in their lives: parents, siblings, friends, teachers, etc. Is it their hair color? Face shape? Height? Or is it because of their location? Also ask which characteristics about themselves do they think people use to identify them? What makes these characteristics unique to each individual, making them key for correct identification?
2. Ask students to think of a specific plant without saying the name out loud. Have them
verbally describe the characteristics of the plant or illustrate them on the board for fellow classmates to see. Ask if anyone can name the mystery plant. After several examples, draw a parallel to how using a plant identification guide is similar to having a classmate describe it.
3. Now for the specifics! Discuss the different basic structures of plants: roots, leaves, growth durations, and growth forms. Use the plant identification guides and cut-outs to help illustrate the parts. Explain some of the functions of the roots, stems, leaves, and flowers of plants; describe the movement of water through a stem of a vascular plant; compare and contrast the processes of photosynthesis and respiration; and describe the process of pollination and seed production.
4. Provide a list of Florida plants and have the students pick one to research. The student should find the basic information about their plants in class reviews and in the handouts, as well as any other information that they find interesting during their research. Allow students access to reference material and class time in order to research their plants, or assign this activity to students as homework. Award extra points if they bring in a sample of their plant, or a picture of it (or photograph it themselves!), and point out key identification characteristics to the class.
5. Students will now construct their own plant identification guides! Hole punch the loose leaf paper and bind it with ribbon, yarn, or string. Have the students decorate the covers. For the first part of this activity, have the students collect leaves or flowers that will be glued into the book, as well as having them sketch a few plants. With one plant per page, have the students also write three unique characteristics of that plant on the same page. See how many students collected the same plants!
Extension Activities:
• Plants can be found with a variety of different characteristics. Have students partner up and complete a Venn diagram to illustrate the similarities and differences between their project plants.
• Leaves can be preserved in a variety of ways. Laminating using a picture laminator
works well. Leaves can also be pressed by inserting them between two paper towels and placing the towels under a stack of books for a week or two. Ironing a piece of waxed paper over the leaf will cause some of the wax to go into the pores of the leaf, preserving it. The leaves may also be mounted between two layers of self-adhesive plastic, or between one layer of plastic and a cardboard backing.
• Explain to students that celery is a stem. It transports water and food to the rest of the
plant. As a demonstration or experiment in small groups, have students put the celery in blue water. They can observe how blue water travels up the celery to the leaves. Students can record how long it takes for the blue water to move up the stem.
References & Resources: Kentucky State Nature Preserves Commission – detailed glossary comprised of identification terms as well as diagrams. http://eppcapps.ky.gov/nprareplants/glossary.aspx USDA Plants – an online comprehensive guide. http://plants.usda.gov/gallery.html Vascular Plant Image Library – not sure if you found the right one? Sometimes cross referencing different pictures can help! http://www.csdl.tamu.edu/FLORA/gallery.htm Plant Identification Game – interactive online key. http://webworld.freac.fsu.edu/cameras/keys/sa/tree.html
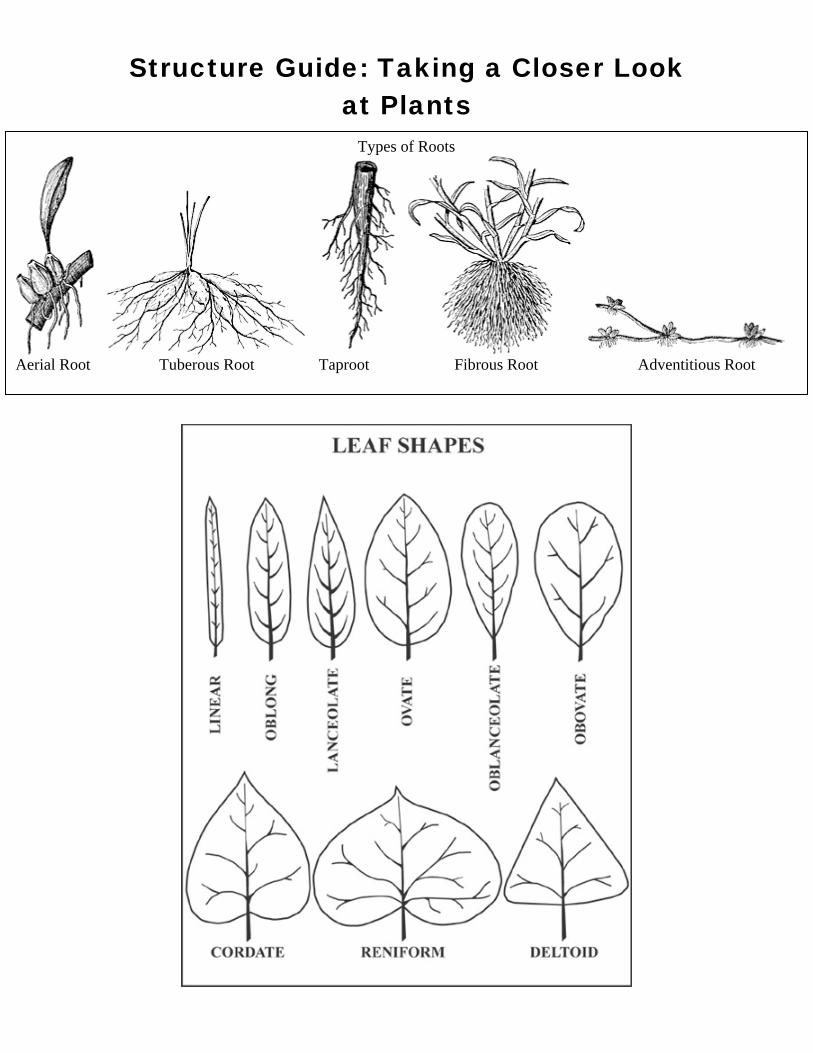
Structure Guide: Taking a Closer Look at Plants
Types of Roots
Aerial Root Tuberous Root Taproot Fibrous Root Adventitious Root

Source: Lesson plans and traveling trunk content created by Melissa Cain Nell for Manatee County's Natural Resources Department. Additional material created by interns Suwanna Blakey and Renee Price. For more information on Manatee County visit www.mymanatee.org