LESSON 09: Mail Merge. LEARNING OUTCOMES: 1.State the usage of mail merge. 2.Create a mail merge...
56
LESSON 09: Mail Merge
-
Upload
stella-reynolds -
Category
Documents
-
view
241 -
download
2
Transcript of LESSON 09: Mail Merge. LEARNING OUTCOMES: 1.State the usage of mail merge. 2.Create a mail merge...

LESSON 09:
Mail Merge

LEARNING OUTCOMES:
1. State the usage of mail merge.2. Create a mail merge document.3. Save the document.

At the end of this lesson, students should be able to:– Create a mail merge document and save the
document.
– Create data source in Excel
– Set up main document
– Open data source
– Insert merge fields
– Merge to new document
– Save the document

• Activity 1: Create “Enrolment Form” document
• Activity 2: Open Mail merge wizard• Activity 3: Insert Data• Activity 4: Save data• Activity 5: Change Field Names • Activity 6: Merge data in the form• Activity 7: Print Mail Merge
:
Activities Menu(Click on the menu to run the activity.)

Activity 1: Create
“Enrolment Form“document

Activity 2:Open Mail Merge Wizard

1. Open a New Microsoft Document
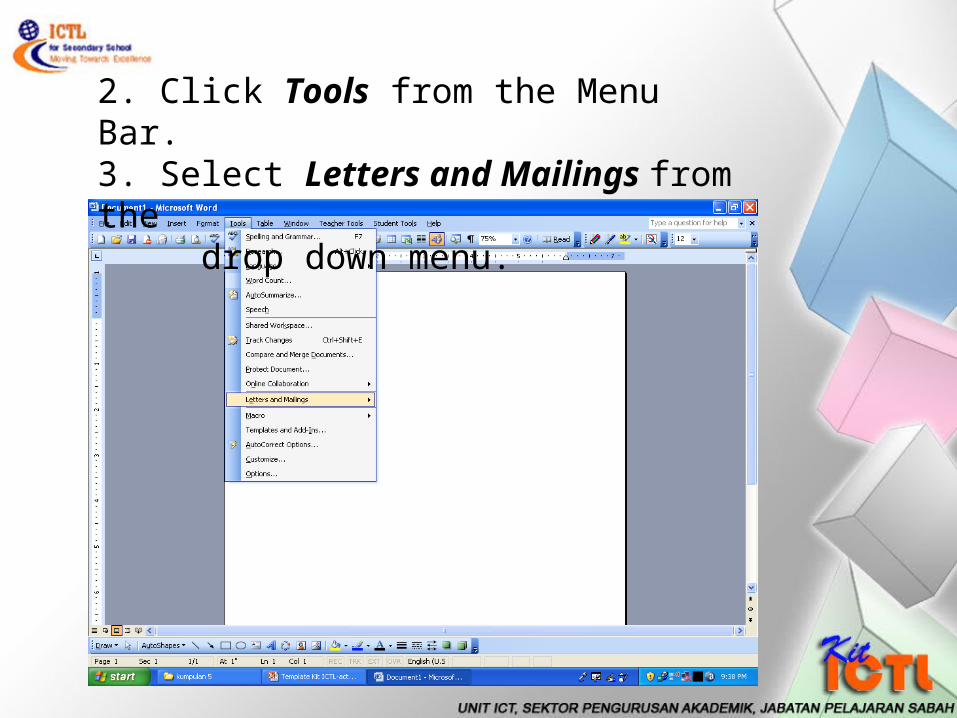
2. Click Tools from the Menu Bar. 3. Select Letters and Mailings from the drop down menu.

4. Another menu will open.5. Click Mail Merge. The Mail Merge task pane will be opened.

6. Click Directory.7. Click Next Starting document.
Directory
Next : Starting document

8. Click Next: Select recipients.
Next: Select recipients

9. Click Type a new list.10. Click Create.
Type a new list
Create

Activity 3 : Insert Data

1. Clicking Create will open the
New Address List dialog box.

2. Insert data in certain sections :
i. Title Azman Bin Mohamadii. In section First Name, type-in 1 Amanahiii. In section Last Name, type-in 900903-10-6019iv. In section Company Name, type-in 13 v. In section Address Line 1, type-in 03 September 1990

2. Insert data in certain sections (continuation) :
vi. In section Address Line 2, type-in 21 Jalan Besar, Klang, Selangorvii. In section City, type-in Mohamad Bin Basriviii. In section State, type-in 03-33722159ix. In section ZIP Code, type-in Bahasa Melayux. In section Country, type-in Hand Ball.

3. Click New Entry
New Entry

4.The next dialog box will appear .
5. Click Close.
Close Button

Activity 4:
Save Data

ii. Save.i. Type Data
1.Type-in Data in the File name section :2.Click Save.
ii. Save.Type Data Save

Activity 5:
Change Field Names

The next dialog box will appear.1.Click Edit.
Edit

2. Click Customize.
Customize.

3.Click Rename.4.Type-in Name at the Rename Field Toolbox.5.Click OK.
Rename
Type-in Name at this section OK

6. Click First Name.7. Click Rename.
First NameRename
First Name
Rename
First Name
Rename

8. Click OK.
OK

9. Repeat the above steps to change the next section .
Last Name to IC NoCompany Name to AgeAddress Line 1 to Date of birthAddress Line 2 to AddressCity to Parents NameState to Telephone NoZip code to SocietyCountry to Club

10. The next outcome will appear. Click OK.
OK

11. Click New Entry.
New Entry

12. Click Close.
Close

13. Click OK at Mail Merge Recipients Toolbox.

Activity 6
Merge data in the form

1. Click Next Arrange your directory.
Next : Arrange your directory

2. Ensure the cursor is placed at the Name section in the form
Place the cursor here

3. Click More Items.
More items.

4. The next dialog box will appear. Click Name from the list. Click Insert.
Insert button

5. Click Close
Close

This particular part will appear

6. Place cursor at the form section
form section

More items
7. Click More items in Mail Merge Task Pane.

8. Click Form.
Form
9. Click insert.Insert

9. Click Close.
Close

10. Ensure the cursor is placed at the IC No section in the form.11. Repeat step 3 until 5 to insert other fields:
IC NoAgeDate of BirthAddressParent’s NameTelephone NumberSocietyClub

12. The next outcome will appear.

13. Click Next : Preview your directory.
Next: Preview your directory

14. The next outcome will appear :

15. Click Next to complete the merge.
Next: Complete the merge

16. The next dialog box will appear.
Click To New Document
Click To New Document

17. Click OK.
OK

18. The Enrolment Form will appear as below.

Activity 7:
Print Mail Merge

1. Click icon open data source.
open data source button

2. Click Data file. Then click open.
Data file
open.

3. Merge to printer.
Merge to printer button

4. Click OK at Merge To Printer dialog box.
OK

5. Click OK to complete printing.
OKOK