Lesson 01 Basic Modeling 1 Steel Precast
50
Basic Modeli ng 1 Tekla Structures 12.0 Basic Training September 19, 2006 Copyright © 2006 Tekla Corporation
-
Upload
agustin-fernandez -
Category
Documents
-
view
218 -
download
0
Transcript of Lesson 01 Basic Modeling 1 Steel Precast

8/2/2019 Lesson 01 Basic Modeling 1 Steel Precast
http://slidepdf.com/reader/full/lesson-01-basic-modeling-1-steel-precast 1/50
Basic Modeling 1
Tekla Structures 12.0 Basic Training
September 19, 2006
Copyright © 2006 Tekla Corporation

8/2/2019 Lesson 01 Basic Modeling 1 Steel Precast
http://slidepdf.com/reader/full/lesson-01-basic-modeling-1-steel-precast 2/50

8/2/2019 Lesson 01 Basic Modeling 1 Steel Precast
http://slidepdf.com/reader/full/lesson-01-basic-modeling-1-steel-precast 3/50
Contents
Contents 3
1 Basic Modeling 1 5
1.1 Start Tekla Structures 6
1.2 Create a New Model – BasicModel1 7
1.3 Create Grids 10
1.4 Create Plane Views along Gridlines 12
1.5 Create Foundations 16
1.6 Create Columns 21
1.7 Create Beams 26
1.8 Create Slabs 41
Copyright © 2006 Tekla Corporation TEKLA STRUCTURES BASIC TRAINING 3
Basic Modeling 1

8/2/2019 Lesson 01 Basic Modeling 1 Steel Precast
http://slidepdf.com/reader/full/lesson-01-basic-modeling-1-steel-precast 4/50
Copyright © 2006 Tekla Corporation TEKLA STRUCTURES BASIC TRAINING 4
Basic Modeling 1
8/2/2019 Lesson 01 Basic Modeling 1 Steel Precast
http://slidepdf.com/reader/full/lesson-01-basic-modeling-1-steel-precast 5/50
1 Basic Modeling 1
We will go through the basic functions of Tekla Structures: How to create a new structural
3D model, and how to create grids (i.e. module lines), grid views and structural members in
the model. As a result of this lesson the model will look as shown below.
In this lesson
Copyright © 2006 Tekla Corporation TEKLA STRUCTURES BASIC TRAINING 5
Basic Modeling 1
8/2/2019 Lesson 01 Basic Modeling 1 Steel Precast
http://slidepdf.com/reader/full/lesson-01-basic-modeling-1-steel-precast 6/50
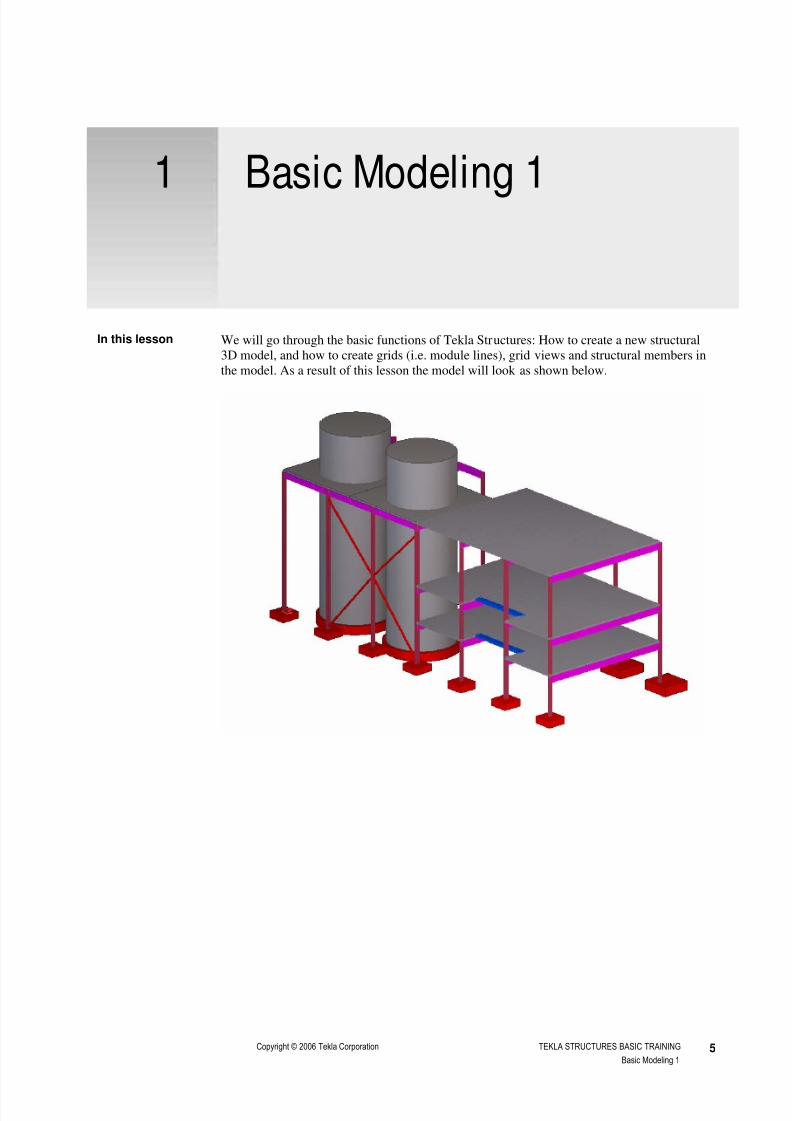
1.1 Start Tekla Structures
To start Tekla Structures, click the Windows Start button. Navigate through Programs >
Tekla Structures > Tekla Structures enu Europe. This will start Tekla Structures inEuropean environment using English language.
The modeling user interface is now opened. At first, most of the menu options and all the
icons are gray indicating that they are inactive. When you open an existing model or create anew model, the icons and available menu options become active.
Start Tekla
Structures
Copyright © 2006 Tekla Corporation TEKLA STRUCTURES BASIC TRAINING 6
Basic Modeling 1

8/2/2019 Lesson 01 Basic Modeling 1 Steel Precast
http://slidepdf.com/reader/full/lesson-01-basic-modeling-1-steel-precast 7/50
1.2 Create a New Model – BasicModel1
To start a new model, you first need to create an empty model database with a unique name.
In this lesson use the name BasicModel1.
1. Select File > New… from the pull-down menu or click the New model icon in the
Standard toolbar to open the New model dialog box.
Start a new model
2. At the center of the dialog box, Tekla Structures suggests the name "New Model" for the
model. The full path of the model folder is shown in the first field.
3. Replace the name "New Model" by BasicModel1.
4. Click the OK button (or Enter) to create the new model.
The menus and icons become activated and the model name appears in the title bar of theTekla Structures window.
Every model must have a unique name. Tekla Structures does not allow
duplicate model names. Do not use special marks ( / \ ; : | ) in model names.
You can only have one model open at a time. If you already have a modelopen, Tekla Structures prompts you to save that model.
Tekla Structures automatically created a grid and a view according to the saved standard
view properties. The default 3D view and grid are shown below.
Copyright © 2006 Tekla Corporation TEKLA STRUCTURES BASIC TRAINING 7
Basic Modeling 1

8/2/2019 Lesson 01 Basic Modeling 1 Steel Precast
http://slidepdf.com/reader/full/lesson-01-basic-modeling-1-steel-precast 8/50
Cyan dash-and-dot lines show the projections of the grids which are visible on the viewplane. Tekla Structures indicates the work area of a view using green, dashed lines. For more
information, see: Help: Modeling > Getting started > Basics.
To save the model:Save the model
5. Select File > Save from the pull-down menu or click the Save icon in the Standard
toolbar.
Remember to save your model every now and then, and always when openinganother model or exiting Tekla Structures.
Tekla Structures includes also an auto save feature that backs up and saves your work
automatically at set intervals. These are set in the Autosave properties dialog box obtained
from the Setup > Autosave… pull-down menu.
For more information on saving and auto saving, see:
Help: Modeling > Getting started > Basics > Saving a model and exiting Tekla
Structures
Most commands of Tekla Structures are found both in menus (main or pop-up) and intoolbars (icons). In this training manual we will mainly use the pop-up menu to activate
commands.
Copyright © 2006 Tekla Corporation TEKLA STRUCTURES BASIC TRAINING 8
Basic Modeling 1

8/2/2019 Lesson 01 Basic Modeling 1 Steel Precast
http://slidepdf.com/reader/full/lesson-01-basic-modeling-1-steel-precast 9/50
There are several ways to execute commands in Tekla Structures:
• Icons
• Commands in main pull-down menu
• Commands in pop-up menu
By default all the commands are found in pull-down menu, and most of them
in the icons. A pop-up menu appears when you click the right mouse button(right-click). If you have an object selected, the commands on the pop-up menu
relate to that object.
For more information on Tekla Structures screen layout and toolbars, see:
Help: Modeling > Introduction > Screen layout
Help: Modeling > Introduction > Toolbars
Copyright © 2006 Tekla Corporation TEKLA STRUCTURES BASIC TRAINING 9
Basic Modeling 1

8/2/2019 Lesson 01 Basic Modeling 1 Steel Precast
http://slidepdf.com/reader/full/lesson-01-basic-modeling-1-steel-precast 10/50
1.3 Create Grids
To create the appropriate grid for BasicModel1 as shown above, you can delete the existinggrid and create a new one from the Points > Grid… pull-down menu. Alternatively you can
modify the existing grid.
To modify the existing grid:Modify theexisting grid
1. Double-click on the gridline.
2. Complete the appearing Grid dialog box as shown below by filling in the X, Y and Z
coordinates and the labels for the gridlines.
Copyright © 2006 Tekla Corporation TEKLA STRUCTURES BASIC TRAINING 10
Basic Modeling 1

8/2/2019 Lesson 01 Basic Modeling 1 Steel Precast
http://slidepdf.com/reader/full/lesson-01-basic-modeling-1-steel-precast 11/50
3. Click Modify to apply the new grid values.
4. Enter the grid file name, GRID1, and click the Save as button to save the grid values for
later use. The settings are saved in the file GRID1.grd, which is stored in the attributes
subfolder of your model folder.
For more information on grids and dialog box buttons, see:
Help: Modeling > Introduction > Inputting information > Common buttons
The number of decimals used in the Grid dialog box (as well as in other
modeling dialog boxes) can be controlled from the Units and decimals...
dialog box obtained from the Setup pull-down menu.
When the grid was modified, the work area of the view, shown with the green dashed line,
was not updated.
To fit the work area according to the modified grid:Fit work area
1. Click the view to activate it.
2. Right-click and select Fit work area from the pop-up menu.
The view should now look as shown below:
Copyright © 2006 Tekla Corporation TEKLA STRUCTURES BASIC TRAINING 11
Basic Modeling 1

8/2/2019 Lesson 01 Basic Modeling 1 Steel Precast
http://slidepdf.com/reader/full/lesson-01-basic-modeling-1-steel-precast 12/50
1.4 Create Plane Views along Gridlines
We will now create Elevation and Plan views along the gridlines created in the previous
section.
A view is a representation of a model from a specific location. Each view is displayed in its
own window inside the Tekla Structures window. Each view has a view plane on which the
grids are visible and points are represented as yellow crosses. Points outside the view plane
appear as red dots.
For more information, see: Help: Modeling > Getting started > Views.
To create views along gridlines,Create grid views
1. Select one gridline.
2. Right-click and select Create view > Grid views from the pop-up menu to open the
Creation of views along grid lines dialog box.
3. Change the View properties as shown above and click the Show… button of the XYview plane to open the View properties dialog box.
4. Change the View depth values as shown below and click OK to close the dialog box.
Copyright © 2006 Tekla Corporation TEKLA STRUCTURES BASIC TRAINING 12
Basic Modeling 1

8/2/2019 Lesson 01 Basic Modeling 1 Steel Precast
http://slidepdf.com/reader/full/lesson-01-basic-modeling-1-steel-precast 13/50
5. Select the number of views as All and click Create in the Creation of views along grid
lines dialog box.
The Views dialog box appears presenting all the created views. All invisible named views
are listed on the left, and all visible views on the right.
For more information on view properties, see:
Help: Modeling > Getting started > Views > View properties
To display or hide views:Display or hideviews
1. Click the Open named view list icon to open the Views dialog box (which is now
already open).
Copyright © 2006 Tekla Corporation TEKLA STRUCTURES BASIC TRAINING 13
Basic Modeling 1

8/2/2019 Lesson 01 Basic Modeling 1 Steel Precast
http://slidepdf.com/reader/full/lesson-01-basic-modeling-1-steel-precast 14/50
2. Select the view(s) you want to display or hide.
3. Use the arrows to move view(s) from left to right (visible) or vice versa (invisible).
Do not keep too many views open at the same time. Nine is the maximum
number of open views. You can open or close named views by clicking the
Open named view list icon. Delete unnecessary views from the view list.
To switch between views, press Ctrl+Tab.
Copyright © 2006 Tekla Corporation TEKLA STRUCTURES BASIC TRAINING 14
Basic Modeling 1

8/2/2019 Lesson 01 Basic Modeling 1 Steel Precast
http://slidepdf.com/reader/full/lesson-01-basic-modeling-1-steel-precast 15/50
You can rotate the model in a 3D view with rendered view type.Rotate the model
1. Press the key v.
2. In the view, pick a center of rotation.
3. Hold down the Ctrl key, and click and drag with the middle mouse button.
With the shortcut Ctrl+P you can change the view angle between 3D and Plane, which is
very useful.
Change between3D / Plane
Copyright © 2006 Tekla Corporation TEKLA STRUCTURES BASIC TRAINING 15
Basic Modeling 1

8/2/2019 Lesson 01 Basic Modeling 1 Steel Precast
http://slidepdf.com/reader/full/lesson-01-basic-modeling-1-steel-precast 16/50
1.5 Create Foundations
We will now create foundations for the BasicModel1.
Column footing
To create footings for columns:1800*1800 footing
1. Double-click on the Create pad footing icon. This will open Pad footing properties
dialog box.
2. Complete the Pad footing properties dialog box as shown below and click Apply.
Copyright © 2006 Tekla Corporation TEKLA STRUCTURES BASIC TRAINING 16
Basic Modeling 1

8/2/2019 Lesson 01 Basic Modeling 1 Steel Precast
http://slidepdf.com/reader/full/lesson-01-basic-modeling-1-steel-precast 17/50
3. In the 3d view, pick the grid intersection A-1 to create the footing.
4. Create the rest of the 1800*1800 footings at other intersections of gridline A by picking
each position.
Help: Modeling > Parts > Part location > Position on work plane
Help: Modeling > Parts > Part location > Position depth
Help: Modeling > Parts > Part properties > Profile
You can undo (and redo) previous commands one by one since the last save by
clicking the icons or typing Ctrl + Z (Undo) and Ctrl + Y (Redo).
While still in the command,2700*2700 footing
5. Complete the Pad footing properties dialog box for a 2700*2700 footing as shown
below and Apply this.
The footings on gridline B need offsetting from the gridline because there will be
additional columns modeled afterwards. This offset will be accomplished by adjusting
the Vertical Position value in the Pad footing properties dialog box.
6. Create the footings at intersections of the gridline B.
7.
Right click and select Interrupt to end the command.
Copyright © 2006 Tekla Corporation TEKLA STRUCTURES BASIC TRAINING 17
Basic Modeling 1

8/2/2019 Lesson 01 Basic Modeling 1 Steel Precast
http://slidepdf.com/reader/full/lesson-01-basic-modeling-1-steel-precast 18/50
The commands will stay active until you interrupt them.
To end commands, right-click and select Interrupt from the pop-up menu, or
press the Esc key.
To restart the last command used, press Enter.
Foundations for silos – parametric profiles
We will create two identical circular foundations for the silos. At first, one foundation will be
created at the coordinate 4500,4500,0 and then the other foundation will be created as a copy
of the first one.
Tekla Structures contains standard (library), parametric, and user-defined profiles. For the
foundation, we will use parametric profiles.
Help: Modeling > Parts > Part properties > Profile
Help: Modeling > Settings and tools > Appendix A: Parametric Profiles
1. Double-click on the Create pad footing icon.Create footing
2. Complete the Pad footing properties dialog box as shown below and click Apply.
You can select the profile for a part from the Select profile dialog box that
opens next to the Profile field in the part properties dialog box.
You can as well enter a profile name in the Profile field in the part properties
dialog box.
Copyright © 2006 Tekla Corporation TEKLA STRUCTURES BASIC TRAINING 18
Basic Modeling 1

8/2/2019 Lesson 01 Basic Modeling 1 Steel Precast
http://slidepdf.com/reader/full/lesson-01-basic-modeling-1-steel-precast 19/50
3. Type 4500,4500 to define the position for the footing (typing the numbers automaticallydisplays the Enter a numeric location dialog box).
4. Press Enter (or click OK) and the foundation is created.
Help: Modeling > Settings and tools > Tools > Snapping
1. Click the footing once to select it.Copy the footing
2. Right click and select Copy special > Translate from the pop-up menu..
3. Click copy.
Copyright © 2006 Tekla Corporation TEKLA STRUCTURES BASIC TRAINING 19
Basic Modeling 1

8/2/2019 Lesson 01 Basic Modeling 1 Steel Precast
http://slidepdf.com/reader/full/lesson-01-basic-modeling-1-steel-precast 20/50
Now the footings should look as shown below:
Copyright © 2006 Tekla Corporation TEKLA STRUCTURES BASIC TRAINING 20
Basic Modeling 1

8/2/2019 Lesson 01 Basic Modeling 1 Steel Precast
http://slidepdf.com/reader/full/lesson-01-basic-modeling-1-steel-precast 21/50
1.6 Create Columns
We will first create two of the columns and then use the Copy command to create the other
columns.
You can create your columns and beams either in steel or concrete! Follow the
left side of the instruction for steel and the right side for concrete.
To create the first two columns.Createsteel/concretecolumns
Create steel columns
1. Double-click on the Create column icon.
Create concrete columns
1. Double-click on the Create concrete column
icon.
2. Complete the Column properties dialog
box as shown below.
2. Complete the Concrete column properties
dialog box as shown below.
3. Complete the dialog's Position tab as
shown below, and then click Apply.
3. Complete the dialog's Position tab as shown
below, and then click Apply.
Copyright © 2006 Tekla Corporation TEKLA STRUCTURES BASIC TRAINING 21
Basic Modeling 1

8/2/2019 Lesson 01 Basic Modeling 1 Steel Precast
http://slidepdf.com/reader/full/lesson-01-basic-modeling-1-steel-precast 22/50
4. Pick the intersection of gridlines A-1 to create one column, and then pick grid B-1 to
create the second column.
1. Select the columns that you just created by dragging a window across them.Copy columns
2. Right click and select Copy special> Translate… from the pop-up menu. Complete the
dialog box as shown below and click Copy.
Copyright © 2006 Tekla Corporation TEKLA STRUCTURES BASIC TRAINING 22
Basic Modeling 1

8/2/2019 Lesson 01 Basic Modeling 1 Steel Precast
http://slidepdf.com/reader/full/lesson-01-basic-modeling-1-steel-precast 23/50
Now all the columns appear in the model.
When you want to model identical structures, you can alternatively create one
footing (and its reinforcement), the steel column on top of it and the base plate
connection between the footing and the column, and copy this structural entity
to all other positions of similar structures.You can select multiple parts in the model by holding down the Ctrl-key when
selecting objects in the model.
Help: Modeling > Introduction > Selecting model objects > How to select objects
Silos
We will now model the steel silos by using solid parametric profiles. A more precise
alternative would be to create the silo as a circular hollow section with a contour plate
welded on top of it.
1. To create the silos, double-click on the Create column icon.Create silos
2. Complete the Column properties dialog box as shown below, and then click Apply.
Copyright © 2006 Tekla Corporation TEKLA STRUCTURES BASIC TRAINING 23
Basic Modeling 1

8/2/2019 Lesson 01 Basic Modeling 1 Steel Precast
http://slidepdf.com/reader/full/lesson-01-basic-modeling-1-steel-precast 24/50
3. Pick the top point of the first silo footing and then the other.
Now the silos appear in the model.
Copyright © 2006 Tekla Corporation TEKLA STRUCTURES BASIC TRAINING 24
Basic Modeling 1

8/2/2019 Lesson 01 Basic Modeling 1 Steel Precast
http://slidepdf.com/reader/full/lesson-01-basic-modeling-1-steel-precast 25/50
The visibility of objects in views depends on the work area, view depth, view
setup, and view filter. You can also temporarily hide parts in a view by using
the Hide tool (on the pop-up menu).
In the pictures hereafter all the model objects created may not always bevisible.
Help: Modeling > Getting started > Views > Displaying and hiding objects
in views
Copyright © 2006 Tekla Corporation TEKLA STRUCTURES BASIC TRAINING 25
Basic Modeling 1

8/2/2019 Lesson 01 Basic Modeling 1 Steel Precast
http://slidepdf.com/reader/full/lesson-01-basic-modeling-1-steel-precast 26/50
1.7 Create Beams
Level 3850 beams
We will first create the beams at the +3850 level and then copy them (using the select filter)
to the two upper levels. Again, you can create the beams either in steel or in concrete.
1. Open the PLAN +3850 view.Createsteel/concretebeams
Create steel beams2. Double-click on the Create beam icon.
Create concrete beams2. Double-click on the Create concrete beam
icon.
3. Complete the Beam properties dialog box as
shown and Apply.
3. Complete the Concrete beam properties
dialog box as shown.
Copyright © 2006 Tekla Corporation TEKLA STRUCTURES BASIC TRAINING 26
Basic Modeling 1
8/2/2019 Lesson 01 Basic Modeling 1 Steel Precast
http://slidepdf.com/reader/full/lesson-01-basic-modeling-1-steel-precast 27/50
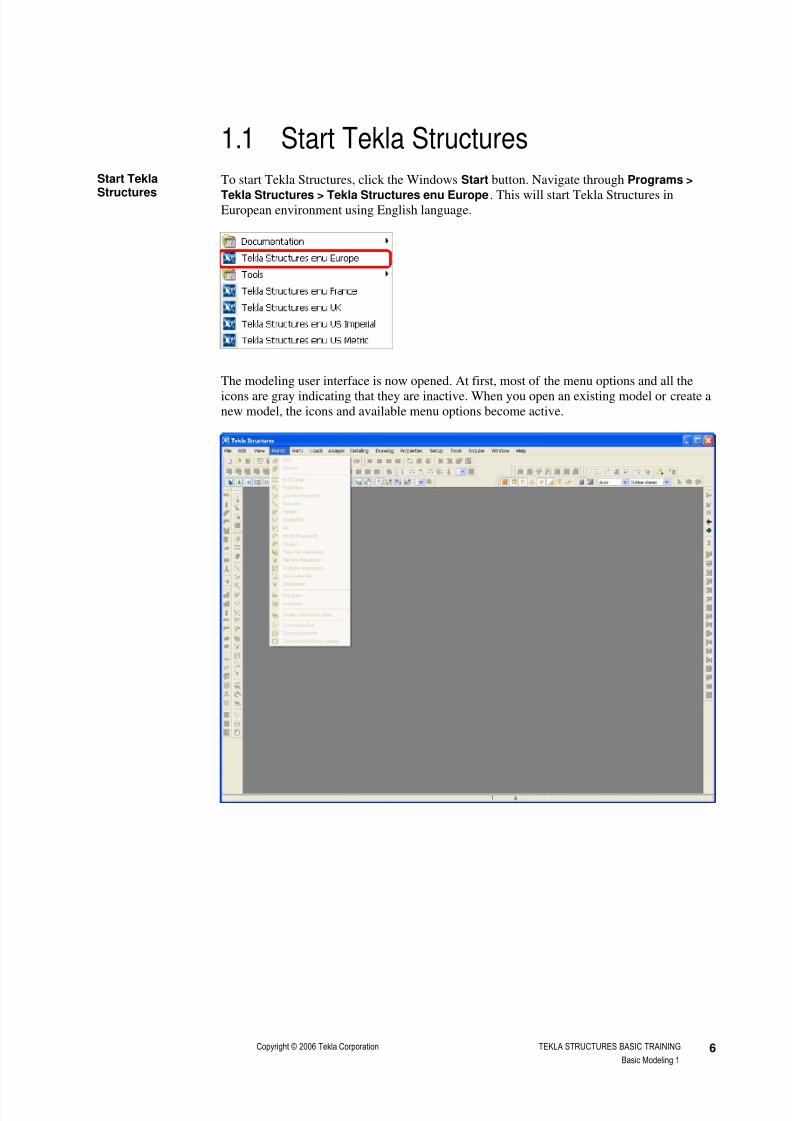
4. Complete the dialog's Position tab as shown below, andApply.
5. In the PLAN +3850 view
pick the intersection of gridlines A-4 and then B-4.
5. In the PLAN +3850 view pick the intersection of gridlines
A-4 and then B-4.
6. Continue at gridlines 5, 6, and 7.
Copyright © 2006 Tekla Corporation TEKLA STRUCTURES BASIC TRAINING 27
Basic Modeling 1

8/2/2019 Lesson 01 Basic Modeling 1 Steel Precast
http://slidepdf.com/reader/full/lesson-01-basic-modeling-1-steel-precast 28/50
When inputting horizontal members always pick from left to right or from
bottom to top for consistency purposes.
Copy beams to upper levels1. Choose the select filter option beam_filter from the drop down list.
Help: Modeling > Settings and tools > Filter > Select filter
Filter beams
2. By dragging the mouse, select an area in the model as shown below.
1. Open the Grid 7 view, right-click and select Copy from the pop-up menu.Copy beams
2. Pick the gridline intersection B-3850 and then B-7350.
3. Copy beams to level +13400 by repeating steps 1-2.
4. Change the select filter option back to standard to enable also the selection of other
objects than beams.
Copyright © 2006 Tekla Corporation TEKLA STRUCTURES BASIC TRAINING 28
Basic Modeling 1

8/2/2019 Lesson 01 Basic Modeling 1 Steel Precast
http://slidepdf.com/reader/full/lesson-01-basic-modeling-1-steel-precast 29/50
Level 13400 beams
Next we will create beams at the view +13400 level.
By using the same beam properties that we applied earlier, create the missing beams at the
gridline intersections shown in the figure below.
Create grid beams
Copyright © 2006 Tekla Corporation TEKLA STRUCTURES BASIC TRAINING 29
Basic Modeling 1

8/2/2019 Lesson 01 Basic Modeling 1 Steel Precast
http://slidepdf.com/reader/full/lesson-01-basic-modeling-1-steel-precast 30/50
Next we will create beams in locations where no gridlines intersect. The snapping tools help
you pick points to position objects precisely without having to know the coordinates or
layout additional lines or points.
Create the rest ofthe beams
Help: Modeling > Settings and tools > Tools > Snapping
1. Double-click one of the existing beams in the model and press Apply.Create beam A
2.
Start the beam command. 2. Start the concrete beam command.
Copyright © 2006 Tekla Corporation TEKLA STRUCTURES BASIC TRAINING 30
Basic Modeling 1

8/2/2019 Lesson 01 Basic Modeling 1 Steel Precast
http://slidepdf.com/reader/full/lesson-01-basic-modeling-1-steel-precast 31/50
3. Make sure only the Snap to reference lines / points icon of the two main snap switcheson the right is pressed down.
4. Make sure the Snap to mid points and Snap to end points icons are pressed down.
5. Pick a midpoint of the beam between A-
2 and A-3 and then the midpoint of the
beam between B-2 and B-3.
5. Pick a midpoint of the beam between A-2
and A-3 and then the midpoint of the beam
between B-2 and B-3.
We will pick the start position of beam B by using the gridline intersection A-1 as atemporary reference point and tracking along gridline 1 in the direction of intersection B-1
for 9000 mm.
Create beam B
We will then pick the second position of beam B using the temporary snap switch
Perpendicular.
1. Start the beam command. 1. Start the concrete beam command.Pick the firstposition of beamB
2. Hold down the Ctrl key and pick gridline intersection A-1 as the origin to show the
“From” location coordinates.
3. Then use the cursor to snap (do not pick!!) in the correct direction (e.g. to gridlineintersection B-1).
Copyright © 2006 Tekla Corporation TEKLA STRUCTURES BASIC TRAINING 31
Basic Modeling 1

8/2/2019 Lesson 01 Basic Modeling 1 Steel Precast
http://slidepdf.com/reader/full/lesson-01-basic-modeling-1-steel-precast 32/50
4. Type 9000 for the numeric location. (The Enter a numeric location dialog box will
open automatically.)
5. Press OK or Enter and the cursor snaps to the correct position. (=9000 mm from A-1 in
the direction of B-1).
6. Right click and select Perpendicular.Pick secondposition of beamB
7. Pick the second position on beam A (see
below).
7. Pick the second position on beam A (see
below).
Copyright © 2006 Tekla Corporation TEKLA STRUCTURES BASIC TRAINING 32
Basic Modeling 1

8/2/2019 Lesson 01 Basic Modeling 1 Steel Precast
http://slidepdf.com/reader/full/lesson-01-basic-modeling-1-steel-precast 33/50
While still in the beam command,Create beam C
8. Right click and select Intersection for snap override.
9. Pick the intersection of beam B and
gridline 2 and then the intersection of
gridlines B-2.
9. Pick the intersection of beam B and
gridline 2 and then the intersection of
gridlines B-2.
We will first create one of the beams that frame around the silo and then by using the Copy >
Rotate command create the other three.
Create beam D
Copyright © 2006 Tekla Corporation TEKLA STRUCTURES BASIC TRAINING 33
Basic Modeling 1

8/2/2019 Lesson 01 Basic Modeling 1 Steel Precast
http://slidepdf.com/reader/full/lesson-01-basic-modeling-1-steel-precast 34/50
Help: Modeling > Settings and tools > Settings and tools reference > Edit>Copy
>Rotate…
1. Hold down the Ctrl key and pick gridline intersection A-1 to show the “From” location
coordinates, use the cursor to snap (do not pick!!) in the correct direction. (E.g. grid
intersection B-1).
2. Type 4000 for the numeric location and press Enter, the cursor snaps to the correct
position.
3. Type the letter O on the keyboard to snap to positions in orthogonal directions on the
work plane (0, 45, 90, 135, and 180 degrees).
4. Let the cursor snap to the midpoint as shown below and pick.
5. Type the letter O to turn the ortho off.
1. Select the beam that you just created.Copy rotate thebeam
2. Right click and select Copy special > Rotate… from the pop-up menu.
Copyright © 2006 Tekla Corporation TEKLA STRUCTURES BASIC TRAINING 34
Basic Modeling 1

8/2/2019 Lesson 01 Basic Modeling 1 Steel Precast
http://slidepdf.com/reader/full/lesson-01-basic-modeling-1-steel-precast 35/50
3. Pick the center point of the silo as the point to define the rotation (select a view in which
the silos are visible and pick near the circumference to snap to the center point). Theorigin X0 and Y0 values will appear in the dialog box.
4. Complete the other fields in the dialog.
5. Click Copy.
We will now copy the beams to the other silo.Copy translate thebeam to the othersilo 1. Select the beams shown highlighted in the picture below (press the Ctrl key to add parts
to the selection).
2. Copy special > translate… them 9000 mm in the x direction.
Bracing
Working in the Grid A elevation view, we will input the vertical steel bracing members using
the Create beam tool.
Copyright © 2006 Tekla Corporation TEKLA STRUCTURES BASIC TRAINING 35
Basic Modeling 1

8/2/2019 Lesson 01 Basic Modeling 1 Steel Precast
http://slidepdf.com/reader/full/lesson-01-basic-modeling-1-steel-precast 36/50
1. Double-click on the Create beam icon.Create braces aand b
2. Complete the Beam properties dialog box as shown below and Apply.
Copyright © 2006 Tekla Corporation TEKLA STRUCTURES BASIC TRAINING 36
Basic Modeling 1

8/2/2019 Lesson 01 Basic Modeling 1 Steel Precast
http://slidepdf.com/reader/full/lesson-01-basic-modeling-1-steel-precast 37/50
3. In the 3d view create brace a by first picking the gridline intersection A-2 and then the
midpoint of column A-3.
Copyright © 2006 Tekla Corporation TEKLA STRUCTURES BASIC TRAINING 37
Basic Modeling 1
8/2/2019 Lesson 01 Basic Modeling 1 Steel Precast
http://slidepdf.com/reader/full/lesson-01-basic-modeling-1-steel-precast 38/50
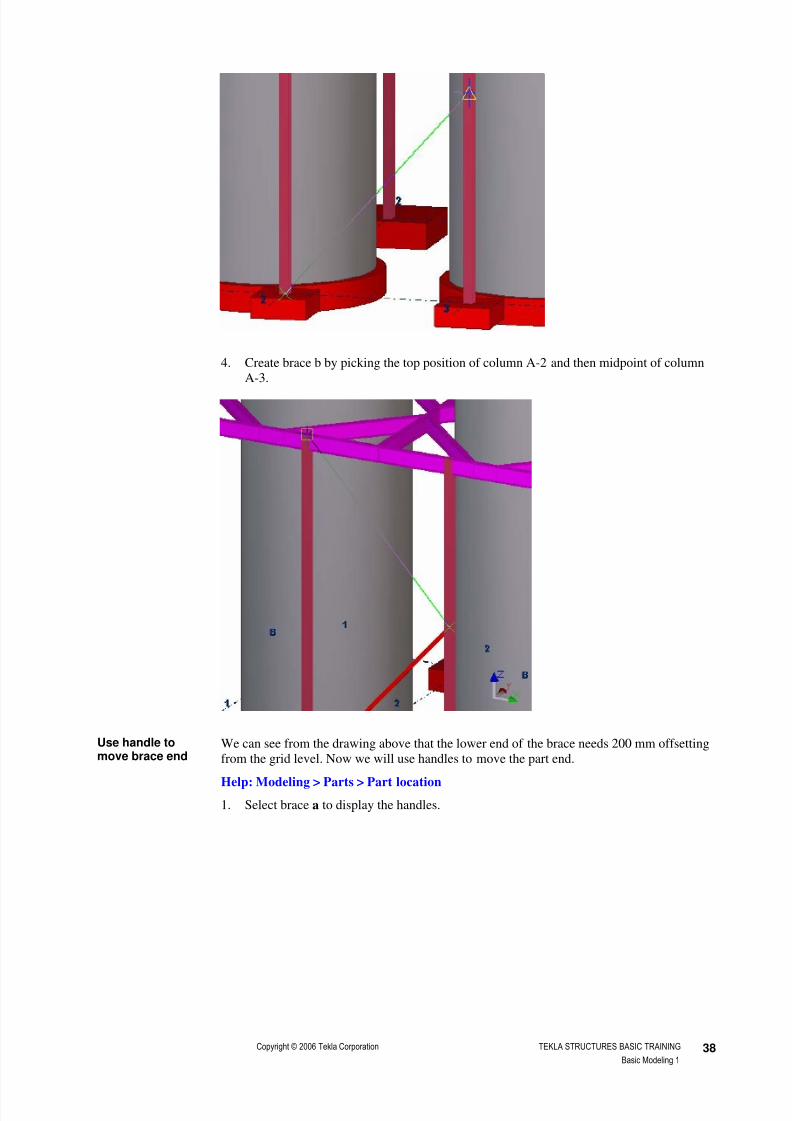
4. Create brace b by picking the top position of column A-2 and then midpoint of column
A-3.
We can see from the drawing above that the lower end of the brace needs 200 mm offsetting
from the grid level. Now we will use handles to move the part end.
Use handle tomove brace end
Help: Modeling > Parts > Part location1. Select brace a to display the handles.
Copyright © 2006 Tekla Corporation TEKLA STRUCTURES BASIC TRAINING 38
Basic Modeling 1

8/2/2019 Lesson 01 Basic Modeling 1 Steel Precast
http://slidepdf.com/reader/full/lesson-01-basic-modeling-1-steel-precast 39/50
2. Select the yellow handle (Tekla Structures then highlights the handle).
3. Right click and select Move special > Translate… to move the handle 200 mm
upwards.
4. Click Move.
5. Repeat the procedure to move brace b’s top handle 1000 mm downwards.
1. Select braces a and b.Copy mirrorbraces a and b
2. Right click and select Copy special > Mirror…
3. In the 3d view, pick grid A-3 then grid B-3 to define the mirror line.
4. Click Copy.
Help: Modeling > Settings and tools > Settings and tools reference > Edit>Copy
>Mirror…
Now we have modeled all the steel and concrete members in Model1. The model should look
like in the picture below.
Copyright © 2006 Tekla Corporation TEKLA STRUCTURES BASIC TRAINING 39
Basic Modeling 1

8/2/2019 Lesson 01 Basic Modeling 1 Steel Precast
http://slidepdf.com/reader/full/lesson-01-basic-modeling-1-steel-precast 40/50
Copyright © 2006 Tekla Corporation TEKLA STRUCTURES BASIC TRAINING 40
Basic Modeling 1

8/2/2019 Lesson 01 Basic Modeling 1 Steel Precast
http://slidepdf.com/reader/full/lesson-01-basic-modeling-1-steel-precast 41/50
1.8 Create Slabs
Concrete hollow-core slabs
We will now create concrete hollow-core slabs. Instead of positioning the slabs to thegridline intersection we will model the slabs to the face of the steel columns.
In the PLAN +13400 view:Create hollow-core slabs
1. Double-click on the Create concrete beam icon.
2. Complete the Concrete beam properties dialog box as shown and Apply.
Copyright © 2006 Tekla Corporation TEKLA STRUCTURES BASIC TRAINING 41
Basic Modeling 1

8/2/2019 Lesson 01 Basic Modeling 1 Steel Precast
http://slidepdf.com/reader/full/lesson-01-basic-modeling-1-steel-precast 42/50
If you have modeled steel columns and
beams:
3. Pick the intersection of the column flange
outer face and gridline 4 and then the
intersection of the column flange outer face
and gridline 5 (make sure that Snap togeometry lines/points is active).
If you have modeled concrete columns and
beams:
3. Pick the intersection of the column outer
border and gridline 4 and then the
intersection of the column outer border and
gridline 5 (make sure that Snap togeometry lines/points is active).
Copyright © 2006 Tekla Corporation TEKLA STRUCTURES BASIC TRAINING 42
Basic Modeling 1

8/2/2019 Lesson 01 Basic Modeling 1 Steel Precast
http://slidepdf.com/reader/full/lesson-01-basic-modeling-1-steel-precast 43/50
1. Select the slab that you just created.Copy the slabs iny direction
2. Right click and select Copy special > Translate… from the pop-up menu.
3. Type 1200 in the dY field of the Copy – translate dialog box and 10 as the number of
copies.1. Drag an area select, selecting all the concrete slabs.Copy the slabs in
x direction2. Right click and select Copy > Translate… from the pop-up menu.
3. Type 6000 in the dX field of the Copy - translate dialog box.
4. Click Copy.
Copyright © 2006 Tekla Corporation TEKLA STRUCTURES BASIC TRAINING 43
Basic Modeling 1

8/2/2019 Lesson 01 Basic Modeling 1 Steel Precast
http://slidepdf.com/reader/full/lesson-01-basic-modeling-1-steel-precast 44/50
Copy hollow-core slabs to levels 7350 and 3850
1. Hold down the Ctrl key and select all the hollow-core slabs by dragging 3 areas through
the slabs.
Copy the slabs
2. Still holding down the Ctrl key, pick the two slabs shown in the picture below to
unselect them.
3. Right click and select Copy special > Translate… from the pop-up menu.
4. Enter -6050 in the dZ field of the Copy special > Translate dialog box, click Copy.
5. Enter -9550 in the dZ field of the Copy special > Translate dialog box, click Copy.
Copyright © 2006 Tekla Corporation TEKLA STRUCTURES BASIC TRAINING 44
Basic Modeling 1
8/2/2019 Lesson 01 Basic Modeling 1 Steel Precast
http://slidepdf.com/reader/full/lesson-01-basic-modeling-1-steel-precast 45/50
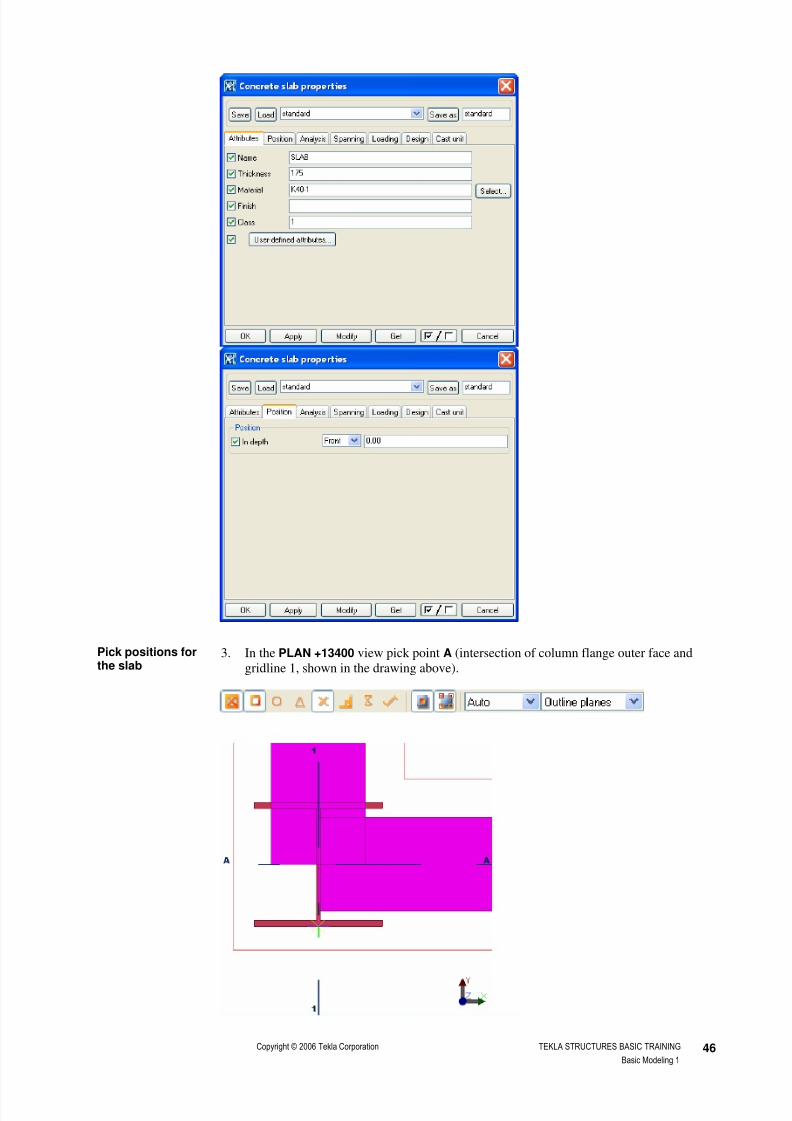
Concrete slab
1. Double-click on the Create concrete slab icon.Start the slab
command2. Complete the Concrete slab properties dialog box as shown and Apply.
Copyright © 2006 Tekla Corporation TEKLA STRUCTURES BASIC TRAINING 45
Basic Modeling 1
8/2/2019 Lesson 01 Basic Modeling 1 Steel Precast
http://slidepdf.com/reader/full/lesson-01-basic-modeling-1-steel-precast 46/50
3. In the PLAN +13400 view pick point A (intersection of column flange outer face and
gridline 1, shown in the drawing above).
Pick positions forthe slab
Copyright © 2006 Tekla Corporation TEKLA STRUCTURES BASIC TRAINING 46
Basic Modeling 1

8/2/2019 Lesson 01 Basic Modeling 1 Steel Precast
http://slidepdf.com/reader/full/lesson-01-basic-modeling-1-steel-precast 47/50
4. Let the cursor snap to the position just picked (do not pick!) and press y to lock the ycoordinate.
5. Let the cursor now snap to the end point of the beam near point B and pick.
6. Press y to release the coordinate lock.
7. Pick point C.
Copyright © 2006 Tekla Corporation TEKLA STRUCTURES BASIC TRAINING 47
Basic Modeling 1

8/2/2019 Lesson 01 Basic Modeling 1 Steel Precast
http://slidepdf.com/reader/full/lesson-01-basic-modeling-1-steel-precast 48/50
8. Pick point D.
9.
Click the middle mouse button to create the slab.
1. Select the slab that you just created.Copy concreteslab
2. Copy – translate the slab 9000 mm in x direction.
Copyright © 2006 Tekla Corporation TEKLA STRUCTURES BASIC TRAINING 48
Basic Modeling 1
8/2/2019 Lesson 01 Basic Modeling 1 Steel Precast
http://slidepdf.com/reader/full/lesson-01-basic-modeling-1-steel-precast 49/50
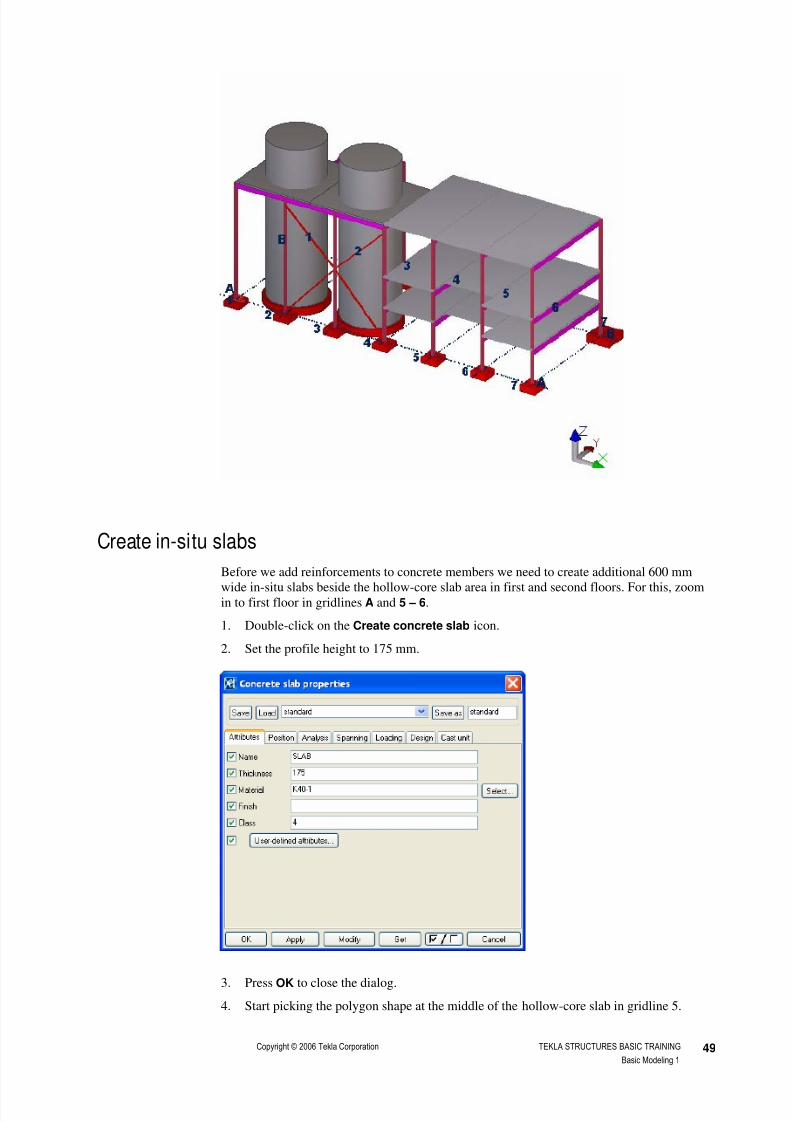
Create in-situ slabs
Before we add reinforcements to concrete members we need to create additional 600 mm
wide in-situ slabs beside the hollow-core slab area in first and second floors. For this, zoomin to first floor in gridlines A and 5 – 6.
1. Double-click on the Create concrete slab icon.
2. Set the profile height to 175 mm.
3. Press OK to close the dialog.
4. Start picking the polygon shape at the middle of the hollow-core slab in gridline 5.
Copyright © 2006 Tekla Corporation TEKLA STRUCTURES BASIC TRAINING 49
Basic Modeling 1

8/2/2019 Lesson 01 Basic Modeling 1 Steel Precast
http://slidepdf.com/reader/full/lesson-01-basic-modeling-1-steel-precast 50/50
5. Write: R then add 0, 600, to the Enter a numeric location dialog and press OK.
6. Write: R then add 6050, 0, to the Enter a numeric location dialog and press OK.
7. Write: R then add 0, -600, to the Enter a numeric location dialog and press OK.
8. Close the polygon with middle button.
Now select the slab and copy it 3500.00 mm in z-direction using Copy special >Translate… right button command.
Now the Model1 framework is finished.
Links to additional information
Help: Modeling > Introduction > General information > Single user mode vs multiuser
mode