Legal Notices - · PDF fileLegal Notices Fractal Audio ... Thank you for purchasing the Axe-Fx...
42
Transcript of Legal Notices - · PDF fileLegal Notices Fractal Audio ... Thank you for purchasing the Axe-Fx...


Doc v15XL i Doc v15XL
Legal Notices
Fractal Audio Systems Axe-Fx II XL Owner’s Manual. Contents Copyright © 2011 -2014. All Rights Reserved.
No part of this publication may be reproduced in any form without the permission of Fractal Audio Systems.
Fractal Audio Systems, Axe-Fx, Axe-Fx II, Axe-Fx II Mark II, Axe-Fx II XL, G2 Modeling Technology (“G2”), Humbuster,
Multipoint Iterative Matching and Impedance Correction (“MIMIC”), Virtual Vacuum Tube (“VVT”), UltraRes, are
trademarks of Fractal Audio Systems. Manufacturer names and product names mentioned herein are trademarks
or registered trademarks of their respective owners, which are in no way associated with or affiliated with Fractal
Audio Systems. The names are used only to illustrate sonic and performance characteristics.
Important Safety Instructions
WARNING: To reduce the risk of fire or electric shock, do not expose
this appliance to rain or moisture.
CAUTION: To reduce the risk of fire or electric shock, do not remove
screws. There are no user serviceable parts inside. Refer servicing to
qualified service personnel.
1. Obey all warnings on the Axe-Fx II and in this User Guide.
2. Keep away from sources of heat such as heat ducts, registers or appliances which produce heat.
3. Connect only to a standard grounded AC outlet of 100–240V, 47–63 Hz.
4. Keep the power cord in good condition. Do not kink, bend, or pinch.
If the cord becomes damaged, discard and replace it.
5. If not using your Axe-Fx II for extended periods of time, disconnect from AC power.
6. Protect the unit from rain and excessive moisture.
7. Refer servicing to qualified personnel only.
8. Stop operation of the unit and obtain service if:
a. Liquids or excessive moisture enter the unit.
b. The unit operates incorrectly or performance is inconsistent or erratic.
c. The unit has been dropped and/or the enclosure damaged.
9. Prolonged exposure to high volume levels can cause hearing damage and/or loss. The use of
hearing protection in high volume situations is recommended.
Doc v15XL

Doc v15XL ii Doc v15XL
Certificate of Conformity
Fractal Audio Systems, USA, hereby declares on its own responsibility that the following product:
Axe-Fx II XL Digital Guitar Preamplifier and Effects Processor
covered by this certificate and marked with CE label, conforms to following standards:
EN60065 (IEC 60065)
Safety requirement for mains operated electronic and related apparatus for household and similar use.
EN 55103-1 Product family standard for audio, video, audio-visual, and entertainment lighting control apparatus for professional use. Part 1: Emission.
EN 55103-2
Product family standard for audio, video, audio-visual, and entertainment lighting control apparatus for professional use. Part 2: Immunity.
with reference to regulations in following directives: 73/23/EEC, 89/336/EEC.
January 2014
Clifford Chase, President
Fractal Audio Systems
EMC / EMI
This equipment has been tested and found to comply with the limits for a Class B Digital device, pursuant to part 15 of the FCC
rules. These limits are designed to provide reasonable protection against harmful interference in residential installations. This
equipment generates, uses and can radiate radio frequency energy and, if not installed and used in accordance with the
instructions, may cause harmful interference to radio communications. There is no guarantee that interference will not occur in
a particular installation. If this equipment does cause harmful interference to radio or television reception, which can be
determined by turning the equipment off and on, the user is encouraged to try to correct the interference by one or more of
the following measures:
Reorient or relocate the receiving antenna.
Increase the separation between the equipment and receiver.
Connect the equipment to an outlet on a circuit different from that to which the receiver is connected.
Consult the dealer or an experienced radio/TV technician for help.
Doc v15XL iii Doc v15XL
Getting Started...
Thank you for purchasing the Axe-Fx II XL, one of the most powerful musical instrument
processors ever produced. The XL is the latest revision of our flagship product the Axe-Fx II.
This Getting Started Guide was envisioned when it became apparent that the Axe-Fx as we
know it defies the use of a traditional printed “Owner’s Manual.”
As anyone who follows our products know, we regularly provide free firmware updates. These
bring subtle or sweeping changes, exemplifying our model of continuous product
improvement. Thanks to these updates, the Axe-Fx you unpack today will be even better in the
future, with new sounds, new features, and more. This quickly makes a paper manual obsolete.
This Getting Started Guide covers the things that are less likely to change, like hardware
features and basic “how-to” operations. Meanwhile, a fully detailed Online Axe-Fx II Owner’s
Manual—kept up to date with every software release—can be downloaded as a PDF to your
computer, tablet or smart phone. This is not only in line with our philosophy of maximizing the
benefits of technology, but environmentally smarter, with less paper wasted and less fuel used
for shipping.
Download it from www.fractalaudio.com and take a look around. You’ll find product info,
updates, links to our forum, preset exchange, support options, and much more.
—Fractal Audio Systems, January 2014

TABLE OF CONTENTS
Doc v15XL iv Doc v15XL
Contents
Getting Started... .............................................................................. iii
Contents ........................................................................................... iv
1 Introduction ..................................................................................1
2 Hardware Overview ......................................................................3
3 Connections ..................................................................................9
4 Basic Operation and Editing ......................................................... 15
5 Basic Blocks Guide ....................................................................... 27
6 Modifiers .................................................................................... 28
7 Additional Topics ......................................................................... 30
8 Troubleshooting .......................................................................... 33
9 Specifications .............................................................................. 35
Warranty ......................................................................................... 37

HARDWARE Overview
Doc v15XL 1 Doc v15XL
1 Introduction
1.1 What is the Axe FX II XL? The Axe-Fx II XL is an advanced digital preamp and multi-effects processor for guitar, bass, and other instruments.
It is As the flagship product from Fractal Audio Systems, it delivers the world’s most advanced amp modeling, plus
our best-ever effects technology with state-of-the-art algorithms of outstanding quality. It replaces amps,
speakers, effects, studio equipment, and more, with an all-in-one, end-to-end total tone solution in a single black
box. It is the latest hardware revision Axe-Fx II, following the Axe-Fx II Mark II, adding more preset/cab memory
and a FASLINK™ port.
Inside, a vast virtual environment allows you to build your dream rig (hundreds of them in fact). Choose from an
inventory with the best of vintage treasures and modern masterpieces. Arrange components any way you like,
limited only by your imagination and the unit’s “CPU” power. Dial in your sound using basic controls, go deeper
with optional advanced parameters, then save presets for instant recall when playing or performing. The sound is
of uncompromising quality, due both to extremely high standards of hardware design and advanced proprietary
software.
The Axe-Fx II creates great tone by paying great respect to its heritage. We’ve performed thousands of hours of
analysis of the best amps, cabs, and effects of all time, painstakingly replicating the sound and feel of the originals.
But while emulations are impressive, the Axe-Fx II goes well beyond mere “models” to become a do-it-yourself
platform, where musical creativity is free to go beyond traditional limits with unrivaled flexibility. You don’t need
to be an engineer, either; the unit is very user-friendly, especially when connected to Axe-Edit, our free companion
software product. Musicians tell us that the Axe-Fx II is inspiring and fun. Here are some highlights:
Freely Routable: Place effects freely in any order and layout—series, parallel, or complex networks, including
feedback loops, plus external send and return at any point in the signal chain.
Totally Programmable: Every effect has a full complement of parameters offering desired features and
tremendous range. Gone are the limits of processors with restrictive options or insufficient depth.
Extensively Controllable: The “MODIFIER” system provides great real-time control options. You can use pedals,
switches, MIDI, or internal “Controllers” to remote control or automate parameters with extreme flexibility.
Of the Utmost Quality: Sound quality is first-and-foremost in the hardware design, and in every detail of our
proprietary natural processing software algorithms. Many of these replicate patterns that occur in nature (thus
“Fractal” Audio Systems.) The amp models use multiple unique, dynamic, non-linearity generators that produce
smooth, even-ordered harmonics, giving dynamics and dimensionality that other processors lack. Our effects have
been vetted and championed by some of the world’s most demanding and discriminating players.
Able to Replace Entire Rigs: The complete integration of all components into a single system offers many distinct
advantages, among them great consistency, simplicity, and control. And of course, after you’ve replaced a rig, the
Axe-Fx II lets you continually re-invent it without ever touching Velcro, rack screws, or your credit card.
All said, given everything the Axe-Fx is, it is really about you, and everything it becomes in your hands.
“Akin to the invention of the wheel” — Steve Vai “This is the new real thing” — Misha Mansoor
“Das Awesome!” — Alex Lifeson “The next level” — John Petrucci
“I consider it… Indespensible”— Tosin Abasi “Amazing feel and endless tone” — Dweezil Zappa

HARDWARE Overview
Doc v15XL 2 Doc v15XL
1.2 The Inventory/Grid Concept
On the Axe-Fx II, many of the limitations of traditional gear are eliminated. You possess an INVENTORY of virtual
amps, cabs, and effects, placed as “BLOCKS” in to the slots of a 12×4 “GRID.” As in the real world, things must be
patched together using connector “CABLES.” Passive “shunts” carry signal through otherwise empty grid spaces.
You can split and merge signal as desired.
Figure 1-1 – The Inventory/Grid Concept
(Note: Seven empty columns were removed from the illustration and are represented by •••)
The figure above shows an example of an Axe-Fx II preset. The top section shows a stylized inventory, and the
bottom shows a preset as it appears on the Axe-Fx grid. On this grid, signal is routed through the dark solid line
from the INPUT, through a totally passive, sonically transparent SHUNT, to feed a “WAH” block. The WAH block is
connected to an “AMP” block (we might set its type to “PLEXI 50W NORMAL”), which in turn feeds a “CAB” (one of
the “4x12” options, perhaps). This is routed to a reverb (“REV”) and then to the OUTPUT.
Each row has full stereo capability, so you have four full stereo paths through the grid!
Once placed on the grid, every block can be edited, with parameters representing all the basic knobs you would
expect to find, and advanced menus for deeper control.
The size and contents of a preset are limited only by the size of the grid, your block inventory, and total processing
power or “CPU”. You’ll be pleased that there is plenty of CPU power to allow large and complex creations.

HARDWARE Overview
Doc v15XL 3 Doc v15XL
2 Hardware Overview
The Axe-Fx II has a simple hardware interface with clearly labeled controls and jacks.
Review the following to familiarize yourself with the hardware features of the unit.
2.1 The Front Panel
Figure 2-1
1. The Axe-Fx II is housed in a powder-coated steel enclosure with an anodized aluminum faceplate.
Dual front handles allow easy rack mounting and removal.
2. The switch turns the unit on or off.
3. The 160 × 80 pixel LCD is where all menu screens are displayed.
4. and LED meters display the levels of incoming signals. See p. 9 for more on levels.
5. LEDs communicate important events:
– This LED is lit when any change has been made to the current preset.
– This LED is lit while data is received at the MIDI IN port.
, – These flash briefly whenever the signal level at the corresponding output causes
the D/A converter to clip. See page 9 for more information on Setting Levels.
6. In RECALL mode, the wheel selects and loads presets as it is turned.
In edit or menu screens, it changes the value of the selected parameter.
7. The button executes commands, commits changes, accesses sub-menus, and more.
works for cancel, escape, and various other functions.
8. In RECALL mode, the four buttons select and load presets. Up/Down = +/-1. Left/Right = +/10.
In edit or menu screens, buttons are used to select on-screen parameters and options.
9. The buttons step through menu pages, shown as tabs at the top of the display.

HARDWARE Overview
Doc v15XL 4 Doc v15XL
10. The 12 main front panel menu/function buttons are listed below. Once you select a menu, you can
change “Pages” (Tabs) using the < PAGE > buttons. This Guide refers to menus and their pages in the
format “MENU:PAGE” (Ex: UTILITY:PRESET would be the PRESET page of the UTILITY menu).
– This menu contains four pages: EDIT, MOVE, GATE, and MIX.
EDIT contains the grid, where you work with blocks to create and edit presets (p. 15).
MOVE has various utilities for moving preset components on the grid (p. 20).
INPUT/GTE contains parameters for the Noise Gate and Instrument input impedance.
OUTPUT contains a mixer. Each “channel” corresponds to one grid row. “MAIN” is the overall level.
– Select any block on the layout grid and press this button to open its EDIT menu.
Press repeatedly to cycle through EDIT menus of all blocks in the preset (top-to-bottom, left-to-right).
– This menu contains pages for the internal controllers available to every preset, plus an
overview screen. See Modifiers on p. 28 for more information.
– This button toggles the bypass state of the currently selected block (p. 25).
Double click BYPASS in any block EDIT menu to access the SAVE/LOAD GLOBAL BLOCKS.
See the online PDF Axe-Fx II Owner’s Manual for how to use Global Blocks.
– This menu contains four pages: CONFIG, OUT1, OUT2, and SCALES.
CONFIG contains parameters that globally affect the sound of all presets.
OUT1 and OUT2 each hold a 10-band graphic EQ and master GAIN fader for their respective outputs.
SCALES allows the creation of custom harmonies for use with the pitch shifter block.
– Engages the tuner. Press or to close.
– Contains six pages used to configure the various input and output options of the Axe-Fx II.
– This menu contains various utility functions.
– Enters RECALL mode, the main operating mode for use during musical performance.
The Axe-Fx II always defaults to RECALL mode when you power it on.
– Enters the STORE menu where you can save, rename, or swap presets. See p. 25 for details.
– Bypasses the Axe-Fx II, routing the output of the A/D directly to the input of the D/A
converters, defeating all processing functions and lighting the BYPASS LED. Press again to un-bypass.
Double-clicking the BYPASS button in any block EDIT menu initializes that block to default settings.
– Flashes the current tempo on its built-in LED. You can also tap this button once to enter the
TEMPO menu, or two or more times to set a new tempo. The tempo can also be entered using a
remote switch or set via MIDI.
Each of the major menus mentioned above is fully detailed in the online Axe-Fx II XL Owner’s Manual.
11. – On the Axe-Fx II, certain effects have two fully independent sets of settings, called “X” and “Y”. Think
of X and Y like two different “channels” for an amp or effect. You can switch between them at will to
access different sound settings without changing presets. and buttons perform other functions as well.
See section 4.5 on p. 24 for more information.
12. – The four Quick Control knobs, A, B, C, and D, perform different functions depending on
what Axe-Fx II screen or menu is shown. See section 4.4.1 on p. 24 for more information.
HARDWARE Overview
Doc v15XL 5 Doc v15XL
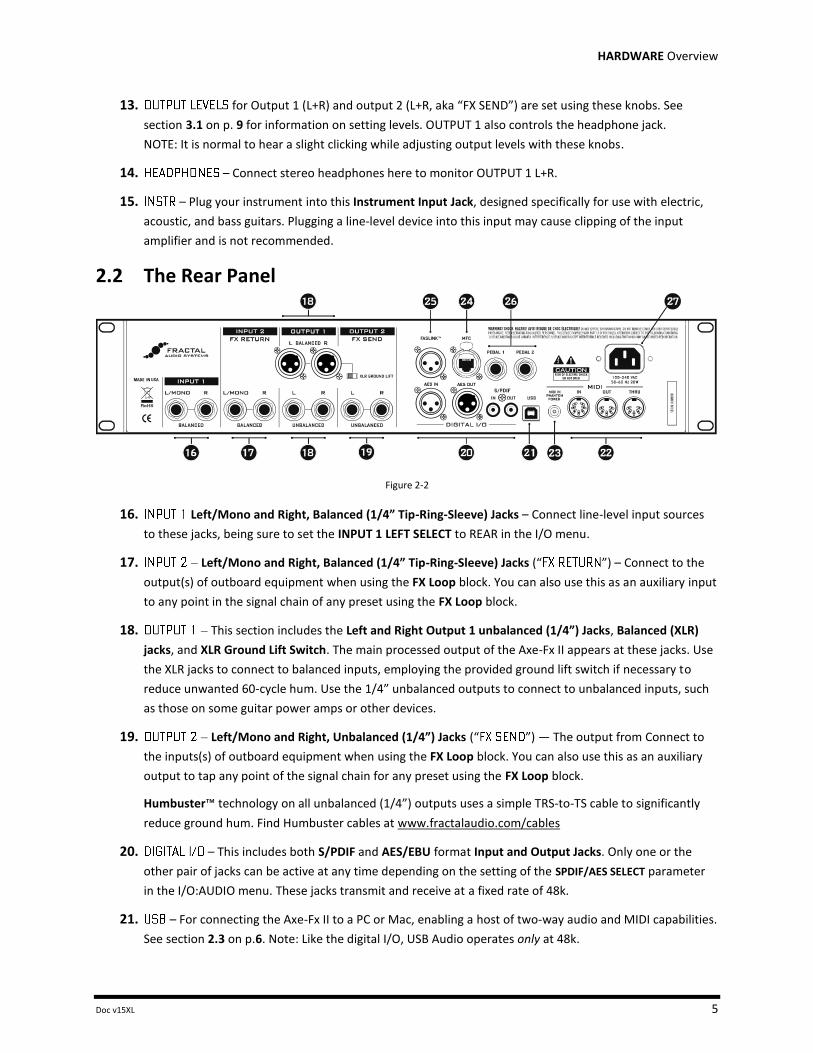
13. for Output 1 (L+R) and output 2 (L+R, aka “FX SEND”) are set using these knobs. See
section 3.1 on p. 9 for information on setting levels. OUTPUT 1 also controls the headphone jack.
NOTE: It is normal to hear a slight clicking while adjusting output levels with these knobs.
14. – Connect stereo headphones here to monitor OUTPUT 1 L+R.
15. – Plug your instrument into this Instrument Input Jack, designed specifically for use with electric,
acoustic, and bass guitars. Plugging a line-level device into this input may cause clipping of the input
amplifier and is not recommended.
2.2 The Rear Panel
Figure 2-2
16. Left/Mono and Right, Balanced (1/4” Tip-Ring-Sleeve) Jacks – Connect line-level input sources
to these jacks, being sure to set the INPUT 1 LEFT SELECT to REAR in the I/O menu.
17. – Left/Mono and Right, Balanced (1/4” Tip-Ring-Sleeve) Jacks (“ ”) – Connect to the
output(s) of outboard equipment when using the FX Loop block. You can also use this as an auxiliary input
to any point in the signal chain of any preset using the FX Loop block.
18. – This section includes the Left and Right Output 1 unbalanced (1/4”) Jacks, Balanced (XLR)
jacks, and XLR Ground Lift Switch. The main processed output of the Axe-Fx II appears at these jacks. Use
the XLR jacks to connect to balanced inputs, employing the provided ground lift switch if necessary to
reduce unwanted 60-cycle hum. Use the 1/4” unbalanced outputs to connect to unbalanced inputs, such
as those on some guitar power amps or other devices.
19. – Left/Mono and Right, Unbalanced (1/4”) Jacks (“ ”) — The output from Connect to
the inputs(s) of outboard equipment when using the FX Loop block. You can also use this as an auxiliary
output to tap any point of the signal chain for any preset using the FX Loop block.
Humbuster™ technology on all unbalanced (1/4”) outputs uses a simple TRS-to-TS cable to significantly
reduce ground hum. Find Humbuster cables at www.fractalaudio.com/cables
20. – This includes both S/PDIF and AES/EBU format Input and Output Jacks. Only one or the
other pair of jacks can be active at any time depending on the setting of the SPDIF/AES SELECT parameter
in the I/O:AUDIO menu. These jacks transmit and receive at a fixed rate of 48k.
21. – For connecting the Axe-Fx II to a PC or Mac, enabling a host of two-way audio and MIDI capabilities.
See section 2.3 on p.6. Note: Like the digital I/O, USB Audio operates only at 48k.

HARDWARE Overview
Doc v15XL 6 Doc v15XL
22. , and jacks – The Axe-Fx II has a MIDI IN port for connecting a legacy MIDI Controller or
Interface, plus separate MIDI Out and MIDI Thru jacks. Please note that the MIDI THRU is “hard-wired” to
the MIDI IN. To pass MIDI signals from as MFC-101 connected at either the FASLINK™ or MFC port, please
use the MIDI OUT jack instead, and turn on “MFC ECHO TO MIDI OUT” on the MIDI page of the I/O menu.
23. Jack – When using the MFC-101 MIDI Foot Controller over a 7-pin MIDI cable,
connect the supplied AC Adapter to this jack to provide power to the floor unit via pins 6+7. Some other
MIDI controllers also support the use of phantom power on pins 6+7.
WARNING! Do not connect an AC adapter with a rating higher than 1A to the Phantom Power jack.
Doing so will damage your Axe-Fx II. Do not use AC adapter while using FASLINK/Ethernet/CON.
24. Control Port – This RJ45 jack allows you to use a standard (non-crossover) Ethernet cable to connect
the Axe-Fx II to a Fractal Audio Systems MFC-101 MIDI Foot Controller. The cable used to connect the Axe-
Fx II and MFC-101 carries two-way data communication and phantom power without needing an external
“wall wart” adapter. The Axe-Fx II Mark II and MFC-101 Mark II are equipped with EtherCON ports.
EtherCON is a ruggedized RJ45 connector designed to prevent cable strain or jolt from damaging ports or
connectors. If possible, use an EtherCON cable with your Mark II products.
High quality Ethernet/EtherCON cables and adapters available via http://www.fractalaudio.com/cables
WARNING! Always ensure that the Axe-Fx II power is OFF before inserting/removing
Ethernet/EtherCON cables. DO NOT connect the MFC jack to an Ethernet device such as a
computer, hub, switch, or router, as damage to one or both units could occur. Be careful not
to insert USB or other cables into the MFC expansion port of the Axe-Fx II, as doing so WILL damage your
Axe-Fx II. Port mis-use leaves tell-tale signs and is NOT covered under warranty.
25. Port – FASLINK™ is a new connector for the MFC-101. It utilizes a proprietary system to carry bi-
directional communications and provide “phantom” power to the MFC over a standard XLR cable. The
MFC-101 Mark III has a corresponding FASLINK™ port. Those who own an original or Mark II MFC-101 can
still enjoy the benefits of FASLINK™ with an optional XA-1 FASLINK-to-MFC-101 Adapter from Fractal
Audio Systems. The XA Adapter is placed on the other end of the XLR Cable to convert FASLINK™ to the
Ethernet/EtherCON connector on the MFC-101.
26. Jacks – These jacks are used to connect up to two external expression pedals or switches to control
various functions of the Axe-Fx II. Use the PEDAL page in the I/O menu to calibrate each connected pedal.
The online PDF Axe-Fx II Owner’s Manual details how to assign a pedal to control various functions. In
short, you must change one of the “EXT CTRL” sources (on the I/O:CTRL page) from a MIDI CC# to “PEDAL
1” or “PEDAL 2” and create a MODIFIER with that external controller as its SOURCE. (See p. 28 for more.)
27. Main Power Input – Insert the supplied power cable and connect the other end to a grounded AC power
receptacle. The Axe-Fx II has a universal power supply, which means it can be connected to power around
the globe simply by changing the power cable.
2.3 Computer Integration
USB provides the Axe-Fx II with a “host” of great features. Although the Axe-Fx II drivers are fully class-compliant,
software installation is still required on all platforms; without drivers installed, USB capabilities of the Axe-Fx II will
not work correctly. Mac and Windows drivers can be downloaded from http://www.fractalaudio.com/support.
Step-by-step instructions are included with the installers.
HARDWARE Overview
Doc v15XL 7 Doc v15XL
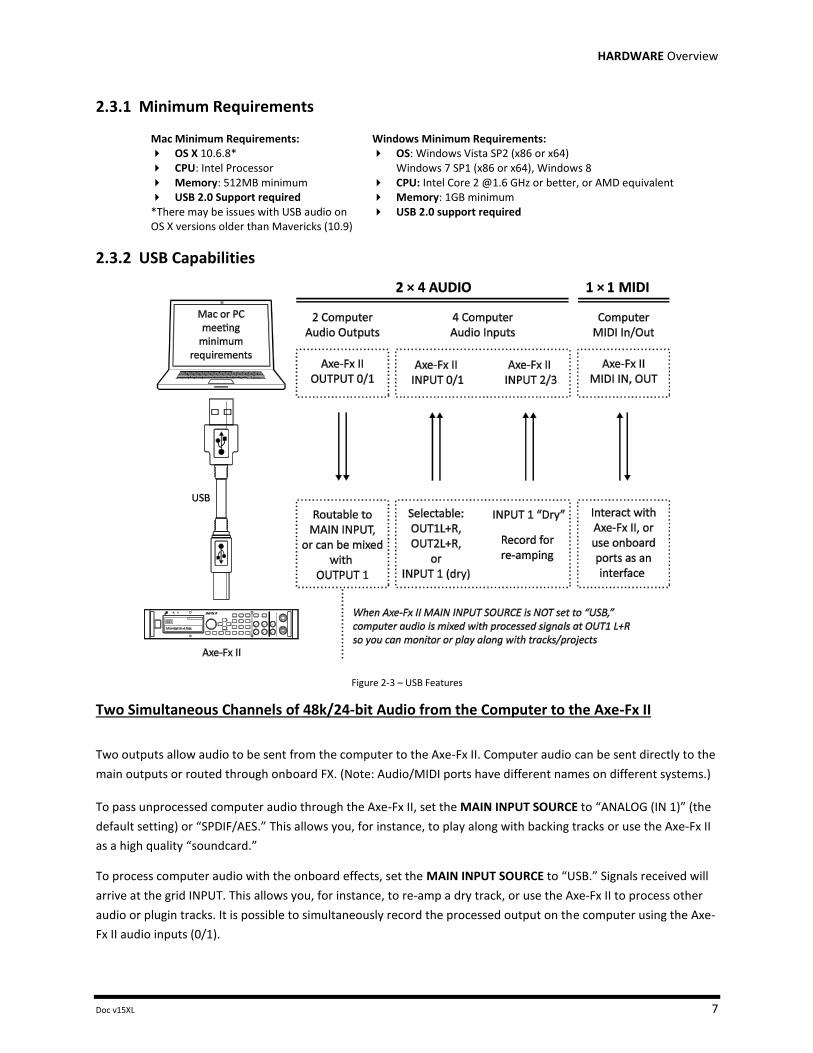
Minimum Requirements 2.3.1
Mac Minimum Requirements: OS X 10.6.8* CPU: Intel Processor Memory: 512MB minimum USB 2.0 Support required *There may be issues with USB audio on OS X versions older than Mavericks (10.9)
Windows Minimum Requirements: OS: Windows Vista SP2 (x86 or x64)
Windows 7 SP1 (x86 or x64), Windows 8 CPU: Intel Core 2 @1.6 GHz or better, or AMD equivalent Memory: 1GB minimum USB 2.0 support required
USB Capabilities 2.3.2
Figure 2-3 – USB Features
Two Simultaneous Channels of 48k/24-bit Audio from the Computer to the Axe-Fx II
Two outputs allow audio to be sent from the computer to the Axe-Fx II. Computer audio can be sent directly to the
main outputs or routed through onboard FX. (Note: Audio/MIDI ports have different names on different systems.)
To pass unprocessed computer audio through the Axe-Fx II, set the MAIN INPUT SOURCE to “ANALOG (IN 1)” (the
default setting) or “SPDIF/AES.” This allows you, for instance, to play along with backing tracks or use the Axe-Fx II
as a high quality “soundcard.”
To process computer audio with the onboard effects, set the MAIN INPUT SOURCE to “USB.” Signals received will
arrive at the grid INPUT. This allows you, for instance, to re-amp a dry track, or use the Axe-Fx II to process other
audio or plugin tracks. It is possible to simultaneously record the processed output on the computer using the Axe-
Fx II audio inputs (0/1).
HARDWARE Overview
Doc v15XL 8 Doc v15XL
Four Simultaneous Channels of 48k/24-bit Audio from the Axe-Fx II to the Computer
Four outputs allow audio to be routed from the Axe-Fx II to the computer, where they can be recorded, processed,
or monitored.
The signal source for the first pair of outputs is selectable, based on the setting of the USB/DIGI OUT SOURCE
parameter of the I/O:AUDIO menu:
Selecting OUTPUT 1 L+R sends the main processed output of the Axe-Fx II to the computer.
The same signal is still routed normally to the outputs of the Axe-Fx II.
Selecting OUTPUT 2 L+R sends the output of the FX loop block to the computer.
Selecting MAIN INPUT sends the source selected under MAIN INPUT SELECT to the computer.
The same result can be obtained by using OUTPUT 1 with a “shunts-only” preset.
Switching INPUT 1 LEFT SELECT to “REAR” allows you to record the line level outputs of a
microphone preamp, keyboard, or any other sound source via the rear INPUT 1 L/R jacks.
The second pair of channels, available only on systems supporting USB 2.0 (see Minimum Requirements above),
provides a way to simultaneously record a raw, dry guitar track for subsequent “reamping.” The source for these
channels is the unprocessed signal from the main input of the Axe-Fx II (whether front or rear).
Warning: As with all input/output systems, certain routing configurations can result in audio feedback loops. Please exercise
care not to route active outputs to active inputs, or damage could occur to connected amps, speakers, or your hearing.
Two-way High-Speed MIDI Communication
MIDI-over-USB enables the Axe-Fx II and the computer to communicate, sending and receiving program changes,
parameter automation, tempo sync, SysEx dump/receive backups, firmware updates, and more. MIDI-over-USB is
considerably faster than “legacy” MIDI, and allows two-way communication with the computer over a single cable.
Fractal-Bot 2.3.3
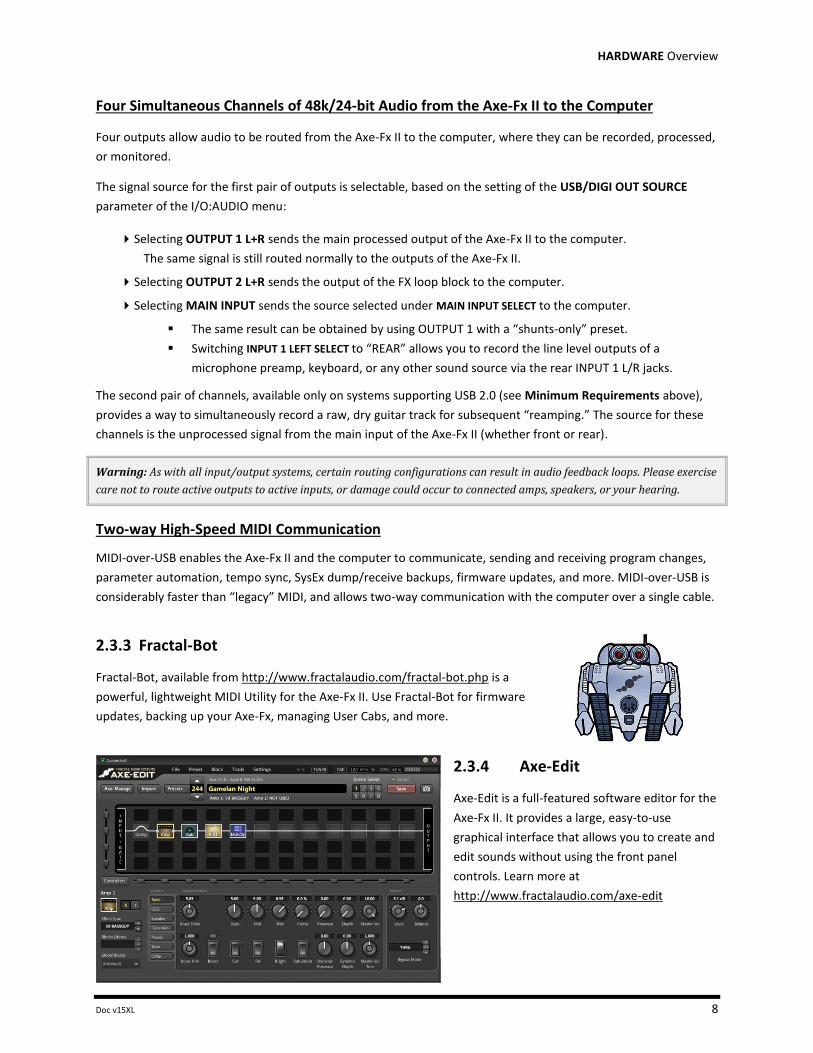
Fractal-Bot, available from http://www.fractalaudio.com/fractal-bot.php is a
powerful, lightweight MIDI Utility for the Axe-Fx II. Use Fractal-Bot for firmware
updates, backing up your Axe-Fx, managing User Cabs, and more.
Axe-Edit 2.3.4
Axe-Edit is a full-featured software editor for the
Axe-Fx II. It provides a large, easy-to-use
graphical interface that allows you to create and
edit sounds without using the front panel
controls. Learn more at
http://www.fractalaudio.com/axe-edit

CONNECTIONS
Doc v15XL 9 Doc v15XL
3 Connections
Before making connections, be sure to turn down the volume of your amps and switch off all power. Take
extreme care NEVER to connect the SPEAKER outputs of any amplifier to any jack on the Axe-Fx II as this
will damage one or both devices. If you’re not sure, don’t do it!
3.1 Setting Levels
For the Axe-Fx II to work properly, it is important that input and
output levels be set correctly. Optimal levels will depend on what
the Axe-Fx II is connected to, and on the level of your presets.
INPUT LEVELS are set with “soft-knobs” on the INPUT page of the
I/O menu. Adjust until “hot” signals “tickle” the red LEDs on the
front panel INPUT meters. The red LED lights at -6 dB (below
clipping). Some sources may not reach these levels but can still be used with no problems.
Changing input levels will NOT affect what you hear. Inputs are compensated, meaning that as you lower trims
to optimize signal-to-noise ratio going into the converters, the output of the converters is adjusted inversely
so “what you hear” (and what reaches the signal processor) always remains the same. If you want to increase or
decrease the distortion of an amp or drive pedal, use the controls provided in the edit menu of those blocks!
OUTPUT LEVELS are set using the front panel and knobs. The Axe-Fx II is designed for easy use
in unity gain applications; simply set the output knob to its MAXIMUM position and a preset containing “all shunts”
will output unity gain. (This type of operation would typically be limited to when you’re running the unit in an
amp’s FX loop. Presets containing amps, cabs, and other effect blocks which add gain can significantly increase the
level.)
CLIPPING THE OUTPUTS
If the or LEDs light while you use the Axe-Fx II, the problem is NOT input trim settings but too
much level or gain inside your preset(s). Reduce the output of one or more blocks (the LEVEL control of the AMP or
CAB block is good starting point) or adjust the main GAIN slider of the preset’s output mixer on the OUT page of
the LAYOUT menu until clipping stops.
3.2 A Word on System Parameters…
The following section shows some typical setups, some of which require special “System Parameter” settings. For
example, when the Axe-Fx is used with guitar speakers instead of a full-range/direct system, you will want global
“Cabinet Modeling” set “OFF.”
In addition to the short introductions provided with the diagrams below, system parameters are detailed in the
online PDF Axe-Fx II Owner’s Manual available on our web site. Additional setup diagrams are also included there.
Many of the basic setups shown here can be easily combined or expanded. Mono setups might be made stereo or
vice versa. The MFC-101 MIDI Foot controller can be added for intelligent remote control. Computer connectivity
can also be added to any other setup, enabling you to use Axe-Edit™, our free software Editor/Librarian for the
Axe-Fx II. Countless combinations are possible.
CONNECTIONS
Doc v15XL 10 Doc v15XL
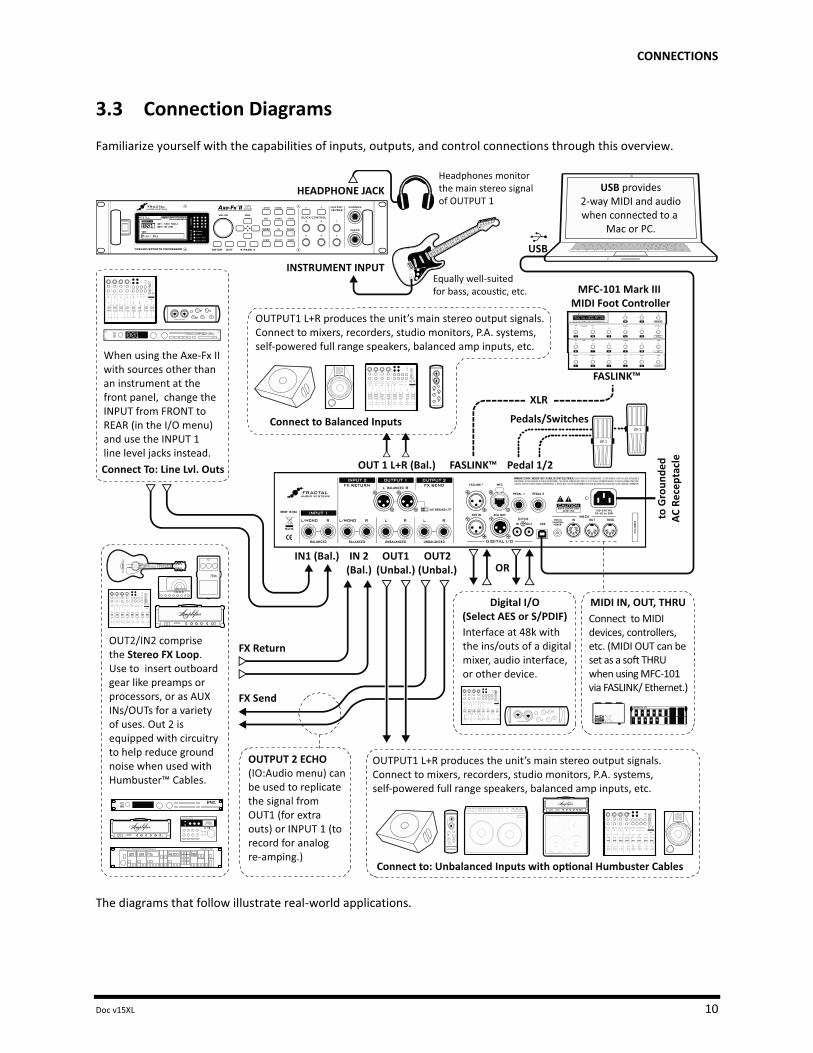
3.3 Connection Diagrams
Familiarize yourself with the capabilities of inputs, outputs, and control connections through this overview.
The diagrams that follow illustrate real-world applications.

CONNECTIONS
Doc v15XL 11 Doc v15XL
Axe-Fx II into Self-Powered Full-Range Speakers 3.3.1
COMPONENTS:
Guitar
Axe-Fx II
Self-Powered Full Range
Speaker(s)
Headphones (opt.)
Global Settings: Default I/O Settings: Default
Notes: With its built-in amp and speaker models, the Axe-Fx II can be played directly into P.A. or other self-
amplified, full-range, flat-response (FRFR) speakers. In this configuration, the Axe-Fx II creates all aspects of the end-
to-end guitar chain for the ultimate in tonal flexibility—stompboxes, amps, cabs, post effects, and more. Optional
headphones provide an alternate way to listen when cabs are not present or are switched off. Balanced (XLR) or
unbalanced (1/4”) jacks and cables can be used to connect the Axe-Fx II, with the former providing the advantage
that less noise will be picked up over longer cable runs. If only one speaker is used, set OUT 1 MODE in the I/O menu
to one of the mono options. The same setup would be used with passive full range speakers with an external amp.
Axe-Fx II into Studio Monitors 3.3.2
COMPONENTS:
Guitar
Axe-Fx II
Mixer (opt.)
Studio Monitors
Headphones (opt.)
Global Settings: Default I/O Settings: Default
Notes: This is essentially identical to the diagram shown above for Self-Powered FRFR speakers. The point to take
away here is that any system intended for full-range monitoring or sound reinforcement—from small computer
speakers to a club P.A. to a stadium sound system—represents a suitable counterpart to the Axe-Fx II.

CONNECTIONS
Doc v15XL 12 Doc v15XL
Axe-Fx II with Power Amp and Guitar Speaker 3.3.3
COMPONENTS:
Guitar
Axe-Fx II
Power Amp and
Guitar Speakers
-OR-
Amp Head/Combo
with FX RETURN jack
(power amp input)
and Guitar Speakers
`
Global Settings: Power Amp Modeling ON or OFF (see below), Cabinet Modeling OFF
I/O Settings: Set OUT1 MODE as required for stereo or mono.
Notes: Depending on the character of the amplifier being used, Power Amp Modeling may need to be ON or OFF for
this type configuration.
Power Amp Modeling should be turned ON when using a “neutral-sounding” (Solid State) power amp that
does NOT significantly affect the tone or feel.
Power Amp Modeling should be turned OFF when using the RETURN on a tube head or combo, or a guitar-
oriented tube power amp—one that significantly affects to the tone and feel.
In either case, it is completely safe and reasonable to try both setting ways to see which you prefer.
Whenever you use the Axe-Fx II with traditional guitar speaker cabinets (whether open back or closed, small or
large, alone or in pairs) it is typically best to turn Speaker Modeling OFF (on the CONFIG page of the GLOBAL menu).
Guitar speakers differ from full-range speakers in that they are voiced with prominent, reduced highs, etc.
Note that some players actually prefer to use Power Amp and Cab modeling ON despite using real guitar speakers.
The settings required for this setup are not ideally suited for monitoring through the Axe-Fx II headphone jack, as
what you hear through headphones will not sound like what you will hear through the speakers.

CONNECTIONS
Doc v15XL 13 Doc v15XL
Axe-Fx II Four Cable Method (“4CM”) 3.3.4
COMPONENTS:
Guitar
Axe-Fx II
Guitar Amp with a series effects
loop1 and built-in or separate
Guitar Speaker(s).
Second Amp for Stereo (opt.)
Global Settings: Defaults are OK,
since special 4CM presets should
not have AMP or CAB blocks.
I/O Settings : Set OUT1 MODE as
required for mono or stereo
operation.
Notes: This highly integrated setup allows you to use the Axe-Fx for effects “in front of” your amplifier, and in its
effects loop at the same time, where many effects work best. Head and cab are shown, but combos with an FX loop
work equally well.
Your guitar signal hits the Axe-Fx II first via the MAIN IN (INSTR or IN1/L) to be processed by any blocks you want in
front of the amp—compressor, wah, wah, and the like. Next, at the FX LOOP block , the signal makes a “round trip”
to the real preamp and back. It is then processed by additional blocks—maybe chorus, delay, reverb, etc. The Axe-Fx
II main outs feed your amp’s Return (Power Amp Input) and the amp powers your real speakers. To extend this
configuration for optional stereo, connect OUT1/R to the RETURN of a second amplifier, bypassing that unit’s
preamp altogether.
Using special cables with the Humbuster™ 1/4" outputs of the Axe-Fx II can significantly reduce ground hum. Visit
fractalaudio.com/cables for purchasing options.
The Boost/Pad functions in the I/O:AUDIO menu can also help run the OUT1 and OUT 2 D/A converters at optimum
levels, padding their outputs for even lower noise. To find the right setting, adjust either of these controls upwards
until you light the respective OUT CLIP LED on the front panel, then back off a few dB to prevent further clipping.
You’ll actually hear the noise floor drop as you make these adjustments.
The no-amp/no-cab presets required for this setup are not well-suited for headphone monitoring, as what you hear
in the headphones will not include any power amp or speaker simulations.
1 Note: If your amp’s effects loop is the PARALLEL type, the chain of post-FX-loop blocks should be mixed to output a wet-only signal.

CONNECTIONS
Doc v15XL 14 Doc v15XL
Direct to Front of House, plus Real Power Amp + Guitar Cab on stage 3.3.5
COMPONENTS:
Guitar
Axe-Fx II
Guitar Amp
with Guitar Speaker
Front-of-House P.A.
Global Settings: Default I/O Settings: Set OUT1 MODE and OUT 2 MODE as required for stereo or mono
Notes: This setup is similar to others in which the Axe-Fx II is used direct into full-range speakers. Here, however, a
special preset feeds both the direct and power amp/cab rig by placing an FX LOOP block between the AMP and CAB,
so signal is passed to Output 2 before it is processed by the CAB block and passed to Output 1.
Note: A template is provided in preset memory location 381: “OUT1->FOH OUT2->CAB”
Note: Be sure to use a STEREO cab type if your post-amp effects are stereo.
Another possibility is to use a preset with totally separate signal paths. In the example below, the top (direct) signal
path contains a fully simulated guitar chain, while the second (backline) does not use a CAB sim.
The backline chain differs from the direct chain in several key ways. First, its AMP block has the “SAG” parameter set
to “0.00” to disable power amp simulation in that block only. Since real guitar speakers and a power amp are being
used at Output 2, no CAB block is inserted. Duplicates of effects following the amp are placed. This is useful because
different settings may be required to “sweeten” each system. The backline chain ends in an FX LOOP block, which is
routed via OUTPUT 2 to a power amp. If a very “neutral” amp is used, the SAG of that second AMP block might be
set higher for simulated tube power amp tone and dynamics.
BASIC OPERATION AND EDITING
Doc v15XL 15 Doc v15XL
4 Basic Operation and Editing Once you have set up your Axe-Fx II with speakers/amps/monitors or a pair of headphones, you can begin to
audition the factory preset sounds and learn to make changes by following this guide to basic operation.
4.1 Presets
Each factory preset is a complete “end-to-end” guitar sound with amps, cabs, and effects—perfectly mixed and
ready to perform. In the sections that follow, you’ll learn to view, edit, and create presets from scratch. To begin,
let’s look at the ways to load the presets stored in the Axe-Fx II.
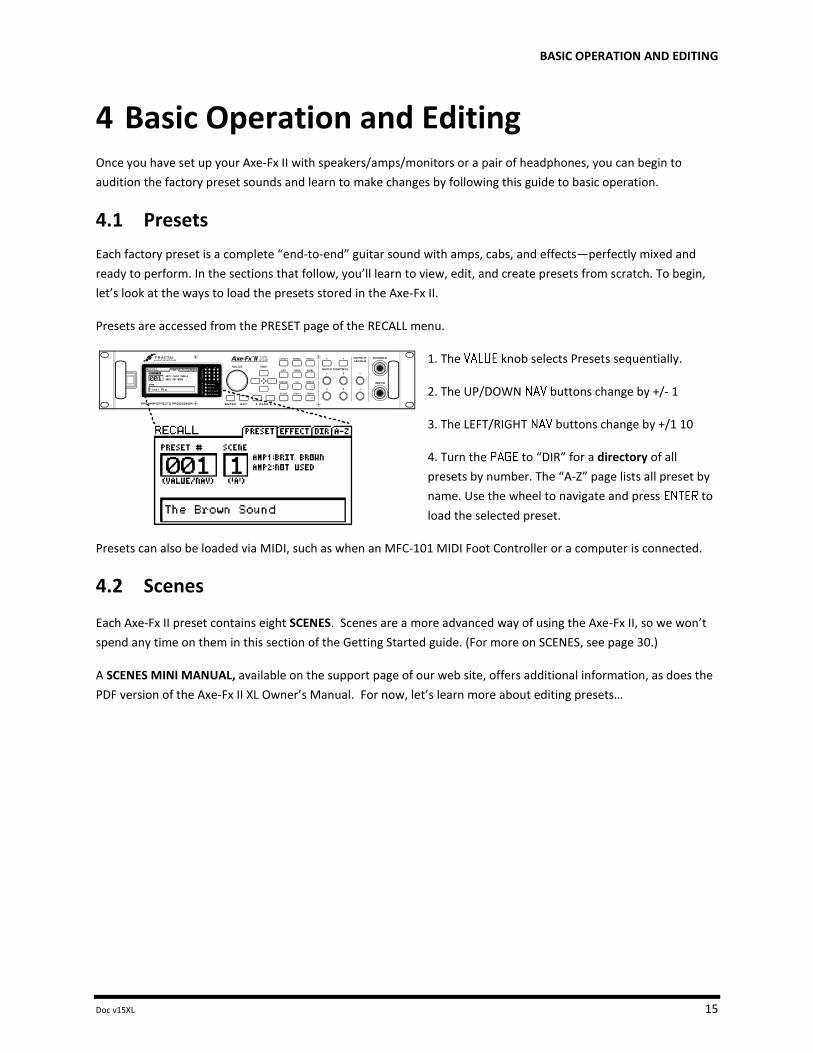
Presets are accessed from the PRESET page of the RECALL menu.
1. The knob selects Presets sequentially.
2. The UP/DOWN buttons change by +/- 1
3. The LEFT/RIGHT buttons change by +/1 10
4. Turn the to “DIR” for a directory of all
presets by number. The “A-Z” page lists all preset by
name. Use the wheel to navigate and press to
load the selected preset.
Presets can also be loaded via MIDI, such as when an MFC-101 MIDI Foot Controller or a computer is connected.
4.2 Scenes
Each Axe-Fx II preset contains eight SCENES. Scenes are a more advanced way of using the Axe-Fx II, so we won’t
spend any time on them in this section of the Getting Started guide. (For more on SCENES, see page 30.)
A SCENES MINI MANUAL, available on the support page of our web site, offers additional information, as does the
PDF version of the Axe-Fx II XL Owner’s Manual. For now, let’s learn more about editing presets…

BASIC OPERATION AND EDITING
Doc v15XL 16 Doc v15XL
4.3 The Grid
The grid is a 12×4 matrix into which BLOCKS are inserted and connected together to build presets.
To display the GRID for any preset, press LAYOUT and select the EDIT page.
The INPUT appears at the left, the OUTPUT at the right. The Axe-Fx LCD display can only show file columns at once.
The buttons are used to show off-screen columns. A bottom scrollbar indicates where you are in the overall
left-to-right layout.
Figure 4-1 – In this image of an empty grid, off-screen areas are grayed.
Inserting and Removing Blocks 4.3.1
As explained in “The Concept” on page 2, the Axe-Fx II grid is populated with BLOCKS—components pulled from an
inventory of amps, cabs, stompbox, studio effects, mixers, and more. The insertion, modification, or removal of
blocks happens at the grid cursor, a solid-filled rectangle that you move with the buttons.
1. The buttons select grid locations.
2. Turn to scroll through the list of available blocks for the
selected space.
3. Press to confirm or to cancel changes.
4. Press to engage or bypass the selected block.
STEP-BY-STEP: INSERTING or CHANGING a BLOCK
Use the buttons to select the desired grid location.
Turn the wheel. Available block names (AMP 1, CAB 1, etc.) will be displayed on the screen in
alphabetical order, and the selected block (if visible) will flash.
When the desired item is found, press to insert it into the grid. To cancel, press instead.
The total number of blocks you can insert in any one preset is limited by the number of available blocks. The total
“CPU utilization” must never exceed 98%. (Check CPU Utilization on the STATUS page of the UTILITY menu). Each
block has a “cost,” and when the sum of all blocks reaches the limit, a warning message prevents you from adding
additional blocks. The Axe-Fx II is extremely powerful, and most presets do not come close to the limit.
INPUT
OUTPUT
“shunt” empty space

BASIC OPERATION AND EDITING
Doc v15XL 17 Doc v15XL
Shunts 4.3.2
A shunt is a passive connector—a utility block that carries signal through otherwise empty grid locations. Shunts
are required because, although you may only wish to have a few components in your chain, signal does NOT flow
through an Axe-Fx II preset unless you completely connect the INPUT to the OUTPUT. A single Axe-Fx II preset can
contain up to 36 shunts.
Figure 4-2 – Shunts are used to span distances between INPUT, BLOCKS, and OUTPUT.
In the figure above, a shunt connects the Input to the WAH, and five shunts connect the Delay [DLY] to the Output.
Empty grid locations are indicated by dotted outlines and the absence of a three-letter abbreviation or thru-line.
STEP-BY-STEP: INSERTING a SHUNT into an empty grid location…
Use the buttons to select the desired empty grid location.
Turn the wheel once to the right. “SHUNT” will be displayed in a popup, and the selected grid space will
flash if not hidden.
Press . To cancel without inserting, press instead.
SHORTCUT: To CHANGE any other block type into a SHUNT…
Select the desired block.
Press . “SHUNT” will be displayed in a popup, and the selected space will flash if not hidden.
Press . To cancel without inserting, press instead.

BASIC OPERATION AND EDITING
Doc v15XL 18 Doc v15XL
Connector “Cables” 4.3.3
As mentioned above, the INPUT must be connected to the OUTPUT for signal to pass through the grid. Blocks
(including shunts) create the components of a chain, but need to be connected to one another for signal to flow.
This is done using routing connectors, commonly referred to as “cables.”
See the difference above? The illustration shows two otherwise identical presets shown WITH and WITHOUT
connector cables between the blocks. The one on the LEFT would produce NO SOUND as nothing is connected!
If a preset is unexpectedly silent, inspect it carefully for one or more missing cables.
The Rules of Axe-Fx II Cables No cables = No sound. Even one missing link will break the entire chain.
Signal always flows from LEFT to RIGHT.
A cable MUST originate from a BLOCK or a SHUNT. Empty locations are not viable origins.
If you try to connect to an EMPTY location, a SHUNT will be created there.
You can ONLY connect to blocks in the next column on the right.
The represents the origin of a connector cable. The shows valid possible destinations.
The shows destinations that are unavailable/illegal. Any columns farther left or right would also be illegal/unavailable.
If the were in a different ROW, every would still be in the same place.
Cables are created AUTOMATICALLY between the INPUT and any blocks in the first column.
Cables are created AUTOMATICALLY between the OUTPUT and any blocks in the last column.
You may freely SPLIT or MERGE the signal up to four ways at any point. This is sonically transparent and there
is zero risk of inherent phase or other problems in the split/merge itself. CROSSING is also possible.
Cables can CROSS one another without issue. Routings can be as COMPLEX as required.
BASIC OPERATION AND EDITING
Doc v15XL 19 Doc v15XL
STEP-BY-STEP: Creating a Connector Cable…
Use the buttons to select the block where you wish the cable to BEGIN.
You can’t start from an EMPTY grid space!
The first and last grid columns are automatically connected to the INPUT and the OUTPUT.
Press . The selected block and its neighbor to the right will alternately flash as “selected.”
Use the UP or DOWN buttons to select the desired destination block.
Remember that you will be prevented from trying to select blocks in other columns.
It is possible to select an empty location, but a shunt will be added automatically at the
destination if you complete the cable.
Be sure to select a destination that is not already connected to the origin block, or you will
REMOVE that cable (see below).
Press . To cancel without connecting, press instead.
Step-By-Step: Removing a Connector Cable…
Cables are removed in much the same way as they are created.
Select the block where the cable begins.
Press . The selected block and its neighbor to the right will alternately flash as “selected.”
Use the UP or DOWN buttons to select the “other end” of the cable you wish to remove.
Press . To cancel without removing, press instead.
A Shortcut for Spanning Empty Spaces
This shortcut allows you to span multiple empty grid columns with a series of automatic shunts and cables. This
technique is especially useful when you have placed your last effect block and need to wire it to the output or if
you want to fill an empty row with shunts.
Select any block that is followed by a series of empty spaces.
PRESS and HOLD the button. The intervening spaces will be automatically filled with shunts and
connected with cables.
You can also use this shortcut for small “runs” to connect any blocks with one or more columns of empty space
between them, but be careful: any existing cables encountered along the way will be REMOVED by the process!
A Word on Shunts and Cables
In the real world, cables and connectors can have an impact on the tone of a guitar rig. In the Axe-Fx II, nothing
could be further from the truth. Shunts and connectors, whether long, short, split, merged, or crisscrossed in a
huge mess, have absolutely no sonic properties whatsoever. They do not impart color, add latency, suck tone,
create load, invite hum, develop shorts, or get tangled up in the road case. A word of advice: merging identical
copies of a split signal will result in additive level increase and should be avoided in favor of simply increasing one
or another gain or level parameters.

BASIC OPERATION AND EDITING
Doc v15XL 20 Doc v15XL
Moving Blocks on the Grid 4.3.4
The menu also includes a MOVE page with tools to move individual blocks or entire rows or columns UP,
DOWN, LEFT, or RIGHT. When a block or a grid row/column is moved, it changes places with the item in the space
it is moved to. This can result in certain connector cables being modified or removed, so be sure to observe how
the elements of your preset are interconnected before proceeding with a MOVE operation.
Press .
Use the buttons to select the MOVE tab.
Select a function with the wheel:
EFFECT LEFT/RIGHT/UP/DOWN
COLUMN LEFT/RIGHT
ROW UP/DOWN
Use the buttons to select the target effect block or row/column you wish to move. Look for the SOLID
square(s) in the grid representation on the screen.
Press to execute the move.
Repeat this step to move the same target again in the same direction.

BASIC OPERATION AND EDITING
Doc v15XL 21 Doc v15XL
Example Presets on the Grid 4.3.5
Four sample presets are shown below as visualized in Axe-Edit, the companion software editor to the Axe-Fx II.
Review the diagrams to get a sense of how presets are constructed and how they appear on the grid.
EXAMPLE 1: Simple Amp Tone – In this extremely simple preset, an AMP and a CAB are combined for a straight-
ahead tone with no effects. Shunts and connectors (which appear in Axe-Edit almost as one continuous cable),
connect the INPUT to the AMP, the AMP to the CAB, and the CAB to the OUTPUT.
Figure 4-3 – Amp/Cab Preset
EXAMPLE 2: Long Pedal Chain – Here, effects are strung together to create a long virtual pedals rig. Compressor,
Volume, Wah, Whammy, Tremolo, Overdrive, Phaser, and Flanger are all connected to an AMP/CAB combination,
followed by Delay and Reverb. As you can see, the Axe-Fx II supports a great number of simultaneous effects; this
preset uses just a portion of the unit’s total CPU power, leaving considerable room for more effects on other rows.
Figure 4-4 – A Pedal Chain

BASIC OPERATION AND EDITING
Doc v15XL 22 Doc v15XL
EXAMPLE 3: Dual Amp Preset – This preset shows a dual-amp rig. A series of effects (Wahwah, Drive, Phaser)
begins the chain, then the signal is split into two amps and two cabs. Signal is panned hard left and right with CAB
block BALANCE controls and then merged to feed stereo post effects. A Multiband Compressor helps balance
dynamics, while spaces in the chain leave plenty of room for future expansion.
Figure 4-5 – Dual Amp Preset
EXAMPLE 4: Complex Routing – The program below demonstrates an extremely complex routing scenario. The
signal is split and merged at various points between the input and the output, with various effects appearing
before and after two independent amps. Notice the complex send and return feedback-loop routing in parallel
with the “dry” signal and the REVERB in parallel at the end of the chain.
Figure 4-6 – Complex Preset
MORE EXAMPLES…
The presets in this section represent only four examples of the nearly limitless possibilities that can be created
using the GRID, BLOCKS, and CONNECTORS of the Axe-Fx II. In addition to reviewing these diagrams, you can gain
valuable insight and ideas by exploring the factory presets or by discussing techniques with other members of the
Fractal Audio community. Visit forum.fractalaudio.com and join the discussion.
You can download additional presets for your Fractal Audio products at http://axechange.fractalaudio.com

BASIC OPERATION AND EDITING
Doc v15XL 23 Doc v15XL
4.4 Editing Sounds
The blocks of the Axe-Fx II represent different types of real-world equipment. In the same way that the original
hardware devices are equipped with different controls, blocks also have many adjustable settings called
parameters. These are arranged on PAGES in the display of the Axe-Fx II. The system of parameters and pages for
any block is referred to as its EDIT menu. Parameter settings determine precisely how an effect will sound.
STEP-BY-STEP: Opening the EDIT Menu for Any Effect Block…
With a preset loaded in normal mode…
Press to display the GRID.
If the GRID is not shown at first, press to reach the EDIT tab.
Use the buttons to select the desired block.
Press to display the EDIT menu.
buttons select parameters on the page.
The name of the selected parameter will be
displayed in .inverse. with “VAL” shown above
if it is a knob, or “>” shown to its left in text
menu pages.
In scrolling menu pages, the sidebar has an indicator to show relative position.
The wheel changes the selected parameter.
Changes can be auditioned in real-time by playing while you edit.
For effect blocks with multi-page menus, the buttons select between them.
Press to return to the grid, or press to go back to play mode.
Pressing repeatedly will step through the EDIT menus for all blocks in a preset, sparing you a return trip to the
grid. You can also press without entering the grid to go directly to editing a selected block in any preset.
The first illustration above shows a sample EDIT page from the AMP block with six simple knob controls.
The INPUT DRIVE parameter is selected for editing.
Notice the tabbed labels, TYPE, PRE, PWR, SPKR, and EQ. Select between these using the buttons.
The second example shows a text-driven menu, the ADVANCED page of the AMP block.

BASIC OPERATION AND EDITING
Doc v15XL 24 Doc v15XL
Quick Control 4.4.1
The function of the , , and knobs depends on which Axe-Fx II menu or
function is selected.
In the main screen, the A knob selects the preset SCENE.
In every EDIT menu1, A,B,C and D are dynamically mapped to four on-screen parameters
for easy editing of multiple controls without the keys. The current mapping is
indicated by the appearance of a small A,B,C or D above or to the left of on-screen
parameters.
When editing Amp TYPE, A, B, and C are conveniently mapped to DRIVE, MASTER, and LEVEL.
While on the MANUAL page of the menu, A,B,C and D work as “Manual knob” modifier sources.
While STORING a preset, A,B,C and D are used as shortcuts to enter text. See p. 26.
4.5 X/Y Switching
Many different effect block types in the Axe-Fx II support X/Y Switching: Amp, Cab, Chorus, Delay, Drive, Flanger,
Pitch, Phaser, Reverb, Wah, Mixer, Compressor, Pan/Trem, Gate/Exp, (and maybe more…). Each instance of these
blocks is equipped with two fully independent sets of parameters—“X” and “Y”—making it possible to switch
between two completely different sound settings using only one block.
X or Y can be recalled at the touch of a front panel button (while editing) or by using MIDI remote control (during
performance). XY Changes are instant and seamless, except in the AMP block, which creates a very short gap as the
block is reconfigured.
When you save a preset, the current X/Y state of each X/Y block is saved as well, so the preset loads with your
choices already selected. The X/Y state of each X/Y block is also storable per SCENE (see p. 30).
The benefits of X/Y Switching are considerable. You might simulate amp channel switching (X as American Clean
and Y as British Crunch). This won’t require the CPU overhead of two separate amp blocks! Another application is
channel-switching effects. Instead of painstakingly tuning modifiers for morphing, you can just dial in X, dial in Y,
and switch between them at will. Imagine a delay that can be switched at will from pristine dotted-eighth-note
echoes to saturated, modulated quarter-notes and heavy feedback.
It is important to understand that MODIFIERS (p. 28) are SHARED across X and Y states.
For more on XY, Scenes, and Modifiers, see the online PDF Axe-Fx II Owner’s Manual available on our web site.
To Use X-Y Switching
Open the desired block for editing.
All blocks default with the state selected. Dial in all parameters for the X state.
Press and dial in all parameters for the state.
Save the preset (see p. 26).
Each available X/Y switch has its own dedicated global MIDI CC# assignment for remote switching. This option is
found in the I/O:CONTROL menu. X is in fact the “ON” state for these CC switches (64-127) and Y is the OFF (0-63).
1 Exceptions: Quick control functions work in PEQ blocks, but letters are not shown. Mixer type blocks do not support Quick Control.

BASIC OPERATION AND EDITING
Doc v15XL 25 Doc v15XL
X-Y / Y-X Copying
You can copy all of the settings from X to Y, or Y to X, by double tapping the button for the one you want to copy
to, and then pressing to confirm. So, to copy X to Y, double-tap and then press . If you accidentally
double tap when you don’t want to copy, press to cancel.
X/Y Quick Jump 4.5.1
The X and Y buttons also double as user-definable Quick-Jump keys. These allow quick access to the EDIT menus of
your two favorite blocks from almost any screen without needing to “drill down” through the grid. You might, for
instance, set “X” to jump to AMP1, while “Y” might be assigned to bring up the PHASER1 menu.
Quick-Jump is disabled if you are already in the EDIT menu of another block (including Global Blocks or Modifier
sub menus), or if you are in the process of SAVING (where X and Y are used for quick character entry).
Quick Jump settings are assigned in the X/Y page of the I/O menu.
4.6 Bypassing a Block
Can you imagine a stompbox that can’t be stomped? Neither can we.
Any effect2 on the Axe-Fx II can be bypassed (or engaged) in three different ways:
1. Press the front panel button while the block is either selected in the grid or open to edit.
2. Use a MODIFIER attached to the block’s BYPASS MODE parameter.3
3. By remote control via the block’s global BYPASS switch, which may
be set to PEDAL 1/2 or to any MIDI CC# (on the CTRL page of the I/O
menu.)
A bypassed block is shown on the grid with a dotted outline.
Every SCENE stores the bypass state for every block in a preset.
4.7 Loading Effects from another Preset
The Recall Effect function makes it possible to load block settings directly from one preset to another. To perform
this operation, select the EFFECT tab of the RECALL menu using the buttons. Select the preset and block that
you want to load from and press . “EFFECT RETRIEVED!” will be displayed, and the “local” block (whether or
not it is already on the grid in the current preset) will be updated with all settings from the “retrieved” block.
Axe-Edit offers many additional options for working with blocks, such as copy/paste within or between presets,
drag-and-drop, saving blocks to a “library” for later use, and more.
2 The MIXER, FB SEND, and SHUNT blocks have no bypass functions. 3 The ENHANCER has no BYPASS MODE parameter.
BASIC OPERATION AND EDITING
Doc v15XL 26 Doc v15XL
4.8 Saving Changes
After making various changes, you will undoubtedly want to save the results of your edits. Every preset in the Axe-
Fx may be changed and saved. There are no hard-coded factory presets. Copies of presets shipped on your unit
are, however, stored in backup memory and may be “fetched” even if you overwrite them (using an option in the
UTILITY:PRESET menu).
To store a sound in place, without changing its name or location…
Press to show the STORE screen.
Press to initiate the process, and again to confirm.
The message “STORED!” is displayed when the operation completes.
To store a sound to a new location or with a new name…
The Axe-Fx II XL has hundreds of numbered preset memory locations. It is possible at any time to save any preset
into any location. It is also possible to change the NAME of a preset before you store it.
Press to show the STORE screen.
Use the buttons to select between the two available functions:
The LOCATION parameter selects where the preset will be stored:
The wheel selects numbered memory locations. left/right skip by 10.
Navigating down to the NAME parameter allows you to edit preset names before saving:
Turn the wheel to select from all available characters.
The “ ” knob selects UPPER CASE letters.
The “ ” knob selects LOWER CASE letters.
The “ ” knob selects NUMBERS.
left/right or the “ ” knob will move the cursor position.
The “ ” button inserts a character at the cursor position.
The “ ” button deletes a character at the cursor position.
You can use up to 23 characters in a preset name.
Press to Store, then press again to Confirm.
The message “STORED!” is displayed when the operation completes.
Swapping the Locations of Two Presets 4.8.1
The Axe-Fx II has a new feature that allows you to SWAP the locations of two saved presets. This is useful, for
instance, if you want to re-order the factory presets without overwriting any of them, or if you need to move a
“keeper” preset to a different location so you can overwrite its previous location with a newer entry. To SWAP two
presets:
Press and to the right to the SWAP page.
Use keys and the wheel to select the two presets whose locations you want to switch.
Press to Store.
Press to Confirm. The message “SWAPPED!” will briefly appear when the operation completes.
Doc v15XL 27 Doc v15XL
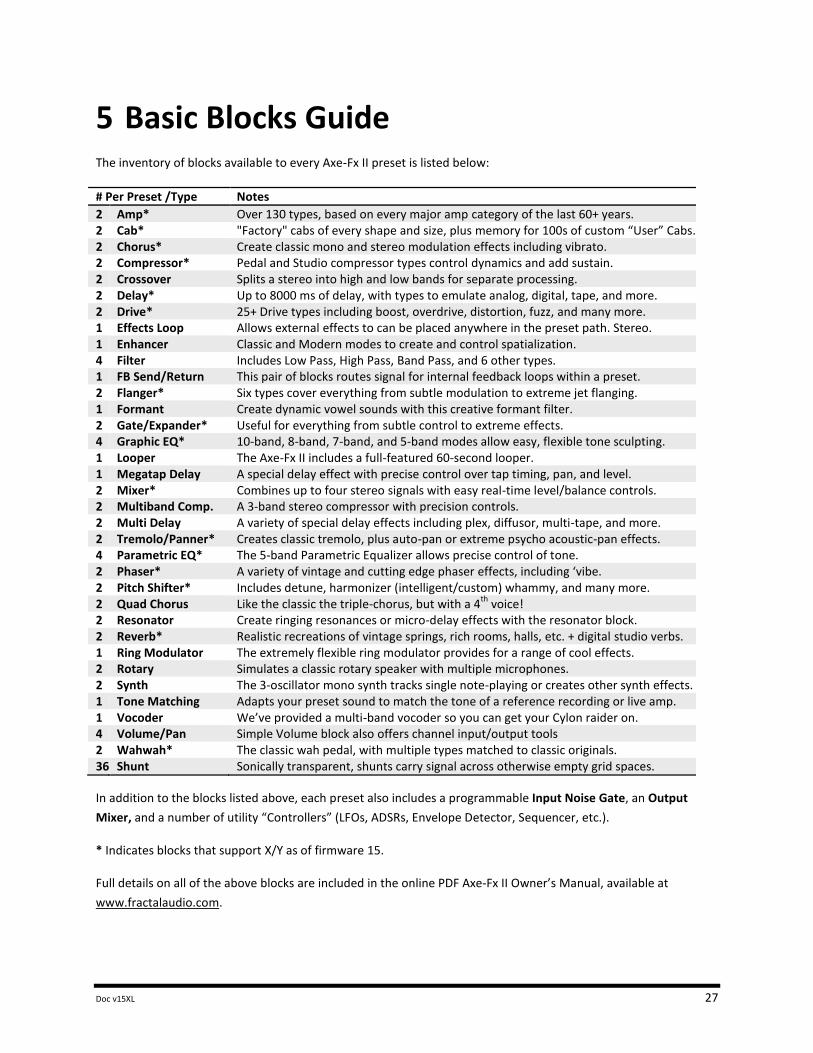
5 Basic Blocks Guide The inventory of blocks available to every Axe-Fx II preset is listed below:
# Per Preset /Type Notes
2 Amp* Over 130 types, based on every major amp category of the last 60+ years. 2 Cab* "Factory" cabs of every shape and size, plus memory for 100s of custom “User” Cabs. 2 Chorus* Create classic mono and stereo modulation effects including vibrato. 2 Compressor* Pedal and Studio compressor types control dynamics and add sustain. 2 Crossover Splits a stereo into high and low bands for separate processing. 2 Delay* Up to 8000 ms of delay, with types to emulate analog, digital, tape, and more. 2 Drive* 25+ Drive types including boost, overdrive, distortion, fuzz, and many more. 1 Effects Loop Allows external effects to can be placed anywhere in the preset path. Stereo. 1 Enhancer Classic and Modern modes to create and control spatialization. 4 Filter Includes Low Pass, High Pass, Band Pass, and 6 other types. 1 FB Send/Return This pair of blocks routes signal for internal feedback loops within a preset. 2 Flanger* Six types cover everything from subtle modulation to extreme jet flanging. 1 Formant Create dynamic vowel sounds with this creative formant filter. 2 Gate/Expander* Useful for everything from subtle control to extreme effects. 4 Graphic EQ* 10-band, 8-band, 7-band, and 5-band modes allow easy, flexible tone sculpting. 1 Looper The Axe-Fx II includes a full-featured 60-second looper. 1 Megatap Delay A special delay effect with precise control over tap timing, pan, and level. 2 Mixer* Combines up to four stereo signals with easy real-time level/balance controls. 2 Multiband Comp. A 3-band stereo compressor with precision controls. 2 Multi Delay A variety of special delay effects including plex, diffusor, multi-tape, and more. 2 Tremolo/Panner* Creates classic tremolo, plus auto-pan or extreme psycho acoustic-pan effects. 4 Parametric EQ* The 5-band Parametric Equalizer allows precise control of tone. 2 Phaser* A variety of vintage and cutting edge phaser effects, including ‘vibe. 2 Pitch Shifter* Includes detune, harmonizer (intelligent/custom) whammy, and many more. 2 Quad Chorus Like the classic the triple-chorus, but with a 4
th voice!
2 Resonator Create ringing resonances or micro-delay effects with the resonator block. 2 Reverb* Realistic recreations of vintage springs, rich rooms, halls, etc. + digital studio verbs. 1 Ring Modulator The extremely flexible ring modulator provides for a range of cool effects. 2 Rotary Simulates a classic rotary speaker with multiple microphones. 2 Synth The 3-oscillator mono synth tracks single note-playing or creates other synth effects. 1 Tone Matching Adapts your preset sound to match the tone of a reference recording or live amp. 1 Vocoder We’ve provided a multi-band vocoder so you can get your Cylon raider on. 4 Volume/Pan Simple Volume block also offers channel input/output tools 2 Wahwah* The classic wah pedal, with multiple types matched to classic originals. 36 Shunt Sonically transparent, shunts carry signal across otherwise empty grid spaces.
In addition to the blocks listed above, each preset also includes a programmable Input Noise Gate, an Output
Mixer, and a number of utility “Controllers” (LFOs, ADSRs, Envelope Detector, Sequencer, etc.).
* Indicates blocks that support X/Y as of firmware 15.
Full details on all of the above blocks are included in the online PDF Axe-Fx II Owner’s Manual, available at
www.fractalaudio.com.

Doc v15XL 28 Doc v15XL
6 Modifiers
Modifiers are used to remote-control or automate sound parameters. For example, you might attach an
expression pedal to a wah, volume, or whammy. Or use an LFO to modulate the pitch of a synth voice.
The process of creating a modifier begins at the parameter
you want to control. Parameters that can be controlled are
marked with a special symbol (left). Look for it beneath a
knob or to the right of a text parameter. If a modifier is already
present, the symbol will have a line through it (left bottom).
In the example (right) MASTER and LEVEL may be controlled with
modifiers. LEVEL has one assigned already.
To Create a Modifier…
Select any controllable parameter ( ) and press the button to show the MODIFIER screen.
Select a SOURCE to assign to the current parameter or choose NONE to remove an existing modifier. For more
on modifier sources, see the online PDF Axe-Fx II Owner’s Manual on our web site. Note: MFC-Expression
pedal jack 1 is factory configured for OUTPUT 1 VOLUME. MFC-101 XP2 is pre-configured for Axe-Fx
“EXTERNAL 1”
The modifier graph shows the relationship between the control source (x-axis) and the sound
parameter (y-axis). The “dot” in the graph tracks the SOURCE as its value changes.
You can set the range of the Modifier with the MIN and MAX parameters, or use START, MID, and END to
create custom curves.
AUTO-ENGAGE causes a block to engage/bypass based on the current value/position of the source.
You must STORE the current preset to make the modifier setting permanent.
To Remove a Modifier…
To remove a modifier, just change its SOURCE parameter to NONE.

Doc v15XL 29 Doc v15XL
Modifier Example: Controlling a Wah
For this example, we assume that the controller called “EXT 1” is set to its default value in the I/O:CTRL page, and
that we have connected a MIDI foot controller with an expression pedal that is set up to send this same message
on the correct MIDI channel. (In fact, this is the default setting for the EXPRESSION PEDAL 2 jack on the MFC-101).
If you don’t have an MFC-101, you can connect an expression pedal directly to the Axe-Fx PEDAL jack. You’ll need
to calibrate it (under I/O:PDL) and change “EXT CTRL 1” from CC#16 to “PDL” (under I/O:CTRL).
1. To start, a WAH block is inserted or selected on the grid.
2. Press to open the WAH block EDIT menu.
3. The modifier symbol beneath the CONTROL knob indicates that a modifier can be added here.
Select the CONTROL parameter and press to open the MODIFIER screen.
4. Change the SOURCE to “EXTRN 1” to “attach” it to our parameter. The wah pedal starts working!
“Follow the bouncing ball” as the dot on the graph follows the motion of your foot on the pedal.
If we change the modifier SOURCE to “ENVELOPE,” our wah is disconnected from the pedal and becomes
controlled instead by the level of the input signal to create a “touch wah”. Note that you can fine tune the
envelope response on the CONTROL:ENV page.
Changing the source to one of the LFOs, creates an oscillating “auto-wah.” Externals, Envelopes, LFOs, and other
sources are detailed below in section
For more about Modifiers, see the Axe-Fx II Owner’s Manual available on our web site.
Doc v15XL 30 Doc v15XL
7 Additional Topics
7.1 Scenes
In an “old-school” guitar rig made from amps, pedals and rack effects, a device called a switcher is used to create
presets. The switcher turns effects on or off in groups, and changes amps or channels. Such capabilities can easily
be simulated on the Axe-Fx II using multiple presets, but this approach is not without certain drawbacks.
Synchronizing edits across presets can be laborious, sound changes are not always gapless, and it takes care to get
levels and spillover right.
SCENES provide an easier way to accomplish many types of sound changes. Every Axe-Fx II preset contains eight
scenes. Each scene stores the BYPASS setting for every block in the preset, the X/Y selection for those blocks that
support it, the main level of the FX LOOP block, and the preset’s MAIN output level. Scene changes can be
seamless and “instantaneous,” with perfect spillover requiring almost no effort. Scenes can easily be selected from
the front panel or with a MIDI foot controller such as the MFC-101.
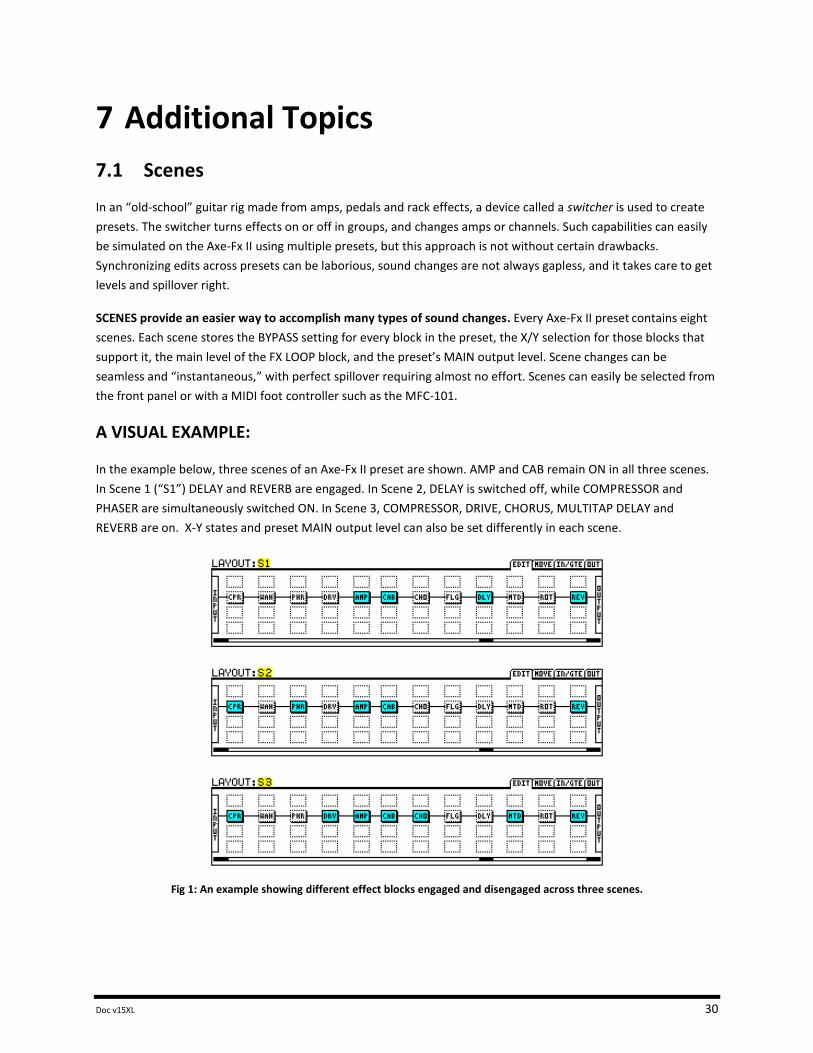
A VISUAL EXAMPLE:
In the example below, three scenes of an Axe-Fx II preset are shown. AMP and CAB remain ON in all three scenes.
In Scene 1 (“S1”) DELAY and REVERB are engaged. In Scene 2, DELAY is switched off, while COMPRESSOR and
PHASER are simultaneously switched ON. In Scene 3, COMPRESSOR, DRIVE, CHORUS, MULTITAP DELAY and
REVERB are on. X-Y states and preset MAIN output level can also be set differently in each scene.
Fig 1: An example showing different effect blocks engaged and disengaged across three scenes.

Doc v15XL 31 Doc v15XL
Selecting Scenes 7.1.1
The current scene is shown on RECALL:PRESET screen, and on all pages of the LAYOUT menu.
Fig 2: “Scene 1”, as shown on the RECALL:PRESET screen. Fig 3: “Scene 1” as shown on the LAYOUT:EDIT screen.
To select a scene, turn the “A” QUICK CONTROL knob on the front panel of the Axe-Fx. Scenes can also be selected
via MIDI. See the online PDF Axe-Fx II Owner’s Manual on our web site for more details.
Setting Up Scenes 7.1.2
To set the BYPASS STATES within a scene:
Press LAYOUT to display the EDIT (grid) page.
Select the desired scene by turning the “A” QUICK CONTROL knob.
Use the NAV and FX BYP buttons to set up the scene as desired.
Note: All blocks in a preset will be engaged by default in scenes 2–8.
To set the X/Y STATES for a given block in a given scene:
Select the scene as described above.
Navigate to the desired block and enter its EDIT menu.
Press X or Y to set the desired state.
Note: X/Y is supported for many but not all block types.
To set the MAIN output level for a scene:
Press LAYOUT.
Page to the OUT screen.
Set the level using the MAIN output level fader.
Note: MAIN output level controls everything you hear, including the level of effect “tails.”
Note: If you’re using the FX LOOP block, you can also set the MAIN level of OUT2 per scene.
Saving Scenes 7.1.3
To save scene changes, simply save the preset.
When using the “A” QUICK CONTROL knob to select scenes, you can make changes across multiple scenes before
saving. If you’re using MIDI to select scenes, you may need to save changes to the current scene before selecting a
new one, depending on the setting of SCENE REVERT on the MIDI page of the I/O menu. See the online PDF Axe-Fx
II Owner’s Manual on our web site for more details.

Doc v15XL 32 Doc v15XL
7.2 Tone Matching
Tone Matching allows the Axe-Fx II to match the sound of a live amp, a recording, or other reference signal.
The subject is covered in detail in the Tone Match Mini Manual, available on the support page of our web site.
7.3 Creating User Cabs
A built-in IR CAPTURE tool allows the Axe-Fx II to create “User” Cabs from the sound of a mic’d guitar amp. The
subject is detailed in the IR CAPTURE GUIDE, available on our web site, and in the Axe-Fx II Owner’s Manual.
7.4 Firmware Updates with Fractal-Bot
Fractal-Bot is an application for Mac or Windows computers which enables you to easily transmit firmware
updates to your Axe-Fx II. It’s small, lightweight, and extremely easy to use, with built-in step-by-step instructions.
Visit http://www.fractalaudio.com/fractal-bot.php to download Fractal-Bot.
7.5 Backup and Restore
The best way to back up and restore the Axe-Fx II XL is with your computer and Fractal-Bot, our free companion
software utility available at http://fractalaudio.com
z

Doc v15XL 33 Doc v15XL
8 Troubleshooting
Fractal Audio Systems offers support through support.fractalaudio.com
You can also get answers to many questions at forum.fractalaudio.com
The Axe-Fx Wiki at wiki.fractalaudio.com/axefx2 is also an excellent source of information.
Here are some frequently asked questions that might help you with very basic issues.
Q: How do I connect the Axe-Fx II to my computer?
A: Install the driver, available in the support section of our web site, and then connect the two devices together
with a standard USB cable. The Audio and MIDI input and output ports created will appear in your applications that
support these functions.
Q: Can I use the Axe-Fx II with MIDI controller “Brand X”?
A: MIDI is MIDI. You won’t get all of the deep integration features provided by “Axe-Fx Mode” on the MFC-101, nor
will you be able to connect via CAT5 Ethernet cable and without the need for a wall-wart AC adapter. But any
device that can send MIDI program and control change messages can interface with the Axe-Fx II.
Q: How do I set up a pedal to control the Wah?
A: See the section in this guide about Modifiers, or refer to our guide in the online Owner’s Manual.
Q: My Axe-Fx II is behaving erratically or “froze up” while I was using it. What should I do?
A: First try a simple reboot. If that doesn’t work, Disconnect MIDI, USB and MFC and hold RECALL while you power
on the unit. This will load an EMPTY preset, but won’t affect any of your saved settings.
Q: One or more of my presets produces no sound.
A: This might be any one (or several) of a number of things:
Is everything still wired up correctly? Most of the time, the problem is a faulty or disconnected cable!
Have you double-checked to ensure that you have a complete path from the input to the output? See p. 18.
Is your guitar plugged into the front “ ” jack while INPUT 1 LEFT SELECT is set to “REAR” or vice versa?
(Check I/O:AUDIO parameters.)
Is there a MODIFIER assigned to a volume or level control while the pedal or external switch is not present?
Find and remove that modifier or change its EXT CTRL INIT VALUE from 0% to 100%.
Does the preset require a USER CAB which is not loaded? Try changing the CAB block to a Factory cab.
Is the Axe-Fx receiving stray MIDI Signals? Reboot and test with MIDI, MFC, and USB connected.
Q: The amps I’ve dialed in sound “wrong.”
A: The amp simulations of the Axe-Fx II are extremely accurate and should sound instantly familiar to those who
know the original amplifiers that inspired them. If things don’t sound correct, a few quick checks can confirm that
basic settings are correct. First, check the speaker cabinet type to make sure it is an appropriate match. You won’t
get typical “DAS METALL” sounds from a 1x8” speaker! Next, consider the setting of the MASTER. If the original
amp had no master, try a high setting (8+) and then dial in the amount of distortion you want using the DRIVE
parameter. Check the CONFIG page of the Global menu to make sure that power amp and cabinet simulations are
set correctly (see Chapter 3). Finally, consider trying default settings and the headphone jack for reference.

Doc v15XL 34 Doc v15XL
Q: All my presets suddenly sound harsh and bright. What’s going on here?
A: Check the CONFIG page of the Global menu to ensure that the Global Power Amp and Cab Modeling have not
been turned off. If a single preset is affected, make sure you haven’t set the SAG parameter of its AMP block(s)
fully counterclockwise. The Global Graphic EQ may also have an unusual setting.
Q: Many of my presets suddenly sound hollow and phasey. What could cause this?
A: These terms are sometimes used to describe the sound of problems caused when stereo sounds have been
summed to mono. Check the AUDIO page of the I/O menu to ensure that the OUTPUT1 MODE and OUTPUT 2 MODE
are set correctly according to how you are listening to your Axe-Fx II. Listening with headphones while making this
change can also confirm or rule out this possible problem.
Q: The sound is distorted even on what should be “clean” presets.
A: Check the input and output levels of the Axe-Fx II and check the input levels of any downstream amps/monitors.
See p. 9 for more on how to set levels. Also, try the obvious and turn DRIVE even lower on the amp, or consider
adjusting global AMP GAIN on the CONFIG page of the GLOBAL menu.
Q: The front panel CLIP LED is coming on. What does this mean?
A: The two CLIP LEDs indicate whether the D/A converters are being overdriven. See p. 9 for more on how to set
levels. Adjust the output levels of your presets, or reduce the global BOOST/PAD setting for the offending output.
In a pinch, you can also lower the GAIN setting on the Global Graphic EQ.
Q: My screen is blinking EXCESS CPU UTILIZATION! REDUCE LOAD.
A: First, try undoing the last change you made by turning the value wheel in the opposite direction. You can also
return to the grid, navigate around the message, and remove one or more blocks. You can also load a different
preset or reboot the unit. Changing CAB mode to “MONO LO-RES” is also a good solution in many cases.
Q: I am pressing FX BYP, but the state of the selected block will not toggle. What gives?
A: The BYPASS MODE parameter, available on almost all blocks, has a modifier slot to control bypass state. Once
attached to this slot, the modifier assumes total control over the block’s bypass switch. Either utilize the MODIFIER
to change the bypass state, or remove it.
Q: I loaded a preset from a backup and it sounds nothing like it did when I first saved it. What’s wrong?
A: The most likely scenario is that something else changed: the guitar, the amp, or perhaps the settings of remote-
controllers. It is also possible, however, that the preset in question uses Global Blocks that have changed.
Q: When I play audio from the computer through the Axe-Fx II, the sound is processed by the effects, and I can’t
hear the guitar. What’s wrong?
A: Change the MAIN INPUT SELECT from USB to ANALOG (IN 1). This will allow you to play along with audio from
the computer.
Q: Can I use the onboard MIDI ports to connect a keyboard/synthesizer/etc. to my computer?
A: Yes. Just turn on USB ADAPTER MODE in the MIDI page of the I/O menu.
Q: My Axe-Fx is warning me about presets not being installed correctly.
A: This rare error can be corrected through a series of steps. Visit http://support.fractalaudio

SPECIFICATIONS
Doc v15XL 35 Doc v15XL
9 Specifications FRONT PANEL INPUT
Connector: 1/4” phone jack, unbalanced. Impedance: 1 MegaOhm (less if Input Impedance is active) Max. Input Level: +16 dBu (conditioned for guitar use)
REAR INPUTS
Connector: 1/4” phone jack, balanced. Impedance: 1 MegaOhm Max. Input Level: +20 dBu
A/D CONVERSION
Bit Depth: 24 bits Sample Rate: 48 kHz Dynamic Range: > 110 dB Frequency Response: 20 – 20kHz, +0 / -1 dB Crosstalk: < -60 dB over full bandwidth
ANALOG OUTPUTS
Connectors: 1/4” phone jack unbalanced (hum-canceling), XLR balanced (for main output) Impedance: 600 ohm Max Output Level: +20 dBu Dynamic Range: > 110 dB Frequency Response: 20 – 20kHz, +0 / -1 dB Crosstalk: < -60 dB over full bandwidth
DIGITAL I/O
Connectors: RCA Coaxial Type for S/PDIF I/O, XLR for AES I/O Format: S/PDIF – 24 bit Sample Rate: 48 kHz fixed USB Audio Clock 48 kHz fixed
MIDI INTERFACE
Input Connector: 7-pin DIN (pins 6 & 7 connected to phantom power in jack) Out/Thru Connector: 5-pin DIN
PEDAL INTERFACE
Connector: 2 x 1/4” TRS phone jacks Format: Switch: Momentary or Latching; Pedal: 10–100kΩ max, linear taper expression type.
MFC INTERFACE:
Connector: RJ-45 Ethernet/EtherCON IMPORTANT: Do NOT connect this to a computer or router/switch/hub! This jack is only intended for connection to an MFC MIDI Foot Controller.
FASLINK™ CONNECTOR:
Connector: Standard female XLR connector IMPORTANT: Do NOT connect this to any device except a Fractal Audio Systems MFC-101 or XA Adapter. This jack provides power to the MFC-101 and misuse will result in damage to one or both connected units.
PHANTOM POWER:
Connector: Female 2.5mm jack WARNING: Do NOT connect adapters with a rating higher than 1A (1000ma)
GENERAL
Finish: Powder coated steel chassis with anodized aluminum faceplate Display: 160x80 dot matrix graphic LCD Dimensions: 19” × 3.5” × 14.25” (483 × 88 × 362 mm) Weight: 14.75 lbs (6.7 kg) Input Voltage: 100–240 VAC, 47 – 63 Hz (universal input) Power Consumption: <40 W Backup Battery Life: >10 years Backup Battery Type: CR2450 Lithium
ENVIRONMENTAL
Operating Temperature: 32 to 122 °F (0 to 50 °C) Storage Temperature: -22 to 167 °F (-30 to 70 °C) Humidity: Max. 90% non-condensing
Specifications subject to change without notice.

SPECIFICATIONS
Doc v15XL 36 Doc v15XL
Midi Implementation Chart
NOTE: MFC-101 Presets and Instant Access Switches have the capability to send custom MIDI data, entered
freeform as hex code, which can be used for many applications not supported “natively” (ex: Note On/Off).
Function Transmitted Received Remarks
Basic Channel Default Changed
1 1-16
1 1-16
Note Number True Voice X X
Velocity Note ON Note OFF
X X
X X
After Touch Keys Channels
X X
X X
Pitch Bend X X
Control Change
X O CCs are GLOBALLY soft-assigned to functions via the I/O:CTRL menu. These include INPUT volume, OUTPUT 1 and OUTPUT2 master volume, Global Bypass, Tap Tempo, Tuner Invoke, 12 “EXTERNAL” control nodes (assignable as modifiers to one or more parameters on a per-preset basis), all LOOPER functions, the BYPASS switch of every block instance AMP1, AMP2, CAB1, CAB2, etc.), and the X/Y switches of the 20 block types that support this function (AMP1, AMP2, etc.).
Program Change
True Number Bank Select
O O
O O
Bank Select and Program Change messages may be used to recall the presets of the Axe-Fx II. The unit also supports custom program change mapping utilizing a FROMTO table with 127 entries. BANK select messages are persisted until a subsequent valid Bank Select is received. Selecting a preset via the Axe-Fx II front panel will also transmit the corresponding bank select and program change number messages
System Exclusive Fractal Audio Real-Time Non-Real-Time
O O X
O X X
The list of parameters that can be controlled/edited via SysEx is listed in the Owner’s Manual under Factory Default Settings. Real-time SysEx is used to transmit Tempo and Tuner.
System Common Song Position Song Select Tune Request
X X X
X X X
System Real-Time Clock Commands
X X
O X
Axe-Fx II Global Tempo syncs automatically to MIDI Beat Clock.
Auxiliary Messages
Local ON/OFF All Notes OFF Active Sense Reset
X X X X
X X X X
0 = YES, X=NO

SPECIFICATIONS
Doc v15XL 37 Doc v15XL
Warranty Fractal Audio Systems warrants that your new Fractal Audio Systems product shall be free of defects in materials and
workmanship for a period of one (1) year from the original date of purchase.
During the warranty period, Fractal Audio Systems shall, at its sole option, either repair or replace any product that proves to
be defective upon inspection by Fractal Audio Systems.
Fractal Audio Systems reserves the right to update any unit returned for repair and to change or improve the design of the
product at any time without notice. Fractal Audio Systems reserves the right to use reconditioned parts and assemblies as
warranty replacements for authorized repairs. This warranty is extended to the original retail purchaser for units purchased
directly from Fractal Audio Systems or one of its authorized distributors or resellers.
This is your sole warranty. Fractal Audio Systems does not authorize any third party, including any dealer or sales
representative, to assume any liability on behalf of Fractal Audio Systems or to make any warranty for Fractal Audio Systems.
Fractal Audio Systems may, at its option, require proof of original purchase date in the form of a dated copy of original
authorized dealer’s invoice or sales receipt. Service and repairs of Fractal Audio Systems products are to be performed only at
the Fractal Audio Systems factory or a Fractal Audio Systems authorized service center. Fractal Audio Systems may require
advanced authorization of repairs to authorized service centers. Unauthorized service, repair or modification will void this
warranty.
DISCLAIMER AND LIMITATION OF WARRANTY
THE FOREGOING WARRANTY IS THE ONLY WARRANTY GIVEN BY FRACTAL AUDIO SYSTEMS AND IS IN LIEU OF ALL OTHER
WARRANTIES. ALL IMPLIED WARRANTIES, INCLUDING WARRANTIES OF MERCHANTABILITY AND FITNESS FOR ANY PARTICULAR
PURPOSE, EXCEEDING THE SPECIFIC PROVISIONS OF THIS WARRANTY ARE HEREBY DISCLAIMED AND EXCLUDED FROM THIS
WARRANTY. UPON EXPIRATION OF THE APPLICABLE EXPRESS WARRANTY PERIOD (1 YEAR), FRACTAL AUDIO SYSTEMS SHALL
HAVE NO FURTHER WARRANTY OBLIGATION OF ANY KIND, EXPRESS OR IMPLIED. FRACTAL AUDIO SYSTEMS SHALL IN NO EVENT
BE LIABLE FOR ANY SPECIAL, INCIDENTAL OR CONSEQUENTIAL DAMAGES SUFFERED BY THE PURCHASER OR ANY THIRD PARTY,
INCLUDING WITHOUT LIMITATION, DAMAGES FOR LOSS OF PROFITS OR BUSINESS, OR DAMAGES RESULTING FROM USE OR
PERFORMANCE OF THE PRODUCT, WHETHER IN CONTRACT OR IN TORT. FRACTAL AUDIO SYSTEMS SHALL NOT BE LIABLE FOR
ANY EXPENSES, CLAIMS, OR SUITS ARISING OUT OF OR RELATING TO ANY OF THE FOREGOING. Some states do not allow the
exclusion or limitation of implied warranties so some of the above limitations and exclusions may not apply to you. This
warranty gives you specific legal rights, and you may also have other rights, which vary, from state to state. This warranty only
applies to products sold and used in the USA and Canada. Fractal Audio Systems shall not be liable for damages or loss resulting
from the negligent or intentional acts of the shipper or its contracted affiliates. You should contact the shipper for proper
claims procedures in the event of damage or loss resulting from shipment.