Nhedziwa Manicaland Lead Farmer Mr Henry Mukonya together with Mrs Betty Mahuku.
LEAD FARMER EXTENSION AND
TRAINING GUIDE ON SUSTAINABLE
AGRICULTURE

1

i
Foreword
Malawi, like any other country in the world, is faced with challenges of climate change and land
degradation which are negatively impacting on the nation’s efforts to improve food and nutrition
security. For the country to continue reaping from its efforts in achieving food security, it is
imperative to implement sustainable agriculture farming systems which include climate change
adaptation measures.
In light of the country’s vulnerability to climate change challenges affecting food security,
investing in Sustainable Agriculture technologies has become a necessity. The Development
Fund of Norway through its partners has developed the Lead Farmer Extension and Training
Guide on Sustainable Agriculture to assist in the implementation and promotion of Sustainable
Agriculture technologies in a more harmonised manner and help reinforce the confidence of
Lead Farmers in addressing questions and concerns raised by follower farmers. The guide
includes modules on the following interventions:
a. Soil and Water Conservation
b. Manure
c. Agroforestry
d. Conservation Agriculture
e. Intercropping and Crop Rotation
f. Integrated Weed Management
g. Pest and Disease Control
h. Farmer-to-Farmer Extension and Leadership Skills
The Lead Farmer Extension and Sustainable Agriculture Guide, apart from containing technical
information, takes into consideration lessons learnt from field experiences. It incorporates step-
by-step construction procedures which are easier to follow, simplified to the level of an
extension worker and Lead Farmer. The guide promotes low cost but more sustainable
approaches that will assist the farmers to use land-based natural resources in a sustainable
manner.
Jeffrey H. Luhanga (PhD)
SECRETARY FOR AGRICULTURE AND FOOD SECURITY
Lead Farmer Extension and Training
Guide on Sustainable Agriculture
ii
Acknowledgements
This Lead Farmer Training and Extension Guide is an outcome of a year-long and concerted effort by farmers, Agricultural and Programme
Management specialists and leaders in different areas of specialty. The Lead Farmer Extension and Training Guide on Sustainable Agriculture
has been produced by the Development Fund (DF) of Norway in close collaboration with the Ministry of Agriculture and Food Security and
other stakeholders acknowledged below.
The process of developing the Training Guide was managed by Mr. Knut Andersen (DF Malawi Country Director) and Mr. Victor Katchika-Jere
(DF Malawi Programme Manager). Mr. Victor Katchika-Jere also developed the leadership and facilitation module and helped with preliminary
editing of the guide. Ms. Waranoot Tungittiplakorn (Head of International Department, DF Oslo) did at the end provide invaluable insights in the
development process.
The following people have substantially contributed to the development of this Training Guide and are hereby sincerely thanked and
acknowledged:
Mr. Frederik Frederiksen, Senior Advisor of the Development Fund, Norway, has headed the development of the Lead Farmer Training and
Extension Guidebook including the training modules and the lead farmer extension system;
Mr. Mahara Nyirenda, Agriculture Consultant of Development Fund, Malawi, was challenged by the multiple roles of coordinating the work in
Malawi and being the author of some of the draft documents;
Mr. Gilbert Kupunda, the Chief Land Resources Conservation Officer for Mzuzu Agricultural Development Division (MZADD) and Mr.
Chimwemwe Soko, Programme Manager for Find Your Feet (FYF) were the two principal writers of the sustainable agriculture modules and
they were responsible for both the technical quality and the relevance of the modules on the ground.
With regard to this development work and with special reference to the importance of national adoption of the Lead Farmer Extension System, it
is essential to note that the two principal writers, together and individually, demonstrated the important collaboration between Government of
Malawi and the NGO sector;
Mr. D. J. Kawonga (SALRCO, Mzimba DAO), Mr. McNoel Kaipanyama (AEDC Chibvala EPA), MS Chimwemwe Luhanga (RLDO FYF), Ms.
Irene Msachi (AEDO Bulala EPA) and Ms. Linet Chatsika (Programme Officer, TAPP) carried out the pre-testing of the training material. The
testing was very valuable and their contribution is acknowledged with thanks.
Finally, DF wishes to salute the following individuals and organisations for their priceless input and invaluable contributions during the
development of the guide:
• Mr. James Banda – Deputy Director, Land Resources Department, Ministry of Agriculture and Food Security;
• Dr Amos Ngwira – Department of Agricultural Research Services;
• Mr. Allan E Kaliwo – Chief Agriculture Extension Officer, Shire Valley ADD;
• Mr. B.F.R Mtika – District Coordinator, FAO/FICA;
• Mr. Joseph Kanyangalazi – Principal Land Resources Conservation Officer, Salima ADD; and,
• Mr. M.T. Chigowo - Chief Land Resources Conservation Officer, Blantyre ADD;
• Mr. Mathews Zulu – Deputy Director, Malawi Lake Basin Project;
• Mr. McPherson Nthara - Chief Land Resources Conservation Officer, Lilongwe ADD;
• Mr. Michael Mainje – M&E Officer, Development Fund of Norway;
• Mr. Paul Fatch – Principal Agriculture Training Officer, Department of Agriculture Extension;
• Mr. Paul Kabuluzi - Chief Agriculture Extension Officer, Machinga ADD;
• Mr. Richard Bwanali – NRM Coordinator, WE EFFECT;
• Mr. Sungeni Ng’onamo – Agribusiness Officer, Total LandCare;
• Mr. Upe Museko Phiri – Principal Agriculture Extension Methodology Officer, Kasungu ADD;
• Mr. YAZ Nyirenda – District Agriculture Development Officer, Rumphi.
• Mrs. Martha Bvumbwe - Chief Agriculture Extension Officer, Karonga ADD;
• Ms. Grace Takomana – Nutrition Specialist, Total LandCare;
• Ms. Sophie Mahonya – Programme Officer, LEAD SEA;
__________________________
Knut Andersen, Country Director
Lilongwe, Malawi March 2014
iii
Table of Contents
Foreword .......................................................................................................................................... i
Acknowledgements ......................................................................................................................... ii
Table of Contents ........................................................................................................................... iii
List of Figures ................................................................................................................................ vi
List of Tables ............................................................................................................................. vi
Acronyms ...................................................................................................................................... vii
Introduction ..................................................................................................................................... 1
Overview Of The Sustainable Agriculture Lead Farmer Program ............................................. 1
Farmer Training And Extension System ..................................................................................... 2
Main Focal Areas Of Daess ........................................................................................................ 2
Part I: Lead Farmer Extension ........................................................................................................ 3
A. The Cropping Season ........................................................................................................... 4
B. SALFP And The Community In The Local Governance Setting ........................................ 4
C. Working With Lead Farmers ............................................................................................... 4
D. The Lead Farmers ................................................................................................................ 5
E. Description Of Salfp ............................................................................................................ 6
F. Core Extension Visits And Expected Outcomes ............................................................... 10
Detailed Generic Extension Topics And Expected Results .......................................................... 12
Year 1 ............................................................................................................................................ 12
Year 2 ............................................................................................................................................ 14
Year 3 ............................................................................................................................................ 15
Year 4 ............................................................................................................................................ 16
Part II: Lead Farmer Training In Sustainable Agriculture ............................................................ 18
Module 1: Soil And Water Conservation...................................................................................... 19
1.1 About This Module ............................................................................................................. 20
1.2 Objectives ............................................................................................................................ 20
1.3 Expected Results ................................................................................................................. 20
1.4 Activities ............................................................................................................................. 20
Module 2: Manure......................................................................................................................... 28
Lead Farmer Extension and Training
Guide on Sustainable Agriculture
iv
2.1 About This Module ............................................................................................................. 29
2.2 Objectives ............................................................................................................................ 30
2.3 Expected Results ................................................................................................................. 30
2.4 Activities ............................................................................................................................. 30
Module 3: Agroforestry ................................................................................................................ 37
3.1 About This Module ............................................................................................................. 38
3.2 Objectives ............................................................................................................................ 38
3.3 Expected Results ................................................................................................................. 38
3.4 Activities ............................................................................................................................. 39
Module 4: Conservation Agriculture ............................................................................................ 47
4.1 About This Module ............................................................................................................. 49
4.2 Objectives ............................................................................................................................ 49
4.3 Expected Results ................................................................................................................. 49
4.4 Activities ............................................................................................................................. 49
Module 5: Intercropping And Crop Rotation................................................................................ 58
Intercropping ................................................................................................................................. 59
5.1 About This Unit ................................................................................................................... 59
5.2 Objectives ............................................................................................................................ 59
5.3 Expected Results ................................................................................................................. 59
5.4 Activities ............................................................................................................................. 59
Crop Rotation ................................................................................................................................ 62
5.6 About This Unit ................................................................................................................... 62
5.7 Objectives ............................................................................................................................ 62
5.8 Expected Results ................................................................................................................. 62
5.9 Activities ............................................................................................................................. 62
Module 6: Integrated Weed Management ..................................................................................... 65
6.1 About This Module ............................................................................................................. 67
6.2 Objectives ............................................................................................................................ 67
6.3 Expected Results ................................................................................................................. 67
6.4 Activities ............................................................................................................................. 67
v
Module 7: Pest And Disease Control ............................................................................................ 73
7.1 About This Module ............................................................................................................. 75
7.2 Objectives ............................................................................................................................ 75
7.3 Expected Results ................................................................................................................. 75
7.4 Activities ............................................................................................................................. 75
Module 8: Farmer To Farmer Extension, Facilitation And Leadership Skills ............................. 82
8.1 About This Module ............................................................................................................. 83
8.2 Objective ............................................................................................................................. 83
8.3 Expected Results ................................................................................................................. 83
8.4 Activities ............................................................................................................................. 83
References ..................................................................................................................................... 87
Annex 1: Facilitation Methods For The Lead Farmer .................................................................. 88
Annex 2: Lead Farmer Training Schedules .................................................................................. 90
Annex 3: The Lead Farmer Identification And Selection Process ............................................... 93
Annex 4: Lead Farmer Technology Transfer ................................................................................ 97
Annex 5: Graduation Of Lead Farmers ........................................................................................ 99
Annex 6: Guideline On Management Of Pass-On Systems ....................................................... 103
Annex 7: Pass-on Agreement Form ............................................................................................ 106
Lead Farmer Extension and Training
Guide on Sustainable Agriculture
vi
List of Figures
Figure 1: Aligned ridges as one measure of soil and water conservation ................................................... 21
Figure 2: Constructing an A-Frame ............................................................................................................ 22
Figure 3: The PhiriLino Frame ................................................................................................................... 23
Figure 4: Material for constructing the PhiriLino frame ............................................................................. 23
Figure 5: Pegging contour lines with a PhiriLino frame ............................................................................. 24
Figure 6: Pegging contour lines using Line Level ...................................................................................... 24
Figure 7: A gully at an advanced stage ....................................................................................................... 26
Figure 8: A newly constructed swale that has been planted with vetiver ................................................... 26
Figure 9: Measurement for manure pit ....................................................................................................... 32
Figure 10: Digging to a depth of 1 m .......................................................................................................... 32
Figure 11: Diameter for manure base in metres (b) .................................... Error! Bookmark not defined.
Figure 12: Material for making Bokash manure ......................................................................................... 33
Figure 13: Liquid from animal manure ....................................................................................................... 34
Figure 14: Material to collect for tube filling ............................................................................................. 40
Figure 15: Seed treatment for different kinds of agroforestry tree seeds .................................................... 41
Figure 16: Moisture stress contrast in maize .............................................................................................. 51
Figure 17: Soil colour contrast .................................................................................................................... 53
Figure 18: Maize intercropped with beans in mixed intercropping ............................................................ 60
Figure 19: Row intercropping ..................................................................................................................... 60
Figure 20: Multi-storey intercropping ......................................................................................................... 60
Figure 21: A sample crop rotation cycle with Maize, G/Nuts, Sweet Potato and Tobacco ........................ 64
Figure 22: Some cultural weed control methods......................................................................................... 68
Figure 23: Mechanical weeding using a hand hoe ...................................................................................... 69
Figure 24: A farmer spraying his crop without protective clothing ............................................................ 69
Figure 25: Herbicides can be harmful to human beings ............................................................................. 71
Figure 26: Examples of traps ...................................................................................................................... 79
List of Tables
Table 1: Agricultural calendar that guides extension schedule ..................................................................... 4
Table 2: Key tasks to be carried out during visits to the communities over the course of the program ..... 11
Table 3: Rates at which different types of manure will be applied to fields ............................................... 35
Table 4: Summary of sowing treatment and methods for different kinds of agroforestry seeds ................ 42
Table 5: Seed rates for different agroforestry trees ..................................................................................... 43
Table 6: Effects from synergies between minimum soil disturbance and other practices .......................... 52
Table 7: Pit dimensions and spacing ........................................................................................................... 56
Table 8: Recipes for different organic sprays ............................................................................................. 80
Table 9: Rating Criteria .............................................................................................................................. 85
vii
Acronyms
ADC Area Development Committee
AEDC Agriculture Extension Development Coordinator
AEDO Agriculture Extension Development Officer
ASHP Area Stakeholder Panel
CAEO Chief Agricultural Extension Officer
CLRCO Chief Land Resource Conservation Officer
DAO District Agriculture Office
DAESS Department of Agricultural Extension Services System
DF Development Fund of Norway
EPA Extension Planning Area
FF Follower Farmer
LF Lead farmer
MoAFS Ministry of Agriculture and Food Security
MoU Memorandum of Understanding
MZADD Mzuzu Agriculture Development Division
NGO Non-Governmental Organisation
SA Sustainable Agriculture
SALRCO Senior Assistant Land Resource Conservation Officer
SALFP Sustainable Agriculture Lead Farmer Programme
VDC Village Development Committee

Lead Farmer Extension and Training
Guide on Sustainable Agriculture
1
Introduction
The majority of farmers in Malawi are smallholders experiencing chronic food shortages
especially during the critical months from January to March. One of the reasons for food
shortage is low yield which is caused by poor soils, lack of quality seeds, inappropriate planting
time and lack of knowledge about simple techniques that will improve productivity of farming
systems.
The Sustainable Agriculture Lead Farmer Programme (SALFP) addresses food insecurity in a
two-step programme of extension and training. The main goal is to increase productivity at
small-holder farmer level in Malawi by introducing sustainable farming techniques that are
simple, effective and do not require expensive inputs. The approach treats farmers as change
agents who are empowered to spread the knowledge and share their skills with communities. The
Lead Farmer (LF) is the cornerstone and the main change agents in the SALFP. Next to the LF a
group of Follower Farmers (FF) is trained by lead farmers through adoption of the recommended
sustainable agriculture (SA) techniques and practices.
Overview of the Sustainable Agriculture Lead Farmer Program SALFP is managed by the Development Fund (DF) of Norway. SALFP operates in a given
community for four years. The program is planned to include one year of mobilization,
enrolment and intensive training of LFs; two years of extension work where the training is
followed up and finally one year of winding up the program and handing-over activities to the
local development and governance structures or farmer groups.
DF is implementing SALFP through local partners. Partners' field officers carry out training and
follow up on the LFs in accordance with the Lead Farmer Training and Extension Guidebook.
Each field staff works according to a plan which is in concurrence with the agriculture calendar
of the particular area. The plan also includes a schedule of the visits to LFs or follower farmers.
This plan is shared with DF and is responsible for overseeing and coordinating the activities of
all partners.
The responsibility of partners' field staff is to guide the LFs to extend the knowledge and skills
effectively to FFs. Field staff will also regularly assess and monitor the progress of adoption of
recommended SA techniques and practices by follower farmers.
LFs have diverse backgrounds including age, gender, literacy levels and practical farming
experiences. Therefore, facilitation of the trainings and extension needs to recognize this
diversity. Common among farmers are the practical and economical interest in how to develop
smallholder farming into a viable and life-long farming enterprise and a general interest in the
2
development of their community. This interest in farming and development is the foundation of
SALFP.
Farmer Training and Extension System A taskforce involving partners' technical staff has been formed. The taskforce monitors the
practical implementation of the Lead Farmer Extension and Training in the field and report
biannually to programme management.
Besides utilizing the decentralized structures, it is planned that during the implementation of the
farmer-to-farmer extension, a deliberate effort is made to work with the District Agricultural
Extension Services System (DAESS) for enhanced coordination and sustainability.
The District Agricultural Extension Services System (DAESS) aims to empower farmers to
demand high quality services from those that are best able to provide them. Specifically the
DAESS aims to:
a. Organise farmers’ agricultural needs
b. Pool service providers and related resources in order to address prioritized farmers
agricultural needs
c. Instil a sense of ownership and self-reliance in agricultural programmes among farmers
d. Foster coordination among stakeholders in service provision
The following committees are established and/or strengthened at the district level in line with the
DAESS system:
a. District Agricultural Committee
b. District Agricultural Extension Coordination Committee and
c. District Stakeholder Panel
At a lower level, the latter committee is called Area Stakeholder Panel (ASHP). These
institutions form a platform for the various stakeholders to meet and discuss agricultural related
issues at different levels so that stakeholders’ participation is promoted in the district.
Main Focal Areas of DAESS The District Agricultural Extension Services System has four main areas of focus as follows:
a. Organisation of farmers’ demands: This is a process of enabling farmers according to
their socio-economic status to identify their agricultural felt-needs.
b. Organising service providers’ response to farmers’ needs: This is a process of
identifying and engaging service providers that would respond to farmers’ needs.
c. Stakeholders Coordination: All the stakeholders will have to cooperate, coordinate and
plan together at the district level for the system to be effective.
d. Funding acquisition: The district assembly finds ways of financing agricultural
extension services from a diverse base of sources. The assemblies have to explore sources
of finances (see section on Financing of Services).
Lead Farmer Extension and Training
Guide on Sustainable Agriculture
3
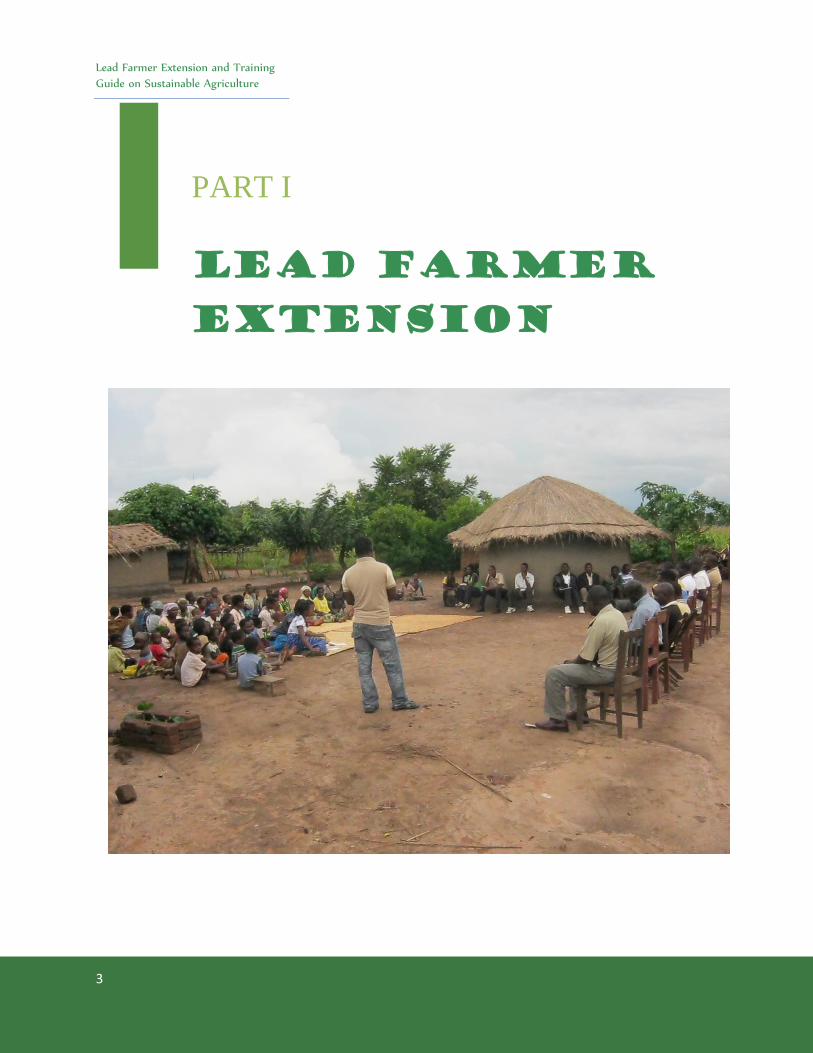
PART I
LEAD FARMER
EXTENSION
Lead Farmer Extension
4
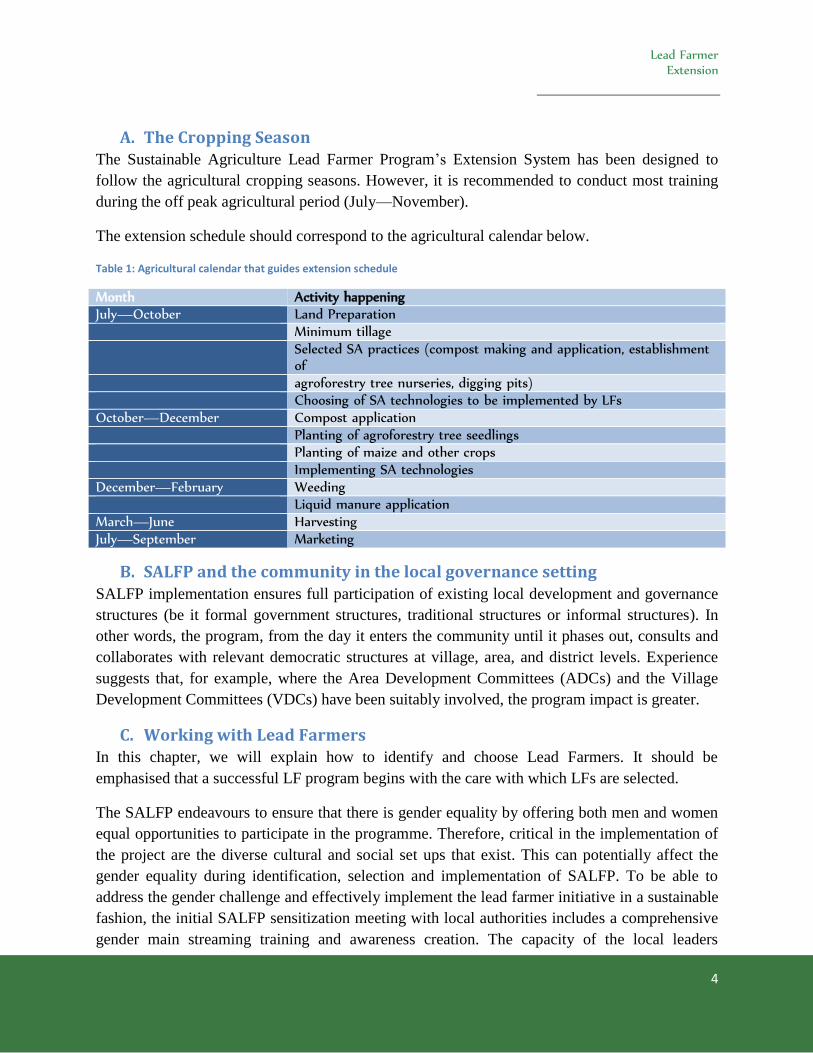
A. The Cropping Season The Sustainable Agriculture Lead Farmer Program’s Extension System has been designed to
follow the agricultural cropping seasons. However, it is recommended to conduct most training
during the off peak agricultural period (July—November).
The extension schedule should correspond to the agricultural calendar below.
Table 1: Agricultural calendar that guides extension schedule
Month Activity happening
July—October Land Preparation
Minimum tillage
Selected SA practices (compost making and application, establishment of
agroforestry tree nurseries, digging pits) Choosing of SA technologies to be implemented by LFs October—December Compost application
Planting of agroforestry tree seedlings Planting of maize and other crops Implementing SA technologies December—February Weeding Liquid manure application
March—June Harvesting
July—September Marketing
B. SALFP and the community in the local governance setting SALFP implementation ensures full participation of existing local development and governance
structures (be it formal government structures, traditional structures or informal structures). In
other words, the program, from the day it enters the community until it phases out, consults and
collaborates with relevant democratic structures at village, area, and district levels. Experience
suggests that, for example, where the Area Development Committees (ADCs) and the Village
Development Committees (VDCs) have been suitably involved, the program impact is greater.
C. Working with Lead Farmers In this chapter, we will explain how to identify and choose Lead Farmers. It should be
emphasised that a successful LF program begins with the care with which LFs are selected.
The SALFP endeavours to ensure that there is gender equality by offering both men and women
equal opportunities to participate in the programme. Therefore, critical in the implementation of
the project are the diverse cultural and social set ups that exist. This can potentially affect the
gender equality during identification, selection and implementation of SALFP. To be able to
address the gender challenge and effectively implement the lead farmer initiative in a sustainable
fashion, the initial SALFP sensitization meeting with local authorities includes a comprehensive
gender main streaming training and awareness creation. The capacity of the local leaders
Lead Farmer Extension and Training
Guide on Sustainable Agriculture
5
(traditional and religious) as custodians of culture has to be built, as they help in initiating the
change in attitude and conduct of the community members. The training clearly highlights the
importance of gender equality and its implications if not properly handled. The briefing defines
the role local leaders play in ensuring that gender equality is achieved. If not handled cautiously,
gender can hinder development activities including the successful implementation of SALFP.
D. The Lead Farmers
i. Who they are?
LFs are self-motivated individuals who are willing to share knowledge and skills with other
farmers, have specialized in SA technologies and are implementing at least three of them of
which one is on a 0.2 to 0.4 ha of land. Identification and subsequent selection of LFs is a critical
stage to ensure success of the farmer- to-farmer extension. It is worth mentioning that the LF
model has been practised in Malawi for a long period of time by different Non-Governmental
Organizations (NGOs) and the Ministry of Agriculture and Food Security (MoAFS).
To get the best out of the LFs, it is recommended that the identification and selection processes
be participatory and inclusive to ensure that the local leadership i.e. chiefs, Area Development
Committees (ADCs) and the Village Development Committees (VDCs) are fully involved. It is
recommended that the following steps be followed in identification and selection (for details
refer to annex 3):
Step one: Extension Worker facilitates a meeting with local leaders to identify technologies
requiring dissemination and reinforcement and potential LFs according to
technologies.
Step two: Local leaders identify and shortlist the potential lead farmers by technology.
Step three: Local leaders discuss with the community on who should be the LF according to
the shortlist.
Step four: Community endorses the lead farmers by technology and the person accepts the
responsibility.
ii. Qualities of a Lead Farmer
Characteristics of the Lead Farmer are as follows:
a. Be willing to share the information with others
b. Be able to lead others
c. Be an early adopter of SA technology
d. A communicator with good facilitation skills
e. Should be literate
f. Be gender sensitive
Lead Farmer Extension
6
g. Should be honest, trustworthy and humble
h. Should be development conscious
i. Should be tolerant
j. Should originate from the village and socially accepted by the community
k. Should be able to sacrifice for others
l. Should be cooperative
m. Should be approachable
E. Description of SALFP At country level, SALFP has three management levels: DF Malawi office; partner office and the
field level where farmers/households organize the daily activities. The overarching framework
for the SALFP is the Malawi Government through the Ministry of Agriculture and Food
Security.
For an extension system to be effective it is important that roles and responsibilities for all
stakeholders are clearly defined. To reduce the practical challenges, we have in this chapter
attempted to define these roles and responsibilities. It should be appreciated that all stakeholders
at all levels are responsible to ensure gender equality within their roles and responsibilities.
i. Roles and responsibilities of different stakeholders
I. Development Fund of Norway Staff
a. To ensure that every partner carries out activities as specified in the extension guide
b. To carry out periodic field support and monitoring visits
c. To consolidate reports on the SALFP extension program
d. To develop a monitoring and evaluation system for extension and training
e. To monitor the implementation of the SALFP extension and training programme
f. To update the SALFP partners on any emerging developments
III. Partner organizations
a. To implement the extension program according to contract
b. To ensure field extension staff have relevant competences
c. To carry out extension planning and follow up of field staff
d. To regularly send consolidated extension reports to DF
IV. Frontline staff (field officers)
a. To provide advice to LFs on leadership and facilitation
b. To provide guidelines to lead farmers on technical issues
c. To advise and mobilize communities into clubs/groups
d. Guide communities in the selection of lead farmers
e. To backstop lead farmers on their day-to-day technical work
f. To link LFs up with other service providers
Lead Farmer Extension and Training
Guide on Sustainable Agriculture
7
g. To initiate and facilitate implementation of appropriate technologies
h. To support lead farmers and communities in organizing field days, manure launches and
seed fairs
i. To receive technical work plans and reports from the lead farmers
j. To report regularly from extension visits
k. To conduct review meetings with the LFs
V. Roles of Lead Farmers.
a. To assist frontline staff to mobilize communities into groups/clubs
b. To facilitate adoption of various improved agricultural technologies by the communities
through farmer trainings, field days, extension meetings, adoption of the technologies,
etc.
c. To assist in compilation of agricultural report for the VDCs
d. To monitor agricultural projects in the VDC
e. To facilitate monitoring of project capital items in the VDCs
f. To coordinate frontline staff activities with the VDCs
g. To provide technical data to the frontline staff as necessary
h. To implement various technologies
i. To mobilize and train follower farmers
j. To give feedback on challenges faced during adoption of extension technologies through
reports
VI. Follower Farmers
a. To attend trainings, field days and any other activities organised by the field officers,
lead farmers and the group
b. To practice sustainable agriculture principles as outlined in the farmer handbook and the
handbook for data collection.
VII. Village Development Committees (VDCs)
a. To overall owner of all activities in the VDC
b. To initiate VDC review meetings
c. To appoint/withdraw LFs
d. To be responsible to the ADC
VIII. Area Development Committees (ADCs)
a. To supervise and monitor the VDCs
b. To approve VDCs work plans
c. To coordinate inter-ADC development activities
d. To be responsible to the district council
IX. District Council
a. To supervise ADCs and implementing partners

Lead Farmer Extension
8
b. To ensure quality implementation of projects
c. To ensure that what is implemented is suitable for the district
d. To support partners in the implementation of activities as outlined in the Extension Guide
e. To approve ADCs plans and fit them into district plans
f. To coordinate the LF approach with other similar projects/programs
When a contract is signed between a partner organisation and DF Malawi office, it is the
obligation of the partner organisation’s management to plan for and carry out of all activities.
The partner organisation would most of the times have an agriculture extension supervisor, who
plans and schedules the activities for the field extension officers.
The detailed planning of extension visits is done in collaboration with LFs and should be
condensed in a work plan for the season. The condensed work plan will be shared with DF
Malawi office. All LFs should also have a copy of the work plan including the schedules for
visits. In this way, all LFs will know in advance when they will be visited.
ii. Advantages of the Lead Farmer Model
The LF model has a lot of advantages. Some of these are as follows:
a. Easy and faster dissemination of technical information since the lead farmer lives within
the community
b. Easy communication as the lead farmer shares the same cultural beliefs and language as
the community
c. Enhanced adoption of agricultural technologies because the learning is from fellow
farmers
d. Farmer’ problems are easily identified, understood and addressed since the lead farmer
stays in the same village
e. The LFs significantly reduce the work load of the extension worker because the lead
farmers cover some technologies and areas which would have been the responsibility of
the extension worker
iii. Ratios and numbers
SALFP and its stakeholders have agreed on the following extension ratios and numbers:
a. Each LF works with up to 30 follower farmers
b. 48 core extension visits to LFs are carried out over a four-year period by field staff
c. Each LF should be visited at least monthly
d. The LF should endeavour to visit FFs at least once a month.
iv. Follow up protocol
SALFP has a monitoring and evaluation system to ensure that the programme objectives are on
track. Follow up visits are done at various levels (follower farmer, lead farmer, extension
worker).
Lead Farmer Extension and Training
Guide on Sustainable Agriculture
9
v. Follower Farmers
It has been planned that each LF will work with up to 25 to 30 FFs in SALFP and s/he will train
them in a group. Preferably, the LF should visit each of his/her FFs once a month for follow up.
It should be noted that the lead farmer can visit up to five farmers a day. These are core visits
aimed at consolidating what SA activities FFs are conducting.
vi. Lead Farmers
As a rule of thumb, the extension worker will ensure that each LF is visited at least once in a
month. These are core visits over and above the visits and support lead farmers may request from
extension workers any time.
vii. Field Extension staff
DF Malawi office may together with the SALFP taskforce conduct joint supervision to the
extension worker once a quarter.
viii. Other Tasks
a) Implementation of SA technologies
Implementation of SA technologies by the Lead Farmers shows the follower farmers how a
technology and/or a practice is done e.g. results of two plots one with manure only and the other
without.
To ensure successful implementation of SA technologies in year 1, each LF receives relevant
inputs in the appropriate quantity and on time on pass-on basis (refer to annex 6).
b) Field days
In SALFP LFs are supported to host field days to showcase SA best practices. All LFs are
encouraged to conduct field days on various technologies being implemented. Besides
backstopping LFs on technical messages, SALFP through its implementing partners support
Lead Farmers with materials such as posters, fliers and relevant literature to enhance learning.
c) Visibility materials
Incentives play a critical role in motivating human beings whenever they are asked to conduct
specific tasks. In SALFP, a provision is made to support Lead Farmers with t-shirts, caps
branded with SA technical messages and a bicycle. Besides conveying the SA messages, the t-
shirts will act as motivation to Lead Farmers as they get recognised in the communities.
d) Lead farmer tours
Experience suggests that farmers learn better from their peers. SALFP endeavours to support
Lead Farmer exchange visits so that they share best practices and learn from one another.
Lead Farmer Extension
10
e) Support to Lead Farmers
For SALFP to be effective, LFs should be adequately supported in their work. The support aims
at increasing the Lead farmers' mobility and visibility as they train follower farmers. Once Lead
Farmers have been selected they sign a contract with the DF partner organisation. The contract
stipulates the obligations of the Lead Farmers to the programme as well as those of the partner
organisation. In addition, the benefits and other accompanying support to enable Lead Farmers
effectively work are stipulated. SALFP supports LFs with a bicycle and with basic cultivation
inputs, such as seeds and fertilizer on pass-on basis.
F. Core extension visits and expected outcomes This part outlines the delivery of SA techniques and practices as extension visits over the
planned four-year period. Over the four-year period, this guide has defined 18 core extension
visits. However, the number may vary according to local circumstances. What is important is
that all techniques and practices are delivered.
The SALFP key stakeholders have contributed to and decided on selected SALFP techniques and
practices. These are defined in the SALFP document, they are detailed in the SALFP Training
Modules and have all been presented to the LFs during the five days initial training.
The SA techniques and practices are:
a. Manure
b. Soil and water conservation
c. Conservation agriculture
d. Agroforestry
e. Crop rotation and intercropping
f. Weed control
g. Pest and diseases and
h. Leadership and facilitation skills.
Over and above these technical messages, a training module on leadership and facilitation skills
has been developed. The module is aimed at equipping the cadre of Lead Farmers with
facilitation skills, something which is a vital element in SALFP. It should be emphasized that the
protocol presented in the table below of year 1—4 year is calculated at ensuring that Lead
Farmers get uniform training and support. Extension staff may use it as a checklist and guide.
Lead Farmer Extension and Training
Guide on Sustainable Agriculture
11
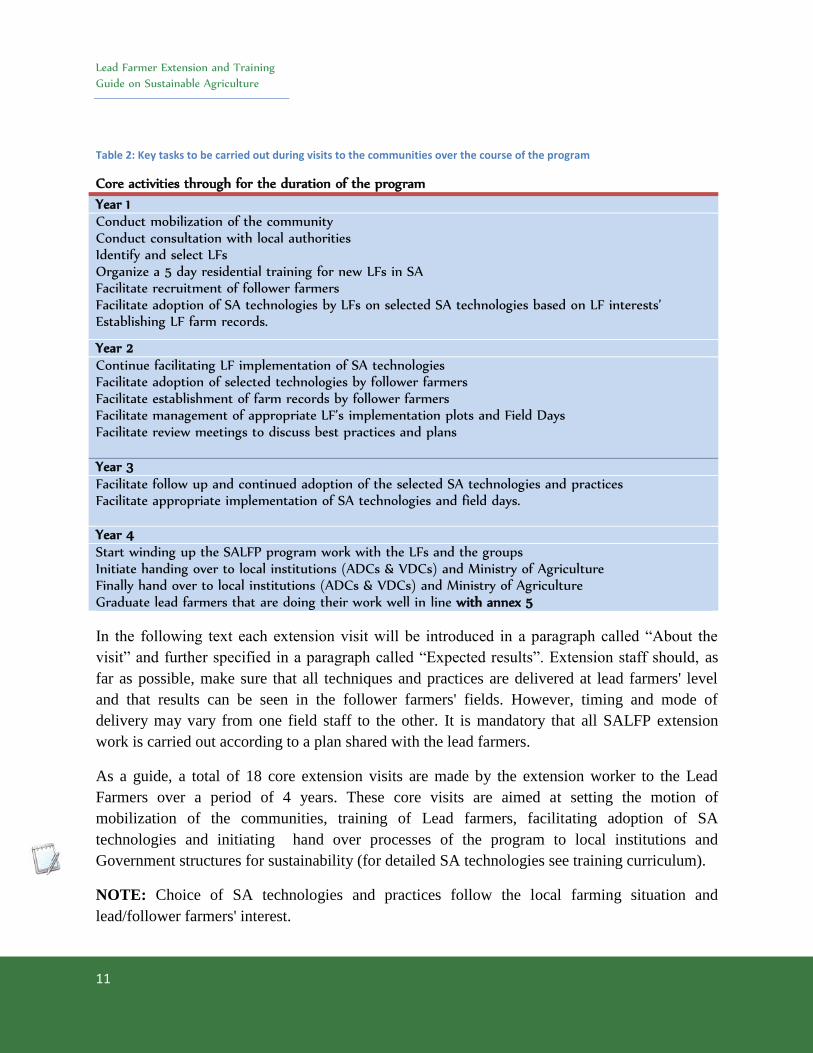
Table 2: Key tasks to be carried out during visits to the communities over the course of the program
Core activities through for the duration of the program
Year 1 Conduct mobilization of the community Conduct consultation with local authorities Identify and select LFs Organize a 5 day residential training for new LFs in SA Facilitate recruitment of follower farmers Facilitate adoption of SA technologies by LFs on selected SA technologies based on LF interests’ Establishing LF farm records.
Year 2 Continue facilitating LF implementation of SA technologies Facilitate adoption of selected technologies by follower farmers Facilitate establishment of farm records by follower farmers Facilitate management of appropriate LF’s implementation plots and Field Days Facilitate review meetings to discuss best practices and plans Year 3 Facilitate follow up and continued adoption of the selected SA technologies and practices Facilitate appropriate implementation of SA technologies and field days. Year 4 Start winding up the SALFP program work with the LFs and the groups Initiate handing over to local institutions (ADCs & VDCs) and Ministry of Agriculture Finally hand over to local institutions (ADCs & VDCs) and Ministry of Agriculture Graduate lead farmers that are doing their work well in line with annex 5
In the following text each extension visit will be introduced in a paragraph called “About the
visit” and further specified in a paragraph called “Expected results”. Extension staff should, as
far as possible, make sure that all techniques and practices are delivered at lead farmers' level
and that results can be seen in the follower farmers' fields. However, timing and mode of
delivery may vary from one field staff to the other. It is mandatory that all SALFP extension
work is carried out according to a plan shared with the lead farmers.
As a guide, a total of 18 core extension visits are made by the extension worker to the Lead
Farmers over a period of 4 years. These core visits are aimed at setting the motion of
mobilization of the communities, training of Lead farmers, facilitating adoption of SA
technologies and initiating hand over processes of the program to local institutions and
Government structures for sustainability (for detailed SA technologies see training curriculum).
NOTE: Choice of SA technologies and practices follow the local farming situation and
lead/follower farmers' interest.
Lead Farmer Extension
12
Detailed generic extension topics and expected results The individual field extension staff and partner organizations work out an extension visit plan
and share this with the LFs.
While all extension visits will be reported on by the lead farmers and the extension staff, the end
results shall be visible in the follower farmers' fields.
Below is the generic guide, in which key extension visits are further detailed. However, and for
simplicity purposes, some of the visits and the topics are grouped together.
Year 1
Purpose of visit
To conduct mobilization of the community. This will be done in line with annex 3.
About this visit: In each new community SALFP ensures that community members and leaders
(Area Development Committees and Village Development Committees) are appropriately
contacted, involved and mobilized. The outcomes of this mobilization and involvement generally
determine the success of SALFP.
Expected results
After community mobilization the leaders and community members will be able to:
a. Explain the intention and limitations of the planned SALFP activities
b. Explain the roles and responsibilities of both the community and SALFP
c. Explain how the lead farmer and the follower farmers will be selected
d. Define the timeframe of SALFP
Purpose of visit
To conduct consultation with local authorities
About this visit: The local authorities consist of traditional leaders who formally and otherwise
make decisions for and over their subordinates. Local authorities are in defined ways part of the
formal Malawian governance set up. Land tenure rights on customary land are primarily
controlled by the local authorities.
Expected results
After consultation, representatives of the local authority will be able to:
a. Explain the intention and limitations of the planned SALFP activities
b. Explain the roles and responsibilities of the community, the local authorities and the
SALFP
c. Define the timeframe of SALFP

Lead Farmer Extension and Training
Guide on Sustainable Agriculture
13
Purpose of visit
To identify and select Lead Farmers
About this visit: A lead farmer is a respected and competent farmer elected by the community.
She or he will be the focal person for SALFP and is expected, in various ways, to pass on the SA
techniques and practices to the follower farmers.
Expected results
After identification and selection of the LF the community members and the LF will be able to:
a. Explain who the LF is and how and why she or he was selected
b. Explain the envisaged mutual collaboration between follower farmers and the LF
including the expected outcomes
c. Explain in brief terms how the SA techniques and practices will be introduced to the
follower farmers
d. Explain in brief terms about the LF's residential training and the subsequent extension
visits.
Purpose of visit
To recruit follower farmers
About this visit: Each LF works together with and train a group of follower farmers .The FFs
are the actual target group of SALFP and the LF and the program staff are the means to reach out
to the FFs and the community in general.
Expected results
After recruitment of the follower farmers the FFs and the LFs will be able to:
a. Explain why group formation is done
b. Explain how the selection of the FFs was done
c. Explain the roles and responsibilities of the FFs and the LFs
d. Explain the expected results
e. Explain the timeframe of the SALFP
Purpose of visit
To facilitate implementation of SA technologies by LFs on selected SA technologies based on
LFs’ interest
About this visit: Each LF implements SA technologies in line with SALFP. Adoption and
implementation of SA technologies should be seen as a training method used to show farmers
how a task or an activity is performed. It can show the participants results of a technology or
how to perform a task. Typical examples are that a LF implements SA in a plot in which the

Lead Farmer Extension
14
effects of compost manure and fertilizer are shown during and after the cropping season.
Implementation of SA technologies by the Lead Farmer serves as a model for other farmers.
Expected results
After this the LF will be able to:
a. Establish and implement the technology in question
b. Explain the role and responsibility of both the LF and the field extension staff
c. Explain to FFs what is done and what the expected results are
Purpose of visit
To establish LF farm records
About this visit: A farm record is a simple and easy-to-use tool for the LFs. Each LF will have a
farm record.
Expected results
After this visit the LF will be able to use the farm record book.
Year 2
Purpose of visit
To continue to facilitate implementation of SA technologies
About this extension task: Each LF will manage implementation of SA as agreed with SALFP.
Each implementation site is designed to be a model for other farmers and will be located
strategically so that many farmers are able to see it. Some inputs, which often OPV maize seed,
are provided by SALFP on pass-on basis.
Expected results
Neighbouring FFs will have:
a. Asked the LF questions regarding implementation of SA
b. Practiced similar techniques in their own farm
c. Discussed the implemented techniques with other farmers
d. Requested SALFP field extension staff to get support
Purpose of visit
To facilitate adoption of selected technologies by follower farmers
About this extension task: This task is the essential part and also the bulk of the SALFP
extension. Interaction with the LFs and the FFs involves all SA techniques and practices. The
extension visits must go well with farmers' needs and be aligned to the practicalities of the

Lead Farmer Extension and Training
Guide on Sustainable Agriculture
15
cropping season. Many visits are required to cover all aspects of the SALFP techniques and
practices. A reasonable fulfilment of farmers needs shall be met during the lifespan (4 years) of
the SALFP.
Expected results
After an initial year of extension work the LF is able to;
a. Assist FFs in learning about and practicing relevant SA techniques and practices.
b. Communicate technical issues, relevant to SALFP, effectively to FFs.
Purpose of visit
To facilitate establishment of farm records by follower farmers
About this extension task: A farm record is a simple and easy-to-use tool for the FFs. In year
two each FF will maintain a farm record book.
Expected results
After explaining the farm record book the FF will be able to;
a. Use the farm record book to the benefit of the farm work
b. Explain to the field extension staff the most interesting information in the farm book
Year 3
Purpose of visit
To facilitate follow up and continued adoption of the selected SA key messages (technologies
and practices)
About this visit: During year 3 all SA techniques and practices shall be followed up and be
completed. Any extra or special request for facilitation from the LFs and the FFs shall be
fulfilled as far as practicable.
Purpose of visit
At the end of year 3 the FFs are practicing minimum 3 of the following soil fertility techniques:
a. Use of compost/manure
b. Fertility crops/fertilizer trees/agroforestry
c. Crop rotation with a legume crop (3 years rotation)
d. Contour ridging
e. Conservation tillage/practicing pot-holes/ripping
And minimum 1 of the following practices:
Lead Farmer Extension
16
f. No burning of crop residues
g. Intercropping
h. Biological/natural pest control.
Purpose of visit
To facilitate the management of appropriate implementation of SA
About this visit: Same as year 2
Expected results
Same as year 2
Year 4
Purpose of visit
To wind up the SA program work with the LF and the group
About this visit: It is anticipated that during the 3 first three years of SALFP the training on all
generic SA techniques and practices are completed. However some need may still arise and
should be met if at all possible. At the same time it should clearly be communicated to the FFs
and the LFs when the SALFP will terminate (after 4 years). A winding-up plan is developed with
the LF and the group and agreed upon. For easy understanding the winding up plan shall be in
writing and be shared widely.
Expected results
After the facilitation of winding up processes, the LF and the group will be able to:
a. Explain the results and outcomes of SALFP so far
b. Explain the winding up plan in brief terms and the consequences for the individual
farmers
c. Explain in brief terms how the individual farmer will continue working with SA in the
years to come
Purpose of visit
To initiate handing-over to local institutions (ADCs & VDCs) and Ministry of Agriculture
About this visit: It is anticipated that during the first three years of SALFP, all training will be
generic SA techniques and practices are completed and collaboration with local institutions is
enhanced. It should now be clearly communicated to all formal and traditional structures when
SALFP will phase out (after 4 years). Furthermore, in tandem with similar processes at FFs' and
LF's level, a winding-up plan is developed and agreed upon. For easy understanding the winding
up plan shall be in writing and distributed to relevant actors.
Lead Farmer Extension and Training
Guide on Sustainable Agriculture
17
Expected results
After the handing over has been initiated the local institutions will be able to:
a. Refer to the handing-over document and explain the details
b. Explain the consequences of the winding up plan for themselves and for the community
c. Explain how the local institutions and MoAFS will continue working with the farmers on
SA in the years to come
Purpose of visit
To finally hand over to local institutions (ADCs & VDCs) and Ministry of Agriculture
About this visit: The final hand-over is done according to the winding-up plan
Expected results
A year after hand-over a field trip to follower farmers will reveal that farmers are practicing a
minimum of two soil fertility techniques and minimum of 1 SA practice, according to the SALFP
LFA.
Lead Farmer Extension and Training
Guide on Sustainable Agriculture
18
PART II
LEAD FARMER TRAINING
IN SUSTAINABLE
AGRICULTURE
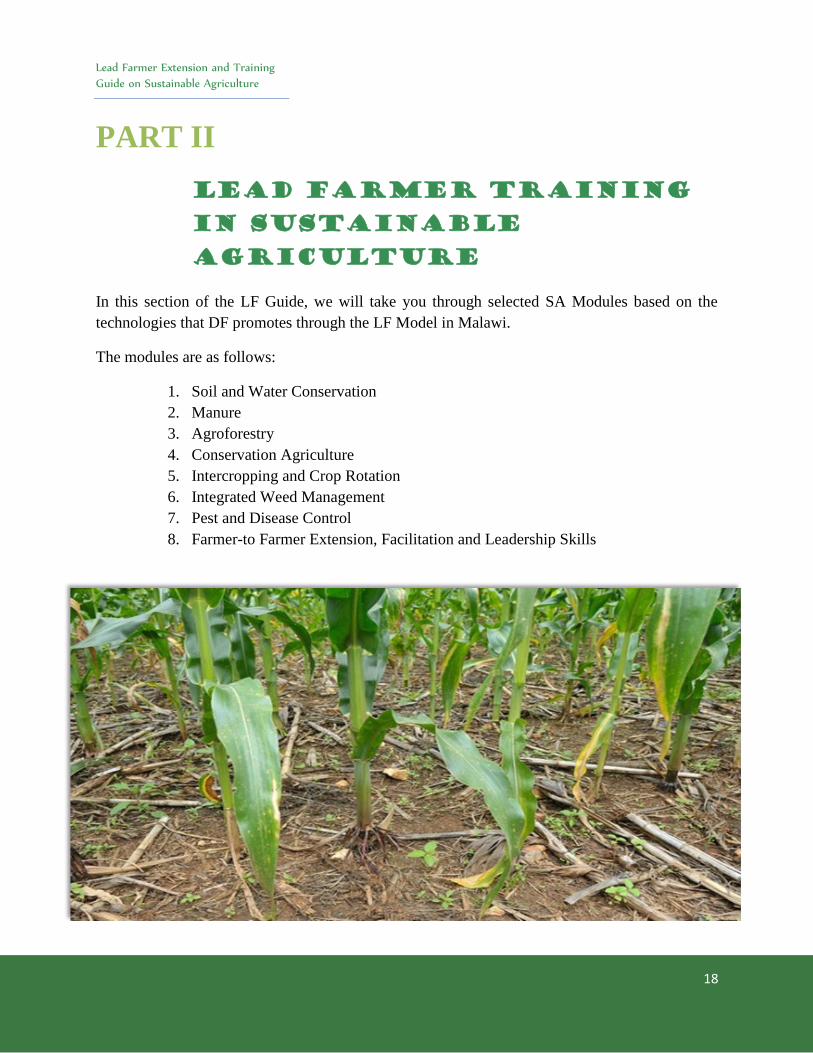
In this section of the LF Guide, we will take you through selected SA Modules based on the
technologies that DF promotes through the LF Model in Malawi.
The modules are as follows:
1. Soil and Water Conservation
2. Manure
3. Agroforestry
4. Conservation Agriculture
5. Intercropping and Crop Rotation
6. Integrated Weed Management
7. Pest and Disease Control
8. Farmer-to Farmer Extension, Facilitation and Leadership Skills
Lead Farmer Extension and Training Guide
on Sustainable Agriculture
19
Module 1
Soil and
Water
Conservation
Lead Farmer Extension and Training Guide
on Sustainable Agriculture
20
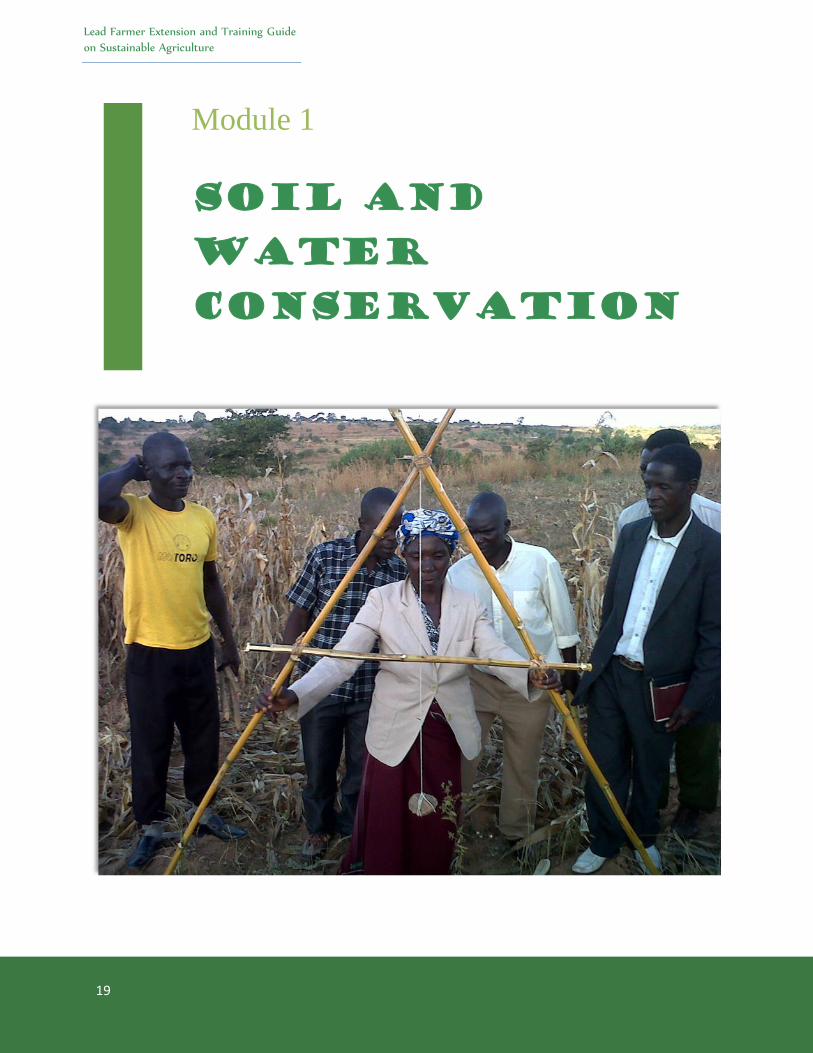
1.1 About this Module Soil and water conservation entails a number of technologies. Some of these technologies
include marker ridges, vetiver planting/establishment, gully reclamation and rain water
harvesting techniques such as, raised footpaths, swales, infiltration pits.
Soil erosion and declining of soil fertility under continuous cultivation are increasingly becoming
serious land degradation problems in the country. There is widespread evidence that the use of
land in some areas is improper as evidenced by continuous growing of crops on the same piece
of land, cultivation of unsuitable areas such as steep slopes and river banks. This also includes
deforestation and all these account for soil degradation. These have contributed to soil erosion,
loss of rainwater and destruction of catchment areas eventually, leading to low crop production
per unit area and food insecurity.
This module will look at how soil and water can be conserved in farming lands with emphasis on
marker ridges and gully reclamation.
1.2 Objectives
By the end of this module participants should be able to:
a. Understand how to conserve soil and water through construction of marker ridges and
planting of vertiver
b. Understand the importance of conserving soil and water.
1.3 Expected Results After learning this module, the LF will be able to:
a. Define Soil and Water Conservation;
b. Know benefits of soil and water conservation practices at farm level;
c. Know how to construct and use instruments in constructing marker ridges;
d. Mark and construct marker ridges;
e. Know how to reclaim gullies;
f. Know how to harvest rainwater;
g. Know how to use vetiver grass in soil and water conservation.
1.4 Activities
1.4.1 Introduction (10 minutes)
The facilitators will ask participants to be in 3 groups. Facilitator will give groups, 20 minutes to
discuss the land as regards to its physical, biological and chemical characteristics as well as other
Time-frame: 3 hours 45 minutes
Lead Farmer Extension and Training Guide
on Sustainable Agriculture
21
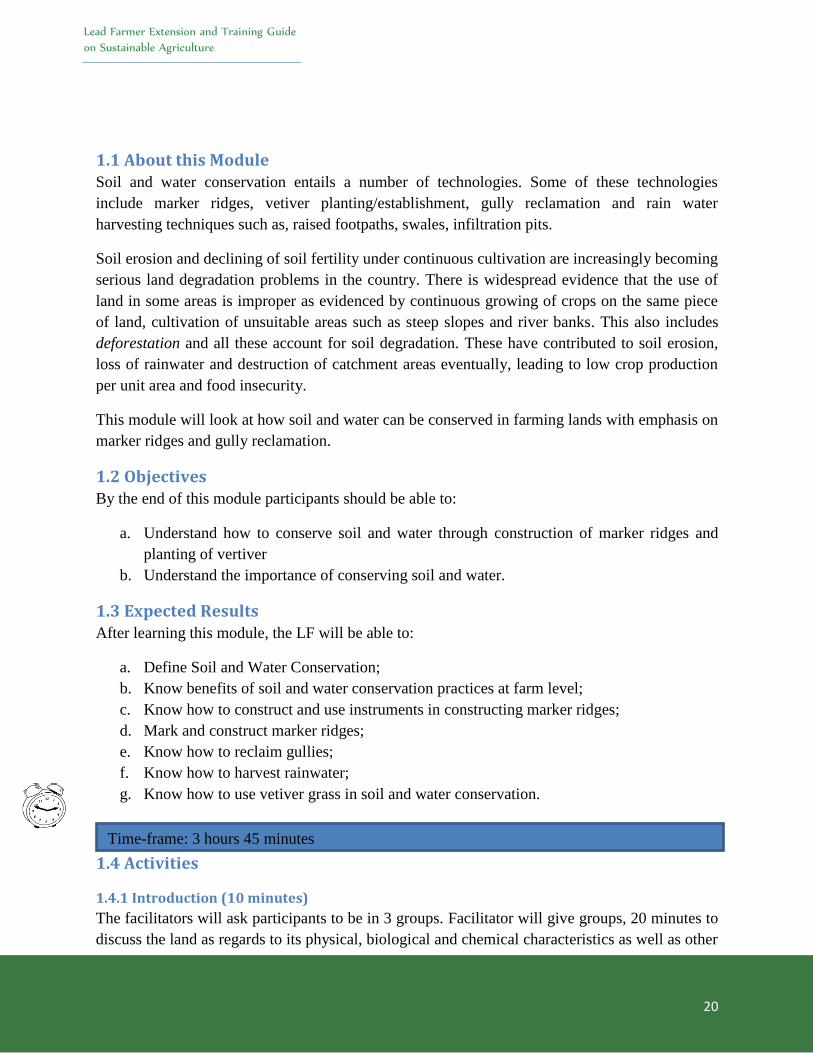
Figure 1: Aligned ridges as one measure of soil and water conservation
environmental factors comparing with 15-20 years ago, their understanding of land degradation
and its causes, how they think they can conserve soil and water for efficient crop use and why
they feel it is important to conserve soil and water.
Flip charts will be posted in front and one person from each group will be asked to write
answers. After the group discussion one member from the group will present in plenary.
1.4.2 Plenary—Teaching about Soil and Water Conservation: 1 hour 55 Minutes
I. Definition of Soil and Water Conservation
The facilitator will give meaning of Soil Conservation as the protection, maintenance,
rehabilitation, restoration and enhancement of soil resources and includes the management and
use of soil resources to ensure the sustainability of such use. Water conservation is ensuring there
is increased infiltration of water in the soil so as to reduce erosion caused by runoff.
II. Benefits of Soil and Water Conservation
The following will be given as benefits of Soil and Water conservation:
a. Reduces water runoff and soil erosion;
b. Conserves soil moisture for plant growth;
c. Increases ground water supplies;
d. Reduces siltation and flooding.
1.4.3 How to Conserve Soil and Water
The following activities will be explained that will lead to conservation of soil and water.
I. Construction of a Marker Ridge
In order to control runoff and soil loss, a marker ridge should be constructed across the contour
starting from the top of any cultivated land.
The facilitator should explain that most crops in Malawi are cultivated onfields with a certain
degree of slope. And that many farmers do not conserve their land through use of marker ridges.
As a result, there is a lot of surface water runoff down the slopes causing soil erosion. This is one
of the major causes of land degradation in Malawi.
The facilitator should explain that construction of markers ridges is a simple practice to reduce
the above impacts.
II. Instruments for Marking Contour Lines
The facilitator will explain that there are different instruments used in making contour lines. The
low cost instruments will be used. The facilitator will have parts used to make the instruments
and explain them one by one as he illustrates on flip charts as follows:
i) The A-frame
The facilitator will explain that an A-frame is shaped like letter A. Will explain each of the
following materials used in making an A-frame:

Soil and Water Conservation
22
a. 2m of string
b. 1 stone
c. 3 nails or string to tie the frame together
d. 1 panga knife
e. Pegs to mark contour
f. 1 hammer or rock or anything for driving pegs into the ground
g. Three 1.6—2m poles
Thereafter, the facilitator will explain how to make and use an A-frame.
ii) The Line Level
The facilitator will explain that a Line Level consists of a miniature spirit level that hangs from a
taut string between two poles. Then will explain each of the following construction materials.
a. 1 line level
b. 5m of string
c. 2 wooden poles, 1.6—2m long with flat ends
d. A knife
e. Pegs to mark contour lines
f. A hammer or rock or anything for driving pegs into the ground
Thereafter, the facilitator will illustrate how it is made.
iii) The PhiriLino Frame
Figure 2: Constructing an A-Frame
Lead Farmer Extension and Training Guide
on Sustainable Agriculture
23
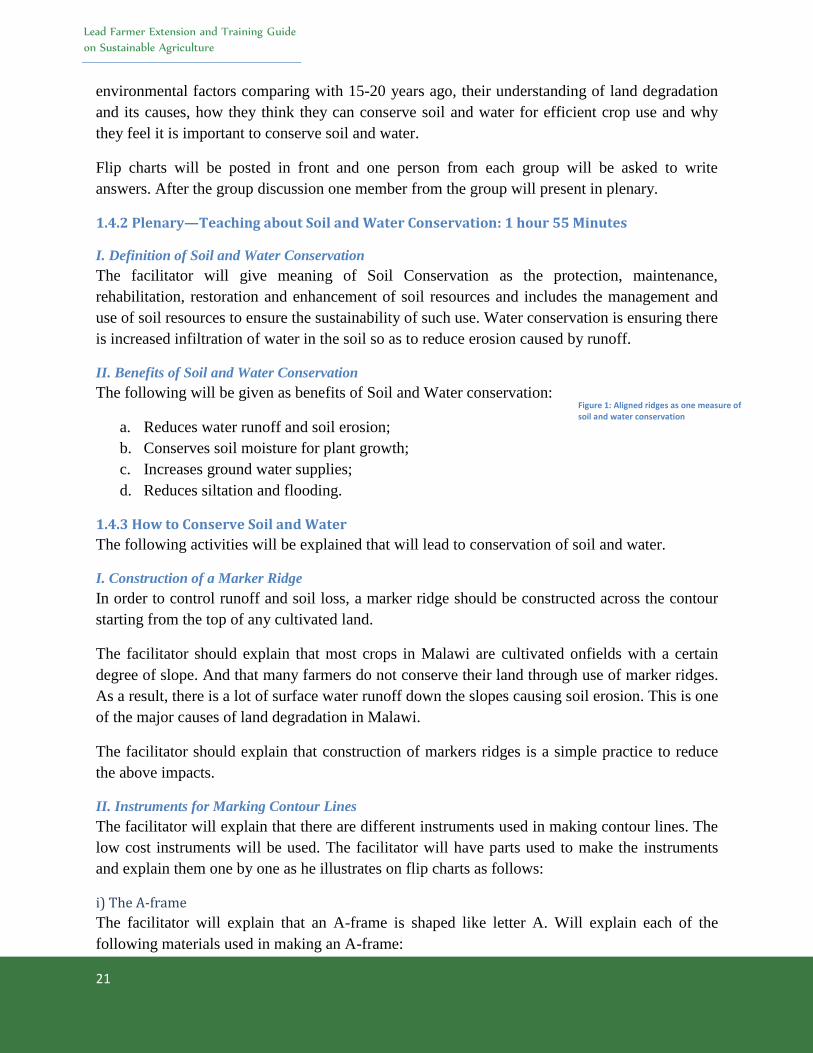
The facilitator will explain that PhiriLino frame is similar to an A-frame except that it uses a line
level superimposed on a string tied to both legs of the frame instead of a pendulum. Therefore, it
combines the advantages of a line level and A-frame which makes it simpler and faster to use.
The facilitator will explain that most materials used are as explained under A- frame and line
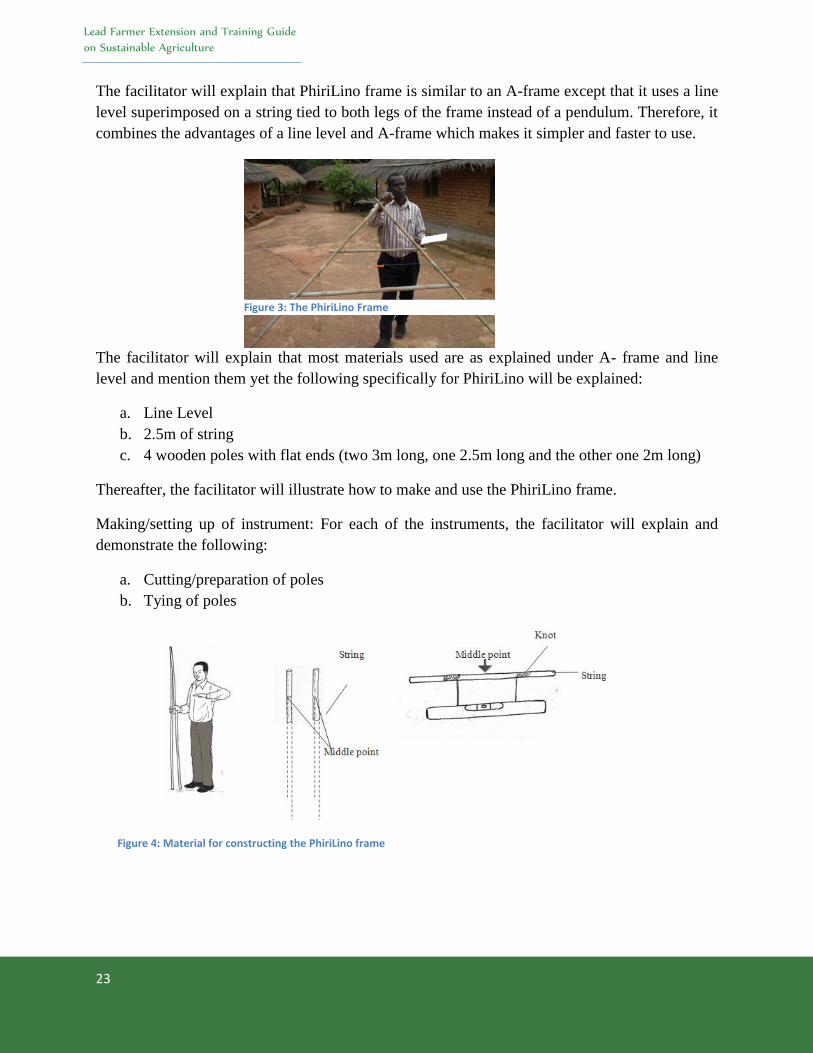
level and mention them yet the following specifically for PhiriLino will be explained:
a. Line Level
b. 2.5m of string
c. 4 wooden poles with flat ends (two 3m long, one 2.5m long and the other one 2m long)
Thereafter, the facilitator will illustrate how to make and use the PhiriLino frame.
Making/setting up of instrument: For each of the instruments, the facilitator will explain and
demonstrate the following:
a. Cutting/preparation of poles
b. Tying of poles
Figure 3: The PhiriLino Frame
Figure 4: Material for constructing the PhiriLino frame
Soil and Water Conservation
24
Figure 5: Pegging contour lines with a PhiriLino frame
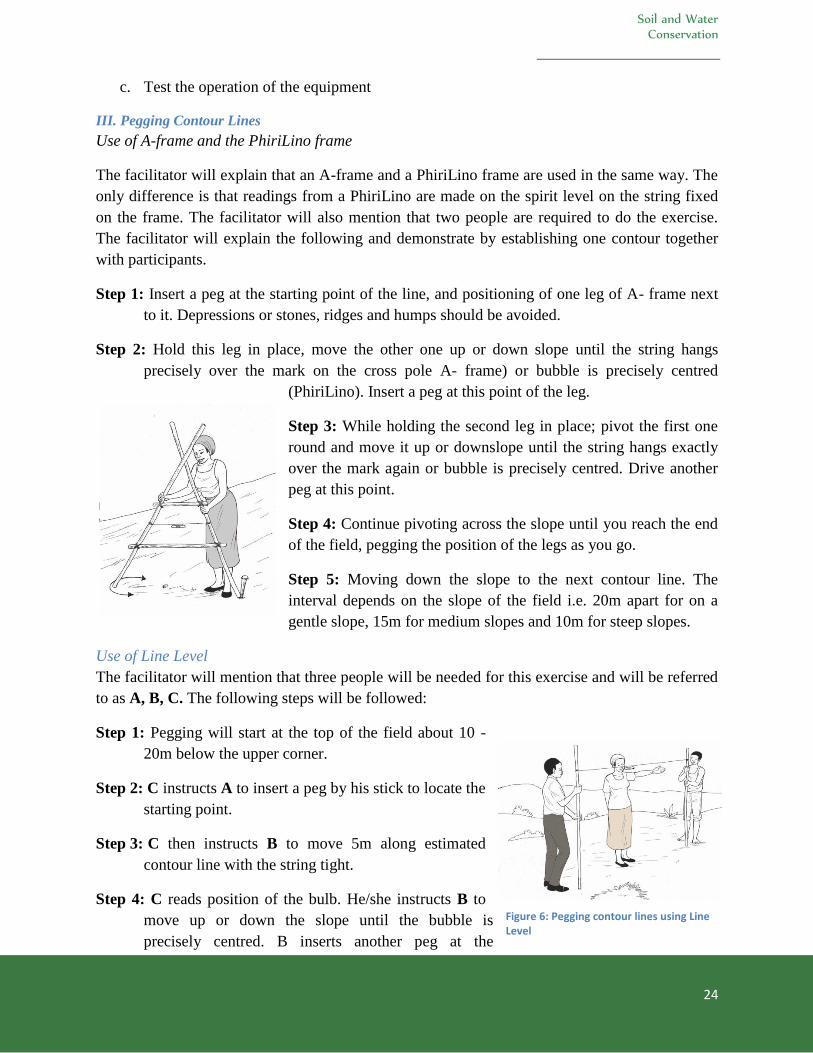
c. Test the operation of the equipment
III. Pegging Contour Lines
Use of A-frame and the PhiriLino frame
The facilitator will explain that an A-frame and a PhiriLino frame are used in the same way. The
only difference is that readings from a PhiriLino are made on the spirit level on the string fixed
on the frame. The facilitator will also mention that two people are required to do the exercise.
The facilitator will explain the following and demonstrate by establishing one contour together
with participants.
Step 1: Insert a peg at the starting point of the line, and positioning of one leg of A- frame next
to it. Depressions or stones, ridges and humps should be avoided.
Step 2: Hold this leg in place, move the other one up or down slope until the string hangs
precisely over the mark on the cross pole A- frame) or bubble is precisely centred
(PhiriLino). Insert a peg at this point of the leg.
Step 3: While holding the second leg in place; pivot the first one
round and move it up or downslope until the string hangs exactly
over the mark again or bubble is precisely centred. Drive another
peg at this point.
Step 4: Continue pivoting across the slope until you reach the end
of the field, pegging the position of the legs as you go.
Step 5: Moving down the slope to the next contour line. The
interval depends on the slope of the field i.e. 20m apart for on a
gentle slope, 15m for medium slopes and 10m for steep slopes.
Use of Line Level
The facilitator will mention that three people will be needed for this exercise and will be referred
to as A, B, C. The following steps will be followed:
Step 1: Pegging will start at the top of the field about 10 -
20m below the upper corner.
Step 2: C instructs A to insert a peg by his stick to locate the
starting point.
Step 3: C then instructs B to move 5m along estimated
contour line with the string tight.
Step 4: C reads position of the bulb. He/she instructs B to
move up or down the slope until the bubble is
precisely centred. B inserts another peg at the
Figure 6: Pegging contour lines using Line Level
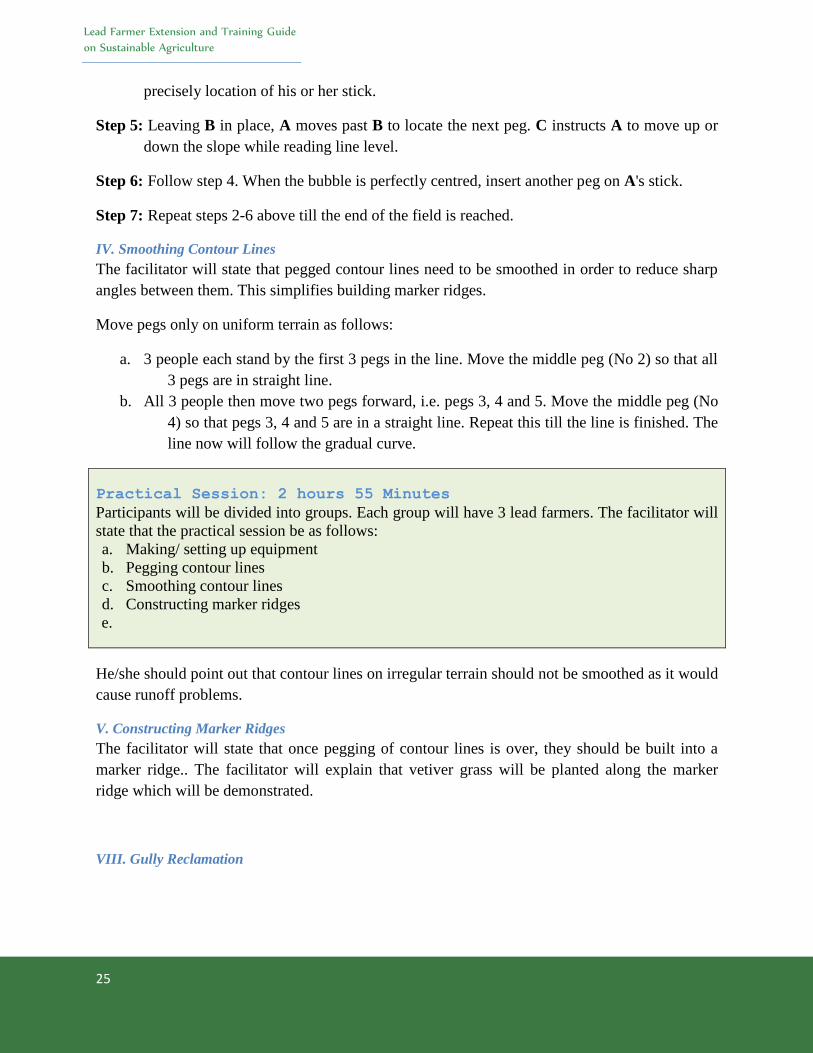
Lead Farmer Extension and Training Guide
on Sustainable Agriculture
25
precisely location of his or her stick.
Step 5: Leaving B in place, A moves past B to locate the next peg. C instructs A to move up or
down the slope while reading line level.
Step 6: Follow step 4. When the bubble is perfectly centred, insert another peg on A's stick.
Step 7: Repeat steps 2-6 above till the end of the field is reached.
IV. Smoothing Contour Lines
The facilitator will state that pegged contour lines need to be smoothed in order to reduce sharp
angles between them. This simplifies building marker ridges.
Move pegs only on uniform terrain as follows:
a. 3 people each stand by the first 3 pegs in the line. Move the middle peg (No 2) so that all
3 pegs are in straight line.
b. All 3 people then move two pegs forward, i.e. pegs 3, 4 and 5. Move the middle peg (No
4) so that pegs 3, 4 and 5 are in a straight line. Repeat this till the line is finished. The
line now will follow the gradual curve.
Practical Session: 2 hours 55 Minutes
Participants will be divided into groups. Each group will have 3 lead farmers. The facilitator will
state that the practical session be as follows:
a. Making/ setting up equipment
b. Pegging contour lines
c. Smoothing contour lines
d. Constructing marker ridges
e.
He/she should point out that contour lines on irregular terrain should not be smoothed as it would
cause runoff problems.
V. Constructing Marker Ridges
The facilitator will state that once pegging of contour lines is over, they should be built into a
marker ridge.. The facilitator will explain that vetiver grass will be planted along the marker
ridge which will be demonstrated.
VIII. Gully Reclamation
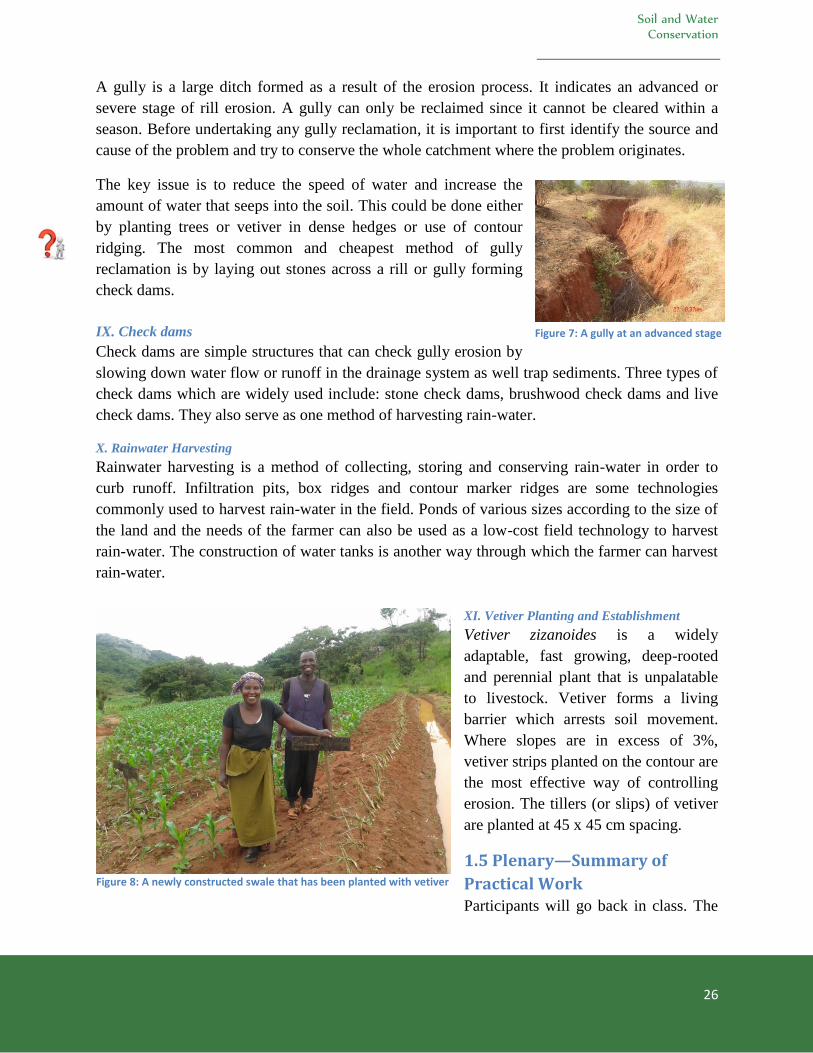
Soil and Water Conservation
26
A gully is a large ditch formed as a result of the erosion process. It indicates an advanced or
severe stage of rill erosion. A gully can only be reclaimed since it cannot be cleared within a
season. Before undertaking any gully reclamation, it is important to first identify the source and
cause of the problem and try to conserve the whole catchment where the problem originates.
The key issue is to reduce the speed of water and increase the
amount of water that seeps into the soil. This could be done either
by planting trees or vetiver in dense hedges or use of contour
ridging. The most common and cheapest method of gully
reclamation is by laying out stones across a rill or gully forming
check dams.
IX. Check dams
Check dams are simple structures that can check gully erosion by
slowing down water flow or runoff in the drainage system as well trap sediments. Three types of
check dams which are widely used include: stone check dams, brushwood check dams and live
check dams. They also serve as one method of harvesting rain-water.
X. Rainwater Harvesting
Rainwater harvesting is a method of collecting, storing and conserving rain-water in order to
curb runoff. Infiltration pits, box ridges and contour marker ridges are some technologies
commonly used to harvest rain-water in the field. Ponds of various sizes according to the size of
the land and the needs of the farmer can also be used as a low-cost field technology to harvest
rain-water. The construction of water tanks is another way through which the farmer can harvest
rain-water.
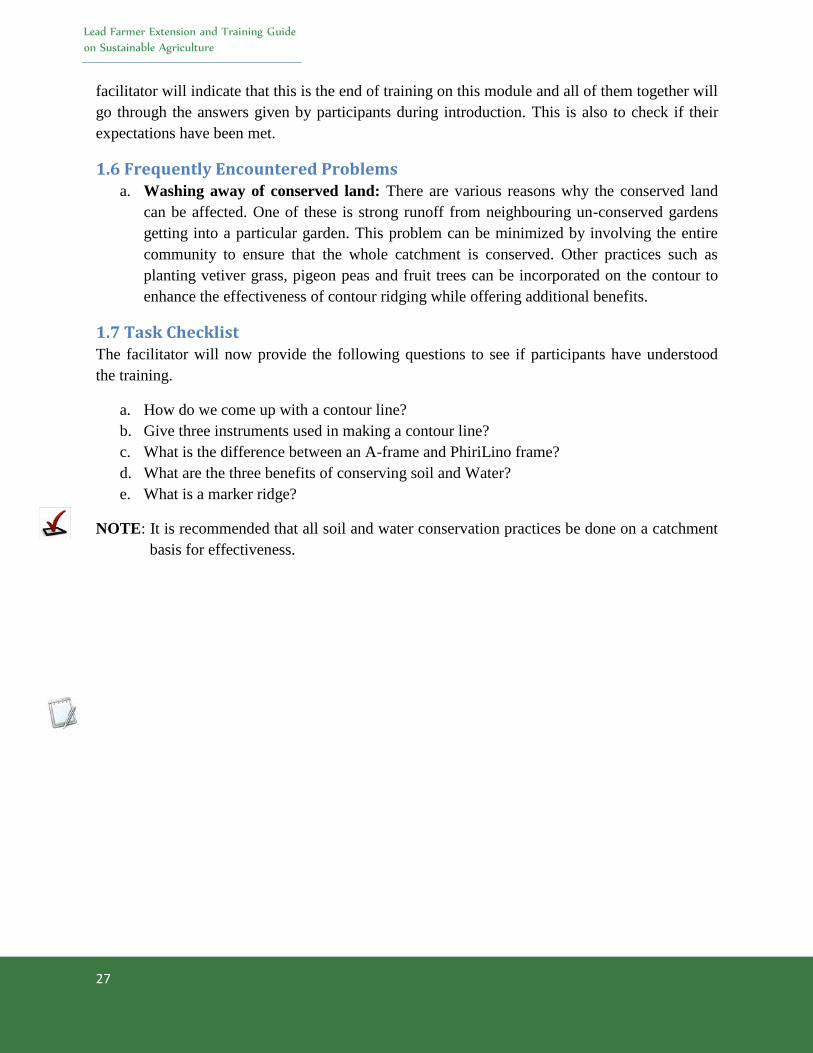
XI. Vetiver Planting and Establishment
Vetiver zizanoides is a widely
adaptable, fast growing, deep-rooted
and perennial plant that is unpalatable
to livestock. Vetiver forms a living
barrier which arrests soil movement.
Where slopes are in excess of 3%,
vetiver strips planted on the contour are
the most effective way of controlling
erosion. The tillers (or slips) of vetiver
are planted at 45 x 45 cm spacing.
1.5 Plenary—Summary of
Practical Work Participants will go back in class. The
Figure 7: A gully at an advanced stage
Figure 8: A newly constructed swale that has been planted with vetiver
Lead Farmer Extension and Training Guide
on Sustainable Agriculture
27
facilitator will indicate that this is the end of training on this module and all of them together will
go through the answers given by participants during introduction. This is also to check if their
expectations have been met.
1.6 Frequently Encountered Problems a. Washing away of conserved land: There are various reasons why the conserved land
can be affected. One of these is strong runoff from neighbouring un-conserved gardens
getting into a particular garden. This problem can be minimized by involving the entire
community to ensure that the whole catchment is conserved. Other practices such as
planting vetiver grass, pigeon peas and fruit trees can be incorporated on the contour to
enhance the effectiveness of contour ridging while offering additional benefits.
1.7 Task Checklist The facilitator will now provide the following questions to see if participants have understood
the training.
a. How do we come up with a contour line?
b. Give three instruments used in making a contour line?
c. What is the difference between an A-frame and PhiriLino frame?
d. What are the three benefits of conserving soil and Water?
e. What is a marker ridge?
NOTE: It is recommended that all soil and water conservation practices be done on a catchment
basis for effectiveness.
Lead Farmer Extension and Training Guide
on Sustainable Agriculture
28
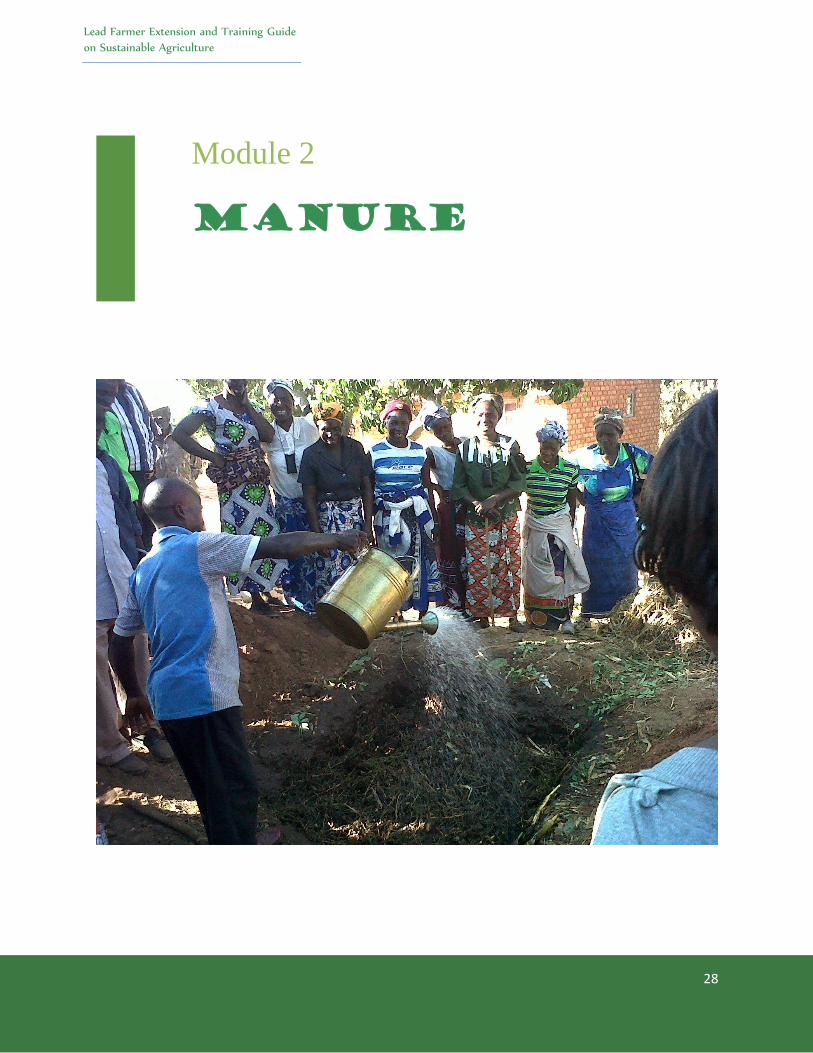
Module 2
Manure
Manure
29
2.1 About this Module
Manure is decomposed organic matter from both plants and animals. It contributes to the fertility
of the soil by adding organic matter and nutrients such as nitrogen. There are three types of
manure. These are:
a. Animal manure;
b. Compost manure; and,
c. Green/ Plant manure.
2.1.1 Livestock in Sustainable Agriculture
Animals are important in a number of ways including provision of manure for crop production
hence very important under Sustainable Agriculture.
2.1.2 Benefits of Livestock Manure
Animal manure has been used for centuries as fertilizer for farming because it improves soil
structure (aggregation) and holds nutrients and water. This improves soil fertility. Animal
manure also encourages soil microbial activity, which promotes the soil's trace mineral supply,
improving plant nutrition. It also contains some nitrogen and other nutrients that assist the
growth of plants. Unlike chemical fertilizers, compost manure have proven useful in sustainable
agriculture as a means of climate change adaptation.
Manure improves soil structure of the top soil through the supply of organic matter. This in turn:
a. Improves root penetration
b. Improves permeability
c. Improves water retention capacity
d. Improves resistance to erosion
e. Improves aeration
f. Reduces leaching of soil nutrients
g. Improves soil microbial activity
2.1.3 Deliberate Efforts to Improve Synergy
It is important that there is a proper integration of crop and livestock by farmers so that either can
benefit from the other in a sustainable way. DF and its partners consider livestock as an
important component in the farming system hence its support in provision of livestock under
pass-on scheme. In this set up, when a beneficiary receives one form of livestock s/he will have
to repay by giving an equivalent number of livestock that she received to another household.
Pass-on has three major objectives and one of them is to allow beneficiaries have access to
manure.
All livestock beneficiaries are farmers who implement SA technologies in their gardens where
they can use manure for crop production. There is proper arrangement in the use of crop residues
depending on the number of livestock and farm size. Part of the residues is used as animal feed
and part of it towards achieving some SA technologies such as CA.
Lead Farmer Extension and Training Guide
on Sustainable Agriculture
30
The other important factor with compost manure is that they are low cost inputs in comparison to
inorganic fertilizers and they supply nutrients even in subsequent years after application. As
opposed to compost manure, chemical fertilizers only contribute to raising the total amount of
nutrients in the soil without maintaining the organic matter content of the soil and eventually this
leads to soil structure deterioration.
NOTE: While integration of livestock is paramount for successful implementation of SA, its
effectiveness is hampered by ineffective and unattended free-range grazing systems.
Therefore, there is a need to ensure restricted movement of livestock throughout the
year.
2.2 Objectives In this module Lead Farmers are going to learn about manure and compost manures focusing on
the following topics: Collection and usage of manure, different types of compost manures that
can be made on the farm, methodology in making compost manures, ideal sites where compost
manure should be made, materials required in making various types of manures and their
application rates.
2.3 Expected Results By the end of this module the Lead Farmers should be able to:
a. Know the importance of composts and manures in sustainable agriculture
b. Different kinds of composts and manures
c. Know the raw materials used in making different types manures
d. Know how to make different kinds of composts and manures
e. Know the application rates for different kinds of manure
2.4 Activities
2.4.1 Introduction (30 minutes)
The facilitator will ask participants to be in three groups. The facilitator will then give each
group a flip chart, marker and different kinds of manure (bokash, liquid and animal manure).The
facilitator will then ask the participants to name the type of manure they have been given and
outline the importance of applying composts and manure in sustainable agriculture.
2.4.2 Plenary – Teaching about different types of manure and how they are made (1 hour 30
minutes)
Compost
The facilitator will define compost as organic matter that has been decomposed and recycled as a
fertiliser.
Time Frame: 5 hours 30 minutes
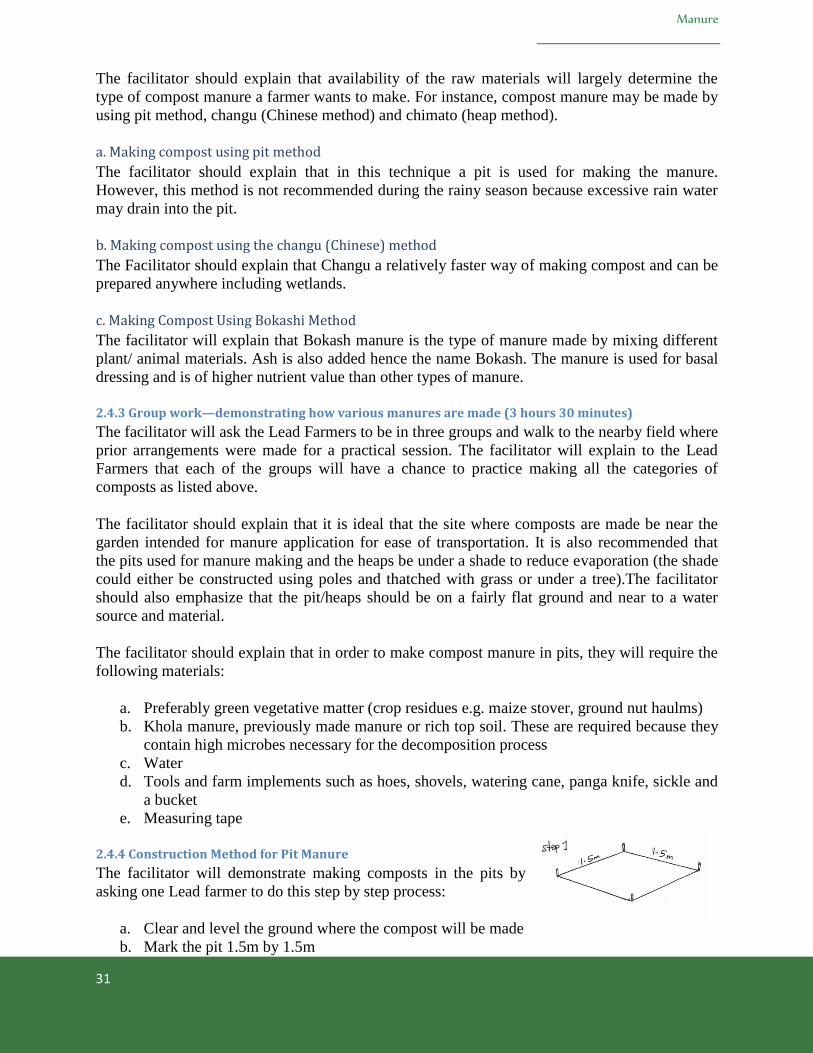
Manure
31
The facilitator should explain that availability of the raw materials will largely determine the
type of compost manure a farmer wants to make. For instance, compost manure may be made by
using pit method, changu (Chinese method) and chimato (heap method).
a. Making compost using pit method
The facilitator should explain that in this technique a pit is used for making the manure.
However, this method is not recommended during the rainy season because excessive rain water
may drain into the pit.
b. Making compost using the changu (Chinese) method
The Facilitator should explain that Changu a relatively faster way of making compost and can be
prepared anywhere including wetlands.
c. Making Compost Using Bokashi Method
The facilitator will explain that Bokash manure is the type of manure made by mixing different
plant/ animal materials. Ash is also added hence the name Bokash. The manure is used for basal
dressing and is of higher nutrient value than other types of manure.
2.4.3 Group work—demonstrating how various manures are made (3 hours 30 minutes) The facilitator will ask the Lead Farmers to be in three groups and walk to the nearby field where
prior arrangements were made for a practical session. The facilitator will explain to the Lead
Farmers that each of the groups will have a chance to practice making all the categories of
composts as listed above.
The facilitator should explain that it is ideal that the site where composts are made be near the
garden intended for manure application for ease of transportation. It is also recommended that
the pits used for manure making and the heaps be under a shade to reduce evaporation (the shade
could either be constructed using poles and thatched with grass or under a tree).The facilitator
should also emphasize that the pit/heaps should be on a fairly flat ground and near to a water
source and material.
The facilitator should explain that in order to make compost manure in pits, they will require the
following materials:
a. Preferably green vegetative matter (crop residues e.g. maize stover, ground nut haulms)
b. Khola manure, previously made manure or rich top soil. These are required because they
contain high microbes necessary for the decomposition process
c. Water
d. Tools and farm implements such as hoes, shovels, watering cane, panga knife, sickle and
a bucket
e. Measuring tape
2.4.4 Construction Method for Pit Manure
The facilitator will demonstrate making composts in the pits by
asking one Lead farmer to do this step by step process:
a. Clear and level the ground where the compost will be made
b. Mark the pit 1.5m by 1.5m
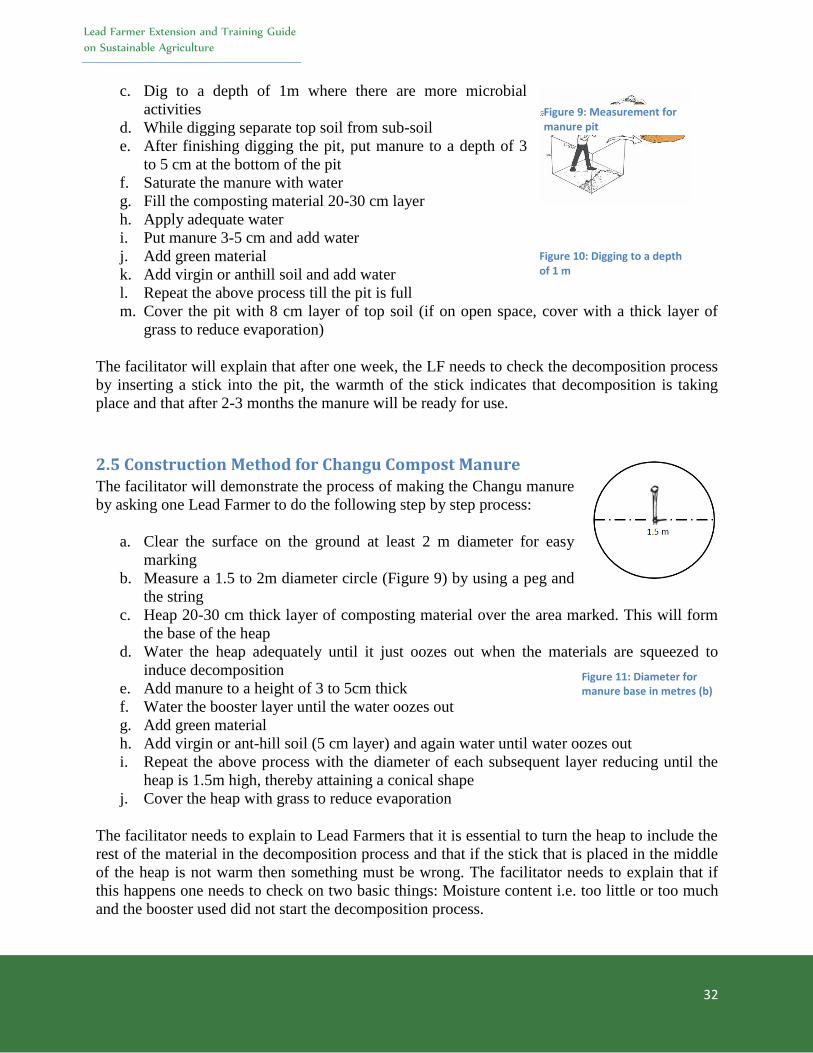
Lead Farmer Extension and Training Guide
on Sustainable Agriculture
32
c. Dig to a depth of 1m where there are more microbial
activities
d. While digging separate top soil from sub-soil
e. After finishing digging the pit, put manure to a depth of 3
to 5 cm at the bottom of the pit
f. Saturate the manure with water
g. Fill the composting material 20-30 cm layer
h. Apply adequate water
i. Put manure 3-5 cm and add water
j. Add green material
k. Add virgin or anthill soil and add water
l. Repeat the above process till the pit is full
m. Cover the pit with 8 cm layer of top soil (if on open space, cover with a thick layer of
grass to reduce evaporation)
The facilitator will explain that after one week, the LF needs to check the decomposition process
by inserting a stick into the pit, the warmth of the stick indicates that decomposition is taking
place and that after 2-3 months the manure will be ready for use.
2.5 Construction Method for Changu Compost Manure The facilitator will demonstrate the process of making the Changu manure
by asking one Lead Farmer to do the following step by step process:
a. Clear the surface on the ground at least 2 m diameter for easy
marking
b. Measure a 1.5 to 2m diameter circle (Figure 9) by using a peg and
the string
c. Heap 20-30 cm thick layer of composting material over the area marked. This will form
the base of the heap
d. Water the heap adequately until it just oozes out when the materials are squeezed to
induce decomposition
e. Add manure to a height of 3 to 5cm thick
f. Water the booster layer until the water oozes out
g. Add green material
h. Add virgin or ant-hill soil (5 cm layer) and again water until water oozes out
i. Repeat the above process with the diameter of each subsequent layer reducing until the
heap is 1.5m high, thereby attaining a conical shape
j. Cover the heap with grass to reduce evaporation
The facilitator needs to explain to Lead Farmers that it is essential to turn the heap to include the
rest of the material in the decomposition process and that if the stick that is placed in the middle
of the heap is not warm then something must be wrong. The facilitator needs to explain that if
this happens one needs to check on two basic things: Moisture content i.e. too little or too much
and the booster used did not start the decomposition process.
Figure 9: Measurement for manure pit
Figure 10: Digging to a depth of 1 m
Figure 11: Diameter for manure base in metres (b)
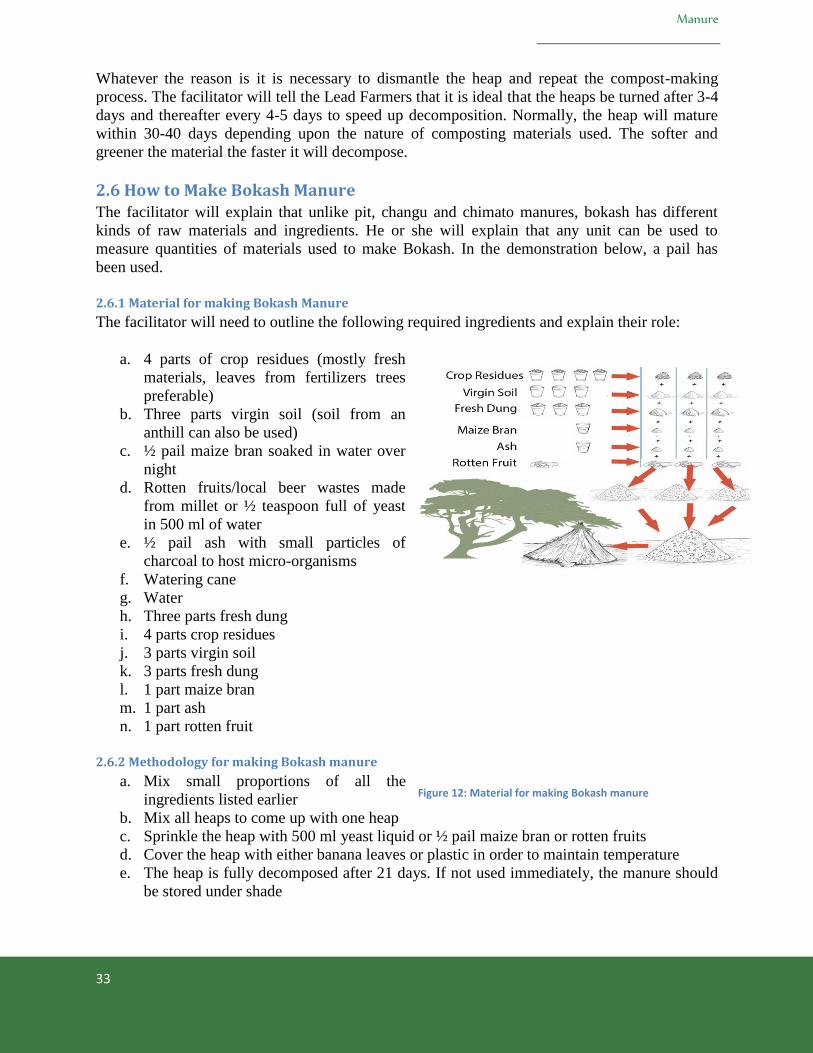
Manure
33
Whatever the reason is it is necessary to dismantle the heap and repeat the compost-making
process. The facilitator will tell the Lead Farmers that it is ideal that the heaps be turned after 3-4
days and thereafter every 4-5 days to speed up decomposition. Normally, the heap will mature
within 30-40 days depending upon the nature of composting materials used. The softer and
greener the material the faster it will decompose.
2.6 How to Make Bokash Manure The facilitator will explain that unlike pit, changu and chimato manures, bokash has different
kinds of raw materials and ingredients. He or she will explain that any unit can be used to
measure quantities of materials used to make Bokash. In the demonstration below, a pail has
been used.
2.6.1 Material for making Bokash Manure
The facilitator will need to outline the following required ingredients and explain their role:
a. 4 parts of crop residues (mostly fresh
materials, leaves from fertilizers trees
preferable)
b. Three parts virgin soil (soil from an
anthill can also be used)
c. ½ pail maize bran soaked in water over
night
d. Rotten fruits/local beer wastes made
from millet or ½ teaspoon full of yeast
in 500 ml of water
e. ½ pail ash with small particles of
charcoal to host micro-organisms
f. Watering cane
g. Water
h. Three parts fresh dung
i. 4 parts crop residues
j. 3 parts virgin soil
k. 3 parts fresh dung
l. 1 part maize bran
m. 1 part ash
n. 1 part rotten fruit
2.6.2 Methodology for making Bokash manure
a. Mix small proportions of all the
ingredients listed earlier
b. Mix all heaps to come up with one heap
c. Sprinkle the heap with 500 ml yeast liquid or ½ pail maize bran or rotten fruits
d. Cover the heap with either banana leaves or plastic in order to maintain temperature
e. The heap is fully decomposed after 21 days. If not used immediately, the manure should
be stored under shade
Figure 12: Material for making Bokash manure
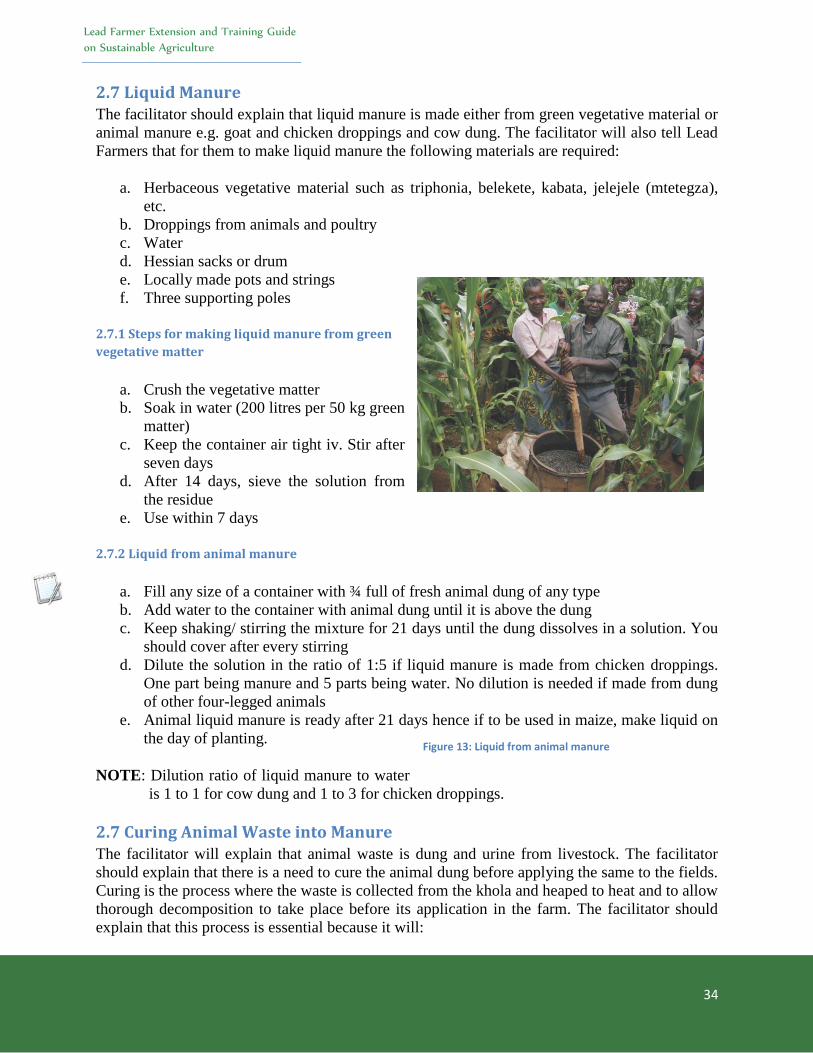
Lead Farmer Extension and Training Guide
on Sustainable Agriculture
34
Figure 13: Liquid from animal manure
2.7 Liquid Manure The facilitator should explain that liquid manure is made either from green vegetative material or
animal manure e.g. goat and chicken droppings and cow dung. The facilitator will also tell Lead
Farmers that for them to make liquid manure the following materials are required:
a. Herbaceous vegetative material such as triphonia, belekete, kabata, jelejele (mtetegza),
etc.
b. Droppings from animals and poultry
c. Water
d. Hessian sacks or drum
e. Locally made pots and strings
f. Three supporting poles
2.7.1 Steps for making liquid manure from green
vegetative matter
a. Crush the vegetative matter
b. Soak in water (200 litres per 50 kg green
matter)
c. Keep the container air tight iv. Stir after
seven days
d. After 14 days, sieve the solution from
the residue
e. Use within 7 days
2.7.2 Liquid from animal manure
a. Fill any size of a container with ¾ full of fresh animal dung of any type
b. Add water to the container with animal dung until it is above the dung
c. Keep shaking/ stirring the mixture for 21 days until the dung dissolves in a solution. You
should cover after every stirring
d. Dilute the solution in the ratio of 1:5 if liquid manure is made from chicken droppings.
One part being manure and 5 parts being water. No dilution is needed if made from dung
of other four-legged animals
e. Animal liquid manure is ready after 21 days hence if to be used in maize, make liquid on
the day of planting.
NOTE: Dilution ratio of liquid manure to water
is 1 to 1 for cow dung and 1 to 3 for chicken droppings.
2.7 Curing Animal Waste into Manure The facilitator will explain that animal waste is dung and urine from livestock. The facilitator
should explain that there is a need to cure the animal dung before applying the same to the fields.
Curing is the process where the waste is collected from the khola and heaped to heat and to allow
thorough decomposition to take place before its application in the farm. The facilitator should
explain that this process is essential because it will:
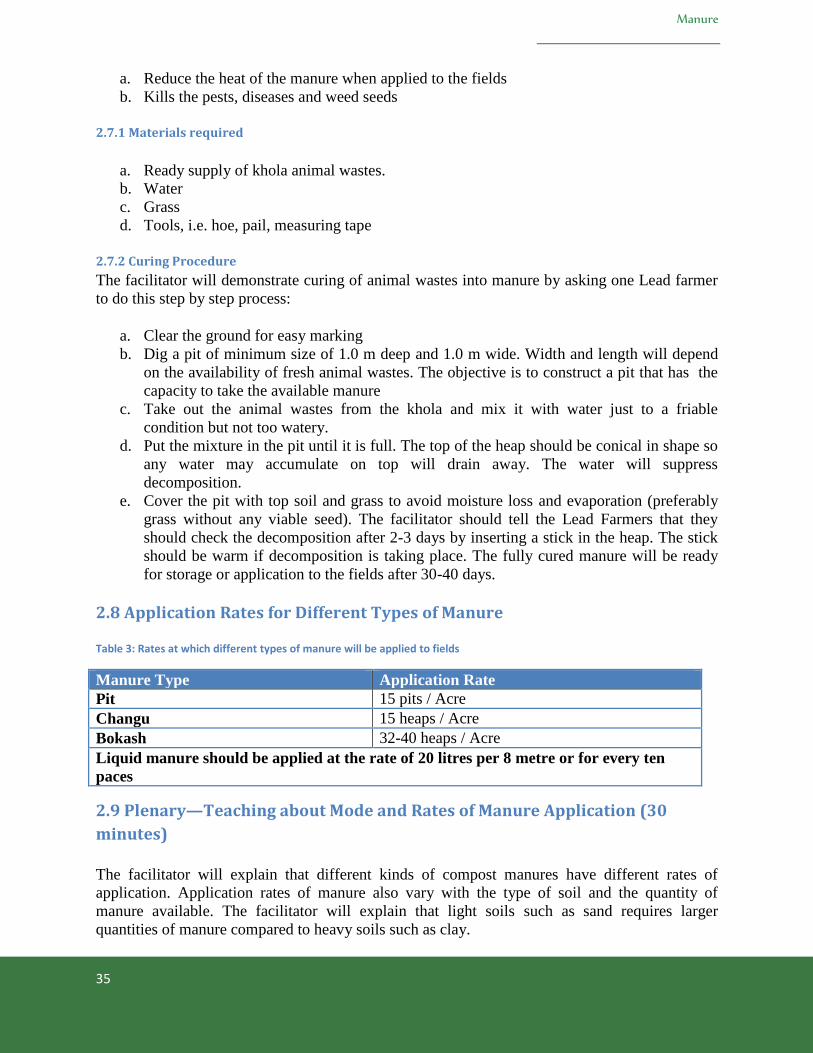
Manure
35
a. Reduce the heat of the manure when applied to the fields
b. Kills the pests, diseases and weed seeds
2.7.1 Materials required
a. Ready supply of khola animal wastes.
b. Water
c. Grass
d. Tools, i.e. hoe, pail, measuring tape
2.7.2 Curing Procedure
The facilitator will demonstrate curing of animal wastes into manure by asking one Lead farmer
to do this step by step process:
a. Clear the ground for easy marking
b. Dig a pit of minimum size of 1.0 m deep and 1.0 m wide. Width and length will depend
on the availability of fresh animal wastes. The objective is to construct a pit that has the
capacity to take the available manure
c. Take out the animal wastes from the khola and mix it with water just to a friable
condition but not too watery.
d. Put the mixture in the pit until it is full. The top of the heap should be conical in shape so
any water may accumulate on top will drain away. The water will suppress
decomposition.
e. Cover the pit with top soil and grass to avoid moisture loss and evaporation (preferably
grass without any viable seed). The facilitator should tell the Lead Farmers that they
should check the decomposition after 2-3 days by inserting a stick in the heap. The stick
should be warm if decomposition is taking place. The fully cured manure will be ready
for storage or application to the fields after 30-40 days.
2.8 Application Rates for Different Types of Manure
Table 3: Rates at which different types of manure will be applied to fields
Manure Type Application Rate
Pit 15 pits / Acre
Changu 15 heaps / Acre
Bokash 32-40 heaps / Acre
Liquid manure should be applied at the rate of 20 litres per 8 metre or for every ten
paces
2.9 Plenary—Teaching about Mode and Rates of Manure Application (30
minutes)
The facilitator will explain that different kinds of compost manures have different rates of
application. Application rates of manure also vary with the type of soil and the quantity of
manure available. The facilitator will explain that light soils such as sand requires larger
quantities of manure compared to heavy soils such as clay.
Lead Farmer Extension and Training Guide
on Sustainable Agriculture
36
2.10 Liquid manure application
a. Apply on both sides of the crop just as fertilizer is applied under Sasakawa in maize
b. Apply 50ml on each side of the crop
c. Apply to maize 21 days after planting
d. On vegetables, application can be after 14 days
e. The residues can also be applied into the field or used as composting material
NOTE: To speed up decomposition of manures, humic acid solution can be used in place of pure
water. In the absence of humic acid, locally available maize samp can be applied for the
same purpose. Beer sediments, if added to the manure have also proved to speed up
decomposition.
2.11 Frequently Encountered Problems and Possible Solutions
a. Applying the compost manure in the garden but the crop not responding well: The
compost made may not be of high quality. Remember that for you to make high quality
composts you need high quality raw materials. Another reason is that the manure might
have been applied below the recommended application rates.
b. Applying khola manure and experiencing an increase in incidence of pests and
having the crops scorched: The khola manure may have been applied before it was
properly cured. Manure curing is essential because it helps to reduce the heat of the
manure when applied to the fields and kill the pests, diseases and weed seeds.
2.12 Task Checklist
a. Why is it is important to make your compost manure near the garden?
b. Why is it important to make composts under a shade?
c. Why would it be important to use humic acid in manure making?
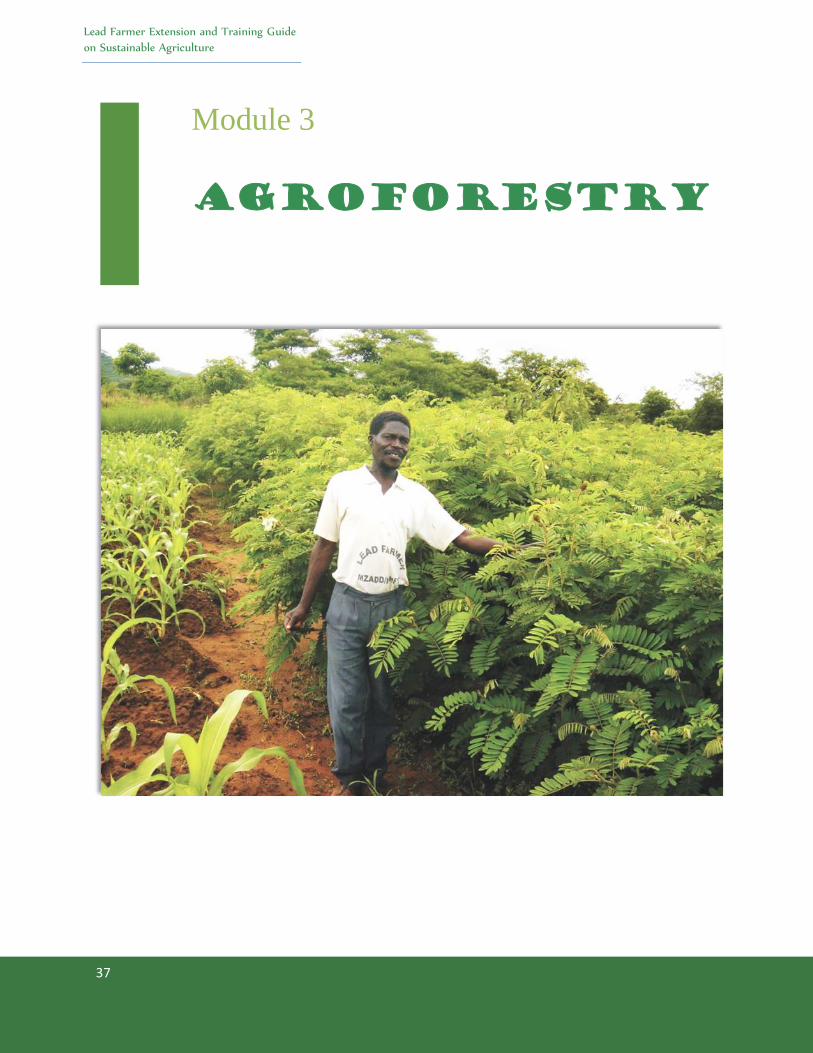
Lead Farmer Extension and Training Guide
on Sustainable Agriculture
37
Module 3
Agroforestry
Lead Farmer Extension and Training
Guide on Sustainable Agriculture
38
3.1 About this Module Agroforestry is any farming system in which trees/shrubs are deliberately integrated with crops
and /or animals on the same unit of land. Besides contributing to increase in soil fertility,
agroforestry is key to mitigating climate change risks as they act as a carbon sink. Agroforestry
benefits both the environment and the farmers' economy in ways such as;
a. Improved soil fertility mainly through increased organic matter which is added through
i. Leaf drops;
ii. Roots bringing up nutrients from sub soil;
iii. Reduced leaching because of the canopy;
iv. Improved micro-climate because of the shade provided by the canopy cover; and
v. Reduced soil temperature through the canopy.
b. Reduced soil erosion through
i. Reduced raindrop impact as raindrops hit the canopy first;
ii. The soil being bound by the roots of the trees
c. Improved soil structure through:
i. Increased organic matter;
ii. Hard soils being broken by roots.
d. Source of raw materials for different household purposes like:
i. Fuel wood;
ii. Housing/ Fencing materials.
e. Improved food security through increased cash crop yield
f. Source of fruits and nuts
g. Source of animal fodder
h. Source of medicinal products
3.2 Objectives The objective of this module will be to train lead farmers on agroforestry practices, nursery and
field management for improved soil fertility and crop production.
3.3 Expected Results By the end of this module, the Lead Farmers should be able to:
a. Explain techniques used in nursery establishment
b. Explain seed rates for different agroforestry species
c. Explain the benefits of practicing agroforestry in sustainable agriculture
d. Explain different kinds of agroforestry species and their benefits
Time Frame: 4 hours 15 minutes
Agroforestry
39
3.4 Activities
3.4.1 Introduction (10 minutes)
The facilitator will ask participants to be in 2-3 equal groups and give each group a flip chart,
pental marker and different types of seeds for agroforestry species. The facilitator will then ask
the group to name the seeds, give seed rates for the different kinds of agroforestry seeds and
outline the importance of agroforestry in sustainable agriculture.
3.4.2 Plenary – Teaching of Nursery Establishment (1 hour 30 Minutes)
The facilitator should explain the importance of nursery establishment in agroforestry and the
various stages in raising nurseries.
Nursery establishment is one of the most important stages in agroforestry technology and every
effort should be put in place to have a well-established and permanent agroforestry nursery.
Some of the critical stages in the development of an agroforestry nursery include the following:
a. Seed collection, selection and storage;
b. Nursery site identification;
c. Fencing
d. Organization of nursery management;
e. Planting containers and media;
f. Seed treatment and sowing; and,
g. Post germination treatment.
3.5 Plenary—Teaching about Principles of Seed Collection and Seed Rates The facilitator will explain why local seed collection and selection is important in agroforestry
technology. She should also explain why it is important to store seeds in a cool shade.
Good plants, to a very large extent, depend on the quality of the seed used. Although preparation
of the soil may be excellent good results will not follow unless the seed is of good quality. This
is where seed selection comes in. Farmers should select seed that is:
a. free from dirt, weed seeds and any other impurity
b. free from diseases
Local seed collection is important for sustainability of the tree planting programme. When
projects reach their conclusion and donors pull out of the area, the communities will have to buy
seed or collect for themselves, the latter is more dependable. It is important that you collect seed
from the type of trees that you see growing well i.e. healthy and mature trees that show the
characteristics of the species. Only collect when the seeds are dry and are falling down on their
own. However, make sure that the falling of the seed is not premature and due to pest or disease
attack. It is also important to follow good seed storage practices so as to maintain seed viability.
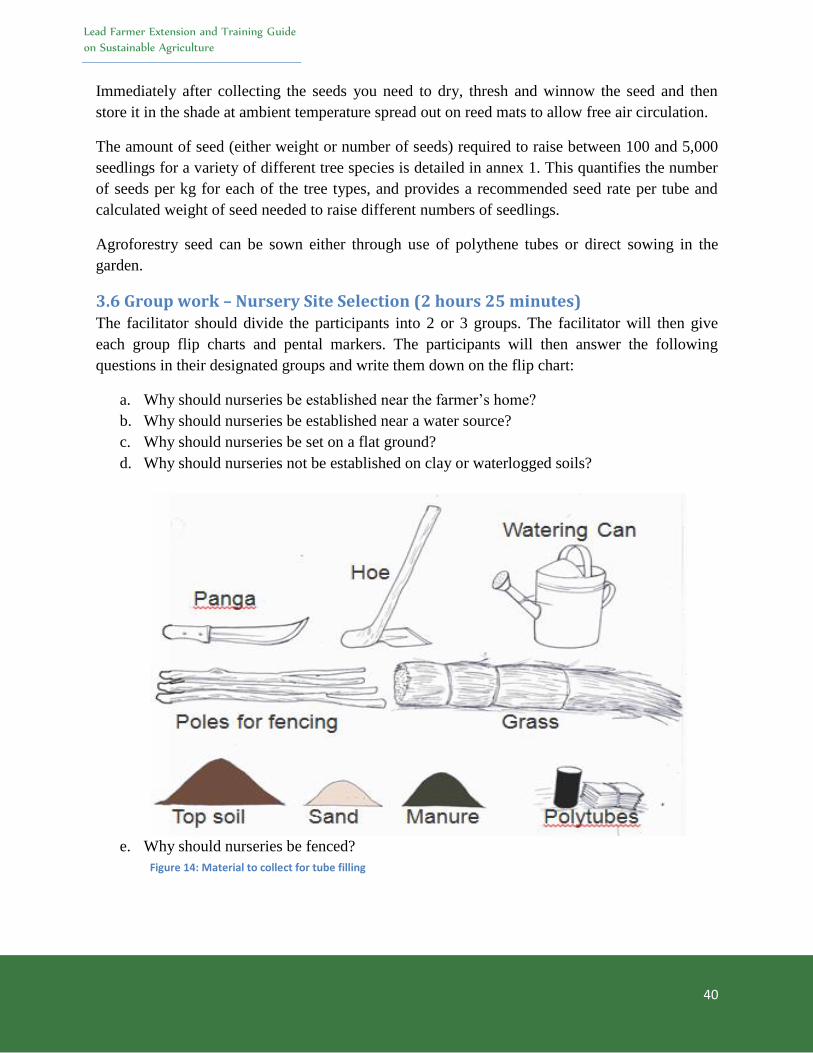
Lead Farmer Extension and Training Guide
on Sustainable Agriculture
40
Immediately after collecting the seeds you need to dry, thresh and winnow the seed and then
store it in the shade at ambient temperature spread out on reed mats to allow free air circulation.
The amount of seed (either weight or number of seeds) required to raise between 100 and 5,000
seedlings for a variety of different tree species is detailed in annex 1. This quantifies the number
of seeds per kg for each of the tree types, and provides a recommended seed rate per tube and
calculated weight of seed needed to raise different numbers of seedlings.
Agroforestry seed can be sown either through use of polythene tubes or direct sowing in the
garden.
3.6 Group work – Nursery Site Selection (2 hours 25 minutes) The facilitator should divide the participants into 2 or 3 groups. The facilitator will then give
each group flip charts and pental markers. The participants will then answer the following
questions in their designated groups and write them down on the flip chart:
a. Why should nurseries be established near the farmer’s home?
b. Why should nurseries be established near a water source?
c. Why should nurseries be set on a flat ground?
d. Why should nurseries not be established on clay or waterlogged soils?
e. Why should nurseries be fenced?
Figure 14: Material to collect for tube filling
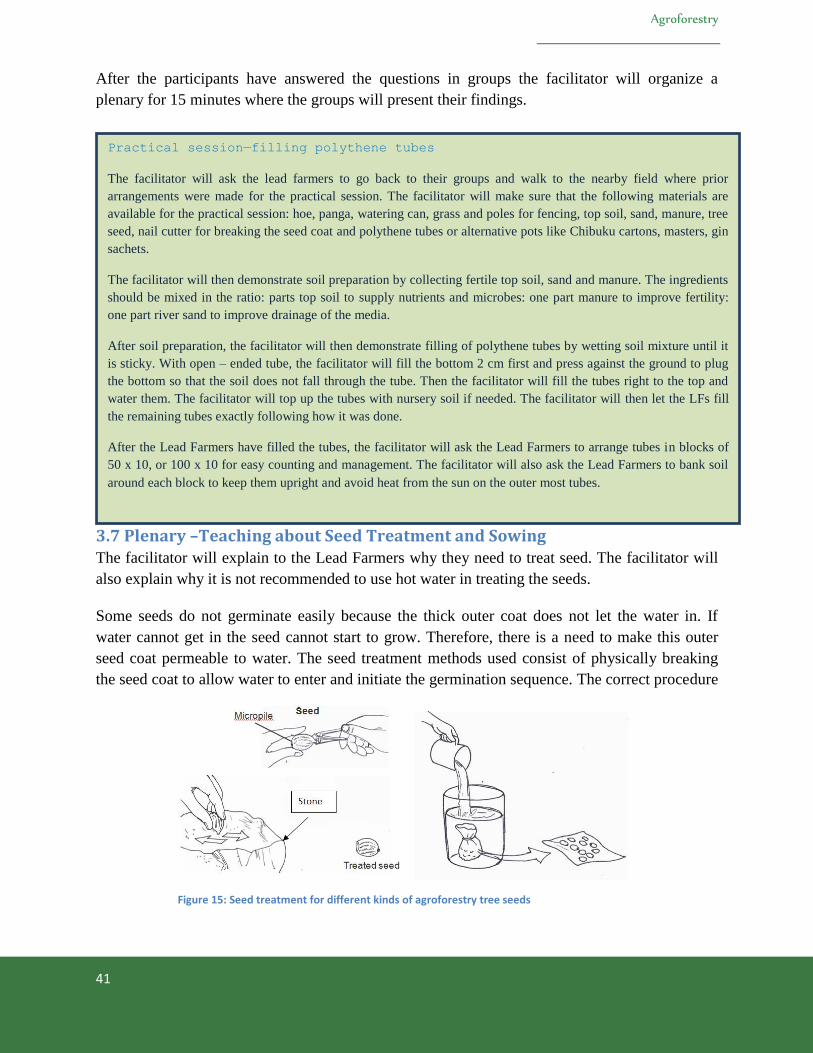
Agroforestry
41
After the participants have answered the questions in groups the facilitator will organize a
plenary for 15 minutes where the groups will present their findings.
3.7 Plenary –Teaching about Seed Treatment and Sowing The facilitator will explain to the Lead Farmers why they need to treat seed. The facilitator will
also explain why it is not recommended to use hot water in treating the seeds.
Some seeds do not germinate easily because the thick outer coat does not let the water in. If
water cannot get in the seed cannot start to grow. Therefore, there is a need to make this outer
seed coat permeable to water. The seed treatment methods used consist of physically breaking
the seed coat to allow water to enter and initiate the germination sequence. The correct procedure
Practical session—filling polythene tubes
The facilitator will ask the lead farmers to go back to their groups and walk to the nearby field where prior
arrangements were made for the practical session. The facilitator will make sure that the following materials are
available for the practical session: hoe, panga, watering can, grass and poles for fencing, top soil, sand, manure, tree
seed, nail cutter for breaking the seed coat and polythene tubes or alternative pots like Chibuku cartons, masters, gin
sachets.
The facilitator will then demonstrate soil preparation by collecting fertile top soil, sand and manure. The ingredients
should be mixed in the ratio: parts top soil to supply nutrients and microbes: one part manure to improve fertility:
one part river sand to improve drainage of the media.
After soil preparation, the facilitator will then demonstrate filling of polythene tubes by wetting soil mixture until it
is sticky. With open – ended tube, the facilitator will fill the bottom 2 cm first and press against the ground to plug
the bottom so that the soil does not fall through the tube. Then the facilitator will fill the tubes right to the top and
water them. The facilitator will top up the tubes with nursery soil if needed. The facilitator will then let the LFs fill
the remaining tubes exactly following how it was done.
After the Lead Farmers have filled the tubes, the facilitator will ask the Lead Farmers to arrange tubes in blocks of
50 x 10, or 100 x 10 for easy counting and management. The facilitator will also ask the Lead Farmers to bank soil
around each block to keep them upright and avoid heat from the sun on the outer most tubes.
Figure 15: Seed treatment for different kinds of agroforestry tree seeds
Lead Farmer Extension and Training Guide
on Sustainable Agriculture
42
needs to ensure that the micro pile is not damaged. The technical term for this process is
scarification. The other term for this process is nicking.
3.9 Seed Treatment and Planting Depth Recommendations for Common Tree
Species
3.9.1 Plenary—Teaching about Seed Sowing in Tubes
The facilitator will explain that the seed need to be sown the same day of pre-treatment. Cover
the seed with soil after sowing. S/he should explain that soil cover should not be too much as
doing so may lead to most seed failing to germinate.
Table 4: Summary of sowing treatment and methods for different kinds of agroforestry seeds
Botanical Name Local Name Seed Treatment Planting Depth (cm) Nursery Time
Acacia galpinii Nkhungu Nick 1.5-2.0 8—12 weeks Acacia polyacantha Mthete Nick 1.5-2.0 8—12 weeks Afzelia quanzensis Msambamfumu Remove aril 4.0 8—12 weeks Albizia lebbeck Mtangatanga Nick 1.5-2.0 8—12 weeks Bauhinia thoningii Chitimbe Nick 1.5-2.0 8—12 weeks Faidherbia albida Msangu Nick 1.5-2.0 5—8 weeks Khaya nyasica Mbawa Soak 48 hrs 3.0 10—16 weeks Sena siamea Khesya wa milimo Nick 1.5-2.0 8—12 weeks Senna spectabilis Khesya wa maluwa Nick 1.0 8—12 weeks Toona ciliate Sendrella None 0.5 10—16 weeks
The facilitator will explain that once sown, the tubes will have to be covered lightly with dry
grass in order to provide some shade.
3.9.2 Group work –Teaching about post germination treatment
The facilitator will ask the Lead Farmers to go into their respective groups again. The facilitator
will then distribute flip charts and markers and ask the Lead Farmers to list the post germination
procedures they will undertake. The Lead Farmers should be able to list the following
procedures: watering, re- sowing, weeding, thinning and root pruning.
Watering: After sowing, water tubes every morning and afternoon. Continue until the seedlings
are 3 weeks old. Thereafter reduce watering to early morning hours only but do not
let plants wilt. As a general guideline remember to avoid under or over watering.
Re-sowing: Empty pots are wasted pots so when there is no germination in some pots it will
have to be investigated. If the seed appears dead then re-sow.
Weeding: it is fundamental to weed both in the pots and around the site to have a healthy
nursery.
Thinning: Thin tubes to one seedling per pot after germination. However, do it gently so that
you do not disturb the plant that is left.
Agroforestry
43
Root pruning: Prune small roots growing through the bottom of the tubes by regularly lifting
tubes off the ground. Prune larger roots by sliding a sharp panga under the tubes.
Root prune every 2 weeks with the final pruning 3 – 4 days before out planting to
allow recovery. Shifting of tubes every 2 weeks to avoid roots sticking to the
ground should be emphasized. Cutting of roots with Panga disturbs fast growth of
seedlings when out planted.
3.9.3 Plenary—Teaching about Under Sowing
The facilitator should explain that under sowing of legumes into maize can be achieved within
both the traditional and Sasakawa planting systems. He/she should also indicate the three
agroforestry species that can be planted: Tephrosia vogelii, Sesbania sesban and Cajanus cajan.
The facilitator should also give examples of the benefits of under sowing. These include:
a. Improve soil fertility and crop yields
b. Control run off and erosion
c. Suppress weeds to reduce loss of soil moisture and nutrients
d. Reduce crop damage from pests (stalk borers, aphids, leaf-eaters, termites, weevils
and fleas) and striga
e. Produce fuel wood for domestic use.
It is important for the facilitator to explain the importance of the legume intercrop at the same
time as maize. Failure to plant early limits growth and so less biomass is produced and makes the
intercrop less tolerant to pests and diseases.
Table 5: Seed rates for different agroforestry trees
Species Name Seeds/Kg Seeds/Tube Grams required to raise the following seedlings
100 1,000 2,000 5,000 Acacia gaipini 4,800 2 40 400 800 2,000
Acacia polyacantha 9,900 3 30 300 600 1,500
Afzelia quanzensis 250 1 400 4,000 8,000 20,000
Azadirachta indica 11,000 2 20 200 400 1,000
Bauhinia thoningii 6,100 3 50 500 1,000 2,500
Faidherbia albilda 6,900 3 40 400 800 2,200
Gliricidia sepium 7,000 2 30 300 600 1,400
Khaya nyasica 2980 3 100 1,000 2,000 5,000
Senna siamea 33000 2 6 60 120 300
Senna spectabilis 82,305 6 7 70 140 360
Tephrosia vogelii 17,500 5 6 60 120 280
Toona cilita 300,000 5 1 10 30 80
Ziziphus mauritiana 1,500 3 200 2,000 4,000 10,000

Lead Farmer Extension and Training Guide
on Sustainable Agriculture
44
Table 6: Tree species and agronomical practice
Species Practice Spacing No of trees/ plants per ha
Gliricidia Green manure banks 90 cm by 150 cm 16,666
Tephrosia Annual under-sowing 75 cm by 75 cm 33, 000 (3 plants) Cajanus cajan Annual under-sowing 75 cm by 75 cm 33,000 (3 plants)
Dispersed systematic tree inter planting
The following tree species are recommended for dispersal tree planting practices. They can
initially be planted at closer spacing and thinned as they grow. The trees include:
a. Faidherbia albida (Msangu)—mostly recommended for this practice
b. Acacia polycanta (Mthethe)
c. Acacia galpinii (Nkunkhu)
Table 7: Canopy size and number of trees per hectare
Tree Canopy Recommended spacing Recommended density
3 meters 10 x 5m 200 trees/ ha 5 meters 10 x 10 m 100 trees/ ha
8 meters 10 x 20 m 50 trees/ ha 10 metres 20 x 20 m 25 tree/ ha
The facilitator should also explain various methods of under sowing in the traditional maize
system with 75 to 90 cm between plants in the rows and the Sasakawa planting system with the
maize planted at 25 cm in a row.
The facilitator should explain that in the traditional system farmers need to sow 3 seeds per
station on the top of the ridge, with two stations 30 cm apart between every two maize
plants/stations while in Sasakawa planting system farmers need to sow 3 seeds per station on the
top of the ridge with one station midpoint between two stations. In both cases the seeds need to
be sown at the depth of 1-5cm.If the seeds are too deep they will not germinate
3.10 Plenary – Teaching about Weeding, Year and Time of Harvesting
3.10.1 Introduction (15 minutes)
In this section the facilitator should explain why it is important to keep fields planted with
Tephrosia free of weeds. At the end of this plenary discussion the facilitator should clearly
outline the harvesting procedure and biomass usage.
3.10.2 Plenary – Teaching about Dispersed Systematic Tree Inter-planting
In this section the facilitator will explain that dispersed systematic tree inter-planting involves
planting trees with crops at wide spacing to improve soil fertility and crop yields. S/he should
also explain that if properly managed this practice sustains farm productivity over a long term
and provides other useful tree products. This practice is popular with smallholder farmers
Agroforestry
45
because it builds on traditional agroforestry practices offering a range of tree species to meet
different farmer needs.
The facilitator should also indicate the common species recommended: Leucaena and Sesbania at
0.9m X 0.9m. Gliricidia and Senna may be planted wider apart at 1.8m X 1.8m because of their
large size. Tephrosia is best spaced at 0.9m X 0.45m.
This practice involves planting trees with crops at wide spacing to improve soil fertility and crop
yields. If properly managed this practice sustains farm productivity over a long term and
provides other useful tree products. This practice is popular with smallholder farmers because it
builds on traditional agroforestry practices offering a range of tree species to meet different
farmer needs.
NOTE: It is a standard practice to start with top soil and then manure in filling the pits.
Remember to create a basin around the tree to allow collection of water. After planting,
the need for putting pressure on soil to chase away air circulating in the soil should also
be emphasized
3.11 Frequently Encountered Problems and Possible Solutions a. Seeds failing to grow after they have been sown in poly tubes: This might be due to
seeds not having been treated (nicked).
b. Tree nursery eaten by goats and other livestock: Nursery may have been established
far away from houses and probably not well fenced.
c. Shortage of water in most rivers and streams especially during Nov and Dec.
3.12 Task Checklist (15minutes) a. Why is it is important to sow the legume intercrop at the same time as maize?
b. Why is it important to create a basin around the tree?
c. Why should farmers not sow seeds too deep?
d. Why is it important to test the viability of the seed after it has been nicked?
NOTE: Experience suggests that farmers raise and out-plant good seedlings in the first year.
However, there is little effort to manage these trees during subsequent years leading to
reduced survival rate. Therefore, it is emphasized that farmers take care of their trees e.
Practical session—learning how to dig planting pits
The facilitator should ask the participants to go into their respective groups for this practical
session. For this session you will need a hoe, soil and manure. The facilitator should demonstrate
by digging a pit (60 by 60 cm). After digging the pit loosely replace the soil in the pits.
The facilitator should also tell the Lead Farmers different pit dimensions for out-planted nursery
seedlings and direct sowing (10 x 10 cm and 5 x 10 cm respectively).

Lead Farmer Extension and Training Guide
on Sustainable Agriculture
46
g. by protecting them from bush fires and livestock.
Agroforestry
47
Module 4
Conservation
Agriculture
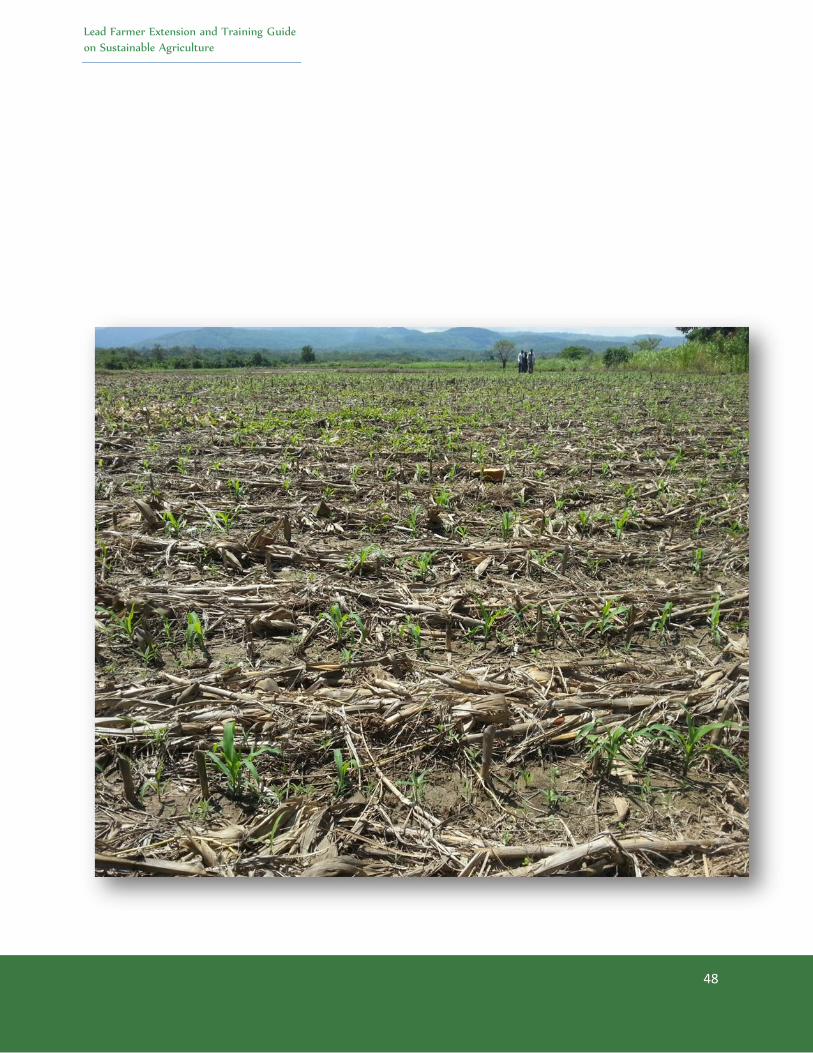
Lead Farmer Extension and Training Guide
on Sustainable Agriculture
48
Conservation Agriculture
49
4.1 About this Module The common method of land preparation among farmers in Malawi is characterized by turning
the soils every season, clearing and burning weed and crop residues and intensive hoeing or
ploughing. Most of these practices lead to lack of organic matter resulting into soil degradation.
Soil degradation is when soil deteriorates because of human activity and loses its quality and
productivity. The yields get lower every year because the soils have been worked over and over
without enough fertility replenishment.
Conservation Agriculture has proven to benefit farmers in many countries. It aims to empower
farmers to make more sustainable use of their land in ways that improve food security and their
incomes. It enables farmers to acquire the knowledge and skills to operate systems that within a
year or two save labour, promote soil water retention, enhance soil fertility and improve crop
yields.
Since both crop rotation and weed control are included in other modules, these topics will briefly
be explained in this module.
4.2 Objectives In this module you are going to learn the crucial techniques in conservation agriculture that will
include why we need conservation agriculture, principles of conservation agriculture, and steps
to follow during the transition period from conventional farming to conservation agriculture.
4.3 Expected Results By the end of this module, participants should be able to:
a. Explain why common methods of land preparation will result in soil degradation and low
soil fertility
b. Explain the benefits of no till and soil cover
c. Explain practically the principles of Conservation agriculture and steps to follow to
achieve when making the switch from Conventional Agriculture
4.4 Activities
4.4.1 Introduction (30 min)
The facilitator should introduce the module to the participants by asking different questions like
what they understand by conservation agriculture, what the difference is between conservation
agriculture and conventional farming and why we need conservation agriculture.
I. What is Conservation agriculture?
Conservation Agriculture is a farming system aimed at producing high crop yields while
reducing production costs, maintaining soil fertility and conserving water. It is a way to
achieving sustainable agriculture and improving livelihoods.
Time Frame: 5 hours 30 minutes
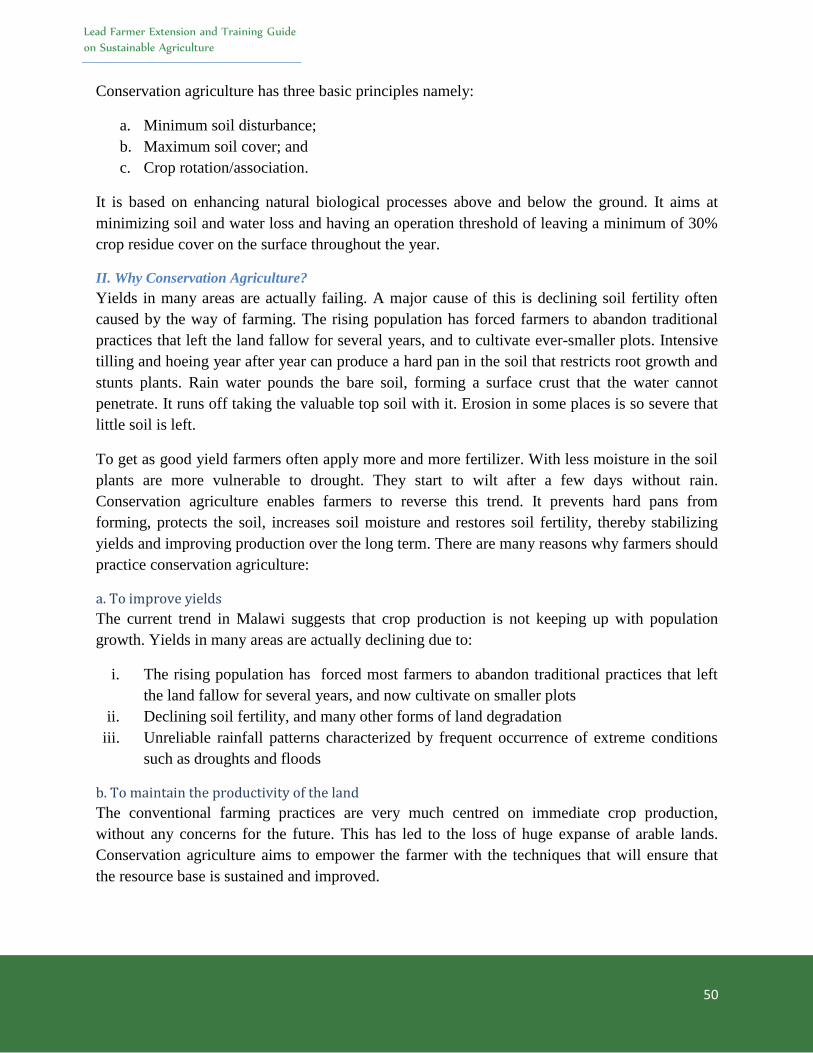
Lead Farmer Extension and Training Guide
on Sustainable Agriculture
50
Conservation agriculture has three basic principles namely:
a. Minimum soil disturbance;
b. Maximum soil cover; and
c. Crop rotation/association.
It is based on enhancing natural biological processes above and below the ground. It aims at
minimizing soil and water loss and having an operation threshold of leaving a minimum of 30%
crop residue cover on the surface throughout the year.
II. Why Conservation Agriculture?
Yields in many areas are actually failing. A major cause of this is declining soil fertility often
caused by the way of farming. The rising population has forced farmers to abandon traditional
practices that left the land fallow for several years, and to cultivate ever-smaller plots. Intensive
tilling and hoeing year after year can produce a hard pan in the soil that restricts root growth and
stunts plants. Rain water pounds the bare soil, forming a surface crust that the water cannot
penetrate. It runs off taking the valuable top soil with it. Erosion in some places is so severe that
little soil is left.
To get as good yield farmers often apply more and more fertilizer. With less moisture in the soil
plants are more vulnerable to drought. They start to wilt after a few days without rain.
Conservation agriculture enables farmers to reverse this trend. It prevents hard pans from
forming, protects the soil, increases soil moisture and restores soil fertility, thereby stabilizing
yields and improving production over the long term. There are many reasons why farmers should
practice conservation agriculture:
a. To improve yields
The current trend in Malawi suggests that crop production is not keeping up with population
growth. Yields in many areas are actually declining due to:
i. The rising population has forced most farmers to abandon traditional practices that left
the land fallow for several years, and now cultivate on smaller plots
ii. Declining soil fertility, and many other forms of land degradation
iii. Unreliable rainfall patterns characterized by frequent occurrence of extreme conditions
such as droughts and floods
b. To maintain the productivity of the land
The conventional farming practices are very much centred on immediate crop production,
without any concerns for the future. This has led to the loss of huge expanse of arable lands.
Conservation agriculture aims to empower the farmer with the techniques that will ensure that
the resource base is sustained and improved.
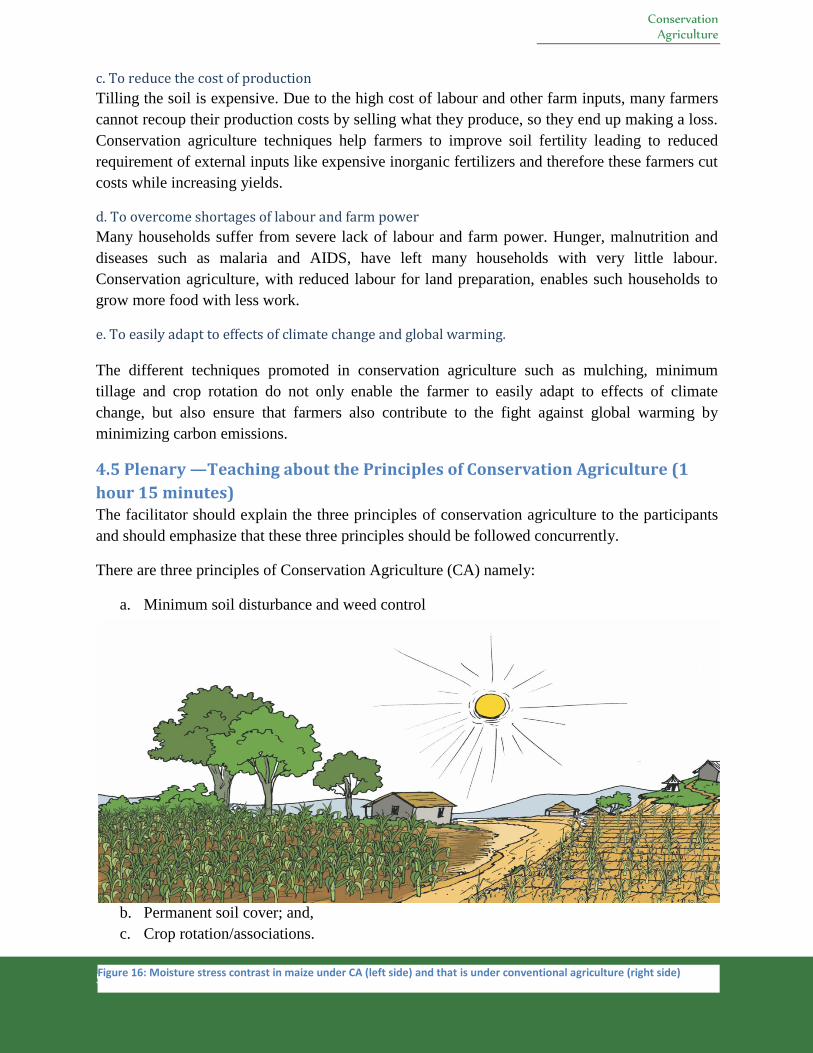
Conservation Agriculture
51
c. To reduce the cost of production
Tilling the soil is expensive. Due to the high cost of labour and other farm inputs, many farmers
cannot recoup their production costs by selling what they produce, so they end up making a loss.
Conservation agriculture techniques help farmers to improve soil fertility leading to reduced
requirement of external inputs like expensive inorganic fertilizers and therefore these farmers cut
costs while increasing yields.
d. To overcome shortages of labour and farm power
Many households suffer from severe lack of labour and farm power. Hunger, malnutrition and
diseases such as malaria and AIDS, have left many households with very little labour.
Conservation agriculture, with reduced labour for land preparation, enables such households to
grow more food with less work.
e. To easily adapt to effects of climate change and global warming.
The different techniques promoted in conservation agriculture such as mulching, minimum
tillage and crop rotation do not only enable the farmer to easily adapt to effects of climate
change, but also ensure that farmers also contribute to the fight against global warming by
minimizing carbon emissions.
4.5 Plenary —Teaching about the Principles of Conservation Agriculture (1
hour 15 minutes) The facilitator should explain the three principles of conservation agriculture to the participants
and should emphasize that these three principles should be followed concurrently.
There are three principles of Conservation Agriculture (CA) namely:
a. Minimum soil disturbance and weed control
b. Permanent soil cover; and,
c. Crop rotation/associations.
Figure 16: Moisture stress contrast in maize under CA (left side) and that is under conventional agriculture (right side)
Lead Farmer Extension and Training Guide
on Sustainable Agriculture
52
4.5.1 Minimum Soil Disturbance
CA involves minimum soil disturbance from practices such as tillage, ridging, weeding, and
banking with hand-hoes. Although soil disturbance has been associated with good performance
of crops in the short term it has negatively been associated with diminishing of soil fertility in the
long term. The high performance in the short term is the result of mineralization as soils are
turned to and forth. Further to the above, the process of chemical soil disturbance deteriorates
soil “life” through formation of crusts and compaction eventually leading to soil erosion
resulting from failure of water to infiltrate the soil.
Eroded soil pollutes rivers and is deposited as sediments behind dams. Conservation agriculture
avoids these problems; it reduces the amount of tillage and can eliminate it altogether if seeds are
planted directly into the soil.
Table 8: Effects from synergies between minimum soil disturbance and other practices related to Conservation Agriculture
Minimum Disturbance and Soil Cover
Minimum Disturbance and Rotation Minimum Disturbance and Organic Matter
Protects soil from erosion, Nutrient balance Stabilizes/holds soil particles together
Regulates soil temperature and evaporation
Stores nutrients Source of carbon and energy for soil microbes
Reduces soil compaction Improves soil aeration Source of organic matter Improved water infiltration Control weeds Nitrogen fixation (e.g. pigeon peas)
Physical root effects Disease / pest control
I. The options for minimum soil disturbance
There are various technologies that in combination, would allow minimum soil disturbance. The
choice of the technology may be based on: soil resistance to erosion (erodibility), land
management and topography. Hereunder two main technologies are explained; a) ridges and b)
pits.
II. Use of Old Planting Ridges
In the first year crops are planted on old ridges, i.e. ridges are not split and reformed in furrows.
Within two years the old ridges effectively disappear.
NOTE: It is recommended that since these ridges will be permanent, they must be made right in
the first year and on contour. Ensure that the hard pan is been broken in the process.
Construction of ridges has to start immediately after harvest. This spreads the labour and allows
the farmer to plant with first rains.
Make the ridges following established marker ridges. The ridge spacing will depend on the crops
to be grown and the desired plant populations. In addition to using old planting ridges, the other
options are: use of rippers and chaka hoes.
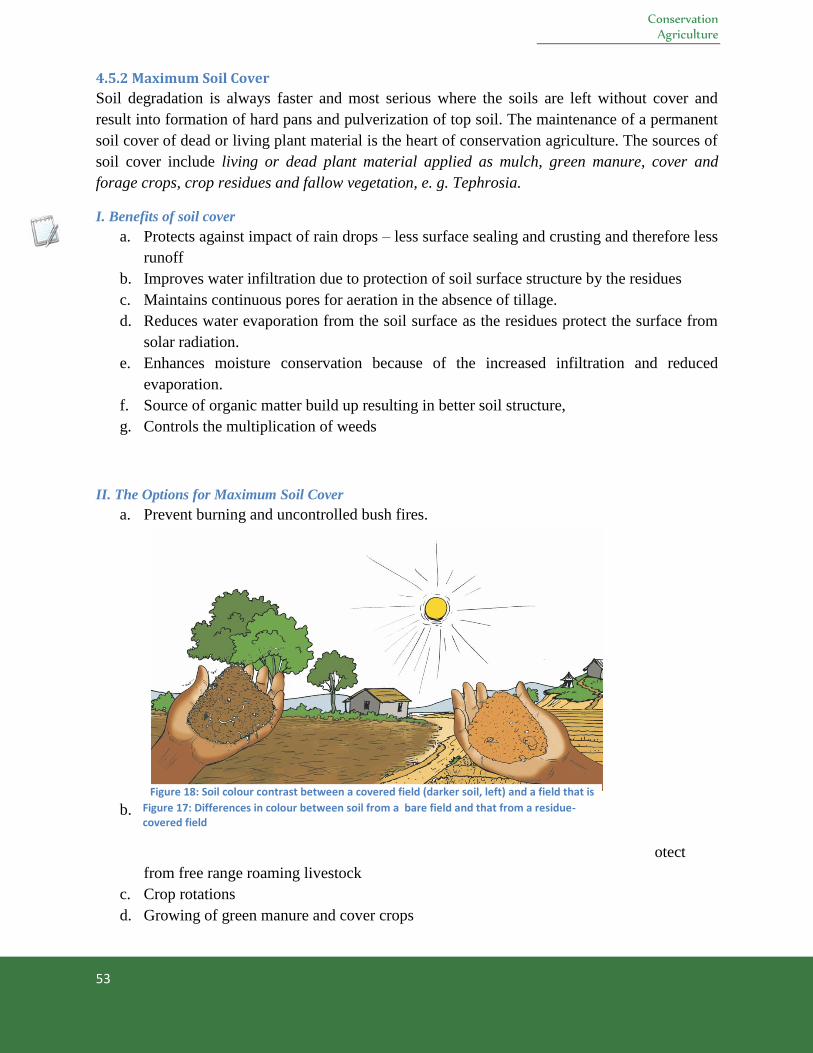
Conservation Agriculture
53
4.5.2 Maximum Soil Cover
Soil degradation is always faster and most serious where the soils are left without cover and
result into formation of hard pans and pulverization of top soil. The maintenance of a permanent
soil cover of dead or living plant material is the heart of conservation agriculture. The sources of
soil cover include living or dead plant material applied as mulch, green manure, cover and
forage crops, crop residues and fallow vegetation, e. g. Tephrosia.
I. Benefits of soil cover
a. Protects against impact of rain drops – less surface sealing and crusting and therefore less
runoff
b. Improves water infiltration due to protection of soil surface structure by the residues
c. Maintains continuous pores for aeration in the absence of tillage.
d. Reduces water evaporation from the soil surface as the residues protect the surface from
solar radiation.
e. Enhances moisture conservation because of the increased infiltration and reduced
evaporation.
f. Source of organic matter build up resulting in better soil structure,
g. Controls the multiplication of weeds
II. The Options for Maximum Soil Cover
a. Prevent burning and uncontrolled bush fires.
b. P
r
otect
from free range roaming livestock
c. Crop rotations
d. Growing of green manure and cover crops
Figure 18: Soil colour contrast between a covered field (darker soil, left) and a field that is left bare (lighter soil, right) Figure 17: Differences in colour between soil from a bare field and that from a residue-
covered field
Lead Farmer Extension and Training Guide
on Sustainable Agriculture
54
NOTE: A minimum of 30% soil cover has been widely recommended.
4.5.3 Crop Rotation/Associations
Crop rotation is the growing of different crops in a sequence (one season after another) in one
field to avoid mono-cropping. A good rotation includes a cash crop, a staple food crop, a legume
and an improved fallow. Crops in a rotation should be suited to the area and manageable by the
farmer. Crop rotation and associations enhance nutrient uptake and replenishment. It is one of the
core principles of conservation agriculture. (Refer to Module on Intercropping and Crop Rotation
for details about crop rotation).
When planning a crop rotation in conservation agriculture always adhere to the following:
a. Alternate a grain crop with a legume or oil crop; and,
b. Alternate a crop that produces a lot of residues with one that produces fewer and
determine whether the crop is commercial and cost effective.
Independent of tillage systems, rotation of crops is always a good practice. In the absence of
tillage, it is even more important to break pest cycles. Crop rotation can either be in space (e.g. a
four year rotational cycle of alternating a legume, grain, and a grass crop) or through crop
mixtures such as under-sowing and Inter-planting.
4.6 Plenary—Teaching about Transition from Conventional Farming to
Conservation Agriculture (1 hour 30 minutes) The facilitator should explain to the participants where Conservation Agriculture can be applied
and steps to be followed when one is moving from Conventional Farming to Conservation
Agriculture
4.7 Where to Apply Conservation Agriculture Conservation Agriculture can be applied under almost all soil-climate-crop combinations, but is
perhaps most effective in increasing and stabilizing yields where low or uneven rainfall limits
crop production. It is also suitable for areas with highly degraded unproductive soils as a
mechanism for recovering the soils.
4.8 Crops that can be grown under CA Crops like maize, wheat, soya beans, cotton, and sunflower can be grown successfully under CA.
Even root crops including potatoes and cassava can be grown although harvesting of these crops
causes considerable soil movement.
4.9 Requirements to start CA
4.9.1 Information
It is advisable to get information about the system from experienced farmers and technicians and
stay informed. The farmer should start with a small area of land (about 10% of the property) and
first learn how to manage the system.
Conservation Agriculture
55
4.9.2 Preparation
a. Prepare the field beforehand (get rid of compaction, perennial weeds and acidity
problems).
b. Obtain the right equipment for seeding (and for weed control).
c. Produce sufficient ground cover
4.9.3 Implementation
a. It is important to achieve good weed control;
b. Start with a good crop rotation to provide nutrients, additional residues and weed control;
c. Prevent weeds from setting seed.
4.10 Frequently Encountered Problems and Possible Solutions
4.10.1 Mind Set
Many farmers, extension agents and researchers find it difficult to understand that crop
production is possible without ridging/breaking the soil. LFs need to implement SA technologies
so that people learn from the results.
4.10.2 Residue retention
CA, generally, does not work well without residues as many benefits come from surface mulch.
However, most smallholder farmers manage well mixed crop-livestock systems and depend on
the residues for fodder during dry season. Therefore, often, there is a conflict concerning use of
residues. To reduce this conflict, CA needs to be started on a small part of the farm with
adequate supply of residue. Once the farmer can manage the system well and yields have
increased, then s/he can use part of the residues for fodder while at the same time leaving enough
on the land as ground cover on another small plot with CA.
4.10.3 Weed Control
Weed infestation can be a problem under CA. In the first seasons of CA, much attention needs
to be paid to weed control as this is, traditionally, the principle reason for tillage. Weed control in
CA can be effectively managed through use of cover crops, maintaining crop residue on the
ground and integrated weed management. Weeds should not set seed, so year-round weed
control is very important. If controlled effectively, the weed populations decrease after the first
two or three seasons.
Practical session—learning how to Pit Making and Laying of Crop
Residues (3 hours 35 minutes)
The facilitator should sub-divide the participants into smaller groups of about ten participants
each and should go out to a field where the participants will have hands-on practice on pit
making and laying of crop residues in a conservation agriculture field.
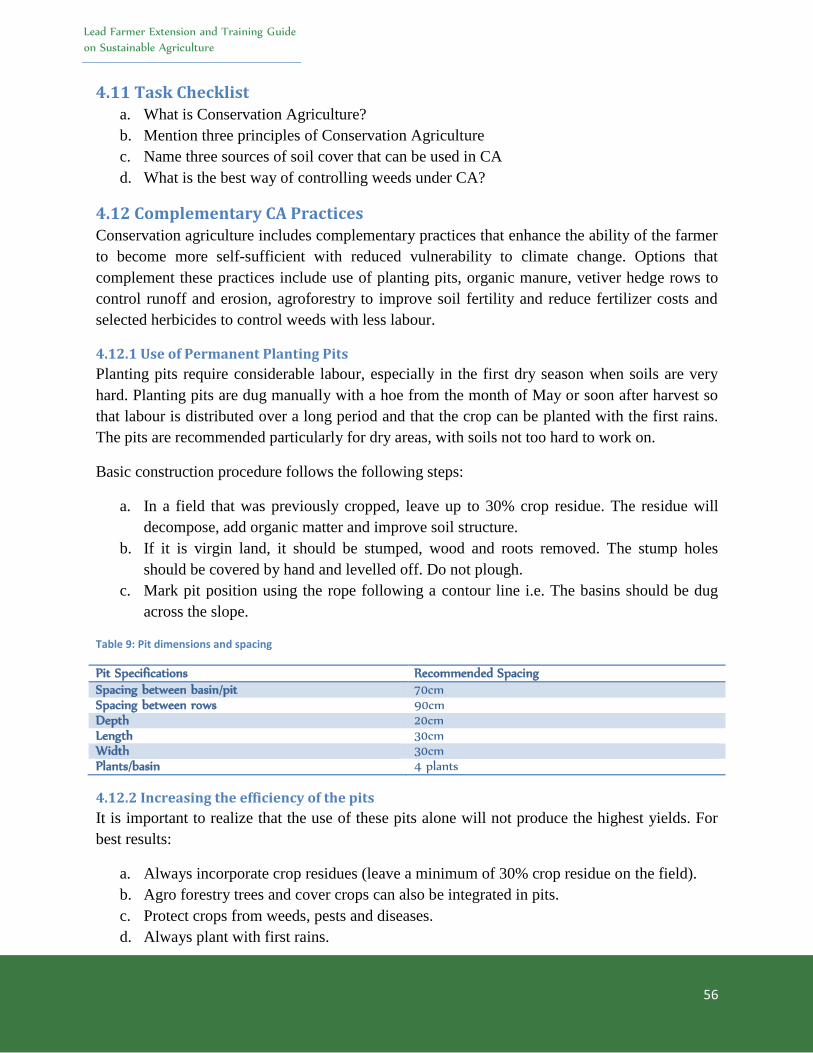
Lead Farmer Extension and Training Guide
on Sustainable Agriculture
56
4.11 Task Checklist a. What is Conservation Agriculture?
b. Mention three principles of Conservation Agriculture
c. Name three sources of soil cover that can be used in CA
d. What is the best way of controlling weeds under CA?
4.12 Complementary CA Practices Conservation agriculture includes complementary practices that enhance the ability of the farmer
to become more self-sufficient with reduced vulnerability to climate change. Options that
complement these practices include use of planting pits, organic manure, vetiver hedge rows to
control runoff and erosion, agroforestry to improve soil fertility and reduce fertilizer costs and
selected herbicides to control weeds with less labour.
4.12.1 Use of Permanent Planting Pits
Planting pits require considerable labour, especially in the first dry season when soils are very
hard. Planting pits are dug manually with a hoe from the month of May or soon after harvest so
that labour is distributed over a long period and that the crop can be planted with the first rains.
The pits are recommended particularly for dry areas, with soils not too hard to work on.
Basic construction procedure follows the following steps:
a. In a field that was previously cropped, leave up to 30% crop residue. The residue will
decompose, add organic matter and improve soil structure.
b. If it is virgin land, it should be stumped, wood and roots removed. The stump holes
should be covered by hand and levelled off. Do not plough.
c. Mark pit position using the rope following a contour line i.e. The basins should be dug
across the slope.
Table 9: Pit dimensions and spacing
Pit Specifications Recommended Spacing Spacing between basin/pit 70cm Spacing between rows 90cm Depth 20cm Length 30cm Width 30cm Plants/basin 4 plants
4.12.2 Increasing the efficiency of the pits
It is important to realize that the use of these pits alone will not produce the highest yields. For
best results:
a. Always incorporate crop residues (leave a minimum of 30% crop residue on the field).
b. Agro forestry trees and cover crops can also be integrated in pits.
c. Protect crops from weeds, pests and diseases.
d. Always plant with first rains.
Conservation Agriculture
57
e. Grow crops in rotation, at least 30% of cropped land should be planted to legumes.
f. Apply fertilizers and manure.
It is recommended to apply two shovels of manure in a basin with the dimension specified in the
table above. If basal dressing fertilizer is available, it can be applied at the same time. When
manure has been applied, it should be covered with soil. A shallow depression should still
remain on top. If manure is used for top dressing use liquid manure at the rate of 50ml per maize
plant or by using a feeding cup.
4.12.3 Weed Control
The pits have to be kept free of weeds at all times. Remove the weed as soon as they appear and
just before harvesting to reduce the amount of weeds in the next season (Refer to Weed Control
Module).
NOTE: When using the planting pits remember that the pits are permanent and can be used for
three successive seasons so it is important to take good care of them.
4.12.4 Harvesting
It is advisable to harvest the crop when the field is free of weeds as this reduces weed infestation
in the next season. Remove the main crop from the field. Cut the stems up to a height of
30cm. The stem should be left to rot together with the roots. Remove the crop and cut plants at
base. Leave stems and leaves on the soil. The roots should not be uprooted but should be left to
decompose within the pit.
It is advisable to fill planting pits with soil almost to the very top to avoid bogging the plants
during watering.
Make planting pits during the dry season as hard pans are best dealt with at this time.
4.12.5 Management of crop residues During the Dry Season
Crop residues must be spread along the ridges. If there is need for livestock fodder, take away
70% for the livestock and other uses. The residues must be protected from fire at all times.
4.12.6 Agroforestry
Agroforestry practices greatly complement CA by enhancing crop yields and soil fertility,
suppressing weeds, pests and diseases; conserving soil and water and providing for other uses
such as fuel wood and fodder from the same piece of land. Soil fertility improvement trees can
be planted in the ridges. The most commonly used tree species include Faidherbia albida,
Gliricidia, Senna siamea, Tephrosia vogelii. These trees can be planted under relay cropping or
mixed/intercropping.
4.12.7 Planting in the Following Season
Planting in the next season can use the same planting stations.
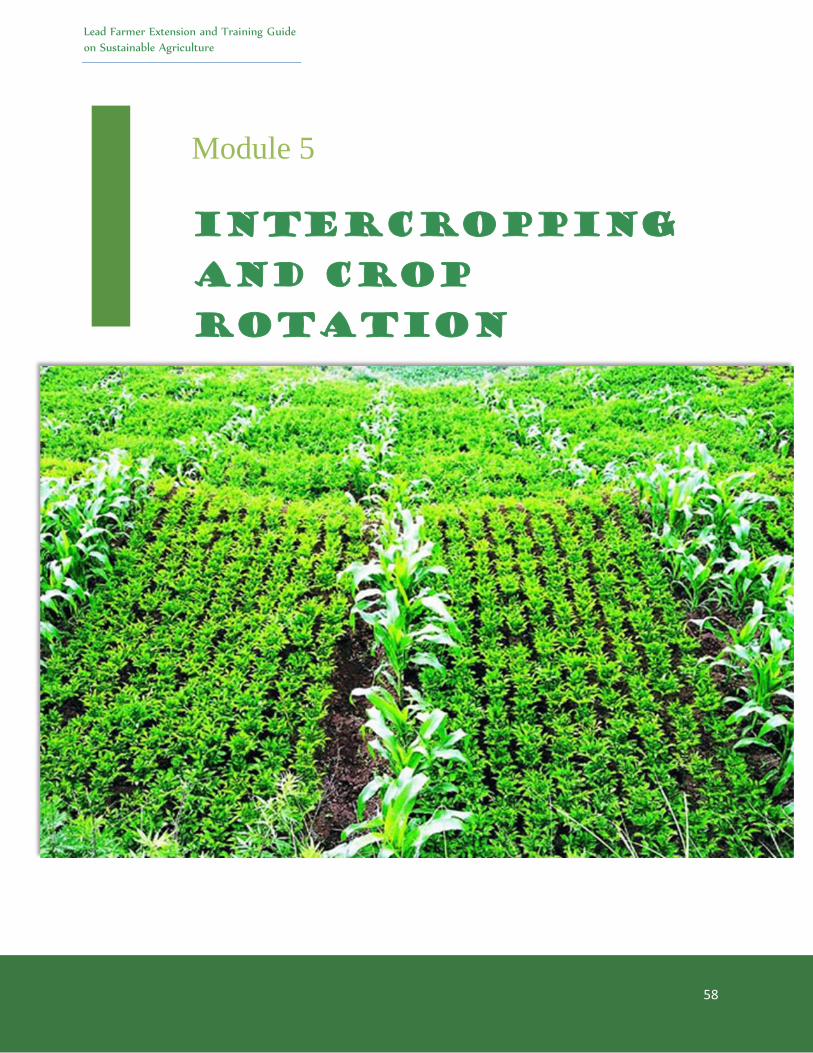
Lead Farmer Extension and Training Guide
on Sustainable Agriculture
58
Module 5
Intercropping
and Crop
Rotation
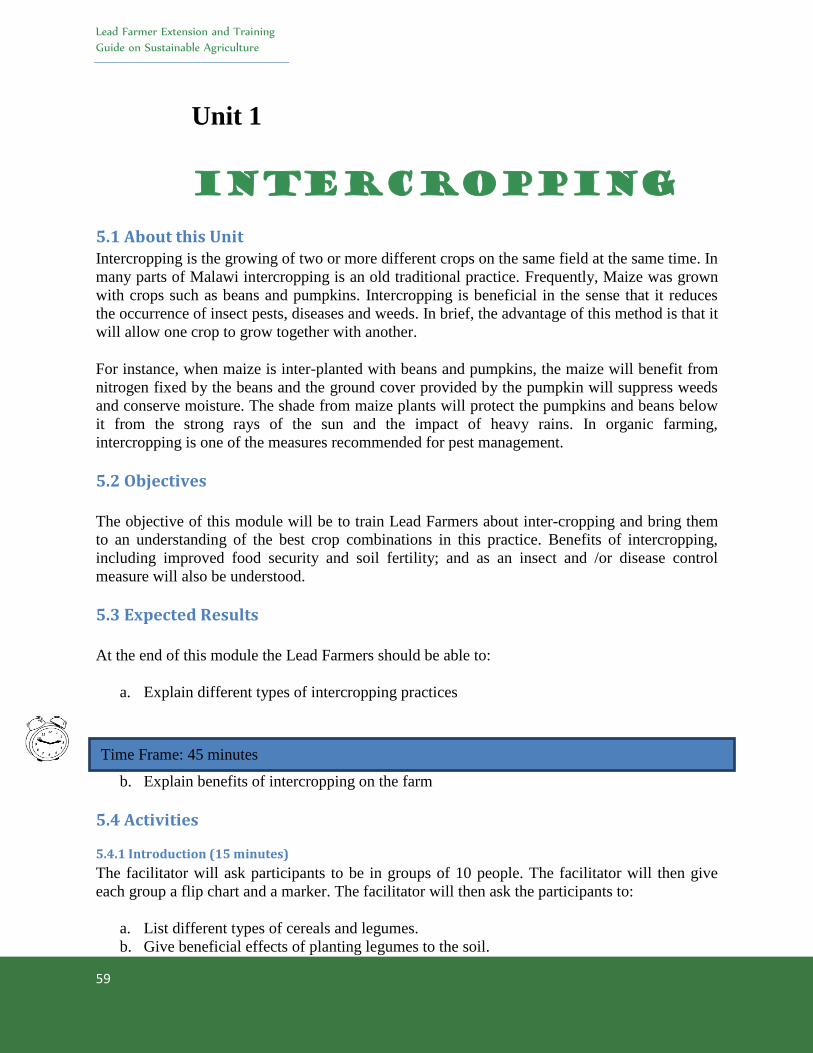
Lead Farmer Extension and Training
Guide on Sustainable Agriculture
59
Unit 1
Intercropping
5.1 About this Unit Intercropping is the growing of two or more different crops on the same field at the same time. In
many parts of Malawi intercropping is an old traditional practice. Frequently, Maize was grown
with crops such as beans and pumpkins. Intercropping is beneficial in the sense that it reduces
the occurrence of insect pests, diseases and weeds. In brief, the advantage of this method is that it
will allow one crop to grow together with another.
For instance, when maize is inter-planted with beans and pumpkins, the maize will benefit from
nitrogen fixed by the beans and the ground cover provided by the pumpkin will suppress weeds
and conserve moisture. The shade from maize plants will protect the pumpkins and beans below
it from the strong rays of the sun and the impact of heavy rains. In organic farming,
intercropping is one of the measures recommended for pest management.
5.2 Objectives
The objective of this module will be to train Lead Farmers about inter-cropping and bring them
to an understanding of the best crop combinations in this practice. Benefits of intercropping,
including improved food security and soil fertility; and as an insect and /or disease control
measure will also be understood.
5.3 Expected Results
At the end of this module the Lead Farmers should be able to:
a. Explain different types of intercropping practices
b. Explain benefits of intercropping on the farm
5.4 Activities
5.4.1 Introduction (15 minutes)
The facilitator will ask participants to be in groups of 10 people. The facilitator will then give
each group a flip chart and a marker. The facilitator will then ask the participants to:
a. List different types of cereals and legumes.
b. Give beneficial effects of planting legumes to the soil.
Time Frame: 45 minutes
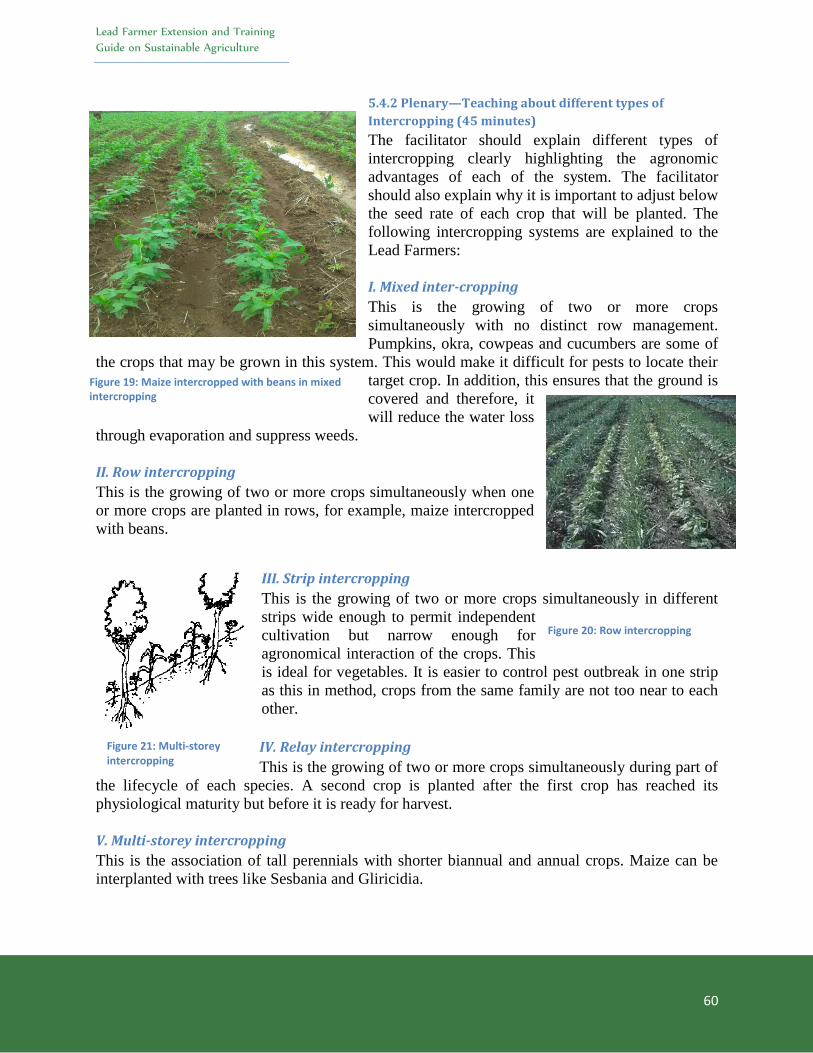
Lead Farmer Extension and Training
Guide on Sustainable Agriculture
60
5.4.2 Plenary—Teaching about different types of
Intercropping (45 minutes)
The facilitator should explain different types of
intercropping clearly highlighting the agronomic
advantages of each of the system. The facilitator
should also explain why it is important to adjust below
the seed rate of each crop that will be planted. The
following intercropping systems are explained to the
Lead Farmers:
I. Mixed inter-cropping
This is the growing of two or more crops
simultaneously with no distinct row management.
Pumpkins, okra, cowpeas and cucumbers are some of
the crops that may be grown in this system. This would make it difficult for pests to locate their
target crop. In addition, this ensures that the ground is
covered and therefore, it
will reduce the water loss
through evaporation and suppress weeds.
II. Row intercropping
This is the growing of two or more crops simultaneously when one
or more crops are planted in rows, for example, maize intercropped
with beans.
III. Strip intercropping
This is the growing of two or more crops simultaneously in different
strips wide enough to permit independent
cultivation but narrow enough for
agronomical interaction of the crops. This
is ideal for vegetables. It is easier to control pest outbreak in one strip
as this in method, crops from the same family are not too near to each
other.
IV. Relay intercropping
This is the growing of two or more crops simultaneously during part of
the lifecycle of each species. A second crop is planted after the first crop has reached its
physiological maturity but before it is ready for harvest.
V. Multi-storey intercropping
This is the association of tall perennials with shorter biannual and annual crops. Maize can be
interplanted with trees like Sesbania and Gliricidia.
Figure 20: Row intercropping
Figure 21: Multi-storey intercropping
Figure 19: Maize intercropped with beans in mixed intercropping

Intercropping
61
VI. Sequential intercropping
This is also an aspect of multiple cropping involving the growing of two more crops in sequence
on the same field in the same year. The succeeding crop is planted after the preceding crop has
been harvested. There is no intercrop competition and farmers have to manage only one crop at a
time.
5.5 Group work—Teaching about Different Crop Combinations Farmers can
Intercrop (30 minutes) The facilitator should divide the participants into groups and give each group flip charts and
markers. The groups will then discuss and answer in writing the following questions:
a. What crops can best be intercropped with Cereals: (maize, sorghum and millet)?
b. What crops can best be intercropped with legumes (ground nuts and beans)?
c. What crops can best be intercropped with cash crops (cotton)?
Lead Farmer Extension and Training
Guide on Sustainable Agriculture
62
Unit 2
Crop Rotation
5.6 About this Unit Crop rotation is the practice of growing a series of dissimilar types of crops in the same field in
sequential seasons.
Crop rotation gives various benefits to the soil. A well-known effect of crop rotation is the
replenishment of nitrogen through the use of green manure in sequence with cereals and other
crops. Crop rotation also benefits the farmer in other ways; it mitigates the build-up of diseases
and pests that often occurs when one species is continuously cropped; it can improve soil
structure; and increase soil fertility by alternating deep-rooted and shallow-rooted plants and
altering crops with different nutrient requirement - for example, maize followed by groundnuts.
5.7 Objectives The objective of this module will be to enable the trainer to:
a. Train Lead Farmers in crop rotation and bring them to understanding of best crop
combinations in this practice,
b. Explain the shortcomings and risks of growing the same crop in the same field for many
years; And,
c. State the benefits of crop rotation and what crops to follow each other in a rotation are
understood.
5.8 Expected Results At the end of this module the Lead Farmers should be able to:
Explain the importance of practicing crop rotation in their fields
Choose crops that can follow each other when practicing crop rotation.
5.9 Activities
5.9.1 Plenary—Teaching about principles of crop rotation and choice of crops (30 minutes)
After explaining the shortcomings and risks associated with mono-cropping the facilitator should
explain the principle of crop rotation. Dissimilar crops need to follow each other. For instance a
crop that depletes the soil of one kind of nutrient is followed during the next growing season by a
Time Frame: 45 minutes
Lead Farmer Extension and Training
Guide on Sustainable Agriculture
63
crop that returns that nutrient to the soil. Similarly deep-rooted crops should be followed by
shallow-rooted crops in the next season.
The facilitator should also explain to Lead Farmers that the choice and sequence of rotation
crops depends on the nature of the soil, the climate, and precipitation which together determine
the type of plants that may be cultivated. The facilitator should also explain that other important
aspects of farming such as crop marketing and economic variables must also be considered when
deciding crop rotations so that farmers get the best of the rotation.
5.9.2 Group-work—Benefits of Crop Rotation (30 minutes)
The facilitator should divide the participants into groups and give each group flip charts and
markers. The participants will then answer the following questions in their groups and write
them down on the flip chart:
a. What are some of the advantages of practicing crop rotation in sustainable agriculture?
b. Why should farmers not plant crops belonging to same family in the subsequent years in
crop rotation?
5.9.3 Plenary – Teaching about how crop rotation helps in control of pests and soil erosion
(30 minutes)
The facilitator will explain to the Lead Farmers why plants within the same taxonomic family
tend to have similar pests and pathogens agronomically. The facilitator will also explain why by
regularly changing the planting location, the pest cycles can be broken or limited.
To help Lead Farmers understand this concept the facilitator needs to give an example of how
the root-knot nematode can be controlled by growing a crop that is not its host in the subsequent
year. This in turn makes it possible to grow a susceptible crop the following season without
needing soil fumigation as is the case in tobacco nurseries, or other external control practices.
The facilitator should also explain how careful choice of crops to be rotated helps reduce soil
erosion by reducing raindrop impact and sediment detachment.
A four-crop rotation will be planned by dividing the garden into 4 subplots.
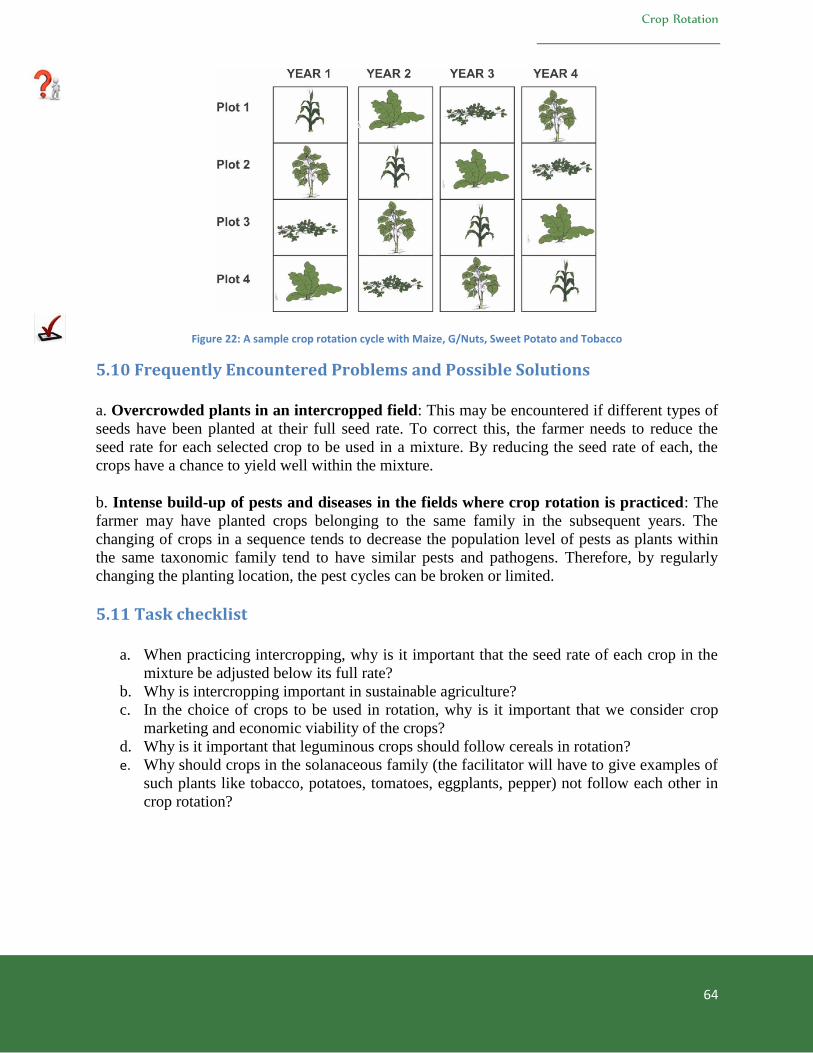
Crop Rotation
64
Figure 22: A sample crop rotation cycle with Maize, G/Nuts, Sweet Potato and Tobacco
5.10 Frequently Encountered Problems and Possible Solutions
a. Overcrowded plants in an intercropped field: This may be encountered if different types of
seeds have been planted at their full seed rate. To correct this, the farmer needs to reduce the
seed rate for each selected crop to be used in a mixture. By reducing the seed rate of each, the
crops have a chance to yield well within the mixture.
b. Intense build-up of pests and diseases in the fields where crop rotation is practiced: The
farmer may have planted crops belonging to the same family in the subsequent years. The
changing of crops in a sequence tends to decrease the population level of pests as plants within
the same taxonomic family tend to have similar pests and pathogens. Therefore, by regularly
changing the planting location, the pest cycles can be broken or limited.
5.11 Task checklist
a. When practicing intercropping, why is it important that the seed rate of each crop in the
mixture be adjusted below its full rate?
b. Why is intercropping important in sustainable agriculture?
c. In the choice of crops to be used in rotation, why is it important that we consider crop
marketing and economic viability of the crops?
d. Why is it important that leguminous crops should follow cereals in rotation?
e. Why should crops in the solanaceous family (the facilitator will have to give examples of
such plants like tobacco, potatoes, tomatoes, eggplants, pepper) not follow each other in
crop rotation?
Lead Farmer Extension and Training
Guide on Sustainable Agriculture
65
Module 6
Integrated
Weed
Management
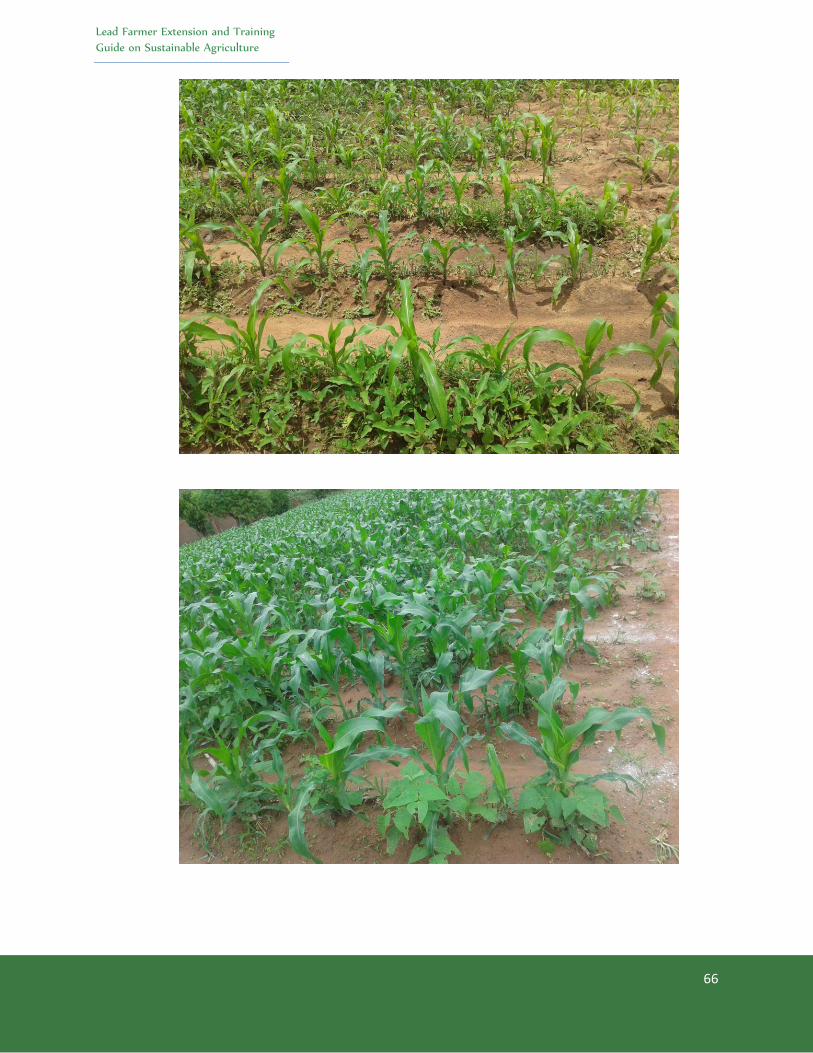
Lead Farmer Extension and Training
Guide on Sustainable Agriculture
66
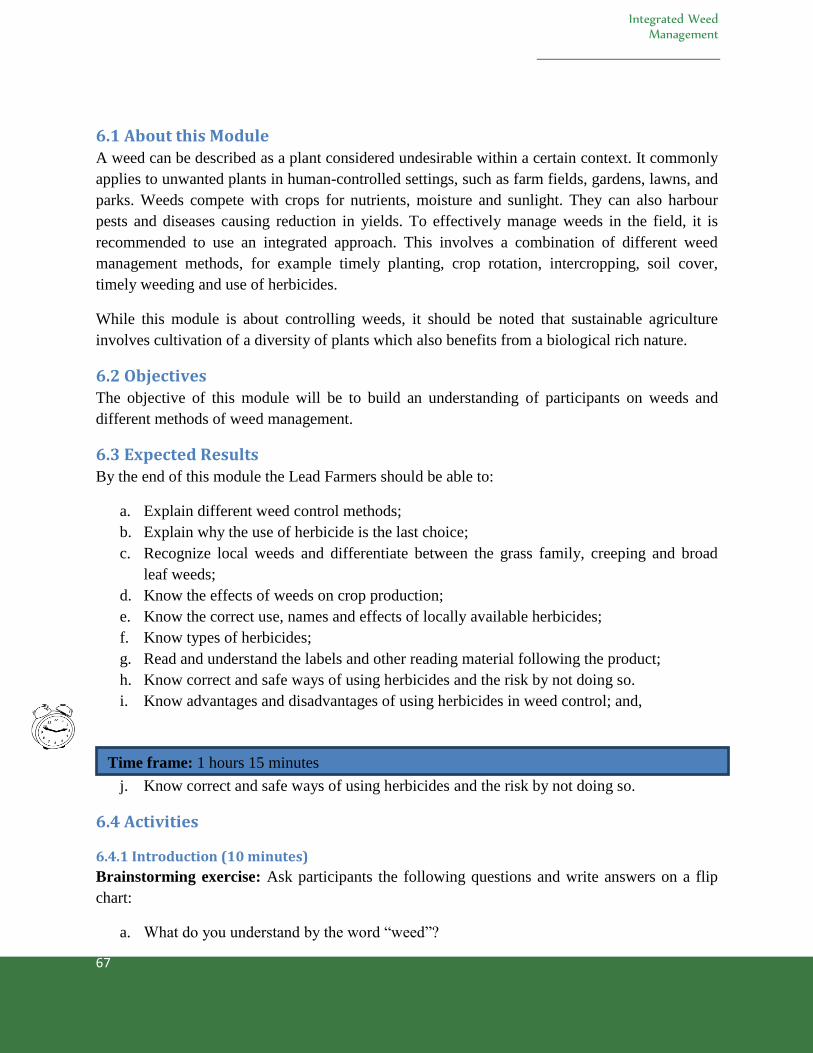
Integrated Weed Management
67
6.1 About this Module
A weed can be described as a plant considered undesirable within a certain context. It commonly
applies to unwanted plants in human-controlled settings, such as farm fields, gardens, lawns, and
parks. Weeds compete with crops for nutrients, moisture and sunlight. They can also harbour
pests and diseases causing reduction in yields. To effectively manage weeds in the field, it is
recommended to use an integrated approach. This involves a combination of different weed
management methods, for example timely planting, crop rotation, intercropping, soil cover,
timely weeding and use of herbicides.
While this module is about controlling weeds, it should be noted that sustainable agriculture
involves cultivation of a diversity of plants which also benefits from a biological rich nature.
6.2 Objectives The objective of this module will be to build an understanding of participants on weeds and
different methods of weed management.
6.3 Expected Results By the end of this module the Lead Farmers should be able to:
a. Explain different weed control methods;
b. Explain why the use of herbicide is the last choice;
c. Recognize local weeds and differentiate between the grass family, creeping and broad
leaf weeds;
d. Know the effects of weeds on crop production;
e. Know the correct use, names and effects of locally available herbicides;
f. Know types of herbicides;
g. Read and understand the labels and other reading material following the product;
h. Know correct and safe ways of using herbicides and the risk by not doing so.
i. Know advantages and disadvantages of using herbicides in weed control; and,
j. Know correct and safe ways of using herbicides and the risk by not doing so.
6.4 Activities
6.4.1 Introduction (10 minutes)
Brainstorming exercise: Ask participants the following questions and write answers on a flip
chart:
a. What do you understand by the word “weed”?
Time frame: 1 hours 15 minutes
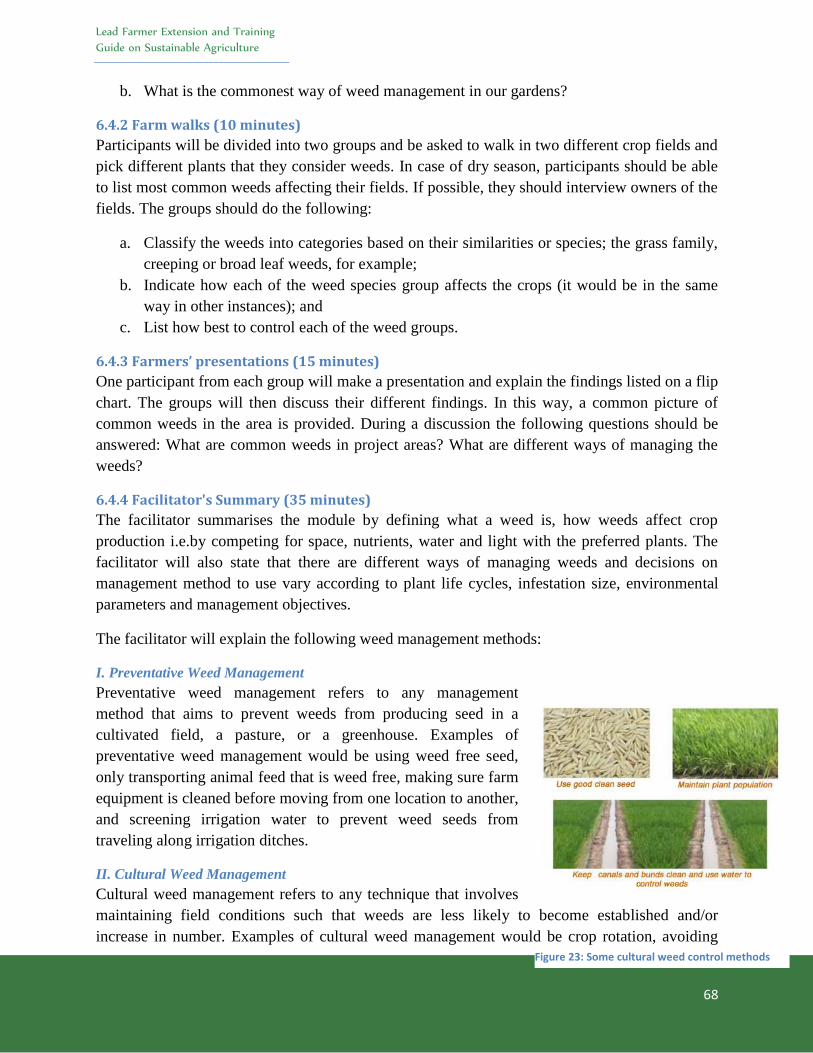
Lead Farmer Extension and Training
Guide on Sustainable Agriculture
68
b. What is the commonest way of weed management in our gardens?
6.4.2 Farm walks (10 minutes)
Participants will be divided into two groups and be asked to walk in two different crop fields and
pick different plants that they consider weeds. In case of dry season, participants should be able
to list most common weeds affecting their fields. If possible, they should interview owners of the
fields. The groups should do the following:
a. Classify the weeds into categories based on their similarities or species; the grass family,
creeping or broad leaf weeds, for example;
b. Indicate how each of the weed species group affects the crops (it would be in the same
way in other instances); and
c. List how best to control each of the weed groups.
6.4.3 Farmers’ presentations (15 minutes)
One participant from each group will make a presentation and explain the findings listed on a flip
chart. The groups will then discuss their different findings. In this way, a common picture of
common weeds in the area is provided. During a discussion the following questions should be
answered: What are common weeds in project areas? What are different ways of managing the
weeds?
6.4.4 Facilitator's Summary (35 minutes)
The facilitator summarises the module by defining what a weed is, how weeds affect crop
production i.e.by competing for space, nutrients, water and light with the preferred plants. The
facilitator will also state that there are different ways of managing weeds and decisions on
management method to use vary according to plant life cycles, infestation size, environmental
parameters and management objectives.
The facilitator will explain the following weed management methods:
I. Preventative Weed Management
Preventative weed management refers to any management
method that aims to prevent weeds from producing seed in a
cultivated field, a pasture, or a greenhouse. Examples of
preventative weed management would be using weed free seed,
only transporting animal feed that is weed free, making sure farm
equipment is cleaned before moving from one location to another,
and screening irrigation water to prevent weed seeds from
traveling along irrigation ditches.
II. Cultural Weed Management
Cultural weed management refers to any technique that involves
maintaining field conditions such that weeds are less likely to become established and/or
increase in number. Examples of cultural weed management would be crop rotation, avoiding
Figure 23: Some cultural weed control methods
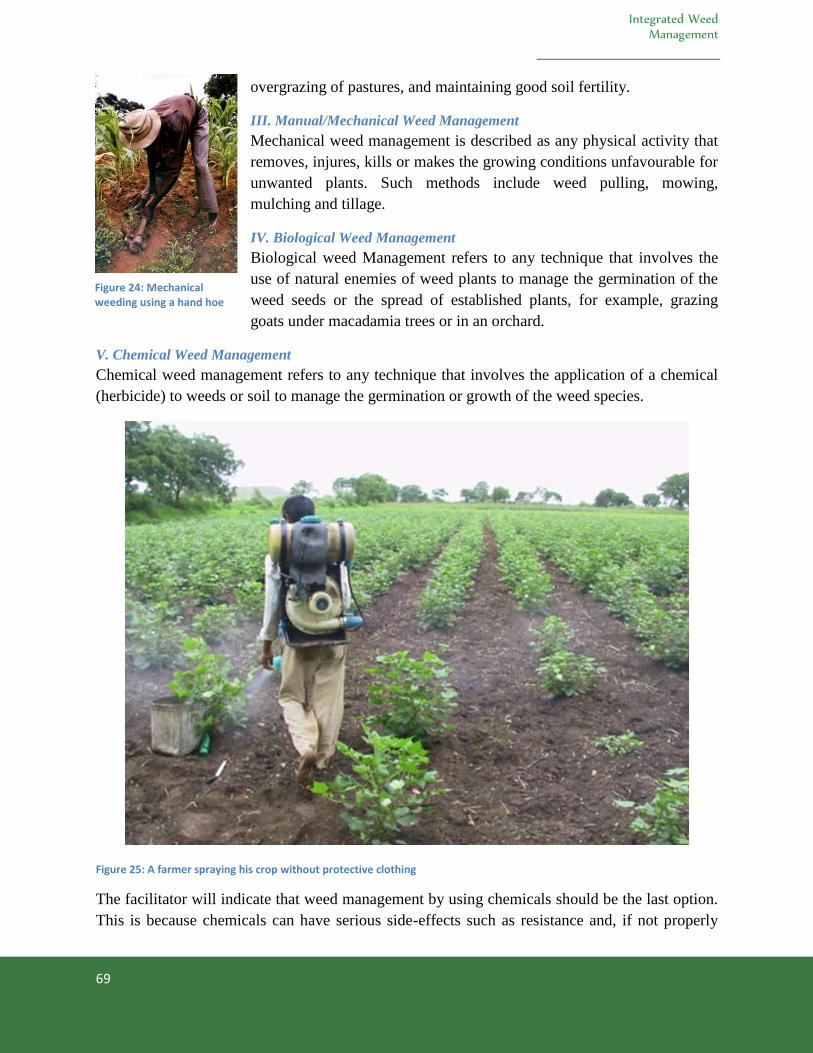
Integrated Weed Management
69
overgrazing of pastures, and maintaining good soil fertility.
III. Manual/Mechanical Weed Management
Mechanical weed management is described as any physical activity that
removes, injures, kills or makes the growing conditions unfavourable for
unwanted plants. Such methods include weed pulling, mowing,
mulching and tillage.
IV. Biological Weed Management
Biological weed Management refers to any technique that involves the
use of natural enemies of weed plants to manage the germination of the
weed seeds or the spread of established plants, for example, grazing
goats under macadamia trees or in an orchard.
V. Chemical Weed Management
Chemical weed management refers to any technique that involves the application of a chemical
(herbicide) to weeds or soil to manage the germination or growth of the weed species.
Figure 25: A farmer spraying his crop without protective clothing
The facilitator will indicate that weed management by using chemicals should be the last option.
This is because chemicals can have serious side-effects such as resistance and, if not properly
Figure 24: Mechanical weeding using a hand hoe

Lead Farmer Extension and Training
Guide on Sustainable Agriculture
70
used they can be dangerous to humans and the environment. The facilitator will indicate that it is,
therefore, important that use of herbicides is discussed a little further.
6.5 Plenary: Teaching about Herbicides The facilitator will ask the following questions at the beginning of this session:
a. Who has ever used herbicides?
b. Can you explain how you have used herbicides in your gardens?
c. What are the advantages and disadvantages of using herbicides in weed control?
d. How do you ensure correct and safe use of Herbicides?
The facilitator will define a herbicide as a chemical used to kill or inhibit the growth of weeds
and other pests. Herbicides can be classified as:
a. Non-selective, and
b. Selective herbicides.
A non-selective herbicide kills all actively growing vegetation by contact or by a systemic mode
of action (chemical transported throughout the plant).An example is Round Up (Glyphosate)
commonly used to kill all vegetation. A selective herbicide kills only certain target plants (as
specified on product label) and leaves behind all other plants virtually unhurt (dosage and timing
of application dependent). Most selective herbicides used on intended weeds are systemic in
nature (chemical transported throughout plant).
6.5.1 Advantages of using herbicides
a. They kill unwanted plants;
b. They can be used as a second or last option for example when manually removing weeds
can destroy the crop;
c. They can remove all plants when used as pre-germination weed control;
d. Herbicides can be used on closely planted crops where other methods cannot be used;
e. When other strategies fail they save time and labour;
f. They work fast; and,
g. Use of herbicides can be cheaper than manual weeding;
h. They help the crops grow by destroying the weed that is robbing the crops of water,
nutrients and sunlight.
6.5.2 Disadvantages of using herbicides
While herbicides can be an effective way to manage weeds, these poisonous chemicals for plants
can also be extremely dangerous to humans, animals and the environment. For these reasons, it
is extremely important to know how to apply herbicides safely.
The following are some of the disadvantages of using herbicide:
a. Some herbicides are non-biodegradable and are harmful for a long period of time;
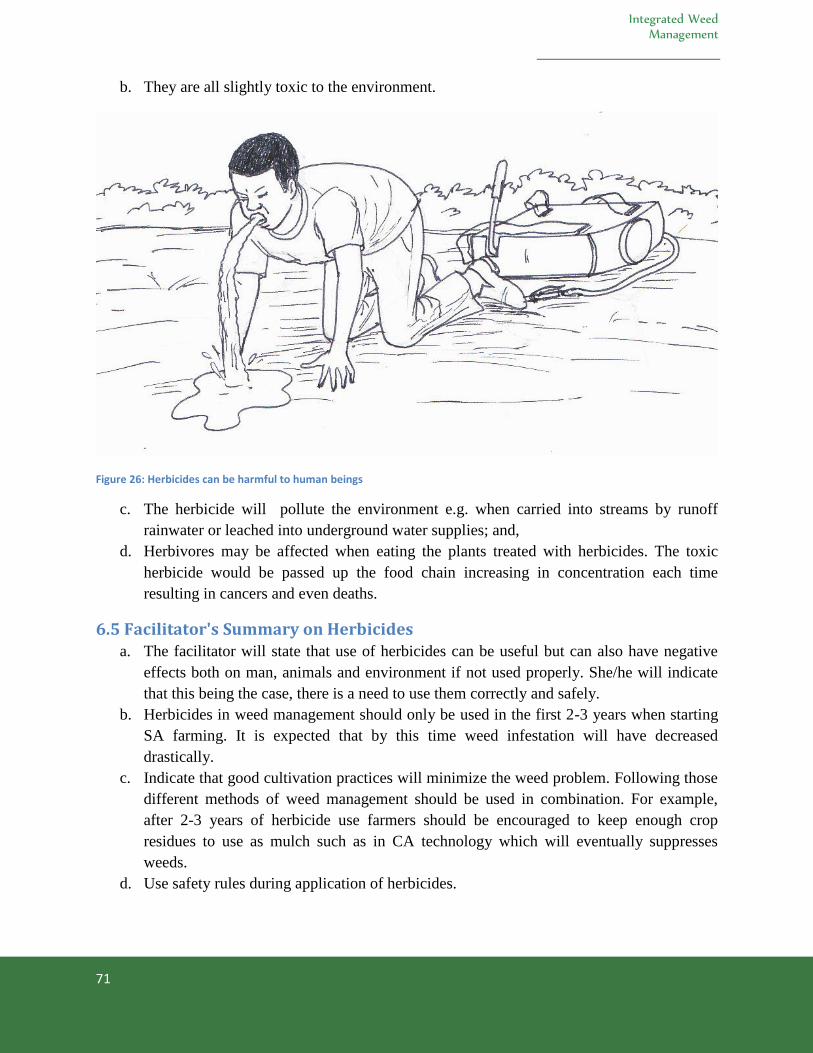
Integrated Weed Management
71
b. They are all slightly toxic to the environment.
Figure 26: Herbicides can be harmful to human beings
c. The herbicide will pollute the environment e.g. when carried into streams by runoff
rainwater or leached into underground water supplies; and,
d. Herbivores may be affected when eating the plants treated with herbicides. The toxic
herbicide would be passed up the food chain increasing in concentration each time
resulting in cancers and even deaths.
6.5 Facilitator's Summary on Herbicides a. The facilitator will state that use of herbicides can be useful but can also have negative
effects both on man, animals and environment if not used properly. She/he will indicate
that this being the case, there is a need to use them correctly and safely.
b. Herbicides in weed management should only be used in the first 2-3 years when starting
SA farming. It is expected that by this time weed infestation will have decreased
drastically.
c. Indicate that good cultivation practices will minimize the weed problem. Following those
different methods of weed management should be used in combination. For example,
after 2-3 years of herbicide use farmers should be encouraged to keep enough crop
residues to use as mulch such as in CA technology which will eventually suppresses
weeds.
d. Use safety rules during application of herbicides.
Lead Farmer Extension and Training
Guide on Sustainable Agriculture
72
6.6 Frequently Encountered Problems and Possible Solutions a. Burning of crop residues: Burning of crop residues is a common problem. If residues
were left to decompose or used as mulch in the field they would improve soil fertility.
Sometimes, people burn residues as a way of preparing land for planting and sometimes
as they are hunting e.g. mice. It is recommended that communities come up with
regulations against unnecessary burning. Those using crop residues for CA could also
safely keep their crop residues where they cannot be destroyed e.g. by fire or grazing
animals Training of communities on the disadvantages of burning crop residues should
continue (to be moved to CA).
b. High infestation rate of weeds: Farmers should be encouraged not to allow weeds to
mature. Farmers should be slashing weeds down towards the end of the season. In so
doing, there will be reduction of weed population over years.
c. Infestation rate of weeds is high year to year: This happens when weeding is done only
once. The weeds that grow later are allowed to flower and mature; as a result, the seed
from such weeds is carried over to the next season.
6.7 Task Check list (5 Minutes) a. What is a weed?
b. Mention 5 methods of controlling weeds
c. What is the best way of controlling weeds?
d. Name two types of Herbicides?
e. What are the advantages and disadvantages of Herbicides?
f. How best should we use herbicides in order to avoid side effects?

Integrated Weed Management
73
Module 7
Pest and disease
control
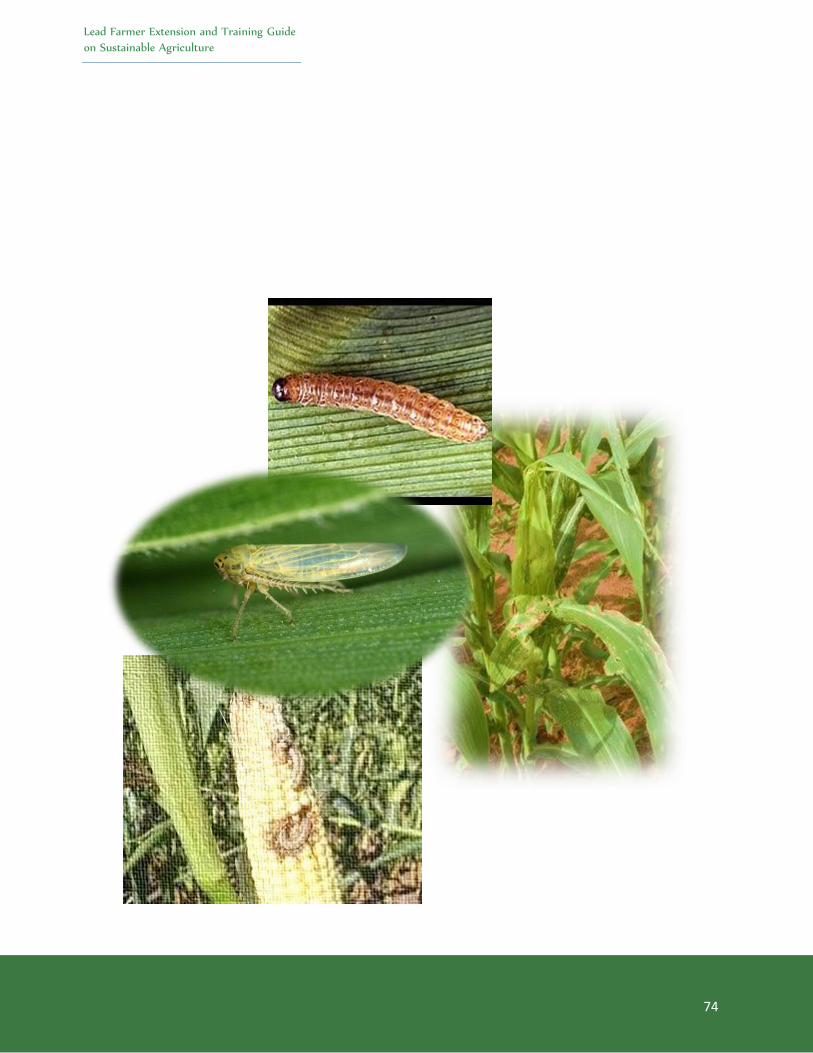
Lead Farmer Extension and Training Guide
on Sustainable Agriculture
74
Lead Farmer Extension and Training Guide
on Sustainable Agriculture
75
7.1 About this Module Pests like insects and organisms that cause diseases are part of the natural environmental system.
In this system there is a balance between predators, parasites and pests. This is nature's way of
managing populations. The creatures that we call pests and the organisms that cause diseases
only become pests and diseases when their activities affect yields economically. If the natural
environmental system is imbalanced then one population can become dominant: because it is not
being preyed upon. However, both pest and diseases can in unpredictable ways seriously attack
and destroy a crop.
7.2 Objectives In this module you are going to learn how farmers can manage to keep balance of predators,
parasites and pest on the farm and also how to use the locally available herbs to manage pest and
diseases on the farm.
7.3 Expected Results By the end of this module the Lead Farmers should be able to:
a. Identify common pest and diseases and explain in which ways they could be harmful to
the crop;
b. explain how to manage pests and diseases in sustainable agriculture;
c. Explain how to avoid economic losses in crop production; and,
d. Explain how to prepare natural remedies in their respective areas and how to use them as
natural pesticides.
7.4 Activities
7.4.1 Introduction (25 minutes)
The facilitator will ask participants to be in groups of 10 people. The facilitator will then ask
each group to go out in the field and observe the presence of predators, pests and diseases in the
field and record them on flip chart. The facilitator will also ask the groups to indicate the role of
each organism in the field.
7.4.2 Plenary—Teaching about Natural Pest and Disease Control (2 hours)
The facilitator should explain the aim of natural pest and disease control and the advantages of
natural control versus the use of chemical control.
The aim of natural pests and disease control is:
a. To restore a balance between pest and predator; and,
Time frame: 2 hours
Pest and Disease Control
76
b. To keep pests and diseases down to an acceptable level.
NOTE: The aim is not to eradicate the pests altogether as they also have a role to play in the
ecosystem. Once a pest or disease has started to attack a crop, the damage cannot be
repaired and control becomes increasingly difficult. Where possible, use techniques that
help to avoid or prevent pests and diseases.
Chemical pesticides do not solve the pest problem. In the past 50 years, insecticide use has
increased tenfold, while crop losses from pest damage have doubled. Here are some advantages
and preventive measures of natural pest control.
I. Advantages of Natural Pest Control
a. Monetary cost
Using natural pest and disease management is often cheaper than applying chemical pesticides
because natural methods do not require buying expensive materials from the outside. Products
and materials which are already in the home and around the farm are most often used.
b. Safety for people
Using natural pest and disease management technique is safe to humans. There is much concern
over the dangers of chemical products. They may be misused because, sometimes, the
instructions are not written in the language spoken by the person using the product. There have
been many reports of people suffering from severe skin rashes and headaches as a result of using
chemical pesticides. There are an estimated one million cases of poisoning by pesticides each
year around the world. Up to 20,000 of these result in death. Most of the deaths occur in
developing countries where chemical pesticides, which are banned in Europe or the USA, are
still available.
c. Safety for the environment
Sustainable agriculture works with nature, not against it and that is why natural pest and disease
management is environmental friendly. In most cases pests are often controlled with man-made
chemicals which have many negative effects. For example, artificial chemicals kill useful insects
which eat pests or parasites. Artificial chemicals can stay in the environment and in the bodies of
animals causing problems for many years. Some pest and disease organisms become resistant to
artificial chemicals and can no longer be controlled.
II. Knowing the problem
Before taking action to control pests and diseases it is very important to make sure that the
problem is correctly identified. Only then you can hope to succeed. Knowledge of pests and
diseases will help you decide whether the problem is caused by a pest, a disease, a mineral
deficiency in the soil or an environmental factor.
Proper identification should be the first step in controlling the problem and, more importantly, in
preventing it from happening again.
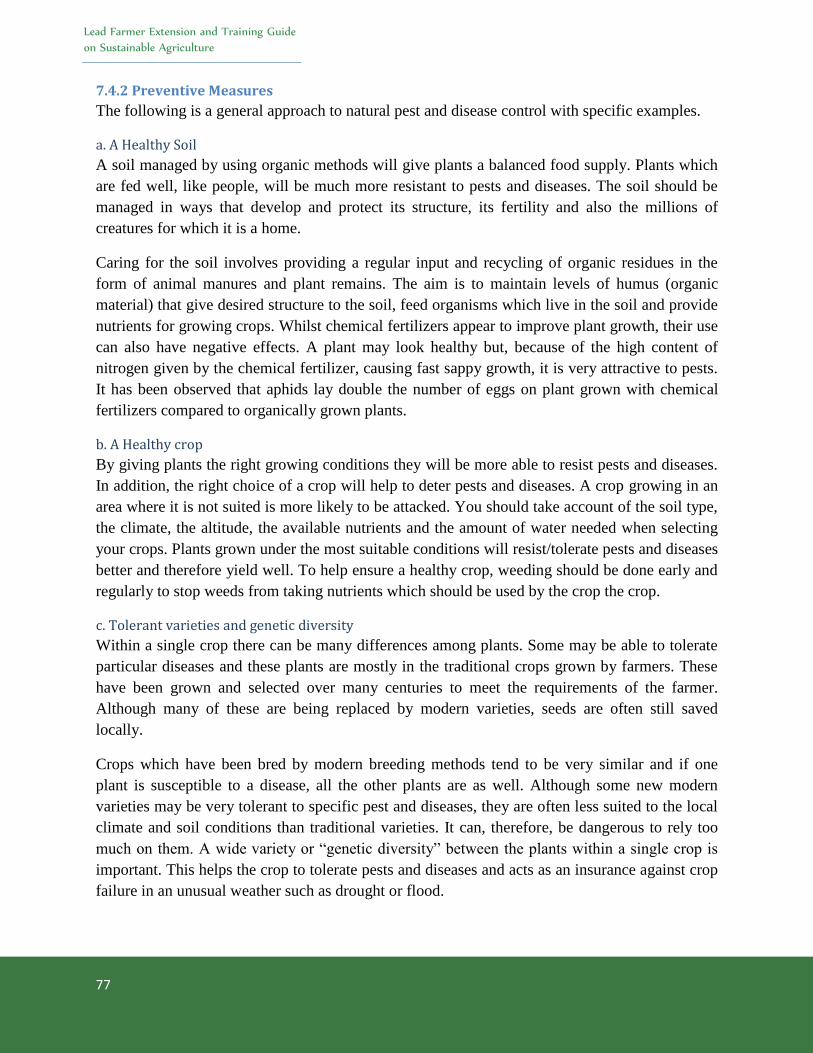
Lead Farmer Extension and Training Guide
on Sustainable Agriculture
77
7.4.2 Preventive Measures
The following is a general approach to natural pest and disease control with specific examples.
a. A Healthy Soil
A soil managed by using organic methods will give plants a balanced food supply. Plants which
are fed well, like people, will be much more resistant to pests and diseases. The soil should be
managed in ways that develop and protect its structure, its fertility and also the millions of
creatures for which it is a home.
Caring for the soil involves providing a regular input and recycling of organic residues in the
form of animal manures and plant remains. The aim is to maintain levels of humus (organic
material) that give desired structure to the soil, feed organisms which live in the soil and provide
nutrients for growing crops. Whilst chemical fertilizers appear to improve plant growth, their use
can also have negative effects. A plant may look healthy but, because of the high content of
nitrogen given by the chemical fertilizer, causing fast sappy growth, it is very attractive to pests.
It has been observed that aphids lay double the number of eggs on plant grown with chemical
fertilizers compared to organically grown plants.
b. A Healthy crop
By giving plants the right growing conditions they will be more able to resist pests and diseases.
In addition, the right choice of a crop will help to deter pests and diseases. A crop growing in an
area where it is not suited is more likely to be attacked. You should take account of the soil type,
the climate, the altitude, the available nutrients and the amount of water needed when selecting
your crops. Plants grown under the most suitable conditions will resist/tolerate pests and diseases
better and therefore yield well. To help ensure a healthy crop, weeding should be done early and
regularly to stop weeds from taking nutrients which should be used by the crop the crop.
c. Tolerant varieties and genetic diversity
Within a single crop there can be many differences among plants. Some may be able to tolerate
particular diseases and these plants are mostly in the traditional crops grown by farmers. These
have been grown and selected over many centuries to meet the requirements of the farmer.
Although many of these are being replaced by modern varieties, seeds are often still saved
locally.
Crops which have been bred by modern breeding methods tend to be very similar and if one
plant is susceptible to a disease, all the other plants are as well. Although some new modern
varieties may be very tolerant to specific pest and diseases, they are often less suited to the local
climate and soil conditions than traditional varieties. It can, therefore, be dangerous to rely too
much on them. A wide variety or “genetic diversity” between the plants within a single crop is
important. This helps the crop to tolerate pests and diseases and acts as an insurance against crop
failure in an unusual weather such as drought or flood.
Pest and Disease Control
78
d. Crop rotation
Growing the same crops in the same site year after year can build up pests and diseases in the
soil. These will transfer from one crop to the next. Crops should be planted in a different piece
of land each year, and not return to the original site for several years. For vegetables a 3 to 4 year
rotation is usually recommended as a minimum. Crop rotation also helps a variety of natural
predators to survive on the farm. A typical four year rotation would include a cycle as follows;
year one maize and beans; year two a cereal; year three a root crop and; year four either green
manure or improved fallow (Refer: Intercropping and Crop rotation Modules for details).
e. Good hygiene
If infected plant material, live or dead, is left lying around, pests and diseases can be passed on to
future crops. Debris should be cleared up and disposed of. This can be done by composting the
debris. The composting process will kill some pests and diseases and produce compost which is a
good soil improver and fertilizer. However, some diseases may survive after being composted. If
in doubt, the infected material should be burnt.
g. Companion planting
Companion planting means growing certain plants to protect other plants from pest or diseases.
This may be because the pest is deterred by the companion plant, or because the pest is attracted
to the companion plant rather than the crop. For example, onions planted either side of a row of
carrots help to deter carrot flies. You need to sow 4 rows of onions for 1 row of carrots. This
effect will only last as long as the onions have growing leaves. Many pests avoid garlic, so this
can be used very effectively for companion planting with most crops.
In a similar way farmers have found that placing mint leaves near spinach plants will deter insect
pests. By planting milkweed among vegetables, some African farmers have effectively reduced
the number of aphids on their crops. This is because aphids are more attracted to the milkweed
than to the vegetables. Companion planting can also mean that one plant acts as a barrier for
another. In Columbia, jassid infestation in beans is reduced when beans are sown 20 to 30 days
after maize. The maize acts as a shelter for the beans.
h. Plants to attract predators, parasitoids and parasites
Similar to companion planting which seeks to deter pests from the main crop, attractant plants
can be grown to attract predatory insects. For example, provision of areas resembling the pests'
natural habitat like bushes and trees provide resting areas, shelter and food. Areas of natural
habitat can be left around the edges of fields where crops are grown. If these areas are destroyed
then there is likely to be an imbalance between the populations of predators and pests.
There are many plants that can be grown to attract natural predators and parasites which will help
to keep down pests and diseases. Flowers such as marigolds (tagetes), mint (Mentha), sunflower
(Helianthus annus), sunhemp (Crotalaria spp) as well as local legumes are useful attractant
plants.
Lead Farmer Extension and Training Guide
on Sustainable Agriculture
79
Hoverflies, whose larvae feed on green flies are attracted to the flowers of herbs and vegetables
such as fennel, celery, coriander, dill, carrot, and parsnips (Umbelliferae family), the nectar and
pollen that these flowers provide will help to increase the number of eggs that these beneficial
insects lay. Umbellifiers will also provide food to various parasitic wasps whose young live on
aphids and some caterpillars. Redhood pokers (Kniphofia uvaria) are used in parts of Africa to
attract birds that eat aphids and other pests.
7.4.3 Curative crop protection methods
If all preventive crop protection practices fail to sufficiently prevent economic losses to the
farmer, it may be necessary to take curative action. Curative action means controlling the pest or
disease once it has already infected the crop. Several options exist in sustainable agriculture,
such as biological control with natural predators
or antagonistic microbes, the use of natural
pesticides based on herbal preparations or other
natural products and mechanical control with traps
including hand picking.
I. Traps
Traps can help to reduce the population of certain
pests. If used at an early stage, mass multiplication
can be prevented. There are several types of traps:
a. Light traps attract nocturnal flying pest insects;
b. Pitfalls catch creeping insects and slugs;
c. Sticky traps, e.g. of a colour attracting a certain pest insect;
d. Pheromone traps release a sex-hormone of the female insect, thus attracting the males
which get stuck in the trap. If a large number of small pheromone containers are
distributed in an area, the male insects get confused and will not manage to find the
females to mate and reproduce with.
I. Social prevention
It may be necessary to work with surrounding farmers to destroy a pest. For example, the
variegated grasshopper (Zonocerus variegates), usually has 1 or 2 nests per hectare. These can be
destroyed by raking out the eggs from the nest and leaving them in the sun to dry out and die.
The nest could be on another farmer's farm but it could affect your crops. Joint action and
cooperation between all farmers could considerably reduce infestation.
7.4.4 Plenary—Teaching about Recipes of Natural Remedies (55 minutes)
The facilitator should ask the participants of any recipes of natural remedies they know or use in
their respective areas and how those recipes were being prepared. The facilitator should ask on
what pests and diseases are those recipes used. Natural recipes may have one or more pests or
diseases to control. Some recipes are used in powdered form while other sprayed in liquid form.
Natural recipes should be handled with care and kept away from children.
Figure 27: Examples of traps
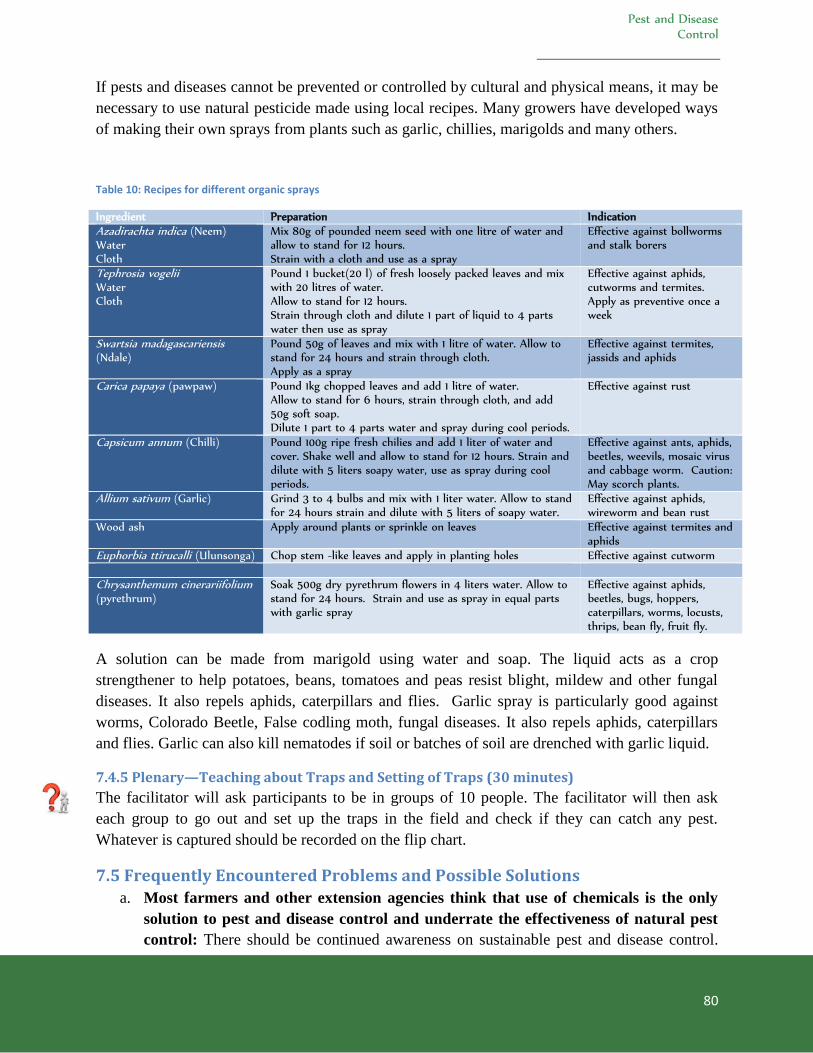
Pest and Disease Control
80
If pests and diseases cannot be prevented or controlled by cultural and physical means, it may be
necessary to use natural pesticide made using local recipes. Many growers have developed ways
of making their own sprays from plants such as garlic, chillies, marigolds and many others.
Table 10: Recipes for different organic sprays
Ingredient Preparation Indication Azadirachta indica (Neem) Water Cloth
Mix 80g of pounded neem seed with one litre of water and allow to stand for 12 hours. Strain with a cloth and use as a spray
Effective against bollworms and stalk borers
Tephrosia vogelii Water Cloth
Pound 1 bucket(20 l) of fresh loosely packed leaves and mix with 20 litres of water. Allow to stand for 12 hours. Strain through cloth and dilute 1 part of liquid to 4 parts water then use as spray
Effective against aphids, cutworms and termites. Apply as preventive once a week
Swartsia madagascariensis (Ndale)
Pound 50g of leaves and mix with 1 litre of water. Allow to stand for 24 hours and strain through cloth. Apply as a spray
Effective against termites, jassids and aphids
Carica papaya (pawpaw) Pound 1kg chopped leaves and add 1 litre of water. Allow to stand for 6 hours, strain through cloth, and add 50g soft soap. Dilute 1 part to 4 parts water and spray during cool periods.
Effective against rust
Capsicum annum (Chilli) Pound 100g ripe fresh chilies and add 1 liter of water and cover. Shake well and allow to stand for 12 hours. Strain and dilute with 5 liters soapy water, use as spray during cool periods.
Effective against ants, aphids, beetles, weevils, mosaic virus and cabbage worm. Caution: May scorch plants.
Allium sativum (Garlic) Grind 3 to 4 bulbs and mix with 1 liter water. Allow to stand for 24 hours strain and dilute with 5 liters of soapy water.
Effective against aphids, wireworm and bean rust
Wood ash Apply around plants or sprinkle on leaves Effective against termites and aphids
Euphorbia ttirucalli (Ulunsonga) Chop stem -like leaves and apply in planting holes Effective against cutworm Chrysanthemum cinerariifolium (pyrethrum)
Soak 500g dry pyrethrum flowers in 4 liters water. Allow to stand for 24 hours. Strain and use as spray in equal parts with garlic spray
Effective against aphids, beetles, bugs, hoppers, caterpillars, worms, locusts, thrips, bean fly, fruit fly.
A solution can be made from marigold using water and soap. The liquid acts as a crop
strengthener to help potatoes, beans, tomatoes and peas resist blight, mildew and other fungal
diseases. It also repels aphids, caterpillars and flies. Garlic spray is particularly good against
worms, Colorado Beetle, False codling moth, fungal diseases. It also repels aphids, caterpillars
and flies. Garlic can also kill nematodes if soil or batches of soil are drenched with garlic liquid.
7.4.5 Plenary—Teaching about Traps and Setting of Traps (30 minutes)
The facilitator will ask participants to be in groups of 10 people. The facilitator will then ask
each group to go out and set up the traps in the field and check if they can catch any pest.
Whatever is captured should be recorded on the flip chart.
7.5 Frequently Encountered Problems and Possible Solutions
a. Most farmers and other extension agencies think that use of chemicals is the only
solution to pest and disease control and underrate the effectiveness of natural pest
control: There should be continued awareness on sustainable pest and disease control.
Lead Farmer Extension and Training Guide
on Sustainable Agriculture
81
Farmers should also be made to understand the various benefits economically, health-
wise and environmentally.
b. Pest and disease identification is a challenge faced by many farmers hence applying the
correct control measure becomes a problem.
c. It is important that farmers are reminded of the most important pests and diseases and
how crops are mainly affected. Pictures should support practical work for better
understanding. This should not be only a single session but in any other convenient time
they meet.
7.6 Task Checklist (10 minutes) a. What is natural pest control?
b. Mention three advantages of natural pest control.
c. What are the preventive measures one can follow in natural pest control? Give examples
of companion crop planting.
d. Name two recipes for natural remedies used in natural pest control and outline how they
are made.
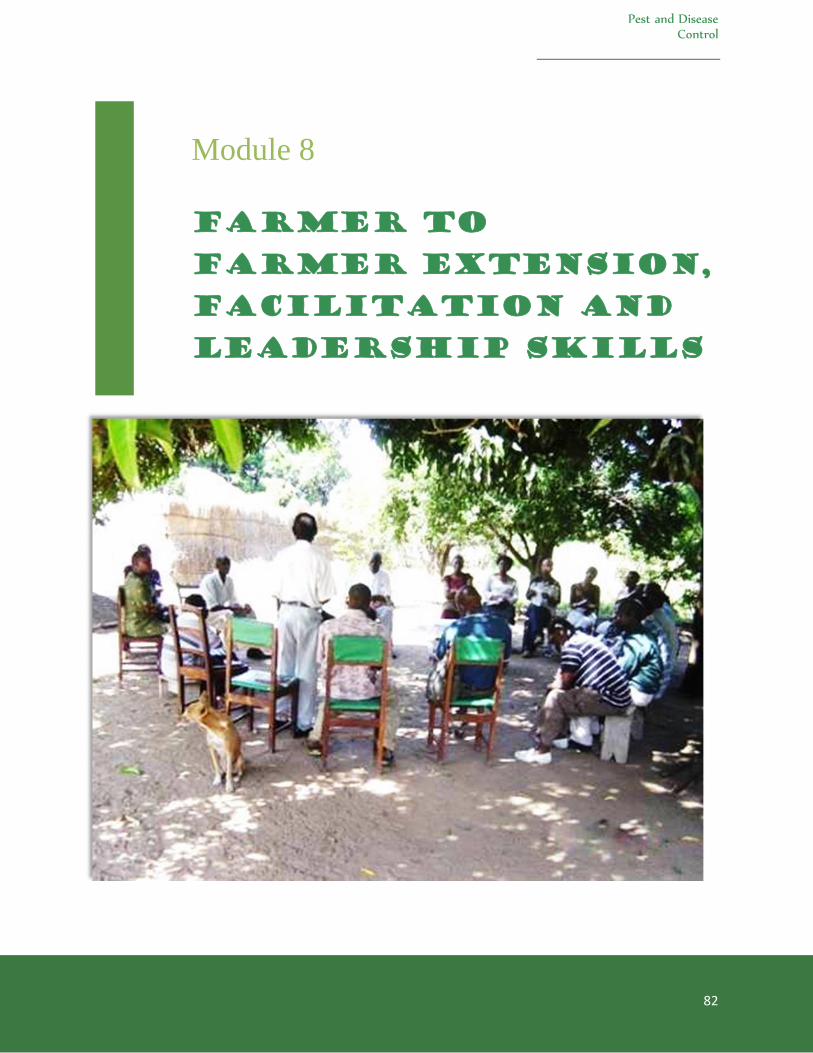
Pest and Disease Control
82
Module 8
Farmer to
Farmer Extension,
Facilitation and
Leadership Skills
Lead Farmer Extension and Training Guide
on Sustainable Agriculture
83
8.1 About this Module Once Lead Farmers have been trained, they will train other farmers. These trainees are referred
to as follower farmers. The approach in training Lead Farmers has been both theoretical and
practical. Lead Farmers will also follow the same approach in training their follower farmers.
This module will equip Lead Farmers with skills on how they can effectively transfer acquired
knowledge and skills to their follower farmers. It will also look at how to handle follower
farmers as being fellow adults.
8.2 Objective The major objective of this module is to equip Lead Farmers with facilitation skills so that they
are able to effectively transfer knowledge and skills to follower farmers.
8.3 Expected Results By the end of this module the Lead Farmers should be able to:
a. Conduct a training session for follower farmers;
b. Know what farmer-to-farmer extension is;
c. The advantages of farmer-to-farmer Extension; and
d. Disadvantages of farmer-to-farmer extension.
e. Know types of leadership and attributes of good leadership.
8.4 Activities
8.4.1 Plenary—Teaching about Facilitation Skills (30 Minutes)
The facilitator will explain that as trained LFs now, they will train other farmers. This type of
training is called Farmer-to-Farmer Extension. The facilitator will continue to say that it has
been noted that these farmers help to increase adoption of SA technologies if they themselves are
also practicing what they are training follower farmers in. The facilitator will explain the
advantages and disadvantages of farmer-to-farmer extension as follows:
I. Advantages of farmer-to-farmer extension
a. Adoption of good farming practices is faster and done at low cost;
b. Farmer-to-farmer extension helps farmers to be settled in the same area. Firstly as a
requirement for choosing a LF and secondly because of the need to have their gardens
established;
c. It helps the lead farmers to be proud of their knowledge, good work and may want to
continue doing better;
3 Hours
Farmer to Farmer Extension, Facilitation and Leadership Skills
84
d. Farmer-to-farmer extension helps many farmers to be reached with recommended
messages at the right time;
e. Encourages ownership of programs by the community since Lead Farmers are from
within the context of the community;
f. Reduces the workload of the extension worker and the problems related to the shortage of
staff are eased; and,
g. It also helps famers work as a group hence they encourage each other.
II. Disadvantages of farmer-to-farmer extension
a. Some Lead Farmers may take themselves as being very knowledgeable or as if they are
equal to government extension staff, which is not true;
b. Some follower farmers may underrate the Lead Farmers; and,
c. Some Lead Farmers do not work well due to the perceived lack of incentives
8.4.2 Plenary—Teaching about Qualities of Good Lead Farmers (30 minutes)
The facilitator will explain that for follower farmers to believe what we will train them, a LF
should have some good qualities. Then s/he will task the participants to list qualities of a good
Lead Farmer. Later she will summarize these as follows:
a. Should have good behaviour so that follower farmers should never have any fear to
approach him or her;
b. Should have audible voice or should be able talk so that everybody can hear;
c. Should have confidence and self-control;
d. Should be able to speak the language of the area.
8.4.3 Plenary—Teaching about Facilitation Skills (1 hour 30 minutes)
The facilitator will explain that the following steps will be followed in training follower farmers:
a. Opening of the training session;
b. Should greet the follower farmers;
c. Opening prayer;
d. Introductions;
e. Objectives of the training;
f. Should ensure that the training is well divided so others can easily follow; and
g. In closing, summarize properly followed by a word of prayer.
8.5 Core Facilitation Skills The facilitator will continue to explain that the LFs will also take note of the following in the
course of training:
a. S/he should be able to see every follower farmer while training them;
b. S/he should be training others while standing;
c. S/he should be seen by FFs and maintain eye contact;
d. S/he should respect FFs views;

Lead Farmer Extension and Training Guide
on Sustainable Agriculture
85
e. S/he should be audible enough;
f. S/he should be knowledgeable of the content;
g. S/he should be able to identify a conducive venue for the training and time;
h. S/he should be free to be moving around the training room; and,
i. S/he should have ways of ensuring that participants are actively engaged in the training.
The facilitator will summarize this area by saying that adult learning is different from the way
children are taught.
Table 11: Rating Criteria
Item Group 1 Group 2
Dressing (use of protective
wear)
Introduction
Explaining the subject matter
Use of teaching and learning
aids
Closing
Total Marks
8.6 Plenary: Teaching About Leadership—1Hour The facilitator will explain that a Lead Farmer is a leader. He will explain that it is very
important that as one leading others, s/he will be expected to be exemplary. S/he will explain that
every group will be successful if it has a leader elected and accepted by the majority. S/he will
explain that the responsibility of a leader is to lead the group towards achieving the goal.
Therefore, as LFs they will be leading and guiding follower farmers to increase the adoption of
SA technologies.
Practical session—learning how to dig planting pits
The facilitator will divide the participants into two groups. He will also advise that each group
will choose one person who will act as a LF and others will be like follower farmers. The
facilitator should explain the following about the assignment:
a. Group 1 will discuss and choose one person to teach about one type of manure.
b. Group 2 will discuss and choose a person to teach about conservation agriculture.
After discussions the facilitator will explain before presentations that once presentations are
made members of the other group will act as judges. They will judge others basing on the
following areas and each area has two points.
Farmer to Farmer Extension, Facilitation and Leadership Skills
86
8.6.1 Who is a Leader?
A leader is a person who is able to guide or make others follow what s/he does, or a person who
is able to influence others towards a particular action or goal.
8.6.2 Types of Leadership
a. Democratic/participatory;
b. Authoritarian/dictatorial; and,
c. Passive/permissive/laissez faire.
I. Democratic Type of Leadership
a. If other members take part in decision making they become encouraged and work hard;
b. There is sharing of ideas in regards to how the group should be carrying out its activities;
c. People work hard; and,
d. People understand their group or activities and their roles.
II. Authoritarian/Dictatorial type of leadership
a. The leader makes decisions on her/his own;
b. Decisions are made from above and they are just followed without asking questions;
c. The leader has wields a lot of power even when things are not going on well.
III. Laissez faire Leadership
a. Little guidance from leaders;
b. There is complete freedom for followers to make decisions;
c. Leaders provide the tools and resources needed and,;
d. Group members are expected to solve problems on their own;
Laissez faire leadership can be effective in situations where group members are highly
skilled and motivated. In cases where group members lack knowledge, however, it may not
be ideal.
8.6.3 Qualities of a Good Leader
a. Should be hard working;
b. Should be able to accept his position/role;
c. Should not easily get angry;
d. Should strive to meet the objectives of the group while ensuring that every member is
involved;
e. Should be able to be thinking of others; and,
f. Should be able to mix freely with group members.
NOTE: It is always important to consider gender and youths when choosing leaders.
Lead Farmer Extension and Training Guide
on Sustainable Agriculture
87
REFERENCES
Better Land Husbandry Manual, PROSCARP (EU) and Land Resources Conservation
Department, 2003
Conservation Agriculture, "A manual For Farmers and Extension Workers in Africa"
ACT, 2005
Guide to Agricultural Production and Natural Resources Management, revised 2012

Lead Farmer Extension and Training Guide
on Sustainable Agriculture
88
Annex I
Facilitation
Methods for the
Lead farmer—a
catalogue of
extension
methodologies
1. Result demonstrations A result demonstration is a method designed to show, by example the practical application of an
established fact or group of facts. ''The result demonstration,” is one which shows after a period
of time what happened after a practice is adopted. As an example, compost is put on a certain
field. Good seed potatoes are planted and cared for. In the next field, no compost is used and
poor seed potatoes are used. At harvest time, the potatoes are dug in each field at the same time.
The villagers have watched everything from the time of planting and growing to harvesting. In
an effort to assist the LFs in planning the demonstration and keeping track on what happened, the
farmer is encouraged to use the farm record book.
2. Household visits These are visits made by the extension staff to individual farmers' farms to help with particular
issues. During the visit, the extension staff makes observations and discusses with the farmer on
possible solutions, strategies and plans.
3. Farmer-to-farmer extension The farmer-to-farmer extension is an extension method or approach where a farmer who has
undergone training in one agricultural practice or technology or more passes over the knowledge
and skills to other farmers. The trained farmer, therefore, becomes the change agent within
his/her community especially after adopting the practice and/or technology.
Lead Farmer Extension and Training Guide
on Sustainable Agriculture
89
4. Group methods Group methods take into account the inclination of the individual to respond to the pressures and
opinions of groups in which he/she participates and to listen to the views of others before
arriving at a decision about making changes in his farming operations. Group methods include:
general meetings, group discussions, exhibits, tours etc.
5. Motivational tours A motivational tour is a primary visit to a practicing farmer or an institution in another area. This
involves a group of up to 30 participants. A motivational tour exposes farmers to developments
and new technologies which are being used by farmers in another area or being developed at a
research station or activities being implemented by other organizations such as NGOs. Tours act
as a vehicle for exchanging ideas and insights among farmers.
6. Diversity/Seed fairs A diversity fair is a unique approach to increase public awareness on the value of traditional
knowledge of local crop diversity. The method has been found popular not only in Nepal and
Vietnam but also in Africa and Latin America. In the fair, farmers participate by displaying
different plant genetic materials for assessing the status of genetic diversity in the area. The
community organized diversity fair exclusively focuses on indigenous landraces and has been
found useful to locate rare diversity. This kind of participatory event also helps to enhance social
interactions and unifies communities and local organizations.
7. Field days A field day is a group extension event conducted at the site of any type of results demonstration.
Field days provide the opportunity for 25 or more farmers to visit a demonstration site, learn
about what is being demonstrated, ask questions and be encouraged to try new ideas on their
farms.
8. On-farm/field training This is a training conducted in the field by the trainers of trainers to a group of up to 30 farmers.
Training is usually practical in nature and can go up to several days. The training is held for a
maximum of 3hrs per day and in some cases can last the whole day. Where the training is
organized for the whole day, the group organizes food to eat during lunch, to avoid people going
back to their homes for lunch.
9. Farmer field schools A farmer field school is a learning approach that is field oriented and participatory emphasizing
on learning by doing. The training takes place over an extended period such as a growing season
and involves classroom and field work. The training is holistic; it follows the farming systems
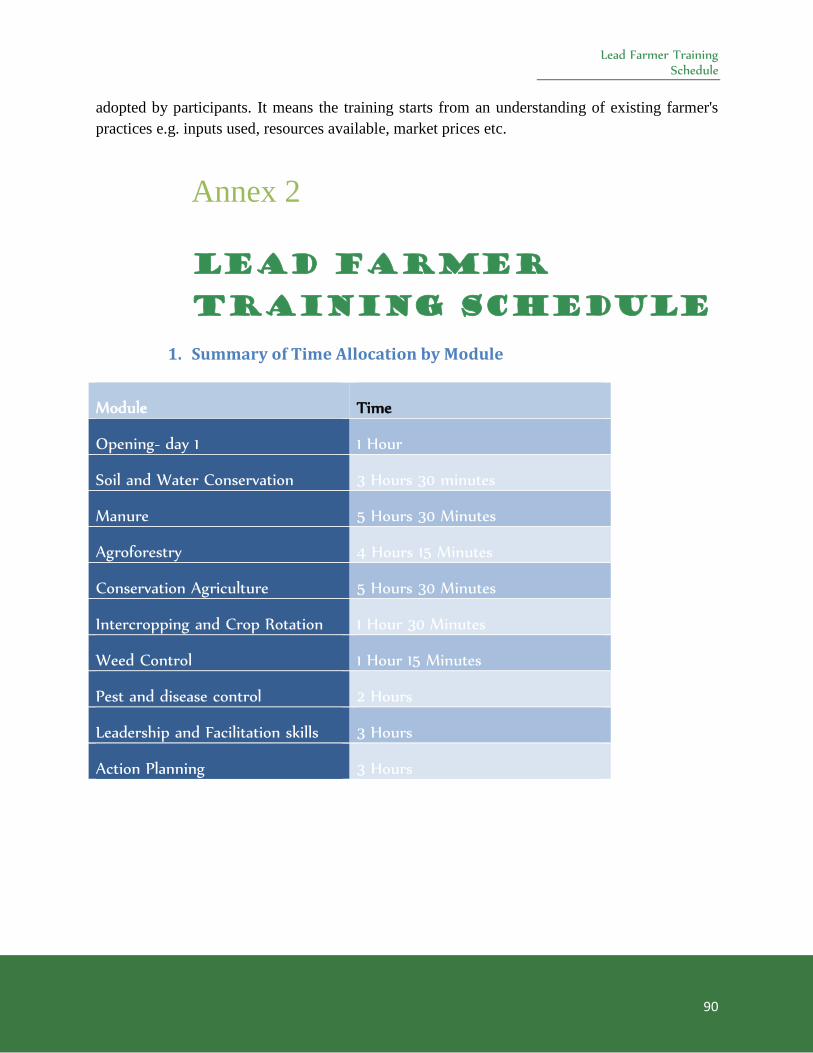
Lead Farmer Training Schedule
90
adopted by participants. It means the training starts from an understanding of existing farmer's
practices e.g. inputs used, resources available, market prices etc.
Annex 2
Lead farmer
Training schedule
1. Summary of Time Allocation by Module
Module Time
Opening- day 1 1 Hour
Soil and Water Conservation 3 Hours 30 minutes
Manure 5 Hours 30 Minutes
Agroforestry 4 Hours 15 Minutes
Conservation Agriculture 5 Hours 30 Minutes
Intercropping and Crop Rotation 1 Hour 30 Minutes
Weed Control 1 Hour 15 Minutes
Pest and disease control 2 Hours
Leadership and Facilitation skills 3 Hours
Action Planning 3 Hours
Lead Farmer Extension and Training Guide
on Sustainable Agriculture
91
2. Timetable for 5 Day Lead Farmer Training—SALFP Curriculum
DAY TIME TOPIC RESOURCE
PERSON
DAY 0 12:00- 6:00 Arrival of participants
Sunday
DAY 1 8:00-8:05 Opening Prayer Volunteer
Monday 8:05-8:15 Introductions
8:15-8:25 Welcome Remarks
8:25-8:35 Opening Remarks
8:35-8:45 A brief on SALP
8:45-9:00 An overview of SA
9:00-10:00 Soil and water conservation (theory)
10:00-10:15 AM Tea Break TIME KEEPER
10:15-10:45 Soil and water conservation (theory)
10:45-12:00 Soil and water conservation
(practical session)
12:00-1:30 PM LUNCH TIME KEEPER
01:30-03:00 Soil and water conservation
(practical session)
03:00-03:15 PM Tea Break TIME KEEPER
03:15-04:00 Soil and water conservation
(practical session)
04:00-05:00 Manure (theory)
5:00 PM END OF DAY 2 President
DAY 2 08:00-08:30 AM RECAP ON DAY 2 WORK
Tuesday 08:30-10:00 AM Compost manure making /use (theory)
Chinese, bokash, Liquid, changu, curing,
pit.
04:00- 05:00 Intercropping & Crop Rotation
5:00PM END OF DAY 3 President
DAY 3 08:00-08:30 AM RECAP DAY 3 WORK
Wednesday 08:30-10:00 AM Agroforestry (theory)
10:00-10:15 AM Tea Break TIME KEEPER
10:15- 12:00 Agroforestry (practical session)
12:00-01:30 PM Lunch TIME KEEPER
Lead Farmer Training Schedule
92
01:30-02:30 Agroforestry (practical session)
02:30- 03:00 Weed Control
03:00-03:15 Tea Break TIME KEEPER
03:15-04:00 Weed Control
04:00- 05:00 Pest and disease control
5:00 PM END OF DAY 4 President
DAY 4 08:00-08:30 AM Recap of Day 4 Work
Thursday 08:30- 09:30 Pest and disease control
09:30-10:00 AM Conservation Agriculture (theory)
10:00-10:15 AM Tea Break TIME KEEPER
10:15-11:00 AM Conservation Agriculture (theory)
11:00- 12:00 Conservation Agriculture (practical
session)
12:00-1:30 PM LUNCH TIME KEEPER
01:30- 03:00 Conservation Agriculture (practical
session)
03:00-03:15 Tea Break TIME KEEPER
03:15- 05:00 Conservation Agriculture (practical
session)
5:00 PM END OF DAY 5 President
DAY 5 08:00-08:30 Recap of Day 5 Work
Friday 08:30-10:00 Facilitation skills
10:00-10:15 AM Tea Break TIME KEEPER
10:15-11:15 Facilitation skills
11:15-01:00 Action planning
Closing remarks
TIME KEEPER
Lead Farmer Identification and Selection Process
93
Annex 3
The Lead Farmer
IDENTIFICATION
AND SELECTION
PROCESS
1. The Process Identification and subsequent selection of Lead Farmers is a critical process to ensure the success of the
farmer-to-farmer extension.
Before the actual selection of Lead Farmers, a community-based training on gender targeting local
leadership and members of the community is conducted in order to raise awareness on the importance of
gender equality in SALFP. This is followed by two meetings which are conducted at the community
level. The first meeting will be to introduce SALFP and the LF approach to the local leadership, VDC,
ADC and religious leaders. This will be followed by the second meeting where LFs will be selected as
described in section 3.2 below. The gender training and subsequent meetings will be facilitated by
project/extension staff assigned by the management of the implementing partner.
2. Gender Awareness Training The participants of this training should include Local leadership including, chiefs, ADC/VDC members,
religious leaders and community members. The extension staff and field officers will help in mobilizing
relevant community members to attend the training.
3. Sensitization Meeting of the SALFP Partner organizations organize a sensitization meeting with the local leaders to introduce the SALF
program. The meeting aims at bringing understanding on the following:
a. SALFP and the implementing partners’ approach and interventions under SALFP;
b. The Lead Farmer Approach and the selection process; and
c. Importance of gender equality in regards to the SALFP and other programs.
Action from this meeting is that the local leaders will explain to their community members where LFs
will be selected. The objective is to ensure that all members understand SALFP and the LF approach
before LFs are selected. The community will select people that have the needed qualities as LFs.
Date and time of the LF selection meeting is agreed at the end of this first meeting. Not less than 2
weeks will be given to allow for proper dissemination of the messages to community members.

Lead Farmer Extension and Training Guide
on Sustainable Agriculture
94
The community leaders should be informed about who should be present at the second meeting i.e.
community members (equal representation of male and female), community leaders including and
other relevant stakeholders in the area (MoAFS extension staff, other local NGOs etc.).
4. Selection of Lead Farmers A meeting is convened as scheduled. The partner organizations should ensure that the meeting has equal
representation of male and female community members, community leaders including village heads,
religious leaders, VDC members, ADC members, ministry of agriculture officials and representatives
from other organizations.
Steps: The following steps are followed at this meeting:
a. Welcoming Remarks by Local Leadership A Local Leader will give welcoming remarks and briefly introduce the purpose of the
meeting. He or she will then hand over to the facilitators from the partner organisations.
b. Facilitation The facilitator (a representative from the implementing partner that knows and understands both SALFP
and the LF approach) introduces the SALFP program to the community and its purpose which is to ensure
sustainable food security and improve the livelihoods of rural communities within the context that
increases their adaptive capacity to the impacts of climate change. After this, the facilitator explains the
following steps before the actual selection of the LFs:
i. Gender This step gives a clear understanding of gender:
a) What gender is
b) Importance of gender equality in developmental projects
c) Role of local leadership in ensuring gender equality
d) Partners’ commitment towards achieving gender equality
e) At the end, equal numbers of males and females will be selected in case more than one
LF is needed.
ii. Characteristics of a lead farmer a) Willing to share the information with others
b) Able to lead others
c) Early adopter of technology
d) A communicator with good facilitation skills
e) Should be literate (Special consideration may be given in case all supposed female LFs
are unable to read and write to avoid being gender inequality).
f) Should be honest, trustworthy and humble
g) Should be development conscious
h) Should be tolerant
i) Should originate from the village and socially accepted by the community
j) Should be able to sacrifice for others
k) Should be cooperative

Lead Farmer Identification and Selection Process
95
l) Should be approachable
iii. The Role of a Lead Farmer a) To teach others and mount promotion plots
b) To implement all new technologies introduced by the AEDOs in line with DF promoted
activities
c) To facilitate formation and implementation of action plans with farmers
d) To write and submit reports to Extension Workers
e) To conduct follow ups on farmers’ action plans
f) To promote extension technologies through farmer training, field days, extension
meetings, promotion plots and local tours
g) To give feedback on problems faced during adoption of extension technologies through
reports
h) To conduct demonstrations on improved technologies
i) To liaise with extension workers on farmers’ needs
j) To lead communities in community-based monitoring and evaluation.
iv. Support from Community members a) Attending meetings organised by LFs
b) Adopting technologies being promoted
c) Giving them time to take care of their personal affairs
d) Communicating problems to lead farmers depending on their specialty
v. Follower Farmers (FFs) The facilitator will explain that the selected lead farmers will be trained and will also have
to train others after their training. Those that will practise what they have been trained in by
LF will be called follower farmers. These steps are followed to recruit FFs:
a) LFs attend the training. This will either be residential or day training. A residential
training will apply where selected LF are coming from far distances hence cannot walk
to and fro the training every day. A day’s training will apply where the selected LFs
forming a class are not far from the venue. They will go home after the training and
come back the next morning to continue with the training till the end
b) The LF reports to local leadership once he or she is back and arranges for a community
training
c) LF conducts training to all interested village members
d) LF monitors those that implement what they have been trained in
e) A FF will be the one that implements at least 3 different SA technologies of which one
should be in the range of 0.2-04 ha.
f) Each LF will have 25-30 FFs.
vi. Technologies The facilitator will explain that a LF will perform a number of Sustainable Agriculture
technologies including:
a) Soil & water conservation, manure making and use, agro forestry, conservation
agriculture, inter-cropping, crop rotation, weed control and pest & disease control.
Lead Farmer Extension and Training Guide
on Sustainable Agriculture
96
b) LF should be willing to implement at least 3 different SA technologies of which one
should be in the range of 0.2- 04 ha in area.
vii. Number of LFs per community/village
The number of LFs per community will be determined by the number of farm families as
follows:
a) A village of not more than 20 farm families will have one LF;
b) If a family has already a lead farmer e.g. by other organizations should never be
considered for selecting another LF; and,
c) Local leaders e.g. a village headman should not be elected as LF.
viii. Feedback The facilitator will give members room for questions.
c. Selection of LFs After explaining the LF approach, the selection process will begin by voting. Include spouses and
immediate relatives, where possible. The meeting will conclude with a consultation session between
partner staff and the newly elected LFs and their spouses and immediate relatives.
d. Verification exercise After the selection, the extension staff will ask all new LFs, their spouses and local leaders to remain
behind for a brief verification exercise. He or she will once again go through the attributes/ characteristics
and the expected roles of the LF. The spouses and local leaders, having full knowledge of the selected LF
will comment on each one of the attributes until a common agreement is reached. Expected level of
support from the spouse and local leaders to the lead farmers will also form part of the agenda.
e. Conclusion In conclusion the LF section process will follow these steps:
i. Call traditional leaders, religious leaders, VDC and ADC members for a gender training to
enforce a common and shared understanding on gender equality. After this a sensitization
meeting on the SALF program with the community leaders will also be convened. It is important
that senior partner staff is present at this meeting. The LF approach should be explained in detail
and the gender aspect will be included in this explanation.
ii. After this meeting the community leaders are given a few weeks to discuss and explain to their
communities about the project and the LF approach
A new meeting will be called by the local leaders for the actual selection of LFs where all community
members should participate. This meeting will follow the steps listed in this document. The participants
should already have some understanding of the project, the LF approach and the importance of gender
equality.
Lead Farmer Technology Transfer
97
Annex 4
Lead Farmer
Technology
transfer
1. Background Development Fund of Norway (DF) has for more than 10 years, been using the farmer-to-farmer
extension approach through the Lead Farmer (LF) model.
2. Objective of LF approach There are two objectives for this approach:
a. To ensure timely dissemination of technical messages as this has not been possible due to reduced
numbers of government extension workers;
b. To scale-up Sustainable Agriculture (SA) technologies. Each lead farmer is supposed to practise
what s/he is trained in and have 25-30 Follower Farmers (FFs) that also practise what they are
trained in by the LF. Some follower farmers graduate into lead farmers and have their own
follower farmers.
3. Factors that Discourage Follower Farmers Experience suggests that much emphasis is given to selecting and training LFs and not much is done
concerning follower farmers as detailed below:
a. No formal training is provided to the FFs;
b. Not much recognition is given to FF in terms of support; and,
c. Follower farmers are visited less and their progress is not monitored by programme staff
Not enough emphasis is made on targets that the lead farmers are supposed to achieve during the
implementation of the techniques they were trained in, for example the hectares under different SA
technologies.
4. Knowledge Transfer from Lead to Follower Farmer A lead farmer is the focal point for dissemination of SALFP supported interventions. The lead farmer and
his/her follower farmers form a group through which DF funded programs are implemented in different
areas. Sustaining the momentum in this group is one factor that is very important for the successful
implementation of SA activities.
An action plan is developed at the end of the lead farmer training. This action plan includes the following:
Lead Farmer Extension and Training Guide
on Sustainable Agriculture
98
a. Training of follower farmers after undergoing the Lead Farmer training. The FFs are expected to
adopt sustainable agriculture technologies being promoted by the LF;
b. Documentation of the technologies being implemented by the follower farmers; and,
c. Joint planning between the lead farmer and his/her follower farmers on the technologies to be
implemented in subsequent seasons. This will help build rapport and bring more cohesion into the
group.
The cohesion of the group of a lead farmer and follower farmers should be used as a factor to consider
when the implementing partner would like to bring additional project interventions like goats to be
passed-on, exchange visits, Village Saving and Loan Associations and irrigation. Any pass-on activity
should trickle down from the lead farmer to her follower farmers.
NOTE: Where possible technology transfer should start at village level. It works well if village members
are hard-working and many have become follower farmers. The village headman is usually at
the center and facilitates SA implementation plans together with the LF.
5. Moving Away from the 10X10 Demonstration Plot During the lead farmer selection process—and at the lead farmer training—it should be emphasized that a
lead farmer will be an implementer at least three different SA technologies one of which should be
implemented on an area of not less than 0.2 hectares.
a. Target Setting
In order to optimize the area under sustainable agriculture practices the plans should include the following
targets:
i. Number of LF to be selected; and,
ii. Area (ha) under individual SA practices (Soil and Water Conservation, Manure, agroforestry,
Conservation agriculture).
b. Action planning after training
At the end of any lead farmer training, a clear action plan is developed for each Lead Farmer. The action
plan should show at least 3 SA technologies that each LF has chosen to start with. This should include:
i. Choice by each LF of one SA technology that he or she will implement on land that is at least
0.2 ha; and,
ii. Technologies that will be put under promotion plots.
Lead Farmer Graduation
99
Annex 5
GRADUATION OF
LEAD FARMERS
1. Background Development Fund of Norway (DF) and its partners have used the Farmer-to-Farmer Extension
through the Lead Farmer Approach for over 10 years. The first Lead Farmers (LFs) were
selected by Mzuzu ADD, DF’s partner who pioneered the Lead Farmer approach.
There are no nationally acceptable guidelines on how long a partner will work with the same LF.
This has resulted in working with some of the LFs for close to 9 years and some LFs becoming
too advanced in age to continue working effectively. This document is a guide as to when and
how a LF could be graduated.
2. Lead Farmer Extension and Training Guide on Sustainable Agriculture
The LF graduation is in line with what has been specified in Part 1 (Lead Farmer Extension) of
this Guide, table 2 as indicated below.
Core activities through for the duration of the program
Year 1
a. Conduct mobilization of the community
b. Conduct consultation with local authorities
c. Identify and select LFs
d. Organize a 5- day residential training for new LFs in SA
e. Facilitate recruitment of follower farmers
f. Facilitate mounting of demonstrations by LFs on selected SA technologies based on LF interests’
g. Establish LF farm records
Year 2
Lead Farmer Extension and Training Guide
on Sustainable Agriculture
100
a. Continue facilitating LF demonstrations
b. Facilitate adoption of selected technologies by follower farmers
c. Facilitate establishment of farm records by follower farmers
d. Facilitate management of appropriate LF’s demonstration plots and field days
e. Facilitate review meetings to discuss best practices and plans
Year 3
a. Facilitate follow up and continued adoption of the selected SA technologies and practices
b. Facilitate management of appropriate LF’s demonstration plots and field days
Year 4
a. Start winding up the SALFP program work with the LFs and the groups
b. Initiate handing over to local institutions (ADCs & VDCs) and Ministry of Agriculture
c. Finally hand over to local institutions (ADCs & VDCs) and Ministry of Agriculture
Summary
In year 1 the Lead Farmer will be selected, trained and start implementation of SA activities.
They will identify Follower Farmers (FFs) in the same year who will also start implementing
activities.
Years 2 and 3 will be full years of implementation and adoption of SA technologies by both lead
farmers and their follower farmers.
In year 4 the beneficiaries will have gained full knowledge of project implementation from both
theoretical and practical experiences. In this year, LFs will be prepared for graduation. This will
be discussed with leadership of local institutions in closer collaboration with the ministry of
agriculture officials so that they are all aware of and understand this arrangement.
During the first three years, the programme will focus on building the capacity of farmers
through trainings, exchange visits, monitoring and follow up among others. The idea is to ensure
that knowledge and skills remain within the context of the community after the programme
phases out. All trainings conducted by the programme are aimed at ensuring that the farmers
have confidence and technical know-how to stand on their own without and/or with little external
support. Throughout the different phases of the programme, implementing partners will be
working in close collaboration with the local development structures and MOAFS.

Lead Farmer Graduation
101
By the end of the fourth year, SALFP’s leader farmer related activities will be “handed over” to
local institutions like Area Development Committees (ADCs) and Village Development
Committees (VDCs). The MOAFS staff at District and EPA levels will be fully involved in the
transition to ensure successful handover of responsibilities from the programme to local
development structures.
3. Preparation for the graduation ceremony
Project staff and government extension workers will ensure that before graduation, the following
will have been put in place:
a. An inventory of SA technologies being implemented;
b. Record keeping is reviewed and encouraged for easy monitoring of activities by ADCs,
VDCs, project and agriculture staff;
c. Empower group/village committees to support the LFs; and,
d. LFs are linked with other local developmental institutions.
4. Qualities of a Lead Farmer to be graduated
The local leadership and project staff will assess every LF and recommend for graduation those
that have fulfilled the following as specified in the LF selection process document:
a. The LF is implementing at least three different SA technologies of which one should be
in the range of 0.2-04 ha;
b. The LF has effectively trained FFs who are also implementing at least 3 different SA
technologies of which one ranges from 0.2-04 ha. They are also active in other project
activities;
c. Conducts demonstrations effectively on newly released technologies as introduced by the
AEDOs or project staff in line with DF promoted activities;
d. Facilitates formation and implementation of action plans with follower farmers;
e. Writes and submits reports to Extension Workers as agreed;
f. Conducts follow up on follower farmers’ action plans;
g. S/he is involved in the promotion of technologies through farmer training, field days,
extension meetings, demonstrations, and local tours;
h. Gives feedback on problems faced during adoption of extension technologies through
reports;
i. Liaises with extension workers on farmers’ needs; and,
j. Takes lead in community-based monitoring and evaluation.
5. On Graduation Day
The following is explained at the graduation ceremony so that there is a clear understanding by
all people present and community members:
Lead Farmer Extension and Training Guide
on Sustainable Agriculture
102
a. That graduating LFs does not mean that they will be left out but rather they are being
recognised for the good work they have been doing;
b. That they have performed well as adopters or innovators and managed their groups well;
c. They will still be responsible for the group or follower farmers. Ensuring that activities
e.g. pass on programmes continue to run effectively;
d. They will still be supported in the implementation of their activities by following them up
on a quarterly basis or twice in a year. They will still be invited to major events e.g. Seed
fairs;
e. They will be at the centre of organising events such as field days together with
agriculture extension staff.
6. Recognition of Graduating LF
a. The programme arranges a graduation ceremony;
b. A clear programme of events is developed;
c. Local leadership, project staff, donor representative and media are invited to the
graduation ceremony;
d. Certificates and badges are presented to all graduating LFs;
e. They are henceforth called Master Lead Farmers; and,
f. A sign-post bearing their names and titles is placed in their gardens.
Management of Pass-on Systems
103
Annex 6
GUIDELINE ON
MANAGEMENT OF
PASS-ON SYSTEMS
1. Background The Development Fund of Norway and its implementing partners have used the pass-on system for
livestock, seed and other materials that have been supplied to project beneficiaries. All of these have been
passed-on to either groups or individuals. This document seeks to harmonize the pass-on system and
bring a common understanding of the same among DF partners and other collaborators.
2. What is pass-on? Pass-on is a form/system of credit/loan provided to an individual or a group in form of material with an
agreement that it will be paid back in form of the similar material, in agreed amounts, to another
individual or group. The recipient will also pay back to another individual or group and the process
continues until all beneficiaries in the catchment receive the material(s).
3. Objectives of pass-on The major objectives of the pass-on are:
a. To ensure that project resources like seed and livestock reach out to many or all beneficiaries in
the catchment;
b. To ensure that no such materials as livestock or seed are issued for free in order to avoid
beneficiaries from developing a dependency syndrome; and,
c. To instil a spirit of commitment, hard work and ownership amongst beneficiaries for
sustainability of the project.
4. Materials under pass-on Any material support provided to beneficiaries is considered for pass-on. The material support includes
but is not limited to:
a. Livestock The objectives of provision of livestock under pass-on are to enable beneficiaries to access manure and
improve their economic and nutritional status. When an individual or a group is given livestock they will
pay back to another group the same in terms of number and sex, i.e. as was issued to them. The livestock
being passed-on will have been weaned and in good health so they can survive on other foodstuffs apart
from milk. If only males are born and it is a female that is to be passed-on, an arrangement has to be made
either to sell the male and acquire the female or it has to be exchanged elsewhere for the a female.
Lead Farmer Extension and Training Guide
on Sustainable Agriculture
104
b. Seed The objectives of providing seed under pass-on are to encourage multiplication, diversification or
introduction of a new variety.
OPV maize is used whenever beneficiaries are supplied with maize seed. OPVs can be recycled for 3
growing seasons.
The seed under pass-on will be paid back in the ratio of 1:2, i.e. if an individual or group received 1 kg of
any form of seed, 2 kg will be paid back. The seed to be provided/passed on should be of good quality
and approved viability.
Cassava cuttings and Sweet Potato vines are also supplied under pass-on. These are issued in bundles.
They will also be paid back in the ratio of 1:2 bundles.
c. Business Capital The objective of providing financial or other resources is to help beneficiaries to increase their capital
base for a particular business or to improve their production.
This would be in form of material to support business or any other production. It may also be in form of
cash to start a specified business. The benefiting group will pay back equal quantities in terms of numbers
and quality. If paying back will be in form of money (for non-cash items), an amount will be agreed upon
e.g. by putting some interest on the principle so that the amount still buys equal quantities as issued to the
initial group.
5. Beneficiary Selection
a. Characteristics: i. The beneficiary or the group should be committed to the values of the programme; and
ii. The beneficiary or the group should be responsible enough to ably care for the materials
until they are passed on to others.
b. Twinning of individuals/ groups Two sets of beneficiaries should be identified at the same time, the one that will initially receive the
materials and the other to whom the materials will be passed on. The first individual/group will receive in
the presence of the second one. The second group will also help in monitoring the care of materials issued
to the first group.
6. Agreement form Once members receive the material, they will sign an agreement form (annex 7) with the Lending
Organization. This will be witnessed by the local leadership.
7. Provision of materials Provision of the material under pass-on should be done at a public function that is witnessed by the local
leadership including, chiefs, ADC/VDC members and religious leaders. All members targeted to benefit
from the system should be present.

Management of Pass-on Systems
105
The meaning and objectives of the pass-on should be explained to all members in detail. It should be
emphasized that the intention is to ensure that everybody in the programme in the area benefits from the
provided items.
When issuing the materials, the second group will be told that once the materials are ready, they will be
the ones that will receive next so they should be ardent in monitoring the first group.
Once materials are issued, members that have received the materials will sign an agreement stating that
they have received materials in good condition and agree to the whole pass-on arrangement.
Pass-on Agreement
106
Annex 7
Pass-on
AGREEMENT
form
BETWEEN
_____________________________________________ [Name of Lending Organization]
AND
___________________________________________________ [Name of Recipient(s)]
1. Responsibilities of Lending Organization
The lending organization agrees to:
a. Ensure that beneficiaries are fully sensitized and trained before they receive the materials. This
will allow beneficiaries to have enough knowledge to avoid unnecessary loss of materials, for
example through death or reduced productivity;
b. Ensure that the right material is procured/provided by involving a specialist in the procurement of
particular material; and,
c. Make frequent follow up to ensure that beneficiaries get required technical advice in a timely
manner until every member of the group benefits from the scheme.
2. Responsibilities of Recipient(s)
The recipient agrees to do the following:
a. Ensure that they have mobilized themselves into functional groups with strong committees
Know in advance the next group to benefit from the first lot of pass-on. This group will also be
empowered to closely monitor how the first group manages the materials;
b. Construct a standard khola before being issued with livestock;
c. Ensure that the materials are well managed and carefully keep records such as births, deaths and
other development; and,
d. Replace livestock that dies in their care within one (1) month after the occurrence of the death.
NOTE: The Lending Organization and the recipient(s) will meet biannually to review progress of the
initiative.

Lead Farmer Extension and Training Guide
on Sustainable Agriculture
107
3. Reasons to Withdraw Material/Stock
The following will lead to termination of this agreement and the withdrawal of the materials lent out:
a. Deaths of more than 40% within a year in case of issued (in this case the recipient will still have
to replace the dead livestock);
b. A lack of respect for the group’s constitution leading to confusion (for example, fighting over
positions, irregular meetings, unilateral decisions made by influential members) in the group; and,
c. No pass-on takes place within the expected time.
Agreement
FOR LENDING ORGANIZATION
Name: _________________________________________
Position: _________________________________________
Signature: _________________________________________
Date: _________________________________________
FOR RECIPIENT
Name: _________________________________________
Position: _________________________________________
Signature: _________________________________________
Date: _________________________________________