LAW ENFORCEMENT ACTIVITIES DIVISION FUNDAMENTALS …handguntrainingspecialists.com/Shotgun...
13
Edition 6.1 CONTENTS: A. General Overview 2 B. Shotgun Marksmanship Fundamentals 2 C. Buckshot & Slug Ammunition 12 Copyright© 2006 by NRA FUNDAMENTALS OF SHOTGUN MARKSMANSHIP NATIONAL RIFLE ASSOCIATION LAW ENFORCEMENT ACTIVITIES DIVISION
Transcript of LAW ENFORCEMENT ACTIVITIES DIVISION FUNDAMENTALS …handguntrainingspecialists.com/Shotgun...

Edition 6.1
CONTENTS:
A. General Overview 2
B. Shotgun Marksmanship Fundamentals 2
C. Buckshot & Slug Ammunition 12
Copyright© 2006 by NRA
FUNDAMENTALS OF SHOTGUN MARKSMANSHIP
NATIONAL RIFLE ASSOCIATION
LAW ENFORCEMENT ACTIVITIES DIVISION
Shotgun Marksmanship
2
A. GENERAL OVERVIEW:
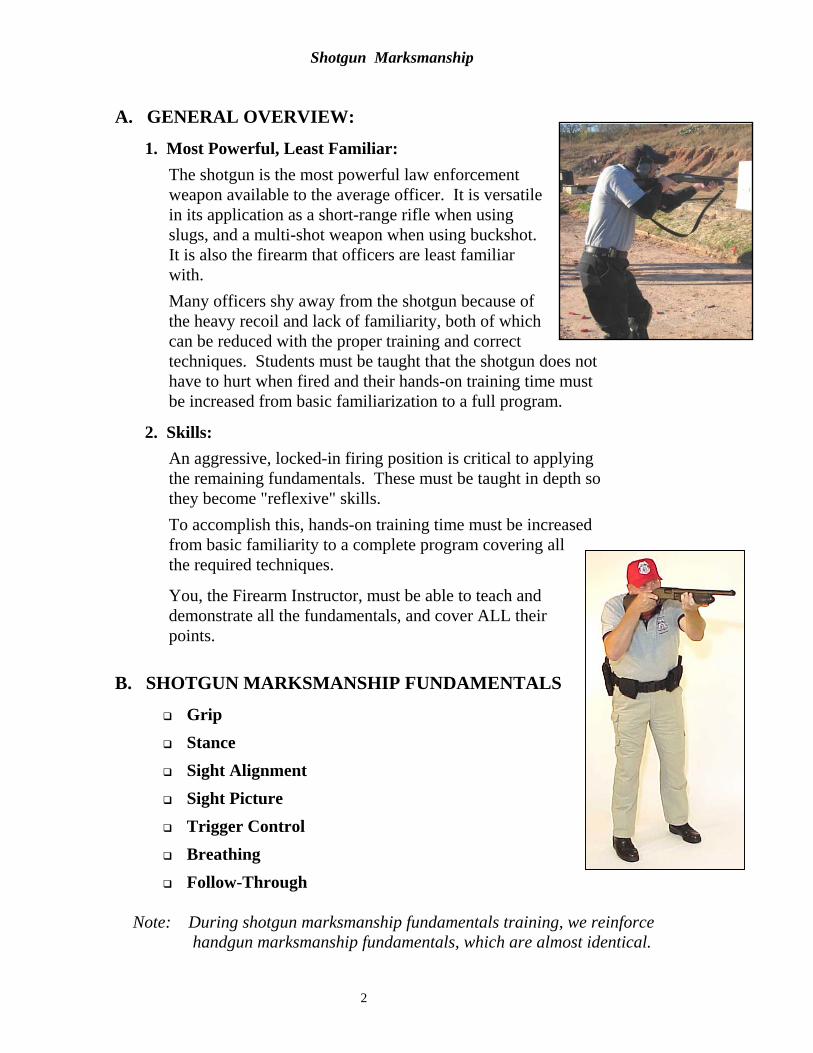
1. Most Powerful, Least Familiar:
The shotgun is the most powerful law enforcement weapon available to the average officer. It is versatile in its application as a short-range rifle when using slugs, and a multi-shot weapon when using buckshot. It is also the firearm that officers are least familiar with.
Many officers shy away from the shotgun because of the heavy recoil and lack of familiarity, both of which can be reduced with the proper training and correct techniques. Students must be taught that the shotgun does not have to hurt when fired and their hands-on training time must be increased from basic familiarization to a full program.
2. Skills:
An aggressive, locked-in firing position is critical to applying the remaining fundamentals. These must be taught in depth so they become "reflexive" skills.
To accomplish this, hands-on training time must be increased from basic familiarity to a complete program covering all the required techniques.
You, the Firearm Instructor, must be able to teach and demonstrate all the fundamentals, and cover ALL their points.
B. SHOTGUN MARKSMANSHIP FUNDAMENTALS
Grip
Stance
Sight Alignment
Sight Picture
Trigger Control
Breathing
Follow-Through
Note: During shotgun marksmanship fundamentals training, we reinforce handgun marksmanship fundamentals, which are almost identical.

Shotgun Marksmanship
3
1. Grip
a. Support Hand Approximately Centered: Support hand is centered on the fore-end with fingers held together or index finger in line with the barrel for fast indexing on a target or threat. The support arm merely “supports” the fore-end, and does not “pull” the stock into the shoulder.
NOTE: If the officer pulls the fore-end to the rear, and maintains constant rearward pressure while firing a pump-action shotgun, the action will appear to be “locked” and the officer will not be able to rack the action. He must first release all rearward pressure on the fore-end and then rack the action to chamber a new round.
b. Shooting Hand: The Shooting Hand grips the stock, pulling it into the shoulder pocket.
For initial correct stock placement: Roll shoulder forward and feel for the pocket. The toe of the stock fits into the shoulder pocket. Do not place butt on the shoulder ball (bone) or the bicep.
c. Both Elbows Down: 1) “Elbows Down” must be used at all times; in a gunfight, officers will
not remember to pull their elbows down when using cover or while moving if they haven’t fired this way consistently in training.
2) Provides solid bone support, which increases stability and reduces fatigue.
3) Reduces the officer’s profile, which is critical when moving in close quarters to prevent elbows and arms from striking doorframes and other objects.
4) Smaller profile = smaller target offered to threat. 5) Keeping the elbows down brings your balance into the centerline of
your body, making movement more natural and fluid. 6) When initially learning to shoulder the shotgun, the shooting elbow
can be raised until the shooter is correctly placing the shotgun’s butt into the shoulder pocket.

Shotgun Marksmanship
4
d. Length of Pull: Recognize that your officers will have arms of varying lengths, and one size does NOT fit all. The addition of body armor and jacket will also affect the fit of the shotgun. The length of pull can be reduced by cutting 1" or 1.5" from the stock, using a collapsible stock, or ordering a short entry stock from the manufacturer.
e. Shooting Hand Clearance: There should be 2 - 3" of clearance between the shooter’s eye and thumb on the stock. Some shooters may have to give up wrapping the thumb over top of the receiver.
Note: “Position" is often applied to the combination of "Grip” and “Stance in long gun training.
These officers have placed the stocks properly in their shoulders so that the gun is lifted into the proper stock weld, and the head does not have to be lowered to thestock. Their elbows are angled down for bone support. They are able to reduce themuzzle flip by avoiding excessive blading of their shoulders.

Shotgun Marksmanship
5
2. Shooting Stance: A law enforcement shooting stance needs to be a stable yet mobile platform from which to fire fast, accurate shots at possibly multiple, moving threats.
Previously in Law Enforcement, we have recognized two common stances in our firearms training, a “bladed” stance, and an “isosceles” stance. In the first stance, the shooter bladed his entire body approximately 30-40º with the shooting elbow raised. In the second stance, the shooter stood with his feet parallel as though on a straight line, and his chest and two arms formed an isosceles triangle.
In keeping with modern training philosophies that we should “bring the street to the range,” firearm instructors should not limit their training to a rigid form of stance and consider the wide variety of positions from which their officers will have to fire when facing real threats in the line of duty.
Officers must be trained to shoot from a variety of positions, including awkward or unconventional positions, rather than just trained with “one” stance. In many situations, an officer will not have the time to get into a perfect stance before firing a shot – he may have to shoot while moving to cover, fire around cover from an awkward or unusual position, or aggress toward the threat while firing if no cover is available.

Shotgun Marksmanship
6
a. Stance Considerations:
In teaching your students how to best position their bodies and hold their shotguns, the following elements should be given consideration:
1) Ability to Fire Accurately a. Consistent Upper Body Position (Grip, Stock Weld, Eye Relief) b. Bone Support - elbows down for long guns
2) Officer Safety (use of cover, including optimal use of body armor) 3) Stability & Balance 4) Mobility & Flexibility 5) Wide peripheral vision 6) Ability to maintain a good position using whatever cover is available
While shooting on the move, the officer should narrow the width of his stance, lower his center of gravity, and point his toes in the direction he is moving. He then turns his upper body position, similar to rotating a tank turret, to quickly fire at the threat if necessary. These officers had to respond quickly to a threats while moving. Rather than stopping to take stationary stances, they rotated their upper body toward the threat and shot on the move.
SHOOTING ON THE MOVE

Shotgun Marksmanship
7
b. Given these considerations, the following Standing Shooting Position will best fit the needs for an officer to prevail in a gunfight:
1) Upper Body: The upper body should face the threat as much as possible. This position: a) Helps maintain stability and good body armor
coverage. b) Allows the officer to see more of the
immediate threat area and scan side and rear areas easily.
c) Allows the officer more flexibility to move in any direction.
d) Helps keep the gun in the shoulder pocket. e) The shooter may have to angle his upper body slightly because of the
ergonomics of his body and the type of shotgun he is shooting (shooters with full sized stocks and shorter arms). Without a collapsible stock, these shooters may have to angle their upper body in order to reach the fore end.
2) Lower Body: The feet are parallel and approximately shoulder-width apart with the Shooting Hand side toe dropped back two to eight inches. This will provide both width and depth to the stance for greater balance. Do not drop the shooting side foot back so far that it draws the shoulder back with it. The feet should be parallel to allow the officer to move quickly in any direction.
3) Aggressive & Balanced: Get aggressively behind the gun. The stance must be balanced front-to-rear and side-to-side with the knees slightly bent so the officer is ready to move instantly in any direction. This aggressive and balanced stance provides better control of the gun and the ability to move as required by a constantly changing situation.
4) Weight Forward: Lean aggressively forward into the stance at the waist. Both knees are slightly bent and the body weight is over the balls of the feet. A forward stance provides greater control over the gun, which will result in reduced muzzle rise and faster follow up shots.

Shotgun Marksmanship
8
Note:
Correct Training Prevents Shotgun Pain
Recoil Generation – A Shotgun generates 25 to 40 pounds of push and will push you back about 1" when using the proper stance.
The Shotgun “Pushes” - Take KICK out of your vocabulary. Use the example of getting hit with a fist (pain), versus being pushed with an open hand (Pressure).
FEMALE SHOOTERS: Women typically have higher cheekbones than men. When the shotgun is properly mounted, women often cannot see the sights. This causes them to have to lift their cheeks off of the stock to see the sights, causing the stock to slam into their faces with each shot, causing bruising and pain. This is NOT because they are not applying the technique correctly – it’s because they can’t see the sights when their cheeks are on the stock. Women can use cheek pads or have Monte Carlo stocks placed on the shotgun to raise the part of the stock where the cheek is mounted so that a proper mount results in a proper sight picture.
Stick-on or Strap-on cheek pieces allow shooters with high check bones to BOTH maintain a stock weld AND see the sights. This photo shows a D&E Scope Eze stock pad designed to raise the line of sight.
Important: Bring the shotgun UP to the head and eyes, not the head down to the gun.

Shotgun Marksmanship
9
3. Sight Alignment: The relationship of front and rear sights.
a. Bead Type Sight: The front sight is a bead that sits on the barrel's rib just back from the muzzle. The eye is not the rear sight. When sighting, use the bead's relationship to the receiver's flat top.
b. Rifle Type Sights: Align according to their particular set-
up.
c. Aperture Type Sight: If the front sight looks like a blade
or post, the top or point of the front sight is centered in the rear aperture. If the front sight looks like a bead, the Bead is centered. If the front sight has protective wings, ensure shooters know to center the sight, and not the wings.
Ghost Ring
Sights with tritium inserts
Shotguns with mounted red dot optic systems are useful when aiming slugs and impact munitions.
EOTech
Doctor

Shotgun Marksmanship
10
4. Sight Picture: The placement of sight alignment on the target.
a. Front Sight in Sharp Focus: (Not the Target)
b. Point of Aim / Point of Impact for Selected Ammunition: Determine where your shotgun and ammunition places projectiles. Aim at the center mass and adjust until you find the Point of Impact in relationship to the Point of Aim. Generally, it will be the center mass, except for shotguns with the bead mounted directly to the barrel with no raised ramp. For these older model guns, the point of impact will rise as the distance increases.
Note: ARC of Movement (Wobble Area): Recognized and Accepted.
Point-of-Aim and Center Mass of the target Offered or Selected.
Eye Dominance: If a shooter is cross-dominant, he will either have to shoot with his non-dominant eye on his shooting side, or mount the gun on the support side and use his dominant eye. It is preferable for the shooter to keep the gun on his shooting side and train to use the non-dominant eye. He may have to close his dominant eye initially while training to use his non-dominant eye.
Keeping Both Eyes Open Will Increase Peripheral Vision.
5. Trigger Control: Movement of the trigger until the gun fires without moving the sights. As with the handgun, it is a mental process and the most difficult fundamental to teach.
a. Finger Contact Between Tip and First Joint: Generally, less is better.
b. No Frame Contact with the Trigger Finger
c. Increase and Decrease of Pressure
d. Maintain Trigger Contact Between Shots: Be careful of shotguns without disconnectors. Some older models such as Winchester Models 12 and 97, and Ithaca Model 37, DO NOT have Disconnectors. If the trigger is held to the rear and the action racked, the shotgun will fire. Be careful of trigger manipulation and check the shotguns your department is using.
e. Let the Shotgun Fire, Do Not Make it Fire
870 With Bead Flat on the Barrel
870 With Raised Bead

Shotgun Marksmanship
11
6. Breathing: Breath control can have a greater impact when firing a long gun than a handgun. The stock is locked into the body and any movement of the body is transmitted to the long gun sights. It is not important to control breathing at distances of approximately 7 yards and closer. When shooting over longer distances or during situations requiring more precise shot placement, breath control becomes more important.
a. Deep breaths increase oxygen in the bloodstream, which will:
1) Strengthen Muscles
2) Clear Vision
3) Aid Concentration
b. Use the Natural Respiratory Pause: This is the pause after natural exhalation and is the ideal time to accomplish trigger press. It is the time when the body is most at rest. It is also the most easily repeated position. Depending on stress levels and physical exertion, the Natural Respiratory Pause can last as long as five seconds. Do NOT let your students take a breath and let half of it out. This position is not so easily repeated and holding in half a lung full of air induces muscular tension into the position.
7. Follow Through:
a. Marksmanship Definition: All fundamentals maintained until the bullet has left the barrel.
b. Instantly Set Up the Next Shot: You may need to fire more than one shot. These four things are done simultaneously:
1) Re-Set Sear: Caution on shotguns without disconnectors.
2) Work Slide Now to Chamber Shell (pump shotguns)
3) Keep Cheek on Stock With Focus on Front Sight
4) Re-Acquire Target (It may have moved)
c. Combat Elements of Follow Through: Ask yourself these questions:
1) Did I hit? 2) Do I need more hits? 3) Are there any other threats?

Shotgun Marksmanship
12
C. BUCKSHOT & SLUG AMMUNITION
1. Maximum Range: The furthest distance a projectile could travel under optimum conditions. It is sometimes called the Downrange Responsibility Area. All distances shown below are for 2 ¾” shells.
a. Buckshot: Maximum Range for 00 and #4 Buckshot is approximately 750 yards.
b. Slugs: Maximum Range is approximately 1700 yards.
c. Birdshot: Maximum Range is approximately 300 yards.
2. Average Effective Range: The furthest distance at which we can expect a well-aimed shot to accomplish our purpose and place ALL the projectiles on target, except for an occasional flyer, under ideal conditions on the range.
a. Buckshot: On average 00 Buckshot is effective to 20 yards and #4 Buckshot is effective to 15 yards.
b. Slugs: The average shotgun and slug combination is effective to 50 yards.
c. Buckshot fired through a Rifled Slug Barrel: None! Buckshot will not pattern effectively through a rifled slug barrel.
3. Testing Firearm and Ammunition Combination: Test the combinations your department is using or considering for use in reference to accuracy, function and performance. Here we are concerned with Buckshot pattern and Slug groups.
A useful way to pattern a shotgun is to test your shotguns with various types of ammunition at various distances. Select the shot which places all pellets on the target at the distances at which you will deploy the shotgun. Select the slug round which gives you the tightest group. Do not fire shot through a rifled slug barrel.
CAUTION - Figures for Maximum Range
and Average Effective Range are rough
approximations for training purposes only.
DO NOT quote as exact.
15 Yard 00 Buck Pattern 20 Yard 00 Buck Pattern 25 Yard 00 Buck Pattern

Shotgun Marksmanship
13
4. Ammunition Inspection: Make sure you are using the correct shells for your shotgun, the particular task and the safety considerations involved.
a. Check Gauge: Usually 12 gauge, but can also be 20, 16 or 10.
b. Check Type: Buckshot or Slugs. NO Buckshot or Slugs if shooting clay birds.
c. Check Chamber Size: Check your barrel to determine what length shell is safe to use in that shotgun (barrel should be stamped). The most common round used is a 2 3/4", but some agencies use a 3". A 2 3/4" shell will function in a 3” chamber, but the reverse is NOT true.
d. Check Condition: Check the overall appearance of shells for wear and tear. Replace if crimp is opening up, filler is coming out, the outside is fuzzy, usually from repeated loading and unloading, or the shell is damaged.
5. Less Lethal: If your agency uses patrol shotguns for deploying Less- Lethal projectiles, such as chemical munitions or beanbag rounds, establish clearing steps to ensure all lethal shotgun rounds have been removed from the shotgun before deploying it and loading Less-Lethal ammunition.
Many agencies dedicate specific shotguns for Less-Lethal rounds and paint the shotgun stock to indicate its use for this purpose. Composite replacement stocks are also commercially available which are pigmented red, orange or yellow and are intended to allow the shotgun’s user to clearly see that it is designated for less lethal munitions only.
* End of Chapter *
See Technical Set on The Law Enforcement Shotgun in Section O for more detailed information
on the shotgun.