Land Development Booklet - Ministry for Primary...
40
A A guide for West Coast Farmers Disclaimer: Every care has been taken in compiling this book to ensure that the information is accurate and current; however the authors do not accept liability for any errors or omissions, or the results of any action taken on the basis of the information in this publication. Contents Foreword 2 Chapter 1 Understanding West Coast soils 3 Chapter 2 Deciding between flipping or humping and hollowing 5 Chapter 3 Benefits of flipping and humping and hollowing 9 Chapter 4 Preparation before development 12 Chapter 5 Undertaking land development 16 • Flipping 16 • Humping and hollowing 19 Chapter 6 Managing developed land 26 • Machinery safety 26 • Lime and fertiliser – Pre-planting 26 • Pasture species 28 • When to sow 30 • Pasture sowing management 30 • Nitrogen 30 Chapter 7 Financial cost / benefit of development 32 Glossary of terms 37 Appendices A. West Coast Regional Councils rules and regulations 38 B. Further reading 39 C. Land development checklist 40
-
Upload
nguyencong -
Category
Documents
-
view
218 -
download
3
Transcript of Land Development Booklet - Ministry for Primary...
AA guide for West Coast Farmers
Disclaimer:Every care has been taken in compiling this book to ensure that the information is accurate and current; however the authors do not accept liability for any errors or omissions, or the results of any action taken on the basis of the information in this publication.
Contents
Foreword 2
Chapter 1 Understanding West Coast soils 3
Chapter 2 Deciding between flipping or humping and hollowing 5
Chapter 3 Benefits of flipping and humping and hollowing 9
Chapter 4 Preparation before development 12
Chapter 5 Undertaking land development 16
• Flipping 16
• Humping and hollowing 19
Chapter 6 Managing developed land 26
• Machinery safety 26
• Lime and fertiliser – Pre-planting 26
• Pasture species 28
• When to sow 30
• Pasture sowing management 30
• Nitrogen 30
Chapter 7 Financial cost / benefit of development 32
Glossary of terms 37
Appendices A. West Coast Regional Councils rules and regulations 38
B. Further reading 39
C. Land development checklist 40
2 Land Development by Flipping and Hump and Hollowing
This booklet has been designed to offer West Coast farmers the most up to date information on land development. Since the first booklet on humping and hollowing the alternative option of flipping the land has become well established
The Buller Community Development Co. Ltd. recognised the potential significance of the new techniques for the local economy and was successful in obtaining a MAF Sustainable Farming Fund grant to investigate the benefits of flipping. From the information gathered, and experiences of farmers, contractors and corporate groups such as Landcorp, it was decided to present this information in a booklet together with up to date information on humping and hollowing.
Acknowledgements
This booklet has been prepared by Murray Craighead, Nutrient Solutions Ltd and Richard Reynolds, Dexcel and includes information from Westland Milk Products ‘Hump and Hollow- A Guide for West Coast Farmers (1996).’
With respect to the flipping project, special thanks to the MAF Sustainable Farming Fund grant for assistance in financing this work, to Ross Bishop, Farm Management Consultant and Richard Reynolds for collecting farm data and running field days to Craig Ross Landcare Research for soil and infiltration data, to Stephen Belton, Ravensdown Fertiliser Co-operative Ltd for soil and plant testing and to Mark Burnett, Alex King, Jonno O’Connor, Brian Hateley for access to their data and use of their properties.
Contributors to the update of the information on humping and hollowing include the Regional Action Team whose membership is made up of farmer representatives, Westland Milk Products, Dexcel, the West Coast Regional Council, Federated Farmers, the NZ Landcare Trust, West Coast Fish and Game and the Department of Conservation. The West Coast Regional Council provided up to date information on the rules regarding land development. Thanks to all those individuals and organisations that assisted with the update.
Photographs have been supplied by Craig Ross, Landcare Research, Murray Craighead, Nutrient Solutions Ltd., and from the West Coast Regional Council’s photo bank.
Westland Milk Products and the Buller Community Development Company have sponsored publication of this booklet.
We hope this booklet will assist you as farmers and contractors in making decisions about land development.
Jonno O’ConnorDirector BCDC
Foreword
3A guide for West Coast Farmers
West Coast soils can be loosely categorised into three groups, Pakihi soils, Recent soils and Terrace soils.
Recent soils include;
alluvial soils such as Hokitika and Hari Hari soils along the rivers and those on young fans, eg. Rotomanu soils.
Terrace (or Brown) soils include;
the Ahaura and Ikamatua glacial terraces of the Grey Valley as well assome older fans eg. Eliot soils, andcoastal sands such as Okari soils.
Pakihi (or podzolised) soils of which there are about 200,000 ha on the West Coast are more diverse. These include;
low glacial outwash terraces such as Kumara and Mai Mai soils,
intermediate and high glacial outwash terraces such as Okarito and Kini soils,rolling pakihi soils such as Waiuta soils (at Bell Hill) and
pakihi soils on the coastal marine benches such as the Addison, Utopia and Charleston soils at Cape Foulwind. small areas of peat soils are also found usually associated with old swamp areas and behind coastal dunes.
Pakihi soils are the name for podzolised and gley podzolised brown soils which develop under high rainfall where high leaching accumulates iron and aluminium oxides, humus and sometimes clay in the subsoil leading to iron and humus-iron pans which impede drainage. High accumulation of litter, particularly in very wet and cool conditions leads to high acidity and leaching of nutrients such as nitrate nitrogen, potassium and sulphate sulphur. The high organic matter derived from the top litter also readily retains high amounts of water.
Soils are mainly derived from greywacke and schist (with some sandstone and mudstones), so most tend to be low in the base cations calcium, potassium and magnesium. Nitrogen status is also low despite their high organic matter content. This is because the waterlogged conditions cause anaerobic conditions (lack of oxygen), which not only reduces plant growth but also the mineralisation (release) of nitrogen from organic matter. The wet conditions also lead to micro-organisms producing toxic compounds to plant growth such as sulphides.
••
•••
•
•
•
•
•
Understanding West Coast SoilsChapter 1
4 Land Development by Flipping and Hump and Hollowing
Recent and Terrace soils also generally lack nitrogen, phosphate and sulphur. Recent soils generally have reasonable levels of potassium due to their clay mineralogy, but many Terrace soils do not. Although both soils generally have sufficient magnesium for grass growth, magnesium is often required in spring for animal health purposes.
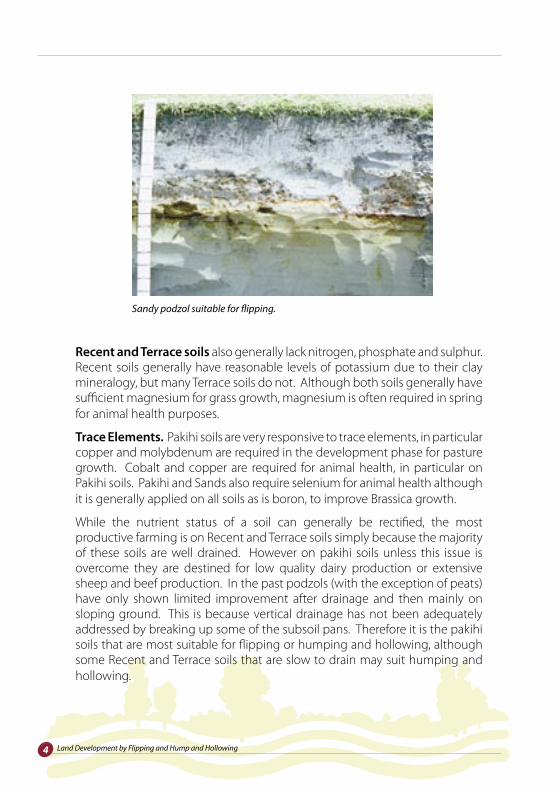
Trace Elements. Pakihi soils are very responsive to trace elements, in particular copper and molybdenum are required in the development phase for pasture growth. Cobalt and copper are required for animal health, in particular on Pakihi soils. Pakihi and Sands also require selenium for animal health although it is generally applied on all soils as is boron, to improve Brassica growth. While the nutrient status of a soil can generally be rectified, the most productive farming is on Recent and Terrace soils simply because the majority of these soils are well drained. However on pakihi soils unless this issue is overcome they are destined for low quality dairy production or extensive sheep and beef production. In the past podzols (with the exception of peats) have only shown limited improvement after drainage and then mainly on sloping ground. This is because vertical drainage has not been adequately addressed by breaking up some of the subsoil pans. Therefore it is the pakihi soils that are most suitable for flipping or humping and hollowing, although some Recent and Terrace soils that are slow to drain may suit humping and hollowing.
Sandy podzol suitable for flipping.
5A guide for West Coast Farmers
Land Development is a very expensive exercise and the process needs to be carefully planned before any land is turned over (see following chapters). Not all Pakihi soils are suitable for flipping. Their suitability depends on their parent material and soil texture, their degree of podzolisation, the amount of organic matter, wetness, the climate and the topography. A lack of vertical drainage is their common theme, usually caused by impervious subsoils of iron and iron-humus pans below cemented sands and gravels or subsoils of silt and clay. The key is to break the top pans and also mix the water saturated organic matter through a larger soil volume so that water drains away from the rooting zone.
In flipping this is done by inverting and mixing the top layers to a depth suitable to release surface water, at least to 1 m and often to 2-3 m. Several pans may be broken to do this, and water generally drains away to appear again at some lower point or drain.
With humping and hollowing the hollow where the pilot drain is, is usually at the depth of the top pan (to give a firm base) and the soil above this is mounded on the adjacent area so water then runs from it to the pilot drain and then away to a main drain. This sequence is repeated across the paddock.
Details of these processes are given in the following chapters.
What is soil texture?
Soil texture is the proportion of sand, silt and clay in the soil, sandy soils have a high proportion of sand, relative to silt and clay; and silt and clay loams a higher proportion of silt or clay relative to the others.
The easy way to identify what your soil is, is to wet some soil and roll it into a ball (about 20 mm across). Press it between your thumb and forefinger.
If you cannot make a ball or either the ball collapses easily or is very soft, then the soil contains a high proportion of sand. It will also feel gritty and make a rasping sound when rubbed. Silty soils will feel smooth, more firm than sands and will crack nicely when you press the ball. Clay soils will easily form a ball but will be extremely sticky to work.
Sandy soils generally contain at least 75-85% sand and are the coarser material. They pack less but dry out quickly so are therefore prone to wind blow during the development phase.
Clay soils contain at least 35% clay and consist of the finest material. They pack the most and are the most difficult to cultivate at both extremes of moisture
•
•
•
Chapter 2 Deciding Between Flipping or Hump and Hollowing
6 Land Development by Flipping and Hump and Hollowing
(either too sticky or too hard). Clay soils go very plastic when wet and so are extremely prone to pugging damage.
The extent of organic matter and the water holding capacity of a top soil is easily found by looking at the soil and seeing how much vegetative matter is present and how much water can be squeezed from the top soil by hand.
If you are unsure about your soils suitability for development dig a few holes to look at the profile and obtain advice from farmers and contractors with previous experience. The cost of getting a digger in to dig some test holes is small compared to the cost of developing the wrong area of the farm
Which is more appropriate flipping or humping and hollowing?
Both methods can be used on the West Coast to improve soil drainage with neither suiting all soil types or desired outcomes.
Apart from the soil textural issues which restrict which soils that can be flipped, there are several factors that affect the cost of flipping or humping and hollowing. These are;
The amount of soil that needs to be moved. The depth of soil that needs to be moved for flipping or the height and size of the hump when humping and hollowing. The energy required to move the soil. This is affected by such things as the degree of cementation of upper layers, the hardness and number of pans, the amount of and size of stones.The wetness of the profile at the time and the amount of debris are also important. In some situations there may be a need to manually pick up wood.
The more effort required the longer it will take to develop a hectare of land and the higher the cost
What soils suit flipping?
It is difficult to make specific soil type recommendations due to the variable nature of these soils. Also while some soils may agronomically suit flipping it may not be economic to do so because of the volume (i.e. depth) of soil that needs to be moved. The increase in production may also not justify flipping.
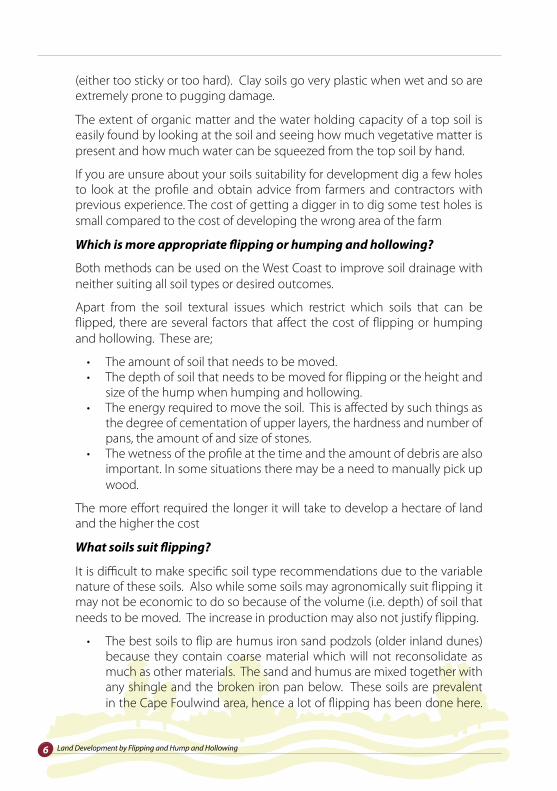
The best soils to flip are humus iron sand podzols (older inland dunes) because they contain coarse material which will not reconsolidate as much as other materials. The sand and humus are mixed together with any shingle and the broken iron pan below. These soils are prevalent in the Cape Foulwind area, hence a lot of flipping has been done here.
••
•
•
•

7A guide for West Coast Farmers
Local examples are Utopia, Charleston, Marris and Sanatorium soils.
It is more marginal to flip humus iron podzols and gley soils developed from stony alluvium which have a pan above gravel or boulders. It really depends on the texture of the soil also in the profile, the depth to which it is necessary to flip and the size and number of boulders. Where larger boulder type material is present in the subsoil flipping is a slower and harder process and hence it becomes less economic. These soils appear on terraces and fans. In the Westport region Addison, Waimangaroa, Millerton, Omanu, Rochfort, Trent and Jones soil series are good examples of these as are the rockier Mai Mai soils in the Upper Grey Valley.
It is not viable to flip poorly drained soils of a silt or clay texture as they are too fine and will quickly reconsolidate after flipping causing a rapid decline in water infiltration. These soils should be hump and hollowed. These soils appear on terraces, fans, riverflats (gley recent soils) and interdune hollows (gley soils). Podzols in areas such as Bell Hill, eg. Waiuta soils, tend to fall into this category as do Okarito soils in the Inangahua, Grey and Hokitika regions. In the Westport region they are represented by O’Malley, Waites, Sim, Lockington, Orowaiti, Kamaka and Seaton soils.
Some podzols have excessive humus content which can cause a pan or in conjunction with iron, an iron-humus pan, both of which can impede drainage. If these are shallow then you may be able to flip these and dilute them by mixing them through the stony subsoil. However if they are deep, it will not be economic to do this and they are better hump and hollowed. Some Mai Mai pakihi soils e.g. in the Mai Mai Valley near Reefton are a good example of these marginal soils.
•
•
•
Silty soil best suited to hump and hollowing.
8 Land Development by Flipping and Hump and Hollowing
More details of soil types can be obtained from soil maps, available from Landcare through the Manaaki Whenua Press at Lincoln, www.mwpress.co.nz.
What soils suit humping and hollowing?
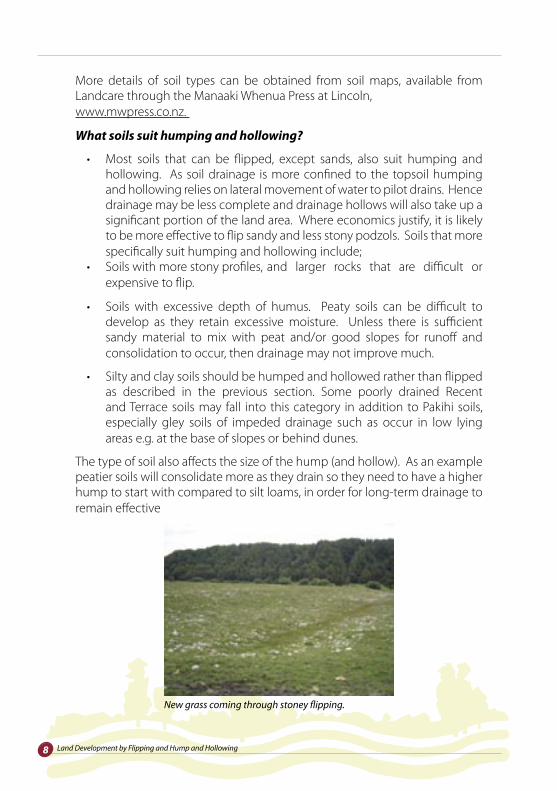
Most soils that can be flipped, except sands, also suit humping and hollowing. As soil drainage is more confined to the topsoil humping and hollowing relies on lateral movement of water to pilot drains. Hence drainage may be less complete and drainage hollows will also take up a significant portion of the land area. Where economics justify, it is likely to be more effective to flip sandy and less stony podzols. Soils that more specifically suit humping and hollowing include;Soils with more stony profiles, and larger rocks that are difficult or expensive to flip.
Soils with excessive depth of humus. Peaty soils can be difficult to develop as they retain excessive moisture. Unless there is sufficient sandy material to mix with peat and/or good slopes for runoff and consolidation to occur, then drainage may not improve much.
Silty and clay soils should be humped and hollowed rather than flipped as described in the previous section. Some poorly drained Recent and Terrace soils may fall into this category in addition to Pakihi soils, especially gley soils of impeded drainage such as occur in low lying areas e.g. at the base of slopes or behind dunes.
The type of soil also affects the size of the hump (and hollow). As an example peatier soils will consolidate more as they drain so they need to have a higher hump to start with compared to silt loams, in order for long-term drainage to remain effective
•
•
•
•
New grass coming through stoney flipping.
9A guide for West Coast Farmers
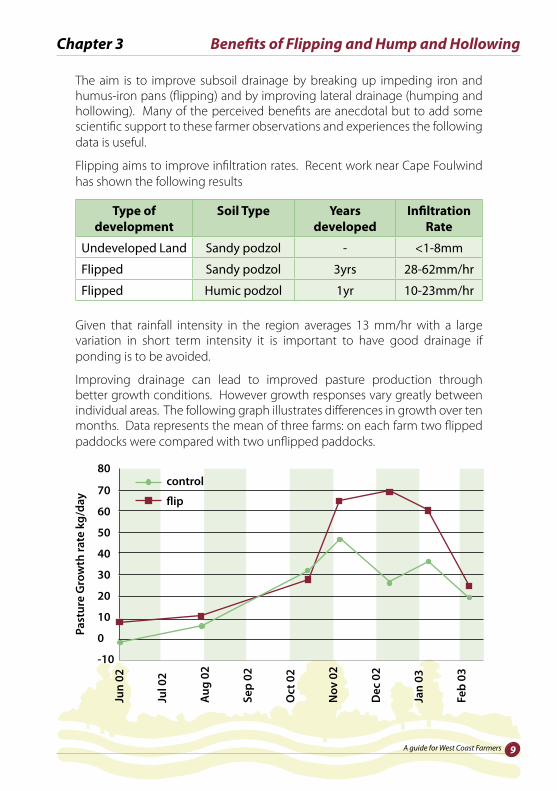
The aim is to improve subsoil drainage by breaking up impeding iron and humus-iron pans (flipping) and by improving lateral drainage (humping and hollowing). Many of the perceived benefits are anecdotal but to add some scientific support to these farmer observations and experiences the following data is useful. Flipping aims to improve infiltration rates. Recent work near Cape Foulwind has shown the following results
Given that rainfall intensity in the region averages 13 mm/hr with a large variation in short term intensity it is important to have good drainage if ponding is to be avoided.
Improving drainage can lead to improved pasture production through better growth conditions. However growth responses vary greatly between individual areas. The following graph illustrates differences in growth over ten months. Data represents the mean of three farms: on each farm two flipped paddocks were compared with two unflipped paddocks.
Benefits of Flipping and Hump and HollowingChapter 3
Type of development
Soil Type Years developed
Infiltration Rate
Undeveloped Land Sandy podzol - <1-8mm
Flipped Sandy podzol 3yrs 28-62mm/hr
Flipped Humic podzol 1yr 10-23mm/hr
10 Land Development by Flipping and Hump and Hollowing
Over 10 months the flipped paddocks produced 9,000 kgDM/ha or 42% more dry matter than unflipped paddocks. However this may not tell the full story as flipping reduces pugging leading to more grazing days and better utilisation of pasture over a full year.
Improved drainage gives farmers the ability to introduce, and in the long term, retain improved pasture species. These have higher production, higher feed value and compete and respond more efficiently to lime and fertiliser. On one farm the three-year average dry matter production for three flipped paddocks grown under a high fertility (nitrogen) regime and using new pasture species was in excess of 18,000 kgDM/ha. This indicates the potential if drainage can be substantially improved.
Increased carrying capacity. Landcorp have observed improvements in carrying capacity from <1 cow/ha to 1 1⁄2 cows/ha with drainage and pasture development only. This increases to upwards of 3 cows/ha if the land is flipped and new pasture established. Another farmer has observed similar improvements from flipping existing pasture from 1 1⁄2 cows/ha to 3 cows/ha.
More specifically on three farms milk production increased over six seasons by 58, 65 and 71%. Much of this improvement can be attributed to significant portions (40-60%) of the properties being developed by flipping and/or humping and hollowing.
Many farmers find in practice they may not necessarily increase stocking rates much with flipping or humping and hollowing. Rather it allows them to retire their most marginal land, to retain areas of native bush and it makes farming much easier as the land is more usable. Consequently stock health is improved with reduced incidence of mastitis, metabolic stress related problems and lameness.
Drier conditions allow for wintering of cattle, calving dates to be brought forward and maintaining cow condition which means more cows are in milk for longer.
Lime and fertiliser can be applied by ground rather than by aerial application saving costs. Stock movement is easier to manage. Weed control is also easier to manage and less of a problem.
Many farmers believe their land is more attractive and therefore more valuable.
•
•
•
•
•
•
•
•
11A guide for West Coast Farmers
Specific problems farmers attribute to less developed land are;
More feed supplements required
more animal health issues
poorer pasture utilisation
shorter milking season (later calving, earlier drying off )
return to oestrus
more nitrogen use
increased turnover of pastures
less opportunity for regrassing
more weeds (buttercups, rushes)
more vehicle damage
greater dependence on run off and feed pads
limited potential and less general satisfaction and confidence in farming.
•
•
•
•
•
•
•
•
•
•
•
•
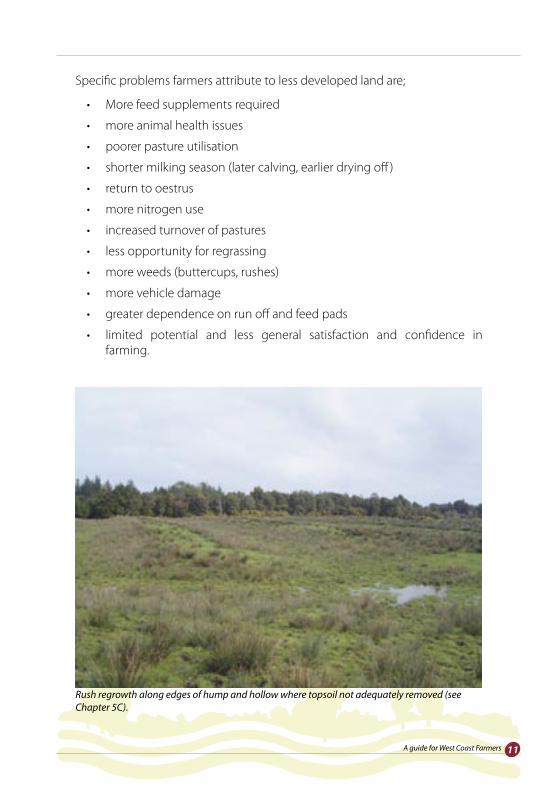
Rush regrowth along edges of hump and hollow where topsoil not adequately removed (see Chapter 5C).
12 Land Development by Flipping and Hump and Hollowing
Once you have made the decision to improve the drainage of a wet area of the farm the first step is to plan what you are going to do. In particular, the order in which things will occur, the timing of operations, the availability of contractors, the equipment required, the likely cost and benefits of the development and how this is to be financed.
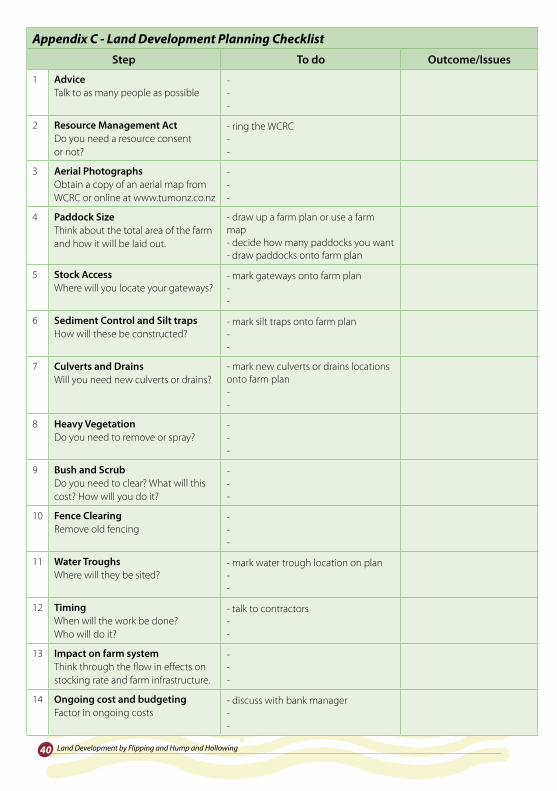
There are 14 steps to consider before starting development. Refer to Appendices C for a Planning Checklist to fill in.
1. Seek AdviceDo not rush into anything without thinking and planning. Take time to talk to farmers who have done this work on their properties. Talk to contractors experienced in land development as they can provide loads of useful tips. It is also advisable to consult a farm adviser as they have probably seen work all over the West Coast and in every type of soil and conditions.
The thing to remember is if you are going to spend $2500 -$5500 per hectare on land improvement you want it to be done right the first time. The best way to achieve this is to put the effort into the planning phase.
2. Resource Management Act. Land development by flipping or humping and hollowing is likely to require a resource consent. Specifically any development exceeding 5 ha in a calendar year requires a resource consent and any work involving the disturbance of a waterway or swamp and the clearing of vegetation will more than likely require a resource consent. Smaller areas will be subject to land slope conditions and their proximity to a creek, for example where slopes are >12O and within 5 m of a creek then a resource consent would also be required. Failure to do so may incur a subsequent infringement or abatement notice or prosecution. Contact the West Coast Regional Council to check resource consent requirements and to determine what mitigation is necessary to avoid adverse effects and to comply with relevant rules.
Of considerable concern, particularly with humping and hollowing is the effect that contouring work has on waterways. As there is risk of erosion and sediment runoff to waterways, where possible land development should be confined to the driest times of the year. Riparian strips should be maintained along the banks of creeks to reduce soil and nutrient runoff and suitable ways found to minimise erosion where main drains feed into creeks. Banks must be stabilised as quickly as possible.
Regional Council rules for Humping and Hollowing can be found on their website www.wcrc.govt.nz or in Appendix 1 at the back of this handbook OR call 0508 800 118 and ask to speak to a Consents Officer.
Preparation Before DevelopmentChapter 4
13A guide for West Coast Farmers
Remember even if you don’t need a resource consent you must tell the Regional Council before you start work (see Condition (i) of the permitted activity rule).
3. Aerial Photographs/GPS MappingAerial photographs are a big help to contractors especially when large blocks are being developed. In a large area they are especially helpful with drainage direction and planning contours. Also it will help with fencing and budgeting to know the area that is to be developed. Maps may be available from the regional council or from web sites such as www.tumonz.co.nz or www.earth.google.com
4. Paddock sizeThink about the total area you are developing and into how many paddocks you want the area divided. Draw this on paper to discuss with your contractor.
5. Stock AccessStock access onto humping and hollowing will vary depending on the design and hardness of the humping and hollowing when complete. Get advice from local farmers who have done humping and hollowing. Have your gateways marked so the contractor can plan the humps. It is better to have two gates into the paddock for grazing and pasture management.
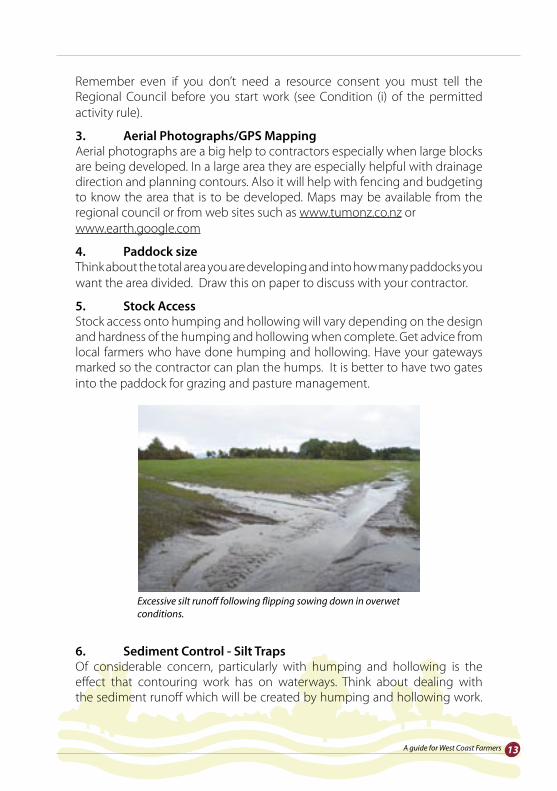
6. Sediment Control - Silt TrapsOf considerable concern, particularly with humping and hollowing is the effect that contouring work has on waterways. Think about dealing with the sediment runoff which will be created by humping and hollowing work.
Excessive silt runoff following flipping sowing down in overwet conditions.
14 Land Development by Flipping and Hump and Hollowing
You will probably need to put in silt or sediment traps. You may also need additional sediment control measures such as haybale fences.
As there is risk of erosion and sediment runoff to waterways, where possible land development should be confined to the driest times of the year. Riparian strips should be maintained along the banks of creeks to reduce soil and nutrient runoff and suitable ways found to minimise erosion where main drains feed into creeks. Banks must be stabilised as quickly as possible.
Mark the location of your riparian margins and sediment traps on your farm plan.
7. Culverts, and DrainsThink about where the increased run off will go. You may need culverts under races or to existing drains or streams. Mark these on your plan.
8. Heavy VegetationIf there is gorse or manuka scrub present it is best to spray this up to six months before work commences. This will help the contractor especially if it has been crushed (and perhaps burnt) and also help to limit regrowth after cultivation.
9. Bush and ScrubThe clearing of bush and scrub can dramatically add to the cost of development with heavy bush having cost some farmers $3500/ha to clear before any form of drainage was carried out. One of the main issues is the disposal of trash. Large material must be removed, although smaller litter can be buried with flipping. Excessive burying of trash may cause problems with later cultivation and long-term cause slumping problems leading to ponding.
10. Fence ClearingMake sure you identify and remove old fences. A couple of hundred metres of rusty barbed wire wrapped around the digger’s tracks is not designed to improve the disposition of your contractor. It will cost you extra for any delays.
11. Water TroughsThink about where these need to be sited. Stock often camp around gateways and troughs so to avoid pugging it may be a good idea to site them away from gateways. It is a good idea to have two troughs per paddock as this will make break feeding easier and will increase the availability of water to stock.
12. TimingExcavation is a slow process, so think ahead as to when is the ideal time to sow the new pasture. As this is normally autumn, work backwards. In order to minimise sediment runoff ideally excavation should occur at the driest time
15A guide for West Coast Farmers
of the year although this is often difficult to gauge. It may also be possible to negotiate a cheaper rate with the contractor doing excavation during the winter. Consider contracting out major items such as fencing, sowing etc. to keep to time.
13. Effect of land improvement on the farm systemConsideration also needs to be given to what effect improving soil drainage will have on the whole farm system. When developing existing pasture there is a risk of creating a short term feed shortage that needs to be budgeted for. One of the effects is that with improved drainage there is a need to carry a higher stocking rate to utilize the extra feed. This can create issues for the farm in the future - Can the farm infrastructure meet the increased cow numbers? Will you need a bigger shed? How will it impact on the amount of staff required? Will you need a bigger tractor ? It is important you consider the flow on effects at the start of the process.
Another effect of improving drainage on some of the farm is that with an increased stocking rate the less developed paddocks that used to be relatively dry may struggle under a higher stocking rate and in the future require development.
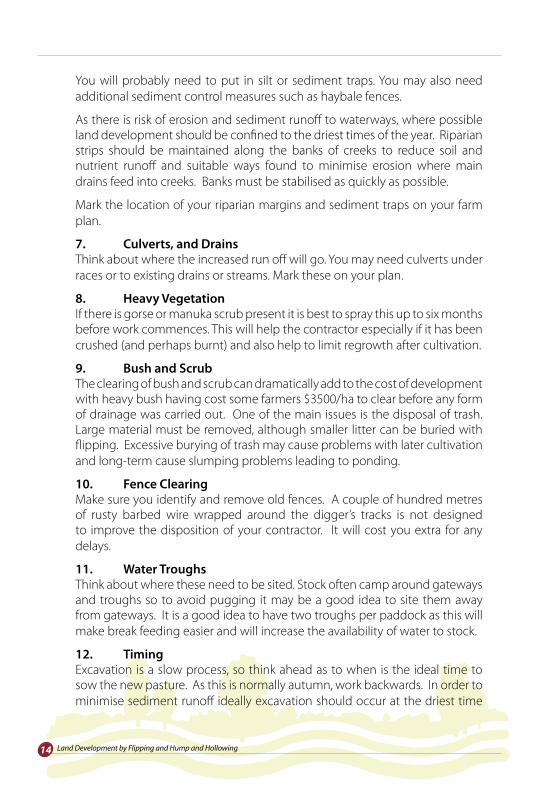
14. On-going costs and budgetingFarmers need to be aware of the significant on-going costs which result from development. The most obvious are an increased use of fertiliser, and in particular nitrogen, in the first three years, follow up lime and increased spot spraying of weeds such as gorse as pasture reaches maximum production in year 2-3. Maintenance inputs will also be higher due to the higher production. Often getting the paddock in grass is only half the cost of the development.
Initial digging to necessary depth.
16 Land Development by Flipping and Hump and Hollowing
Flipping
Flipping is an art not a science. In the early days the process has sometimes had to be repeated once a better understanding of what each site specifically required, in particular the depth to which flipping needed to occur.
1. Pre excavationConsideration needs to be given to where the water that is released as a result of flipping will go. Although it seeps away, eventually it will move to some lower point. It is pointless developing one area and having the water move directly into another productive area and causing excessive waterlogging. Hence it may be important to have initially opened up main drains further down the property to take this water away. One option is to clean out main drains the previous year.
If flipping is to be carried out on previously undeveloped land existing vegetation becomes an issue. Brush must be adequately removed (e.g. burnt). It is also desirable to spray out excessive gorse and preferably crush and burn, as burying residues ultimately cause two problems. Firstly where large volumes are buried significant localised subsidence may occur leading to long term ponding issues. Secondly where gorse seed appears in the top layers regrowth will occur once pasture is established.
Where semi-developed pasture exists, the vegetation can be adequately flipped without preparation as there is often sufficient volume of soil to adequately dilute it through the profile.
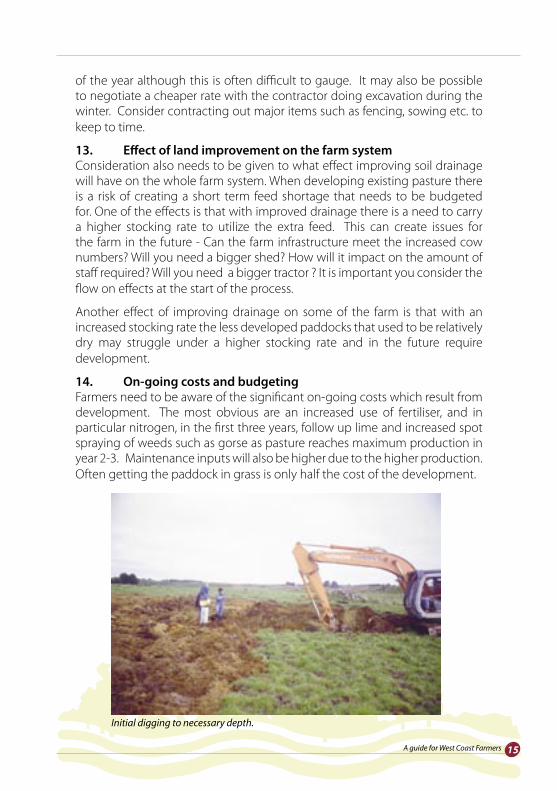
2. ExcavationThe process initially involves the digger removing the topsoil and putting it to the side and then digging to the depth required to break the top pans to improve vertical drainage. Once the digger operator has sufficient working space in front of the digger he starts mixing the subsoil gravels with previous topsoil filling in as he goes. The process is slow and depending on the size of the excavator (many are 12 or 20 tonne diggers, but they can range from 7-30 tonne) it can take 18-45 hrs/ha. As the soil profile is fluffed up the resulting land looks like a moonscape of piles of soil (see photos).
The depth may vary between 1-3 m depending on the soil texture and the number of pans it is felt necessary to break. For example 1m may be adequate in sandy soils where the main pan is near the surface. However a greater depth may be required if there is a lot of organic matter in the topsoil or multiple pans exist and it is necessary to bring up more gravel to mix. Be prepared to adjust flipping depth across the site.
Chapter 5 Undertaking Land Development
17A guide for West Coast Farmers
Iron pans can be hard to penetrate, in one instance on sandstone country it was necessary to use a ripper on the digger to pre-rip the site before the bucket was used for mixing.
At the other extreme there are physical constraints as to how deep a digger can go especially if there is more bouldery material in the subsoil. It is generally felt that if the water table can be moved at least 1 m down the profile then there is suitable buffer for it to disperse to prevent ponding in very high rainfall events.
Depth also needs to consider the contour, on slopes some farmers go deeper to reduce the amount of water moving laterally as this quickly seeps out further down the slope causing erosion at the seep line and reduced growth and utilisation of resulting pasture. As some interdurnal areas will be silty gley soils with poor drainage these areas should be hump and hollowed (i.e. lateral drainage should be utilised) rather than the whole site being flipped. If these areas are too small or this is impractical they could be deliberately set aside as wetlands and/or fenced off as ponding areas.
A further option recently tried on gravels (which could be considered marginal to flip) has been to dig large trenches to a flipping depth every 12 m or so. The inter-trench sloppy material is then moved to the trench and mixed with the original material removed from the trench. While this compromise improves both vertical and lateral drainage of a soil it is not as successful as flipping.
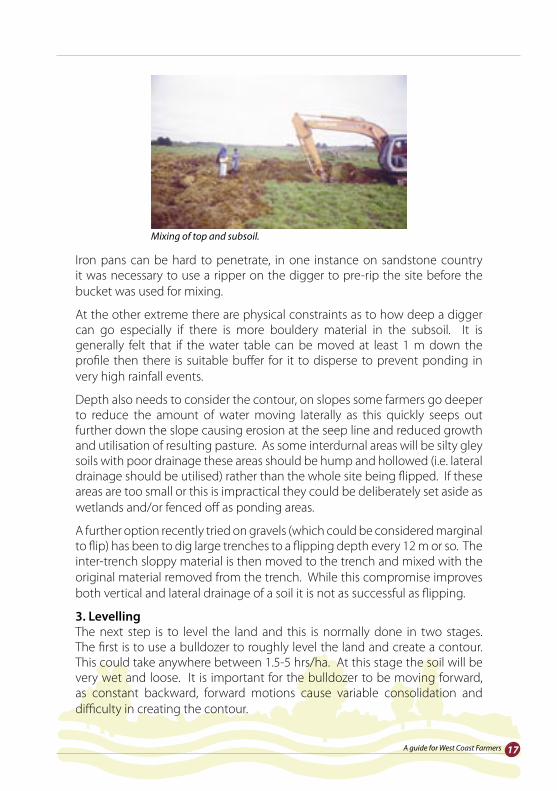
3. LevellingThe next step is to level the land and this is normally done in two stages. The first is to use a bulldozer to roughly level the land and create a contour. This could take anywhere between 1.5-5 hrs/ha. At this stage the soil will be very wet and loose. It is important for the bulldozer to be moving forward, as constant backward, forward motions cause variable consolidation and difficulty in creating the contour.
Mixing of top and subsoil.
18 Land Development by Flipping and Hump and Hollowing
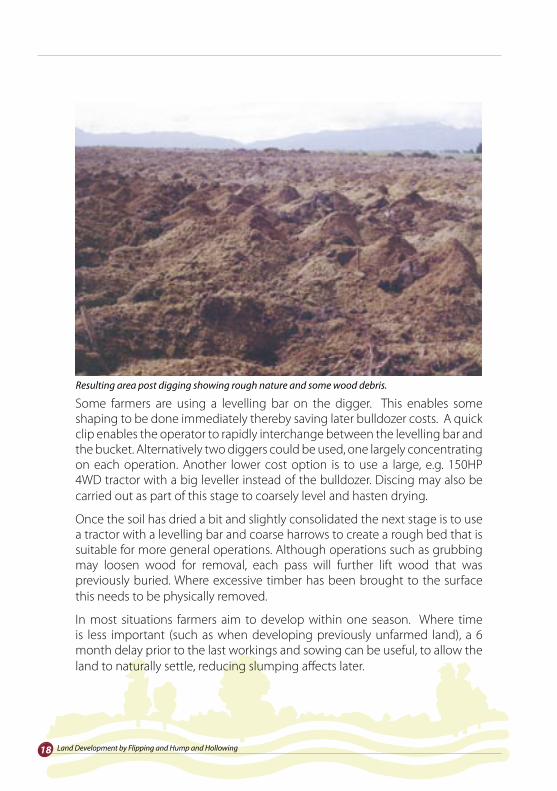
Some farmers are using a levelling bar on the digger. This enables some shaping to be done immediately thereby saving later bulldozer costs. A quick clip enables the operator to rapidly interchange between the levelling bar and the bucket. Alternatively two diggers could be used, one largely concentrating on each operation. Another lower cost option is to use a large, e.g. 150HP 4WD tractor with a big leveller instead of the bulldozer. Discing may also be carried out as part of this stage to coarsely level and hasten drying.
Once the soil has dried a bit and slightly consolidated the next stage is to use a tractor with a levelling bar and coarse harrows to create a rough bed that is suitable for more general operations. Although operations such as grubbing may loosen wood for removal, each pass will further lift wood that was previously buried. Where excessive timber has been brought to the surface this needs to be physically removed.
In most situations farmers aim to develop within one season. Where time is less important (such as when developing previously unfarmed land), a 6 month delay prior to the last workings and sowing can be useful, to allow the land to naturally settle, reducing slumping affects later.
Resulting area post digging showing rough nature and some wood debris.
19A guide for West Coast Farmers
4. Seedbed PreparationIdeally lime should be applied part way through the levelling process, once it can be worked into the soil to a greater depth. Some levelling must first be undertaken to ensure it can be safely and representatively spread.
Any further liming material and capital fertiliser can be applied in the latter stages of levelling. Any sowing fertiliser should be broadcast just prior to sowing.
The actual cultivation required to achieve a seedbed will vary according to the previous processes carried out. Often these are minimal due to the sandy nature of the site.
Conventional sowing is usually followed by rolling with a Cambridge roller (unless a roller drill has been used). With broadcasting, harrows would be better in front of the roller to incorporate seed (see following chapters for more specific details).
Humping and hollowing
1. Main Tracks A lot of time and money can be saved with planning and formation of the main races or tracks before any other development is done. This allows for a direct route to the cowshed to be planned without having to work around humping and hollowing later. Main drains and pilot drains can then be worked around the main race. This main race also gives good access to the areas being developed.
2. Main Drains The main drainage system should be dug first. These drains will then dictate the direction of the hump and hollows. They will also control the maximum depth of the hollow and the height of the hump. The bottom of the main drain should be one metre below the bottom of the hollow.
There should be a fall of at least 300 mm from the bottom of the hollow to the main drain. If it is less than this the main drains are too shallow and this will hinder drainage.
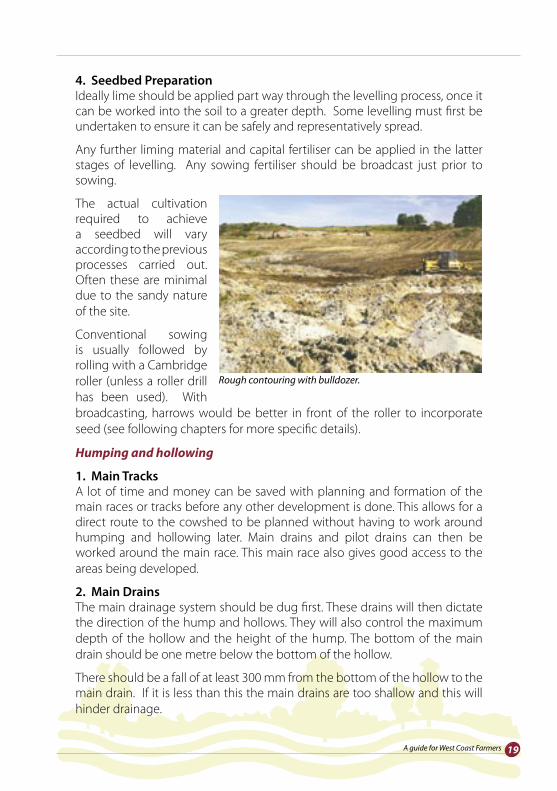
Rough contouring with bulldozer.
20 Land Development by Flipping and Hump and Hollowing
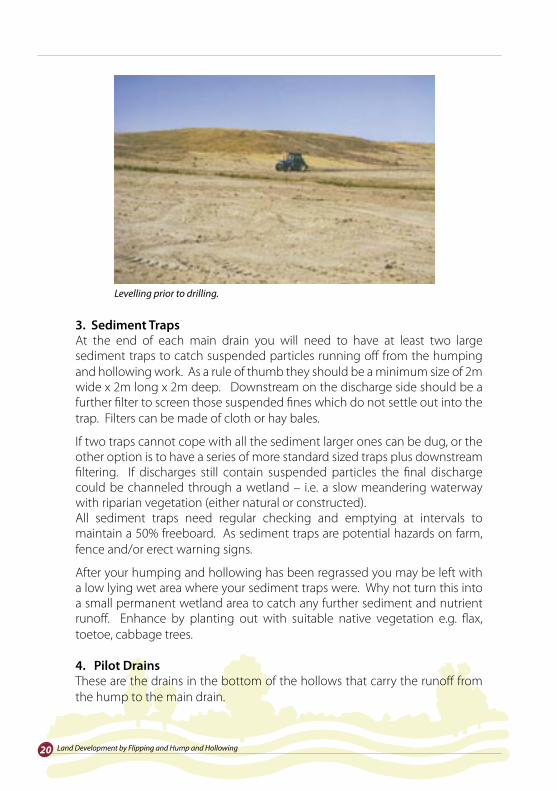
3. Sediment TrapsAt the end of each main drain you will need to have at least two large sediment traps to catch suspended particles running off from the humping and hollowing work. As a rule of thumb they should be a minimum size of 2m wide x 2m long x 2m deep. Downstream on the discharge side should be a further filter to screen those suspended fines which do not settle out into the trap. Filters can be made of cloth or hay bales.
If two traps cannot cope with all the sediment larger ones can be dug, or the other option is to have a series of more standard sized traps plus downstream filtering. If discharges still contain suspended particles the final discharge could be channeled through a wetland – i.e. a slow meandering waterway with riparian vegetation (either natural or constructed).All sediment traps need regular checking and emptying at intervals to maintain a 50% freeboard. As sediment traps are potential hazards on farm, fence and/or erect warning signs.
After your humping and hollowing has been regrassed you may be left with a low lying wet area where your sediment traps were. Why not turn this into a small permanent wetland area to catch any further sediment and nutrient runoff. Enhance by planting out with suitable native vegetation e.g. flax, toetoe, cabbage trees.
4. Pilot DrainsThese are the drains in the bottom of the hollows that carry the runoff from the hump to the main drain.
Levelling prior to drilling.
21A guide for West Coast Farmers
There should be a 200 mm rise from the bottom of the pilot drain to the start of the contour of the hump. Drains in pakihi and peat ground should be deeper to allow for the greater run off.
Over time drains will fill with sediment so they may need clearing on a regular basis to ensure maximum runoff is obtained.
Additional sediment control should be installed at the outlet of each pipe drain. Waratahs and hay bales work well. These should be maintained in place until grass has been established on the humping and hollowing. (Also see above)
Some soils benefit from the drains being flipped to maintain a dry bottom and stop rush growth.
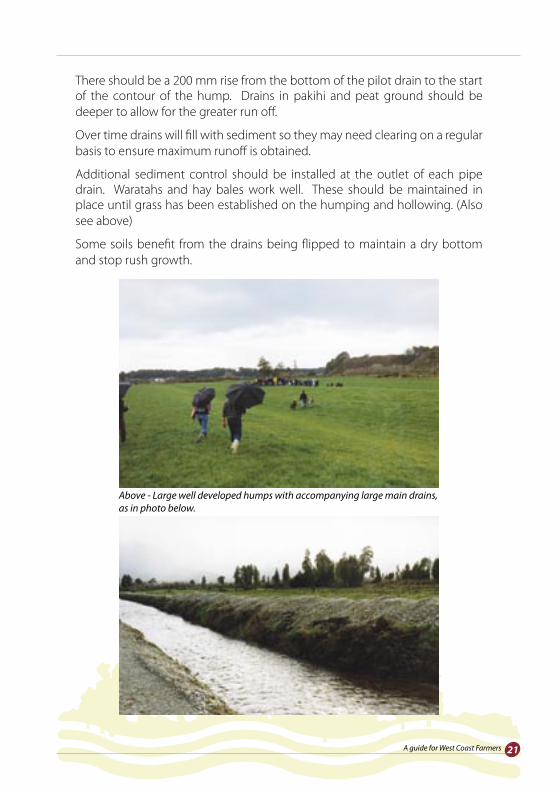
Above - Large well developed humps with accompanying large main drains, as in photo below.
22 Land Development by Flipping and Hump and Hollowing
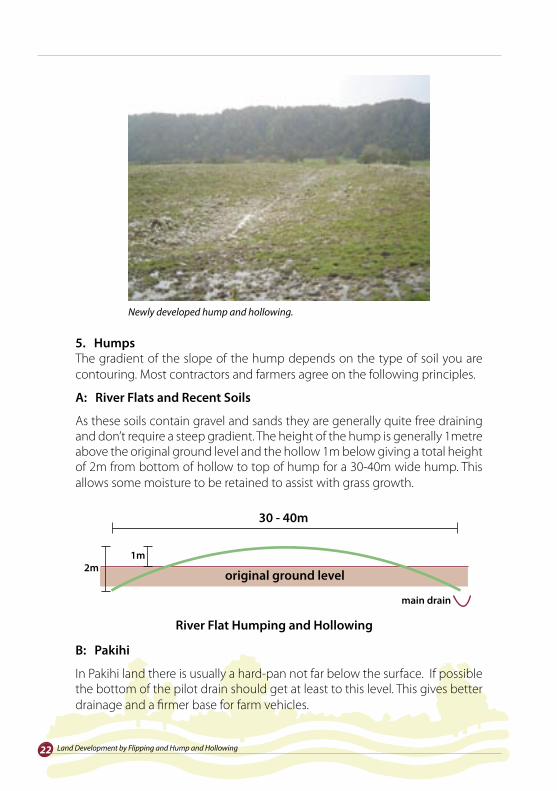
5. HumpsThe gradient of the slope of the hump depends on the type of soil you are contouring. Most contractors and farmers agree on the following principles.
A: River Flats and Recent Soils
As these soils contain gravel and sands they are generally quite free draining and don’t require a steep gradient. The height of the hump is generally 1metre above the original ground level and the hollow 1m below giving a total height of 2m from bottom of hollow to top of hump for a 30-40m wide hump. This allows some moisture to be retained to assist with grass growth.
B: Pakihi
In Pakihi land there is usually a hard-pan not far below the surface. If possible the bottom of the pilot drain should get at least to this level. This gives better drainage and a firmer base for farm vehicles.
Newly developed hump and hollowing.
River Flat Humping and Hollowing
original ground level
30 - 40m
1m2m
main drain
23A guide for West Coast Farmers
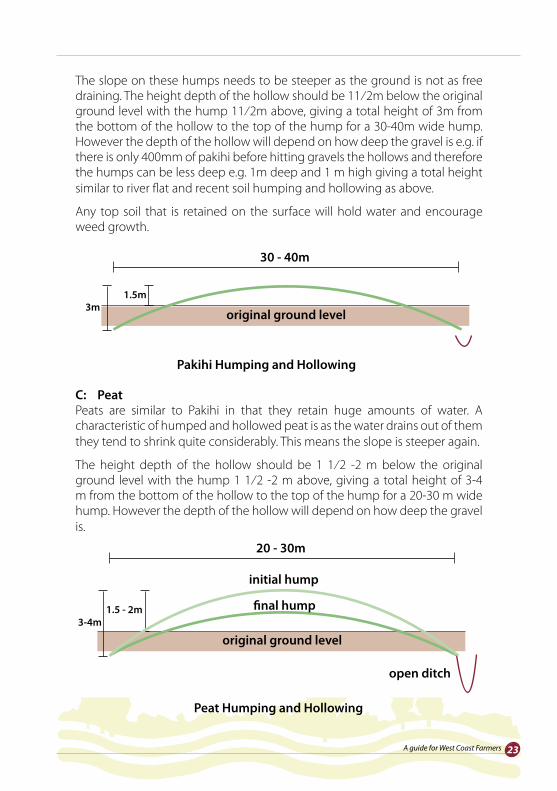
The slope on these humps needs to be steeper as the ground is not as free draining. The height depth of the hollow should be 11⁄2m below the original ground level with the hump 11⁄2m above, giving a total height of 3m from the bottom of the hollow to the top of the hump for a 30-40m wide hump. However the depth of the hollow will depend on how deep the gravel is e.g. if there is only 400mm of pakihi before hitting gravels the hollows and therefore the humps can be less deep e.g. 1m deep and 1 m high giving a total height similar to river flat and recent soil humping and hollowing as above.
Any top soil that is retained on the surface will hold water and encourage weed growth.
C: PeatPeats are similar to Pakihi in that they retain huge amounts of water. A characteristic of humped and hollowed peat is as the water drains out of them they tend to shrink quite considerably. This means the slope is steeper again.
The height depth of the hollow should be 1 1⁄2 -2 m below the original ground level with the hump 1 1⁄2 -2 m above, giving a total height of 3-4 m from the bottom of the hollow to the top of the hump for a 20-30 m wide hump. However the depth of the hollow will depend on how deep the gravel is.
Pakihi Humping and Hollowing
original ground level
30 - 40m
1.5m3m
Peat Humping and Hollowing
original ground level
20 - 30m
1.5 - 2m3-4m
open ditch
initial hump
final hump
24 Land Development by Flipping and Hump and Hollowing
Humps 20-30 m wide are the norm in this type of soil. The pilot drains need to be deeper, up to 1 m for 30 m humps and 1⁄2 m for 20 m humps. It is recommended that there is an open ditch left in the bottom of the hollow, this ditch stops the wet bottom getting higher and higher up the hump. An open ditch it is also easier to clean and maintain. It is also recommended to install culverts for stock crossings through hollows to keep stock out of the drains.
6. MachineryThe two most commonly used pieces of equipment are diggers and bulldozers.
The length of the boom generally dictates the width of the hump when a digger is used. Having to double handle the soil when making larger humps will increase the cost. Some farmers have used a combination of digger and bulldozer, the digger does the rough formation and the dozer the contouring. This gives quicker consolidation, reducing the hump by about 500 mm and allows wheel tractor access sooner. A further option for smoothing out flipping and for humping and hollowing is to attach a leveling bar to an excavator, where one machine can be used for leveling and contouring.
7. FormationBefore digging is commenced it is very important to break up and remove all topsoil and turf from the area that will be the transition from the humped up earth to the subsoil. If this is not done properly you’ll get a line of rushes or reeds along this line halfway up the hump (see photo).
Make sure all stumps are removed and buried in the middle of the humps. Nothing is more annoying than having stumps re¬appear once the ground has settled.
Another point to consider is the head of the hump. Quite often the digger is short of soil there and this can lead to wet areas. It is especially important to make sure these are filled when they are near gateways or water troughs.
8. ConsolidationAfter the initial humping with the digger the humps will still be very wet. These should be left until the soil has dried out enough for a bulldozer to easily work the area. This can take from one week and up to six months. Some farmers do the digger work in the early winter and then leave it for 2 or 3 months to dry out before continuing. Ideally work should be done in the driest months to hasten the process and minimise compaction issues associated with heavy machinery.
25A guide for West Coast Farmers
Another advantage of early winter work is contractors are not so busy with seasonal work at that time.
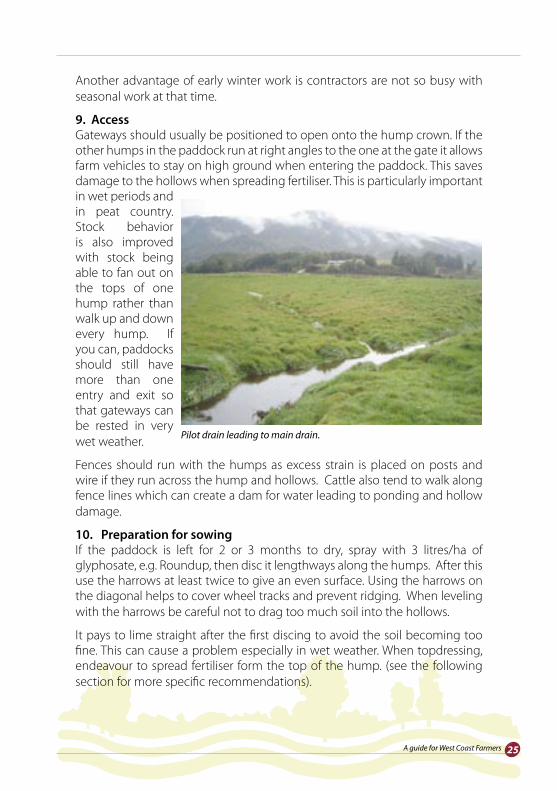
9. AccessGateways should usually be positioned to open onto the hump crown. If the other humps in the paddock run at right angles to the one at the gate it allows farm vehicles to stay on high ground when entering the paddock. This saves damage to the hollows when spreading fertiliser. This is particularly important in wet periods and in peat country. Stock behavior is also improved with stock being able to fan out on the tops of one hump rather than walk up and down every hump. If you can, paddocks should still have more than one entry and exit so that gateways can be rested in very wet weather.
Fences should run with the humps as excess strain is placed on posts and wire if they run across the hump and hollows. Cattle also tend to walk along fence lines which can create a dam for water leading to ponding and hollow damage.
10. Preparation for sowingIf the paddock is left for 2 or 3 months to dry, spray with 3 litres/ha of glyphosate, e.g. Roundup, then disc it lengthways along the humps. After this use the harrows at least twice to give an even surface. Using the harrows on the diagonal helps to cover wheel tracks and prevent ridging. When leveling with the harrows be careful not to drag too much soil into the hollows.
It pays to lime straight after the first discing to avoid the soil becoming too fine. This can cause a problem especially in wet weather. When topdressing, endeavour to spread fertiliser form the top of the hump. (see the following section for more specific recommendations).
Pilot drain leading to main drain.
26 Land Development by Flipping and Hump and Hollowing
Machinery Safety
Special care needs to be taken with driving machinery over humped and hollowed and flipped ground for several different reasons:
Sloping ground needs to be managed differently from flat land when applying fertiliser etc. or simply driving over with a motorbike. Staff may need to be made aware of the dangers particularly if they are not used to traversing undulating ground.Slumping or formation of holes can occur on hump and hollowed and flipped land particularly where timber has been buried. Care needs to be taken for the first 12 months on newly developed land.
Lime and Fertiliser – pre plant
Both processes move considerable volumes of soil, in particular flipping. These cause a massive dilution of nutrients as infertile subsoils are brought to the surface and the surface layers containing phosphorus and organic nitrogen are buried.
Ideally once most levelling and contouring has been completed the area should be soil tested to a depth of 150 mm rather than the conventional 75 mm. Make sure soil sampling is representative of the block and in the case of humping and hollowing both aspects of a hump. Soil pH will be low so lime will need to be applied immediately (if it has not already been done) and worked in before final levelling. It normally requires 700-1000 kg/ha of lime to lift pH by 0.1 in the top 75 mm so don’t expect as great a lift over 150 mm.
Normally 3-5 t/ha of lime will be required, but adjust according to soil test results. An alternative may be to apply 2.5-3 t/ha of average to good quality lime and work in and follow before drilling with a further 1 t/ha as dolomite (to also provide magnesium). Expect to apply further lime 12 months later although recent experience at Cape Foulwind has found lime requirements are less than previously thought. Aim to lift pH to 5.8-6.2.
Prior to drilling or in the latter cultivation/levelling or shaping stage) also apply 750-1,000 kg/ha of Pakihi Starter 0 N - 7.5 P - 4 K - 14 S (not the old Westland Pakihi Starter) as a surface application or lightly work in. This contains Superphosphate, Sulphur Super, potassium chloride and the trace elements, boron, copper, selenium, cobalt and molybdenum. Humping and hollowing generally requires less development fertiliser compared to flipping. Pakihi soils should still receive a significant portion of their sulphur as elemental sulphur to provide a constant supply of sulphate sulphur to plants.
At planting apply 250-375 kg/ha of Cropmaster 15 or equivalent, preferably broadcast in front of the drill (if drilling) as this will cause some germination
•
•
Chapter 6 Managing Developed Land
27A guide for West Coast Farmers
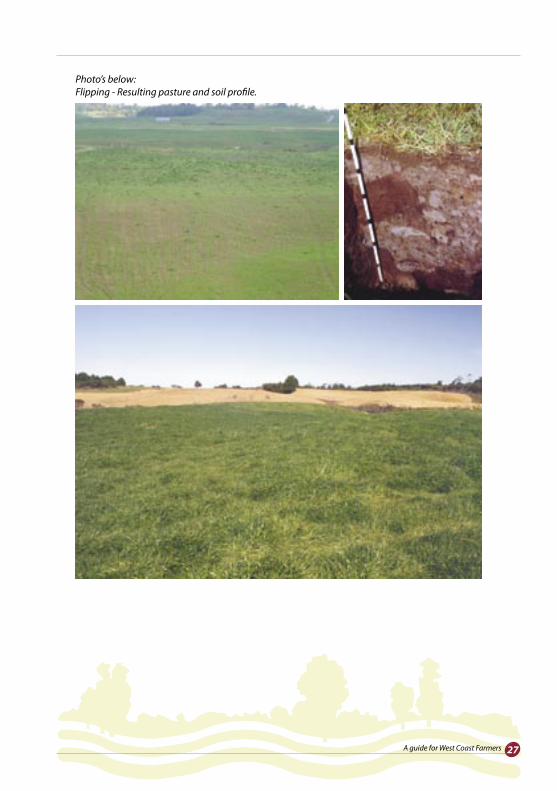
Photo’s below:Flipping - Resulting pasture and soil profile.
28 Land Development by Flipping and Hump and Hollowing
damage if applied through a conventional drill (there is less risk with drills which place seed and fertiliser apart). This will provide enough nitrogen to establish the pasture but young pasture will quickly turn yellow and require followup nitrogen applications. Seed and fertiliser can be mixed and broadcast, without causing germination damage, providing they are spread immediately after mixing.
Some alternatives used by farmers include combinations of Superphosphate, Pasturemag and Potash Sulphur Supers or DAP Potash Sulphur Supers instead of Pakihi starter, dolomite and Cropmaster 15. These can be less effective as trace elements are not applied and in many cases nitrogen needs to be applied at emergence when seedbeds are still soft. Pasture species
A wide variety of species and cultivars are available to farmers and it is best to obtain expert advice to decide what best suits your circumstances. Cultivars should be chosen for their compatibility with each other, their quality (palatability), their growth pattern and flowering date. Due to the summer moist conditions that usually prevail on the West Coast many grass and clover species will grow well.
The ryegrasses include;
Annual and Italian ryegrasses – these are quick growing, winter active, highly palatable and low in endophyte suiting in particular specialty short term pastures. Examples of newer varieties are Flanker and Tabu.
Perennial and long rotation ryegrasses – these are finer leaved long lasting, good quality grasses such as Bronsyn, Impact and Matrix. Seed is smaller and takes longer to germinate than annual ryegrasses. Hybrid or short rotation ryegrasses fall intermediate between the above with intermediate persistence and winter growth, eg. Maverick. Some ryegrasses are tetraploids which are more palatable, eg. Quartet, Sterling.
Hybrid, long roation and perennial ryegrasses are normally high endophyte but many are available as low or with novel endophyte.
High endophyte grasses can severely inhibit animal performance (eg. cause ryegrass staggers), but prevent attack from argentine stem weevil and other insect pests which shorten the pasture’s life and production. As these are generally not a problem particularly in wetter areas such as Westland many farmers will be able to get away with low endophyte grasses.
•
•
•
•
•
29A guide for West Coast Farmers
The alternative is to use Novel endophyte ryegrasses such as AR1 which have protection against pests. These grasses are more expensive but their animal and growth performance and their increased persistence in drier conditions can more than justify the extra cost.
Think carefully about the area you sow in each cultivar, don’t sow the same species over a large area of the farm as it will all flower together.
An alternative grass species for drier particularly sand country are fescues such as Advance which can be highly nutritious pastures when mixed with clover. However these do require specific careful grazing management.
White clover species with large leaves eg. Kopu II generally suit more open dairy pastures while small to medium leaved clovers with higher stolon density eg. Huia, will persist for longer, particularly in shorter grazing rotations. Newer cultivars such as Sustain and Aran give a good combination of production and persistence.
Pasture mixes that have or should perform well for dairying under flipping or humping and hollowing include;
15-20 kg/ha of ryegrass (preferably as perennial, long rotation or hybrids) 3-4 kg/ha of mixed mixed white clovers, preferably with1-2 kg/ha of herbs
Annual and Italian ryegrasses are used in mixes for early growth but as they are more aggressive than perennial ryegrasses the rates should be kept low. Increasingly farmers are looking at growing specialty short term crops (eg. short rotation grasses) which are ripped up after 2 or so years. This allows some further levelling to correct localised slumping before permanent pasture is grown.
Note: Sowing rates will vary depending on how the pasture is sown e.g. drilled pastures will require lower rates of seed than broadcast pastures. Seek advice from you local seed merchant.
Italian ryegrasses are used in mixes for early growth but as they are more aggressive than perennial ryegrasses the rates should be kept low. Increasingly farmers are looking at growing specialty short term crops (eg. short rotation
•
Early Flowering Meridian, Embassy
Mid Flowering Bronsyn, Aries HD
Late Flowering Impact, Matrix
30 Land Development by Flipping and Hump and Hollowing
grasses) which are ripped up after 2 or so years. This allows some further levelling to correct localised slumping before permanent pasture is grown.
Inoculated clover seed should be used and it would be advisable to use an insecticide at planting where porina and manuka beetle may cause damage.
When to sow
Ideally pasture should be sown early enough in late summer, early autumn so that it can be grazed lightly once before winter. If this does not happen clover growth will be slow and pasture will tend to produce less over spring when you need it to grow. Weed competition will tend to be higher with spring sowing which will therefore require more spraying and increased cost.
Pasture can be successfully established by drilling or broadcasting. Air seeders or a roller drill are often used although the latter is not very effective in stony ground. Fine seed beds are prone to drying and wind erosion, so roller drills and broadcasting can be risky in warm drier conditions. Seed rates should be slightly increased if broadcasting. On very sandy soils Landcorp have initially grown pea/oat crops which are mulched in so that sufficient moisture is available for new pasture establishment.
Post Sowing Management
Weed control is important in the first spring and is best when seedling weeds are young so the success rate is higher. Choose chemicals which control the weed spectrum that is likely to be present, ask for expert advice. Chemicals such as 2,4DB and MCPB are likely to be the most cost effective. 2,4DB will give better control of willow weed, pepper weed, docks and ragwort but will damage red clover.
Nitrogen Nitrogen will be severely deficient in the first 2-3 years of the pastures life, therefore high inputs will be required. The first application is required within 4-6 weeks of sowing, (if the ground has not consolidated sufficiently then think about flying nitrogen on). Apply N regularly at approximately 4-6 weeks intervals for the first year starting at 100-120 kg/ha of urea (45-55 kgN/ha) for the initial 2-3 dressings before reducing thereafter to 65-85 kg/ha of urea (30-40 kgN/ha). Landcorp and some Buller farmers have found upwards of 400 kgN/ha is required in the first year on flipped land and slightly less on humping and hollowing. Nitrogen requirements are likely to be closer to 300 kgN/ha (650kg urea/ha) in the second year, declining to closer to maintenance (250 kgN/ha or less) in the third year.

31A guide for West Coast Farmers
After autumn sowing apply extra fertiliser (part of maintenance programme) in late spring, early summer (Oct-Nov) such as Potash Sulphur Super or DAP Potash Sulphur Super mixes. Soil test after 6-12 months (reverting to conventional 0-75 mm samples) to ascertain future requirements.
First grazing is usually 6-10 weeks after sowing. Graze lightly when 80-100 mm high down to 40-60 mm. First apply the ‘pull test’ to ensure plants are firmly enough anchored to avoid damage. It will be easier to pull plants in soils of high organic (peat) content.
Preferably younger stock should be used for the early grazings as they will pull less plants and cause less pugging damage. As it is often impractical to prevent pugging reduce the risk of damage by avoiding grazing in wet conditions. In spring as plants grow more rapidly, graze more frequently to encourage tillering of ryegrass and prevent shading of clovers. Graze more lightly and less frequently in dry conditions. If the pasture turns yellow or dies back (browns at the tip) quickly graze then apply 100 kg/ha of DAP or urea.
Where possible avoid taking hay or silage crops in the first year, if this is necessary cut higher to leave higher residuals.
Riperian strips along existing waterways and ponding areas - Cape Foulwind.
32 Land Development by Flipping and Hump and Hollowing
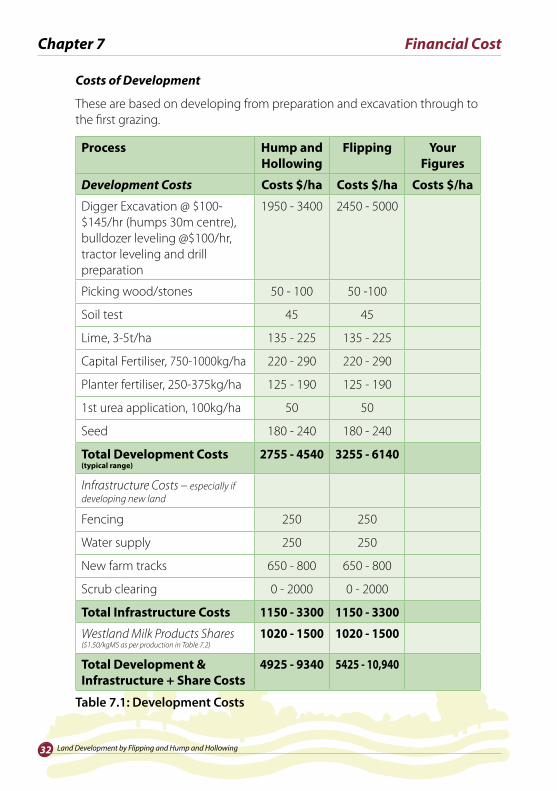
Costs of Development
These are based on developing from preparation and excavation through to the first grazing.
Chapter 7 Financial Cost
Process Hump and Hollowing
Flipping Your Figures
Development Costs Costs $/ha Costs $/ha Costs $/ha
Digger Excavation @ $100-$145/hr (humps 30m centre), bulldozer leveling @$100/hr, tractor leveling and drill preparation
1950 - 3400 2450 - 5000
Picking wood/stones 50 - 100 50 -100
Soil test 45 45
Lime, 3-5t/ha 135 - 225 135 - 225
Capital Fertiliser, 750-1000kg/ha 220 - 290 220 - 290
Planter fertiliser, 250-375kg/ha 125 - 190 125 - 190
1st urea application, 100kg/ha 50 50
Seed 180 - 240 180 - 240
Total Development Costs (typical range)
2755 - 4540 3255 - 6140
Infrastructure Costs – especially if developing new land
Fencing 250 250
Water supply 250 250
New farm tracks 650 - 800 650 - 800
Scrub clearing 0 - 2000 0 - 2000
Total Infrastructure Costs 1150 - 3300 1150 - 3300
Westland Milk Products Shares ($1.50/kgMS as per production in Table 7.2)
1020 - 1500 1020 - 1500
Total Development & Infrastructure + Share Costs
4925 - 9340 5425 - 10,940
Table 7.1: Development Costs

33A guide for West Coast Farmers
Ongoing Costs also include extra fertiliser in the first 2 years ($150-200/ha), extra weed control ($20-30/ha).
No account has been made for administrative costs (planning, resource consents).
If a significant area of land is developed in one year several additional costs will need to be considered. These include the purchase of additional milking cows and the ability of infrastructure to accommodate extra land and cows e.g. cowshed, laneways, stock water supply, and tractor and machinery size. The bulk of the costs of development is in the equipment hire. The total costs per hectare will vary with the type of land, the charge out rate of the contractor and the amount of work the farmer is able to do himself. In the long run you will get a better job and it will cost less if you use a good contractor, a poor contractor will make more work with leveling and contouring.
If the farmer has the equipment and the time to do the compacting and harrowing in preparation for sowing this will save bulldozer charges. Recent examples for flipping indicate the job with a lot of farmer involvement and good ground conditions has cost as little as $1950/ha compared with $7000/ha when using contractors and requiring scrub clearing.
Although a considerable investment is required to complete development work, the cost should be compared with purchasing new land.
Cost – Benefit Analysis
Developed paddocks can be expected to produce significantly more pasture on an annual basis than the existing paddock and typically achieving 14,000 kg dry matter per hectare or 800kgMS/ha.
Assuming that most new, improved pastures on the West Coast have the ability to produce an annual average yield 800kgMS/ha the following gross margin can be calculated:
BenefitThe benefit of development will range depending on how productive the land was before development began. This could range from carrying no stock to carrying 1 cow/ha (as on Landcorp’s undeveloped areas). Assuming 1 cow/ha producing 320kg milksolids/yr the benefit of development in year 1 is 800kgMS minus 320kgMS previously = 480kgMS improvement. So the range of improvement in year 1 is 480 – 800kgMS/ha.
Over the first 3 years after development production per hectare off the developed land will increase as the soils and pastures become more
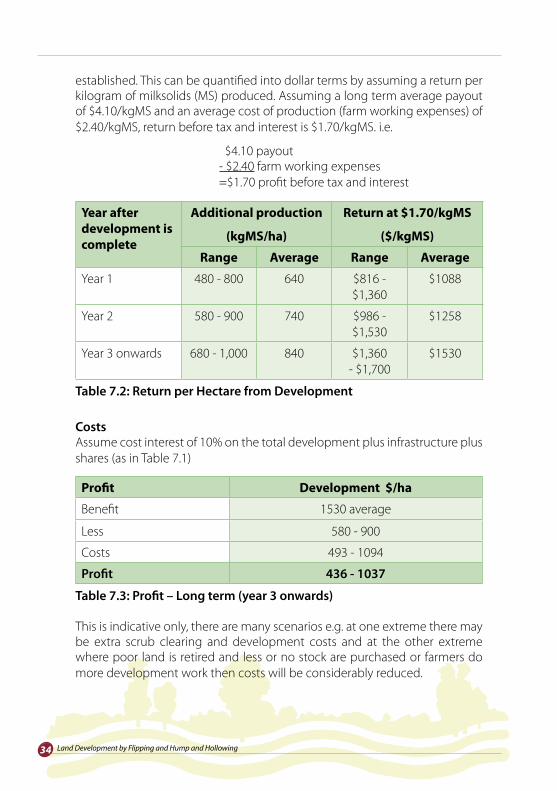
34 Land Development by Flipping and Hump and Hollowing
established. This can be quantified into dollar terms by assuming a return per kilogram of milksolids (MS) produced. Assuming a long term average payout of $4.10/kgMS and an average cost of production (farm working expenses) of $2.40/kgMS, return before tax and interest is $1.70/kgMS. i.e.
$4.10 payout - $2.40 farm working expenses =$1.70 profit before tax and interest
CostsAssume cost interest of 10% on the total development plus infrastructure plus shares (as in Table 7.1)
This is indicative only, there are many scenarios e.g. at one extreme there may be extra scrub clearing and development costs and at the other extreme where poor land is retired and less or no stock are purchased or farmers do more development work then costs will be considerably reduced.
Year after development is complete
Additional production
(kgMS/ha)
Return at $1.70/kgMS
($/kgMS)
Range Average Range Average
Year 1 480 - 800 640 $816 - $1,360
$1088
Year 2 580 - 900 740 $986 - $1,530
$1258
Year 3 onwards 680 - 1,000 840 $1,360 - $1,700
$1530
Table 7.2: Return per Hectare from Development
Profit Development $/ha
Benefit 1530 average
Less 580 - 900
Costs 493 - 1094
Profit 436 - 1037
Table 7.3: Profit – Long term (year 3 onwards)
35A guide for West Coast Farmers
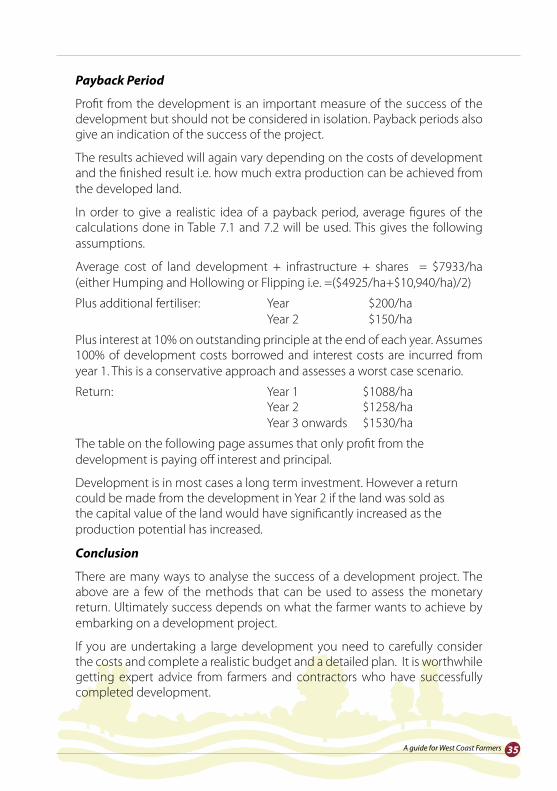
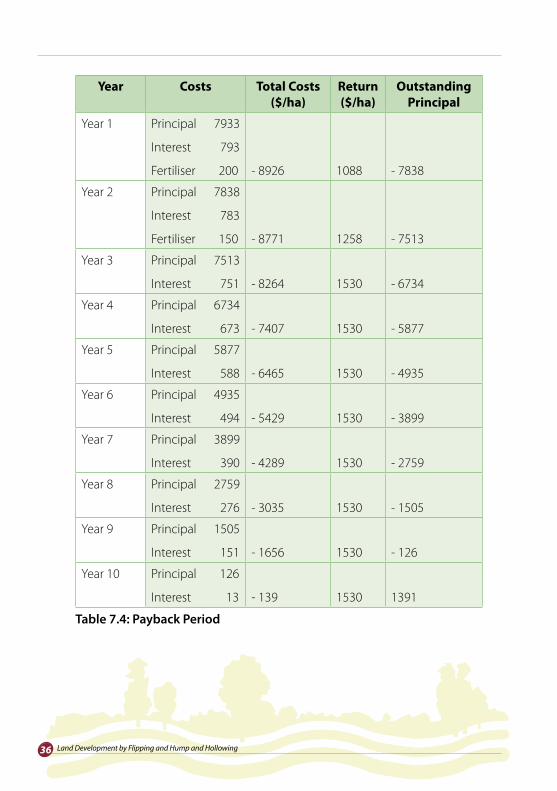
Payback Period
Profit from the development is an important measure of the success of the development but should not be considered in isolation. Payback periods also give an indication of the success of the project.
The results achieved will again vary depending on the costs of development and the finished result i.e. how much extra production can be achieved from the developed land.
In order to give a realistic idea of a payback period, average figures of the calculations done in Table 7.1 and 7.2 will be used. This gives the following assumptions.
Average cost of land development + infrastructure + shares = $7933/ha (either Humping and Hollowing or Flipping i.e. =($4925/ha+$10,940/ha)/2)
Plus additional fertiliser: Year $200/ha Year 2 $150/ha
Plus interest at 10% on outstanding principle at the end of each year. Assumes 100% of development costs borrowed and interest costs are incurred from year 1. This is a conservative approach and assesses a worst case scenario. Return: Year 1 $1088/ha Year 2 $1258/ha Year 3 onwards $1530/ha
The table on the following page assumes that only profit from the development is paying off interest and principal.
Development is in most cases a long term investment. However a return could be made from the development in Year 2 if the land was sold as the capital value of the land would have significantly increased as the production potential has increased.
Conclusion
There are many ways to analyse the success of a development project. The above are a few of the methods that can be used to assess the monetary return. Ultimately success depends on what the farmer wants to achieve by embarking on a development project.
If you are undertaking a large development you need to carefully consider the costs and complete a realistic budget and a detailed plan. It is worthwhile getting expert advice from farmers and contractors who have successfully completed development.
36 Land Development by Flipping and Hump and Hollowing
Year Costs Total Costs ($/ha)
Return ($/ha)
Outstanding Principal
Year 1 Principal 7933
Interest 793
Fertiliser 200 - 8926 1088 - 7838
Year 2 Principal 7838
Interest 783
Fertiliser 150 - 8771 1258 - 7513
Year 3 Principal 7513
Interest 751 - 8264 1530 - 6734
Year 4 Principal 6734
Interest 673 - 7407 1530 - 5877
Year 5 Principal 5877
Interest 588 - 6465 1530 - 4935
Year 6 Principal 4935
Interest 494 - 5429 1530 - 3899
Year 7 Principal 3899
Interest 390 - 4289 1530 - 2759
Year 8 Principal 2759
Interest 276 - 3035 1530 - 1505
Year 9 Principal 1505
Interest 151 - 1656 1530 - 126
Year 10 Principal 126
Interest 13 - 139 1530 1391
Table 7.4: Payback Period

37A guide for West Coast Farmers
Agronomic – the management of land.
Gley – soil formed under high water conditions where the lack of oxygen causes conditions which reduce chemical compounds and lower worm and micro-organism activity.
Humus – a mixture of partly decomposed organic matter that is blended with soil mineral material by soil micro-organisms.
Humus iron – in high humus soils, iron compounds react with humus to form a subsurface pan.
Impeding iron – a subsurface layer of iron compounds which form a pan and prevent drainage through it.
Impervious – water cannot pass through.
Infiltration – rate at which water can move from the soil surface through the profile.
Interdune – low lying area between the dunes usually of poorer drainage as the water has been trapped preventing runoff.
Lateral drainage – sideways drainage (by gravity), usually when vertical drainage is prevented by subsurface pans (or rock).
Pakihi soil – a general term used to cover infertile wetland soils formed on flat and gently sloping land under high rainfall, typically on the West Coast and Golden Bay.
Peat soil – a soil containing raw or slightly decomposed organic matter accumulated under swamp conditions.
Plastic (as it relates to clay soils) – when wet the soil can be moulded into a permanent shape which is maintained once the soil dries.
Podzolisation – a soil forming process in which leaching of iron and aluminium compounds from the upper soil layers and deposition of some of these compounds as a subsurface layer is a feature.
Glossary of Terms
38 Land Development by Flipping and Hump and Hollowing
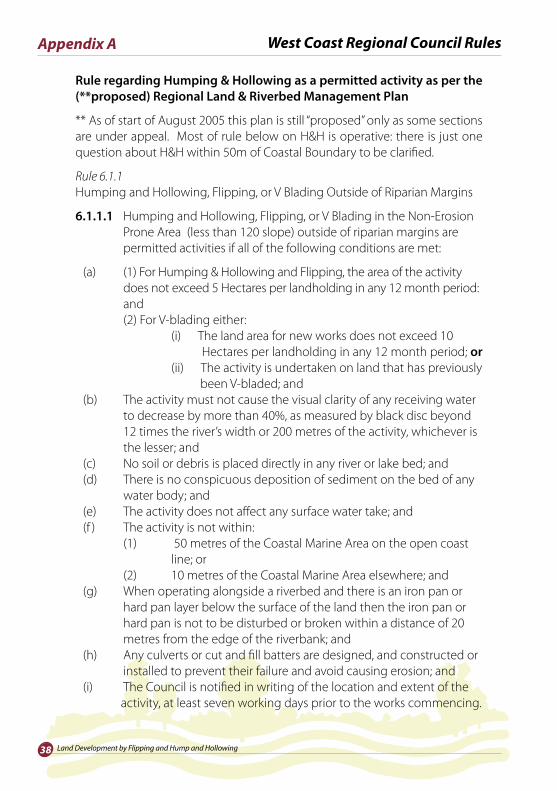
Rule regarding Humping & Hollowing as a permitted activity as per the (**proposed) Regional Land & Riverbed Management Plan
** As of start of August 2005 this plan is still “proposed” only as some sections are under appeal. Most of rule below on H&H is operative: there is just one question about H&H within 50m of Coastal Boundary to be clarified.
Rule 6.1.1 Humping and Hollowing, Flipping, or V Blading Outside of Riparian Margins
6.1.1.1 Humping and Hollowing, Flipping, or V Blading in the Non-Erosion Prone Area (less than 120 slope) outside of riparian margins are permitted activities if all of the following conditions are met:
(a) (1) For Humping & Hollowing and Flipping, the area of the activity does not exceed 5 Hectares per landholding in any 12 month period: and
(2) For V-blading either: (i) The land area for new works does not exceed 10 Hectares per landholding in any 12 month period; or (ii) The activity is undertaken on land that has previously been V-bladed; and
(b) The activity must not cause the visual clarity of any receiving water to decrease by more than 40%, as measured by black disc beyond 12 times the river’s width or 200 metres of the activity, whichever is the lesser; and(c) No soil or debris is placed directly in any river or lake bed; and(d) There is no conspicuous deposition of sediment on the bed of any water body; and(e) The activity does not affect any surface water take; and(f ) The activity is not within:
(1) 50 metres of the Coastal Marine Area on the open coast line; or (2) 10 metres of the Coastal Marine Area elsewhere; and
(g) When operating alongside a riverbed and there is an iron pan or hard pan layer below the surface of the land then the iron pan or hard pan is not to be disturbed or broken within a distance of 20 metres from the edge of the riverbank; and(h) Any culverts or cut and fill batters are designed, and constructed or installed to prevent their failure and avoid causing erosion; and (i) The Council is notified in writing of the location and extent of the activity, at least seven working days prior to the works commencing.
Appendix A West Coast Regional Council Rules
39A guide for West Coast Farmers
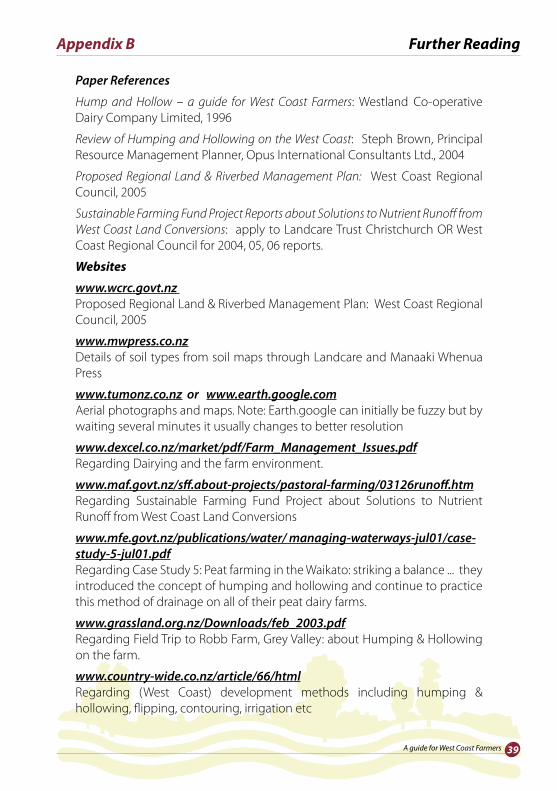
Paper References
Hump and Hollow – a guide for West Coast Farmers: Westland Co-operative Dairy Company Limited, 1996
Review of Humping and Hollowing on the West Coast: Steph Brown, Principal Resource Management Planner, Opus International Consultants Ltd., 2004
Proposed Regional Land & Riverbed Management Plan: West Coast Regional Council, 2005
Sustainable Farming Fund Project Reports about Solutions to Nutrient Runoff from West Coast Land Conversions: apply to Landcare Trust Christchurch OR West Coast Regional Council for 2004, 05, 06 reports.
Websites
www.wcrc.govt.nz Proposed Regional Land & Riverbed Management Plan: West Coast Regional Council, 2005
www.mwpress.co.nzDetails of soil types from soil maps through Landcare and Manaaki Whenua Press
www.tumonz.co.nz or www.earth.google.comAerial photographs and maps. Note: Earth.google can initially be fuzzy but by waiting several minutes it usually changes to better resolution
www.dexcel.co.nz/market/pdf/Farm_Management_Issues.pdfRegarding Dairying and the farm environment.
www.maf.govt.nz/sff.about-projects/pastoral-farming/03126runoff.htmRegarding Sustainable Farming Fund Project about Solutions to Nutrient Runoff from West Coast Land Conversions
www.mfe.govt.nz/publications/water/ managing-waterways-jul01/case-study-5-jul01.pdf Regarding Case Study 5: Peat farming in the Waikato: striking a balance ... they introduced the concept of humping and hollowing and continue to practice this method of drainage on all of their peat dairy farms.
www.grassland.org.nz/Downloads/feb_2003.pdfRegarding Field Trip to Robb Farm, Grey Valley: about Humping & Hollowing on the farm.
www.country-wide.co.nz/article/66/htmlRegarding (West Coast) development methods including humping & hollowing, flipping, contouring, irrigation etc
Appendix B Further Reading
40 Land Development by Flipping and Hump and Hollowing
Appendix C - Land Development Planning Checklist
Step To do Outcome/Issues
1 Advice Talk to as many people as possible
- - -
2 Resource Management Act Do you need a resource consent or not?
- ring the WCRC - -
3 Aerial Photographs Obtain a copy of an aerial map from WCRC or online at www.tumonz.co.nz
- - -
4 Paddock Size Think about the total area of the farm and how it will be laid out.
- draw up a farm plan or use a farm map - decide how many paddocks you want - draw paddocks onto farm plan
5 Stock Access Where will you locate your gateways?
- mark gateways onto farm plan - -
6 Sediment Control and Silt traps How will these be constructed?
- mark silt traps onto farm plan - -
7 Culverts and Drains Will you need new culverts or drains?
- mark new culverts or drains locations onto farm plan - -
8 Heavy Vegetation Do you need to remove or spray?
- - -
9 Bush and Scrub Do you need to clear? What will this cost? How will you do it?
- - -
10 Fence Clearing Remove old fencing
- - -
11 Water Troughs Where will they be sited?
- mark water trough location on plan - -
12 Timing When will the work be done? Who will do it?
- talk to contractors - -
13 Impact on farm system Think through the flow in effects on stocking rate and farm infrastructure.
- - -
14 Ongoing cost and budgeting Factor in ongoing costs
- discuss with bank manager - -