Kronos System Approver Instruction Manualcontrol/docs/kronos/kronos-approver-training... ·...
47
Kronos System Approver Instruction Manual Workforce Central v8.0.14 Document last updated: 11/08/2017
Transcript of Kronos System Approver Instruction Manualcontrol/docs/kronos/kronos-approver-training... ·...
Kronos System Approver Instruction Manual
Workforce Central v8.0.14
Document last updated: 11/08/2017
Dartmouth College
Kronos System Approver Instruction Manual
Document last updated: 11/08/2017 1 | P a g e
Table of Contents Kronos Overview ....................................................................................................................................................... 3
Ideal computer browser and system requirements for using Kronos ................................................................... 3
System Requirements .......................................................................................................................................... 3
Browsers: .......................................................................................................................................................... 3
Operating Systems: .......................................................................................................................................... 3
Other Software: ................................................................................................................................................. 3
Time-Out Warning ................................................................................................................................................. 3
Technical Support & Trouble-shooting ................................................................................................................ 3
Accessing Kronos ..................................................................................................................................................... 4
Log-in to Kronos .................................................................................................................................................... 4
Log-out of Kronos ................................................................................................................................................. 4
How to save the Kronos URL as a favorite .......................................................................................................... 5
Dartmouth College Procedures and Expectations of Time Reporting for Hourly Staff and Student Employees 7
Employee Responsibilities ................................................................................................................................... 7
Supervisor Responsibilities .................................................................................................................................. 7
Approver Responsibilities ..................................................................................................................................... 8
Finance Center Responsibilities .......................................................................................................................... 8
Payroll Responsibilities ........................................................................................................................................ 9
Employee Best Practices .......................................................................................................................................... 9
Approver Best Practices ........................................................................................................................................... 9
Navigation for Approvers ........................................................................................................................................ 10
Approving Employee Timecards ............................................................................................................................. 14
Steps used for Approvers to review employee timecards: ............................................................................... 14
Viewing Approvals ............................................................................................................................................... 18
General information: ...................................................................................................................................... 18
Changing the chart string (chart string override) used to pay employee’s time ............................................. 19
PTO Pay Codes (an abbreviated listing): ........................................................................................................... 21
If an employee is not at work at the end of the pay period: ............................................................................ 21
Timecard Corrections ............................................................................................................................................. 22
Timecard Corrections within the pay period ..................................................................................................... 22
Timecard Corrections after the pay period has ended, but prior to the time being submitted to Payroll for
payment .............................................................................................................................................................. 22
Corrections to an employee’s time after a paycheck has been processed .................................................... 22
HyperFind Queries .................................................................................................................................................. 23
Dartmouth College
Kronos System Approver Instruction Manual
Document last updated: 11/08/2017 2 | P a g e
Create a HyperFind Query .................................................................................................................................. 23
Create a HyperFind Query using Division, Department, Jobnet, Employee Assignment, Union Crew, or Chart
string.................................................................................................................................................................... 27
Testing HyperFind Queries (before saving) ....................................................................................................... 29
Save a newly created HyperFind Query (after creating and testing) ............................................................... 29
Create a HyperFind Query using Chart String Accounts ................................................................................... 30
Create a HyperFind Query using Name or ID .................................................................................................... 31
Edit, Share or Delete a Personal HyperFind Query ........................................................................................... 32
Edit a Personal HyperFind Query ................................................................................................................... 34
Delete a Personal HyperFind Query ............................................................................................................... 34
Share a Personal HyperFind Query ................................................................................................................ 34
Using HyperFind Queries ........................................................................................................................................ 35
Change the Date Range being Viewed .............................................................................................................. 35
Finding and Acting on Employee Data .............................................................................................................. 36
Option One: Use QuickFind ............................................................................................................................ 36
Option Two: Use HyperFind Query ................................................................................................................. 37
Reports .................................................................................................................................................................... 38
Running & Viewing Reports ............................................................................................................................... 38
Using the Reports Genie to select from previously created employee groups: .......................................... 38
Selecting a Report .............................................................................................................................................. 41
Create Favorite Reports ..................................................................................................................................... 42
Generating Reports ................................................................................................................................................ 43
Run a Report ....................................................................................................................................................... 43
To View a Report ................................................................................................................................................. 43
Scheduling a Report ........................................................................................................................................... 44
Edit, Disable or Delete a Scheduled Report ................................................................................................. 46
Check the status of a Scheduled Report ...................................................................................................... 46
Reports to Run & Properties of each: ............................................................................................................... 46
Dartmouth College
Kronos System Approver Instruction Manual
Document last updated: 11/08/2017 3 | P a g e
Kronos Overview Kronos is a time and attendance system used to:
• Capture time in/out for work, apply pay rules and send information to Payroll for calculating
employees’ pay
• Track Paid time Off (PTO) balances (vacation, personal, holiday, winter break, etc.)
• Reduce payroll errors and paper flow, increase data accuracy
• Help with compliance, and save time through payroll process improvements
Note:
• Kronos is the system of record for employee’s worked hours.
• HRMS is the system of record for employee pay. This includes an employee’s earnings, Short-term
Disability (STD), Worker’s Compensation, PTO, etc.
Ideal computer browser and system requirements for using Kronos
System Requirements
Browsers:
Internet Explorer 11
Google Chrome 41+
Mozilla Firefox 35+
Apple Safari 7.x
NOTE: There are known issues when using this software with Microsoft Edge browser.
Operating Systems:
Windows 10
Windows 8 and 8.1 (64-Bit)
Windows 7 (32 & 64-Bit)
Macintosh OSX 10.9 and 10.10
Other Software:
Adobe Flash Player - whatever the latest version that is supported by the browser
Java 1.8.0_45 - minimum, 1.8.0_92 - recommended (Java is not required for Student and Bi-Weekly
Employee users)
NOTE: This software is not optimized for use on any mobile devices (iPhone, iPad, etc.)
Time-Out Warning
Kronos will time-out 30 minutes after logging in. The user will see a prompt, asking whether they wish to
continue or log out.
Technical Support & Trouble-shooting
The Dartmouth College Technical Support Document for Kronos is available online. It contains details
regarding possible Problems when Logging into Kronos, including:
• Security Errors
• Compatibility Mode
• Kronos Support
Dartmouth College
Kronos System Approver Instruction Manual
Document last updated: 11/08/2017 4 | P a g e
Link to Technical Support Documents - http://www.dartmouth.edu/~control/training/index.html (scroll down
to Kronos Training Materials)
Employees with questions on how to use Kronos should contact either their Kronos approver or Finance
Center for guidance on how to proceed.
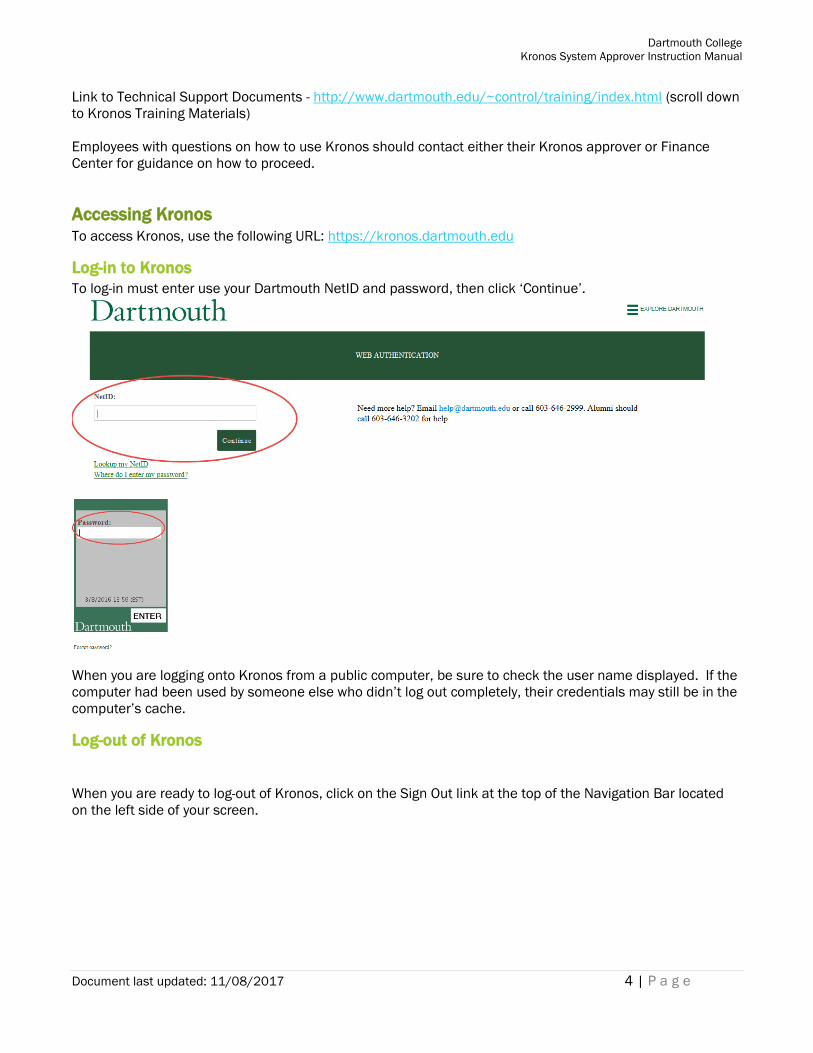
Accessing Kronos To access Kronos, use the following URL: https://kronos.dartmouth.edu
Log-in to Kronos
To log-in must enter use your Dartmouth NetID and password, then click ‘Continue’.
When you are logging onto Kronos from a public computer, be sure to check the user name displayed. If the
computer had been used by someone else who didn’t log out completely, their credentials may still be in the
computer’s cache.
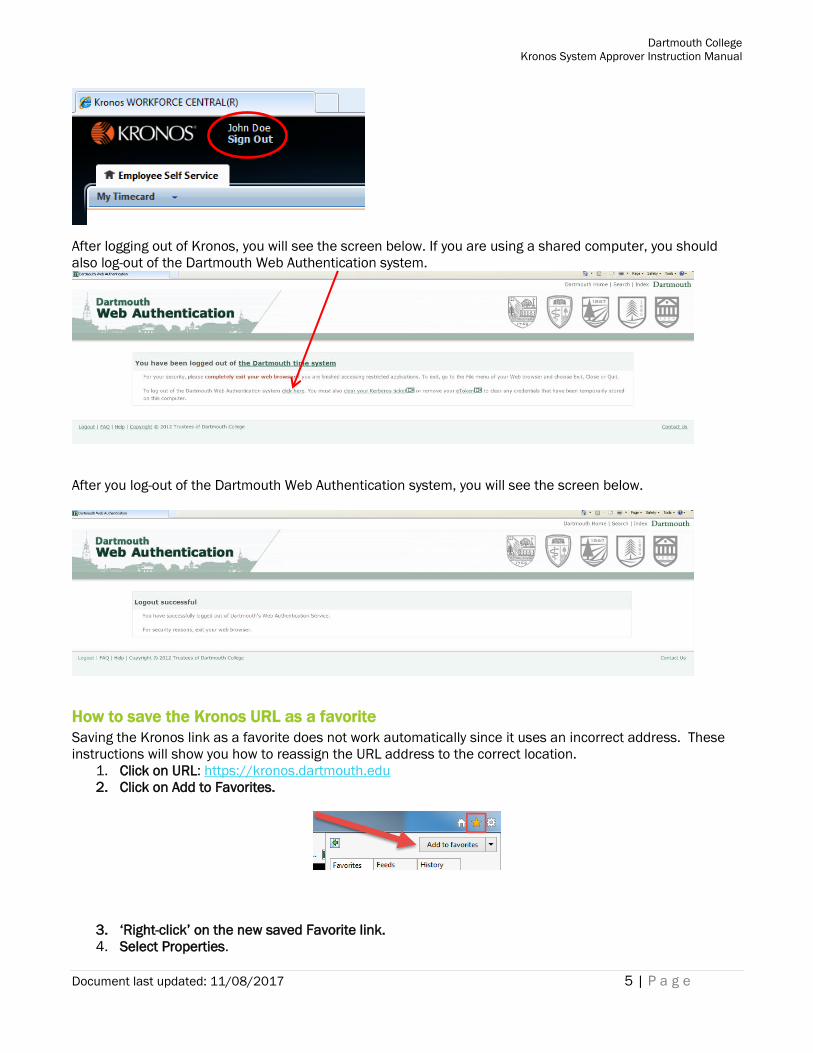
Log-out of Kronos
When you are ready to log-out of Kronos, click on the Sign Out link at the top of the Navigation Bar located
on the left side of your screen.
Dartmouth College
Kronos System Approver Instruction Manual
Document last updated: 11/08/2017 5 | P a g e
After logging out of Kronos, you will see the screen below. If you are using a shared computer, you should
also log-out of the Dartmouth Web Authentication system.
After you log-out of the Dartmouth Web Authentication system, you will see the screen below.
How to save the Kronos URL as a favorite
Saving the Kronos link as a favorite does not work automatically since it uses an incorrect address. These
instructions will show you how to reassign the URL address to the correct location.
1. Click on URL: https://kronos.dartmouth.edu
2. Click on Add to Favorites.
3. ‘Right-click’ on the new saved Favorite link.
4. Select Properties.
Dartmouth College
Kronos System Approver Instruction Manual
Document last updated: 11/08/2017 6 | P a g e
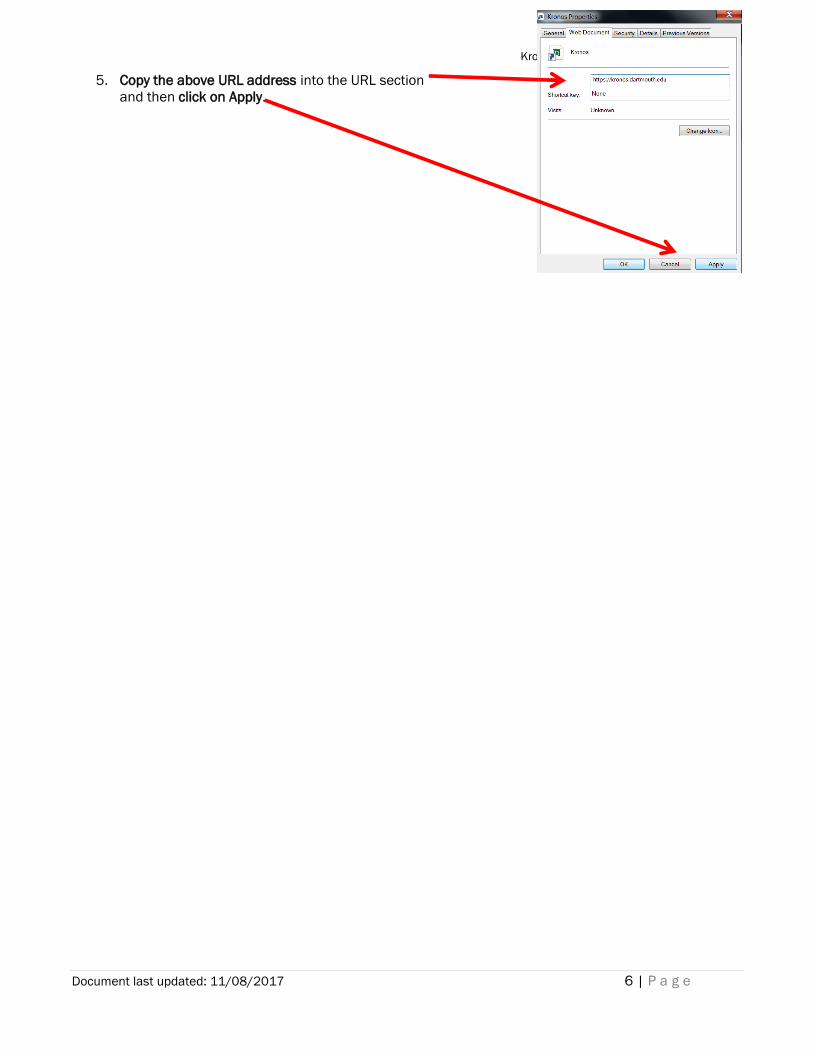
5. Copy the above URL address into the URL section
and then click on Apply.
Dartmouth College
Kronos System Approver Instruction Manual
Document last updated: 11/08/2017 7 | P a g e
Dartmouth College Procedures and Expectations of Time Reporting for Hourly Staff
and Student Employees1
Employee Responsibilities
All hourly employees are responsible for the following:
• An employee is required to accurately record all time worked through the approved timekeeping
system.
• An employee acknowledges that by swiping a clock or entering time using the web entry form, he or
she is attesting that the entry is accurate and correct and that any false entry or omission is grounds
for corrective action, up to and including termination of employment.
• An employee is required to follow his or her assigned work schedule unless changes are approved in
advance by his or her supervisor or unless there is an employment-related emergency that requires
the employee to work outside of that schedule. If an employment-related emergency necessitates
that an employee work prior to signing in or after signing out, the employee using a time clock must
report the time worked to his or her supervisor and approver (if they are not the same individual)
within twenty-four (24) hours or in all cases before the end of the workweek so that he or she can be
paid for the time worked. An employee using the web entry form must update their time record prior
to the end of the pay period.
• All employees who work more than 5 consecutive hours are expected to take a 30-minute meal
break. For non-exempt employees, the meal break will be unpaid. Non-exempt employees who wish
to work through their meal break must obtain advance authorization to do so from their supervisor.
Employees will be paid for all hours worked.
• An employee must not request or permit an unauthorized employee to report his or her time worked
and must not report time worked for another employee unless authorized to do so.
• An employee must not falsify or incorrectly report the time worked of another employee or instruct or
advise another employee to falsify or incorrectly report time. Any of these actions are grounds for
corrective action, up to and including termination.
• An employee who has knowledge of another employee’s falsification, incorrect, or improper recording
of time worked must report this information immediately to a supervisor, Human Resources or
Payroll. This call can be anonymous and the reporting employee will be protected from any
retaliation.
• An employee who has good faith knowledge that a supervisor or approver is violating any part of this
Policy must report it to the Compliance and Ethics Hotline by calling 888-497-0516 or filling out a
report on the Hotline website:
https://secure.ethicspoint.com/domain/media/en/gui/35378/index.html. This call can be
anonymous and the reporting employee will be protected from any retaliation.
• An employee must review any changes made to their recorded time in Kronos or on paper
timesheets. Paper timesheet must be signed by both the employee and his/her supervisor.
• An employee must notify his/her supervisor or the Department when they discover that an error has
been made on a time card that has been approved and/or signed off on. The employee and
supervisor must sign the completed correction form/paper time sheet, which is then submitted to
the Payroll Office for processing.
Supervisor Responsibilities
All supervisors are responsible for the following:
• Supervisors must ensure that employees are paid for all time worked.
• Supervisors may not falsify, alter, or incorrectly report time worked by an employee, or instruct or
advise an employee to do the same. Any of these actions are grounds for corrective action, up to and
including termination.
1 This information is adapted from its original source.
Dartmouth College
Kronos System Approver Instruction Manual
Document last updated: 11/08/2017 8 | P a g e
• Supervisors must encourage that an employee who has worked 5 consecutive hours has a meal
period free from any work responsibilities.
• Supervisors must ensure that an employee who misses a meal period or whose meal period is
interrupted is paid for the meal period.
• Supervisors must ensure that they review all timekeeping records and submit corrections for any
errors or omissions before they are submitted for payment or after payment, if necessary.
• When an error is discovered that has been made on a time card that has been approved. The
employee and supervisor must sign the completed correction form/paper time sheet, which is then
submitted to Finance Center. The Finance Center corrects the Kronos time card. If the pay period has
been signed off by Payroll, the Finance Center will work with Payroll to correct the pay period.
• Supervisors must discuss and document any changes to the timekeeping record created by an
employee and have the employee record their consent to the change. If the employee disputes the
accuracy of any time adjustments, for wage payment purposes the dispute must be resolved in favor
of the employee absent indisputable evidence that the adjusted time is correct. Under no
circumstances may an employee be paid for less time than he or she actually worked. Supervisors
should report disputes that are not resolved to Human Resources.
• Supervisors must complete Employee Time Management training upon hire or promotion into a
management role and on a periodic basis thereafter, as required by Human Resources and Payroll.
Approver Responsibilities
All approvers are responsible for the following:
• Approvers are expected to follow the standard reporting protocols to notify supervisors of recorded
employee time in advance of approving that time.
• At least bi-weekly, approvers are expected to send reports of employee time to the appropriate
supervisor(s) for each employee in the approver’s area.
• Approvers may not alter time worked by an employee without written authorization from the
employee's supervisor.
• Approvers must ensure that they make any authorized adjustments to timekeeping records to correct
any errors or omissions before they are submitted for payment or after payment, if necessary.
• Approvers may not falsify or incorrectly report times worked by an employee, or instruct or advise an
employee to do the same. Any of these actions are grounds for corrective action, up to and including
termination.
• Approvers must follow up with Supervisors to ensure that proper documentation exists for any
changes to the timekeeping record created by an employee. In the absence of proper
documentation, Approvers should process the payment based on the record created by the
employee.
• Approvers, who are not the supervisor, are not expected to use their role to address concerns about
the irregularities and/or errors in another employee's time records. Approvers should report those
concerns to management and process payments based on the records available to the Approver.
• Approvers must complete Employee Time Management training upon hire or promotion into an
approver role and on a periodic basis thereafter, as required by Human Resources and Payroll.
Finance Center Responsibilities
The Finance Center staff will serve as a first point of contact for providing general assistance to employees
and Kronos system approvers.
As a unit, Finance Centers are responsible for the following:
• Periodically run reports (Weekly, Daily, Bi-Weekly) to audit exceptions in the areas of your
responsibility.
• Contact Approvers if exceptions are found to work towards resolution.
Dartmouth College
Kronos System Approver Instruction Manual
Document last updated: 11/08/2017 9 | P a g e
• Run, review and email reports to ensure all areas are approved by employees and approvers; contact
areas that are not completed. • Assist departments with paper time sheets as needed. • Submit all paper time sheets to Payroll.
• Ensure that all electronic time cards are approved prior to the payroll cutoff.
• Contact Payroll to alert them when electronic time cards have been approved by the Finance Center.
Payroll Responsibilities
As a unit, the Payroll Office is responsible for the following:
• Receive notification that timesheets have been approved.
• Sign off on areas of responsibility.
• Perform Historical Corrections in Kronos to correct previous signed off pay periods.
• Run import from Kronos to Oracle HRMS.
• If a correction is needed after the import from Kronos to Oracle HRMS but before Payroll has
finalized, Payroll will work with the Finance Center to be sure all corrections are entered into both
Kronos and HRMS.
• Run reports to ensure all hours have been imported from Kronos to Oracle HRMS.
• Run other reports and send appropriate reports to Finance Center.
• Complete payroll so checks run on time.
Employee Best Practices
• Each day, enter exact time worked or Paid Time Off (PTO) used. If you do not enter daily, you must ensure
time is entered and saved before leaving work at the end of your scheduled hours at the end of the pay
period. All time worked must be entered by the end of the pay period (11:59pm Saturday).
• If your scheduled time off coincides with the end of a pay period, enter your PTO time in advance.
• Be sure to always click the Save Button when you’ve completed entering your time. If you forget to
click the ‘save’ button, all the data entered will be lost. When a change has been made that needs to be
saved, the Save button will be orange, otherwise it will be greyed out.
Approver Best Practices
• Leverage HyperFind queries for easy retrieval of employee groups.
• Set expectations with each non-approving supervisor regarding:
o When (day of week and time) the supervisor wants their employee reports scheduled
o How supervisor will confirm that hours worked for each employee are accurate
• Create and schedule reports to automatically send to all non-approving supervisors at least every pay
period.
• Coordinate with secondary approver to alert him/her when you (as the primary approver) will be
unavailable and need the secondary approver to take on your role.
• Review each employee timecard on the Monday morning following the end of a pay period. Facilitate any
changes needed and approve timecards by 12:00pm.
• Maintain awareness of early payroll deadlines and communicate these expectations to employees and
supervisors.
• Be sure to always click the Save Button when you’ve completed entering your time. If you forget to
click the ‘save’ button, all the data entered will be lost.
Dartmouth College
Kronos System Approver Instruction Manual
Document last updated: 11/08/2017 10 | P a g e
Navigation for Approvers When you first log into Kronos, you are presented with the Dartmouth Approver Workspace. Navigation does
not change significantly from page to page. On any page you may see the following elements:
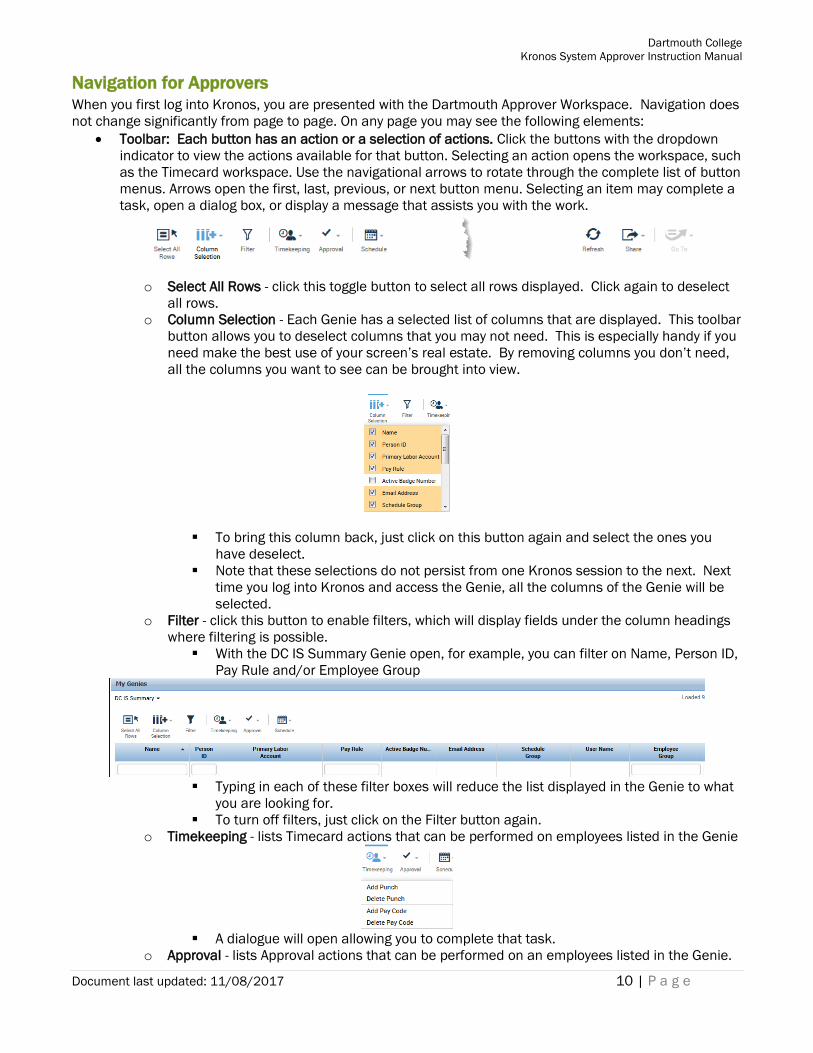
• Toolbar: Each button has an action or a selection of actions. Click the buttons with the dropdown
indicator to view the actions available for that button. Selecting an action opens the workspace, such
as the Timecard workspace. Use the navigational arrows to rotate through the complete list of button
menus. Arrows open the first, last, previous, or next button menu. Selecting an item may complete a
task, open a dialog box, or display a message that assists you with the work.
o Select All Rows - click this toggle button to select all rows displayed. Click again to deselect
all rows.
o Column Selection - Each Genie has a selected list of columns that are displayed. This toolbar
button allows you to deselect columns that you may not need. This is especially handy if you
need make the best use of your screen’s real estate. By removing columns you don’t need,
all the columns you want to see can be brought into view.
▪ To bring this column back, just click on this button again and select the ones you
have deselect.
▪ Note that these selections do not persist from one Kronos session to the next. Next
time you log into Kronos and access the Genie, all the columns of the Genie will be
selected.
o Filter - click this button to enable filters, which will display fields under the column headings
where filtering is possible.
▪ With the DC IS Summary Genie open, for example, you can filter on Name, Person ID,
Pay Rule and/or Employee Group
▪ Typing in each of these filter boxes will reduce the list displayed in the Genie to what
you are looking for.
▪ To turn off filters, just click on the Filter button again.
o Timekeeping - lists Timecard actions that can be performed on employees listed in the Genie
▪ A dialogue will open allowing you to complete that task.
o Approval - lists Approval actions that can be performed on an employees listed in the Genie.
Dartmouth College
Kronos System Approver Instruction Manual
Document last updated: 11/08/2017 11 | P a g e
o A dialogue box will pop asking you to confirm the action you are taking. Click Yes or No.
o Schedule - list schedule actions that can be taken on one or more employees.
o Refresh - clicking this button will ensure that the Genie is displaying the most recent data for
the employees listed.
o Share - clicking this button allows you to Print, Export to Excel or Export to CSV (comma
delimited text file) all the data displayed in the Genie.
o GoTo - with 1 or more employees selected you can open a Widget or Workspace for the
selected employees.
o For example, with a group of employees selected, you can use the GoTo button to open
Dartmouth Timecards for the employees selected. There will be a drop down list and
navigation arrows in the upper left-hand corner of the Timecard widget that you can use to
navigate between selected employees.
• Available Genies: Dropdown list of Genies available from the open workspace.
Dartmouth College
Kronos System Approver Instruction Manual
Document last updated: 11/08/2017 12 | P a g e
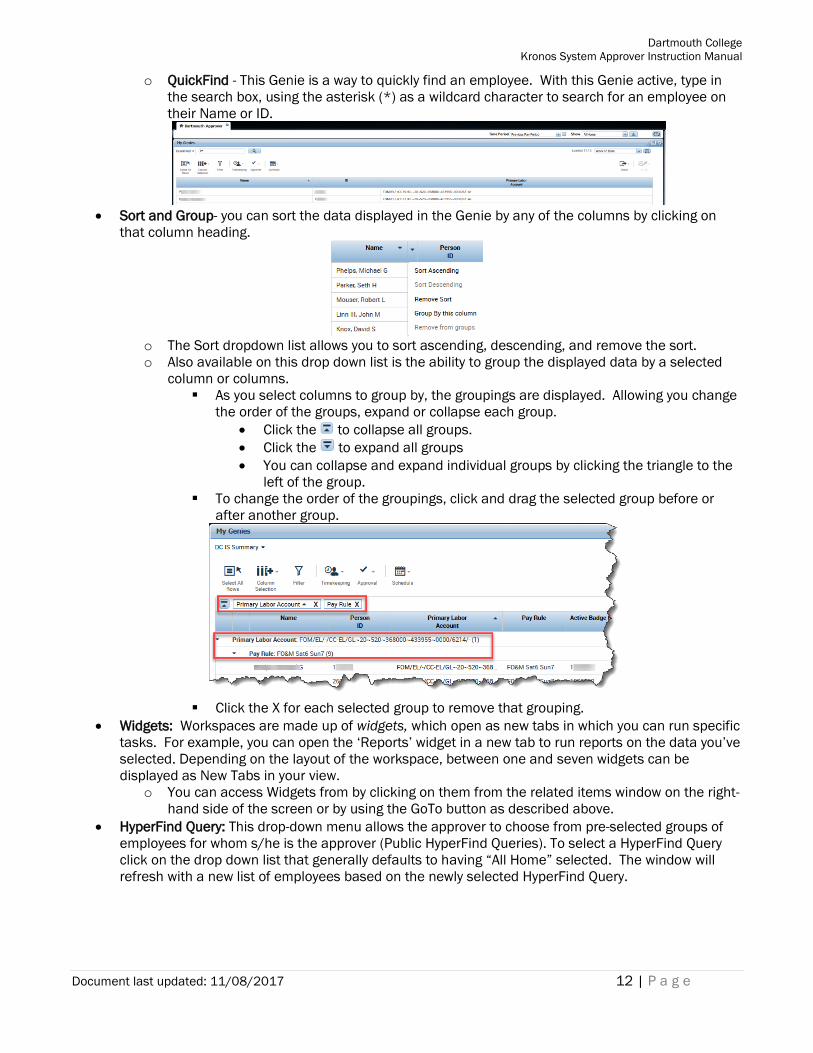
o QuickFind - This Genie is a way to quickly find an employee. With this Genie active, type in
the search box, using the asterisk (*) as a wildcard character to search for an employee on
their Name or ID.
• Sort and Group- you can sort the data displayed in the Genie by any of the columns by clicking on
that column heading.
o The Sort dropdown list allows you to sort ascending, descending, and remove the sort.
o Also available on this drop down list is the ability to group the displayed data by a selected
column or columns.
▪ As you select columns to group by, the groupings are displayed. Allowing you change
the order of the groups, expand or collapse each group.
• Click the to collapse all groups.
• Click the to expand all groups
• You can collapse and expand individual groups by clicking the triangle to the
left of the group.
▪ To change the order of the groupings, click and drag the selected group before or
after another group.
▪ Click the X for each selected group to remove that grouping.
• Widgets: Workspaces are made up of widgets, which open as new tabs in which you can run specific
tasks. For example, you can open the ‘Reports’ widget in a new tab to run reports on the data you’ve
selected. Depending on the layout of the workspace, between one and seven widgets can be
displayed as New Tabs in your view.
o You can access Widgets from by clicking on them from the related items window on the right-
hand side of the screen or by using the GoTo button as described above.
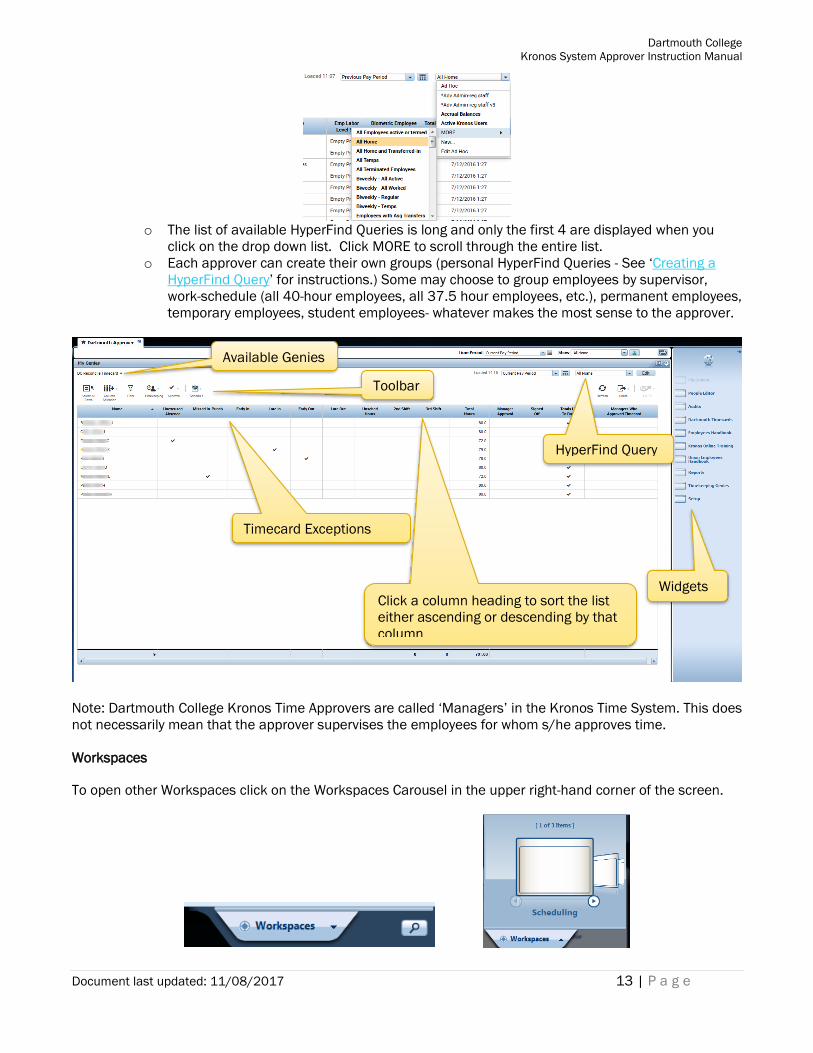
• HyperFind Query: This drop-down menu allows the approver to choose from pre-selected groups of
employees for whom s/he is the approver (Public HyperFind Queries). To select a HyperFind Query
click on the drop down list that generally defaults to having “All Home” selected. The window will
refresh with a new list of employees based on the newly selected HyperFind Query.
Dartmouth College
Kronos System Approver Instruction Manual
Document last updated: 11/08/2017 13 | P a g e
o The list of available HyperFind Queries is long and only the first 4 are displayed when you
click on the drop down list. Click MORE to scroll through the entire list.
o Each approver can create their own groups (personal HyperFind Queries - See ‘Creating a
HyperFind Query’ for instructions.) Some may choose to group employees by supervisor,
work-schedule (all 40-hour employees, all 37.5 hour employees, etc.), permanent employees,
temporary employees, student employees- whatever makes the most sense to the approver.
Note: Dartmouth College Kronos Time Approvers are called ‘Managers’ in the Kronos Time System. This does
not necessarily mean that the approver supervises the employees for whom s/he approves time.
Workspaces
To open other Workspaces click on the Workspaces Carousel in the upper right-hand corner of the screen.
Available Genies
Timecard Exceptions
Toolbar
Widgets
HyperFind Query
Click a column heading to sort the list
either ascending or descending by that
column
Dartmouth College
Kronos System Approver Instruction Manual
Document last updated: 11/08/2017 14 | P a g e
Click on the triangle to expand the carousel and scroll through the available Workspaces. Selecting a
Workspace will open it in a new tab within Kronos.
• Scheduling - perform scheduling tasks for the employees you have access to.
• Dartmouth Time Entry - you can use this workspace to manage your own timecard.
• Kronos Support - access online help for Kronos.
Approving Employee Timecards Approving a timecard is an indication that the timecard is acceptable for payroll processing. Approvers may
have access to view and approve timecards for employees where they are not the primary approver. (Others
in your area may be designated as your 'back-up' approver).
Deadlines:
• All hourly-paid employees are expected to enter and save their own time before leaving work at the end
of their scheduled hours at the end of the pay period.
• Supervisors must notify the employee and the approver as early as possible, but no later than 10:30am
if there are corrections that must be made to the employee’s timecard. Supervisors need to give the
system approver enough time to have the updates approved in Kronos prior to 12 pm.
• All Approvers will have reviewed, contacted employees & their supervisors for revisions, and approved all
employees’ time by 12pm on Monday for the now closed prior pay period.
Primary Approvers will approve all time in the system for all of their employee’s assignments (primary,
secondary, tertiary, etc.).
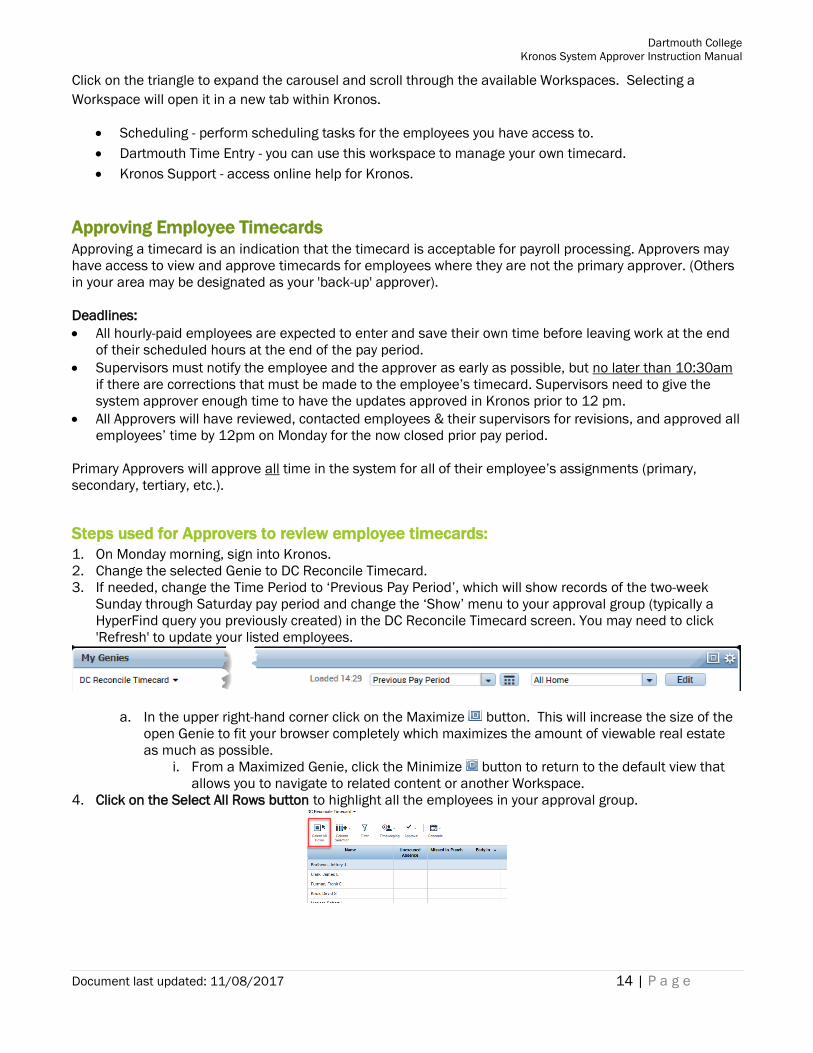
Steps used for Approvers to review employee timecards:
1. On Monday morning, sign into Kronos.
2. Change the selected Genie to DC Reconcile Timecard.
3. If needed, change the Time Period to ‘Previous Pay Period’, which will show records of the two-week
Sunday through Saturday pay period and change the ‘Show’ menu to your approval group (typically a
HyperFind query you previously created) in the DC Reconcile Timecard screen. You may need to click
'Refresh' to update your listed employees.
a. In the upper right-hand corner click on the Maximize button. This will increase the size of the
open Genie to fit your browser completely which maximizes the amount of viewable real estate
as much as possible.
i. From a Maximized Genie, click the Minimize button to return to the default view that
allows you to navigate to related content or another Workspace.
4. Click on the Select All Rows button to highlight all the employees in your approval group.
Dartmouth College
Kronos System Approver Instruction Manual
Document last updated: 11/08/2017 15 | P a g e
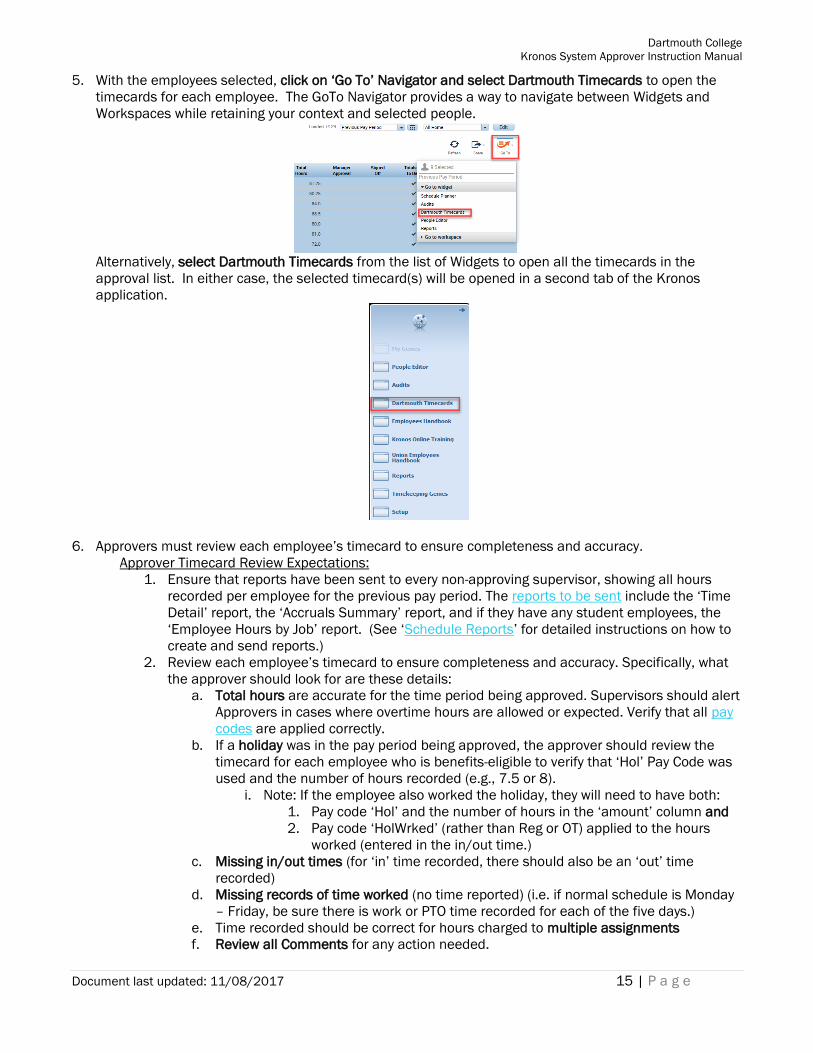
5. With the employees selected, click on ‘Go To’ Navigator and select Dartmouth Timecards to open the
timecards for each employee. The GoTo Navigator provides a way to navigate between Widgets and
Workspaces while retaining your context and selected people.
Alternatively, select Dartmouth Timecards from the list of Widgets to open all the timecards in the
approval list. In either case, the selected timecard(s) will be opened in a second tab of the Kronos
application.
6. Approvers must review each employee’s timecard to ensure completeness and accuracy.
Approver Timecard Review Expectations:
1. Ensure that reports have been sent to every non-approving supervisor, showing all hours
recorded per employee for the previous pay period. The reports to be sent include the ‘Time
Detail’ report, the ‘Accruals Summary’ report, and if they have any student employees, the
‘Employee Hours by Job’ report. (See ‘Schedule Reports’ for detailed instructions on how to
create and send reports.)
2. Review each employee’s timecard to ensure completeness and accuracy. Specifically, what
the approver should look for are these details:
a. Total hours are accurate for the time period being approved. Supervisors should alert
Approvers in cases where overtime hours are allowed or expected. Verify that all pay
codes are applied correctly.
b. If a holiday was in the pay period being approved, the approver should review the
timecard for each employee who is benefits-eligible to verify that ‘Hol’ Pay Code was
used and the number of hours recorded (e.g., 7.5 or 8).
i. Note: If the employee also worked the holiday, they will need to have both:
1. Pay code ‘Hol’ and the number of hours in the ‘amount’ column and
2. Pay code ‘HolWrked’ (rather than Reg or OT) applied to the hours
worked (entered in the in/out time.)
c. Missing in/out times (for ‘in’ time recorded, there should also be an ‘out’ time
recorded)
d. Missing records of time worked (no time reported) (i.e. if normal schedule is Monday
– Friday, be sure there is work or PTO time recorded for each of the five days.)
e. Time recorded should be correct for hours charged to multiple assignments
f. Review all Comments for any action needed.
Dartmouth College
Kronos System Approver Instruction Manual
Document last updated: 11/08/2017 16 | P a g e
i. Hours needing to be charged to an override account must be completed by
the approver.
g. Overnight hours on the last date of the pay period must end at 11:59pm.
h. Use of Schedules is optional. If scheduling feature is chosen, approver will be
encouraged to make changes to employee's schedules as necessary; this can also be
completed by the Finance Center as agreed upon by both departmental leaders and
Finance Center representative.
3. Respond to supervisors when alerted to a question or concern about an employee’s recorded
time. If notified of a correction that is needed, the approver should:
a. Ensure that employee makes appropriate change and
b. Resend updated/revised timecard to supervisor
7. If you have questions about a particular timecard, simply double-click that employee’s name and it will
open their timecard for the specified timeframe. You should follow-up with the employee and their
supervisor with any questions as quickly as possible to allow time for resolution of any issues.
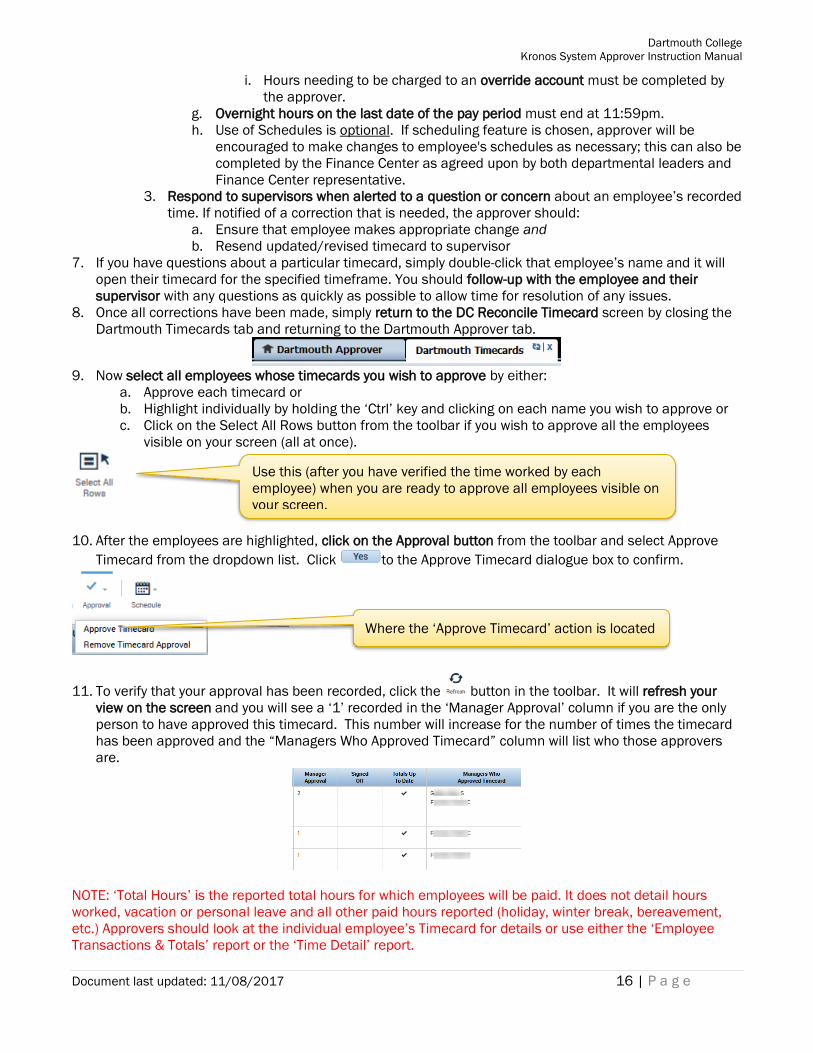
8. Once all corrections have been made, simply return to the DC Reconcile Timecard screen by closing the
Dartmouth Timecards tab and returning to the Dartmouth Approver tab.
9. Now select all employees whose timecards you wish to approve by either:
a. Approve each timecard or
b. Highlight individually by holding the ‘Ctrl’ key and clicking on each name you wish to approve or
c. Click on the Select All Rows button from the toolbar if you wish to approve all the employees
visible on your screen (all at once).
10. After the employees are highlighted, click on the Approval button from the toolbar and select Approve
Timecard from the dropdown list. Click to the Approve Timecard dialogue box to confirm.
11. To verify that your approval has been recorded, click the button in the toolbar. It will refresh your
view on the screen and you will see a ‘1’ recorded in the ‘Manager Approval’ column if you are the only
person to have approved this timecard. This number will increase for the number of times the timecard
has been approved and the “Managers Who Approved Timecard” column will list who those approvers
are.
NOTE: ‘Total Hours’ is the reported total hours for which employees will be paid. It does not detail hours
worked, vacation or personal leave and all other paid hours reported (holiday, winter break, bereavement,
etc.) Approvers should look at the individual employee’s Timecard for details or use either the ‘Employee
Transactions & Totals’ report or the ‘Time Detail’ report.
Use this (after you have verified the time worked by each
employee) when you are ready to approve all employees visible on
your screen.
Where the ‘Approve Timecard’ action is located
Dartmouth College
Kronos System Approver Instruction Manual
Document last updated: 11/08/2017 17 | P a g e
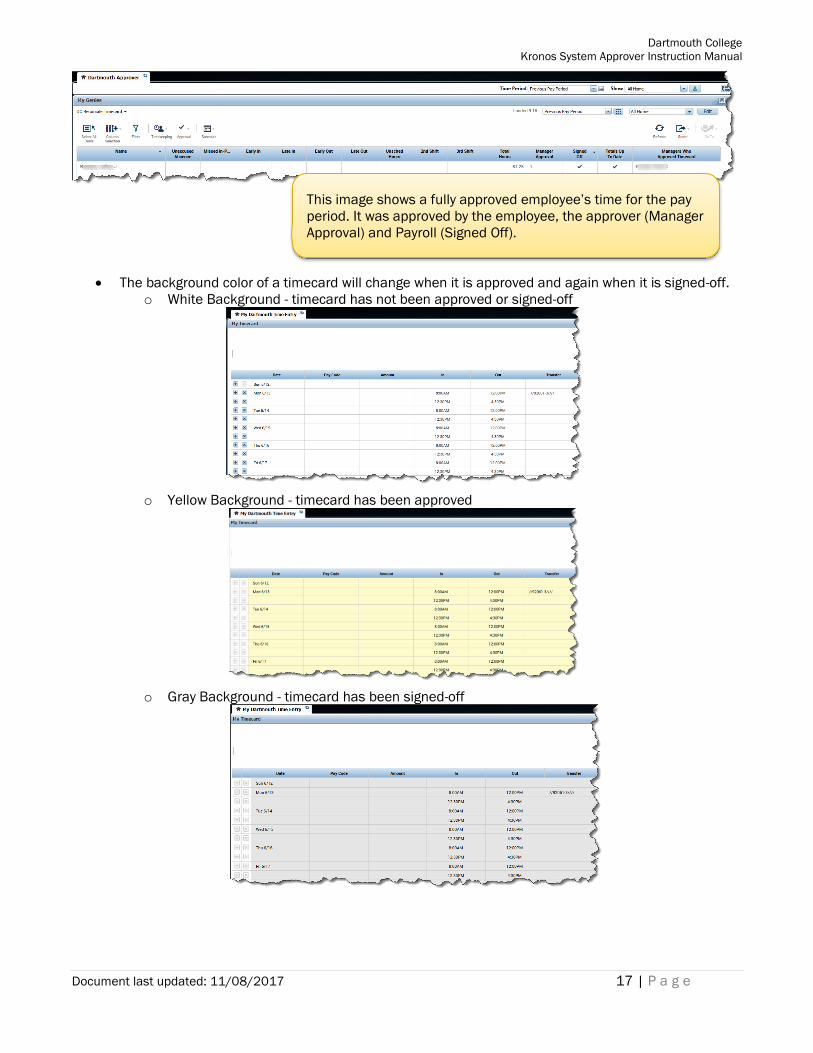
• The background color of a timecard will change when it is approved and again when it is signed-off.
o White Background - timecard has not been approved or signed-off
o Yellow Background - timecard has been approved
o Gray Background - timecard has been signed-off
This image shows a fully approved employee’s time for the pay
period. It was approved by the employee, the approver (Manager
Approval) and Payroll (Signed Off).
Dartmouth College
Kronos System Approver Instruction Manual
Document last updated: 11/08/2017 18 | P a g e
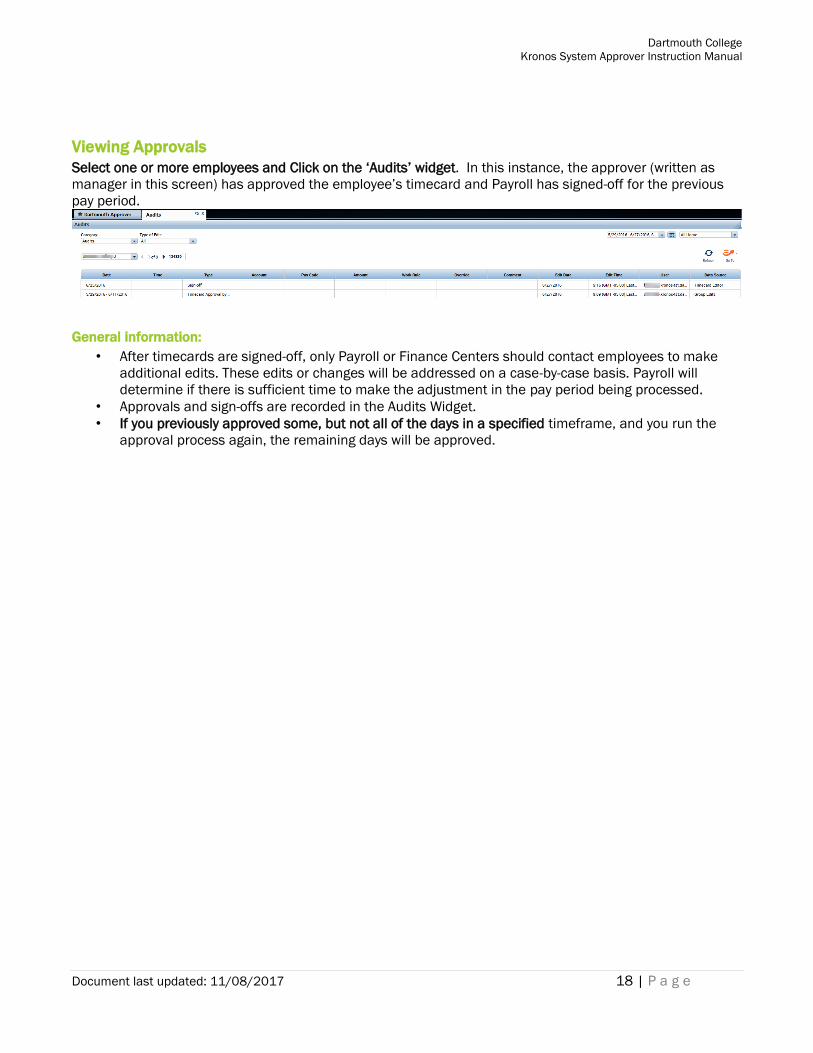
Viewing Approvals
Select one or more employees and Click on the ‘Audits’ widget. In this instance, the approver (written as
manager in this screen) has approved the employee’s timecard and Payroll has signed-off for the previous
pay period.
General information:
• After timecards are signed-off, only Payroll or Finance Centers should contact employees to make
additional edits. These edits or changes will be addressed on a case-by-case basis. Payroll will
determine if there is sufficient time to make the adjustment in the pay period being processed.
• Approvals and sign-offs are recorded in the Audits Widget.
• If you previously approved some, but not all of the days in a specified timeframe, and you run the
approval process again, the remaining days will be approved.

Dartmouth College
Kronos System Approver Instruction Manual
Document last updated: 11/08/2017 19 | P a g e
Changing the chart string (chart string override) used to pay employee’s time
Each position held by an employee is automatically charged to chart string(s) according to their Labor
Schedule. (Questions regarding one’s Labor Schedule should be directed to the Finance Center.) In very rare
occasions, an employee’s time may need to be charged to a different chart string. If this occurs, the
employee must leave a ‘Comment’ for their approver to request an ‘override’ of the chart string and give the
approver the exact chart string to which that shift should be charged.
Process a Chart string override:
1. Comments can be reviewed on an employee’s timecard by hovering your cursor over the Comment icon
to get the details on what hours to charge to which chart string.
Alternatively, navigate to the Audits Widget and select Comments from the Category Dropdown list.
2. Click on the drop-down arrow within the Transfer column for the exact date and time (shift) for which you
need to change a chart string.
When you are looking at a time card and an ‘In’ and/or ‘Out’ punch has been edited by someone other than
the employee who entered the time, there will be a little gray triangle in the upper right-hand corner of the
cell that had been edited.
Dartmouth College
Kronos System Approver Instruction Manual
Document last updated: 11/08/2017 20 | P a g e
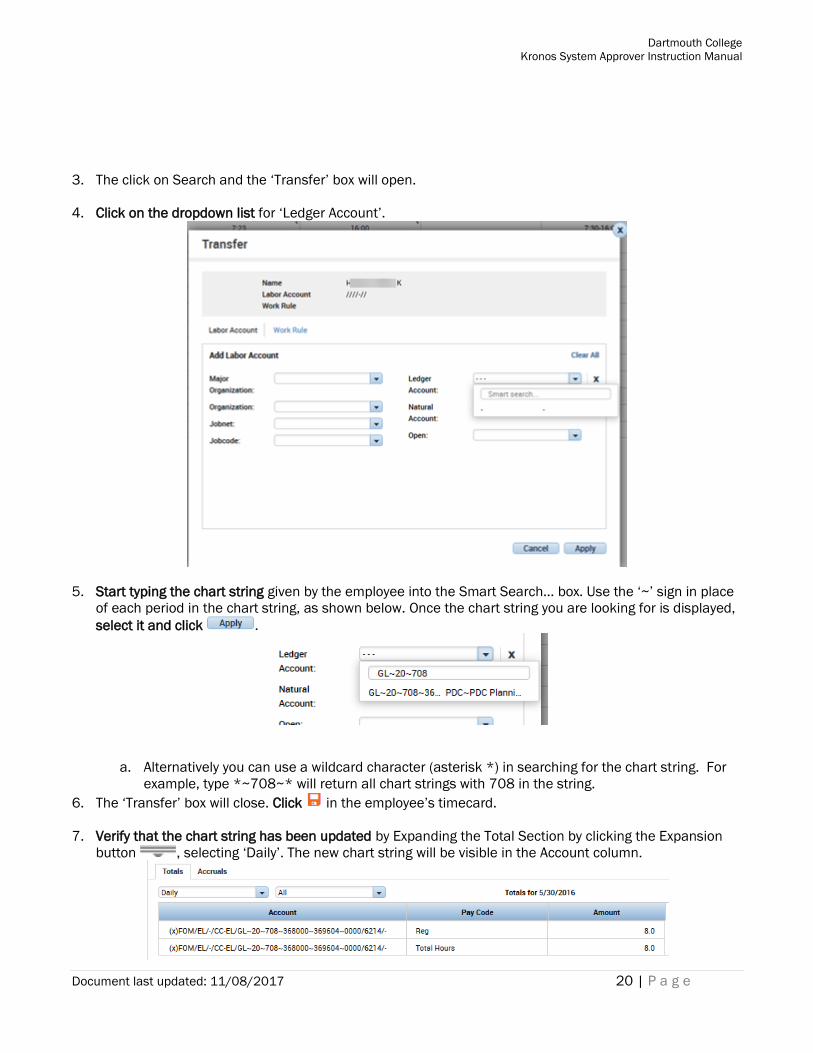
3. The click on Search and the ‘Transfer’ box will open.
4. Click on the dropdown list for ‘Ledger Account’.
5. Start typing the chart string given by the employee into the Smart Search… box. Use the ‘~’ sign in place
of each period in the chart string, as shown below. Once the chart string you are looking for is displayed,
select it and click .
a. Alternatively you can use a wildcard character (asterisk *) in searching for the chart string. For
example, type *~708~* will return all chart strings with 708 in the string.
6. The ‘Transfer’ box will close. Click in the employee’s timecard.
7. Verify that the chart string has been updated by Expanding the Total Section by clicking the Expansion
button , selecting ‘Daily’. The new chart string will be visible in the Account column.
Dartmouth College
Kronos System Approver Instruction Manual
Document last updated: 11/08/2017 21 | P a g e
Note: If the chart string provided by the employee is not in your view, contact your Finance Center for
assistance.
Note: If overriding OT, please notify your finance center or payroll to ensure that it gets applied correctly.
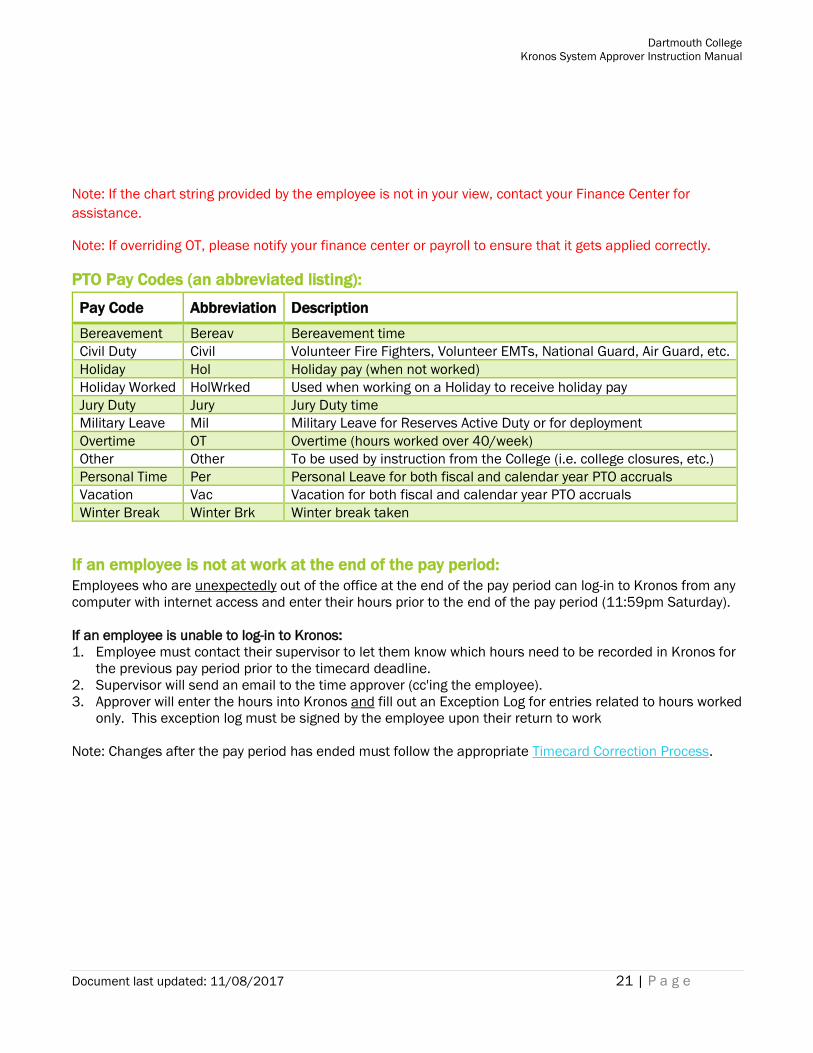
PTO Pay Codes (an abbreviated listing):
Pay Code Abbreviation Description
Bereavement Bereav Bereavement time
Civil Duty Civil Volunteer Fire Fighters, Volunteer EMTs, National Guard, Air Guard, etc.
Holiday Hol Holiday pay (when not worked)
Holiday Worked HolWrked Used when working on a Holiday to receive holiday pay
Jury Duty Jury Jury Duty time
Military Leave Mil Military Leave for Reserves Active Duty or for deployment
Overtime OT Overtime (hours worked over 40/week)
Other Other To be used by instruction from the College (i.e. college closures, etc.)
Personal Time Per Personal Leave for both fiscal and calendar year PTO accruals
Vacation Vac Vacation for both fiscal and calendar year PTO accruals
Winter Break Winter Brk Winter break taken
If an employee is not at work at the end of the pay period:
Employees who are unexpectedly out of the office at the end of the pay period can log-in to Kronos from any
computer with internet access and enter their hours prior to the end of the pay period (11:59pm Saturday).
If an employee is unable to log-in to Kronos:
1. Employee must contact their supervisor to let them know which hours need to be recorded in Kronos for
the previous pay period prior to the timecard deadline.
2. Supervisor will send an email to the time approver (cc'ing the employee).
3. Approver will enter the hours into Kronos and fill out an Exception Log for entries related to hours worked
only. This exception log must be signed by the employee upon their return to work
Note: Changes after the pay period has ended must follow the appropriate Timecard Correction Process.
Dartmouth College
Kronos System Approver Instruction Manual
Document last updated: 11/08/2017 22 | P a g e
Timecard Corrections
Timecard Corrections within the pay period
Corrections must be made in Kronos by the employee. If the timecard has not yet been approved by the
Approver, Finance Center or Payroll, the employee need only correct the information by either deleting the
incorrect row of data or by clicking in each incorrect cell and making the correction.
To delete a row of data, simply click the button on the left of the date for which you wish to remove the
data. This will not remove the date, simply the data previously entered on that line. Be sure to always click
the Save Button when you’ve completed entering/changing data.
Timecard Corrections after the pay period has ended, but prior to the time being
submitted to Payroll for payment
There is a very limited period of time between when the employee’s pay period ends (11:59pm Saturday)
and when the Payroll Office uses that data to create paychecks (typically Tuesday mornings). If a mistake is
noticed during that time, it may be possible to have it corrected prior to the employee’s paycheck being run.
The steps below must take place quickly.
1. If employee’s timecard has not yet been approved in this limited period of time, then employee
should make the change in their timecard and notify supervisor.
2. If a change is needed, but the employee cannot edit the timecard (due to approvals), the employee
should contact both their supervisor and approver to request the removal of the timecard
approval(s).
a. Once the approvals have been removed, the employee must open their timecard for the
previous pay period and make the correction.
b. After the correction has been made and saved, the employee must contact the supervisor
and approver to let them know the correction is completed, so the timecard can be
submitted to the Payroll Office for payment of wages.
Note: If the approver or finance center allows an employee to change his or her timecard after the
supervisor’s report was sent, then the approver or finance center should alert the supervisor of the change
via email.
Corrections to an employee’s time after a paycheck has been processed
Corrections to an employee’s time and/or PTO time must be made in Kronos. If the pay period has passed,
the following steps must be followed:
1. An employee should contact their supervisor if a revision is necessary to a prior pay period.
2. The supervisor will coordinate with the Finance Center and the Payroll Dept. to have adjustments
made. The Finance Center or Department will prepare the Payroll Revised Timecard form and email
it to the employee to print, review, sign, and date.
3. The employee must then send the signed form back to Finance Center or directly to Payroll.
4. Finance Center routes the form to Payroll or Payroll receives the form directly from the Department.
Payroll makes the adjustment and the change is included in next pay period.
a. Prior to Kronos import to HRMS, Payroll will input the Historical Correction into Kronos, and
this input will be included in the Kronos import into HRMS.
b. If this occurs after the Kronos import into HRMS, Payroll will correct Kronos, and then Payroll
will manually make the correction in HRMS.
If a Historical Correction has been performed on a timecard, you will see a blue circle next to the date and
circle tick mark in the upper right-hand corner of the timecard cell that has been changed. When you
hover your cursor over this tick mark a text bubble will display.
Dartmouth College
Kronos System Approver Instruction Manual
Document last updated: 11/08/2017 23 | P a g e
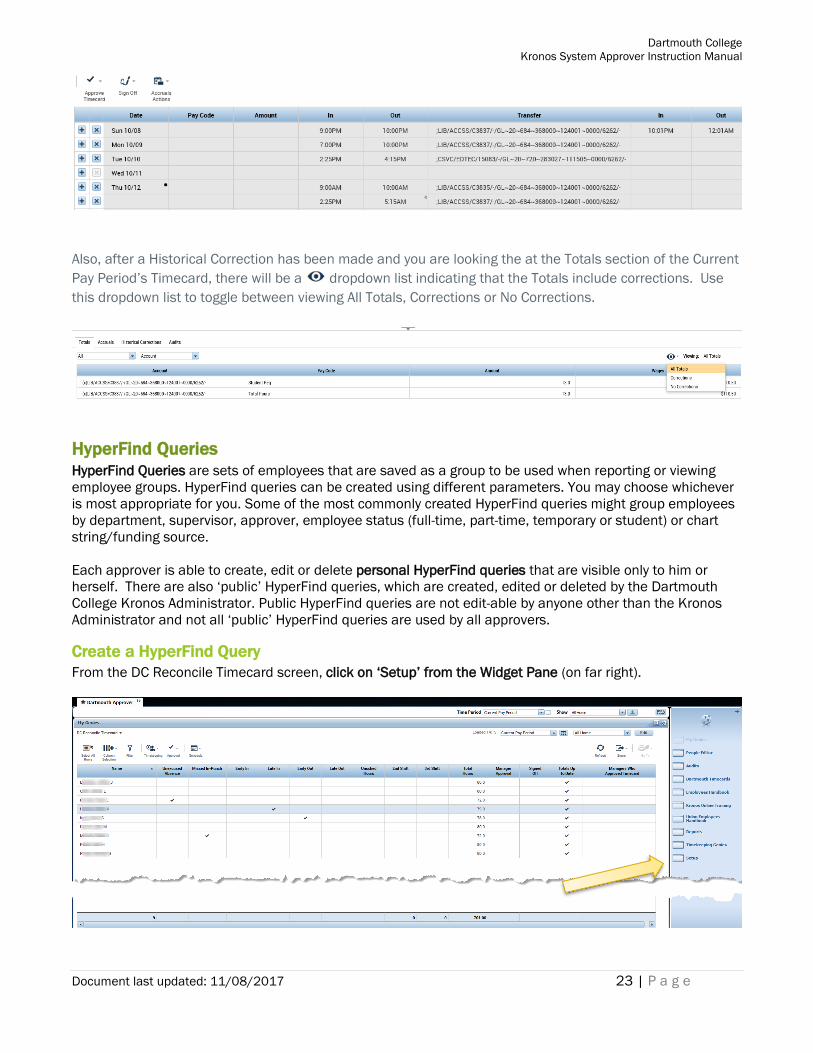
Also, after a Historical Correction has been made and you are looking the at the Totals section of the Current
Pay Period’s Timecard, there will be a dropdown list indicating that the Totals include corrections. Use
this dropdown list to toggle between viewing All Totals, Corrections or No Corrections.
HyperFind Queries HyperFind Queries are sets of employees that are saved as a group to be used when reporting or viewing
employee groups. HyperFind queries can be created using different parameters. You may choose whichever
is most appropriate for you. Some of the most commonly created HyperFind queries might group employees
by department, supervisor, approver, employee status (full-time, part-time, temporary or student) or chart
string/funding source.
Each approver is able to create, edit or delete personal HyperFind queries that are visible only to him or
herself. There are also ‘public’ HyperFind queries, which are created, edited or deleted by the Dartmouth
College Kronos Administrator. Public HyperFind queries are not edit-able by anyone other than the Kronos
Administrator and not all ‘public’ HyperFind queries are used by all approvers.
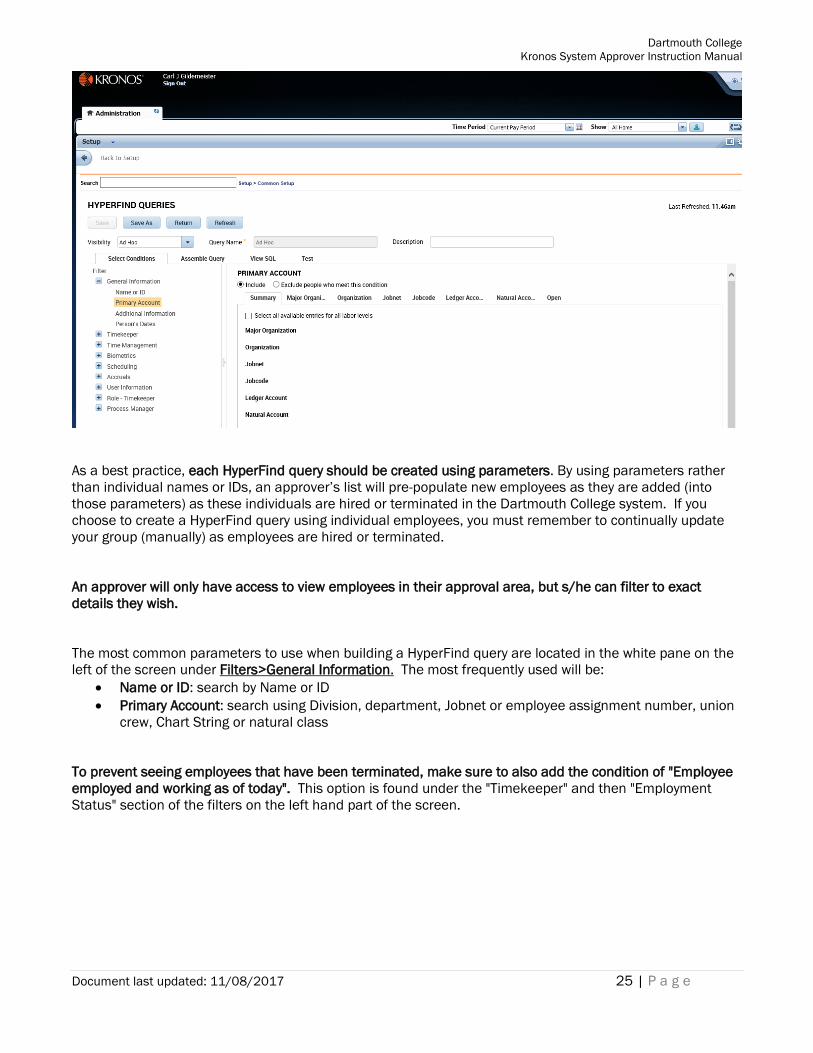
Create a HyperFind Query
From the DC Reconcile Timecard screen, click on ‘Setup’ from the Widget Pane (on far right).

Dartmouth College
Kronos System Approver Instruction Manual
Document last updated: 11/08/2017 24 | P a g e
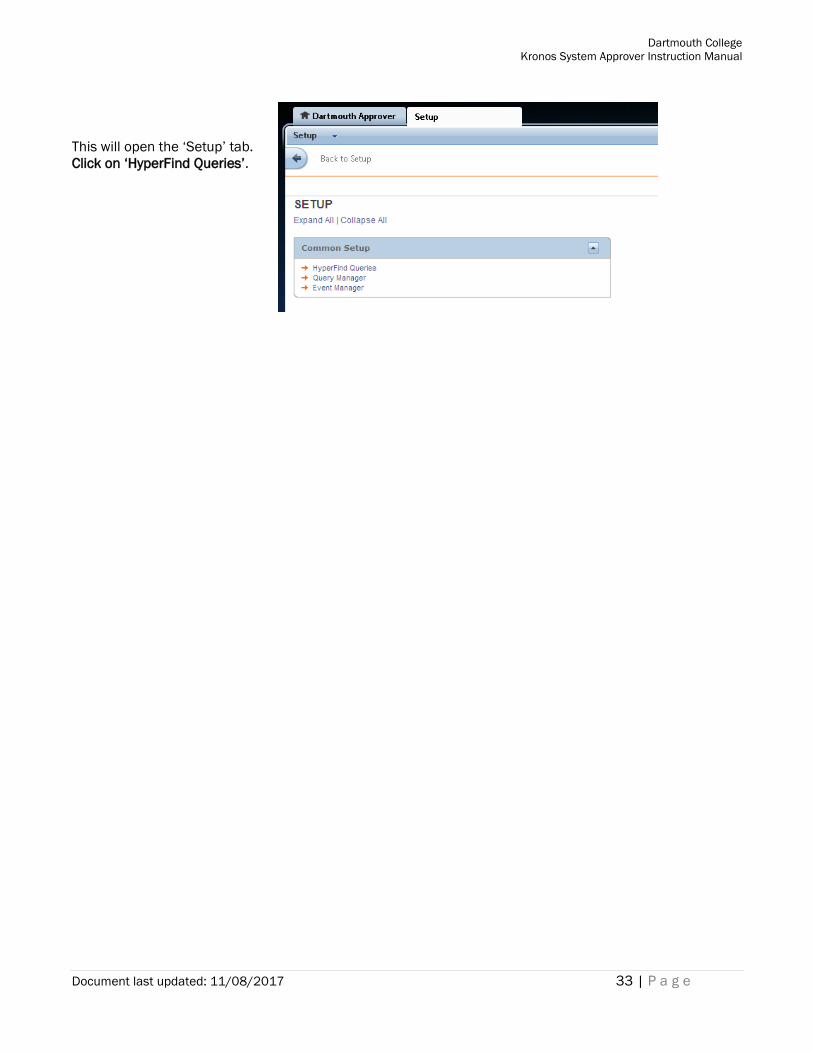
This will open the ‘Setup’ tab.
Click on ‘HyperFind Queries’.
This will open the ‘HyperFind Queries’ screen, which lists all of the HyperFind Queries that you have access
to, including public and personal queries.
• Click on .
You will now be at the ‘HyperFind Query’ Setup screen below.
Dartmouth College
Kronos System Approver Instruction Manual
Document last updated: 11/08/2017 25 | P a g e
As a best practice, each HyperFind query should be created using parameters. By using parameters rather
than individual names or IDs, an approver’s list will pre-populate new employees as they are added (into
those parameters) as these individuals are hired or terminated in the Dartmouth College system. If you
choose to create a HyperFind query using individual employees, you must remember to continually update
your group (manually) as employees are hired or terminated.
An approver will only have access to view employees in their approval area, but s/he can filter to exact
details they wish.
The most common parameters to use when building a HyperFind query are located in the white pane on the
left of the screen under Filters>General Information. The most frequently used will be:
• Name or ID: search by Name or ID
• Primary Account: search using Division, department, Jobnet or employee assignment number, union
crew, Chart String or natural class
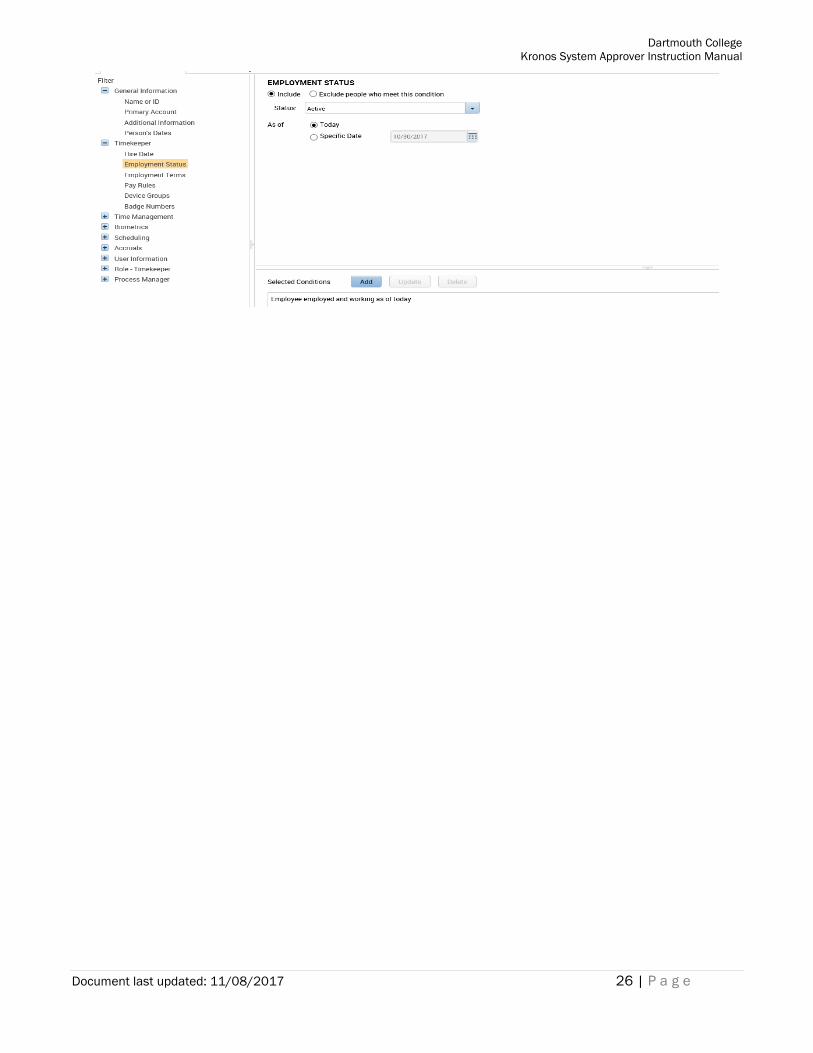
To prevent seeing employees that have been terminated, make sure to also add the condition of "Employee
employed and working as of today". This option is found under the "Timekeeper" and then "Employment
Status" section of the filters on the left hand part of the screen.
Dartmouth College
Kronos System Approver Instruction Manual
Document last updated: 11/08/2017 26 | P a g e
Dartmouth College
Kronos System Approver Instruction Manual
Document last updated: 11/08/2017 27 | P a g e
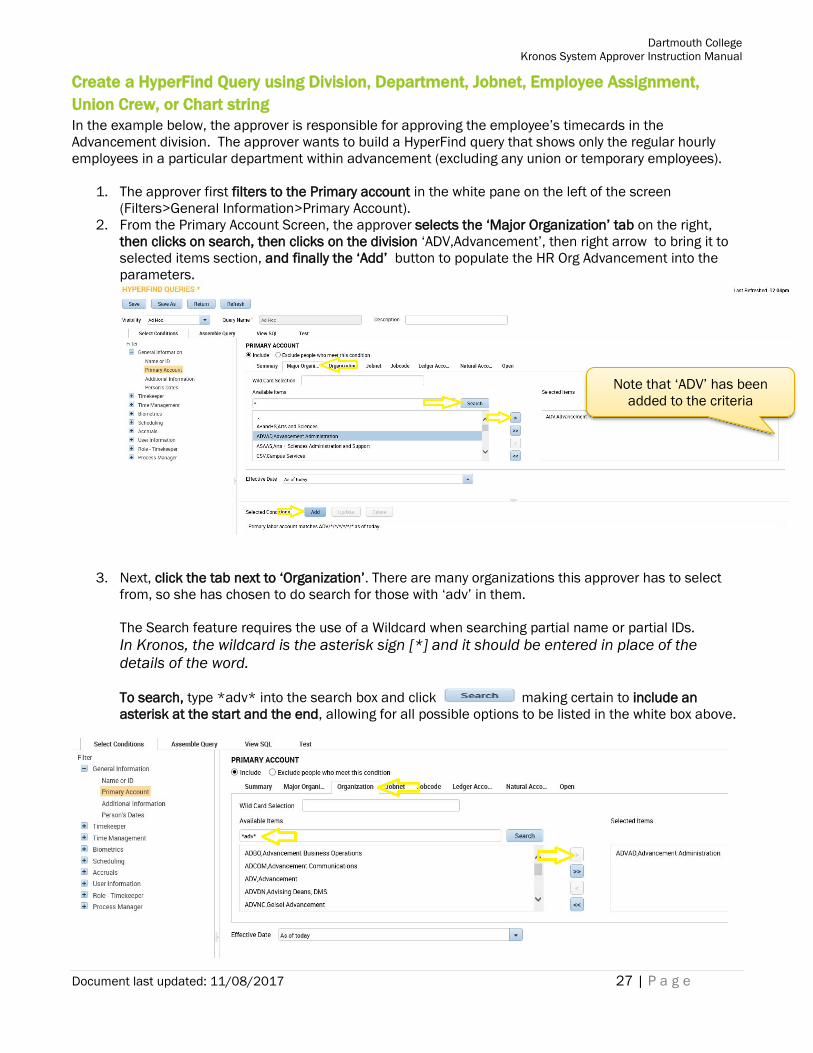
Create a HyperFind Query using Division, Department, Jobnet, Employee Assignment,
Union Crew, or Chart string
In the example below, the approver is responsible for approving the employee’s timecards in the
Advancement division. The approver wants to build a HyperFind query that shows only the regular hourly
employees in a particular department within advancement (excluding any union or temporary employees).
1. The approver first filters to the Primary account in the white pane on the left of the screen
(Filters>General Information>Primary Account).
2. From the Primary Account Screen, the approver selects the ‘Major Organization’ tab on the right,
then clicks on search, then clicks on the division ‘ADV,Advancement’, then right arrow to bring it to
selected items section, and finally the ‘Add’ button to populate the HR Org Advancement into the
parameters.
3. Next, click the tab next to ‘Organization’. There are many organizations this approver has to select
from, so she has chosen to do search for those with ‘adv’ in them.
The Search feature requires the use of a Wildcard when searching partial name or partial IDs.
In Kronos, the wildcard is the asterisk sign [*] and it should be entered in place of the
details of the word.
To search, type *adv* into the search box and click making certain to include an
asterisk at the start and the end, allowing for all possible options to be listed in the white box above.
Note that ‘ADV’ has been
added to the criteria
Dartmouth College
Kronos System Approver Instruction Manual
Document last updated: 11/08/2017 28 | P a g e
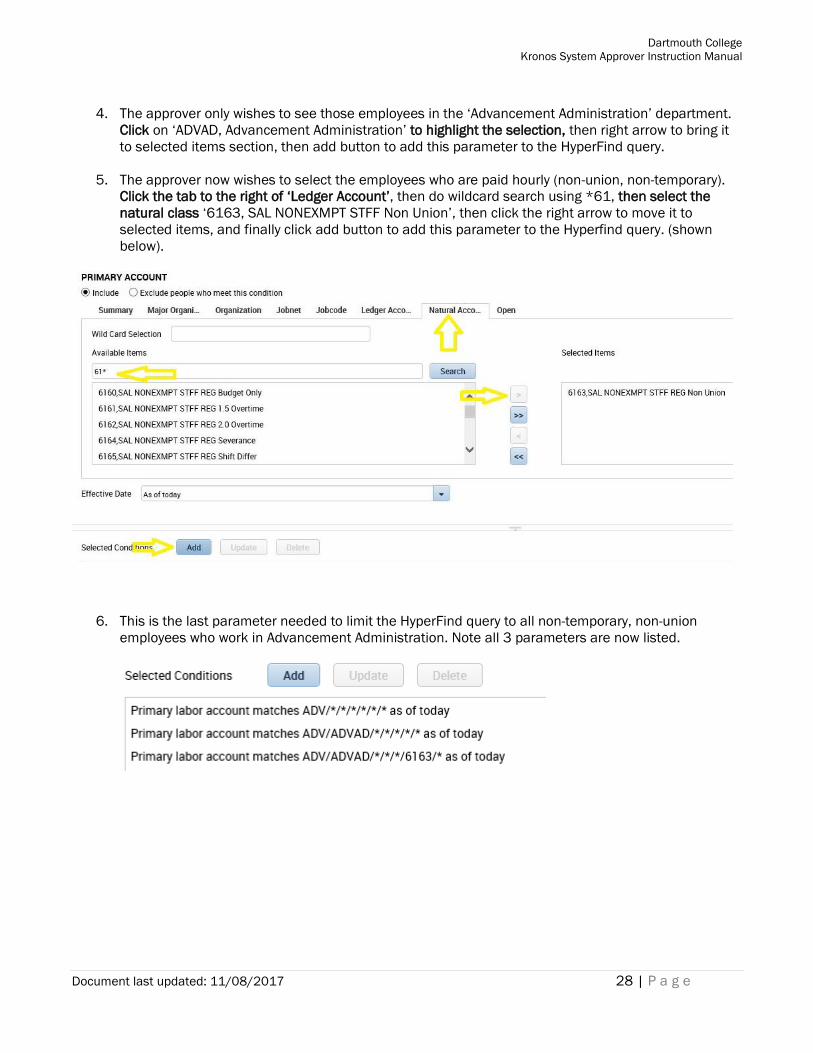
4. The approver only wishes to see those employees in the ‘Advancement Administration’ department.
Click on ‘ADVAD, Advancement Administration’ to highlight the selection, then right arrow to bring it
to selected items section, then add button to add this parameter to the HyperFind query.
5. The approver now wishes to select the employees who are paid hourly (non-union, non-temporary).
Click the tab to the right of ‘Ledger Account’, then do wildcard search using *61, then select the
natural class ‘6163, SAL NONEXMPT STFF Non Union’, then click the right arrow to move it to
selected items, and finally click add button to add this parameter to the Hyperfind query. (shown
below).
6. This is the last parameter needed to limit the HyperFind query to all non-temporary, non-union
employees who work in Advancement Administration. Note all 3 parameters are now listed.
Dartmouth College
Kronos System Approver Instruction Manual
Document last updated: 11/08/2017 29 | P a g e
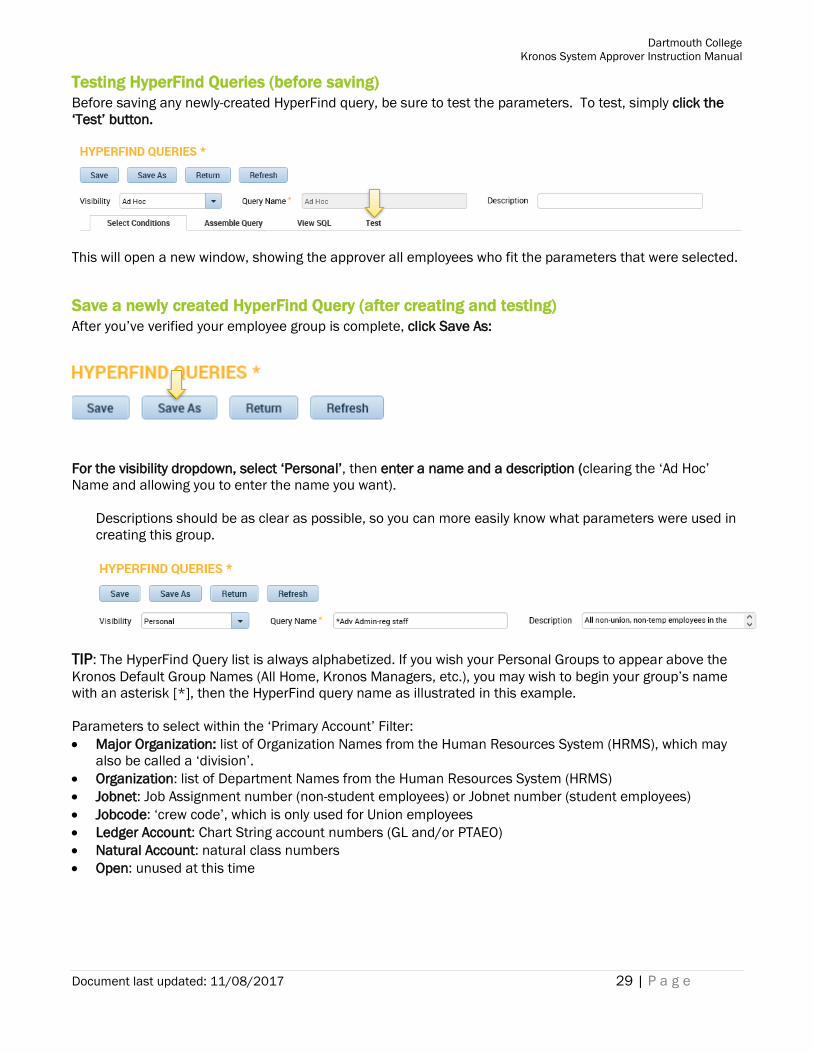
Testing HyperFind Queries (before saving)
Before saving any newly-created HyperFind query, be sure to test the parameters. To test, simply click the
‘Test’ button.
This will open a new window, showing the approver all employees who fit the parameters that were selected.
Save a newly created HyperFind Query (after creating and testing)
After you’ve verified your employee group is complete, click Save As:
For the visibility dropdown, select ‘Personal’, then enter a name and a description (clearing the ‘Ad Hoc’
Name and allowing you to enter the name you want).
Descriptions should be as clear as possible, so you can more easily know what parameters were used in
creating this group.
TIP: The HyperFind Query list is always alphabetized. If you wish your Personal Groups to appear above the
Kronos Default Group Names (All Home, Kronos Managers, etc.), you may wish to begin your group’s name
with an asterisk [*], then the HyperFind query name as illustrated in this example.
Parameters to select within the ‘Primary Account’ Filter:
• Major Organization: list of Organization Names from the Human Resources System (HRMS), which may
also be called a ‘division’.
• Organization: list of Department Names from the Human Resources System (HRMS)
• Jobnet: Job Assignment number (non-student employees) or Jobnet number (student employees)
• Jobcode: ‘crew code’, which is only used for Union employees
• Ledger Account: Chart String account numbers (GL and/or PTAEO)
• Natural Account: natural class numbers
• Open: unused at this time
Dartmouth College
Kronos System Approver Instruction Manual
Document last updated: 11/08/2017 30 | P a g e
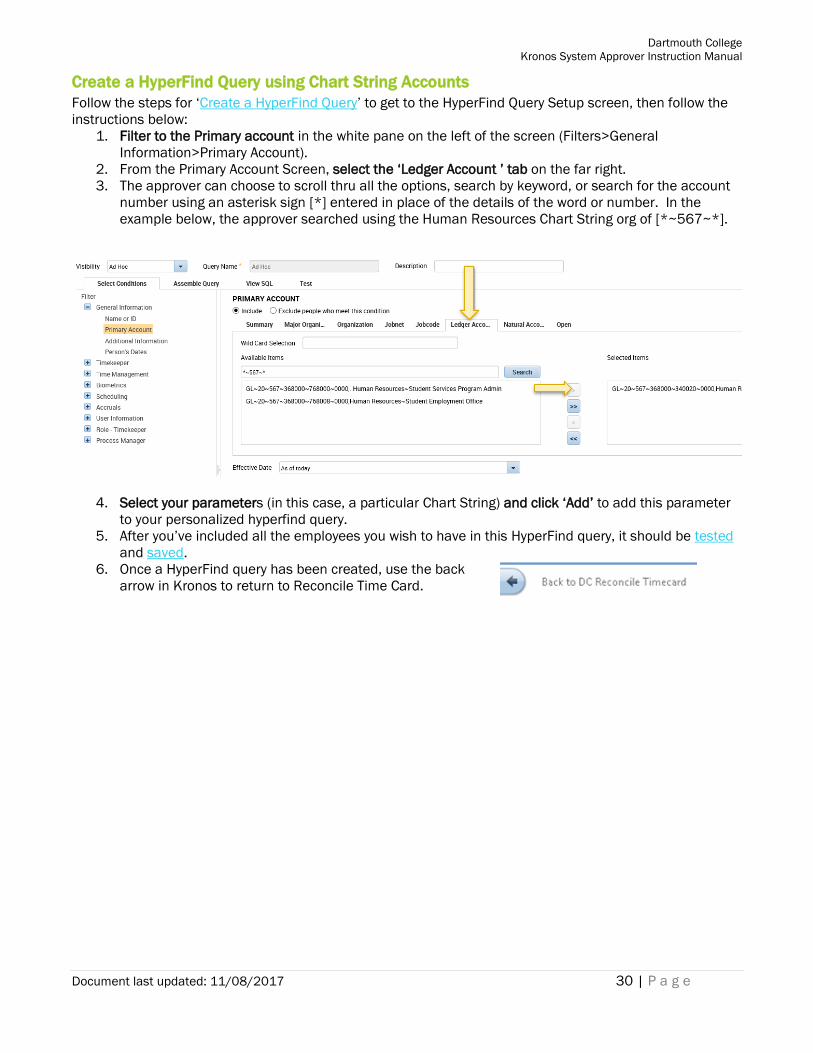
Create a HyperFind Query using Chart String Accounts
Follow the steps for ‘Create a HyperFind Query’ to get to the HyperFind Query Setup screen, then follow the
instructions below:
1. Filter to the Primary account in the white pane on the left of the screen (Filters>General
Information>Primary Account).
2. From the Primary Account Screen, select the ‘Ledger Account ’ tab on the far right.
3. The approver can choose to scroll thru all the options, search by keyword, or search for the account
number using an asterisk sign [*] entered in place of the details of the word or number. In the
example below, the approver searched using the Human Resources Chart String org of [*~567~*].
4. Select your parameters (in this case, a particular Chart String) and click ‘Add’ to add this parameter
to your personalized hyperfind query.
5. After you’ve included all the employees you wish to have in this HyperFind query, it should be tested
and saved.
6. Once a HyperFind query has been created, use the back
arrow in Kronos to return to Reconcile Time Card.
Dartmouth College
Kronos System Approver Instruction Manual
Document last updated: 11/08/2017 31 | P a g e
Create a HyperFind Query using Name or ID
NOTE: If you choose to create a HyperFind query using individual employees, you must remember to
continually update your group (manually) as employees are hired or terminated. This approach is not
encouraged, but there are circumstances where it could be useful.
Follow the steps for ‘Create a HyperFind Query’ to get to the HyperFind Query Setup screen, then follow the
instructions below:
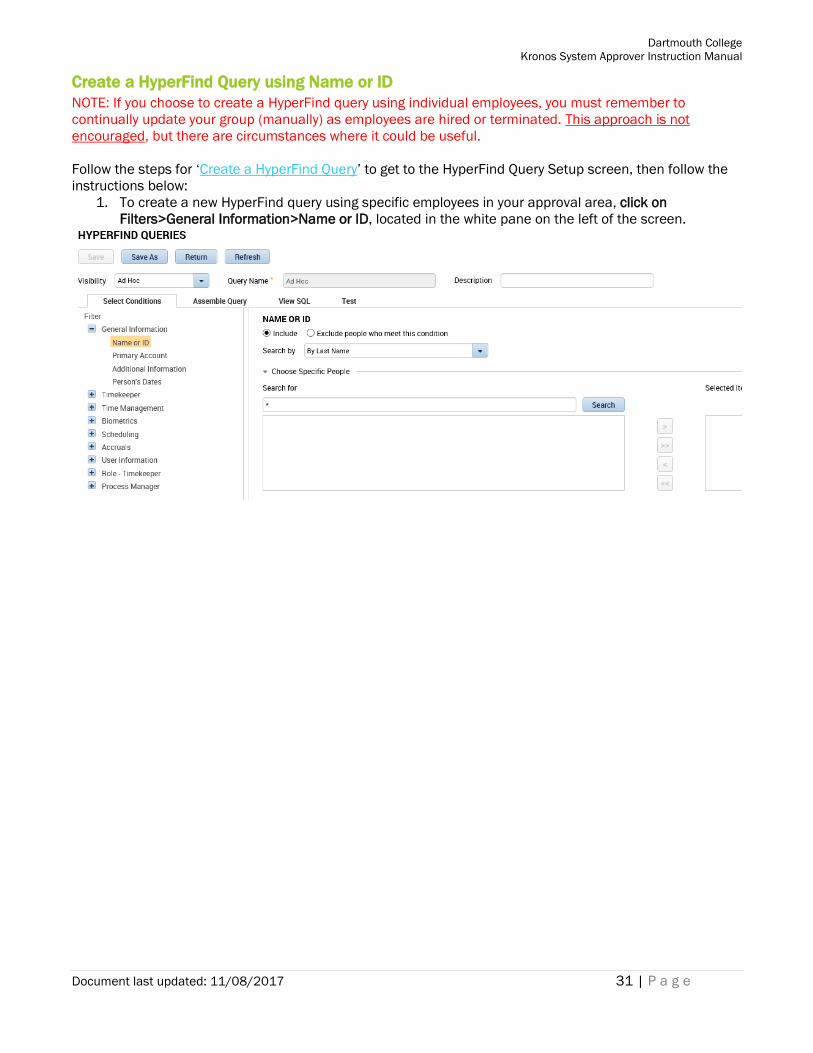
1. To create a new HyperFind query using specific employees in your approval area, click on
Filters>General Information>Name or ID, located in the white pane on the left of the screen.
Dartmouth College
Kronos System Approver Instruction Manual
Document last updated: 11/08/2017 32 | P a g e
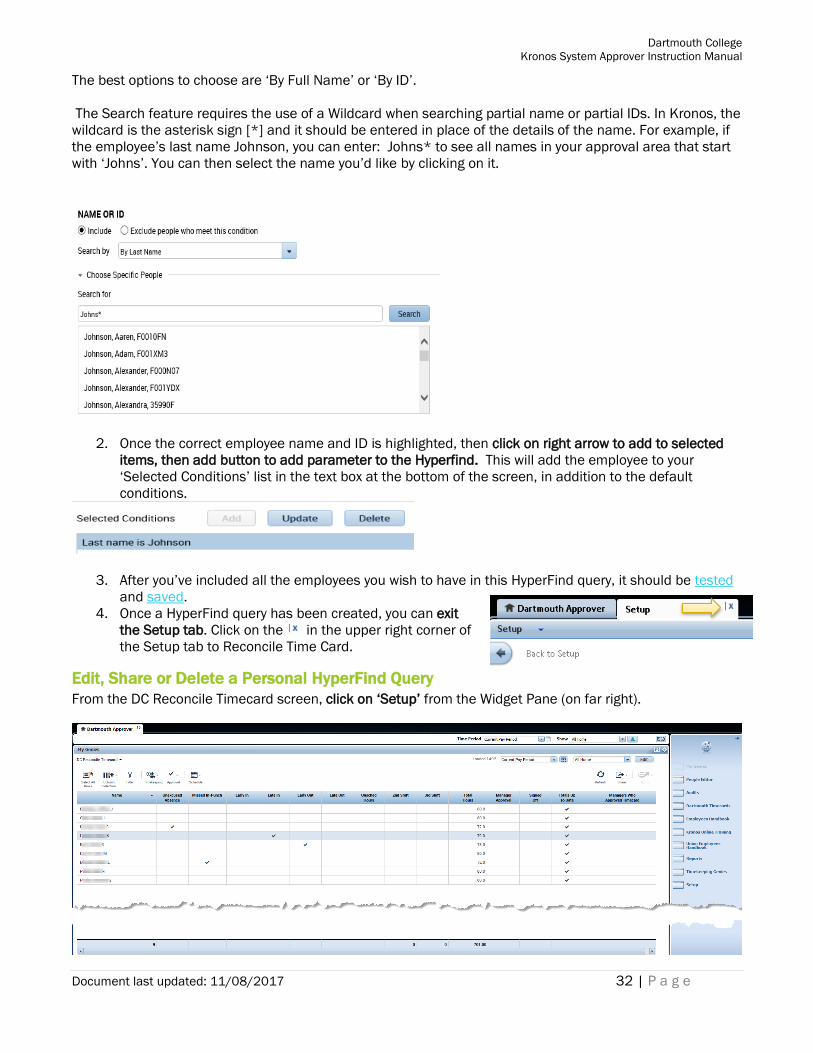
The best options to choose are ‘By Full Name’ or ‘By ID’.
The Search feature requires the use of a Wildcard when searching partial name or partial IDs. In Kronos, the
wildcard is the asterisk sign [*] and it should be entered in place of the details of the name. For example, if
the employee’s last name Johnson, you can enter: Johns* to see all names in your approval area that start
with ‘Johns’. You can then select the name you’d like by clicking on it.
2. Once the correct employee name and ID is highlighted, then click on right arrow to add to selected
items, then add button to add parameter to the Hyperfind. This will add the employee to your
‘Selected Conditions’ list in the text box at the bottom of the screen, in addition to the default
conditions.
3. After you’ve included all the employees you wish to have in this HyperFind query, it should be tested
and saved.
4. Once a HyperFind query has been created, you can exit
the Setup tab. Click on the in the upper right corner of
the Setup tab to Reconcile Time Card.
Edit, Share or Delete a Personal HyperFind Query
From the DC Reconcile Timecard screen, click on ‘Setup’ from the Widget Pane (on far right).
Dartmouth College
Kronos System Approver Instruction Manual
Document last updated: 11/08/2017 33 | P a g e
This will open the ‘Setup’ tab.
Click on ‘HyperFind Queries’.
Dartmouth College
Kronos System Approver Instruction Manual
Document last updated: 11/08/2017 34 | P a g e
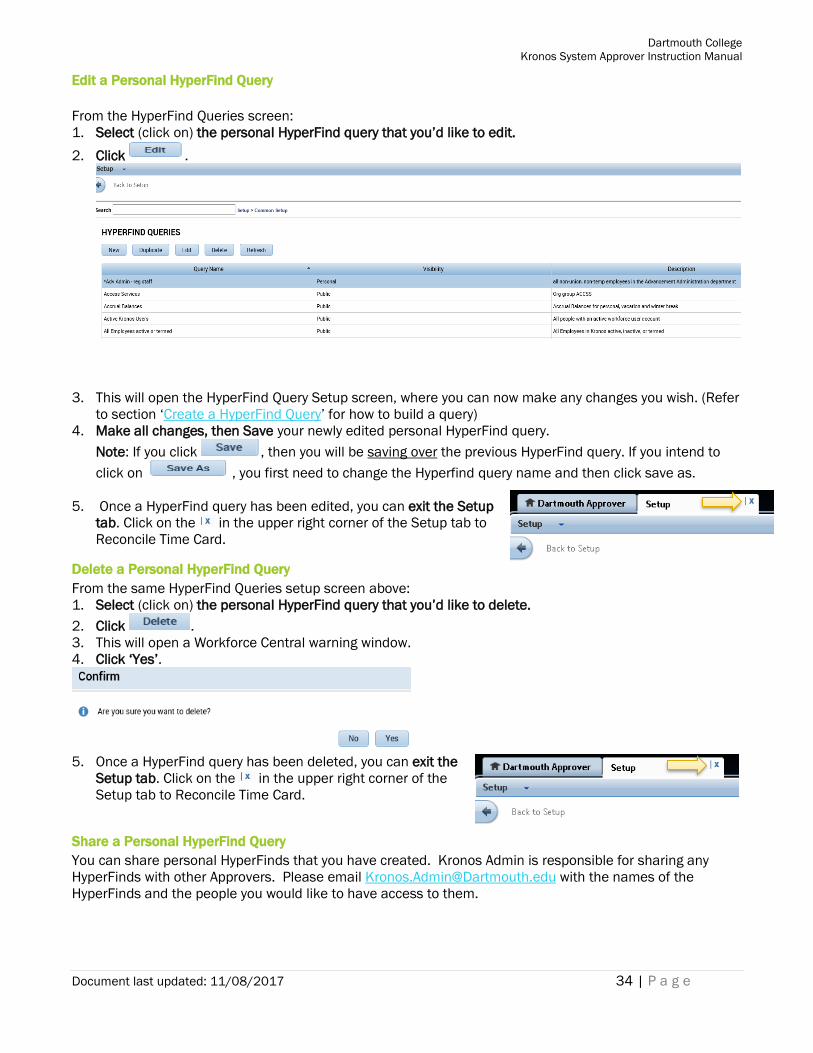
Edit a Personal HyperFind Query
From the HyperFind Queries screen:
1. Select (click on) the personal HyperFind query that you’d like to edit.
2. Click .
3. This will open the HyperFind Query Setup screen, where you can now make any changes you wish. (Refer
to section ‘Create a HyperFind Query’ for how to build a query)
4. Make all changes, then Save your newly edited personal HyperFind query.
Note: If you click , then you will be saving over the previous HyperFind query. If you intend to
click on , you first need to change the Hyperfind query name and then click save as.
5. Once a HyperFind query has been edited, you can exit the Setup
tab. Click on the in the upper right corner of the Setup tab to
Reconcile Time Card.
Delete a Personal HyperFind Query
From the same HyperFind Queries setup screen above:
1. Select (click on) the personal HyperFind query that you’d like to delete.
2. Click .
3. This will open a Workforce Central warning window.
4. Click ‘Yes’.
5. Once a HyperFind query has been deleted, you can exit the
Setup tab. Click on the in the upper right corner of the
Setup tab to Reconcile Time Card.
Share a Personal HyperFind Query
You can share personal HyperFinds that you have created. Kronos Admin is responsible for sharing any
HyperFinds with other Approvers. Please email [email protected] with the names of the
HyperFinds and the people you would like to have access to them.

Dartmouth College
Kronos System Approver Instruction Manual
Document last updated: 11/08/2017 35 | P a g e
Using HyperFind Queries You can change the Employee Group being viewed from the DC Reconcile Timecard screen, click the
dropdown arrow on the right side of the calendar button. Only 5 HyperFinds are displayed in the main
list. Click “MORE” to view the rest of the list.
• ‘All Home’ – This includes every employee for which you have access to see and approve.
o There are several Public defaults groups which may include employees outside of your approval
area. It is a best practice to create your own personal HyperFind query using the instructions in
‘Create a HyperFind Query’.
• Ad Hoc – This group shows the most recently used group of employees that you have selected. It
changes with each function as you move throughout the system and can be useful when using a
selected group that you want to view only once and don’t wish to save.
Use your cursor to click the group you wish to view. The program will respond to your requested change and
show only those employees who are in this HyperFind query.
Change the Date Range being Viewed
1. From the DC Reconcile Timecard screen (or any other Genie), click the dropdown list to the left of the
calendar button to select a pre-set time period.
2. You can create also limit your view to a range of dates of your choice by clicking on the calendar
button.
3. A pop-up calendar box will prompt you to enter the exact range you are looking for and click .
4. This specified date range will now be available in the dropdown list and will be what you see until you
change it.
Dartmouth College
Kronos System Approver Instruction Manual
Document last updated: 11/08/2017 36 | P a g e
5. If for some reason, that requested change in dates did not work correctly, click the button from the
toolbar.
Finding and Acting on Employee Data
Approvers work from a list of their employees to review time. For Approvers that are responsible for
approving more than one employee group, the employee list can be viewed two ways that are listed below.
From either of these views, managers can:
Choose a task to perform on employee data.
Navigate to other components, such as Timecards or Reports.
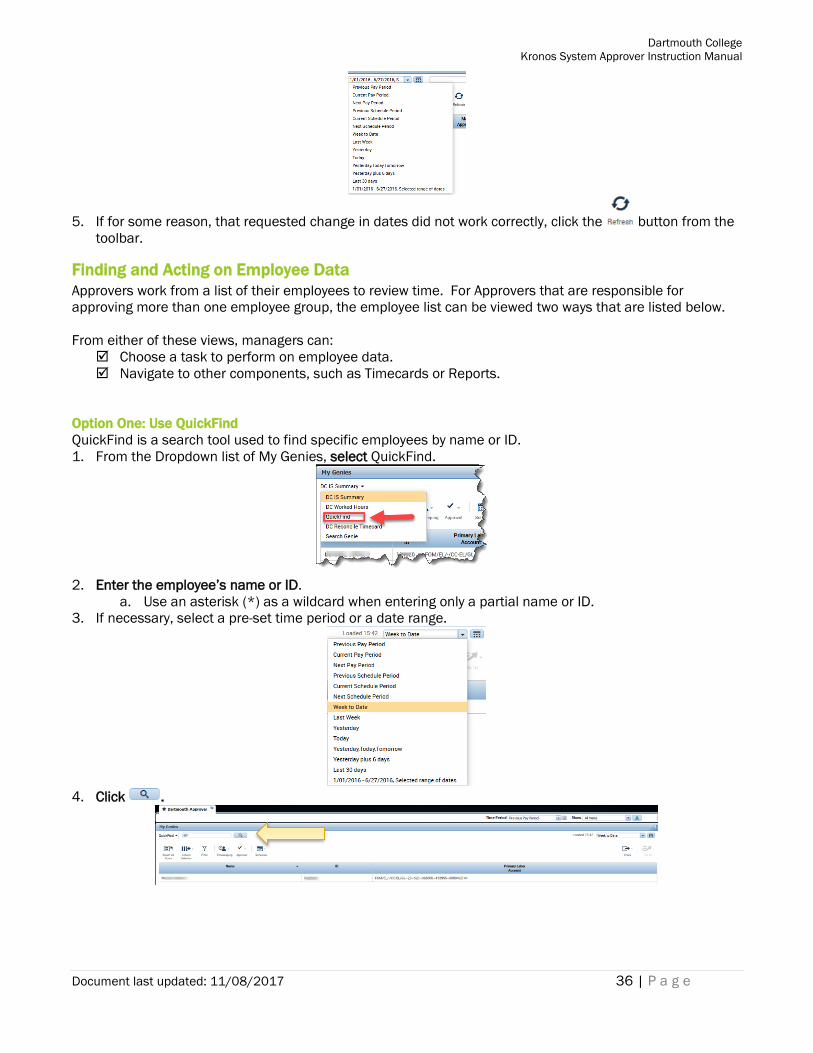
Option One: Use QuickFind
QuickFind is a search tool used to find specific employees by name or ID.
1. From the Dropdown list of My Genies, select QuickFind.
2. Enter the employee’s name or ID.
a. Use an asterisk (*) as a wildcard when entering only a partial name or ID.
3. If necessary, select a pre-set time period or a date range.
4. Click .
Dartmouth College
Kronos System Approver Instruction Manual
Document last updated: 11/08/2017 37 | P a g e
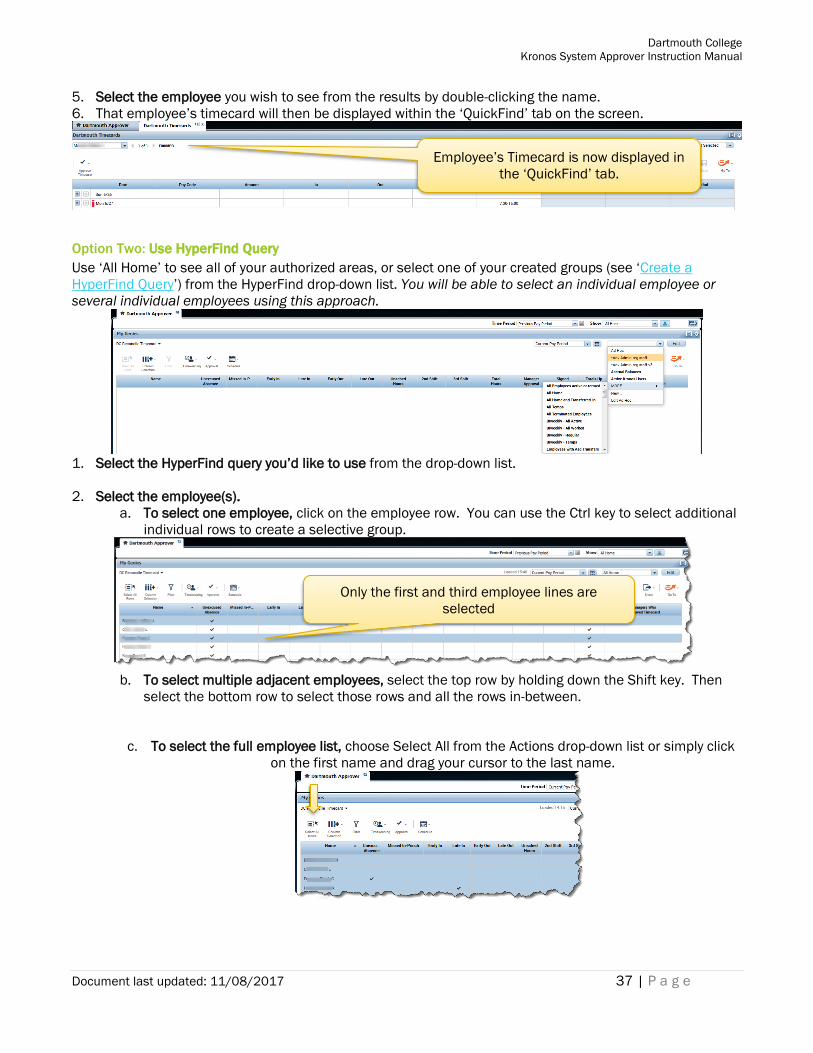
5. Select the employee you wish to see from the results by double-clicking the name.
6. That employee’s timecard will then be displayed within the ‘QuickFind’ tab on the screen.
Option Two: Use HyperFind Query
Use ‘All Home’ to see all of your authorized areas, or select one of your created groups (see ‘Create a
HyperFind Query’) from the HyperFind drop-down list. You will be able to select an individual employee or
several individual employees using this approach.
1. Select the HyperFind query you’d like to use from the drop-down list.
2. Select the employee(s).
a. To select one employee, click on the employee row. You can use the Ctrl key to select additional
individual rows to create a selective group.
b. To select multiple adjacent employees, select the top row by holding down the Shift key. Then
select the bottom row to select those rows and all the rows in-between.
c. To select the full employee list, choose Select All from the Actions drop-down list or simply click
on the first name and drag your cursor to the last name.
Employee’s Timecard is now displayed in
the ‘QuickFind’ tab.
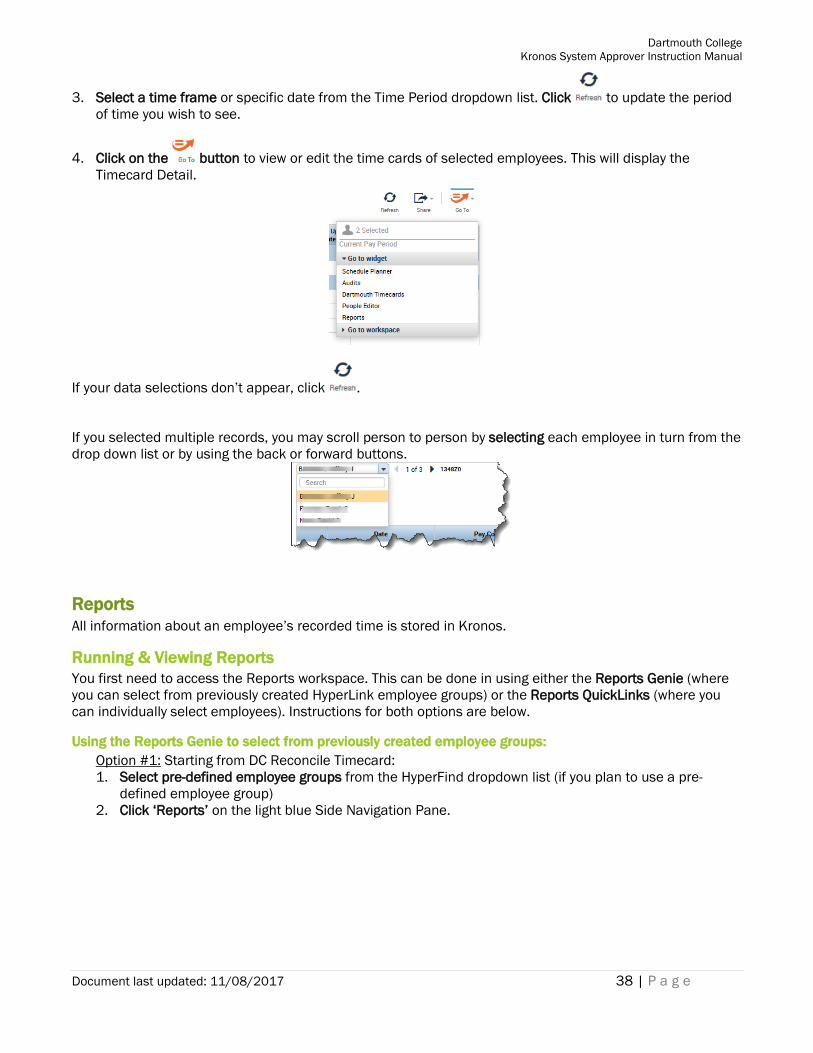
Only the first and third employee lines are
selected
Dartmouth College
Kronos System Approver Instruction Manual
Document last updated: 11/08/2017 38 | P a g e
3. Select a time frame or specific date from the Time Period dropdown list. Click to update the period
of time you wish to see.
4. Click on the button to view or edit the time cards of selected employees. This will display the
Timecard Detail.
If your data selections don’t appear, click .
If you selected multiple records, you may scroll person to person by selecting each employee in turn from the
drop down list or by using the back or forward buttons.
Reports All information about an employee’s recorded time is stored in Kronos.
Running & Viewing Reports
You first need to access the Reports workspace. This can be done in using either the Reports Genie (where
you can select from previously created HyperLink employee groups) or the Reports QuickLinks (where you
can individually select employees). Instructions for both options are below.
Using the Reports Genie to select from previously created employee groups:
Option #1: Starting from DC Reconcile Timecard:
1. Select pre-defined employee groups from the HyperFind dropdown list (if you plan to use a pre-
defined employee group)
2. Click ‘Reports’ on the light blue Side Navigation Pane.
Dartmouth College
Kronos System Approver Instruction Manual
Document last updated: 11/08/2017 39 | P a g e
Or
Option #2:
1. Select pre-defined employee groups from the HyperFind dropdown list (if you plan to use a pre-
defined employee group)
2. Use the button from the toolbar and select Reports.
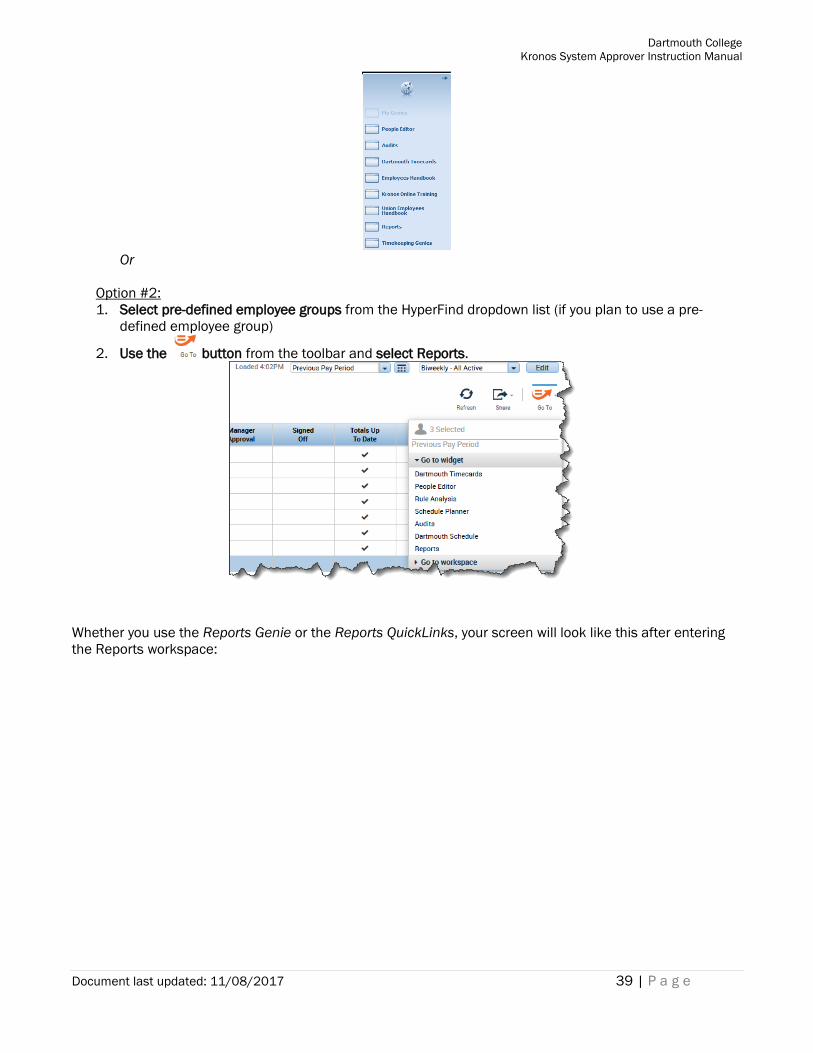
Whether you use the Reports Genie or the Reports QuickLinks, your screen will look like this after entering
the Reports workspace:
Dartmouth College
Kronos System Approver Instruction Manual
Document last updated: 11/08/2017 40 | P a g e
Dartmouth College
Kronos System Approver Instruction Manual
Document last updated: 11/08/2017 41 | P a g e
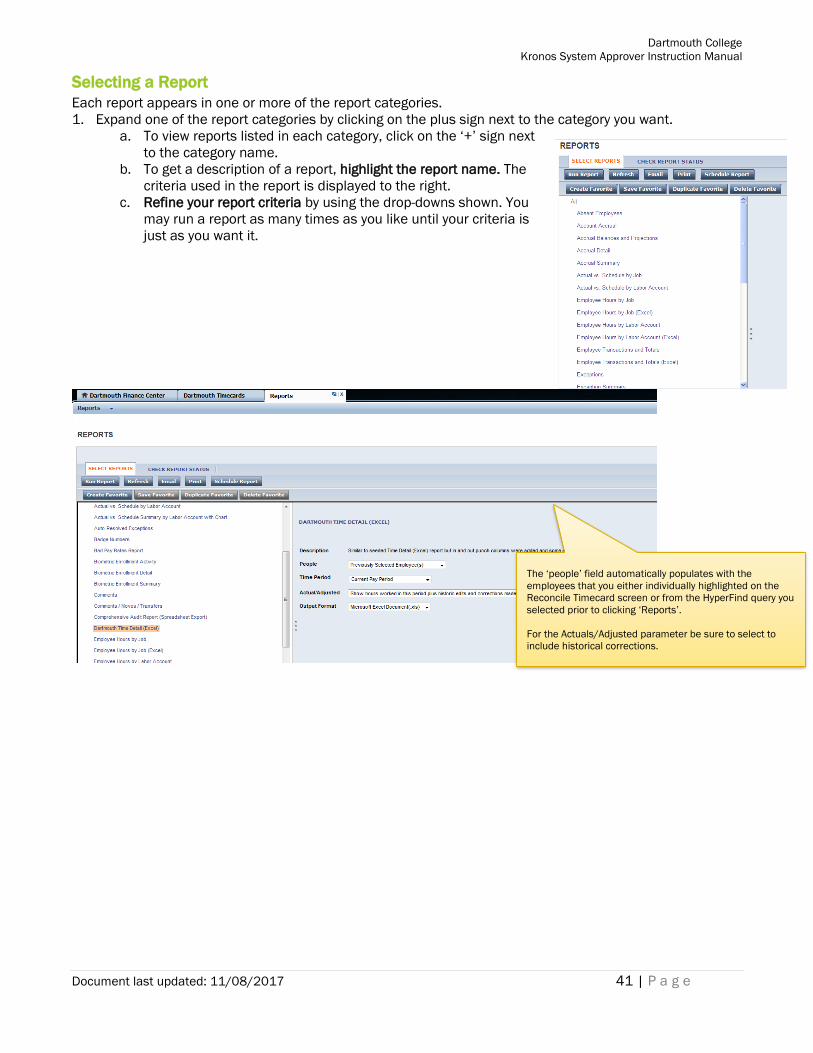
Selecting a Report
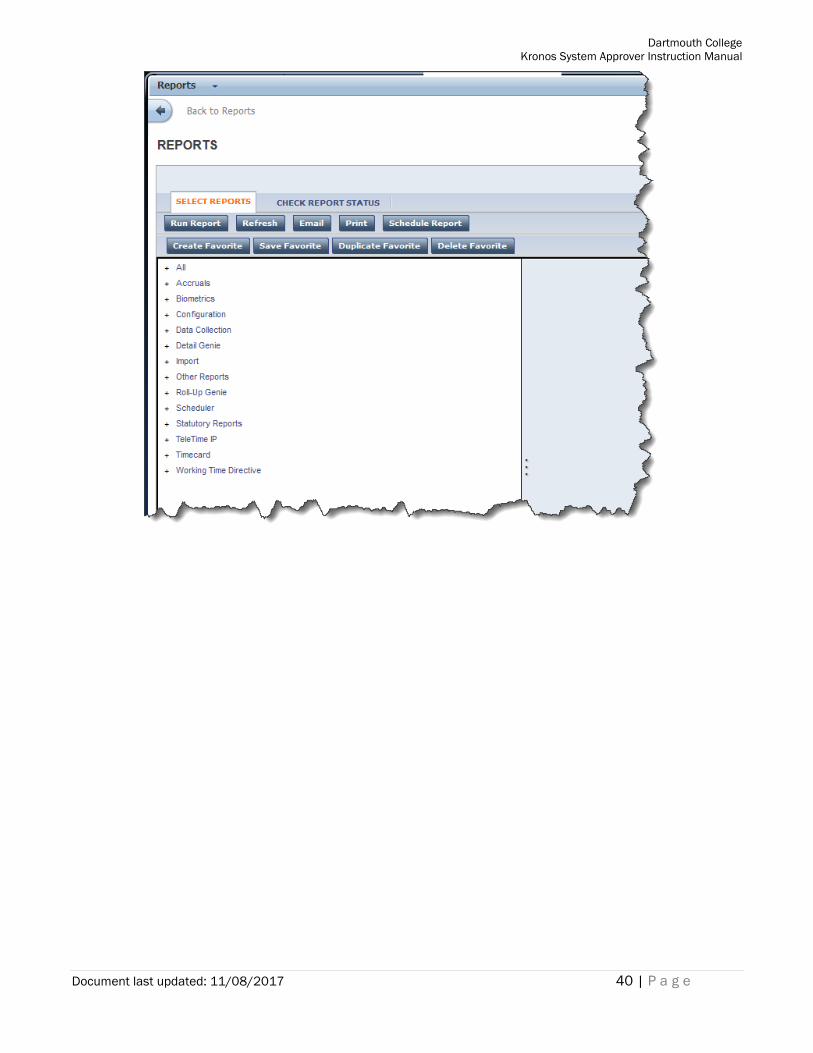
Each report appears in one or more of the report categories.
1. Expand one of the report categories by clicking on the plus sign next to the category you want.
a. To view reports listed in each category, click on the ‘+’ sign next
to the category name.
b. To get a description of a report, highlight the report name. The
criteria used in the report is displayed to the right.
c. Refine your report criteria by using the drop-downs shown. You
may run a report as many times as you like until your criteria is
just as you want it.
The ‘people’ field automatically populates with the
employees that you either individually highlighted on the
Reconcile Timecard screen or from the HyperFind query you
selected prior to clicking ‘Reports’.
For the Actuals/Adjusted parameter be sure to select to
include historical corrections.

Dartmouth College
Kronos System Approver Instruction Manual
Document last updated: 11/08/2017 42 | P a g e
Create Favorite Reports
If there is a report that you intend to run (using a particular set of criteria) on a frequent but unscheduled
basis, you may want to use the ‘Create Favorite’ option. First, navigate to the Reports screen by selecting
‘Back to Reports’ or ‘Select Reports’.
1. With the report selected as above, click .
2. Give the Favorite Report a name, and if needed, add remarks to describe it.
3. Define parameters on how you want the report to run:
a. People: select a HyperFind to define which employees you want to be included in the report. You
can select a public HyperFind or one of your own personal HyperFinds.
i. You can click Edit to make changes to the currently selected HyperFind or click New to
create a new personal HyperFind.
b. Time Period: select which time or pay period you want the report to run for.
c. Actual/Adjusted: select whether you want to see either:
i. Hours worked in the period only or
ii. Hours worked in this period plus historic edits and corrections made for the period.
d. Output Format: Either Excel or PDF.
4. Once you have finished defining your Favorite Report, click .
5. Once you have created at least one favorite, it will be displayed at the top of the list of reports.
Dartmouth College
Kronos System Approver Instruction Manual
Document last updated: 11/08/2017 43 | P a g e
Generating Reports
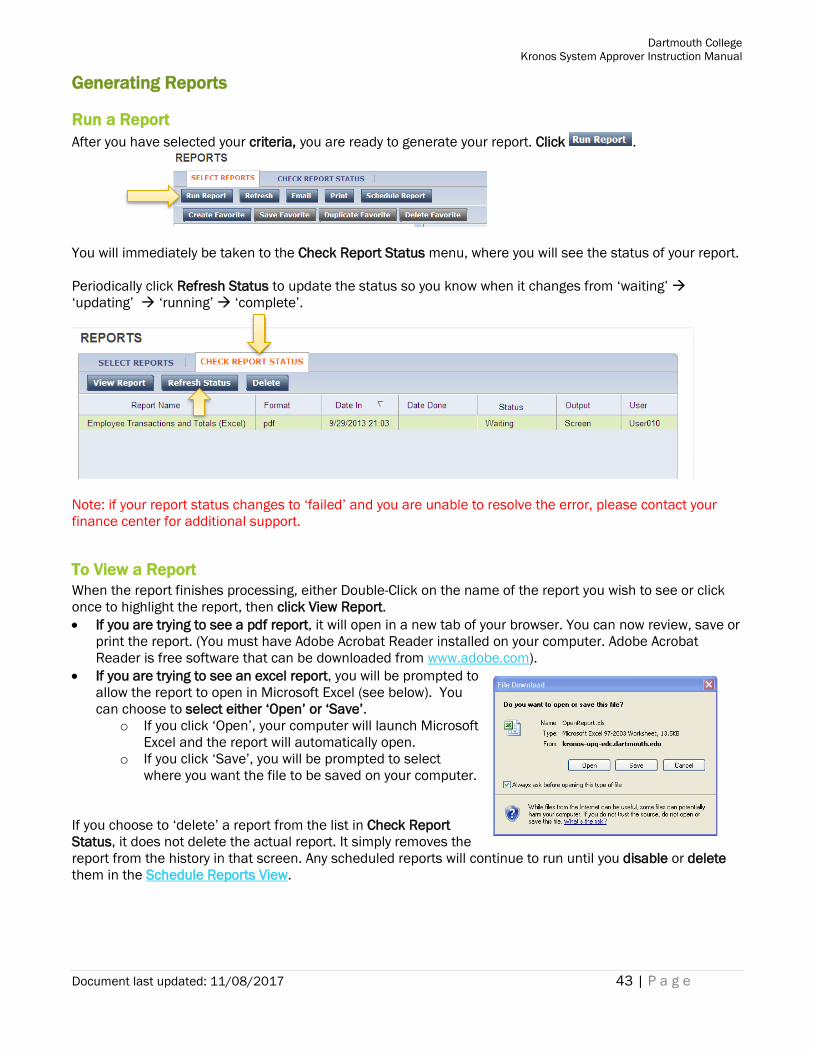
Run a Report
After you have selected your criteria, you are ready to generate your report. Click .
You will immediately be taken to the Check Report Status menu, where you will see the status of your report.
Periodically click Refresh Status to update the status so you know when it changes from ‘waiting’
‘updating’ ‘running’ ‘complete’.
Note: if your report status changes to ‘failed’ and you are unable to resolve the error, please contact your
finance center for additional support.
To View a Report
When the report finishes processing, either Double-Click on the name of the report you wish to see or click
once to highlight the report, then click View Report.
• If you are trying to see a pdf report, it will open in a new tab of your browser. You can now review, save or
print the report. (You must have Adobe Acrobat Reader installed on your computer. Adobe Acrobat
Reader is free software that can be downloaded from www.adobe.com).
• If you are trying to see an excel report, you will be prompted to
allow the report to open in Microsoft Excel (see below). You
can choose to select either ‘Open’ or ‘Save’.
o If you click ‘Open’, your computer will launch Microsoft
Excel and the report will automatically open.
o If you click ‘Save’, you will be prompted to select
where you want the file to be saved on your computer.
If you choose to ‘delete’ a report from the list in Check Report
Status, it does not delete the actual report. It simply removes the
report from the history in that screen. Any scheduled reports will continue to run until you disable or delete
them in the Schedule Reports View.
Dartmouth College
Kronos System Approver Instruction Manual
Document last updated: 11/08/2017 44 | P a g e
Scheduling a Report
Any report can be scheduled so that it is automatically generated
on a regular basis by using the ‘Schedule Report’ option.
Scheduled reports MUST be created using a HyperFind in order to
run correctly.
1. Select your report criteria.
2. Click .
a. You will be prompted to provide details (name of report, description, how often the report should
be generated and to whom it should go).
b. Provide as much detail as possible in the ‘Event Details’ so you remember the parameters and
purpose of the report.
Message received after clicking ‘Delete’
This report will no longer be listed in the ‘Check Report Status’ view.
Highlight a report by clicking on the row.
Click on the delete button.
Dartmouth College
Kronos System Approver Instruction Manual
Document last updated: 11/08/2017 45 | P a g e
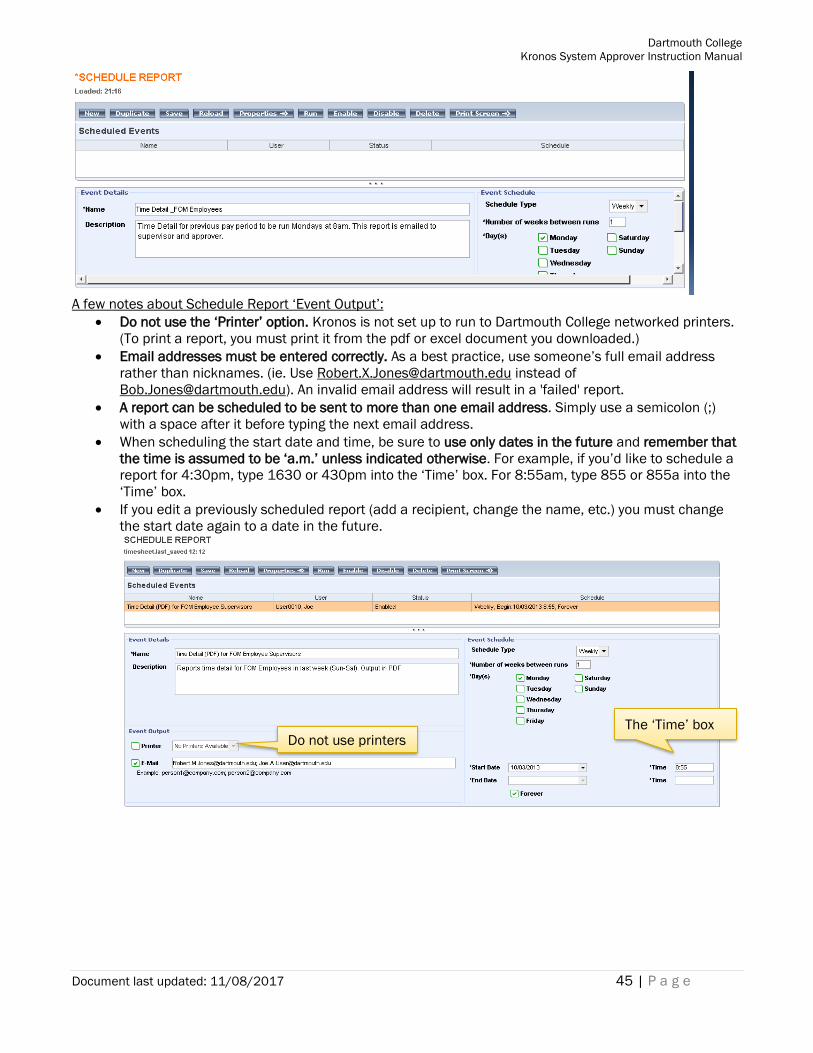
A few notes about Schedule Report ‘Event Output’:
• Do not use the ‘Printer’ option. Kronos is not set up to run to Dartmouth College networked printers.
(To print a report, you must print it from the pdf or excel document you downloaded.)
• Email addresses must be entered correctly. As a best practice, use someone’s full email address
rather than nicknames. (ie. Use [email protected] instead of
[email protected]). An invalid email address will result in a 'failed' report.
• A report can be scheduled to be sent to more than one email address. Simply use a semicolon (;)
with a space after it before typing the next email address.
• When scheduling the start date and time, be sure to use only dates in the future and remember that
the time is assumed to be ‘a.m.’ unless indicated otherwise. For example, if you’d like to schedule a
report for 4:30pm, type 1630 or 430pm into the ‘Time’ box. For 8:55am, type 855 or 855a into the
‘Time’ box.
• If you edit a previously scheduled report (add a recipient, change the name, etc.) you must change
the start date again to a date in the future.
Do not use printers The ‘Time’ box
Dartmouth College
Kronos System Approver Instruction Manual
Document last updated: 11/08/2017 46 | P a g e
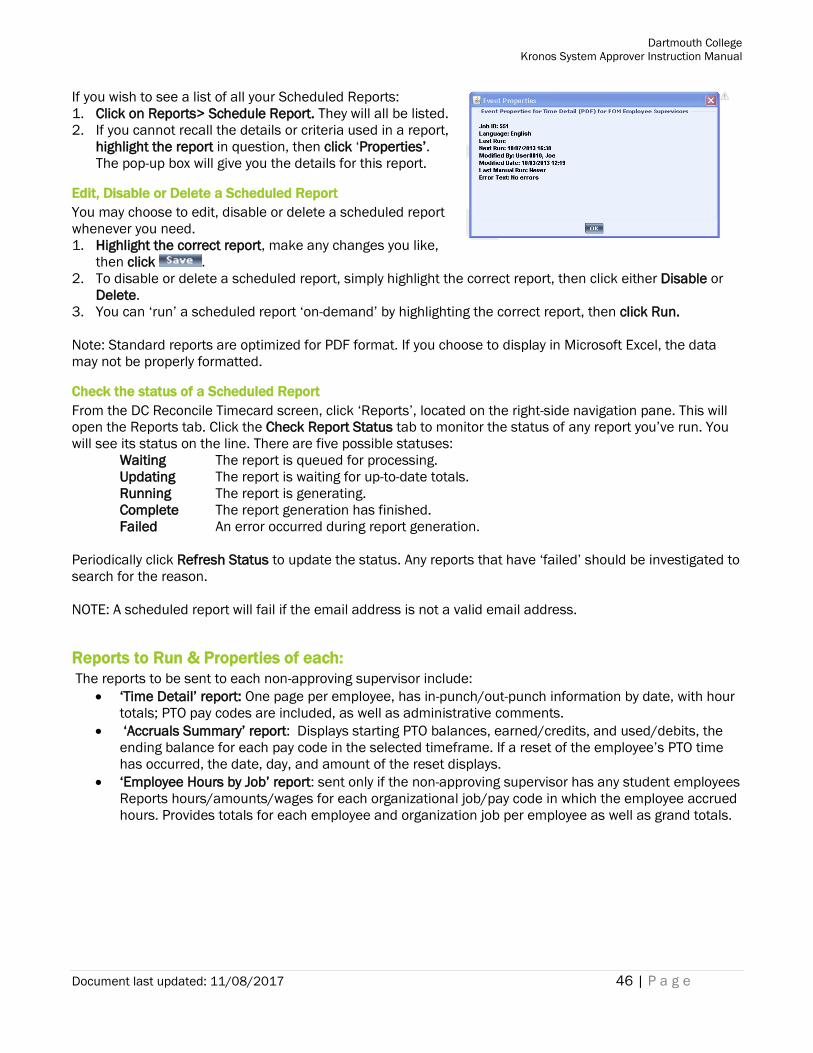
If you wish to see a list of all your Scheduled Reports:
1. Click on Reports> Schedule Report. They will all be listed.
2. If you cannot recall the details or criteria used in a report,
highlight the report in question, then click ‘Properties’.
The pop-up box will give you the details for this report.
Edit, Disable or Delete a Scheduled Report
You may choose to edit, disable or delete a scheduled report
whenever you need.
1. Highlight the correct report, make any changes you like,
then click .
2. To disable or delete a scheduled report, simply highlight the correct report, then click either Disable or
Delete.
3. You can ‘run’ a scheduled report ‘on-demand’ by highlighting the correct report, then click Run.
Note: Standard reports are optimized for PDF format. If you choose to display in Microsoft Excel, the data
may not be properly formatted.
Check the status of a Scheduled Report
From the DC Reconcile Timecard screen, click ‘Reports’, located on the right-side navigation pane. This will
open the Reports tab. Click the Check Report Status tab to monitor the status of any report you’ve run. You
will see its status on the line. There are five possible statuses:
Waiting The report is queued for processing.
Updating The report is waiting for up-to-date totals.
Running The report is generating.
Complete The report generation has finished.
Failed An error occurred during report generation.
Periodically click Refresh Status to update the status. Any reports that have ‘failed’ should be investigated to
search for the reason.
NOTE: A scheduled report will fail if the email address is not a valid email address.
Reports to Run & Properties of each:
The reports to be sent to each non-approving supervisor include:
• ‘Time Detail’ report: One page per employee, has in-punch/out-punch information by date, with hour
totals; PTO pay codes are included, as well as administrative comments.
• ‘Accruals Summary’ report: Displays starting PTO balances, earned/credits, and used/debits, the
ending balance for each pay code in the selected timeframe. If a reset of the employee’s PTO time
has occurred, the date, day, and amount of the reset displays.
• ‘Employee Hours by Job’ report: sent only if the non-approving supervisor has any student employees
Reports hours/amounts/wages for each organizational job/pay code in which the employee accrued
hours. Provides totals for each employee and organization job per employee as well as grand totals.
Pop-up box