Kreg Multipurpose Work Center - Kreg Tool · PDF filecomplete and accurate in the instructions...
14
R MULTIPURPOSE WORK CENTER PROJECT PLANS This handy project can provide the work space you need anywhere in your home. Whether you need that work space in the shop, the garage, the basement, or in a laundry room or craft room, this work center has features you’ll enjoy. There’s a large work surface, plus lots of storage. Doors keep things tidy, and adjustable shelves ensure that the items you need to store will fit. It’s a large project, but it’s not difficult to build. This plan breaks it down into easy-to-manage steps. Plus, with a Kreg Jig ® and Kreg ® Hardware Installation Solutions—the Concealed Hinge Jig, Drawer Slide Jig, Cabinet Hardware Jig, and Shelf Pin Jig—you can easily create all of the joinery yourself and install the hardware using ordinary toolslike a drill, circular saw and a miter saw.
Transcript of Kreg Multipurpose Work Center - Kreg Tool · PDF filecomplete and accurate in the instructions...

R
MULTIPURPOSE WORK CENTERPROJECT PLANS
This handy project can provide the work space you need anywhere in your home. Whether you need that work space in the shop, the garage, the basement, or in a laundry room or craft room, this work center has features you’ll enjoy. There’s a large work surface, plus lots of storage. Doors keep things tidy, and adjustable shelves ensure that the items you need to store will fi t.
It’s a large project, but it’s not diffi cult to build. This plan breaks it down into easy-to-manage steps. Plus, with a Kreg Jig® and Kreg® Hardware Installation Solutions—the Concealed Hinge Jig, Drawer Slide Jig, Cabinet Hardware Jig, and Shelf Pin Jig—you can easily create all of the joinery yourself and install the hardware using ordinary toolslike a drill, circular saw and a miter saw.
2 Kreg® Project Plans: Multipurpose Work Center©2016 Kreg Tool Company. All Rights Reserved.
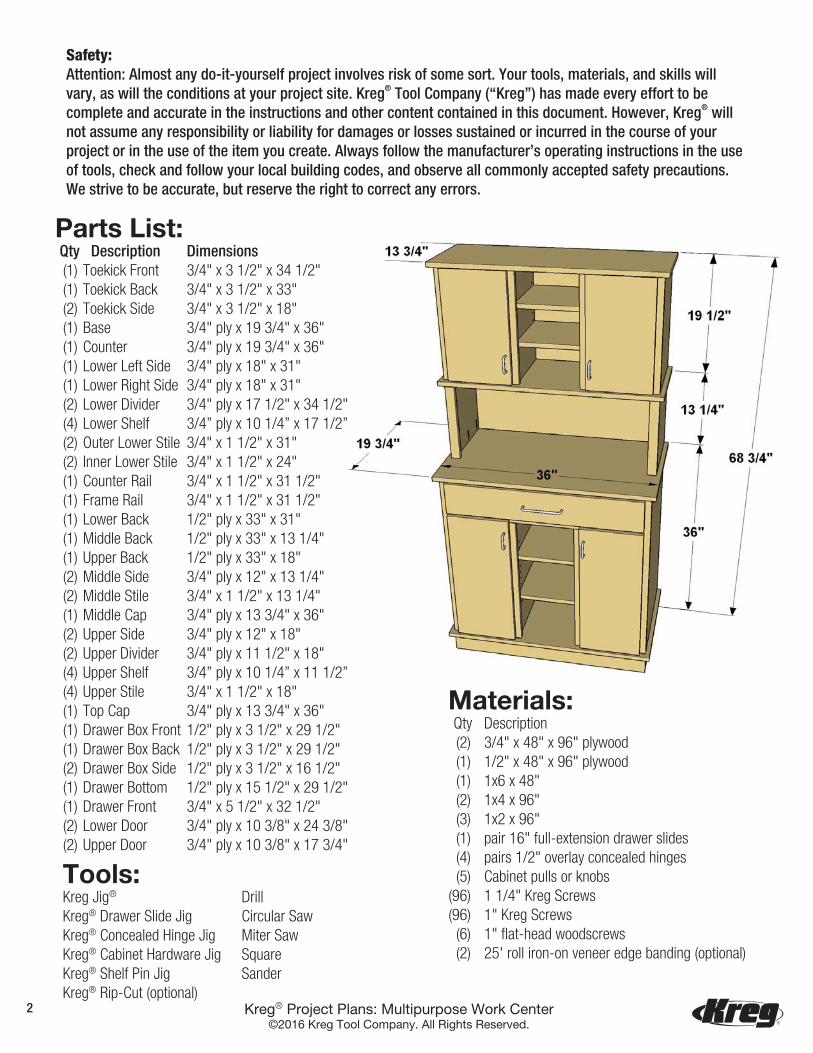
Safety:Attention: Almost any do-it-yourself project involves risk of some sort. Your tools, materials, and skills will vary, as will the conditions at your project site. Kreg® Tool Company (“Kreg”) has made every effort to be complete and accurate in the instructions and other content contained in this document. However, Kreg® will not assume any responsibility or liability for damages or losses sustained or incurred in the course of your project or in the use of the item you create. Always follow the manufacturer’s operating instructions in the use of tools, check and follow your local building codes, and observe all commonly accepted safety precautions. We strive to be accurate, but reserve the right to correct any errors.
Tools:Kreg Jig®
Kreg® Drawer Slide JigKreg® Concealed Hinge JigKreg® Cabinet Hardware JigKreg® Shelf Pin JigKreg® Rip-Cut (optional)
DrillCircular SawMiter SawSquareSander
Parts List: Qty Description Dimensions (1) Toekick Front 3/4" x 3 1/2" x 34 1/2" (1) Toekick Back 3/4" x 3 1/2" x 33" (2) Toekick Side 3/4" x 3 1/2" x 18" (1) Base 3/4" ply x 19 3/4" x 36" (1) Counter 3/4" ply x 19 3/4" x 36" (1) Lower Left Side 3/4" ply x 18" x 31" (1) Lower Right Side 3/4" ply x 18" x 31" (2) Lower Divider 3/4" ply x 17 1/2" x 34 1/2" (4) Lower Shelf 3/4” ply x 10 1/4” x 17 1/2” (2) Outer Lower Stile 3/4" x 1 1/2" x 31" (2) Inner Lower Stile 3/4" x 1 1/2" x 24" (1) Counter Rail 3/4" x 1 1/2" x 31 1/2" (1) Frame Rail 3/4" x 1 1/2" x 31 1/2" (1) Lower Back 1/2" ply x 33" x 31" (1) Middle Back 1/2" ply x 33" x 13 1/4" (1) Upper Back 1/2" ply x 33" x 18" (2) Middle Side 3/4" ply x 12" x 13 1/4" (2) Middle Stile 3/4" x 1 1/2" x 13 1/4" (1) Middle Cap 3/4" ply x 13 3/4" x 36" (2) Upper Side 3/4" ply x 12" x 18" (2) Upper Divider 3/4" ply x 11 1/2" x 18" (4) Upper Shelf 3/4” ply x 10 1/4” x 11 1/2” (4) Upper Stile 3/4" x 1 1/2" x 18" (1) Top Cap 3/4" ply x 13 3/4" x 36" (1) Drawer Box Front 1/2" ply x 3 1/2" x 29 1/2" (1) Drawer Box Back 1/2" ply x 3 1/2" x 29 1/2" (2) Drawer Box Side 1/2" ply x 3 1/2" x 16 1/2" (1) Drawer Bottom 1/2" ply x 15 1/2" x 29 1/2" (1) Drawer Front 3/4" x 5 1/2" x 32 1/2" (2) Lower Door 3/4" ply x 10 3/8" x 24 3/8" (2) Upper Door 3/4" ply x 10 3/8" x 17 3/4"
Materials: Qty Description (2) 3/4" x 48" x 96" plywood (1) 1/2" x 48" x 96" plywood (1) 1x6 x 48" (2) 1x4 x 96" (3) 1x2 x 96" (1) pair 16" full-extension drawer slides (4) pairs 1/2" overlay concealed hinges (5) Cabinet pulls or knobs (96) 1 1/4" Kreg Screws (96) 1" Kreg Screws (6) 1" fl at-head woodscrews (2) 25' roll iron-on veneer edge banding (optional)

3 Kreg® Project Plans: Multipurpose Work Center©2016 Kreg Tool Company. All Rights Reserved.
Cutting Diagram:

4 Kreg® Project Plans: Multipurpose Work Center©2016 Kreg Tool Company. All Rights Reserved.
Cutting Diagram:
5 Kreg® Project Plans: Multipurpose Work Center©2016 Kreg Tool Company. All Rights Reserved.
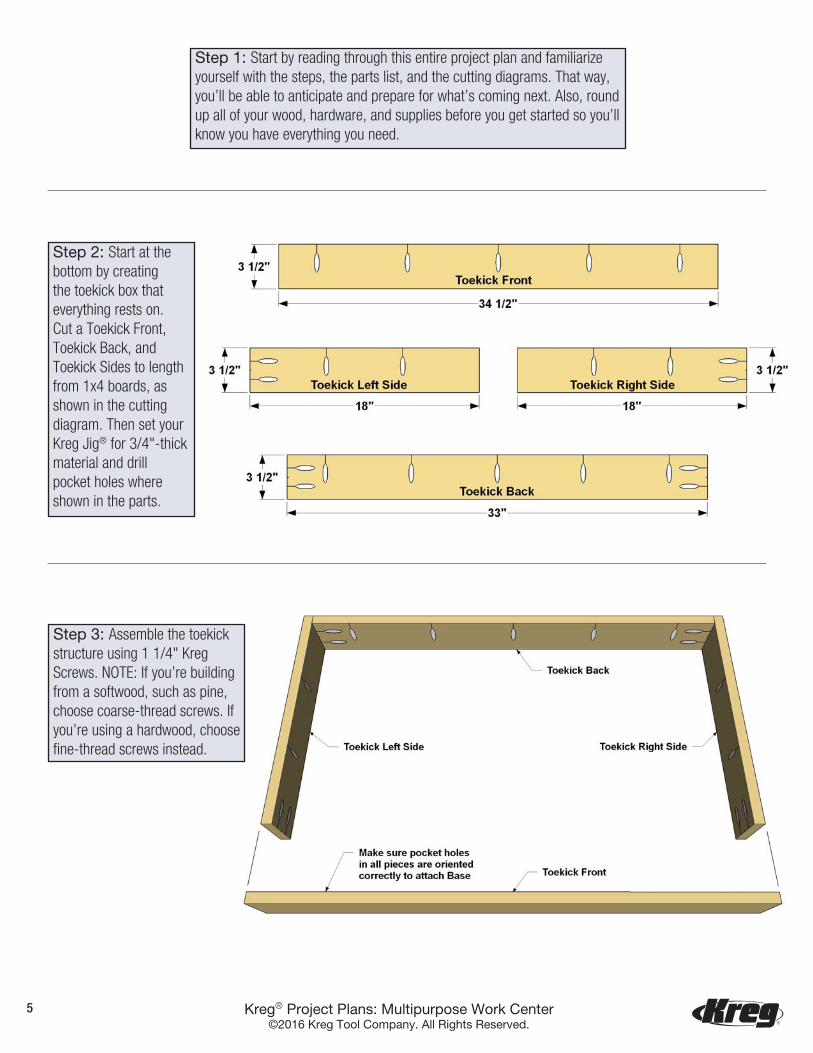
Step 1: Start by reading through this entire project plan and familiarize yourself with the steps, the parts list, and the cutting diagrams. That way, you’ll be able to anticipate and prepare for what’s coming next. Also, round up all of your wood, hardware, and supplies before you get started so you’ll know you have everything you need.
Step 2: Start at the bottom by creating the toekick box that everything rests on. Cut a Toekick Front, Toekick Back, and Toekick Sides to length from 1x4 boards, as shown in the cutting diagram. Then set your Kreg Jig® for 3/4"-thick material and drill pocket holes where shown in the parts.
Step 3: Assemble the toekick structure using 1 1/4" Kreg Screws. NOTE: If you’re building from a softwood, such as pine, choose coarse-thread screws. If you’re using a hardwood, choose fi ne-thread screws instead.

6 Kreg® Project Plans: Multipurpose Work Center©2016 Kreg Tool Company. All Rights Reserved.
Step 5: Cut a Lower Left Side, Lower Right Side, two Lower Dividers, and four Lower Shelves to size from 3/4" plywood, as shown in the cutting diagram. Next, use your Shelf Pin Jig to drill holes for shelf pins. Note that in the Sides, the holes are 3/8" deep—the standard drilling depth for the Shelf Pin Jig. On the Lower Dividers, the holes go all the way through. You’ll actually drill in from each face using the jig, but that will effectively create holes that go all the way through.
Make sure to measure carefully for the lowest hole in each piece, since this will ensure that the shelves sit level. The Jig takes care of consistent spacing for the remaining holes. The Lower Dividers, by the way, will be symmetrical, so you can simply rotate them to get the correct orientation for installation. After drilling the shelf pin holes, use your Kreg Jig® (set up for 3/4" material) to drill pocket holes, as shown. The exact hole location isn’t critical, except that you want to make sure that the pocket holes don’t interfere with the shelf pin holes.
Step 4: Cut a Base to size from 3/4" plywood. If desired, cover the front and side edges of the Base with veneer edge banding. Then, attach the Base to the toekick structure using 1 1/4" Kreg Screws. Note that the rear edge of the Base is fl ush with the rear of the toekick structure, and that the Base overhangs at the sides and front.

7 Kreg® Project Plans: Multipurpose Work Center©2016 Kreg Tool Company. All Rights Reserved.
Step 6: Cut two Outer Lower Stiles and two Inner Lower Stiles to length from 1x2 boards, as shown in the cutting diagram. Then attach the Stiles to the Lower Sides and Lower Dividers using 1 1/4" Kreg Screws, as shown. Be sure to align the Stiles with the panels as shown. The Stiles are fl ush with the outside faces of the Lower Sides. On the Lower Dividers, the Stiles are centered, and set fl ush with the bottom end, which leaves a 1/2" offset at the top end. This will slip behind the rail at the bottom of the drawer opening.
Step 7: Cut a Frame Rail and a Counter Rail to length from 1x2 boards, as shown in the cutting diagram. Also cut two Slide Spacers to length from a 1x4. Then drill pocket holes in the Rails where shown. Note that the Counter Rail has holes along the upper edge for attaching it to the Counter.
8 Kreg® Project Plans: Multipurpose Work Center©2016 Kreg Tool Company. All Rights Reserved.
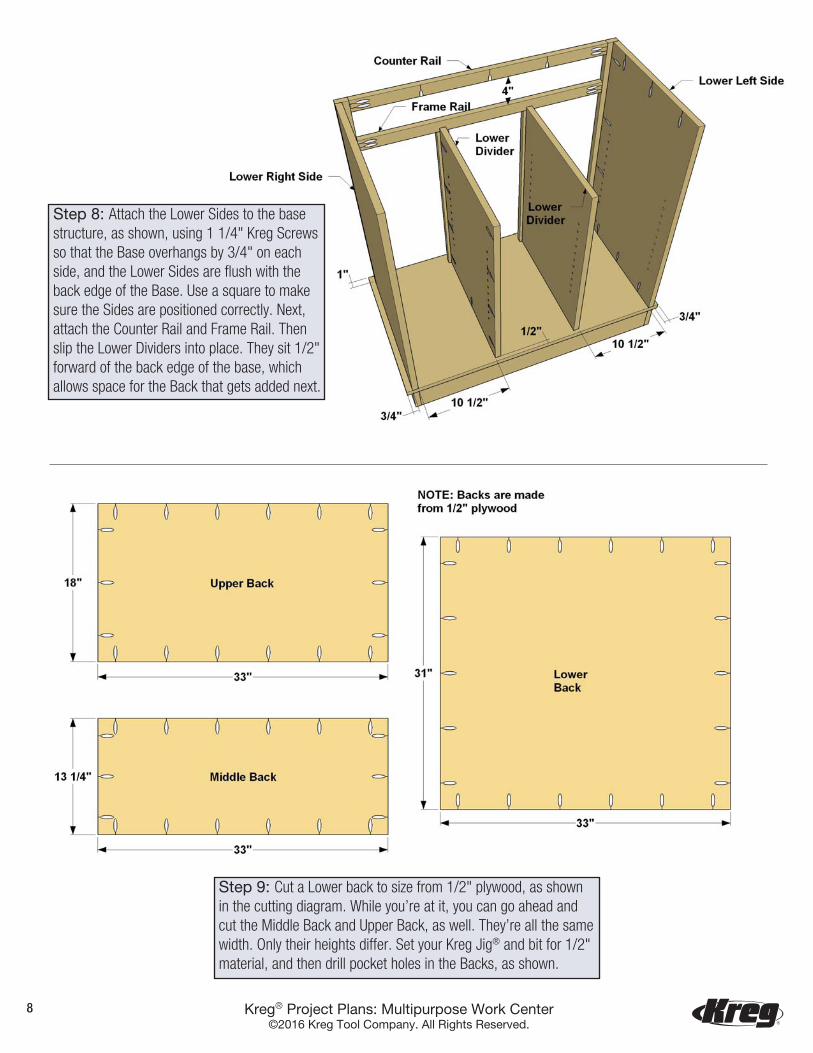
Step 9: Cut a Lower back to size from 1/2" plywood, as shown in the cutting diagram. While you’re at it, you can go ahead and cut the Middle Back and Upper Back, as well. They’re all the same width. Only their heights differ. Set your Kreg Jig® and bit for 1/2" material, and then drill pocket holes in the Backs, as shown.
Step 8: Attach the Lower Sides to the base structure, as shown, using 1 1/4" Kreg Screws so that the Base overhangs by 3/4" on each side, and the Lower Sides are fl ush with the back edge of the Base. Use a square to make sure the Sides are positioned correctly. Next, attach the Counter Rail and Frame Rail. Then slip the Lower Dividers into place. They sit 1/2" forward of the back edge of the base, which allows space for the Back that gets added next.

9 Kreg® Project Plans: Multipurpose Work Center©2016 Kreg Tool Company. All Rights Reserved.
Step 11: Cut two Middle Sides to size from 3/4" plywood. Also cut two Middle Stiles from 1x2 boards. Then, with your Kreg Jig® and bit reset for 3/4" material, drill pocket holes where shown. Once again, these parts are symmetrical, so they can be used on either side.
Step 12: Using 1 1/4" Kreg Screws, attach the Middle Stiles to the Middle Sides. Then attach these and the Middle back to the Counter using 1 1/4" and 1" Kreg Screws as warranted.
Step 10: Now cut a Counter to size from 3/4" plywood. Apply banding to the front and side edges if desired. Then attach the Counter using 1 1/4" Kreg Screws to the lower structure. Like the Base, the Counter overhangs at each side, and sits fl ush in in back. Now you can attach the Lower Back. Drive 1" pocket-holes screws in around the perimeter. Then drive 1" pocket screws from inside to attach the Lower Dividers to the Back. Wrap up the lower structure by gluing and nailing the Slide Spacers to the inner faces of the Lower Sides. The Spacers align with the drawer opening.

10 Kreg® Project Plans: Multipurpose Work Center©2016 Kreg Tool Company. All Rights Reserved.
Step 13: Cut a Middle Cap to size from 3/4" plywood. While you’re at it, cut the Top Cap, as well. They’re the same size. If desired, apply edge banding to the front and side edges. Now attach the Middle Cap to the middle structure. You’ll use 1 1/4" Kreg Screws in the Sides, and 1" Kreg Screws in the Back.
Step 14: Cut two Upper Sides and two Upper Dividers to size from 3/4" plywood, as shown in the cutting diagram. These parts are the same height, but the Dividers are 1/2" narrower. Also cut four Upper Shelves. Next, use your Shelf Pin Jig to drill holes for shelf pins, just as you did in the Lower Sides and Lower Dividers. After drilling the shelf pin holes, use your Kreg Jig® to drill pocket holes, as shown. The exact hole location isn’t critical, except that you want to make sure that the pocket holes don’t interfere with the shelf pin holes.

11 Kreg® Project Plans: Multipurpose Work Center©2016 Kreg Tool Company. All Rights Reserved.
Step 15: Cut four Upper Stiles to length from 1x2 boards, and then attach them to the Upper Sides and Upper Dividers, as shown. Again, this is similar to creating the Lower Sides and Lower Dividers.
Step 16: Attach the Upper Sides and Upper Dividers to the Middle Cap, as shown. The Cap overhangs the Sides by 3/4", once again, and the Dividers are set 1/2" forward from the back edge of the Cap to allow the back to fi t in. Use a square to make sure the pieces are positioned correctly.

12 Kreg® Project Plans: Multipurpose Work Center©2016 Kreg Tool Company. All Rights Reserved.
Step 17: Now you can attach the Upper Back using 1" Kreg Screws around the perimeter. Also drive 1" screws from inside to attach the Dividers to the Back.
Step 18: Cut two Lower Doors and two Upper Doors to size from 3/4" plywood, as shown in the cutting diagram. If desired, apply edge banding to all door edges. Then use the Kreg Concealed Hinge Jig to bore the holes for mounting the door hinges.
13 Kreg® Project Plans: Multipurpose Work Center©2016 Kreg Tool Company. All Rights Reserved.
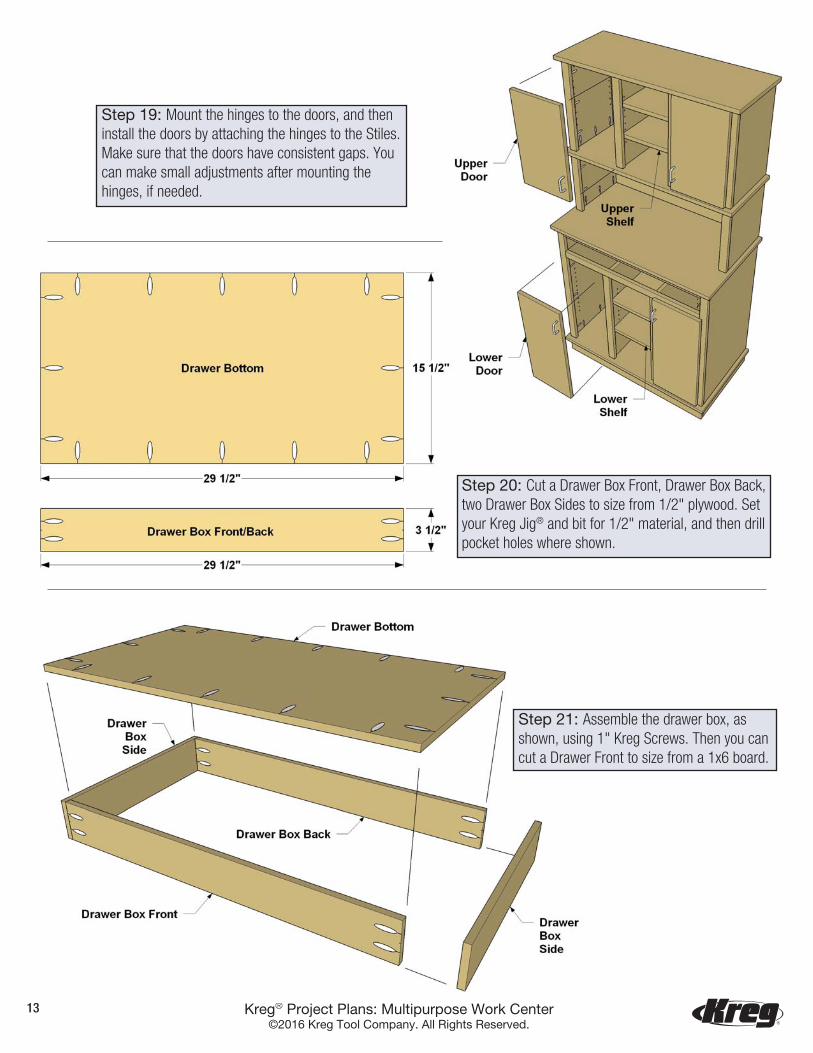
Step 19: Mount the hinges to the doors, and then install the doors by attaching the hinges to the Stiles. Make sure that the doors have consistent gaps. You can make small adjustments after mounting the hinges, if needed.
Step 20: Cut a Drawer Box Front, Drawer Box Back, two Drawer Box Sides to size from 1/2" plywood. Set your Kreg Jig® and bit for 1/2" material, and then drill pocket holes where shown.
Step 21: Assemble the drawer box, as shown, using 1" Kreg Screws. Then you can cut a Drawer Front to size from a 1x6 board.

14 Kreg® Project Plans: Multipurpose Work Center©2016 Kreg Tool Company. All Rights Reserved.
Step 22: Use the Kreg Drawer Slide Jig to install the drawer box. You’ll attach the cabinet half of the slides to the Slide Spacers. Then attach the drawer half to the drawer box. Finally, align the Drawer Front with the Lower Doors, and attach the Drawer Front to the drawer box. A great way to do this is to apply a couple of pieces of double-faced carpet tape to the drawer box front. Then you can press the Drawer Front into place, gently pull the drawer open, and drive a few fl at-head screws from inside the drawer box.
Step 23: All that’s left now is to install the knobs or pulls that you choose to use. The Kreg Cabinet Hardware Jig makes this process easy. Once they’re on, you can pull the drawer, remove the doors and hardware, and get set for the fi nish or paint you want. Sand everything as needed to get the surfaces smooth and remove sharp edges, and then clean away the dust. Apply your fi nish, reinstall the hardware, and your work center is ready for whatever activity you have in mind.