Korg i30 User Manual
171
Table of Contents STEP 1.. . . . . . . . . . . . . . . . . . . . . . . . . . . 1 Front panel . . . . . . . . . . . . . . . . . . . . . . . . . . . . . . . . . . . . . . . . 1 Rear panel and connections . . . . . . . . . . . . . . . . . . . . . . . . . . 6 Basic LCD screen operation . . . . . . . . . . . . . . . . . . . . . . . . . . 8 1. Operating objects in the LCD screen . . . . . . . . . . . . . . . . . 8 STEP 2. Playing . . . . . . . . . . . . . . . . . . . 10 Check the connections . . . . . . . . . . . . . . . . . . . . . . . . . . . . . . 10 1. Make connections. . . . . . . . . . . . . . . . . . . . . . . . . . . . . . . . 10 2. Turning the power on/off . . . . . . . . . . . . . . . . . . . . . . . . 10 3. Using headphones . . . . . . . . . . . . . . . . . . . . . . . . . . . . . . . 10 4. Adjusting the volume . . . . . . . . . . . . . . . . . . . . . . . . . . . . 10 Listening to the demo songs. . . . . . . . . . . . . . . . . . . . . . . . . 10 1. Listening to the demo songs . . . . . . . . . . . . . . . . . . . . . . . 10 2. Starting playback from a specific demo song . . . . . . . . 10 3. Listening to demo playback of a backing sequence . . . 11 Selecting sounds . . . . . . . . . . . . . . . . . . . . . . . . . . . . . . . . . . . 11 1. Selecting by category . . . . . . . . . . . . . . . . . . . . . . . . . . . . . 11 2. Directly selecting an arrangement, style or program . . 12 3. Using a controller to select . . . . . . . . . . . . . . . . . . . . . . . . 12 Performance edit . . . . . . . . . . . . . . . . . . . . . . . . . . . . . . . . . . 12 The modes of the i30 . . . . . . . . . . . . . . . . . . . . . . . . . . . . . . . 13 1. Arrangement Play mode . . . . . . . . . . . . . . . . . . . . . . . . . . 13 2. Backing Sequence mode . . . . . . . . . . . . . . . . . . . . . . . . . . 13 3. Song mode. . . . . . . . . . . . . . . . . . . . . . . . . . . . . . . . . . . . . . 13 4. Song Play mode . . . . . . . . . . . . . . . . . . . . . . . . . . . . . . . . . 13 5. Program mode . . . . . . . . . . . . . . . . . . . . . . . . . . . . . . . . . . 13 6. Edit Style mode . . . . . . . . . . . . . . . . . . . . . . . . . . . . . . . . . 13 7. Global mode . . . . . . . . . . . . . . . . . . . . . . . . . . . . . . . . . . . . 14 8. Disk mode . . . . . . . . . . . . . . . . . . . . . . . . . . . . . . . . . . . . . . 14 STEP 3. Editing . . . . . . . . . . . . . . . . . . . . 15 Basic operation . . . . . . . . . . . . . . . . . . . . . . . . . . . . . . . . . . . . 15 1. Selecting the mode . . . . . . . . . . . . . . . . . . . . . . . . . . . . . . . 15 2. Pages . . . . . . . . . . . . . . . . . . . . . . . . . . . . . . . . . . . . . . . . . . 15 3. Setting parameter values. . . . . . . . . . . . . . . . . . . . . . . . . . 15 Editing an arrangement (Arrangement Play mode) . . . . . 16 1. Playing an arrangement . . . . . . . . . . . . . . . . . . . . . . . . . . 16 2. Changing the keyboard (KBD) sound. . . . . . . . . . . . . . . 17 3. Editing an arrangement . . . . . . . . . . . . . . . . . . . . . . . . . . 17 4. Using a KBD Set . . . . . . . . . . . . . . . . . . . . . . . . . . . . . . . . . 21 5. Other convenient functions . . . . . . . . . . . . . . . . . . . . . . . 22 6. Writing an arrangement . . . . . . . . . . . . . . . . . . . . . . . . . . 22 Editing a backing sequence (Backing Sequence mode) . . 23 1. Recording an arrangement performance to the sequencer . . . . . . . . . . . . . . . . . . . . . . . . . . . . . . . . . . . . . . . 23 2. If you make a mistake while recording an arrangement performance 24 3. Using the extra keyboard tracks to add finishing touches . . . . . . . . . . . . . . . . . . . . . . . . . . . . . . . . . . . . . . . . . 24 Editing a program (Program mode) . . . . . . . . . . . . . . . . . . 26 1. How a program is constructed. . . . . . . . . . . . . . . . . . . . . 26 2. Basic program editing . . . . . . . . . . . . . . . . . . . . . . . . . . . . 26 3. Effect settings . . . . . . . . . . . . . . . . . . . . . . . . . . . . . . . . . . . 29 4. Writing a program . . . . . . . . . . . . . . . . . . . . . . . . . . . . . . . 33 5. Drum program settings . . . . . . . . . . . . . . . . . . . . . . . . . . . 33 Style editing (Edit Style mode) . . . . . . . . . . . . . . . . . . . . . . . 35 1. What is a Style? . . . . . . . . . . . . . . . . . . . . . . . . . . . . . . . . . . 35 2. Recording a style . . . . . . . . . . . . . . . . . . . . . . . . . . . . . . . . . 36 3. Testing a chord variation . . . . . . . . . . . . . . . . . . . . . . . . . . 37 4. Take advantage of patterns . . . . . . . . . . . . . . . . . . . . . . . . 38 5. Sophisticated recording techniques for the Drums track . . . . . . . . . . . . . . . . . . . . . . . . . . . . . . . . . . . . . 39 6. Elements . . . . . . . . . . . . . . . . . . . . . . . . . . . . . . . . . . . . . . . . 40 7. Writing a style . . . . . . . . . . . . . . . . . . . . . . . . . . . . . . . . . . . 40 Playing a Standard MIDI File (Song Play mode) . . . . . . . . 41 1. About SMF . . . . . . . . . . . . . . . . . . . . . . . . . . . . . . . . . . . . . . 41 2. Playing back SMF data . . . . . . . . . . . . . . . . . . . . . . . . . . . . 41 3. Saving a Jukebox list . . . . . . . . . . . . . . . . . . . . . . . . . . . . . . 42 4. Playing along with SMF data. . . . . . . . . . . . . . . . . . . . . . . 43 5. Playing one song at a time . . . . . . . . . . . . . . . . . . . . . . . . . 43 Saving data (Disk mode) . . . . . . . . . . . . . . . . . . . . . . . . . . . . 44 1. Media that can be used . . . . . . . . . . . . . . . . . . . . . . . . . . . . 44 2. Saving data . . . . . . . . . . . . . . . . . . . . . . . . . . . . . . . . . . . . . . 44 3. Loading data . . . . . . . . . . . . . . . . . . . . . . . . . . . . . . . . . . . . 44 4. Data handled in Disk mode . . . . . . . . . . . . . . . . . . . . . . . . 45 Floppy disk handling . . . . . . . . . . . . . . . . . . . . . . . . . . . . . . . 45 1. Types of floppy disk and formatting . . . . . . . . . . . . . . . . 45 2. Floppy disk handling . . . . . . . . . . . . . . . . . . . . . . . . . . . . . 45 3. Floppy disk write protect tab . . . . . . . . . . . . . . . . . . . . . . 46 4. Inserting a floppy disk . . . . . . . . . . . . . . . . . . . . . . . . . . . . 46 5. Removing a floppy disk . . . . . . . . . . . . . . . . . . . . . . . . . . . 46 6. Cleaning the heads . . . . . . . . . . . . . . . . . . . . . . . . . . . . . . . 46 Appendices . . . . . . . . . . . . . . . . . . . . . . . 47 MIDI applications . . . . . . . . . . . . . . . . . . . . . . . . . . . . . . . . . . 47 About Interfacing with Your computer . . . . . . . . . . . . . . . . 47 1. Connecting via MIDI. . . . . . . . . . . . . . . . . . . . . . . . . . . . . . 47 2. Connecting an IBM PC (compatible) . . . . . . . . . . . . . . . . 48 3. Connecting an Apple Macintosh. . . . . . . . . . . . . . . . . . . . 48 “TO HOST” Baud Rate setting . . . . . . . . . . . . . . . . . . . . . . . 48 Wiring diagram for special connection cable . . . . . . . . . . . 48 Korg MIDI Driver installation and setup . . . . . . . . . . . . . . 49 1. Installing the Korg MIDI Driver into Windows 95 . . . . 49 2. Installing the Korg MIDI Driver into Windows 3.1 . . . . 50 3. Installing the Korg MIDI Driver into a Macintosh . . . . . 51 Messages of the i30 . . . . . . . . . . . . . . . . . . . . . . . . . . . . . . . . . 53 Troubleshooting . . . . . . . . . . . . . . . . . . . . . . . . . . . . . . . . . . . 55 Initialized programs and styles . . . . . . . . . . . . . . . . . . . . . . . 56 1. Program . . . . . . . . . . . . . . . . . . . . . . . . . . . . . . . . . . . . . . . . 56 2. Style . . . . . . . . . . . . . . . . . . . . . . . . . . . . . . . . . . . . . . . . . . . . 57 List of detected chords . . . . . . . . . . . . . . . . . . . . . . . . . . . . . . 58 Specifications and options . . . . . . . . . . . . . . . . . . . . . . . . . . . 60 Specifications . . . . . . . . . . . . . . . . . . . . . . . . . . . . . . . . . . . . . . 60 Options (sold separately) . . . . . . . . . . . . . . . . . . . . . . . . . . . . 60 MIDI Implementation Chart . . . . . . . . . . . . . . . . . . . . . . . . . 61
Transcript of Korg i30 User Manual
Table of Contents
STEP 1.. . . . . . . . . . . . . . . . . . . . . . . . . . . 1
Front panel . . . . . . . . . . . . . . . . . . . . . . . . . . . . . . . . . . . . . . . . 1
Rear panel and connections . . . . . . . . . . . . . . . . . . . . . . . . . . 6
Basic LCD screen operation . . . . . . . . . . . . . . . . . . . . . . . . . . 81. Operating objects in the LCD screen. . . . . . . . . . . . . . . . . 8
STEP 2. Playing . . . . . . . . . . . . . . . . . . . 10
Check the connections. . . . . . . . . . . . . . . . . . . . . . . . . . . . . . 101. Make connections. . . . . . . . . . . . . . . . . . . . . . . . . . . . . . . . 102. Turning the power on/off . . . . . . . . . . . . . . . . . . . . . . . . 103. Using headphones . . . . . . . . . . . . . . . . . . . . . . . . . . . . . . . 104. Adjusting the volume . . . . . . . . . . . . . . . . . . . . . . . . . . . . 10
Listening to the demo songs. . . . . . . . . . . . . . . . . . . . . . . . . 101. Listening to the demo songs. . . . . . . . . . . . . . . . . . . . . . . 102. Starting playback from a specific demo song . . . . . . . . 103. Listening to demo playback of a backing sequence . . . 11
Selecting sounds. . . . . . . . . . . . . . . . . . . . . . . . . . . . . . . . . . . 111. Selecting by category . . . . . . . . . . . . . . . . . . . . . . . . . . . . . 112. Directly selecting an arrangement, style or program . . 123. Using a controller to select . . . . . . . . . . . . . . . . . . . . . . . . 12
Performance edit . . . . . . . . . . . . . . . . . . . . . . . . . . . . . . . . . . 12
The modes of the i30 . . . . . . . . . . . . . . . . . . . . . . . . . . . . . . . 131. Arrangement Play mode. . . . . . . . . . . . . . . . . . . . . . . . . . 132. Backing Sequence mode . . . . . . . . . . . . . . . . . . . . . . . . . . 133. Song mode. . . . . . . . . . . . . . . . . . . . . . . . . . . . . . . . . . . . . . 134. Song Play mode . . . . . . . . . . . . . . . . . . . . . . . . . . . . . . . . . 135. Program mode . . . . . . . . . . . . . . . . . . . . . . . . . . . . . . . . . . 136. Edit Style mode . . . . . . . . . . . . . . . . . . . . . . . . . . . . . . . . . 137. Global mode . . . . . . . . . . . . . . . . . . . . . . . . . . . . . . . . . . . . 148. Disk mode . . . . . . . . . . . . . . . . . . . . . . . . . . . . . . . . . . . . . . 14
STEP 3. Editing . . . . . . . . . . . . . . . . . . . . 15
Basic operation . . . . . . . . . . . . . . . . . . . . . . . . . . . . . . . . . . . . 151. Selecting the mode . . . . . . . . . . . . . . . . . . . . . . . . . . . . . . . 152. Pages . . . . . . . . . . . . . . . . . . . . . . . . . . . . . . . . . . . . . . . . . . 153. Setting parameter values. . . . . . . . . . . . . . . . . . . . . . . . . . 15
Editing an arrangement (Arrangement Play mode). . . . . 161. Playing an arrangement . . . . . . . . . . . . . . . . . . . . . . . . . . 162. Changing the keyboard (KBD) sound. . . . . . . . . . . . . . . 173. Editing an arrangement . . . . . . . . . . . . . . . . . . . . . . . . . . 174. Using a KBD Set . . . . . . . . . . . . . . . . . . . . . . . . . . . . . . . . . 215. Other convenient functions . . . . . . . . . . . . . . . . . . . . . . . 226. Writing an arrangement . . . . . . . . . . . . . . . . . . . . . . . . . . 22
Editing a backing sequence (Backing Sequence mode) . . 231. Recording an arrangement performance to the
sequencer. . . . . . . . . . . . . . . . . . . . . . . . . . . . . . . . . . . . . . . 232. If you make a mistake while recording an arrangement performance
243. Using the extra keyboard tracks to add finishing
touches . . . . . . . . . . . . . . . . . . . . . . . . . . . . . . . . . . . . . . . . . 24
Editing a program (Program mode) . . . . . . . . . . . . . . . . . . 261. How a program is constructed. . . . . . . . . . . . . . . . . . . . . 262. Basic program editing . . . . . . . . . . . . . . . . . . . . . . . . . . . . 263. Effect settings . . . . . . . . . . . . . . . . . . . . . . . . . . . . . . . . . . . 294. Writing a program . . . . . . . . . . . . . . . . . . . . . . . . . . . . . . . 335. Drum program settings. . . . . . . . . . . . . . . . . . . . . . . . . . . 33
Style editing (Edit Style mode) . . . . . . . . . . . . . . . . . . . . . . .351. What is a Style? . . . . . . . . . . . . . . . . . . . . . . . . . . . . . . . . . .352. Recording a style . . . . . . . . . . . . . . . . . . . . . . . . . . . . . . . . .363. Testing a chord variation . . . . . . . . . . . . . . . . . . . . . . . . . .374. Take advantage of patterns . . . . . . . . . . . . . . . . . . . . . . . .385. Sophisticated recording techniques for the
Drums track . . . . . . . . . . . . . . . . . . . . . . . . . . . . . . . . . . . . .396. Elements . . . . . . . . . . . . . . . . . . . . . . . . . . . . . . . . . . . . . . . .407. Writing a style . . . . . . . . . . . . . . . . . . . . . . . . . . . . . . . . . . .40
Playing a Standard MIDI File (Song Play mode) . . . . . . . .411. About SMF . . . . . . . . . . . . . . . . . . . . . . . . . . . . . . . . . . . . . .412. Playing back SMF data . . . . . . . . . . . . . . . . . . . . . . . . . . . .413. Saving a Jukebox list . . . . . . . . . . . . . . . . . . . . . . . . . . . . . .424. Playing along with SMF data. . . . . . . . . . . . . . . . . . . . . . .435. Playing one song at a time . . . . . . . . . . . . . . . . . . . . . . . . .43
Saving data (Disk mode) . . . . . . . . . . . . . . . . . . . . . . . . . . . .441. Media that can be used . . . . . . . . . . . . . . . . . . . . . . . . . . . .442. Saving data . . . . . . . . . . . . . . . . . . . . . . . . . . . . . . . . . . . . . .443. Loading data . . . . . . . . . . . . . . . . . . . . . . . . . . . . . . . . . . . .444. Data handled in Disk mode . . . . . . . . . . . . . . . . . . . . . . . .45
Floppy disk handling . . . . . . . . . . . . . . . . . . . . . . . . . . . . . . .451. Types of floppy disk and formatting . . . . . . . . . . . . . . . .452. Floppy disk handling . . . . . . . . . . . . . . . . . . . . . . . . . . . . .453. Floppy disk write protect tab . . . . . . . . . . . . . . . . . . . . . .464. Inserting a floppy disk . . . . . . . . . . . . . . . . . . . . . . . . . . . .465. Removing a floppy disk . . . . . . . . . . . . . . . . . . . . . . . . . . .466. Cleaning the heads . . . . . . . . . . . . . . . . . . . . . . . . . . . . . . .46
Appendices . . . . . . . . . . . . . . . . . . . . . . .47
MIDI applications . . . . . . . . . . . . . . . . . . . . . . . . . . . . . . . . . .47
About Interfacing with Your computer . . . . . . . . . . . . . . . .471. Connecting via MIDI. . . . . . . . . . . . . . . . . . . . . . . . . . . . . .472. Connecting an IBM PC (compatible) . . . . . . . . . . . . . . . .483. Connecting an Apple Macintosh. . . . . . . . . . . . . . . . . . . .48
“TO HOST” Baud Rate setting . . . . . . . . . . . . . . . . . . . . . . .48
Wiring diagram for special connection cable . . . . . . . . . . .48
Korg MIDI Driver installation and setup . . . . . . . . . . . . . .491. Installing the Korg MIDI Driver into Windows 95 . . . .492. Installing the Korg MIDI Driver into Windows 3.1 . . . .503. Installing the Korg MIDI Driver into a Macintosh . . . . .51
Messages of the i30 . . . . . . . . . . . . . . . . . . . . . . . . . . . . . . . . .53
Troubleshooting . . . . . . . . . . . . . . . . . . . . . . . . . . . . . . . . . . .55
Initialized programs and styles. . . . . . . . . . . . . . . . . . . . . . .561. Program . . . . . . . . . . . . . . . . . . . . . . . . . . . . . . . . . . . . . . . .562. Style . . . . . . . . . . . . . . . . . . . . . . . . . . . . . . . . . . . . . . . . . . . .57
List of detected chords . . . . . . . . . . . . . . . . . . . . . . . . . . . . . .58
Specifications and options . . . . . . . . . . . . . . . . . . . . . . . . . . .60Specifications . . . . . . . . . . . . . . . . . . . . . . . . . . . . . . . . . . . . . .60Options (sold separately) . . . . . . . . . . . . . . . . . . . . . . . . . . . .60
MIDI Implementation Chart . . . . . . . . . . . . . . . . . . . . . . . . .61
STEP
1
STEP 1.
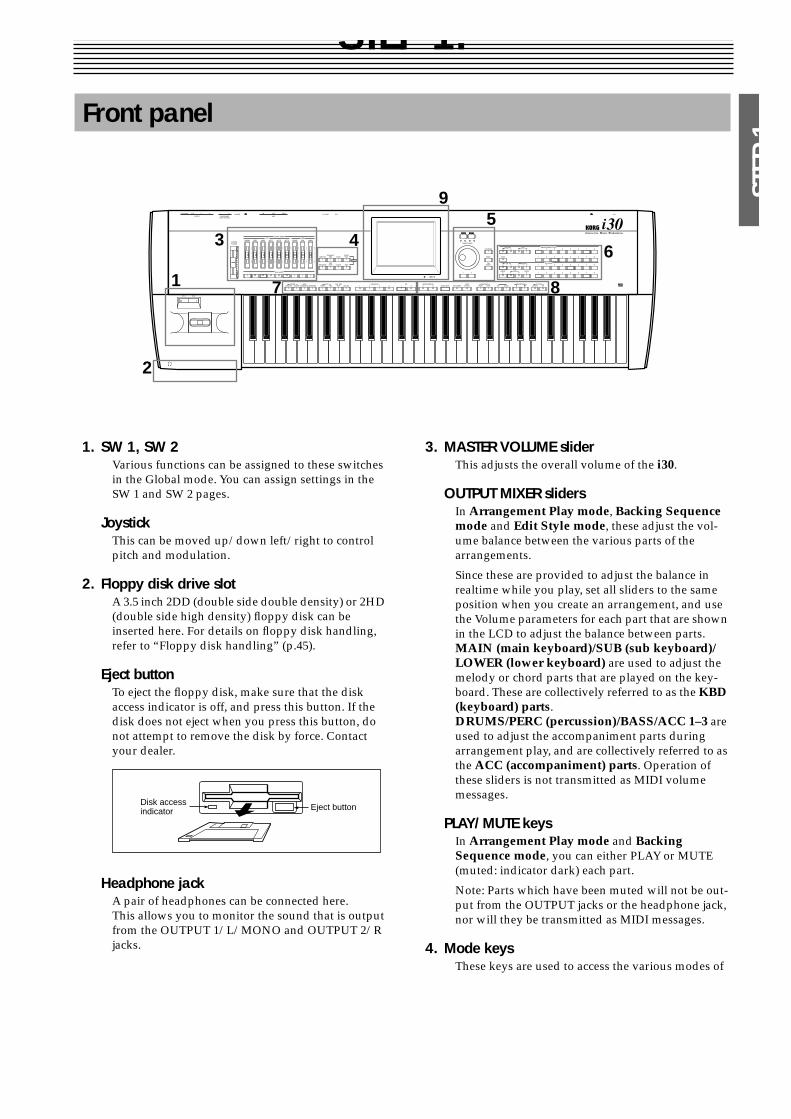
1. SW 1, SW 2
Various functions can be assigned to these switches in the Global mode. You can assign settings in the SW 1 and SW 2 pages.
Joystick
This can be moved up/down left/right to control pitch and modulation.
2. Floppy disk drive slot
A 3.5 inch 2DD (double side double density) or 2HD (double side high density) floppy disk can be inserted here. For details on floppy disk handling, refer to “Floppy disk handling” (p.45).
Eject button
To eject the floppy disk, make sure that the disk access indicator is off, and press this button. If the disk does not eject when you press this button, do not attempt to remove the disk by force. Contact your dealer.
Headphone jack
A pair of headphones can be connected here.This allows you to monitor the sound that is output from the OUTPUT 1/L/MONO and OUTPUT 2/R jacks.
3. MASTER VOLUME slider
This adjusts the overall volume of the
i30
.
OUTPUT MIXER sliders
In
Arrangement Play mode
,
Backing Sequence mode
and
Edit Style mode
, these adjust the vol-ume balance between the various parts of the arrangements.
Since these are provided to adjust the balance in realtime while you play, set all sliders to the same position when you create an arrangement, and use the Volume parameters for each part that are shown in the LCD to adjust the balance between parts.
MAIN (main keyboard)/SUB (sub keyboard)/LOWER (lower keyboard)
are used to adjust the melody or chord parts that are played on the key-board. These are collectively referred to as the
KBD (keyboard) parts
.
DRUMS/PERC (percussion)/BASS/ACC 1–3
are used to adjust the accompaniment parts during arrangement play, and are collectively referred to as the
ACC (accompaniment) parts
. Operation of these sliders is not transmitted as MIDI volume messages.
PLAY/MUTE keys
In
Arrangement Play mode
and
Backing Sequence mode
, you can either PLAY or MUTE (muted: indicator dark) each part.
Note: Parts which have been muted will not be out-put from the OUTPUT jacks or the headphone jack, nor will they be transmitted as MIDI messages.
4. Mode keys
These keys are used to access the various modes of
Front panel
1
2
3 45
6
7
9
8
Disk access indicator Eject button
the
i30
.
ARR PLAY (arrangement play) key
In Arrangement Play mode you can enjoy perform-ing with the automatic accompaniment functional-ity.Note: If you modify the settings of an arrangement here, any backing sequences which uses that arrangement will also be affected.
BACKING SEQ (backing sequence) key
In Backing Sequence mode you can record a perfor-mance which uses the automatic accompaniment functionality, or playback the data which was recorded.
SONG key
In Song mode you can create sixteen track sequence data.
Use this mode when you wish to create an original song from scratch, or when you wish to modify backing sequence data which was converted into a Standard MIDI File.
SONG PLAY key
In Song Play mode you can playback Standard MIDI Files that were loaded from floppy disk or hard disk (if installed).
Note: If you simultaneously press the
Song Play key
and the
DISK key
, you will enter DEMO mode. For details on demo playback, refer to “Lis-tening to the demo songs” (p.10).
PROGRAM key
In Program mode you can edit programs (sounds), and use the
i30
as a conventional synthesizer.
EDIT STYLE key
In Edit Style mode you can create and edit the styles used by an arrangement.
GLOBAL key
In Global mode you can edit various settings which affect the overall system of the
i30
(such as key-board touch sensitivity, etc.).
DISK key
In Disk mode you can save
i30
data to floppy disk or hard disk (if installed), or load this data into the
i30
.
Note: If you simultaneously press the
Song Play key
and the
DISK key
, you will enter DEMO mode. For details on demo playback, refer to “Lis-tening to the demo songs” (p.10).
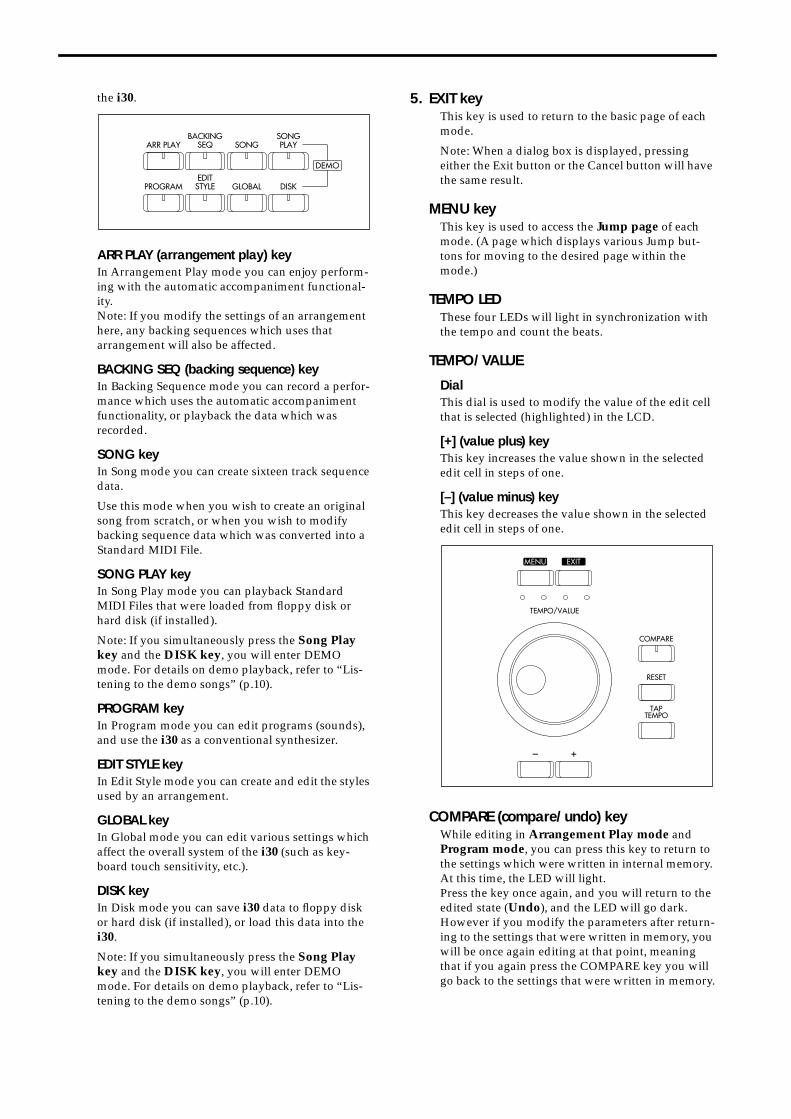
5. EXIT key
This key is used to return to the basic page of each mode.
Note: When a dialog box is displayed, pressing either the Exit button or the Cancel button will have the same result.
MENU key
This key is used to access the
Jump page
of each mode. (A page which displays various Jump but-tons for moving to the desired page within the mode.)
TEMPO LED
These four LEDs will light in synchronization with the tempo and count the beats.
TEMPO/VALUE
Dial
This dial is used to modify the value of the edit cell that is selected (highlighted) in the LCD.
[+] (value plus) key
This key increases the value shown in the selected edit cell in steps of one.
[–] (value minus) key
This key decreases the value shown in the selected edit cell in steps of one.
COMPARE (compare/undo) key
While editing in
Arrangement Play mode
and
Program mode
, you can press this key to return to the settings which were written in internal memory. At this time, the LED will light.Press the key once again, and you will return to the edited state (
Undo
), and the LED will go dark.However if you modify the parameters after return-ing to the settings that were written in memory, you will be once again editing at that point, meaning that if you again press the COMPARE key you will go back to the settings that were written in memory.
STEP
1
While recording or editing data in
Backing Sequence mode
,
Song mode
or
Edit Style mode
, you can press this key to return to the condition in which the data was before that operation was exe-cuted.
However if you modify the parameters after return-ing to the unedited condition, you will once again be editing, meaning that
Undo
will no longer be available even if you press the COMPARE key once again.
RESET key
In
Backing Sequence mode
,
Song mode
or
Edit Style mode
, press this key to return to the first measure. When you wish to modify the initial set-tings for each part of a backing sequence or song, press this key before making the changes.
You can also press this key if for some reason notes become “stuck".
TAP TEMPO key
By pressing this key several times in succession, you can input the corresponding time interval as one beat.
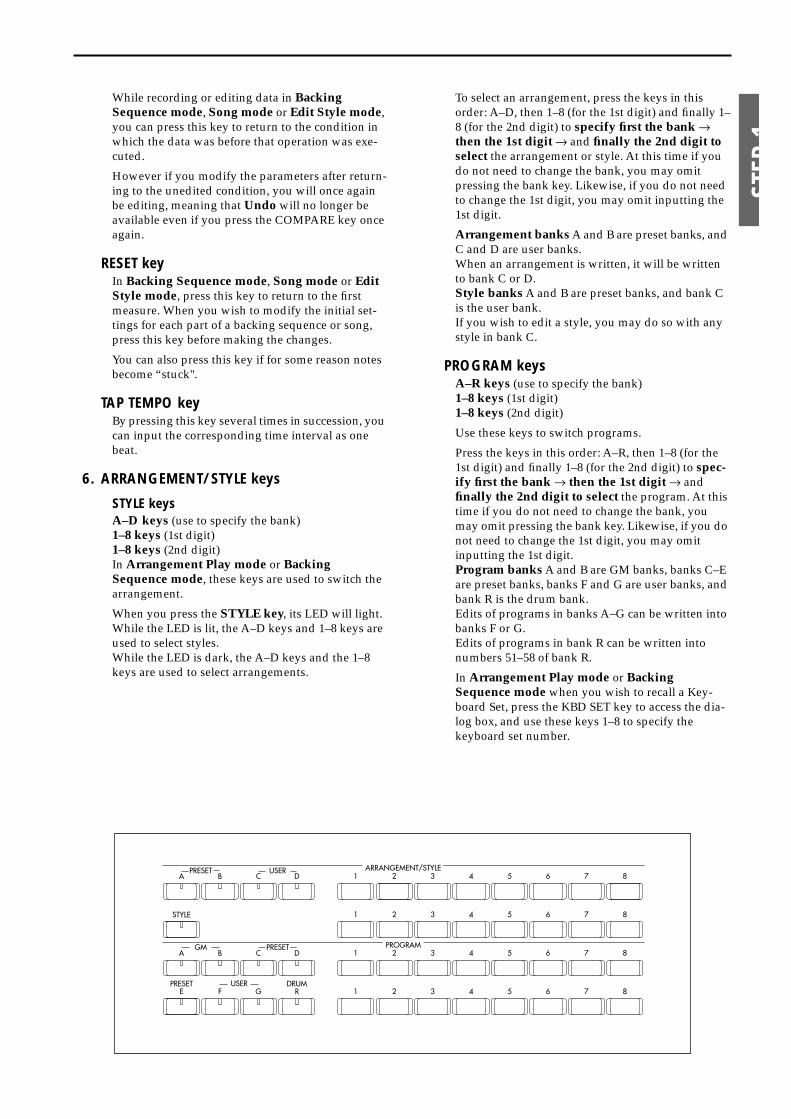
6. ARRANGEMENT/STYLE keys
STYLE keys
A–D keys
(use to specify the bank)
1–8 keys
(1st digit)
1–8 keys
(2nd digit)In
Arrangement Play mode
or
Backing Sequence mode
, these keys are used to switch the arrangement.
When you press the
STYLE key
, its LED will light. While the LED is lit, the A–D keys and 1–8 keys are used to select styles.While the LED is dark, the A–D keys and the 1–8 keys are used to select arrangements.
To select an arrangement, press the keys in this order: A–D, then 1–8 (for the 1st digit) and finally 1–8 (for the 2nd digit) to
specify first the bank
→
then the 1st digit
→
and
finally the 2nd digit to select
the arrangement or style. At this time if you do not need to change the bank, you may omit pressing the bank key. Likewise, if you do not need to change the 1st digit, you may omit inputting the 1st digit.
Arrangement banks
A and B are preset banks, and C and D are user banks.When an arrangement is written, it will be written to bank C or D.
Style banks
A and B are preset banks, and bank C is the user bank.If you wish to edit a style, you may do so with any style in bank C.
PROGRAM keys
A–R keys
(use to specify the bank)
1–8 keys
(1st digit)
1–8 keys
(2nd digit)
Use these keys to switch programs.
Press the keys in this order: A–R, then 1–8 (for the 1st digit) and finally 1–8 (for the 2nd digit) to
spec-ify first the bank
→
then the 1st digit
→
and
finally the 2nd digit to select
the program. At this time if you do not need to change the bank, you may omit pressing the bank key. Likewise, if you do not need to change the 1st digit, you may omit inputting the 1st digit.
Program banks
A and B are GM banks, banks C–E are preset banks, banks F and G are user banks, and bank R is the drum bank.Edits of programs in banks A–G can be written into banks F or G.Edits of programs in bank R can be written into numbers 51–58 of bank R.
In
Arrangement Play mode
or
Backing Sequence mode
when you wish to recall a Key-board Set, press the KBD SET key to access the dia-log box, and use these keys 1–8 to specify the keyboard set number.
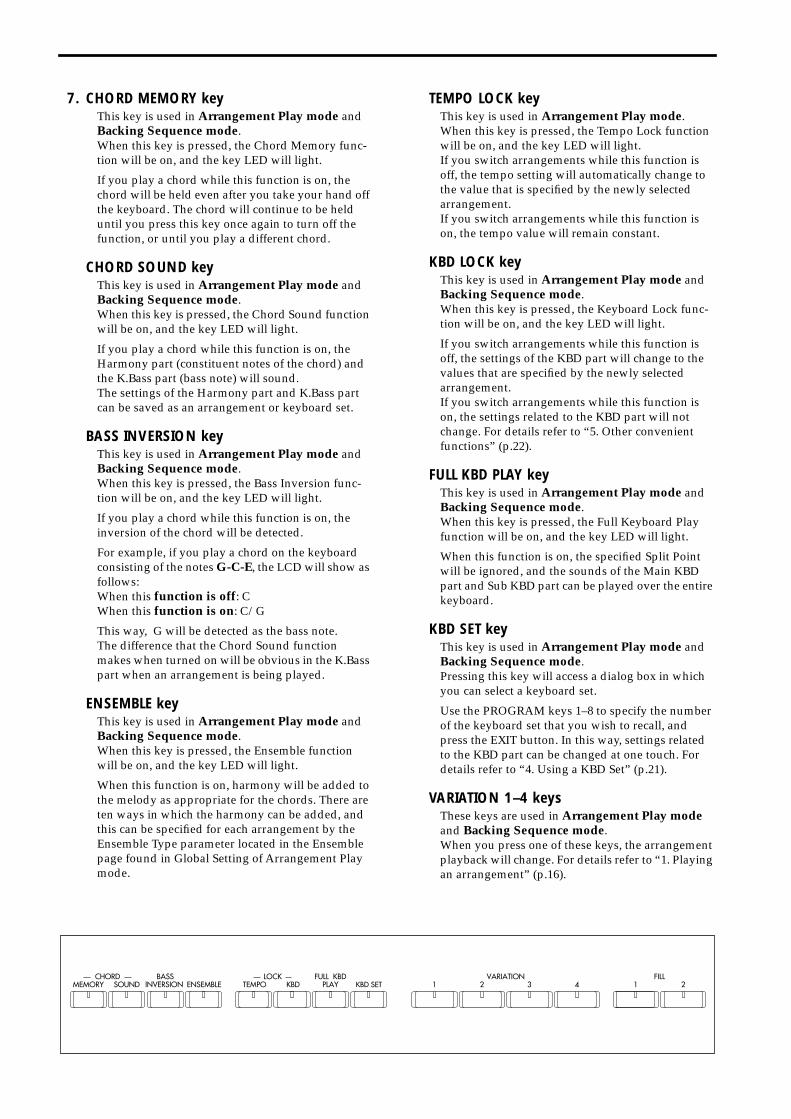
7. CHORD MEMORY key
This key is used in
Arrangement Play mode
and
Backing Sequence mode
.When this key is pressed, the Chord Memory func-tion will be on, and the key LED will light.
If you play a chord while this function is on, the chord will be held even after you take your hand off the keyboard. The chord will continue to be held until you press this key once again to turn off the function, or until you play a different chord.
CHORD SOUND key
This key is used in
Arrangement Play mode
and
Backing Sequence mode
.When this key is pressed, the Chord Sound function will be on, and the key LED will light.
If you play a chord while this function is on, the Harmony part (constituent notes of the chord) and the K.Bass part (bass note) will sound.The settings of the Harmony part and K.Bass part can be saved as an arrangement or keyboard set.
BASS INVERSION key
This key is used in
Arrangement Play mode
and
Backing Sequence mode
.When this key is pressed, the Bass Inversion func-tion will be on, and the key LED will light.
If you play a chord while this function is on, the inversion of the chord will be detected.
For example, if you play a chord on the keyboard consisting of the notes
G-C-E
, the LCD will show as follows:When this
function is off
: CWhen this
function is on
: C/G
This way, G will be detected as the bass note.The difference that the Chord Sound function makes when turned on will be obvious in the K.Bass part when an arrangement is being played.
ENSEMBLE key
This key is used in
Arrangement Play mode and Backing Sequence mode.When this key is pressed, the Ensemble function will be on, and the key LED will light.
When this function is on, harmony will be added to the melody as appropriate for the chords. There are ten ways in which the harmony can be added, and this can be specified for each arrangement by the Ensemble Type parameter located in the Ensemble page found in Global Setting of Arrangement Play mode.
TEMPO LOCK keyThis key is used in Arrangement Play mode.When this key is pressed, the Tempo Lock function will be on, and the key LED will light.If you switch arrangements while this function is off, the tempo setting will automatically change to the value that is specified by the newly selected arrangement.If you switch arrangements while this function is on, the tempo value will remain constant.
KBD LOCK keyThis key is used in Arrangement Play mode and Backing Sequence mode.When this key is pressed, the Keyboard Lock func-tion will be on, and the key LED will light.
If you switch arrangements while this function is off, the settings of the KBD part will change to the values that are specified by the newly selected arrangement.If you switch arrangements while this function is on, the settings related to the KBD part will not change. For details refer to “5. Other convenient functions” (p.22).
FULL KBD PLAY keyThis key is used in Arrangement Play mode and Backing Sequence mode.When this key is pressed, the Full Keyboard Play function will be on, and the key LED will light.
When this function is on, the specified Split Point will be ignored, and the sounds of the Main KBD part and Sub KBD part can be played over the entire keyboard.
KBD SET keyThis key is used in Arrangement Play mode and Backing Sequence mode.Pressing this key will access a dialog box in which you can select a keyboard set.
Use the PROGRAM keys 1–8 to specify the number of the keyboard set that you wish to recall, and press the EXIT button. In this way, settings related to the KBD part can be changed at one touch. For details refer to “4. Using a KBD Set” (p.21).
VARIATION 1–4 keysThese keys are used in Arrangement Play mode and Backing Sequence mode.When you press one of these keys, the arrangement playback will change. For details refer to “1. Playing an arrangement” (p.16).
STEP
1
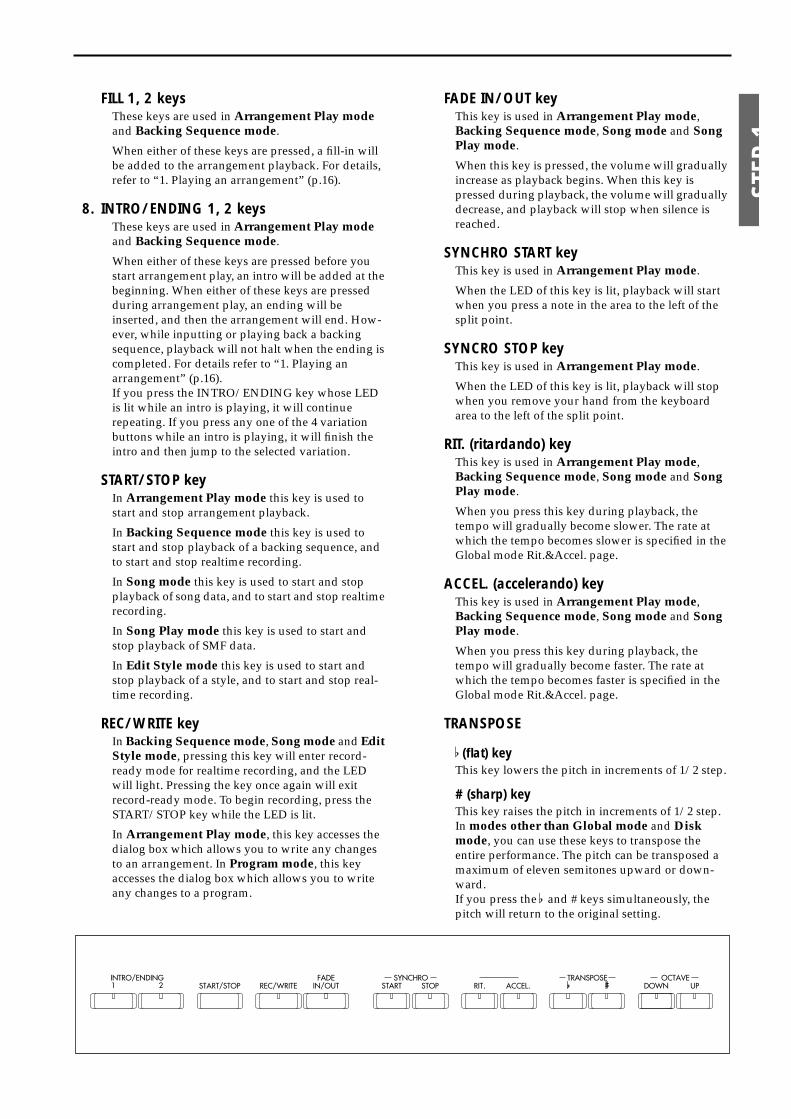
FILL 1, 2 keysThese keys are used in Arrangement Play mode and Backing Sequence mode.
When either of these keys are pressed, a fill-in will be added to the arrangement playback. For details, refer to “1. Playing an arrangement” (p.16).
8. INTRO/ENDING 1, 2 keysThese keys are used in Arrangement Play mode and Backing Sequence mode.
When either of these keys are pressed before you start arrangement play, an intro will be added at the beginning. When either of these keys are pressed during arrangement play, an ending will be inserted, and then the arrangement will end. How-ever, while inputting or playing back a backing sequence, playback will not halt when the ending is completed. For details refer to “1. Playing an arrangement” (p.16).If you press the INTRO/ENDING key whose LED is lit while an intro is playing, it will continue repeating. If you press any one of the 4 variation buttons while an intro is playing, it will finish the intro and then jump to the selected variation.
START/STOP keyIn Arrangement Play mode this key is used to start and stop arrangement playback.
In Backing Sequence mode this key is used to start and stop playback of a backing sequence, and to start and stop realtime recording.
In Song mode this key is used to start and stop playback of song data, and to start and stop realtime recording.
In Song Play mode this key is used to start and stop playback of SMF data.
In Edit Style mode this key is used to start and stop playback of a style, and to start and stop real-time recording.
REC/WRITE keyIn Backing Sequence mode, Song mode and Edit Style mode, pressing this key will enter record-ready mode for realtime recording, and the LED will light. Pressing the key once again will exit record-ready mode. To begin recording, press the START/STOP key while the LED is lit.
In Arrangement Play mode, this key accesses the dialog box which allows you to write any changes to an arrangement. In Program mode, this key accesses the dialog box which allows you to write any changes to a program.
FADE IN/OUT keyThis key is used in Arrangement Play mode, Backing Sequence mode, Song mode and Song Play mode.
When this key is pressed, the volume will gradually increase as playback begins. When this key is pressed during playback, the volume will gradually decrease, and playback will stop when silence is reached.
SYNCHRO START keyThis key is used in Arrangement Play mode.
When the LED of this key is lit, playback will start when you press a note in the area to the left of the split point.
SYNCRO STOP keyThis key is used in Arrangement Play mode.
When the LED of this key is lit, playback will stop when you remove your hand from the keyboard area to the left of the split point.
RIT. (ritardando) keyThis key is used in Arrangement Play mode, Backing Sequence mode, Song mode and Song Play mode.
When you press this key during playback, the tempo will gradually become slower. The rate at which the tempo becomes slower is specified in the Global mode Rit.&Accel. page.
ACCEL. (accelerando) keyThis key is used in Arrangement Play mode, Backing Sequence mode, Song mode and Song Play mode.
When you press this key during playback, the tempo will gradually become faster. The rate at which the tempo becomes faster is specified in the Global mode Rit.&Accel. page.
TRANSPOSE
� (flat) keyThis key lowers the pitch in increments of 1/2 step.
# (sharp) keyThis key raises the pitch in increments of 1/2 step.In modes other than Global mode and Disk mode, you can use these keys to transpose the entire performance. The pitch can be transposed a maximum of eleven semitones upward or down-ward.If you press the � and # keys simultaneously, the pitch will return to the original setting.
OCTAVE
DOWN keyThis key lowers the pitch in increments of one octave.
UP keyThis key raises the pitch in increments of one octave.In modes other than Global mode and Disk mode, you can use these keys to raise or lower the pitch played by the keyboard in units of one octave. The pitch can be raised or lowered a maximum of two octaves. This is useful when you wish to play notes that are beyond the normal range of the key-
board.In Arrangement Play mode and Backing Sequence mode, these keys will change the octave of the KBD parts (Lower KBD, Sub KBD, Main KBD) shown in the LCD screen.
9. LCD screenThe i30 features a Touch View System using a touch panel.
By pressing objects that are shown in the LCD, you can select factory-set arrangements, backing sequences, or programs, and edit (modify) their parameters. For details refer to “Basic LCD screen operation” (p.8).
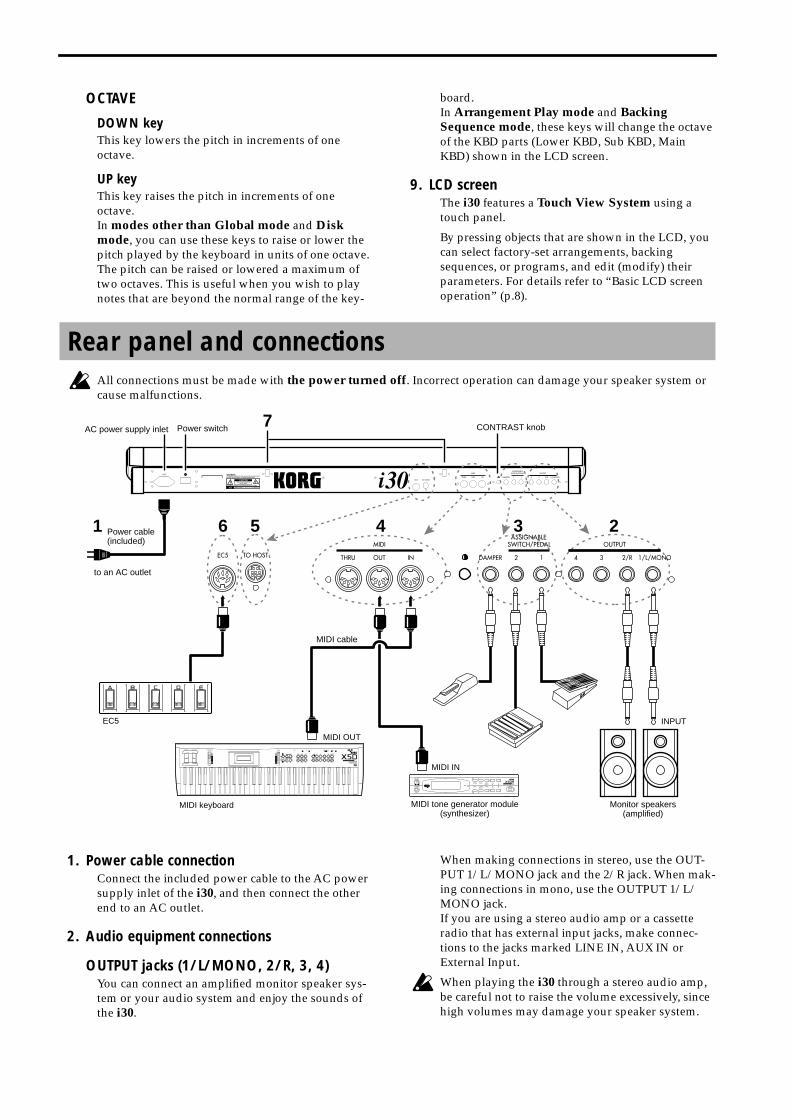
All connections must be made with the power turned off. Incorrect operation can damage your speaker system or cause malfunctions.
1. Power cable connectionConnect the included power cable to the AC power supply inlet of the i30, and then connect the other end to an AC outlet.
2. Audio equipment connections
OUTPUT jacks (1/L/MONO, 2/R, 3, 4)You can connect an amplified monitor speaker sys-tem or your audio system and enjoy the sounds of the i30.
When making connections in stereo, use the OUT-PUT 1/L/MONO jack and the 2/R jack. When mak-ing connections in mono, use the OUTPUT 1/L/MONO jack.If you are using a stereo audio amp or a cassette radio that has external input jacks, make connec-tions to the jacks marked LINE IN, AUX IN or External Input.
When playing the i30 through a stereo audio amp, be careful not to raise the volume excessively, since high volumes may damage your speaker system.
Rear panel and connections
AC power supply inlet
to an AC outlet
Power cable (included)
Power switch 7
EC5
Monitor speakers(amplified)
INPUT
MIDI tone generator module(synthesizer)
VOLUME
100
PHONESMIDI
EDIT GLOBALMULTI
PAGE-
+10 +1COMBI PROG BANKPAGE+
-10 -1POWER
MIDI IN
MIDI OUT
MIDI cable
MIDI keyboard
451 23
CONTRAST knob
6
STEP
1
3. Pedal connections
ASSIGNABLE PEDAL/SWITCH jacks (1, 2)A separately sold Korg XVP–10 or EXP–2 pedal con-troller or PS–1 foot switch etc. can be connected.
In the Assignable Pedal page located in Global mode Assign, functions such as Start/Stop or Pro-gram Up/Down can be assigned to these pedals.
DAMPER jackA separately sold Korg DS–1H damper pedal etc. can be connected here.
In the Assignable Pedal page located in Global mode Assign, you can specify a polarity setting that is appropriate for the pedal that was connected.
4. MIDI equipment connections
MIDI connectors (IN, OUT, THRU)If you wish to connect an external MIDI device, use a MIDI cable to make connections to the MIDI con-nectors of the external device. For details refer to “MIDI applications” (p.47).
These connectors are used to exchange data with devices that have a MIDI interface, such as a com-puter or another keyboard. In order to make con-nections, you will need a separately sold MIDI cable.
The MIDI IN connector receives MIDI messages from another device.The MIDI OUT connector transmits MIDI mes-sages to another device.The MIDI THRU connector re-transmits without change all messages which were received at the MIDI IN connector.
5. TO HOST connectorThis connector allows the i30 to be connected directly to a computer etc. that is not equipped with a MIDI interface, so that data can be exchanged.
To make connections using this, you will need to purchase a separately sold connection kit of the type suitable for your computer.
6. EC5 connectorA separately sold Korg EC5 external controller can be connected here.
In the EC5 page of Global mode Assign, you can assign different functions such as Start/Stop or Pro-gram Up/Down to each of the five switches of the EC5.
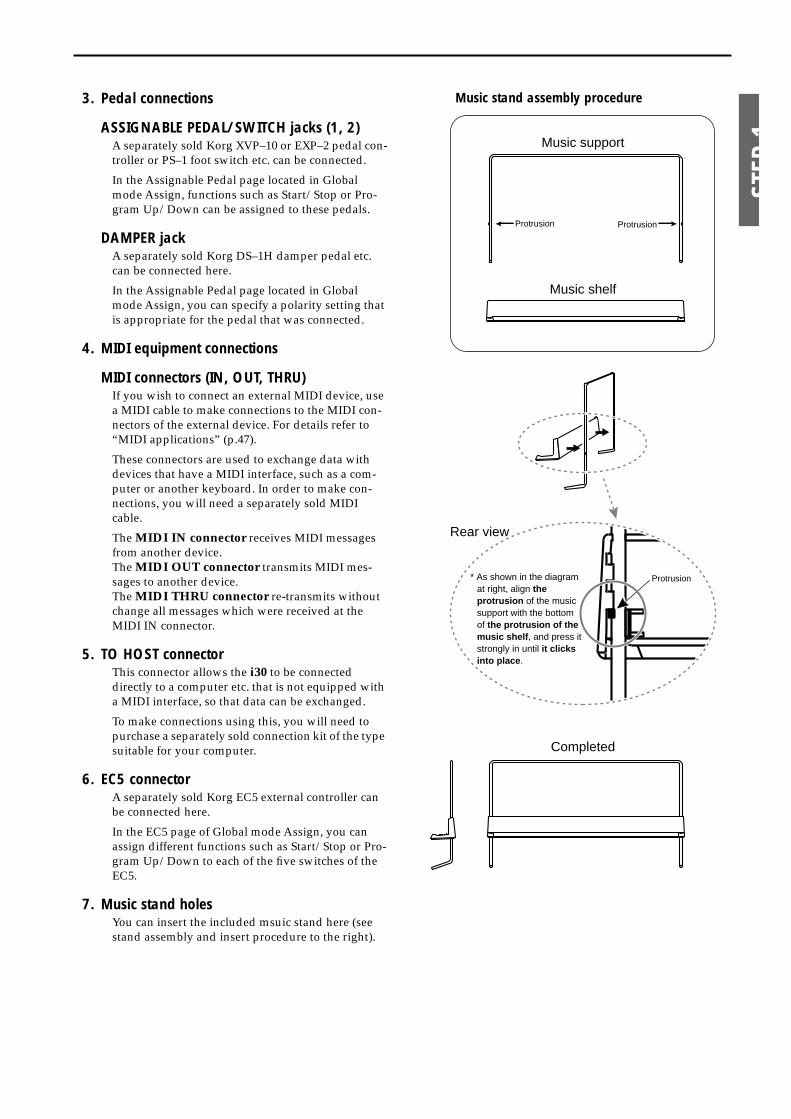
7. Music stand holesYou can insert the included msuic stand here (see stand assembly and insert procedure to the right).
Music stand assembly procedure
Rear view
Music support
Music shelf
Completed
Protrusion Protrusion
Protrusion* As shown in the diagram at right, align the protrusion of the music support with the bottom of the protrusion of the music shelf, and press it strongly in until it clicks into place.
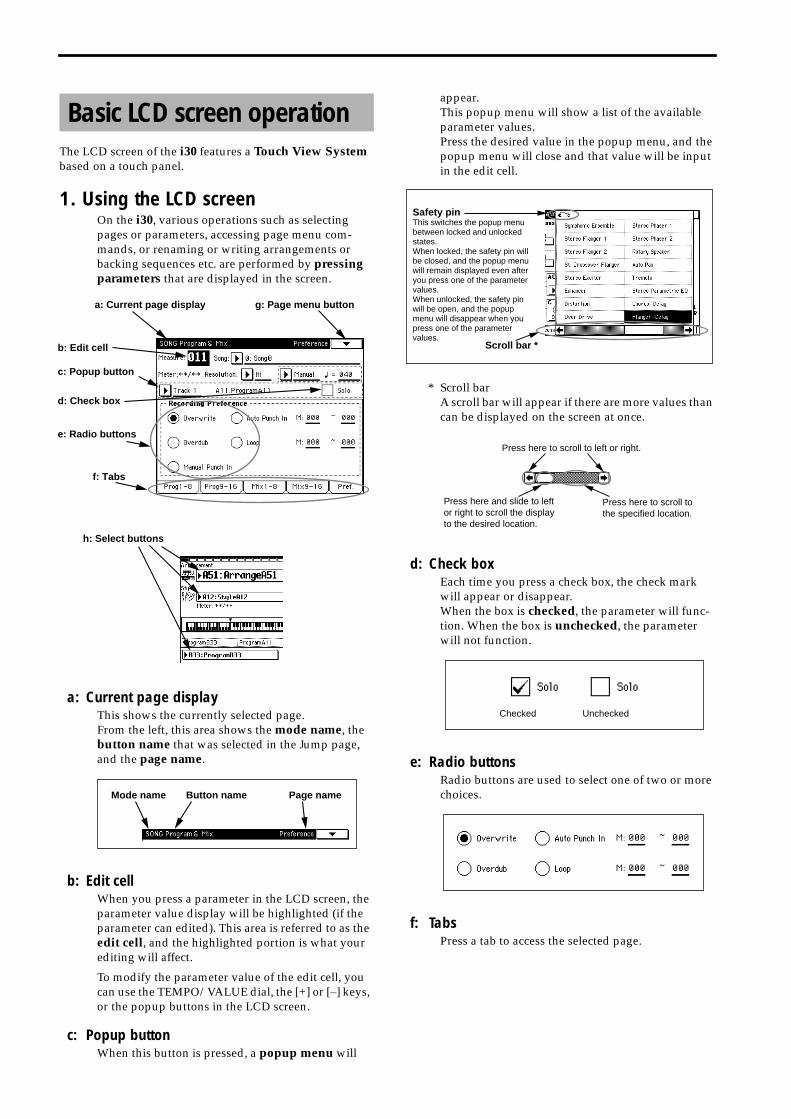
The LCD screen of the i30 features a Touch View System based on a touch panel.
1. Using the LCD screenOn the i30, various operations such as selecting pages or parameters, accessing page menu com-mands, or renaming or writing arrangements or backing sequences etc. are performed by pressing parameters that are displayed in the screen.
a: Current page displayThis shows the currently selected page.From the left, this area shows the mode name, the button name that was selected in the Jump page, and the page name.
b: Edit cellWhen you press a parameter in the LCD screen, the parameter value display will be highlighted (if the parameter can edited). This area is referred to as the edit cell, and the highlighted portion is what your editing will affect.
To modify the parameter value of the edit cell, you can use the TEMPO/VALUE dial, the [+] or [–] keys, or the popup buttons in the LCD screen.
c: Popup buttonWhen this button is pressed, a popup menu will
appear.This popup menu will show a list of the available parameter values.Press the desired value in the popup menu, and the popup menu will close and that value will be input in the edit cell.
* Scroll barA scroll bar will appear if there are more values than can be displayed on the screen at once.
d: Check boxEach time you press a check box, the check mark will appear or disappear.When the box is checked, the parameter will func-tion. When the box is unchecked, the parameter will not function.
e: Radio buttonsRadio buttons are used to select one of two or more choices.
f: TabsPress a tab to access the selected page.
Basic LCD screen operation
a: Current page display g: Page menu button
c: Popup button
b: Edit cell
e: Radio buttons
d: Check box
f: Tabs
h: Select buttons
Mode name Page nameButton name
Scroll bar *
Safety pinThis switches the popup menu between locked and unlocked states.When locked, the safety pin will be closed, and the popup menu will remain displayed even after you press one of the parameter values.When unlocked, the safety pin will be open, and the popup menu will disappear when you press one of the parameter values.
Press here and slide to left or right to scroll the display to the desired location.
Press here to scroll to left or right.
Press here to scroll to the specified location.
Checked Unchecked
STEP
1
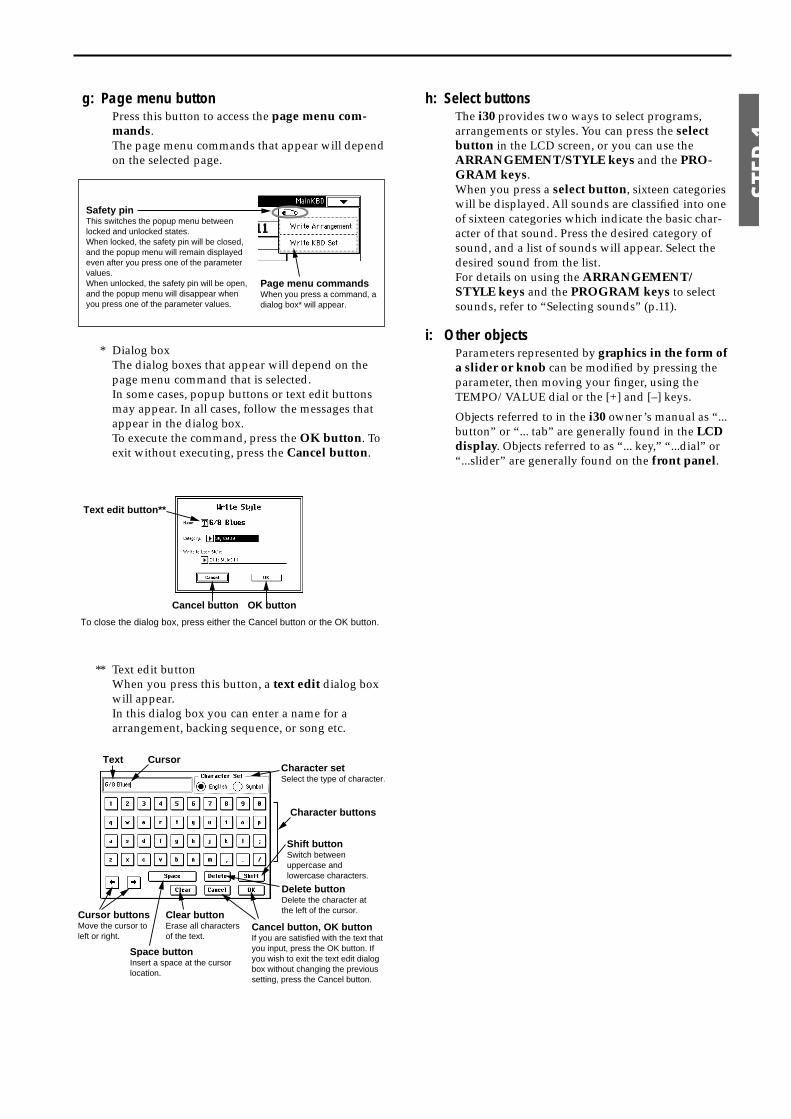
g: Page menu buttonPress this button to access the page menu com-mands.The page menu commands that appear will depend on the selected page.
* Dialog boxThe dialog boxes that appear will depend on the page menu command that is selected.In some cases, popup buttons or text edit buttons may appear. In all cases, follow the messages that appear in the dialog box.To execute the command, press the OK button. To exit without executing, press the Cancel button.
** Text edit buttonWhen you press this button, a text edit dialog box will appear.In this dialog box you can enter a name for a arrangement, backing sequence, or song etc.
h: Select buttonsThe i30 provides two ways to select programs, arrangements or styles. You can press the select button in the LCD screen, or you can use the ARRANGEMENT/STYLE keys and the PRO-GRAM keys.When you press a select button, sixteen categories will be displayed. All sounds are classified into one of sixteen categories which indicate the basic char-acter of that sound. Press the desired category of sound, and a list of sounds will appear. Select the desired sound from the list.For details on using the ARRANGEMENT/STYLE keys and the PROGRAM keys to select sounds, refer to “Selecting sounds” (p.11).
i: Other objectsParameters represented by graphics in the form of a slider or knob can be modified by pressing the parameter, then moving your finger, using the TEMPO/VALUE dial or the [+] and [–] keys.
Objects referred to in the i30 owner’s manual as “... button” or “... tab” are generally found in the LCD display. Objects referred to as “... key,” “...dial” or “...slider” are generally found on the front panel.
Safety pinThis switches the popup menu between locked and unlocked states.When locked, the safety pin will be closed, and the popup menu will remain displayed even after you press one of the parameter values.When unlocked, the safety pin will be open, and the popup menu will disappear when you press one of the parameter values.
Page menu commandsWhen you press a command, a dialog box* will appear.
Text edit button**
Cancel button OK button
To close the dialog box, press either the Cancel button or the OK button.
CursorCharacter setSelect the type of character.
Character buttons
Shift buttonSwitch between uppercase and lowercase characters.
Delete buttonDelete the character at the left of the cursor.Cursor buttons
Move the cursor to left or right.
Space buttonInsert a space at the cursor location.
Clear buttonErase all characters of the text.
Text
Cancel button, OK buttonIf you are satisfied with the text that you input, press the OK button. If you wish to exit the text edit dialog box without changing the previous setting, press the Cancel button.
STEP 2. Playing
1. Making connectionsRefer to “Rear panel and connections” (p.6) and make connections as necessary.
2. Turning the power on/off
Turning the power on1 Press the power switch of the i30 to turn the power
on.The Arrangement Play mode Main KBD page will appear.
2 Turn on the power of your powered monitor speak-ers or stereo amp.
Turning the power off1 Turn off the power of your powered monitor speak-
ers or stereo amp.
2 Press the power switch of the i30 to turn the power off.
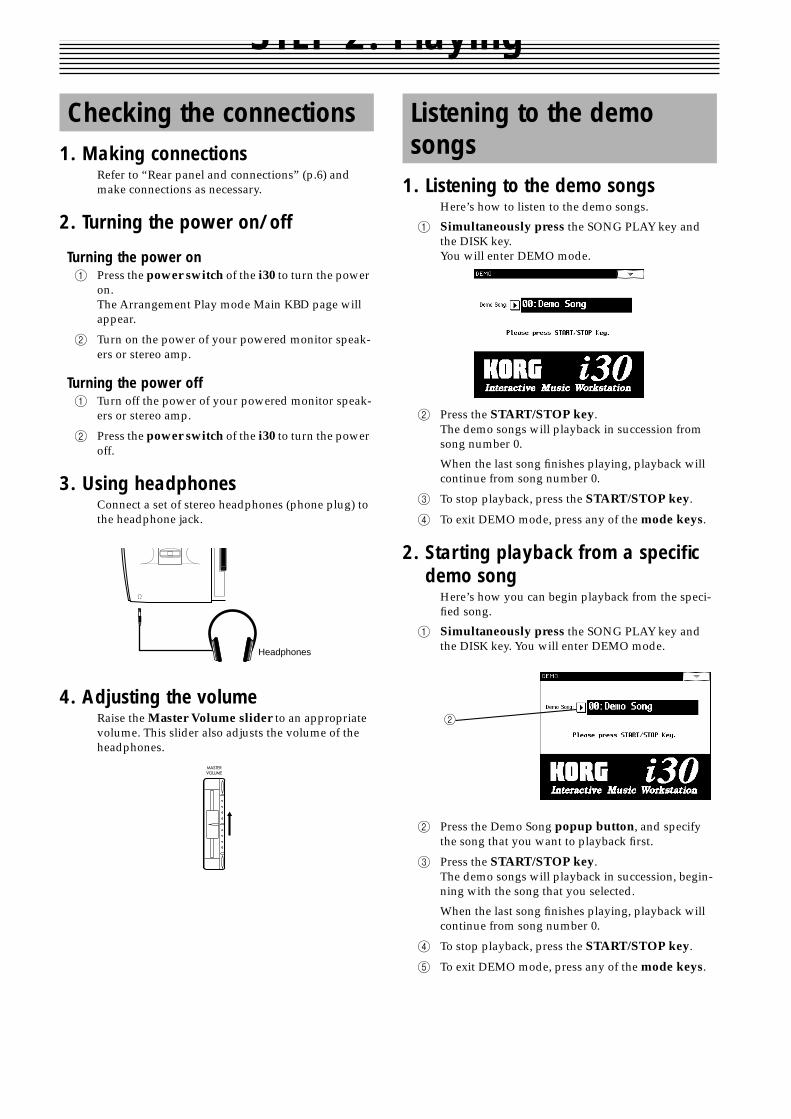
3. Using headphonesConnect a set of stereo headphones (phone plug) to the headphone jack.
4. Adjusting the volumeRaise the Master Volume slider to an appropriate volume. This slider also adjusts the volume of the headphones.
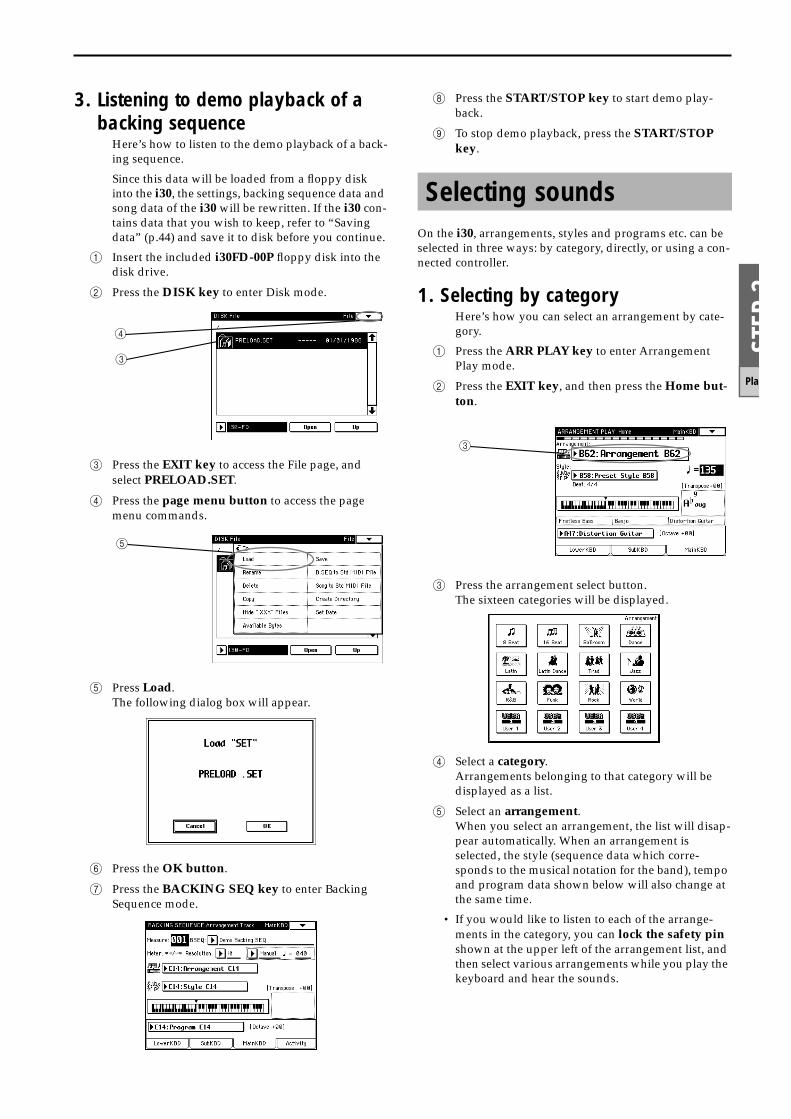
1. Listening to the demo songsHere’s how to listen to the demo songs.
1 Simultaneously press the SONG PLAY key and the DISK key. You will enter DEMO mode.
2 Press the START/STOP key.The demo songs will playback in succession from song number 0.
When the last song finishes playing, playback will continue from song number 0.
3 To stop playback, press the START/STOP key.
4 To exit DEMO mode, press any of the mode keys.
2. Starting playback from a specific demo song
Here’s how you can begin playback from the speci-fied song.
1 Simultaneously press the SONG PLAY key and the DISK key. You will enter DEMO mode.
2 Press the Demo Song popup button, and specify the song that you want to playback first.
3 Press the START/STOP key.The demo songs will playback in succession, begin-ning with the song that you selected.
When the last song finishes playing, playback will continue from song number 0.
4 To stop playback, press the START/STOP key.
5 To exit DEMO mode, press any of the mode keys.
Checking the connections
Headphones
Listening to the demo songs
2
STEP
2
Play
3. Listening to demo playback of a backing sequence
Here’s how to listen to the demo playback of a back-ing sequence.
Since this data will be loaded from a floppy disk into the i30, the settings, backing sequence data and song data of the i30 will be rewritten. If the i30 con-tains data that you wish to keep, refer to “Saving data” (p.44) and save it to disk before you continue.
1 Insert the included i30FD-00P floppy disk into the disk drive.
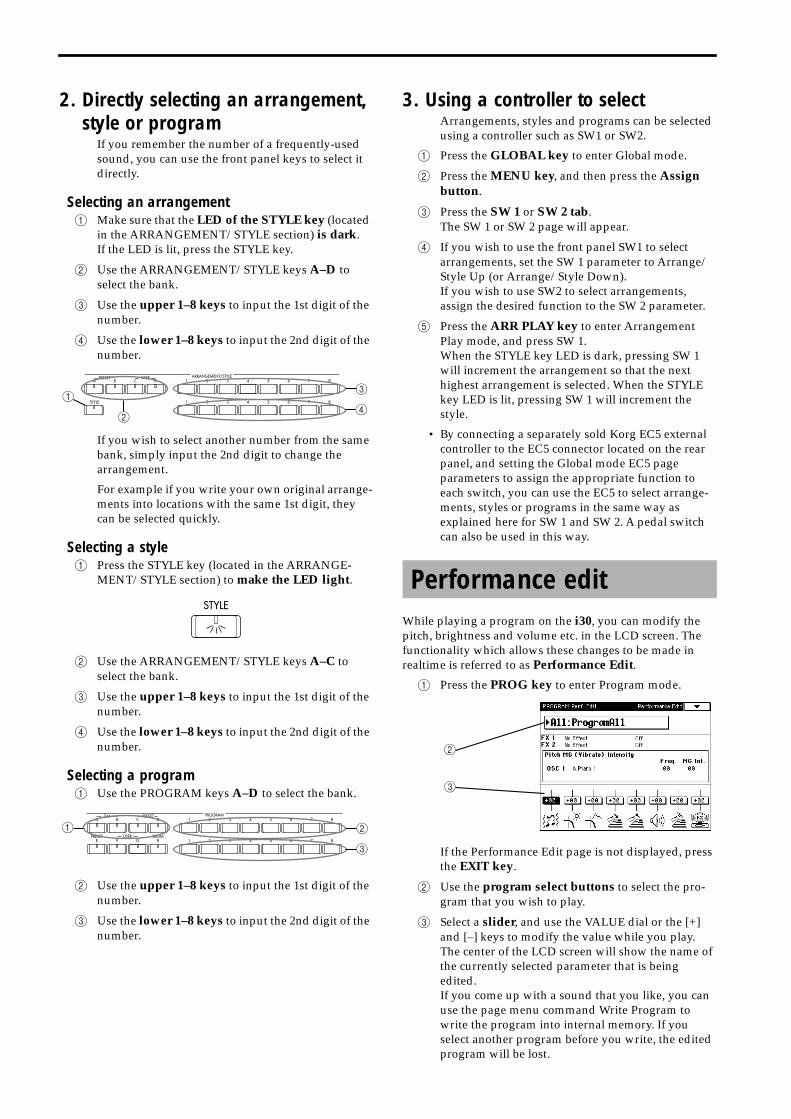
2 Press the DISK key to enter Disk mode.
3 Press the EXIT key to access the File page, and select PRELOAD.SET.
4 Press the page menu button to access the page menu commands.
5 Press Load.The following dialog box will appear.
6 Press the OK button.
7 Press the BACKING SEQ key to enter Backing Sequence mode.
8 Press the START/STOP key to start demo play-back.
9 To stop demo playback, press the START/STOP key.
On the i30, arrangements, styles and programs etc. can be selected in three ways: by category, directly, or using a con-nected controller.
1. Selecting by categoryHere’s how you can select an arrangement by cate-gory.
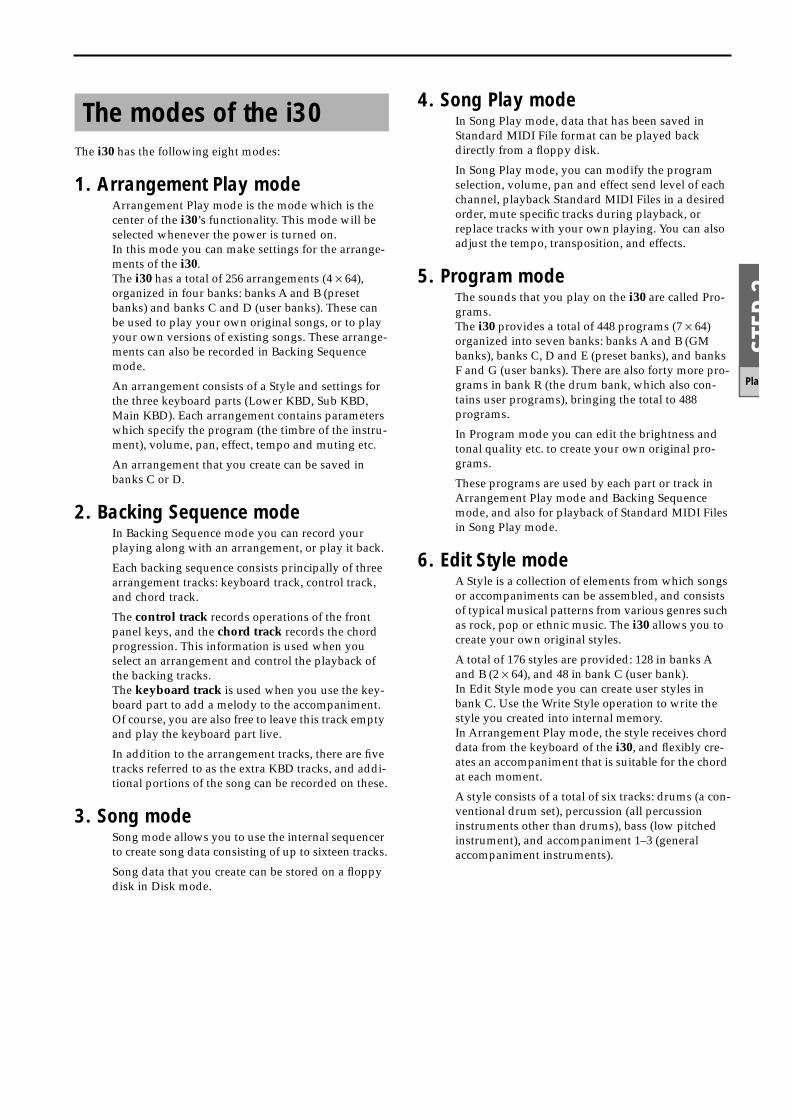
1 Press the ARR PLAY key to enter Arrangement Play mode.
2 Press the EXIT key, and then press the Home but-ton.
3 Press the arrangement select button.The sixteen categories will be displayed.
4 Select a category.Arrangements belonging to that category will be displayed as a list.
5 Select an arrangement.When you select an arrangement, the list will disap-pear automatically. When an arrangement is selected, the style (sequence data which corre-sponds to the musical notation for the band), tempo and program data shown below will also change at the same time.
• If you would like to listen to each of the arrange-ments in the category, you can lock the safety pin shown at the upper left of the arrangement list, and then select various arrangements while you play the keyboard and hear the sounds.
3
4
5
Selecting sounds
3
2. Directly selecting an arrangement, style or program
If you remember the number of a frequently-used sound, you can use the front panel keys to select it directly.
Selecting an arrangement1 Make sure that the LED of the STYLE key (located
in the ARRANGEMENT/STYLE section) is dark.If the LED is lit, press the STYLE key.
2 Use the ARRANGEMENT/STYLE keys A–D to select the bank.
3 Use the upper 1–8 keys to input the 1st digit of the number.
4 Use the lower 1–8 keys to input the 2nd digit of the number.
If you wish to select another number from the same bank, simply input the 2nd digit to change the arrangement.
For example if you write your own original arrange-ments into locations with the same 1st digit, they can be selected quickly.
Selecting a style1 Press the STYLE key (located in the ARRANGE-
MENT/STYLE section) to make the LED light.
2 Use the ARRANGEMENT/STYLE keys A–C to select the bank.
3 Use the upper 1–8 keys to input the 1st digit of the number.
4 Use the lower 1–8 keys to input the 2nd digit of the number.
Selecting a program1 Use the PROGRAM keys A–D to select the bank.
2 Use the upper 1–8 keys to input the 1st digit of the number.
3 Use the lower 1–8 keys to input the 2nd digit of the number.
3. Using a controller to selectArrangements, styles and programs can be selected using a controller such as SW1 or SW2.
1 Press the GLOBAL key to enter Global mode.
2 Press the MENU key, and then press the Assign button.
3 Press the SW 1 or SW 2 tab.The SW 1 or SW 2 page will appear.
4 If you wish to use the front panel SW1 to select arrangements, set the SW 1 parameter to Arrange/Style Up (or Arrange/Style Down).If you wish to use SW2 to select arrangements, assign the desired function to the SW 2 parameter.
5 Press the ARR PLAY key to enter Arrangement Play mode, and press SW 1.When the STYLE key LED is dark, pressing SW 1 will increment the arrangement so that the next highest arrangement is selected. When the STYLE key LED is lit, pressing SW 1 will increment the style.
• By connecting a separately sold Korg EC5 external controller to the EC5 connector located on the rear panel, and setting the Global mode EC5 page parameters to assign the appropriate function to each switch, you can use the EC5 to select arrange-ments, styles or programs in the same way as explained here for SW 1 and SW 2. A pedal switch can also be used in this way.
While playing a program on the i30, you can modify the pitch, brightness and volume etc. in the LCD screen. The functionality which allows these changes to be made in realtime is referred to as Performance Edit.
1 Press the PROG key to enter Program mode.
If the Performance Edit page is not displayed, press the EXIT key.
2 Use the program select buttons to select the pro-gram that you wish to play.
3 Select a slider, and use the VALUE dial or the [+] and [–] keys to modify the value while you play.The center of the LCD screen will show the name of the currently selected parameter that is being edited.If you come up with a sound that you like, you can use the page menu command Write Program to write the program into internal memory. If you select another program before you write, the edited program will be lost.
1
2
3
4
1 2
3
Performance edit
2
3
STEP
2
Play
The i30 has the following eight modes:
1. Arrangement Play modeArrangement Play mode is the mode which is the center of the i30’s functionality. This mode will be selected whenever the power is turned on.In this mode you can make settings for the arrange-ments of the i30.The i30 has a total of 256 arrangements (4 × 64), organized in four banks: banks A and B (preset banks) and banks C and D (user banks). These can be used to play your own original songs, or to play your own versions of existing songs. These arrange-ments can also be recorded in Backing Sequence mode.
An arrangement consists of a Style and settings for the three keyboard parts (Lower KBD, Sub KBD, Main KBD). Each arrangement contains parameters which specify the program (the timbre of the instru-ment), volume, pan, effect, tempo and muting etc.
An arrangement that you create can be saved in banks C or D.
2. Backing Sequence modeIn Backing Sequence mode you can record your playing along with an arrangement, or play it back.
Each backing sequence consists principally of three arrangement tracks: keyboard track, control track, and chord track.
The control track records operations of the front panel keys, and the chord track records the chord progression. This information is used when you select an arrangement and control the playback of the backing tracks.The keyboard track is used when you use the key-board part to add a melody to the accompaniment. Of course, you are also free to leave this track empty and play the keyboard part live.
In addition to the arrangement tracks, there are five tracks referred to as the extra KBD tracks, and addi-tional portions of the song can be recorded on these.
3. Song modeSong mode allows you to use the internal sequencer to create song data consisting of up to sixteen tracks.
Song data that you create can be stored on a floppy disk in Disk mode.
4. Song Play modeIn Song Play mode, data that has been saved in Standard MIDI File format can be played back directly from a floppy disk.
In Song Play mode, you can modify the program selection, volume, pan and effect send level of each channel, playback Standard MIDI Files in a desired order, mute specific tracks during playback, or replace tracks with your own playing. You can also adjust the tempo, transposition, and effects.
5. Program modeThe sounds that you play on the i30 are called Pro-grams.The i30 provides a total of 448 programs (7 × 64) organized into seven banks: banks A and B (GM banks), banks C, D and E (preset banks), and banks F and G (user banks). There are also forty more pro-grams in bank R (the drum bank, which also con-tains user programs), bringing the total to 488 programs.
In Program mode you can edit the brightness and tonal quality etc. to create your own original pro-grams.
These programs are used by each part or track in Arrangement Play mode and Backing Sequence mode, and also for playback of Standard MIDI Files in Song Play mode.
6. Edit Style modeA Style is a collection of elements from which songs or accompaniments can be assembled, and consists of typical musical patterns from various genres such as rock, pop or ethnic music. The i30 allows you to create your own original styles.
A total of 176 styles are provided: 128 in banks A and B (2 × 64), and 48 in bank C (user bank).In Edit Style mode you can create user styles in bank C. Use the Write Style operation to write the style you created into internal memory.In Arrangement Play mode, the style receives chord data from the keyboard of the i30, and flexibly cre-ates an accompaniment that is suitable for the chord at each moment.
A style consists of a total of six tracks: drums (a con-ventional drum set), percussion (all percussion instruments other than drums), bass (low pitched instrument), and accompaniment 1–3 (general accompaniment instruments).
The modes of the i30
7. Global modeIn Global mode you can make the following settings which affect the functionality of the entire i30.
• Keyboard tuning parameters• Settings for MIDI functions• Settings for SW 1 and SW 2• Settings for a connected foot pedal• External controller settings• Velocity curve settings• Scale settings• Control of MIDI transmission/reception
Note: You must execute the Write Global Settings command to write these settings.
8. Disk modeIn this mode, i30 data can be saved to a floppy disk or hard disk (if installed). i30 data or SMF data can also be loaded from floppy disk or hard disk (if installed) into internal memory.
Note: the i30 can use Style data from other i-series instruments.
STEP
3
Edi
STEP 3. Editing
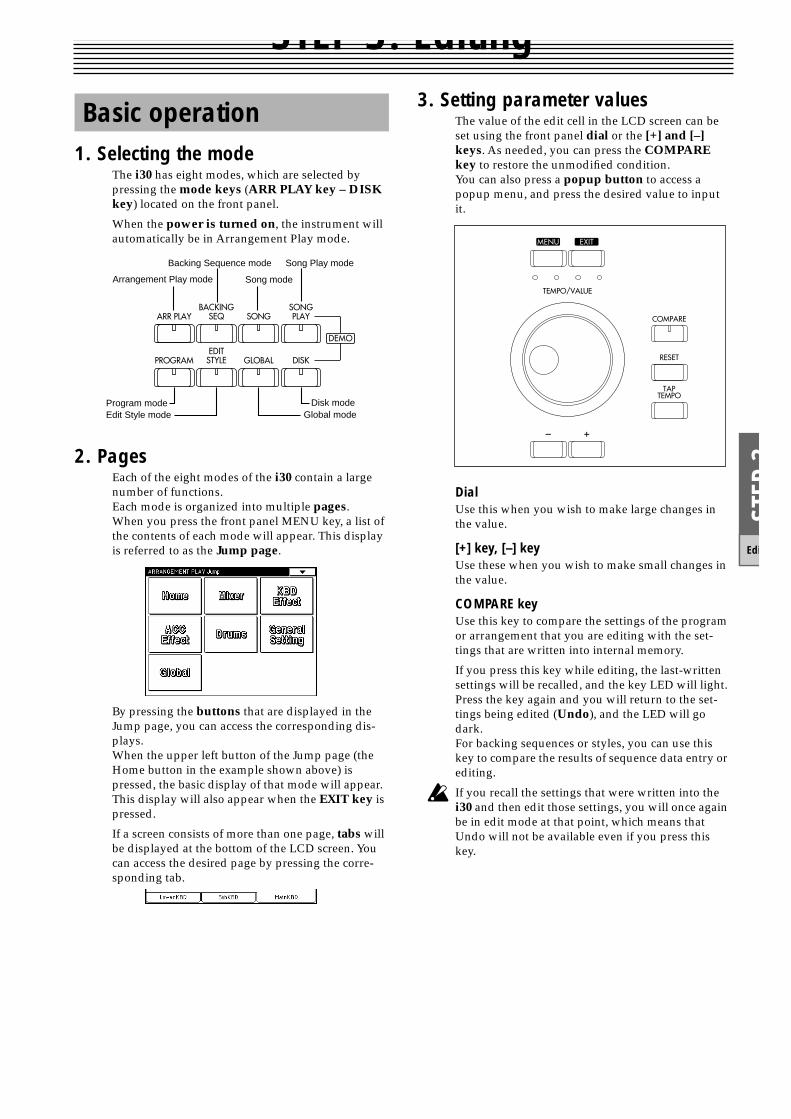
1. Selecting the modeThe i30 has eight modes, which are selected by pressing the mode keys (ARR PLAY key – DISK key) located on the front panel.
When the power is turned on, the instrument will automatically be in Arrangement Play mode.
2. PagesEach of the eight modes of the i30 contain a large number of functions.Each mode is organized into multiple pages.When you press the front panel MENU key, a list of the contents of each mode will appear. This display is referred to as the Jump page.
By pressing the buttons that are displayed in the Jump page, you can access the corresponding dis-plays.When the upper left button of the Jump page (the Home button in the example shown above) is pressed, the basic display of that mode will appear. This display will also appear when the EXIT key is pressed.
If a screen consists of more than one page, tabs will be displayed at the bottom of the LCD screen. You can access the desired page by pressing the corre-sponding tab.
3. Setting parameter valuesThe value of the edit cell in the LCD screen can be set using the front panel dial or the [+] and [–] keys. As needed, you can press the COMPARE key to restore the unmodified condition.You can also press a popup button to access a popup menu, and press the desired value to input it.
DialUse this when you wish to make large changes in the value.
[+] key, [–] keyUse these when you wish to make small changes in the value.
COMPARE keyUse this key to compare the settings of the program or arrangement that you are editing with the set-tings that are written into internal memory.
If you press this key while editing, the last-written settings will be recalled, and the key LED will light. Press the key again and you will return to the set-tings being edited (Undo), and the LED will go dark.For backing sequences or styles, you can use this key to compare the results of sequence data entry or editing.
If you recall the settings that were written into the i30 and then edit those settings, you will once again be in edit mode at that point, which means that Undo will not be available even if you press this key.
Basic operation
Program modeEdit Style mode
Song modeArrangement Play mode
Backing Sequence mode Song Play mode
Global modeDisk mode

1. Playing an arrangementLet’s select arrangement B62 and play it.
1 Press the ARR PLAY key to enter Arrangement Play mode.
2 Make sure that the LED of the STYLE key (located in the ARRANGEMENT/STYLE section) is off, and press the B key.
If the STYLE key LED is lit, press the STYLE key to make the LED go dark.
3 Press the 6 key in the upper line, and press the 2 key in the lower line.Arrangement B62 will be selected.
4 Press the START/STOP key.Arrangement play will begin.
5 Play a chord (three or more notes) in the keyboard area to the left of the split point.
The keyboard shown in the middle of the LCD screen corresponds to the keyboard of the i30. When you play a chord in the range shown in inverse video, the chord will be detected by the i30, and the chord name will be displayed in the right of the LCD.
If you have pressed the CHORD MEMORY key to turn the function on, the i30 will detect the last-pressed chord even if you release the hand which was playing the chord.
6 Play another chord on the keyboard.The i30 will detect the chord, and will produce an automatic accompaniment that is appropriate for that chord.
During arrangement play, six parts are accompany-ing: Drums, Perc, Bass, ACC1, ACC2 and ACC3. These are collectively referred to as the ACC (accompaniment) parts.Of these, the Bass, ACC1, ACC2 and ACC3 parts will play automatically according to the chord.When no chord is detected (when the chord name is not displayed), only the Drums part and Perc part (which are not related to the chord) will play.
7 Press the START/STOP key to stop arrangement play.
8 Press the INTRO/ENDING 1 key.The INTRO/ENDING 1 key LED will light.
At this time, one of the VARIATION 1–4 key LEDs will blink. This indicates the variation that will be used following the intro.The performance played by the arrangement will differ depending on the variation that is used.
9 Press the START/STOP key.The intro will begin.
At this time, the measure location of the currently played intro will be displayed in the upper left-hand side of the LCD screen.
When the intro ends, playback will switch to the variation that was blinking in step 8.
0 Try pressing the FILL 1 key.A short fill-in will be inserted.
Note: when you press the INTRO/ENDING 1 key or the FILL 1 key, the timing will be adjusted so that it connects smoothly with the i30’s performance. However depending on the timing at which you press the button, there may be cases in which only the latter portion is played, so be aware of the tim-ing at which you press the button.
As with the intro, the playback will switch to the blinking variation when the fill ends. On the i30 you can specify the variation which will be used follow-ing a fill. For details refer to Arrangement Play mode “6–4. Fill/Scale” (Parameter Guide p.8), in the discussion of the Variation Change after “Fill in” parameter.
A Press the INTRO/ENDING 1 key.The ending will begin. When the ending is com-pleted, arrangement play will stop.
• In the factory preset arrangements, the intro and ending will be played differently, depending on whether you have pressed the INTRO/ENDING 1 key or the INTRO/ENDING 2 key.
When you press the INTRO/ENDING 1 key, an intro or ending with chord development will be played.
When you press the INTRO/ENDING 2 key, an intro or ending without chord development will be played.
• Since variations, intros and endings are played according to the sequence data of the style, the musical content will also change depending on the style that you select. The i30 allows you to create your own original styles. For details refer to “Style editing” (p.35).
Editing an arrangement (Arrangement Play mode)
Chord name display
Chord detection area
STEP
3
Edi
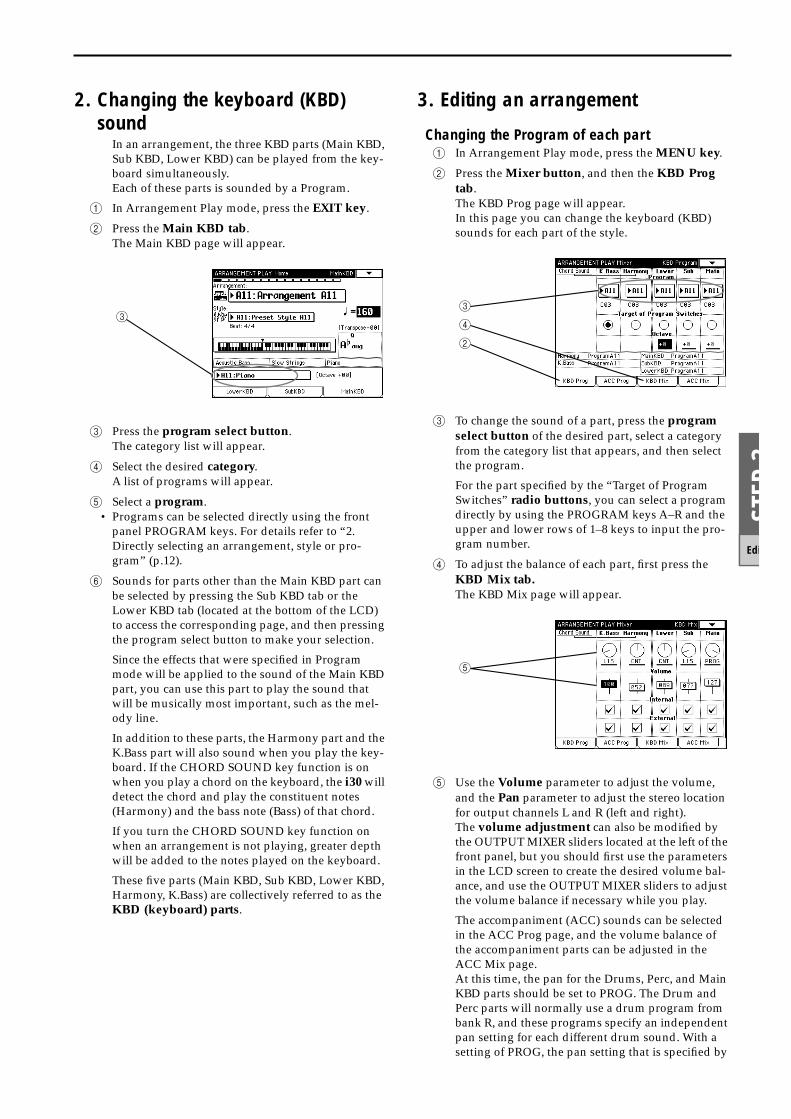
2. Changing the keyboard (KBD) sound
In an arrangement, the three KBD parts (Main KBD, Sub KBD, Lower KBD) can be played from the key-board simultaneously.Each of these parts is sounded by a Program.
1 In Arrangement Play mode, press the EXIT key.
2 Press the Main KBD tab.The Main KBD page will appear.
3 Press the program select button.The category list will appear.
4 Select the desired category.A list of programs will appear.
5 Select a program.• Programs can be selected directly using the front
panel PROGRAM keys. For details refer to “2. Directly selecting an arrangement, style or pro-gram” (p.12).
6 Sounds for parts other than the Main KBD part can be selected by pressing the Sub KBD tab or the Lower KBD tab (located at the bottom of the LCD) to access the corresponding page, and then pressing the program select button to make your selection.
Since the effects that were specified in Program mode will be applied to the sound of the Main KBD part, you can use this part to play the sound that will be musically most important, such as the mel-ody line.
In addition to these parts, the Harmony part and the K.Bass part will also sound when you play the key-board. If the CHORD SOUND key function is on when you play a chord on the keyboard, the i30 will detect the chord and play the constituent notes (Harmony) and the bass note (Bass) of that chord.
If you turn the CHORD SOUND key function on when an arrangement is not playing, greater depth will be added to the notes played on the keyboard.
These five parts (Main KBD, Sub KBD, Lower KBD, Harmony, K.Bass) are collectively referred to as the KBD (keyboard) parts.
3. Editing an arrangement
Changing the Program of each part1 In Arrangement Play mode, press the MENU key.
2 Press the Mixer button, and then the KBD Prog tab.The KBD Prog page will appear.In this page you can change the keyboard (KBD) sounds for each part of the style.
3 To change the sound of a part, press the program select button of the desired part, select a category from the category list that appears, and then select the program.
For the part specified by the “Target of Program Switches” radio buttons, you can select a program directly by using the PROGRAM keys A–R and the upper and lower rows of 1–8 keys to input the pro-gram number.
4 To adjust the balance of each part, first press the KBD Mix tab.The KBD Mix page will appear.
5 Use the Volume parameter to adjust the volume, and the Pan parameter to adjust the stereo location for output channels L and R (left and right).The volume adjustment can also be modified by the OUTPUT MIXER sliders located at the left of the front panel, but you should first use the parameters in the LCD screen to create the desired volume bal-ance, and use the OUTPUT MIXER sliders to adjust the volume balance if necessary while you play.
The accompaniment (ACC) sounds can be selected in the ACC Prog page, and the volume balance of the accompaniment parts can be adjusted in the ACC Mix page.At this time, the pan for the Drums, Perc, and Main KBD parts should be set to PROG. The Drum and Perc parts will normally use a drum program from bank R, and these programs specify an independent pan setting for each different drum sound. With a setting of PROG, the pan setting that is specified by
33
4
2
5
each program will be used, so that each drum sound will be panned independently.If you use a program that was created with a pan setting intended for use in an arrangement, set the pan of that part to PROG.
Modifying the effect settingsThe Main KBD part will be processed by the KBD FX 1 and KBD FX 2 effects. The ACC parts (Drums, Perc, Bass, ACC1–3) will be processed by the ACC FX 1 and ACC FX 2 effects. Let’s try modifying the effect settings of the Main KBD part and the ACC parts.
1 In Arrangement Play mode, press the MENU key.
2 Press the KBD Effect button.The KBD Effect page will appear.
The Main KBD part will use the effects specified by the selected program. The lower half of the LCD will show the status of the effects as specified by the program.
Changes to these effect settings can be made in the various Effect pages of Program mode.
In order for the effect settings made in Program mode to be reflected accurately by the Main KBD part, the following settings must be made.
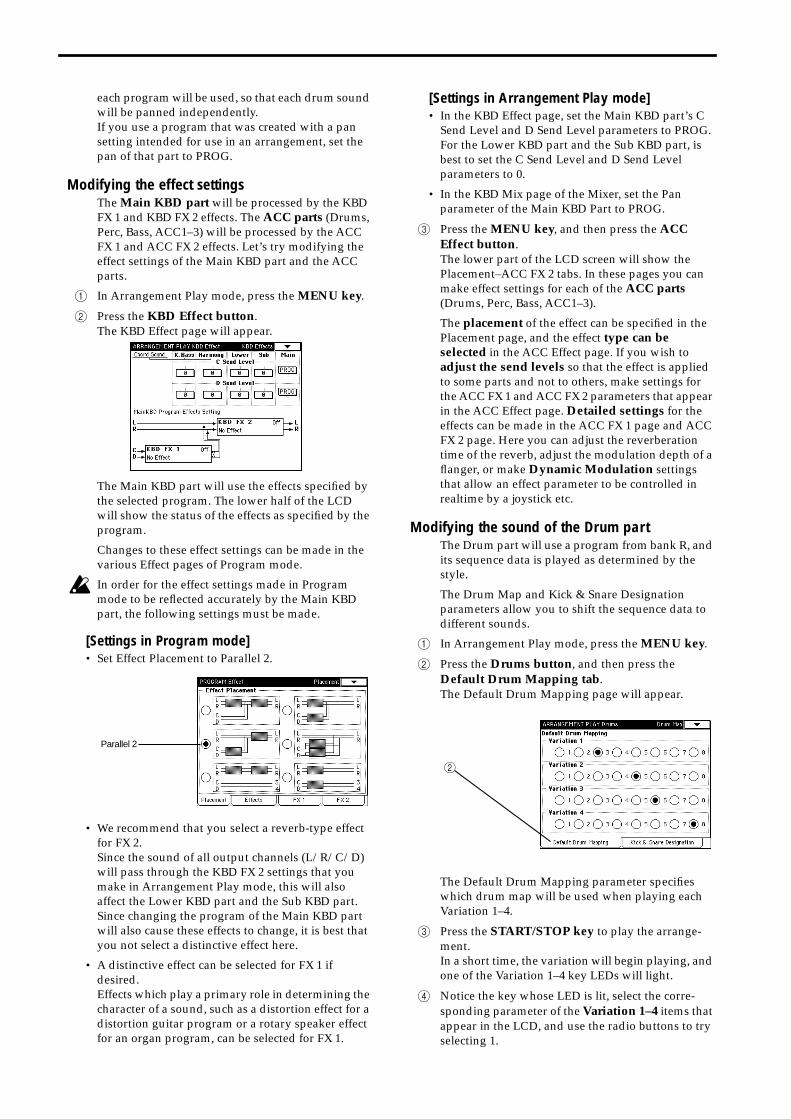
[Settings in Program mode]• Set Effect Placement to Parallel 2.
• We recommend that you select a reverb-type effect for FX 2.Since the sound of all output channels (L/R/C/D) will pass through the KBD FX 2 settings that you make in Arrangement Play mode, this will also affect the Lower KBD part and the Sub KBD part. Since changing the program of the Main KBD part will also cause these effects to change, it is best that you not select a distinctive effect here.
• A distinctive effect can be selected for FX 1 if desired.Effects which play a primary role in determining the character of a sound, such as a distortion effect for a distortion guitar program or a rotary speaker effect for an organ program, can be selected for FX 1.
[Settings in Arrangement Play mode]• In the KBD Effect page, set the Main KBD part’s C
Send Level and D Send Level parameters to PROG. For the Lower KBD part and the Sub KBD part, is best to set the C Send Level and D Send Level parameters to 0.
• In the KBD Mix page of the Mixer, set the Pan parameter of the Main KBD Part to PROG.
3 Press the MENU key, and then press the ACC Effect button.The lower part of the LCD screen will show the Placement–ACC FX 2 tabs. In these pages you can make effect settings for each of the ACC parts (Drums, Perc, Bass, ACC1–3).
The placement of the effect can be specified in the Placement page, and the effect type can be selected in the ACC Effect page. If you wish to adjust the send levels so that the effect is applied to some parts and not to others, make settings for the ACC FX 1 and ACC FX 2 parameters that appear in the ACC Effect page. Detailed settings for the effects can be made in the ACC FX 1 page and ACC FX 2 page. Here you can adjust the reverberation time of the reverb, adjust the modulation depth of a flanger, or make Dynamic Modulation settings that allow an effect parameter to be controlled in realtime by a joystick etc.
Modifying the sound of the Drum partThe Drum part will use a program from bank R, and its sequence data is played as determined by the style.
The Drum Map and Kick & Snare Designation parameters allow you to shift the sequence data to different sounds.
1 In Arrangement Play mode, press the MENU key.
2 Press the Drums button, and then press the Default Drum Mapping tab.The Default Drum Mapping page will appear.
The Default Drum Mapping parameter specifies which drum map will be used when playing each Variation 1–4.
3 Press the START/STOP key to play the arrange-ment.In a short time, the variation will begin playing, and one of the Variation 1–4 key LEDs will light.
4 Notice the key whose LED is lit, select the corre-sponding parameter of the Variation 1–4 items that appear in the LCD, and use the radio buttons to try selecting 1.
Parallel 2
2
STEP
3
Edi
The playback of the Drum part will change to per-cussion-type sounds.By selecting 1–8 you can change the character of the Drums part.
1: Percussion (neither kick nor snare)2: No snare3: Side stick and hi-hat4: Side stick and ride5: Original data of the style6: Snare and ride7: Open hi-hat8: Crash
Try out each selection, and select the drum map that is most appropriate for each variation.
5 Press the Kick & Snare Designation tab.The Kick & Snare Designation page will appear.The Kick Designation parameter lets you modify the sound of the kick, and the Snare Designation parameter lets you modify the sound of the snare.
Programs of bank R contain four types of kick and four types of snare each, and you can select the desired sound from each.
6 Press the START/STOP key to stop arrangement playback.
Playing with an ensemble1 In Arrangement Play mode, press the EXIT key.
2 Press the ENSEMBLE key.The function will be turned on, and the LED will light.
3 Press the START/STOP key.The arrangement will playback.
4 Play a chord (three or more notes) in the keyboard area to the left of the split point.The keyboard displayed in the center of the LCD corresponds to the keyboard of the i30. When you play a chord in the area displayed in inverse video, the i30 will detect the chord, and the chord name will be displayed in the right side of the LCD.
5 While a chord is detected, play the melody in the right hand.Harmony will be added to the melody as appropri-ate for the chord.If you have pressed the CHORD MEMORY key to turn on the function, the i30 will continue to detect the chord that was pressed even after you take your hand off the chord.
Modifying the ensemble1 In Arrangement Play mode, press the MENU key.
2 Press the General Settings button, and then press the Ensemble tab.The Ensemble page will appear.
3 Use the Ensemble Type parameter to change the type of harmony.You can select the type of harmony that will be added to the melody when you press the ENSEM-BLE key to turn on the function.
Using the Synchro Backing function1 In Arrangement Play mode, press the MENU key.
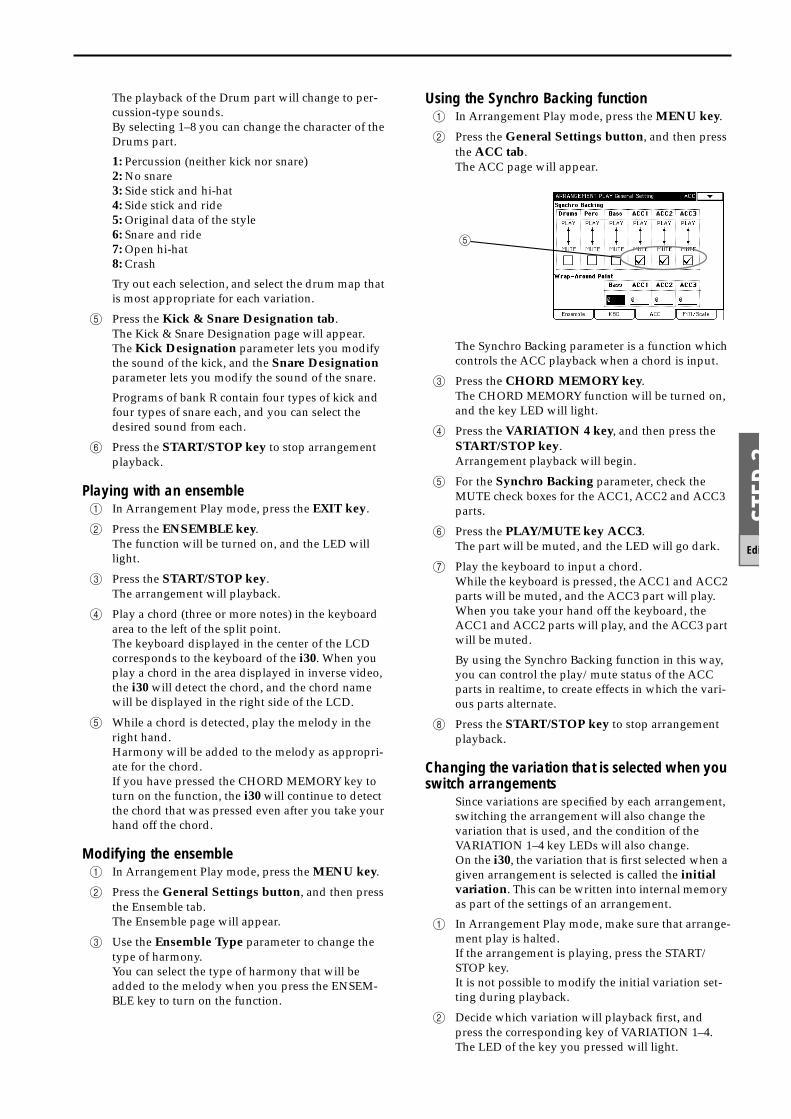
2 Press the General Settings button, and then press the ACC tab.The ACC page will appear.
The Synchro Backing parameter is a function which controls the ACC playback when a chord is input.
3 Press the CHORD MEMORY key.The CHORD MEMORY function will be turned on, and the key LED will light.
4 Press the VARIATION 4 key, and then press the START/STOP key.Arrangement playback will begin.
5 For the Synchro Backing parameter, check the MUTE check boxes for the ACC1, ACC2 and ACC3 parts.
6 Press the PLAY/MUTE key ACC3.The part will be muted, and the LED will go dark.
7 Play the keyboard to input a chord.While the keyboard is pressed, the ACC1 and ACC2 parts will be muted, and the ACC3 part will play. When you take your hand off the keyboard, the ACC1 and ACC2 parts will play, and the ACC3 part will be muted.
By using the Synchro Backing function in this way, you can control the play/mute status of the ACC parts in realtime, to create effects in which the vari-ous parts alternate.
8 Press the START/STOP key to stop arrangement playback.
Changing the variation that is selected when you switch arrangements
Since variations are specified by each arrangement, switching the arrangement will also change the variation that is used, and the condition of the VARIATION 1–4 key LEDs will also change.On the i30, the variation that is first selected when a given arrangement is selected is called the initial variation. This can be written into internal memory as part of the settings of an arrangement.
1 In Arrangement Play mode, make sure that arrange-ment play is halted.If the arrangement is playing, press the START/STOP key.It is not possible to modify the initial variation set-ting during playback.
2 Decide which variation will playback first, and press the corresponding key of VARIATION 1–4.The LED of the key you pressed will light.
5
3 Press the page menu button, and then press the page menu command Write Arrangement.A dialog box will appear.
Use the text edit button to input the name of the arrangement (refer to p.9), specify the category, and select a writing destination of C11–D88.
4 Press the OK button to write the arrangement.Intro and fill settings can also be set together with the initial variation.
Using an external device to process the ACC sound
[Using an external MIDI device]For example if you wish to sound just the Bass part on an external tone generator, make the following settings.
1 In Arrangement Play mode, press the MENU key.
2 Press the Mixer button, and then press the ACC Mix tab.The ACC Mix page will appear.
3 Uncheck the Internal parameter for the Bass part, and check the External parameter.With these settings, the Bass part will not be sounded by the i30’s internal tone generator, but will be sounded by an external tone generator con-nected to the MIDI OUT connector or the TO HOST connector.If the External parameter of other parts is checked, those parts will also be sounded on the external tone generator, so be sure that only the Internal parameter is checked.
4 Press the MENU key.
5 Press the Global button, and then press the MIDI Ch. tab.The MIDI Ch page will appear.
6 Check the MIDI channel of the Bass part, and set the MIDI channel of the connected external tone gener-ator to match the channel of the Bass part.
The Global mode settings in the Chord Sound–MIDI Ch. pages will affect all arrangements, so if you need to set the MIDI channel, we recommend that you change the setting on the external tone genera-tor, rather than on the i30.
7 Press the START/STOP key, and listen to the arrangement playback.
[Using an external effect device]For example if you wish to apply an external effect device only to the ACC1 part, make the following settings.
1 In Arrangement Play mode, press the MENU key.
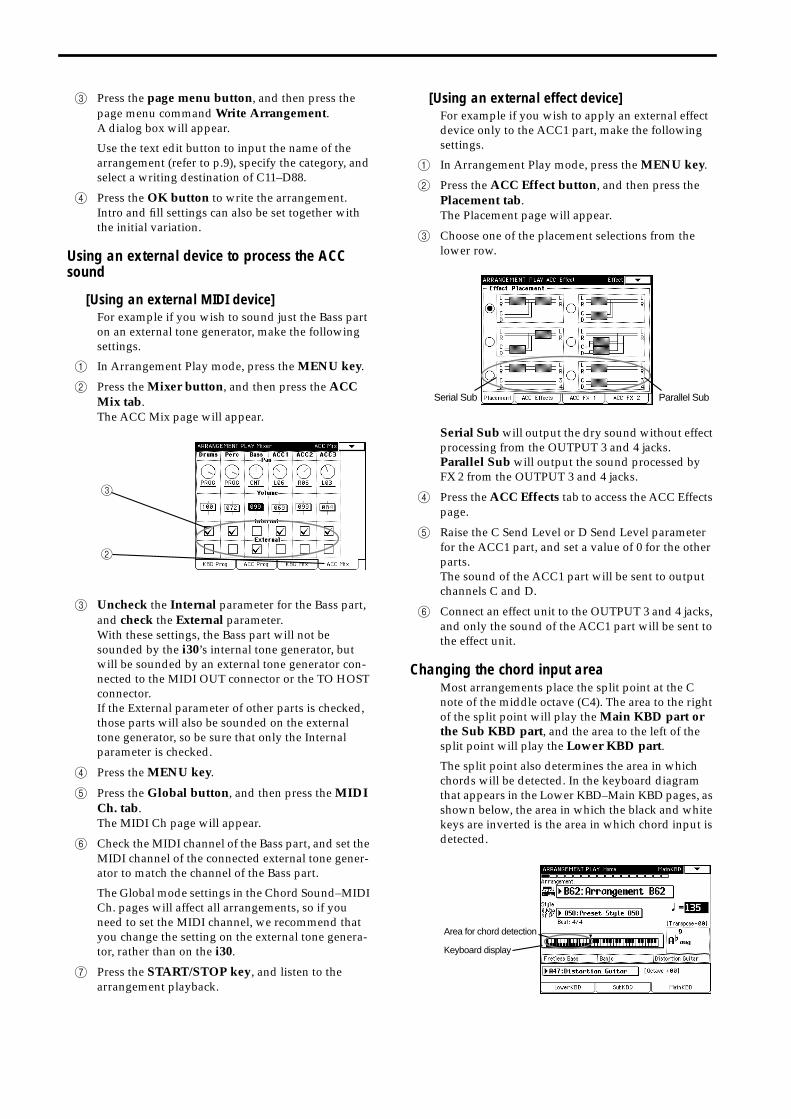
2 Press the ACC Effect button, and then press the Placement tab.The Placement page will appear.
3 Choose one of the placement selections from the lower row.
Serial Sub will output the dry sound without effect processing from the OUTPUT 3 and 4 jacks.Parallel Sub will output the sound processed by FX 2 from the OUTPUT 3 and 4 jacks.
4 Press the ACC Effects tab to access the ACC Effects page.
5 Raise the C Send Level or D Send Level parameter for the ACC1 part, and set a value of 0 for the other parts.The sound of the ACC1 part will be sent to output channels C and D.
6 Connect an effect unit to the OUTPUT 3 and 4 jacks, and only the sound of the ACC1 part will be sent to the effect unit.
Changing the chord input areaMost arrangements place the split point at the C note of the middle octave (C4). The area to the right of the split point will play the Main KBD part or the Sub KBD part, and the area to the left of the split point will play the Lower KBD part.
The split point also determines the area in which chords will be detected. In the keyboard diagram that appears in the Lower KBD–Main KBD pages, as shown below, the area in which the black and white keys are inverted is the area in which chord input is detected.
3
2
Serial Sub Parallel Sub
Area for chord detection
Keyboard display
STEP
3
Edi
Most arrangements of banks A and B (preset banks) are created with the intent that you will play the melody on the notes to the right of C4, and play chords in the notes to the left.However, if you wish to change the split point, use the following procedure.
1 In Arrangement Play mode, press the EXIT key.
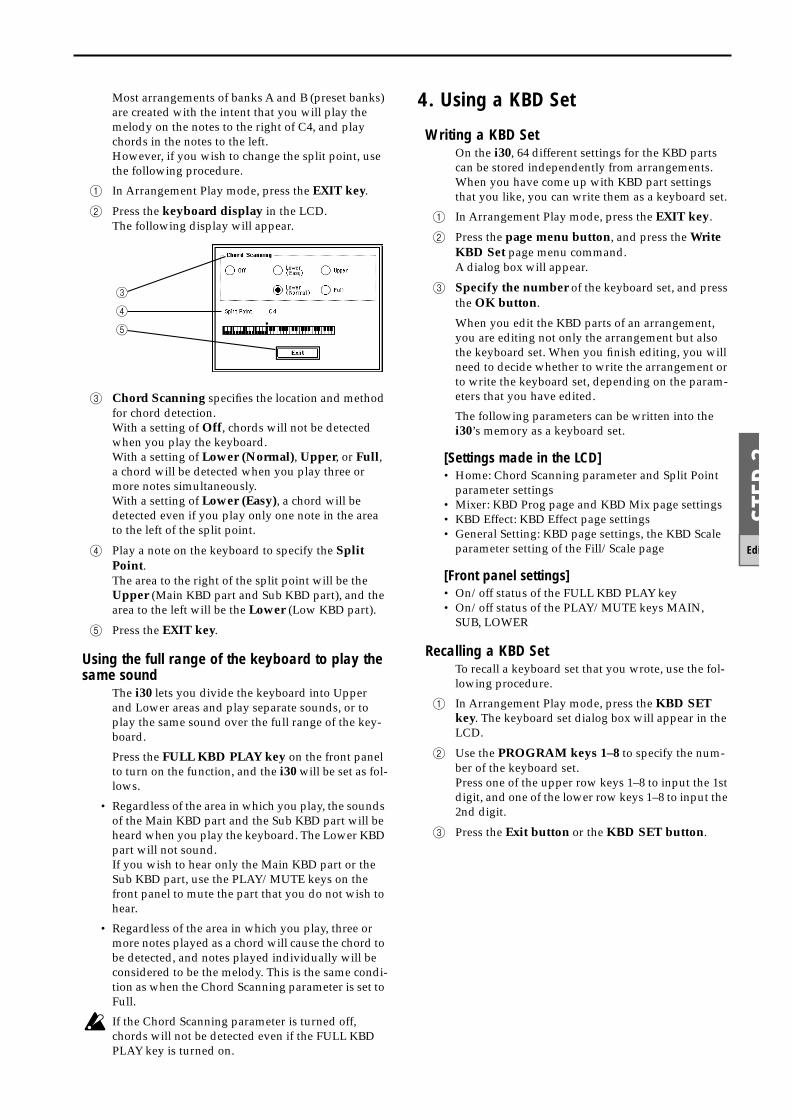
2 Press the keyboard display in the LCD.The following display will appear.
3 Chord Scanning specifies the location and method for chord detection.With a setting of Off, chords will not be detected when you play the keyboard.With a setting of Lower (Normal), Upper, or Full, a chord will be detected when you play three or more notes simultaneously.With a setting of Lower (Easy), a chord will be detected even if you play only one note in the area to the left of the split point.
4 Play a note on the keyboard to specify the Split Point.The area to the right of the split point will be the Upper (Main KBD part and Sub KBD part), and the area to the left will be the Lower (Low KBD part).
5 Press the EXIT key.
Using the full range of the keyboard to play the same sound
The i30 lets you divide the keyboard into Upper and Lower areas and play separate sounds, or to play the same sound over the full range of the key-board.
Press the FULL KBD PLAY key on the front panel to turn on the function, and the i30 will be set as fol-lows.
• Regardless of the area in which you play, the sounds of the Main KBD part and the Sub KBD part will be heard when you play the keyboard. The Lower KBD part will not sound.If you wish to hear only the Main KBD part or the Sub KBD part, use the PLAY/MUTE keys on the front panel to mute the part that you do not wish to hear.
• Regardless of the area in which you play, three or more notes played as a chord will cause the chord to be detected, and notes played individually will be considered to be the melody. This is the same condi-tion as when the Chord Scanning parameter is set to Full.
If the Chord Scanning parameter is turned off, chords will not be detected even if the FULL KBD PLAY key is turned on.
4. Using a KBD Set
Writing a KBD SetOn the i30, 64 different settings for the KBD parts can be stored independently from arrangements. When you have come up with KBD part settings that you like, you can write them as a keyboard set.
1 In Arrangement Play mode, press the EXIT key.
2 Press the page menu button, and press the Write KBD Set page menu command.A dialog box will appear.
3 Specify the number of the keyboard set, and press the OK button.
When you edit the KBD parts of an arrangement, you are editing not only the arrangement but also the keyboard set. When you finish editing, you will need to decide whether to write the arrangement or to write the keyboard set, depending on the param-eters that you have edited.
The following parameters can be written into the i30’s memory as a keyboard set.
[Settings made in the LCD]• Home: Chord Scanning parameter and Split Point
parameter settings• Mixer: KBD Prog page and KBD Mix page settings• KBD Effect: KBD Effect page settings• General Setting: KBD page settings, the KBD Scale
parameter setting of the Fill/Scale page
[Front panel settings]• On/off status of the FULL KBD PLAY key• On/off status of the PLAY/MUTE keys MAIN,
SUB, LOWER
Recalling a KBD SetTo recall a keyboard set that you wrote, use the fol-lowing procedure.
1 In Arrangement Play mode, press the KBD SET key. The keyboard set dialog box will appear in the LCD.
2 Use the PROGRAM keys 1–8 to specify the num-ber of the keyboard set.Press one of the upper row keys 1–8 to input the 1st digit, and one of the lower row keys 1–8 to input the 2nd digit.
3 Press the Exit button or the KBD SET button.
3
4
5
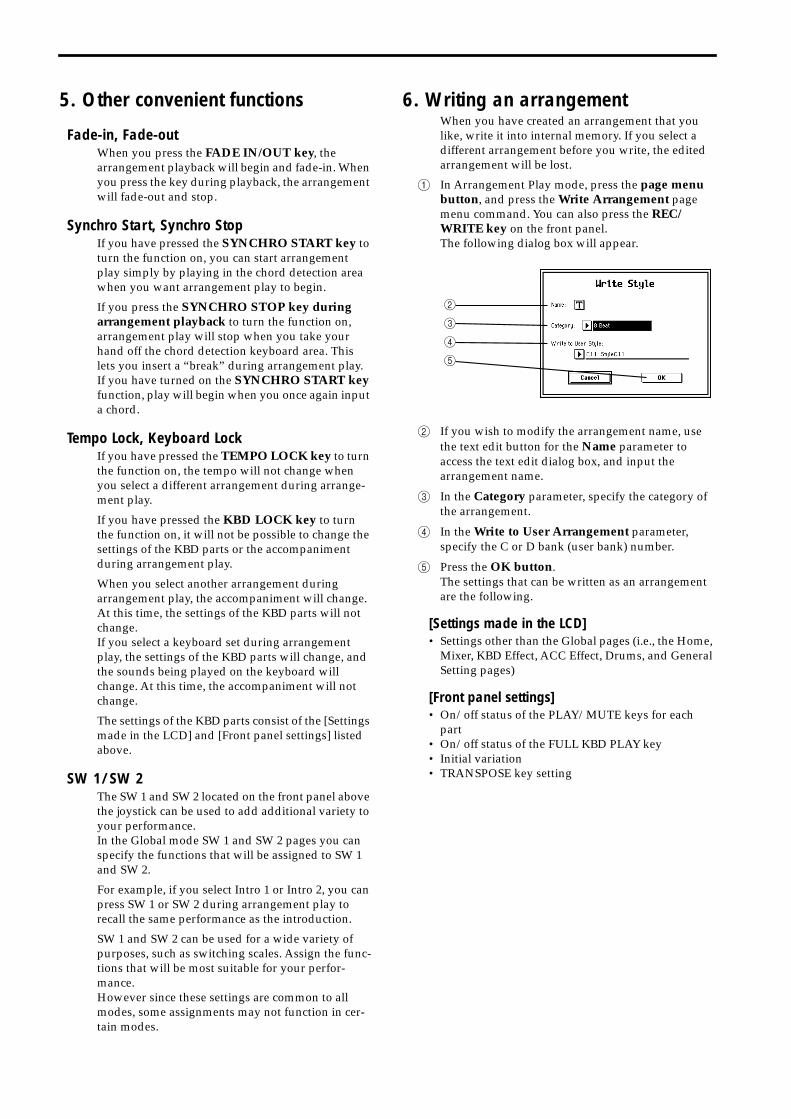
5. Other convenient functions
Fade-in, Fade-outWhen you press the FADE IN/OUT key, the arrangement playback will begin and fade-in. When you press the key during playback, the arrangement will fade-out and stop.
Synchro Start, Synchro StopIf you have pressed the SYNCHRO START key to turn the function on, you can start arrangement play simply by playing in the chord detection area when you want arrangement play to begin.
If you press the SYNCHRO STOP key during arrangement playback to turn the function on, arrangement play will stop when you take your hand off the chord detection keyboard area. This lets you insert a “break” during arrangement play.If you have turned on the SYNCHRO START key function, play will begin when you once again input a chord.
Tempo Lock, Keyboard LockIf you have pressed the TEMPO LOCK key to turn the function on, the tempo will not change when you select a different arrangement during arrange-ment play.
If you have pressed the KBD LOCK key to turn the function on, it will not be possible to change the settings of the KBD parts or the accompaniment during arrangement play.
When you select another arrangement during arrangement play, the accompaniment will change. At this time, the settings of the KBD parts will not change.If you select a keyboard set during arrangement play, the settings of the KBD parts will change, and the sounds being played on the keyboard will change. At this time, the accompaniment will not change.
The settings of the KBD parts consist of the [Settings made in the LCD] and [Front panel settings] listed above.
SW 1/SW 2The SW 1 and SW 2 located on the front panel above the joystick can be used to add additional variety to your performance.In the Global mode SW 1 and SW 2 pages you can specify the functions that will be assigned to SW 1 and SW 2.
For example, if you select Intro 1 or Intro 2, you can press SW 1 or SW 2 during arrangement play to recall the same performance as the introduction.
SW 1 and SW 2 can be used for a wide variety of purposes, such as switching scales. Assign the func-tions that will be most suitable for your perfor-mance.However since these settings are common to all modes, some assignments may not function in cer-tain modes.
6. Writing an arrangementWhen you have created an arrangement that you like, write it into internal memory. If you select a different arrangement before you write, the edited arrangement will be lost.
1 In Arrangement Play mode, press the page menu button, and press the Write Arrangement page menu command. You can also press the REC/WRITE key on the front panel.The following dialog box will appear.
2 If you wish to modify the arrangement name, use the text edit button for the Name parameter to access the text edit dialog box, and input the arrangement name.
3 In the Category parameter, specify the category of the arrangement.
4 In the Write to User Arrangement parameter, specify the C or D bank (user bank) number.
5 Press the OK button.The settings that can be written as an arrangement are the following.
[Settings made in the LCD]• Settings other than the Global pages (i.e., the Home,
Mixer, KBD Effect, ACC Effect, Drums, and General Setting pages)
[Front panel settings]• On/off status of the PLAY/MUTE keys for each
part• On/off status of the FULL KBD PLAY key• Initial variation• TRANSPOSE key setting
2
3
4
5
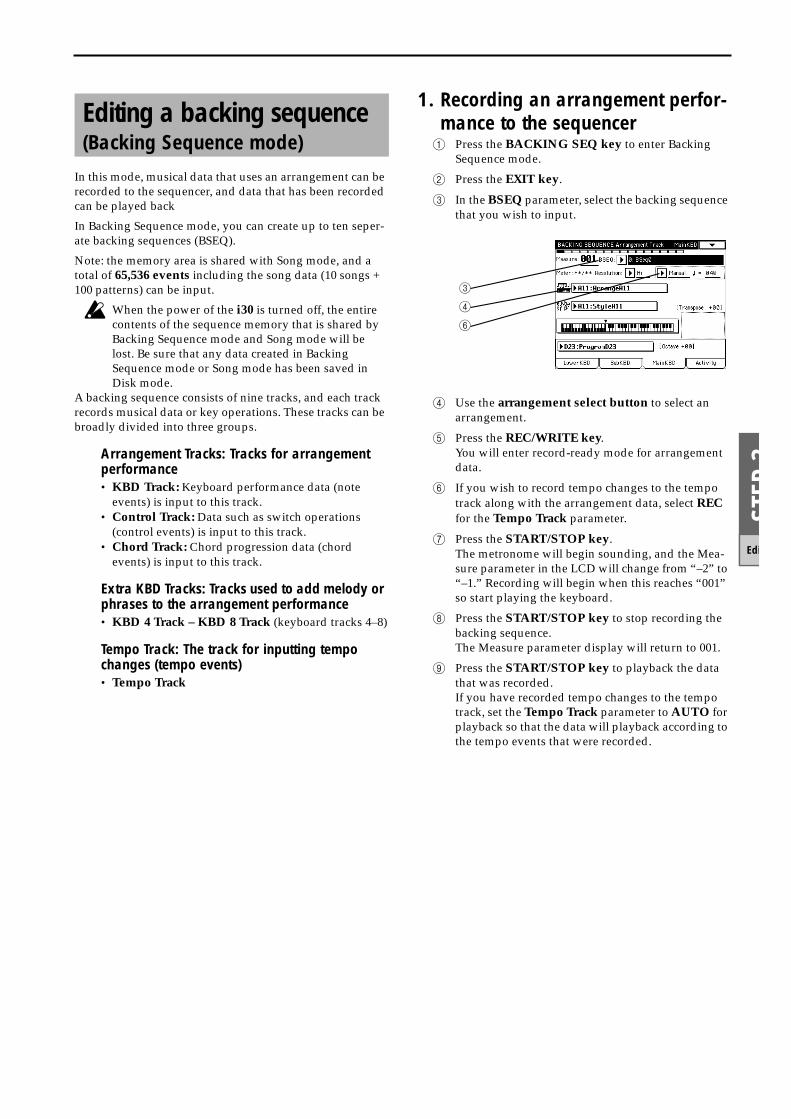
STEP
3
Edi
In this mode, musical data that uses an arrangement can be recorded to the sequencer, and data that has been recorded can be played back
In Backing Sequence mode, you can create up to ten seper-ate backing sequences (BSEQ).
Note: the memory area is shared with Song mode, and a total of 65,536 events including the song data (10 songs + 100 patterns) can be input.
When the power of the i30 is turned off, the entire contents of the sequence memory that is shared by Backing Sequence mode and Song mode will be lost. Be sure that any data created in Backing Sequence mode or Song mode has been saved in Disk mode.
A backing sequence consists of nine tracks, and each track records musical data or key operations. These tracks can be broadly divided into three groups.
Arrangement Tracks: Tracks for arrangement performance• KBD Track: Keyboard performance data (note
events) is input to this track.• Control Track: Data such as switch operations
(control events) is input to this track.• Chord Track: Chord progression data (chord
events) is input to this track.
Extra KBD Tracks: Tracks used to add melody or phrases to the arrangement performance• KBD 4 Track – KBD 8 Track (keyboard tracks 4–8)
Tempo Track: The track for inputting tempo changes (tempo events)• Tempo Track
1. Recording an arrangement perfor-mance to the sequencer1 Press the BACKING SEQ key to enter Backing
Sequence mode.
2 Press the EXIT key.
3 In the BSEQ parameter, select the backing sequence that you wish to input.
4 Use the arrangement select button to select an arrangement.
5 Press the REC/WRITE key.You will enter record-ready mode for arrangement data.
6 If you wish to record tempo changes to the tempo track along with the arrangement data, select REC for the Tempo Track parameter.
7 Press the START/STOP key.The metronome will begin sounding, and the Mea-sure parameter in the LCD will change from “–2” to “–1.” Recording will begin when this reaches “001” so start playing the keyboard.
8 Press the START/STOP key to stop recording the backing sequence.The Measure parameter display will return to 001.
9 Press the START/STOP key to playback the data that was recorded.If you have recorded tempo changes to the tempo track, set the Tempo Track parameter to AUTO for playback so that the data will playback according to the tempo events that were recorded.
Editing a backing sequence(Backing Sequence mode)
3
4
6
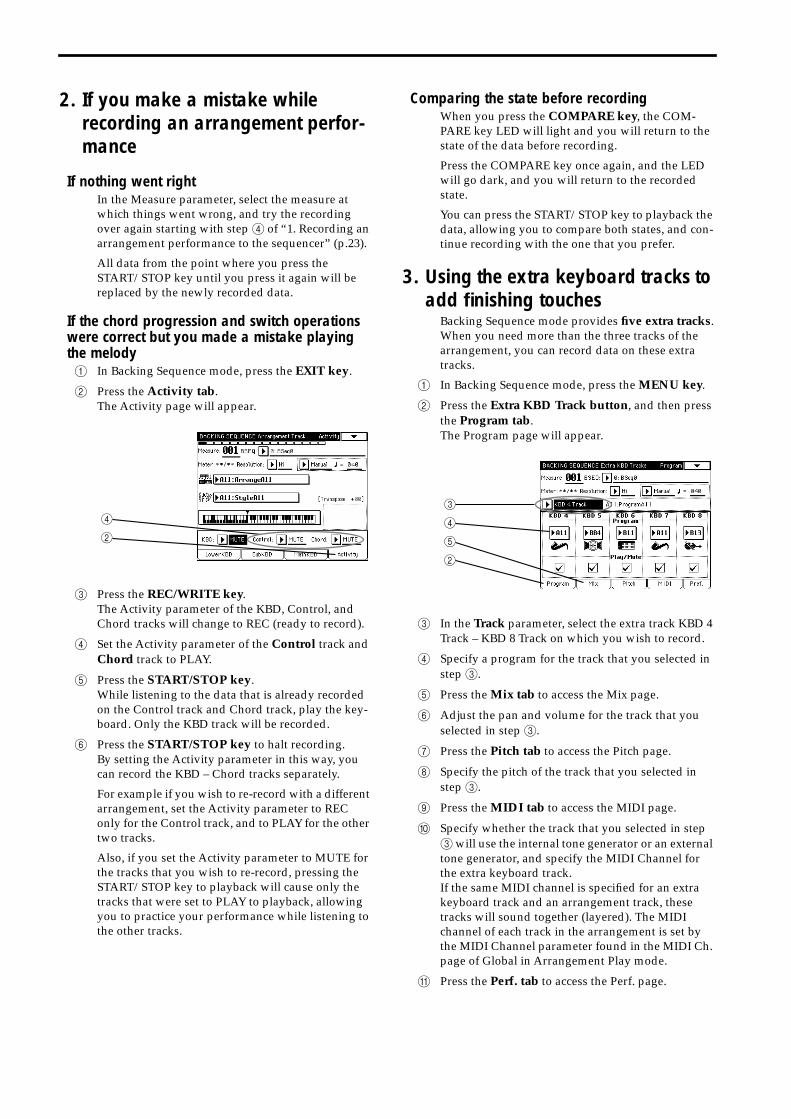
2. If you make a mistake while recording an arrangement perfor-mance
If nothing went rightIn the Measure parameter, select the measure at which things went wrong, and try the recording over again starting with step 4 of “1. Recording an arrangement performance to the sequencer” (p.23).
All data from the point where you press the START/STOP key until you press it again will be replaced by the newly recorded data.
If the chord progression and switch operations were correct but you made a mistake playing the melody1 In Backing Sequence mode, press the EXIT key.
2 Press the Activity tab.The Activity page will appear.
3 Press the REC/WRITE key.The Activity parameter of the KBD, Control, and Chord tracks will change to REC (ready to record).
4 Set the Activity parameter of the Control track and Chord track to PLAY.
5 Press the START/STOP key.While listening to the data that is already recorded on the Control track and Chord track, play the key-board. Only the KBD track will be recorded.
6 Press the START/STOP key to halt recording.By setting the Activity parameter in this way, you can record the KBD – Chord tracks separately.
For example if you wish to re-record with a different arrangement, set the Activity parameter to REC only for the Control track, and to PLAY for the other two tracks.
Also, if you set the Activity parameter to MUTE for the tracks that you wish to re-record, pressing the START/STOP key to playback will cause only the tracks that were set to PLAY to playback, allowing you to practice your performance while listening to the other tracks.
Comparing the state before recordingWhen you press the COMPARE key, the COM-PARE key LED will light and you will return to the state of the data before recording.
Press the COMPARE key once again, and the LED will go dark, and you will return to the recorded state.
You can press the START/STOP key to playback the data, allowing you to compare both states, and con-tinue recording with the one that you prefer.
3. Using the extra keyboard tracks to add finishing touches
Backing Sequence mode provides five extra tracks.When you need more than the three tracks of the arrangement, you can record data on these extra tracks.
1 In Backing Sequence mode, press the MENU key.
2 Press the Extra KBD Track button, and then press the Program tab.The Program page will appear.
3 In the Track parameter, select the extra track KBD 4 Track – KBD 8 Track on which you wish to record.
4 Specify a program for the track that you selected in step 3.
5 Press the Mix tab to access the Mix page.
6 Adjust the pan and volume for the track that you selected in step 3.
7 Press the Pitch tab to access the Pitch page.
8 Specify the pitch of the track that you selected in step 3.
9 Press the MIDI tab to access the MIDI page.
0 Specify whether the track that you selected in step 3 will use the internal tone generator or an external tone generator, and specify the MIDI Channel for the extra keyboard track.If the same MIDI channel is specified for an extra keyboard track and an arrangement track, these tracks will sound together (layered). The MIDI channel of each track in the arrangement is set by the MIDI Channel parameter found in the MIDI Ch. page of Global in Arrangement Play mode.
A Press the Perf. tab to access the Perf. page.
4
2
3
4
5
2
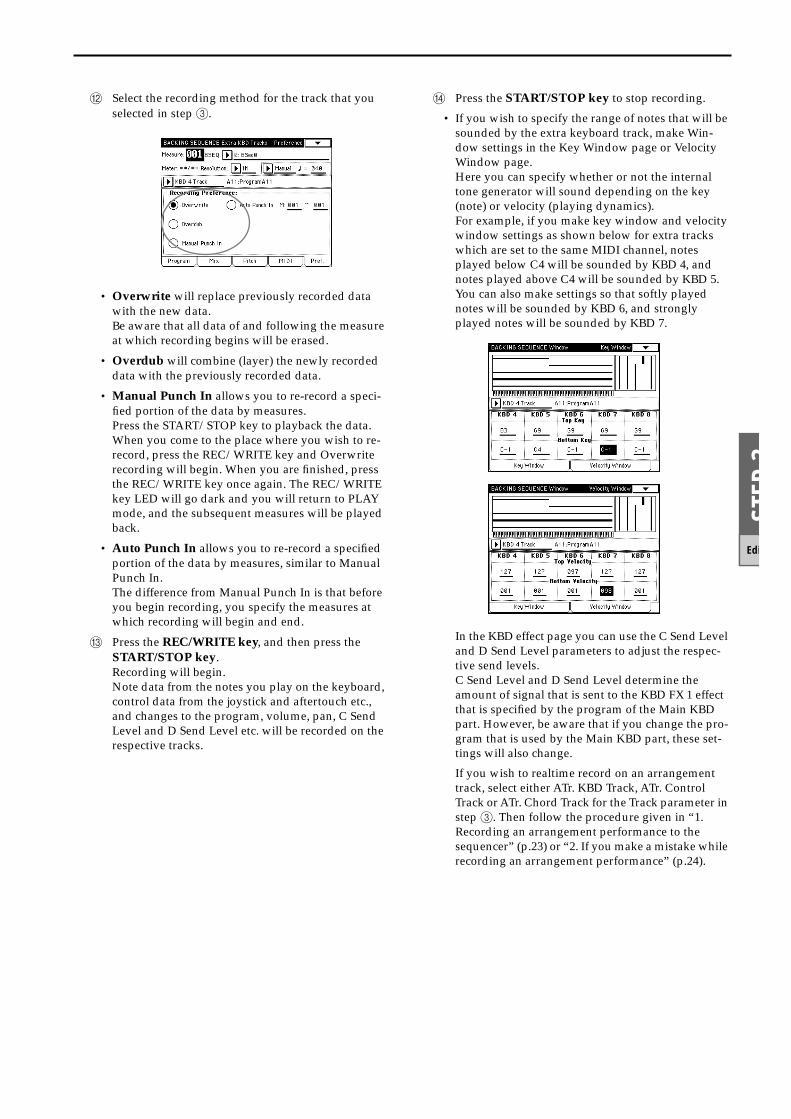
STEP
3
Edi
B Select the recording method for the track that you selected in step 3.
• Overwrite will replace previously recorded data with the new data.Be aware that all data of and following the measure at which recording begins will be erased.
• Overdub will combine (layer) the newly recorded data with the previously recorded data.
• Manual Punch In allows you to re-record a speci-fied portion of the data by measures.Press the START/STOP key to playback the data. When you come to the place where you wish to re-record, press the REC/WRITE key and Overwrite recording will begin. When you are finished, press the REC/WRITE key once again. The REC/WRITE key LED will go dark and you will return to PLAY mode, and the subsequent measures will be played back.
• Auto Punch In allows you to re-record a specified portion of the data by measures, similar to Manual Punch In.The difference from Manual Punch In is that before you begin recording, you specify the measures at which recording will begin and end.
C Press the REC/WRITE key, and then press the START/STOP key.Recording will begin.Note data from the notes you play on the keyboard, control data from the joystick and aftertouch etc., and changes to the program, volume, pan, C Send Level and D Send Level etc. will be recorded on the respective tracks.
D Press the START/STOP key to stop recording.
• If you wish to specify the range of notes that will be sounded by the extra keyboard track, make Win-dow settings in the Key Window page or Velocity Window page.Here you can specify whether or not the internal tone generator will sound depending on the key (note) or velocity (playing dynamics).For example, if you make key window and velocity window settings as shown below for extra tracks which are set to the same MIDI channel, notes played below C4 will be sounded by KBD 4, and notes played above C4 will be sounded by KBD 5. You can also make settings so that softly played notes will be sounded by KBD 6, and strongly played notes will be sounded by KBD 7.
In the KBD effect page you can use the C Send Level and D Send Level parameters to adjust the respec-tive send levels.C Send Level and D Send Level determine the amount of signal that is sent to the KBD FX 1 effect that is specified by the program of the Main KBD part. However, be aware that if you change the pro-gram that is used by the Main KBD part, these set-tings will also change.
If you wish to realtime record on an arrangement track, select either ATr. KBD Track, ATr. Control Track or ATr. Chord Track for the Track parameter in step 3. Then follow the procedure given in “1. Recording an arrangement performance to the sequencer” (p.23) or “2. If you make a mistake while recording an arrangement performance” (p.24).
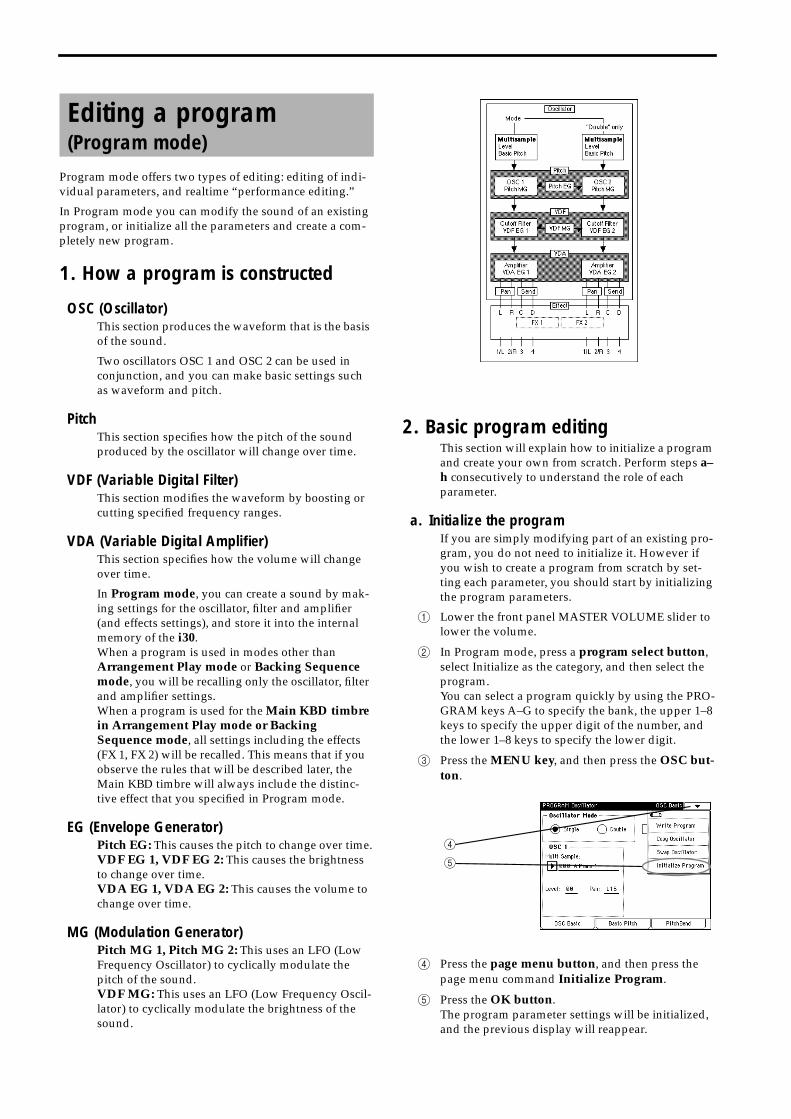
Program mode offers two types of editing: editing of indi-vidual parameters, and realtime “performance editing.”
In Program mode you can modify the sound of an existing program, or initialize all the parameters and create a com-pletely new program.
1. How a program is constructed
OSC (Oscillator)This section produces the waveform that is the basis of the sound.
Two oscillators OSC 1 and OSC 2 can be used in conjunction, and you can make basic settings such as waveform and pitch.
PitchThis section specifies how the pitch of the sound produced by the oscillator will change over time.
VDF (Variable Digital Filter)This section modifies the waveform by boosting or cutting specified frequency ranges.
VDA (Variable Digital Amplifier)This section specifies how the volume will change over time.
In Program mode, you can create a sound by mak-ing settings for the oscillator, filter and amplifier (and effects settings), and store it into the internal memory of the i30.When a program is used in modes other than Arrangement Play mode or Backing Sequence mode, you will be recalling only the oscillator, filter and amplifier settings.When a program is used for the Main KBD timbre in Arrangement Play mode or Backing Sequence mode, all settings including the effects (FX 1, FX 2) will be recalled. This means that if you observe the rules that will be described later, the Main KBD timbre will always include the distinc-tive effect that you specified in Program mode.
EG (Envelope Generator)Pitch EG: This causes the pitch to change over time.VDF EG 1, VDF EG 2: This causes the brightness to change over time.VDA EG 1, VDA EG 2: This causes the volume to change over time.
MG (Modulation Generator)Pitch MG 1, Pitch MG 2: This uses an LFO (Low Frequency Oscillator) to cyclically modulate the pitch of the sound.VDF MG: This uses an LFO (Low Frequency Oscil-lator) to cyclically modulate the brightness of the sound.
2. Basic program editingThis section will explain how to initialize a program and create your own from scratch. Perform steps a–h consecutively to understand the role of each parameter.
a. Initialize the programIf you are simply modifying part of an existing pro-gram, you do not need to initialize it. However if you wish to create a program from scratch by set-ting each parameter, you should start by initializing the program parameters.
1 Lower the front panel MASTER VOLUME slider to lower the volume.
2 In Program mode, press a program select button, select Initialize as the category, and then select the program.You can select a program quickly by using the PRO-GRAM keys A–G to specify the bank, the upper 1–8 keys to specify the upper digit of the number, and the lower 1–8 keys to specify the lower digit.
3 Press the MENU key, and then press the OSC but-ton.
4 Press the page menu button, and then press the page menu command Initialize Program.
5 Press the OK button.The program parameter settings will be initialized, and the previous display will reappear.
Editing a program(Program mode)
4
5
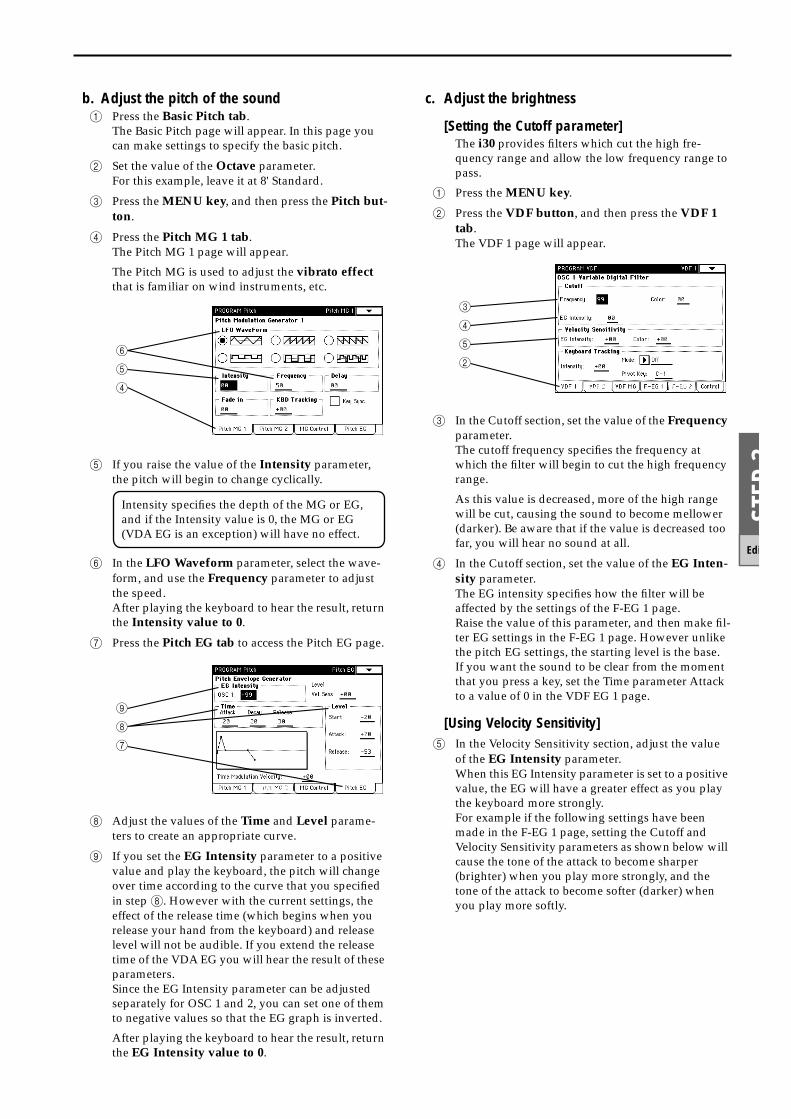
STEP
3
Edi
b. Adjust the pitch of the sound1 Press the Basic Pitch tab.
The Basic Pitch page will appear. In this page you can make settings to specify the basic pitch.
2 Set the value of the Octave parameter.For this example, leave it at 8' Standard.
3 Press the MENU key, and then press the Pitch but-ton.
4 Press the Pitch MG 1 tab.The Pitch MG 1 page will appear.
The Pitch MG is used to adjust the vibrato effect that is familiar on wind instruments, etc.
5 If you raise the value of the Intensity parameter, the pitch will begin to change cyclically.
6 In the LFO Waveform parameter, select the wave-form, and use the Frequency parameter to adjust the speed.After playing the keyboard to hear the result, return the Intensity value to 0.
7 Press the Pitch EG tab to access the Pitch EG page.
8 Adjust the values of the Time and Level parame-ters to create an appropriate curve.
9 If you set the EG Intensity parameter to a positive value and play the keyboard, the pitch will change over time according to the curve that you specified in step 8. However with the current settings, the effect of the release time (which begins when you release your hand from the keyboard) and release level will not be audible. If you extend the release time of the VDA EG you will hear the result of these parameters.Since the EG Intensity parameter can be adjusted separately for OSC 1 and 2, you can set one of them to negative values so that the EG graph is inverted.
After playing the keyboard to hear the result, return the EG Intensity value to 0.
c. Adjust the brightness
[Setting the Cutoff parameter]The i30 provides filters which cut the high fre-quency range and allow the low frequency range to pass.
1 Press the MENU key.
2 Press the VDF button, and then press the VDF 1 tab.The VDF 1 page will appear.
3 In the Cutoff section, set the value of the Frequency parameter.The cutoff frequency specifies the frequency at which the filter will begin to cut the high frequency range.
As this value is decreased, more of the high range will be cut, causing the sound to become mellower (darker). Be aware that if the value is decreased too far, you will hear no sound at all.
4 In the Cutoff section, set the value of the EG Inten-sity parameter.The EG intensity specifies how the filter will be affected by the settings of the F-EG 1 page.Raise the value of this parameter, and then make fil-ter EG settings in the F-EG 1 page. However unlike the pitch EG settings, the starting level is the base.If you want the sound to be clear from the moment that you press a key, set the Time parameter Attack to a value of 0 in the VDF EG 1 page.
[Using Velocity Sensitivity]5 In the Velocity Sensitivity section, adjust the value
of the EG Intensity parameter.When this EG Intensity parameter is set to a positive value, the EG will have a greater effect as you play the keyboard more strongly.For example if the following settings have been made in the F-EG 1 page, setting the Cutoff and Velocity Sensitivity parameters as shown below will cause the tone of the attack to become sharper (brighter) when you play more strongly, and the tone of the attack to become softer (darker) when you play more softly.
6
5
4
Intensity specifies the depth of the MG or EG, and if the Intensity value is 0, the MG or EG (VDA EG is an exception) will have no effect.
9
8
7
3
4
5
2
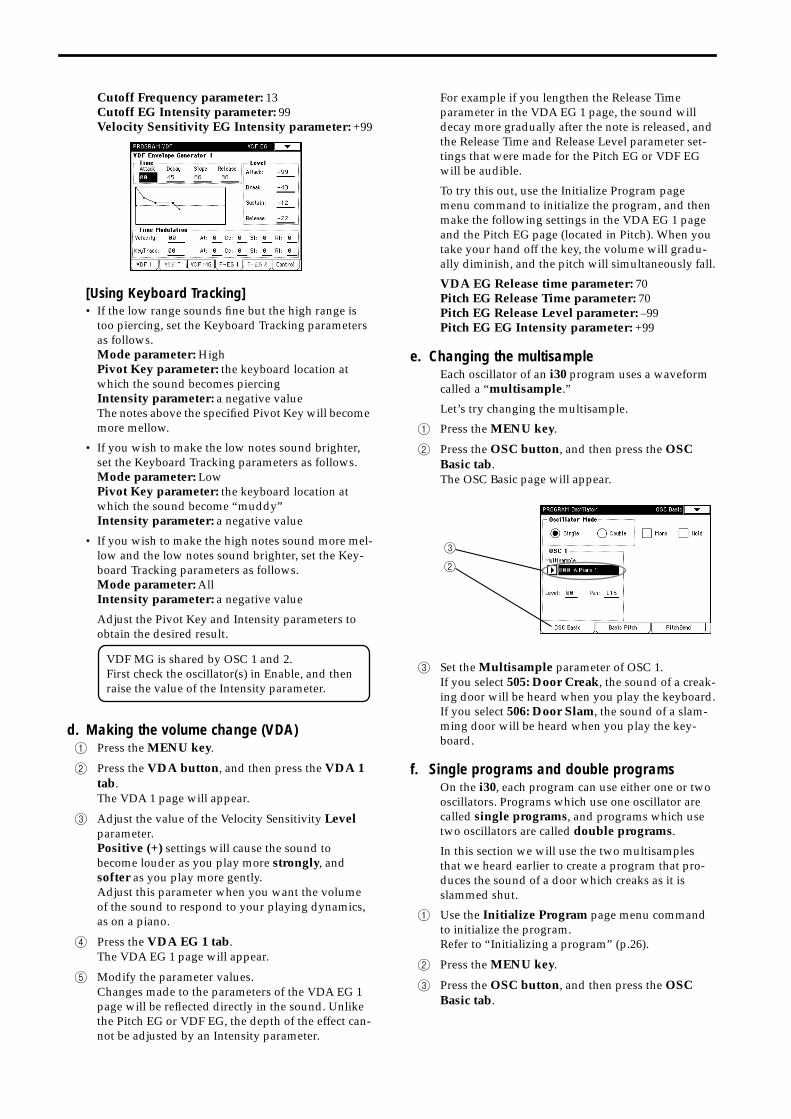
Cutoff Frequency parameter: 13Cutoff EG Intensity parameter: 99Velocity Sensitivity EG Intensity parameter: +99
[Using Keyboard Tracking]• If the low range sounds fine but the high range is
too piercing, set the Keyboard Tracking parameters as follows.Mode parameter: HighPivot Key parameter: the keyboard location at which the sound becomes piercing Intensity parameter: a negative valueThe notes above the specified Pivot Key will become more mellow.
• If you wish to make the low notes sound brighter, set the Keyboard Tracking parameters as follows.Mode parameter: LowPivot Key parameter: the keyboard location at which the sound become “muddy”Intensity parameter: a negative value
• If you wish to make the high notes sound more mel-low and the low notes sound brighter, set the Key-board Tracking parameters as follows.Mode parameter: AllIntensity parameter: a negative value
Adjust the Pivot Key and Intensity parameters to obtain the desired result.
d. Making the volume change (VDA)1 Press the MENU key.
2 Press the VDA button, and then press the VDA 1 tab.The VDA 1 page will appear.
3 Adjust the value of the Velocity Sensitivity Level parameter.Positive (+) settings will cause the sound to become louder as you play more strongly, and softer as you play more gently.Adjust this parameter when you want the volume of the sound to respond to your playing dynamics, as on a piano.
4 Press the VDA EG 1 tab.The VDA EG 1 page will appear.
5 Modify the parameter values.Changes made to the parameters of the VDA EG 1 page will be reflected directly in the sound. Unlike the Pitch EG or VDF EG, the depth of the effect can-not be adjusted by an Intensity parameter.
For example if you lengthen the Release Time parameter in the VDA EG 1 page, the sound will decay more gradually after the note is released, and the Release Time and Release Level parameter set-tings that were made for the Pitch EG or VDF EG will be audible.
To try this out, use the Initialize Program page menu command to initialize the program, and then make the following settings in the VDA EG 1 page and the Pitch EG page (located in Pitch). When you take your hand off the key, the volume will gradu-ally diminish, and the pitch will simultaneously fall.
VDA EG Release time parameter: 70Pitch EG Release Time parameter: 70Pitch EG Release Level parameter: –99Pitch EG EG Intensity parameter: +99
e. Changing the multisampleEach oscillator of an i30 program uses a waveform called a “multisample.”
Let’s try changing the multisample.
1 Press the MENU key.
2 Press the OSC button, and then press the OSC Basic tab.The OSC Basic page will appear.
3 Set the Multisample parameter of OSC 1.If you select 505: Door Creak, the sound of a creak-ing door will be heard when you play the keyboard.If you select 506: Door Slam, the sound of a slam-ming door will be heard when you play the key-board.
f. Single programs and double programsOn the i30, each program can use either one or two oscillators. Programs which use one oscillator are called single programs, and programs which use two oscillators are called double programs.
In this section we will use the two multisamples that we heard earlier to create a program that pro-duces the sound of a door which creaks as it is slammed shut.
1 Use the Initialize Program page menu command to initialize the program.Refer to “Initializing a program” (p.26).
2 Press the MENU key.
3 Press the OSC button, and then press the OSC Basic tab.
VDF MG is shared by OSC 1 and 2.First check the oscillator(s) in Enable, and then raise the value of the Intensity parameter.
3
2
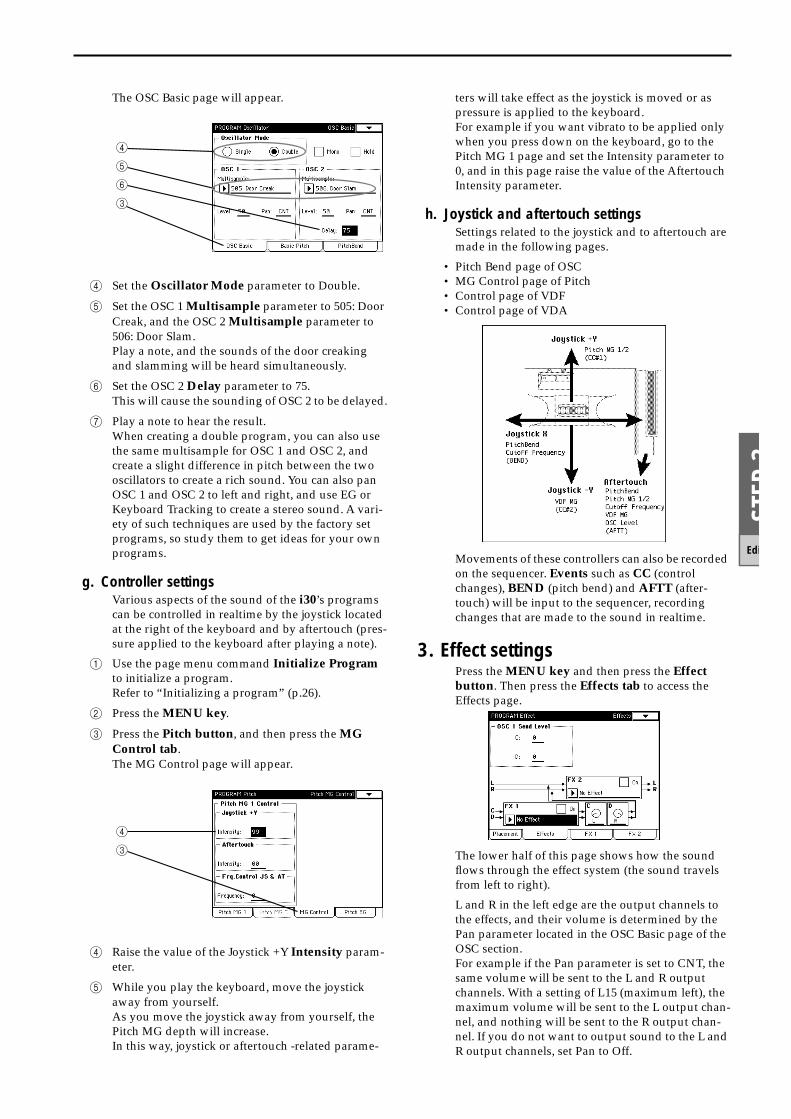
STEP
3
Edi
The OSC Basic page will appear.
4 Set the Oscillator Mode parameter to Double.
5 Set the OSC 1 Multisample parameter to 505: Door Creak, and the OSC 2 Multisample parameter to 506: Door Slam.Play a note, and the sounds of the door creaking and slamming will be heard simultaneously.
6 Set the OSC 2 Delay parameter to 75.This will cause the sounding of OSC 2 to be delayed.
7 Play a note to hear the result.When creating a double program, you can also use the same multisample for OSC 1 and OSC 2, and create a slight difference in pitch between the two oscillators to create a rich sound. You can also pan OSC 1 and OSC 2 to left and right, and use EG or Keyboard Tracking to create a stereo sound. A vari-ety of such techniques are used by the factory set programs, so study them to get ideas for your own programs.
g. Controller settingsVarious aspects of the sound of the i30’s programs can be controlled in realtime by the joystick located at the right of the keyboard and by aftertouch (pres-sure applied to the keyboard after playing a note).
1 Use the page menu command Initialize Program to initialize a program.Refer to “Initializing a program” (p.26).
2 Press the MENU key.
3 Press the Pitch button, and then press the MG Control tab.The MG Control page will appear.
4 Raise the value of the Joystick +Y Intensity param-eter.
5 While you play the keyboard, move the joystick away from yourself.As you move the joystick away from yourself, the Pitch MG depth will increase.In this way, joystick or aftertouch -related parame-
ters will take effect as the joystick is moved or as pressure is applied to the keyboard.For example if you want vibrato to be applied only when you press down on the keyboard, go to the Pitch MG 1 page and set the Intensity parameter to 0, and in this page raise the value of the Aftertouch Intensity parameter.
h. Joystick and aftertouch settingsSettings related to the joystick and to aftertouch are made in the following pages.
• Pitch Bend page of OSC• MG Control page of Pitch• Control page of VDF• Control page of VDA
Movements of these controllers can also be recorded on the sequencer. Events such as CC (control changes), BEND (pitch bend) and AFTT (after-touch) will be input to the sequencer, recording changes that are made to the sound in realtime.
3. Effect settingsPress the MENU key and then press the Effect button. Then press the Effects tab to access the Effects page.
The lower half of this page shows how the sound flows through the effect system (the sound travels from left to right).
L and R in the left edge are the output channels to the effects, and their volume is determined by the Pan parameter located in the OSC Basic page of the OSC section.For example if the Pan parameter is set to CNT, the same volume will be sent to the L and R output channels. With a setting of L15 (maximum left), the maximum volume will be sent to the L output chan-nel, and nothing will be sent to the R output chan-nel. If you do not want to output sound to the L and R output channels, set Pan to Off.
4
5
6
3
4
3
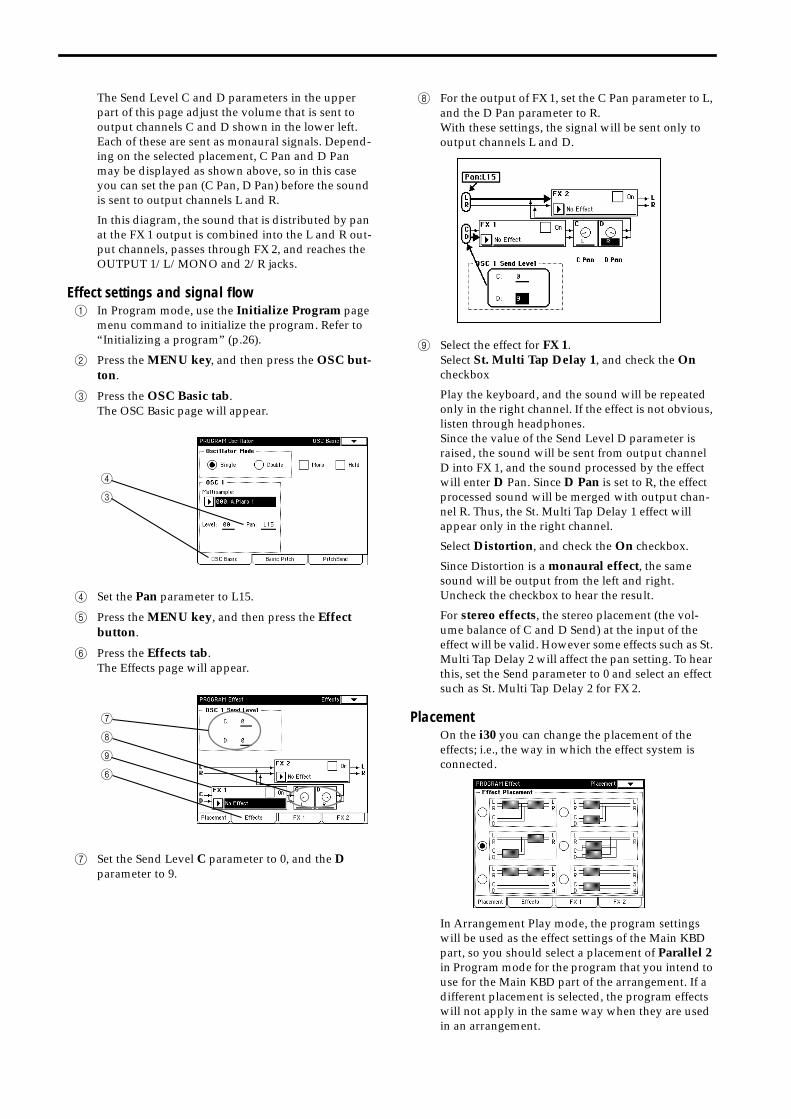
The Send Level C and D parameters in the upper part of this page adjust the volume that is sent to output channels C and D shown in the lower left. Each of these are sent as monaural signals. Depend-ing on the selected placement, C Pan and D Pan may be displayed as shown above, so in this case you can set the pan (C Pan, D Pan) before the sound is sent to output channels L and R.
In this diagram, the sound that is distributed by pan at the FX 1 output is combined into the L and R out-put channels, passes through FX 2, and reaches the OUTPUT 1/L/MONO and 2/R jacks.
Effect settings and signal flow1 In Program mode, use the Initialize Program page
menu command to initialize the program. Refer to “Initializing a program” (p.26).
2 Press the MENU key, and then press the OSC but-ton.
3 Press the OSC Basic tab.The OSC Basic page will appear.
4 Set the Pan parameter to L15.
5 Press the MENU key, and then press the Effect button.
6 Press the Effects tab.The Effects page will appear.
7 Set the Send Level C parameter to 0, and the D parameter to 9.
8 For the output of FX 1, set the C Pan parameter to L, and the D Pan parameter to R.With these settings, the signal will be sent only to output channels L and D.
9 Select the effect for FX 1.Select St. Multi Tap Delay 1, and check the On checkbox
Play the keyboard, and the sound will be repeated only in the right channel. If the effect is not obvious, listen through headphones.Since the value of the Send Level D parameter is raised, the sound will be sent from output channel D into FX 1, and the sound processed by the effect will enter D Pan. Since D Pan is set to R, the effect processed sound will be merged with output chan-nel R. Thus, the St. Multi Tap Delay 1 effect will appear only in the right channel.
Select Distortion, and check the On checkbox.
Since Distortion is a monaural effect, the same sound will be output from the left and right. Uncheck the checkbox to hear the result.
For stereo effects, the stereo placement (the vol-ume balance of C and D Send) at the input of the effect will be valid. However some effects such as St. Multi Tap Delay 2 will affect the pan setting. To hear this, set the Send parameter to 0 and select an effect such as St. Multi Tap Delay 2 for FX 2.
PlacementOn the i30 you can change the placement of the effects; i.e., the way in which the effect system is connected.
In Arrangement Play mode, the program settings will be used as the effect settings of the Main KBD part, so you should select a placement of Parallel 2 in Program mode for the program that you intend to use for the Main KBD part of the arrangement. If a different placement is selected, the program effects will not apply in the same way when they are used in an arrangement.
4
3
7
8
9
6
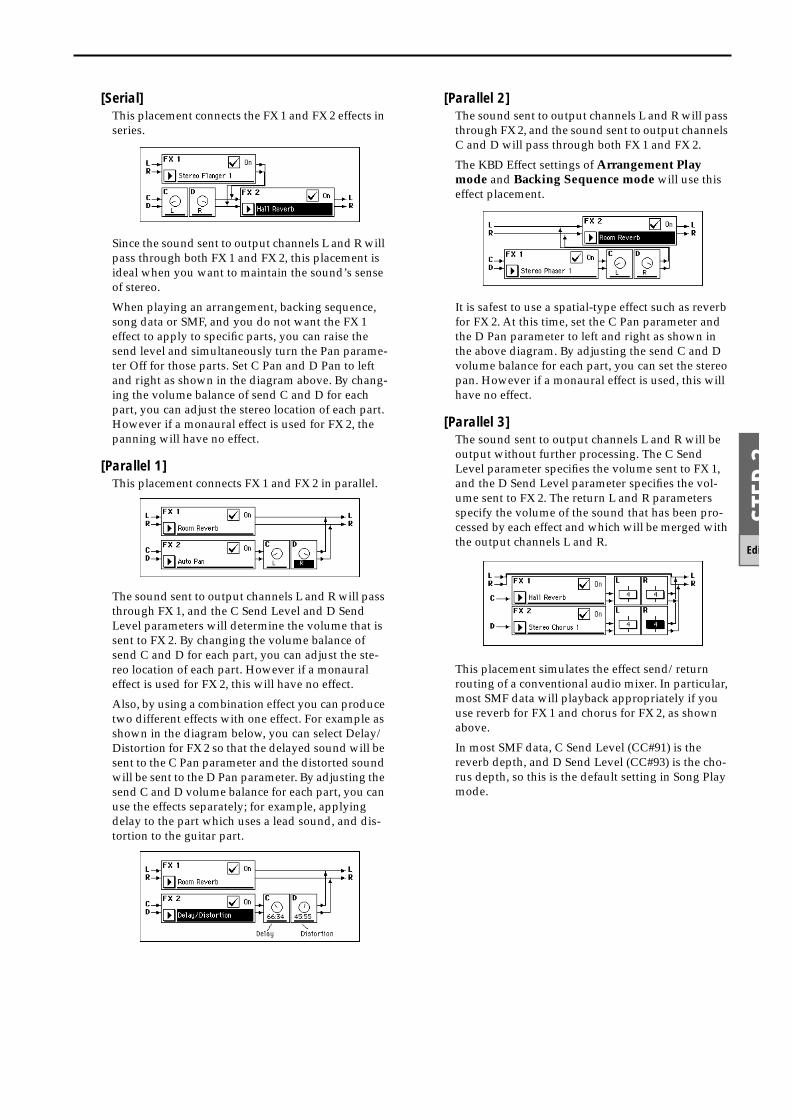
STEP
3
Edi
[Serial]This placement connects the FX 1 and FX 2 effects in series.
Since the sound sent to output channels L and R will pass through both FX 1 and FX 2, this placement is ideal when you want to maintain the sound’s sense of stereo.
When playing an arrangement, backing sequence, song data or SMF, and you do not want the FX 1 effect to apply to specific parts, you can raise the send level and simultaneously turn the Pan parame-ter Off for those parts. Set C Pan and D Pan to left and right as shown in the diagram above. By chang-ing the volume balance of send C and D for each part, you can adjust the stereo location of each part. However if a monaural effect is used for FX 2, the panning will have no effect.
[Parallel 1]This placement connects FX 1 and FX 2 in parallel.
The sound sent to output channels L and R will pass through FX 1, and the C Send Level and D Send Level parameters will determine the volume that is sent to FX 2. By changing the volume balance of send C and D for each part, you can adjust the ste-reo location of each part. However if a monaural effect is used for FX 2, this will have no effect.
Also, by using a combination effect you can produce two different effects with one effect. For example as shown in the diagram below, you can select Delay/Distortion for FX 2 so that the delayed sound will be sent to the C Pan parameter and the distorted sound will be sent to the D Pan parameter. By adjusting the send C and D volume balance for each part, you can use the effects separately; for example, applying delay to the part which uses a lead sound, and dis-tortion to the guitar part.
[Parallel 2]The sound sent to output channels L and R will pass through FX 2, and the sound sent to output channels C and D will pass through both FX 1 and FX 2.
The KBD Effect settings of Arrangement Play mode and Backing Sequence mode will use this effect placement.
It is safest to use a spatial-type effect such as reverb for FX 2. At this time, set the C Pan parameter and the D Pan parameter to left and right as shown in the above diagram. By adjusting the send C and D volume balance for each part, you can set the stereo pan. However if a monaural effect is used, this will have no effect.
[Parallel 3]The sound sent to output channels L and R will be output without further processing. The C Send Level parameter specifies the volume sent to FX 1, and the D Send Level parameter specifies the vol-ume sent to FX 2. The return L and R parameters specify the volume of the sound that has been pro-cessed by each effect and which will be merged with the output channels L and R.
This placement simulates the effect send/return routing of a conventional audio mixer. In particular, most SMF data will playback appropriately if you use reverb for FX 1 and chorus for FX 2, as shown above.
In most SMF data, C Send Level (CC#91) is the reverb depth, and D Send Level (CC#93) is the cho-rus depth, so this is the default setting in Song Play mode.
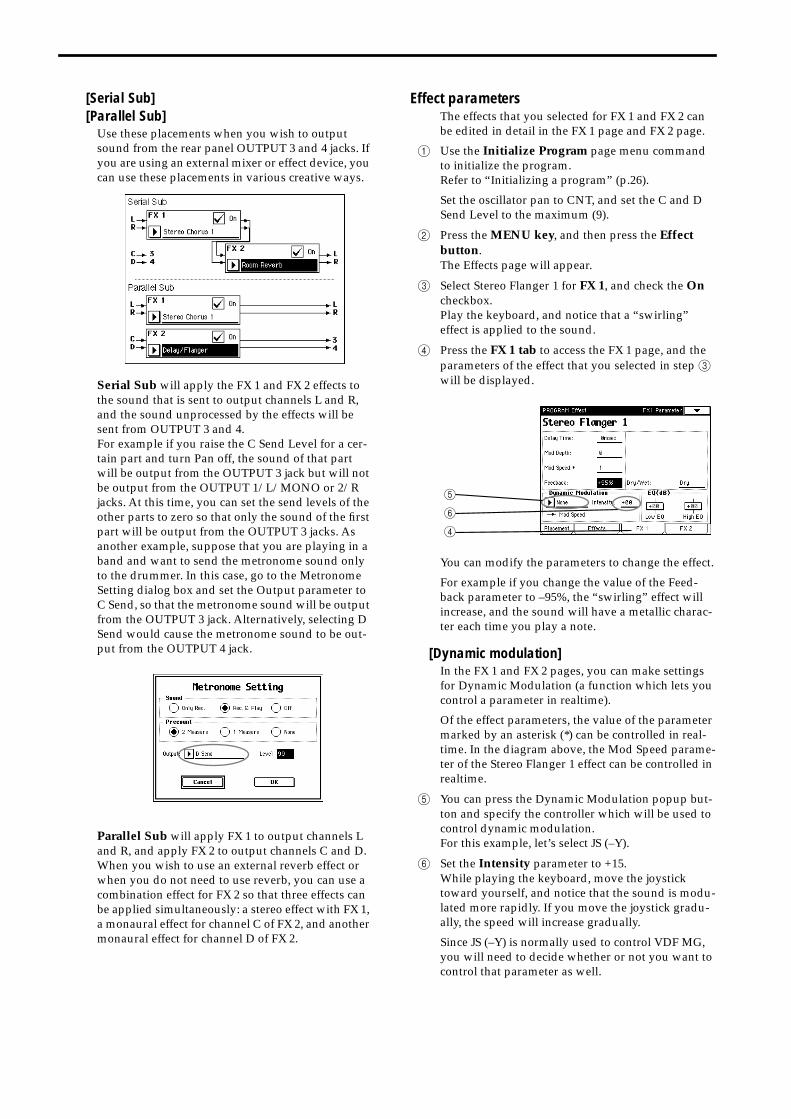
[Serial Sub][Parallel Sub]
Use these placements when you wish to output sound from the rear panel OUTPUT 3 and 4 jacks. If you are using an external mixer or effect device, you can use these placements in various creative ways.
Serial Sub will apply the FX 1 and FX 2 effects to the sound that is sent to output channels L and R, and the sound unprocessed by the effects will be sent from OUTPUT 3 and 4.For example if you raise the C Send Level for a cer-tain part and turn Pan off, the sound of that part will be output from the OUTPUT 3 jack but will not be output from the OUTPUT 1/L/MONO or 2/R jacks. At this time, you can set the send levels of the other parts to zero so that only the sound of the first part will be output from the OUTPUT 3 jacks. As another example, suppose that you are playing in a band and want to send the metronome sound only to the drummer. In this case, go to the Metronome Setting dialog box and set the Output parameter to C Send, so that the metronome sound will be output from the OUTPUT 3 jack. Alternatively, selecting D Send would cause the metronome sound to be out-put from the OUTPUT 4 jack.
Parallel Sub will apply FX 1 to output channels L and R, and apply FX 2 to output channels C and D. When you wish to use an external reverb effect or when you do not need to use reverb, you can use a combination effect for FX 2 so that three effects can be applied simultaneously: a stereo effect with FX 1, a monaural effect for channel C of FX 2, and another monaural effect for channel D of FX 2.
Effect parametersThe effects that you selected for FX 1 and FX 2 can be edited in detail in the FX 1 page and FX 2 page.
1 Use the Initialize Program page menu command to initialize the program.Refer to “Initializing a program” (p.26).
Set the oscillator pan to CNT, and set the C and D Send Level to the maximum (9).
2 Press the MENU key, and then press the Effect button.The Effects page will appear.
3 Select Stereo Flanger 1 for FX 1, and check the On checkbox.Play the keyboard, and notice that a “swirling” effect is applied to the sound.
4 Press the FX 1 tab to access the FX 1 page, and the parameters of the effect that you selected in step 3 will be displayed.
You can modify the parameters to change the effect.
For example if you change the value of the Feed-back parameter to –95%, the “swirling” effect will increase, and the sound will have a metallic charac-ter each time you play a note.
[Dynamic modulation]In the FX 1 and FX 2 pages, you can make settings for Dynamic Modulation (a function which lets you control a parameter in realtime).
Of the effect parameters, the value of the parameter marked by an asterisk (*) can be controlled in real-time. In the diagram above, the Mod Speed parame-ter of the Stereo Flanger 1 effect can be controlled in realtime.
5 You can press the Dynamic Modulation popup but-ton and specify the controller which will be used to control dynamic modulation.For this example, let’s select JS (–Y).
6 Set the Intensity parameter to +15.While playing the keyboard, move the joystick toward yourself, and notice that the sound is modu-lated more rapidly. If you move the joystick gradu-ally, the speed will increase gradually.
Since JS (–Y) is normally used to control VDF MG, you will need to decide whether or not you want to control that parameter as well.
5
6
4
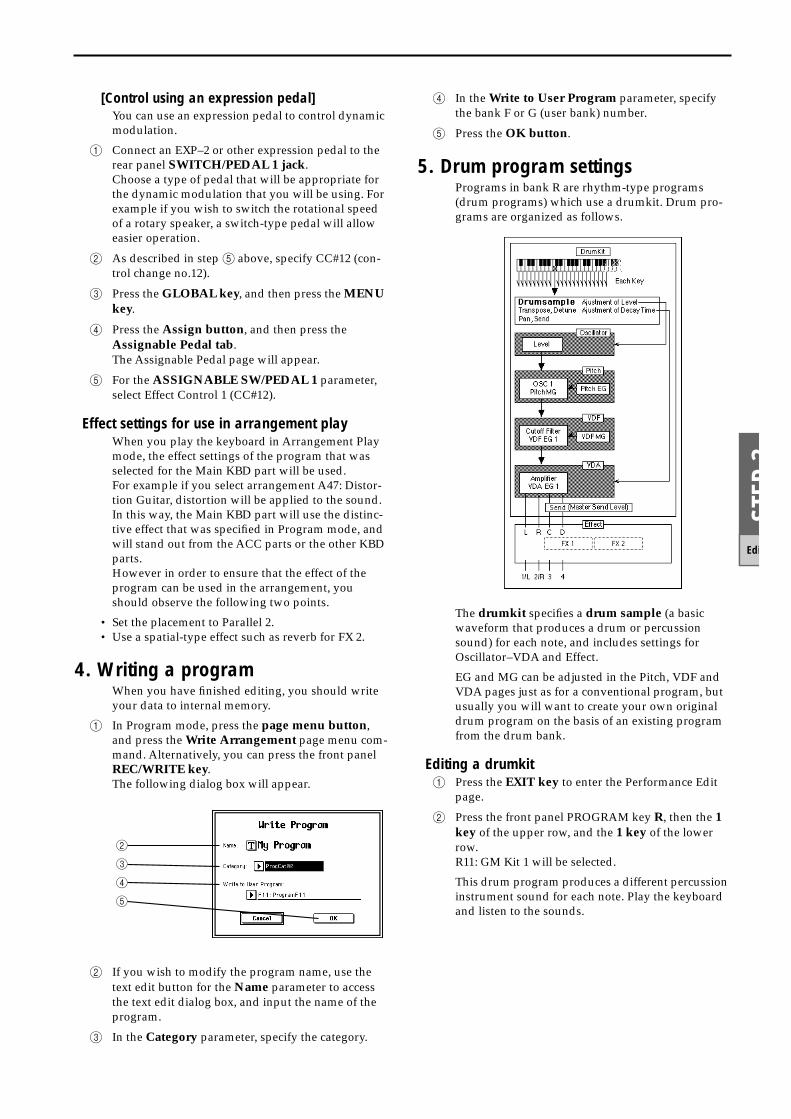
STEP
3
Edi
[Control using an expression pedal]You can use an expression pedal to control dynamic modulation.
1 Connect an EXP–2 or other expression pedal to the rear panel SWITCH/PEDAL 1 jack.Choose a type of pedal that will be appropriate for the dynamic modulation that you will be using. For example if you wish to switch the rotational speed of a rotary speaker, a switch-type pedal will allow easier operation.
2 As described in step 5 above, specify CC#12 (con-trol change no.12).
3 Press the GLOBAL key, and then press the MENU key.
4 Press the Assign button, and then press the Assignable Pedal tab.The Assignable Pedal page will appear.
5 For the ASSIGNABLE SW/PEDAL 1 parameter, select Effect Control 1 (CC#12).
Effect settings for use in arrangement playWhen you play the keyboard in Arrangement Play mode, the effect settings of the program that was selected for the Main KBD part will be used.For example if you select arrangement A47: Distor-tion Guitar, distortion will be applied to the sound. In this way, the Main KBD part will use the distinc-tive effect that was specified in Program mode, and will stand out from the ACC parts or the other KBD parts.However in order to ensure that the effect of the program can be used in the arrangement, you should observe the following two points.
• Set the placement to Parallel 2.• Use a spatial-type effect such as reverb for FX 2.
4. Writing a programWhen you have finished editing, you should write your data to internal memory.
1 In Program mode, press the page menu button, and press the Write Arrangement page menu com-mand. Alternatively, you can press the front panel REC/WRITE key.The following dialog box will appear.
2 If you wish to modify the program name, use the text edit button for the Name parameter to access the text edit dialog box, and input the name of the program.
3 In the Category parameter, specify the category.
4 In the Write to User Program parameter, specify the bank F or G (user bank) number.
5 Press the OK button.
5. Drum program settingsPrograms in bank R are rhythm-type programs (drum programs) which use a drumkit. Drum pro-grams are organized as follows.
The drumkit specifies a drum sample (a basic waveform that produces a drum or percussion sound) for each note, and includes settings for Oscillator–VDA and Effect.
EG and MG can be adjusted in the Pitch, VDF and VDA pages just as for a conventional program, but usually you will want to create your own original drum program on the basis of an existing program from the drum bank.
Editing a drumkit1 Press the EXIT key to enter the Performance Edit
page.
2 Press the front panel PROGRAM key R, then the 1 key of the upper row, and the 1 key of the lower row.R11: GM Kit 1 will be selected.
This drum program produces a different percussion instrument sound for each note. Play the keyboard and listen to the sounds.
2
3
4
5
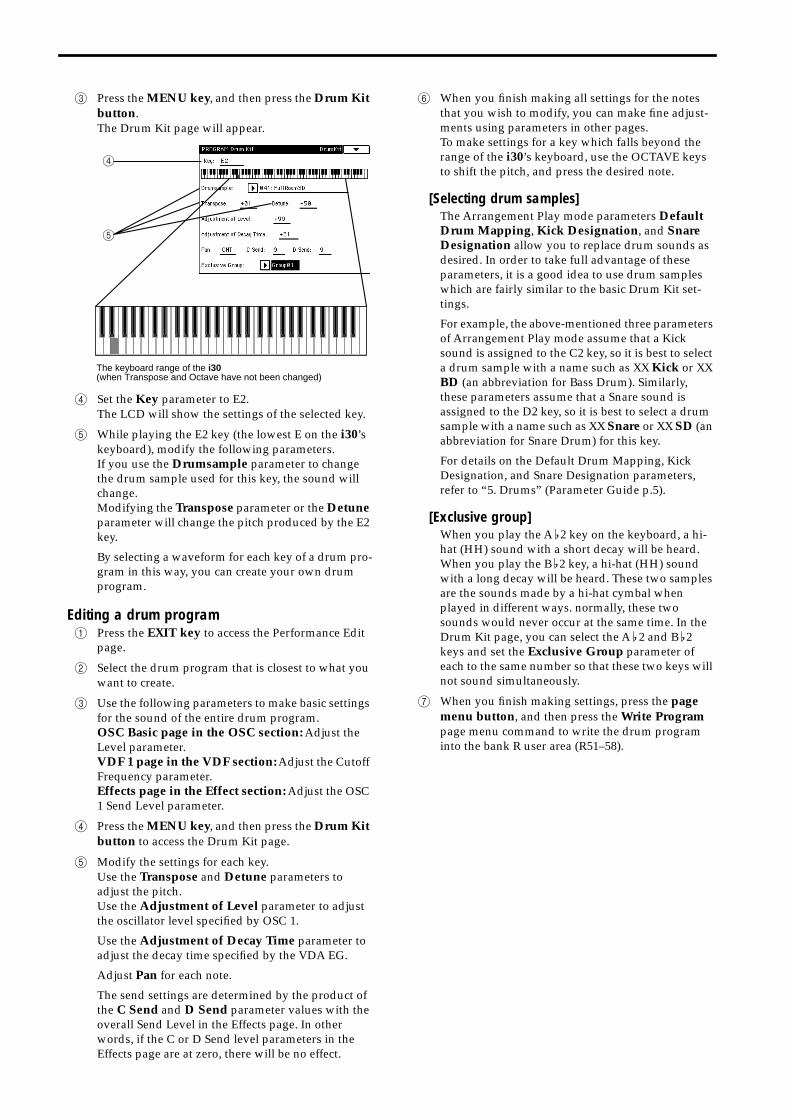
3 Press the MENU key, and then press the Drum Kit button.The Drum Kit page will appear.
4 Set the Key parameter to E2.The LCD will show the settings of the selected key.
5 While playing the E2 key (the lowest E on the i30’s keyboard), modify the following parameters.If you use the Drumsample parameter to change the drum sample used for this key, the sound will change.Modifying the Transpose parameter or the Detune parameter will change the pitch produced by the E2 key.
By selecting a waveform for each key of a drum pro-gram in this way, you can create your own drum program.
Editing a drum program1 Press the EXIT key to access the Performance Edit
page.
2 Select the drum program that is closest to what you want to create.
3 Use the following parameters to make basic settings for the sound of the entire drum program.OSC Basic page in the OSC section: Adjust the Level parameter.VDF 1 page in the VDF section: Adjust the Cutoff Frequency parameter.Effects page in the Effect section: Adjust the OSC 1 Send Level parameter.
4 Press the MENU key, and then press the Drum Kit button to access the Drum Kit page.
5 Modify the settings for each key.Use the Transpose and Detune parameters to adjust the pitch.Use the Adjustment of Level parameter to adjust the oscillator level specified by OSC 1.
Use the Adjustment of Decay Time parameter to adjust the decay time specified by the VDA EG.
Adjust Pan for each note.
The send settings are determined by the product of the C Send and D Send parameter values with the overall Send Level in the Effects page. In other words, if the C or D Send level parameters in the Effects page are at zero, there will be no effect.
6 When you finish making all settings for the notes that you wish to modify, you can make fine adjust-ments using parameters in other pages.To make settings for a key which falls beyond the range of the i30’s keyboard, use the OCTAVE keys to shift the pitch, and press the desired note.
[Selecting drum samples]The Arrangement Play mode parameters Default Drum Mapping, Kick Designation, and Snare Designation allow you to replace drum sounds as desired. In order to take full advantage of these parameters, it is a good idea to use drum samples which are fairly similar to the basic Drum Kit set-tings.
For example, the above-mentioned three parameters of Arrangement Play mode assume that a Kick sound is assigned to the C2 key, so it is best to select a drum sample with a name such as XX Kick or XX BD (an abbreviation for Bass Drum). Similarly, these parameters assume that a Snare sound is assigned to the D2 key, so it is best to select a drum sample with a name such as XX Snare or XX SD (an abbreviation for Snare Drum) for this key.
For details on the Default Drum Mapping, Kick Designation, and Snare Designation parameters, refer to “5. Drums” (Parameter Guide p.5).
[Exclusive group]When you play the A � 2 key on the keyboard, a hi-hat (HH) sound with a short decay will be heard. When you play the B � 2 key, a hi-hat (HH) sound with a long decay will be heard. These two samples are the sounds made by a hi-hat cymbal when played in different ways. normally, these two sounds would never occur at the same time. In the Drum Kit page, you can select the A � 2 and B � 2 keys and set the Exclusive Group parameter of each to the same number so that these two keys will not sound simultaneously.
7 When you finish making settings, press the page menu button, and then press the Write Program page menu command to write the drum program into the bank R user area (R51–58).
The keyboard range of the i30(when Transpose and Octave have not been changed)
4
5
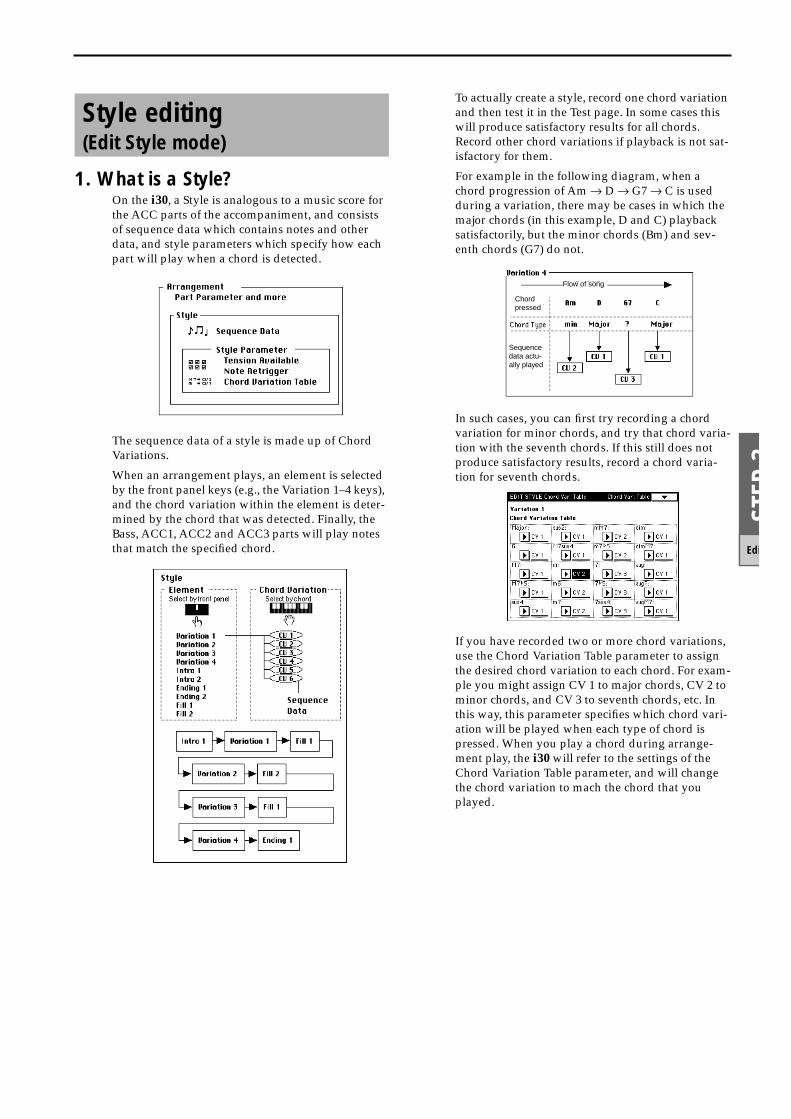
STEP
3
Edi
1. What is a Style?On the i30, a Style is analogous to a music score for the ACC parts of the accompaniment, and consists of sequence data which contains notes and other data, and style parameters which specify how each part will play when a chord is detected.
The sequence data of a style is made up of Chord Variations.
When an arrangement plays, an element is selected by the front panel keys (e.g., the Variation 1–4 keys), and the chord variation within the element is deter-mined by the chord that was detected. Finally, the Bass, ACC1, ACC2 and ACC3 parts will play notes that match the specified chord.
To actually create a style, record one chord variation and then test it in the Test page. In some cases this will produce satisfactory results for all chords. Record other chord variations if playback is not sat-isfactory for them.
For example in the following diagram, when a chord progression of Am → D → G7 → C is used during a variation, there may be cases in which the major chords (in this example, D and C) playback satisfactorily, but the minor chords (Bm) and sev-enth chords (G7) do not.
In such cases, you can first try recording a chord variation for minor chords, and try that chord varia-tion with the seventh chords. If this still does not produce satisfactory results, record a chord varia-tion for seventh chords.
If you have recorded two or more chord variations, use the Chord Variation Table parameter to assign the desired chord variation to each chord. For exam-ple you might assign CV 1 to major chords, CV 2 to minor chords, and CV 3 to seventh chords, etc. In this way, this parameter specifies which chord vari-ation will be played when each type of chord is pressed. When you play a chord during arrange-ment play, the i30 will refer to the settings of the Chord Variation Table parameter, and will change the chord variation to mach the chord that you played.
Style editing(Edit Style mode)
Flow of song
Chord pressed
Sequence data actu-ally played
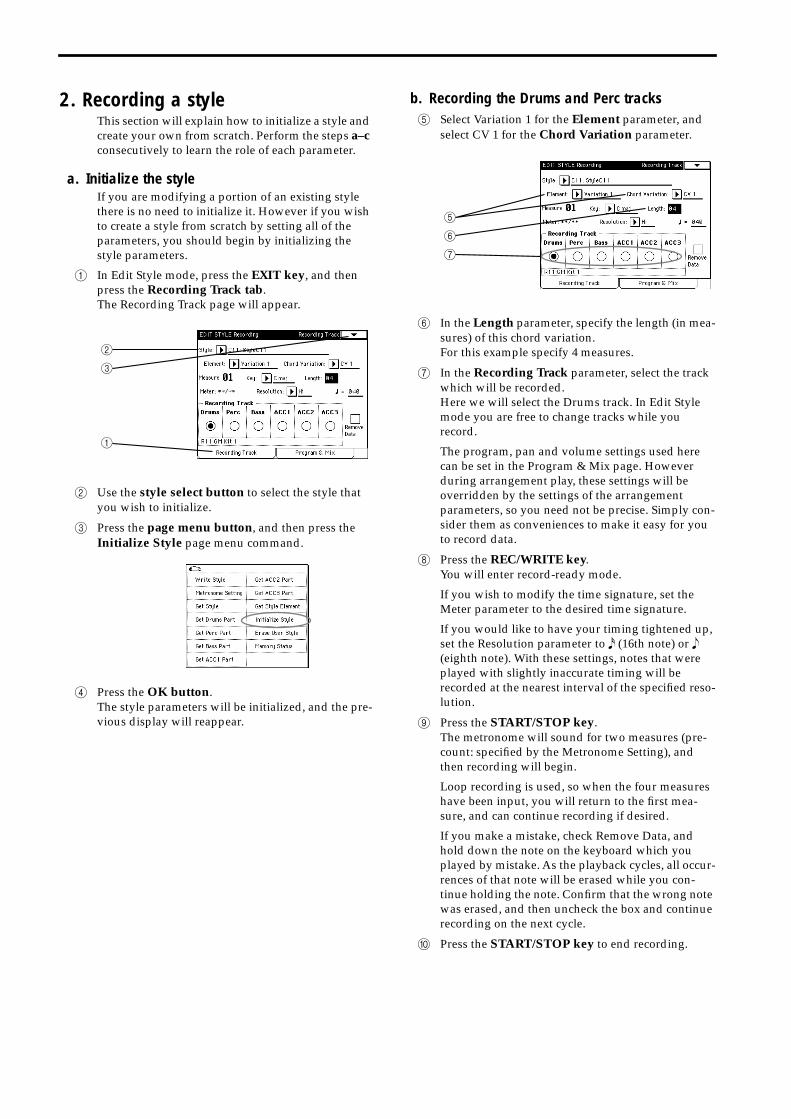
2. Recording a styleThis section will explain how to initialize a style and create your own from scratch. Perform the steps a–c consecutively to learn the role of each parameter.
a. Initialize the styleIf you are modifying a portion of an existing style there is no need to initialize it. However if you wish to create a style from scratch by setting all of the parameters, you should begin by initializing the style parameters.
1 In Edit Style mode, press the EXIT key, and then press the Recording Track tab.The Recording Track page will appear.
2 Use the style select button to select the style that you wish to initialize.
3 Press the page menu button, and then press the Initialize Style page menu command.
4 Press the OK button.The style parameters will be initialized, and the pre-vious display will reappear.
b. Recording the Drums and Perc tracks5 Select Variation 1 for the Element parameter, and
select CV 1 for the Chord Variation parameter.
6 In the Length parameter, specify the length (in mea-sures) of this chord variation.For this example specify 4 measures.
7 In the Recording Track parameter, select the track which will be recorded.Here we will select the Drums track. In Edit Style mode you are free to change tracks while you record.
The program, pan and volume settings used here can be set in the Program & Mix page. However during arrangement play, these settings will be overridden by the settings of the arrangement parameters, so you need not be precise. Simply con-sider them as conveniences to make it easy for you to record data.
8 Press the REC/WRITE key.You will enter record-ready mode.
If you wish to modify the time signature, set the Meter parameter to the desired time signature.
If you would like to have your timing tightened up, set the Resolution parameter to � (16th note) or � (eighth note). With these settings, notes that were played with slightly inaccurate timing will be recorded at the nearest interval of the specified reso-lution.
9 Press the START/STOP key.The metronome will sound for two measures (pre-count: specified by the Metronome Setting), and then recording will begin.
Loop recording is used, so when the four measures have been input, you will return to the first mea-sure, and can continue recording if desired.
If you make a mistake, check Remove Data, and hold down the note on the keyboard which you played by mistake. As the playback cycles, all occur-rences of that note will be erased while you con-tinue holding the note. Confirm that the wrong note was erased, and then uncheck the box and continue recording on the next cycle.
0 Press the START/STOP key to end recording.
2
3
1
5
6
7
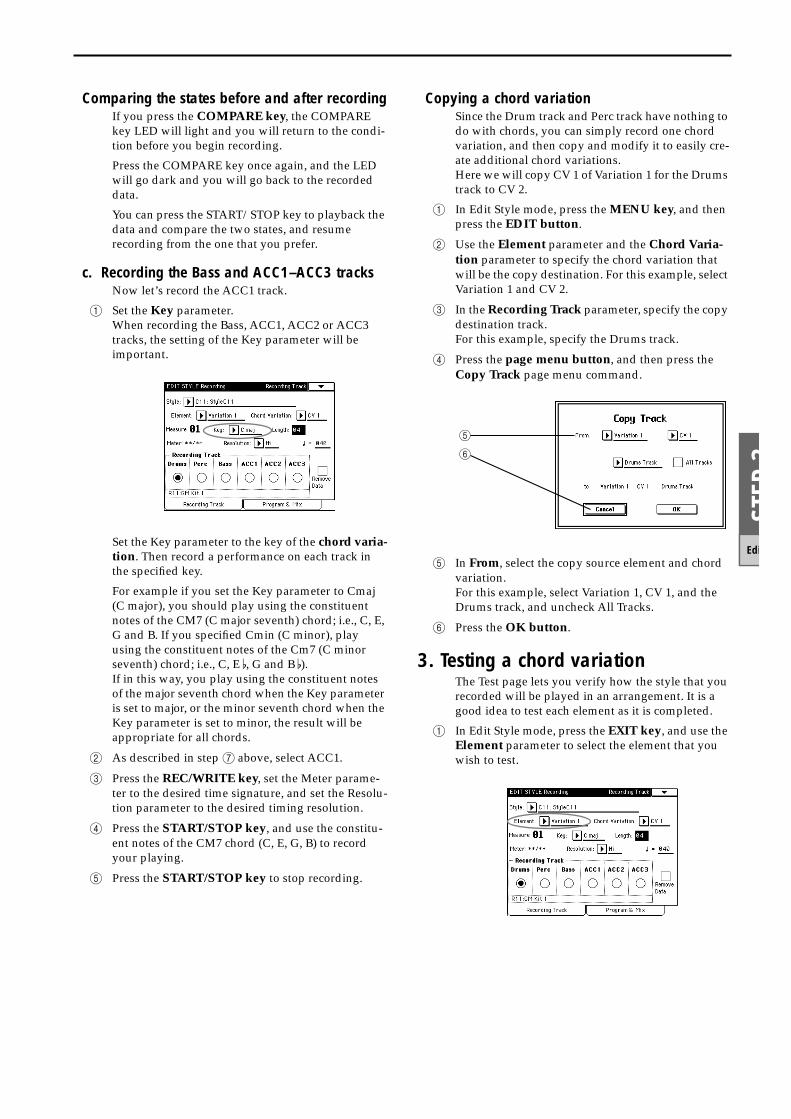
STEP
3
Edi
Comparing the states before and after recordingIf you press the COMPARE key, the COMPARE key LED will light and you will return to the condi-tion before you begin recording.
Press the COMPARE key once again, and the LED will go dark and you will go back to the recorded data.
You can press the START/STOP key to playback the data and compare the two states, and resume recording from the one that you prefer.
c. Recording the Bass and ACC1–ACC3 tracksNow let’s record the ACC1 track.
1 Set the Key parameter.When recording the Bass, ACC1, ACC2 or ACC3 tracks, the setting of the Key parameter will be important.
Set the Key parameter to the key of the chord varia-tion. Then record a performance on each track in the specified key.
For example if you set the Key parameter to Cmaj (C major), you should play using the constituent notes of the CM7 (C major seventh) chord; i.e., C, E, G and B. If you specified Cmin (C minor), play using the constituent notes of the Cm7 (C minor seventh) chord; i.e., C, E �, G and B �).If in this way, you play using the constituent notes of the major seventh chord when the Key parameter is set to major, or the minor seventh chord when the Key parameter is set to minor, the result will be appropriate for all chords.
2 As described in step 7 above, select ACC1.
3 Press the REC/WRITE key, set the Meter parame-ter to the desired time signature, and set the Resolu-tion parameter to the desired timing resolution.
4 Press the START/STOP key, and use the constitu-ent notes of the CM7 chord (C, E, G, B) to record your playing.
5 Press the START/STOP key to stop recording.
Copying a chord variationSince the Drum track and Perc track have nothing to do with chords, you can simply record one chord variation, and then copy and modify it to easily cre-ate additional chord variations.Here we will copy CV 1 of Variation 1 for the Drums track to CV 2.
1 In Edit Style mode, press the MENU key, and then press the EDIT button.
2 Use the Element parameter and the Chord Varia-tion parameter to specify the chord variation that will be the copy destination. For this example, select Variation 1 and CV 2.
3 In the Recording Track parameter, specify the copy destination track.For this example, specify the Drums track.
4 Press the page menu button, and then press the Copy Track page menu command.
5 In From, select the copy source element and chord variation.For this example, select Variation 1, CV 1, and the Drums track, and uncheck All Tracks.
6 Press the OK button.
3. Testing a chord variationThe Test page lets you verify how the style that you recorded will be played in an arrangement. It is a good idea to test each element as it is completed.
1 In Edit Style mode, press the EXIT key, and use the Element parameter to select the element that you wish to test.
5
6
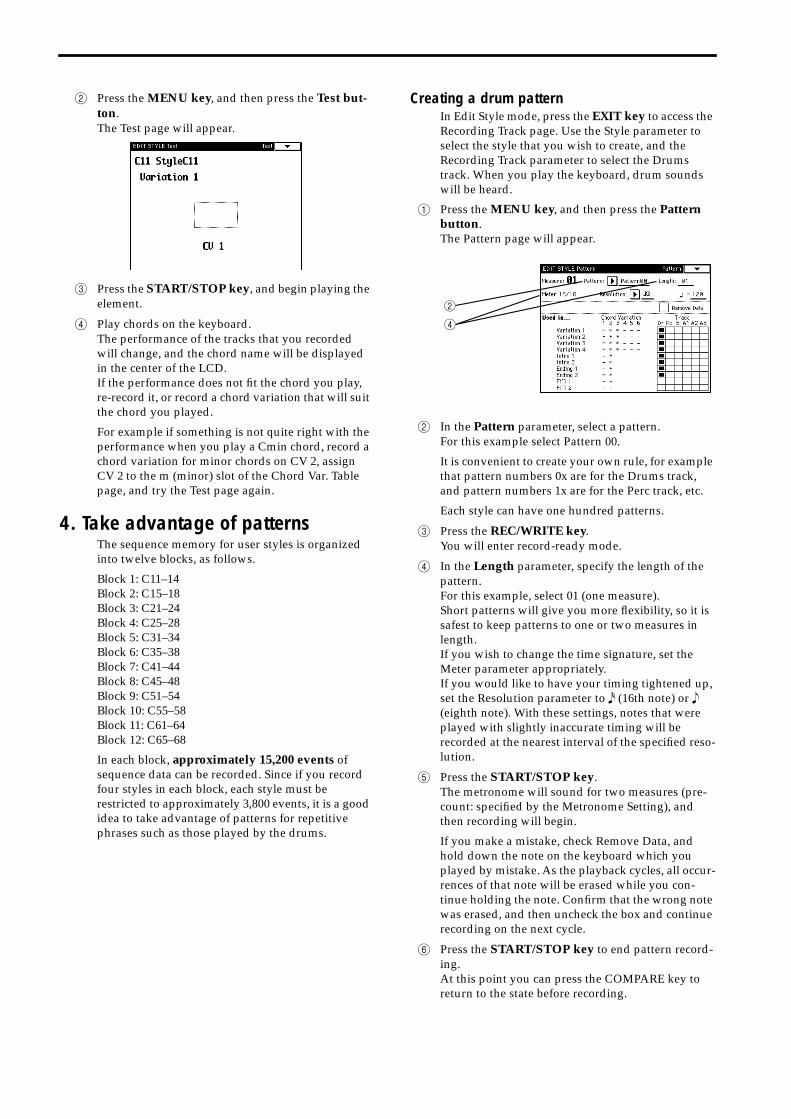
2 Press the MENU key, and then press the Test but-ton.The Test page will appear.
3 Press the START/STOP key, and begin playing the element.
4 Play chords on the keyboard.The performance of the tracks that you recorded will change, and the chord name will be displayed in the center of the LCD.If the performance does not fit the chord you play, re-record it, or record a chord variation that will suit the chord you played.
For example if something is not quite right with the performance when you play a Cmin chord, record a chord variation for minor chords on CV 2, assign CV 2 to the m (minor) slot of the Chord Var. Table page, and try the Test page again.
4. Take advantage of patternsThe sequence memory for user styles is organized into twelve blocks, as follows.
Block 1: C11–14Block 2: C15–18Block 3: C21–24Block 4: C25–28Block 5: C31–34Block 6: C35–38Block 7: C41–44Block 8: C45–48Block 9: C51–54Block 10: C55–58Block 11: C61–64Block 12: C65–68
In each block, approximately 15,200 events of sequence data can be recorded. Since if you record four styles in each block, each style must be restricted to approximately 3,800 events, it is a good idea to take advantage of patterns for repetitive phrases such as those played by the drums.
Creating a drum patternIn Edit Style mode, press the EXIT key to access the Recording Track page. Use the Style parameter to select the style that you wish to create, and the Recording Track parameter to select the Drums track. When you play the keyboard, drum sounds will be heard.
1 Press the MENU key, and then press the Pattern button.The Pattern page will appear.
2 In the Pattern parameter, select a pattern.For this example select Pattern 00.
It is convenient to create your own rule, for example that pattern numbers 0x are for the Drums track, and pattern numbers 1x are for the Perc track, etc.
Each style can have one hundred patterns.
3 Press the REC/WRITE key.You will enter record-ready mode.
4 In the Length parameter, specify the length of the pattern.For this example, select 01 (one measure).Short patterns will give you more flexibility, so it is safest to keep patterns to one or two measures in length.If you wish to change the time signature, set the Meter parameter appropriately.If you would like to have your timing tightened up, set the Resolution parameter to � (16th note) or � (eighth note). With these settings, notes that were played with slightly inaccurate timing will be recorded at the nearest interval of the specified reso-lution.
5 Press the START/STOP key.The metronome will sound for two measures (pre-count: specified by the Metronome Setting), and then recording will begin.
If you make a mistake, check Remove Data, and hold down the note on the keyboard which you played by mistake. As the playback cycles, all occur-rences of that note will be erased while you con-tinue holding the note. Confirm that the wrong note was erased, and then uncheck the box and continue recording on the next cycle.
6 Press the START/STOP key to end pattern record-ing.At this point you can press the COMPARE key to return to the state before recording.
2
4
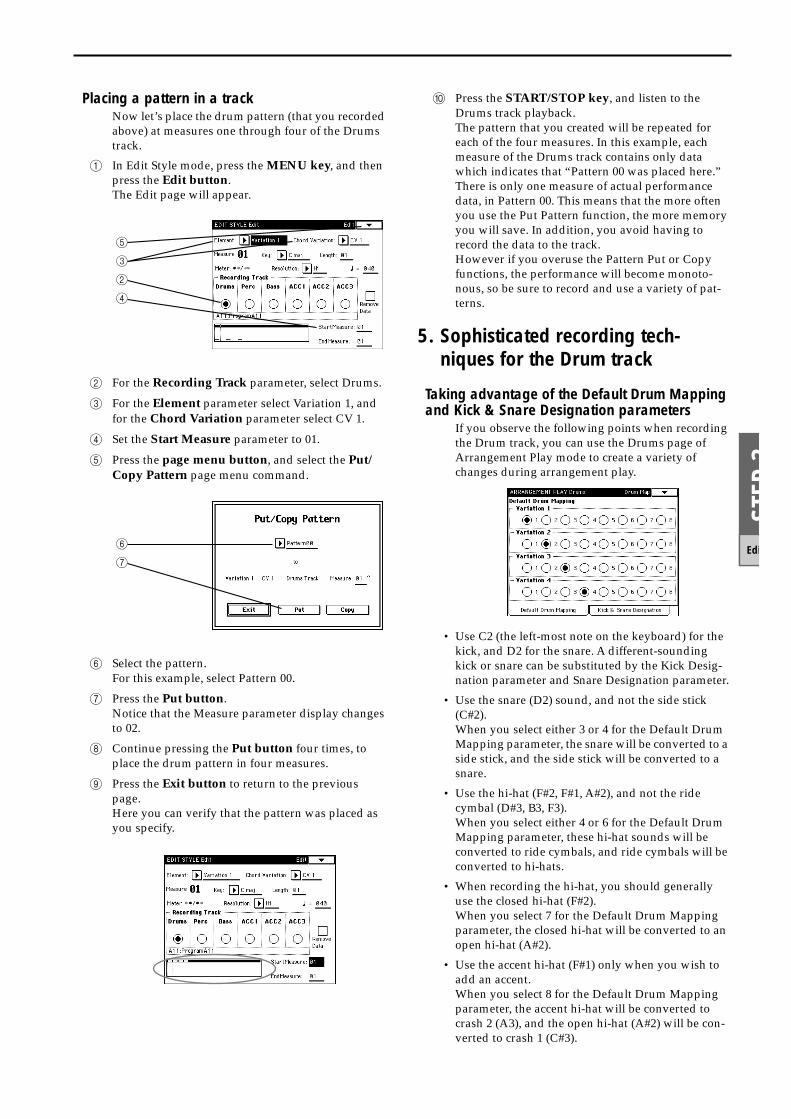
STEP
3
Edi
Placing a pattern in a trackNow let’s place the drum pattern (that you recorded above) at measures one through four of the Drums track.
1 In Edit Style mode, press the MENU key, and then press the Edit button.The Edit page will appear.
2 For the Recording Track parameter, select Drums.
3 For the Element parameter select Variation 1, and for the Chord Variation parameter select CV 1.
4 Set the Start Measure parameter to 01.
5 Press the page menu button, and select the Put/Copy Pattern page menu command.
6 Select the pattern.For this example, select Pattern 00.
7 Press the Put button.Notice that the Measure parameter display changes to 02.
8 Continue pressing the Put button four times, to place the drum pattern in four measures.
9 Press the Exit button to return to the previous page.Here you can verify that the pattern was placed as you specify.
0 Press the START/STOP key, and listen to the Drums track playback.The pattern that you created will be repeated for each of the four measures. In this example, each measure of the Drums track contains only data which indicates that “Pattern 00 was placed here.” There is only one measure of actual performance data, in Pattern 00. This means that the more often you use the Put Pattern function, the more memory you will save. In addition, you avoid having to record the data to the track.However if you overuse the Pattern Put or Copy functions, the performance will become monoto-nous, so be sure to record and use a variety of pat-terns.
5. Sophisticated recording tech-niques for the Drum track
Taking advantage of the Default Drum Mapping and Kick & Snare Designation parameters
If you observe the following points when recording the Drum track, you can use the Drums page of Arrangement Play mode to create a variety of changes during arrangement play.
• Use C2 (the left-most note on the keyboard) for the kick, and D2 for the snare. A different-sounding kick or snare can be substituted by the Kick Desig-nation parameter and Snare Designation parameter.
• Use the snare (D2) sound, and not the side stick (C#2).When you select either 3 or 4 for the Default Drum Mapping parameter, the snare will be converted to a side stick, and the side stick will be converted to a snare.
• Use the hi-hat (F#2, F#1, A#2), and not the ride cymbal (D#3, B3, F3).When you select either 4 or 6 for the Default Drum Mapping parameter, these hi-hat sounds will be converted to ride cymbals, and ride cymbals will be converted to hi-hats.
• When recording the hi-hat, you should generally use the closed hi-hat (F#2).When you select 7 for the Default Drum Mapping parameter, the closed hi-hat will be converted to an open hi-hat (A#2).
• Use the accent hi-hat (F#1) only when you wish to add an accent.When you select 8 for the Default Drum Mapping parameter, the accent hi-hat will be converted to crash 2 (A3), and the open hi-hat (A#2) will be con-verted to crash 1 (C#3).
5
3
2
4
6
7
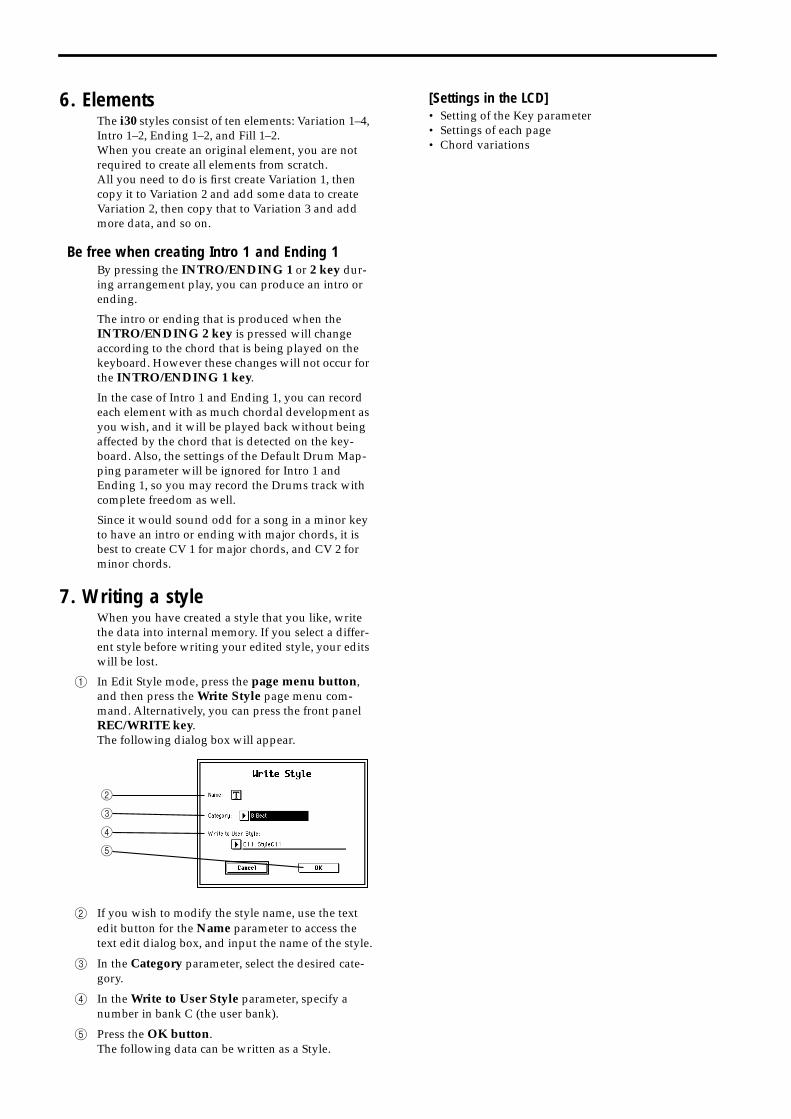
6. ElementsThe i30 styles consist of ten elements: Variation 1–4, Intro 1–2, Ending 1–2, and Fill 1–2.When you create an original element, you are not required to create all elements from scratch.All you need to do is first create Variation 1, then copy it to Variation 2 and add some data to create Variation 2, then copy that to Variation 3 and add more data, and so on.
Be free when creating Intro 1 and Ending 1By pressing the INTRO/ENDING 1 or 2 key dur-ing arrangement play, you can produce an intro or ending.
The intro or ending that is produced when the INTRO/ENDING 2 key is pressed will change according to the chord that is being played on the keyboard. However these changes will not occur for the INTRO/ENDING 1 key.
In the case of Intro 1 and Ending 1, you can record each element with as much chordal development as you wish, and it will be played back without being affected by the chord that is detected on the key-board. Also, the settings of the Default Drum Map-ping parameter will be ignored for Intro 1 and Ending 1, so you may record the Drums track with complete freedom as well.
Since it would sound odd for a song in a minor key to have an intro or ending with major chords, it is best to create CV 1 for major chords, and CV 2 for minor chords.
7. Writing a styleWhen you have created a style that you like, write the data into internal memory. If you select a differ-ent style before writing your edited style, your edits will be lost.
1 In Edit Style mode, press the page menu button, and then press the Write Style page menu com-mand. Alternatively, you can press the front panel REC/WRITE key.The following dialog box will appear.
2 If you wish to modify the style name, use the text edit button for the Name parameter to access the text edit dialog box, and input the name of the style.
3 In the Category parameter, select the desired cate-gory.
4 In the Write to User Style parameter, specify a number in bank C (the user bank).
5 Press the OK button.The following data can be written as a Style.
[Settings in the LCD]• Setting of the Key parameter• Settings of each page• Chord variations
2
3
4
5
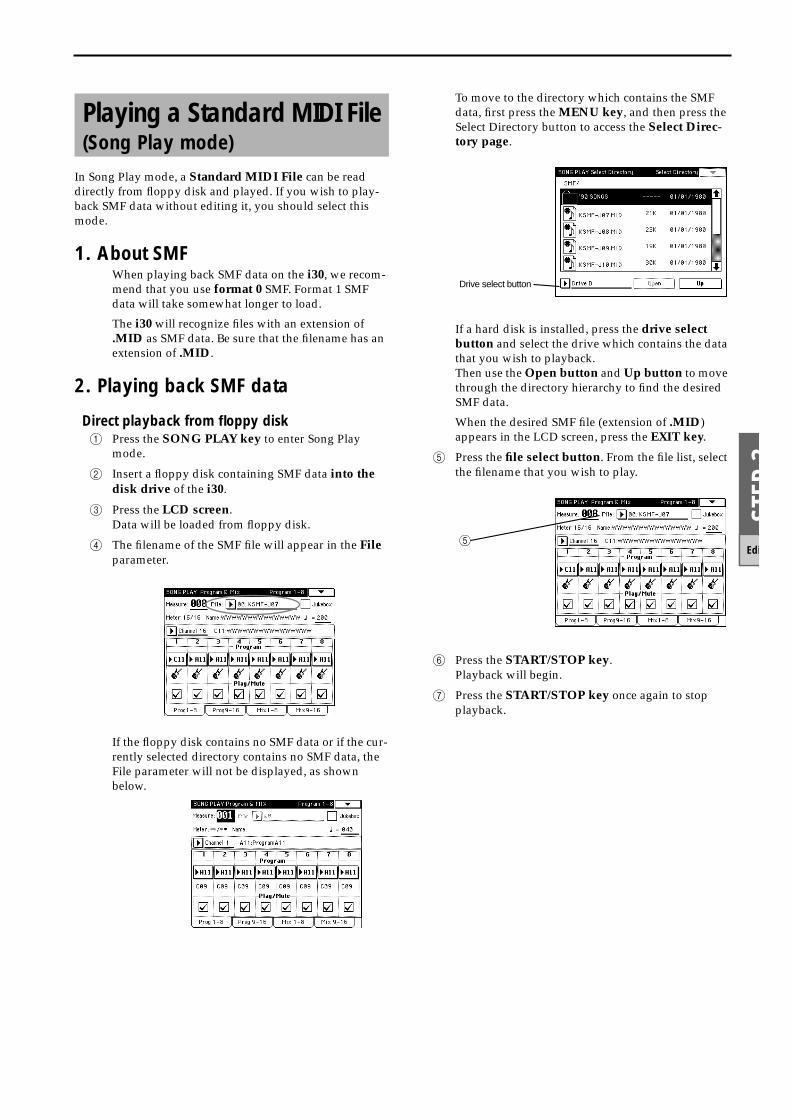
STEP
3
Edi
In Song Play mode, a Standard MIDI File can be read directly from floppy disk and played. If you wish to play-back SMF data without editing it, you should select this mode.
1. About SMFWhen playing back SMF data on the i30, we recom-mend that you use format 0 SMF. Format 1 SMF data will take somewhat longer to load.
The i30 will recognize files with an extension of .MID as SMF data. Be sure that the filename has an extension of .MID.
2. Playing back SMF data
Direct playback from floppy disk1 Press the SONG PLAY key to enter Song Play
mode.
2 Insert a floppy disk containing SMF data into the disk drive of the i30.
3 Press the LCD screen.Data will be loaded from floppy disk.
4 The filename of the SMF file will appear in the File parameter.
If the floppy disk contains no SMF data or if the cur-rently selected directory contains no SMF data, the File parameter will not be displayed, as shown below.
To move to the directory which contains the SMF data, first press the MENU key, and then press the Select Directory button to access the Select Direc-tory page.
If a hard disk is installed, press the drive select button and select the drive which contains the data that you wish to playback.Then use the Open button and Up button to move through the directory hierarchy to find the desired SMF data.
When the desired SMF file (extension of .MID) appears in the LCD screen, press the EXIT key.
5 Press the file select button. From the file list, select the filename that you wish to play.
6 Press the START/STOP key.Playback will begin.
7 Press the START/STOP key once again to stop playback.
Playing a Standard MIDI File(Song Play mode)
Drive select button
5
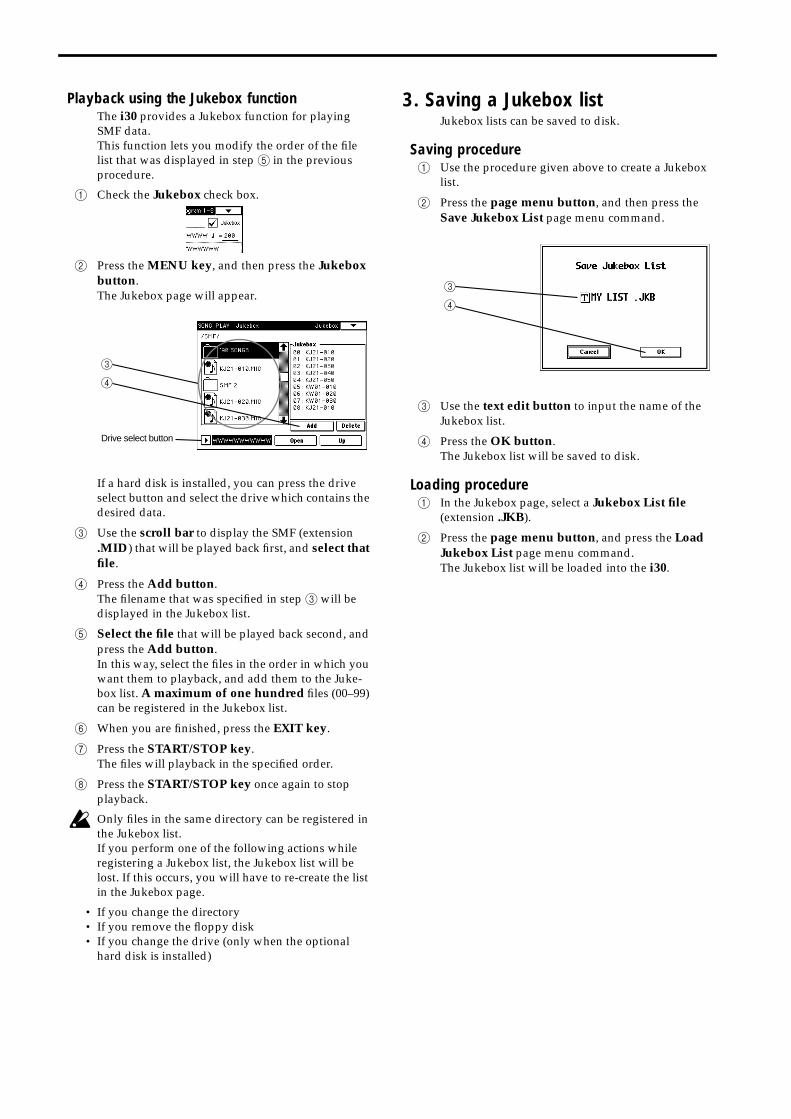
Playback using the Jukebox functionThe i30 provides a Jukebox function for playing SMF data.This function lets you modify the order of the file list that was displayed in step 5 in the previous procedure.
1 Check the Jukebox check box.
2 Press the MENU key, and then press the Jukebox button.The Jukebox page will appear.
If a hard disk is installed, you can press the drive select button and select the drive which contains the desired data.
3 Use the scroll bar to display the SMF (extension .MID) that will be played back first, and select that file.
4 Press the Add button.The filename that was specified in step 3 will be displayed in the Jukebox list.
5 Select the file that will be played back second, and press the Add button.In this way, select the files in the order in which you want them to playback, and add them to the Juke-box list. A maximum of one hundred files (00–99) can be registered in the Jukebox list.
6 When you are finished, press the EXIT key.
7 Press the START/STOP key.The files will playback in the specified order.
8 Press the START/STOP key once again to stop playback.
Only files in the same directory can be registered in the Jukebox list.If you perform one of the following actions while registering a Jukebox list, the Jukebox list will be lost. If this occurs, you will have to re-create the list in the Jukebox page.
• If you change the directory• If you remove the floppy disk• If you change the drive (only when the optional
hard disk is installed)
3. Saving a Jukebox listJukebox lists can be saved to disk.
Saving procedure1 Use the procedure given above to create a Jukebox
list.
2 Press the page menu button, and then press the Save Jukebox List page menu command.
3 Use the text edit button to input the name of the Jukebox list.
4 Press the OK button.The Jukebox list will be saved to disk.
Loading procedure1 In the Jukebox page, select a Jukebox List file
(extension .JKB).
2 Press the page menu button, and press the Load Jukebox List page menu command.The Jukebox list will be loaded into the i30.
3
4
Drive select button
3
4
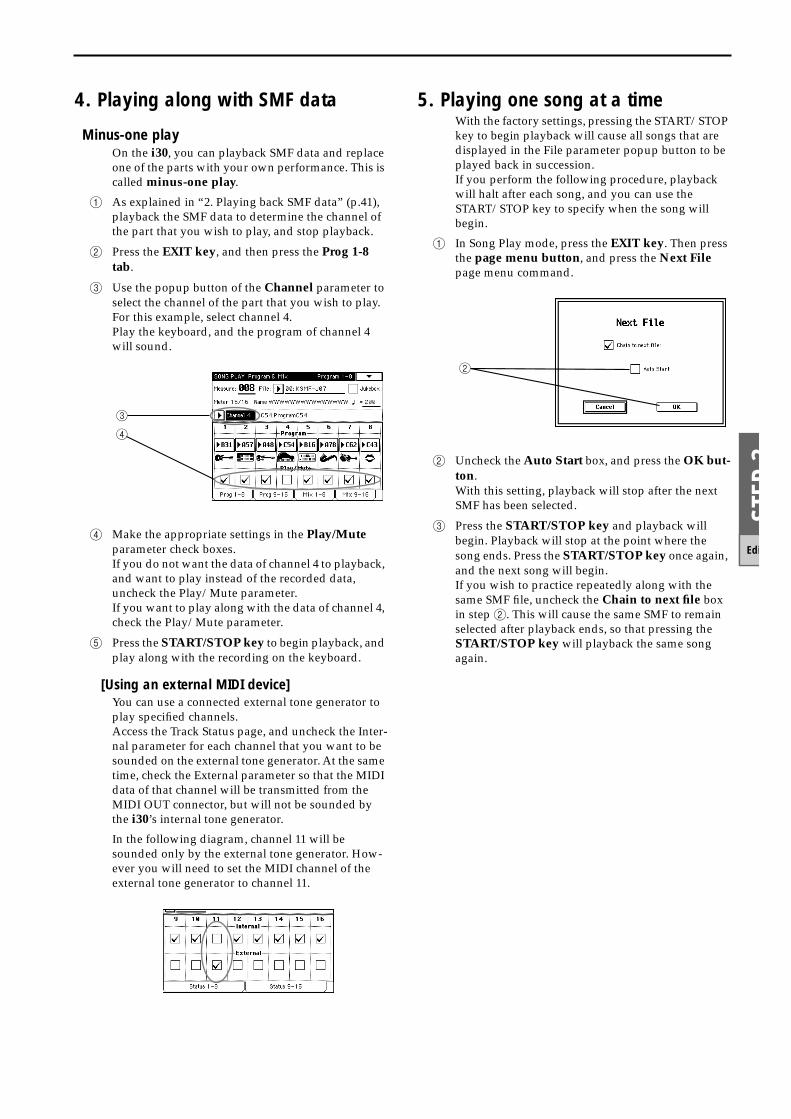
STEP
3
Edi
4. Playing along with SMF data
Minus-one playOn the i30, you can playback SMF data and replace one of the parts with your own performance. This is called minus-one play.
1 As explained in “2. Playing back SMF data” (p.41), playback the SMF data to determine the channel of the part that you wish to play, and stop playback.
2 Press the EXIT key, and then press the Prog 1-8 tab.
3 Use the popup button of the Channel parameter to select the channel of the part that you wish to play.For this example, select channel 4.Play the keyboard, and the program of channel 4 will sound.
4 Make the appropriate settings in the Play/Mute parameter check boxes.If you do not want the data of channel 4 to playback, and want to play instead of the recorded data, uncheck the Play/Mute parameter.If you want to play along with the data of channel 4, check the Play/Mute parameter.
5 Press the START/STOP key to begin playback, and play along with the recording on the keyboard.
[Using an external MIDI device]You can use a connected external tone generator to play specified channels.Access the Track Status page, and uncheck the Inter-nal parameter for each channel that you want to be sounded on the external tone generator. At the same time, check the External parameter so that the MIDI data of that channel will be transmitted from the MIDI OUT connector, but will not be sounded by the i30’s internal tone generator.
In the following diagram, channel 11 will be sounded only by the external tone generator. How-ever you will need to set the MIDI channel of the external tone generator to channel 11.
5. Playing one song at a timeWith the factory settings, pressing the START/STOP key to begin playback will cause all songs that are displayed in the File parameter popup button to be played back in succession.If you perform the following procedure, playback will halt after each song, and you can use the START/STOP key to specify when the song will begin.
1 In Song Play mode, press the EXIT key. Then press the page menu button, and press the Next File page menu command.
2 Uncheck the Auto Start box, and press the OK but-ton.With this setting, playback will stop after the next SMF has been selected.
3 Press the START/STOP key and playback will begin. Playback will stop at the point where the song ends. Press the START/STOP key once again, and the next song will begin.If you wish to practice repeatedly along with the same SMF file, uncheck the Chain to next file box in step 2. This will cause the same SMF to remain selected after playback ends, so that pressing the START/STOP key will playback the same song again.
3
4
2
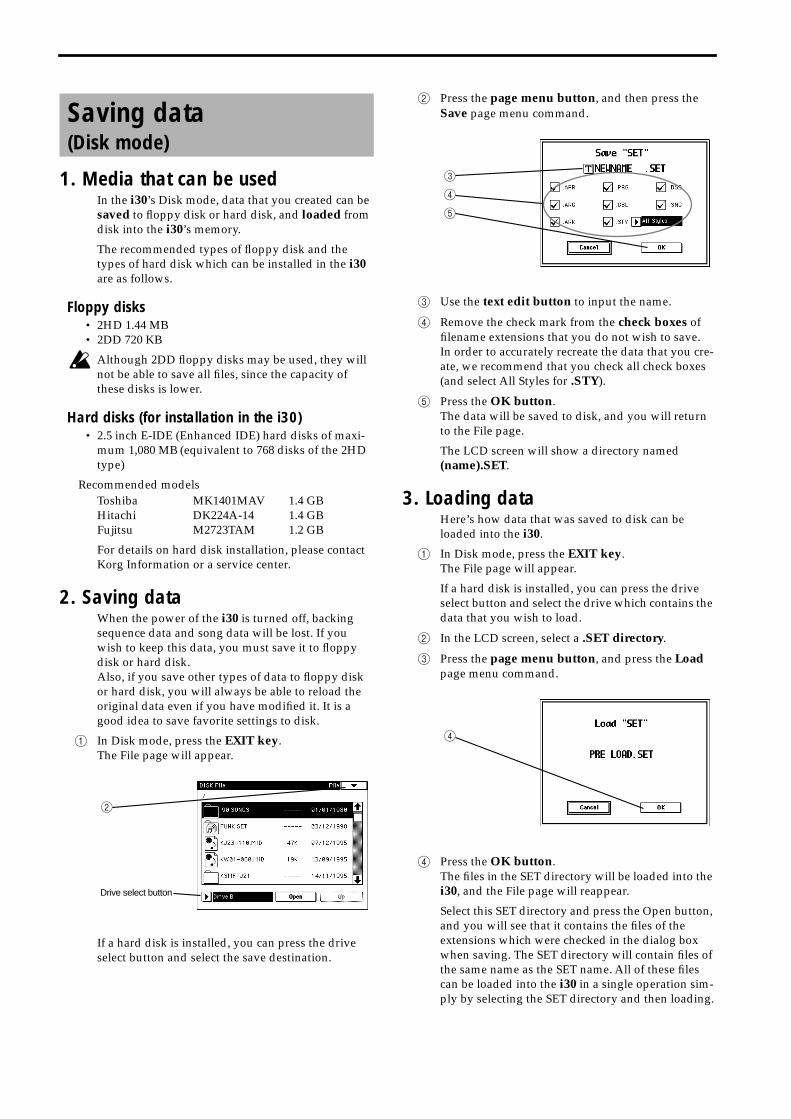
1. Media that can be usedIn the i30’s Disk mode, data that you created can be saved to floppy disk or hard disk, and loaded from disk into the i30’s memory.
The recommended types of floppy disk and the types of hard disk which can be installed in the i30 are as follows.
Floppy disks• 2HD 1.44 MB• 2DD 720 KB
Although 2DD floppy disks may be used, they will not be able to save all files, since the capacity of these disks is lower.
Hard disks (for installation in the i30)• 2.5 inch E-IDE (Enhanced IDE) hard disks of maxi-
mum 1,080 MB (equivalent to 768 disks of the 2HD type)
Recommended models
For details on hard disk installation, please contact Korg Information or a service center.
2. Saving dataWhen the power of the i30 is turned off, backing sequence data and song data will be lost. If you wish to keep this data, you must save it to floppy disk or hard disk.Also, if you save other types of data to floppy disk or hard disk, you will always be able to reload the original data even if you have modified it. It is a good idea to save favorite settings to disk.
1 In Disk mode, press the EXIT key.The File page will appear.
If a hard disk is installed, you can press the drive select button and select the save destination.
2 Press the page menu button, and then press the Save page menu command.
3 Use the text edit button to input the name.
4 Remove the check mark from the check boxes of filename extensions that you do not wish to save.In order to accurately recreate the data that you cre-ate, we recommend that you check all check boxes (and select All Styles for .STY).
5 Press the OK button.The data will be saved to disk, and you will return to the File page.
The LCD screen will show a directory named (name).SET.
3. Loading dataHere’s how data that was saved to disk can be loaded into the i30.
1 In Disk mode, press the EXIT key.The File page will appear.
If a hard disk is installed, you can press the drive select button and select the drive which contains the data that you wish to load.
2 In the LCD screen, select a .SET directory.
3 Press the page menu button, and press the Load page menu command.
4 Press the OK button.The files in the SET directory will be loaded into the i30, and the File page will reappear.
Select this SET directory and press the Open button, and you will see that it contains the files of the extensions which were checked in the dialog box when saving. The SET directory will contain files of the same name as the SET name. All of these files can be loaded into the i30 in a single operation sim-ply by selecting the SET directory and then loading.
Saving data(Disk mode)
Toshiba MK1401MAV 1.4 GBHitachi DK224A-14 1.4 GBFujitsu M2723TAM 1.2 GB
2
Drive select button
3
4
5
4
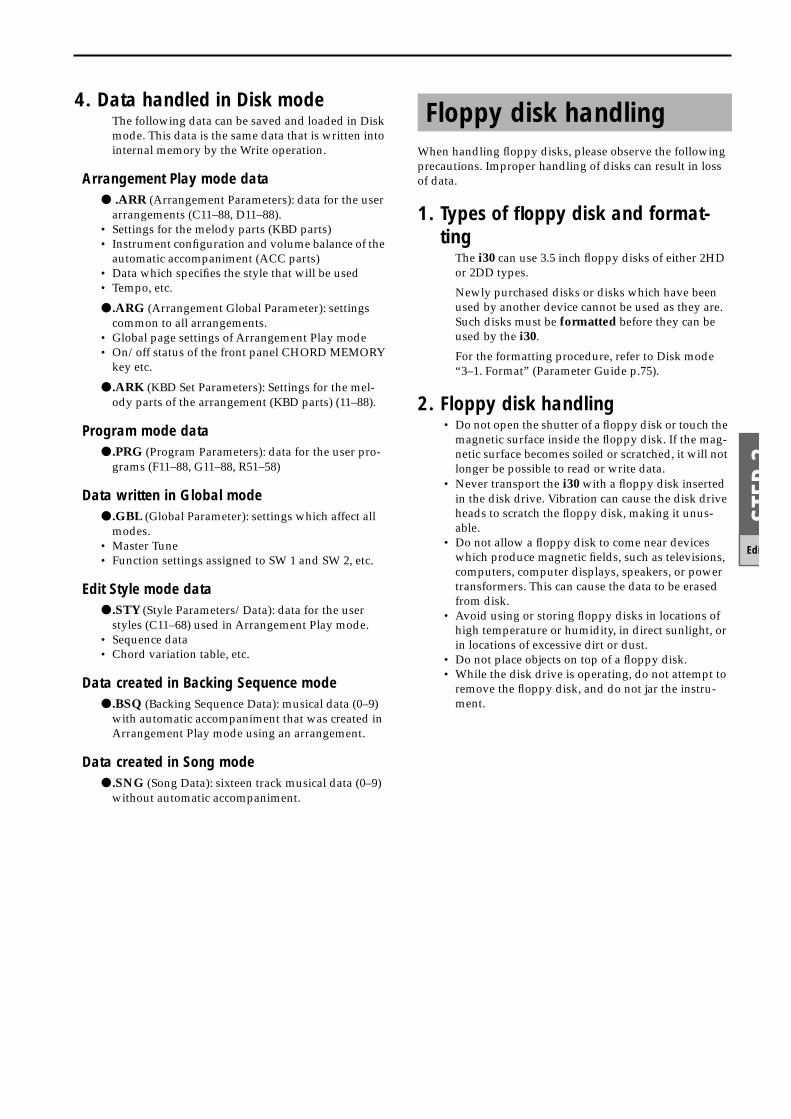
STEP
3
Edi
4. Data handled in Disk modeThe following data can be saved and loaded in Disk mode. This data is the same data that is written into internal memory by the Write operation.
Arrangement Play mode data● .ARR (Arrangement Parameters): data for the user
arrangements (C11–88, D11–88).• Settings for the melody parts (KBD parts)• Instrument configuration and volume balance of the
automatic accompaniment (ACC parts)• Data which specifies the style that will be used• Tempo, etc.
● .ARG (Arrangement Global Parameter): settings common to all arrangements.
• Global page settings of Arrangement Play mode• On/off status of the front panel CHORD MEMORY
key etc.
● .ARK (KBD Set Parameters): Settings for the mel-ody parts of the arrangement (KBD parts) (11–88).
Program mode data● .PRG (Program Parameters): data for the user pro-
grams (F11–88, G11–88, R51–58)
Data written in Global mode● .GBL (Global Parameter): settings which affect all
modes.• Master Tune• Function settings assigned to SW 1 and SW 2, etc.
Edit Style mode data● .STY (Style Parameters/Data): data for the user
styles (C11–68) used in Arrangement Play mode.• Sequence data• Chord variation table, etc.
Data created in Backing Sequence mode● .BSQ (Backing Sequence Data): musical data (0–9)
with automatic accompaniment that was created in Arrangement Play mode using an arrangement.
Data created in Song mode● .SNG (Song Data): sixteen track musical data (0–9)
without automatic accompaniment.
When handling floppy disks, please observe the following precautions. Improper handling of disks can result in loss of data.
1. Types of floppy disk and format-ting
The i30 can use 3.5 inch floppy disks of either 2HD or 2DD types.
Newly purchased disks or disks which have been used by another device cannot be used as they are. Such disks must be formatted before they can be used by the i30.
For the formatting procedure, refer to Disk mode “3–1. Format” (Parameter Guide p.75).
2. Floppy disk handling• Do not open the shutter of a floppy disk or touch the
magnetic surface inside the floppy disk. If the mag-netic surface becomes soiled or scratched, it will not longer be possible to read or write data.
• Never transport the i30 with a floppy disk inserted in the disk drive. Vibration can cause the disk drive heads to scratch the floppy disk, making it unus-able.
• Do not allow a floppy disk to come near devices which produce magnetic fields, such as televisions, computers, computer displays, speakers, or power transformers. This can cause the data to be erased from disk.
• Avoid using or storing floppy disks in locations of high temperature or humidity, in direct sunlight, or in locations of excessive dirt or dust.
• Do not place objects on top of a floppy disk.• While the disk drive is operating, do not attempt to
remove the floppy disk, and do not jar the instru-ment.
Floppy disk handling
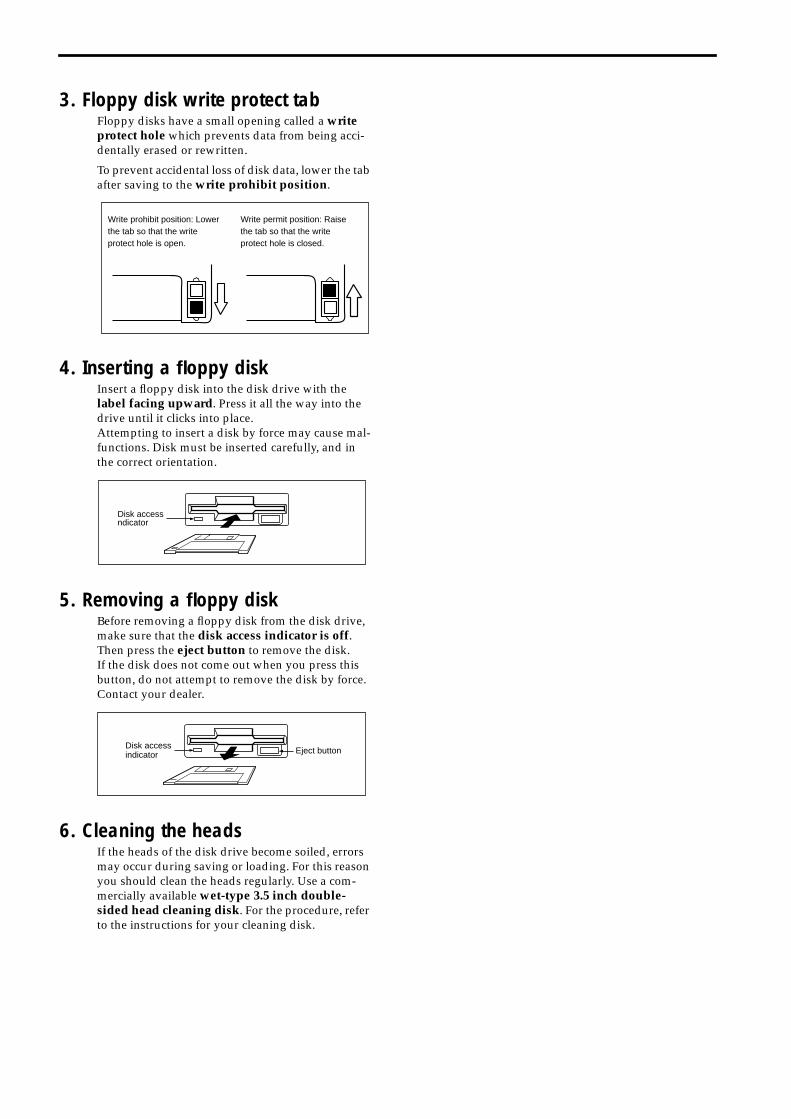
3. Floppy disk write protect tabFloppy disks have a small opening called a write protect hole which prevents data from being acci-dentally erased or rewritten.
To prevent accidental loss of disk data, lower the tab after saving to the write prohibit position.
4. Inserting a floppy diskInsert a floppy disk into the disk drive with the label facing upward. Press it all the way into the drive until it clicks into place.Attempting to insert a disk by force may cause mal-functions. Disk must be inserted carefully, and in the correct orientation.
5. Removing a floppy diskBefore removing a floppy disk from the disk drive, make sure that the disk access indicator is off. Then press the eject button to remove the disk.If the disk does not come out when you press this button, do not attempt to remove the disk by force. Contact your dealer.
6. Cleaning the headsIf the heads of the disk drive become soiled, errors may occur during saving or loading. For this reason you should clean the heads regularly. Use a com-mercially available wet-type 3.5 inch double-sided head cleaning disk. For the procedure, refer to the instructions for your cleaning disk.
Write permit position: Raise the tab so that the write protect hole is closed.
Write prohibit position: Lower the tab so that the write protect hole is open.
Disk access ndicator
Disk access indicator Eject button
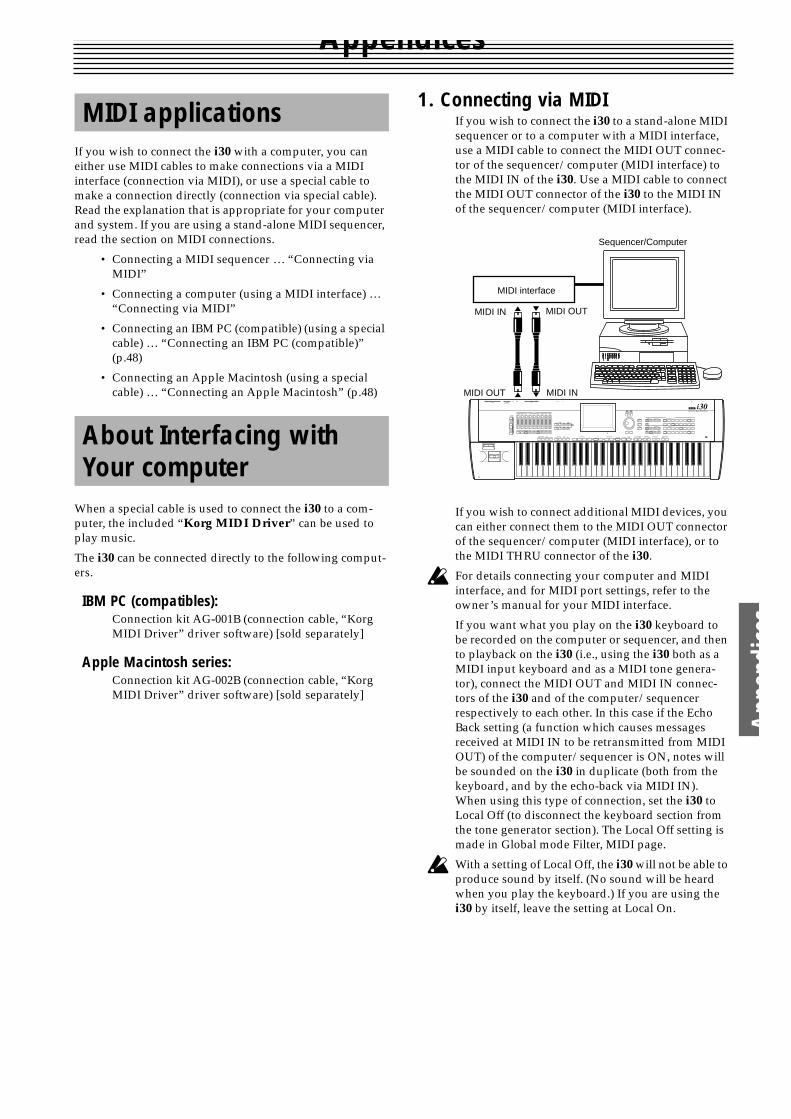
Appe
ndice
s
Appendices
If you wish to connect the i30 with a computer, you can either use MIDI cables to make connections via a MIDI interface (connection via MIDI), or use a special cable to make a connection directly (connection via special cable). Read the explanation that is appropriate for your computer and system. If you are using a stand-alone MIDI sequencer, read the section on MIDI connections.
• Connecting a MIDI sequencer … “Connecting via MIDI”
• Connecting a computer (using a MIDI interface) … “Connecting via MIDI”
• Connecting an IBM PC (compatible) (using a special cable) … “Connecting an IBM PC (compatible)” (p.48)
• Connecting an Apple Macintosh (using a special cable) … “Connecting an Apple Macintosh” (p.48)
When a special cable is used to connect the i30 to a com-puter, the included “Korg MIDI Driver” can be used to play music.
The i30 can be connected directly to the following comput-ers.
IBM PC (compatibles):Connection kit AG-001B (connection cable, “Korg MIDI Driver” driver software) [sold separately]
Apple Macintosh series:Connection kit AG-002B (connection cable, “Korg MIDI Driver” driver software) [sold separately]
1. Connecting via MIDIIf you wish to connect the i30 to a stand-alone MIDI sequencer or to a computer with a MIDI interface, use a MIDI cable to connect the MIDI OUT connec-tor of the sequencer/computer (MIDI interface) to the MIDI IN of the i30. Use a MIDI cable to connect the MIDI OUT connector of the i30 to the MIDI IN of the sequencer/computer (MIDI interface).
If you wish to connect additional MIDI devices, you can either connect them to the MIDI OUT connector of the sequencer/computer (MIDI interface), or to the MIDI THRU connector of the i30.
For details connecting your computer and MIDI interface, and for MIDI port settings, refer to the owner’s manual for your MIDI interface.
If you want what you play on the i30 keyboard to be recorded on the computer or sequencer, and then to playback on the i30 (i.e., using the i30 both as a MIDI input keyboard and as a MIDI tone genera-tor), connect the MIDI OUT and MIDI IN connec-tors of the i30 and of the computer/sequencer respectively to each other. In this case if the Echo Back setting (a function which causes messages received at MIDI IN to be retransmitted from MIDI OUT) of the computer/sequencer is ON, notes will be sounded on the i30 in duplicate (both from the keyboard, and by the echo-back via MIDI IN). When using this type of connection, set the i30 to Local Off (to disconnect the keyboard section from the tone generator section). The Local Off setting is made in Global mode Filter, MIDI page.
With a setting of Local Off, the i30 will not be able to produce sound by itself. (No sound will be heard when you play the keyboard.) If you are using the i30 by itself, leave the setting at Local On.
MIDI applications
About Interfacing with Your computer
Sequencer/Computer
MIDI OUT MIDI IN
MIDI interface
MIDI OUTMIDI IN
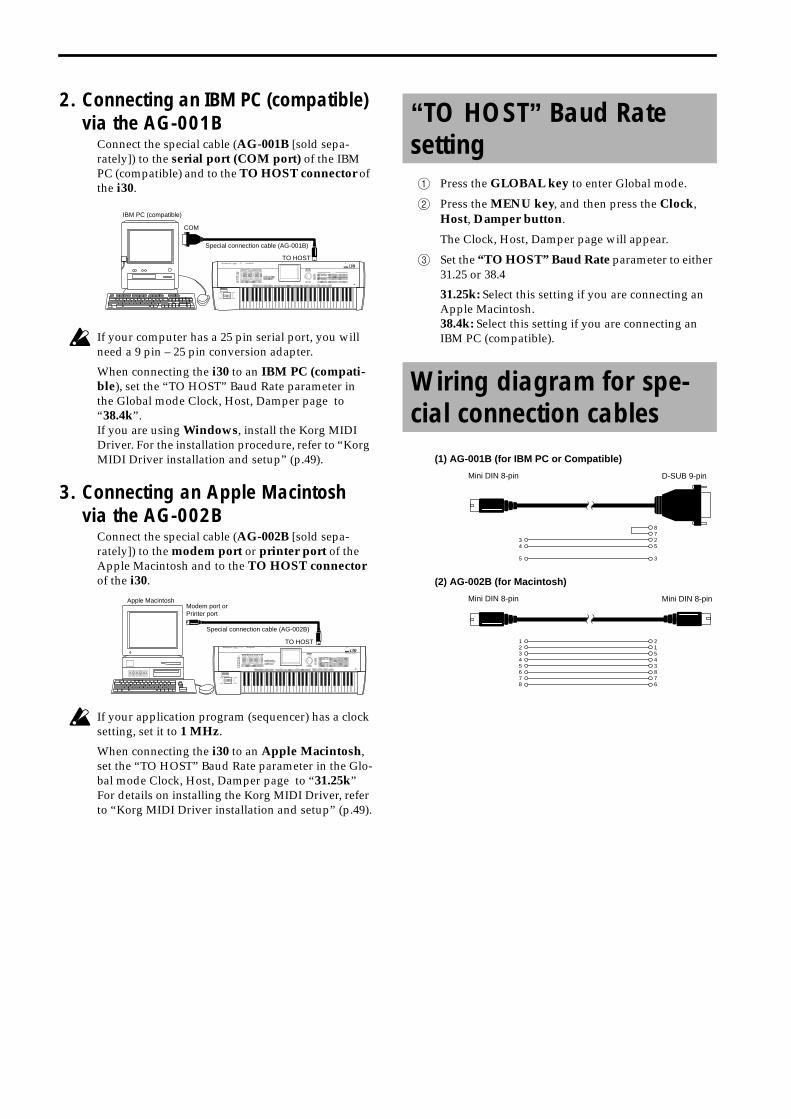
2. Connecting an IBM PC (compatible) via the AG-001B
Connect the special cable (AG-001B [sold sepa-rately]) to the serial port (COM port) of the IBM PC (compatible) and to the TO HOST connector of the i30.
If your computer has a 25 pin serial port, you will need a 9 pin – 25 pin conversion adapter.
When connecting the i30 to an IBM PC (compati-ble), set the “TO HOST” Baud Rate parameter in the Global mode Clock, Host, Damper page to “38.4k”.If you are using Windows, install the Korg MIDI Driver. For the installation procedure, refer to “Korg MIDI Driver installation and setup” (p.49).
3. Connecting an Apple Macintosh via the AG-002B
Connect the special cable (AG-002B [sold sepa-rately]) to the modem port or printer port of the Apple Macintosh and to the TO HOST connector of the i30.
If your application program (sequencer) has a clock setting, set it to 1 MHz.
When connecting the i30 to an Apple Macintosh, set the “TO HOST” Baud Rate parameter in the Glo-bal mode Clock, Host, Damper page to “31.25k”For details on installing the Korg MIDI Driver, refer to “Korg MIDI Driver installation and setup” (p.49).
1 Press the GLOBAL key to enter Global mode.
2 Press the MENU key, and then press the Clock, Host, Damper button.
The Clock, Host, Damper page will appear.
3 Set the “TO HOST” Baud Rate parameter to either 31.25 or 38.4
31.25k: Select this setting if you are connecting an Apple Macintosh.38.4k: Select this setting if you are connecting an IBM PC (compatible).
COM
IBM PC (compatible)
Special connection cable (AG-001B)
TO HOST
Modem port orPrinter port
TO HOST
Apple Macintosh
Special connection cable (AG-002B)
“TO HOST” Baud Rate setting
Wiring diagram for spe-cial connection cables
(2) AG-002B (for Macintosh)
Mini DIN 8-pin Mini DIN 8-pin
12345678
21543876
(1) AG-001B (for IBM PC or Compatible)
Mini DIN 8-pin D-SUB 9-pin
34
5
8725
3
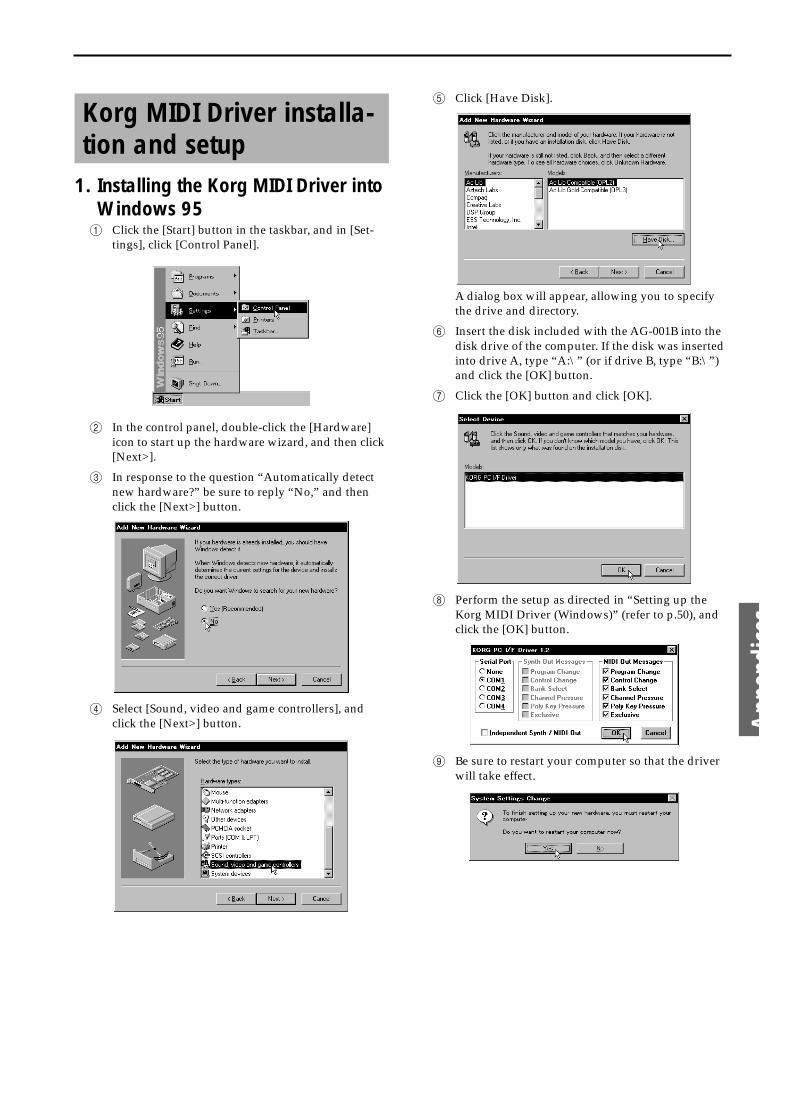
Appe
ndice
s
1. Installing the Korg MIDI Driver into Windows 951 Click the [Start] button in the taskbar, and in [Set-
tings], click [Control Panel].
2 In the control panel, double-click the [Hardware] icon to start up the hardware wizard, and then click [Next>].
3 In response to the question “Automatically detect new hardware?” be sure to reply “No,” and then click the [Next>] button.
4 Select [Sound, video and game controllers], and click the [Next>] button.
5 Click [Have Disk].
A dialog box will appear, allowing you to specify the drive and directory.
6 Insert the disk included with the AG-001B into the disk drive of the computer. If the disk was inserted into drive A, type “A:\” (or if drive B, type “B:\”) and click the [OK] button.
7 Click the [OK] button and click [OK].
8 Perform the setup as directed in “Setting up the Korg MIDI Driver (Windows)” (refer to p.50), and click the [OK] button.
9 Be sure to restart your computer so that the driver will take effect.
Korg MIDI Driver installa-tion and setup

Modifying the Korg MIDI Driver setup for Win-dows 951 In the control panel, double-click the [Multimedia]
icon, and the multimedia properties dialog box will appear.
2 Click the [Advanced] tab located at the upper right.
3 Click the [+] for [MIDI Devices] (the display will change to [–]), and click [KORG PC I/F MIDI Port].
4 Click the [Properties] button.The KORG PC I/F MIDI Port properties will be dis-played.
5 Click the [Settings] button.
Perform the setup as directed in “Setting up the Korg MIDI Driver (Windows),” and click the [OK] button.
If you have modified the settings, you must re-start Windows.
2. Installing the Korg MIDI Driver into Windows 3.11 In the control panel, double-click the Driver icon.
2 Click the [Add...] button.
3 In the driver list, select [Unlisted or updated driver] and click the [OK] button.
4 Insert the disk included with the AG-001B into the disk drive of the computer. If you inserted the disk into drive A, type “A:\” (for drive B, type “B:\”), and click the [OK] button.
5 Select Korg PC I/F Driver, and click the [OK] but-ton. The setup window will appear. Follow the directions in “Setting up the Korg MIDI Driver (Windows)” (refer to p.51) to perform the setup.
6 After setup is complete, remove the disk and select [Restart] to make the newly installed driver avail-able.
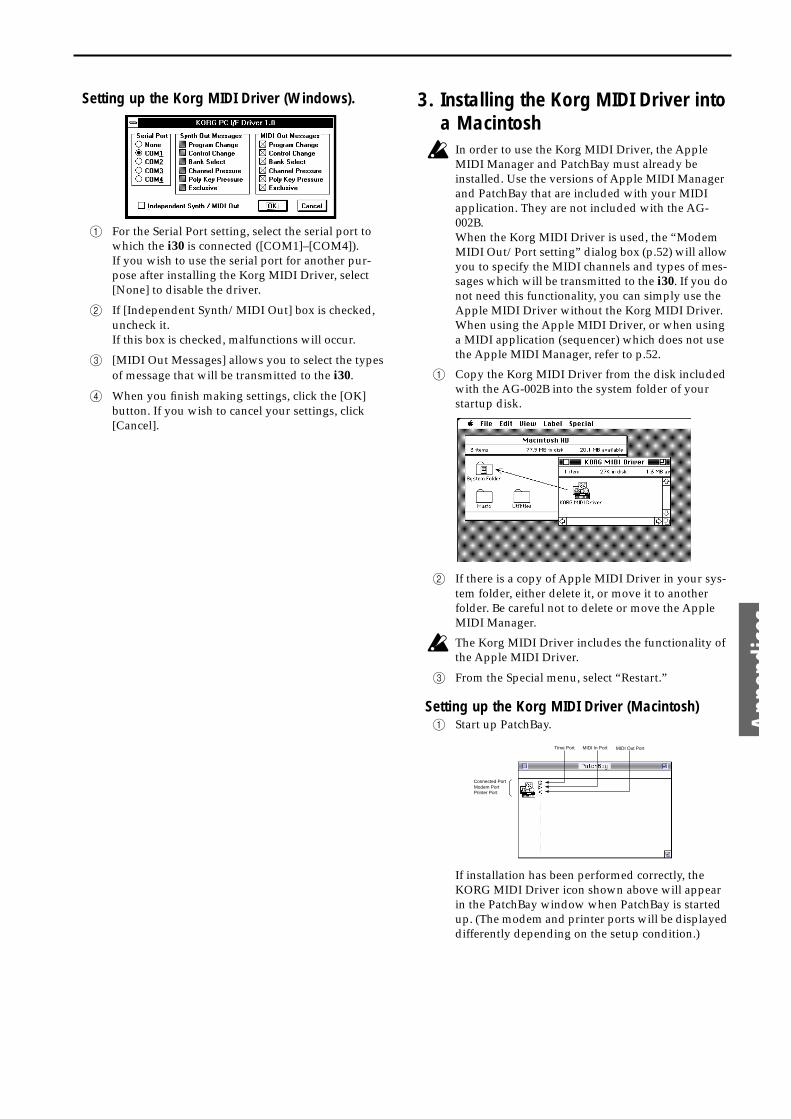
Appe
ndice
s
Setting up the Korg MIDI Driver (Windows).
1 For the Serial Port setting, select the serial port to which the i30 is connected ([COM1]–[COM4]).If you wish to use the serial port for another pur-pose after installing the Korg MIDI Driver, select [None] to disable the driver.
2 If [Independent Synth/MIDI Out] box is checked, uncheck it.If this box is checked, malfunctions will occur.
3 [MIDI Out Messages] allows you to select the types of message that will be transmitted to the i30.
4 When you finish making settings, click the [OK] button. If you wish to cancel your settings, click [Cancel].
3. Installing the Korg MIDI Driver into a Macintosh
In order to use the Korg MIDI Driver, the Apple MIDI Manager and PatchBay must already be installed. Use the versions of Apple MIDI Manager and PatchBay that are included with your MIDI application. They are not included with the AG-002B.When the Korg MIDI Driver is used, the “Modem MIDI Out/Port setting” dialog box (p.52) will allow you to specify the MIDI channels and types of mes-sages which will be transmitted to the i30. If you do not need this functionality, you can simply use the Apple MIDI Driver without the Korg MIDI Driver. When using the Apple MIDI Driver, or when using a MIDI application (sequencer) which does not use the Apple MIDI Manager, refer to p.52.
1 Copy the Korg MIDI Driver from the disk included with the AG-002B into the system folder of your startup disk.
2 If there is a copy of Apple MIDI Driver in your sys-tem folder, either delete it, or move it to another folder. Be careful not to delete or move the Apple MIDI Manager.
The Korg MIDI Driver includes the functionality of the Apple MIDI Driver.
3 From the Special menu, select “Restart.”
Setting up the Korg MIDI Driver (Macintosh)1 Start up PatchBay.
If installation has been performed correctly, the KORG MIDI Driver icon shown above will appear in the PatchBay window when PatchBay is started up. (The modem and printer ports will be displayed differently depending on the setup condition.)
Modem Port
Time Port MIDI In Port MIDI Out Port
Printer Port
Connected Port
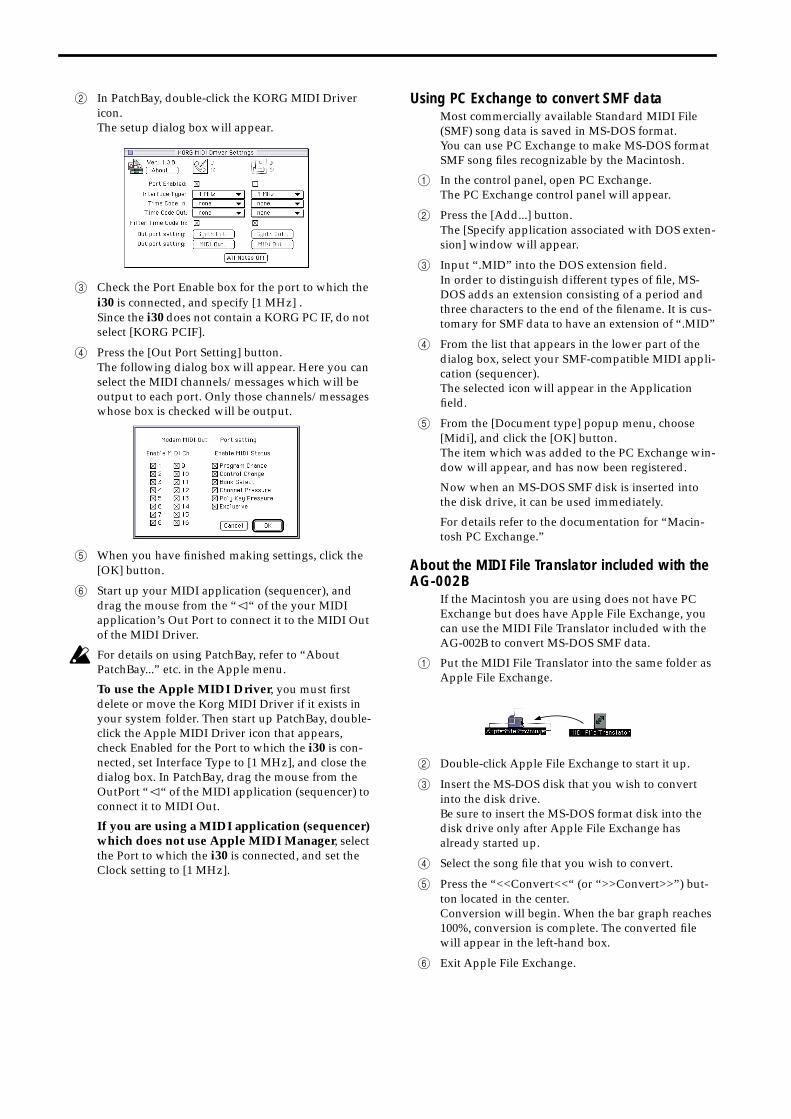
2 In PatchBay, double-click the KORG MIDI Driver icon.The setup dialog box will appear.
3 Check the Port Enable box for the port to which the i30 is connected, and specify [1 MHz] .Since the i30 does not contain a KORG PC IF, do not select [KORG PCIF].
4 Press the [Out Port Setting] button.The following dialog box will appear. Here you can select the MIDI channels/messages which will be output to each port. Only those channels/messages whose box is checked will be output.
5 When you have finished making settings, click the [OK] button.
6 Start up your MIDI application (sequencer), and drag the mouse from the “w“ of the your MIDI application’s Out Port to connect it to the MIDI Out of the MIDI Driver.
For details on using PatchBay, refer to “About PatchBay...” etc. in the Apple menu.
To use the Apple MIDI Driver, you must first delete or move the Korg MIDI Driver if it exists in your system folder. Then start up PatchBay, double-click the Apple MIDI Driver icon that appears, check Enabled for the Port to which the i30 is con-nected, set Interface Type to [1 MHz], and close the dialog box. In PatchBay, drag the mouse from the OutPort “w“ of the MIDI application (sequencer) to connect it to MIDI Out.
If you are using a MIDI application (sequencer) which does not use Apple MIDI Manager, select the Port to which the i30 is connected, and set the Clock setting to [1 MHz].
Using PC Exchange to convert SMF dataMost commercially available Standard MIDI File (SMF) song data is saved in MS-DOS format.You can use PC Exchange to make MS-DOS format SMF song files recognizable by the Macintosh.
1 In the control panel, open PC Exchange.The PC Exchange control panel will appear.
2 Press the [Add...] button.The [Specify application associated with DOS exten-sion] window will appear.
3 Input “.MID” into the DOS extension field.In order to distinguish different types of file, MS-DOS adds an extension consisting of a period and three characters to the end of the filename. It is cus-tomary for SMF data to have an extension of “.MID”
4 From the list that appears in the lower part of the dialog box, select your SMF-compatible MIDI appli-cation (sequencer).The selected icon will appear in the Application field.
5 From the [Document type] popup menu, choose [Midi], and click the [OK] button.The item which was added to the PC Exchange win-dow will appear, and has now been registered.
Now when an MS-DOS SMF disk is inserted into the disk drive, it can be used immediately.
For details refer to the documentation for “Macin-tosh PC Exchange.”
About the MIDI File Translator included with the AG-002B
If the Macintosh you are using does not have PC Exchange but does have Apple File Exchange, you can use the MIDI File Translator included with the AG-002B to convert MS-DOS SMF data.
1 Put the MIDI File Translator into the same folder as Apple File Exchange.
2 Double-click Apple File Exchange to start it up.
3 Insert the MS-DOS disk that you wish to convert into the disk drive.Be sure to insert the MS-DOS format disk into the disk drive only after Apple File Exchange has already started up.
4 Select the song file that you wish to convert.
5 Press the “<<Convert<<“ (or “>>Convert>>”) but-ton located in the center.Conversion will begin. When the bar graph reaches 100%, conversion is complete. The converted file will appear in the left-hand box.
6 Exit Apple File Exchange.
Appe
ndice
s
C
Can’t Calibrate• Calibration could not be performed correctly.
☞ Perform the operation again.
Complete• Processing has been completed. Proceed to the next
step.
D
Destination and source are identical.• When executing a Copy or Bounce command, the
same setting was made for both the source and the destination.
Destination block has not enough memory.• When executing the Save command, there was
insufficient space in the save destination block.
☞ Either change the save destination, or use the Erase User Style command to erase a style from the save destination block.
Destination is empty.• The backing sequence, song, track, or pattern that
was specified as the destination contains no data.
Destination measure is empty.• The measure that was specified as the destination
contains no data.
E
Error in formatting medium.• When formatting a disk, a bad sector was found on
disk. Formatting cannot be performed.
☞ Use another disk.
Error in reading from medium.• Failure occurred when reading from disk.
☞ Try the operation once again. If the same error occurs, it is possible that the data on disk has been lost.
Error in writing to medium.• Failure occurred when writing to disk.
☞ It is possible that the disk is physically damaged. Use a different disk.
Events of track overflow.• The maximum number of events on one track
(16,384 events) has been exceeded.
F
File already exists.• When the Create Directory, Copy, or Rename
command was executed, an identically-named directory or file already exists.
☞ Either use the Delete command to delete the old directory or file, or change the name.
File is read only protected.• You attempted to delete or overwrite a disk file
which was read-only.
☞ Save the data under a different name.
File/path not found.• The specified file or directory does not exist. Or, you
attempted to open a DOS directory which exceeds the limit of hierarchy (64 characters for the full path name).
I
Illegal file description.• An invalid filename was input when saving a file or
creating a directory.
☞ Use a filename other than CON, PRN or AUX.
• No filename was assigned.
☞ Assign a filename.
Illegal SMF data.• You attempted to load or playback a file which was
not a Standard MIDI File.
Illegal SMF division.• You attempted to load a Standard MIDI File that
was time-code based.
Illegal SMF format.• You attempted to load a Format 2 SMF.
☞ Select an SMF file of either Format 0 or 1 for loading.
M
Measure is occupied by pattern.• The beginning measure of a pattern exists at the
destination, and execution was not possible since the pattern was not opened.
Measure over max.• Executing the edit operation would cause the limit
of 999 measures to be exceeded. Alternatively, exe-cuting the edit operation would exceed the length of the Style.
Medium changed.• The floppy disk was exchanged.
Error Messages
Medium unavailable• A command was executed for a floppy disk which is
not in MS-DOS 2HD or 2DD format.
Medium write protected.• The writing destination floppy disk is write pro-
tected.
☞ Turn off the write protect setting of the floppy disk.
N
No Medium.• A floppy disk is not inserted.
No space available on medium.• When the Save or Create Directory command was
executed, there was insufficient space on disk.
☞ Either delete an existing file, or insert a disk which has vacant capacity.
Not enough memory.• The specified editing operation could not be per-
formed since there was insufficient sequence mem-ory available.
☞ Free more memory by deleting data such as unneeded songs, tracks or patterns.
Not enough memory to load.• When loading SMF data, sequence memory became
full.
☞ It is possible that the data can be loaded if you delete unneeded song data.
Not enough memory to open pattern.• There was insufficient sequence memory to open
the pattern.
☞ Delete unneeded songs, tracks or patterns etc. to free more memory.
P
Pattern conflicts with events.• When the Bounce command was executed, there
was a measure in which a pattern was Put, and the operation cannot be executed since the pattern was not opened.
☞ Open the pattern.
Pattern has been put on destination or source track. Open Pattern?
• A pattern has been put on either the destination or the source. At this point you will be able to specify yes/no wheter or not you want the pattern to be opened.
R
Root directory is full.• When you copied a file to the root directory or exe-
cuted the Create Directory command, the maxi-mum number of root directory entries was exceeded.
☞ Either delete an existing file or directory, or change disks.
S
Source includes pattern.• The source includes the second or subsequent mea-
sures of a pattern, and execution is not possible since the pattern was not opened.
Source is empty.• The track, measure or pattern that was specified as
the source contains no data.
Source overlaps destination.• When the Copy Measure command was executed,
the measures of the source and destination overlap.
T
Tempo Track can’t be recorded alone.• You attempted to begin recording when the Tempo
Track was the current track.
☞ It is not possible to record the tempo track by itself. If you wish to record tempo changes, set the tempo track to REC when recording another track, and record them together.
This style has not been done “Write Style” yet. Do you discard this edited style?”
• You selected another style before writing the style that was currently being edited.
☞ If you wish to write the style that is being edited, press the Cancel button and then execute the Write Style command.
Track number over.• When loading SMF data, the number of tracks being
loaded exceeded sixteen.
U
Unable to create directory.• You attempted to create a directory that exceeded
the limit of directory depth (64 characters for the full path name).
Appe
ndice
s
Y
You can’t undo this change. Are you sure?• There is insufficient free area in the sequence mem-
ory, it will not be possible to access the Undo func-tion by pressing the COMPARE key.
☞ To increase the amount of free memory, use the Backing Sequence mode command Erase Backing Sequence or the Song mode command Erase Song to delete unneeded backing sequence data or song data.
If a problem occurs, please check the following items.
Power does not turn on• Is the power cable connected to the AC outlet?
☞ Check the connections (p.6).
• Is the POWER switch turned on?
☞ Turn on the POWER switch located on the rear panel.
Power is on but nothing appears in the LCD screen
☞ Use the rear panel CONTRAST knob to adjust the contrast of the LCD screen.
Operations in the LCD screen are not input cor-rectly
☞ Execute the Touch Panel Calibration command to adjust the sensitivity of the touch panel.
In the Global mode Basic Setup page, execute the Touch Panel Calibration page menu command. If the screen has drifted so far that you are unable to access the page menu commands, simultaneously press the EXIT key and the [+] key in Global mode.
No sound• Are your amp, mixer, or headphones connected to
the correct jacks?
☞ Check the connections (p.6).
• Is the power of your amp and mixer turned on?
• Is Local Control turned ON?
☞ Check Local Control On in the Filter, MIDI page of Global mode.
• Is the MASTER VOLUME slider or the OUTPUT MIXER sliders raised?
• If there is no sound from the OUTPUT 3 and 4 jacks, has the effect placement been set so that the sound is output from the OUTPUT 3 and 4 jacks? Alterna-tively, are the effect send levels set above zero?
☞ In the Effect Placement page, select a placement that will output the sound from the OUTPUT 3 and 4 jacks. Set the C Send Level and D Send Level parameters above zero.
• A specific part does not sound in Arrangement Play mode or Backing Sequence mode: Is the front panel PLAY/MUTE key LED dark?
• A specific part does not sound in Song mode or Song Play mode: Is Play/Mute checked? Is Internal checked? Is Pan set other than OFF, and C Send Level and D Send Level set above zero? Do the set-tings of the Key Window page and Velocity Win-dow page allow the notes to be heard?
Notes are stuck• In Program mode OSC, is the OSC Basic page Hold
parameter unchecked?
• In the Global mode Clock, Host, Damper page, is the Damper Switch Polarity set correctly?
Arrangement does not playback correctly after data was loaded
• Were all check boxes in the dialog box checked when you saved the data?
Backing sequence does not playback correctly after data was loaded
• Were all check boxes in the dialog box checked when you saved the data?
Song does not playback correctly after data was loaded
• Were all check boxes in the dialog box checked when you saved the data?
Playback does not start when you press the START/STOP key
• In the Global mode Clock, Host, Damper page, is the Clock Source set to Internal?
Cannot record in Backing Sequence mode or Song mode
• In the Global mode Clock, Host, Damper page, is the Clock Source set to Internal?
No response to MIDI messages transmitted from an external device
• Are all MIDI cables connected correctly?
• Is MIDI data being received on the channel on which it is being transmitted?
Incorrect response to MIDI messages transmitted from an external device
• Are the Global mode Filter, MIDI page settings Enable Program Change, Enable Bank Change, Enable Control Change, and Enable Aftertouch all checked?
• Are the messages being transmitted supported by the i30?
Settings for oscillator 2 are not displayed• Is a double program selected?
Troubleshooting
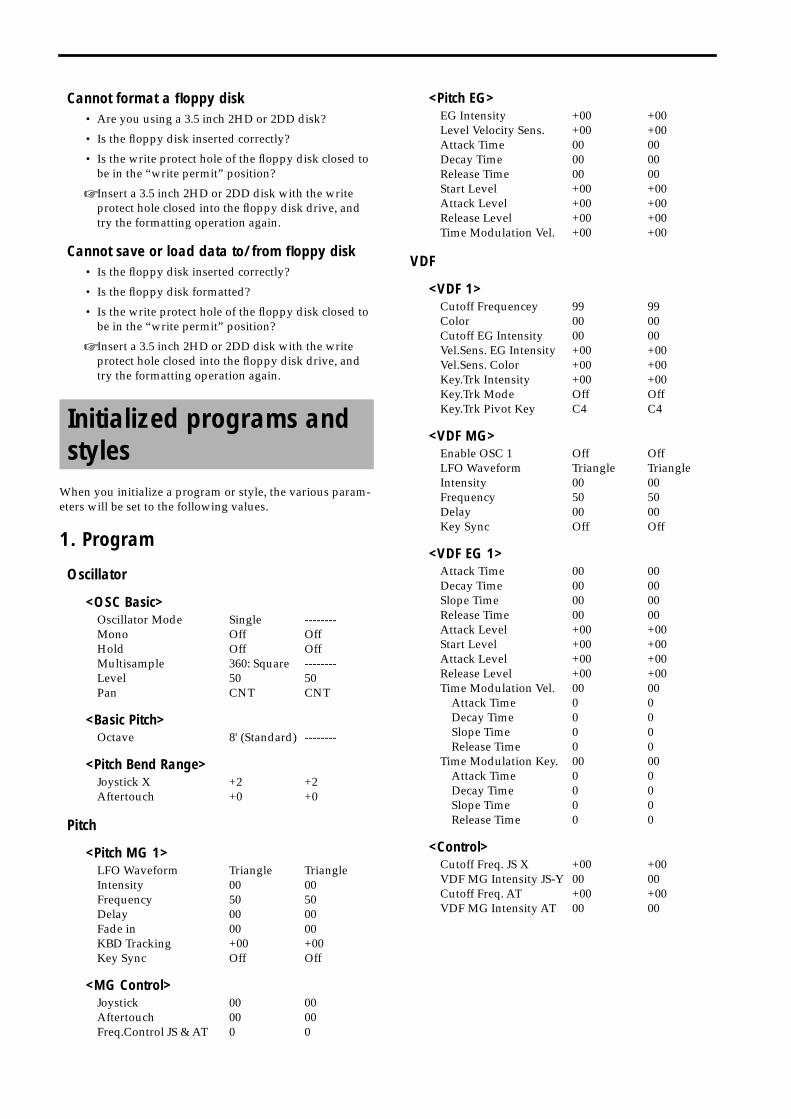
Cannot format a floppy disk• Are you using a 3.5 inch 2HD or 2DD disk?
• Is the floppy disk inserted correctly?
• Is the write protect hole of the floppy disk closed to be in the “write permit” position?
☞ Insert a 3.5 inch 2HD or 2DD disk with the write protect hole closed into the floppy disk drive, and try the formatting operation again.
Cannot save or load data to/from floppy disk• Is the floppy disk inserted correctly?
• Is the floppy disk formatted?
• Is the write protect hole of the floppy disk closed to be in the “write permit” position?
☞ Insert a 3.5 inch 2HD or 2DD disk with the write protect hole closed into the floppy disk drive, and try the formatting operation again.
When you initialize a program or style, the various param-eters will be set to the following values.
1. Program
Oscillator
<OSC Basic>Oscillator Mode Single --------Mono Off OffHold Off OffMultisample 360: Square --------Level 50 50Pan CNT CNT
<Basic Pitch>Octave 8' (Standard) --------
<Pitch Bend Range>Joystick X +2 +2Aftertouch +0 +0
Pitch
<Pitch MG 1>LFO Waveform Triangle TriangleIntensity 00 00Frequency 50 50Delay 00 00Fade in 00 00KBD Tracking +00 +00Key Sync Off Off
<MG Control>Joystick 00 00Aftertouch 00 00Freq.Control JS & AT 0 0
<Pitch EG>EG Intensity +00 +00Level Velocity Sens. +00 +00Attack Time 00 00Decay Time 00 00Release Time 00 00Start Level +00 +00Attack Level +00 +00Release Level +00 +00Time Modulation Vel. +00 +00
VDF
<VDF 1>Cutoff Frequencey 99 99Color 00 00Cutoff EG Intensity 00 00Vel.Sens. EG Intensity +00 +00Vel.Sens. Color +00 +00Key.Trk Intensity +00 +00Key.Trk Mode Off OffKey.Trk Pivot Key C4 C4
<VDF MG>Enable OSC 1 Off OffLFO Waveform Triangle TriangleIntensity 00 00Frequency 50 50Delay 00 00Key Sync Off Off
<VDF EG 1>Attack Time 00 00Decay Time 00 00Slope Time 00 00Release Time 00 00Attack Level +00 +00Start Level +00 +00Attack Level +00 +00Release Level +00 +00Time Modulation Vel. 00 00
Attack Time 0 0Decay Time 0 0Slope Time 0 0Release Time 0 0
Time Modulation Key. 00 00Attack Time 0 0Decay Time 0 0Slope Time 0 0Release Time 0 0
<Control>Cutoff Freq. JS X +00 +00VDF MG Intensity JS-Y 00 00Cutoff Freq. AT +00 +00VDF MG Intensity AT 00 00
Initialized programs and styles
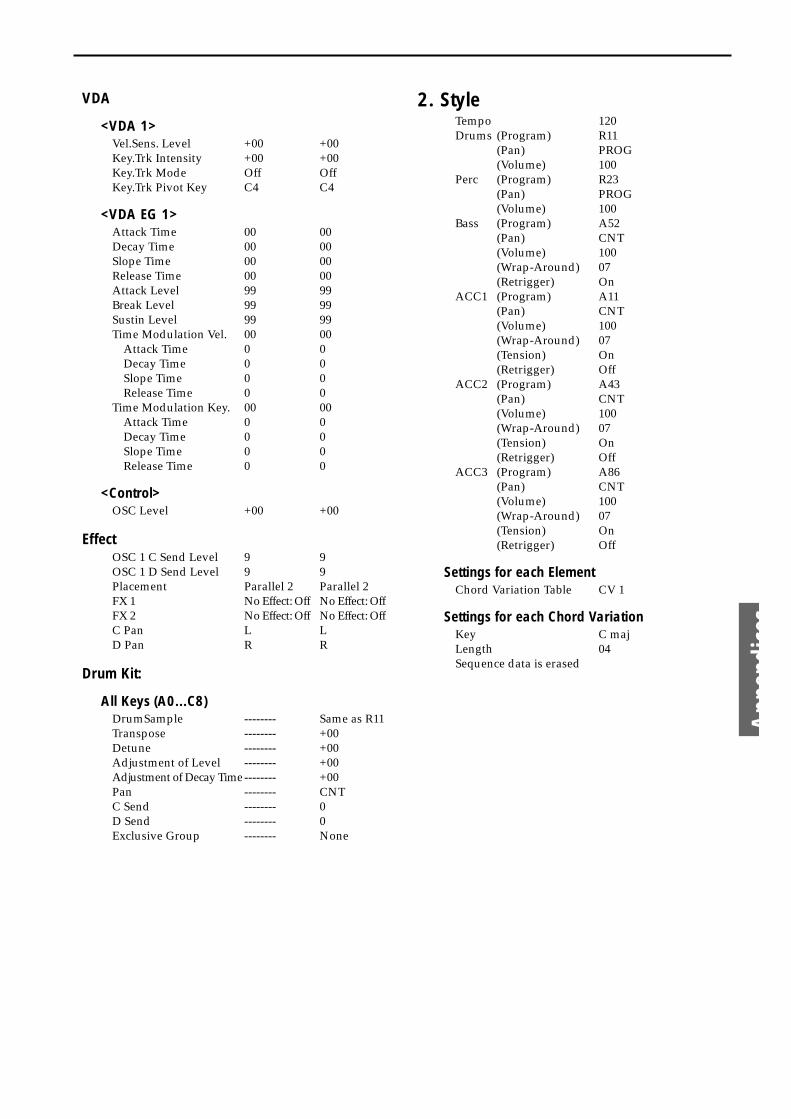
Appe
ndice
s
VDA
<VDA 1>Vel.Sens. Level +00 +00Key.Trk Intensity +00 +00Key.Trk Mode Off OffKey.Trk Pivot Key C4 C4
<VDA EG 1>Attack Time 00 00Decay Time 00 00Slope Time 00 00Release Time 00 00Attack Level 99 99Break Level 99 99Sustin Level 99 99Time Modulation Vel. 00 00
Attack Time 0 0Decay Time 0 0Slope Time 0 0Release Time 0 0
Time Modulation Key. 00 00Attack Time 0 0Decay Time 0 0Slope Time 0 0Release Time 0 0
<Control>OSC Level +00 +00
EffectOSC 1 C Send Level 9 9OSC 1 D Send Level 9 9Placement Parallel 2 Parallel 2FX 1 No Effect: Off No Effect: OffFX 2 No Effect: Off No Effect: OffC Pan L LD Pan R R
Drum Kit:
All Keys (A0...C8)DrumSample -------- Same as R11Transpose -------- +00Detune -------- +00Adjustment of Level -------- +00Adjustment of Decay Time-------- +00Pan -------- CNTC Send -------- 0D Send -------- 0Exclusive Group -------- None
2. StyleTempo 120Drums (Program) R11
(Pan) PROG(Volume) 100
Perc (Program) R23(Pan) PROG(Volume) 100
Bass (Program) A52(Pan) CNT(Volume) 100(Wrap-Around) 07(Retrigger) On
ACC1 (Program) A11(Pan) CNT(Volume) 100(Wrap-Around) 07(Tension) On(Retrigger) Off
ACC2 (Program) A43(Pan) CNT(Volume) 100(Wrap-Around) 07(Tension) On(Retrigger) Off
ACC3 (Program) A86(Pan) CNT(Volume) 100(Wrap-Around) 07(Tension) On(Retrigger) Off
Settings for each ElementChord Variation Table CV 1
Settings for each Chord VariationKey C majLength 04Sequence data is erased
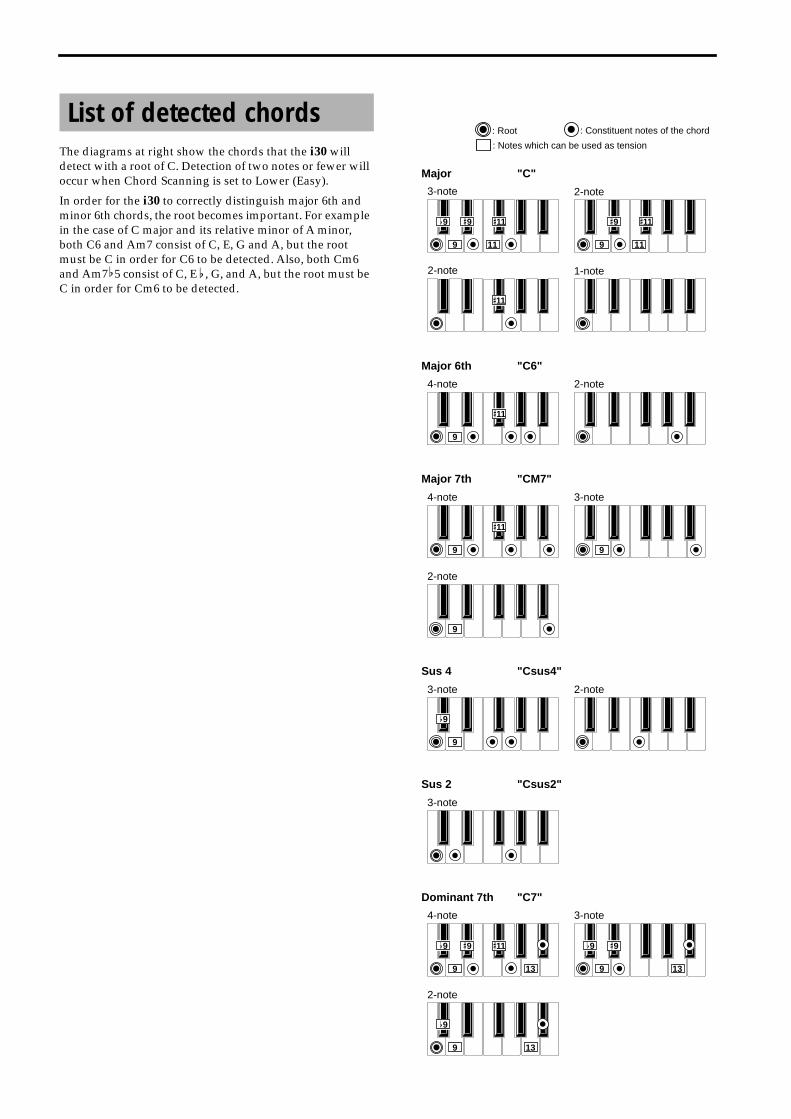
The diagrams at right show the chords that the i30 will detect with a root of C. Detection of two notes or fewer will occur when Chord Scanning is set to Lower (Easy).
In order for the i30 to correctly distinguish major 6th and minor 6th chords, the root becomes important. For example in the case of C major and its relative minor of A minor, both C6 and Am7 consist of C, E, G and A, but the root must be C in order for C6 to be detected. Also, both Cm6 and Am7 � 5 consist of C, E � , G, and A, but the root must be C in order for Cm6 to be detected.
List of detected chords: Root
Major "C"
Major 6th "C6"
Major 7th "CM7"
Sus 4 "Csus4"
Sus 2 "Csus2"
Dominant 7th "C7"
3-note 2-note
2-note
2-note
3-note
2-note
4-note
4-note 3-note
2-note
3-note
4-note 3-note
2-note
1-note
9
�11�9�911
�9 �11
9 11
�11
9
�11
9
�11
9
9
�99
�99
�11�913
�99
�913
�99 13
: Notes which can be used as tension
: Constituent notes of the chord
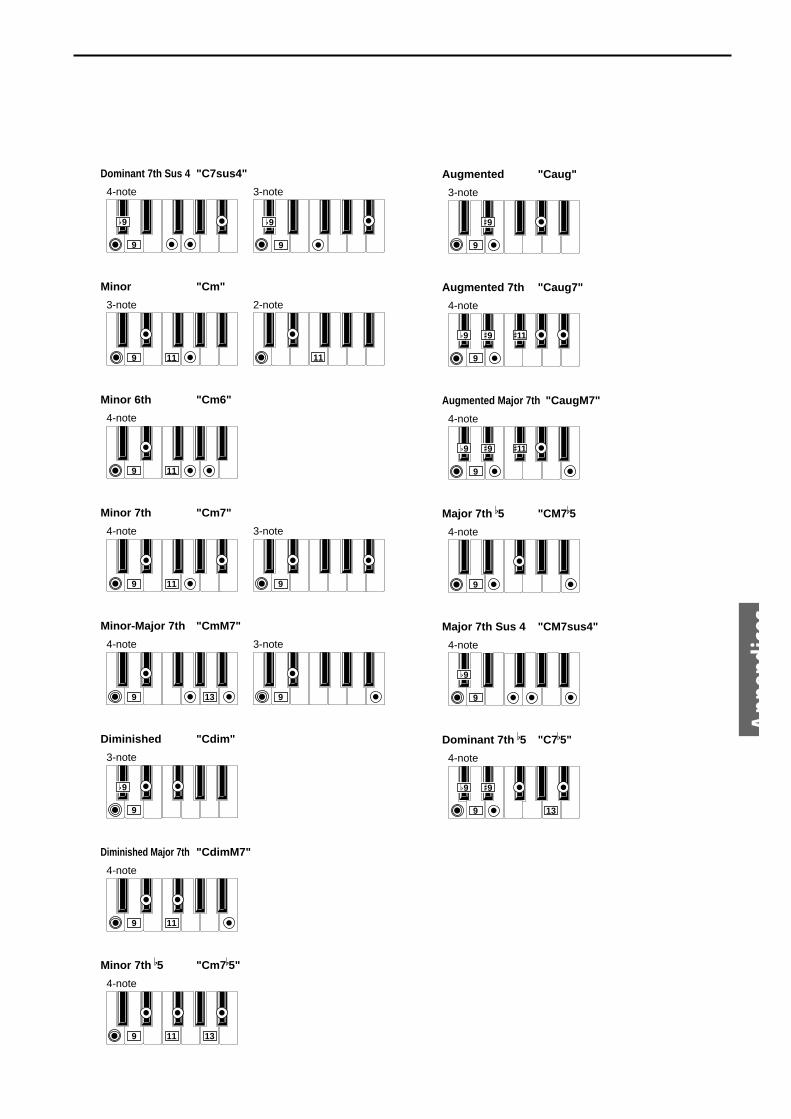
Appe
ndice
s
Minor "Cm"
Minor 6th "Cm6"
Minor 7th "Cm7"
Minor-Major 7th "CmM7"
Diminished "Cdim"
Diminished Major 7th "CdimM7"
Minor 7th �5 "Cm7�5"
3-note
3-note
3-note 2-note
4-note
4-note
4-note
3-note
4-note
4-note
Dominant 7th Sus 4 "C7sus4"
4-note 3-note
9
�99
�9
9 11
9 11
9 11
9
�9
9 11 13
9 13 9
99 11
11
3-note
Augmented "Caug"
4-note
Augmented Major 7th "CaugM7"
4-note
Major 7th �5 "CM7�5
Dominant 7th �5 "C7�5"
4-note
Major 7th Sus 4 "CM7sus4"
4-note
Augmented 7th "Caug7"
9
�9
�99
�11�9
�99
�11�9
9
�99
�99
�913
4-note
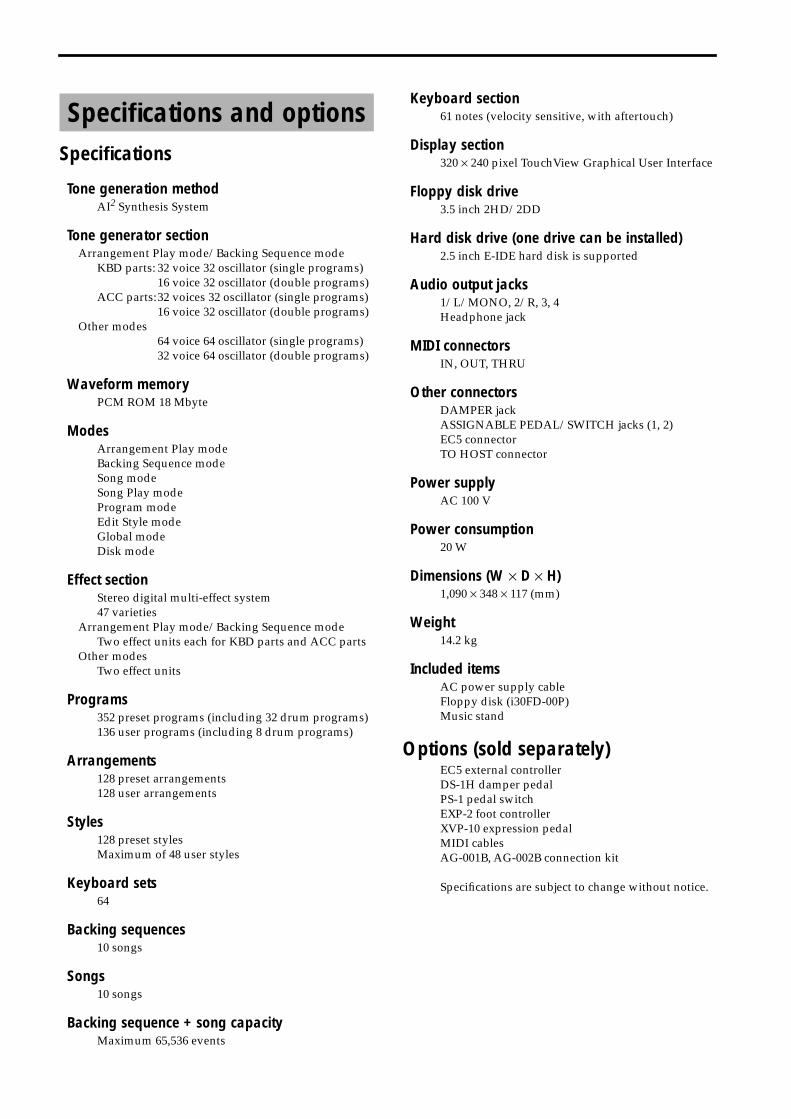
Specifications
Tone generation methodAI2 Synthesis System
Tone generator sectionArrangement Play mode/Backing Sequence mode
KBD parts: 32 voice 32 oscillator (single programs)16 voice 32 oscillator (double programs)
ACC parts:32 voices 32 oscillator (single programs)16 voice 32 oscillator (double programs)
Other modes64 voice 64 oscillator (single programs)32 voice 64 oscillator (double programs)
Waveform memoryPCM ROM 18 Mbyte
ModesArrangement Play modeBacking Sequence modeSong modeSong Play modeProgram modeEdit Style modeGlobal modeDisk mode
Effect sectionStereo digital multi-effect system47 varieties
Arrangement Play mode/Backing Sequence modeTwo effect units each for KBD parts and ACC parts
Other modesTwo effect units
Programs352 preset programs (including 32 drum programs)136 user programs (including 8 drum programs)
Arrangements128 preset arrangements128 user arrangements
Styles128 preset stylesMaximum of 48 user styles
Keyboard sets64
Backing sequences10 songs
Songs10 songs
Backing sequence + song capacityMaximum 65,536 events
Keyboard section61 notes (velocity sensitive, with aftertouch)
Display section320 × 240 pixel TouchView Graphical User Interface
Floppy disk drive3.5 inch 2HD/2DD
Hard disk drive (one drive can be installed)2.5 inch E-IDE hard disk is supported
Audio output jacks1/L/MONO, 2/R, 3, 4Headphone jack
MIDI connectorsIN, OUT, THRU
Other connectorsDAMPER jackASSIGNABLE PEDAL/SWITCH jacks (1, 2)EC5 connectorTO HOST connector
Power supplyAC 100 V
Power consumption20 W
Dimensions (W × D × H)1,090 × 348 × 117 (mm)
Weight14.2 kg
Included itemsAC power supply cableFloppy disk (i30FD-00P)Music stand
Options (sold separately)EC5 external controllerDS-1H damper pedalPS-1 pedal switchEXP-2 foot controllerXVP-10 expression pedalMIDI cablesAG-001B, AG-002B connection kit
Specifications are subject to change without notice.
Specifications and options
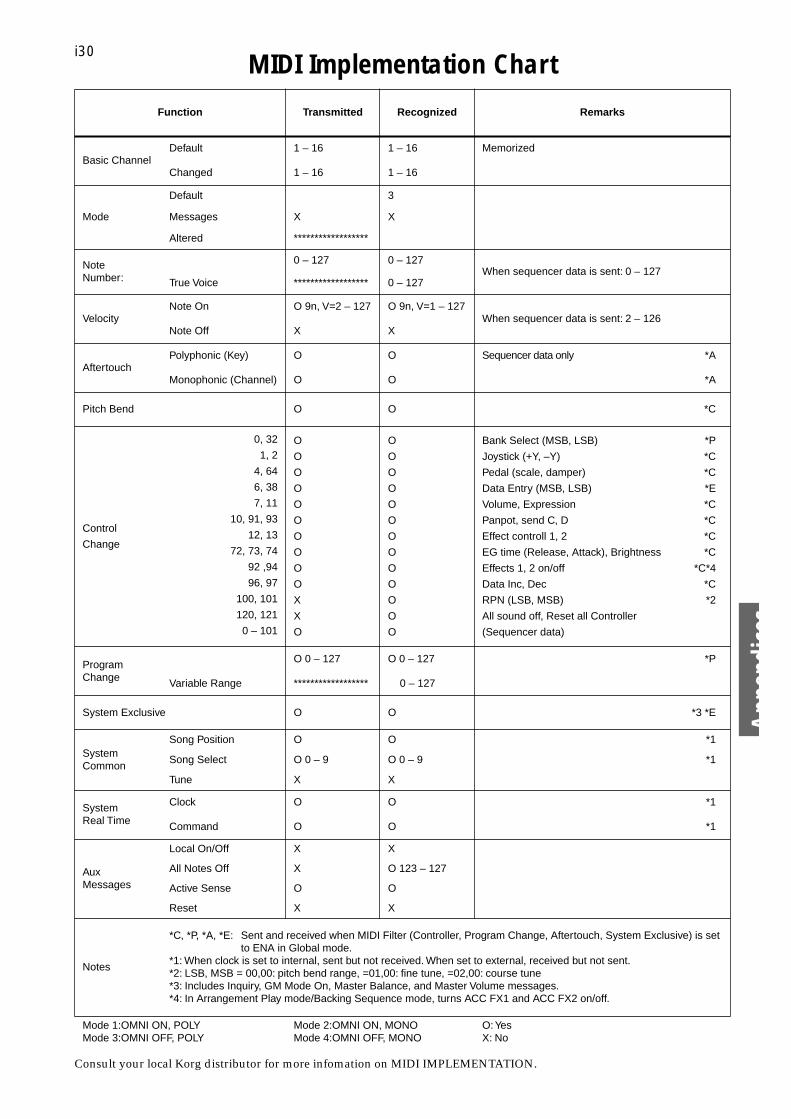
Appe
ndice
s
MIDI Implementation Chart
Consult your local Korg distributor for more infomation on MIDI IMPLEMENTATION.
Function Transmitted Recognized Remarks
Basic ChannelDefault 1 – 16 1 – 16 Memorized
Changed 1 – 16 1 – 16
Mode
Default 3
Messages X X
Altered ******************
Note Number:
0 – 127 0 – 127When sequencer data is sent: 0 – 127
True Voice ****************** 0 – 127
VelocityNote On O 9n, V=2 – 127 O 9n, V=1 – 127
When sequencer data is sent: 2 – 126Note Off X X
AftertouchPolyphonic (Key) O O Sequencer data only *A
Monophonic (Channel) O O *A
Pitch Bend O O *C
Control
Change
0, 32
1, 2
4, 64
6, 38
7, 11
10, 91, 93
12, 13
72, 73, 74
92 ,94
96, 97
100, 101
120, 121
0 – 101
O
O
O
O
O
O
O
O
O
O
X
X
O
O
O
O
O
O
O
O
O
O
O
O
O
O
Bank Select (MSB, LSB) *P
Joystick (+Y, –Y) *C
Pedal (scale, damper) *C
Data Entry (MSB, LSB) *E
Volume, Expression *C
Panpot, send C, D *C
Effect controll 1, 2 *C
EG time (Release, Attack), Brightness *C
Effects 1, 2 on/off *C*4
Data Inc, Dec *C
RPN (LSB, MSB) *2
All sound off, Reset all Controller
(Sequencer data)
Program Change
O 0 – 127 O 0 – 127 *P
Variable Range ****************** 0 – 127
System Exclusive O O *3 *E
SystemCommon
Song Position O O *1
Song Select O 0 – 9 O 0 – 9 *1
Tune X X
SystemReal Time
Clock O O *1
Command O O *1
AuxMessages
Local On/Off X X
All Notes Off X O 123 – 127
Active Sense O O
Reset X X
Notes
*C, *P, *A, *E: Sent and received when MIDI Filter (Controller, Program Change, Aftertouch, System Exclusive) is set to ENA in Global mode.
*1: When clock is set to internal, sent but not received. When set to external, received but not sent.*2: LSB, MSB = 00,00: pitch bend range, =01,00: fine tune, =02,00: course tune*3: Includes Inquiry, GM Mode On, Master Balance, and Master Volume messages.*4: In Arrangement Play mode/Backing Sequence mode, turns ACC FX1 and ACC FX2 on/off.
Mode 1:OMNI ON, POLYMode 3:OMNI OFF, POLY
Mode 2:OMNI ON, MONOMode 4:OMNI OFF, MONO
O: YesX: No
i30
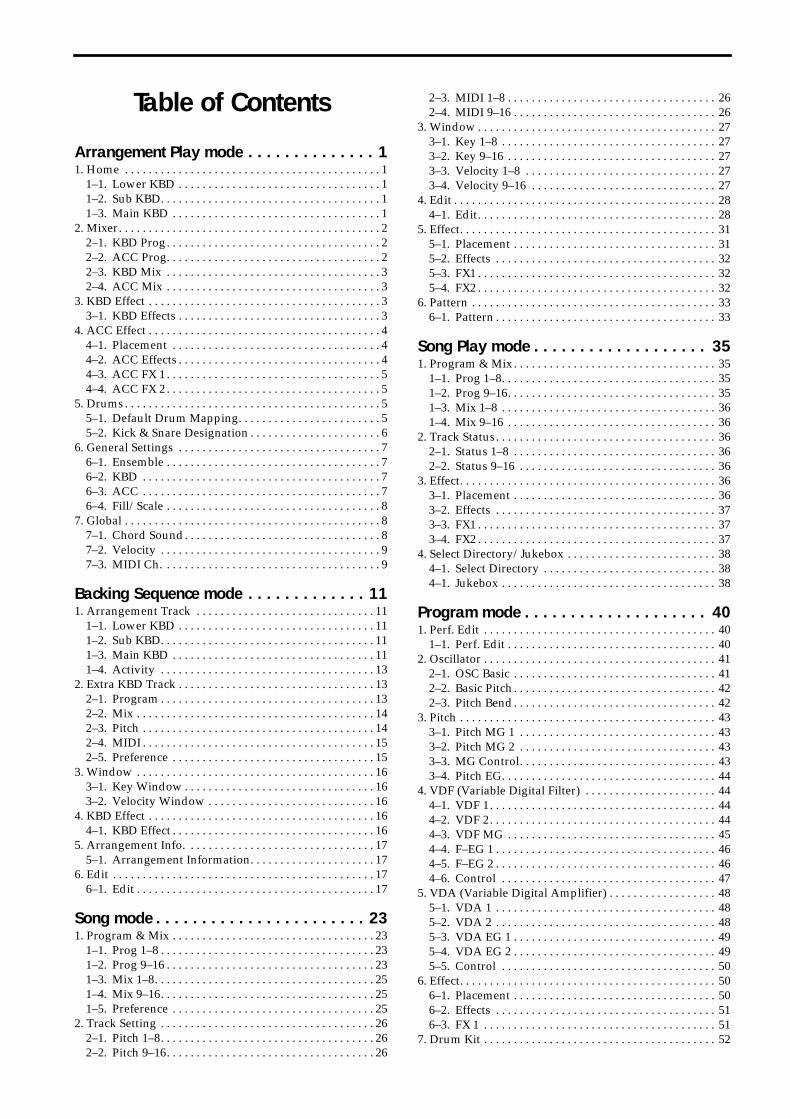
Table of Contents
Arrangement Play mode . . . . . . . . . . . . . . 1
1. Home . . . . . . . . . . . . . . . . . . . . . . . . . . . . . . . . . . . . . . . . . . . 11–1. Lower KBD . . . . . . . . . . . . . . . . . . . . . . . . . . . . . . . . . . 11–2. Sub KBD. . . . . . . . . . . . . . . . . . . . . . . . . . . . . . . . . . . . . 11–3. Main KBD . . . . . . . . . . . . . . . . . . . . . . . . . . . . . . . . . . . 1
2. Mixer. . . . . . . . . . . . . . . . . . . . . . . . . . . . . . . . . . . . . . . . . . . . 22–1. KBD Prog. . . . . . . . . . . . . . . . . . . . . . . . . . . . . . . . . . . . 22–2. ACC Prog. . . . . . . . . . . . . . . . . . . . . . . . . . . . . . . . . . . . 22–3. KBD Mix . . . . . . . . . . . . . . . . . . . . . . . . . . . . . . . . . . . . 32–4. ACC Mix . . . . . . . . . . . . . . . . . . . . . . . . . . . . . . . . . . . . 3
3. KBD Effect . . . . . . . . . . . . . . . . . . . . . . . . . . . . . . . . . . . . . . . 33–1. KBD Effects . . . . . . . . . . . . . . . . . . . . . . . . . . . . . . . . . . 3
4. ACC Effect . . . . . . . . . . . . . . . . . . . . . . . . . . . . . . . . . . . . . . . 44–1. Placement . . . . . . . . . . . . . . . . . . . . . . . . . . . . . . . . . . . 44–2. ACC Effects . . . . . . . . . . . . . . . . . . . . . . . . . . . . . . . . . . 44–3. ACC FX 1 . . . . . . . . . . . . . . . . . . . . . . . . . . . . . . . . . . . . 54–4. ACC FX 2 . . . . . . . . . . . . . . . . . . . . . . . . . . . . . . . . . . . . 5
5. Drums. . . . . . . . . . . . . . . . . . . . . . . . . . . . . . . . . . . . . . . . . . . 55–1. Default Drum Mapping. . . . . . . . . . . . . . . . . . . . . . . . 55–2. Kick & Snare Designation . . . . . . . . . . . . . . . . . . . . . . 6
6. General Settings . . . . . . . . . . . . . . . . . . . . . . . . . . . . . . . . . . 76–1. Ensemble . . . . . . . . . . . . . . . . . . . . . . . . . . . . . . . . . . . . 76–2. KBD . . . . . . . . . . . . . . . . . . . . . . . . . . . . . . . . . . . . . . . . 76–3. ACC . . . . . . . . . . . . . . . . . . . . . . . . . . . . . . . . . . . . . . . . 76–4. Fill/Scale . . . . . . . . . . . . . . . . . . . . . . . . . . . . . . . . . . . . 8
7. Global . . . . . . . . . . . . . . . . . . . . . . . . . . . . . . . . . . . . . . . . . . . 87–1. Chord Sound. . . . . . . . . . . . . . . . . . . . . . . . . . . . . . . . . 87–2. Velocity . . . . . . . . . . . . . . . . . . . . . . . . . . . . . . . . . . . . . 97–3. MIDI Ch. . . . . . . . . . . . . . . . . . . . . . . . . . . . . . . . . . . . . 9
Backing Sequence mode . . . . . . . . . . . . . 11
1. Arrangement Track . . . . . . . . . . . . . . . . . . . . . . . . . . . . . . 111–1. Lower KBD . . . . . . . . . . . . . . . . . . . . . . . . . . . . . . . . . 111–2. Sub KBD. . . . . . . . . . . . . . . . . . . . . . . . . . . . . . . . . . . . 111–3. Main KBD . . . . . . . . . . . . . . . . . . . . . . . . . . . . . . . . . . 111–4. Activity . . . . . . . . . . . . . . . . . . . . . . . . . . . . . . . . . . . . 13
2. Extra KBD Track . . . . . . . . . . . . . . . . . . . . . . . . . . . . . . . . . 132–1. Program . . . . . . . . . . . . . . . . . . . . . . . . . . . . . . . . . . . . 132–2. Mix . . . . . . . . . . . . . . . . . . . . . . . . . . . . . . . . . . . . . . . . 142–3. Pitch . . . . . . . . . . . . . . . . . . . . . . . . . . . . . . . . . . . . . . . 142–4. MIDI . . . . . . . . . . . . . . . . . . . . . . . . . . . . . . . . . . . . . . . 152–5. Preference . . . . . . . . . . . . . . . . . . . . . . . . . . . . . . . . . . 15
3. Window . . . . . . . . . . . . . . . . . . . . . . . . . . . . . . . . . . . . . . . . 163–1. Key Window . . . . . . . . . . . . . . . . . . . . . . . . . . . . . . . . 163–2. Velocity Window . . . . . . . . . . . . . . . . . . . . . . . . . . . . 16
4. KBD Effect . . . . . . . . . . . . . . . . . . . . . . . . . . . . . . . . . . . . . . 164–1. KBD Effect . . . . . . . . . . . . . . . . . . . . . . . . . . . . . . . . . . 16
5. Arrangement Info. . . . . . . . . . . . . . . . . . . . . . . . . . . . . . . . 175–1. Arrangement Information. . . . . . . . . . . . . . . . . . . . . 17
6. Edit . . . . . . . . . . . . . . . . . . . . . . . . . . . . . . . . . . . . . . . . . . . . 176–1. Edit . . . . . . . . . . . . . . . . . . . . . . . . . . . . . . . . . . . . . . . . 17
Song mode . . . . . . . . . . . . . . . . . . . . . . . 23
1. Program & Mix . . . . . . . . . . . . . . . . . . . . . . . . . . . . . . . . . . 231–1. Prog 1–8 . . . . . . . . . . . . . . . . . . . . . . . . . . . . . . . . . . . . 231–2. Prog 9–16 . . . . . . . . . . . . . . . . . . . . . . . . . . . . . . . . . . . 231–3. Mix 1–8. . . . . . . . . . . . . . . . . . . . . . . . . . . . . . . . . . . . . 251–4. Mix 9–16. . . . . . . . . . . . . . . . . . . . . . . . . . . . . . . . . . . . 251–5. Preference . . . . . . . . . . . . . . . . . . . . . . . . . . . . . . . . . . 25
2. Track Setting . . . . . . . . . . . . . . . . . . . . . . . . . . . . . . . . . . . . 262–1. Pitch 1–8. . . . . . . . . . . . . . . . . . . . . . . . . . . . . . . . . . . . 262–2. Pitch 9–16. . . . . . . . . . . . . . . . . . . . . . . . . . . . . . . . . . . 26
2–3. MIDI 1–8 . . . . . . . . . . . . . . . . . . . . . . . . . . . . . . . . . . . 262–4. MIDI 9–16 . . . . . . . . . . . . . . . . . . . . . . . . . . . . . . . . . . 26
3. Window . . . . . . . . . . . . . . . . . . . . . . . . . . . . . . . . . . . . . . . . 273–1. Key 1–8 . . . . . . . . . . . . . . . . . . . . . . . . . . . . . . . . . . . . 273–2. Key 9–16 . . . . . . . . . . . . . . . . . . . . . . . . . . . . . . . . . . . 273–3. Velocity 1–8 . . . . . . . . . . . . . . . . . . . . . . . . . . . . . . . . 273–4. Velocity 9–16 . . . . . . . . . . . . . . . . . . . . . . . . . . . . . . . 27
4. Edit . . . . . . . . . . . . . . . . . . . . . . . . . . . . . . . . . . . . . . . . . . . . 284–1. Edit. . . . . . . . . . . . . . . . . . . . . . . . . . . . . . . . . . . . . . . . 28
5. Effect. . . . . . . . . . . . . . . . . . . . . . . . . . . . . . . . . . . . . . . . . . . 315–1. Placement . . . . . . . . . . . . . . . . . . . . . . . . . . . . . . . . . . 315–2. Effects . . . . . . . . . . . . . . . . . . . . . . . . . . . . . . . . . . . . . 325–3. FX1 . . . . . . . . . . . . . . . . . . . . . . . . . . . . . . . . . . . . . . . . 325–4. FX2 . . . . . . . . . . . . . . . . . . . . . . . . . . . . . . . . . . . . . . . . 32
6. Pattern . . . . . . . . . . . . . . . . . . . . . . . . . . . . . . . . . . . . . . . . . 336–1. Pattern . . . . . . . . . . . . . . . . . . . . . . . . . . . . . . . . . . . . . 33
Song Play mode . . . . . . . . . . . . . . . . . . . 35
1. Program & Mix . . . . . . . . . . . . . . . . . . . . . . . . . . . . . . . . . . 351–1. Prog 1–8. . . . . . . . . . . . . . . . . . . . . . . . . . . . . . . . . . . . 351–2. Prog 9–16. . . . . . . . . . . . . . . . . . . . . . . . . . . . . . . . . . . 351–3. Mix 1–8 . . . . . . . . . . . . . . . . . . . . . . . . . . . . . . . . . . . . 361–4. Mix 9–16 . . . . . . . . . . . . . . . . . . . . . . . . . . . . . . . . . . . 36
2. Track Status. . . . . . . . . . . . . . . . . . . . . . . . . . . . . . . . . . . . . 362–1. Status 1–8 . . . . . . . . . . . . . . . . . . . . . . . . . . . . . . . . . . 362–2. Status 9–16 . . . . . . . . . . . . . . . . . . . . . . . . . . . . . . . . . 36
3. Effect. . . . . . . . . . . . . . . . . . . . . . . . . . . . . . . . . . . . . . . . . . . 363–1. Placement . . . . . . . . . . . . . . . . . . . . . . . . . . . . . . . . . . 363–2. Effects . . . . . . . . . . . . . . . . . . . . . . . . . . . . . . . . . . . . . 373–3. FX1 . . . . . . . . . . . . . . . . . . . . . . . . . . . . . . . . . . . . . . . . 373–4. FX2 . . . . . . . . . . . . . . . . . . . . . . . . . . . . . . . . . . . . . . . . 37
4. Select Directory/Jukebox . . . . . . . . . . . . . . . . . . . . . . . . . 384–1. Select Directory . . . . . . . . . . . . . . . . . . . . . . . . . . . . . 384–1. Jukebox . . . . . . . . . . . . . . . . . . . . . . . . . . . . . . . . . . . . 38
Program mode . . . . . . . . . . . . . . . . . . . . 40
1. Perf. Edit . . . . . . . . . . . . . . . . . . . . . . . . . . . . . . . . . . . . . . . 401–1. Perf. Edit . . . . . . . . . . . . . . . . . . . . . . . . . . . . . . . . . . . 40
2. Oscillator . . . . . . . . . . . . . . . . . . . . . . . . . . . . . . . . . . . . . . . 412–1. OSC Basic . . . . . . . . . . . . . . . . . . . . . . . . . . . . . . . . . . 412–2. Basic Pitch . . . . . . . . . . . . . . . . . . . . . . . . . . . . . . . . . . 422–3. Pitch Bend. . . . . . . . . . . . . . . . . . . . . . . . . . . . . . . . . . 42
3. Pitch . . . . . . . . . . . . . . . . . . . . . . . . . . . . . . . . . . . . . . . . . . . 433–1. Pitch MG 1 . . . . . . . . . . . . . . . . . . . . . . . . . . . . . . . . . 433–2. Pitch MG 2 . . . . . . . . . . . . . . . . . . . . . . . . . . . . . . . . . 433–3. MG Control. . . . . . . . . . . . . . . . . . . . . . . . . . . . . . . . . 433–4. Pitch EG. . . . . . . . . . . . . . . . . . . . . . . . . . . . . . . . . . . . 44
4. VDF (Variable Digital Filter) . . . . . . . . . . . . . . . . . . . . . . 444–1. VDF 1. . . . . . . . . . . . . . . . . . . . . . . . . . . . . . . . . . . . . . 444–2. VDF 2. . . . . . . . . . . . . . . . . . . . . . . . . . . . . . . . . . . . . . 444–3. VDF MG . . . . . . . . . . . . . . . . . . . . . . . . . . . . . . . . . . . 454–4. F–EG 1 . . . . . . . . . . . . . . . . . . . . . . . . . . . . . . . . . . . . . 464–5. F–EG 2 . . . . . . . . . . . . . . . . . . . . . . . . . . . . . . . . . . . . . 464–6. Control . . . . . . . . . . . . . . . . . . . . . . . . . . . . . . . . . . . . 47
5. VDA (Variable Digital Amplifier) . . . . . . . . . . . . . . . . . . 485–1. VDA 1 . . . . . . . . . . . . . . . . . . . . . . . . . . . . . . . . . . . . . 485–2. VDA 2 . . . . . . . . . . . . . . . . . . . . . . . . . . . . . . . . . . . . . 485–3. VDA EG 1 . . . . . . . . . . . . . . . . . . . . . . . . . . . . . . . . . . 495–4. VDA EG 2 . . . . . . . . . . . . . . . . . . . . . . . . . . . . . . . . . . 495–5. Control . . . . . . . . . . . . . . . . . . . . . . . . . . . . . . . . . . . . 50
6. Effect. . . . . . . . . . . . . . . . . . . . . . . . . . . . . . . . . . . . . . . . . . . 506–1. Placement . . . . . . . . . . . . . . . . . . . . . . . . . . . . . . . . . . 506–2. Effects . . . . . . . . . . . . . . . . . . . . . . . . . . . . . . . . . . . . . 516–3. FX 1 . . . . . . . . . . . . . . . . . . . . . . . . . . . . . . . . . . . . . . . 51
7. Drum Kit . . . . . . . . . . . . . . . . . . . . . . . . . . . . . . . . . . . . . . . 52
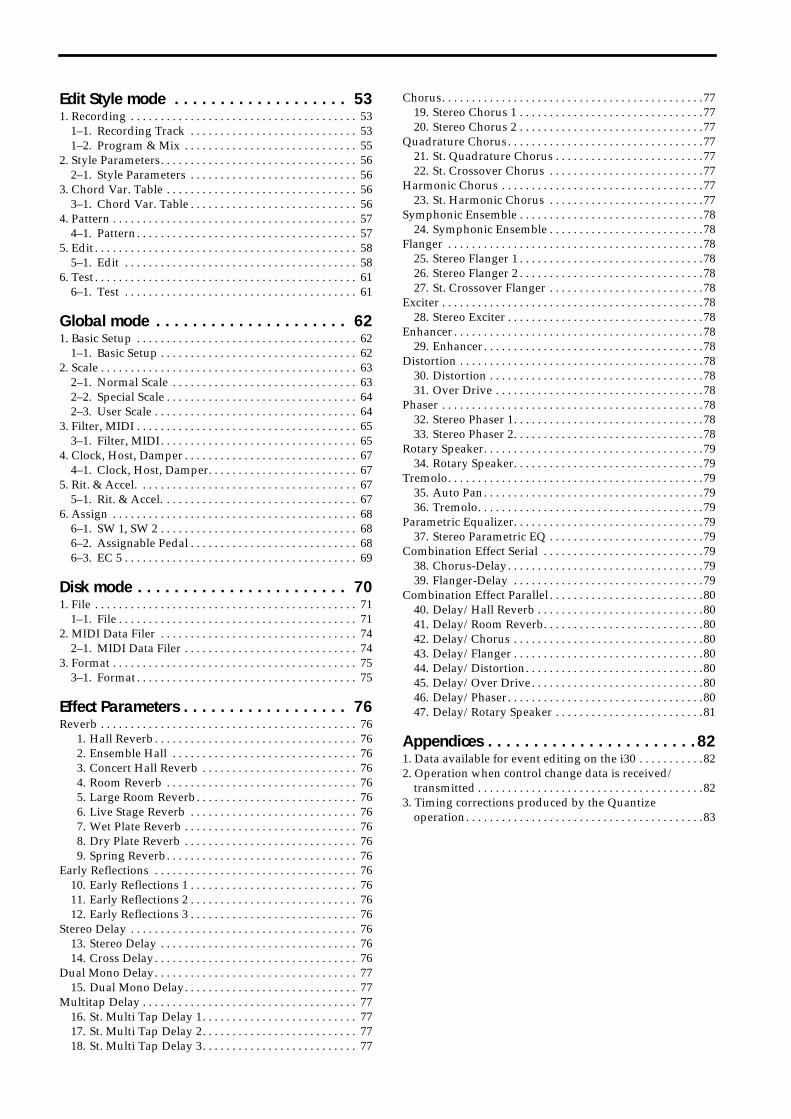
Edit Style mode . . . . . . . . . . . . . . . . . . . 53
1. Recording . . . . . . . . . . . . . . . . . . . . . . . . . . . . . . . . . . . . . . 531–1. Recording Track . . . . . . . . . . . . . . . . . . . . . . . . . . . . 531–2. Program & Mix . . . . . . . . . . . . . . . . . . . . . . . . . . . . . 55
2. Style Parameters. . . . . . . . . . . . . . . . . . . . . . . . . . . . . . . . . 562–1. Style Parameters . . . . . . . . . . . . . . . . . . . . . . . . . . . . 56
3. Chord Var. Table . . . . . . . . . . . . . . . . . . . . . . . . . . . . . . . . 563–1. Chord Var. Table . . . . . . . . . . . . . . . . . . . . . . . . . . . . 56
4. Pattern . . . . . . . . . . . . . . . . . . . . . . . . . . . . . . . . . . . . . . . . . 574–1. Pattern. . . . . . . . . . . . . . . . . . . . . . . . . . . . . . . . . . . . . 57
5. Edit . . . . . . . . . . . . . . . . . . . . . . . . . . . . . . . . . . . . . . . . . . . . 585–1. Edit . . . . . . . . . . . . . . . . . . . . . . . . . . . . . . . . . . . . . . . 58
6. Test . . . . . . . . . . . . . . . . . . . . . . . . . . . . . . . . . . . . . . . . . . . . 616–1. Test . . . . . . . . . . . . . . . . . . . . . . . . . . . . . . . . . . . . . . . 61
Global mode . . . . . . . . . . . . . . . . . . . . . 62
1. Basic Setup . . . . . . . . . . . . . . . . . . . . . . . . . . . . . . . . . . . . . 621–1. Basic Setup . . . . . . . . . . . . . . . . . . . . . . . . . . . . . . . . . 62
2. Scale . . . . . . . . . . . . . . . . . . . . . . . . . . . . . . . . . . . . . . . . . . . 632–1. Normal Scale . . . . . . . . . . . . . . . . . . . . . . . . . . . . . . . 632–2. Special Scale . . . . . . . . . . . . . . . . . . . . . . . . . . . . . . . . 642–3. User Scale . . . . . . . . . . . . . . . . . . . . . . . . . . . . . . . . . . 64
3. Filter, MIDI . . . . . . . . . . . . . . . . . . . . . . . . . . . . . . . . . . . . . 653–1. Filter, MIDI. . . . . . . . . . . . . . . . . . . . . . . . . . . . . . . . . 65
4. Clock, Host, Damper . . . . . . . . . . . . . . . . . . . . . . . . . . . . . 674–1. Clock, Host, Damper. . . . . . . . . . . . . . . . . . . . . . . . . 67
5. Rit. & Accel. . . . . . . . . . . . . . . . . . . . . . . . . . . . . . . . . . . . . 675–1. Rit. & Accel. . . . . . . . . . . . . . . . . . . . . . . . . . . . . . . . . 67
6. Assign . . . . . . . . . . . . . . . . . . . . . . . . . . . . . . . . . . . . . . . . . 686–1. SW 1, SW 2 . . . . . . . . . . . . . . . . . . . . . . . . . . . . . . . . . 686–2. Assignable Pedal . . . . . . . . . . . . . . . . . . . . . . . . . . . . 686–3. EC 5 . . . . . . . . . . . . . . . . . . . . . . . . . . . . . . . . . . . . . . . 69
Disk mode . . . . . . . . . . . . . . . . . . . . . . . 70
1. File . . . . . . . . . . . . . . . . . . . . . . . . . . . . . . . . . . . . . . . . . . . . 711–1. File . . . . . . . . . . . . . . . . . . . . . . . . . . . . . . . . . . . . . . . . 71
2. MIDI Data Filer . . . . . . . . . . . . . . . . . . . . . . . . . . . . . . . . . 742–1. MIDI Data Filer . . . . . . . . . . . . . . . . . . . . . . . . . . . . . 74
3. Format . . . . . . . . . . . . . . . . . . . . . . . . . . . . . . . . . . . . . . . . . 753–1. Format. . . . . . . . . . . . . . . . . . . . . . . . . . . . . . . . . . . . . 75
Effect Parameters . . . . . . . . . . . . . . . . . . 76
Reverb . . . . . . . . . . . . . . . . . . . . . . . . . . . . . . . . . . . . . . . . . . . 761. Hall Reverb . . . . . . . . . . . . . . . . . . . . . . . . . . . . . . . . . . 762. Ensemble Hall . . . . . . . . . . . . . . . . . . . . . . . . . . . . . . . 763. Concert Hall Reverb . . . . . . . . . . . . . . . . . . . . . . . . . . 764. Room Reverb . . . . . . . . . . . . . . . . . . . . . . . . . . . . . . . . 765. Large Room Reverb . . . . . . . . . . . . . . . . . . . . . . . . . . . 766. Live Stage Reverb . . . . . . . . . . . . . . . . . . . . . . . . . . . . 767. Wet Plate Reverb . . . . . . . . . . . . . . . . . . . . . . . . . . . . . 768. Dry Plate Reverb . . . . . . . . . . . . . . . . . . . . . . . . . . . . . 769. Spring Reverb. . . . . . . . . . . . . . . . . . . . . . . . . . . . . . . . 76
Early Reflections . . . . . . . . . . . . . . . . . . . . . . . . . . . . . . . . . . 7610. Early Reflections 1 . . . . . . . . . . . . . . . . . . . . . . . . . . . . 7611. Early Reflections 2 . . . . . . . . . . . . . . . . . . . . . . . . . . . . 7612. Early Reflections 3 . . . . . . . . . . . . . . . . . . . . . . . . . . . . 76
Stereo Delay . . . . . . . . . . . . . . . . . . . . . . . . . . . . . . . . . . . . . . 7613. Stereo Delay . . . . . . . . . . . . . . . . . . . . . . . . . . . . . . . . . 7614. Cross Delay. . . . . . . . . . . . . . . . . . . . . . . . . . . . . . . . . . 76
Dual Mono Delay. . . . . . . . . . . . . . . . . . . . . . . . . . . . . . . . . . 7715. Dual Mono Delay. . . . . . . . . . . . . . . . . . . . . . . . . . . . . 77
Multitap Delay . . . . . . . . . . . . . . . . . . . . . . . . . . . . . . . . . . . . 7716. St. Multi Tap Delay 1. . . . . . . . . . . . . . . . . . . . . . . . . . 7717. St. Multi Tap Delay 2. . . . . . . . . . . . . . . . . . . . . . . . . . 7718. St. Multi Tap Delay 3. . . . . . . . . . . . . . . . . . . . . . . . . . 77
Chorus. . . . . . . . . . . . . . . . . . . . . . . . . . . . . . . . . . . . . . . . . . . .7719. Stereo Chorus 1 . . . . . . . . . . . . . . . . . . . . . . . . . . . . . . .7720. Stereo Chorus 2 . . . . . . . . . . . . . . . . . . . . . . . . . . . . . . .77
Quadrature Chorus. . . . . . . . . . . . . . . . . . . . . . . . . . . . . . . . .7721. St. Quadrature Chorus . . . . . . . . . . . . . . . . . . . . . . . . .7722. St. Crossover Chorus . . . . . . . . . . . . . . . . . . . . . . . . . .77
Harmonic Chorus . . . . . . . . . . . . . . . . . . . . . . . . . . . . . . . . . .7723. St. Harmonic Chorus . . . . . . . . . . . . . . . . . . . . . . . . . .77
Symphonic Ensemble . . . . . . . . . . . . . . . . . . . . . . . . . . . . . . .7824. Symphonic Ensemble . . . . . . . . . . . . . . . . . . . . . . . . . .78
Flanger . . . . . . . . . . . . . . . . . . . . . . . . . . . . . . . . . . . . . . . . . . .7825. Stereo Flanger 1 . . . . . . . . . . . . . . . . . . . . . . . . . . . . . . .7826. Stereo Flanger 2 . . . . . . . . . . . . . . . . . . . . . . . . . . . . . . .7827. St. Crossover Flanger . . . . . . . . . . . . . . . . . . . . . . . . . .78
Exciter . . . . . . . . . . . . . . . . . . . . . . . . . . . . . . . . . . . . . . . . . . . .7828. Stereo Exciter . . . . . . . . . . . . . . . . . . . . . . . . . . . . . . . . .78
Enhancer . . . . . . . . . . . . . . . . . . . . . . . . . . . . . . . . . . . . . . . . . .7829. Enhancer . . . . . . . . . . . . . . . . . . . . . . . . . . . . . . . . . . . . .78
Distortion . . . . . . . . . . . . . . . . . . . . . . . . . . . . . . . . . . . . . . . . .7830. Distortion . . . . . . . . . . . . . . . . . . . . . . . . . . . . . . . . . . . .7831. Over Drive . . . . . . . . . . . . . . . . . . . . . . . . . . . . . . . . . . .78
Phaser . . . . . . . . . . . . . . . . . . . . . . . . . . . . . . . . . . . . . . . . . . . .7832. Stereo Phaser 1. . . . . . . . . . . . . . . . . . . . . . . . . . . . . . . .7833. Stereo Phaser 2. . . . . . . . . . . . . . . . . . . . . . . . . . . . . . . .78
Rotary Speaker. . . . . . . . . . . . . . . . . . . . . . . . . . . . . . . . . . . . .7934. Rotary Speaker. . . . . . . . . . . . . . . . . . . . . . . . . . . . . . . .79
Tremolo. . . . . . . . . . . . . . . . . . . . . . . . . . . . . . . . . . . . . . . . . . .7935. Auto Pan. . . . . . . . . . . . . . . . . . . . . . . . . . . . . . . . . . . . .7936. Tremolo. . . . . . . . . . . . . . . . . . . . . . . . . . . . . . . . . . . . . .79
Parametric Equalizer. . . . . . . . . . . . . . . . . . . . . . . . . . . . . . . .7937. Stereo Parametric EQ . . . . . . . . . . . . . . . . . . . . . . . . . .79
Combination Effect Serial . . . . . . . . . . . . . . . . . . . . . . . . . . .7938. Chorus-Delay. . . . . . . . . . . . . . . . . . . . . . . . . . . . . . . . .7939. Flanger-Delay . . . . . . . . . . . . . . . . . . . . . . . . . . . . . . . .79
Combination Effect Parallel . . . . . . . . . . . . . . . . . . . . . . . . . .8040. Delay/Hall Reverb . . . . . . . . . . . . . . . . . . . . . . . . . . . .8041. Delay/Room Reverb. . . . . . . . . . . . . . . . . . . . . . . . . . .8042. Delay/Chorus . . . . . . . . . . . . . . . . . . . . . . . . . . . . . . . .8043. Delay/Flanger . . . . . . . . . . . . . . . . . . . . . . . . . . . . . . . .8044. Delay/Distortion. . . . . . . . . . . . . . . . . . . . . . . . . . . . . .8045. Delay/Over Drive. . . . . . . . . . . . . . . . . . . . . . . . . . . . .8046. Delay/Phaser. . . . . . . . . . . . . . . . . . . . . . . . . . . . . . . . .8047. Delay/Rotary Speaker . . . . . . . . . . . . . . . . . . . . . . . . .81
Appendices . . . . . . . . . . . . . . . . . . . . . . .82
1. Data available for event editing on the i30 . . . . . . . . . . .822. Operation when control change data is received/
transmitted . . . . . . . . . . . . . . . . . . . . . . . . . . . . . . . . . . . . . .823. Timing corrections produced by the Quantize
operation. . . . . . . . . . . . . . . . . . . . . . . . . . . . . . . . . . . . . . . .83
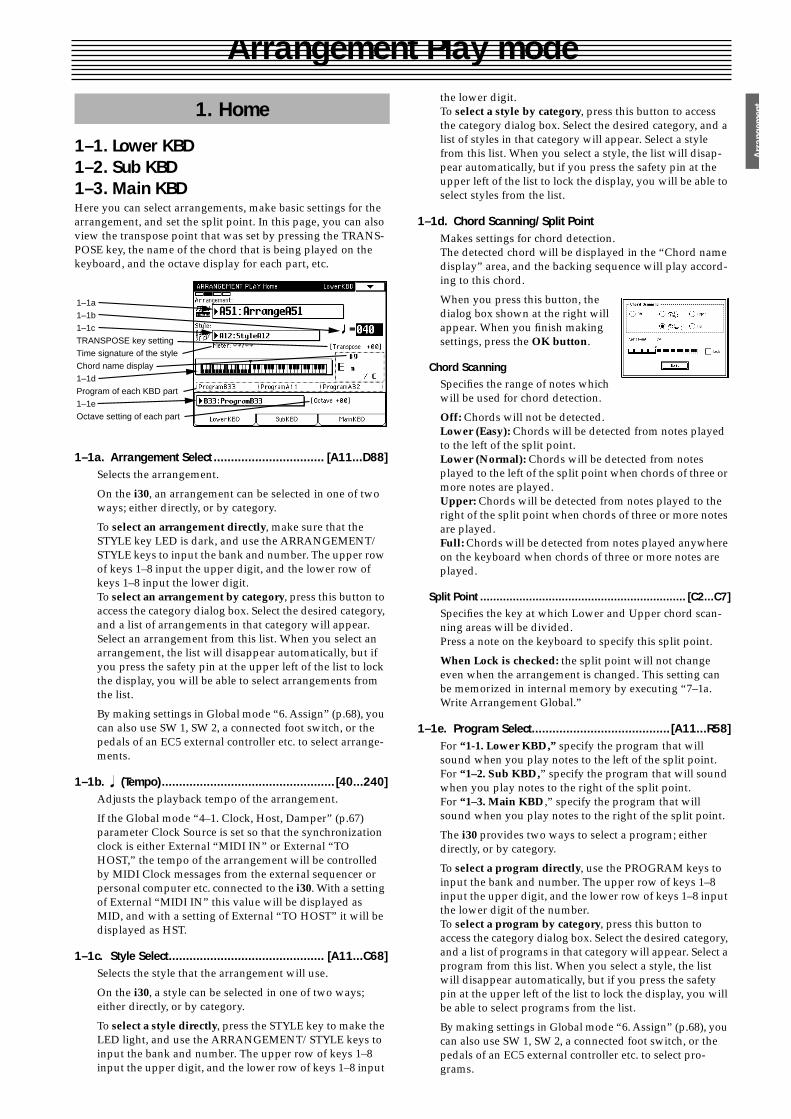
Arra
ngem
ent
Arrangement Play mode
1–1. Lower KBD1–2. Sub KBD1–3. Main KBD
Here you can select arrangements, make basic settings for the arrangement, and set the split point. In this page, you can also view the transpose point that was set by pressing the TRANS-POSE key, the name of the chord that is being played on the keyboard, and the octave display for each part, etc.
1–1a. Arrangement Select ................................ [A11...D88]
Selects the arrangement.
On the
i30
, an arrangement can be selected in one of two ways; either directly, or by category.
To
select an arrangement directly
, make sure that the STYLE key LED is dark, and use the ARRANGEMENT/STYLE keys to input the bank and number. The upper row of keys 1–8 input the upper digit, and the lower row of keys 1–8 input the lower digit.To
select an arrangement by category
, press this button to access the category dialog box. Select the desired category, and a list of arrangements in that category will appear. Select an arrangement from this list. When you select an arrangement, the list will disappear automatically, but if you press the safety pin at the upper left of the list to lock the display, you will be able to select arrangements from the list.
By making settings in Global mode “6. Assign” (p.68), you can also use SW 1, SW 2, a connected foot switch, or the pedals of an EC5 external controller etc. to select arrange-ments.
1–1b.
�
(Tempo).................................................. [40...240]
Adjusts the playback tempo of the arrangement.
If the Global mode “4–1. Clock, Host, Damper” (p.67) parameter Clock Source is set so that the synchronization clock is either External “MIDI IN” or External “TO HOST,” the tempo of the arrangement will be controlled by MIDI Clock messages from the external sequencer or personal computer etc. connected to the
i30
. With a setting of External “MIDI IN” this value will be displayed as MID, and with a setting of External “TO HOST” it will be displayed as HST.
1–1c. Style Select............................................. [A11...C68]
Selects the style that the arrangement will use.
On the
i30
, a style can be selected in one of two ways; either directly, or by category.
To
select a style directly
, press the STYLE key to make the LED light, and use the ARRANGEMENT/STYLE keys to input the bank and number. The upper row of keys 1–8 input the upper digit, and the lower row of keys 1–8 input
the lower digit.To
select a style by category
, press this button to access the category dialog box. Select the desired category, and a list of styles in that category will appear. Select a style from this list. When you select a style, the list will disap-pear automatically, but if you press the safety pin at the upper left of the list to lock the display, you will be able to select styles from the list.
1–1d. Chord Scanning/Split Point
Makes settings for chord detection.The detected chord will be displayed in the “Chord name display” area, and the backing sequence will play accord-ing to this chord.
When you press this button, the dialog box shown at the right will appear. When you finish making settings, press the
OK button
.
Chord Scanning
Specifies the range of notes which will be used for chord detection.
Off:
Chords will not be detected.
Lower (Easy):
Chords will be detected from notes played to the left of the split point.
Lower (Normal):
Chords will be detected from notes played to the left of the split point when chords of three or more notes are played.
Upper:
Chords will be detected from notes played to the right of the split point when chords of three or more notes are played.
Full:
Chords will be detected from notes played anywhere on the keyboard when chords of three or more notes are played.
Split Point ............................................................... [C2...C7]
Specifies the key at which Lower and Upper chord scan-ning areas will be divided.Press a note on the keyboard to specify this split point.
When Lock is checked:
the split point will not change even when the arrangement is changed. This setting can be memorized in internal memory by executing “7–1a. Write Arrangement Global.”
1–1e. Program Select........................................[A11...R58]
For
“1-1. Lower KBD,”
specify the program that will sound when you play notes to the left of the split point.For
“1–2. Sub KBD,
” specify the program that will sound when you play notes to the right of the split point.For
“1–3. Main KBD
,” specify the program that will sound when you play notes to the right of the split point.
The
i30
provides two ways to select a program; either directly, or by category.
To
select a program directly
, use the PROGRAM keys to input the bank and number. The upper row of keys 1–8 input the upper digit, and the lower row of keys 1–8 input the lower digit of the number.To
select a program by category
, press this button to access the category dialog box. Select the desired category, and a list of programs in that category will appear. Select a program from this list. When you select a style, the list will disappear automatically, but if you press the safety pin at the upper left of the list to lock the display, you will be able to select programs from the list.
By making settings in Global mode “6. Assign” (p.68), you can also use SW 1, SW 2, a connected foot switch, or the pedals of an EC5 external controller etc. to select pro-grams.
1. Home
1–1a
1–1b
1–1c
TRANSPOSE key setting
Time signature of the style
Chord name display
1–1d
Program of each KBD part
1–1e
Octave setting of each part
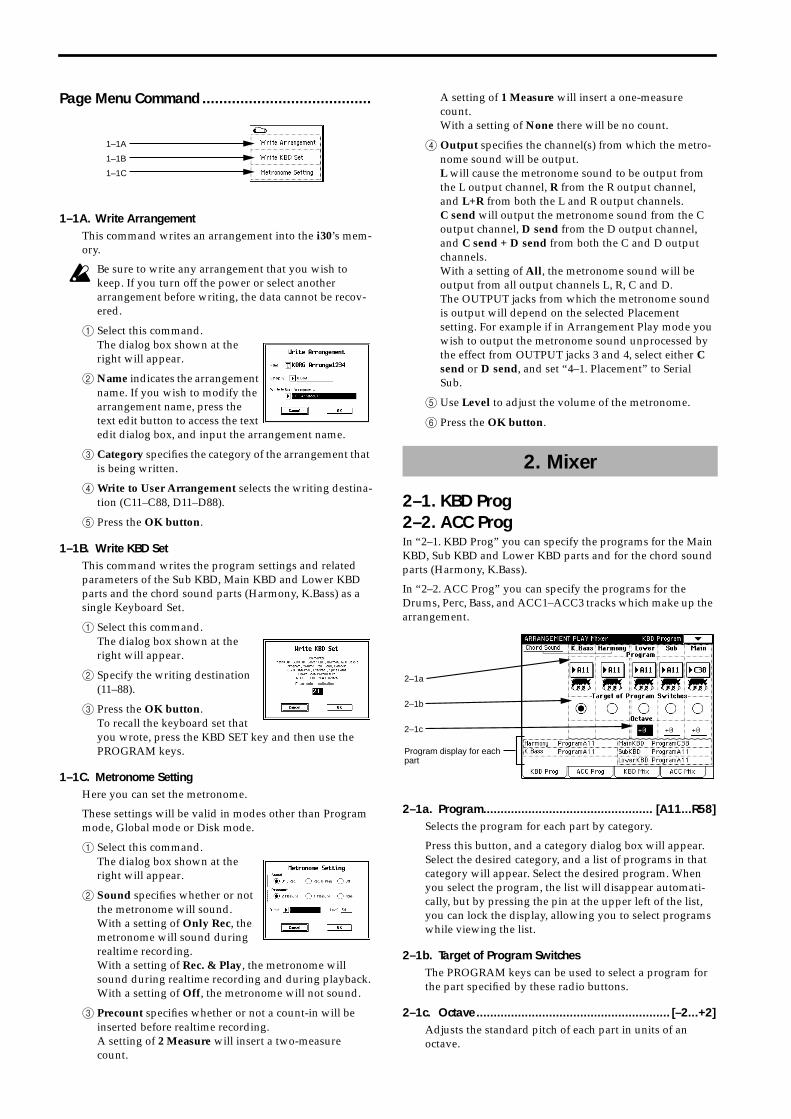
Page Menu Command ........................................
1–1A. Write Arrangement
This command writes an arrangement into the
i30
’s mem-ory.
Be sure to write any arrangement that you wish to keep. If you turn off the power or select another arrangement before writing, the data cannot be recov-ered.
1
Select this command.The dialog box shown at the right will appear.
2
Name
indicates the arrangement name. If you wish to modify the arrangement name, press the text edit button to access the text edit dialog box, and input the arrangement name.
3
Category
specifies the category of the arrangement that is being written.
4
Write to User Arrangement
selects the writing destina-tion (C11–C88, D11–D88).
5
Press the
OK button
.
1–1B. Write KBD Set
This command writes the program settings and related parameters of the Sub KBD, Main KBD and Lower KBD parts and the chord sound parts (Harmony, K.Bass) as a single Keyboard Set.
1
Select this command.The dialog box shown at the right will appear.
2
Specify the writing destination (11–88).
3
Press the
OK button
.To recall the keyboard set that you wrote, press the KBD SET key and then use the PROGRAM keys.
1–1C. Metronome Setting
Here you can set the metronome.
These settings will be valid in modes other than Program mode, Global mode or Disk mode.
1
Select this command.The dialog box shown at the right will appear.
2
Sound
specifies whether or not the metronome will sound.With a setting of
Only Rec
, the metronome will sound during realtime recording.With a setting of
Rec. & Play
, the metronome will sound during realtime recording and during playback.With a setting of
Off
, the metronome will not sound.
3
Precount
specifies whether or not a count-in will be inserted before realtime recording.A setting of
2 Measure
will insert a two-measure count.
A setting of
1 Measure
will insert a one-measure count.With a setting of
None
there will be no count.
4
Output
specifies the channel(s) from which the metro-nome sound will be output.
L
will cause the metronome sound to be output from the L output channel,
R
from the R output channel, and
L+R
from both the L and R output channels.
C send
will output the metronome sound from the C output channel,
D send
from the D output channel, and
C send + D send
from both the C and D output channels.With a setting of
All
, the metronome sound will be output from all output channels L, R, C and D.The OUTPUT jacks from which the metronome sound is output will depend on the selected Placement setting. For example if in Arrangement Play mode you wish to output the metronome sound unprocessed by the effect from OUTPUT jacks 3 and 4, select either
C send
or
D send
, and set “4–1. Placement” to Serial Sub.
5
Use
Level
to adjust the volume of the metronome.
6
Press the
OK button
.
2–1. KBD Prog2–2. ACC Prog
In “2–1. KBD Prog” you can specify the programs for the Main KBD, Sub KBD and Lower KBD parts and for the chord sound parts (Harmony, K.Bass).
In “2–2. ACC Prog” you can specify the programs for the Drums, Perc, Bass, and ACC1–ACC3 tracks which make up the arrangement.
2–1a. Program................................................. [A11...R58]
Selects the program for each part by category.
Press this button, and a category dialog box will appear. Select the desired category, and a list of programs in that category will appear. Select the desired program. When you select the program, the list will disappear automati-cally, but by pressing the pin at the upper left of the list, you can lock the display, allowing you to select programs while viewing the list.
2–1b. Target of Program Switches
The PROGRAM keys can be used to select a program for the part specified by these radio buttons.
2–1c. Octave ........................................................ [–2...+2]
Adjusts the standard pitch of each part in units of an octave.
1–1A
1–1B
1–1C
2. Mixer
2–1a
2–1b
2–1c
Program display for each part
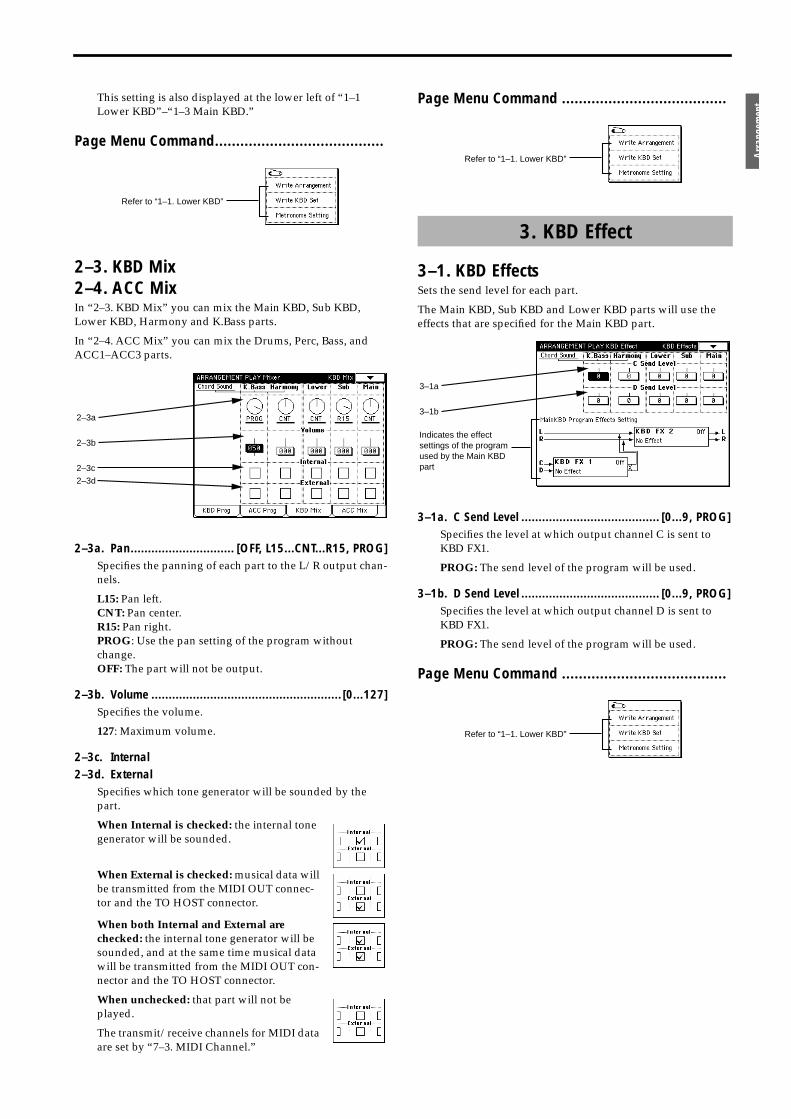
Arra
ngem
ent
This setting is also displayed at the lower left of “1–1 Lower KBD”–“1–3 Main KBD.”
Page Menu Command........................................
2–3. KBD Mix2–4. ACC Mix
In “2–3. KBD Mix” you can mix the Main KBD, Sub KBD, Lower KBD, Harmony and K.Bass parts.
In “2–4. ACC Mix” you can mix the Drums, Perc, Bass, and ACC1–ACC3 parts.
2–3a. Pan.............................. [OFF, L15...CNT...R15, PROG]
Specifies the panning of each part to the L/R output chan-nels.
L15:
Pan left.
CNT:
Pan center.
R15:
Pan right.
PROG
: Use the pan setting of the program without change.
OFF:
The part will not be output.
2–3b. Volume ....................................................... [0...127]
Specifies the volume.
127
: Maximum volume.
2–3c. Internal2–3d. External
Specifies which tone generator will be sounded by the part.
When Internal is checked:
the internal tone generator will be sounded.
When External is checked:
musical data will be transmitted from the MIDI OUT connec-tor and the TO HOST connector.
When both Internal and External are checked:
the internal tone generator will be sounded, and at the same time musical data will be transmitted from the MIDI OUT con-nector and the TO HOST connector.
When unchecked:
that part will not be played.
The transmit/receive channels for MIDI data are set by “7–3. MIDI Channel.”
Page Menu Command .......................................
3–1. KBD Effects
Sets the send level for each part.
The Main KBD, Sub KBD and Lower KBD parts will use the effects that are specified for the Main KBD part.
3–1a. C Send Level ........................................ [0...9, PROG]
Specifies the level at which output channel C is sent to KBD FX1.
PROG:
The send level of the program will be used.
3–1b. D Send Level ........................................ [0...9, PROG]
Specifies the level at which output channel D is sent to KBD FX1.
PROG: The send level of the program will be used.
Page Menu Command .......................................
Refer to “1–1. Lower KBD”
2–3a
2–3b
2–3c
2–3d
3. KBD Effect
Refer to “1–1. Lower KBD”
3–1a
3–1b
Indicates the effect settings of the program used by the Main KBD part
Refer to “1–1. Lower KBD”
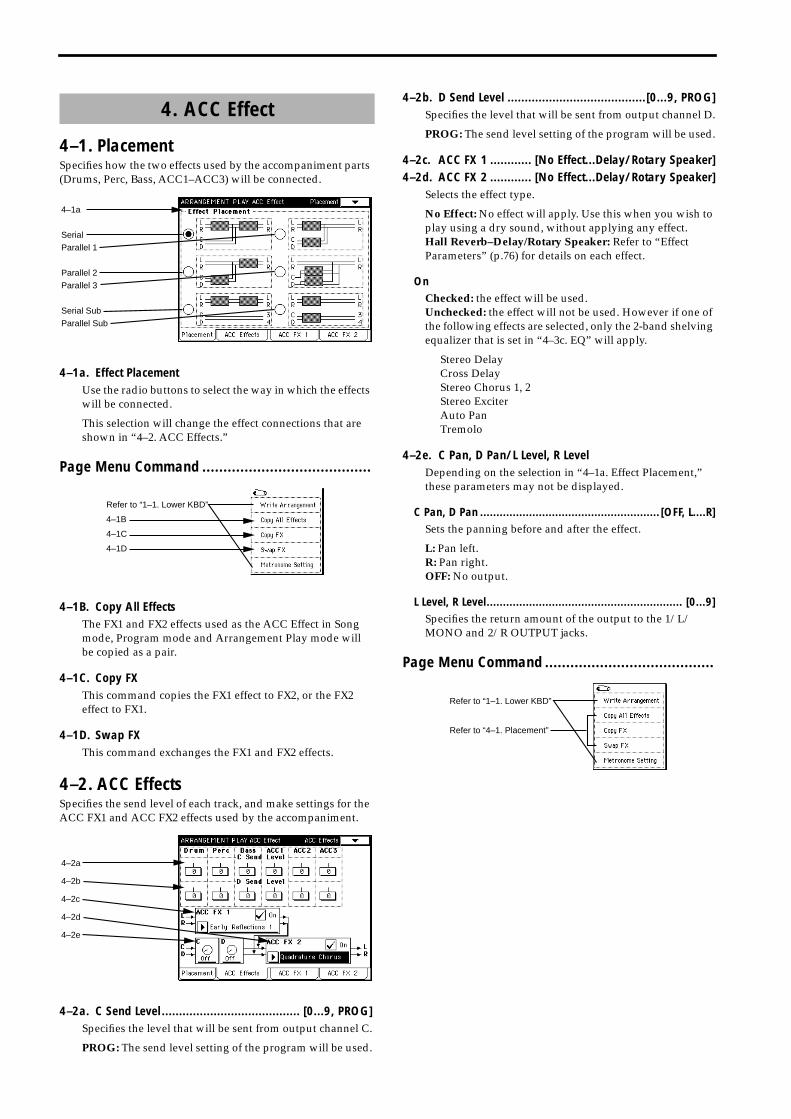
4–1. PlacementSpecifies how the two effects used by the accompaniment parts (Drums, Perc, Bass, ACC1–ACC3) will be connected.
4–1a. Effect PlacementUse the radio buttons to select the way in which the effects will be connected.
This selection will change the effect connections that are shown in “4–2. ACC Effects.”
Page Menu Command ........................................
4–1B. Copy All EffectsThe FX1 and FX2 effects used as the ACC Effect in Song mode, Program mode and Arrangement Play mode will be copied as a pair.
4–1C. Copy FXThis command copies the FX1 effect to FX2, or the FX2 effect to FX1.
4–1D. Swap FXThis command exchanges the FX1 and FX2 effects.
4–2. ACC EffectsSpecifies the send level of each track, and make settings for the ACC FX1 and ACC FX2 effects used by the accompaniment.
4–2a. C Send Level ........................................ [0...9, PROG]Specifies the level that will be sent from output channel C.
PROG: The send level setting of the program will be used.
4–2b. D Send Level ........................................[0...9, PROG]Specifies the level that will be sent from output channel D.
PROG: The send level setting of the program will be used.
4–2c. ACC FX 1 ............ [No Effect...Delay/Rotary Speaker]4–2d. ACC FX 2 ............ [No Effect...Delay/Rotary Speaker]
Selects the effect type.
No Effect: No effect will apply. Use this when you wish to play using a dry sound, without applying any effect.Hall Reverb–Delay/Rotary Speaker: Refer to “Effect Parameters” (p.76) for details on each effect.
OnChecked: the effect will be used.Unchecked: the effect will not be used. However if one of the following effects are selected, only the 2-band shelving equalizer that is set in “4–3c. EQ” will apply.
Stereo DelayCross DelayStereo Chorus 1, 2Stereo ExciterAuto PanTremolo
4–2e. C Pan, D Pan/L Level, R LevelDepending on the selection in “4–1a. Effect Placement,” these parameters may not be displayed.
C Pan, D Pan ....................................................... [OFF, L....R]Sets the panning before and after the effect.
L: Pan left.R: Pan right.OFF: No output.
L Level, R Level............................................................ [0...9]Specifies the return amount of the output to the 1/L/MONO and 2/R OUTPUT jacks.
Page Menu Command ........................................
4. ACC Effect
4–1a
Serial
Parallel 1
Parallel 2
Parallel 3
Serial Sub
Parallel Sub
Refer to “1–1. Lower KBD”
4–1B
4–1C
4–1D
4–2a
4–2b
4–2c
4–2d
4–2e
Refer to “1–1. Lower KBD”
Refer to “4–1. Placement”
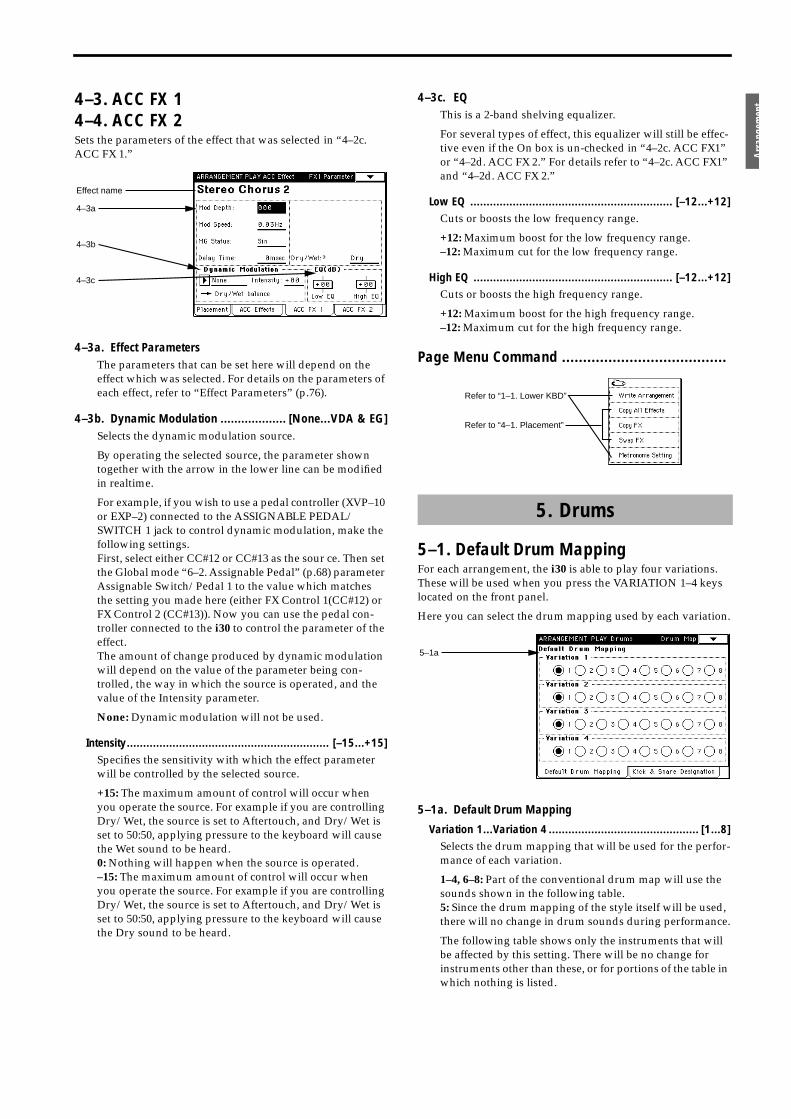
Arra
ngem
ent4–3. ACC FX 1
4–4. ACC FX 2Sets the parameters of the effect that was selected in “4–2c. ACC FX 1.”
4–3a. Effect ParametersThe parameters that can be set here will depend on the effect which was selected. For details on the parameters of each effect, refer to “Effect Parameters” (p.76).
4–3b. Dynamic Modulation ................... [None...VDA & EG]Selects the dynamic modulation source.
By operating the selected source, the parameter shown together with the arrow in the lower line can be modified in realtime.
For example, if you wish to use a pedal controller (XVP–10 or EXP–2) connected to the ASSIGNABLE PEDAL/SWITCH 1 jack to control dynamic modulation, make the following settings.First, select either CC#12 or CC#13 as the sour ce. Then set the Global mode “6–2. Assignable Pedal” (p.68) parameter Assignable Switch/Pedal 1 to the value which matches the setting you made here (either FX Control 1(CC#12) or FX Control 2 (CC#13)). Now you can use the pedal con-troller connected to the i30 to control the parameter of the effect.The amount of change produced by dynamic modulation will depend on the value of the parameter being con-trolled, the way in which the source is operated, and the value of the Intensity parameter.
None: Dynamic modulation will not be used.
Intensity.............................................................. [–15...+15]Specifies the sensitivity with which the effect parameter will be controlled by the selected source.
+15: The maximum amount of control will occur when you operate the source. For example if you are controlling Dry/Wet, the source is set to Aftertouch, and Dry/Wet is set to 50:50, applying pressure to the keyboard will cause the Wet sound to be heard.0: Nothing will happen when the source is operated.–15: The maximum amount of control will occur when you operate the source. For example if you are controlling Dry/Wet, the source is set to Aftertouch, and Dry/Wet is set to 50:50, applying pressure to the keyboard will cause the Dry sound to be heard.
4–3c. EQThis is a 2-band shelving equalizer.
For several types of effect, this equalizer will still be effec-tive even if the On box is un-checked in “4–2c. ACC FX1” or “4–2d. ACC FX 2.” For details refer to “4–2c. ACC FX1” and “4–2d. ACC FX 2.”
Low EQ .............................................................. [–12...+12]Cuts or boosts the low frequency range.
+12: Maximum boost for the low frequency range.–12: Maximum cut for the low frequency range.
High EQ ............................................................. [–12...+12]Cuts or boosts the high frequency range.
+12: Maximum boost for the high frequency range.–12: Maximum cut for the high frequency range.
Page Menu Command .......................................
5–1. Default Drum MappingFor each arrangement, the i30 is able to play four variations. These will be used when you press the VARIATION 1–4 keys located on the front panel.
Here you can select the drum mapping used by each variation.
5–1a. Default Drum Mapping
Variation 1...Variation 4 .............................................. [1...8]Selects the drum mapping that will be used for the perfor-mance of each variation.
1–4, 6–8: Part of the conventional drum map will use the sounds shown in the following table.5: Since the drum mapping of the style itself will be used, there will no change in drum sounds during performance.
The following table shows only the instruments that will be affected by this setting. There will be no change for instruments other than these, or for portions of the table in which nothing is listed.
Effect name
4–3a
4–3b
4–3c
5. Drums
Refer to “1–1. Lower KBD”
Refer to “4–1. Placement”
5–1a
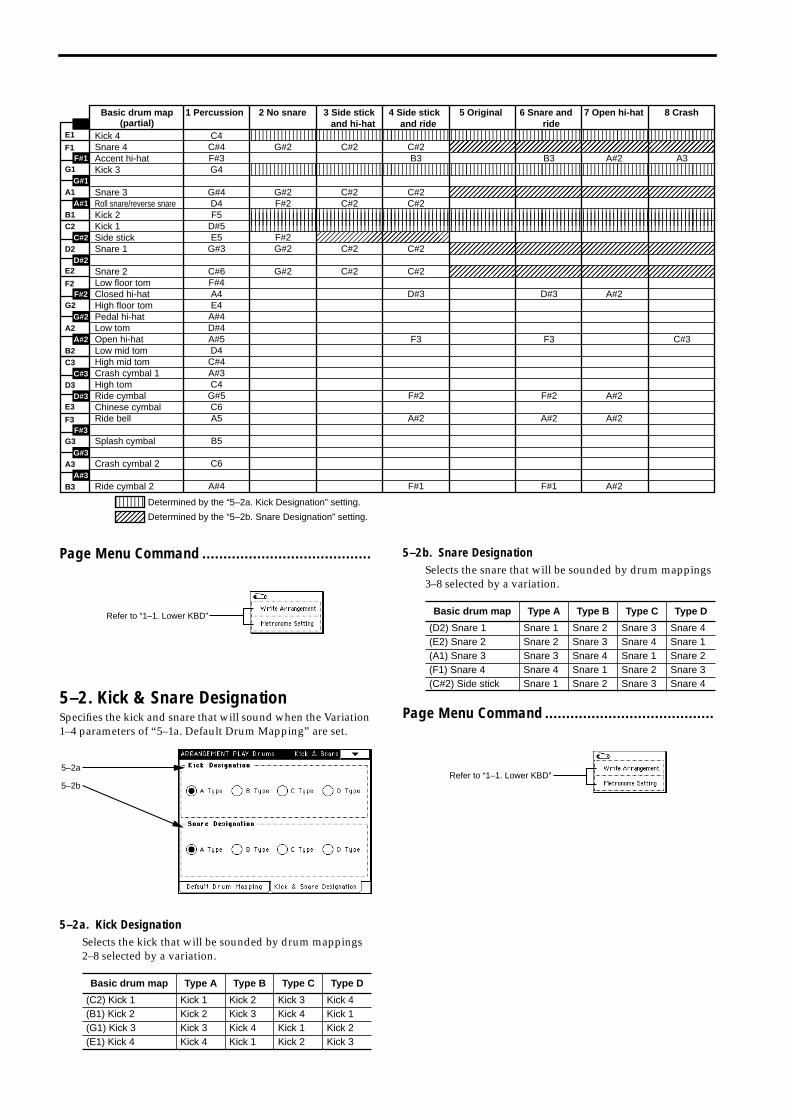
Page Menu Command ........................................
5–2. Kick & Snare DesignationSpecifies the kick and snare that will sound when the Variation 1–4 parameters of “5–1a. Default Drum Mapping” are set.
5–2a. Kick DesignationSelects the kick that will be sounded by drum mappings 2–8 selected by a variation.
5–2b. Snare DesignationSelects the snare that will be sounded by drum mappings 3–8 selected by a variation.
Page Menu Command ........................................
Basic drum map Type A Type B Type C Type D
(C2) Kick 1 Kick 1 Kick 2 Kick 3 Kick 4(B1) Kick 2 Kick 2 Kick 3 Kick 4 Kick 1(G1) Kick 3 Kick 3 Kick 4 Kick 1 Kick 2(E1) Kick 4 Kick 4 Kick 1 Kick 2 Kick 3
�������F#1
G#1
A#1
E1
F1
G1
A1
B1
C#2
D#2
F#2
G#2
A#2
C2
D2
E2
F2
G2
A2
B2
C#3
D#3
F#3
G#3
A#3
C3
D3
E3
F3
G3
A3
B3
C4C#4 G#2 C#2 C#2F#3 B3 B3 A#2 A3G4
G#4 G#2 C#2 C#2D4 F#2 C#2 C#2F5
D#5E5 F#2
G#3 G#2 C#2 C#2
C#6 G#2 C#2 C#2F#4A4 D#3 D#3 A#2E4A#4D#4A#5 F3 F3 C#3D4C#4A#3C4
G#5 F#2 F#2 A#2C6A5 A#2 A#2 A#2
B5
C6
A#4 F#1 F#1 A#2
��������������������������
����������������������
���
Kick 4Snare 4Accent hi-hatKick 3
Snare 3Roll snare/reverse snareKick 2Kick 1Side stickSnare 1
Snare 2Low floor tomClosed hi-hatHigh floor tomPedal hi-hatLow tomOpen hi-hatLow mid tomHigh mid tomCrash cymbal 1High tomRide cymbalChinese cymbalRide bell
Splash cymbal
Crash cymbal 2
Ride cymbal 2
1 Percussion 2 No snare 3 Side stick 4 Side stick 5 Original 6 Snare and 7 Open hi-hat 8 Crash and hi-hat and ride ride
Basic drum map(partial)
Determined by the “5–2a. Kick Designation” setting.
Determined by the “5–2b. Snare Designation” setting.
Refer to “1–1. Lower KBD”
5–2a
5–2b
Basic drum map Type A Type B Type C Type D
(D2) Snare 1 Snare 1 Snare 2 Snare 3 Snare 4(E2) Snare 2 Snare 2 Snare 3 Snare 4 Snare 1(A1) Snare 3 Snare 3 Snare 4 Snare 1 Snare 2(F1) Snare 4 Snare 4 Snare 1 Snare 2 Snare 3(C#2) Side stick Snare 1 Snare 2 Snare 3 Snare 4
Refer to “1–1. Lower KBD”
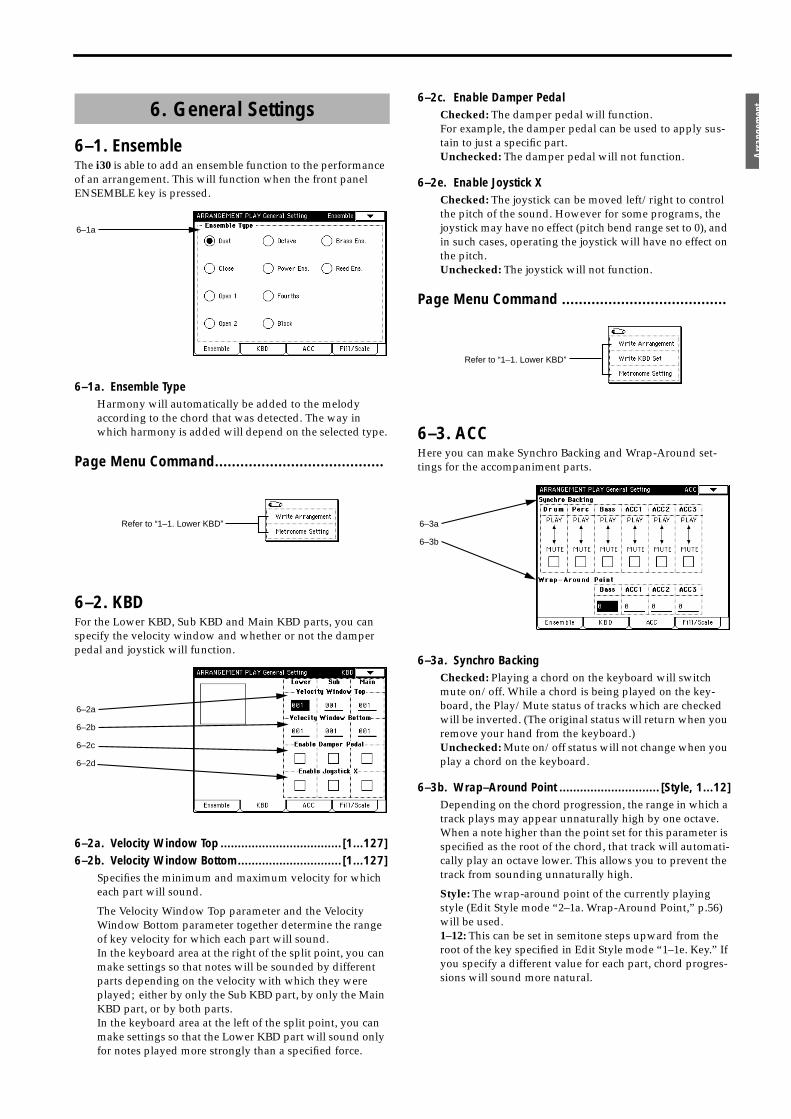
Arra
ngem
ent
6–1. EnsembleThe i30 is able to add an ensemble function to the performance of an arrangement. This will function when the front panel ENSEMBLE key is pressed.
6–1a. Ensemble TypeHarmony will automatically be added to the melody according to the chord that was detected. The way in which harmony is added will depend on the selected type.
Page Menu Command........................................
6–2. KBDFor the Lower KBD, Sub KBD and Main KBD parts, you can specify the velocity window and whether or not the damper pedal and joystick will function.
6–2a. Velocity Window Top ................................... [1...127]6–2b. Velocity Window Bottom.............................. [1...127]
Specifies the minimum and maximum velocity for which each part will sound.
The Velocity Window Top parameter and the Velocity Window Bottom parameter together determine the range of key velocity for which each part will sound.In the keyboard area at the right of the split point, you can make settings so that notes will be sounded by different parts depending on the velocity with which they were played; either by only the Sub KBD part, by only the Main KBD part, or by both parts.In the keyboard area at the left of the split point, you can make settings so that the Lower KBD part will sound only for notes played more strongly than a specified force.
6–2c. Enable Damper PedalChecked: The damper pedal will function.For example, the damper pedal can be used to apply sus-tain to just a specific part.Unchecked: The damper pedal will not function.
6–2e. Enable Joystick XChecked: The joystick can be moved left/right to control the pitch of the sound. However for some programs, the joystick may have no effect (pitch bend range set to 0), and in such cases, operating the joystick will have no effect on the pitch.Unchecked: The joystick will not function.
Page Menu Command .......................................
6–3. ACCHere you can make Synchro Backing and Wrap-Around set-tings for the accompaniment parts.
6–3a. Synchro BackingChecked: Playing a chord on the keyboard will switch mute on/off. While a chord is being played on the key-board, the Play/Mute status of tracks which are checked will be inverted. (The original status will return when you remove your hand from the keyboard.)Unchecked: Mute on/off status will not change when you play a chord on the keyboard.
6–3b. Wrap–Around Point ............................. [Style, 1...12]Depending on the chord progression, the range in which a track plays may appear unnaturally high by one octave. When a note higher than the point set for this parameter is specified as the root of the chord, that track will automati-cally play an octave lower. This allows you to prevent the track from sounding unnaturally high.
Style: The wrap-around point of the currently playing style (Edit Style mode “2–1a. Wrap-Around Point,” p.56) will be used.1–12: This can be set in semitone steps upward from the root of the key specified in Edit Style mode “1–1e. Key.” If you specify a different value for each part, chord progres-sions will sound more natural.
6. General Settings
6–1a
Refer to “1–1. Lower KBD”
6–2a
6–2b
6–2c
6–2d
Refer to “1–1. Lower KBD”
6–3a
6–3b
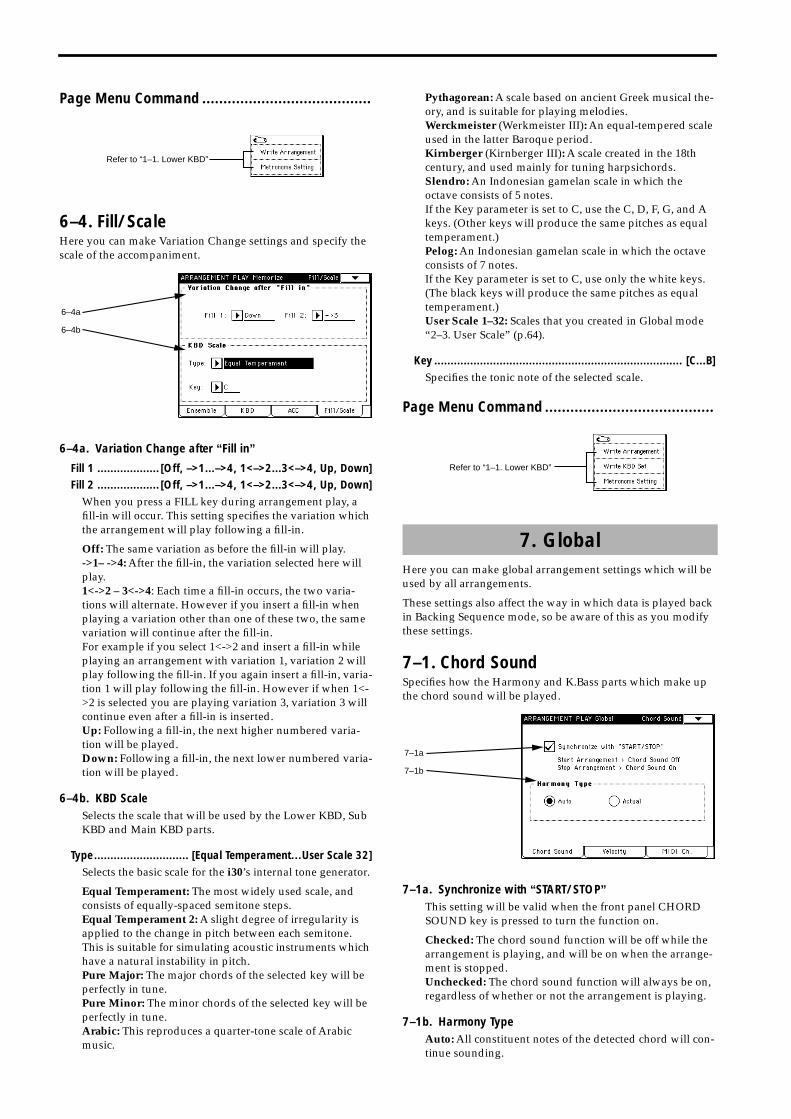
Page Menu Command ........................................
6–4. Fill/ScaleHere you can make Variation Change settings and specify the scale of the accompaniment.
6–4a. Variation Change after “Fill in”
Fill 1 ................... [Off, –>1...–>4, 1<–>2...3<–>4, Up, Down]Fill 2 ................... [Off, –>1...–>4, 1<–>2...3<–>4, Up, Down]
When you press a FILL key during arrangement play, a fill-in will occur. This setting specifies the variation which the arrangement will play following a fill-in.
Off: The same variation as before the fill-in will play.->1– ->4: After the fill-in, the variation selected here will play.1<->2 – 3<->4: Each time a fill-in occurs, the two varia-tions will alternate. However if you insert a fill-in when playing a variation other than one of these two, the same variation will continue after the fill-in.For example if you select 1<->2 and insert a fill-in while playing an arrangement with variation 1, variation 2 will play following the fill-in. If you again insert a fill-in, varia-tion 1 will play following the fill-in. However if when 1<->2 is selected you are playing variation 3, variation 3 will continue even after a fill-in is inserted.Up: Following a fill-in, the next higher numbered varia-tion will be played.Down: Following a fill-in, the next lower numbered varia-tion will be played.
6–4b. KBD ScaleSelects the scale that will be used by the Lower KBD, Sub KBD and Main KBD parts.
Type............................. [Equal Temperament…User Scale 32]Selects the basic scale for the i30’s internal tone generator.
Equal Temperament: The most widely used scale, and consists of equally-spaced semitone steps.Equal Temperament 2: A slight degree of irregularity is applied to the change in pitch between each semitone. This is suitable for simulating acoustic instruments which have a natural instability in pitch.Pure Major: The major chords of the selected key will be perfectly in tune.Pure Minor: The minor chords of the selected key will be perfectly in tune.Arabic: This reproduces a quarter-tone scale of Arabic music.
Pythagorean: A scale based on ancient Greek musical the-ory, and is suitable for playing melodies.Werckmeister (Werkmeister III): An equal-tempered scale used in the latter Baroque period.Kirnberger (Kirnberger III): A scale created in the 18th century, and used mainly for tuning harpsichords.Slendro: An Indonesian gamelan scale in which the octave consists of 5 notes.If the Key parameter is set to C, use the C, D, F, G, and A keys. (Other keys will produce the same pitches as equal temperament.)Pelog: An Indonesian gamelan scale in which the octave consists of 7 notes.If the Key parameter is set to C, use only the white keys. (The black keys will produce the same pitches as equal temperament.)User Scale 1–32: Scales that you created in Global mode “2–3. User Scale” (p.64).
Key ............................................................................ [C...B]Specifies the tonic note of the selected scale.
Page Menu Command ........................................
Here you can make global arrangement settings which will be used by all arrangements.
These settings also affect the way in which data is played back in Backing Sequence mode, so be aware of this as you modify these settings.
7–1. Chord SoundSpecifies how the Harmony and K.Bass parts which make up the chord sound will be played.
7–1a. Synchronize with “START/STOP”This setting will be valid when the front panel CHORD SOUND key is pressed to turn the function on.
Checked: The chord sound function will be off while the arrangement is playing, and will be on when the arrange-ment is stopped.Unchecked: The chord sound function will always be on, regardless of whether or not the arrangement is playing.
7–1b. Harmony TypeAuto: All constituent notes of the detected chord will con-tinue sounding.
Refer to “1–1. Lower KBD”
6–4a
6–4b
7. Global
Refer to “1–1. Lower KBD”
7–1a
7–1b
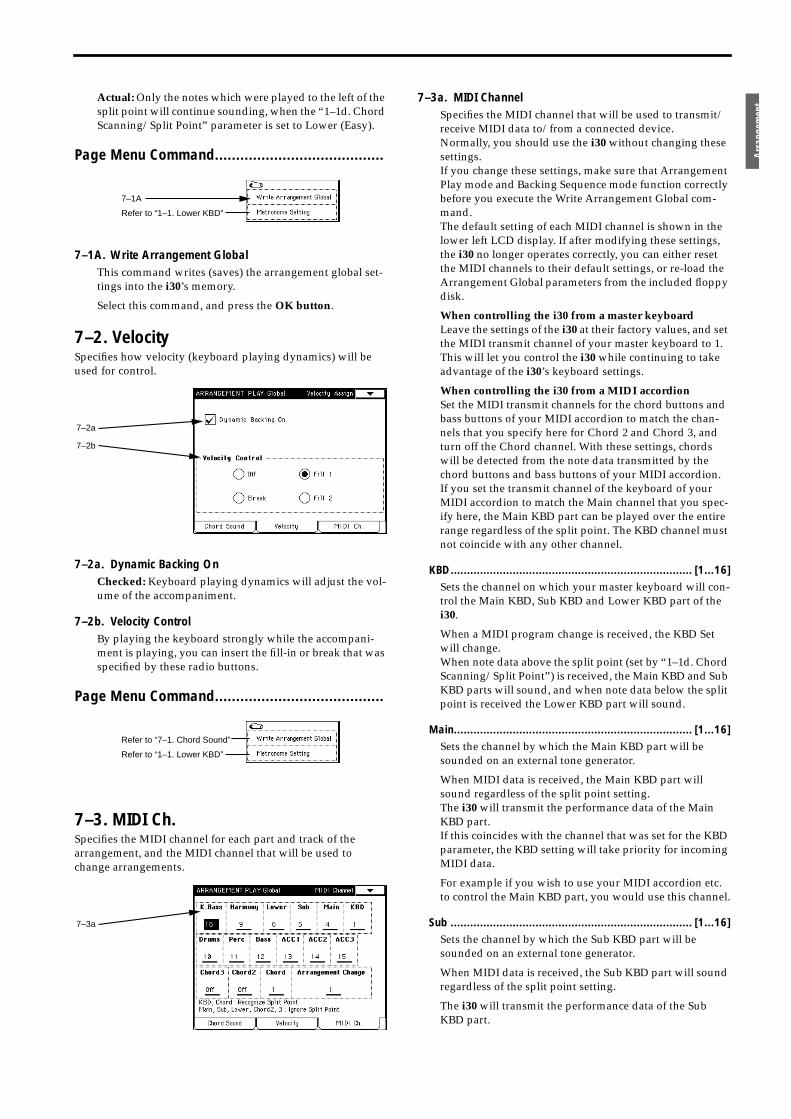
Arra
ngem
entActual: Only the notes which were played to the left of the
split point will continue sounding, when the “1–1d. Chord Scanning/Split Point” parameter is set to Lower (Easy).
Page Menu Command........................................
7–1A. Write Arrangement GlobalThis command writes (saves) the arrangement global set-tings into the i30’s memory.
Select this command, and press the OK button.
7–2. VelocitySpecifies how velocity (keyboard playing dynamics) will be used for control.
7–2a. Dynamic Backing OnChecked: Keyboard playing dynamics will adjust the vol-ume of the accompaniment.
7–2b. Velocity ControlBy playing the keyboard strongly while the accompani-ment is playing, you can insert the fill-in or break that was specified by these radio buttons.
Page Menu Command........................................
7–3. MIDI Ch.Specifies the MIDI channel for each part and track of the arrangement, and the MIDI channel that will be used to change arrangements.
7–3a. MIDI ChannelSpecifies the MIDI channel that will be used to transmit/receive MIDI data to/from a connected device.Normally, you should use the i30 without changing these settings.If you change these settings, make sure that Arrangement Play mode and Backing Sequence mode function correctly before you execute the Write Arrangement Global com-mand.The default setting of each MIDI channel is shown in the lower left LCD display. If after modifying these settings, the i30 no longer operates correctly, you can either reset the MIDI channels to their default settings, or re-load the Arrangement Global parameters from the included floppy disk.
When controlling the i30 from a master keyboardLeave the settings of the i30 at their factory values, and set the MIDI transmit channel of your master keyboard to 1. This will let you control the i30 while continuing to take advantage of the i30’s keyboard settings.
When controlling the i30 from a MIDI accordionSet the MIDI transmit channels for the chord buttons and bass buttons of your MIDI accordion to match the chan-nels that you specify here for Chord 2 and Chord 3, and turn off the Chord channel. With these settings, chords will be detected from the note data transmitted by the chord buttons and bass buttons of your MIDI accordion.If you set the transmit channel of the keyboard of your MIDI accordion to match the Main channel that you spec-ify here, the Main KBD part can be played over the entire range regardless of the split point. The KBD channel must not coincide with any other channel.
KBD.......................................................................... [1...16]Sets the channel on which your master keyboard will con-trol the Main KBD, Sub KBD and Lower KBD part of the i30.
When a MIDI program change is received, the KBD Set will change.When note data above the split point (set by “1–1d. Chord Scanning/Split Point”) is received, the Main KBD and Sub KBD parts will sound, and when note data below the split point is received the Lower KBD part will sound.
Main......................................................................... [1...16]Sets the channel by which the Main KBD part will be sounded on an external tone generator.
When MIDI data is received, the Main KBD part will sound regardless of the split point setting.The i30 will transmit the performance data of the Main KBD part.If this coincides with the channel that was set for the KBD parameter, the KBD setting will take priority for incoming MIDI data.
For example if you wish to use your MIDI accordion etc. to control the Main KBD part, you would use this channel.
Sub .......................................................................... [1...16]Sets the channel by which the Sub KBD part will be sounded on an external tone generator.
When MIDI data is received, the Sub KBD part will sound regardless of the split point setting.
The i30 will transmit the performance data of the Sub KBD part.
7–1A
Refer to “1–1. Lower KBD”
7–2a
7–2b
Refer to “7–1. Chord Sound”
Refer to “1–1. Lower KBD”
7–3a
If this coincides with the channel that was set for the KBD parameter, the KBD setting will take priority for incoming MIDI data.
For example if you wish to use your MIDI accordion etc. to control the Sub KBD part, you would use this channel.
Lower........................................................................[1...16]Sets the channel by which the Lower KBD part will be sounded on an external tone generator.
When MIDI data is received, the Lower KBD part will sound regardless of the split point setting.The i30 will transmit the performance data of the Lower KBD part.If this coincides with the channel that was set for the KBD parameter, the KBD setting will take priority for incoming MIDI data.
For example if you wish to use your MIDI accordion etc. to control the Lower KBD part, you would use this chan-nel.
Drums .......................................................................[1...16]Sets the channel by which the Drums part will be sounded on an external tone generator.
When MIDI data is received, the Drums part will sound.The i30 will transmit the performance data of the Drums part.
Perc ..........................................................................[1...16]Sets the channel by which the Perc part will be sounded on an external tone generator.
When MIDI data is received, the Perc part will sound.The i30 will transmit the performance data of the Perc part.
Bass ..........................................................................[1...16]Sets the channel by which the Bass part will be sounded on an external tone generator.
When MIDI data is received, the Bass part will sound.The i30 will transmit the performance data of the Bass part.
ACC1 ........................................................................[1...16]Sets the channel by which the ACC1 part will be sounded on an external tone generator.
When MIDI data is received, the ACC1 part will sound.The i30 will transmit the performance data of the ACC1 part.
ACC2 ........................................................................[1...16]Sets the channel by which the ACC2 part will be sounded on an external tone generator.
When MIDI data is received, the ACC2 part will sound.The i30 will transmit the performance data of the ACC2 part.
ACC3 ........................................................................[1...16]Sets the channel by which the ACC3 part will be sounded on an external tone generator.
When MIDI data is received, the ACC3 part will sound.The i30 will transmit the performance data of the ACC3 part.
Harmony.................................................................. [1...16]Sets the channel by which the Harmony part will be sounded on an external tone generator.
When MIDI data is received, the Harmony part will sound.The i30 will transmit the performance data of the Har-mony part.
K.Bass ...................................................................... [1...16]Sets the channel by which the K.Bass part will be sounded on an external tone generator.
When MIDI data is received, the K.Bass part will sound.The i30 will transmit the performance data of the K.Bass part.
Chord.................................................................[Off, 1...16]This channel is used for reception of MIDI data.Specify the channel that will be used to receive note data from your master keyboard in order to detect chords.
Normally you will set this to the same channel as specified for the KBD parameter.The i30 will detect chords from the incoming MIDI data according to the settings of “1–1d. Chord Scanning/Split Point.”
Chord 2..............................................................[Off, 1...16]Chord 3..............................................................[Off, 1...16]
These channels are used for reception of MIDI data.The i30 will detect chords from the incoming data received on the Chord 2 and Chord 3 channels. In this case, the split point setting has no effect.For example if you wish to receive note messages from your MIDI accordion etc. to detect chords, set this channel to receive those messages.
Arrangement Change..........................................[Off, 1...16]This channel is used for reception of MIDI data.
When a MIDI program change message is received, the arrangement will change.
About MIDI channels in Backing Sequence modeThe MIDI channels that are specified here are also used for transmission/reception in Backing Sequence mode. How-ever, the channel set by the KBD parameter will be used for transmission/reception of data of the arrangement tracks. In this case, the channel settings of the Main, Sub and Lower parameters will be ignored.
Page Menu Command ........................................
Refer to “7–1. Chord Sound”
Refer to “1–1. Lower KBD”
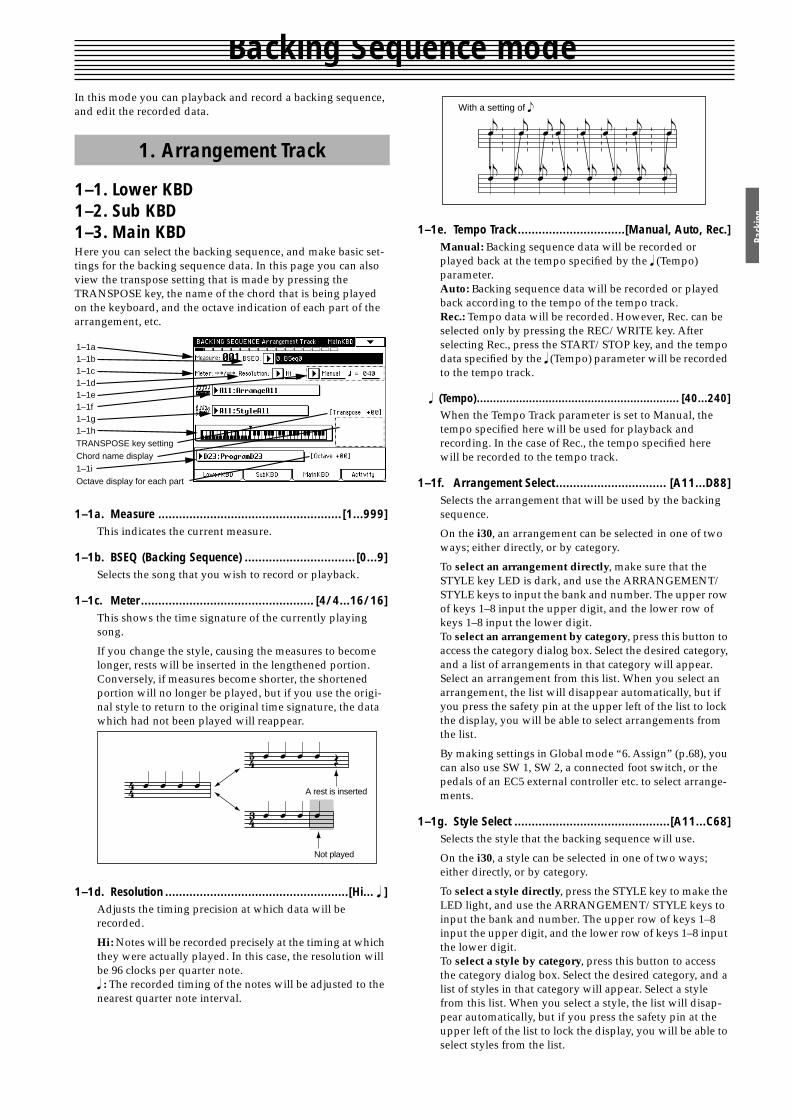
Back
ing
Backing Sequence modeIn this mode you can playback and record a backing sequence, and edit the recorded data.
1–1. Lower KBD1–2. Sub KBD1–3. Main KBDHere you can select the backing sequence, and make basic set-tings for the backing sequence data. In this page you can also view the transpose setting that is made by pressing the TRANSPOSE key, the name of the chord that is being played on the keyboard, and the octave indication of each part of the arrangement, etc.
1–1a. Measure ..................................................... [1...999]This indicates the current measure.
1–1b. BSEQ (Backing Sequence) ................................ [0...9]Selects the song that you wish to record or playback.
1–1c. Meter.................................................. [4/4...16/16]This shows the time signature of the currently playing song.
If you change the style, causing the measures to become longer, rests will be inserted in the lengthened portion. Conversely, if measures become shorter, the shortened portion will no longer be played, but if you use the origi-nal style to return to the original time signature, the data which had not been played will reappear.
1–1d. Resolution .....................................................[Hi... � ]Adjusts the timing precision at which data will be recorded.
Hi: Notes will be recorded precisely at the timing at which they were actually played. In this case, the resolution will be 96 clocks per quarter note.� : The recorded timing of the notes will be adjusted to the nearest quarter note interval.
1–1e. Tempo Track...............................[Manual, Auto, Rec.]Manual: Backing sequence data will be recorded or played back at the tempo specified by the � (Tempo) parameter.Auto: Backing sequence data will be recorded or played back according to the tempo of the tempo track.Rec.: Tempo data will be recorded. However, Rec. can be selected only by pressing the REC/WRITE key. After selecting Rec., press the START/STOP key, and the tempo data specified by the � (Tempo) parameter will be recorded to the tempo track.
� (Tempo).............................................................. [40...240]When the Tempo Track parameter is set to Manual, the tempo specified here will be used for playback and recording. In the case of Rec., the tempo specified here will be recorded to the tempo track.
1–1f. Arrangement Select ................................ [A11...D88]Selects the arrangement that will be used by the backing sequence.
On the i30, an arrangement can be selected in one of two ways; either directly, or by category.
To select an arrangement directly, make sure that the STYLE key LED is dark, and use the ARRANGEMENT/STYLE keys to input the bank and number. The upper row of keys 1–8 input the upper digit, and the lower row of keys 1–8 input the lower digit.To select an arrangement by category, press this button to access the category dialog box. Select the desired category, and a list of arrangements in that category will appear. Select an arrangement from this list. When you select an arrangement, the list will disappear automatically, but if you press the safety pin at the upper left of the list to lock the display, you will be able to select arrangements from the list.
By making settings in Global mode “6. Assign” (p.68), you can also use SW 1, SW 2, a connected foot switch, or the pedals of an EC5 external controller etc. to select arrange-ments.
1–1g. Style Select .............................................[A11...C68]Selects the style that the backing sequence will use.
On the i30, a style can be selected in one of two ways; either directly, or by category.
To select a style directly, press the STYLE key to make the LED light, and use the ARRANGEMENT/STYLE keys to input the bank and number. The upper row of keys 1–8 input the upper digit, and the lower row of keys 1–8 input the lower digit.To select a style by category, press this button to access the category dialog box. Select the desired category, and a list of styles in that category will appear. Select a style from this list. When you select a style, the list will disap-pear automatically, but if you press the safety pin at the upper left of the list to lock the display, you will be able to select styles from the list.
1. Arrangement Track
1–1a1–1b1–1c1–1d1–1e1–1f1–1g1–1h
TRANSPOSE key setting
Chord name display
1–1i
Octave display for each part
� � � �� � � � �� � � �A rest is inserted
Not played
�� � � � � � � �
� � � � � � �
With a setting of �
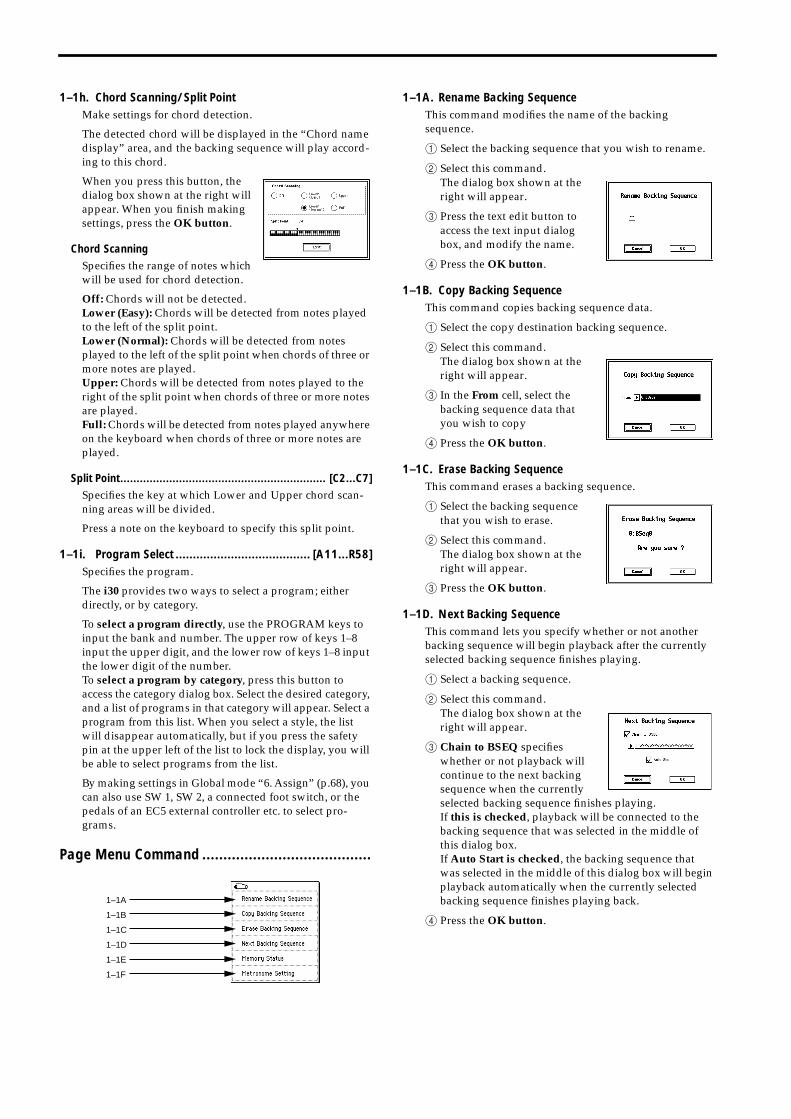
1–1h. Chord Scanning/Split PointMake settings for chord detection.
The detected chord will be displayed in the “Chord name display” area, and the backing sequence will play accord-ing to this chord.
When you press this button, the dialog box shown at the right will appear. When you finish making settings, press the OK button.
Chord ScanningSpecifies the range of notes which will be used for chord detection.
Off: Chords will not be detected.Lower (Easy): Chords will be detected from notes played to the left of the split point.Lower (Normal): Chords will be detected from notes played to the left of the split point when chords of three or more notes are played.Upper: Chords will be detected from notes played to the right of the split point when chords of three or more notes are played.Full: Chords will be detected from notes played anywhere on the keyboard when chords of three or more notes are played.
Split Point............................................................... [C2...C7]Specifies the key at which Lower and Upper chord scan-ning areas will be divided.
Press a note on the keyboard to specify this split point.
1–1i. Program Select ....................................... [A11...R58]Specifies the program.
The i30 provides two ways to select a program; either directly, or by category.
To select a program directly, use the PROGRAM keys to input the bank and number. The upper row of keys 1–8 input the upper digit, and the lower row of keys 1–8 input the lower digit of the number.To select a program by category, press this button to access the category dialog box. Select the desired category, and a list of programs in that category will appear. Select a program from this list. When you select a style, the list will disappear automatically, but if you press the safety pin at the upper left of the list to lock the display, you will be able to select programs from the list.
By making settings in Global mode “6. Assign” (p.68), you can also use SW 1, SW 2, a connected foot switch, or the pedals of an EC5 external controller etc. to select pro-grams.
Page Menu Command ........................................
1–1A. Rename Backing SequenceThis command modifies the name of the backing sequence.
1 Select the backing sequence that you wish to rename.
2 Select this command.The dialog box shown at the right will appear.
3 Press the text edit button to access the text input dialog box, and modify the name.
4 Press the OK button.
1–1B. Copy Backing SequenceThis command copies backing sequence data.
1 Select the copy destination backing sequence.
2 Select this command.The dialog box shown at the right will appear.
3 In the From cell, select the backing sequence data that you wish to copy
4 Press the OK button.
1–1C. Erase Backing SequenceThis command erases a backing sequence.
1 Select the backing sequence that you wish to erase.
2 Select this command.The dialog box shown at the right will appear.
3 Press the OK button.
1–1D. Next Backing SequenceThis command lets you specify whether or not another backing sequence will begin playback after the currently selected backing sequence finishes playing.
1 Select a backing sequence.
2 Select this command.The dialog box shown at the right will appear.
3 Chain to BSEQ specifies whether or not playback will continue to the next backing sequence when the currently selected backing sequence finishes playing.If this is checked, playback will be connected to the backing sequence that was selected in the middle of this dialog box.If Auto Start is checked, the backing sequence that was selected in the middle of this dialog box will begin playback automatically when the currently selected backing sequence finishes playing back.
4 Press the OK button.
1–1A
1–1B
1–1C
1–1D
1–1E
1–1F
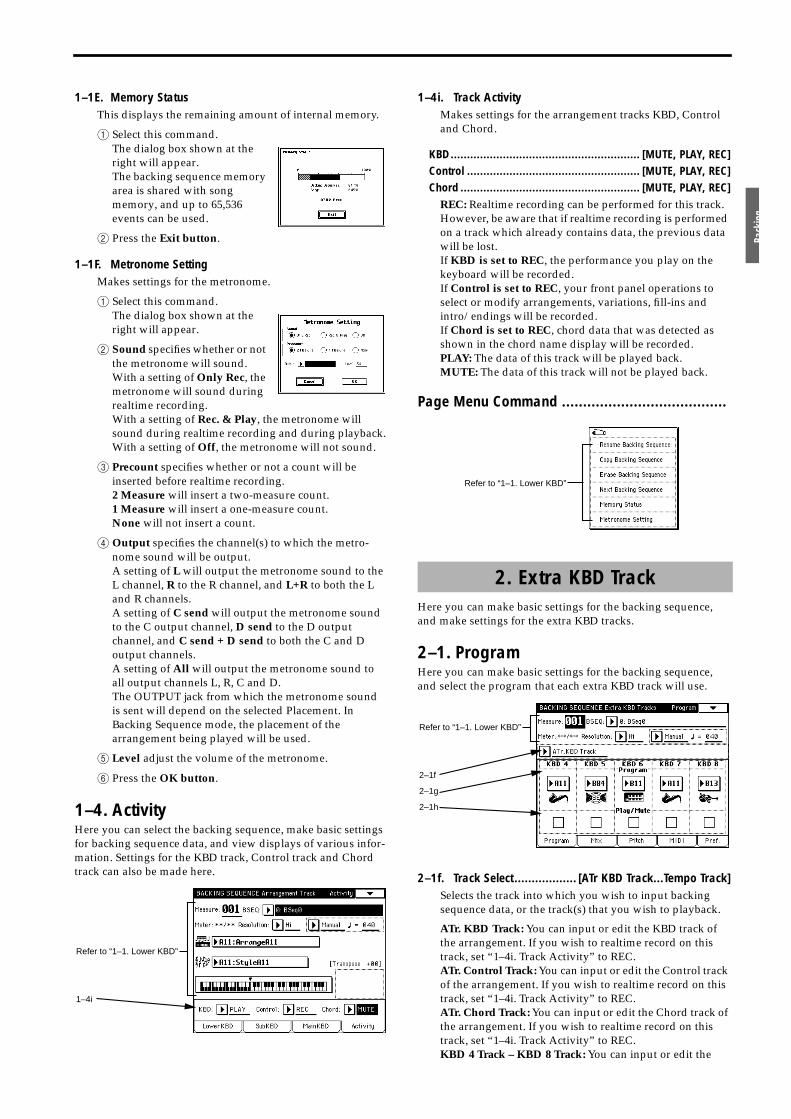
Back
ing
1–1E. Memory StatusThis displays the remaining amount of internal memory.
1 Select this command.The dialog box shown at the right will appear.The backing sequence memory area is shared with song memory, and up to 65,536 events can be used.
2 Press the Exit button.
1–1F. Metronome SettingMakes settings for the metronome.
1 Select this command.The dialog box shown at the right will appear.
2 Sound specifies whether or not the metronome will sound.With a setting of Only Rec, the metronome will sound during realtime recording.With a setting of Rec. & Play, the metronome will sound during realtime recording and during playback.With a setting of Off, the metronome will not sound.
3 Precount specifies whether or not a count will be inserted before realtime recording.2 Measure will insert a two-measure count.1 Measure will insert a one-measure count.None will not insert a count.
4 Output specifies the channel(s) to which the metro-nome sound will be output.A setting of L will output the metronome sound to the L channel, R to the R channel, and L+R to both the L and R channels.A setting of C send will output the metronome sound to the C output channel, D send to the D output channel, and C send + D send to both the C and D output channels.A setting of All will output the metronome sound to all output channels L, R, C and D.The OUTPUT jack from which the metronome sound is sent will depend on the selected Placement. In Backing Sequence mode, the placement of the arrangement being played will be used.
5 Level adjust the volume of the metronome.
6 Press the OK button.
1–4. ActivityHere you can select the backing sequence, make basic settings for backing sequence data, and view displays of various infor-mation. Settings for the KBD track, Control track and Chord track can also be made here.
1–4i. Track ActivityMakes settings for the arrangement tracks KBD, Control and Chord.
KBD.......................................................... [MUTE, PLAY, REC]Control ..................................................... [MUTE, PLAY, REC]Chord ....................................................... [MUTE, PLAY, REC]
REC: Realtime recording can be performed for this track. However, be aware that if realtime recording is performed on a track which already contains data, the previous data will be lost.If KBD is set to REC, the performance you play on the keyboard will be recorded.If Control is set to REC, your front panel operations to select or modify arrangements, variations, fill-ins and intro/endings will be recorded.If Chord is set to REC, chord data that was detected as shown in the chord name display will be recorded.PLAY: The data of this track will be played back.MUTE: The data of this track will not be played back.
Page Menu Command .......................................
Here you can make basic settings for the backing sequence, and make settings for the extra KBD tracks.
2–1. ProgramHere you can make basic settings for the backing sequence, and select the program that each extra KBD track will use.
2–1f. Track Select.................. [ATr KBD Track...Tempo Track]Selects the track into which you wish to input backing sequence data, or the track(s) that you wish to playback.
ATr. KBD Track: You can input or edit the KBD track of the arrangement. If you wish to realtime record on this track, set “1–4i. Track Activity” to REC.ATr. Control Track: You can input or edit the Control track of the arrangement. If you wish to realtime record on this track, set “1–4i. Track Activity” to REC.ATr. Chord Track: You can input or edit the Chord track of the arrangement. If you wish to realtime record on this track, set “1–4i. Track Activity” to REC.KBD 4 Track – KBD 8 Track: You can input or edit the
Refer to “1–1. Lower KBD”
1–4i
2. Extra KBD Track
Refer to “1–1. Lower KBD”
Refer to “1–1. Lower KBD”
2–1f
2–1g
2–1h
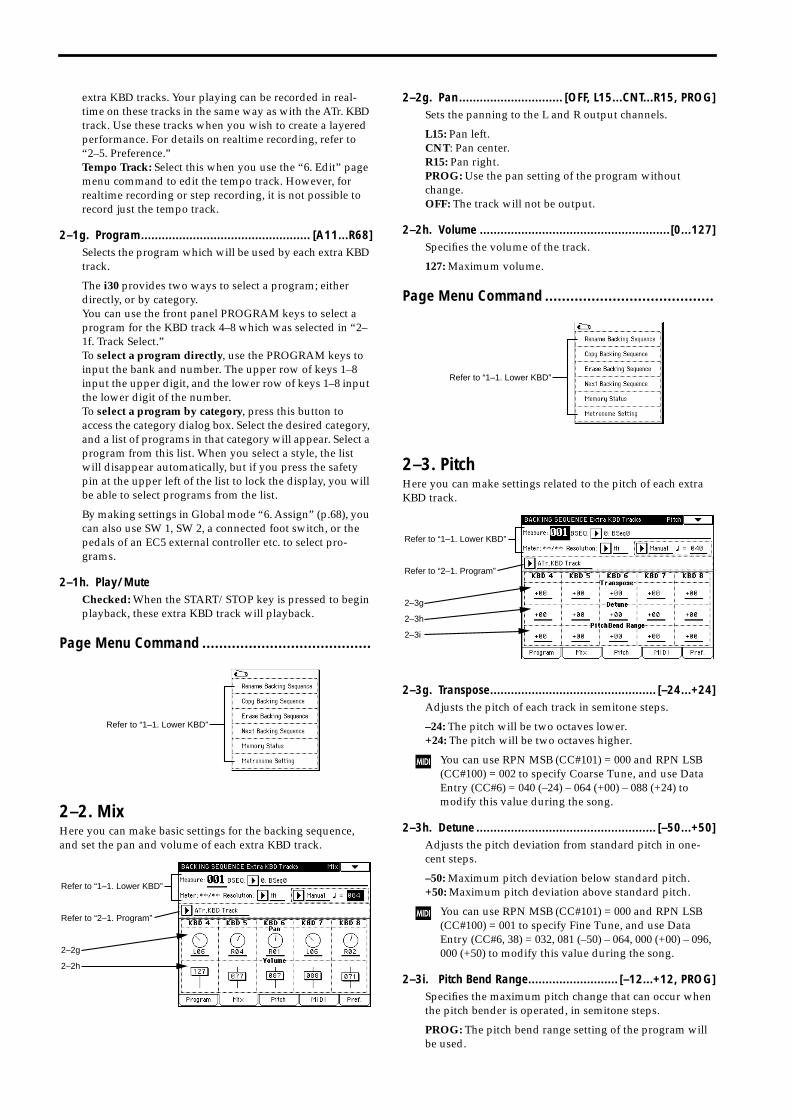
extra KBD tracks. Your playing can be recorded in real-time on these tracks in the same way as with the ATr. KBD track. Use these tracks when you wish to create a layered performance. For details on realtime recording, refer to “2–5. Preference.”Tempo Track: Select this when you use the “6. Edit” page menu command to edit the tempo track. However, for realtime recording or step recording, it is not possible to record just the tempo track.
2–1g. Program................................................. [A11...R68]Selects the program which will be used by each extra KBD track.
The i30 provides two ways to select a program; either directly, or by category.You can use the front panel PROGRAM keys to select a program for the KBD track 4–8 which was selected in “2–1f. Track Select.”To select a program directly, use the PROGRAM keys to input the bank and number. The upper row of keys 1–8 input the upper digit, and the lower row of keys 1–8 input the lower digit of the number.To select a program by category, press this button to access the category dialog box. Select the desired category, and a list of programs in that category will appear. Select a program from this list. When you select a style, the list will disappear automatically, but if you press the safety pin at the upper left of the list to lock the display, you will be able to select programs from the list.
By making settings in Global mode “6. Assign” (p.68), you can also use SW 1, SW 2, a connected foot switch, or the pedals of an EC5 external controller etc. to select pro-grams.
2–1h. Play/MuteChecked: When the START/STOP key is pressed to begin playback, these extra KBD track will playback.
Page Menu Command ........................................
2–2. MixHere you can make basic settings for the backing sequence, and set the pan and volume of each extra KBD track.
2–2g. Pan.............................. [OFF, L15...CNT...R15, PROG]Sets the panning to the L and R output channels.
L15: Pan left.CNT: Pan center.R15: Pan right.PROG: Use the pan setting of the program without change.OFF: The track will not be output.
2–2h. Volume .......................................................[0...127]Specifies the volume of the track.
127: Maximum volume.
Page Menu Command ........................................
2–3. PitchHere you can make settings related to the pitch of each extra KBD track.
2–3g. Transpose................................................ [–24...+24]Adjusts the pitch of each track in semitone steps.
–24: The pitch will be two octaves lower.+24: The pitch will be two octaves higher.
You can use RPN MSB (CC#101) = 000 and RPN LSB (CC#100) = 002 to specify Coarse Tune, and use Data Entry (CC#6) = 040 (–24) – 064 (+00) – 088 (+24) to modify this value during the song.
2–3h. Detune .................................................... [–50...+50]Adjusts the pitch deviation from standard pitch in one-cent steps.
–50: Maximum pitch deviation below standard pitch.+50: Maximum pitch deviation above standard pitch.
You can use RPN MSB (CC#101) = 000 and RPN LSB (CC#100) = 001 to specify Fine Tune, and use Data Entry (CC#6, 38) = 032, 081 (–50) – 064, 000 (+00) – 096, 000 (+50) to modify this value during the song.
2–3i. Pitch Bend Range.......................... [–12...+12, PROG]Specifies the maximum pitch change that can occur when the pitch bender is operated, in semitone steps.
PROG: The pitch bend range setting of the program will be used.
Refer to “1–1. Lower KBD”
Refer to “1–1. Lower KBD”
Refer to “2–1. Program”
2–2g
2–2h
Refer to “1–1. Lower KBD”
Refer to “1–1. Lower KBD”
Refer to “2–1. Program”
2–3g
2–3h
2–3i

Back
ing
–12: The pitch can be changed as much as 2 octaves down-ward.+12: The pitch can be changed as much as 2 octaves upward.
You can use RPN MSB (CC#101) = 000 and RPN LSB (CC#100) = 000 to specify Pitch Bend Sensitivity, and use Data Entry (CC#6) = 000 (+00) – 012 (+12) to mod-ify this value during the song.
Page Menu Command........................................
2–4. MIDIHere you can make basic settings for the backing sequence, and make MIDI-related settings for the extra KBD tracks.
2–4g. Internal2–4h. External
Specifies the tone generator(s) which will be used by each track.
When Internal is checked: the track will be sounded by the internal tone generator.
When External is checked: musical data will be transmitted from the MIDI OUT connec-tor and the TO HOST connector.
When both Internal and External are checked: the internal tone generator will be sounded, and at the same time musical data will be transmitted from the MIDI OUT con-nector and the TO HOST connector.
When unchecked: the track will not be played back.
The transmit/receive channels for the MIDI data can be specified in “2–4i. MIDI Chan-nel.”
When you change songs or when you reset to the begin-ning of the song, MIDI program change, MIDI volume (CC#7) and MIDI panpot (CC#10) messages will be trans-mitted.
2–4i. MIDI Channel ................................................ [1...16]Specifies the MIDI channel on which each extra KBD track will transmit and receive performance data.
The channel for each arrangement track will be according to the “7–3a. MIDI Channel” (p.9) setting of Arrangement Play mode. However when you play the keyboard of the i30 in Backing Sequence mode, the channel that was spec-ified for the KBD part in “7–3a. MIDI Channel” will be used (the channels of the Main KBD, Sub KBD and Lower KBD parts will be ignored).
Page Menu Command .......................................
2–5. PreferenceHere you can make basic settings for the backing sequence, and specify how realtime recording will take place for the extra KBD tracks.
2–5g. Recording PreferenceSelects the recording method. Select the backing sequence and make settings for measure, track and time signature etc. in the Measure – Track cells of the LCD beforehand.
OverwriteSelects this method when recording for the first time.
Press the REC/WRITE key, then press the START/STOP key to begin recording. Press the START/STOP key once again to stop recording.If you use this method to record on a track which already contains recorded data, be aware that all previous data will be erased from the measure at which you begin recording and all subsequent measures.
OverdubSelects this method when you wish to add data to a previ-ously recorded track.
Press the REC/WRITE key, then press the START/STOP key to begin recording. Press the START/STOP key once again to stop recording.Any previously recorded data will remain, and the newly recorded data will be added to it.
Manual Punch InSelects this method when you wish to rewrite a specific portion of the previously recorded data.
Press the START/STOP key to playback the backing sequence. At the measure where you wish to begin rewrit-ing the data, press the REC/WRITE key or the pedal
Refer to “1–1. Lower KBD”
Refer to “1–1. Lower KBD”
Refer to “2–1. Program”
2–4g
2–4h
2–4i
Refer to “1–1. Lower KBD”
Refer to “1–1. Lower KBD”
Refer to “2–1. Program”
2–5g
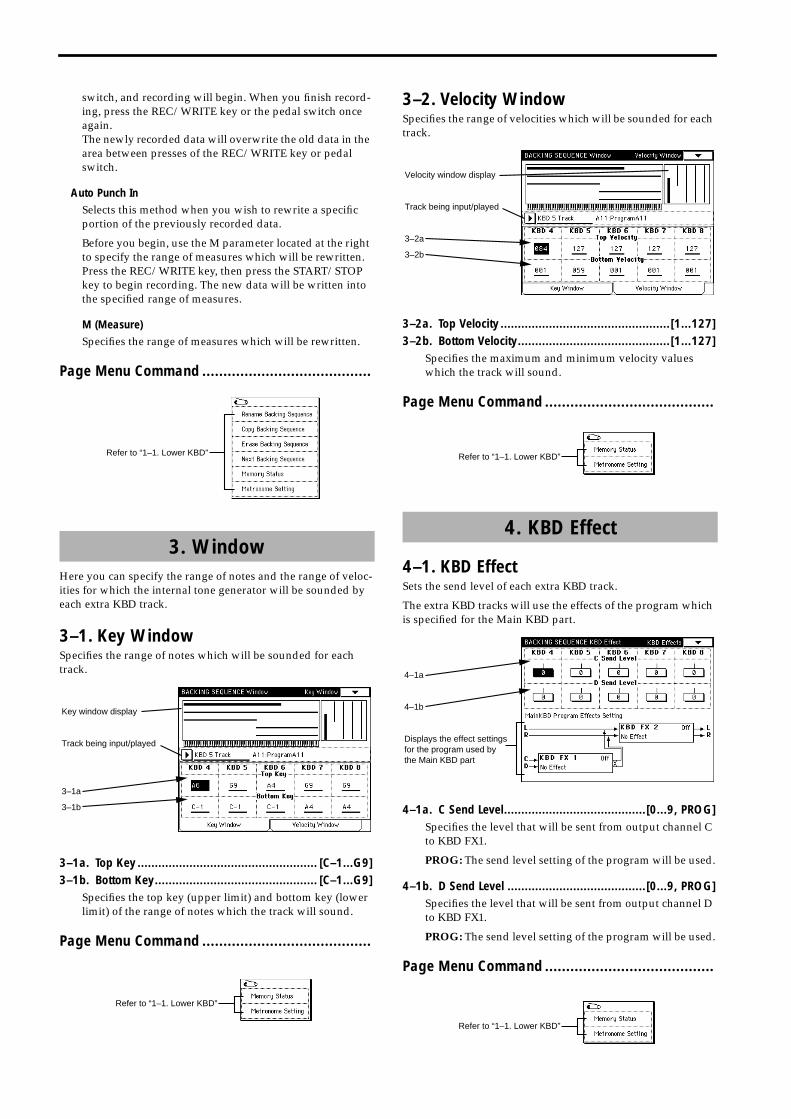
switch, and recording will begin. When you finish record-ing, press the REC/WRITE key or the pedal switch once again.The newly recorded data will overwrite the old data in the area between presses of the REC/WRITE key or pedal switch.
Auto Punch InSelects this method when you wish to rewrite a specific portion of the previously recorded data.
Before you begin, use the M parameter located at the right to specify the range of measures which will be rewritten.Press the REC/WRITE key, then press the START/STOP key to begin recording. The new data will be written into the specified range of measures.
M (Measure)Specifies the range of measures which will be rewritten.
Page Menu Command ........................................
Here you can specify the range of notes and the range of veloc-ities for which the internal tone generator will be sounded by each extra KBD track.
3–1. Key WindowSpecifies the range of notes which will be sounded for each track.
3–1a. Top Key .................................................... [C–1...G9]3–1b. Bottom Key............................................... [C–1...G9]
Specifies the top key (upper limit) and bottom key (lower limit) of the range of notes which the track will sound.
Page Menu Command ........................................
3–2. Velocity WindowSpecifies the range of velocities which will be sounded for each track.
3–2a. Top Velocity .................................................[1...127]3–2b. Bottom Velocity............................................[1...127]
Specifies the maximum and minimum velocity values which the track will sound.
Page Menu Command ........................................
4–1. KBD EffectSets the send level of each extra KBD track.
The extra KBD tracks will use the effects of the program which is specified for the Main KBD part.
4–1a. C Send Level.........................................[0...9, PROG]Specifies the level that will be sent from output channel C to KBD FX1.
PROG: The send level setting of the program will be used.
4–1b. D Send Level ........................................[0...9, PROG]Specifies the level that will be sent from output channel D to KBD FX1.
PROG: The send level setting of the program will be used.
Page Menu Command ........................................
3. Window
Refer to “1–1. Lower KBD”
Key window display
Track being input/played
3–1a
3–1b
Refer to “1–1. Lower KBD”
4. KBD Effect
Velocity window display
Track being input/played
3–2a
3–2b
Refer to “1–1. Lower KBD”
4–1a
4–1b
Displays the effect settings for the program used by the Main KBD part
Refer to “1–1. Lower KBD”
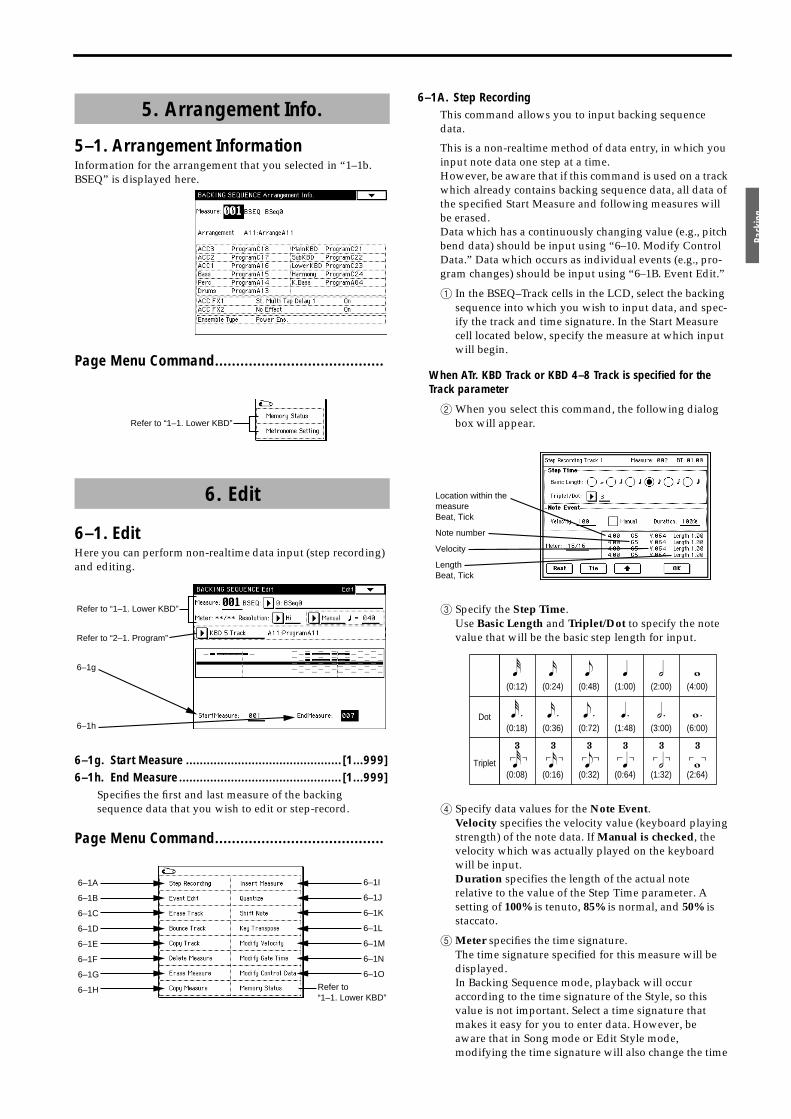
Back
ing
5–1. Arrangement InformationInformation for the arrangement that you selected in “1–1b. BSEQ” is displayed here.
Page Menu Command........................................
6–1. EditHere you can perform non-realtime data input (step recording) and editing.
6–1g. Start Measure ............................................. [1...999]6–1h. End Measure ............................................... [1...999]
Specifies the first and last measure of the backing sequence data that you wish to edit or step-record.
Page Menu Command........................................
6–1A. Step RecordingThis command allows you to input backing sequence data.
This is a non-realtime method of data entry, in which you input note data one step at a time.However, be aware that if this command is used on a track which already contains backing sequence data, all data of the specified Start Measure and following measures will be erased.Data which has a continuously changing value (e.g., pitch bend data) should be input using “6–10. Modify Control Data.” Data which occurs as individual events (e.g., pro-gram changes) should be input using “6–1B. Event Edit.”
1 In the BSEQ–Track cells in the LCD, select the backing sequence into which you wish to input data, and spec-ify the track and time signature. In the Start Measure cell located below, specify the measure at which input will begin.
When ATr. KBD Track or KBD 4–8 Track is specified for the Track parameter
2When you select this command, the following dialog box will appear.
3 Specify the Step Time.Use Basic Length and Triplet/Dot to specify the note value that will be the basic step length for input.
4 Specify data values for the Note Event.Velocity specifies the velocity value (keyboard playing strength) of the note data. If Manual is checked, the velocity which was actually played on the keyboard will be input.Duration specifies the length of the actual note relative to the value of the Step Time parameter. A setting of 100% is tenuto, 85% is normal, and 50% is staccato.
5Meter specifies the time signature.The time signature specified for this measure will be displayed.In Backing Sequence mode, playback will occur according to the time signature of the Style, so this value is not important. Select a time signature that makes it easy for you to enter data. However, be aware that in Song mode or Edit Style mode, modifying the time signature will also change the time
5. Arrangement Info.
6. Edit
Refer to “1–1. Lower KBD”
Refer to “1–1. Lower KBD”
Refer to “2–1. Program”
6–1g
6–1h
6–1A
6–1B
6–1C
6–1D
6–1E
6–1F
6–1G
6–1H
6–1I
6–1J
6–1K
6–1L
6–1M
6–1N
6–1O
Refer to “1–1. Lower KBD”
Location within the measureBeat, Tick
Note number
Velocity
LengthBeat, Tick
�(0:12)
�(0:24)
�(0:48)
�(1:00)
�(2:00)
�(4:00)
� (0:18)
� (0:36)
� (0:72)
� (1:48)
� (3:00)
� (6:00)
�(0:08)
�(0:16)
�(0:32)
�(0:64)
�(1:32)
�(2:64)
3 3 3 3 3 3Dot
Triplet
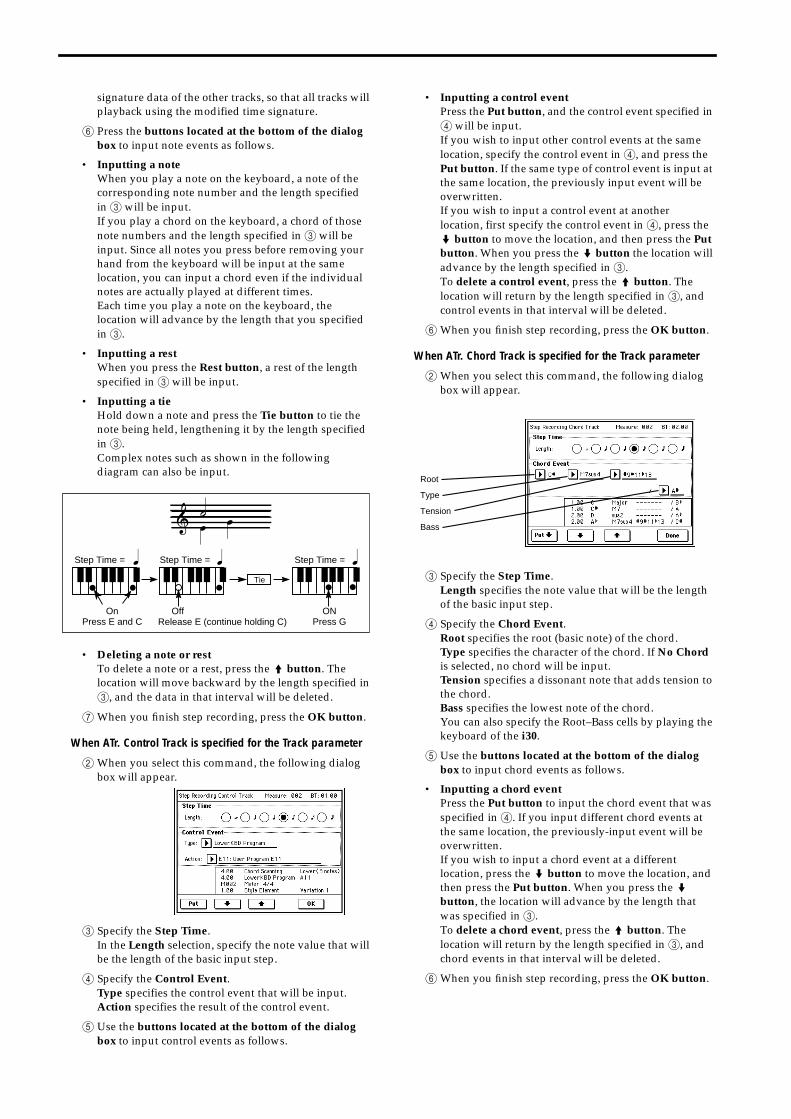
signature data of the other tracks, so that all tracks will playback using the modified time signature.
6 Press the buttons located at the bottom of the dialog box to input note events as follows.
• Inputting a noteWhen you play a note on the keyboard, a note of the corresponding note number and the length specified in 3 will be input.If you play a chord on the keyboard, a chord of those note numbers and the length specified in 3 will be input. Since all notes you press before removing your hand from the keyboard will be input at the same location, you can input a chord even if the individual notes are actually played at different times.Each time you play a note on the keyboard, the location will advance by the length that you specified in 3.
• Inputting a restWhen you press the Rest button, a rest of the length specified in 3 will be input.
• Inputting a tieHold down a note and press the Tie button to tie the note being held, lengthening it by the length specified in 3.Complex notes such as shown in the following diagram can also be input.
• Deleting a note or restTo delete a note or a rest, press the i button. The location will move backward by the length specified in 3, and the data in that interval will be deleted.
7When you finish step recording, press the OK button.
When ATr. Control Track is specified for the Track parameter
2When you select this command, the following dialog box will appear.
3 Specify the Step Time.In the Length selection, specify the note value that will be the length of the basic input step.
4 Specify the Control Event.Type specifies the control event that will be input.Action specifies the result of the control event.
5 Use the buttons located at the bottom of the dialog box to input control events as follows.
• Inputting a control eventPress the Put button, and the control event specified in 4 will be input.If you wish to input other control events at the same location, specify the control event in 4, and press the Put button. If the same type of control event is input at the same location, the previously input event will be overwritten.If you wish to input a control event at another location, first specify the control event in 4, press the m button to move the location, and then press the Put button. When you press the m button the location will advance by the length specified in 3.To delete a control event, press the i button. The location will return by the length specified in 3, and control events in that interval will be deleted.
6When you finish step recording, press the OK button.
When ATr. Chord Track is specified for the Track parameter
2When you select this command, the following dialog box will appear.
3 Specify the Step Time.Length specifies the note value that will be the length of the basic input step.
4 Specify the Chord Event.Root specifies the root (basic note) of the chord.Type specifies the character of the chord. If No Chord is selected, no chord will be input.Tension specifies a dissonant note that adds tension to the chord.Bass specifies the lowest note of the chord.You can also specify the Root–Bass cells by playing the keyboard of the i30.
5 Use the buttons located at the bottom of the dialog box to input chord events as follows.
• Inputting a chord eventPress the Put button to input the chord event that was specified in 4. If you input different chord events at the same location, the previously-input event will be overwritten.If you wish to input a chord event at a different location, press the m button to move the location, and then press the Put button. When you press the m button, the location will advance by the length that was specified in 3.To delete a chord event, press the i button. The location will return by the length specified in 3, and chord events in that interval will be deleted.
6When you finish step recording, press the OK button.
�Step Time = �Step Time = �Step Time =
Tie
OnPress E and C
ONPress G
� ��
Release E (continue holding C)
�Off
Root
Type
Tension
Bass
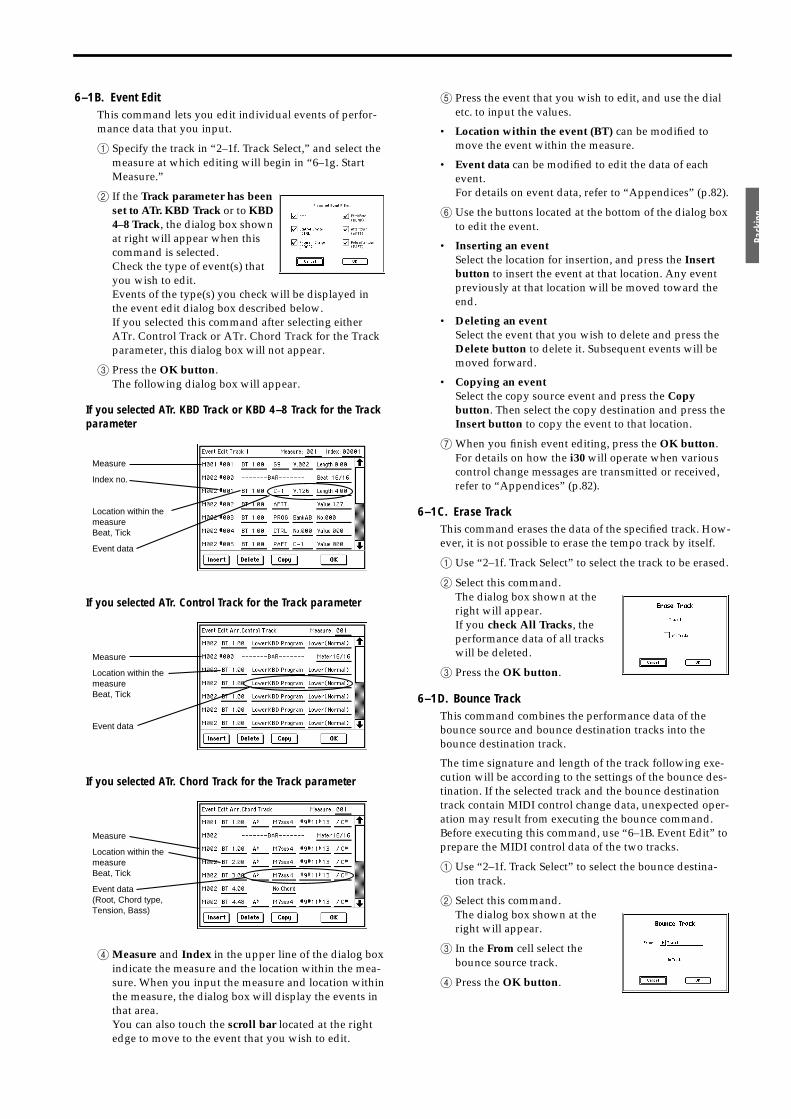
Back
ing
6–1B. Event EditThis command lets you edit individual events of perfor-mance data that you input.
1 Specify the track in “2–1f. Track Select,” and select the measure at which editing will begin in “6–1g. Start Measure.”
2 If the Track parameter has been set to ATr. KBD Track or to KBD 4–8 Track, the dialog box shown at right will appear when this command is selected.Check the type of event(s) that you wish to edit.Events of the type(s) you check will be displayed in the event edit dialog box described below.If you selected this command after selecting either ATr. Control Track or ATr. Chord Track for the Track parameter, this dialog box will not appear.
3 Press the OK button.The following dialog box will appear.
If you selected ATr. KBD Track or KBD 4–8 Track for the Track parameter
If you selected ATr. Control Track for the Track parameter
If you selected ATr. Chord Track for the Track parameter
4Measure and Index in the upper line of the dialog box indicate the measure and the location within the mea-sure. When you input the measure and location within the measure, the dialog box will display the events in that area.You can also touch the scroll bar located at the right edge to move to the event that you wish to edit.
5 Press the event that you wish to edit, and use the dial etc. to input the values.
• Location within the event (BT) can be modified to move the event within the measure.
• Event data can be modified to edit the data of each event.For details on event data, refer to “Appendices” (p.82).
6 Use the buttons located at the bottom of the dialog box to edit the event.
• Inserting an eventSelect the location for insertion, and press the Insert button to insert the event at that location. Any event previously at that location will be moved toward the end.
• Deleting an eventSelect the event that you wish to delete and press the Delete button to delete it. Subsequent events will be moved forward.
• Copying an eventSelect the copy source event and press the Copy button. Then select the copy destination and press the Insert button to copy the event to that location.
7When you finish event editing, press the OK button.For details on how the i30 will operate when various control change messages are transmitted or received, refer to “Appendices” (p.82).
6–1C. Erase TrackThis command erases the data of the specified track. How-ever, it is not possible to erase the tempo track by itself.
1 Use “2–1f. Track Select” to select the track to be erased.
2 Select this command.The dialog box shown at the right will appear.If you check All Tracks, the performance data of all tracks will be deleted.
3 Press the OK button.
6–1D. Bounce TrackThis command combines the performance data of the bounce source and bounce destination tracks into the bounce destination track.
The time signature and length of the track following exe-cution will be according to the settings of the bounce des-tination. If the selected track and the bounce destination track contain MIDI control change data, unexpected oper-ation may result from executing the bounce command. Before executing this command, use “6–1B. Event Edit” to prepare the MIDI control data of the two tracks.
1 Use “2–1f. Track Select” to select the bounce destina-tion track.
2 Select this command.The dialog box shown at the right will appear.
3 In the From cell select the bounce source track.
4 Press the OK button.
Measure
Index no.
Location within the measureBeat, Tick
Event data
Measure
Location within the measureBeat, Tick
Event data
Measure
Location within the measureBeat, Tick
Event data(Root, Chord type, Tension, Bass)
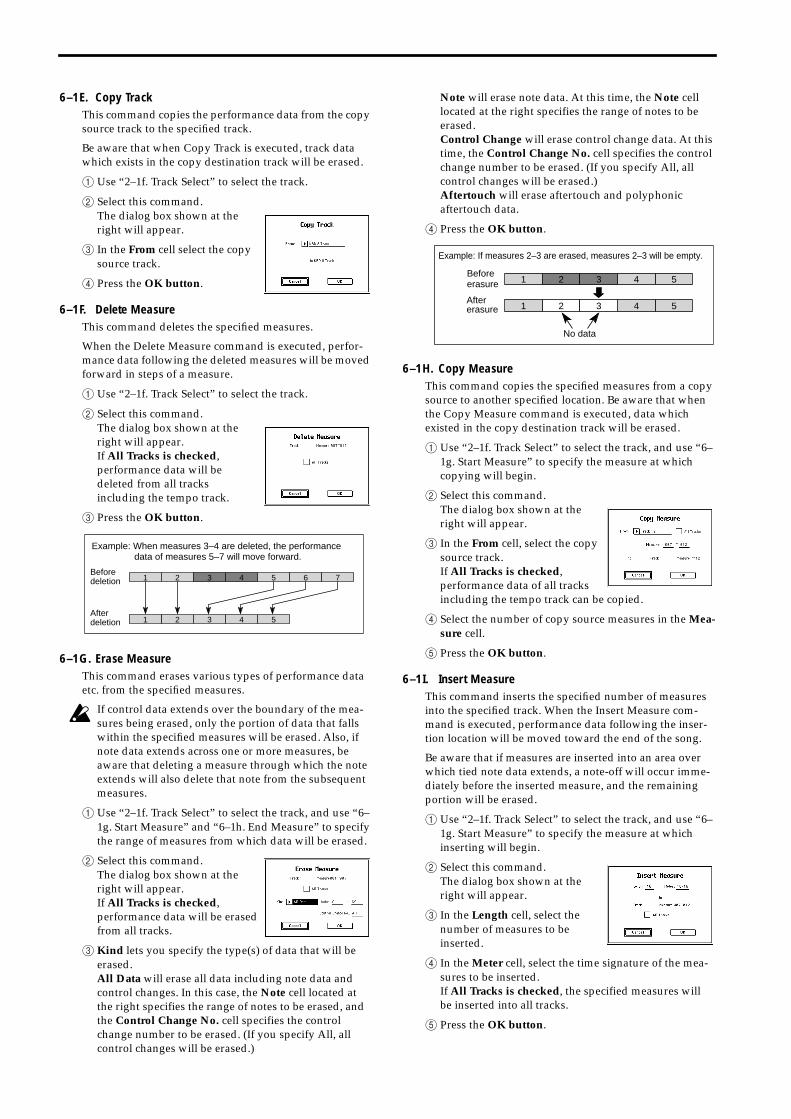
6–1E. Copy TrackThis command copies the performance data from the copy source track to the specified track.
Be aware that when Copy Track is executed, track data which exists in the copy destination track will be erased.
1 Use “2–1f. Track Select” to select the track.
2 Select this command.The dialog box shown at the right will appear.
3 In the From cell select the copy source track.
4 Press the OK button.
6–1F. Delete MeasureThis command deletes the specified measures.
When the Delete Measure command is executed, perfor-mance data following the deleted measures will be moved forward in steps of a measure.
1 Use “2–1f. Track Select” to select the track.
2 Select this command.The dialog box shown at the right will appear.If All Tracks is checked, performance data will be deleted from all tracks including the tempo track.
3 Press the OK button.
6–1G. Erase MeasureThis command erases various types of performance data etc. from the specified measures.
If control data extends over the boundary of the mea-sures being erased, only the portion of data that falls within the specified measures will be erased. Also, if note data extends across one or more measures, be aware that deleting a measure through which the note extends will also delete that note from the subsequent measures.
1 Use “2–1f. Track Select” to select the track, and use “6–1g. Start Measure” and “6–1h. End Measure” to specify the range of measures from which data will be erased.
2 Select this command.The dialog box shown at the right will appear.If All Tracks is checked, performance data will be erased from all tracks.
3 Kind lets you specify the type(s) of data that will be erased.All Data will erase all data including note data and control changes. In this case, the Note cell located at the right specifies the range of notes to be erased, and the Control Change No. cell specifies the control change number to be erased. (If you specify All, all control changes will be erased.)
Note will erase note data. At this time, the Note cell located at the right specifies the range of notes to be erased.Control Change will erase control change data. At this time, the Control Change No. cell specifies the control change number to be erased. (If you specify All, all control changes will be erased.)Aftertouch will erase aftertouch and polyphonic aftertouch data.
4 Press the OK button.
6–1H. Copy MeasureThis command copies the specified measures from a copy source to another specified location. Be aware that when the Copy Measure command is executed, data which existed in the copy destination track will be erased.
1 Use “2–1f. Track Select” to select the track, and use “6–1g. Start Measure” to specify the measure at which copying will begin.
2 Select this command.The dialog box shown at the right will appear.
3 In the From cell, select the copy source track.If All Tracks is checked, performance data of all tracks including the tempo track can be copied.
4 Select the number of copy source measures in the Mea-sure cell.
5 Press the OK button.
6–1I. Insert MeasureThis command inserts the specified number of measures into the specified track. When the Insert Measure com-mand is executed, performance data following the inser-tion location will be moved toward the end of the song.
Be aware that if measures are inserted into an area over which tied note data extends, a note-off will occur imme-diately before the inserted measure, and the remaining portion will be erased.
1 Use “2–1f. Track Select” to select the track, and use “6–1g. Start Measure” to specify the measure at which inserting will begin.
2 Select this command.The dialog box shown at the right will appear.
3 In the Length cell, select the number of measures to be inserted.
4 In the Meter cell, select the time signature of the mea-sures to be inserted.If All Tracks is checked, the specified measures will be inserted into all tracks.
5 Press the OK button.
Example: When measures 3–4 are deleted, the performance data of measures 5–7 will move forward.
Beforedeletion 1 2 3 4 5 6
21
7
543Afterdeletion
Beforeerasure 21 543
No data
Aftererasure
Example: If measures 2–3 are erased, measures 2–3 will be empty.
21 543
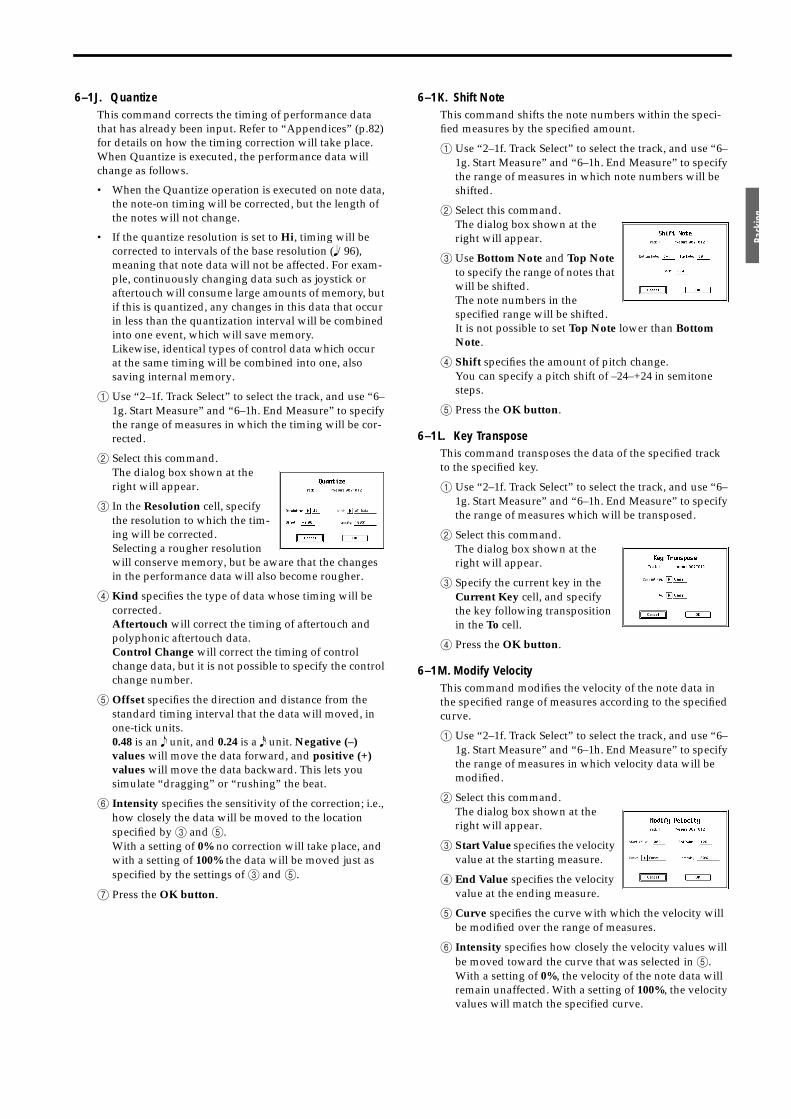
Back
ing
6–1J. QuantizeThis command corrects the timing of performance data that has already been input. Refer to “Appendices” (p.82) for details on how the timing correction will take place. When Quantize is executed, the performance data will change as follows.
• When the Quantize operation is executed on note data, the note-on timing will be corrected, but the length of the notes will not change.
• If the quantize resolution is set to Hi, timing will be corrected to intervals of the base resolution (�/96), meaning that note data will not be affected. For exam-ple, continuously changing data such as joystick or aftertouch will consume large amounts of memory, but if this is quantized, any changes in this data that occur in less than the quantization interval will be combined into one event, which will save memory.Likewise, identical types of control data which occur at the same timing will be combined into one, also saving internal memory.
1 Use “2–1f. Track Select” to select the track, and use “6–1g. Start Measure” and “6–1h. End Measure” to specify the range of measures in which the timing will be cor-rected.
2 Select this command.The dialog box shown at the right will appear.
3 In the Resolution cell, specify the resolution to which the tim-ing will be corrected.Selecting a rougher resolution will conserve memory, but be aware that the changes in the performance data will also become rougher.
4 Kind specifies the type of data whose timing will be corrected.Aftertouch will correct the timing of aftertouch and polyphonic aftertouch data.Control Change will correct the timing of control change data, but it is not possible to specify the control change number.
5 Offset specifies the direction and distance from the standard timing interval that the data will moved, in one-tick units.0.48 is an � unit, and 0.24 is a � unit. Negative (–) values will move the data forward, and positive (+) values will move the data backward. This lets you simulate “dragging” or “rushing” the beat.
6 Intensity specifies the sensitivity of the correction; i.e., how closely the data will be moved to the location specified by 3 and 5.With a setting of 0% no correction will take place, and with a setting of 100% the data will be moved just as specified by the settings of 3 and 5.
7 Press the OK button.
6–1K. Shift NoteThis command shifts the note numbers within the speci-fied measures by the specified amount.
1 Use “2–1f. Track Select” to select the track, and use “6–1g. Start Measure” and “6–1h. End Measure” to specify the range of measures in which note numbers will be shifted.
2 Select this command.The dialog box shown at the right will appear.
3 Use Bottom Note and Top Note to specify the range of notes that will be shifted.The note numbers in the specified range will be shifted.It is not possible to set Top Note lower than Bottom Note.
4 Shift specifies the amount of pitch change.You can specify a pitch shift of –24–+24 in semitone steps.
5 Press the OK button.
6–1L. Key TransposeThis command transposes the data of the specified track to the specified key.
1 Use “2–1f. Track Select” to select the track, and use “6–1g. Start Measure” and “6–1h. End Measure” to specify the range of measures which will be transposed.
2 Select this command.The dialog box shown at the right will appear.
3 Specify the current key in the Current Key cell, and specify the key following transposition in the To cell.
4 Press the OK button.
6–1M. Modify VelocityThis command modifies the velocity of the note data in the specified range of measures according to the specified curve.
1 Use “2–1f. Track Select” to select the track, and use “6–1g. Start Measure” and “6–1h. End Measure” to specify the range of measures in which velocity data will be modified.
2 Select this command.The dialog box shown at the right will appear.
3 Start Value specifies the velocity value at the starting measure.
4 End Value specifies the velocity value at the ending measure.
5 Curve specifies the curve with which the velocity will be modified over the range of measures.
6 Intensity specifies how closely the velocity values will be moved toward the curve that was selected in 5.With a setting of 0%, the velocity of the note data will remain unaffected. With a setting of 100%, the velocity values will match the specified curve.
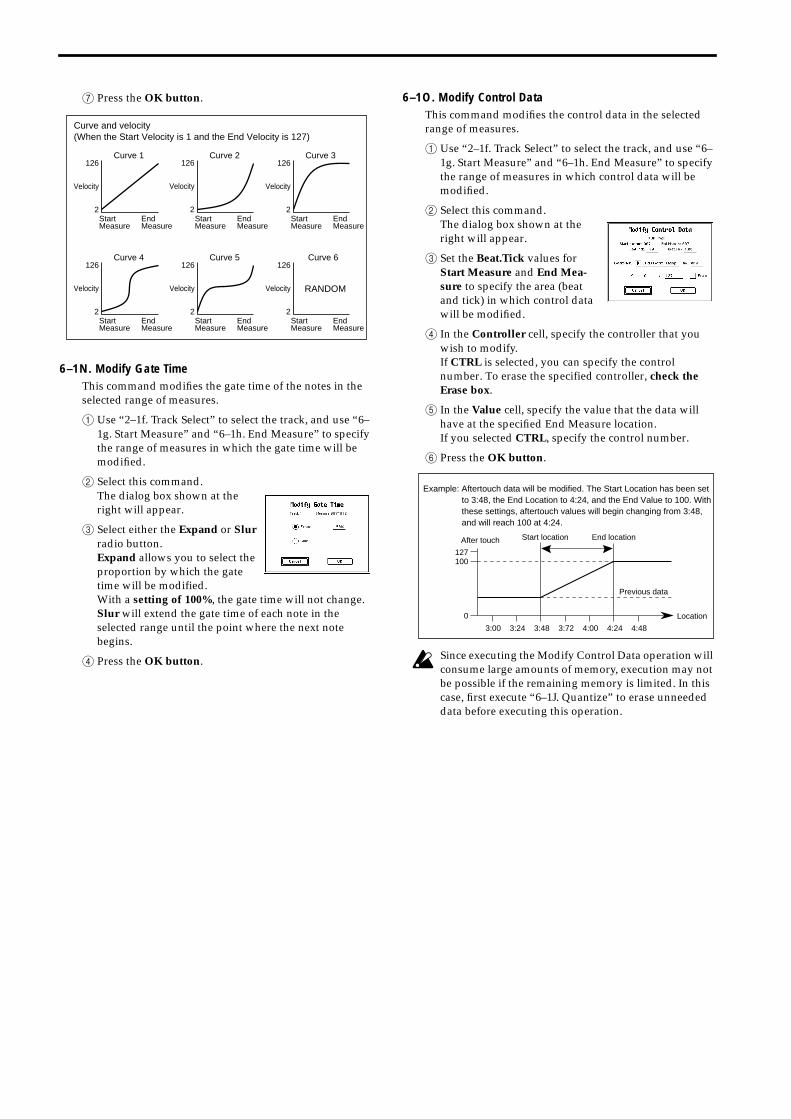
7 Press the OK button.
6–1N. Modify Gate TimeThis command modifies the gate time of the notes in the selected range of measures.
1 Use “2–1f. Track Select” to select the track, and use “6–1g. Start Measure” and “6–1h. End Measure” to specify the range of measures in which the gate time will be modified.
2 Select this command.The dialog box shown at the right will appear.
3 Select either the Expand or Slur radio button.Expand allows you to select the proportion by which the gate time will be modified.With a setting of 100%, the gate time will not change.Slur will extend the gate time of each note in the selected range until the point where the next note begins.
4 Press the OK button.
6–1O. Modify Control DataThis command modifies the control data in the selected range of measures.
1 Use “2–1f. Track Select” to select the track, and use “6–1g. Start Measure” and “6–1h. End Measure” to specify the range of measures in which control data will be modified.
2 Select this command.The dialog box shown at the right will appear.
3 Set the Beat.Tick values for Start Measure and End Mea-sure to specify the area (beat and tick) in which control data will be modified.
4 In the Controller cell, specify the controller that you wish to modify.If CTRL is selected, you can specify the control number. To erase the specified controller, check the Erase box.
5 In the Value cell, specify the value that the data will have at the specified End Measure location.If you selected CTRL, specify the control number.
6 Press the OK button.
Since executing the Modify Control Data operation will consume large amounts of memory, execution may not be possible if the remaining memory is limited. In this case, first execute “6–1J. Quantize” to erase unneeded data before executing this operation.
126
Velocity
2StartMeasure
EndMeasure
Curve 1
StartMeasure
EndMeasure
Curve 2
StartMeasure
EndMeasure
Curve 3
StartMeasure
EndMeasure
Curve 4
StartMeasure
EndMeasure
Curve 5
StartMeasure
EndMeasure
Curve 6
RANDOM
Curve and velocity(When the Start Velocity is 1 and the End Velocity is 127)
126
Velocity
2
126
Velocity
2
126
Velocity
2
126
Velocity
2
126
Velocity
2
Location0
3:00 3:24 3:48 3:72 4:00 4:24 4:48
After touch
127100
Previous data
Start location End location
Example: Aftertouch data will be modified. The Start Location has been set to 3:48, the End Location to 4:24, and the End Value to 100. With these settings, aftertouch values will begin changing from 3:48, and will reach 100 at 4:24.
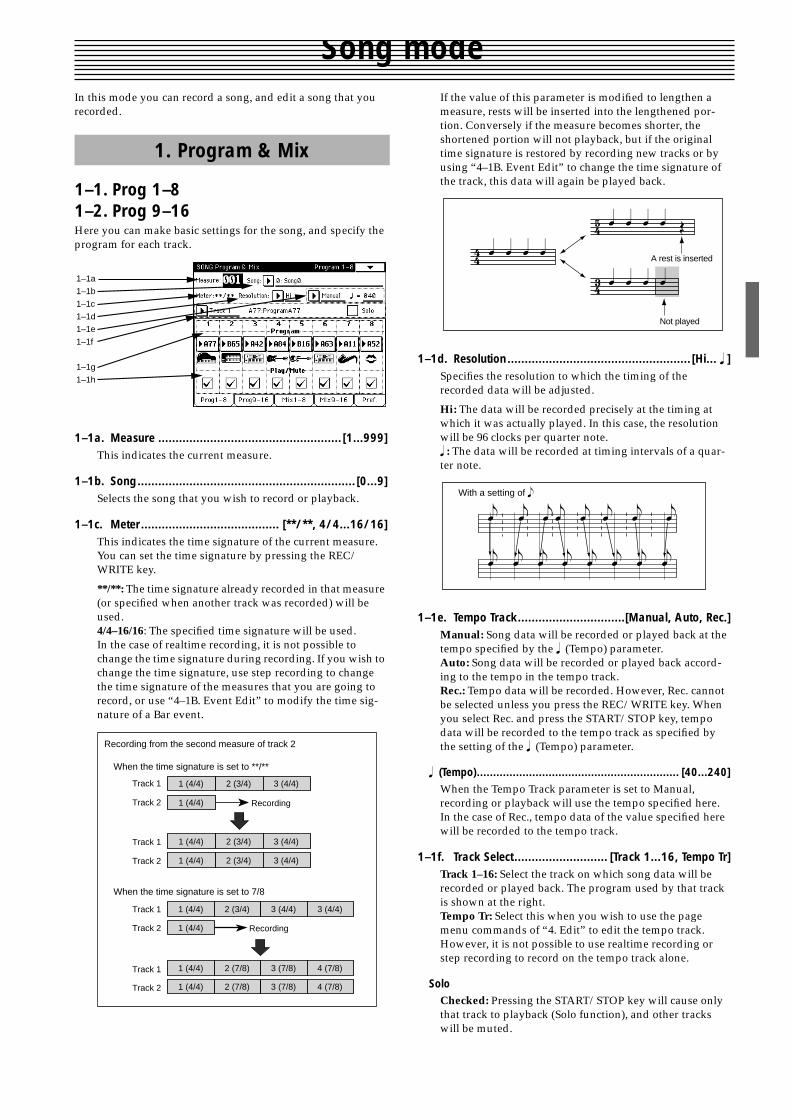
Song modeIn this mode you can record a song, and edit a song that you recorded.
1–1. Prog 1–81–2. Prog 9–16Here you can make basic settings for the song, and specify the program for each track.
1–1a. Measure ..................................................... [1...999]This indicates the current measure.
1–1b. Song............................................................... [0...9]Selects the song that you wish to record or playback.
1–1c. Meter........................................ [**/**, 4/4...16/16]This indicates the time signature of the current measure. You can set the time signature by pressing the REC/WRITE key.
**/**: The time signature already recorded in that measure (or specified when another track was recorded) will be used.4/4–16/16: The specified time signature will be used.In the case of realtime recording, it is not possible to change the time signature during recording. If you wish to change the time signature, use step recording to change the time signature of the measures that you are going to record, or use “4–1B. Event Edit” to modify the time sig-nature of a Bar event.
If the value of this parameter is modified to lengthen a measure, rests will be inserted into the lengthened por-tion. Conversely if the measure becomes shorter, the shortened portion will not playback, but if the original time signature is restored by recording new tracks or by using “4–1B. Event Edit” to change the time signature of the track, this data will again be played back.
1–1d. Resolution..................................................... [Hi... � ]Specifies the resolution to which the timing of the recorded data will be adjusted.
Hi: The data will be recorded precisely at the timing at which it was actually played. In this case, the resolution will be 96 clocks per quarter note.� : The data will be recorded at timing intervals of a quar-ter note.
1–1e. Tempo Track...............................[Manual, Auto, Rec.]Manual: Song data will be recorded or played back at the tempo specified by the � (Tempo) parameter.Auto: Song data will be recorded or played back accord-ing to the tempo in the tempo track.Rec.: Tempo data will be recorded. However, Rec. cannot be selected unless you press the REC/WRITE key. When you select Rec. and press the START/STOP key, tempo data will be recorded to the tempo track as specified by the setting of the � (Tempo) parameter.
� (Tempo).............................................................. [40...240]When the Tempo Track parameter is set to Manual, recording or playback will use the tempo specified here. In the case of Rec., tempo data of the value specified here will be recorded to the tempo track.
1–1f. Track Select........................... [Track 1...16, Tempo Tr]Track 1–16: Select the track on which song data will be recorded or played back. The program used by that track is shown at the right.Tempo Tr: Select this when you wish to use the page menu commands of “4. Edit” to edit the tempo track. However, it is not possible to use realtime recording or step recording to record on the tempo track alone.
SoloChecked: Pressing the START/STOP key will cause only that track to playback (Solo function), and other tracks will be muted.
1. Program & Mix
1–1a
1–1b
1–1c
1–1d
1–1e
1–1f
1–1g
1–1h
1 (4/4) 2 (3/4)Track 1 3 (4/4)
1 (4/4) 2 (3/4)Track 1 3 (4/4)
1 (4/4) 2 (3/4)Track 2 3 (4/4)
1 (4/4)Track 2 Recording
When the time signature is set to **/**
1 (4/4) 2 (3/4)Track 1 3 (4/4)
1 (4/4) 2 (7/8)Track 1 3 (7/8)
1 (4/4) 2 (7/8)Track 2 3 (7/8)
3 (4/4)
4 (7/8)
Recording1 (4/4)Track 2
4 (7/8)
When the time signature is set to 7/8
Recording from the second measure of track 2
� � � �� � � � �� � � �A rest is inserted
Not played
�� � � � � � � �
� � � � � � �
With a setting of �
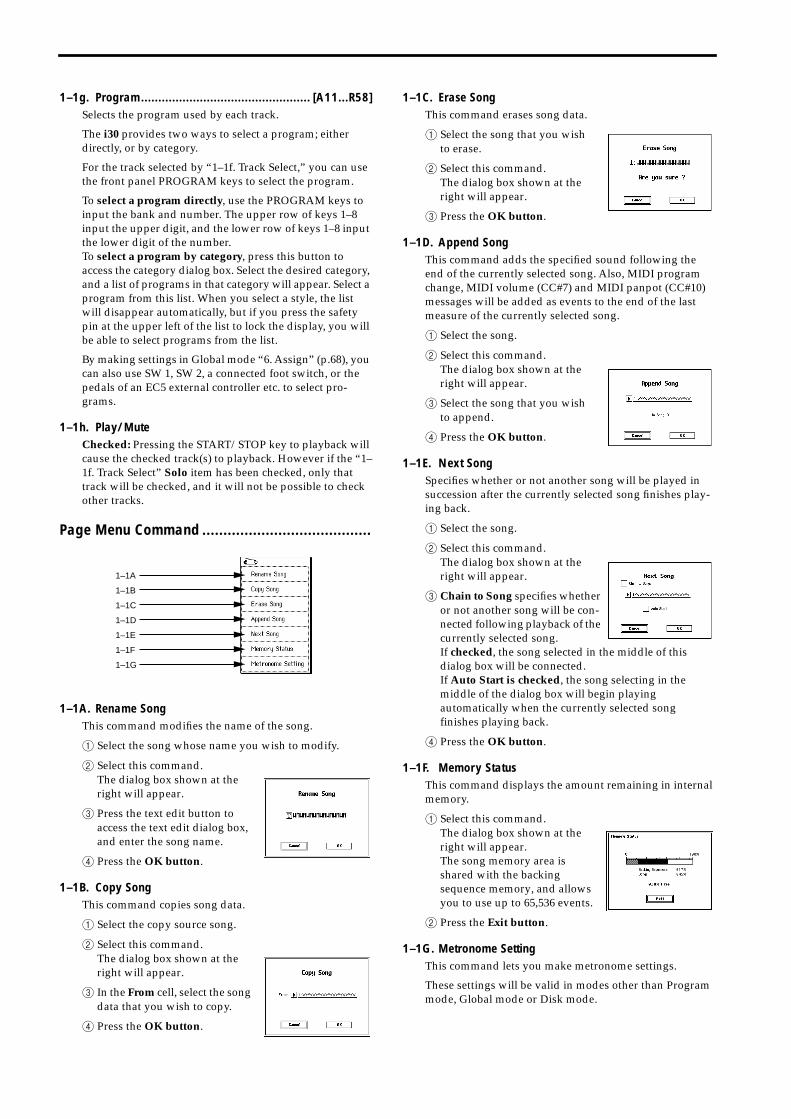
1–1g. Program................................................. [A11...R58]Selects the program used by each track.
The i30 provides two ways to select a program; either directly, or by category.
For the track selected by “1–1f. Track Select,” you can use the front panel PROGRAM keys to select the program.
To select a program directly, use the PROGRAM keys to input the bank and number. The upper row of keys 1–8 input the upper digit, and the lower row of keys 1–8 input the lower digit of the number.To select a program by category, press this button to access the category dialog box. Select the desired category, and a list of programs in that category will appear. Select a program from this list. When you select a style, the list will disappear automatically, but if you press the safety pin at the upper left of the list to lock the display, you will be able to select programs from the list.
By making settings in Global mode “6. Assign” (p.68), you can also use SW 1, SW 2, a connected foot switch, or the pedals of an EC5 external controller etc. to select pro-grams.
1–1h. Play/MuteChecked: Pressing the START/STOP key to playback will cause the checked track(s) to playback. However if the “1–1f. Track Select” Solo item has been checked, only that track will be checked, and it will not be possible to check other tracks.
Page Menu Command ........................................
1–1A. Rename SongThis command modifies the name of the song.
1 Select the song whose name you wish to modify.
2 Select this command.The dialog box shown at the right will appear.
3 Press the text edit button to access the text edit dialog box, and enter the song name.
4 Press the OK button.
1–1B. Copy SongThis command copies song data.
1 Select the copy source song.
2 Select this command.The dialog box shown at the right will appear.
3 In the From cell, select the song data that you wish to copy.
4 Press the OK button.
1–1C. Erase SongThis command erases song data.
1 Select the song that you wish to erase.
2 Select this command.The dialog box shown at the right will appear.
3 Press the OK button.
1–1D. Append SongThis command adds the specified sound following the end of the currently selected song. Also, MIDI program change, MIDI volume (CC#7) and MIDI panpot (CC#10) messages will be added as events to the end of the last measure of the currently selected song.
1 Select the song.
2 Select this command.The dialog box shown at the right will appear.
3 Select the song that you wish to append.
4 Press the OK button.
1–1E. Next SongSpecifies whether or not another song will be played in succession after the currently selected song finishes play-ing back.
1 Select the song.
2 Select this command.The dialog box shown at the right will appear.
3 Chain to Song specifies whether or not another song will be con-nected following playback of the currently selected song.If checked, the song selected in the middle of this dialog box will be connected.If Auto Start is checked, the song selecting in the middle of the dialog box will begin playing automatically when the currently selected song finishes playing back.
4 Press the OK button.
1–1F. Memory StatusThis command displays the amount remaining in internal memory.
1 Select this command.The dialog box shown at the right will appear.The song memory area is shared with the backing sequence memory, and allows you to use up to 65,536 events.
2 Press the Exit button.
1–1G. Metronome SettingThis command lets you make metronome settings.
These settings will be valid in modes other than Program mode, Global mode or Disk mode.
1–1A
1–1B
1–1C
1–1D
1–1E
1–1F
1–1G
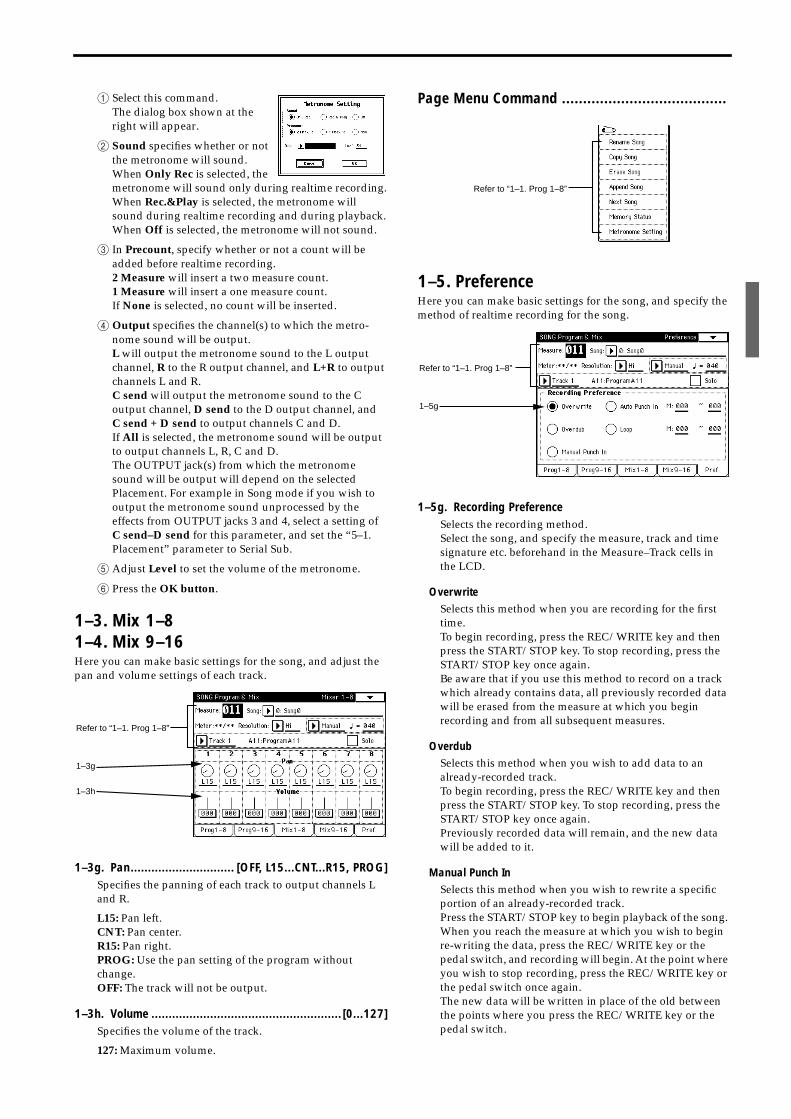
1 Select this command.The dialog box shown at the right will appear.
2 Sound specifies whether or not the metronome will sound.When Only Rec is selected, the metronome will sound only during realtime recording.When Rec.&Play is selected, the metronome will sound during realtime recording and during playback.When Off is selected, the metronome will not sound.
3 In Precount, specify whether or not a count will be added before realtime recording.2 Measure will insert a two measure count.1 Measure will insert a one measure count.If None is selected, no count will be inserted.
4 Output specifies the channel(s) to which the metro-nome sound will be output.L will output the metronome sound to the L output channel, R to the R output channel, and L+R to output channels L and R.C send will output the metronome sound to the C output channel, D send to the D output channel, and C send + D send to output channels C and D.If All is selected, the metronome sound will be output to output channels L, R, C and D.The OUTPUT jack(s) from which the metronome sound will be output will depend on the selected Placement. For example in Song mode if you wish to output the metronome sound unprocessed by the effects from OUTPUT jacks 3 and 4, select a setting of C send–D send for this parameter, and set the “5–1. Placement” parameter to Serial Sub.
5 Adjust Level to set the volume of the metronome.
6 Press the OK button.
1–3. Mix 1–81–4. Mix 9–16Here you can make basic settings for the song, and adjust the pan and volume settings of each track.
1–3g. Pan.............................. [OFF, L15...CNT...R15, PROG]Specifies the panning of each track to output channels L and R.
L15: Pan left.CNT: Pan center.R15: Pan right.PROG: Use the pan setting of the program without change.OFF: The track will not be output.
1–3h. Volume ....................................................... [0...127]Specifies the volume of the track.
127: Maximum volume.
Page Menu Command .......................................
1–5. PreferenceHere you can make basic settings for the song, and specify the method of realtime recording for the song.
1–5g. Recording PreferenceSelects the recording method.Select the song, and specify the measure, track and time signature etc. beforehand in the Measure–Track cells in the LCD.
OverwriteSelects this method when you are recording for the first time.To begin recording, press the REC/WRITE key and then press the START/STOP key. To stop recording, press the START/STOP key once again.Be aware that if you use this method to record on a track which already contains data, all previously recorded data will be erased from the measure at which you begin recording and from all subsequent measures.
OverdubSelects this method when you wish to add data to an already-recorded track.To begin recording, press the REC/WRITE key and then press the START/STOP key. To stop recording, press the START/STOP key once again.Previously recorded data will remain, and the new data will be added to it.
Manual Punch InSelects this method when you wish to rewrite a specific portion of an already-recorded track.Press the START/STOP key to begin playback of the song. When you reach the measure at which you wish to begin re-writing the data, press the REC/WRITE key or the pedal switch, and recording will begin. At the point where you wish to stop recording, press the REC/WRITE key or the pedal switch once again.The new data will be written in place of the old between the points where you press the REC/WRITE key or the pedal switch.
Refer to “1–1. Prog 1–8”
1–3g
1–3h
Refer to “1–1. Prog 1–8”
Refer to “1–1. Prog 1–8”
1–5g
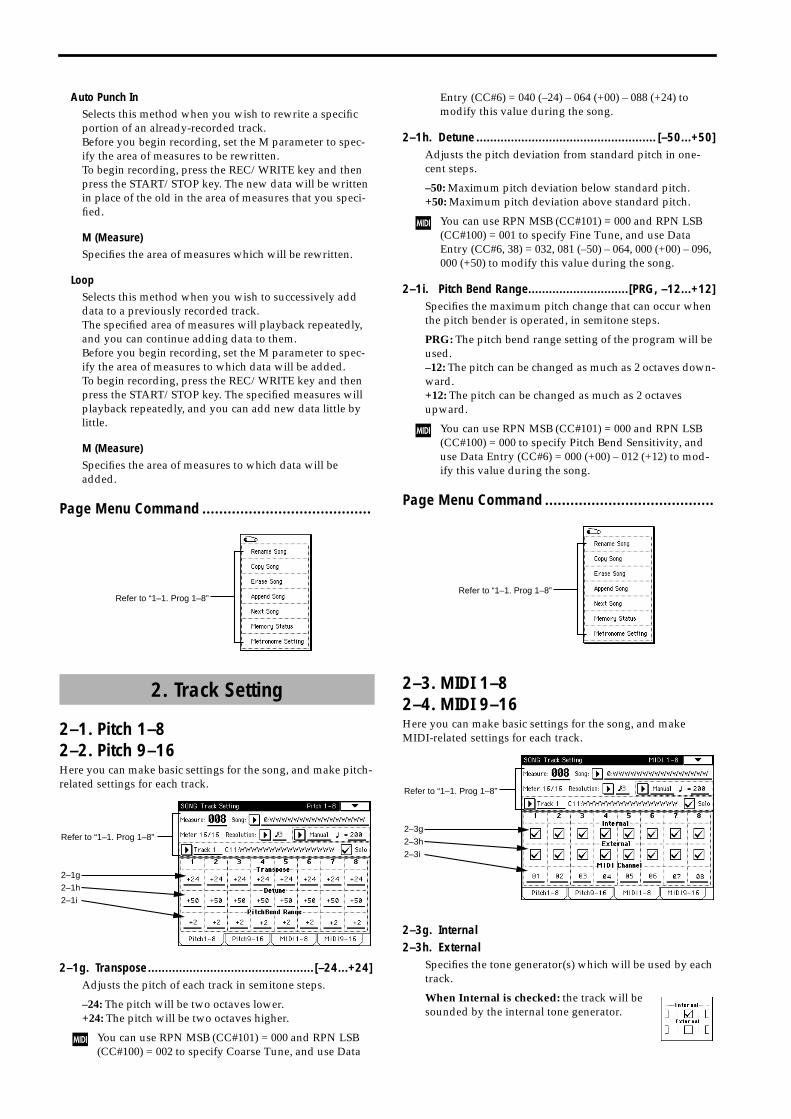
Auto Punch InSelects this method when you wish to rewrite a specific portion of an already-recorded track.Before you begin recording, set the M parameter to spec-ify the area of measures to be rewritten.To begin recording, press the REC/WRITE key and then press the START/STOP key. The new data will be written in place of the old in the area of measures that you speci-fied.
M (Measure)Specifies the area of measures which will be rewritten.
LoopSelects this method when you wish to successively add data to a previously recorded track.The specified area of measures will playback repeatedly, and you can continue adding data to them.Before you begin recording, set the M parameter to spec-ify the area of measures to which data will be added.To begin recording, press the REC/WRITE key and then press the START/STOP key. The specified measures will playback repeatedly, and you can add new data little by little.
M (Measure)Specifies the area of measures to which data will be added.
Page Menu Command ........................................
2–1. Pitch 1–82–2. Pitch 9–16Here you can make basic settings for the song, and make pitch-related settings for each track.
2–1g. Transpose................................................[–24...+24]Adjusts the pitch of each track in semitone steps.
–24: The pitch will be two octaves lower.+24: The pitch will be two octaves higher.
You can use RPN MSB (CC#101) = 000 and RPN LSB (CC#100) = 002 to specify Coarse Tune, and use Data
Entry (CC#6) = 040 (–24) – 064 (+00) – 088 (+24) to modify this value during the song.
2–1h. Detune .................................................... [–50...+50]Adjusts the pitch deviation from standard pitch in one-cent steps.
–50: Maximum pitch deviation below standard pitch.+50: Maximum pitch deviation above standard pitch.
You can use RPN MSB (CC#101) = 000 and RPN LSB (CC#100) = 001 to specify Fine Tune, and use Data Entry (CC#6, 38) = 032, 081 (–50) – 064, 000 (+00) – 096, 000 (+50) to modify this value during the song.
2–1i. Pitch Bend Range.............................[PRG, –12...+12]Specifies the maximum pitch change that can occur when the pitch bender is operated, in semitone steps.
PRG: The pitch bend range setting of the program will be used.–12: The pitch can be changed as much as 2 octaves down-ward.+12: The pitch can be changed as much as 2 octaves upward.
You can use RPN MSB (CC#101) = 000 and RPN LSB (CC#100) = 000 to specify Pitch Bend Sensitivity, and use Data Entry (CC#6) = 000 (+00) – 012 (+12) to mod-ify this value during the song.
Page Menu Command ........................................
2–3. MIDI 1–82–4. MIDI 9–16Here you can make basic settings for the song, and make MIDI-related settings for each track.
2–3g. Internal2–3h. External
Specifies the tone generator(s) which will be used by each track.
When Internal is checked: the track will be sounded by the internal tone generator.
2. Track Setting
Refer to “1–1. Prog 1–8”
Refer to “1–1. Prog 1–8”
2–1g
2–1h
2–1i
Refer to “1–1. Prog 1–8”
Refer to “1–1. Prog 1–8”
2–3g
2–3h
2–3i
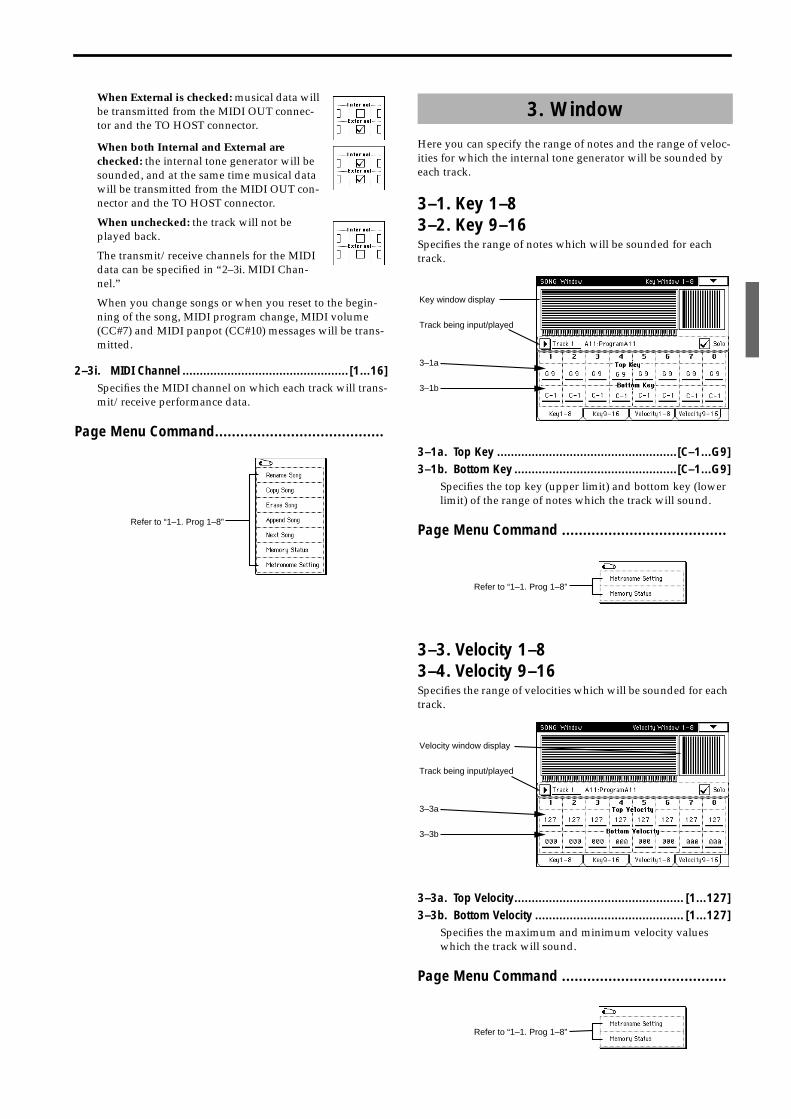
When External is checked: musical data will be transmitted from the MIDI OUT connec-tor and the TO HOST connector.
When both Internal and External are checked: the internal tone generator will be sounded, and at the same time musical data will be transmitted from the MIDI OUT con-nector and the TO HOST connector.
When unchecked: the track will not be played back.
The transmit/receive channels for the MIDI data can be specified in “2–3i. MIDI Chan-nel.”
When you change songs or when you reset to the begin-ning of the song, MIDI program change, MIDI volume (CC#7) and MIDI panpot (CC#10) messages will be trans-mitted.
2–3i. MIDI Channel ................................................ [1...16]Specifies the MIDI channel on which each track will trans-mit/receive performance data.
Page Menu Command........................................
Here you can specify the range of notes and the range of veloc-ities for which the internal tone generator will be sounded by each track.
3–1. Key 1–83–2. Key 9–16Specifies the range of notes which will be sounded for each track.
3–1a. Top Key ....................................................[C–1...G9]3–1b. Bottom Key ...............................................[C–1...G9]
Specifies the top key (upper limit) and bottom key (lower limit) of the range of notes which the track will sound.
Page Menu Command .......................................
3–3. Velocity 1–83–4. Velocity 9–16Specifies the range of velocities which will be sounded for each track.
3–3a. Top Velocity................................................. [1...127]3–3b. Bottom Velocity ........................................... [1...127]
Specifies the maximum and minimum velocity values which the track will sound.
Page Menu Command .......................................
Refer to “1–1. Prog 1–8”
3. Window
Key window display
Track being input/played
3–1a
3–1b
Refer to “1–1. Prog 1–8”
Velocity window display
Track being input/played
3–3a
3–3b
Refer to “1–1. Prog 1–8”
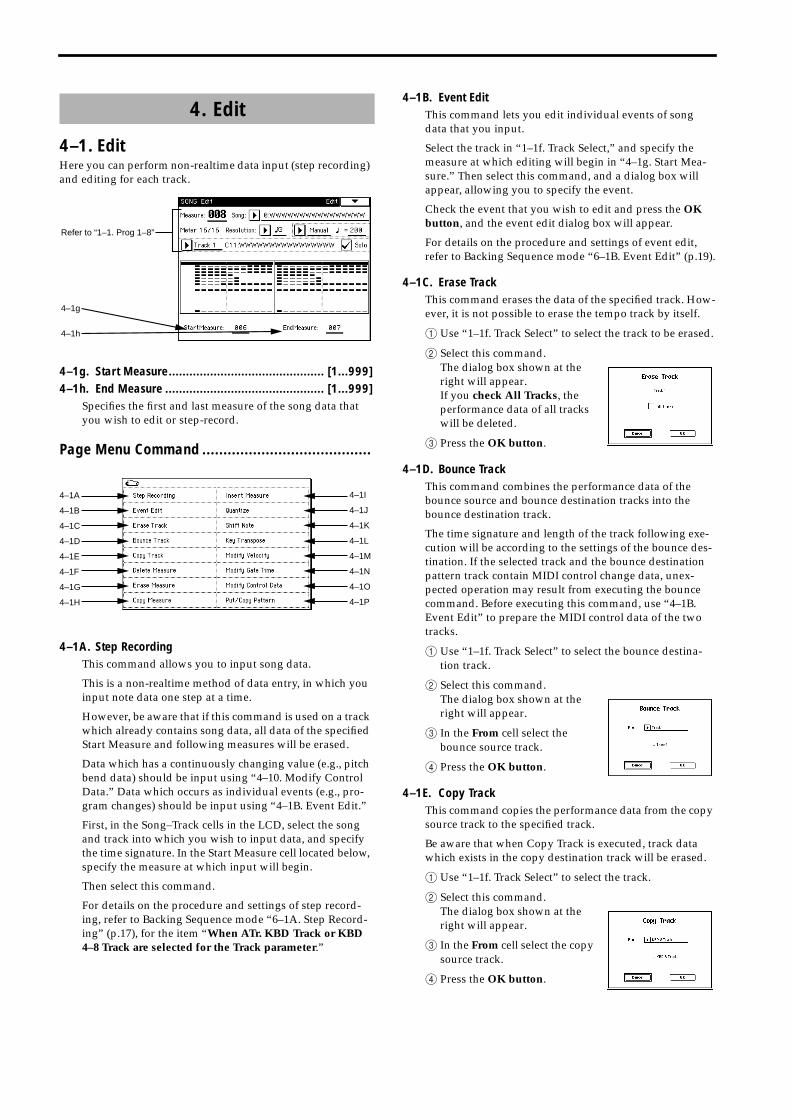
4–1. EditHere you can perform non-realtime data input (step recording) and editing for each track.
4–1g. Start Measure............................................. [1...999]4–1h. End Measure .............................................. [1...999]
Specifies the first and last measure of the song data that you wish to edit or step-record.
Page Menu Command ........................................
4–1A. Step RecordingThis command allows you to input song data.
This is a non-realtime method of data entry, in which you input note data one step at a time.
However, be aware that if this command is used on a track which already contains song data, all data of the specified Start Measure and following measures will be erased.
Data which has a continuously changing value (e.g., pitch bend data) should be input using “4–10. Modify Control Data.” Data which occurs as individual events (e.g., pro-gram changes) should be input using “4–1B. Event Edit.”
First, in the Song–Track cells in the LCD, select the song and track into which you wish to input data, and specify the time signature. In the Start Measure cell located below, specify the measure at which input will begin.
Then select this command.
For details on the procedure and settings of step record-ing, refer to Backing Sequence mode “6–1A. Step Record-ing” (p.17), for the item “When ATr. KBD Track or KBD 4–8 Track are selected for the Track parameter.”
4–1B. Event EditThis command lets you edit individual events of song data that you input.
Select the track in “1–1f. Track Select,” and specify the measure at which editing will begin in “4–1g. Start Mea-sure.” Then select this command, and a dialog box will appear, allowing you to specify the event.
Check the event that you wish to edit and press the OK button, and the event edit dialog box will appear.
For details on the procedure and settings of event edit, refer to Backing Sequence mode “6–1B. Event Edit” (p.19).
4–1C. Erase TrackThis command erases the data of the specified track. How-ever, it is not possible to erase the tempo track by itself.
1 Use “1–1f. Track Select” to select the track to be erased.
2 Select this command.The dialog box shown at the right will appear.If you check All Tracks, the performance data of all tracks will be deleted.
3 Press the OK button.
4–1D. Bounce TrackThis command combines the performance data of the bounce source and bounce destination tracks into the bounce destination track.
The time signature and length of the track following exe-cution will be according to the settings of the bounce des-tination. If the selected track and the bounce destination pattern track contain MIDI control change data, unex-pected operation may result from executing the bounce command. Before executing this command, use “4–1B. Event Edit” to prepare the MIDI control data of the two tracks.
1 Use “1–1f. Track Select” to select the bounce destina-tion track.
2 Select this command.The dialog box shown at the right will appear.
3 In the From cell select the bounce source track.
4 Press the OK button.
4–1E. Copy TrackThis command copies the performance data from the copy source track to the specified track.
Be aware that when Copy Track is executed, track data which exists in the copy destination track will be erased.
1 Use “1–1f. Track Select” to select the track.
2 Select this command.The dialog box shown at the right will appear.
3 In the From cell select the copy source track.
4 Press the OK button.
4. Edit
Refer to “1–1. Prog 1–8”
4–1g
4–1h
4–1A
4–1B
4–1C
4–1D
4–1E
4–1F
4–1G
4–1H
4–1I
4–1J
4–1K
4–1L
4–1M
4–1N
4–1O
4–1P
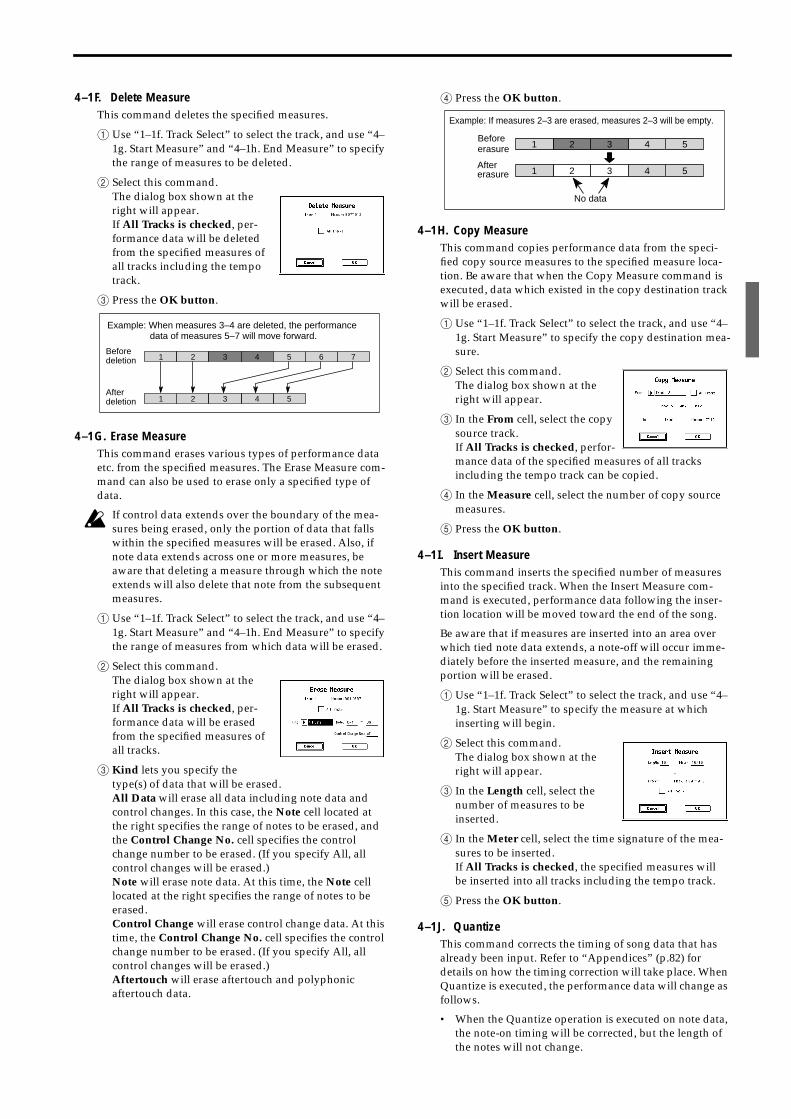
4–1F. Delete MeasureThis command deletes the specified measures.
1 Use “1–1f. Track Select” to select the track, and use “4–1g. Start Measure” and “4–1h. End Measure” to specify the range of measures to be deleted.
2 Select this command.The dialog box shown at the right will appear.If All Tracks is checked, per-formance data will be deleted from the specified measures of all tracks including the tempo track.
3 Press the OK button.
4–1G. Erase MeasureThis command erases various types of performance data etc. from the specified measures. The Erase Measure com-mand can also be used to erase only a specified type of data.
If control data extends over the boundary of the mea-sures being erased, only the portion of data that falls within the specified measures will be erased. Also, if note data extends across one or more measures, be aware that deleting a measure through which the note extends will also delete that note from the subsequent measures.
1 Use “1–1f. Track Select” to select the track, and use “4–1g. Start Measure” and “4–1h. End Measure” to specify the range of measures from which data will be erased.
2 Select this command.The dialog box shown at the right will appear.If All Tracks is checked, per-formance data will be erased from the specified measures of all tracks.
3 Kind lets you specify the type(s) of data that will be erased.All Data will erase all data including note data and control changes. In this case, the Note cell located at the right specifies the range of notes to be erased, and the Control Change No. cell specifies the control change number to be erased. (If you specify All, all control changes will be erased.)Note will erase note data. At this time, the Note cell located at the right specifies the range of notes to be erased.Control Change will erase control change data. At this time, the Control Change No. cell specifies the control change number to be erased. (If you specify All, all control changes will be erased.)Aftertouch will erase aftertouch and polyphonic aftertouch data.
4 Press the OK button.
4–1H. Copy MeasureThis command copies performance data from the speci-fied copy source measures to the specified measure loca-tion. Be aware that when the Copy Measure command is executed, data which existed in the copy destination track will be erased.
1 Use “1–1f. Track Select” to select the track, and use “4–1g. Start Measure” to specify the copy destination mea-sure.
2 Select this command.The dialog box shown at the right will appear.
3 In the From cell, select the copy source track.If All Tracks is checked, perfor-mance data of the specified measures of all tracks including the tempo track can be copied.
4 In the Measure cell, select the number of copy source measures.
5 Press the OK button.
4–1I. Insert MeasureThis command inserts the specified number of measures into the specified track. When the Insert Measure com-mand is executed, performance data following the inser-tion location will be moved toward the end of the song.
Be aware that if measures are inserted into an area over which tied note data extends, a note-off will occur imme-diately before the inserted measure, and the remaining portion will be erased.
1 Use “1–1f. Track Select” to select the track, and use “4–1g. Start Measure” to specify the measure at which inserting will begin.
2 Select this command.The dialog box shown at the right will appear.
3 In the Length cell, select the number of measures to be inserted.
4 In the Meter cell, select the time signature of the mea-sures to be inserted.If All Tracks is checked, the specified measures will be inserted into all tracks including the tempo track.
5 Press the OK button.
4–1J. QuantizeThis command corrects the timing of song data that has already been input. Refer to “Appendices” (p.82) for details on how the timing correction will take place. When Quantize is executed, the performance data will change as follows.
• When the Quantize operation is executed on note data, the note-on timing will be corrected, but the length of the notes will not change.
Example: When measures 3–4 are deleted, the performance data of measures 5–7 will move forward.
Beforedeletion 1 2 3 4 5 6
21
7
543Afterdeletion
Beforeerasure 21 543
No data
Aftererasure
Example: If measures 2–3 are erased, measures 2–3 will be empty.
21 543
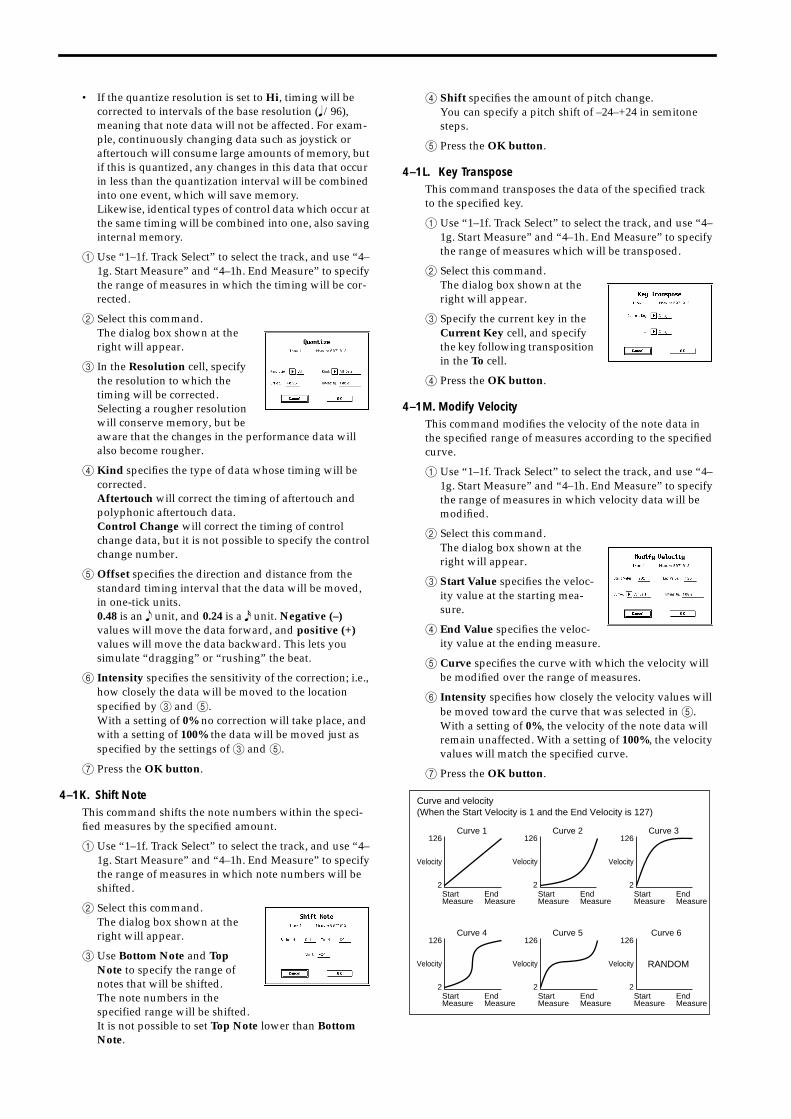
• If the quantize resolution is set to Hi, timing will be corrected to intervals of the base resolution (� /96), meaning that note data will not be affected. For exam-ple, continuously changing data such as joystick or aftertouch will consume large amounts of memory, but if this is quantized, any changes in this data that occur in less than the quantization interval will be combined into one event, which will save memory.Likewise, identical types of control data which occur at the same timing will be combined into one, also saving internal memory.
1 Use “1–1f. Track Select” to select the track, and use “4–1g. Start Measure” and “4–1h. End Measure” to specify the range of measures in which the timing will be cor-rected.
2 Select this command.The dialog box shown at the right will appear.
3 In the Resolution cell, specify the resolution to which the timing will be corrected.Selecting a rougher resolution will conserve memory, but be aware that the changes in the performance data will also become rougher.
4 Kind specifies the type of data whose timing will be corrected.Aftertouch will correct the timing of aftertouch and polyphonic aftertouch data.Control Change will correct the timing of control change data, but it is not possible to specify the control change number.
5 Offset specifies the direction and distance from the standard timing interval that the data will be moved, in one-tick units.0.48 is an � unit, and 0.24 is a � unit. Negative (–) values will move the data forward, and positive (+) values will move the data backward. This lets you simulate “dragging” or “rushing” the beat.
6 Intensity specifies the sensitivity of the correction; i.e., how closely the data will be moved to the location specified by 3 and 5.With a setting of 0% no correction will take place, and with a setting of 100% the data will be moved just as specified by the settings of 3 and 5.
7 Press the OK button.
4–1K. Shift NoteThis command shifts the note numbers within the speci-fied measures by the specified amount.
1 Use “1–1f. Track Select” to select the track, and use “4–1g. Start Measure” and “4–1h. End Measure” to specify the range of measures in which note numbers will be shifted.
2 Select this command.The dialog box shown at the right will appear.
3 Use Bottom Note and Top Note to specify the range of notes that will be shifted.The note numbers in the specified range will be shifted.It is not possible to set Top Note lower than Bottom Note.
4 Shift specifies the amount of pitch change.You can specify a pitch shift of –24–+24 in semitone steps.
5 Press the OK button.
4–1L. Key TransposeThis command transposes the data of the specified track to the specified key.
1 Use “1–1f. Track Select” to select the track, and use “4–1g. Start Measure” and “4–1h. End Measure” to specify the range of measures which will be transposed.
2 Select this command.The dialog box shown at the right will appear.
3 Specify the current key in the Current Key cell, and specify the key following transposition in the To cell.
4 Press the OK button.
4–1M. Modify VelocityThis command modifies the velocity of the note data in the specified range of measures according to the specified curve.
1 Use “1–1f. Track Select” to select the track, and use “4–1g. Start Measure” and “4–1h. End Measure” to specify the range of measures in which velocity data will be modified.
2 Select this command.The dialog box shown at the right will appear.
3 Start Value specifies the veloc-ity value at the starting mea-sure.
4 End Value specifies the veloc-ity value at the ending measure.
5 Curve specifies the curve with which the velocity will be modified over the range of measures.
6 Intensity specifies how closely the velocity values will be moved toward the curve that was selected in 5.With a setting of 0%, the velocity of the note data will remain unaffected. With a setting of 100%, the velocity values will match the specified curve.
7 Press the OK button.
126
Velocity
2StartMeasure
EndMeasure
Curve 1
StartMeasure
EndMeasure
Curve 2
StartMeasure
EndMeasure
Curve 3
StartMeasure
EndMeasure
Curve 4
StartMeasure
EndMeasure
Curve 5
StartMeasure
EndMeasure
Curve 6
RANDOM
Curve and velocity(When the Start Velocity is 1 and the End Velocity is 127)
126
Velocity
2
126
Velocity
2
126
Velocity
2
126
Velocity
2
126
Velocity
2
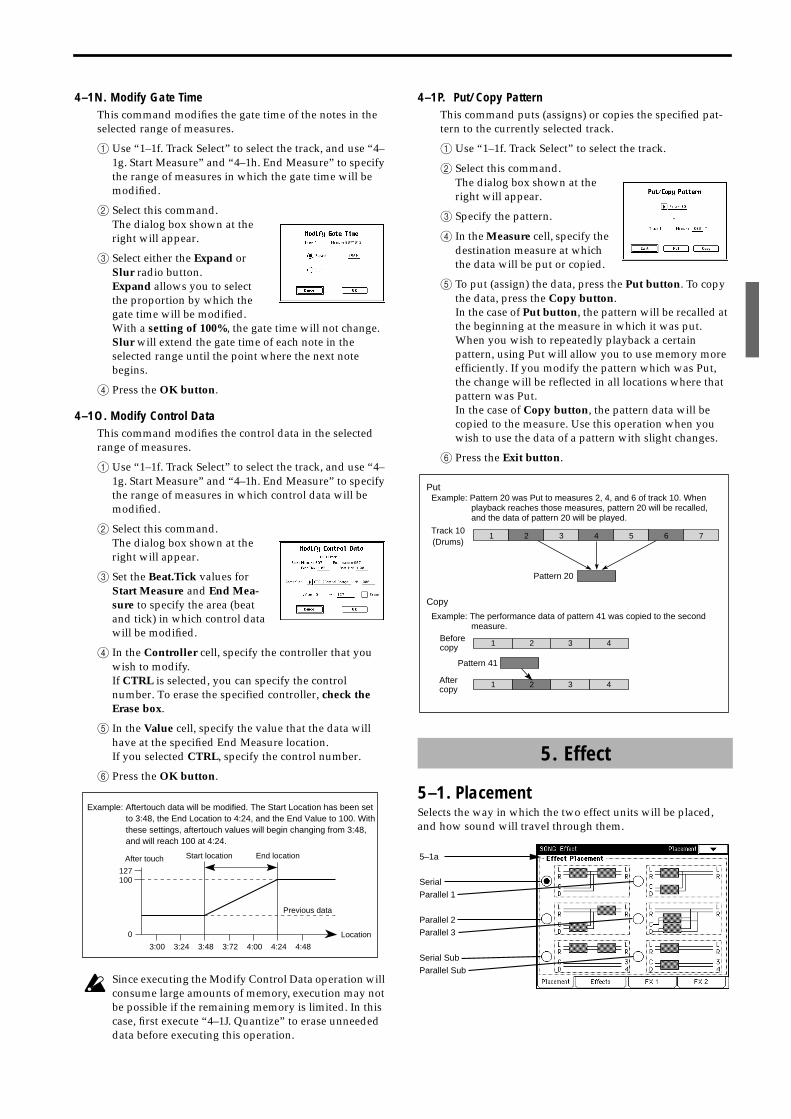
4–1N. Modify Gate TimeThis command modifies the gate time of the notes in the selected range of measures.
1 Use “1–1f. Track Select” to select the track, and use “4–1g. Start Measure” and “4–1h. End Measure” to specify the range of measures in which the gate time will be modified.
2 Select this command.The dialog box shown at the right will appear.
3 Select either the Expand or Slur radio button.Expand allows you to select the proportion by which the gate time will be modified.With a setting of 100%, the gate time will not change.Slur will extend the gate time of each note in the selected range until the point where the next note begins.
4 Press the OK button.
4–1O. Modify Control DataThis command modifies the control data in the selected range of measures.
1 Use “1–1f. Track Select” to select the track, and use “4–1g. Start Measure” and “4–1h. End Measure” to specify the range of measures in which control data will be modified.
2 Select this command.The dialog box shown at the right will appear.
3 Set the Beat.Tick values for Start Measure and End Mea-sure to specify the area (beat and tick) in which control data will be modified.
4 In the Controller cell, specify the controller that you wish to modify.If CTRL is selected, you can specify the control number. To erase the specified controller, check the Erase box.
5 In the Value cell, specify the value that the data will have at the specified End Measure location.If you selected CTRL, specify the control number.
6 Press the OK button.
Since executing the Modify Control Data operation will consume large amounts of memory, execution may not be possible if the remaining memory is limited. In this case, first execute “4–1J. Quantize” to erase unneeded data before executing this operation.
4–1P. Put/Copy PatternThis command puts (assigns) or copies the specified pat-tern to the currently selected track.
1 Use “1–1f. Track Select” to select the track.
2 Select this command.The dialog box shown at the right will appear.
3 Specify the pattern.
4 In the Measure cell, specify the destination measure at which the data will be put or copied.
5 To put (assign) the data, press the Put button. To copy the data, press the Copy button.In the case of Put button, the pattern will be recalled at the beginning at the measure in which it was put. When you wish to repeatedly playback a certain pattern, using Put will allow you to use memory more efficiently. If you modify the pattern which was Put, the change will be reflected in all locations where that pattern was Put.In the case of Copy button, the pattern data will be copied to the measure. Use this operation when you wish to use the data of a pattern with slight changes.
6 Press the Exit button.
5–1. PlacementSelects the way in which the two effect units will be placed, and how sound will travel through them.
Location0
3:00 3:24 3:48 3:72 4:00 4:24 4:48
After touch
127100
Previous data
Start location End location
Example: Aftertouch data will be modified. The Start Location has been set to 3:48, the End Location to 4:24, and the End Value to 100. With these settings, aftertouch values will begin changing from 3:48, and will reach 100 at 4:24.
5. Effect
Track 10(Drums)
Pattern 20
Example: Pattern 20 was Put to measures 2, 4, and 6 of track 10. When playback reaches those measures, pattern 20 will be recalled, and the data of pattern 20 will be played.
Example: The performance data of pattern 41 was copied to the second measure.
21 543 6 7
Put
Copy
1 432
1 432
Pattern 41
Beforecopy
Aftercopy
5–1a
Serial
Parallel 1
Parallel 2
Parallel 3
Serial Sub
Parallel Sub
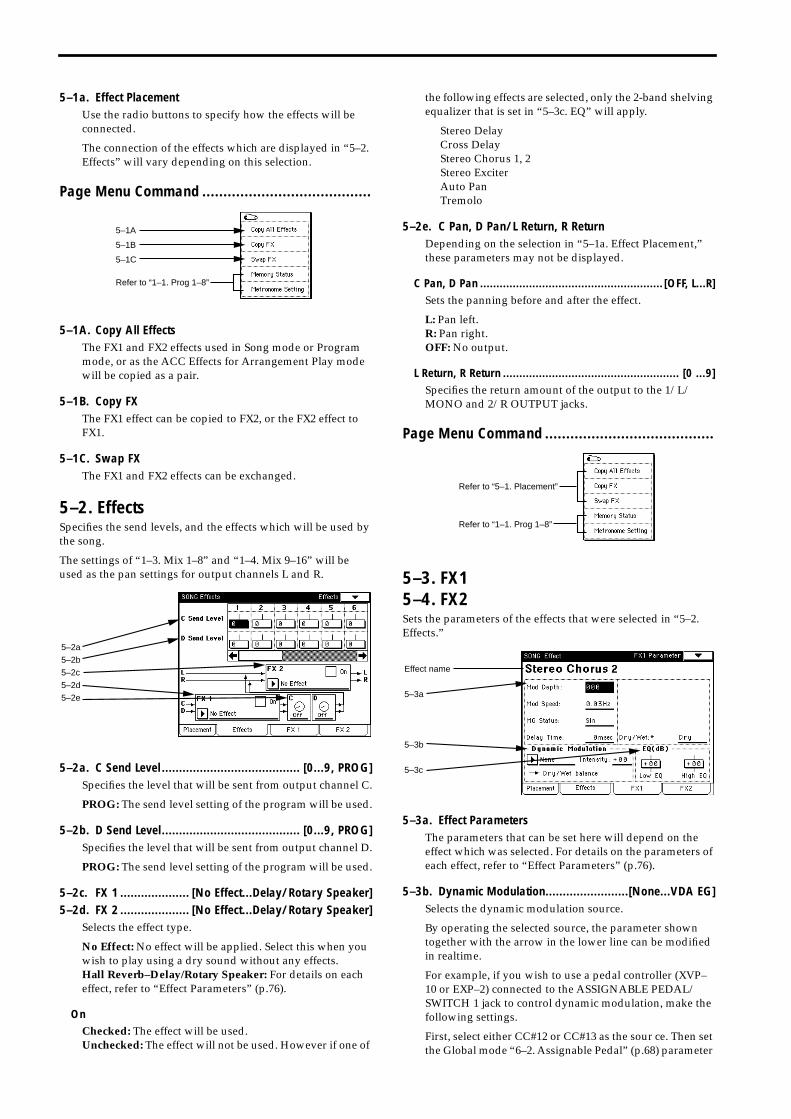
5–1a. Effect PlacementUse the radio buttons to specify how the effects will be connected.
The connection of the effects which are displayed in “5–2. Effects” will vary depending on this selection.
Page Menu Command ........................................
5–1A. Copy All EffectsThe FX1 and FX2 effects used in Song mode or Program mode, or as the ACC Effects for Arrangement Play mode will be copied as a pair.
5–1B. Copy FXThe FX1 effect can be copied to FX2, or the FX2 effect to FX1.
5–1C. Swap FXThe FX1 and FX2 effects can be exchanged.
5–2. EffectsSpecifies the send levels, and the effects which will be used by the song.
The settings of “1–3. Mix 1–8” and “1–4. Mix 9–16” will be used as the pan settings for output channels L and R.
5–2a. C Send Level ........................................ [0...9, PROG]Specifies the level that will be sent from output channel C.
PROG: The send level setting of the program will be used.
5–2b. D Send Level........................................ [0...9, PROG]Specifies the level that will be sent from output channel D.
PROG: The send level setting of the program will be used.
5–2c. FX 1 .................... [No Effect...Delay/Rotary Speaker]5–2d. FX 2 .................... [No Effect...Delay/Rotary Speaker]
Selects the effect type.
No Effect: No effect will be applied. Select this when you wish to play using a dry sound without any effects.Hall Reverb–Delay/Rotary Speaker: For details on each effect, refer to “Effect Parameters” (p.76).
OnChecked: The effect will be used.Unchecked: The effect will not be used. However if one of
the following effects are selected, only the 2-band shelving equalizer that is set in “5–3c. EQ” will apply.
Stereo DelayCross DelayStereo Chorus 1, 2Stereo ExciterAuto PanTremolo
5–2e. C Pan, D Pan/L Return, R ReturnDepending on the selection in “5–1a. Effect Placement,” these parameters may not be displayed.
C Pan, D Pan ........................................................ [OFF, L...R]Sets the panning before and after the effect.
L: Pan left.R: Pan right.OFF: No output.
L Return, R Return ...................................................... [0 ...9]Specifies the return amount of the output to the 1/L/MONO and 2/R OUTPUT jacks.
Page Menu Command ........................................
5–3. FX15–4. FX2Sets the parameters of the effects that were selected in “5–2. Effects.”
5–3a. Effect ParametersThe parameters that can be set here will depend on the effect which was selected. For details on the parameters of each effect, refer to “Effect Parameters” (p.76).
5–3b. Dynamic Modulation........................[None...VDA EG]Selects the dynamic modulation source.
By operating the selected source, the parameter shown together with the arrow in the lower line can be modified in realtime.
For example, if you wish to use a pedal controller (XVP–10 or EXP–2) connected to the ASSIGNABLE PEDAL/SWITCH 1 jack to control dynamic modulation, make the following settings.
First, select either CC#12 or CC#13 as the sour ce. Then set the Global mode “6–2. Assignable Pedal” (p.68) parameter
5–1A
5–1B
5–1C
Refer to “1–1. Prog 1–8”
5–2a
5–2b
5–2c
5–2d
5–2e
Refer to “5–1. Placement”
Refer to “1–1. Prog 1–8”
Effect name
5–3a
5–3b
5–3c
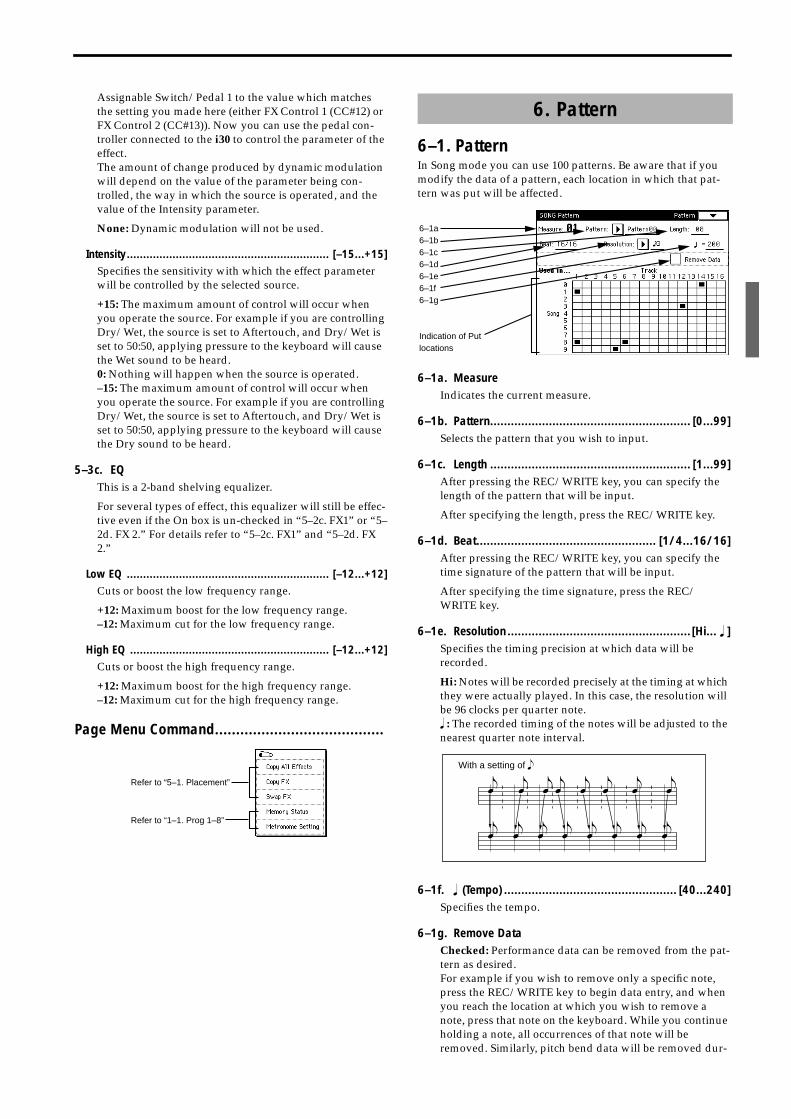
Assignable Switch/Pedal 1 to the value which matches the setting you made here (either FX Control 1 (CC#12) or FX Control 2 (CC#13)). Now you can use the pedal con-troller connected to the i30 to control the parameter of the effect.The amount of change produced by dynamic modulation will depend on the value of the parameter being con-trolled, the way in which the source is operated, and the value of the Intensity parameter.
None: Dynamic modulation will not be used.
Intensity.............................................................. [–15...+15]Specifies the sensitivity with which the effect parameter will be controlled by the selected source.
+15: The maximum amount of control will occur when you operate the source. For example if you are controlling Dry/Wet, the source is set to Aftertouch, and Dry/Wet is set to 50:50, applying pressure to the keyboard will cause the Wet sound to be heard.0: Nothing will happen when the source is operated.–15: The maximum amount of control will occur when you operate the source. For example if you are controlling Dry/Wet, the source is set to Aftertouch, and Dry/Wet is set to 50:50, applying pressure to the keyboard will cause the Dry sound to be heard.
5–3c. EQThis is a 2-band shelving equalizer.
For several types of effect, this equalizer will still be effec-tive even if the On box is un-checked in “5–2c. FX1” or “5–2d. FX 2.” For details refer to “5–2c. FX1” and “5–2d. FX 2.”
Low EQ .............................................................. [–12...+12]Cuts or boost the low frequency range.
+12: Maximum boost for the low frequency range.–12: Maximum cut for the low frequency range.
High EQ ............................................................. [–12...+12]Cuts or boost the high frequency range.
+12: Maximum boost for the high frequency range.–12: Maximum cut for the high frequency range.
Page Menu Command........................................
6–1. PatternIn Song mode you can use 100 patterns. Be aware that if you modify the data of a pattern, each location in which that pat-tern was put will be affected.
6–1a. MeasureIndicates the current measure.
6–1b. Pattern.......................................................... [0...99]Selects the pattern that you wish to input.
6–1c. Length .......................................................... [1...99]After pressing the REC/WRITE key, you can specify the length of the pattern that will be input.
After specifying the length, press the REC/WRITE key.
6–1d. Beat.................................................... [1/4...16/16]After pressing the REC/WRITE key, you can specify the time signature of the pattern that will be input.
After specifying the time signature, press the REC/WRITE key.
6–1e. Resolution..................................................... [Hi... � ]Specifies the timing precision at which data will be recorded.
Hi: Notes will be recorded precisely at the timing at which they were actually played. In this case, the resolution will be 96 clocks per quarter note.� : The recorded timing of the notes will be adjusted to the nearest quarter note interval.
6–1f. � (Tempo) .................................................. [40...240]Specifies the tempo.
6–1g. Remove DataChecked: Performance data can be removed from the pat-tern as desired.For example if you wish to remove only a specific note, press the REC/WRITE key to begin data entry, and when you reach the location at which you wish to remove a note, press that note on the keyboard. While you continue holding a note, all occurrences of that note will be removed. Similarly, pitch bend data will be removed dur-
Refer to “5–1. Placement”
Refer to “1–1. Prog 1–8”
6. Pattern
6–1a6–1b6–1c6–1d6–1e6–1f6–1g
Indication of Put locations
�� � � � � � � �
� � � � � � �
With a setting of �
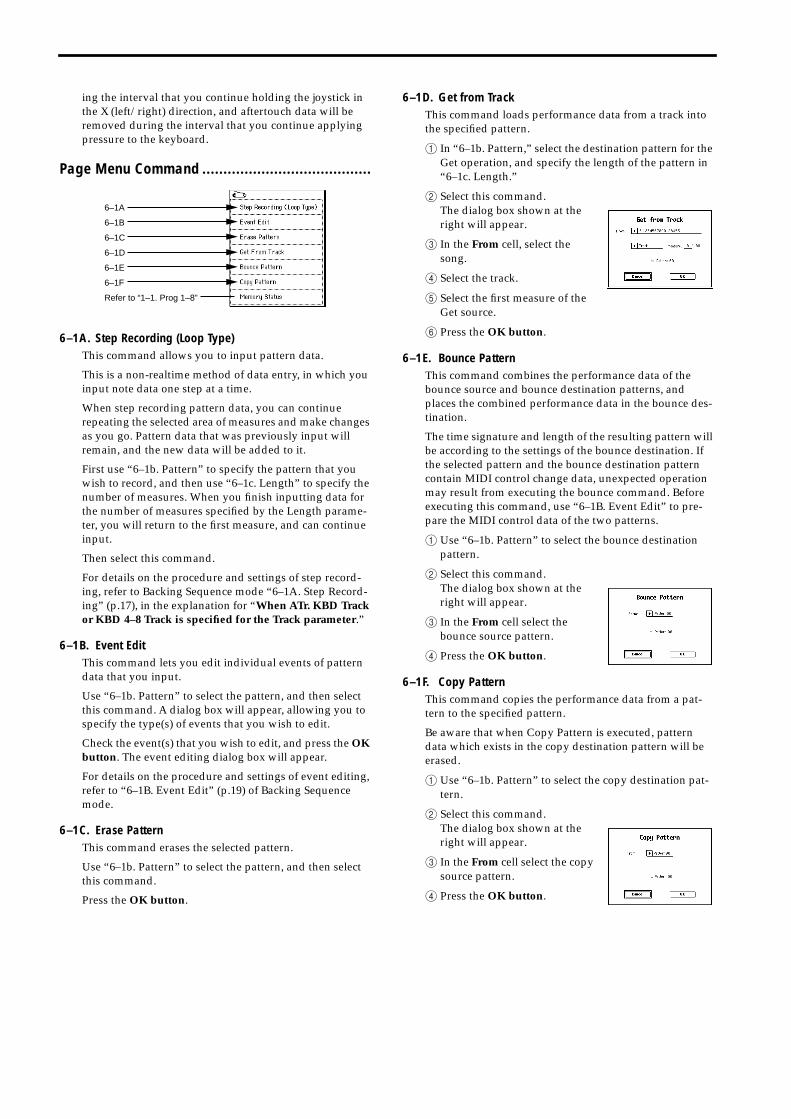
ing the interval that you continue holding the joystick in the X (left/right) direction, and aftertouch data will be removed during the interval that you continue applying pressure to the keyboard.
Page Menu Command ........................................
6–1A. Step Recording (Loop Type)This command allows you to input pattern data.
This is a non-realtime method of data entry, in which you input note data one step at a time.
When step recording pattern data, you can continue repeating the selected area of measures and make changes as you go. Pattern data that was previously input will remain, and the new data will be added to it.
First use “6–1b. Pattern” to specify the pattern that you wish to record, and then use “6–1c. Length” to specify the number of measures. When you finish inputting data for the number of measures specified by the Length parame-ter, you will return to the first measure, and can continue input.
Then select this command.
For details on the procedure and settings of step record-ing, refer to Backing Sequence mode “6–1A. Step Record-ing” (p.17), in the explanation for “When ATr. KBD Track or KBD 4–8 Track is specified for the Track parameter.”
6–1B. Event EditThis command lets you edit individual events of pattern data that you input.
Use “6–1b. Pattern” to select the pattern, and then select this command. A dialog box will appear, allowing you to specify the type(s) of events that you wish to edit.
Check the event(s) that you wish to edit, and press the OK button. The event editing dialog box will appear.
For details on the procedure and settings of event editing, refer to “6–1B. Event Edit” (p.19) of Backing Sequence mode.
6–1C. Erase PatternThis command erases the selected pattern.
Use “6–1b. Pattern” to select the pattern, and then select this command.
Press the OK button.
6–1D. Get from TrackThis command loads performance data from a track into the specified pattern.
1 In “6–1b. Pattern,” select the destination pattern for the Get operation, and specify the length of the pattern in “6–1c. Length.”
2 Select this command.The dialog box shown at the right will appear.
3 In the From cell, select the song.
4 Select the track.
5 Select the first measure of the Get source.
6 Press the OK button.
6–1E. Bounce PatternThis command combines the performance data of the bounce source and bounce destination patterns, and places the combined performance data in the bounce des-tination.
The time signature and length of the resulting pattern will be according to the settings of the bounce destination. If the selected pattern and the bounce destination pattern contain MIDI control change data, unexpected operation may result from executing the bounce command. Before executing this command, use “6–1B. Event Edit” to pre-pare the MIDI control data of the two patterns.
1 Use “6–1b. Pattern” to select the bounce destination pattern.
2 Select this command.The dialog box shown at the right will appear.
3 In the From cell select the bounce source pattern.
4 Press the OK button.
6–1F. Copy PatternThis command copies the performance data from a pat-tern to the specified pattern.
Be aware that when Copy Pattern is executed, pattern data which exists in the copy destination pattern will be erased.
1 Use “6–1b. Pattern” to select the copy destination pat-tern.
2 Select this command.The dialog box shown at the right will appear.
3 In the From cell select the copy source pattern.
4 Press the OK button.
6–1A
6–1B
6–1C
6–1D
6–1E
6–1F
Refer to “1–1. Prog 1–8”
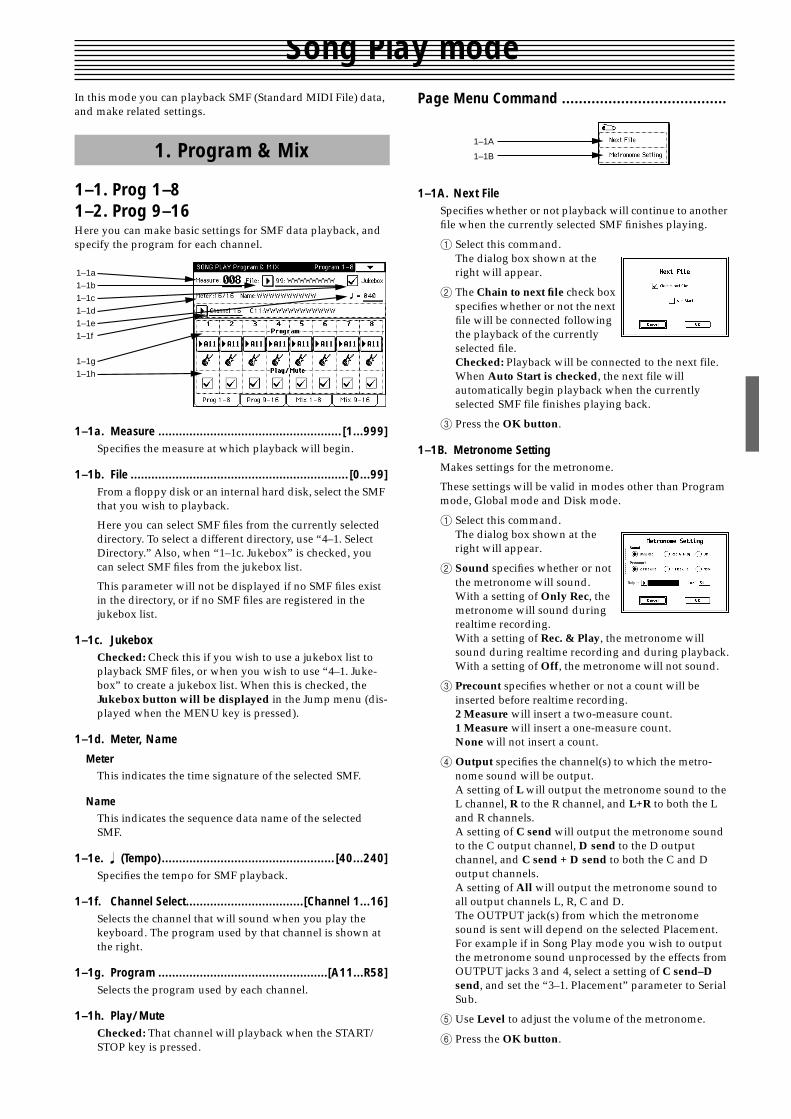
Song Play modeIn this mode you can playback SMF (Standard MIDI File) data, and make related settings.
1–1. Prog 1–81–2. Prog 9–16Here you can make basic settings for SMF data playback, and specify the program for each channel.
1–1a. Measure ..................................................... [1...999]Specifies the measure at which playback will begin.
1–1b. File ............................................................... [0...99]From a floppy disk or an internal hard disk, select the SMF that you wish to playback.
Here you can select SMF files from the currently selected directory. To select a different directory, use “4–1. Select Directory.” Also, when “1–1c. Jukebox” is checked, you can select SMF files from the jukebox list.
This parameter will not be displayed if no SMF files exist in the directory, or if no SMF files are registered in the jukebox list.
1–1c. JukeboxChecked: Check this if you wish to use a jukebox list to playback SMF files, or when you wish to use “4–1. Juke-box” to create a jukebox list. When this is checked, the Jukebox button will be displayed in the Jump menu (dis-played when the MENU key is pressed).
1–1d. Meter, Name
MeterThis indicates the time signature of the selected SMF.
NameThis indicates the sequence data name of the selected SMF.
1–1e. � (Tempo).................................................. [40...240]Specifies the tempo for SMF playback.
1–1f. Channel Select..................................[Channel 1...16]Selects the channel that will sound when you play the keyboard. The program used by that channel is shown at the right.
1–1g. Program .................................................[A11...R58]Selects the program used by each channel.
1–1h. Play/MuteChecked: That channel will playback when the START/STOP key is pressed.
Page Menu Command .......................................
1–1A. Next FileSpecifies whether or not playback will continue to another file when the currently selected SMF finishes playing.
1 Select this command.The dialog box shown at the right will appear.
2 The Chain to next file check box specifies whether or not the next file will be connected following the playback of the currently selected file.Checked: Playback will be connected to the next file.When Auto Start is checked, the next file will automatically begin playback when the currently selected SMF file finishes playing back.
3 Press the OK button.
1–1B. Metronome SettingMakes settings for the metronome.
These settings will be valid in modes other than Program mode, Global mode and Disk mode.
1 Select this command.The dialog box shown at the right will appear.
2 Sound specifies whether or not the metronome will sound.With a setting of Only Rec, the metronome will sound during realtime recording.With a setting of Rec. & Play, the metronome will sound during realtime recording and during playback.With a setting of Off, the metronome will not sound.
3 Precount specifies whether or not a count will be inserted before realtime recording.2 Measure will insert a two-measure count.1 Measure will insert a one-measure count.None will not insert a count.
4 Output specifies the channel(s) to which the metro-nome sound will be output.A setting of L will output the metronome sound to the L channel, R to the R channel, and L+R to both the L and R channels.A setting of C send will output the metronome sound to the C output channel, D send to the D output channel, and C send + D send to both the C and D output channels.A setting of All will output the metronome sound to all output channels L, R, C and D.The OUTPUT jack(s) from which the metronome sound is sent will depend on the selected Placement. For example if in Song Play mode you wish to output the metronome sound unprocessed by the effects from OUTPUT jacks 3 and 4, select a setting of C send–D send, and set the “3–1. Placement” parameter to Serial Sub.
5 Use Level to adjust the volume of the metronome.
6 Press the OK button.
1. Program & Mix
1–1a
1–1b
1–1c
1–1d
1–1e
1–1f
1–1g
1–1h
1–1A
1–1B
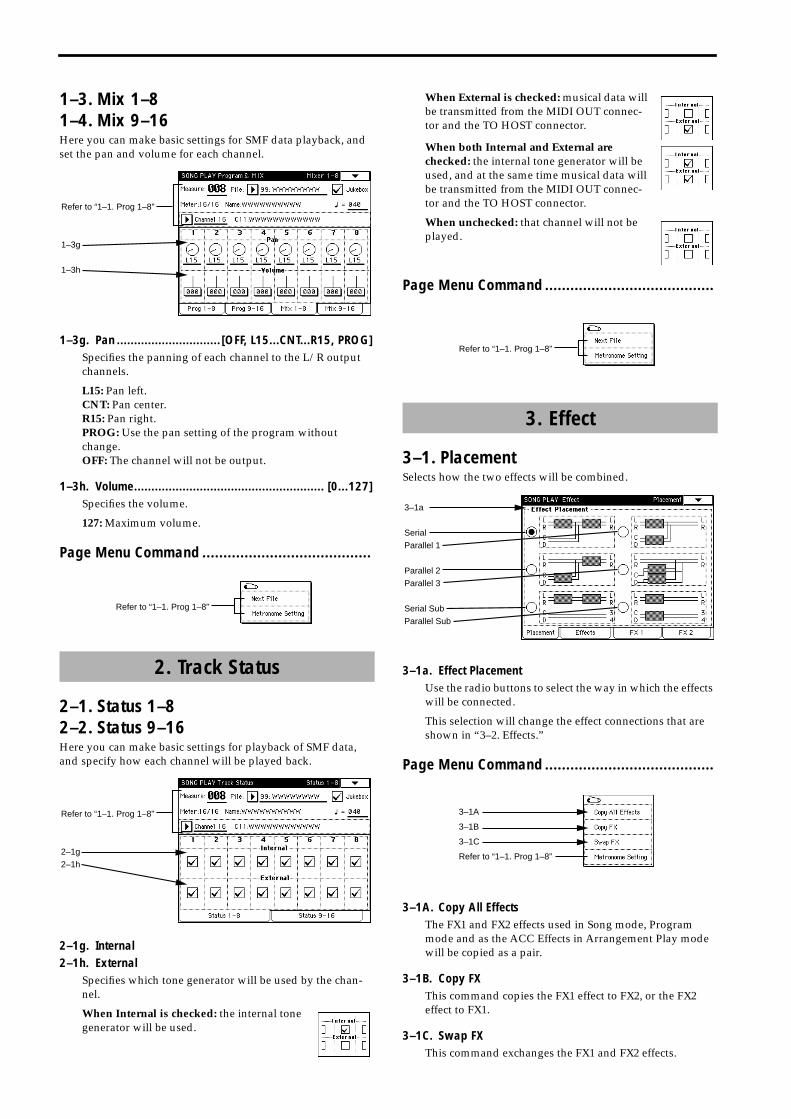
1–3. Mix 1–81–4. Mix 9–16Here you can make basic settings for SMF data playback, and set the pan and volume for each channel.
1–3g. Pan .............................. [OFF, L15...CNT...R15, PROG]Specifies the panning of each channel to the L/R output channels.
L15: Pan left.CNT: Pan center.R15: Pan right.PROG: Use the pan setting of the program without change.OFF: The channel will not be output.
1–3h. Volume....................................................... [0...127]Specifies the volume.
127: Maximum volume.
Page Menu Command ........................................
2–1. Status 1–82–2. Status 9–16Here you can make basic settings for playback of SMF data, and specify how each channel will be played back.
2–1g. Internal2–1h. External
Specifies which tone generator will be used by the chan-nel.
When Internal is checked: the internal tone generator will be used.
When External is checked: musical data will be transmitted from the MIDI OUT connec-tor and the TO HOST connector.
When both Internal and External are checked: the internal tone generator will be used, and at the same time musical data will be transmitted from the MIDI OUT connec-tor and the TO HOST connector.
When unchecked: that channel will not be played.
Page Menu Command ........................................
3–1. PlacementSelects how the two effects will be combined.
3–1a. Effect PlacementUse the radio buttons to select the way in which the effects will be connected.
This selection will change the effect connections that are shown in “3–2. Effects.”
Page Menu Command ........................................
3–1A. Copy All EffectsThe FX1 and FX2 effects used in Song mode, Program mode and as the ACC Effects in Arrangement Play mode will be copied as a pair.
3–1B. Copy FXThis command copies the FX1 effect to FX2, or the FX2 effect to FX1.
3–1C. Swap FXThis command exchanges the FX1 and FX2 effects.
2. Track Status
Refer to “1–1. Prog 1–8”
1–3g
1–3h
Refer to “1–1. Prog 1–8”
Refer to “1–1. Prog 1–8”
2–1g
2–1h
3. Effect
Refer to “1–1. Prog 1–8”
3–1a
Serial
Parallel 1
Parallel 2
Parallel 3
Serial Sub
Parallel Sub
3–1A
3–1B
3–1C
Refer to “1–1. Prog 1–8”
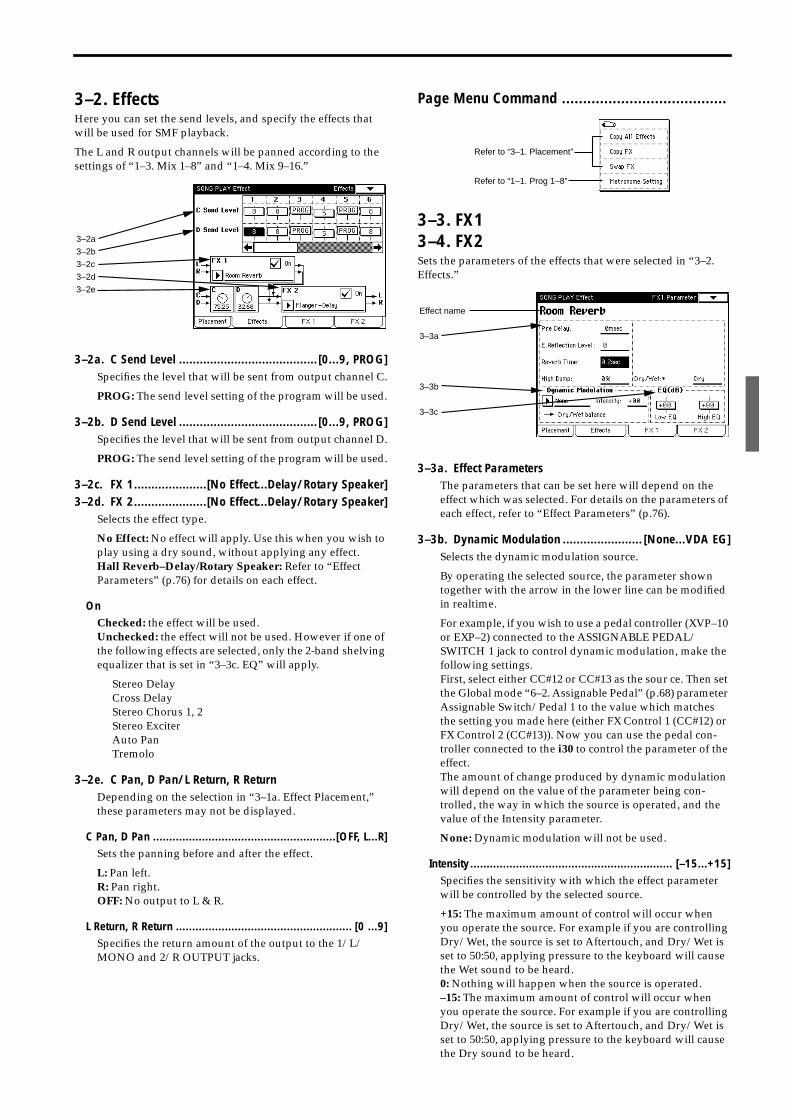
3–2. EffectsHere you can set the send levels, and specify the effects that will be used for SMF playback.
The L and R output channels will be panned according to the settings of “1–3. Mix 1–8” and “1–4. Mix 9–16.”
3–2a. C Send Level ........................................ [0...9, PROG]Specifies the level that will be sent from output channel C.
PROG: The send level setting of the program will be used.
3–2b. D Send Level ........................................ [0...9, PROG]Specifies the level that will be sent from output channel D.
PROG: The send level setting of the program will be used.
3–2c. FX 1.....................[No Effect...Delay/Rotary Speaker]3–2d. FX 2.....................[No Effect...Delay/Rotary Speaker]
Selects the effect type.
No Effect: No effect will apply. Use this when you wish to play using a dry sound, without applying any effect.Hall Reverb–Delay/Rotary Speaker: Refer to “Effect Parameters” (p.76) for details on each effect.
OnChecked: the effect will be used.Unchecked: the effect will not be used. However if one of the following effects are selected, only the 2-band shelving equalizer that is set in “3–3c. EQ” will apply.
Stereo DelayCross DelayStereo Chorus 1, 2Stereo ExciterAuto PanTremolo
3–2e. C Pan, D Pan/L Return, R ReturnDepending on the selection in “3–1a. Effect Placement,” these parameters may not be displayed.
C Pan, D Pan ........................................................[OFF, L...R]Sets the panning before and after the effect.
L: Pan left.R: Pan right.OFF: No output to L & R.
L Return, R Return ...................................................... [0 ...9]Specifies the return amount of the output to the 1/L/MONO and 2/R OUTPUT jacks.
Page Menu Command .......................................
3–3. FX13–4. FX2Sets the parameters of the effects that were selected in “3–2. Effects.”
3–3a. Effect ParametersThe parameters that can be set here will depend on the effect which was selected. For details on the parameters of each effect, refer to “Effect Parameters” (p.76).
3–3b. Dynamic Modulation ....................... [None...VDA EG]Selects the dynamic modulation source.
By operating the selected source, the parameter shown together with the arrow in the lower line can be modified in realtime.
For example, if you wish to use a pedal controller (XVP–10 or EXP–2) connected to the ASSIGNABLE PEDAL/SWITCH 1 jack to control dynamic modulation, make the following settings.First, select either CC#12 or CC#13 as the sour ce. Then set the Global mode “6–2. Assignable Pedal” (p.68) parameter Assignable Switch/Pedal 1 to the value which matches the setting you made here (either FX Control 1 (CC#12) or FX Control 2 (CC#13)). Now you can use the pedal con-troller connected to the i30 to control the parameter of the effect.The amount of change produced by dynamic modulation will depend on the value of the parameter being con-trolled, the way in which the source is operated, and the value of the Intensity parameter.
None: Dynamic modulation will not be used.
Intensity.............................................................. [–15...+15]Specifies the sensitivity with which the effect parameter will be controlled by the selected source.
+15: The maximum amount of control will occur when you operate the source. For example if you are controlling Dry/Wet, the source is set to Aftertouch, and Dry/Wet is set to 50:50, applying pressure to the keyboard will cause the Wet sound to be heard.0: Nothing will happen when the source is operated.–15: The maximum amount of control will occur when you operate the source. For example if you are controlling Dry/Wet, the source is set to Aftertouch, and Dry/Wet is set to 50:50, applying pressure to the keyboard will cause the Dry sound to be heard.
3–2a
3–2b
3–2c
3–2d
3–2e
Refer to “3–1. Placement”
Refer to “1–1. Prog 1–8”
Effect name
3–3a
3–3b
3–3c
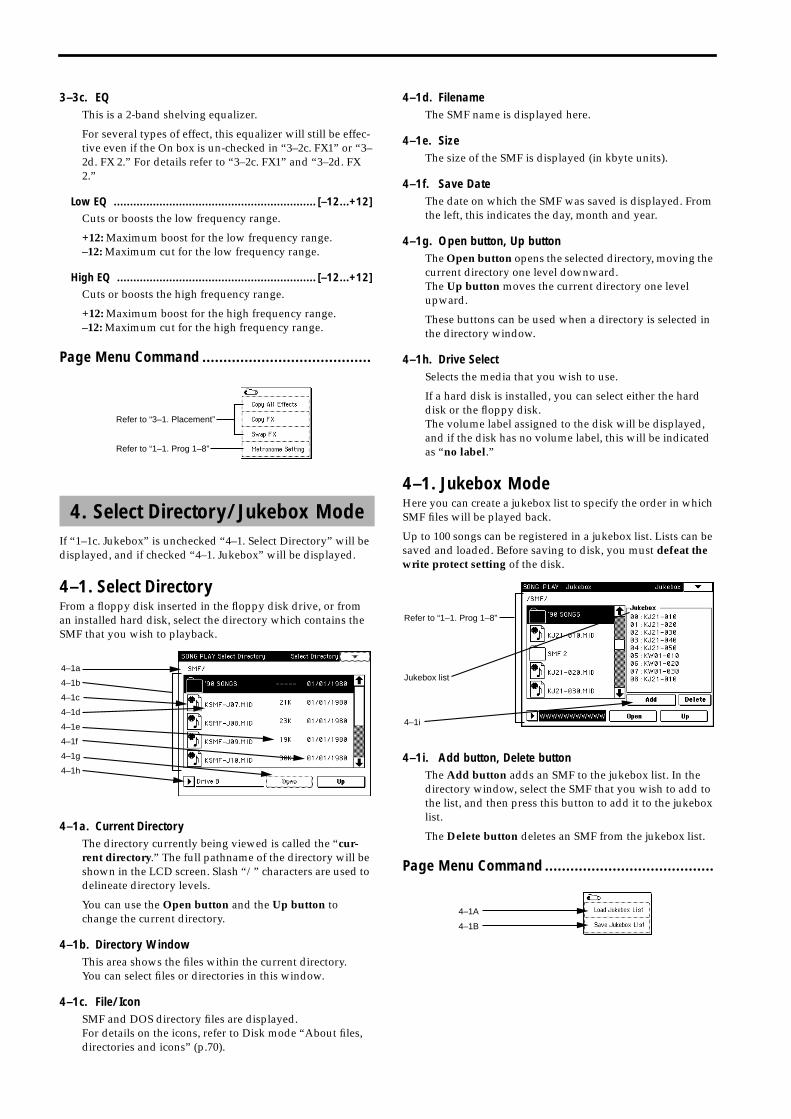
3–3c. EQThis is a 2-band shelving equalizer.
For several types of effect, this equalizer will still be effec-tive even if the On box is un-checked in “3–2c. FX1” or “3–2d. FX 2.” For details refer to “3–2c. FX1” and “3–2d. FX 2.”
Low EQ .............................................................. [–12...+12]Cuts or boosts the low frequency range.
+12: Maximum boost for the low frequency range.–12: Maximum cut for the low frequency range.
High EQ ............................................................. [–12...+12]Cuts or boosts the high frequency range.
+12: Maximum boost for the high frequency range.–12: Maximum cut for the high frequency range.
Page Menu Command ........................................
If “1–1c. Jukebox” is unchecked “4–1. Select Directory” will be displayed, and if checked “4–1. Jukebox” will be displayed.
4–1. Select DirectoryFrom a floppy disk inserted in the floppy disk drive, or from an installed hard disk, select the directory which contains the SMF that you wish to playback.
4–1a. Current DirectoryThe directory currently being viewed is called the “cur-rent directory.” The full pathname of the directory will be shown in the LCD screen. Slash “/” characters are used to delineate directory levels.
You can use the Open button and the Up button to change the current directory.
4–1b. Directory WindowThis area shows the files within the current directory.You can select files or directories in this window.
4–1c. File/IconSMF and DOS directory files are displayed.For details on the icons, refer to Disk mode “About files, directories and icons” (p.70).
4–1d. FilenameThe SMF name is displayed here.
4–1e. SizeThe size of the SMF is displayed (in kbyte units).
4–1f. Save DateThe date on which the SMF was saved is displayed. From the left, this indicates the day, month and year.
4–1g. Open button, Up buttonThe Open button opens the selected directory, moving the current directory one level downward.The Up button moves the current directory one level upward.
These buttons can be used when a directory is selected in the directory window.
4–1h. Drive SelectSelects the media that you wish to use.
If a hard disk is installed, you can select either the hard disk or the floppy disk.The volume label assigned to the disk will be displayed, and if the disk has no volume label, this will be indicated as “no label.”
4–1. Jukebox ModeHere you can create a jukebox list to specify the order in which SMF files will be played back.
Up to 100 songs can be registered in a jukebox list. Lists can be saved and loaded. Before saving to disk, you must defeat the write protect setting of the disk.
4–1i. Add button, Delete buttonThe Add button adds an SMF to the jukebox list. In the directory window, select the SMF that you wish to add to the list, and then press this button to add it to the jukebox list.
The Delete button deletes an SMF from the jukebox list.
Page Menu Command ........................................
4. Select Directory/Jukebox Mode
Refer to “3–1. Placement”
Refer to “1–1. Prog 1–8”
4–1a
4–1b
4–1c
4–1d
4–1e
4–1f
4–1g
4–1h
Refer to “1–1. Prog 1–8”
Jukebox list
4–1i
4–1A
4–1B
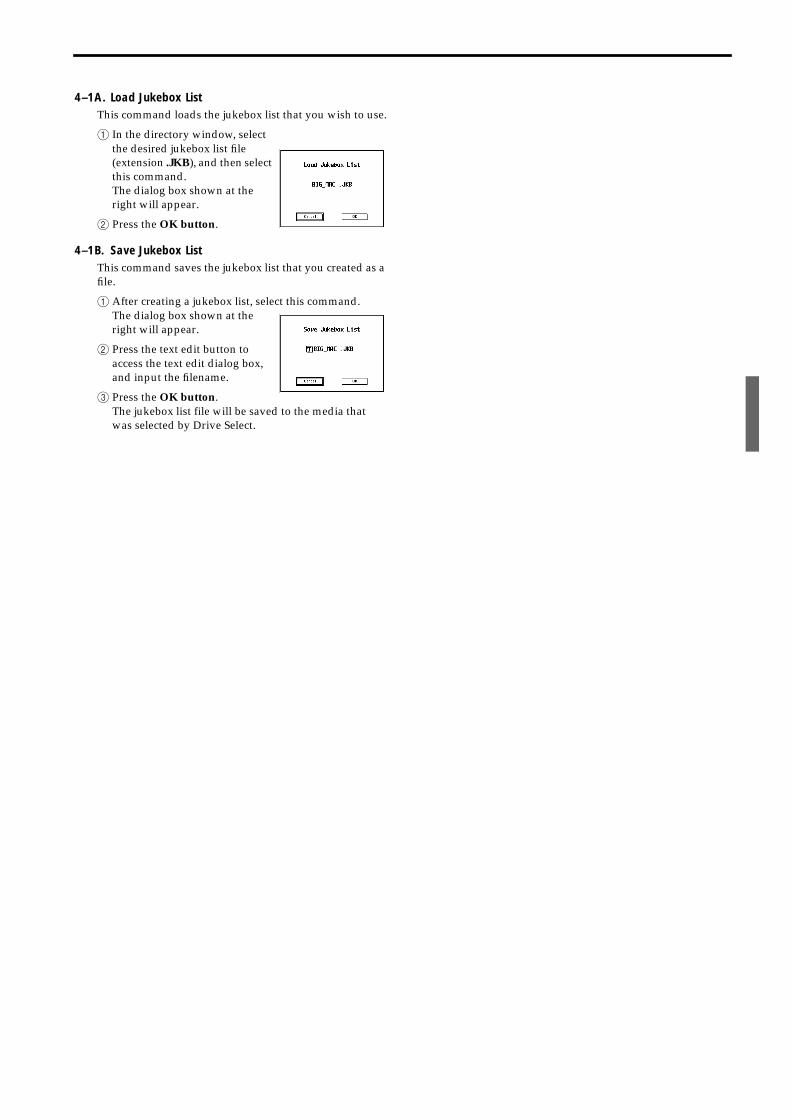
4–1A. Load Jukebox ListThis command loads the jukebox list that you wish to use.
1 In the directory window, select the desired jukebox list file (extension .JKB), and then select this command.The dialog box shown at the right will appear.
2 Press the OK button.
4–1B. Save Jukebox ListThis command saves the jukebox list that you created as a file.
1 After creating a jukebox list, select this command.The dialog box shown at the right will appear.
2 Press the text edit button to access the text edit dialog box, and input the filename.
3 Press the OK button.The jukebox list file will be saved to the media that was selected by Drive Select.
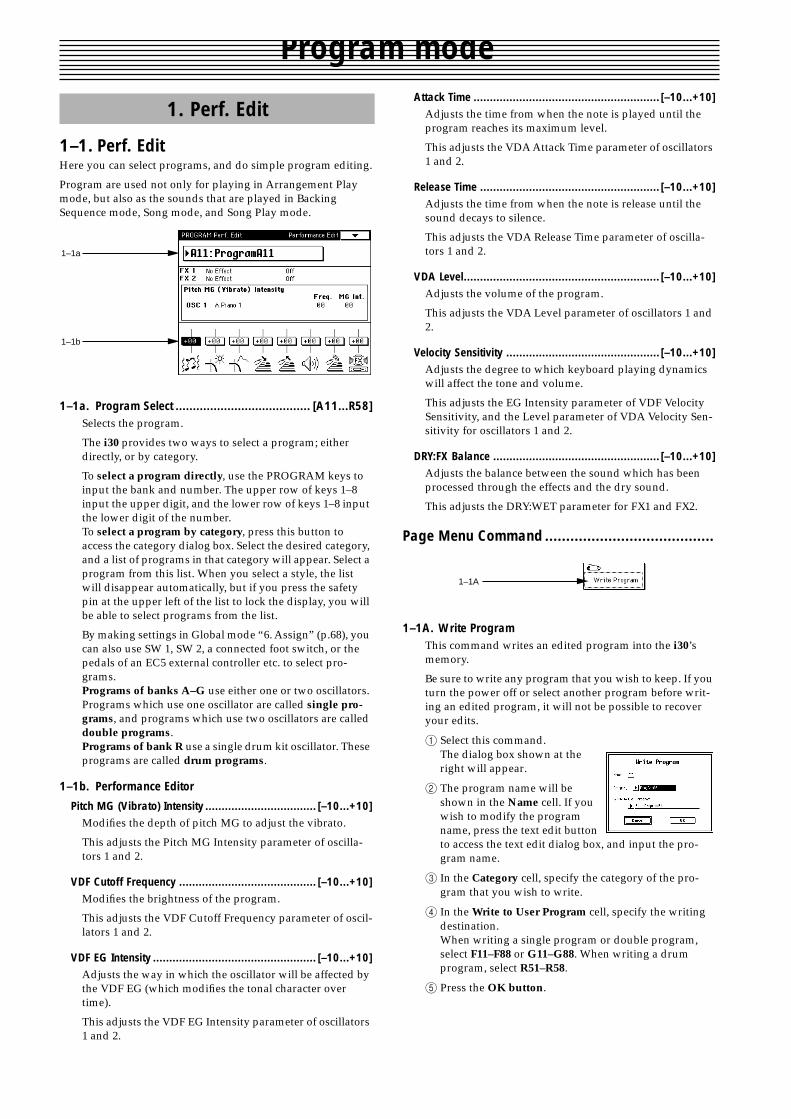
Program mode
1–1. Perf. EditHere you can select programs, and do simple program editing.
Program are used not only for playing in Arrangement Play mode, but also as the sounds that are played in Backing Sequence mode, Song mode, and Song Play mode.
1–1a. Program Select ....................................... [A11...R58]Selects the program.
The i30 provides two ways to select a program; either directly, or by category.
To select a program directly, use the PROGRAM keys to input the bank and number. The upper row of keys 1–8 input the upper digit, and the lower row of keys 1–8 input the lower digit of the number.To select a program by category, press this button to access the category dialog box. Select the desired category, and a list of programs in that category will appear. Select a program from this list. When you select a style, the list will disappear automatically, but if you press the safety pin at the upper left of the list to lock the display, you will be able to select programs from the list.
By making settings in Global mode “6. Assign” (p.68), you can also use SW 1, SW 2, a connected foot switch, or the pedals of an EC5 external controller etc. to select pro-grams.Programs of banks A–G use either one or two oscillators. Programs which use one oscillator are called single pro-grams, and programs which use two oscillators are called double programs.Programs of bank R use a single drum kit oscillator. These programs are called drum programs.
1–1b. Performance Editor
Pitch MG (Vibrato) Intensity .................................. [–10...+10]Modifies the depth of pitch MG to adjust the vibrato.
This adjusts the Pitch MG Intensity parameter of oscilla-tors 1 and 2.
VDF Cutoff Frequency .......................................... [–10...+10]Modifies the brightness of the program.
This adjusts the VDF Cutoff Frequency parameter of oscil-lators 1 and 2.
VDF EG Intensity .................................................. [–10...+10]Adjusts the way in which the oscillator will be affected by the VDF EG (which modifies the tonal character over time).
This adjusts the VDF EG Intensity parameter of oscillators 1 and 2.
Attack Time ......................................................... [–10...+10]Adjusts the time from when the note is played until the program reaches its maximum level.
This adjusts the VDA Attack Time parameter of oscillators 1 and 2.
Release Time ....................................................... [–10...+10]Adjusts the time from when the note is release until the sound decays to silence.
This adjusts the VDA Release Time parameter of oscilla-tors 1 and 2.
VDA Level............................................................ [–10...+10]Adjusts the volume of the program.
This adjusts the VDA Level parameter of oscillators 1 and 2.
Velocity Sensitivity ............................................... [–10...+10]Adjusts the degree to which keyboard playing dynamics will affect the tone and volume.
This adjusts the EG Intensity parameter of VDF Velocity Sensitivity, and the Level parameter of VDA Velocity Sen-sitivity for oscillators 1 and 2.
DRY:FX Balance ................................................... [–10...+10]Adjusts the balance between the sound which has been processed through the effects and the dry sound.
This adjusts the DRY:WET parameter for FX1 and FX2.
Page Menu Command ........................................
1–1A. Write ProgramThis command writes an edited program into the i30’s memory.
Be sure to write any program that you wish to keep. If you turn the power off or select another program before writ-ing an edited program, it will not be possible to recover your edits.
1 Select this command.The dialog box shown at the right will appear.
2 The program name will be shown in the Name cell. If you wish to modify the program name, press the text edit button to access the text edit dialog box, and input the pro-gram name.
3 In the Category cell, specify the category of the pro-gram that you wish to write.
4 In the Write to User Program cell, specify the writing destination.When writing a single program or double program, select F11–F88 or G11–G88. When writing a drum program, select R51–R58.
5 Press the OK button.
1. Perf. Edit
1–1a
1–1b
1–1A
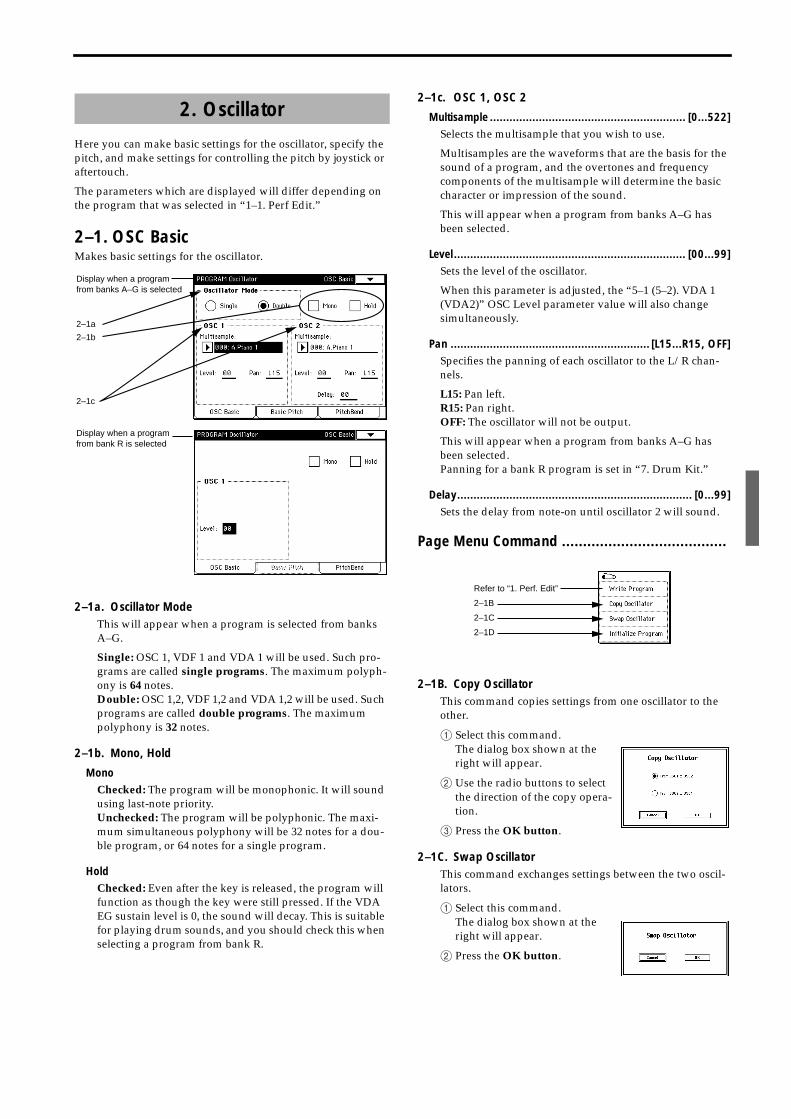
Here you can make basic settings for the oscillator, specify the pitch, and make settings for controlling the pitch by joystick or aftertouch.
The parameters which are displayed will differ depending on the program that was selected in “1–1. Perf Edit.”
2–1. OSC BasicMakes basic settings for the oscillator.
2–1a. Oscillator ModeThis will appear when a program is selected from banks A–G.
Single: OSC 1, VDF 1 and VDA 1 will be used. Such pro-grams are called single programs. The maximum polyph-ony is 64 notes.Double: OSC 1,2, VDF 1,2 and VDA 1,2 will be used. Such programs are called double programs. The maximum polyphony is 32 notes.
2–1b. Mono, Hold
MonoChecked: The program will be monophonic. It will sound using last-note priority.Unchecked: The program will be polyphonic. The maxi-mum simultaneous polyphony will be 32 notes for a dou-ble program, or 64 notes for a single program.
HoldChecked: Even after the key is released, the program will function as though the key were still pressed. If the VDA EG sustain level is 0, the sound will decay. This is suitable for playing drum sounds, and you should check this when selecting a program from bank R.
2–1c. OSC 1, OSC 2
Multisample ............................................................ [0...522]Selects the multisample that you wish to use.
Multisamples are the waveforms that are the basis for the sound of a program, and the overtones and frequency components of the multisample will determine the basic character or impression of the sound.
This will appear when a program from banks A–G has been selected.
Level....................................................................... [00...99]Sets the level of the oscillator.
When this parameter is adjusted, the “5–1 (5–2). VDA 1 (VDA2)” OSC Level parameter value will also change simultaneously.
Pan ............................................................. [L15...R15, OFF]Specifies the panning of each oscillator to the L/R chan-nels.
L15: Pan left.R15: Pan right.OFF: The oscillator will not be output.
This will appear when a program from banks A–G has been selected.Panning for a bank R program is set in “7. Drum Kit.”
Delay........................................................................ [0...99]Sets the delay from note-on until oscillator 2 will sound.
Page Menu Command .......................................
2–1B. Copy OscillatorThis command copies settings from one oscillator to the other.
1 Select this command.The dialog box shown at the right will appear.
2 Use the radio buttons to select the direction of the copy opera-tion.
3 Press the OK button.
2–1C. Swap OscillatorThis command exchanges settings between the two oscil-lators.
1 Select this command.The dialog box shown at the right will appear.
2 Press the OK button.
2. Oscillator
Display when a program from banks A–G is selected
2–1a
2–1b
2–1c
Display when a program from bank R is selected
Refer to “1. Perf. Edit”
2–1B
2–1C
2–1D
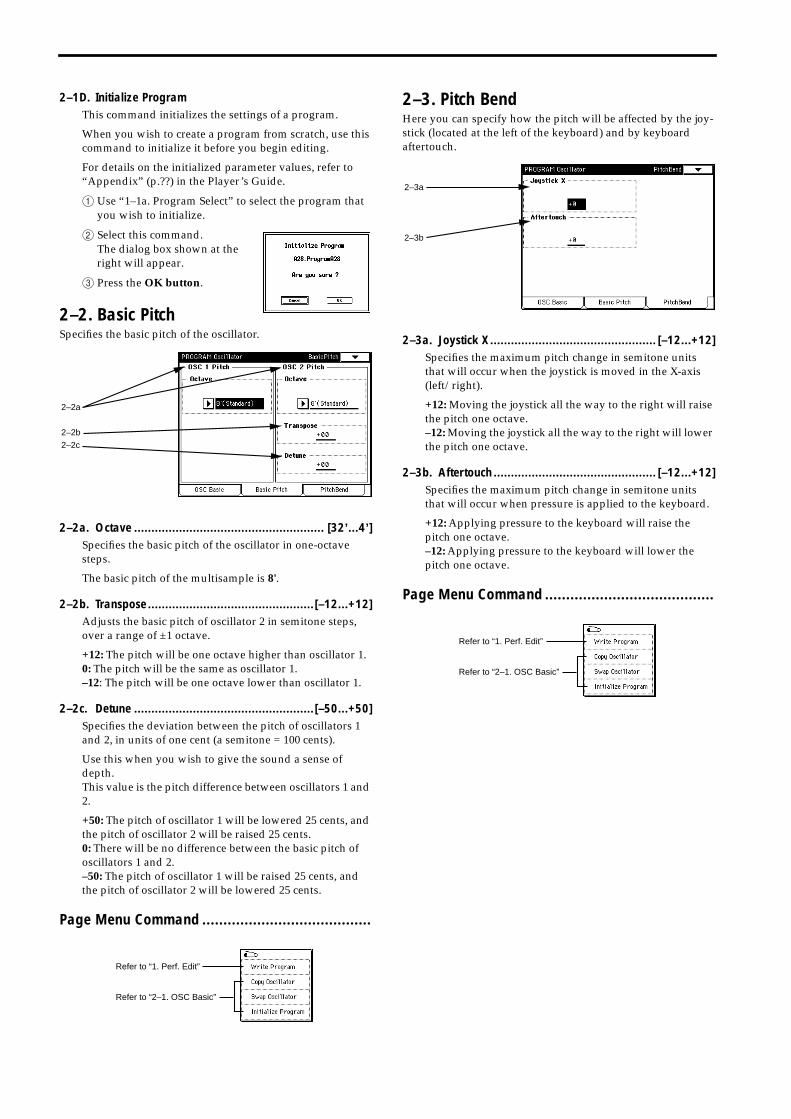
2–1D. Initialize ProgramThis command initializes the settings of a program.
When you wish to create a program from scratch, use this command to initialize it before you begin editing.
For details on the initialized parameter values, refer to “Appendix” (p.??) in the Player’s Guide.
1 Use “1–1a. Program Select” to select the program that you wish to initialize.
2 Select this command.The dialog box shown at the right will appear.
3 Press the OK button.
2–2. Basic PitchSpecifies the basic pitch of the oscillator.
2–2a. Octave ....................................................... [32’...4’]Specifies the basic pitch of the oscillator in one-octave steps.
The basic pitch of the multisample is 8'.
2–2b. Transpose................................................[–12...+12]Adjusts the basic pitch of oscillator 2 in semitone steps, over a range of ±1 octave.
+12: The pitch will be one octave higher than oscillator 1.0: The pitch will be the same as oscillator 1.–12: The pitch will be one octave lower than oscillator 1.
2–2c. Detune ....................................................[–50...+50]Specifies the deviation between the pitch of oscillators 1 and 2, in units of one cent (a semitone = 100 cents).
Use this when you wish to give the sound a sense of depth.This value is the pitch difference between oscillators 1 and 2.
+50: The pitch of oscillator 1 will be lowered 25 cents, and the pitch of oscillator 2 will be raised 25 cents.0: There will be no difference between the basic pitch of oscillators 1 and 2.–50: The pitch of oscillator 1 will be raised 25 cents, and the pitch of oscillator 2 will be lowered 25 cents.
Page Menu Command ........................................
2–3. Pitch BendHere you can specify how the pitch will be affected by the joy-stick (located at the left of the keyboard) and by keyboard aftertouch.
2–3a. Joystick X................................................ [–12...+12]Specifies the maximum pitch change in semitone units that will occur when the joystick is moved in the X-axis (left/right).
+12: Moving the joystick all the way to the right will raise the pitch one octave.–12: Moving the joystick all the way to the right will lower the pitch one octave.
2–3b. Aftertouch ............................................... [–12...+12]Specifies the maximum pitch change in semitone units that will occur when pressure is applied to the keyboard.
+12: Applying pressure to the keyboard will raise the pitch one octave.–12: Applying pressure to the keyboard will lower the pitch one octave.
Page Menu Command ........................................
2–2a
2–2b
2–2c
Refer to “1. Perf. Edit”
Refer to “2–1. OSC Basic”
2–3a
2–3b
Refer to “1. Perf. Edit”
Refer to “2–1. OSC Basic”
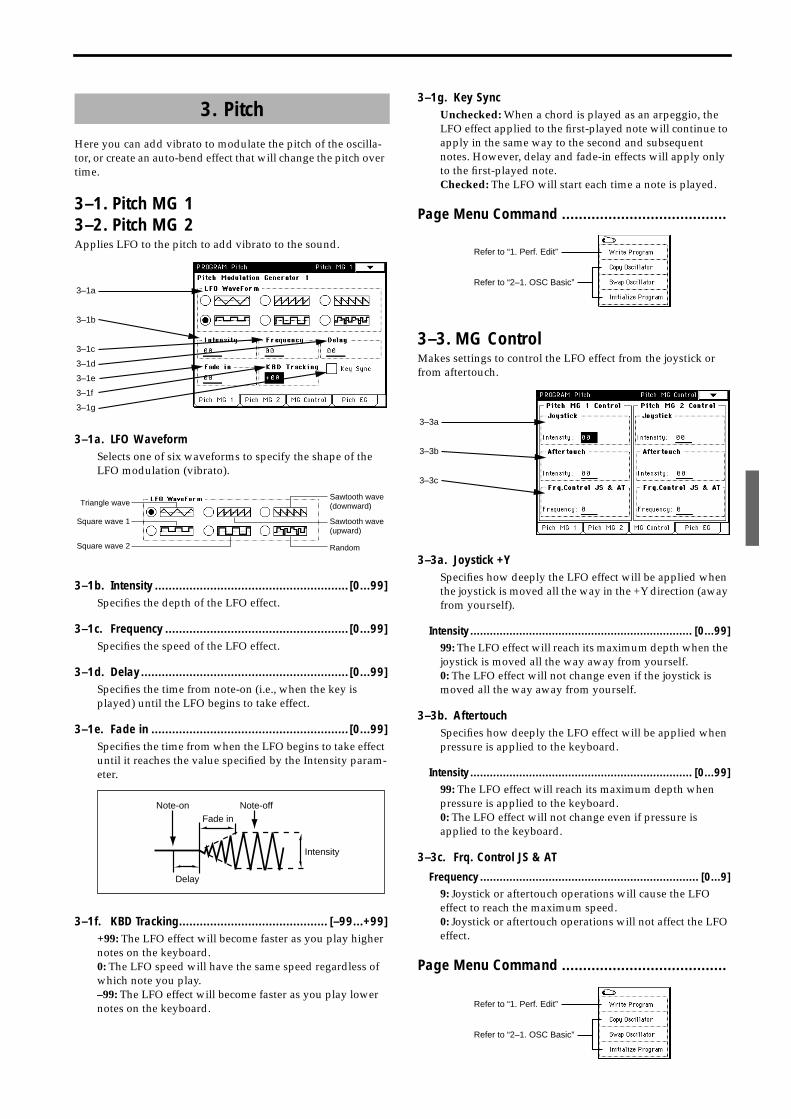
Here you can add vibrato to modulate the pitch of the oscilla-tor, or create an auto-bend effect that will change the pitch over time.
3–1. Pitch MG 13–2. Pitch MG 2Applies LFO to the pitch to add vibrato to the sound.
3–1a. LFO WaveformSelects one of six waveforms to specify the shape of the LFO modulation (vibrato).
3–1b. Intensity ........................................................ [0...99]Specifies the depth of the LFO effect.
3–1c. Frequency ..................................................... [0...99]Specifies the speed of the LFO effect.
3–1d. Delay............................................................ [0...99]Specifies the time from note-on (i.e., when the key is played) until the LFO begins to take effect.
3–1e. Fade in ......................................................... [0...99]Specifies the time from when the LFO begins to take effect until it reaches the value specified by the Intensity param-eter.
3–1f. KBD Tracking........................................... [–99...+99]+99: The LFO effect will become faster as you play higher notes on the keyboard.0: The LFO speed will have the same speed regardless of which note you play.–99: The LFO effect will become faster as you play lower notes on the keyboard.
3–1g. Key SyncUnchecked: When a chord is played as an arpeggio, the LFO effect applied to the first-played note will continue to apply in the same way to the second and subsequent notes. However, delay and fade-in effects will apply only to the first-played note.Checked: The LFO will start each time a note is played.
Page Menu Command .......................................
3–3. MG ControlMakes settings to control the LFO effect from the joystick or from aftertouch.
3–3a. Joystick +YSpecifies how deeply the LFO effect will be applied when the joystick is moved all the way in the +Y direction (away from yourself).
Intensity.................................................................... [0...99]99: The LFO effect will reach its maximum depth when the joystick is moved all the way away from yourself.0: The LFO effect will not change even if the joystick is moved all the way away from yourself.
3–3b. AftertouchSpecifies how deeply the LFO effect will be applied when pressure is applied to the keyboard.
Intensity.................................................................... [0...99]99: The LFO effect will reach its maximum depth when pressure is applied to the keyboard.0: The LFO effect will not change even if pressure is applied to the keyboard.
3–3c. Frq. Control JS & AT
Frequency................................................................... [0...9]9: Joystick or aftertouch operations will cause the LFO effect to reach the maximum speed.0: Joystick or aftertouch operations will not affect the LFO effect.
Page Menu Command .......................................
3. Pitch
3–1a
3–1b
3–1c
3–1d
3–1e
3–1f
3–1g
Triangle wave
Sawtooth wave(upward)
Sawtooth wave(downward)
Square wave 1
Square wave 2 Random
Note-on Note-offFade in
Delay
Intensity
Refer to “1. Perf. Edit”
Refer to “2–1. OSC Basic”
3–3a
3–3b
3–3c
Refer to “1. Perf. Edit”
Refer to “2–1. OSC Basic”
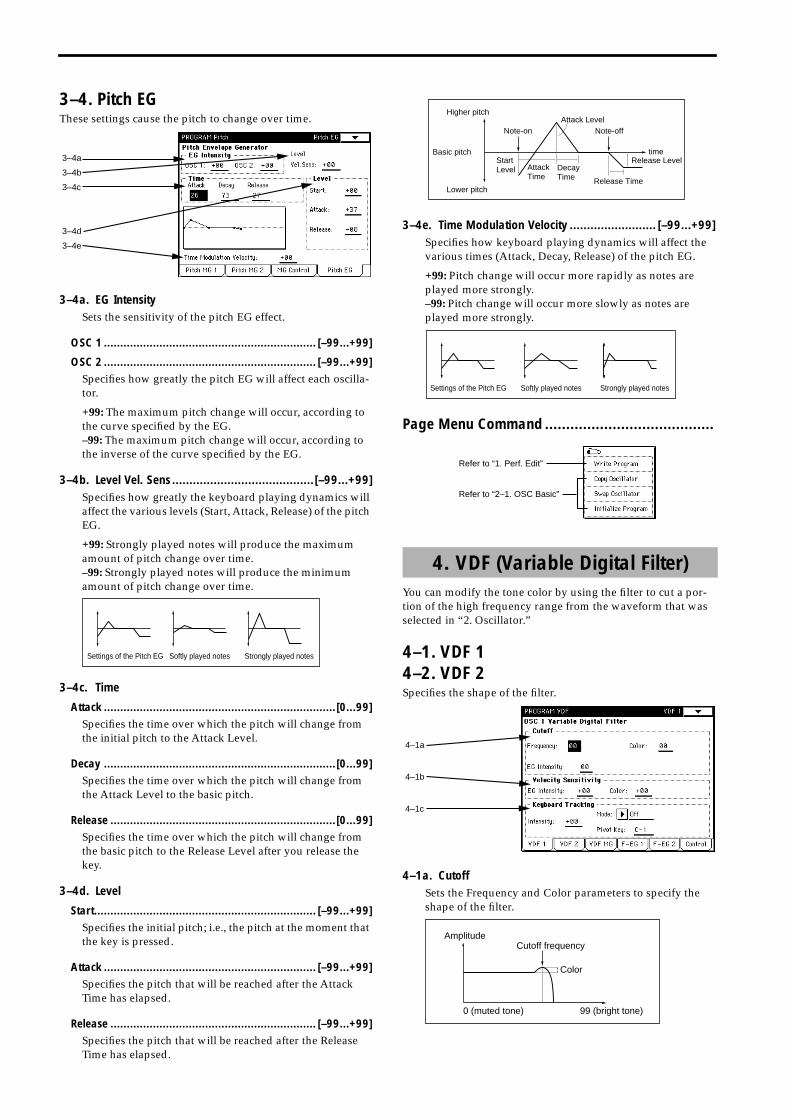
3–4. Pitch EGThese settings cause the pitch to change over time.
3–4a. EG IntensitySets the sensitivity of the pitch EG effect.
OSC 1 ................................................................. [–99...+99]
OSC 2 ................................................................. [–99...+99]Specifies how greatly the pitch EG will affect each oscilla-tor.
+99: The maximum pitch change will occur, according to the curve specified by the EG.–99: The maximum pitch change will occur, according to the inverse of the curve specified by the EG.
3–4b. Level Vel. Sens .........................................[–99...+99]Specifies how greatly the keyboard playing dynamics will affect the various levels (Start, Attack, Release) of the pitch EG.
+99: Strongly played notes will produce the maximum amount of pitch change over time.–99: Strongly played notes will produce the minimum amount of pitch change over time.
3–4c. Time
Attack .......................................................................[0...99]Specifies the time over which the pitch will change from the initial pitch to the Attack Level.
Decay .......................................................................[0...99]Specifies the time over which the pitch will change from the Attack Level to the basic pitch.
Release .....................................................................[0...99]Specifies the time over which the pitch will change from the basic pitch to the Release Level after you release the key.
3–4d. Level
Start.................................................................... [–99...+99]Specifies the initial pitch; i.e., the pitch at the moment that the key is pressed.
Attack ................................................................. [–99...+99]Specifies the pitch that will be reached after the Attack Time has elapsed.
Release ............................................................... [–99...+99]Specifies the pitch that will be reached after the Release Time has elapsed.
3–4e. Time Modulation Velocity ......................... [–99...+99]Specifies how keyboard playing dynamics will affect the various times (Attack, Decay, Release) of the pitch EG.
+99: Pitch change will occur more rapidly as notes are played more strongly.–99: Pitch change will occur more slowly as notes are played more strongly.
Page Menu Command ........................................
You can modify the tone color by using the filter to cut a por-tion of the high frequency range from the waveform that was selected in “2. Oscillator.”
4–1. VDF 14–2. VDF 2Specifies the shape of the filter.
4–1a. CutoffSets the Frequency and Color parameters to specify the shape of the filter.
3–4a
3–4b
3–4c
3–4d
3–4e
Settings of the Pitch EG Softly played notes Strongly played notes
4. VDF (Variable Digital Filter)
Note-on Note-off
AttackTime
DecayTime Release Time
StartLevel
Attack Level
Release LevelBasic pitch time
Higher pitch
Lower pitch
Settings of the Pitch EG Softly played notes Strongly played notes
Refer to “1. Perf. Edit”
Refer to “2–1. OSC Basic”
4–1a
4–1b
4–1c
Cutoff frequencyAmplitude
0 (muted tone) 99 (bright tone)
Color
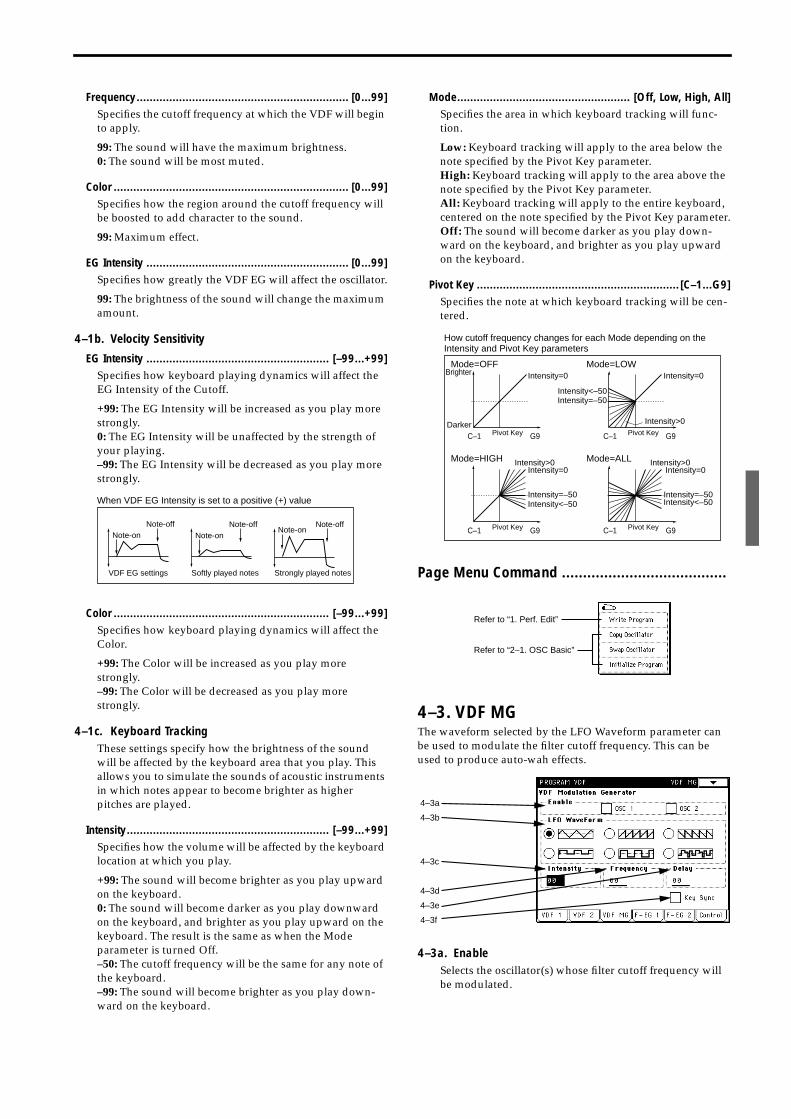
Frequency................................................................. [0...99]Specifies the cutoff frequency at which the VDF will begin to apply.
99: The sound will have the maximum brightness.0: The sound will be most muted.
Color ........................................................................ [0...99]Specifies how the region around the cutoff frequency will be boosted to add character to the sound.
99: Maximum effect.
EG Intensity .............................................................. [0...99]Specifies how greatly the VDF EG will affect the oscillator.
99: The brightness of the sound will change the maximum amount.
4–1b. Velocity Sensitivity
EG Intensity ........................................................ [–99...+99]Specifies how keyboard playing dynamics will affect the EG Intensity of the Cutoff.
+99: The EG Intensity will be increased as you play more strongly.0: The EG Intensity will be unaffected by the strength of your playing.–99: The EG Intensity will be decreased as you play more strongly.
Color .................................................................. [–99...+99]Specifies how keyboard playing dynamics will affect the Color.
+99: The Color will be increased as you play more strongly.–99: The Color will be decreased as you play more strongly.
4–1c. Keyboard TrackingThese settings specify how the brightness of the sound will be affected by the keyboard area that you play. This allows you to simulate the sounds of acoustic instruments in which notes appear to become brighter as higher pitches are played.
Intensity.............................................................. [–99...+99]Specifies how the volume will be affected by the keyboard location at which you play.
+99: The sound will become brighter as you play upward on the keyboard.0: The sound will become darker as you play downward on the keyboard, and brighter as you play upward on the keyboard. The result is the same as when the Mode parameter is turned Off.–50: The cutoff frequency will be the same for any note of the keyboard.–99: The sound will become brighter as you play down-ward on the keyboard.
Mode..................................................... [Off, Low, High, All]Specifies the area in which keyboard tracking will func-tion.
Low: Keyboard tracking will apply to the area below the note specified by the Pivot Key parameter.High: Keyboard tracking will apply to the area above the note specified by the Pivot Key parameter.All: Keyboard tracking will apply to the entire keyboard, centered on the note specified by the Pivot Key parameter.Off: The sound will become darker as you play down-ward on the keyboard, and brighter as you play upward on the keyboard.
Pivot Key .............................................................. [C–1...G9]Specifies the note at which keyboard tracking will be cen-tered.
Page Menu Command .......................................
4–3. VDF MGThe waveform selected by the LFO Waveform parameter can be used to modulate the filter cutoff frequency. This can be used to produce auto-wah effects.
4–3a. EnableSelects the oscillator(s) whose filter cutoff frequency will be modulated.
VDF EG settings Strongly played notesSoftly played notes
When VDF EG Intensity is set to a positive (+) value
Note-onNote-off
Note-onNote-off Note-off
Note-on
How cutoff frequency changes for each Mode depending on the Intensity and Pivot Key parameters
Pivot KeyC–1 G9
Pivot KeyC–1 G9
Intensity=0Intensity>0
Intensity=–50Intensity<–50
Pivot KeyC–1 G9
Intensity=0
Intensity>0
Intensity=–50Intensity<–50
Pivot KeyC–1 G9
Intensity=0Intensity>0
Intensity=–50Intensity<–50
Brighter
Darker
Intensity=0Mode=OFF
Mode=HIGH
Mode=LOW
Mode=ALL
Refer to “1. Perf. Edit”
Refer to “2–1. OSC Basic”
4–3a
4–3b
4–3c
4–3d
4–3e
4–3f
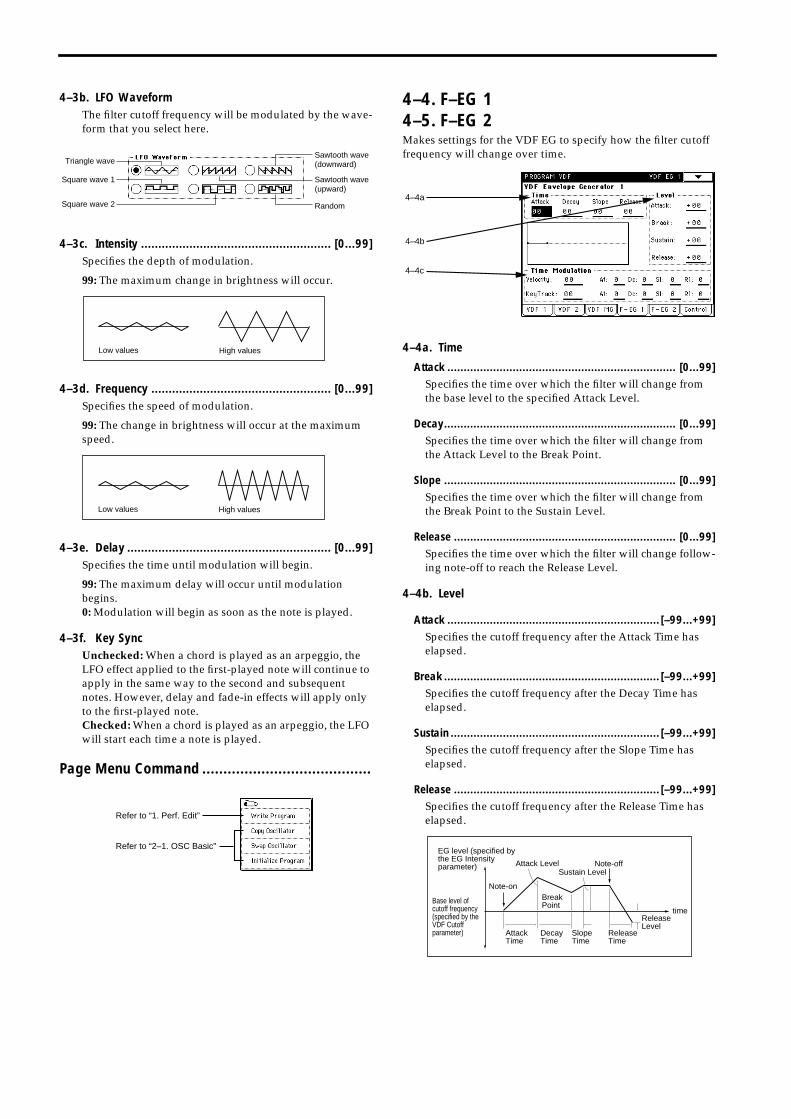
4–3b. LFO WaveformThe filter cutoff frequency will be modulated by the wave-form that you select here.
4–3c. Intensity ....................................................... [0...99]Specifies the depth of modulation.
99: The maximum change in brightness will occur.
4–3d. Frequency .................................................... [0...99]Specifies the speed of modulation.
99: The change in brightness will occur at the maximum speed.
4–3e. Delay ........................................................... [0...99]Specifies the time until modulation will begin.
99: The maximum delay will occur until modulation begins.0: Modulation will begin as soon as the note is played.
4–3f. Key SyncUnchecked: When a chord is played as an arpeggio, the LFO effect applied to the first-played note will continue to apply in the same way to the second and subsequent notes. However, delay and fade-in effects will apply only to the first-played note.Checked: When a chord is played as an arpeggio, the LFO will start each time a note is played.
Page Menu Command ........................................
4–4. F–EG 14–5. F–EG 2Makes settings for the VDF EG to specify how the filter cutoff frequency will change over time.
4–4a. Time
Attack ...................................................................... [0...99]Specifies the time over which the filter will change from the base level to the specified Attack Level.
Decay....................................................................... [0...99]Specifies the time over which the filter will change from the Attack Level to the Break Point.
Slope ....................................................................... [0...99]Specifies the time over which the filter will change from the Break Point to the Sustain Level.
Release .................................................................... [0...99]Specifies the time over which the filter will change follow-ing note-off to reach the Release Level.
4–4b. Level
Attack ................................................................. [–99...+99]Specifies the cutoff frequency after the Attack Time has elapsed.
Break .................................................................. [–99...+99]Specifies the cutoff frequency after the Decay Time has elapsed.
Sustain ................................................................ [–99...+99]Specifies the cutoff frequency after the Slope Time has elapsed.
Release ............................................................... [–99...+99]Specifies the cutoff frequency after the Release Time has elapsed.
Triangle wave
Sawtooth wave(upward)
Sawtooth wave(downward)
Square wave 1
Square wave 2 Random
Low values High values
Low values High values
Refer to “1. Perf. Edit”
Refer to “2–1. OSC Basic”
4–4a
4–4b
4–4c
Note-off
Note-on
AttackTime
DecayTime
ReleaseTime
ReleaseLevel
time
Attack Level
BreakPoint
Slope Time
Sustain Level
Base level of cutoff frequency (specified by the VDF Cutoff parameter)
EG level (specified by the EG Intensity parameter)
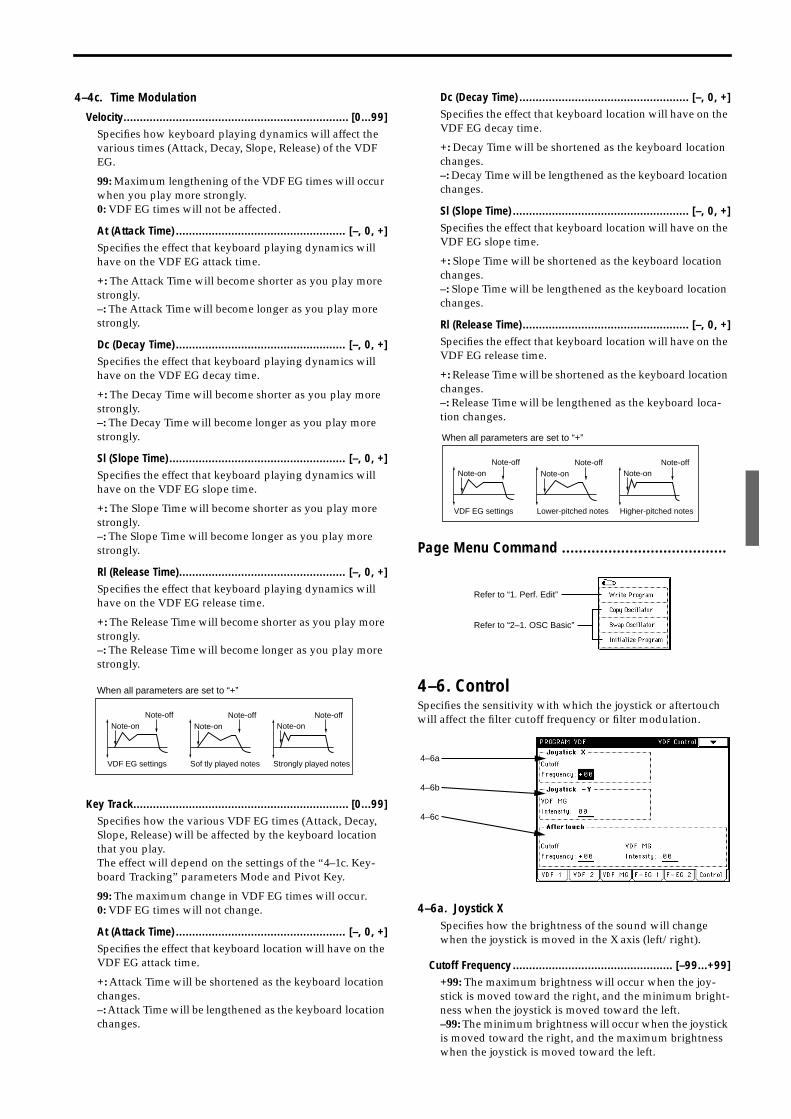
4–4c. Time Modulation
Velocity..................................................................... [0...99]Specifies how keyboard playing dynamics will affect the various times (Attack, Decay, Slope, Release) of the VDF EG.
99: Maximum lengthening of the VDF EG times will occur when you play more strongly.0: VDF EG times will not be affected.
At (Attack Time) .................................................... [–, 0, +]Specifies the effect that keyboard playing dynamics will have on the VDF EG attack time.
+: The Attack Time will become shorter as you play more strongly.–: The Attack Time will become longer as you play more strongly.
Dc (Decay Time) .................................................... [–, 0, +]Specifies the effect that keyboard playing dynamics will have on the VDF EG decay time.
+: The Decay Time will become shorter as you play more strongly.–: The Decay Time will become longer as you play more strongly.
Sl (Slope Time) ...................................................... [–, 0, +]Specifies the effect that keyboard playing dynamics will have on the VDF EG slope time.
+: The Slope Time will become shorter as you play more strongly.–: The Slope Time will become longer as you play more strongly.
Rl (Release Time)................................................... [–, 0, +]Specifies the effect that keyboard playing dynamics will have on the VDF EG release time.
+: The Release Time will become shorter as you play more strongly.–: The Release Time will become longer as you play more strongly.
Key Track.................................................................. [0...99]Specifies how the various VDF EG times (Attack, Decay, Slope, Release) will be affected by the keyboard location that you play.The effect will depend on the settings of the “4–1c. Key-board Tracking” parameters Mode and Pivot Key.
99: The maximum change in VDF EG times will occur.0: VDF EG times will not change.
At (Attack Time) .................................................... [–, 0, +]Specifies the effect that keyboard location will have on the VDF EG attack time.
+: Attack Time will be shortened as the keyboard location changes.–: Attack Time will be lengthened as the keyboard location changes.
Dc (Decay Time) .................................................... [–, 0, +]Specifies the effect that keyboard location will have on the VDF EG decay time.
+: Decay Time will be shortened as the keyboard location changes.–: Decay Time will be lengthened as the keyboard location changes.
Sl (Slope Time) ...................................................... [–, 0, +]Specifies the effect that keyboard location will have on the VDF EG slope time.
+: Slope Time will be shortened as the keyboard location changes.–: Slope Time will be lengthened as the keyboard location changes.
Rl (Release Time)................................................... [–, 0, +]Specifies the effect that keyboard location will have on the VDF EG release time.
+: Release Time will be shortened as the keyboard location changes.–: Release Time will be lengthened as the keyboard loca-tion changes.
Page Menu Command .......................................
4–6. ControlSpecifies the sensitivity with which the joystick or aftertouch will affect the filter cutoff frequency or filter modulation.
4–6a. Joystick XSpecifies how the brightness of the sound will change when the joystick is moved in the X axis (left/right).
Cutoff Frequency ................................................. [–99...+99]+99: The maximum brightness will occur when the joy-stick is moved toward the right, and the minimum bright-ness when the joystick is moved toward the left.–99: The minimum brightness will occur when the joystick is moved toward the right, and the maximum brightness when the joystick is moved toward the left.
VDF EG settings Strongly played notesSof tly played notes
When all parameters are set to “+”
Note-onNote-off
Note-onNote-off Note-off
Note-on
VDF EG settings Higher-pitched notesLower-pitched notes
When all parameters are set to “+”
Note-onNote-off
Note-onNote-off
Note-onNote-off
Refer to “1. Perf. Edit”
Refer to “2–1. OSC Basic”
4–6a
4–6b
4–6c
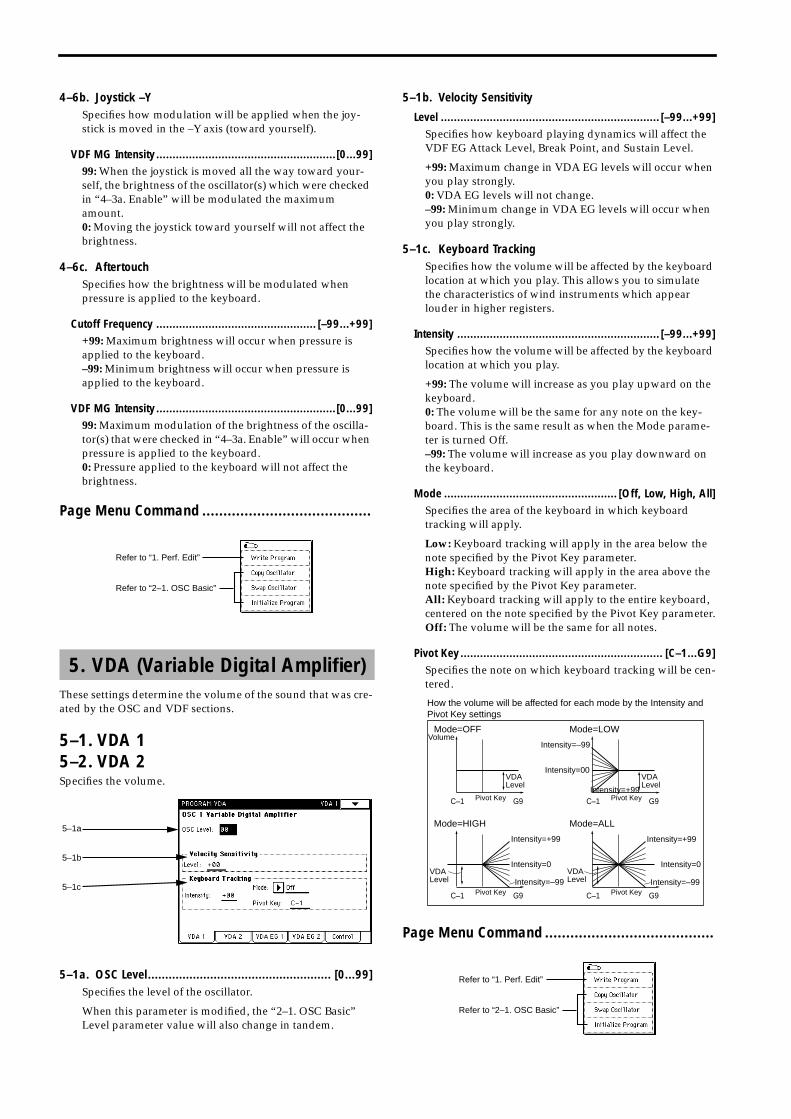
4–6b. Joystick –YSpecifies how modulation will be applied when the joy-stick is moved in the –Y axis (toward yourself).
VDF MG Intensity.......................................................[0...99]99: When the joystick is moved all the way toward your-self, the brightness of the oscillator(s) which were checked in “4–3a. Enable” will be modulated the maximum amount.0: Moving the joystick toward yourself will not affect the brightness.
4–6c. AftertouchSpecifies how the brightness will be modulated when pressure is applied to the keyboard.
Cutoff Frequency ................................................. [–99...+99]+99: Maximum brightness will occur when pressure is applied to the keyboard.–99: Minimum brightness will occur when pressure is applied to the keyboard.
VDF MG Intensity.......................................................[0...99]99: Maximum modulation of the brightness of the oscilla-tor(s) that were checked in “4–3a. Enable” will occur when pressure is applied to the keyboard.0: Pressure applied to the keyboard will not affect the brightness.
Page Menu Command ........................................
These settings determine the volume of the sound that was cre-ated by the OSC and VDF sections.
5–1. VDA 15–2. VDA 2Specifies the volume.
5–1a. OSC Level..................................................... [0...99]Specifies the level of the oscillator.
When this parameter is modified, the “2–1. OSC Basic” Level parameter value will also change in tandem.
5–1b. Velocity Sensitivity
Level ................................................................... [–99...+99]Specifies how keyboard playing dynamics will affect the VDF EG Attack Level, Break Point, and Sustain Level.
+99: Maximum change in VDA EG levels will occur when you play strongly.0: VDA EG levels will not change.–99: Minimum change in VDA EG levels will occur when you play strongly.
5–1c. Keyboard TrackingSpecifies how the volume will be affected by the keyboard location at which you play. This allows you to simulate the characteristics of wind instruments which appear louder in higher registers.
Intensity .............................................................. [–99...+99]Specifies how the volume will be affected by the keyboard location at which you play.
+99: The volume will increase as you play upward on the keyboard.0: The volume will be the same for any note on the key-board. This is the same result as when the Mode parame-ter is turned Off.–99: The volume will increase as you play downward on the keyboard.
Mode ..................................................... [Off, Low, High, All]Specifies the area of the keyboard in which keyboard tracking will apply.
Low: Keyboard tracking will apply in the area below the note specified by the Pivot Key parameter.High: Keyboard tracking will apply in the area above the note specified by the Pivot Key parameter.All: Keyboard tracking will apply to the entire keyboard, centered on the note specified by the Pivot Key parameter.Off: The volume will be the same for all notes.
Pivot Key.............................................................. [C–1...G9]Specifies the note on which keyboard tracking will be cen-tered.
Page Menu Command ........................................
5. VDA (Variable Digital Amplifier)
Refer to “1. Perf. Edit”
Refer to “2–1. OSC Basic”
5–1a
5–1b
5–1c
How the volume will be affected for each mode by the Intensity and Pivot Key settings
Pivot KeyC–1 G9
Pivot KeyC–1 G9
Intensity=0
Pivot KeyC–1 G9Intensity=+99
Intensity=–99
Intensity=00
Pivot KeyC–1 G9
Intensity=0
VolumeMode=OFF
Mode=HIGH
Mode=LOW
Mode=ALL
VDA Level
VDA Level
VDA Level
Intensity=+99
Intensity=–99
Intensity=+99
Intensity=–99VDA Level
Refer to “1. Perf. Edit”
Refer to “2–1. OSC Basic”
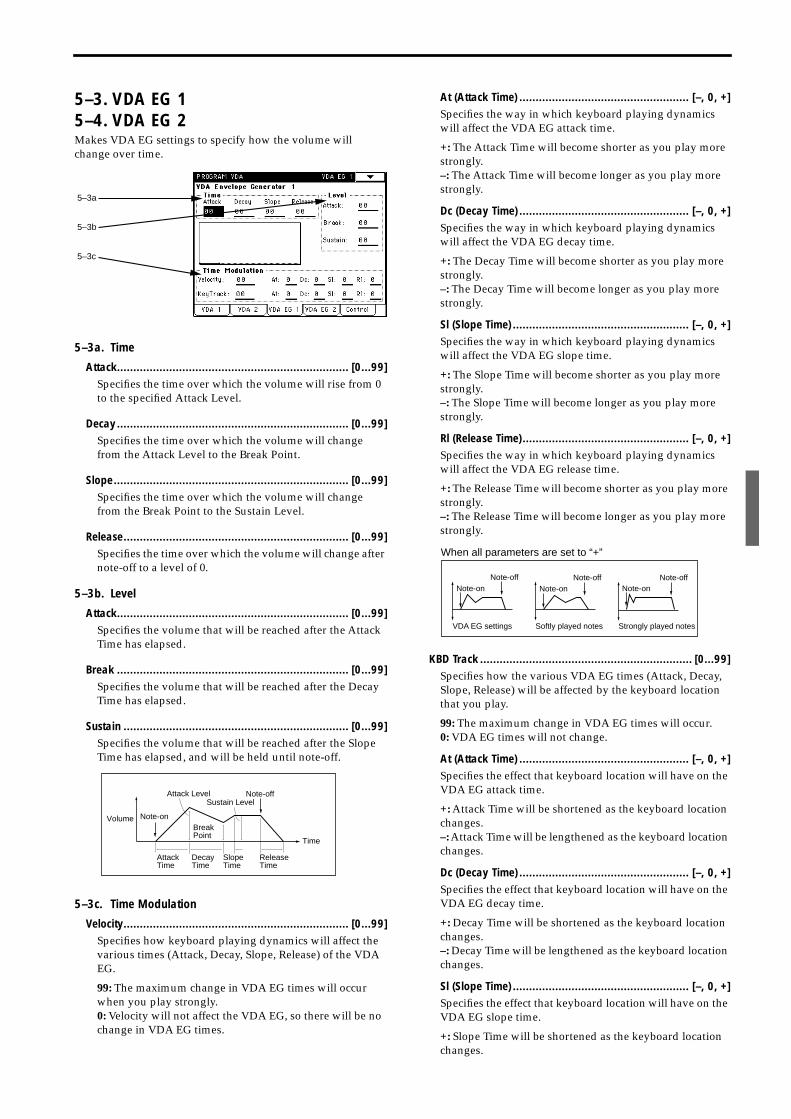
5–3. VDA EG 15–4. VDA EG 2Makes VDA EG settings to specify how the volume will change over time.
5–3a. Time
Attack....................................................................... [0...99]Specifies the time over which the volume will rise from 0 to the specified Attack Level.
Decay....................................................................... [0...99]Specifies the time over which the volume will change from the Attack Level to the Break Point.
Slope........................................................................ [0...99]Specifies the time over which the volume will change from the Break Point to the Sustain Level.
Release..................................................................... [0...99]Specifies the time over which the volume will change after note-off to a level of 0.
5–3b. Level
Attack....................................................................... [0...99]Specifies the volume that will be reached after the Attack Time has elapsed.
Break ....................................................................... [0...99]Specifies the volume that will be reached after the Decay Time has elapsed.
Sustain ..................................................................... [0...99]Specifies the volume that will be reached after the Slope Time has elapsed, and will be held until note-off.
5–3c. Time Modulation
Velocity..................................................................... [0...99]Specifies how keyboard playing dynamics will affect the various times (Attack, Decay, Slope, Release) of the VDA EG.
99: The maximum change in VDA EG times will occur when you play strongly.0: Velocity will not affect the VDA EG, so there will be no change in VDA EG times.
At (Attack Time) .................................................... [–, 0, +]Specifies the way in which keyboard playing dynamics will affect the VDA EG attack time.
+: The Attack Time will become shorter as you play more strongly.–: The Attack Time will become longer as you play more strongly.
Dc (Decay Time) .................................................... [–, 0, +]Specifies the way in which keyboard playing dynamics will affect the VDA EG decay time.
+: The Decay Time will become shorter as you play more strongly.–: The Decay Time will become longer as you play more strongly.
Sl (Slope Time) ...................................................... [–, 0, +]Specifies the way in which keyboard playing dynamics will affect the VDA EG slope time.
+: The Slope Time will become shorter as you play more strongly.–: The Slope Time will become longer as you play more strongly.
Rl (Release Time)................................................... [–, 0, +]Specifies the way in which keyboard playing dynamics will affect the VDA EG release time.
+: The Release Time will become shorter as you play more strongly.–: The Release Time will become longer as you play more strongly.
KBD Track ................................................................. [0...99]Specifies how the various VDA EG times (Attack, Decay, Slope, Release) will be affected by the keyboard location that you play.
99: The maximum change in VDA EG times will occur.0: VDA EG times will not change.
At (Attack Time) .................................................... [–, 0, +]Specifies the effect that keyboard location will have on the VDA EG attack time.
+: Attack Time will be shortened as the keyboard location changes.–: Attack Time will be lengthened as the keyboard location changes.
Dc (Decay Time) .................................................... [–, 0, +]Specifies the effect that keyboard location will have on the VDA EG decay time.
+: Decay Time will be shortened as the keyboard location changes.–: Decay Time will be lengthened as the keyboard location changes.
Sl (Slope Time) ...................................................... [–, 0, +]Specifies the effect that keyboard location will have on the VDA EG slope time.
+: Slope Time will be shortened as the keyboard location changes.
5–3a
5–3b
5–3c
Note-off
Note-on
Attack Time
DecayTime
ReleaseTime
Time
Attack Level
BreakPoint
SlopeTime
Sustain Level
Volume
VDA EG settings Strongly played notesSoftly played notes
Note-onNote-off
Note-onNote-off
Note-onNote-off
When all parameters are set to “+”
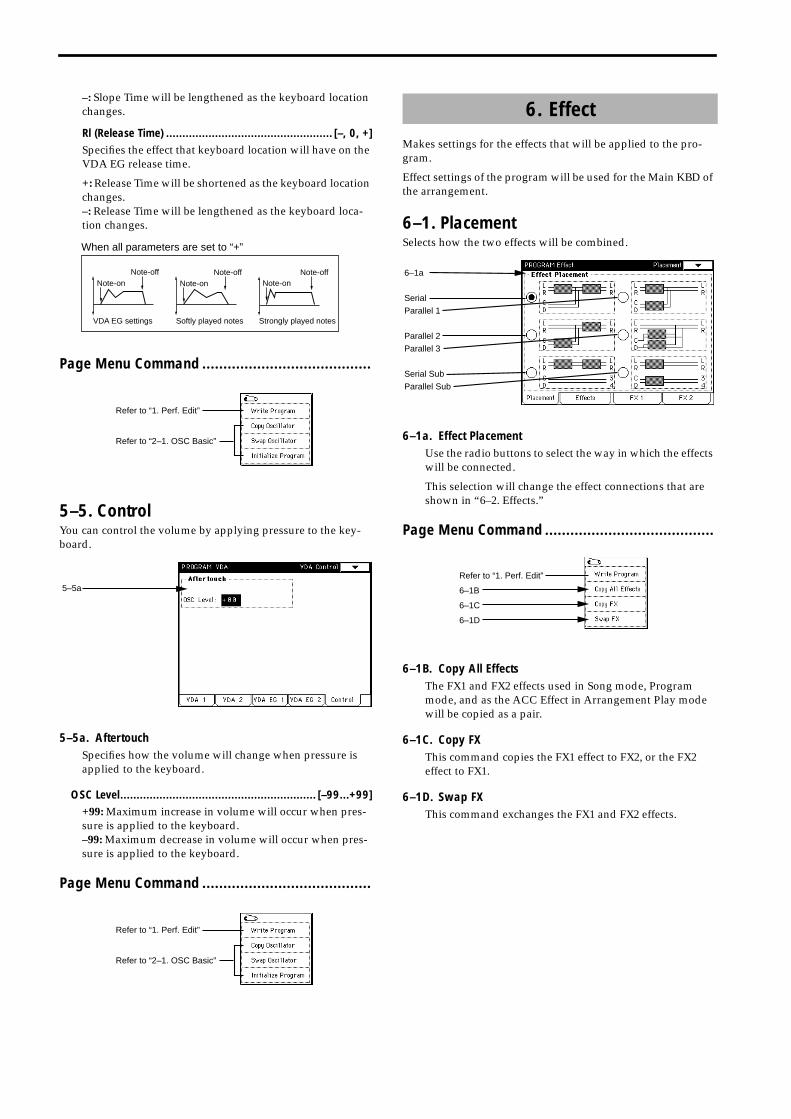
–: Slope Time will be lengthened as the keyboard location changes.
Rl (Release Time) ................................................... [–, 0, +]Specifies the effect that keyboard location will have on the VDA EG release time.
+: Release Time will be shortened as the keyboard location changes.–: Release Time will be lengthened as the keyboard loca-tion changes.
Page Menu Command ........................................
5–5. ControlYou can control the volume by applying pressure to the key-board.
5–5a. AftertouchSpecifies how the volume will change when pressure is applied to the keyboard.
OSC Level............................................................ [–99...+99]+99: Maximum increase in volume will occur when pres-sure is applied to the keyboard.–99: Maximum decrease in volume will occur when pres-sure is applied to the keyboard.
Page Menu Command ........................................
Makes settings for the effects that will be applied to the pro-gram.
Effect settings of the program will be used for the Main KBD of the arrangement.
6–1. PlacementSelects how the two effects will be combined.
6–1a. Effect PlacementUse the radio buttons to select the way in which the effects will be connected.
This selection will change the effect connections that are shown in “6–2. Effects.”
Page Menu Command ........................................
6–1B. Copy All EffectsThe FX1 and FX2 effects used in Song mode, Program mode, and as the ACC Effect in Arrangement Play mode will be copied as a pair.
6–1C. Copy FXThis command copies the FX1 effect to FX2, or the FX2 effect to FX1.
6–1D. Swap FXThis command exchanges the FX1 and FX2 effects.
VDA EG settings Strongly played notesSoftly played notes
Note-onNote-off
Note-onNote-off
Note-onNote-off
When all parameters are set to “+”
Refer to “1. Perf. Edit”
Refer to “2–1. OSC Basic”
5–5a
Refer to “1. Perf. Edit”
Refer to “2–1. OSC Basic”
6. Effect
6–1a
Serial
Parallel 1
Parallel 2
Parallel 3
Serial Sub
Parallel Sub
Refer to “1. Perf. Edit”
6–1B
6–1C
6–1D
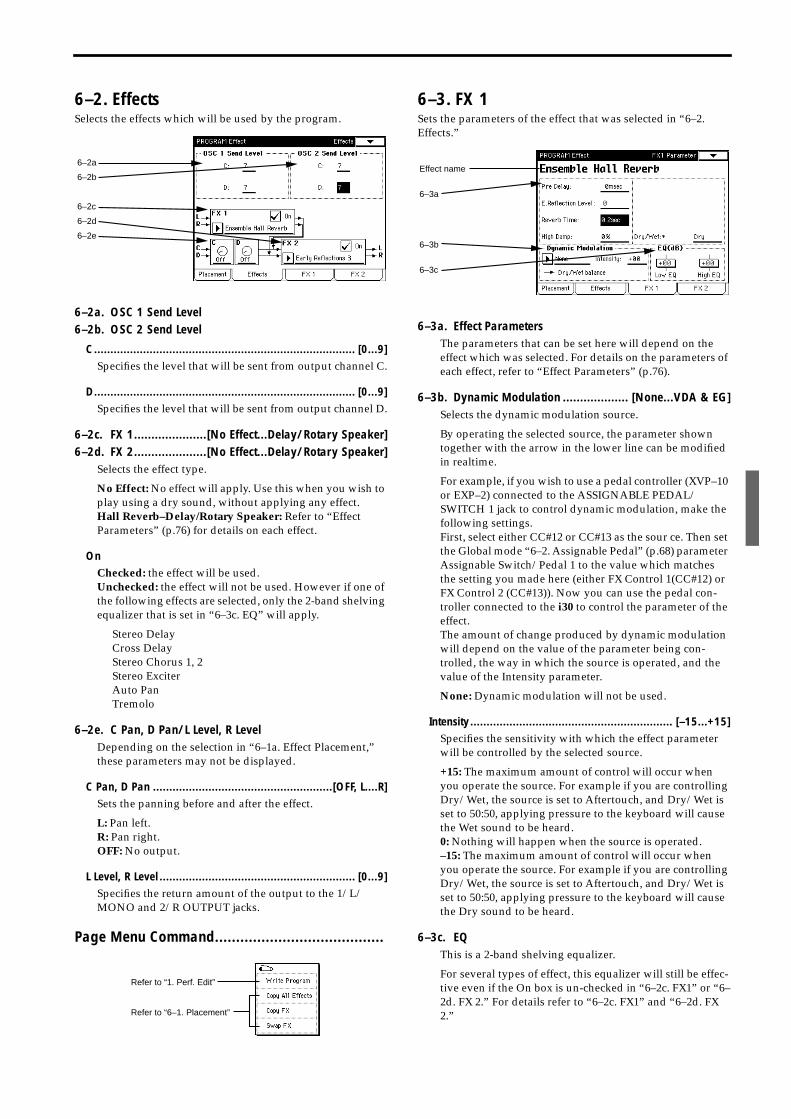
6–2. EffectsSelects the effects which will be used by the program.
6–2a. OSC 1 Send Level6–2b. OSC 2 Send Level
C ................................................................................ [0...9]Specifies the level that will be sent from output channel C.
D................................................................................ [0...9]Specifies the level that will be sent from output channel D.
6–2c. FX 1.....................[No Effect...Delay/Rotary Speaker]6–2d. FX 2.....................[No Effect...Delay/Rotary Speaker]
Selects the effect type.
No Effect: No effect will apply. Use this when you wish to play using a dry sound, without applying any effect.Hall Reverb–Delay/Rotary Speaker: Refer to “Effect Parameters” (p.76) for details on each effect.
OnChecked: the effect will be used.Unchecked: the effect will not be used. However if one of the following effects are selected, only the 2-band shelving equalizer that is set in “6–3c. EQ” will apply.
Stereo DelayCross DelayStereo Chorus 1, 2Stereo ExciterAuto PanTremolo
6–2e. C Pan, D Pan/L Level, R LevelDepending on the selection in “6–1a. Effect Placement,” these parameters may not be displayed.
C Pan, D Pan .......................................................[OFF, L....R]Sets the panning before and after the effect.
L: Pan left.R: Pan right.OFF: No output.
L Level, R Level ............................................................ [0...9]Specifies the return amount of the output to the 1/L/MONO and 2/R OUTPUT jacks.
Page Menu Command........................................
6–3. FX 1Sets the parameters of the effect that was selected in “6–2. Effects.”
6–3a. Effect ParametersThe parameters that can be set here will depend on the effect which was selected. For details on the parameters of each effect, refer to “Effect Parameters” (p.76).
6–3b. Dynamic Modulation ................... [None...VDA & EG]Selects the dynamic modulation source.
By operating the selected source, the parameter shown together with the arrow in the lower line can be modified in realtime.
For example, if you wish to use a pedal controller (XVP–10 or EXP–2) connected to the ASSIGNABLE PEDAL/SWITCH 1 jack to control dynamic modulation, make the following settings.First, select either CC#12 or CC#13 as the sour ce. Then set the Global mode “6–2. Assignable Pedal” (p.68) parameter Assignable Switch/Pedal 1 to the value which matches the setting you made here (either FX Control 1(CC#12) or FX Control 2 (CC#13)). Now you can use the pedal con-troller connected to the i30 to control the parameter of the effect.The amount of change produced by dynamic modulation will depend on the value of the parameter being con-trolled, the way in which the source is operated, and the value of the Intensity parameter.
None: Dynamic modulation will not be used.
Intensity.............................................................. [–15...+15]Specifies the sensitivity with which the effect parameter will be controlled by the selected source.
+15: The maximum amount of control will occur when you operate the source. For example if you are controlling Dry/Wet, the source is set to Aftertouch, and Dry/Wet is set to 50:50, applying pressure to the keyboard will cause the Wet sound to be heard.0: Nothing will happen when the source is operated.–15: The maximum amount of control will occur when you operate the source. For example if you are controlling Dry/Wet, the source is set to Aftertouch, and Dry/Wet is set to 50:50, applying pressure to the keyboard will cause the Dry sound to be heard.
6–3c. EQThis is a 2-band shelving equalizer.
For several types of effect, this equalizer will still be effec-tive even if the On box is un-checked in “6–2c. FX1” or “6–2d. FX 2.” For details refer to “6–2c. FX1” and “6–2d. FX 2.”
6–2a
6–2b
6–2c
6–2d
6–2e
Refer to “1. Perf. Edit”
Refer to “6–1. Placement”
Effect name
6–3a
6–3b
6–3c
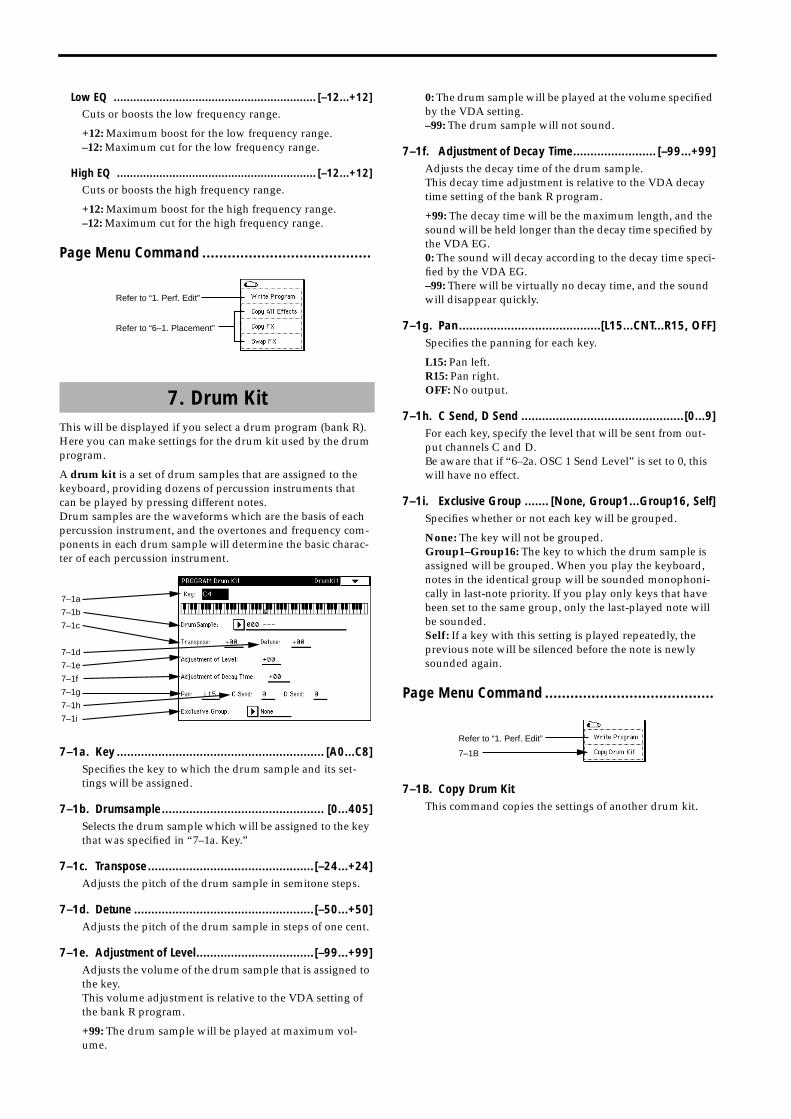
Low EQ .............................................................. [–12...+12]Cuts or boosts the low frequency range.
+12: Maximum boost for the low frequency range.–12: Maximum cut for the low frequency range.
High EQ ............................................................. [–12...+12]Cuts or boosts the high frequency range.
+12: Maximum boost for the high frequency range.–12: Maximum cut for the high frequency range.
Page Menu Command ........................................
This will be displayed if you select a drum program (bank R).Here you can make settings for the drum kit used by the drum program.
A drum kit is a set of drum samples that are assigned to the keyboard, providing dozens of percussion instruments that can be played by pressing different notes.Drum samples are the waveforms which are the basis of each percussion instrument, and the overtones and frequency com-ponents in each drum sample will determine the basic charac-ter of each percussion instrument.
7–1a. Key ............................................................ [A0...C8]Specifies the key to which the drum sample and its set-tings will be assigned.
7–1b. Drumsample............................................... [0...405]Selects the drum sample which will be assigned to the key that was specified in “7–1a. Key.”
7–1c. Transpose................................................[–24...+24]Adjusts the pitch of the drum sample in semitone steps.
7–1d. Detune ....................................................[–50...+50]Adjusts the pitch of the drum sample in steps of one cent.
7–1e. Adjustment of Level..................................[–99...+99]Adjusts the volume of the drum sample that is assigned to the key.This volume adjustment is relative to the VDA setting of the bank R program.
+99: The drum sample will be played at maximum vol-ume.
0: The drum sample will be played at the volume specified by the VDA setting.–99: The drum sample will not sound.
7–1f. Adjustment of Decay Time........................ [–99...+99]Adjusts the decay time of the drum sample.This decay time adjustment is relative to the VDA decay time setting of the bank R program.
+99: The decay time will be the maximum length, and the sound will be held longer than the decay time specified by the VDA EG.0: The sound will decay according to the decay time speci-fied by the VDA EG.–99: There will be virtually no decay time, and the sound will disappear quickly.
7–1g. Pan.........................................[L15...CNT...R15, OFF]Specifies the panning for each key.
L15: Pan left.R15: Pan right.OFF: No output.
7–1h. C Send, D Send ...............................................[0...9]For each key, specify the level that will be sent from out-put channels C and D.Be aware that if “6–2a. OSC 1 Send Level” is set to 0, this will have no effect.
7–1i. Exclusive Group ....... [None, Group1...Group16, Self]Specifies whether or not each key will be grouped.
None: The key will not be grouped.Group1–Group16: The key to which the drum sample is assigned will be grouped. When you play the keyboard, notes in the identical group will be sounded monophoni-cally in last-note priority. If you play only keys that have been set to the same group, only the last-played note will be sounded.Self: If a key with this setting is played repeatedly, the previous note will be silenced before the note is newly sounded again.
Page Menu Command ........................................
7–1B. Copy Drum KitThis command copies the settings of another drum kit.
7. Drum Kit
Refer to “1. Perf. Edit”
Refer to “6–1. Placement”
7–1a
7–1b
7–1c
7–1d
7–1e
7–1f
7–1g
7–1h
7–1i
Refer to “1. Perf. Edit”
7–1B
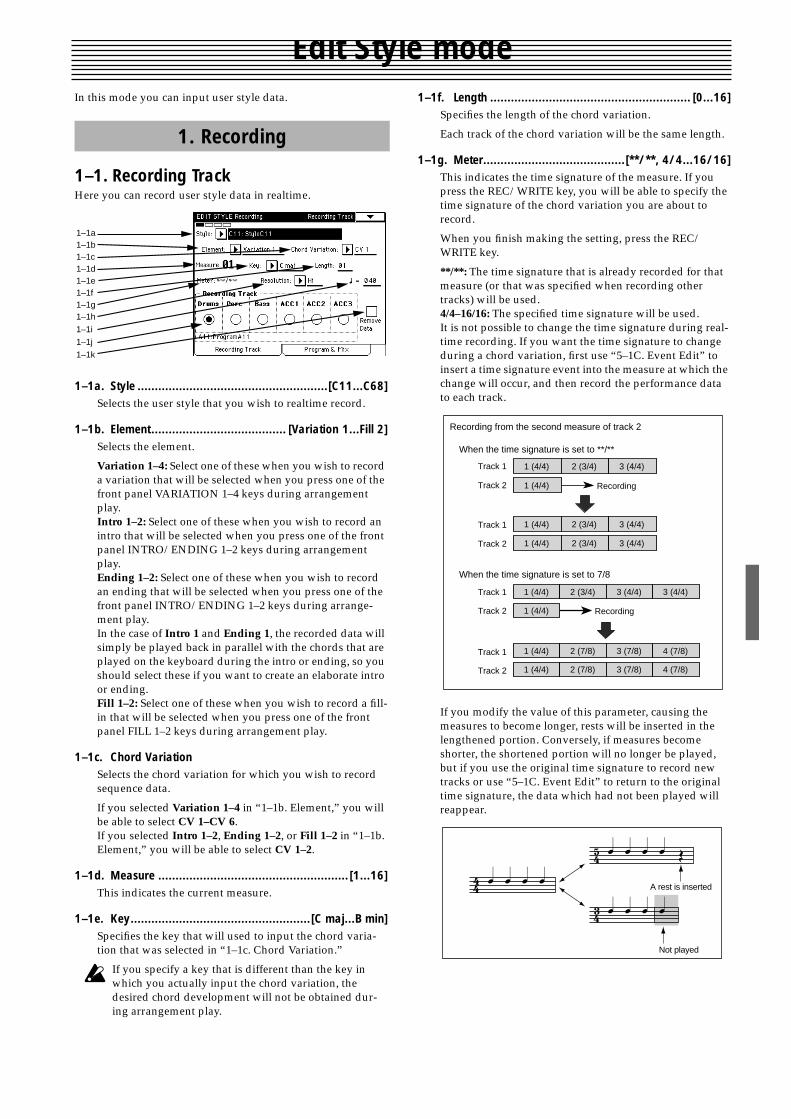
Edit Style modeIn this mode you can input user style data.
1–1. Recording TrackHere you can record user style data in realtime.
1–1a. Style .......................................................[C11...C68]Selects the user style that you wish to realtime record.
1–1b. Element....................................... [Variation 1...Fill 2]Selects the element.
Variation 1–4: Select one of these when you wish to record a variation that will be selected when you press one of the front panel VARIATION 1–4 keys during arrangement play.Intro 1–2: Select one of these when you wish to record an intro that will be selected when you press one of the front panel INTRO/ENDING 1–2 keys during arrangement play.Ending 1–2: Select one of these when you wish to record an ending that will be selected when you press one of the front panel INTRO/ENDING 1–2 keys during arrange-ment play.In the case of Intro 1 and Ending 1, the recorded data will simply be played back in parallel with the chords that are played on the keyboard during the intro or ending, so you should select these if you want to create an elaborate intro or ending.Fill 1–2: Select one of these when you wish to record a fill-in that will be selected when you press one of the front panel FILL 1–2 keys during arrangement play.
1–1c. Chord VariationSelects the chord variation for which you wish to record sequence data.
If you selected Variation 1–4 in “1–1b. Element,” you will be able to select CV 1–CV 6.If you selected Intro 1–2, Ending 1–2, or Fill 1–2 in “1–1b. Element,” you will be able to select CV 1–2.
1–1d. Measure ....................................................... [1...16]This indicates the current measure.
1–1e. Key....................................................[C maj...B min]Specifies the key that will used to input the chord varia-tion that was selected in “1–1c. Chord Variation.”
If you specify a key that is different than the key in which you actually input the chord variation, the desired chord development will not be obtained dur-ing arrangement play.
1–1f. Length .......................................................... [0...16]Specifies the length of the chord variation.
Each track of the chord variation will be the same length.
1–1g. Meter.........................................[**/**, 4/4...16/16]This indicates the time signature of the measure. If you press the REC/WRITE key, you will be able to specify the time signature of the chord variation you are about to record.
When you finish making the setting, press the REC/WRITE key.
**/**: The time signature that is already recorded for that measure (or that was specified when recording other tracks) will be used.4/4–16/16: The specified time signature will be used.It is not possible to change the time signature during real-time recording. If you want the time signature to change during a chord variation, first use “5–1C. Event Edit” to insert a time signature event into the measure at which the change will occur, and then record the performance data to each track.
If you modify the value of this parameter, causing the measures to become longer, rests will be inserted in the lengthened portion. Conversely, if measures become shorter, the shortened portion will no longer be played, but if you use the original time signature to record new tracks or use “5–1C. Event Edit” to return to the original time signature, the data which had not been played will reappear.
1. Recording
1–1a1–1b1–1c1–1d1–1e1–1f1–1g1–1h
1–1i
1–1j
1–1k
1 (4/4) 2 (3/4)Track 1 3 (4/4)
1 (4/4) 2 (3/4)Track 1 3 (4/4)
1 (4/4) 2 (3/4)Track 2 3 (4/4)
1 (4/4)Track 2 Recording
When the time signature is set to **/**
1 (4/4) 2 (3/4)Track 1 3 (4/4)
1 (4/4) 2 (7/8)Track 1 3 (7/8)
1 (4/4) 2 (7/8)Track 2 3 (7/8)
3 (4/4)
4 (7/8)
Recording1 (4/4)Track 2
4 (7/8)
When the time signature is set to 7/8
Recording from the second measure of track 2
� � � �� � � � �� � � �A rest is inserted
Not played
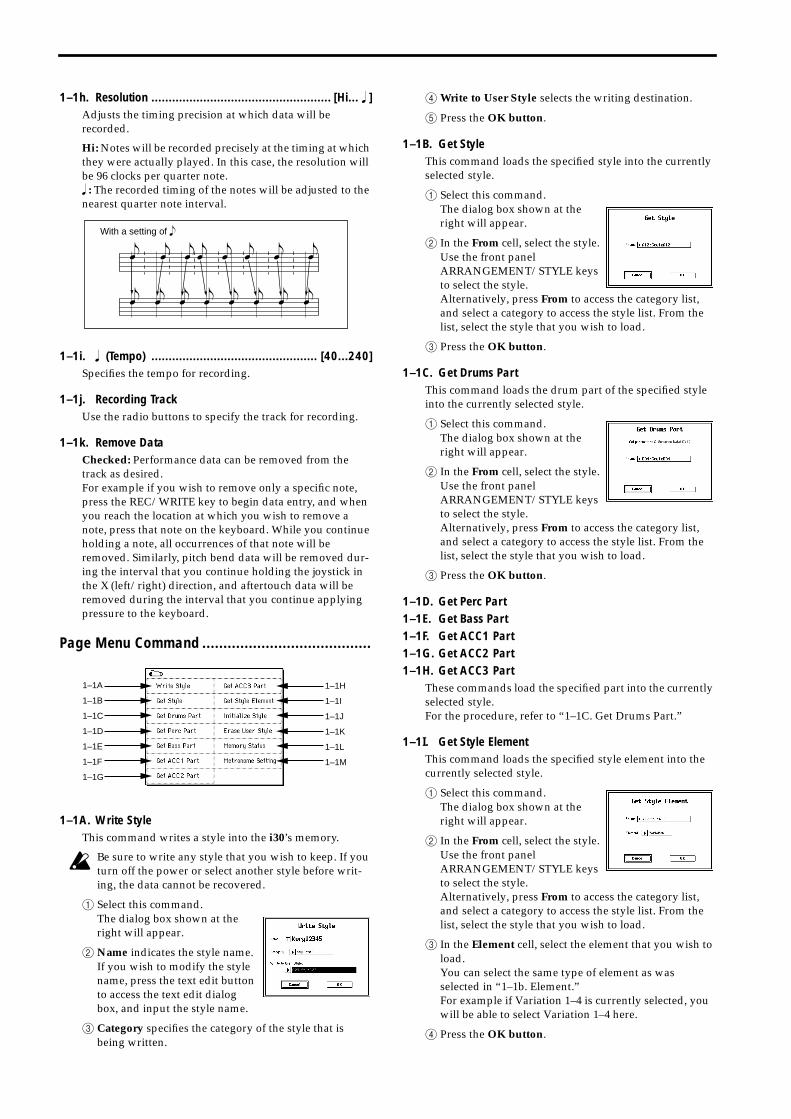
1–1h. Resolution .................................................... [Hi... � ]Adjusts the timing precision at which data will be recorded.
Hi: Notes will be recorded precisely at the timing at which they were actually played. In this case, the resolution will be 96 clocks per quarter note.� : The recorded timing of the notes will be adjusted to the nearest quarter note interval.
1–1i. � (Tempo) ................................................ [40...240]Specifies the tempo for recording.
1–1j. Recording TrackUse the radio buttons to specify the track for recording.
1–1k. Remove DataChecked: Performance data can be removed from the track as desired.For example if you wish to remove only a specific note, press the REC/WRITE key to begin data entry, and when you reach the location at which you wish to remove a note, press that note on the keyboard. While you continue holding a note, all occurrences of that note will be removed. Similarly, pitch bend data will be removed dur-ing the interval that you continue holding the joystick in the X (left/right) direction, and aftertouch data will be removed during the interval that you continue applying pressure to the keyboard.
Page Menu Command ........................................
1–1A. Write StyleThis command writes a style into the i30’s memory.
Be sure to write any style that you wish to keep. If you turn off the power or select another style before writ-ing, the data cannot be recovered.
1 Select this command.The dialog box shown at the right will appear.
2 Name indicates the style name. If you wish to modify the style name, press the text edit button to access the text edit dialog box, and input the style name.
3 Category specifies the category of the style that is being written.
4Write to User Style selects the writing destination.
5 Press the OK button.
1–1B. Get StyleThis command loads the specified style into the currently selected style.
1 Select this command.The dialog box shown at the right will appear.
2 In the From cell, select the style.Use the front panel ARRANGEMENT/STYLE keys to select the style.Alternatively, press From to access the category list, and select a category to access the style list. From the list, select the style that you wish to load.
3 Press the OK button.
1–1C. Get Drums PartThis command loads the drum part of the specified style into the currently selected style.
1 Select this command.The dialog box shown at the right will appear.
2 In the From cell, select the style.Use the front panel ARRANGEMENT/STYLE keys to select the style.Alternatively, press From to access the category list, and select a category to access the style list. From the list, select the style that you wish to load.
3 Press the OK button.
1–1D. Get Perc Part1–1E. Get Bass Part1–1F. Get ACC1 Part1–1G. Get ACC2 Part1–1H. Get ACC3 Part
These commands load the specified part into the currently selected style.For the procedure, refer to “1–1C. Get Drums Part.”
1–1I. Get Style ElementThis command loads the specified style element into the currently selected style.
1 Select this command.The dialog box shown at the right will appear.
2 In the From cell, select the style.Use the front panel ARRANGEMENT/STYLE keys to select the style.Alternatively, press From to access the category list, and select a category to access the style list. From the list, select the style that you wish to load.
3 In the Element cell, select the element that you wish to load.You can select the same type of element as was selected in “1–1b. Element.”For example if Variation 1–4 is currently selected, you will be able to select Variation 1–4 here.
4 Press the OK button.
�� � � � � � � �
� � � � � � �
With a setting of �
1–1A
1–1B
1–1C
1–1D
1–1E
1–1F
1–1G
1–1H
1–1I
1–1J
1–1K
1–1L
1–1M
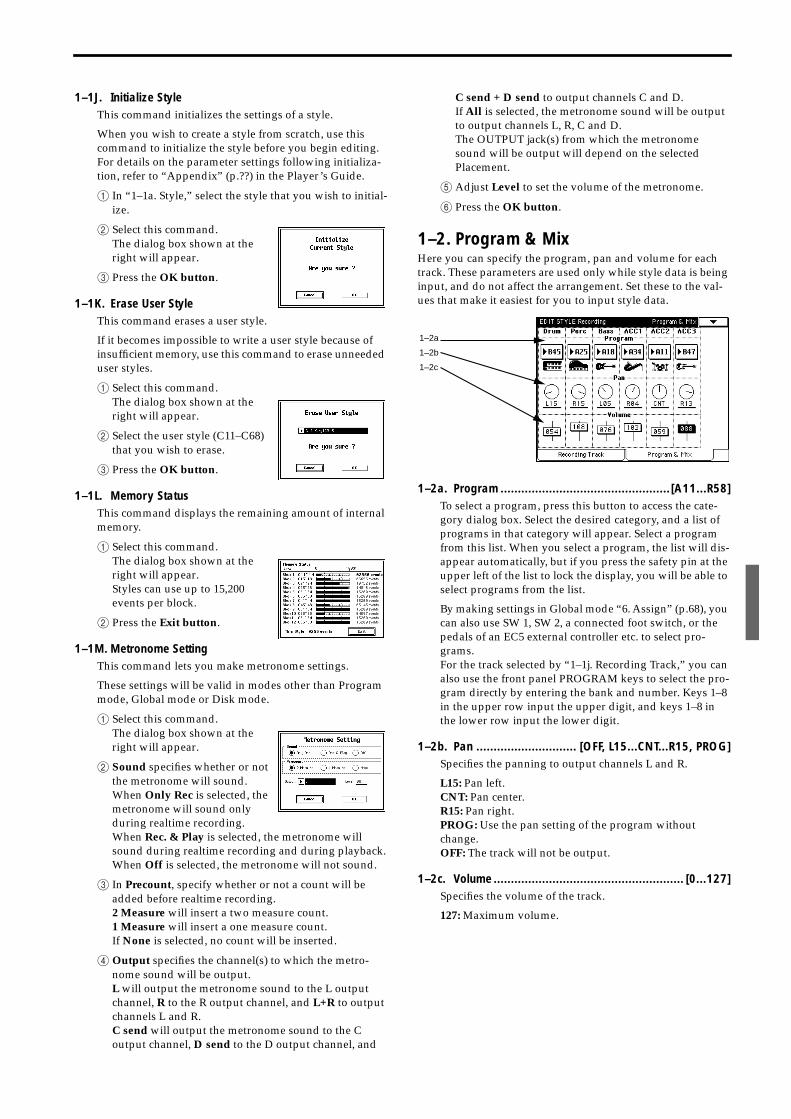
1–1J. Initialize StyleThis command initializes the settings of a style.
When you wish to create a style from scratch, use this command to initialize the style before you begin editing.For details on the parameter settings following initializa-tion, refer to “Appendix” (p.??) in the Player’s Guide.
1 In “1–1a. Style,” select the style that you wish to initial-ize.
2 Select this command.The dialog box shown at the right will appear.
3 Press the OK button.
1–1K. Erase User StyleThis command erases a user style.
If it becomes impossible to write a user style because of insufficient memory, use this command to erase unneeded user styles.
1 Select this command.The dialog box shown at the right will appear.
2 Select the user style (C11–C68) that you wish to erase.
3 Press the OK button.
1–1L. Memory StatusThis command displays the remaining amount of internal memory.
1 Select this command.The dialog box shown at the right will appear.Styles can use up to 15,200 events per block.
2 Press the Exit button.
1–1M. Metronome SettingThis command lets you make metronome settings.
These settings will be valid in modes other than Program mode, Global mode or Disk mode.
1 Select this command.The dialog box shown at the right will appear.
2 Sound specifies whether or not the metronome will sound.When Only Rec is selected, the metronome will sound only during realtime recording.When Rec. & Play is selected, the metronome will sound during realtime recording and during playback.When Off is selected, the metronome will not sound.
3 In Precount, specify whether or not a count will be added before realtime recording.2 Measure will insert a two measure count.1 Measure will insert a one measure count.If None is selected, no count will be inserted.
4 Output specifies the channel(s) to which the metro-nome sound will be output.L will output the metronome sound to the L output channel, R to the R output channel, and L+R to output channels L and R.C send will output the metronome sound to the C output channel, D send to the D output channel, and
C send + D send to output channels C and D.If All is selected, the metronome sound will be output to output channels L, R, C and D.The OUTPUT jack(s) from which the metronome sound will be output will depend on the selected Placement.
5 Adjust Level to set the volume of the metronome.
6 Press the OK button.
1–2. Program & MixHere you can specify the program, pan and volume for each track. These parameters are used only while style data is being input, and do not affect the arrangement. Set these to the val-ues that make it easiest for you to input style data.
1–2a. Program .................................................[A11...R58]To select a program, press this button to access the cate-gory dialog box. Select the desired category, and a list of programs in that category will appear. Select a program from this list. When you select a program, the list will dis-appear automatically, but if you press the safety pin at the upper left of the list to lock the display, you will be able to select programs from the list.
By making settings in Global mode “6. Assign” (p.68), you can also use SW 1, SW 2, a connected foot switch, or the pedals of an EC5 external controller etc. to select pro-grams.For the track selected by “1–1j. Recording Track,” you can also use the front panel PROGRAM keys to select the pro-gram directly by entering the bank and number. Keys 1–8 in the upper row input the upper digit, and keys 1–8 in the lower row input the lower digit.
1–2b. Pan ............................. [OFF, L15...CNT...R15, PROG]Specifies the panning to output channels L and R.
L15: Pan left.CNT: Pan center.R15: Pan right.PROG: Use the pan setting of the program without change.OFF: The track will not be output.
1–2c. Volume ....................................................... [0...127]Specifies the volume of the track.
127: Maximum volume.
1–2a
1–2b
1–2c
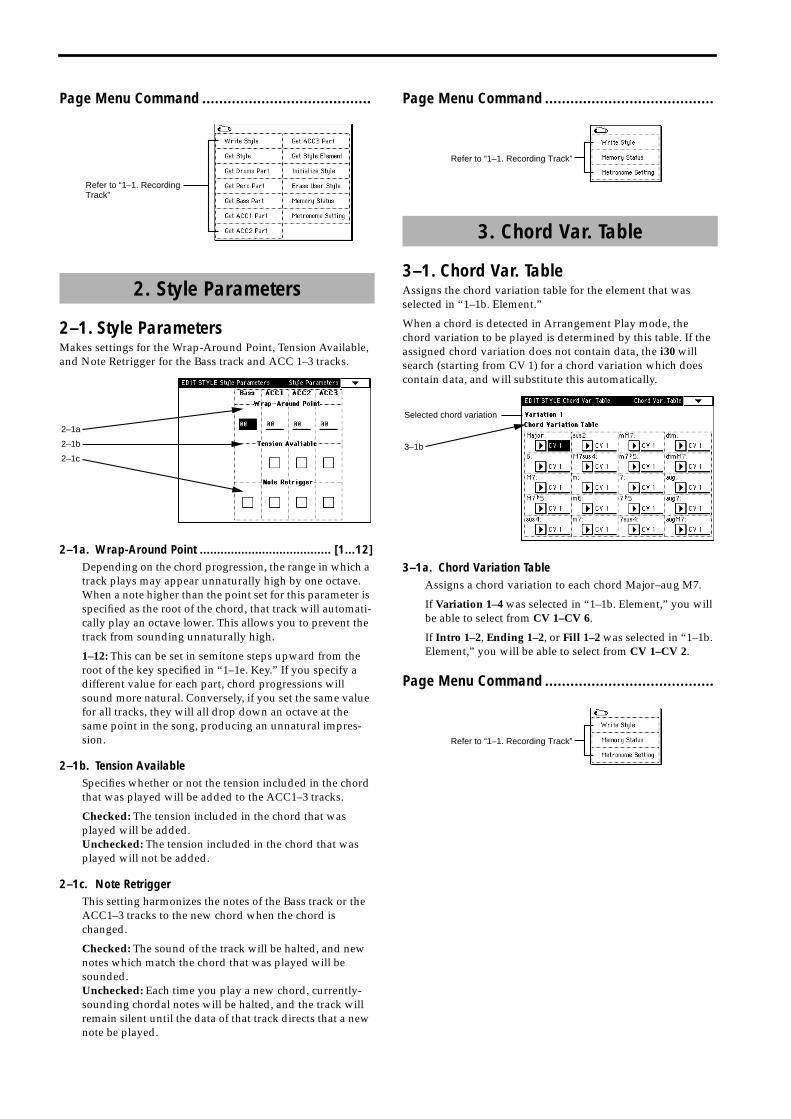
Page Menu Command ........................................
2–1. Style ParametersMakes settings for the Wrap-Around Point, Tension Available, and Note Retrigger for the Bass track and ACC 1–3 tracks.
2–1a. Wrap-Around Point ...................................... [1...12]Depending on the chord progression, the range in which a track plays may appear unnaturally high by one octave. When a note higher than the point set for this parameter is specified as the root of the chord, that track will automati-cally play an octave lower. This allows you to prevent the track from sounding unnaturally high.
1–12: This can be set in semitone steps upward from the root of the key specified in “1–1e. Key.” If you specify a different value for each part, chord progressions will sound more natural. Conversely, if you set the same value for all tracks, they will all drop down an octave at the same point in the song, producing an unnatural impres-sion.
2–1b. Tension AvailableSpecifies whether or not the tension included in the chord that was played will be added to the ACC1–3 tracks.
Checked: The tension included in the chord that was played will be added.Unchecked: The tension included in the chord that was played will not be added.
2–1c. Note RetriggerThis setting harmonizes the notes of the Bass track or the ACC1–3 tracks to the new chord when the chord is changed.
Checked: The sound of the track will be halted, and new notes which match the chord that was played will be sounded.Unchecked: Each time you play a new chord, currently-sounding chordal notes will be halted, and the track will remain silent until the data of that track directs that a new note be played.
Page Menu Command ........................................
3–1. Chord Var. TableAssigns the chord variation table for the element that was selected in “1–1b. Element.”
When a chord is detected in Arrangement Play mode, the chord variation to be played is determined by this table. If the assigned chord variation does not contain data, the i30 will search (starting from CV 1) for a chord variation which does contain data, and will substitute this automatically.
3–1a. Chord Variation TableAssigns a chord variation to each chord Major–aug M7.
If Variation 1–4 was selected in “1–1b. Element,” you will be able to select from CV 1–CV 6.
If Intro 1–2, Ending 1–2, or Fill 1–2 was selected in “1–1b. Element,” you will be able to select from CV 1–CV 2.
Page Menu Command ........................................
2. Style Parameters
Refer to “1–1. Recording Track”
2–1a
2–1b
2–1c
3. Chord Var. Table
Refer to “1–1. Recording Track”
Selected chord variation
3–1b
Refer to “1–1. Recording Track”
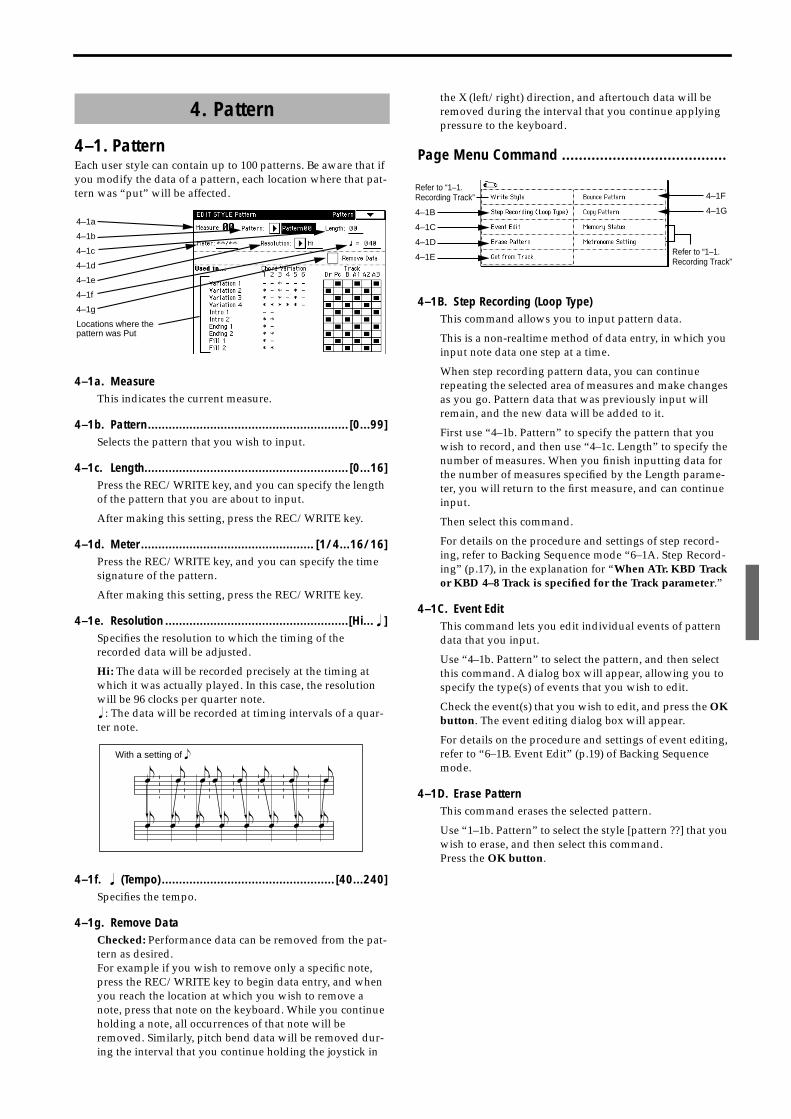
4–1. PatternEach user style can contain up to 100 patterns. Be aware that if you modify the data of a pattern, each location where that pat-tern was “put” will be affected.
4–1a. MeasureThis indicates the current measure.
4–1b. Pattern.......................................................... [0...99]Selects the pattern that you wish to input.
4–1c. Length........................................................... [0...16]Press the REC/WRITE key, and you can specify the length of the pattern that you are about to input.
After making this setting, press the REC/WRITE key.
4–1d. Meter.................................................. [1/4...16/16]Press the REC/WRITE key, and you can specify the time signature of the pattern.
After making this setting, press the REC/WRITE key.
4–1e. Resolution .....................................................[Hi... � ]Specifies the resolution to which the timing of the recorded data will be adjusted.
Hi: The data will be recorded precisely at the timing at which it was actually played. In this case, the resolution will be 96 clocks per quarter note. � : The data will be recorded at timing intervals of a quar-ter note.
4–1f. � (Tempo).................................................. [40...240]Specifies the tempo.
4–1g. Remove DataChecked: Performance data can be removed from the pat-tern as desired.For example if you wish to remove only a specific note, press the REC/WRITE key to begin data entry, and when you reach the location at which you wish to remove a note, press that note on the keyboard. While you continue holding a note, all occurrences of that note will be removed. Similarly, pitch bend data will be removed dur-ing the interval that you continue holding the joystick in
the X (left/right) direction, and aftertouch data will be removed during the interval that you continue applying pressure to the keyboard.
Page Menu Command .......................................
4–1B. Step Recording (Loop Type)This command allows you to input pattern data.
This is a non-realtime method of data entry, in which you input note data one step at a time.
When step recording pattern data, you can continue repeating the selected area of measures and make changes as you go. Pattern data that was previously input will remain, and the new data will be added to it.
First use “4–1b. Pattern” to specify the pattern that you wish to record, and then use “4–1c. Length” to specify the number of measures. When you finish inputting data for the number of measures specified by the Length parame-ter, you will return to the first measure, and can continue input.
Then select this command.
For details on the procedure and settings of step record-ing, refer to Backing Sequence mode “6–1A. Step Record-ing” (p.17), in the explanation for “When ATr. KBD Track or KBD 4–8 Track is specified for the Track parameter.”
4–1C. Event EditThis command lets you edit individual events of pattern data that you input.
Use “4–1b. Pattern” to select the pattern, and then select this command. A dialog box will appear, allowing you to specify the type(s) of events that you wish to edit.
Check the event(s) that you wish to edit, and press the OK button. The event editing dialog box will appear.
For details on the procedure and settings of event editing, refer to “6–1B. Event Edit” (p.19) of Backing Sequence mode.
4–1D. Erase PatternThis command erases the selected pattern.
Use “1–1b. Pattern” to select the style [pattern ??] that you wish to erase, and then select this command.Press the OK button.
4. Pattern
4–1a
4–1b
4–1c
4–1d
4–1e
4–1f
4–1g
Locations where the pattern was Put
�� � � � � � � �
� � � � � � �
With a setting of �
Refer to “1–1. Recording Track”
4–1B
4–1C
4–1D
4–1ERefer to “1–1.Recording Track”
4–1F
4–1G
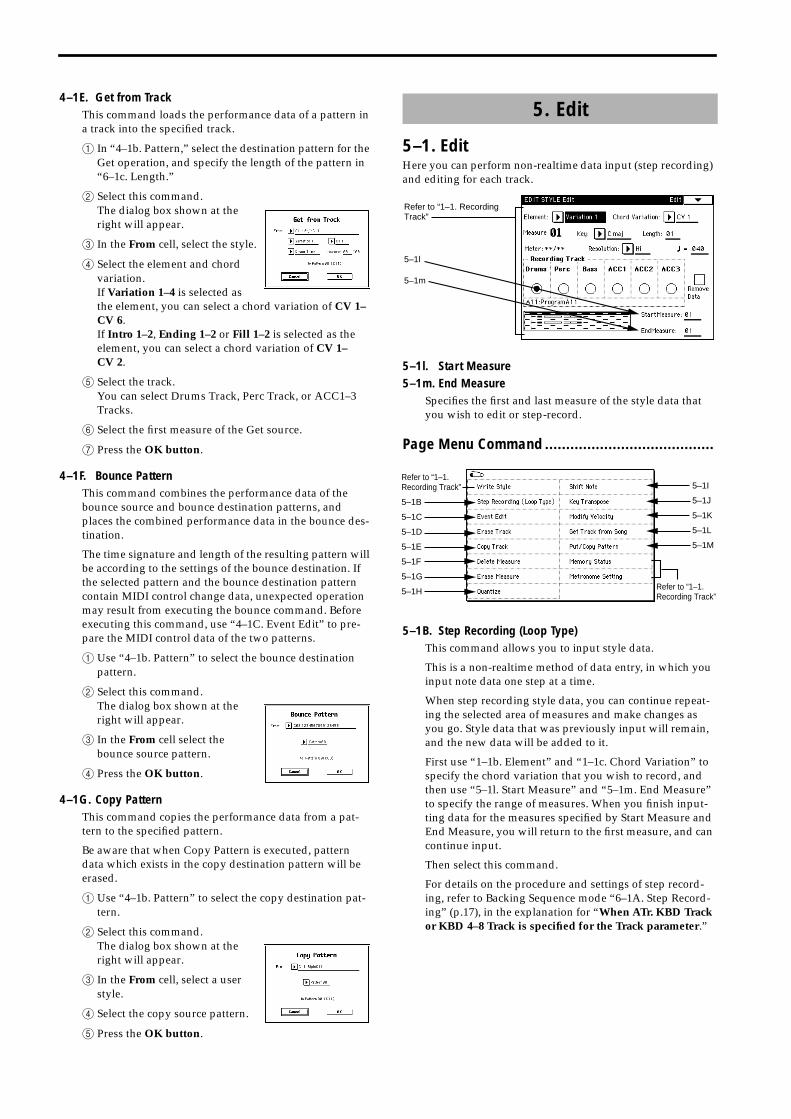
4–1E. Get from TrackThis command loads the performance data of a pattern in a track into the specified track.
1 In “4–1b. Pattern,” select the destination pattern for the Get operation, and specify the length of the pattern in “6–1c. Length.”
2 Select this command.The dialog box shown at the right will appear.
3 In the From cell, select the style.
4 Select the element and chord variation.If Variation 1–4 is selected as the element, you can select a chord variation of CV 1–CV 6.If Intro 1–2, Ending 1–2 or Fill 1–2 is selected as the element, you can select a chord variation of CV 1–CV 2.
5 Select the track.You can select Drums Track, Perc Track, or ACC1–3 Tracks.
6 Select the first measure of the Get source.
7 Press the OK button.
4–1F. Bounce PatternThis command combines the performance data of the bounce source and bounce destination patterns, and places the combined performance data in the bounce des-tination.
The time signature and length of the resulting pattern will be according to the settings of the bounce destination. If the selected pattern and the bounce destination pattern contain MIDI control change data, unexpected operation may result from executing the bounce command. Before executing this command, use “4–1C. Event Edit” to pre-pare the MIDI control data of the two patterns.
1 Use “4–1b. Pattern” to select the bounce destination pattern.
2 Select this command.The dialog box shown at the right will appear.
3 In the From cell select the bounce source pattern.
4 Press the OK button.
4–1G. Copy PatternThis command copies the performance data from a pat-tern to the specified pattern.
Be aware that when Copy Pattern is executed, pattern data which exists in the copy destination pattern will be erased.
1 Use “4–1b. Pattern” to select the copy destination pat-tern.
2 Select this command.The dialog box shown at the right will appear.
3 In the From cell, select a user style.
4 Select the copy source pattern.
5 Press the OK button.
5–1. EditHere you can perform non-realtime data input (step recording) and editing for each track.
5–1l. Start Measure5–1m. End Measure
Specifies the first and last measure of the style data that you wish to edit or step-record.
Page Menu Command ........................................
5–1B. Step Recording (Loop Type)This command allows you to input style data.
This is a non-realtime method of data entry, in which you input note data one step at a time.
When step recording style data, you can continue repeat-ing the selected area of measures and make changes as you go. Style data that was previously input will remain, and the new data will be added to it.
First use “1–1b. Element” and “1–1c. Chord Variation” to specify the chord variation that you wish to record, and then use “5–1l. Start Measure” and “5–1m. End Measure” to specify the range of measures. When you finish input-ting data for the measures specified by Start Measure and End Measure, you will return to the first measure, and can continue input.
Then select this command.
For details on the procedure and settings of step record-ing, refer to Backing Sequence mode “6–1A. Step Record-ing” (p.17), in the explanation for “When ATr. KBD Track or KBD 4–8 Track is specified for the Track parameter.”
5. Edit
Refer to “1–1. Recording Track”
5–1l
5–1m
Refer to “1–1.Recording Track”
5–1B
5–1C
5–1D
5–1E
5–1F
5–1G
5–1H Refer to “1–1.Recording Track”
5–1I
5–1J
5–1K
5–1L
5–1M
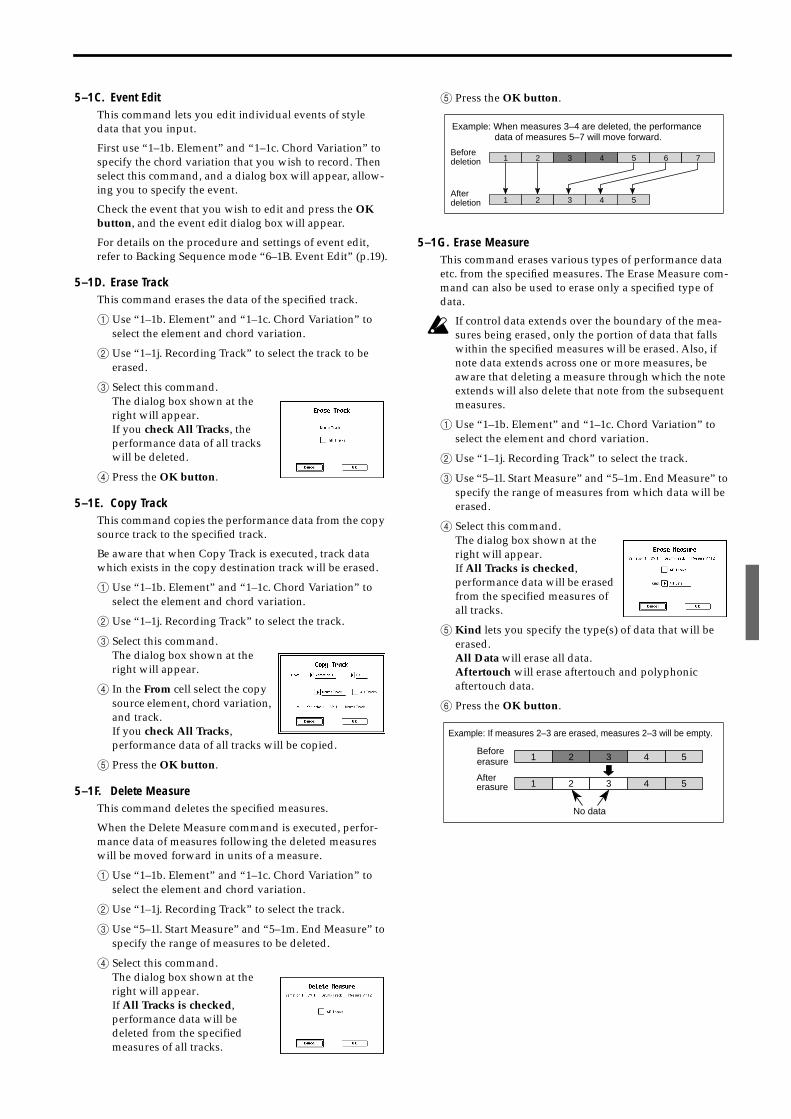
5–1C. Event EditThis command lets you edit individual events of style data that you input.
First use “1–1b. Element” and “1–1c. Chord Variation” to specify the chord variation that you wish to record. Then select this command, and a dialog box will appear, allow-ing you to specify the event.
Check the event that you wish to edit and press the OK button, and the event edit dialog box will appear.
For details on the procedure and settings of event edit, refer to Backing Sequence mode “6–1B. Event Edit” (p.19).
5–1D. Erase TrackThis command erases the data of the specified track.
1 Use “1–1b. Element” and “1–1c. Chord Variation” to select the element and chord variation.
2 Use “1–1j. Recording Track” to select the track to be erased.
3 Select this command.The dialog box shown at the right will appear.If you check All Tracks, the performance data of all tracks will be deleted.
4 Press the OK button.
5–1E. Copy TrackThis command copies the performance data from the copy source track to the specified track.
Be aware that when Copy Track is executed, track data which exists in the copy destination track will be erased.
1 Use “1–1b. Element” and “1–1c. Chord Variation” to select the element and chord variation.
2 Use “1–1j. Recording Track” to select the track.
3 Select this command.The dialog box shown at the right will appear.
4 In the From cell select the copy source element, chord variation, and track.If you check All Tracks, performance data of all tracks will be copied.
5 Press the OK button.
5–1F. Delete MeasureThis command deletes the specified measures.
When the Delete Measure command is executed, perfor-mance data of measures following the deleted measures will be moved forward in units of a measure.
1 Use “1–1b. Element” and “1–1c. Chord Variation” to select the element and chord variation.
2 Use “1–1j. Recording Track” to select the track.
3 Use “5–1l. Start Measure” and “5–1m. End Measure” to specify the range of measures to be deleted.
4 Select this command.The dialog box shown at the right will appear.If All Tracks is checked, performance data will be deleted from the specified measures of all tracks.
5 Press the OK button.
5–1G. Erase MeasureThis command erases various types of performance data etc. from the specified measures. The Erase Measure com-mand can also be used to erase only a specified type of data.
If control data extends over the boundary of the mea-sures being erased, only the portion of data that falls within the specified measures will be erased. Also, if note data extends across one or more measures, be aware that deleting a measure through which the note extends will also delete that note from the subsequent measures.
1 Use “1–1b. Element” and “1–1c. Chord Variation” to select the element and chord variation.
2 Use “1–1j. Recording Track” to select the track.
3 Use “5–1l. Start Measure” and “5–1m. End Measure” to specify the range of measures from which data will be erased.
4 Select this command.The dialog box shown at the right will appear.If All Tracks is checked, performance data will be erased from the specified measures of all tracks.
5 Kind lets you specify the type(s) of data that will be erased.All Data will erase all data.Aftertouch will erase aftertouch and polyphonic aftertouch data.
6 Press the OK button.
Example: When measures 3–4 are deleted, the performance data of measures 5–7 will move forward.
Beforedeletion 1 2 3 4 5 6
21
7
543Afterdeletion
Beforeerasure 21 543
No data
Aftererasure
Example: If measures 2–3 are erased, measures 2–3 will be empty.
21 543
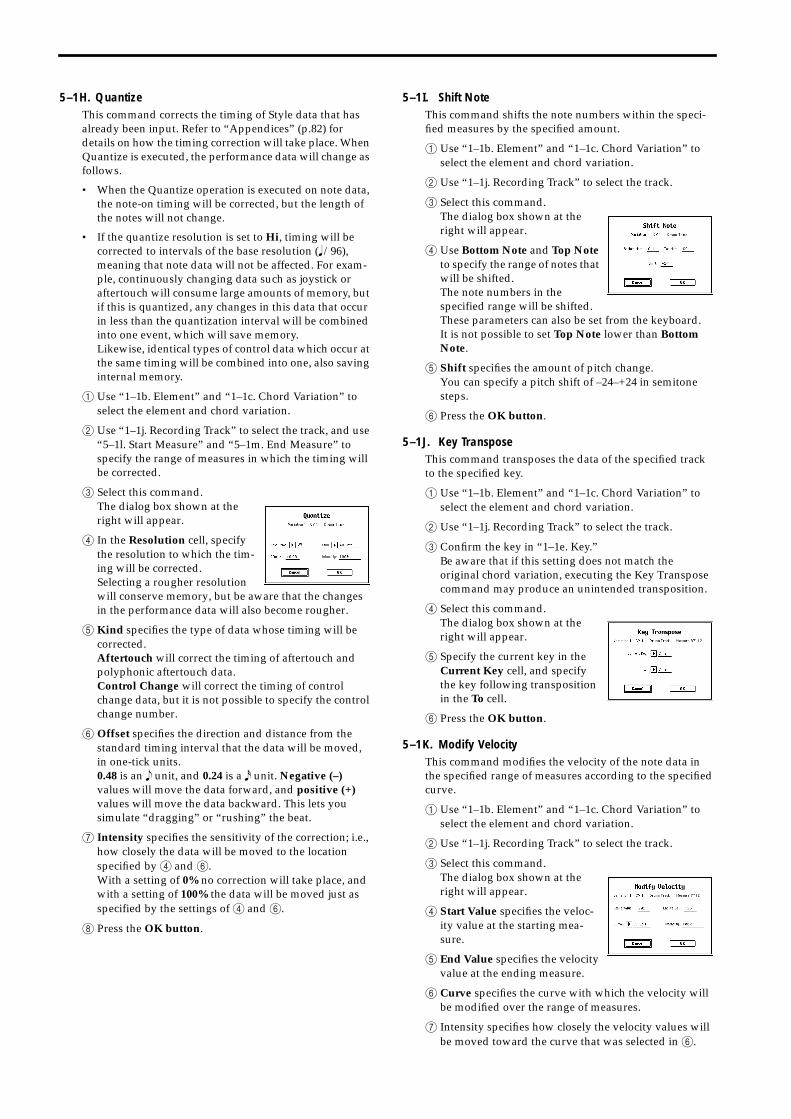
5–1H. QuantizeThis command corrects the timing of Style data that has already been input. Refer to “Appendices” (p.82) for details on how the timing correction will take place. When Quantize is executed, the performance data will change as follows.
• When the Quantize operation is executed on note data, the note-on timing will be corrected, but the length of the notes will not change.
• If the quantize resolution is set to Hi, timing will be corrected to intervals of the base resolution (� /96), meaning that note data will not be affected. For exam-ple, continuously changing data such as joystick or aftertouch will consume large amounts of memory, but if this is quantized, any changes in this data that occur in less than the quantization interval will be combined into one event, which will save memory.Likewise, identical types of control data which occur at the same timing will be combined into one, also saving internal memory.
1 Use “1–1b. Element” and “1–1c. Chord Variation” to select the element and chord variation.
2 Use “1–1j. Recording Track” to select the track, and use “5–1l. Start Measure” and “5–1m. End Measure” to specify the range of measures in which the timing will be corrected.
3 Select this command.The dialog box shown at the right will appear.
4 In the Resolution cell, specify the resolution to which the tim-ing will be corrected.Selecting a rougher resolution will conserve memory, but be aware that the changes in the performance data will also become rougher.
5 Kind specifies the type of data whose timing will be corrected.Aftertouch will correct the timing of aftertouch and polyphonic aftertouch data.Control Change will correct the timing of control change data, but it is not possible to specify the control change number.
6 Offset specifies the direction and distance from the standard timing interval that the data will be moved, in one-tick units.0.48 is an � unit, and 0.24 is a � unit. Negative (–) values will move the data forward, and positive (+) values will move the data backward. This lets you simulate “dragging” or “rushing” the beat.
7 Intensity specifies the sensitivity of the correction; i.e., how closely the data will be moved to the location specified by 4 and 6.With a setting of 0% no correction will take place, and with a setting of 100% the data will be moved just as specified by the settings of 4 and 6.
8 Press the OK button.
5–1I. Shift NoteThis command shifts the note numbers within the speci-fied measures by the specified amount.
1 Use “1–1b. Element” and “1–1c. Chord Variation” to select the element and chord variation.
2 Use “1–1j. Recording Track” to select the track.
3 Select this command.The dialog box shown at the right will appear.
4 Use Bottom Note and Top Note to specify the range of notes that will be shifted.The note numbers in the specified range will be shifted.These parameters can also be set from the keyboard.It is not possible to set Top Note lower than Bottom Note.
5 Shift specifies the amount of pitch change.You can specify a pitch shift of –24–+24 in semitone steps.
6 Press the OK button.
5–1J. Key TransposeThis command transposes the data of the specified track to the specified key.
1 Use “1–1b. Element” and “1–1c. Chord Variation” to select the element and chord variation.
2 Use “1–1j. Recording Track” to select the track.
3 Confirm the key in “1–1e. Key.”Be aware that if this setting does not match the original chord variation, executing the Key Transpose command may produce an unintended transposition.
4 Select this command.The dialog box shown at the right will appear.
5 Specify the current key in the Current Key cell, and specify the key following transposition in the To cell.
6 Press the OK button.
5–1K. Modify VelocityThis command modifies the velocity of the note data in the specified range of measures according to the specified curve.
1 Use “1–1b. Element” and “1–1c. Chord Variation” to select the element and chord variation.
2 Use “1–1j. Recording Track” to select the track.
3 Select this command.The dialog box shown at the right will appear.
4 Start Value specifies the veloc-ity value at the starting mea-sure.
5 End Value specifies the velocity value at the ending measure.
6 Curve specifies the curve with which the velocity will be modified over the range of measures.
7 Intensity specifies how closely the velocity values will be moved toward the curve that was selected in 6.
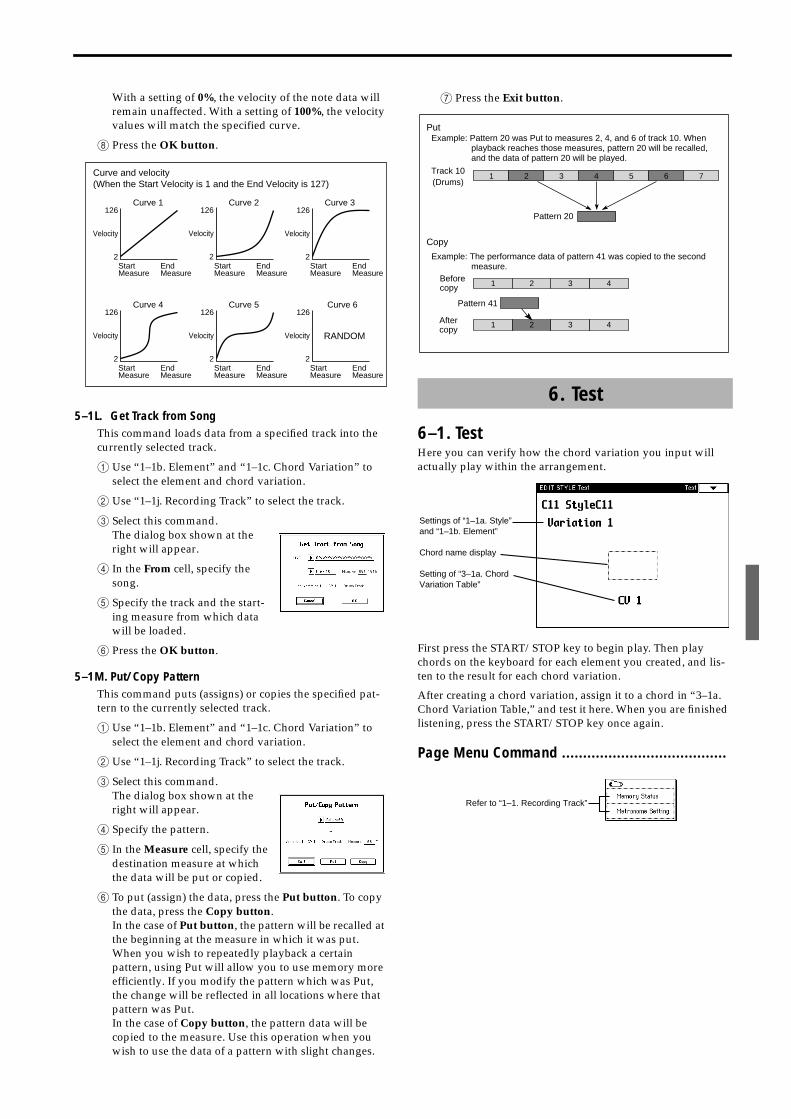
With a setting of 0%, the velocity of the note data will remain unaffected. With a setting of 100%, the velocity values will match the specified curve.
8 Press the OK button.
5–1L. Get Track from SongThis command loads data from a specified track into the currently selected track.
1 Use “1–1b. Element” and “1–1c. Chord Variation” to select the element and chord variation.
2 Use “1–1j. Recording Track” to select the track.
3 Select this command.The dialog box shown at the right will appear.
4 In the From cell, specify the song.
5 Specify the track and the start-ing measure from which data will be loaded.
6 Press the OK button.
5–1M. Put/Copy PatternThis command puts (assigns) or copies the specified pat-tern to the currently selected track.
1 Use “1–1b. Element” and “1–1c. Chord Variation” to select the element and chord variation.
2 Use “1–1j. Recording Track” to select the track.
3 Select this command.The dialog box shown at the right will appear.
4 Specify the pattern.
5 In the Measure cell, specify the destination measure at which the data will be put or copied.
6 To put (assign) the data, press the Put button. To copy the data, press the Copy button.In the case of Put button, the pattern will be recalled at the beginning at the measure in which it was put. When you wish to repeatedly playback a certain pattern, using Put will allow you to use memory more efficiently. If you modify the pattern which was Put, the change will be reflected in all locations where that pattern was Put.In the case of Copy button, the pattern data will be copied to the measure. Use this operation when you wish to use the data of a pattern with slight changes.
7 Press the Exit button.
6–1. TestHere you can verify how the chord variation you input will actually play within the arrangement.
First press the START/STOP key to begin play. Then play chords on the keyboard for each element you created, and lis-ten to the result for each chord variation.
After creating a chord variation, assign it to a chord in “3–1a. Chord Variation Table,” and test it here. When you are finished listening, press the START/STOP key once again.
Page Menu Command .......................................
126
Velocity
2StartMeasure
EndMeasure
Curve 1
StartMeasure
EndMeasure
Curve 2
StartMeasure
EndMeasure
Curve 3
StartMeasure
EndMeasure
Curve 4
StartMeasure
EndMeasure
Curve 5
StartMeasure
EndMeasure
Curve 6
RANDOM
Curve and velocity(When the Start Velocity is 1 and the End Velocity is 127)
126
Velocity
2
126
Velocity
2
126
Velocity
2
126
Velocity
2
126
Velocity
2
6. Test
Track 10(Drums)
Pattern 20
Example: Pattern 20 was Put to measures 2, 4, and 6 of track 10. When playback reaches those measures, pattern 20 will be recalled, and the data of pattern 20 will be played.
Example: The performance data of pattern 41 was copied to the second measure.
21 543 6 7
Put
Copy
1 432
1 432
Pattern 41
Beforecopy
Aftercopy
Settings of “1–1a. Style” and “1–1b. Element”
Chord name display
Setting of “3–1a. Chord Variation Table”
Refer to “1–1. Recording Track”
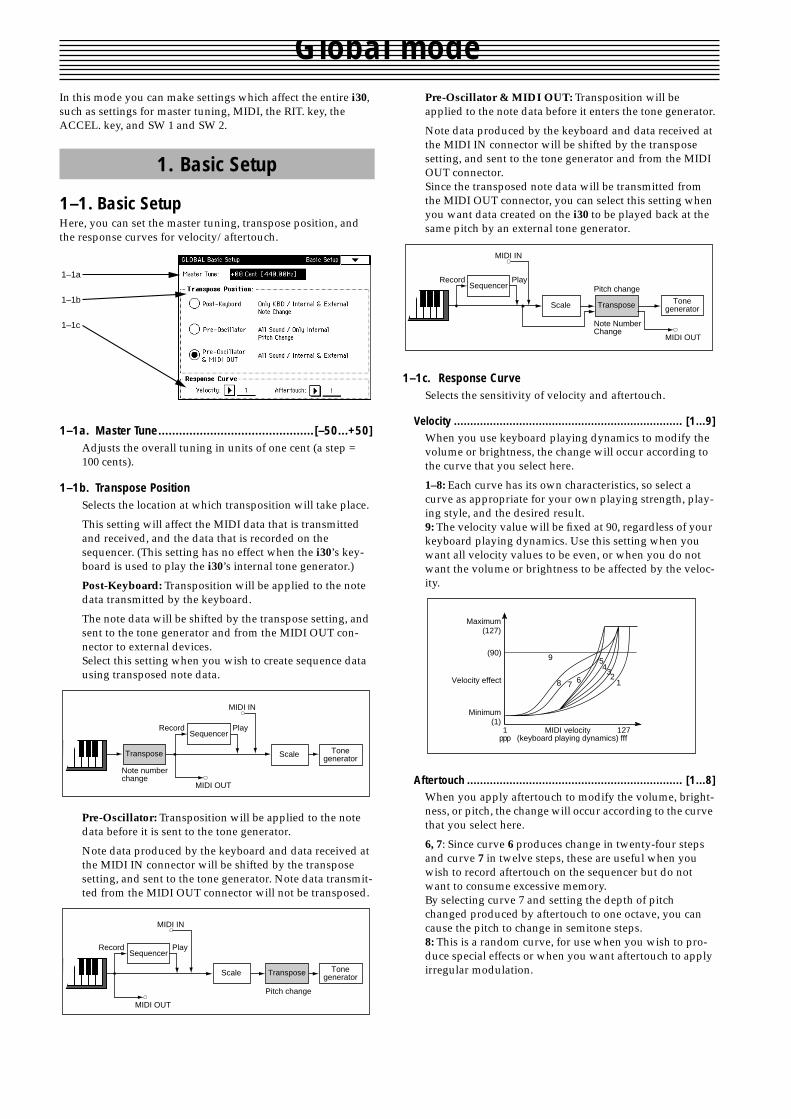
Global modeIn this mode you can make settings which affect the entire i30, such as settings for master tuning, MIDI, the RIT. key, the ACCEL. key, and SW 1 and SW 2.
1–1. Basic SetupHere, you can set the master tuning, transpose position, and the response curves for velocity/aftertouch.
1–1a. Master Tune.............................................[–50...+50]Adjusts the overall tuning in units of one cent (a step = 100 cents).
1–1b. Transpose PositionSelects the location at which transposition will take place.
This setting will affect the MIDI data that is transmitted and received, and the data that is recorded on the sequencer. (This setting has no effect when the i30’s key-board is used to play the i30’s internal tone generator.)
Post-Keyboard: Transposition will be applied to the note data transmitted by the keyboard.
The note data will be shifted by the transpose setting, and sent to the tone generator and from the MIDI OUT con-nector to external devices.Select this setting when you wish to create sequence data using transposed note data.
Pre-Oscillator: Transposition will be applied to the note data before it is sent to the tone generator.
Note data produced by the keyboard and data received at the MIDI IN connector will be shifted by the transpose setting, and sent to the tone generator. Note data transmit-ted from the MIDI OUT connector will not be transposed.
Pre-Oscillator & MIDI OUT: Transposition will be applied to the note data before it enters the tone generator.
Note data produced by the keyboard and data received at the MIDI IN connector will be shifted by the transpose setting, and sent to the tone generator and from the MIDI OUT connector.Since the transposed note data will be transmitted from the MIDI OUT connector, you can select this setting when you want data created on the i30 to be played back at the same pitch by an external tone generator.
1–1c. Response CurveSelects the sensitivity of velocity and aftertouch.
Velocity ...................................................................... [1...9]When you use keyboard playing dynamics to modify the volume or brightness, the change will occur according to the curve that you select here.
1–8: Each curve has its own characteristics, so select a curve as appropriate for your own playing strength, play-ing style, and the desired result.9: The velocity value will be fixed at 90, regardless of your keyboard playing dynamics. Use this setting when you want all velocity values to be even, or when you do not want the volume or brightness to be affected by the veloc-ity.
Aftertouch .................................................................. [1...8]When you apply aftertouch to modify the volume, bright-ness, or pitch, the change will occur according to the curve that you select here.
6, 7: Since curve 6 produces change in twenty-four steps and curve 7 in twelve steps, these are useful when you wish to record aftertouch on the sequencer but do not want to consume excessive memory.By selecting curve 7 and setting the depth of pitch changed produced by aftertouch to one octave, you can cause the pitch to change in semitone steps.8: This is a random curve, for use when you wish to pro-duce special effects or when you want aftertouch to apply irregular modulation.
1. Basic Setup
1–1a
1–1b
1–1c
Note number change
Play
MIDI IN
MIDI OUT
RecordSequencer
ScaleTranspose Tonegenerator
Pitch change
TransposeScale
Play
MIDI IN
MIDI OUT
RecordSequencer
Tonegenerator
Pitch change
TransposeScale Tonegenerator
PlayRecordSequencer
MIDI OUT
MIDI IN
Note NumberChange
45
338 77 6 2
1
9
1ppp
Maximum(127)
127fff
Velocity effect
MIDI velocity(keyboard playing dynamics)
Minimum(1)
(90)
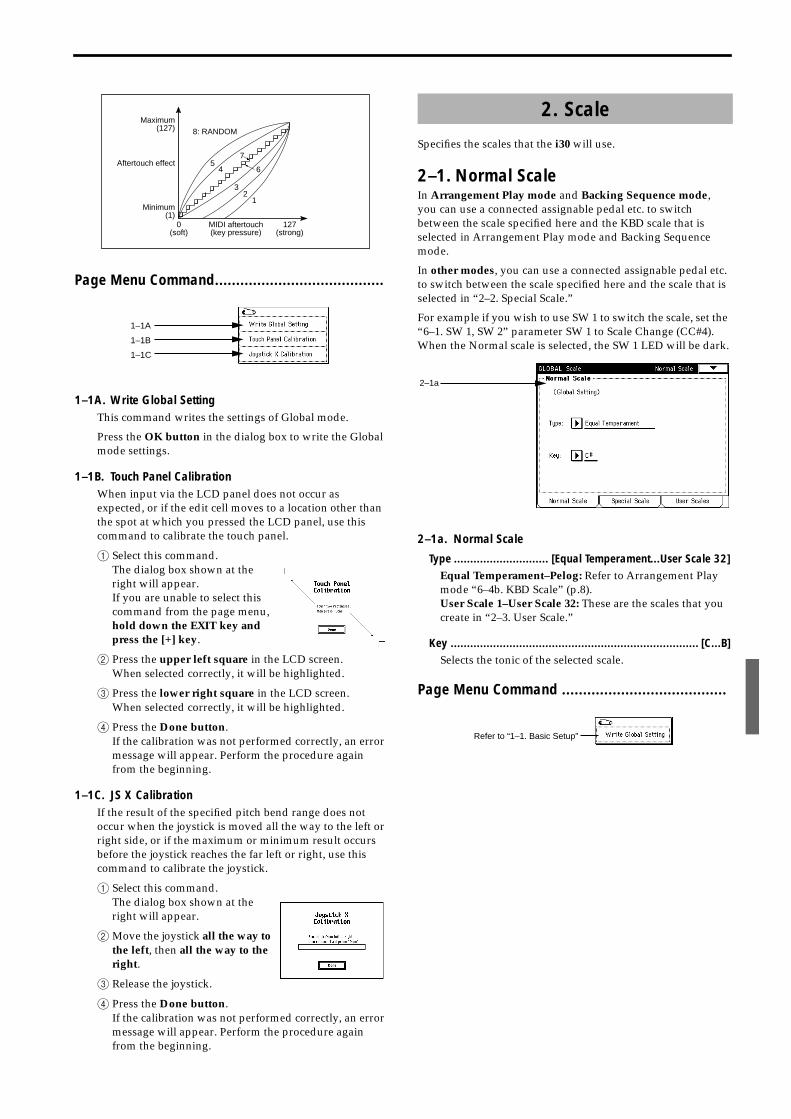
Page Menu Command........................................
1–1A. Write Global SettingThis command writes the settings of Global mode.
Press the OK button in the dialog box to write the Global mode settings.
1–1B. Touch Panel CalibrationWhen input via the LCD panel does not occur as expected, or if the edit cell moves to a location other than the spot at which you pressed the LCD panel, use this command to calibrate the touch panel.
1 Select this command.The dialog box shown at the right will appear.If you are unable to select this command from the page menu, hold down the EXIT key and press the [+] key.
2 Press the upper left square in the LCD screen.When selected correctly, it will be highlighted.
3 Press the lower right square in the LCD screen.When selected correctly, it will be highlighted.
4 Press the Done button.If the calibration was not performed correctly, an error message will appear. Perform the procedure again from the beginning.
1–1C. JS X CalibrationIf the result of the specified pitch bend range does not occur when the joystick is moved all the way to the left or right side, or if the maximum or minimum result occurs before the joystick reaches the far left or right, use this command to calibrate the joystick.
1 Select this command.The dialog box shown at the right will appear.
2Move the joystick all the way to the left, then all the way to the right.
3 Release the joystick.
4 Press the Done button.If the calibration was not performed correctly, an error message will appear. Perform the procedure again from the beginning.
Specifies the scales that the i30 will use.
2–1. Normal ScaleIn Arrangement Play mode and Backing Sequence mode, you can use a connected assignable pedal etc. to switch between the scale specified here and the KBD scale that is selected in Arrangement Play mode and Backing Sequence mode.
In other modes, you can use a connected assignable pedal etc. to switch between the scale specified here and the scale that is selected in “2–2. Special Scale.”
For example if you wish to use SW 1 to switch the scale, set the “6–1. SW 1, SW 2” parameter SW 1 to Scale Change (CC#4). When the Normal scale is selected, the SW 1 LED will be dark.
2–1a. Normal Scale
Type ............................. [Equal Temperament...User Scale 32]Equal Temperament–Pelog: Refer to Arrangement Play mode “6–4b. KBD Scale” (p.8).User Scale 1–User Scale 32: These are the scales that you create in “2–3. User Scale.”
Key ............................................................................ [C...B]Selects the tonic of the selected scale.
Page Menu Command .......................................
1
0(soft)
Maximum(127)
127(strong)
Aftertouch effect
3
45
2
6
7
8: RANDOM
MIDI aftertouch(key pressure)
Minimum(1)
1–1A
1–1B
1–1C
2. Scale
2–1a
Refer to “1–1. Basic Setup”

2–2. Special ScaleIn modes other than Arrangement Play mode and Backing Sequence mode, you can use a connected assignable pedal etc. to switch between the scale specified here and the scale that is selected in “2–1. Normal Scale.”
For example if you wish to use SW 1 to switch the scale, set the “6–1. SW 1, SW 2” parameter SW 1 to Scale Change (CC#4). When the Normal scale is selected, the SW 1 LED will be dark.
2–2a. Special Scale
Type.............................. [Equal Temperament...User Scale 32]Equal Temperament–Pelog: Refer to Arrangement Play mode “6–4b. KBD Scale” (p.8).User Scale 1–User Scale 32: These are the scales that you create in “2–3. User Scale.”
Key .............................................................................[C...B]Selects the tonic of the selected scale.
Page Menu Command ........................................
2–3. User ScaleHere you can make settings for the 32 user scales.
2–3a. User Scale .....................................................[1...32]Selects a number, and the pitches of that scale will be dis-played below.
You can adjust the pitch of each note to create an original scale. The pitch of each note can be adjusted in the range of –50 – +50 cents.
Page Menu Command ........................................
2–3B. Copy ScaleThis command copies a scale.
This is convenient when you wish to create a user scale that is based on an existing scale.
1 Select a user scale.
2 Select this command.The dialog box shown at the right will appear.
3 Select the scale that you wish to copy.
4 Press the OK button.
2–2a
Refer to “1–1. Basic Setup”
2–3a
Refer to “1–1. Basic Setup”
2–3B
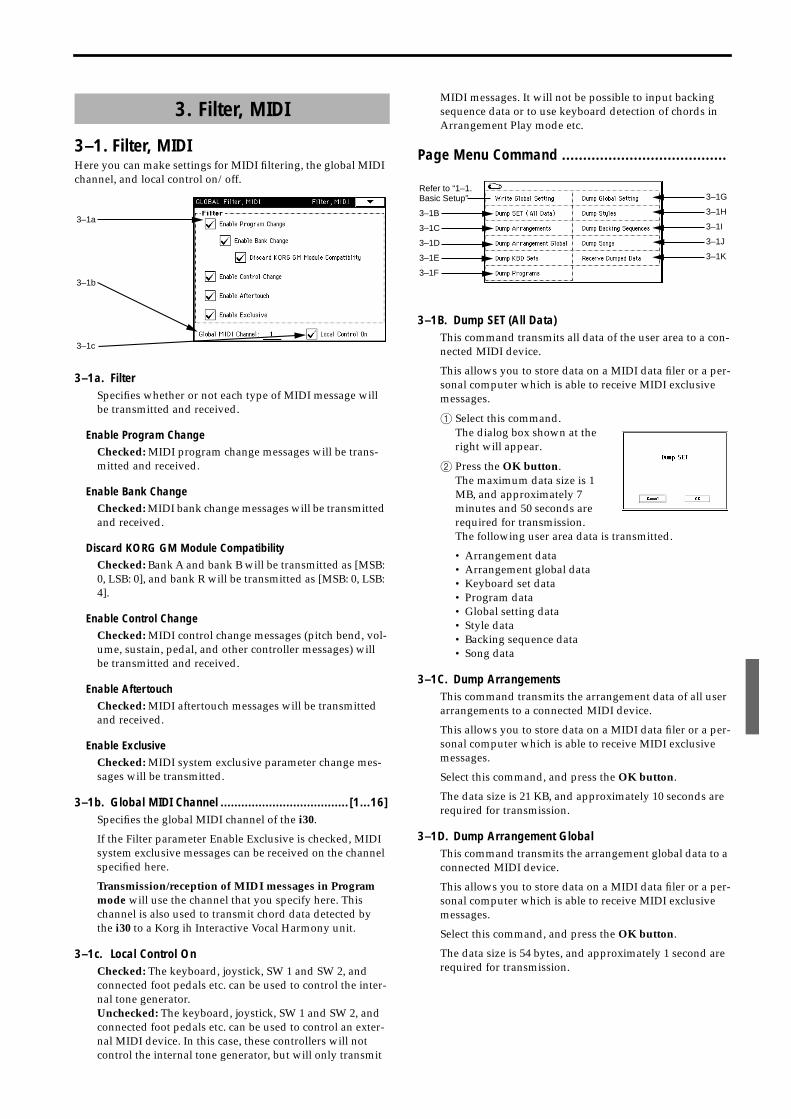
3–1. Filter, MIDIHere you can make settings for MIDI filtering, the global MIDI channel, and local control on/off.
3–1a. FilterSpecifies whether or not each type of MIDI message will be transmitted and received.
Enable Program ChangeChecked: MIDI program change messages will be trans-mitted and received.
Enable Bank ChangeChecked: MIDI bank change messages will be transmitted and received.
Discard KORG GM Module CompatibilityChecked: Bank A and bank B will be transmitted as [MSB: 0, LSB: 0], and bank R will be transmitted as [MSB: 0, LSB: 4].
Enable Control ChangeChecked: MIDI control change messages (pitch bend, vol-ume, sustain, pedal, and other controller messages) will be transmitted and received.
Enable AftertouchChecked: MIDI aftertouch messages will be transmitted and received.
Enable ExclusiveChecked: MIDI system exclusive parameter change mes-sages will be transmitted.
3–1b. Global MIDI Channel ..................................... [1...16]Specifies the global MIDI channel of the i30.
If the Filter parameter Enable Exclusive is checked, MIDI system exclusive messages can be received on the channel specified here.
Transmission/reception of MIDI messages in Program mode will use the channel that you specify here. This channel is also used to transmit chord data detected by the i30 to a Korg ih Interactive Vocal Harmony unit.
3–1c. Local Control OnChecked: The keyboard, joystick, SW 1 and SW 2, and connected foot pedals etc. can be used to control the inter-nal tone generator.Unchecked: The keyboard, joystick, SW 1 and SW 2, and connected foot pedals etc. can be used to control an exter-nal MIDI device. In this case, these controllers will not control the internal tone generator, but will only transmit
MIDI messages. It will not be possible to input backing sequence data or to use keyboard detection of chords in Arrangement Play mode etc.
Page Menu Command .......................................
3–1B. Dump SET (All Data)This command transmits all data of the user area to a con-nected MIDI device.
This allows you to store data on a MIDI data filer or a per-sonal computer which is able to receive MIDI exclusive messages.
1 Select this command.The dialog box shown at the right will appear.
2 Press the OK button.The maximum data size is 1 MB, and approximately 7 minutes and 50 seconds are required for transmission.The following user area data is transmitted.
• Arrangement data• Arrangement global data• Keyboard set data• Program data• Global setting data• Style data• Backing sequence data• Song data
3–1C. Dump ArrangementsThis command transmits the arrangement data of all user arrangements to a connected MIDI device.
This allows you to store data on a MIDI data filer or a per-sonal computer which is able to receive MIDI exclusive messages.
Select this command, and press the OK button.
The data size is 21 KB, and approximately 10 seconds are required for transmission.
3–1D. Dump Arrangement GlobalThis command transmits the arrangement global data to a connected MIDI device.
This allows you to store data on a MIDI data filer or a per-sonal computer which is able to receive MIDI exclusive messages.
Select this command, and press the OK button.
The data size is 54 bytes, and approximately 1 second are required for transmission.
3. Filter, MIDI
3–1a
3–1b
3–1c
Refer to “1–1.Basic Setup”
3–1B
3–1C
3–1D
3–1E
3–1F
3–1G
3–1H
3–1I
3–1J
3–1K
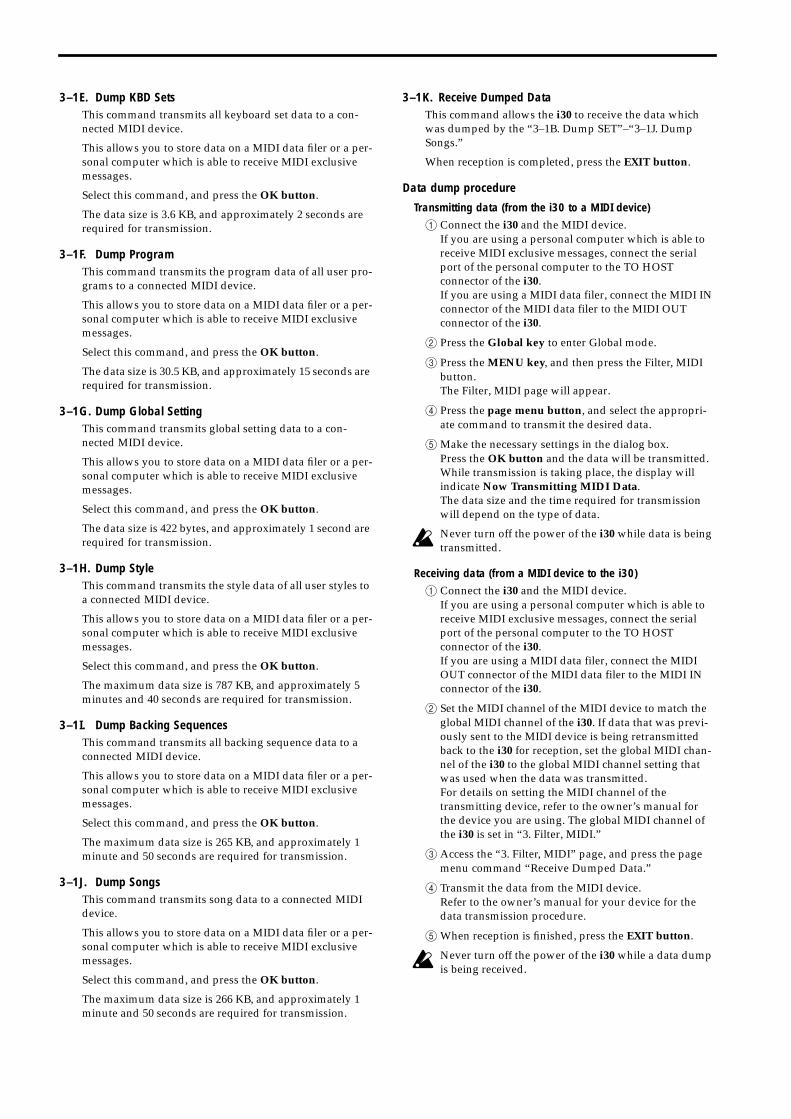
3–1E. Dump KBD SetsThis command transmits all keyboard set data to a con-nected MIDI device.
This allows you to store data on a MIDI data filer or a per-sonal computer which is able to receive MIDI exclusive messages.
Select this command, and press the OK button.
The data size is 3.6 KB, and approximately 2 seconds are required for transmission.
3–1F. Dump ProgramThis command transmits the program data of all user pro-grams to a connected MIDI device.
This allows you to store data on a MIDI data filer or a per-sonal computer which is able to receive MIDI exclusive messages.
Select this command, and press the OK button.
The data size is 30.5 KB, and approximately 15 seconds are required for transmission.
3–1G. Dump Global SettingThis command transmits global setting data to a con-nected MIDI device.
This allows you to store data on a MIDI data filer or a per-sonal computer which is able to receive MIDI exclusive messages.
Select this command, and press the OK button.
The data size is 422 bytes, and approximately 1 second are required for transmission.
3–1H. Dump StyleThis command transmits the style data of all user styles to a connected MIDI device.
This allows you to store data on a MIDI data filer or a per-sonal computer which is able to receive MIDI exclusive messages.
Select this command, and press the OK button.
The maximum data size is 787 KB, and approximately 5 minutes and 40 seconds are required for transmission.
3–1I. Dump Backing SequencesThis command transmits all backing sequence data to a connected MIDI device.
This allows you to store data on a MIDI data filer or a per-sonal computer which is able to receive MIDI exclusive messages.
Select this command, and press the OK button.
The maximum data size is 265 KB, and approximately 1 minute and 50 seconds are required for transmission.
3–1J. Dump SongsThis command transmits song data to a connected MIDI device.
This allows you to store data on a MIDI data filer or a per-sonal computer which is able to receive MIDI exclusive messages.
Select this command, and press the OK button.
The maximum data size is 266 KB, and approximately 1 minute and 50 seconds are required for transmission.
3–1K. Receive Dumped DataThis command allows the i30 to receive the data which was dumped by the “3–1B. Dump SET”–“3–1J. Dump Songs.”
When reception is completed, press the EXIT button.
Data dump procedure
Transmitting data (from the i30 to a MIDI device)1 Connect the i30 and the MIDI device.
If you are using a personal computer which is able to receive MIDI exclusive messages, connect the serial port of the personal computer to the TO HOST connector of the i30.If you are using a MIDI data filer, connect the MIDI IN connector of the MIDI data filer to the MIDI OUT connector of the i30.
2 Press the Global key to enter Global mode.
3 Press the MENU key, and then press the Filter, MIDI button.The Filter, MIDI page will appear.
4 Press the page menu button, and select the appropri-ate command to transmit the desired data.
5Make the necessary settings in the dialog box.Press the OK button and the data will be transmitted. While transmission is taking place, the display will indicate Now Transmitting MIDI Data.The data size and the time required for transmission will depend on the type of data.
Never turn off the power of the i30 while data is being transmitted.
Receiving data (from a MIDI device to the i30)1 Connect the i30 and the MIDI device.
If you are using a personal computer which is able to receive MIDI exclusive messages, connect the serial port of the personal computer to the TO HOST connector of the i30.If you are using a MIDI data filer, connect the MIDI OUT connector of the MIDI data filer to the MIDI IN connector of the i30.
2 Set the MIDI channel of the MIDI device to match the global MIDI channel of the i30. If data that was previ-ously sent to the MIDI device is being retransmitted back to the i30 for reception, set the global MIDI chan-nel of the i30 to the global MIDI channel setting that was used when the data was transmitted.For details on setting the MIDI channel of the transmitting device, refer to the owner’s manual for the device you are using. The global MIDI channel of the i30 is set in “3. Filter, MIDI.”
3 Access the “3. Filter, MIDI” page, and press the page menu command “Receive Dumped Data.”
4 Transmit the data from the MIDI device.Refer to the owner’s manual for your device for the data transmission procedure.
5When reception is finished, press the EXIT button.
Never turn off the power of the i30 while a data dump is being received.
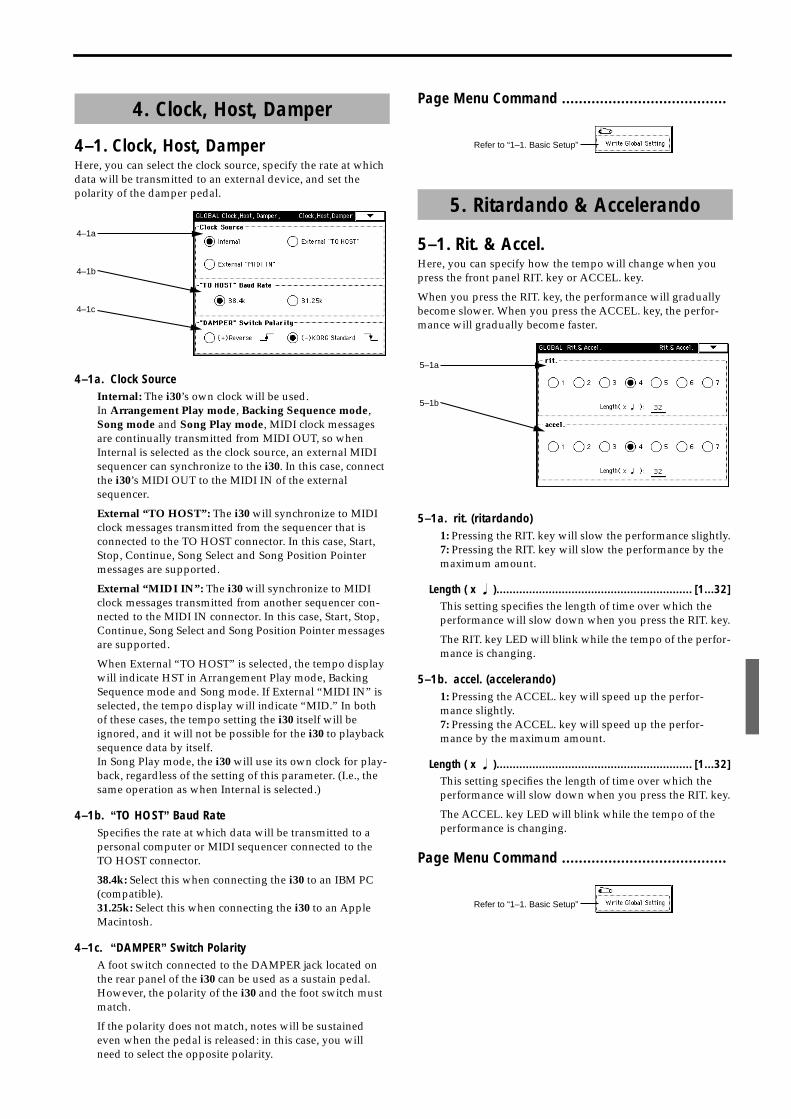
4–1. Clock, Host, DamperHere, you can select the clock source, specify the rate at which data will be transmitted to an external device, and set the polarity of the damper pedal.
4–1a. Clock SourceInternal: The i30’s own clock will be used.In Arrangement Play mode, Backing Sequence mode, Song mode and Song Play mode, MIDI clock messages are continually transmitted from MIDI OUT, so when Internal is selected as the clock source, an external MIDI sequencer can synchronize to the i30. In this case, connect the i30’s MIDI OUT to the MIDI IN of the external sequencer.
External “TO HOST”: The i30 will synchronize to MIDI clock messages transmitted from the sequencer that is connected to the TO HOST connector. In this case, Start, Stop, Continue, Song Select and Song Position Pointer messages are supported.
External “MIDI IN”: The i30 will synchronize to MIDI clock messages transmitted from another sequencer con-nected to the MIDI IN connector. In this case, Start, Stop, Continue, Song Select and Song Position Pointer messages are supported.
When External “TO HOST” is selected, the tempo display will indicate HST in Arrangement Play mode, Backing Sequence mode and Song mode. If External “MIDI IN” is selected, the tempo display will indicate “MID.” In both of these cases, the tempo setting the i30 itself will be ignored, and it will not be possible for the i30 to playback sequence data by itself.In Song Play mode, the i30 will use its own clock for play-back, regardless of the setting of this parameter. (I.e., the same operation as when Internal is selected.)
4–1b. “TO HOST” Baud RateSpecifies the rate at which data will be transmitted to a personal computer or MIDI sequencer connected to the TO HOST connector.
38.4k: Select this when connecting the i30 to an IBM PC (compatible).31.25k: Select this when connecting the i30 to an Apple Macintosh.
4–1c. “DAMPER” Switch PolarityA foot switch connected to the DAMPER jack located on the rear panel of the i30 can be used as a sustain pedal. However, the polarity of the i30 and the foot switch must match.
If the polarity does not match, notes will be sustained even when the pedal is released: in this case, you will need to select the opposite polarity.
Page Menu Command .......................................
5–1. Rit. & Accel.Here, you can specify how the tempo will change when you press the front panel RIT. key or ACCEL. key.
When you press the RIT. key, the performance will gradually become slower. When you press the ACCEL. key, the perfor-mance will gradually become faster.
5–1a. rit. (ritardando)1: Pressing the RIT. key will slow the performance slightly.7: Pressing the RIT. key will slow the performance by the maximum amount.
Length ( x � )............................................................ [1...32]This setting specifies the length of time over which the performance will slow down when you press the RIT. key.
The RIT. key LED will blink while the tempo of the perfor-mance is changing.
5–1b. accel. (accelerando)1: Pressing the ACCEL. key will speed up the perfor-mance slightly.7: Pressing the ACCEL. key will speed up the perfor-mance by the maximum amount.
Length ( x � )............................................................ [1...32]This setting specifies the length of time over which the performance will slow down when you press the RIT. key.
The ACCEL. key LED will blink while the tempo of the performance is changing.
Page Menu Command .......................................
4. Clock, Host, Damper
4–1a
4–1b
4–1c
5. Ritardando & Accelerando
Refer to “1–1. Basic Setup”
5–1a
5–1b
Refer to “1–1. Basic Setup”
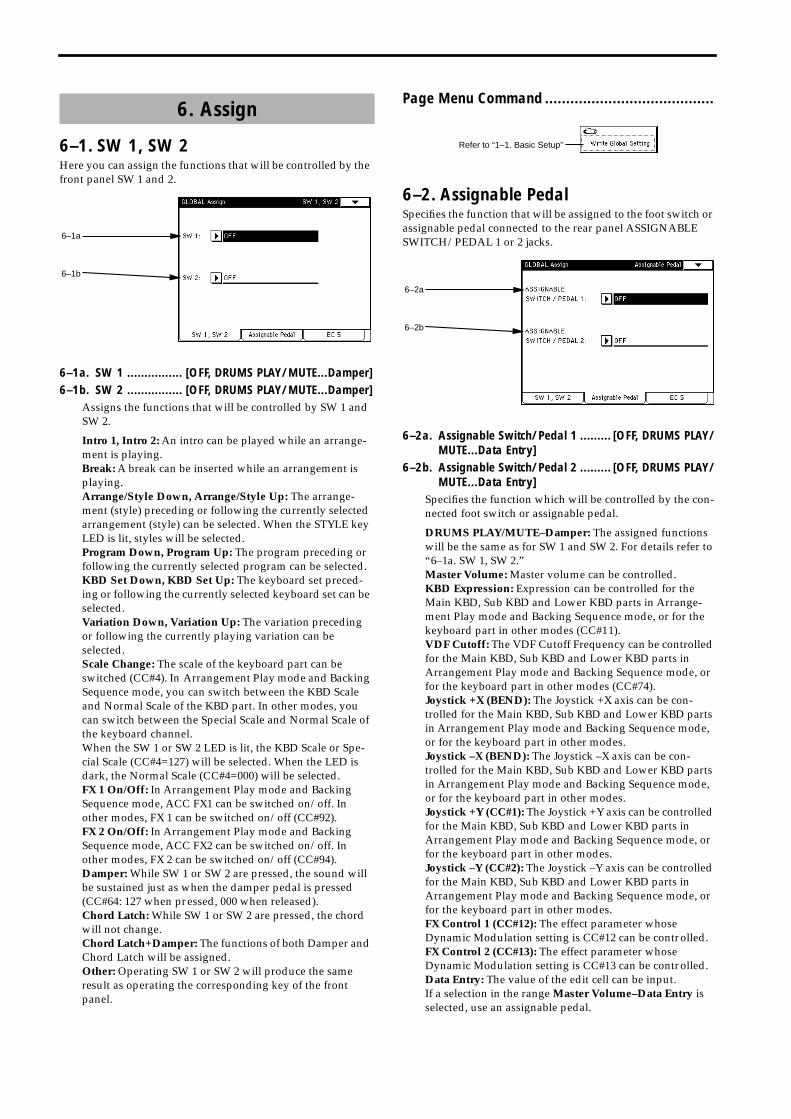
6–1. SW 1, SW 2Here you can assign the functions that will be controlled by the front panel SW 1 and 2.
6–1a. SW 1 ................ [OFF, DRUMS PLAY/MUTE...Damper]6–1b. SW 2 ................ [OFF, DRUMS PLAY/MUTE...Damper]
Assigns the functions that will be controlled by SW 1 and SW 2.
Intro 1, Intro 2: An intro can be played while an arrange-ment is playing.Break: A break can be inserted while an arrangement is playing.Arrange/Style Down, Arrange/Style Up: The arrange-ment (style) preceding or following the currently selected arrangement (style) can be selected. When the STYLE key LED is lit, styles will be selected.Program Down, Program Up: The program preceding or following the currently selected program can be selected.KBD Set Down, KBD Set Up: The keyboard set preced-ing or following the currently selected keyboard set can be selected.Variation Down, Variation Up: The variation preceding or following the currently playing variation can be selected.Scale Change: The scale of the keyboard part can be switched (CC#4). In Arrangement Play mode and Backing Sequence mode, you can switch between the KBD Scale and Normal Scale of the KBD part. In other modes, you can switch between the Special Scale and Normal Scale of the keyboard channel.When the SW 1 or SW 2 LED is lit, the KBD Scale or Spe-cial Scale (CC#4=127) will be selected. When the LED is dark, the Normal Scale (CC#4=000) will be selected.FX 1 On/Off: In Arrangement Play mode and Backing Sequence mode, ACC FX1 can be switched on/off. In other modes, FX 1 can be switched on/off (CC#92).FX 2 On/Off: In Arrangement Play mode and Backing Sequence mode, ACC FX2 can be switched on/off. In other modes, FX 2 can be switched on/off (CC#94).Damper: While SW 1 or SW 2 are pressed, the sound will be sustained just as when the damper pedal is pressed (CC#64: 127 when pressed, 000 when released).Chord Latch: While SW 1 or SW 2 are pressed, the chord will not change.Chord Latch+Damper: The functions of both Damper and Chord Latch will be assigned.Other: Operating SW 1 or SW 2 will produce the same result as operating the corresponding key of the front panel.
Page Menu Command ........................................
6–2. Assignable PedalSpecifies the function that will be assigned to the foot switch or assignable pedal connected to the rear panel ASSIGNABLE SWITCH/PEDAL 1 or 2 jacks.
6–2a. Assignable Switch/Pedal 1 ......... [OFF, DRUMS PLAY/MUTE...Data Entry]
6–2b. Assignable Switch/Pedal 2 ......... [OFF, DRUMS PLAY/MUTE...Data Entry]
Specifies the function which will be controlled by the con-nected foot switch or assignable pedal.
DRUMS PLAY/MUTE–Damper: The assigned functions will be the same as for SW 1 and SW 2. For details refer to “6–1a. SW 1, SW 2.”Master Volume: Master volume can be controlled.KBD Expression: Expression can be controlled for the Main KBD, Sub KBD and Lower KBD parts in Arrange-ment Play mode and Backing Sequence mode, or for the keyboard part in other modes (CC#11).VDF Cutoff: The VDF Cutoff Frequency can be controlled for the Main KBD, Sub KBD and Lower KBD parts in Arrangement Play mode and Backing Sequence mode, or for the keyboard part in other modes (CC#74).Joystick +X (BEND): The Joystick +X axis can be con-trolled for the Main KBD, Sub KBD and Lower KBD parts in Arrangement Play mode and Backing Sequence mode, or for the keyboard part in other modes.Joystick –X (BEND): The Joystick –X axis can be con-trolled for the Main KBD, Sub KBD and Lower KBD parts in Arrangement Play mode and Backing Sequence mode, or for the keyboard part in other modes.Joystick +Y (CC#1): The Joystick +Y axis can be controlled for the Main KBD, Sub KBD and Lower KBD parts in Arrangement Play mode and Backing Sequence mode, or for the keyboard part in other modes.Joystick –Y (CC#2): The Joystick –Y axis can be controlled for the Main KBD, Sub KBD and Lower KBD parts in Arrangement Play mode and Backing Sequence mode, or for the keyboard part in other modes.FX Control 1 (CC#12): The effect parameter whose Dynamic Modulation setting is CC#12 can be controlled.FX Control 2 (CC#13): The effect parameter whose Dynamic Modulation setting is CC#13 can be controlled.Data Entry: The value of the edit cell can be input.If a selection in the range Master Volume–Data Entry is selected, use an assignable pedal.
6. Assign
6–1a
6–1b
Refer to “1–1. Basic Setup”
6–2a
6–2b
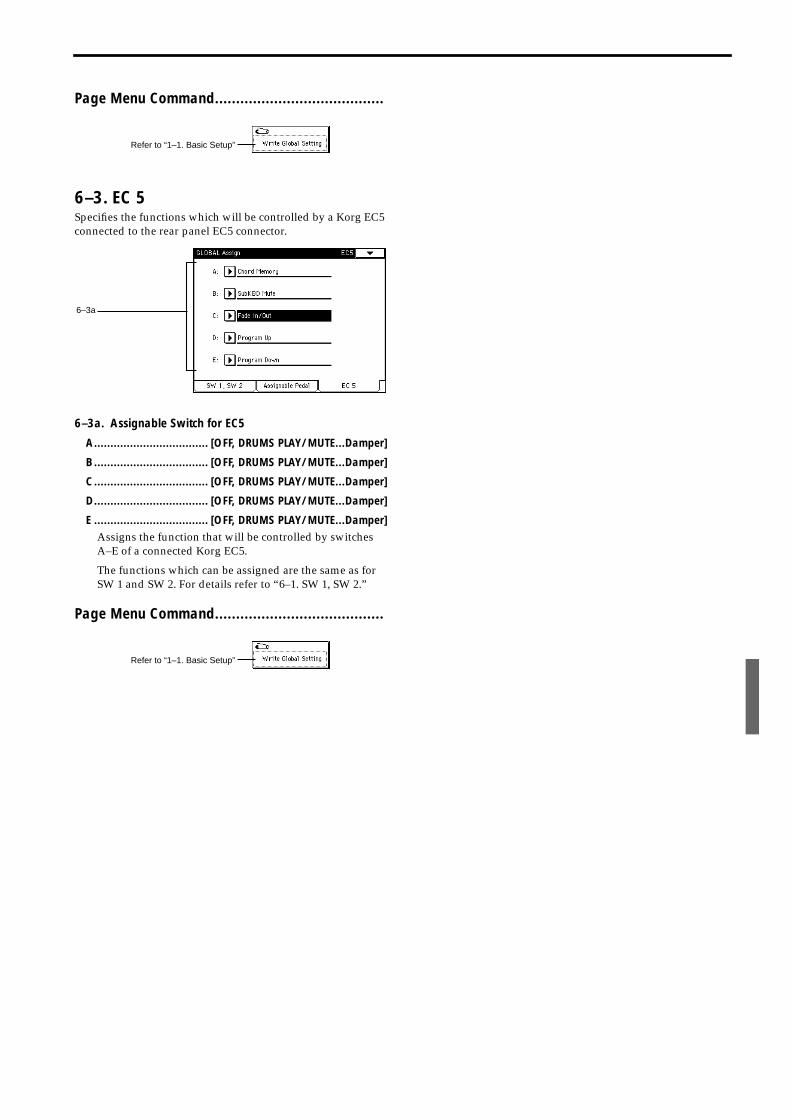
Page Menu Command........................................
6–3. EC 5Specifies the functions which will be controlled by a Korg EC5 connected to the rear panel EC5 connector.
6–3a. Assignable Switch for EC5
A................................... [OFF, DRUMS PLAY/MUTE...Damper]
B ................................... [OFF, DRUMS PLAY/MUTE...Damper]
C ................................... [OFF, DRUMS PLAY/MUTE...Damper]
D................................... [OFF, DRUMS PLAY/MUTE...Damper]
E ................................... [OFF, DRUMS PLAY/MUTE...Damper]Assigns the function that will be controlled by switches A–E of a connected Korg EC5.
The functions which can be assigned are the same as for SW 1 and SW 2. For details refer to “6–1. SW 1, SW 2.”
Page Menu Command........................................
Refer to “1–1. Basic Setup”
6–3a
Refer to “1–1. Basic Setup”
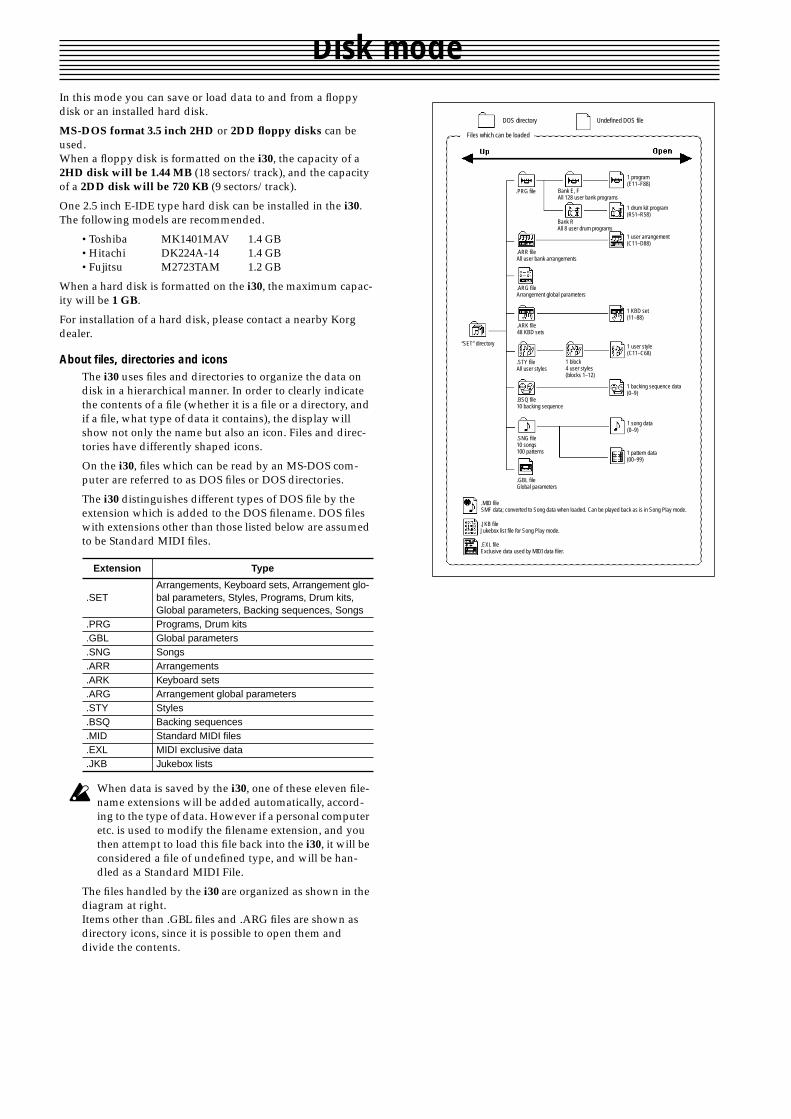
Disk modeIn this mode you can save or load data to and from a floppy disk or an installed hard disk.
MS-DOS format 3.5 inch 2HD or 2DD floppy disks can be used.When a floppy disk is formatted on the i30, the capacity of a 2HD disk will be 1.44 MB (18 sectors/track), and the capacity of a 2DD disk will be 720 KB (9 sectors/track).
One 2.5 inch E-IDE type hard disk can be installed in the i30. The following models are recommended.
•Toshiba MK1401MAV 1.4 GB•Hitachi DK224A-14 1.4 GB•Fujitsu M2723TAM 1.2 GB
When a hard disk is formatted on the i30, the maximum capac-ity will be 1 GB.
For installation of a hard disk, please contact a nearby Korg dealer.
About files, directories and iconsThe i30 uses files and directories to organize the data on disk in a hierarchical manner. In order to clearly indicate the contents of a file (whether it is a file or a directory, and if a file, what type of data it contains), the display will show not only the name but also an icon. Files and direc-tories have differently shaped icons.
On the i30, files which can be read by an MS-DOS com-puter are referred to as DOS files or DOS directories.
The i30 distinguishes different types of DOS file by the extension which is added to the DOS filename. DOS files with extensions other than those listed below are assumed to be Standard MIDI files.
When data is saved by the i30, one of these eleven file-name extensions will be added automatically, accord-ing to the type of data. However if a personal computer etc. is used to modify the filename extension, and you then attempt to load this file back into the i30, it will be considered a file of undefined type, and will be han-dled as a Standard MIDI File.
The files handled by the i30 are organized as shown in the diagram at right.Items other than .GBL files and .ARG files are shown as directory icons, since it is possible to open them and divide the contents.
Extension Type
.SETArrangements, Keyboard sets, Arrangement glo-bal parameters, Styles, Programs, Drum kits, Global parameters, Backing sequences, Songs
.PRG Programs, Drum kits
.GBL Global parameters
.SNG Songs
.ARR Arrangements
.ARK Keyboard sets
.ARG Arrangement global parameters
.STY Styles
.BSQ Backing sequences
.MID Standard MIDI files
.EXL MIDI exclusive data
.JKB Jukebox lists
DOS directory Undefined DOS file
Files which can be loaded
“SET” directory
.PRG file Bank E, FAll 128 user bank programs
Bank RAll 8 user drum programs
.ARR fileAll user bank arrangements
.ARG fileArrangement global parameters
.ARK file48 KBD sets
.MID fileSMF data; converted to Song data when loaded. Can be played back as is in Song Play mode.
.STY fileAll user styles
1 block4 user styles(blocks 1–12)
1 user style(C11–C68)
1 KBD set(11–88)
1 user arrangement(C11–D88)
1 drum kit program(R51–R58)
1 program(E11–F88)
.BSQ file 10 backing sequence
1 backing sequence data(0–9)
.SNG file10 songs100 patterns
.GBL fileGlobal parameters
1 song data(0–9)
1 pattern data(00–99)
.EXL fileExclusive data used by MIDI data filer.
.JKB fileJukebox list file for Song Play mode.
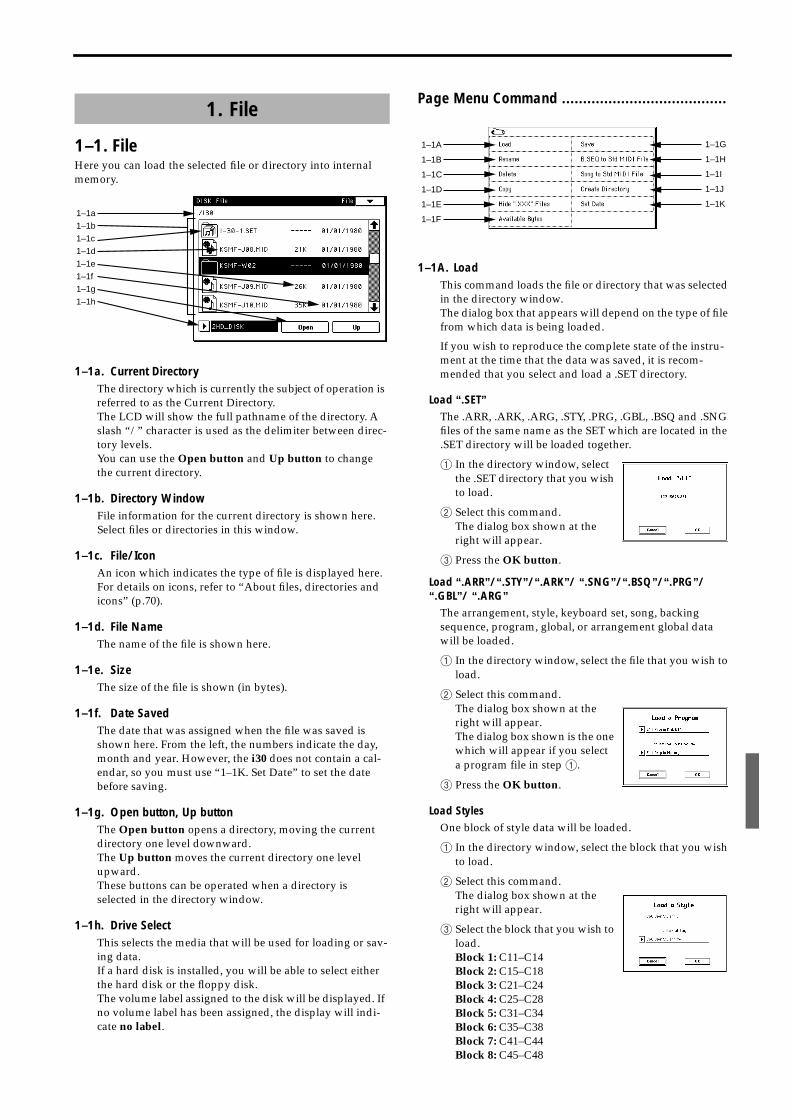
1–1. FileHere you can load the selected file or directory into internal memory.
1–1a. Current DirectoryThe directory which is currently the subject of operation is referred to as the Current Directory.The LCD will show the full pathname of the directory. A slash “/” character is used as the delimiter between direc-tory levels.You can use the Open button and Up button to change the current directory.
1–1b. Directory WindowFile information for the current directory is shown here.Select files or directories in this window.
1–1c. File/IconAn icon which indicates the type of file is displayed here.For details on icons, refer to “About files, directories and icons” (p.70).
1–1d. File NameThe name of the file is shown here.
1–1e. SizeThe size of the file is shown (in bytes).
1–1f. Date SavedThe date that was assigned when the file was saved is shown here. From the left, the numbers indicate the day, month and year. However, the i30 does not contain a cal-endar, so you must use “1–1K. Set Date” to set the date before saving.
1–1g. Open button, Up buttonThe Open button opens a directory, moving the current directory one level downward.The Up button moves the current directory one level upward.These buttons can be operated when a directory is selected in the directory window.
1–1h. Drive SelectThis selects the media that will be used for loading or sav-ing data.If a hard disk is installed, you will be able to select either the hard disk or the floppy disk.The volume label assigned to the disk will be displayed. If no volume label has been assigned, the display will indi-cate no label.
Page Menu Command .......................................
1–1A. LoadThis command loads the file or directory that was selected in the directory window.The dialog box that appears will depend on the type of file from which data is being loaded.
If you wish to reproduce the complete state of the instru-ment at the time that the data was saved, it is recom-mended that you select and load a .SET directory.
Load “.SET”The .ARR, .ARK, .ARG, .STY, .PRG, .GBL, .BSQ and .SNG files of the same name as the SET which are located in the .SET directory will be loaded together.
1 In the directory window, select the .SET directory that you wish to load.
2 Select this command.The dialog box shown at the right will appear.
3 Press the OK button.
Load “.ARR”/“.STY”/“.ARK”/ “.SNG”/“.BSQ”/“.PRG”/“.GBL”/ “.ARG”
The arrangement, style, keyboard set, song, backing sequence, program, global, or arrangement global data will be loaded.
1 In the directory window, select the file that you wish to load.
2 Select this command.The dialog box shown at the right will appear.The dialog box shown is the one which will appear if you select a program file in step 1.
3 Press the OK button.
Load StylesOne block of style data will be loaded.
1 In the directory window, select the block that you wish to load.
2 Select this command.The dialog box shown at the right will appear.
3 Select the block that you wish to load.Block 1: C11–C14Block 2: C15–C18Block 3: C21–C24Block 4: C25–C28Block 5: C31–C34Block 6: C35–C38Block 7: C41–C44Block 8: C45–C48
1. File
1–1a
1–1b
1–1c
1–1d
1–1e
1–1f
1–1g
1–1h
1–1A
1–1B
1–1C
1–1D
1–1E
1–1F
1–1G
1–1H
1–1I
1–1J
1–1K
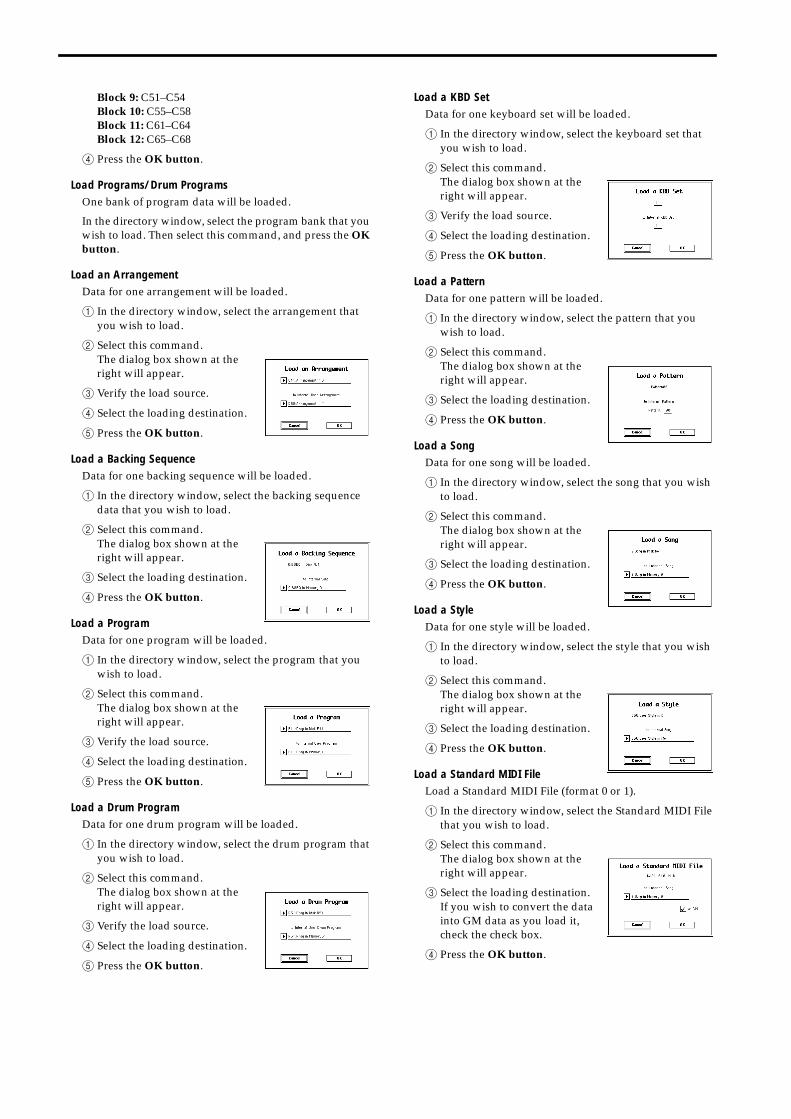
Block 9: C51–C54Block 10: C55–C58Block 11: C61–C64Block 12: C65–C68
4 Press the OK button.
Load Programs/Drum ProgramsOne bank of program data will be loaded.
In the directory window, select the program bank that you wish to load. Then select this command, and press the OK button.
Load an ArrangementData for one arrangement will be loaded.
1 In the directory window, select the arrangement that you wish to load.
2 Select this command.The dialog box shown at the right will appear.
3 Verify the load source.
4 Select the loading destination.
5 Press the OK button.
Load a Backing SequenceData for one backing sequence will be loaded.
1 In the directory window, select the backing sequence data that you wish to load.
2 Select this command.The dialog box shown at the right will appear.
3 Select the loading destination.
4 Press the OK button.
Load a ProgramData for one program will be loaded.
1 In the directory window, select the program that you wish to load.
2 Select this command.The dialog box shown at the right will appear.
3 Verify the load source.
4 Select the loading destination.
5 Press the OK button.
Load a Drum ProgramData for one drum program will be loaded.
1 In the directory window, select the drum program that you wish to load.
2 Select this command.The dialog box shown at the right will appear.
3 Verify the load source.
4 Select the loading destination.
5 Press the OK button.
Load a KBD SetData for one keyboard set will be loaded.
1 In the directory window, select the keyboard set that you wish to load.
2 Select this command.The dialog box shown at the right will appear.
3 Verify the load source.
4 Select the loading destination.
5 Press the OK button.
Load a PatternData for one pattern will be loaded.
1 In the directory window, select the pattern that you wish to load.
2 Select this command.The dialog box shown at the right will appear.
3 Select the loading destination.
4 Press the OK button.
Load a SongData for one song will be loaded.
1 In the directory window, select the song that you wish to load.
2 Select this command.The dialog box shown at the right will appear.
3 Select the loading destination.
4 Press the OK button.
Load a StyleData for one style will be loaded.
1 In the directory window, select the style that you wish to load.
2 Select this command.The dialog box shown at the right will appear.
3 Select the loading destination.
4 Press the OK button.
Load a Standard MIDI FileLoad a Standard MIDI File (format 0 or 1).
1 In the directory window, select the Standard MIDI File that you wish to load.
2 Select this command.The dialog box shown at the right will appear.
3 Select the loading destination.If you wish to convert the data into GM data as you load it, check the check box.
4 Press the OK button.
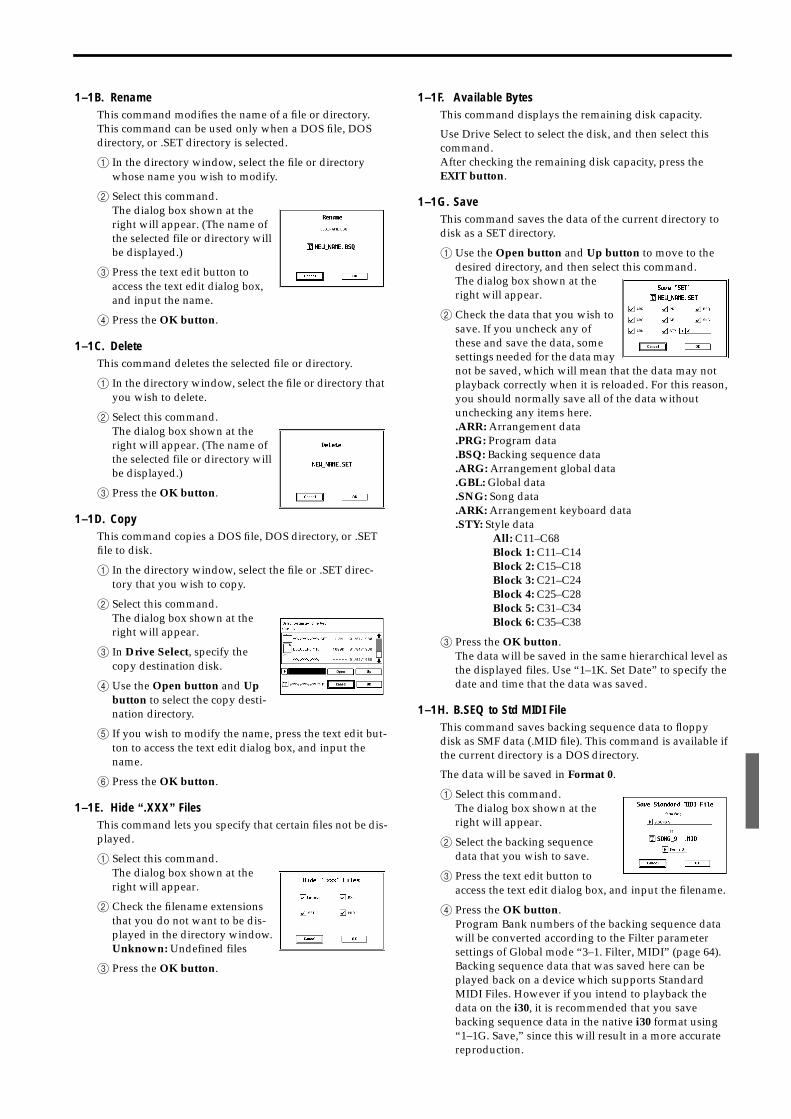
1–1B. RenameThis command modifies the name of a file or directory. This command can be used only when a DOS file, DOS directory, or .SET directory is selected.
1 In the directory window, select the file or directory whose name you wish to modify.
2 Select this command.The dialog box shown at the right will appear. (The name of the selected file or directory will be displayed.)
3 Press the text edit button to access the text edit dialog box, and input the name.
4 Press the OK button.
1–1C. DeleteThis command deletes the selected file or directory.
1 In the directory window, select the file or directory that you wish to delete.
2 Select this command.The dialog box shown at the right will appear. (The name of the selected file or directory will be displayed.)
3 Press the OK button.
1–1D. CopyThis command copies a DOS file, DOS directory, or .SET file to disk.
1 In the directory window, select the file or .SET direc-tory that you wish to copy.
2 Select this command.The dialog box shown at the right will appear.
3 In Drive Select, specify the copy destination disk.
4 Use the Open button and Up button to select the copy desti-nation directory.
5 If you wish to modify the name, press the text edit but-ton to access the text edit dialog box, and input the name.
6 Press the OK button.
1–1E. Hide “.XXX” FilesThis command lets you specify that certain files not be dis-played.
1 Select this command.The dialog box shown at the right will appear.
2 Check the filename extensions that you do not want to be dis-played in the directory window.Unknown: Undefined files
3 Press the OK button.
1–1F. Available BytesThis command displays the remaining disk capacity.
Use Drive Select to select the disk, and then select this command.After checking the remaining disk capacity, press the EXIT button.
1–1G. SaveThis command saves the data of the current directory to disk as a SET directory.
1 Use the Open button and Up button to move to the desired directory, and then select this command.The dialog box shown at the right will appear.
2 Check the data that you wish to save. If you uncheck any of these and save the data, some settings needed for the data may not be saved, which will mean that the data may not playback correctly when it is reloaded. For this reason, you should normally save all of the data without unchecking any items here..ARR: Arrangement data.PRG: Program data.BSQ: Backing sequence data.ARG: Arrangement global data.GBL: Global data.SNG: Song data.ARK: Arrangement keyboard data.STY: Style data
All: C11–C68Block 1: C11–C14Block 2: C15–C18Block 3: C21–C24Block 4: C25–C28Block 5: C31–C34Block 6: C35–C38
3 Press the OK button.The data will be saved in the same hierarchical level as the displayed files. Use “1–1K. Set Date” to specify the date and time that the data was saved.
1–1H. B.SEQ to Std MIDI FileThis command saves backing sequence data to floppy disk as SMF data (.MID file). This command is available if the current directory is a DOS directory.
The data will be saved in Format 0.
1 Select this command.The dialog box shown at the right will appear.
2 Select the backing sequence data that you wish to save.
3 Press the text edit button to access the text edit dialog box, and input the filename.
4 Press the OK button.Program Bank numbers of the backing sequence data will be converted according to the Filter parameter settings of Global mode “3–1. Filter, MIDI” (page 64).Backing sequence data that was saved here can be played back on a device which supports Standard MIDI Files. However if you intend to playback the data on the i30, it is recommended that you save backing sequence data in the native i30 format using “1–1G. Save,” since this will result in a more accurate reproduction.
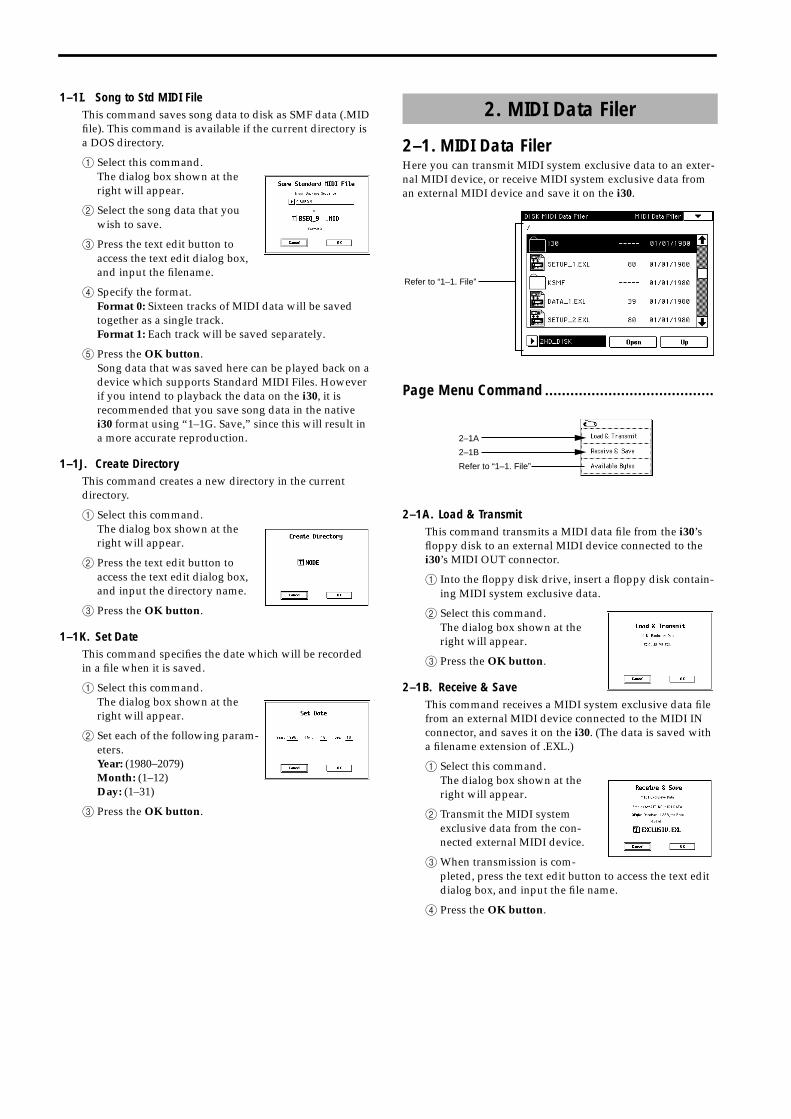
1–1I. Song to Std MIDI FileThis command saves song data to disk as SMF data (.MID file). This command is available if the current directory is a DOS directory.
1 Select this command.The dialog box shown at the right will appear.
2 Select the song data that you wish to save.
3 Press the text edit button to access the text edit dialog box, and input the filename.
4 Specify the format.Format 0: Sixteen tracks of MIDI data will be saved together as a single track.Format 1: Each track will be saved separately.
5 Press the OK button.Song data that was saved here can be played back on a device which supports Standard MIDI Files. However if you intend to playback the data on the i30, it is recommended that you save song data in the native i30 format using “1–1G. Save,” since this will result in a more accurate reproduction.
1–1J. Create DirectoryThis command creates a new directory in the current directory.
1 Select this command.The dialog box shown at the right will appear.
2 Press the text edit button to access the text edit dialog box, and input the directory name.
3 Press the OK button.
1–1K. Set DateThis command specifies the date which will be recorded in a file when it is saved.
1 Select this command.The dialog box shown at the right will appear.
2 Set each of the following param-eters.Year: (1980–2079)Month: (1–12)Day: (1–31)
3 Press the OK button.
2–1. MIDI Data FilerHere you can transmit MIDI system exclusive data to an exter-nal MIDI device, or receive MIDI system exclusive data from an external MIDI device and save it on the i30.
Page Menu Command ........................................
2–1A. Load & TransmitThis command transmits a MIDI data file from the i30’s floppy disk to an external MIDI device connected to the i30’s MIDI OUT connector.
1 Into the floppy disk drive, insert a floppy disk contain-ing MIDI system exclusive data.
2 Select this command.The dialog box shown at the right will appear.
3 Press the OK button.
2–1B. Receive & SaveThis command receives a MIDI system exclusive data file from an external MIDI device connected to the MIDI IN connector, and saves it on the i30. (The data is saved with a filename extension of .EXL.)
1 Select this command.The dialog box shown at the right will appear.
2 Transmit the MIDI system exclusive data from the con-nected external MIDI device.
3When transmission is com-pleted, press the text edit button to access the text edit dialog box, and input the file name.
4 Press the OK button.
2. MIDI Data Filer
Refer to “1–1. File”
2–1A
2–1B
Refer to “1–1. File”
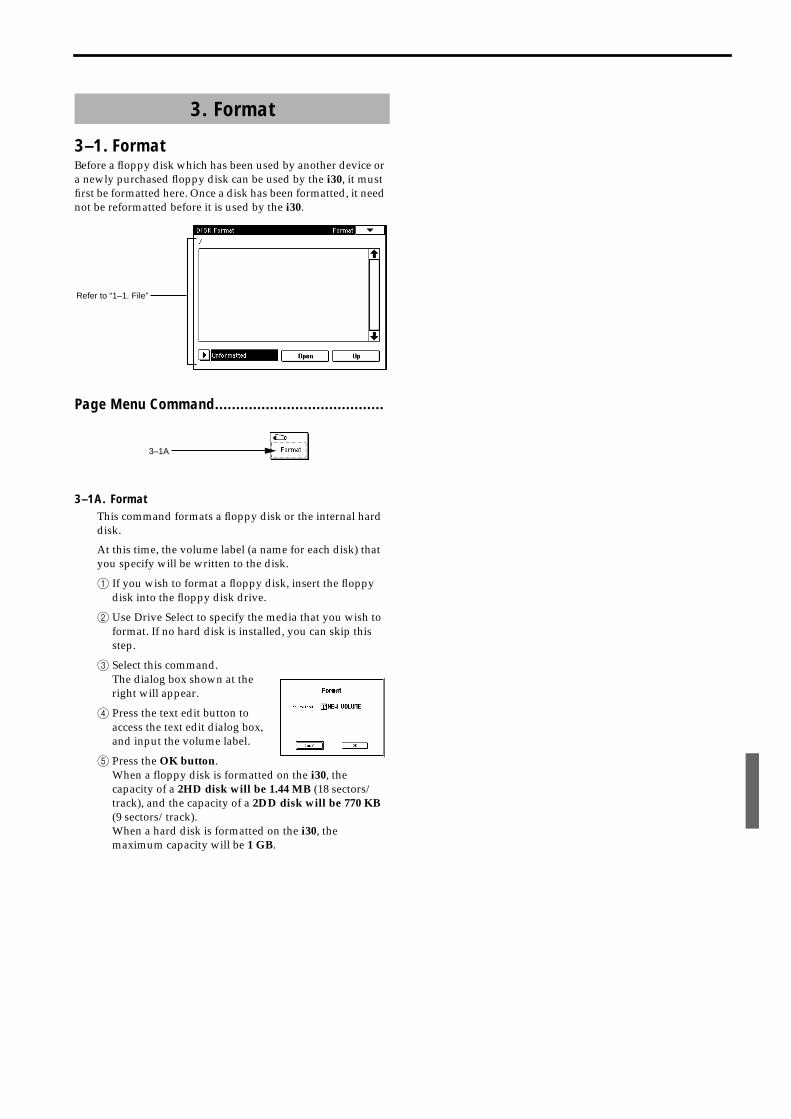
3–1. FormatBefore a floppy disk which has been used by another device or a newly purchased floppy disk can be used by the i30, it must first be formatted here. Once a disk has been formatted, it need not be reformatted before it is used by the i30.
Page Menu Command........................................
3–1A. FormatThis command formats a floppy disk or the internal hard disk.
At this time, the volume label (a name for each disk) that you specify will be written to the disk.
1 If you wish to format a floppy disk, insert the floppy disk into the floppy disk drive.
2 Use Drive Select to specify the media that you wish to format. If no hard disk is installed, you can skip this step.
3 Select this command.The dialog box shown at the right will appear.
4 Press the text edit button to access the text edit dialog box, and input the volume label.
5 Press the OK button.When a floppy disk is formatted on the i30, the capacity of a 2HD disk will be 1.44 MB (18 sectors/track), and the capacity of a 2DD disk will be 770 KB (9 sectors/track).When a hard disk is formatted on the i30, the maximum capacity will be 1 GB.
3. Format
Refer to “1–1. File”
3–1A
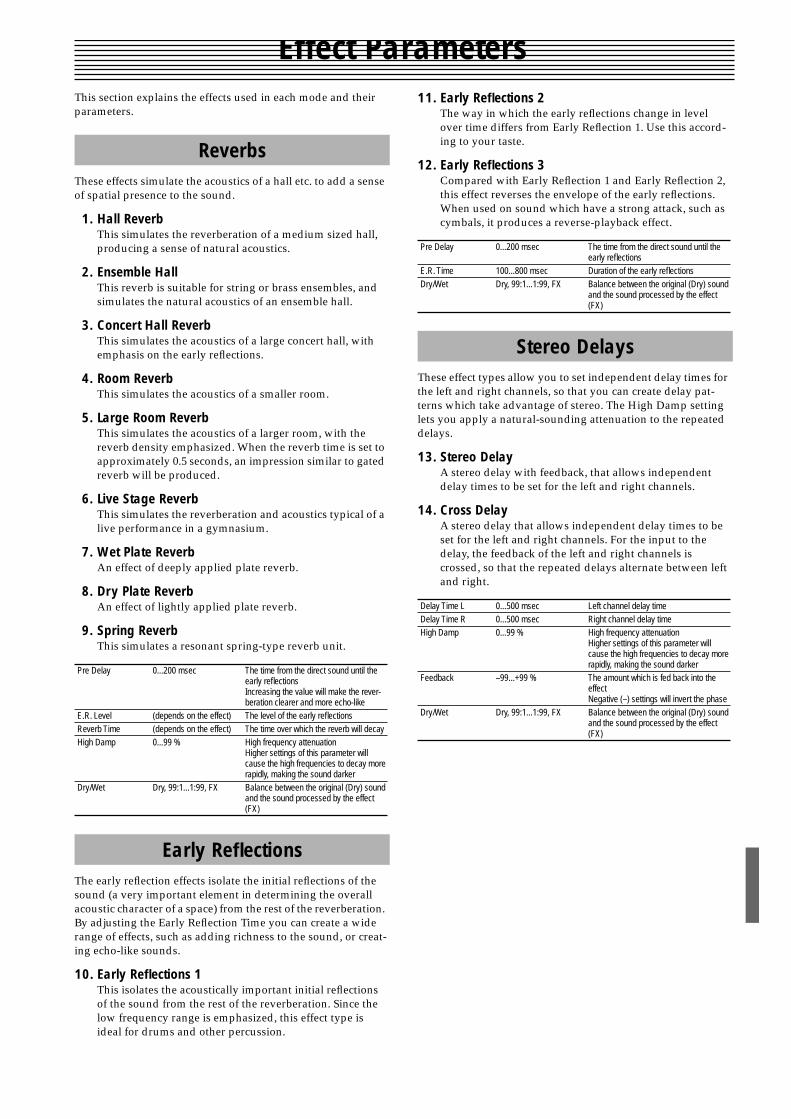
Effect ParametersThis section explains the effects used in each mode and their parameters.
These effects simulate the acoustics of a hall etc. to add a sense of spatial presence to the sound.
1. Hall ReverbThis simulates the reverberation of a medium sized hall, producing a sense of natural acoustics.
2. Ensemble HallThis reverb is suitable for string or brass ensembles, and simulates the natural acoustics of an ensemble hall.
3. Concert Hall ReverbThis simulates the acoustics of a large concert hall, with emphasis on the early reflections.
4. Room ReverbThis simulates the acoustics of a smaller room.
5. Large Room ReverbThis simulates the acoustics of a larger room, with the reverb density emphasized. When the reverb time is set to approximately 0.5 seconds, an impression similar to gated reverb will be produced.
6. Live Stage ReverbThis simulates the reverberation and acoustics typical of a live performance in a gymnasium.
7. Wet Plate ReverbAn effect of deeply applied plate reverb.
8. Dry Plate ReverbAn effect of lightly applied plate reverb.
9. Spring ReverbThis simulates a resonant spring-type reverb unit.
The early reflection effects isolate the initial reflections of the sound (a very important element in determining the overall acoustic character of a space) from the rest of the reverberation. By adjusting the Early Reflection Time you can create a wide range of effects, such as adding richness to the sound, or creat-ing echo-like sounds.
10. Early Reflections 1This isolates the acoustically important initial reflections of the sound from the rest of the reverberation. Since the low frequency range is emphasized, this effect type is ideal for drums and other percussion.
11. Early Reflections 2The way in which the early reflections change in level over time differs from Early Reflection 1. Use this accord-ing to your taste.
12. Early Reflections 3Compared with Early Reflection 1 and Early Reflection 2, this effect reverses the envelope of the early reflections. When used on sound which have a strong attack, such as cymbals, it produces a reverse-playback effect.
These effect types allow you to set independent delay times for the left and right channels, so that you can create delay pat-terns which take advantage of stereo. The High Damp setting lets you apply a natural-sounding attenuation to the repeated delays.
13. Stereo DelayA stereo delay with feedback, that allows independent delay times to be set for the left and right channels.
14. Cross DelayA stereo delay that allows independent delay times to be set for the left and right channels. For the input to the delay, the feedback of the left and right channels is crossed, so that the repeated delays alternate between left and right.
Reverbs
Pre Delay 0...200 msec The time from the direct sound until the early reflectionsIncreasing the value will make the rever-beration clearer and more echo-like
E.R. Level (depends on the effect) The level of the early reflectionsReverb Time (depends on the effect) The time over which the reverb will decayHigh Damp 0...99 % High frequency attenuation
Higher settings of this parameter will cause the high frequencies to decay more rapidly, making the sound darker
Dry/Wet Dry, 99:1...1:99, FX Balance between the original (Dry) sound and the sound processed by the effect (FX)
Early Reflections
Pre Delay 0...200 msec The time from the direct sound until the early reflections
E.R. Time 100...800 msec Duration of the early reflectionsDry/Wet Dry, 99:1...1:99, FX Balance between the original (Dry) sound
and the sound processed by the effect (FX)
Stereo Delays
Delay Time L 0...500 msec Left channel delay timeDelay Time R 0...500 msec Right channel delay timeHigh Damp 0...99 % High frequency attenuation
Higher settings of this parameter will cause the high frequencies to decay more rapidly, making the sound darker
Feedback –99...+99 % The amount which is fed back into the effectNegative (–) settings will invert the phase
Dry/Wet Dry, 99:1...1:99, FX Balance between the original (Dry) sound and the sound processed by the effect (FX)
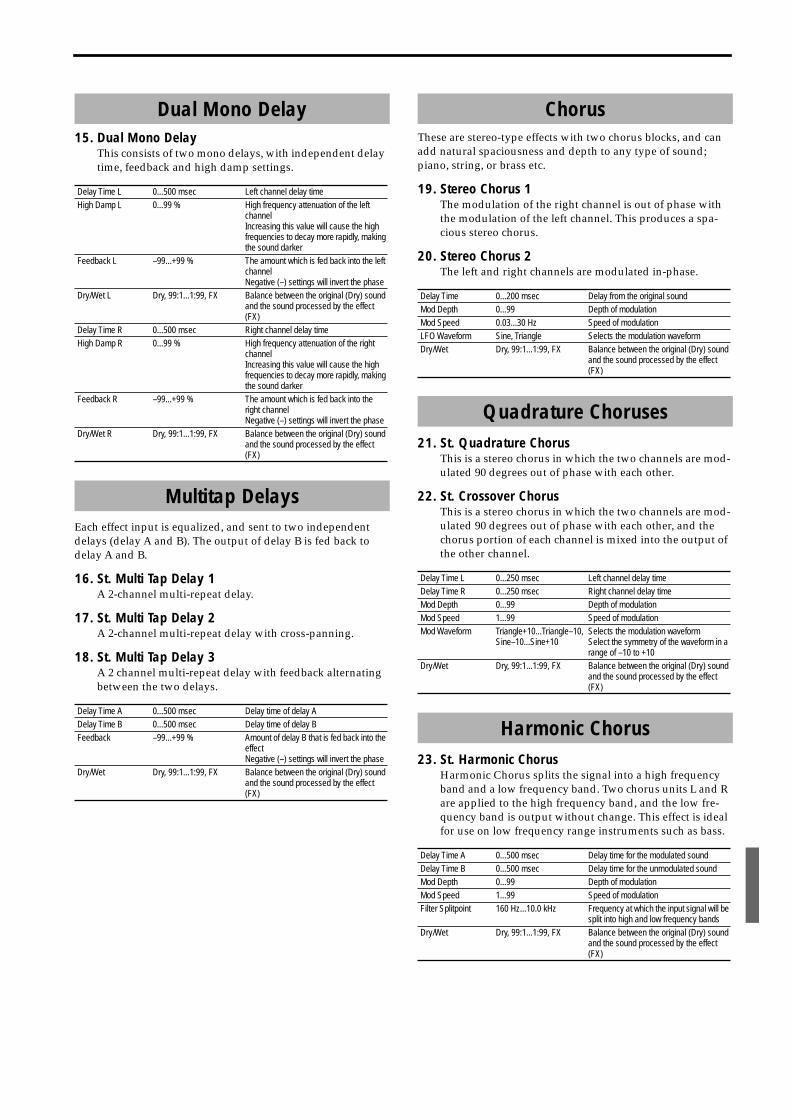
15. Dual Mono DelayThis consists of two mono delays, with independent delay time, feedback and high damp settings.
Each effect input is equalized, and sent to two independent delays (delay A and B). The output of delay B is fed back to delay A and B.
16. St. Multi Tap Delay 1A 2-channel multi-repeat delay.
17. St. Multi Tap Delay 2A 2-channel multi-repeat delay with cross-panning.
18. St. Multi Tap Delay 3A 2 channel multi-repeat delay with feedback alternating between the two delays.
These are stereo-type effects with two chorus blocks, and can add natural spaciousness and depth to any type of sound; piano, string, or brass etc.
19. Stereo Chorus 1The modulation of the right channel is out of phase with the modulation of the left channel. This produces a spa-cious stereo chorus.
20. Stereo Chorus 2The left and right channels are modulated in-phase.
21. St. Quadrature ChorusThis is a stereo chorus in which the two channels are mod-ulated 90 degrees out of phase with each other.
22. St. Crossover ChorusThis is a stereo chorus in which the two channels are mod-ulated 90 degrees out of phase with each other, and the chorus portion of each channel is mixed into the output of the other channel.
23. St. Harmonic ChorusHarmonic Chorus splits the signal into a high frequency band and a low frequency band. Two chorus units L and R are applied to the high frequency band, and the low fre-quency band is output without change. This effect is ideal for use on low frequency range instruments such as bass.
Dual Mono Delay
Delay Time L 0...500 msec Left channel delay timeHigh Damp L 0...99 % High frequency attenuation of the left
channelIncreasing this value will cause the high frequencies to decay more rapidly, making the sound darker
Feedback L –99...+99 % The amount which is fed back into the left channelNegative (–) settings will invert the phase
Dry/Wet L Dry, 99:1...1:99, FX Balance between the original (Dry) sound and the sound processed by the effect (FX)
Delay Time R 0...500 msec Right channel delay timeHigh Damp R 0...99 % High frequency attenuation of the right
channelIncreasing this value will cause the high frequencies to decay more rapidly, making the sound darker
Feedback R –99...+99 % The amount which is fed back into the right channelNegative (–) settings will invert the phase
Dry/Wet R Dry, 99:1...1:99, FX Balance between the original (Dry) sound and the sound processed by the effect (FX)
Multitap Delays
Delay Time A 0...500 msec Delay time of delay ADelay Time B 0...500 msec Delay time of delay BFeedback –99...+99 % Amount of delay B that is fed back into the
effectNegative (–) settings will invert the phase
Dry/Wet Dry, 99:1...1:99, FX Balance between the original (Dry) sound and the sound processed by the effect (FX)
Chorus
Delay Time 0...200 msec Delay from the original soundMod Depth 0...99 Depth of modulationMod Speed 0.03...30 Hz Speed of modulationLFO Waveform Sine, Triangle Selects the modulation waveformDry/Wet Dry, 99:1...1:99, FX Balance between the original (Dry) sound
and the sound processed by the effect (FX)
Quadrature Choruses
Delay Time L 0...250 msec Left channel delay timeDelay Time R 0...250 msec Right channel delay timeMod Depth 0...99 Depth of modulationMod Speed 1...99 Speed of modulationMod Waveform Triangle+10...Triangle–10,
Sine–10...Sine+10Selects the modulation waveformSelect the symmetry of the waveform in a range of –10 to +10
Dry/Wet Dry, 99:1...1:99, FX Balance between the original (Dry) sound and the sound processed by the effect (FX)
Harmonic Chorus
Delay Time A 0...500 msec Delay time for the modulated soundDelay Time B 0...500 msec Delay time for the unmodulated soundMod Depth 0...99 Depth of modulationMod Speed 1...99 Speed of modulationFilter Splitpoint 160 Hz...10.0 kHz Frequency at which the input signal will be
split into high and low frequency bandsDry/Wet Dry, 99:1...1:99, FX Balance between the original (Dry) sound
and the sound processed by the effect (FX)
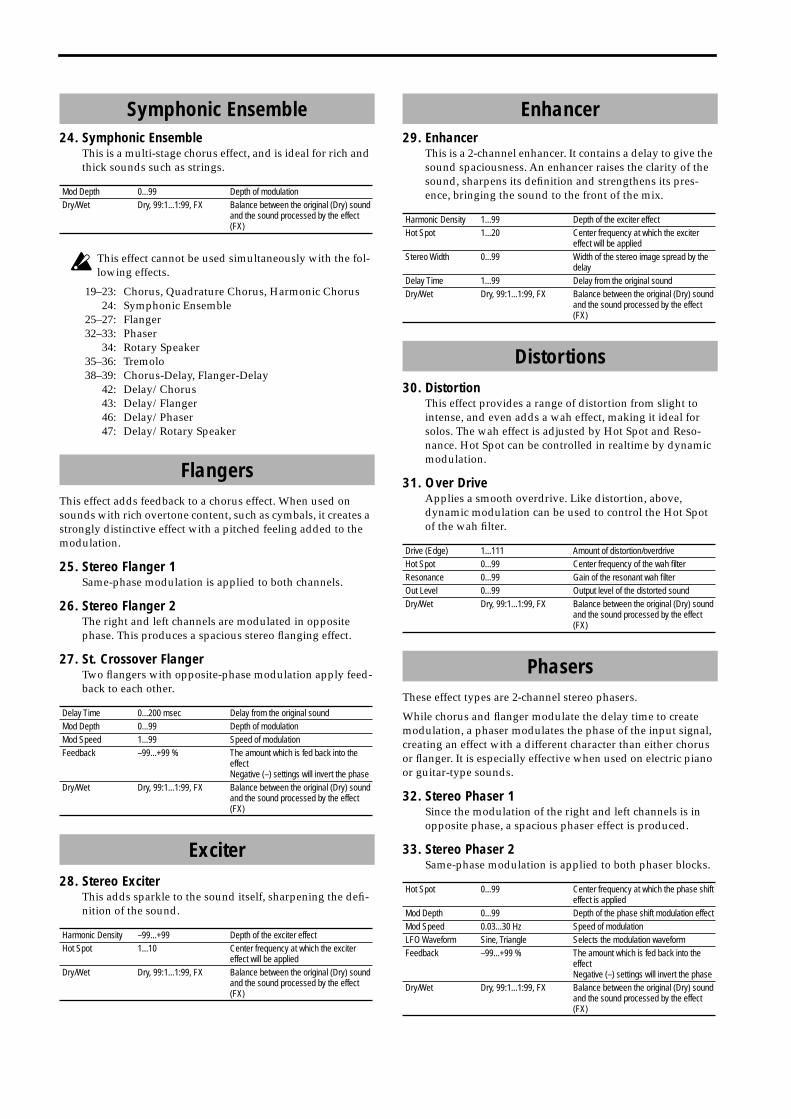
24. Symphonic EnsembleThis is a multi-stage chorus effect, and is ideal for rich and thick sounds such as strings.
This effect cannot be used simultaneously with the fol-lowing effects.
19–23: Chorus, Quadrature Chorus, Harmonic Chorus24: Symphonic Ensemble
25–27: Flanger32–33: Phaser
34: Rotary Speaker35–36: Tremolo38–39: Chorus-Delay, Flanger-Delay
42: Delay/Chorus43: Delay/Flanger46: Delay/Phaser47: Delay/Rotary Speaker
This effect adds feedback to a chorus effect. When used on sounds with rich overtone content, such as cymbals, it creates a strongly distinctive effect with a pitched feeling added to the modulation.
25. Stereo Flanger 1Same-phase modulation is applied to both channels.
26. Stereo Flanger 2The right and left channels are modulated in opposite phase. This produces a spacious stereo flanging effect.
27. St. Crossover FlangerTwo flangers with opposite-phase modulation apply feed-back to each other.
28. Stereo ExciterThis adds sparkle to the sound itself, sharpening the defi-nition of the sound.
29. EnhancerThis is a 2-channel enhancer. It contains a delay to give the sound spaciousness. An enhancer raises the clarity of the sound, sharpens its definition and strengthens its pres-ence, bringing the sound to the front of the mix.
30. DistortionThis effect provides a range of distortion from slight to intense, and even adds a wah effect, making it ideal for solos. The wah effect is adjusted by Hot Spot and Reso-nance. Hot Spot can be controlled in realtime by dynamic modulation.
31. Over DriveApplies a smooth overdrive. Like distortion, above, dynamic modulation can be used to control the Hot Spot of the wah filter.
These effect types are 2-channel stereo phasers.
While chorus and flanger modulate the delay time to create modulation, a phaser modulates the phase of the input signal, creating an effect with a different character than either chorus or flanger. It is especially effective when used on electric piano or guitar-type sounds.
32. Stereo Phaser 1Since the modulation of the right and left channels is in opposite phase, a spacious phaser effect is produced.
33. Stereo Phaser 2Same-phase modulation is applied to both phaser blocks.
Symphonic Ensemble
Mod Depth 0...99 Depth of modulationDry/Wet Dry, 99:1...1:99, FX Balance between the original (Dry) sound
and the sound processed by the effect (FX)
Flangers
Delay Time 0...200 msec Delay from the original soundMod Depth 0...99 Depth of modulationMod Speed 1...99 Speed of modulationFeedback –99...+99 % The amount which is fed back into the
effectNegative (–) settings will invert the phase
Dry/Wet Dry, 99:1...1:99, FX Balance between the original (Dry) sound and the sound processed by the effect (FX)
Exciter
Harmonic Density –99...+99 Depth of the exciter effectHot Spot 1...10 Center frequency at which the exciter
effect will be appliedDry/Wet Dry, 99:1...1:99, FX Balance between the original (Dry) sound
and the sound processed by the effect (FX)
Enhancer
Harmonic Density 1...99 Depth of the exciter effectHot Spot 1...20 Center frequency at which the exciter
effect will be appliedStereo Width 0...99 Width of the stereo image spread by the
delayDelay Time 1...99 Delay from the original soundDry/Wet Dry, 99:1...1:99, FX Balance between the original (Dry) sound
and the sound processed by the effect (FX)
Distortions
Drive (Edge) 1...111 Amount of distortion/overdriveHot Spot 0...99 Center frequency of the wah filterResonance 0...99 Gain of the resonant wah filterOut Level 0...99 Output level of the distorted soundDry/Wet Dry, 99:1...1:99, FX Balance between the original (Dry) sound
and the sound processed by the effect (FX)
Phasers
Hot Spot 0...99 Center frequency at which the phase shift effect is applied
Mod Depth 0...99 Depth of the phase shift modulation effectMod Speed 0.03...30 Hz Speed of modulationLFO Waveform Sine, Triangle Selects the modulation waveformFeedback –99...+99 % The amount which is fed back into the
effectNegative (–) settings will invert the phase
Dry/Wet Dry, 99:1...1:99, FX Balance between the original (Dry) sound and the sound processed by the effect (FX)
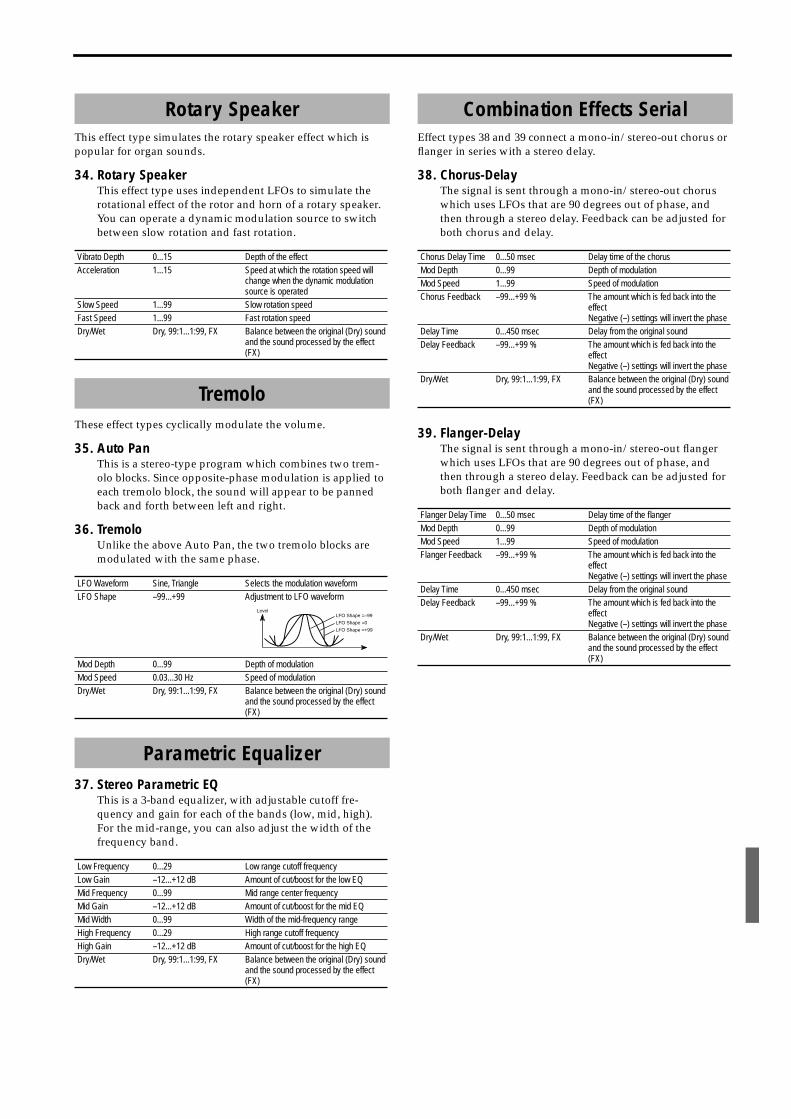
This effect type simulates the rotary speaker effect which is popular for organ sounds.
34. Rotary SpeakerThis effect type uses independent LFOs to simulate the rotational effect of the rotor and horn of a rotary speaker. You can operate a dynamic modulation source to switch between slow rotation and fast rotation.
These effect types cyclically modulate the volume.
35. Auto PanThis is a stereo-type program which combines two trem-olo blocks. Since opposite-phase modulation is applied to each tremolo block, the sound will appear to be panned back and forth between left and right.
36. TremoloUnlike the above Auto Pan, the two tremolo blocks are modulated with the same phase.
37. Stereo Parametric EQThis is a 3-band equalizer, with adjustable cutoff fre-quency and gain for each of the bands (low, mid, high). For the mid-range, you can also adjust the width of the frequency band.
Effect types 38 and 39 connect a mono-in/stereo-out chorus or flanger in series with a stereo delay.
38. Chorus-DelayThe signal is sent through a mono-in/stereo-out chorus which uses LFOs that are 90 degrees out of phase, and then through a stereo delay. Feedback can be adjusted for both chorus and delay.
39. Flanger-DelayThe signal is sent through a mono-in/stereo-out flanger which uses LFOs that are 90 degrees out of phase, and then through a stereo delay. Feedback can be adjusted for both flanger and delay.
Rotary Speaker
Vibrato Depth 0...15 Depth of the effectAcceleration 1...15 Speed at which the rotation speed will
change when the dynamic modulation source is operated
Slow Speed 1...99 Slow rotation speedFast Speed 1...99 Fast rotation speedDry/Wet Dry, 99:1...1:99, FX Balance between the original (Dry) sound
and the sound processed by the effect (FX)
Tremolo
LFO Waveform Sine, Triangle Selects the modulation waveformLFO Shape –99...+99 Adjustment to LFO waveform
Mod Depth 0...99 Depth of modulationMod Speed 0.03...30 Hz Speed of modulationDry/Wet Dry, 99:1...1:99, FX Balance between the original (Dry) sound
and the sound processed by the effect (FX)
Parametric Equalizer
Low Frequency 0...29 Low range cutoff frequencyLow Gain –12...+12 dB Amount of cut/boost for the low EQMid Frequency 0...99 Mid range center frequencyMid Gain –12...+12 dB Amount of cut/boost for the mid EQMid Width 0...99 Width of the mid-frequency rangeHigh Frequency 0...29 High range cutoff frequencyHigh Gain –12...+12 dB Amount of cut/boost for the high EQDry/Wet Dry, 99:1...1:99, FX Balance between the original (Dry) sound
and the sound processed by the effect (FX)
LevelLFO Shape =–99
LFO Shape =0
LFO Shape =+99
Combination Effects Serial
Chorus Delay Time 0...50 msec Delay time of the chorusMod Depth 0...99 Depth of modulationMod Speed 1...99 Speed of modulationChorus Feedback –99...+99 % The amount which is fed back into the
effectNegative (–) settings will invert the phase
Delay Time 0...450 msec Delay from the original soundDelay Feedback –99...+99 % The amount which is fed back into the
effectNegative (–) settings will invert the phase
Dry/Wet Dry, 99:1...1:99, FX Balance between the original (Dry) sound and the sound processed by the effect (FX)
Flanger Delay Time 0...50 msec Delay time of the flangerMod Depth 0...99 Depth of modulationMod Speed 1...99 Speed of modulationFlanger Feedback –99...+99 % The amount which is fed back into the
effectNegative (–) settings will invert the phase
Delay Time 0...450 msec Delay from the original soundDelay Feedback –99...+99 % The amount which is fed back into the
effectNegative (–) settings will invert the phase
Dry/Wet Dry, 99:1...1:99, FX Balance between the original (Dry) sound and the sound processed by the effect (FX)
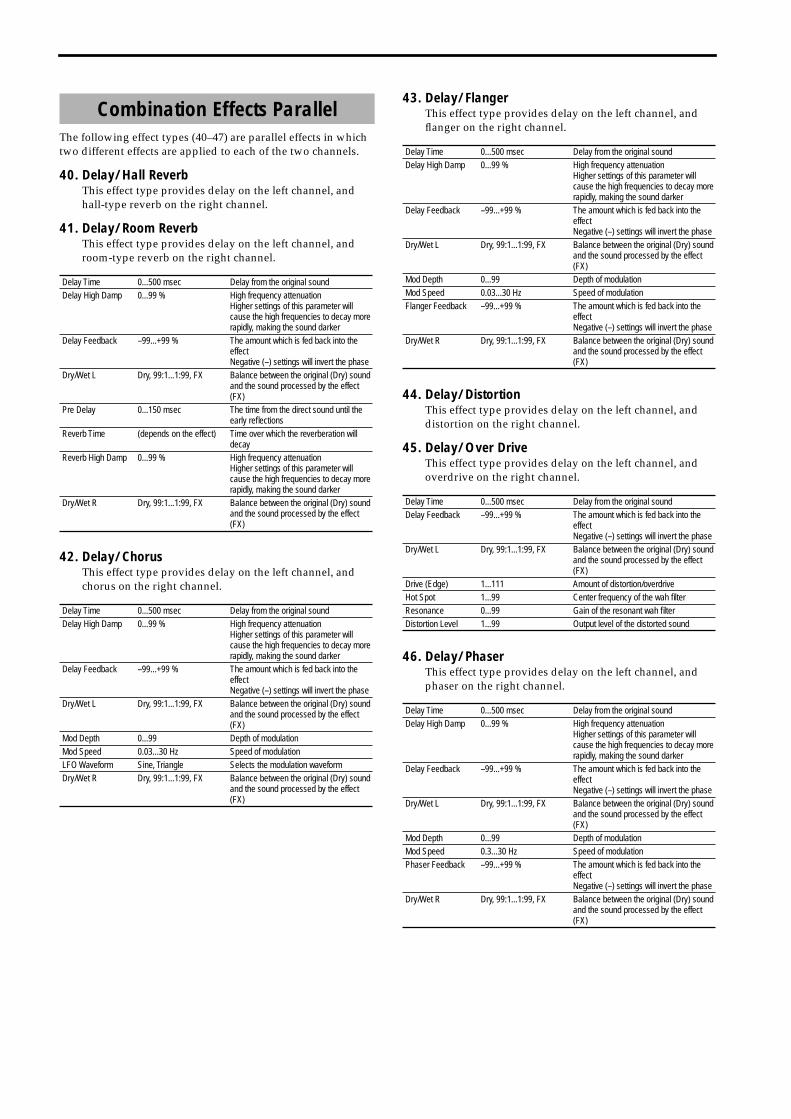
The following effect types (40–47) are parallel effects in which two different effects are applied to each of the two channels.
40. Delay/Hall ReverbThis effect type provides delay on the left channel, and hall-type reverb on the right channel.
41. Delay/Room ReverbThis effect type provides delay on the left channel, and room-type reverb on the right channel.
42. Delay/ChorusThis effect type provides delay on the left channel, and chorus on the right channel.
43. Delay/FlangerThis effect type provides delay on the left channel, and flanger on the right channel.
44. Delay/DistortionThis effect type provides delay on the left channel, and distortion on the right channel.
45. Delay/Over DriveThis effect type provides delay on the left channel, and overdrive on the right channel.
46. Delay/PhaserThis effect type provides delay on the left channel, and phaser on the right channel.
Combination Effects Parallel
Delay Time 0...500 msec Delay from the original soundDelay High Damp 0...99 % High frequency attenuation
Higher settings of this parameter will cause the high frequencies to decay more rapidly, making the sound darker
Delay Feedback –99...+99 % The amount which is fed back into the effectNegative (–) settings will invert the phase
Dry/Wet L Dry, 99:1...1:99, FX Balance between the original (Dry) sound and the sound processed by the effect (FX)
Pre Delay 0...150 msec The time from the direct sound until the early reflections
Reverb Time (depends on the effect) Time over which the reverberation will decay
Reverb High Damp 0...99 % High frequency attenuationHigher settings of this parameter will cause the high frequencies to decay more rapidly, making the sound darker
Dry/Wet R Dry, 99:1...1:99, FX Balance between the original (Dry) sound and the sound processed by the effect (FX)
Delay Time 0...500 msec Delay from the original soundDelay High Damp 0...99 % High frequency attenuation
Higher settings of this parameter will cause the high frequencies to decay more rapidly, making the sound darker
Delay Feedback –99...+99 % The amount which is fed back into the effectNegative (–) settings will invert the phase
Dry/Wet L Dry, 99:1...1:99, FX Balance between the original (Dry) sound and the sound processed by the effect (FX)
Mod Depth 0...99 Depth of modulationMod Speed 0.03...30 Hz Speed of modulationLFO Waveform Sine, Triangle Selects the modulation waveformDry/Wet R Dry, 99:1...1:99, FX Balance between the original (Dry) sound
and the sound processed by the effect (FX)
Delay Time 0...500 msec Delay from the original soundDelay High Damp 0...99 % High frequency attenuation
Higher settings of this parameter will cause the high frequencies to decay more rapidly, making the sound darker
Delay Feedback –99...+99 % The amount which is fed back into the effectNegative (–) settings will invert the phase
Dry/Wet L Dry, 99:1...1:99, FX Balance between the original (Dry) sound and the sound processed by the effect (FX)
Mod Depth 0...99 Depth of modulationMod Speed 0.03...30 Hz Speed of modulationFlanger Feedback –99...+99 % The amount which is fed back into the
effectNegative (–) settings will invert the phase
Dry/Wet R Dry, 99:1...1:99, FX Balance between the original (Dry) sound and the sound processed by the effect (FX)
Delay Time 0...500 msec Delay from the original soundDelay Feedback –99...+99 % The amount which is fed back into the
effectNegative (–) settings will invert the phase
Dry/Wet L Dry, 99:1...1:99, FX Balance between the original (Dry) sound and the sound processed by the effect (FX)
Drive (Edge) 1...111 Amount of distortion/overdriveHot Spot 1...99 Center frequency of the wah filterResonance 0...99 Gain of the resonant wah filterDistortion Level 1...99 Output level of the distorted sound
Delay Time 0...500 msec Delay from the original soundDelay High Damp 0...99 % High frequency attenuation
Higher settings of this parameter will cause the high frequencies to decay more rapidly, making the sound darker
Delay Feedback –99...+99 % The amount which is fed back into the effectNegative (–) settings will invert the phase
Dry/Wet L Dry, 99:1...1:99, FX Balance between the original (Dry) sound and the sound processed by the effect (FX)
Mod Depth 0...99 Depth of modulationMod Speed 0.3...30 Hz Speed of modulationPhaser Feedback –99...+99 % The amount which is fed back into the
effectNegative (–) settings will invert the phase
Dry/Wet R Dry, 99:1...1:99, FX Balance between the original (Dry) sound and the sound processed by the effect (FX)
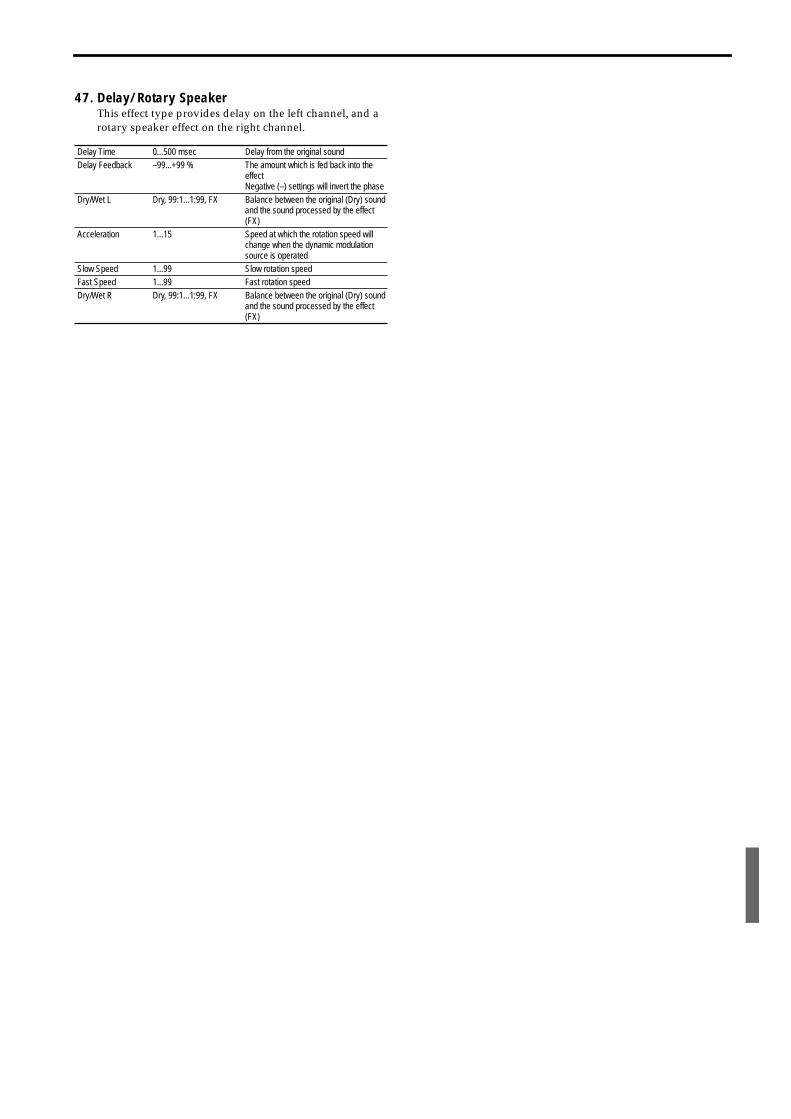
47. Delay/Rotary SpeakerThis effect type provides delay on the left channel, and a rotary speaker effect on the right channel.
Delay Time 0...500 msec Delay from the original soundDelay Feedback –99...+99 % The amount which is fed back into the
effectNegative (–) settings will invert the phase
Dry/Wet L Dry, 99:1...1:99, FX Balance between the original (Dry) sound and the sound processed by the effect (FX)
Acceleration 1...15 Speed at which the rotation speed will change when the dynamic modulation source is operated
Slow Speed 1...99 Slow rotation speedFast Speed 1...99 Fast rotation speedDry/Wet R Dry, 99:1...1:99, FX Balance between the original (Dry) sound
and the sound processed by the effect (FX)

Appendices1. Data available for event editing
on the i30• ATr. KBD Track and KBD 4–8 Tracks of Backing
Sequence mode• Tracks 1–16 of Song mode• Drum Track–ACC 3 Track of Edit Style mode
* Be aware that since the time signature is recorded in the tempo track, modifying the time signature of one track will also change the corresponding measure of all tracks.
• Control Track of Backing Sequence mode
• Chord Track of Backing Sequence mode
2. Operation when control change data is received/transmitted
*1: The channel that is specified as the global MIDI channel will be used for CC#92 and 94 on/off.
*2: Bank Select data is normally specified as part of a program change event, but there may be cases in which this is insufficient to change banks on an external device. In such cases, use CC#00 and CC#32. For the relation between the bank select data and the banks of the external device, refer to the owner’s manual for your device.
*3: On the i30, the actual volume is determined by multiply-ing the Volume value (CC#07) with the Expression value (CC#11).
*4: Use RPC (Registered Parameter Control) messages to set the Pitch Bend Range, Fine Tune, or Coarse Tune. The pro-cedure is to use an RPN (Registered Parameter Number) message to select the parameter that you wish to edit, and then use Data Entry to input the value for that parameter. Use CC#100 (value: 00–02) and CC#101 (value: 00) to select the parameter, and use CC#06 and CC#38 to input the data. The correspondence between Data Entry values and parameter values are shown below for each parame-ter.
C–1...G9(Note data)
V. 2...126(Velocity)
Length 0:00...4:00, Tie(Length)
BAR(Bar line)
Meter 1/4...16/16(Time signature)*
Pattern xx(Pattern number)
Meter 1/4...16/16(Time signature)*
BEND(Pitch bend)
Value –8192...+8191(Value)
AFTT(Aftertouch)
Value 0...127(Value)
PROG(Program change)
Bank AB, CD, E, FG, R, B.5...127 (Program bank)
No. 0...127(Program number)
CTRL(Control change)
No. 0...127(Control change num-ber)
Value 0...127(Value)
PAFT(Polyphonic aftertouch)
C–1...G9(Note number)
Value 0...127(Value)
Type ValueArrangement A11...D88Style A11...C68
Style ElementOff, Variation 1...4, Intro 1...2, Ending 1...2, Fill 1...2, Break
Full KBD Play Off/OnChord Scanning Off/Lower (Easy)/Upper/Full/Lower (Normal)Chord Memory Off/OnBass Inversion Off/OnTranspose –11...+11Drums Mute Play/MutePerc Mute Play/MuteBass Mute Play/MuteACC1 Mute Play/MuteACC2 Mute Play/MuteACC3 Mute Play/MuteMain KBD Mute Play/MuteSub KBD Mute Play/MuteLower KBD Mute Play/MuteMain KBD Program A11...R58Sub KBD Program A11...R58Lower KBD Program A11...R58Main KBD Octave –2...+2Sub KBD Octave –2...+2Lower KBD Octave –2...+2KBD Set 11...88Chord Sound Off/OnEnsemble Off/OnKBD Lock Off/OnSplit Point C2...C7
Root Chord type Tension Bass
C...B Major...No Chord �9...13 /C.../B
Control change number Value i30 operation0: Bank Select (MSB) 0...127 MSB of Bank Select *2
1: Oscillator LFO 0...127joystick movement in +Y direction
2: Filter LFO 0...127joystick movement in –Y direction
4: Foot Controller0...6364...127
normal scalespecial scale
6: Data Entry (MSB) 0...127 MSB of RPN data *47: Volume 0...127 volume *3
10: Panpot0...636465...127
leftcenterright
11: Expression 0...127 volume *312: Effect Control 1 0...127 effect control 1 *713: Effect Control 2 0...127 effect control 2 *732: Bank Select (LSB) 0...127 LSB of Bank Select *238: Data Entry (LSB) 0...127 LSB of RPN data *4
64: Sustain Pedal Switch on/off0...63 (Off)64...127 (On)
sustain offsustain on
72: Release Time 0...127release time of VDF/VDA EG
*5
73: Attack Time 0...127 attack time of VDA EG *574: Brightness 0...127 cutoff frequency of VDF *691: Send C Level 0...127 send C level
92: Effect 1 On/Off0 (Off)1...127 (On)
effect 1 offeffect 2 on
93: Send D Level 0...127 send D level
94: Effect 2 On/Off0 (Off)1...127 (On)
effect 2 offeffect 2 on *1
100: RPN (LSB)000102
select Pitch Bend Rangeselect Fine Tuneselect Coarse Tune *4
101: RPN (MSB) 00 MSB of RPN *4120: All Sound Off halt sound121: Reset All Controller initialize controllers
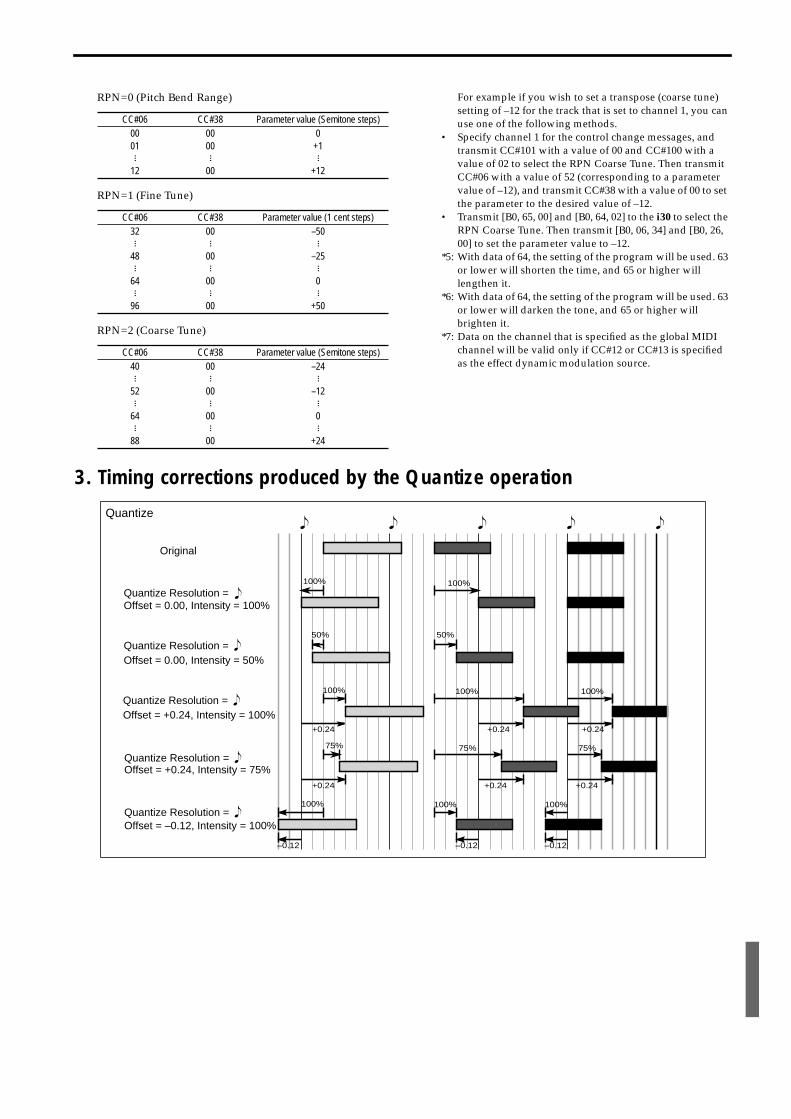
RPN=0 (Pitch Bend Range)
RPN=1 (Fine Tune)
RPN=2 (Coarse Tune)
For example if you wish to set a transpose (coarse tune) setting of –12 for the track that is set to channel 1, you can use one of the following methods.
• Specify channel 1 for the control change messages, and transmit CC#101 with a value of 00 and CC#100 with a value of 02 to select the RPN Coarse Tune. Then transmit CC#06 with a value of 52 (corresponding to a parameter value of –12), and transmit CC#38 with a value of 00 to set the parameter to the desired value of –12.
• Transmit [B0, 65, 00] and [B0, 64, 02] to the i30 to select the RPN Coarse Tune. Then transmit [B0, 06, 34] and [B0, 26, 00] to set the parameter value to –12.
*5: With data of 64, the setting of the program will be used. 63 or lower will shorten the time, and 65 or higher will lengthen it.
*6: With data of 64, the setting of the program will be used. 63 or lower will darken the tone, and 65 or higher will brighten it.
*7: Data on the channel that is specified as the global MIDI channel will be valid only if CC#12 or CC#13 is specified as the effect dynamic modulation source.
3. Timing corrections produced by the Quantize operation
CC#06 CC#38 Parameter value (Semitone steps)0001
12
0000
00
0+1
+12
CC#06 CC#38 Parameter value (1 cent steps)32
48
64
96
00
00
00
00
–50
–25
0
+50
CC#06 CC#38 Parameter value (Semitone steps)40
52
64
88
00
00
00
00
–24
–12
0
+24
... ... ...
......
...
......
...
......
...
......
...
......
...
......
...
Quantize
Original
Quantize Resolution = Offset = 0.00, Intensity = 100%
�
Quantize Resolution = �Offset = 0.00, Intensity = 50%
Quantize Resolution = �Offset = +0.24, Intensity = 100%
Quantize Resolution = �Offset = +0.24, Intensity = 75%
Quantize Resolution = �Offset = –0.12, Intensity = 100%
� � � � �
100% 100%
50% 50%
100%
+0.24
75%
100%
+0.24
–0.12 –0.12 –0.12
+0.24 +0.24
100% 100%
+0.24 +0.24
75% 75%
100% 100%
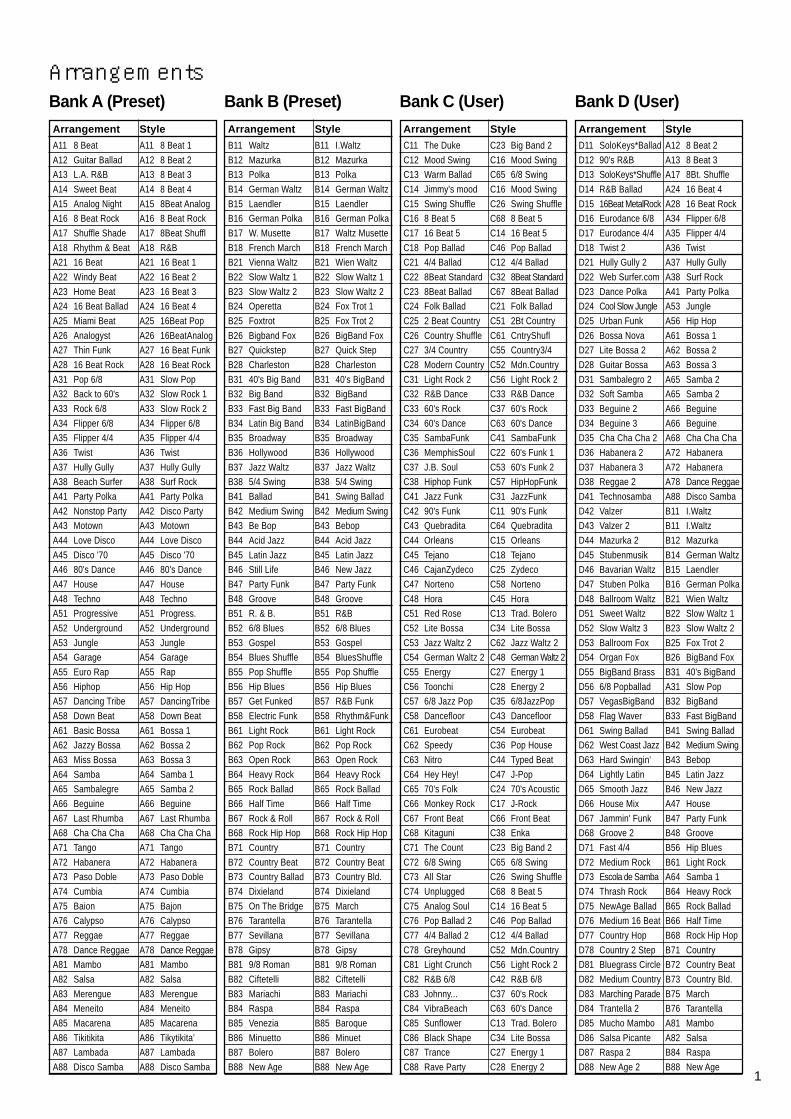
1
Arrangement Style Arrangement Style Arrangement Style Arrangement Style
Bank B (Preset)
ArrangementsBank A (Preset)
A11 8 Beat A11 8 Beat 1
A12 Guitar Ballad A12 8 Beat 2
A13 L.A. R&B A13 8 Beat 3
A14 Sweet Beat A14 8 Beat 4
A15 Analog Night A15 8Beat Analog
A16 8 Beat Rock A16 8 Beat Rock
A17 Shuffle Shade A17 8Beat Shuffl
A18 Rhythm & Beat A18 R&B
A21 16 Beat A21 16 Beat 1
A22 Windy Beat A22 16 Beat 2
A23 Home Beat A23 16 Beat 3
A24 16 Beat Ballad A24 16 Beat 4
A25 Miami Beat A25 16Beat Pop
A26 Analogyst A26 16BeatAnalog
A27 Thin Funk A27 16 Beat Funk
A28 16 Beat Rock A28 16 Beat Rock
A31 Pop 6/8 A31 Slow Pop
A32 Back to 60's A32 Slow Rock 1
A33 Rock 6/8 A33 Slow Rock 2
A34 Flipper 6/8 A34 Flipper 6/8
A35 Flipper 4/4 A35 Flipper 4/4
A36 Twist A36 Twist
A37 Hully Gully A37 Hully Gully
A38 Beach Surfer A38 Surf Rock
A41 Party Polka A41 Party Polka
A42 Nonstop Party A42 Disco Party
A43 Motown A43 Motown
A44 Love Disco A44 Love Disco
A45 Disco '70 A45 Disco '70
A46 80's Dance A46 80's Dance
A47 House A47 House
A48 Techno A48 Techno
A51 Progressive A51 Progress.
A52 Underground A52 Underground
A53 Jungle A53 Jungle
A54 Garage A54 Garage
A55 Euro Rap A55 Rap
A56 Hiphop A56 Hip Hop
A57 Dancing Tribe A57 DancingTribe
A58 Down Beat A58 Down Beat
A61 Basic Bossa A61 Bossa 1
A62 Jazzy Bossa A62 Bossa 2
A63 Miss Bossa A63 Bossa 3
A64 Samba A64 Samba 1
A65 Sambalegre A65 Samba 2
A66 Beguine A66 Beguine
A67 Last Rhumba A67 Last Rhumba
A68 Cha Cha Cha A68 Cha Cha Cha
A71 Tango A71 Tango
A72 Habanera A72 Habanera
A73 Paso Doble A73 Paso Doble
A74 Cumbia A74 Cumbia
A75 Baion A75 Bajon
A76 Calypso A76 Calypso
A77 Reggae A77 Reggae
A78 Dance Reggae A78 Dance Reggae
A81 Mambo A81 Mambo
A82 Salsa A82 Salsa
A83 Merengue A83 Merengue
A84 Meneito A84 Meneito
A85 Macarena A85 Macarena
A86 Tikitikita A86 Tikytikita’
A87 Lambada A87 Lambada
A88 Disco Samba A88 Disco Samba
B11 Waltz B11 I.Waltz
B12 Mazurka B12 Mazurka
B13 Polka B13 Polka
B14 German Waltz B14 German Waltz
B15 Laendler B15 Laendler
B16 German Polka B16 German Polka
B17 W. Musette B17 Waltz Musette
B18 French March B18 French March
B21 Vienna Waltz B21 Wien Waltz
B22 Slow Waltz 1 B22 Slow Waltz 1
B23 Slow Waltz 2 B23 Slow Waltz 2
B24 Operetta B24 Fox Trot 1
B25 Foxtrot B25 Fox Trot 2
B26 Bigband Fox B26 BigBand Fox
B27 Quickstep B27 Quick Step
B28 Charleston B28 Charleston
B31 40's Big Band B31 40's BigBand
B32 Big Band B32 BigBand
B33 Fast Big Band B33 Fast BigBand
B34 Latin Big Band B34 LatinBigBand
B35 Broadway B35 Broadway
B36 Hollywood B36 Hollywood
B37 Jazz Waltz B37 Jazz Waltz
B38 5/4 Swing B38 5/4 Swing
B41 Ballad B41 Swing Ballad
B42 Medium Swing B42 Medium Swing
B43 Be Bop B43 Bebop
B44 Acid Jazz B44 Acid Jazz
B45 Latin Jazz B45 Latin Jazz
B46 Still Life B46 New Jazz
B47 Party Funk B47 Party Funk
B48 Groove B48 Groove
B51 R. & B. B51 R&B
B52 6/8 Blues B52 6/8 Blues
B53 Gospel B53 Gospel
B54 Blues Shuffle B54 BluesShuffle
B55 Pop Shuffle B55 Pop Shuffle
B56 Hip Blues B56 Hip Blues
B57 Get Funked B57 R&B Funk
B58 Electric Funk B58 Rhythm&Funk
B61 Light Rock B61 Light Rock
B62 Pop Rock B62 Pop Rock
B63 Open Rock B63 Open Rock
B64 Heavy Rock B64 Heavy Rock
B65 Rock Ballad B65 Rock Ballad
B66 Half Time B66 Half Time
B67 Rock & Roll B67 Rock & Roll
B68 Rock Hip Hop B68 Rock Hip Hop
B71 Country B71 Country
B72 Country Beat B72 Country Beat
B73 Country Ballad B73 Country Bld.
B74 Dixieland B74 Dixieland
B75 On The Bridge B75 March
B76 Tarantella B76 Tarantella
B77 Sevillana B77 Sevillana
B78 Gipsy B78 Gipsy
B81 9/8 Roman B81 9/8 Roman
B82 Ciftetelli B82 Ciftetelli
B83 Mariachi B83 Mariachi
B84 Raspa B84 Raspa
B85 Venezia B85 Baroque
B86 Minuetto B86 Minuet
B87 Bolero B87 Bolero
B88 New Age B88 New Age
Bank C (User) Bank D (User)
C11 The Duke C23 Big Band 2
C12 Mood Swing C16 Mood Swing
C13 Warm Ballad C65 6/8 Swing
C14 Jimmy's mood C16 Mood Swing
C15 Swing Shuffle C26 Swing Shuffle
C16 8 Beat 5 C68 8 Beat 5
C17 16 Beat 5 C14 16 Beat 5
C18 Pop Ballad C46 Pop Ballad
C21 4/4 Ballad C12 4/4 Ballad
C22 8Beat Standard C32 8Beat Standard
C23 8Beat Ballad C67 8Beat Ballad
C24 Folk Ballad C21 Folk Ballad
C25 2 Beat Country C51 2Bt Country
C26 Country Shuffle C61 CntryShufl
C27 3/4 Country C55 Country3/4
C28 Modern Country C52 Mdn.Country
C31 Light Rock 2 C56 Light Rock 2
C32 R&B Dance C33 R&B Dance
C33 60's Rock C37 60's Rock
C34 60's Dance C63 60's Dance
C35 SambaFunk C41 SambaFunk
C36 MemphisSoul C22 60's Funk 1
C37 J.B. Soul C53 60's Funk 2
C38 Hiphop Funk C57 HipHopFunk
C41 Jazz Funk C31 JazzFunk
C42 90's Funk C11 90's Funk
C43 Quebradita C64 Quebradita
C44 Orleans C15 Orleans
C45 Tejano C18 Tejano
C46 CajanZydeco C25 Zydeco
C47 Norteno C58 Norteno
C48 Hora C45 Hora
C51 Red Rose C13 Trad. Bolero
C52 Lite Bossa C34 Lite Bossa
C53 Jazz Waltz 2 C62 Jazz Waltz 2
C54 German Waltz 2 C48 German Waltz 2
C55 Energy C27 Energy 1
C56 Toonchi C28 Energy 2
C57 6/8 Jazz Pop C35 6/8JazzPop
C58 Dancefloor C43 Dancefloor
C61 Eurobeat C54 Eurobeat
C62 Speedy C36 Pop House
C63 Nitro C44 Typed Beat
C64 Hey Hey! C47 J-Pop
C65 70's Folk C24 70's Acoustic
C66 Monkey Rock C17 J-Rock
C67 Front Beat C66 Front Beat
C68 Kitaguni C38 Enka
C71 The Count C23 Big Band 2
C72 6/8 Swing C65 6/8 Swing
C73 All Star C26 Swing Shuffle
C74 Unplugged C68 8 Beat 5
C75 Analog Soul C14 16 Beat 5
C76 Pop Ballad 2 C46 Pop Ballad
C77 4/4 Ballad 2 C12 4/4 Ballad
C78 Greyhound C52 Mdn.Country
C81 Light Crunch C56 Light Rock 2
C82 R&B 6/8 C42 R&B 6/8
C83 Johnny... C37 60's Rock
C84 VibraBeach C63 60's Dance
C85 Sunflower C13 Trad. Bolero
C86 Black Shape C34 Lite Bossa
C87 Trance C27 Energy 1
C88 Rave Party C28 Energy 2
D11 SoloKeys*Ballad A12 8 Beat 2
D12 90's R&B A13 8 Beat 3
D13 SoloKeys*Shuffle A17 8Bt. Shuffle
D14 R&B Ballad A24 16 Beat 4
D15 16Beat MetalRock A28 16 Beat Rock
D16 Eurodance 6/8 A34 Flipper 6/8
D17 Eurodance 4/4 A35 Flipper 4/4
D18 Twist 2 A36 Twist
D21 Hully Gully 2 A37 Hully Gully
D22 Web Surfer.com A38 Surf Rock
D23 Dance Polka A41 Party Polka
D24 Cool Slow Jungle A53 Jungle
D25 Urban Funk A56 Hip Hop
D26 Bossa Nova A61 Bossa 1
D27 Lite Bossa 2 A62 Bossa 2
D28 Guitar Bossa A63 Bossa 3
D31 Sambalegro 2 A65 Samba 2
D32 Soft Samba A65 Samba 2
D33 Beguine 2 A66 Beguine
D34 Beguine 3 A66 Beguine
D35 Cha Cha Cha 2 A68 Cha Cha Cha
D36 Habanera 2 A72 Habanera
D37 Habanera 3 A72 Habanera
D38 Reggae 2 A78 Dance Reggae
D41 Technosamba A88 Disco Samba
D42 Valzer B11 I.Waltz
D43 Valzer 2 B11 I.Waltz
D44 Mazurka 2 B12 Mazurka
D45 Stubenmusik B14 German Waltz
D46 Bavarian Waltz B15 Laendler
D47 Stuben Polka B16 German Polka
D48 Ballroom Waltz B21 Wien Waltz
D51 Sweet Waltz B22 Slow Waltz 1
D52 Slow Waltz 3 B23 Slow Waltz 2
D53 Ballroom Fox B25 Fox Trot 2
D54 Organ Fox B26 BigBand Fox
D55 BigBand Brass B31 40's BigBand
D56 6/8 Popballad A31 Slow Pop
D57 VegasBigBand B32 BigBand
D58 Flag Waver B33 Fast BigBand
D61 Swing Ballad B41 Swing Ballad
D62 West Coast Jazz B42 Medium Swing
D63 Hard Swingin' B43 Bebop
D64 Lightly Latin B45 Latin Jazz
D65 Smooth Jazz B46 New Jazz
D66 House Mix A47 House
D67 Jammin' Funk B47 Party Funk
D68 Groove 2 B48 Groove
D71 Fast 4/4 B56 Hip Blues
D72 Medium Rock B61 Light Rock
D73 Escola de Samba A64 Samba 1
D74 Thrash Rock B64 Heavy Rock
D75 NewAge Ballad B65 Rock Ballad
D76 Medium 16 Beat B66 Half Time
D77 Country Hop B68 Rock Hip Hop
D78 Country 2 Step B71 Country
D81 Bluegrass Circle B72 Country Beat
D82 Medium Country B73 Country Bld.
D83 Marching Parade B75 March
D84 Trantella 2 B76 Tarantella
D85 Mucho Mambo A81 Mambo
D86 Salsa Picante A82 Salsa
D87 Raspa 2 B84 Raspa
D88 New Age 2 B88 New Age
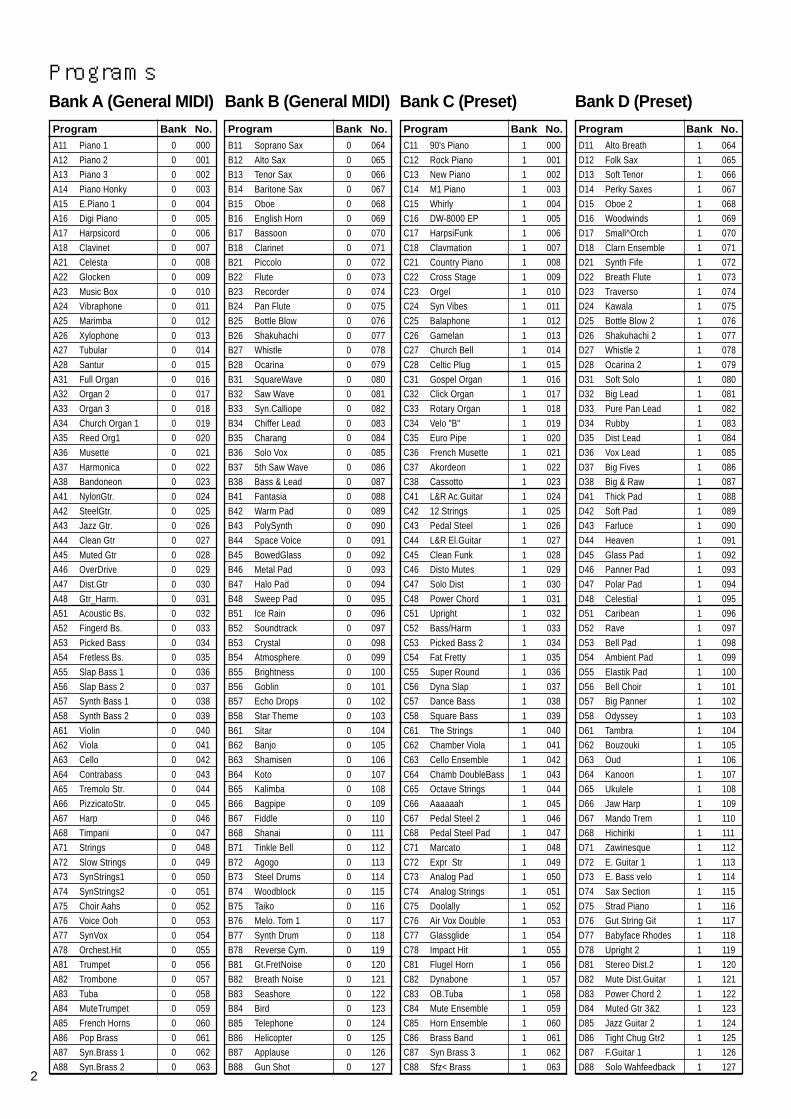
2
Program Bank No. Program Bank No. Program Bank No.Program Bank No.
B11 Soprano Sax 0 064
B12 Alto Sax 0 065
B13 Tenor Sax 0 066
B14 Baritone Sax 0 067
B15 Oboe 0 068
B16 English Horn 0 069
B17 Bassoon 0 070
B18 Clarinet 0 071
B21 Piccolo 0 072
B22 Flute 0 073
B23 Recorder 0 074
B24 Pan Flute 0 075
B25 Bottle Blow 0 076
B26 Shakuhachi 0 077
B27 Whistle 0 078
B28 Ocarina 0 079
B31 SquareWave 0 080
B32 Saw Wave 0 081
B33 Syn.Calliope 0 082
B34 Chiffer Lead 0 083
B35 Charang 0 084
B36 Solo Vox 0 085
B37 5th Saw Wave 0 086
B38 Bass & Lead 0 087
B41 Fantasia 0 088
B42 Warm Pad 0 089
B43 PolySynth 0 090
B44 Space Voice 0 091
B45 BowedGlass 0 092
B46 Metal Pad 0 093
B47 Halo Pad 0 094
B48 Sweep Pad 0 095
B51 Ice Rain 0 096
B52 Soundtrack 0 097
B53 Crystal 0 098
B54 Atmosphere 0 099
B55 Brightness 0 100
B56 Goblin 0 101
B57 Echo Drops 0 102
B58 Star Theme 0 103
B61 Sitar 0 104
B62 Banjo 0 105
B63 Shamisen 0 106
B64 Koto 0 107
B65 Kalimba 0 108
B66 Bagpipe 0 109
B67 Fiddle 0 110
B68 Shanai 0 111
B71 Tinkle Bell 0 112
B72 Agogo 0 113
B73 Steel Drums 0 114
B74 Woodblock 0 115
B75 Taiko 0 116
B76 Melo. Tom 1 0 117
B77 Synth Drum 0 118
B78 Reverse Cym. 0 119
B81 Gt.FretNoise 0 120
B82 Breath Noise 0 121
B83 Seashore 0 122
B84 Bird 0 123
B85 Telephone 0 124
B86 Helicopter 0 125
B87 Applause 0 126
B88 Gun Shot 0 127
C11 90's Piano 1 000
C12 Rock Piano 1 001
C13 New Piano 1 002
C14 M1 Piano 1 003
C15 Whirly 1 004
C16 DW-8000 EP 1 005
C17 HarpsiFunk 1 006
C18 Clavmation 1 007
C21 Country Piano 1 008
C22 Cross Stage 1 009
C23 Orgel 1 010
C24 Syn Vibes 1 011
C25 Balaphone 1 012
C26 Gamelan 1 013
C27 Church Bell 1 014
C28 Celtic Plug 1 015
C31 Gospel Organ 1 016
C32 Click Organ 1 017
C33 Rotary Organ 1 018
C34 Velo "B" 1 019
C35 Euro Pipe 1 020
C36 French Musette 1 021
C37 Akordeon 1 022
C38 Cassotto 1 023
C41 L&R Ac.Guitar 1 024
C42 12 Strings 1 025
C43 Pedal Steel 1 026
C44 L&R El.Guitar 1 027
C45 Clean Funk 1 028
C46 Disto Mutes 1 029
C47 Solo Dist 1 030
C48 Power Chord 1 031
C51 Upright 1 032
C52 Bass/Harm 1 033
C53 Picked Bass 2 1 034
C54 Fat Fretty 1 035
C55 Super Round 1 036
C56 Dyna Slap 1 037
C57 Dance Bass 1 038
C58 Square Bass 1 039
C61 The Strings 1 040
C62 Chamber Viola 1 041
C63 Cello Ensemble 1 042
C64 Chamb DoubleBass 1 043
C65 Octave Strings 1 044
C66 Aaaaaah 1 045
C67 Pedal Steel 2 1 046
C68 Pedal Steel Pad 1 047
C71 Marcato 1 048
C72 Expr Str 1 049
C73 Analog Pad 1 050
C74 Analog Strings 1 051
C75 Doolally 1 052
C76 Air Vox Double 1 053
C77 Glassglide 1 054
C78 Impact Hit 1 055
C81 Flugel Horn 1 056
C82 Dynabone 1 057
C83 OB.Tuba 1 058
C84 Mute Ensemble 1 059
C85 Horn Ensemble 1 060
C86 Brass Band 1 061
C87 Syn Brass 3 1 062
C88 Sfz< Brass 1 063
A11 Piano 1 0 000
A12 Piano 2 0 001
A13 Piano 3 0 002
A14 Piano Honky 0 003
A15 E.Piano 1 0 004
A16 Digi Piano 0 005
A17 Harpsicord 0 006
A18 Clavinet 0 007
A21 Celesta 0 008
A22 Glocken 0 009
A23 Music Box 0 010
A24 Vibraphone 0 011
A25 Marimba 0 012
A26 Xylophone 0 013
A27 Tubular 0 014
A28 Santur 0 015
A31 Full Organ 0 016
A32 Organ 2 0 017
A33 Organ 3 0 018
A34 Church Organ 1 0 019
A35 Reed Org1 0 020
A36 Musette 0 021
A37 Harmonica 0 022
A38 Bandoneon 0 023
A41 NylonGtr. 0 024
A42 SteelGtr. 0 025
A43 Jazz Gtr. 0 026
A44 Clean Gtr 0 027
A45 Muted Gtr 0 028
A46 OverDrive 0 029
A47 Dist.Gtr 0 030
A48 Gtr_Harm. 0 031
A51 Acoustic Bs. 0 032
A52 Fingerd Bs. 0 033
A53 Picked Bass 0 034
A54 Fretless Bs. 0 035
A55 Slap Bass 1 0 036
A56 Slap Bass 2 0 037
A57 Synth Bass 1 0 038
A58 Synth Bass 2 0 039
A61 Violin 0 040
A62 Viola 0 041
A63 Cello 0 042
A64 Contrabass 0 043
A65 Tremolo Str. 0 044
A66 PizzicatoStr. 0 045
A67 Harp 0 046
A68 Timpani 0 047
A71 Strings 0 048
A72 Slow Strings 0 049
A73 SynStrings1 0 050
A74 SynStrings2 0 051
A75 Choir Aahs 0 052
A76 Voice Ooh 0 053
A77 SynVox 0 054
A78 Orchest.Hit 0 055
A81 Trumpet 0 056
A82 Trombone 0 057
A83 Tuba 0 058
A84 MuteTrumpet 0 059
A85 French Horns 0 060
A86 Pop Brass 0 061
A87 Syn.Brass 1 0 062
A88 Syn.Brass 2 0 063
D11 Alto Breath 1 064
D12 Folk Sax 1 065
D13 Soft Tenor 1 066
D14 Perky Saxes 1 067
D15 Oboe 2 1 068
D16 Woodwinds 1 069
D17 Small^Orch 1 070
D18 Clarn Ensemble 1 071
D21 Synth Fife 1 072
D22 Breath Flute 1 073
D23 Traverso 1 074
D24 Kawala 1 075
D25 Bottle Blow 2 1 076
D26 Shakuhachi 2 1 077
D27 Whistle 2 1 078
D28 Ocarina 2 1 079
D31 Soft Solo 1 080
D32 Big Lead 1 081
D33 Pure Pan Lead 1 082
D34 Rubby 1 083
D35 Dist Lead 1 084
D36 Vox Lead 1 085
D37 Big Fives 1 086
D38 Big & Raw 1 087
D41 Thick Pad 1 088
D42 Soft Pad 1 089
D43 Farluce 1 090
D44 Heaven 1 091
D45 Glass Pad 1 092
D46 Panner Pad 1 093
D47 Polar Pad 1 094
D48 Celestial 1 095
D51 Caribean 1 096
D52 Rave 1 097
D53 Bell Pad 1 098
D54 Ambient Pad 1 099
D55 Elastik Pad 1 100
D56 Bell Choir 1 101
D57 Big Panner 1 102
D58 Odyssey 1 103
D61 Tambra 1 104
D62 Bouzouki 1 105
D63 Oud 1 106
D64 Kanoon 1 107
D65 Ukulele 1 108
D66 Jaw Harp 1 109
D67 Mando Trem 1 110
D68 Hichiriki 1 111
D71 Zawinesque 1 112
D72 E. Guitar 1 1 113
D73 E. Bass velo 1 114
D74 Sax Section 1 115
D75 Strad Piano 1 116
D76 Gut String Git 1 117
D77 Babyface Rhodes 1 118
D78 Upright 2 1 119
D81 Stereo Dist.2 1 120
D82 Mute Dist.Guitar 1 121
D83 Power Chord 2 1 122
D84 Muted Gtr 3&2 1 123
D85 Jazz Guitar 2 1 124
D86 Tight Chug Gtr2 1 125
D87 F.Guitar 1 1 126
D88 Solo Wahfeedback 1 127
Bank D (Preset)
ProgramsBank A (General MIDI) Bank B (General MIDI) Bank C (Preset)
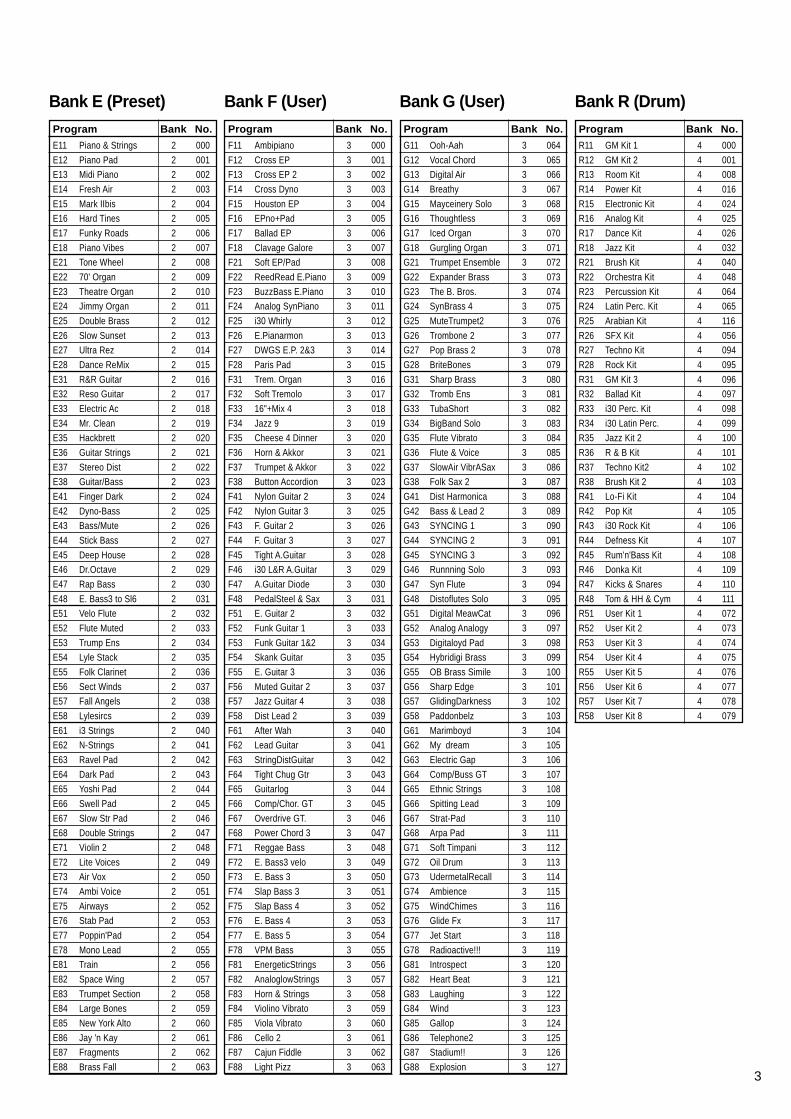
3
Program Bank No. Program Bank No. Program Bank No. Program Bank No.
G11 Ooh-Aah 3 064
G12 Vocal Chord 3 065
G13 Digital Air 3 066
G14 Breathy 3 067
G15 Mayceinery Solo 3 068
G16 Thoughtless 3 069
G17 Iced Organ 3 070
G18 Gurgling Organ 3 071
G21 Trumpet Ensemble 3 072
G22 Expander Brass 3 073
G23 The B. Bros. 3 074
G24 SynBrass 4 3 075
G25 MuteTrumpet2 3 076
G26 Trombone 2 3 077
G27 Pop Brass 2 3 078
G28 BriteBones 3 079
G31 Sharp Brass 3 080
G32 Tromb Ens 3 081
G33 TubaShort 3 082
G34 BigBand Solo 3 083
G35 Flute Vibrato 3 084
G36 Flute & Voice 3 085
G37 SlowAir VibrASax 3 086
G38 Folk Sax 2 3 087
G41 Dist Harmonica 3 088
G42 Bass & Lead 2 3 089
G43 SYNCING 1 3 090
G44 SYNCING 2 3 091
G45 SYNCING 3 3 092
G46 Runnning Solo 3 093
G47 Syn Flute 3 094
G48 Distoflutes Solo 3 095
G51 Digital MeawCat 3 096
G52 Analog Analogy 3 097
G53 Digitaloyd Pad 3 098
G54 Hybridigi Brass 3 099
G55 OB Brass Simile 3 100
G56 Sharp Edge 3 101
G57 GlidingDarkness 3 102
G58 Paddonbelz 3 103
G61 Marimboyd 3 104
G62 My dream 3 105
G63 Electric Gap 3 106
G64 Comp/Buss GT 3 107
G65 Ethnic Strings 3 108
G66 Spitting Lead 3 109
G67 Strat-Pad 3 110
G68 Arpa Pad 3 111
G71 Soft Timpani 3 112
G72 Oil Drum 3 113
G73 UdermetalRecall 3 114
G74 Ambience 3 115
G75 WindChimes 3 116
G76 Glide Fx 3 117
G77 Jet Start 3 118
G78 Radioactive!!! 3 119
G81 Introspect 3 120
G82 Heart Beat 3 121
G83 Laughing 3 122
G84 Wind 3 123
G85 Gallop 3 124
G86 Telephone2 3 125
G87 Stadium!! 3 126
G88 Explosion 3 127
R11 GM Kit 1 4 000
R12 GM Kit 2 4 001
R13 Room Kit 4 008
R14 Power Kit 4 016
R15 Electronic Kit 4 024
R16 Analog Kit 4 025
R17 Dance Kit 4 026
R18 Jazz Kit 4 032
R21 Brush Kit 4 040
R22 Orchestra Kit 4 048
R23 Percussion Kit 4 064
R24 Latin Perc. Kit 4 065
R25 Arabian Kit 4 116
R26 SFX Kit 4 056
R27 Techno Kit 4 094
R28 Rock Kit 4 095
R31 GM Kit 3 4 096
R32 Ballad Kit 4 097
R33 i30 Perc. Kit 4 098
R34 i30 Latin Perc. 4 099
R35 Jazz Kit 2 4 100
R36 R & B Kit 4 101
R37 Techno Kit2 4 102
R38 Brush Kit 2 4 103
R41 Lo-Fi Kit 4 104
R42 Pop Kit 4 105
R43 i30 Rock Kit 4 106
R44 Defness Kit 4 107
R45 Rum'n'Bass Kit 4 108
R46 Donka Kit 4 109
R47 Kicks & Snares 4 110
R48 Tom & HH & Cym 4 111
R51 User Kit 1 4 072
R52 User Kit 2 4 073
R53 User Kit 3 4 074
R54 User Kit 4 4 075
R55 User Kit 5 4 076
R56 User Kit 6 4 077
R57 User Kit 7 4 078
R58 User Kit 8 4 079
E11 Piano & Strings 2 000
E12 Piano Pad 2 001
E13 Midi Piano 2 002
E14 Fresh Air 2 003
E15 Mark IIbis 2 004
E16 Hard Tines 2 005
E17 Funky Roads 2 006
E18 Piano Vibes 2 007
E21 Tone Wheel 2 008
E22 70' Organ 2 009
E23 Theatre Organ 2 010
E24 Jimmy Organ 2 011
E25 Double Brass 2 012
E26 Slow Sunset 2 013
E27 Ultra Rez 2 014
E28 Dance ReMix 2 015
E31 R&R Guitar 2 016
E32 Reso Guitar 2 017
E33 Electric Ac 2 018
E34 Mr. Clean 2 019
E35 Hackbrett 2 020
E36 Guitar Strings 2 021
E37 Stereo Dist 2 022
E38 Guitar/Bass 2 023
E41 Finger Dark 2 024
E42 Dyno-Bass 2 025
E43 Bass/Mute 2 026
E44 Stick Bass 2 027
E45 Deep House 2 028
E46 Dr.Octave 2 029
E47 Rap Bass 2 030
E48 E. Bass3 to Sl6 2 031
E51 Velo Flute 2 032
E52 Flute Muted 2 033
E53 Trump Ens 2 034
E54 Lyle Stack 2 035
E55 Folk Clarinet 2 036
E56 Sect Winds 2 037
E57 Fall Angels 2 038
E58 Lylesircs 2 039
E61 i3 Strings 2 040
E62 N-Strings 2 041
E63 Ravel Pad 2 042
E64 Dark Pad 2 043
E65 Yoshi Pad 2 044
E66 Swell Pad 2 045
E67 Slow Str Pad 2 046
E68 Double Strings 2 047
E71 Violin 2 2 048
E72 Lite Voices 2 049
E73 Air Vox 2 050
E74 Ambi Voice 2 051
E75 Airways 2 052
E76 Stab Pad 2 053
E77 Poppin'Pad 2 054
E78 Mono Lead 2 055
E81 Train 2 056
E82 Space Wing 2 057
E83 Trumpet Section 2 058
E84 Large Bones 2 059
E85 New York Alto 2 060
E86 Jay 'n Kay 2 061
E87 Fragments 2 062
E88 Brass Fall 2 063
F11 Ambipiano 3 000
F12 Cross EP 3 001
F13 Cross EP 2 3 002
F14 Cross Dyno 3 003
F15 Houston EP 3 004
F16 EPno+Pad 3 005
F17 Ballad EP 3 006
F18 Clavage Galore 3 007
F21 Soft EP/Pad 3 008
F22 ReedRead E.Piano 3 009
F23 BuzzBass E.Piano 3 010
F24 Analog SynPiano 3 011
F25 i30 Whirly 3 012
F26 E.Pianarmon 3 013
F27 DWGS E.P. 2&3 3 014
F28 Paris Pad 3 015
F31 Trem. Organ 3 016
F32 Soft Tremolo 3 017
F33 16"+Mix 4 3 018
F34 Jazz 9 3 019
F35 Cheese 4 Dinner 3 020
F36 Horn & Akkor 3 021
F37 Trumpet & Akkor 3 022
F38 Button Accordion 3 023
F41 Nylon Guitar 2 3 024
F42 Nylon Guitar 3 3 025
F43 F. Guitar 2 3 026
F44 F. Guitar 3 3 027
F45 Tight A.Guitar 3 028
F46 i30 L&R A.Guitar 3 029
F47 A.Guitar Diode 3 030
F48 PedalSteel & Sax 3 031
F51 E. Guitar 2 3 032
F52 Funk Guitar 1 3 033
F53 Funk Guitar 1&2 3 034
F54 Skank Guitar 3 035
F55 E. Guitar 3 3 036
F56 Muted Guitar 2 3 037
F57 Jazz Guitar 4 3 038
F58 Dist Lead 2 3 039
F61 After Wah 3 040
F62 Lead Guitar 3 041
F63 StringDistGuitar 3 042
F64 Tight Chug Gtr 3 043
F65 Guitarlog 3 044
F66 Comp/Chor. GT 3 045
F67 Overdrive GT. 3 046
F68 Power Chord 3 3 047
F71 Reggae Bass 3 048
F72 E. Bass3 velo 3 049
F73 E. Bass 3 3 050
F74 Slap Bass 3 3 051
F75 Slap Bass 4 3 052
F76 E. Bass 4 3 053
F77 E. Bass 5 3 054
F78 VPM Bass 3 055
F81 EnergeticStrings 3 056
F82 AnaloglowStrings 3 057
F83 Horn & Strings 3 058
F84 Violino Vibrato 3 059
F85 Viola Vibrato 3 060
F86 Cello 2 3 061
F87 Cajun Fiddle 3 062
F88 Light Pizz 3 063
Bank E (Preset) Bank F (User) Bank G (User) Bank R (Drum)
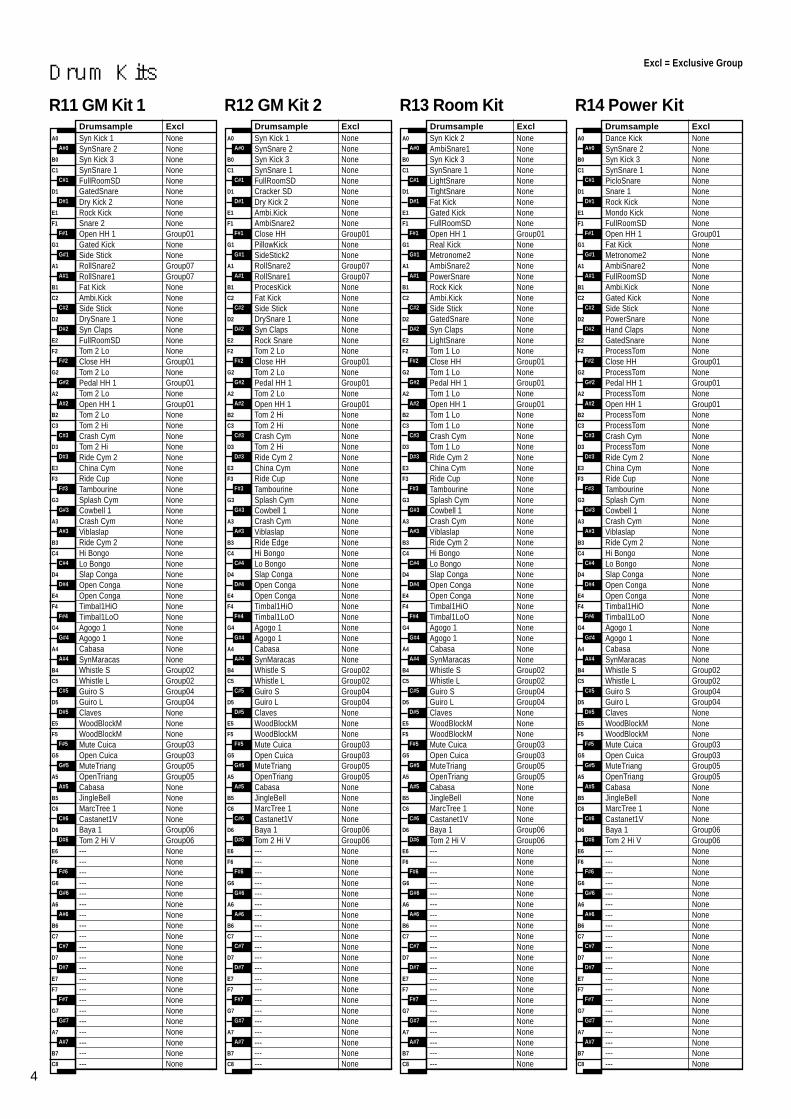
Excl = Exclusive Group
4
Drumsample Excl Drumsample Excl Drumsample Excl Drumsample ExclA0
B0
C1
D1
E1
F1
G1
A1
B1
C2
D2
E2
F2
G2
A2
B2
C3
D3
E3
F3
G3
A3
B3
C4
D4
E4
F4
G4
A4
B4
C5
D5
E5
F5
G5
A5
B5
C6
D6
E6
F6
G6
A6
B6
C7
D7
E7
F7
G7
A7
B7
C8
A#0
C#1
D#1
F#1
G#1
A#1
C#2
D#2
F#2
G#2
A#2
C#3
D#3
F#3
G#3
A#3
C#4
D#4
F#4
G#4
A#4
C#5
D#5
F#5
G#5
A#5
C#6
D#6
F#6
G#6
A#6
C#7
D#7
F#7
G#7
A#7
A0
B0
C1
D1
E1
F1
G1
A1
B1
C2
D2
E2
F2
G2
A2
B2
C3
D3
E3
F3
G3
A3
B3
C4
D4
E4
F4
G4
A4
B4
C5
D5
E5
F5
G5
A5
B5
C6
D6
E6
F6
G6
A6
B6
C7
D7
E7
F7
G7
A7
B7
C8
A#0
C#1
D#1
F#1
G#1
A#1
C#2
D#2
F#2
G#2
A#2
C#3
D#3
F#3
G#3
A#3
C#4
D#4
F#4
G#4
A#4
C#5
D#5
F#5
G#5
A#5
C#6
D#6
F#6
G#6
A#6
C#7
D#7
F#7
G#7
A#7
A0
B0
C1
D1
E1
F1
G1
A1
B1
C2
D2
E2
F2
G2
A2
B2
C3
D3
E3
F3
G3
A3
B3
C4
D4
E4
F4
G4
A4
B4
C5
D5
E5
F5
G5
A5
B5
C6
D6
E6
F6
G6
A6
B6
C7
D7
E7
F7
G7
A7
B7
C8
A#0
C#1
D#1
F#1
G#1
A#1
C#2
D#2
F#2
G#2
A#2
C#3
D#3
F#3
G#3
A#3
C#4
D#4
F#4
G#4
A#4
C#5
D#5
F#5
G#5
A#5
C#6
D#6
F#6
G#6
A#6
C#7
D#7
F#7
G#7
A#7
A0
B0
C1
D1
E1
F1
G1
A1
B1
C2
D2
E2
F2
G2
A2
B2
C3
D3
E3
F3
G3
A3
B3
C4
D4
E4
F4
G4
A4
B4
C5
D5
E5
F5
G5
A5
B5
C6
D6
E6
F6
G6
A6
B6
C7
D7
E7
F7
G7
A7
B7
C8
A#0
C#1
D#1
F#1
G#1
A#1
C#2
D#2
F#2
G#2
A#2
C#3
D#3
F#3
G#3
A#3
C#4
D#4
F#4
G#4
A#4
C#5
D#5
F#5
G#5
A#5
C#6
D#6
F#6
G#6
A#6
C#7
D#7
F#7
G#7
A#7
Drum KitsR11 GM Kit 1
Syn Kick 1 NoneSynSnare 2 NoneSyn Kick 3 NoneSynSnare 1 NoneFullRoomSD NoneCracker SD NoneDry Kick 2 NoneAmbi.Kick NoneAmbiSnare2 NoneClose HH Group01PillowKick NoneSideStick2 NoneRollSnare2 Group07RollSnare1 Group07ProcesKick NoneFat Kick NoneSide Stick NoneDrySnare 1 NoneSyn Claps NoneRock Snare NoneTom 2 Lo NoneClose HH Group01Tom 2 Lo NonePedal HH 1 Group01Tom 2 Lo NoneOpen HH 1 Group01Tom 2 Hi NoneTom 2 Hi NoneCrash Cym NoneTom 2 Hi NoneRide Cym 2 NoneChina Cym NoneRide Cup NoneTambourine NoneSplash Cym NoneCowbell 1 NoneCrash Cym NoneViblaslap NoneRide Edge NoneHi Bongo NoneLo Bongo NoneSlap Conga NoneOpen Conga NoneOpen Conga NoneTimbal1HiO NoneTimbal1LoO NoneAgogo 1 NoneAgogo 1 NoneCabasa NoneSynMaracas NoneWhistle S Group02Whistle L Group02Guiro S Group04Guiro L Group04Claves NoneWoodBlockM NoneWoodBlockM NoneMute Cuica Group03Open Cuica Group03MuteTriang Group05OpenTriang Group05Cabasa NoneJingleBell NoneMarcTree 1 NoneCastanet1V NoneBaya 1 Group06Tom 2 Hi V Group06--- None--- None--- None--- None--- None--- None--- None--- None--- None--- None--- None--- None--- None--- None--- None--- None--- None--- None--- None--- None--- None
Syn Kick 2 NoneAmbiSnare1 NoneSyn Kick 3 NoneSynSnare 1 NoneLightSnare NoneTightSnare NoneFat Kick NoneGated Kick NoneFullRoomSD NoneOpen HH 1 Group01Real Kick NoneMetronome2 NoneAmbiSnare2 NonePowerSnare NoneRock Kick NoneAmbi.Kick NoneSide Stick NoneGatedSnare NoneSyn Claps NoneLightSnare NoneTom 1 Lo NoneClose HH Group01Tom 1 Lo NonePedal HH 1 Group01Tom 1 Lo NoneOpen HH 1 Group01Tom 1 Lo NoneTom 1 Lo NoneCrash Cym NoneTom 1 Lo NoneRide Cym 2 NoneChina Cym NoneRide Cup NoneTambourine NoneSplash Cym NoneCowbell 1 NoneCrash Cym NoneViblaslap NoneRide Cym 2 NoneHi Bongo NoneLo Bongo NoneSlap Conga NoneOpen Conga NoneOpen Conga NoneTimbal1HiO NoneTimbal1LoO NoneAgogo 1 NoneAgogo 1 NoneCabasa NoneSynMaracas NoneWhistle S Group02Whistle L Group02Guiro S Group04Guiro L Group04Claves NoneWoodBlockM NoneWoodBlockM NoneMute Cuica Group03Open Cuica Group03MuteTriang Group05OpenTriang Group05Cabasa NoneJingleBell NoneMarcTree 1 NoneCastanet1V NoneBaya 1 Group06Tom 2 Hi V Group06--- None--- None--- None--- None--- None--- None--- None--- None--- None--- None--- None--- None--- None--- None--- None--- None--- None--- None--- None--- None--- None
Dance Kick NoneSynSnare 2 NoneSyn Kick 3 NoneSynSnare 1 NonePicloSnare NoneSnare 1 NoneRock Kick NoneMondo Kick NoneFullRoomSD NoneOpen HH 1 Group01Fat Kick NoneMetronome2 NoneAmbiSnare2 NoneFullRoomSD NoneAmbi.Kick NoneGated Kick NoneSide Stick NonePowerSnare NoneHand Claps NoneGatedSnare NoneProcessTom NoneClose HH Group01ProcessTom NonePedal HH 1 Group01ProcessTom NoneOpen HH 1 Group01ProcessTom NoneProcessTom NoneCrash Cym NoneProcessTom NoneRide Cym 2 NoneChina Cym NoneRide Cup NoneTambourine NoneSplash Cym NoneCowbell 1 NoneCrash Cym NoneViblaslap NoneRide Cym 2 NoneHi Bongo NoneLo Bongo NoneSlap Conga NoneOpen Conga NoneOpen Conga NoneTimbal1HiO NoneTimbal1LoO NoneAgogo 1 NoneAgogo 1 NoneCabasa NoneSynMaracas NoneWhistle S Group02Whistle L Group02Guiro S Group04Guiro L Group04Claves NoneWoodBlockM NoneWoodBlockM NoneMute Cuica Group03Open Cuica Group03MuteTriang Group05OpenTriang Group05Cabasa NoneJingleBell NoneMarcTree 1 NoneCastanet1V NoneBaya 1 Group06Tom 2 Hi V Group06--- None--- None--- None--- None--- None--- None--- None--- None--- None--- None--- None--- None--- None--- None--- None--- None--- None--- None--- None--- None--- None
Syn Kick 1 NoneSynSnare 2 NoneSyn Kick 3 NoneSynSnare 1 NoneFullRoomSD NoneGatedSnare NoneDry Kick 2 NoneRock Kick NoneSnare 2 NoneOpen HH 1 Group01Gated Kick NoneSide Stick NoneRollSnare2 Group07RollSnare1 Group07Fat Kick NoneAmbi.Kick NoneSide Stick NoneDrySnare 1 NoneSyn Claps NoneFullRoomSD NoneTom 2 Lo NoneClose HH Group01Tom 2 Lo NonePedal HH 1 Group01Tom 2 Lo NoneOpen HH 1 Group01Tom 2 Lo NoneTom 2 Hi NoneCrash Cym NoneTom 2 Hi NoneRide Cym 2 NoneChina Cym NoneRide Cup NoneTambourine NoneSplash Cym NoneCowbell 1 NoneCrash Cym NoneViblaslap NoneRide Cym 2 NoneHi Bongo NoneLo Bongo NoneSlap Conga NoneOpen Conga NoneOpen Conga NoneTimbal1HiO NoneTimbal1LoO NoneAgogo 1 NoneAgogo 1 NoneCabasa NoneSynMaracas NoneWhistle S Group02Whistle L Group02Guiro S Group04Guiro L Group04Claves NoneWoodBlockM NoneWoodBlockM NoneMute Cuica Group03Open Cuica Group03MuteTriang Group05OpenTriang Group05Cabasa NoneJingleBell NoneMarcTree 1 NoneCastanet1V NoneBaya 1 Group06Tom 2 Hi V Group06--- None--- None--- None--- None--- None--- None--- None--- None--- None--- None--- None--- None--- None--- None--- None--- None--- None--- None--- None--- None--- None
R12 GM Kit 2 R13 Room Kit R14 Power Kit
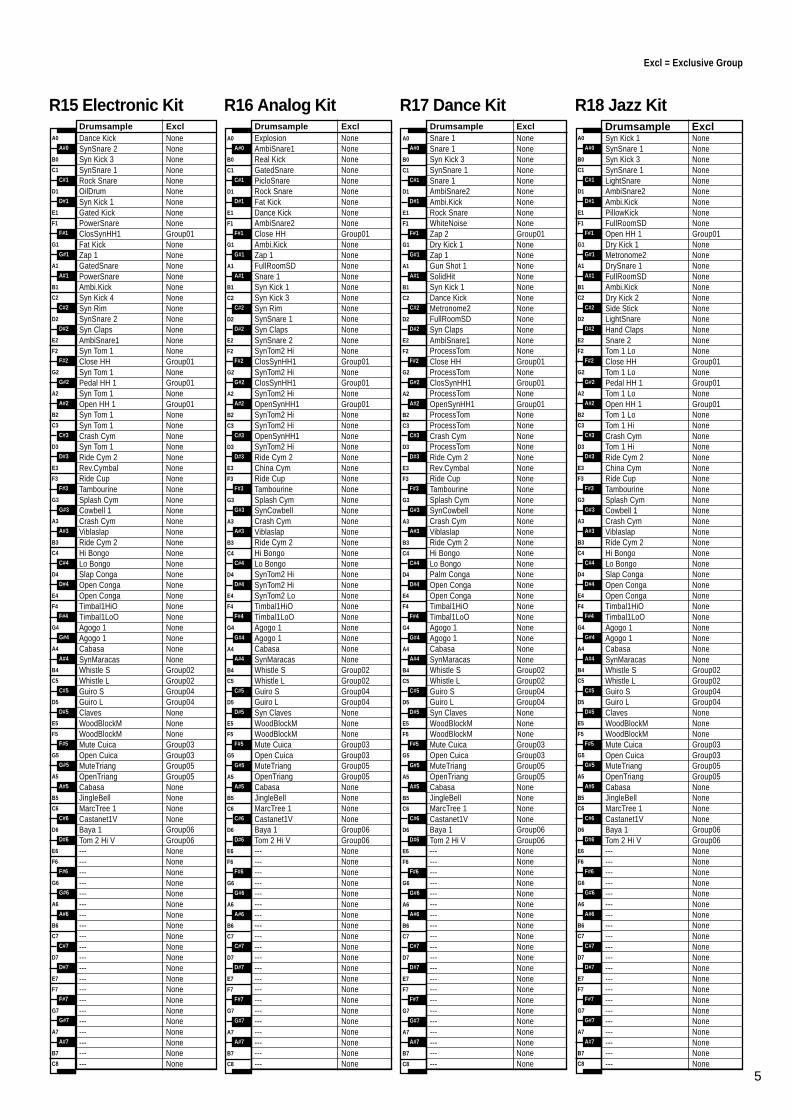
Excl = Exclusive Group
5
Drumsample Excl Drumsample Excl Drumsample Excl Drumsample ExclA0
B0
C1
D1
E1
F1
G1
A1
B1
C2
D2
E2
F2
G2
A2
B2
C3
D3
E3
F3
G3
A3
B3
C4
D4
E4
F4
G4
A4
B4
C5
D5
E5
F5
G5
A5
B5
C6
D6
E6
F6
G6
A6
B6
C7
D7
E7
F7
G7
A7
B7
C8
A#0
C#1
D#1
F#1
G#1
A#1
C#2
D#2
F#2
G#2
A#2
C#3
D#3
F#3
G#3
A#3
C#4
D#4
F#4
G#4
A#4
C#5
D#5
F#5
G#5
A#5
C#6
D#6
F#6
G#6
A#6
C#7
D#7
F#7
G#7
A#7
A0
B0
C1
D1
E1
F1
G1
A1
B1
C2
D2
E2
F2
G2
A2
B2
C3
D3
E3
F3
G3
A3
B3
C4
D4
E4
F4
G4
A4
B4
C5
D5
E5
F5
G5
A5
B5
C6
D6
E6
F6
G6
A6
B6
C7
D7
E7
F7
G7
A7
B7
C8
A#0
C#1
D#1
F#1
G#1
A#1
C#2
D#2
F#2
G#2
A#2
C#3
D#3
F#3
G#3
A#3
C#4
D#4
F#4
G#4
A#4
C#5
D#5
F#5
G#5
A#5
C#6
D#6
F#6
G#6
A#6
C#7
D#7
F#7
G#7
A#7
A0
B0
C1
D1
E1
F1
G1
A1
B1
C2
D2
E2
F2
G2
A2
B2
C3
D3
E3
F3
G3
A3
B3
C4
D4
E4
F4
G4
A4
B4
C5
D5
E5
F5
G5
A5
B5
C6
D6
E6
F6
G6
A6
B6
C7
D7
E7
F7
G7
A7
B7
C8
A#0
C#1
D#1
F#1
G#1
A#1
C#2
D#2
F#2
G#2
A#2
C#3
D#3
F#3
G#3
A#3
C#4
D#4
F#4
G#4
A#4
C#5
D#5
F#5
G#5
A#5
C#6
D#6
F#6
G#6
A#6
C#7
D#7
F#7
G#7
A#7
A0
B0
C1
D1
E1
F1
G1
A1
B1
C2
D2
E2
F2
G2
A2
B2
C3
D3
E3
F3
G3
A3
B3
C4
D4
E4
F4
G4
A4
B4
C5
D5
E5
F5
G5
A5
B5
C6
D6
E6
F6
G6
A6
B6
C7
D7
E7
F7
G7
A7
B7
C8
A#0
C#1
D#1
F#1
G#1
A#1
C#2
D#2
F#2
G#2
A#2
C#3
D#3
F#3
G#3
A#3
C#4
D#4
F#4
G#4
A#4
C#5
D#5
F#5
G#5
A#5
C#6
D#6
F#6
G#6
A#6
C#7
D#7
F#7
G#7
A#7
Explosion NoneAmbiSnare1 NoneReal Kick NoneGatedSnare NonePicloSnare NoneRock Snare NoneFat Kick NoneDance Kick NoneAmbiSnare2 NoneClose HH Group01Ambi.Kick NoneZap 1 NoneFullRoomSD NoneSnare 1 NoneSyn Kick 1 NoneSyn Kick 3 NoneSyn Rim NoneSynSnare 1 NoneSyn Claps NoneSynSnare 2 NoneSynTom2 Hi NoneClosSynHH1 Group01SynTom2 Hi NoneClosSynHH1 Group01SynTom2 Hi NoneOpenSynHH1 Group01SynTom2 Hi NoneSynTom2 Hi NoneOpenSynHH1 NoneSynTom2 Hi NoneRide Cym 2 NoneChina Cym NoneRide Cup NoneTambourine NoneSplash Cym NoneSynCowbell NoneCrash Cym NoneViblaslap NoneRide Cym 2 NoneHi Bongo NoneLo Bongo NoneSynTom2 Hi NoneSynTom2 Hi NoneSynTom2 Lo NoneTimbal1HiO NoneTimbal1LoO NoneAgogo 1 NoneAgogo 1 NoneCabasa NoneSynMaracas NoneWhistle S Group02Whistle L Group02Guiro S Group04Guiro L Group04Syn Claves NoneWoodBlockM NoneWoodBlockM NoneMute Cuica Group03Open Cuica Group03MuteTriang Group05OpenTriang Group05Cabasa NoneJingleBell NoneMarcTree 1 NoneCastanet1V NoneBaya 1 Group06Tom 2 Hi V Group06--- None--- None--- None--- None--- None--- None--- None--- None--- None--- None--- None--- None--- None--- None--- None--- None--- None--- None--- None--- None--- None
Snare 1 NoneSnare 1 NoneSyn Kick 3 NoneSynSnare 1 NoneSnare 1 NoneAmbiSnare2 NoneAmbi.Kick NoneRock Snare NoneWhiteNoise NoneZap 2 Group01Dry Kick 1 NoneZap 1 NoneGun Shot 1 NoneSolidHit NoneSyn Kick 1 NoneDance Kick NoneMetronome2 NoneFullRoomSD NoneSyn Claps NoneAmbiSnare1 NoneProcessTom NoneClose HH Group01ProcessTom NoneClosSynHH1 Group01ProcessTom NoneOpenSynHH1 Group01ProcessTom NoneProcessTom NoneCrash Cym NoneProcessTom NoneRide Cym 2 NoneRev.Cymbal NoneRide Cup NoneTambourine NoneSplash Cym NoneSynCowbell NoneCrash Cym NoneViblaslap NoneRide Cym 2 NoneHi Bongo NoneLo Bongo NonePalm Conga NoneOpen Conga NoneOpen Conga NoneTimbal1HiO NoneTimbal1LoO NoneAgogo 1 NoneAgogo 1 NoneCabasa NoneSynMaracas NoneWhistle S Group02Whistle L Group02Guiro S Group04Guiro L Group04Syn Claves NoneWoodBlockM NoneWoodBlockM NoneMute Cuica Group03Open Cuica Group03MuteTriang Group05OpenTriang Group05Cabasa NoneJingleBell NoneMarcTree 1 NoneCastanet1V NoneBaya 1 Group06Tom 2 Hi V Group06--- None--- None--- None--- None--- None--- None--- None--- None--- None--- None--- None--- None--- None--- None--- None--- None--- None--- None--- None--- None--- None
Syn Kick 1 NoneSynSnare 1 NoneSyn Kick 3 NoneSynSnare 1 NoneLightSnare NoneAmbiSnare2 NoneAmbi.Kick NonePillowKick NoneFullRoomSD NoneOpen HH 1 Group01Dry Kick 1 NoneMetronome2 NoneDrySnare 1 NoneFullRoomSD NoneAmbi.Kick NoneDry Kick 2 NoneSide Stick NoneLightSnare NoneHand Claps NoneSnare 2 NoneTom 1 Lo NoneClose HH Group01Tom 1 Lo NonePedal HH 1 Group01Tom 1 Lo NoneOpen HH 1 Group01Tom 1 Lo NoneTom 1 Hi NoneCrash Cym NoneTom 1 Hi NoneRide Cym 2 NoneChina Cym NoneRide Cup NoneTambourine NoneSplash Cym NoneCowbell 1 NoneCrash Cym NoneViblaslap NoneRide Cym 2 NoneHi Bongo NoneLo Bongo NoneSlap Conga NoneOpen Conga NoneOpen Conga NoneTimbal1HiO NoneTimbal1LoO NoneAgogo 1 NoneAgogo 1 NoneCabasa NoneSynMaracas NoneWhistle S Group02Whistle L Group02Guiro S Group04Guiro L Group04Claves NoneWoodBlockM NoneWoodBlockM NoneMute Cuica Group03Open Cuica Group03MuteTriang Group05OpenTriang Group05Cabasa NoneJingleBell NoneMarcTree 1 NoneCastanet1V NoneBaya 1 Group06Tom 2 Hi V Group06--- None--- None--- None--- None--- None--- None--- None--- None--- None--- None--- None--- None--- None--- None--- None--- None--- None--- None--- None--- None--- None
Dance Kick NoneSynSnare 2 NoneSyn Kick 3 NoneSynSnare 1 NoneRock Snare NoneOilDrum NoneSyn Kick 1 NoneGated Kick NonePowerSnare NoneClosSynHH1 Group01Fat Kick NoneZap 1 NoneGatedSnare NonePowerSnare NoneAmbi.Kick NoneSyn Kick 4 NoneSyn Rim NoneSynSnare 2 NoneSyn Claps NoneAmbiSnare1 NoneSyn Tom 1 NoneClose HH Group01Syn Tom 1 NonePedal HH 1 Group01Syn Tom 1 NoneOpen HH 1 Group01Syn Tom 1 NoneSyn Tom 1 NoneCrash Cym NoneSyn Tom 1 NoneRide Cym 2 NoneRev.Cymbal NoneRide Cup NoneTambourine NoneSplash Cym NoneCowbell 1 NoneCrash Cym NoneViblaslap NoneRide Cym 2 NoneHi Bongo NoneLo Bongo NoneSlap Conga NoneOpen Conga NoneOpen Conga NoneTimbal1HiO NoneTimbal1LoO NoneAgogo 1 NoneAgogo 1 NoneCabasa NoneSynMaracas NoneWhistle S Group02Whistle L Group02Guiro S Group04Guiro L Group04Claves NoneWoodBlockM NoneWoodBlockM NoneMute Cuica Group03Open Cuica Group03MuteTriang Group05OpenTriang Group05Cabasa NoneJingleBell NoneMarcTree 1 NoneCastanet1V NoneBaya 1 Group06Tom 2 Hi V Group06--- None--- None--- None--- None--- None--- None--- None--- None--- None--- None--- None--- None--- None--- None--- None--- None--- None--- None--- None--- None--- None
R15 Electronic Kit R16 Analog Kit R17 Dance Kit R18 Jazz Kit
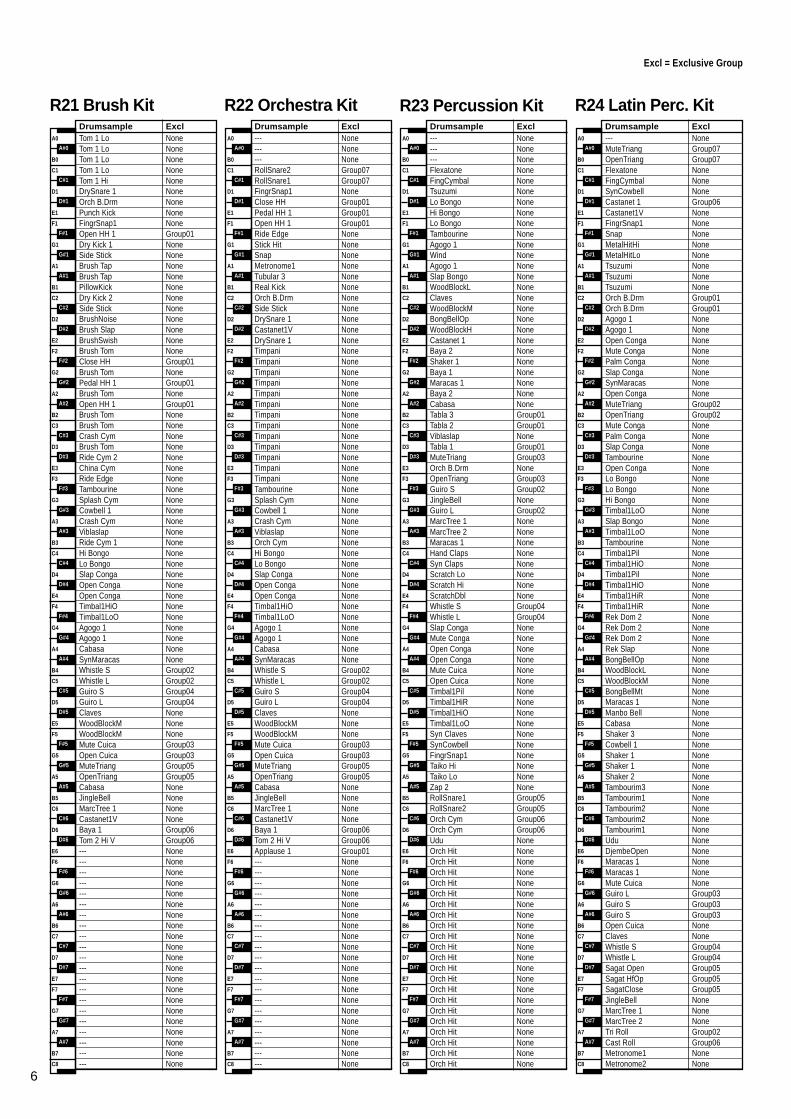
Excl = Exclusive Group
6
Drumsample Excl Drumsample Excl Drumsample Excl Drumsample ExclA0
B0
C1
D1
E1
F1
G1
A1
B1
C2
D2
E2
F2
G2
A2
B2
C3
D3
E3
F3
G3
A3
B3
C4
D4
E4
F4
G4
A4
B4
C5
D5
E5
F5
G5
A5
B5
C6
D6
E6
F6
G6
A6
B6
C7
D7
E7
F7
G7
A7
B7
C8
A#0
C#1
D#1
F#1
G#1
A#1
C#2
D#2
F#2
G#2
A#2
C#3
D#3
F#3
G#3
A#3
C#4
D#4
F#4
G#4
A#4
C#5
D#5
F#5
G#5
A#5
C#6
D#6
F#6
G#6
A#6
C#7
D#7
F#7
G#7
A#7
A0
B0
C1
D1
E1
F1
G1
A1
B1
C2
D2
E2
F2
G2
A2
B2
C3
D3
E3
F3
G3
A3
B3
C4
D4
E4
F4
G4
A4
B4
C5
D5
E5
F5
G5
A5
B5
C6
D6
E6
F6
G6
A6
B6
C7
D7
E7
F7
G7
A7
B7
C8
A#0
C#1
D#1
F#1
G#1
A#1
C#2
D#2
F#2
G#2
A#2
C#3
D#3
F#3
G#3
A#3
C#4
D#4
F#4
G#4
A#4
C#5
D#5
F#5
G#5
A#5
C#6
D#6
F#6
G#6
A#6
C#7
D#7
F#7
G#7
A#7
A0
B0
C1
D1
E1
F1
G1
A1
B1
C2
D2
E2
F2
G2
A2
B2
C3
D3
E3
F3
G3
A3
B3
C4
D4
E4
F4
G4
A4
B4
C5
D5
E5
F5
G5
A5
B5
C6
D6
E6
F6
G6
A6
B6
C7
D7
E7
F7
G7
A7
B7
C8
A#0
C#1
D#1
F#1
G#1
A#1
C#2
D#2
F#2
G#2
A#2
C#3
D#3
F#3
G#3
A#3
C#4
D#4
F#4
G#4
A#4
C#5
D#5
F#5
G#5
A#5
C#6
D#6
F#6
G#6
A#6
C#7
D#7
F#7
G#7
A#7
A0
B0
C1
D1
E1
F1
G1
A1
B1
C2
D2
E2
F2
G2
A2
B2
C3
D3
E3
F3
G3
A3
B3
C4
D4
E4
F4
G4
A4
B4
C5
D5
E5
F5
G5
A5
B5
C6
D6
E6
F6
G6
A6
B6
C7
D7
E7
F7
G7
A7
B7
C8
A#0
C#1
D#1
F#1
G#1
A#1
C#2
D#2
F#2
G#2
A#2
C#3
D#3
F#3
G#3
A#3
C#4
D#4
F#4
G#4
A#4
C#5
D#5
F#5
G#5
A#5
C#6
D#6
F#6
G#6
A#6
C#7
D#7
F#7
G#7
A#7
Tom 1 Lo NoneTom 1 Lo NoneTom 1 Lo NoneTom 1 Lo NoneTom 1 Hi NoneDrySnare 1 NoneOrch B.Drm NonePunch Kick NoneFingrSnap1 NoneOpen HH 1 Group01Dry Kick 1 NoneSide Stick NoneBrush Tap NoneBrush Tap NonePillowKick NoneDry Kick 2 NoneSide Stick NoneBrushNoise NoneBrush Slap NoneBrushSwish NoneBrush Tom NoneClose HH Group01Brush Tom NonePedal HH 1 Group01Brush Tom NoneOpen HH 1 Group01Brush Tom NoneBrush Tom NoneCrash Cym NoneBrush Tom NoneRide Cym 2 NoneChina Cym NoneRide Edge NoneTambourine NoneSplash Cym NoneCowbell 1 NoneCrash Cym NoneViblaslap NoneRide Cym 1 NoneHi Bongo NoneLo Bongo NoneSlap Conga NoneOpen Conga NoneOpen Conga NoneTimbal1HiO NoneTimbal1LoO NoneAgogo 1 NoneAgogo 1 NoneCabasa NoneSynMaracas NoneWhistle S Group02Whistle L Group02Guiro S Group04Guiro L Group04Claves NoneWoodBlockM NoneWoodBlockM NoneMute Cuica Group03Open Cuica Group03MuteTriang Group05OpenTriang Group05Cabasa NoneJingleBell NoneMarcTree 1 NoneCastanet1V NoneBaya 1 Group06Tom 2 Hi V Group06--- None--- None--- None--- None--- None--- None--- None--- None--- None--- None--- None--- None--- None--- None--- None--- None--- None--- None--- None--- None--- None
--- None--- None--- NoneRollSnare2 Group07RollSnare1 Group07FingrSnap1 NoneClose HH Group01Pedal HH 1 Group01Open HH 1 Group01Ride Edge NoneStick Hit NoneSnap NoneMetronome1 NoneTubular 3 NoneReal Kick NoneOrch B.Drm NoneSide Stick NoneDrySnare 1 NoneCastanet1V NoneDrySnare 1 NoneTimpani NoneTimpani NoneTimpani NoneTimpani NoneTimpani NoneTimpani NoneTimpani NoneTimpani NoneTimpani NoneTimpani NoneTimpani NoneTimpani NoneTimpani NoneTambourine NoneSplash Cym NoneCowbell 1 NoneCrash Cym NoneViblaslap NoneOrch Cym NoneHi Bongo NoneLo Bongo NoneSlap Conga NoneOpen Conga NoneOpen Conga NoneTimbal1HiO NoneTimbal1LoO NoneAgogo 1 NoneAgogo 1 NoneCabasa NoneSynMaracas NoneWhistle S Group02Whistle L Group02Guiro S Group04Guiro L Group04Claves NoneWoodBlockM NoneWoodBlockM NoneMute Cuica Group03Open Cuica Group03MuteTriang Group05OpenTriang Group05Cabasa NoneJingleBell NoneMarcTree 1 NoneCastanet1V NoneBaya 1 Group06Tom 2 Hi V Group06Applause 1 Group01--- None--- None--- None--- None--- None--- None--- None--- None--- None--- None--- None--- None--- None--- None--- None--- None--- None--- None--- None--- None
--- None--- None--- NoneFlexatone NoneFingCymbal NoneTsuzumi NoneLo Bongo NoneHi Bongo NoneLo Bongo NoneTambourine NoneAgogo 1 NoneWind NoneAgogo 1 NoneSlap Bongo NoneWoodBlockL NoneClaves NoneWoodBlockM NoneBongBellOp NoneWoodBlockH NoneCastanet 1 NoneBaya 2 NoneShaker 1 NoneBaya 1 NoneMaracas 1 NoneBaya 2 NoneCabasa NoneTabla 3 Group01Tabla 2 Group01Viblaslap NoneTabla 1 Group01MuteTriang Group03Orch B.Drm NoneOpenTriang Group03Guiro S Group02JingleBell NoneGuiro L Group02MarcTree 1 NoneMarcTree 2 NoneMaracas 1 NoneHand Claps NoneSyn Claps NoneScratch Lo NoneScratch Hi NoneScratchDbl NoneWhistle S Group04Whistle L Group04Slap Conga NoneMute Conga NoneOpen Conga NoneOpen Conga NoneMute Cuica NoneOpen Cuica NoneTimbal1Pil NoneTimbal1HiR NoneTimbal1HiO NoneTimbal1LoO NoneSyn Claves NoneSynCowbell NoneFingrSnap1 NoneTaiko Hi NoneTaiko Lo NoneZap 2 NoneRollSnare1 Group05RollSnare2 Group05Orch Cym Group06Orch Cym Group06Udu NoneOrch Hit NoneOrch Hit NoneOrch Hit NoneOrch Hit NoneOrch Hit NoneOrch Hit NoneOrch Hit NoneOrch Hit NoneOrch Hit NoneOrch Hit NoneOrch Hit NoneOrch Hit NoneOrch Hit NoneOrch Hit NoneOrch Hit NoneOrch Hit NoneOrch Hit NoneOrch Hit NoneOrch Hit NoneOrch Hit NoneOrch Hit None
--- NoneMuteTriang Group07OpenTriang Group07Flexatone NoneFingCymbal NoneSynCowbell NoneCastanet 1 Group06Castanet1V NoneFingrSnap1 NoneSnap NoneMetalHitHi NoneMetalHitLo NoneTsuzumi NoneTsuzumi NoneTsuzumi NoneOrch B.Drm Group01Orch B.Drm Group01Agogo 1 NoneAgogo 1 NoneOpen Conga NoneMute Conga NonePalm Conga NoneSlap Conga NoneSynMaracas NoneOpen Conga NoneMuteTriang Group02OpenTriang Group02Mute Conga NonePalm Conga NoneSlap Conga NoneTambourine NoneOpen Conga NoneLo Bongo NoneLo Bongo NoneHi Bongo NoneTimbal1LoO NoneSlap Bongo NoneTimbal1LoO NoneTambourine NoneTimbal1Pil NoneTimbal1HiO NoneTimbal1Pil NoneTimbal1HiO NoneTimbal1HiR NoneTimbal1HiR NoneRek Dom 2 NoneRek Dom 2 NoneRek Dom 2 NoneRek Slap NoneBongBellOp NoneWoodBlockL NoneWoodBlockM NoneBongBellMt NoneMaracas 1 NoneManbo Bell NoneCabasa NoneShaker 3 NoneCowbell 1 NoneShaker 1 NoneShaker 1 NoneShaker 2 NoneTambourim3 NoneTambourim1 NoneTambourim2 NoneTambourim2 NoneTambourim1 NoneUdu NoneDjembeOpen NoneMaracas 1 NoneMaracas 1 NoneMute Cuica NoneGuiro L Group03Guiro S Group03Guiro S Group03Open Cuica NoneClaves NoneWhistle S Group04Whistle L Group04Sagat Open Group05Sagat HfOp Group05SagatClose Group05JingleBell NoneMarcTree 1 NoneMarcTree 2 NoneTri Roll Group02Cast Roll Group06Metronome1 NoneMetronome2 None
R21 Brush Kit R22 Orchestra Kit R23 Percussion Kit R24 Latin Perc. Kit
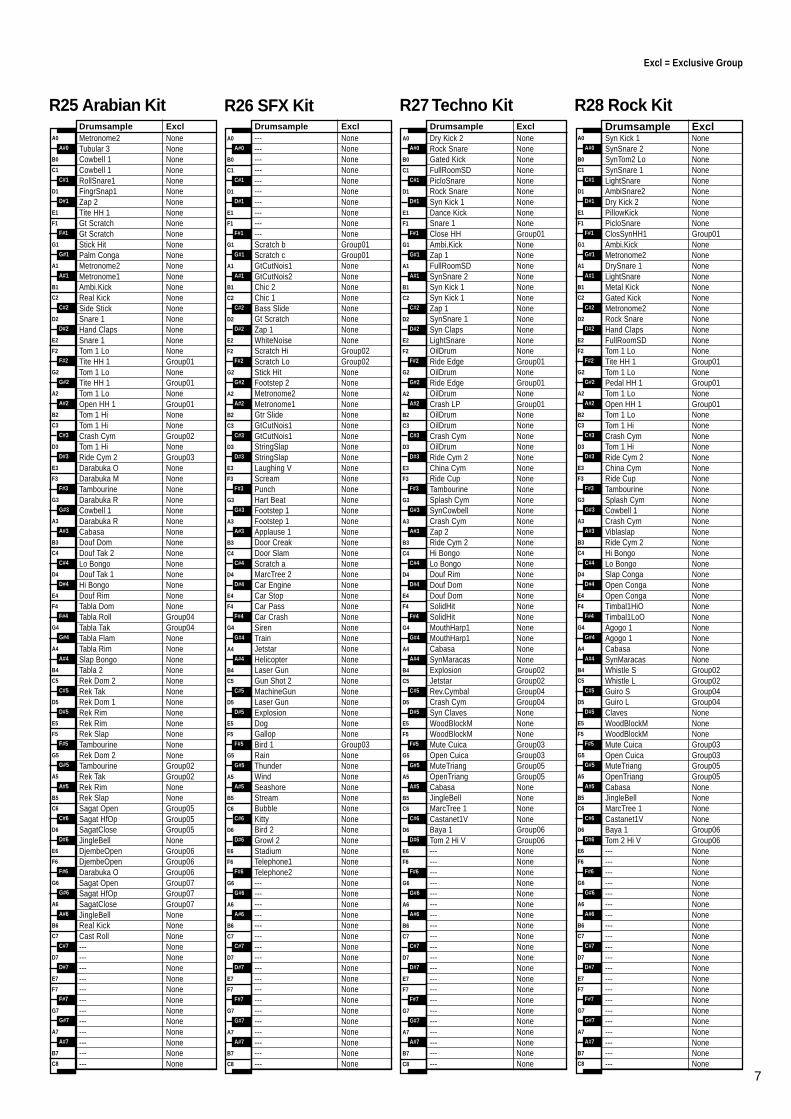
Excl = Exclusive Group
7
Drumsample Excl Drumsample Excl Drumsample Excl Drumsample ExclA0
B0
C1
D1
E1
F1
G1
A1
B1
C2
D2
E2
F2
G2
A2
B2
C3
D3
E3
F3
G3
A3
B3
C4
D4
E4
F4
G4
A4
B4
C5
D5
E5
F5
G5
A5
B5
C6
D6
E6
F6
G6
A6
B6
C7
D7
E7
F7
G7
A7
B7
C8
A#0
C#1
D#1
F#1
G#1
A#1
C#2
D#2
F#2
G#2
A#2
C#3
D#3
F#3
G#3
A#3
C#4
D#4
F#4
G#4
A#4
C#5
D#5
F#5
G#5
A#5
C#6
D#6
F#6
G#6
A#6
C#7
D#7
F#7
G#7
A#7
A0
B0
C1
D1
E1
F1
G1
A1
B1
C2
D2
E2
F2
G2
A2
B2
C3
D3
E3
F3
G3
A3
B3
C4
D4
E4
F4
G4
A4
B4
C5
D5
E5
F5
G5
A5
B5
C6
D6
E6
F6
G6
A6
B6
C7
D7
E7
F7
G7
A7
B7
C8
A#0
C#1
D#1
F#1
G#1
A#1
C#2
D#2
F#2
G#2
A#2
C#3
D#3
F#3
G#3
A#3
C#4
D#4
F#4
G#4
A#4
C#5
D#5
F#5
G#5
A#5
C#6
D#6
F#6
G#6
A#6
C#7
D#7
F#7
G#7
A#7
A0
B0
C1
D1
E1
F1
G1
A1
B1
C2
D2
E2
F2
G2
A2
B2
C3
D3
E3
F3
G3
A3
B3
C4
D4
E4
F4
G4
A4
B4
C5
D5
E5
F5
G5
A5
B5
C6
D6
E6
F6
G6
A6
B6
C7
D7
E7
F7
G7
A7
B7
C8
A#0
C#1
D#1
F#1
G#1
A#1
C#2
D#2
F#2
G#2
A#2
C#3
D#3
F#3
G#3
A#3
C#4
D#4
F#4
G#4
A#4
C#5
D#5
F#5
G#5
A#5
C#6
D#6
F#6
G#6
A#6
C#7
D#7
F#7
G#7
A#7
A0
B0
C1
D1
E1
F1
G1
A1
B1
C2
D2
E2
F2
G2
A2
B2
C3
D3
E3
F3
G3
A3
B3
C4
D4
E4
F4
G4
A4
B4
C5
D5
E5
F5
G5
A5
B5
C6
D6
E6
F6
G6
A6
B6
C7
D7
E7
F7
G7
A7
B7
C8
A#0
C#1
D#1
F#1
G#1
A#1
C#2
D#2
F#2
G#2
A#2
C#3
D#3
F#3
G#3
A#3
C#4
D#4
F#4
G#4
A#4
C#5
D#5
F#5
G#5
A#5
C#6
D#6
F#6
G#6
A#6
C#7
D#7
F#7
G#7
A#7
Metronome2 NoneTubular 3 NoneCowbell 1 NoneCowbell 1 NoneRollSnare1 NoneFingrSnap1 NoneZap 2 NoneTite HH 1 NoneGt Scratch NoneGt Scratch NoneStick Hit NonePalm Conga NoneMetronome2 NoneMetronome1 NoneAmbi.Kick NoneReal Kick NoneSide Stick NoneSnare 1 NoneHand Claps NoneSnare 1 NoneTom 1 Lo NoneTite HH 1 Group01Tom 1 Lo NoneTite HH 1 Group01Tom 1 Lo NoneOpen HH 1 Group01Tom 1 Hi NoneTom 1 Hi NoneCrash Cym Group02Tom 1 Hi NoneRide Cym 2 Group03Darabuka O NoneDarabuka M NoneTambourine NoneDarabuka R NoneCowbell 1 NoneDarabuka R NoneCabasa NoneDouf Dom NoneDouf Tak 2 NoneLo Bongo NoneDouf Tak 1 NoneHi Bongo NoneDouf Rim NoneTabla Dom NoneTabla Roll Group04Tabla Tak Group04Tabla Flam NoneTabla Rim NoneSlap Bongo NoneTabla 2 NoneRek Dom 2 NoneRek Tak NoneRek Dom 1 NoneRek Rim NoneRek Rim NoneRek Slap NoneTambourine NoneRek Dom 2 NoneTambourine Group02Rek Tak Group02Rek Rim NoneRek Slap NoneSagat Open Group05Sagat HfOp Group05SagatClose Group05JingleBell NoneDjembeOpen Group06DjembeOpen Group06Darabuka O Group06Sagat Open Group07Sagat HfOp Group07SagatClose Group07JingleBell NoneReal Kick NoneCast Roll None--- None--- None--- None--- None--- None--- None--- None--- None--- None--- None--- None--- None
--- None--- None--- None--- None--- None--- None--- None--- None--- None--- NoneScratch b Group01Scratch c Group01GtCutNois1 NoneGtCutNois2 NoneChic 2 NoneChic 1 NoneBass Slide NoneGt Scratch NoneZap 1 NoneWhiteNoise NoneScratch Hi Group02Scratch Lo Group02Stick Hit NoneFootstep 2 NoneMetronome2 NoneMetronome1 NoneGtr Slide NoneGtCutNois1 NoneGtCutNois1 NoneStringSlap NoneStringSlap NoneLaughing V NoneScream NonePunch NoneHart Beat NoneFootstep 1 NoneFootstep 1 NoneApplause 1 NoneDoor Creak NoneDoor Slam NoneScratch a NoneMarcTree 2 NoneCar Engine NoneCar Stop NoneCar Pass NoneCar Crash NoneSiren NoneTrain NoneJetstar NoneHelicopter NoneLaser Gun NoneGun Shot 2 NoneMachineGun NoneLaser Gun NoneExplosion NoneDog NoneGallop NoneBird 1 Group03Rain NoneThunder NoneWind NoneSeashore NoneStream NoneBubble NoneKitty NoneBird 2 NoneGrowl 2 NoneStadium NoneTelephone1 NoneTelephone2 None--- None--- None--- None--- None--- None--- None--- None--- None--- None--- None--- None--- None--- None--- None--- None--- None--- None--- None
Dry Kick 2 NoneRock Snare NoneGated Kick NoneFullRoomSD NonePicloSnare NoneRock Snare NoneSyn Kick 1 NoneDance Kick NoneSnare 1 NoneClose HH Group01Ambi.Kick NoneZap 1 NoneFullRoomSD NoneSynSnare 2 NoneSyn Kick 1 NoneSyn Kick 1 NoneZap 1 NoneSynSnare 1 NoneSyn Claps NoneLightSnare NoneOilDrum NoneRide Edge Group01OilDrum NoneRide Edge Group01OilDrum NoneCrash LP Group01OilDrum NoneOilDrum NoneCrash Cym NoneOilDrum NoneRide Cym 2 NoneChina Cym NoneRide Cup NoneTambourine NoneSplash Cym NoneSynCowbell NoneCrash Cym NoneZap 2 NoneRide Cym 2 NoneHi Bongo NoneLo Bongo NoneDouf Rim NoneDouf Dom NoneDouf Dom NoneSolidHit NoneSolidHit NoneMouthHarp1 NoneMouthHarp1 NoneCabasa NoneSynMaracas NoneExplosion Group02Jetstar Group02Rev.Cymbal Group04Crash Cym Group04Syn Claves NoneWoodBlockM NoneWoodBlockM NoneMute Cuica Group03Open Cuica Group03MuteTriang Group05OpenTriang Group05Cabasa NoneJingleBell NoneMarcTree 1 NoneCastanet1V NoneBaya 1 Group06Tom 2 Hi V Group06--- None--- None--- None--- None--- None--- None--- None--- None--- None--- None--- None--- None--- None--- None--- None--- None--- None--- None--- None--- None--- None
Syn Kick 1 NoneSynSnare 2 NoneSynTom2 Lo NoneSynSnare 1 NoneLightSnare NoneAmbiSnare2 NoneDry Kick 2 NonePillowKick NonePicloSnare NoneClosSynHH1 Group01Ambi.Kick NoneMetronome2 NoneDrySnare 1 NoneLightSnare NoneMetal Kick NoneGated Kick NoneMetronome2 NoneRock Snare NoneHand Claps NoneFullRoomSD NoneTom 1 Lo NoneTite HH 1 Group01Tom 1 Lo NonePedal HH 1 Group01Tom 1 Lo NoneOpen HH 1 Group01Tom 1 Lo NoneTom 1 Hi NoneCrash Cym NoneTom 1 Hi NoneRide Cym 2 NoneChina Cym NoneRide Cup NoneTambourine NoneSplash Cym NoneCowbell 1 NoneCrash Cym NoneViblaslap NoneRide Cym 2 NoneHi Bongo NoneLo Bongo NoneSlap Conga NoneOpen Conga NoneOpen Conga NoneTimbal1HiO NoneTimbal1LoO NoneAgogo 1 NoneAgogo 1 NoneCabasa NoneSynMaracas NoneWhistle S Group02Whistle L Group02Guiro S Group04Guiro L Group04Claves NoneWoodBlockM NoneWoodBlockM NoneMute Cuica Group03Open Cuica Group03MuteTriang Group05OpenTriang Group05Cabasa NoneJingleBell NoneMarcTree 1 NoneCastanet1V NoneBaya 1 Group06Tom 2 Hi V Group06--- None--- None--- None--- None--- None--- None--- None--- None--- None--- None--- None--- None--- None--- None--- None--- None--- None--- None--- None--- None--- None
R25 Arabian Kit R26 SFX Kit R27 Techno Kit R28 Rock Kit
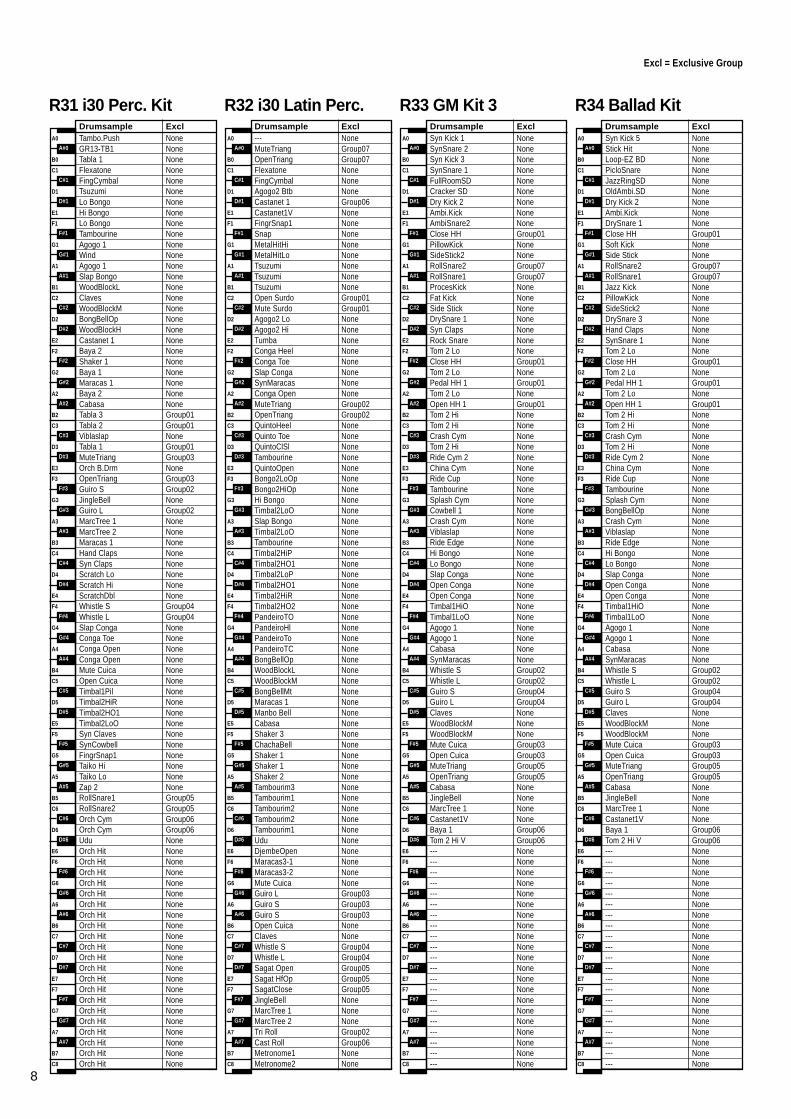
Excl = Exclusive Group
8
Drumsample Excl Drumsample Excl Drumsample Excl Drumsample ExclA0
B0
C1
D1
E1
F1
G1
A1
B1
C2
D2
E2
F2
G2
A2
B2
C3
D3
E3
F3
G3
A3
B3
C4
D4
E4
F4
G4
A4
B4
C5
D5
E5
F5
G5
A5
B5
C6
D6
E6
F6
G6
A6
B6
C7
D7
E7
F7
G7
A7
B7
C8
A#0
C#1
D#1
F#1
G#1
A#1
C#2
D#2
F#2
G#2
A#2
C#3
D#3
F#3
G#3
A#3
C#4
D#4
F#4
G#4
A#4
C#5
D#5
F#5
G#5
A#5
C#6
D#6
F#6
G#6
A#6
C#7
D#7
F#7
G#7
A#7
A0
B0
C1
D1
E1
F1
G1
A1
B1
C2
D2
E2
F2
G2
A2
B2
C3
D3
E3
F3
G3
A3
B3
C4
D4
E4
F4
G4
A4
B4
C5
D5
E5
F5
G5
A5
B5
C6
D6
E6
F6
G6
A6
B6
C7
D7
E7
F7
G7
A7
B7
C8
A#0
C#1
D#1
F#1
G#1
A#1
C#2
D#2
F#2
G#2
A#2
C#3
D#3
F#3
G#3
A#3
C#4
D#4
F#4
G#4
A#4
C#5
D#5
F#5
G#5
A#5
C#6
D#6
F#6
G#6
A#6
C#7
D#7
F#7
G#7
A#7
A0
B0
C1
D1
E1
F1
G1
A1
B1
C2
D2
E2
F2
G2
A2
B2
C3
D3
E3
F3
G3
A3
B3
C4
D4
E4
F4
G4
A4
B4
C5
D5
E5
F5
G5
A5
B5
C6
D6
E6
F6
G6
A6
B6
C7
D7
E7
F7
G7
A7
B7
C8
A#0
C#1
D#1
F#1
G#1
A#1
C#2
D#2
F#2
G#2
A#2
C#3
D#3
F#3
G#3
A#3
C#4
D#4
F#4
G#4
A#4
C#5
D#5
F#5
G#5
A#5
C#6
D#6
F#6
G#6
A#6
C#7
D#7
F#7
G#7
A#7
A0
B0
C1
D1
E1
F1
G1
A1
B1
C2
D2
E2
F2
G2
A2
B2
C3
D3
E3
F3
G3
A3
B3
C4
D4
E4
F4
G4
A4
B4
C5
D5
E5
F5
G5
A5
B5
C6
D6
E6
F6
G6
A6
B6
C7
D7
E7
F7
G7
A7
B7
C8
A#0
C#1
D#1
F#1
G#1
A#1
C#2
D#2
F#2
G#2
A#2
C#3
D#3
F#3
G#3
A#3
C#4
D#4
F#4
G#4
A#4
C#5
D#5
F#5
G#5
A#5
C#6
D#6
F#6
G#6
A#6
C#7
D#7
F#7
G#7
A#7
Syn Kick 1 NoneSynSnare 2 NoneSyn Kick 3 NoneSynSnare 1 NoneFullRoomSD NoneCracker SD NoneDry Kick 2 NoneAmbi.Kick NoneAmbiSnare2 NoneClose HH Group01PillowKick NoneSideStick2 NoneRollSnare2 Group07RollSnare1 Group07ProcesKick NoneFat Kick NoneSide Stick NoneDrySnare 1 NoneSyn Claps NoneRock Snare NoneTom 2 Lo NoneClose HH Group01Tom 2 Lo NonePedal HH 1 Group01Tom 2 Lo NoneOpen HH 1 Group01Tom 2 Hi NoneTom 2 Hi NoneCrash Cym NoneTom 2 Hi NoneRide Cym 2 NoneChina Cym NoneRide Cup NoneTambourine NoneSplash Cym NoneCowbell 1 NoneCrash Cym NoneViblaslap NoneRide Edge NoneHi Bongo NoneLo Bongo NoneSlap Conga NoneOpen Conga NoneOpen Conga NoneTimbal1HiO NoneTimbal1LoO NoneAgogo 1 NoneAgogo 1 NoneCabasa NoneSynMaracas NoneWhistle S Group02Whistle L Group02Guiro S Group04Guiro L Group04Claves NoneWoodBlockM NoneWoodBlockM NoneMute Cuica Group03Open Cuica Group03MuteTriang Group05OpenTriang Group05Cabasa NoneJingleBell NoneMarcTree 1 NoneCastanet1V NoneBaya 1 Group06Tom 2 Hi V Group06--- None--- None--- None--- None--- None--- None--- None--- None--- None--- None--- None--- None--- None--- None--- None--- None--- None--- None--- None--- None--- None
Syn Kick 5 NoneStick Hit NoneLoop-EZ BD NonePicloSnare NoneJazzRingSD NoneOldAmbi.SD NoneDry Kick 2 NoneAmbi.Kick NoneDrySnare 1 NoneClose HH Group01Soft Kick NoneSide Stick NoneRollSnare2 Group07RollSnare1 Group07Jazz Kick NonePillowKick NoneSideStick2 NoneDrySnare 3 NoneHand Claps NoneSynSnare 1 NoneTom 2 Lo NoneClose HH Group01Tom 2 Lo NonePedal HH 1 Group01Tom 2 Lo NoneOpen HH 1 Group01Tom 2 Hi NoneTom 2 Hi NoneCrash Cym NoneTom 2 Hi NoneRide Cym 2 NoneChina Cym NoneRide Cup NoneTambourine NoneSplash Cym NoneBongBellOp NoneCrash Cym NoneViblaslap NoneRide Edge NoneHi Bongo NoneLo Bongo NoneSlap Conga NoneOpen Conga NoneOpen Conga NoneTimbal1HiO NoneTimbal1LoO NoneAgogo 1 NoneAgogo 1 NoneCabasa NoneSynMaracas NoneWhistle S Group02Whistle L Group02Guiro S Group04Guiro L Group04Claves NoneWoodBlockM NoneWoodBlockM NoneMute Cuica Group03Open Cuica Group03MuteTriang Group05OpenTriang Group05Cabasa NoneJingleBell NoneMarcTree 1 NoneCastanet1V NoneBaya 1 Group06Tom 2 Hi V Group06--- None--- None--- None--- None--- None--- None--- None--- None--- None--- None--- None--- None--- None--- None--- None--- None--- None--- None--- None--- None--- None
Tambo.Push NoneGR13-TB1 NoneTabla 1 NoneFlexatone NoneFingCymbal NoneTsuzumi NoneLo Bongo NoneHi Bongo NoneLo Bongo NoneTambourine NoneAgogo 1 NoneWind NoneAgogo 1 NoneSlap Bongo NoneWoodBlockL NoneClaves NoneWoodBlockM NoneBongBellOp NoneWoodBlockH NoneCastanet 1 NoneBaya 2 NoneShaker 1 NoneBaya 1 NoneMaracas 1 NoneBaya 2 NoneCabasa NoneTabla 3 Group01Tabla 2 Group01Viblaslap NoneTabla 1 Group01MuteTriang Group03Orch B.Drm NoneOpenTriang Group03Guiro S Group02JingleBell NoneGuiro L Group02MarcTree 1 NoneMarcTree 2 NoneMaracas 1 NoneHand Claps NoneSyn Claps NoneScratch Lo NoneScratch Hi NoneScratchDbl NoneWhistle S Group04Whistle L Group04Slap Conga NoneConga Toe NoneConga Open NoneConga Open NoneMute Cuica NoneOpen Cuica NoneTimbal1Pil NoneTimbal2HiR NoneTimbal2HO1 NoneTimbal2LoO NoneSyn Claves NoneSynCowbell NoneFingrSnap1 NoneTaiko Hi NoneTaiko Lo NoneZap 2 NoneRollSnare1 Group05RollSnare2 Group05Orch Cym Group06Orch Cym Group06Udu NoneOrch Hit NoneOrch Hit NoneOrch Hit NoneOrch Hit NoneOrch Hit NoneOrch Hit NoneOrch Hit NoneOrch Hit NoneOrch Hit NoneOrch Hit NoneOrch Hit NoneOrch Hit NoneOrch Hit NoneOrch Hit NoneOrch Hit NoneOrch Hit NoneOrch Hit NoneOrch Hit NoneOrch Hit NoneOrch Hit NoneOrch Hit None
--- NoneMuteTriang Group07OpenTriang Group07Flexatone NoneFingCymbal NoneAgogo2 Btb NoneCastanet 1 Group06Castanet1V NoneFingrSnap1 NoneSnap NoneMetalHitHi NoneMetalHitLo NoneTsuzumi NoneTsuzumi NoneTsuzumi NoneOpen Surdo Group01Mute Surdo Group01Agogo2 Lo NoneAgogo2 Hi NoneTumba NoneConga Heel NoneConga Toe NoneSlap Conga NoneSynMaracas NoneConga Open NoneMuteTriang Group02OpenTriang Group02QuintoHeel NoneQuinto Toe NoneQuintoClSl NoneTambourine NoneQuintoOpen NoneBongo2LoOp NoneBongo2HiOp NoneHi Bongo NoneTimbal2LoO NoneSlap Bongo NoneTimbal2LoO NoneTambourine NoneTimbal2HiP NoneTimbal2HO1 NoneTimbal2LoP NoneTimbal2HO1 NoneTimbal2HiR NoneTimbal2HO2 NonePandeiroTO NonePandeiroHl NonePandeiroTo NonePandeiroTC NoneBongBellOp NoneWoodBlockL NoneWoodBlockM NoneBongBellMt NoneMaracas 1 NoneManbo Bell NoneCabasa NoneShaker 3 NoneChachaBell NoneShaker 1 NoneShaker 1 NoneShaker 2 NoneTambourim3 NoneTambourim1 NoneTambourim2 NoneTambourim2 NoneTambourim1 NoneUdu NoneDjembeOpen NoneMaracas3-1 NoneMaracas3-2 NoneMute Cuica NoneGuiro L Group03Guiro S Group03Guiro S Group03Open Cuica NoneClaves NoneWhistle S Group04Whistle L Group04Sagat Open Group05Sagat HfOp Group05SagatClose Group05JingleBell NoneMarcTree 1 NoneMarcTree 2 NoneTri Roll Group02Cast Roll Group06Metronome1 NoneMetronome2 None
R31 i30 Perc. Kit R32 i30 Latin Perc. R33 GM Kit 3 R34 Ballad Kit
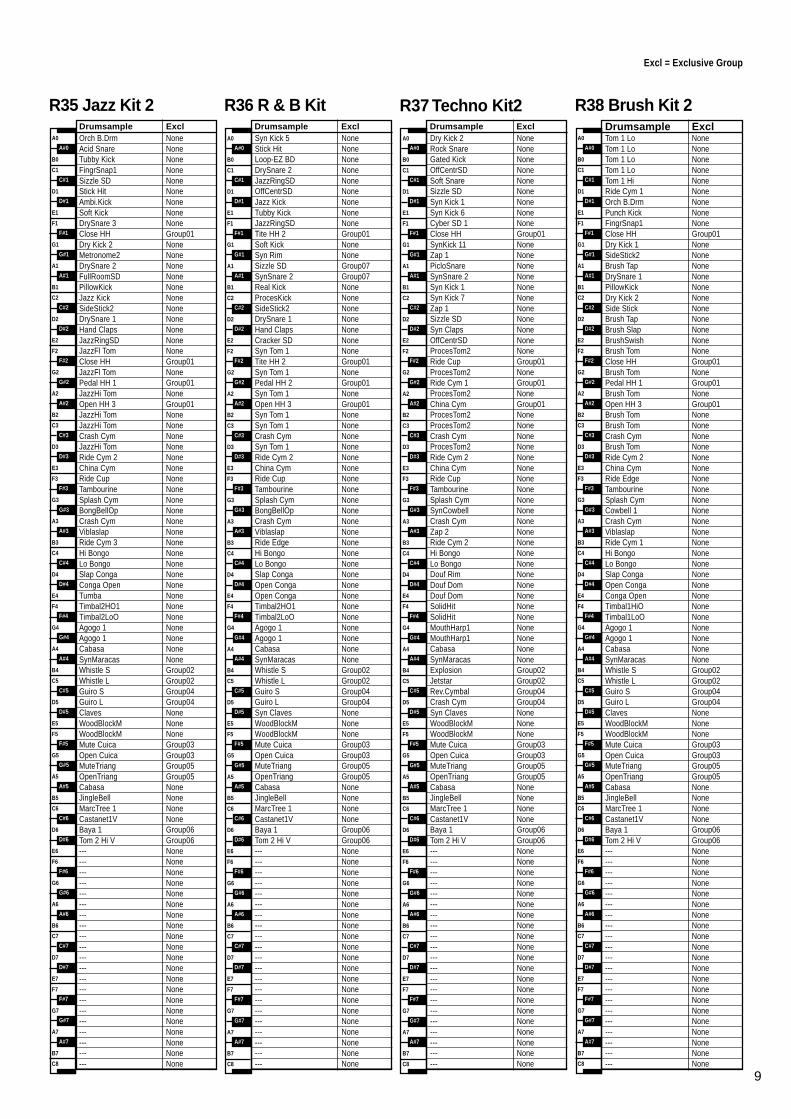
Excl = Exclusive Group
9
Drumsample Excl Drumsample Excl Drumsample Excl Drumsample ExclA0
B0
C1
D1
E1
F1
G1
A1
B1
C2
D2
E2
F2
G2
A2
B2
C3
D3
E3
F3
G3
A3
B3
C4
D4
E4
F4
G4
A4
B4
C5
D5
E5
F5
G5
A5
B5
C6
D6
E6
F6
G6
A6
B6
C7
D7
E7
F7
G7
A7
B7
C8
A#0
C#1
D#1
F#1
G#1
A#1
C#2
D#2
F#2
G#2
A#2
C#3
D#3
F#3
G#3
A#3
C#4
D#4
F#4
G#4
A#4
C#5
D#5
F#5
G#5
A#5
C#6
D#6
F#6
G#6
A#6
C#7
D#7
F#7
G#7
A#7
A0
B0
C1
D1
E1
F1
G1
A1
B1
C2
D2
E2
F2
G2
A2
B2
C3
D3
E3
F3
G3
A3
B3
C4
D4
E4
F4
G4
A4
B4
C5
D5
E5
F5
G5
A5
B5
C6
D6
E6
F6
G6
A6
B6
C7
D7
E7
F7
G7
A7
B7
C8
A#0
C#1
D#1
F#1
G#1
A#1
C#2
D#2
F#2
G#2
A#2
C#3
D#3
F#3
G#3
A#3
C#4
D#4
F#4
G#4
A#4
C#5
D#5
F#5
G#5
A#5
C#6
D#6
F#6
G#6
A#6
C#7
D#7
F#7
G#7
A#7
A0
B0
C1
D1
E1
F1
G1
A1
B1
C2
D2
E2
F2
G2
A2
B2
C3
D3
E3
F3
G3
A3
B3
C4
D4
E4
F4
G4
A4
B4
C5
D5
E5
F5
G5
A5
B5
C6
D6
E6
F6
G6
A6
B6
C7
D7
E7
F7
G7
A7
B7
C8
A#0
C#1
D#1
F#1
G#1
A#1
C#2
D#2
F#2
G#2
A#2
C#3
D#3
F#3
G#3
A#3
C#4
D#4
F#4
G#4
A#4
C#5
D#5
F#5
G#5
A#5
C#6
D#6
F#6
G#6
A#6
C#7
D#7
F#7
G#7
A#7
A0
B0
C1
D1
E1
F1
G1
A1
B1
C2
D2
E2
F2
G2
A2
B2
C3
D3
E3
F3
G3
A3
B3
C4
D4
E4
F4
G4
A4
B4
C5
D5
E5
F5
G5
A5
B5
C6
D6
E6
F6
G6
A6
B6
C7
D7
E7
F7
G7
A7
B7
C8
A#0
C#1
D#1
F#1
G#1
A#1
C#2
D#2
F#2
G#2
A#2
C#3
D#3
F#3
G#3
A#3
C#4
D#4
F#4
G#4
A#4
C#5
D#5
F#5
G#5
A#5
C#6
D#6
F#6
G#6
A#6
C#7
D#7
F#7
G#7
A#7
Orch B.Drm NoneAcid Snare NoneTubby Kick NoneFingrSnap1 NoneSizzle SD NoneStick Hit NoneAmbi.Kick NoneSoft Kick NoneDrySnare 3 NoneClose HH Group01Dry Kick 2 NoneMetronome2 NoneDrySnare 2 NoneFullRoomSD NonePillowKick NoneJazz Kick NoneSideStick2 NoneDrySnare 1 NoneHand Claps NoneJazzRingSD NoneJazzFl Tom NoneClose HH Group01JazzFl Tom NonePedal HH 1 Group01JazzHi Tom NoneOpen HH 3 Group01JazzHi Tom NoneJazzHi Tom NoneCrash Cym NoneJazzHi Tom NoneRide Cym 2 NoneChina Cym NoneRide Cup NoneTambourine NoneSplash Cym NoneBongBellOp NoneCrash Cym NoneViblaslap NoneRide Cym 3 NoneHi Bongo NoneLo Bongo NoneSlap Conga NoneConga Open NoneTumba NoneTimbal2HO1 NoneTimbal2LoO NoneAgogo 1 NoneAgogo 1 NoneCabasa NoneSynMaracas NoneWhistle S Group02Whistle L Group02Guiro S Group04Guiro L Group04Claves NoneWoodBlockM NoneWoodBlockM NoneMute Cuica Group03Open Cuica Group03MuteTriang Group05OpenTriang Group05Cabasa NoneJingleBell NoneMarcTree 1 NoneCastanet1V NoneBaya 1 Group06Tom 2 Hi V Group06--- None--- None--- None--- None--- None--- None--- None--- None--- None--- None--- None--- None--- None--- None--- None--- None--- None--- None--- None--- None--- None
Syn Kick 5 NoneStick Hit NoneLoop-EZ BD NoneDrySnare 2 NoneJazzRingSD NoneOffCentrSD NoneJazz Kick NoneTubby Kick NoneJazzRingSD NoneTite HH 2 Group01Soft Kick NoneSyn Rim NoneSizzle SD Group07SynSnare 2 Group07Real Kick NoneProcesKick NoneSideStick2 NoneDrySnare 1 NoneHand Claps NoneCracker SD NoneSyn Tom 1 NoneTite HH 2 Group01Syn Tom 1 NonePedal HH 2 Group01Syn Tom 1 NoneOpen HH 3 Group01Syn Tom 1 NoneSyn Tom 1 NoneCrash Cym NoneSyn Tom 1 NoneRide Cym 2 NoneChina Cym NoneRide Cup NoneTambourine NoneSplash Cym NoneBongBellOp NoneCrash Cym NoneViblaslap NoneRide Edge NoneHi Bongo NoneLo Bongo NoneSlap Conga NoneOpen Conga NoneOpen Conga NoneTimbal2HO1 NoneTimbal2LoO NoneAgogo 1 NoneAgogo 1 NoneCabasa NoneSynMaracas NoneWhistle S Group02Whistle L Group02Guiro S Group04Guiro L Group04Syn Claves NoneWoodBlockM NoneWoodBlockM NoneMute Cuica Group03Open Cuica Group03MuteTriang Group05OpenTriang Group05Cabasa NoneJingleBell NoneMarcTree 1 NoneCastanet1V NoneBaya 1 Group06Tom 2 Hi V Group06--- None--- None--- None--- None--- None--- None--- None--- None--- None--- None--- None--- None--- None--- None--- None--- None--- None--- None--- None--- None--- None
Dry Kick 2 NoneRock Snare NoneGated Kick NoneOffCentrSD NoneSoft Snare NoneSizzle SD NoneSyn Kick 1 NoneSyn Kick 6 NoneCyber SD 1 NoneClose HH Group01SynKick 11 NoneZap 1 NonePicloSnare NoneSynSnare 2 NoneSyn Kick 1 NoneSyn Kick 7 NoneZap 1 NoneSizzle SD NoneSyn Claps NoneOffCentrSD NoneProcesTom2 NoneRide Cup Group01ProcesTom2 NoneRide Cym 1 Group01ProcesTom2 NoneChina Cym Group01ProcesTom2 NoneProcesTom2 NoneCrash Cym NoneProcesTom2 NoneRide Cym 2 NoneChina Cym NoneRide Cup NoneTambourine NoneSplash Cym NoneSynCowbell NoneCrash Cym NoneZap 2 NoneRide Cym 2 NoneHi Bongo NoneLo Bongo NoneDouf Rim NoneDouf Dom NoneDouf Dom NoneSolidHit NoneSolidHit NoneMouthHarp1 NoneMouthHarp1 NoneCabasa NoneSynMaracas NoneExplosion Group02Jetstar Group02Rev.Cymbal Group04Crash Cym Group04Syn Claves NoneWoodBlockM NoneWoodBlockM NoneMute Cuica Group03Open Cuica Group03MuteTriang Group05OpenTriang Group05Cabasa NoneJingleBell NoneMarcTree 1 NoneCastanet1V NoneBaya 1 Group06Tom 2 Hi V Group06--- None--- None--- None--- None--- None--- None--- None--- None--- None--- None--- None--- None--- None--- None--- None--- None--- None--- None--- None--- None--- None
Tom 1 Lo NoneTom 1 Lo NoneTom 1 Lo NoneTom 1 Lo NoneTom 1 Hi NoneRide Cym 1 NoneOrch B.Drm NonePunch Kick NoneFingrSnap1 NoneClose HH Group01Dry Kick 1 NoneSideStick2 NoneBrush Tap NoneDrySnare 1 NonePillowKick NoneDry Kick 2 NoneSide Stick NoneBrush Tap NoneBrush Slap NoneBrushSwish NoneBrush Tom NoneClose HH Group01Brush Tom NonePedal HH 1 Group01Brush Tom NoneOpen HH 3 Group01Brush Tom NoneBrush Tom NoneCrash Cym NoneBrush Tom NoneRide Cym 2 NoneChina Cym NoneRide Edge NoneTambourine NoneSplash Cym NoneCowbell 1 NoneCrash Cym NoneViblaslap NoneRide Cym 1 NoneHi Bongo NoneLo Bongo NoneSlap Conga NoneOpen Conga NoneConga Open NoneTimbal1HiO NoneTimbal1LoO NoneAgogo 1 NoneAgogo 1 NoneCabasa NoneSynMaracas NoneWhistle S Group02Whistle L Group02Guiro S Group04Guiro L Group04Claves NoneWoodBlockM NoneWoodBlockM NoneMute Cuica Group03Open Cuica Group03MuteTriang Group05OpenTriang Group05Cabasa NoneJingleBell NoneMarcTree 1 NoneCastanet1V NoneBaya 1 Group06Tom 2 Hi V Group06--- None--- None--- None--- None--- None--- None--- None--- None--- None--- None--- None--- None--- None--- None--- None--- None--- None--- None--- None--- None--- None
R35 Jazz Kit 2 R36 R & B Kit R37 Techno Kit2 R38 Brush Kit 2
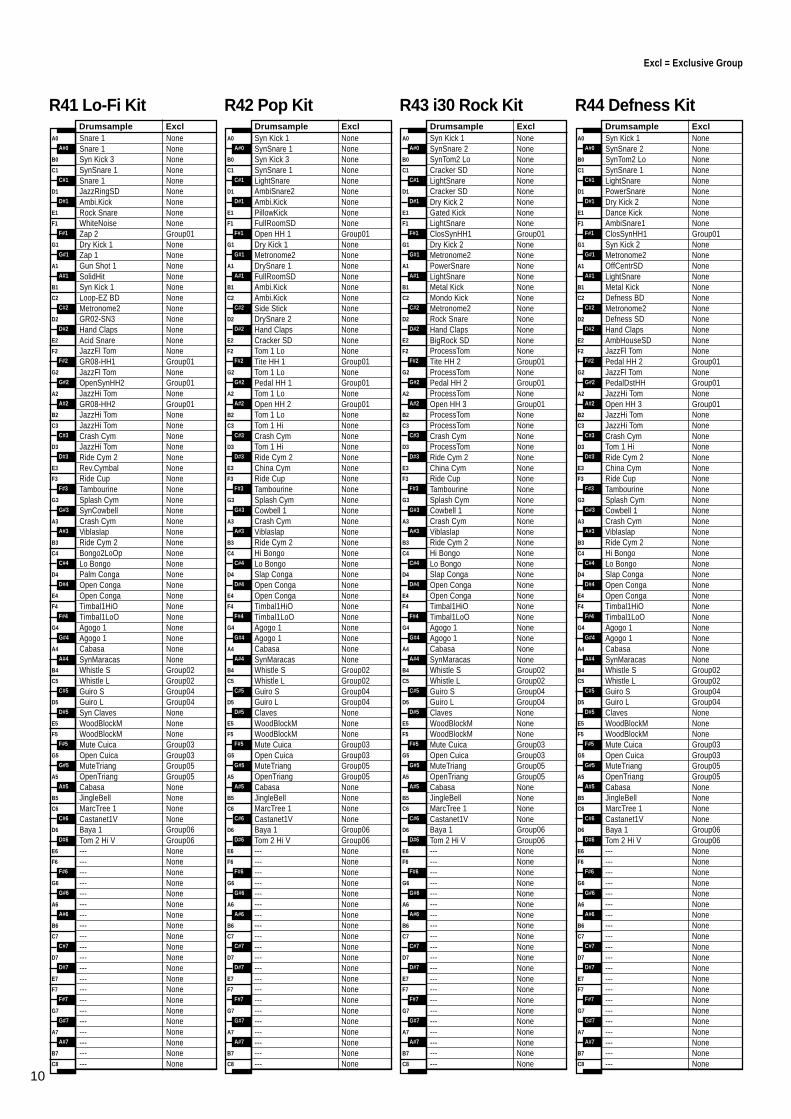
Excl = Exclusive Group
10
Drumsample Excl Drumsample Excl Drumsample Excl Drumsample ExclA0
B0
C1
D1
E1
F1
G1
A1
B1
C2
D2
E2
F2
G2
A2
B2
C3
D3
E3
F3
G3
A3
B3
C4
D4
E4
F4
G4
A4
B4
C5
D5
E5
F5
G5
A5
B5
C6
D6
E6
F6
G6
A6
B6
C7
D7
E7
F7
G7
A7
B7
C8
A#0
C#1
D#1
F#1
G#1
A#1
C#2
D#2
F#2
G#2
A#2
C#3
D#3
F#3
G#3
A#3
C#4
D#4
F#4
G#4
A#4
C#5
D#5
F#5
G#5
A#5
C#6
D#6
F#6
G#6
A#6
C#7
D#7
F#7
G#7
A#7
A0
B0
C1
D1
E1
F1
G1
A1
B1
C2
D2
E2
F2
G2
A2
B2
C3
D3
E3
F3
G3
A3
B3
C4
D4
E4
F4
G4
A4
B4
C5
D5
E5
F5
G5
A5
B5
C6
D6
E6
F6
G6
A6
B6
C7
D7
E7
F7
G7
A7
B7
C8
A#0
C#1
D#1
F#1
G#1
A#1
C#2
D#2
F#2
G#2
A#2
C#3
D#3
F#3
G#3
A#3
C#4
D#4
F#4
G#4
A#4
C#5
D#5
F#5
G#5
A#5
C#6
D#6
F#6
G#6
A#6
C#7
D#7
F#7
G#7
A#7
A0
B0
C1
D1
E1
F1
G1
A1
B1
C2
D2
E2
F2
G2
A2
B2
C3
D3
E3
F3
G3
A3
B3
C4
D4
E4
F4
G4
A4
B4
C5
D5
E5
F5
G5
A5
B5
C6
D6
E6
F6
G6
A6
B6
C7
D7
E7
F7
G7
A7
B7
C8
A#0
C#1
D#1
F#1
G#1
A#1
C#2
D#2
F#2
G#2
A#2
C#3
D#3
F#3
G#3
A#3
C#4
D#4
F#4
G#4
A#4
C#5
D#5
F#5
G#5
A#5
C#6
D#6
F#6
G#6
A#6
C#7
D#7
F#7
G#7
A#7
A0
B0
C1
D1
E1
F1
G1
A1
B1
C2
D2
E2
F2
G2
A2
B2
C3
D3
E3
F3
G3
A3
B3
C4
D4
E4
F4
G4
A4
B4
C5
D5
E5
F5
G5
A5
B5
C6
D6
E6
F6
G6
A6
B6
C7
D7
E7
F7
G7
A7
B7
C8
A#0
C#1
D#1
F#1
G#1
A#1
C#2
D#2
F#2
G#2
A#2
C#3
D#3
F#3
G#3
A#3
C#4
D#4
F#4
G#4
A#4
C#5
D#5
F#5
G#5
A#5
C#6
D#6
F#6
G#6
A#6
C#7
D#7
F#7
G#7
A#7
Syn Kick 1 NoneSynSnare 2 NoneSynTom2 Lo NoneSynSnare 1 NoneLightSnare NonePowerSnare NoneDry Kick 2 NoneDance Kick NoneAmbiSnare1 NoneClosSynHH1 Group01Syn Kick 2 NoneMetronome2 NoneOffCentrSD NoneLightSnare NoneMetal Kick NoneDefness BD NoneMetronome2 NoneDefness SD NoneHand Claps NoneAmbHouseSD NoneJazzFl Tom NonePedal HH 2 Group01JazzFl Tom NonePedalDstHH Group01JazzHi Tom NoneOpen HH 3 Group01JazzHi Tom NoneJazzHi Tom NoneCrash Cym NoneTom 1 Hi NoneRide Cym 2 NoneChina Cym NoneRide Cup NoneTambourine NoneSplash Cym NoneCowbell 1 NoneCrash Cym NoneViblaslap NoneRide Cym 2 NoneHi Bongo NoneLo Bongo NoneSlap Conga NoneOpen Conga NoneOpen Conga NoneTimbal1HiO NoneTimbal1LoO NoneAgogo 1 NoneAgogo 1 NoneCabasa NoneSynMaracas NoneWhistle S Group02Whistle L Group02Guiro S Group04Guiro L Group04Claves NoneWoodBlockM NoneWoodBlockM NoneMute Cuica Group03Open Cuica Group03MuteTriang Group05OpenTriang Group05Cabasa NoneJingleBell NoneMarcTree 1 NoneCastanet1V NoneBaya 1 Group06Tom 2 Hi V Group06--- None--- None--- None--- None--- None--- None--- None--- None--- None--- None--- None--- None--- None--- None--- None--- None--- None--- None--- None--- None--- None
Syn Kick 1 NoneSynSnare 1 NoneSyn Kick 3 NoneSynSnare 1 NoneLightSnare NoneAmbiSnare2 NoneAmbi.Kick NonePillowKick NoneFullRoomSD NoneOpen HH 1 Group01Dry Kick 1 NoneMetronome2 NoneDrySnare 1 NoneFullRoomSD NoneAmbi.Kick NoneAmbi.Kick NoneSide Stick NoneDrySnare 2 NoneHand Claps NoneCracker SD NoneTom 1 Lo NoneTite HH 1 Group01Tom 1 Lo NonePedal HH 1 Group01Tom 1 Lo NoneOpen HH 2 Group01Tom 1 Lo NoneTom 1 Hi NoneCrash Cym NoneTom 1 Hi NoneRide Cym 2 NoneChina Cym NoneRide Cup NoneTambourine NoneSplash Cym NoneCowbell 1 NoneCrash Cym NoneViblaslap NoneRide Cym 2 NoneHi Bongo NoneLo Bongo NoneSlap Conga NoneOpen Conga NoneOpen Conga NoneTimbal1HiO NoneTimbal1LoO NoneAgogo 1 NoneAgogo 1 NoneCabasa NoneSynMaracas NoneWhistle S Group02Whistle L Group02Guiro S Group04Guiro L Group04Claves NoneWoodBlockM NoneWoodBlockM NoneMute Cuica Group03Open Cuica Group03MuteTriang Group05OpenTriang Group05Cabasa NoneJingleBell NoneMarcTree 1 NoneCastanet1V NoneBaya 1 Group06Tom 2 Hi V Group06--- None--- None--- None--- None--- None--- None--- None--- None--- None--- None--- None--- None--- None--- None--- None--- None--- None--- None--- None--- None--- None
Syn Kick 1 NoneSynSnare 2 NoneSynTom2 Lo NoneCracker SD NoneLightSnare NoneCracker SD NoneDry Kick 2 NoneGated Kick NoneLightSnare NoneClosSynHH1 Group01Dry Kick 2 NoneMetronome2 NonePowerSnare NoneLightSnare NoneMetal Kick NoneMondo Kick NoneMetronome2 NoneRock Snare NoneHand Claps NoneBigRock SD NoneProcessTom NoneTite HH 2 Group01ProcessTom NonePedal HH 2 Group01ProcessTom NoneOpen HH 3 Group01ProcessTom NoneProcessTom NoneCrash Cym NoneProcessTom NoneRide Cym 2 NoneChina Cym NoneRide Cup NoneTambourine NoneSplash Cym NoneCowbell 1 NoneCrash Cym NoneViblaslap NoneRide Cym 2 NoneHi Bongo NoneLo Bongo NoneSlap Conga NoneOpen Conga NoneOpen Conga NoneTimbal1HiO NoneTimbal1LoO NoneAgogo 1 NoneAgogo 1 NoneCabasa NoneSynMaracas NoneWhistle S Group02Whistle L Group02Guiro S Group04Guiro L Group04Claves NoneWoodBlockM NoneWoodBlockM NoneMute Cuica Group03Open Cuica Group03MuteTriang Group05OpenTriang Group05Cabasa NoneJingleBell NoneMarcTree 1 NoneCastanet1V NoneBaya 1 Group06Tom 2 Hi V Group06--- None--- None--- None--- None--- None--- None--- None--- None--- None--- None--- None--- None--- None--- None--- None--- None--- None--- None--- None--- None--- None
Snare 1 NoneSnare 1 NoneSyn Kick 3 NoneSynSnare 1 NoneSnare 1 NoneJazzRingSD NoneAmbi.Kick NoneRock Snare NoneWhiteNoise NoneZap 2 Group01Dry Kick 1 NoneZap 1 NoneGun Shot 1 NoneSolidHit NoneSyn Kick 1 NoneLoop-EZ BD NoneMetronome2 NoneGR02-SN3 NoneHand Claps NoneAcid Snare NoneJazzFl Tom NoneGR08-HH1 Group01JazzFl Tom NoneOpenSynHH2 Group01JazzHi Tom NoneGR08-HH2 Group01JazzHi Tom NoneJazzHi Tom NoneCrash Cym NoneJazzHi Tom NoneRide Cym 2 NoneRev.Cymbal NoneRide Cup NoneTambourine NoneSplash Cym NoneSynCowbell NoneCrash Cym NoneViblaslap NoneRide Cym 2 NoneBongo2LoOp NoneLo Bongo NonePalm Conga NoneOpen Conga NoneOpen Conga NoneTimbal1HiO NoneTimbal1LoO NoneAgogo 1 NoneAgogo 1 NoneCabasa NoneSynMaracas NoneWhistle S Group02Whistle L Group02Guiro S Group04Guiro L Group04Syn Claves NoneWoodBlockM NoneWoodBlockM NoneMute Cuica Group03Open Cuica Group03MuteTriang Group05OpenTriang Group05Cabasa NoneJingleBell NoneMarcTree 1 NoneCastanet1V NoneBaya 1 Group06Tom 2 Hi V Group06--- None--- None--- None--- None--- None--- None--- None--- None--- None--- None--- None--- None--- None--- None--- None--- None--- None--- None--- None--- None--- None
R41 Lo-Fi Kit R42 Pop Kit R43 i30 Rock Kit R44 Defness Kit
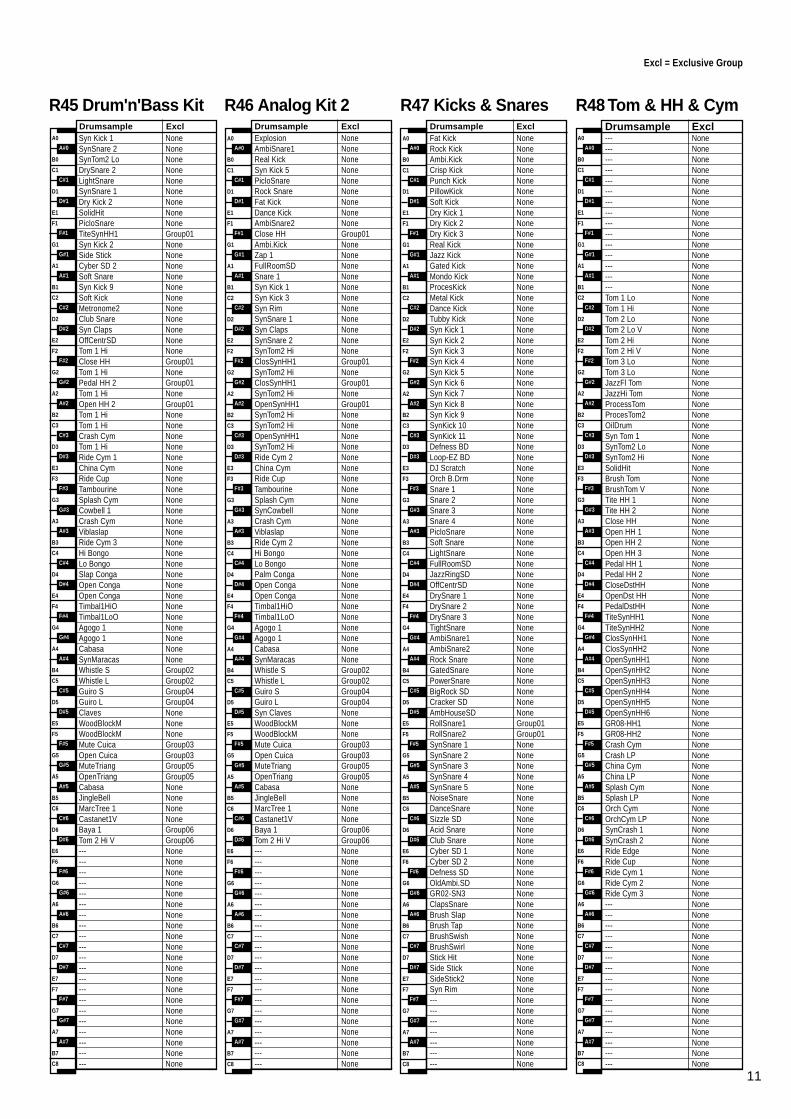
Excl = Exclusive Group
11
Drumsample Excl Drumsample Excl Drumsample Excl Drumsample ExclA0
B0
C1
D1
E1
F1
G1
A1
B1
C2
D2
E2
F2
G2
A2
B2
C3
D3
E3
F3
G3
A3
B3
C4
D4
E4
F4
G4
A4
B4
C5
D5
E5
F5
G5
A5
B5
C6
D6
E6
F6
G6
A6
B6
C7
D7
E7
F7
G7
A7
B7
C8
A#0
C#1
D#1
F#1
G#1
A#1
C#2
D#2
F#2
G#2
A#2
C#3
D#3
F#3
G#3
A#3
C#4
D#4
F#4
G#4
A#4
C#5
D#5
F#5
G#5
A#5
C#6
D#6
F#6
G#6
A#6
C#7
D#7
F#7
G#7
A#7
A0
B0
C1
D1
E1
F1
G1
A1
B1
C2
D2
E2
F2
G2
A2
B2
C3
D3
E3
F3
G3
A3
B3
C4
D4
E4
F4
G4
A4
B4
C5
D5
E5
F5
G5
A5
B5
C6
D6
E6
F6
G6
A6
B6
C7
D7
E7
F7
G7
A7
B7
C8
A#0
C#1
D#1
F#1
G#1
A#1
C#2
D#2
F#2
G#2
A#2
C#3
D#3
F#3
G#3
A#3
C#4
D#4
F#4
G#4
A#4
C#5
D#5
F#5
G#5
A#5
C#6
D#6
F#6
G#6
A#6
C#7
D#7
F#7
G#7
A#7
A0
B0
C1
D1
E1
F1
G1
A1
B1
C2
D2
E2
F2
G2
A2
B2
C3
D3
E3
F3
G3
A3
B3
C4
D4
E4
F4
G4
A4
B4
C5
D5
E5
F5
G5
A5
B5
C6
D6
E6
F6
G6
A6
B6
C7
D7
E7
F7
G7
A7
B7
C8
A#0
C#1
D#1
F#1
G#1
A#1
C#2
D#2
F#2
G#2
A#2
C#3
D#3
F#3
G#3
A#3
C#4
D#4
F#4
G#4
A#4
C#5
D#5
F#5
G#5
A#5
C#6
D#6
F#6
G#6
A#6
C#7
D#7
F#7
G#7
A#7
A0
B0
C1
D1
E1
F1
G1
A1
B1
C2
D2
E2
F2
G2
A2
B2
C3
D3
E3
F3
G3
A3
B3
C4
D4
E4
F4
G4
A4
B4
C5
D5
E5
F5
G5
A5
B5
C6
D6
E6
F6
G6
A6
B6
C7
D7
E7
F7
G7
A7
B7
C8
A#0
C#1
D#1
F#1
G#1
A#1
C#2
D#2
F#2
G#2
A#2
C#3
D#3
F#3
G#3
A#3
C#4
D#4
F#4
G#4
A#4
C#5
D#5
F#5
G#5
A#5
C#6
D#6
F#6
G#6
A#6
C#7
D#7
F#7
G#7
A#7
Syn Kick 1 NoneSynSnare 2 NoneSynTom2 Lo NoneDrySnare 2 NoneLightSnare NoneSynSnare 1 NoneDry Kick 2 NoneSolidHit NonePicloSnare NoneTiteSynHH1 Group01Syn Kick 2 NoneSide Stick NoneCyber SD 2 NoneSoft Snare NoneSyn Kick 9 NoneSoft Kick NoneMetronome2 NoneClub Snare NoneSyn Claps NoneOffCentrSD NoneTom 1 Hi NoneClose HH Group01Tom 1 Hi NonePedal HH 2 Group01Tom 1 Hi NoneOpen HH 2 Group01Tom 1 Hi NoneTom 1 Hi NoneCrash Cym NoneTom 1 Hi NoneRide Cym 1 NoneChina Cym NoneRide Cup NoneTambourine NoneSplash Cym NoneCowbell 1 NoneCrash Cym NoneViblaslap NoneRide Cym 3 NoneHi Bongo NoneLo Bongo NoneSlap Conga NoneOpen Conga NoneOpen Conga NoneTimbal1HiO NoneTimbal1LoO NoneAgogo 1 NoneAgogo 1 NoneCabasa NoneSynMaracas NoneWhistle S Group02Whistle L Group02Guiro S Group04Guiro L Group04Claves NoneWoodBlockM NoneWoodBlockM NoneMute Cuica Group03Open Cuica Group03MuteTriang Group05OpenTriang Group05Cabasa NoneJingleBell NoneMarcTree 1 NoneCastanet1V NoneBaya 1 Group06Tom 2 Hi V Group06--- None--- None--- None--- None--- None--- None--- None--- None--- None--- None--- None--- None--- None--- None--- None--- None--- None--- None--- None--- None--- None
Explosion NoneAmbiSnare1 NoneReal Kick NoneSyn Kick 5 NonePicloSnare NoneRock Snare NoneFat Kick NoneDance Kick NoneAmbiSnare2 NoneClose HH Group01Ambi.Kick NoneZap 1 NoneFullRoomSD NoneSnare 1 NoneSyn Kick 1 NoneSyn Kick 3 NoneSyn Rim NoneSynSnare 1 NoneSyn Claps NoneSynSnare 2 NoneSynTom2 Hi NoneClosSynHH1 Group01SynTom2 Hi NoneClosSynHH1 Group01SynTom2 Hi NoneOpenSynHH1 Group01SynTom2 Hi NoneSynTom2 Hi NoneOpenSynHH1 NoneSynTom2 Hi NoneRide Cym 2 NoneChina Cym NoneRide Cup NoneTambourine NoneSplash Cym NoneSynCowbell NoneCrash Cym NoneViblaslap NoneRide Cym 2 NoneHi Bongo NoneLo Bongo NonePalm Conga NoneOpen Conga NoneOpen Conga NoneTimbal1HiO NoneTimbal1LoO NoneAgogo 1 NoneAgogo 1 NoneCabasa NoneSynMaracas NoneWhistle S Group02Whistle L Group02Guiro S Group04Guiro L Group04Syn Claves NoneWoodBlockM NoneWoodBlockM NoneMute Cuica Group03Open Cuica Group03MuteTriang Group05OpenTriang Group05Cabasa NoneJingleBell NoneMarcTree 1 NoneCastanet1V NoneBaya 1 Group06Tom 2 Hi V Group06--- None--- None--- None--- None--- None--- None--- None--- None--- None--- None--- None--- None--- None--- None--- None--- None--- None--- None--- None--- None--- None
Fat Kick NoneRock Kick NoneAmbi.Kick NoneCrisp Kick NonePunch Kick NonePillowKick NoneSoft Kick NoneDry Kick 1 NoneDry Kick 2 NoneDry Kick 3 NoneReal Kick NoneJazz Kick NoneGated Kick NoneMondo Kick NoneProcesKick NoneMetal Kick NoneDance Kick NoneTubby Kick NoneSyn Kick 1 NoneSyn Kick 2 NoneSyn Kick 3 NoneSyn Kick 4 NoneSyn Kick 5 NoneSyn Kick 6 NoneSyn Kick 7 NoneSyn Kick 8 NoneSyn Kick 9 NoneSynKick 10 NoneSynKick 11 NoneDefness BD NoneLoop-EZ BD NoneDJ Scratch NoneOrch B.Drm NoneSnare 1 NoneSnare 2 NoneSnare 3 NoneSnare 4 NonePicloSnare NoneSoft Snare NoneLightSnare NoneFullRoomSD NoneJazzRingSD NoneOffCentrSD NoneDrySnare 1 NoneDrySnare 2 NoneDrySnare 3 NoneTightSnare NoneAmbiSnare1 NoneAmbiSnare2 NoneRock Snare NoneGatedSnare NonePowerSnare NoneBigRock SD NoneCracker SD NoneAmbHouseSD NoneRollSnare1 Group01RollSnare2 Group01SynSnare 1 NoneSynSnare 2 NoneSynSnare 3 NoneSynSnare 4 NoneSynSnare 5 NoneNoiseSnare NoneDanceSnare NoneSizzle SD NoneAcid Snare NoneClub Snare NoneCyber SD 1 NoneCyber SD 2 NoneDefness SD NoneOldAmbi.SD NoneGR02-SN3 NoneClapsSnare NoneBrush Slap NoneBrush Tap NoneBrushSwish NoneBrushSwirl NoneStick Hit NoneSide Stick NoneSideStick2 NoneSyn Rim None--- None--- None--- None--- None--- None--- None--- None
--- None--- None--- None--- None--- None--- None--- None--- None--- None--- None--- None--- None--- None--- None--- NoneTom 1 Lo NoneTom 1 Hi NoneTom 2 Lo NoneTom 2 Lo V NoneTom 2 Hi NoneTom 2 Hi V NoneTom 3 Lo NoneTom 3 Lo NoneJazzFl Tom NoneJazzHi Tom NoneProcessTom NoneProcesTom2 NoneOilDrum NoneSyn Tom 1 NoneSynTom2 Lo NoneSynTom2 Hi NoneSolidHit NoneBrush Tom NoneBrushTom V NoneTite HH 1 NoneTite HH 2 NoneClose HH NoneOpen HH 1 NoneOpen HH 2 NoneOpen HH 3 NonePedal HH 1 NonePedal HH 2 NoneCloseDstHH NoneOpenDst HH NonePedalDstHH NoneTiteSynHH1 NoneTiteSynHH2 NoneClosSynHH1 NoneClosSynHH2 NoneOpenSynHH1 NoneOpenSynHH2 NoneOpenSynHH3 NoneOpenSynHH4 NoneOpenSynHH5 NoneOpenSynHH6 NoneGR08-HH1 NoneGR08-HH2 NoneCrash Cym NoneCrash LP NoneChina Cym NoneChina LP NoneSplash Cym NoneSplash LP NoneOrch Cym NoneOrchCym LP NoneSynCrash 1 NoneSynCrash 2 NoneRide Edge NoneRide Cup NoneRide Cym 1 NoneRide Cym 2 NoneRide Cym 3 None--- None--- None--- None--- None--- None--- None--- None--- None--- None--- None--- None--- None--- None--- None--- None--- None
R45 Drum'n'Bass Kit R46 Analog Kit 2 R47 Kicks & Snares R48 Tom & HH & Cym
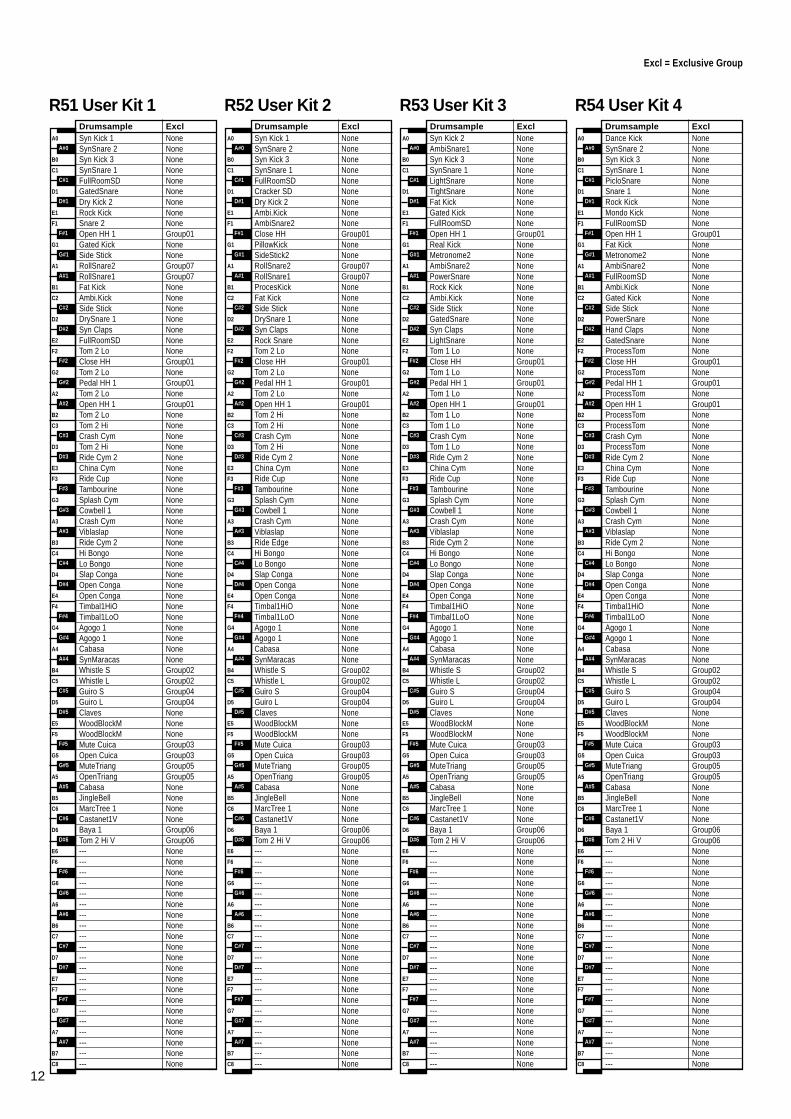
Excl = Exclusive Group
12
Drumsample Excl Drumsample Excl Drumsample Excl Drumsample ExclA0
B0
C1
D1
E1
F1
G1
A1
B1
C2
D2
E2
F2
G2
A2
B2
C3
D3
E3
F3
G3
A3
B3
C4
D4
E4
F4
G4
A4
B4
C5
D5
E5
F5
G5
A5
B5
C6
D6
E6
F6
G6
A6
B6
C7
D7
E7
F7
G7
A7
B7
C8
A#0
C#1
D#1
F#1
G#1
A#1
C#2
D#2
F#2
G#2
A#2
C#3
D#3
F#3
G#3
A#3
C#4
D#4
F#4
G#4
A#4
C#5
D#5
F#5
G#5
A#5
C#6
D#6
F#6
G#6
A#6
C#7
D#7
F#7
G#7
A#7
A0
B0
C1
D1
E1
F1
G1
A1
B1
C2
D2
E2
F2
G2
A2
B2
C3
D3
E3
F3
G3
A3
B3
C4
D4
E4
F4
G4
A4
B4
C5
D5
E5
F5
G5
A5
B5
C6
D6
E6
F6
G6
A6
B6
C7
D7
E7
F7
G7
A7
B7
C8
A#0
C#1
D#1
F#1
G#1
A#1
C#2
D#2
F#2
G#2
A#2
C#3
D#3
F#3
G#3
A#3
C#4
D#4
F#4
G#4
A#4
C#5
D#5
F#5
G#5
A#5
C#6
D#6
F#6
G#6
A#6
C#7
D#7
F#7
G#7
A#7
A0
B0
C1
D1
E1
F1
G1
A1
B1
C2
D2
E2
F2
G2
A2
B2
C3
D3
E3
F3
G3
A3
B3
C4
D4
E4
F4
G4
A4
B4
C5
D5
E5
F5
G5
A5
B5
C6
D6
E6
F6
G6
A6
B6
C7
D7
E7
F7
G7
A7
B7
C8
A#0
C#1
D#1
F#1
G#1
A#1
C#2
D#2
F#2
G#2
A#2
C#3
D#3
F#3
G#3
A#3
C#4
D#4
F#4
G#4
A#4
C#5
D#5
F#5
G#5
A#5
C#6
D#6
F#6
G#6
A#6
C#7
D#7
F#7
G#7
A#7
A0
B0
C1
D1
E1
F1
G1
A1
B1
C2
D2
E2
F2
G2
A2
B2
C3
D3
E3
F3
G3
A3
B3
C4
D4
E4
F4
G4
A4
B4
C5
D5
E5
F5
G5
A5
B5
C6
D6
E6
F6
G6
A6
B6
C7
D7
E7
F7
G7
A7
B7
C8
A#0
C#1
D#1
F#1
G#1
A#1
C#2
D#2
F#2
G#2
A#2
C#3
D#3
F#3
G#3
A#3
C#4
D#4
F#4
G#4
A#4
C#5
D#5
F#5
G#5
A#5
C#6
D#6
F#6
G#6
A#6
C#7
D#7
F#7
G#7
A#7
R51 User Kit 1
Syn Kick 1 NoneSynSnare 2 NoneSyn Kick 3 NoneSynSnare 1 NoneFullRoomSD NoneCracker SD NoneDry Kick 2 NoneAmbi.Kick NoneAmbiSnare2 NoneClose HH Group01PillowKick NoneSideStick2 NoneRollSnare2 Group07RollSnare1 Group07ProcesKick NoneFat Kick NoneSide Stick NoneDrySnare 1 NoneSyn Claps NoneRock Snare NoneTom 2 Lo NoneClose HH Group01Tom 2 Lo NonePedal HH 1 Group01Tom 2 Lo NoneOpen HH 1 Group01Tom 2 Hi NoneTom 2 Hi NoneCrash Cym NoneTom 2 Hi NoneRide Cym 2 NoneChina Cym NoneRide Cup NoneTambourine NoneSplash Cym NoneCowbell 1 NoneCrash Cym NoneViblaslap NoneRide Edge NoneHi Bongo NoneLo Bongo NoneSlap Conga NoneOpen Conga NoneOpen Conga NoneTimbal1HiO NoneTimbal1LoO NoneAgogo 1 NoneAgogo 1 NoneCabasa NoneSynMaracas NoneWhistle S Group02Whistle L Group02Guiro S Group04Guiro L Group04Claves NoneWoodBlockM NoneWoodBlockM NoneMute Cuica Group03Open Cuica Group03MuteTriang Group05OpenTriang Group05Cabasa NoneJingleBell NoneMarcTree 1 NoneCastanet1V NoneBaya 1 Group06Tom 2 Hi V Group06--- None--- None--- None--- None--- None--- None--- None--- None--- None--- None--- None--- None--- None--- None--- None--- None--- None--- None--- None--- None--- None
Syn Kick 2 NoneAmbiSnare1 NoneSyn Kick 3 NoneSynSnare 1 NoneLightSnare NoneTightSnare NoneFat Kick NoneGated Kick NoneFullRoomSD NoneOpen HH 1 Group01Real Kick NoneMetronome2 NoneAmbiSnare2 NonePowerSnare NoneRock Kick NoneAmbi.Kick NoneSide Stick NoneGatedSnare NoneSyn Claps NoneLightSnare NoneTom 1 Lo NoneClose HH Group01Tom 1 Lo NonePedal HH 1 Group01Tom 1 Lo NoneOpen HH 1 Group01Tom 1 Lo NoneTom 1 Lo NoneCrash Cym NoneTom 1 Lo NoneRide Cym 2 NoneChina Cym NoneRide Cup NoneTambourine NoneSplash Cym NoneCowbell 1 NoneCrash Cym NoneViblaslap NoneRide Cym 2 NoneHi Bongo NoneLo Bongo NoneSlap Conga NoneOpen Conga NoneOpen Conga NoneTimbal1HiO NoneTimbal1LoO NoneAgogo 1 NoneAgogo 1 NoneCabasa NoneSynMaracas NoneWhistle S Group02Whistle L Group02Guiro S Group04Guiro L Group04Claves NoneWoodBlockM NoneWoodBlockM NoneMute Cuica Group03Open Cuica Group03MuteTriang Group05OpenTriang Group05Cabasa NoneJingleBell NoneMarcTree 1 NoneCastanet1V NoneBaya 1 Group06Tom 2 Hi V Group06--- None--- None--- None--- None--- None--- None--- None--- None--- None--- None--- None--- None--- None--- None--- None--- None--- None--- None--- None--- None--- None
Dance Kick NoneSynSnare 2 NoneSyn Kick 3 NoneSynSnare 1 NonePicloSnare NoneSnare 1 NoneRock Kick NoneMondo Kick NoneFullRoomSD NoneOpen HH 1 Group01Fat Kick NoneMetronome2 NoneAmbiSnare2 NoneFullRoomSD NoneAmbi.Kick NoneGated Kick NoneSide Stick NonePowerSnare NoneHand Claps NoneGatedSnare NoneProcessTom NoneClose HH Group01ProcessTom NonePedal HH 1 Group01ProcessTom NoneOpen HH 1 Group01ProcessTom NoneProcessTom NoneCrash Cym NoneProcessTom NoneRide Cym 2 NoneChina Cym NoneRide Cup NoneTambourine NoneSplash Cym NoneCowbell 1 NoneCrash Cym NoneViblaslap NoneRide Cym 2 NoneHi Bongo NoneLo Bongo NoneSlap Conga NoneOpen Conga NoneOpen Conga NoneTimbal1HiO NoneTimbal1LoO NoneAgogo 1 NoneAgogo 1 NoneCabasa NoneSynMaracas NoneWhistle S Group02Whistle L Group02Guiro S Group04Guiro L Group04Claves NoneWoodBlockM NoneWoodBlockM NoneMute Cuica Group03Open Cuica Group03MuteTriang Group05OpenTriang Group05Cabasa NoneJingleBell NoneMarcTree 1 NoneCastanet1V NoneBaya 1 Group06Tom 2 Hi V Group06--- None--- None--- None--- None--- None--- None--- None--- None--- None--- None--- None--- None--- None--- None--- None--- None--- None--- None--- None--- None--- None
Syn Kick 1 NoneSynSnare 2 NoneSyn Kick 3 NoneSynSnare 1 NoneFullRoomSD NoneGatedSnare NoneDry Kick 2 NoneRock Kick NoneSnare 2 NoneOpen HH 1 Group01Gated Kick NoneSide Stick NoneRollSnare2 Group07RollSnare1 Group07Fat Kick NoneAmbi.Kick NoneSide Stick NoneDrySnare 1 NoneSyn Claps NoneFullRoomSD NoneTom 2 Lo NoneClose HH Group01Tom 2 Lo NonePedal HH 1 Group01Tom 2 Lo NoneOpen HH 1 Group01Tom 2 Lo NoneTom 2 Hi NoneCrash Cym NoneTom 2 Hi NoneRide Cym 2 NoneChina Cym NoneRide Cup NoneTambourine NoneSplash Cym NoneCowbell 1 NoneCrash Cym NoneViblaslap NoneRide Cym 2 NoneHi Bongo NoneLo Bongo NoneSlap Conga NoneOpen Conga NoneOpen Conga NoneTimbal1HiO NoneTimbal1LoO NoneAgogo 1 NoneAgogo 1 NoneCabasa NoneSynMaracas NoneWhistle S Group02Whistle L Group02Guiro S Group04Guiro L Group04Claves NoneWoodBlockM NoneWoodBlockM NoneMute Cuica Group03Open Cuica Group03MuteTriang Group05OpenTriang Group05Cabasa NoneJingleBell NoneMarcTree 1 NoneCastanet1V NoneBaya 1 Group06Tom 2 Hi V Group06--- None--- None--- None--- None--- None--- None--- None--- None--- None--- None--- None--- None--- None--- None--- None--- None--- None--- None--- None--- None--- None
R52 User Kit 2 R53 User Kit 3 R54 User Kit 4
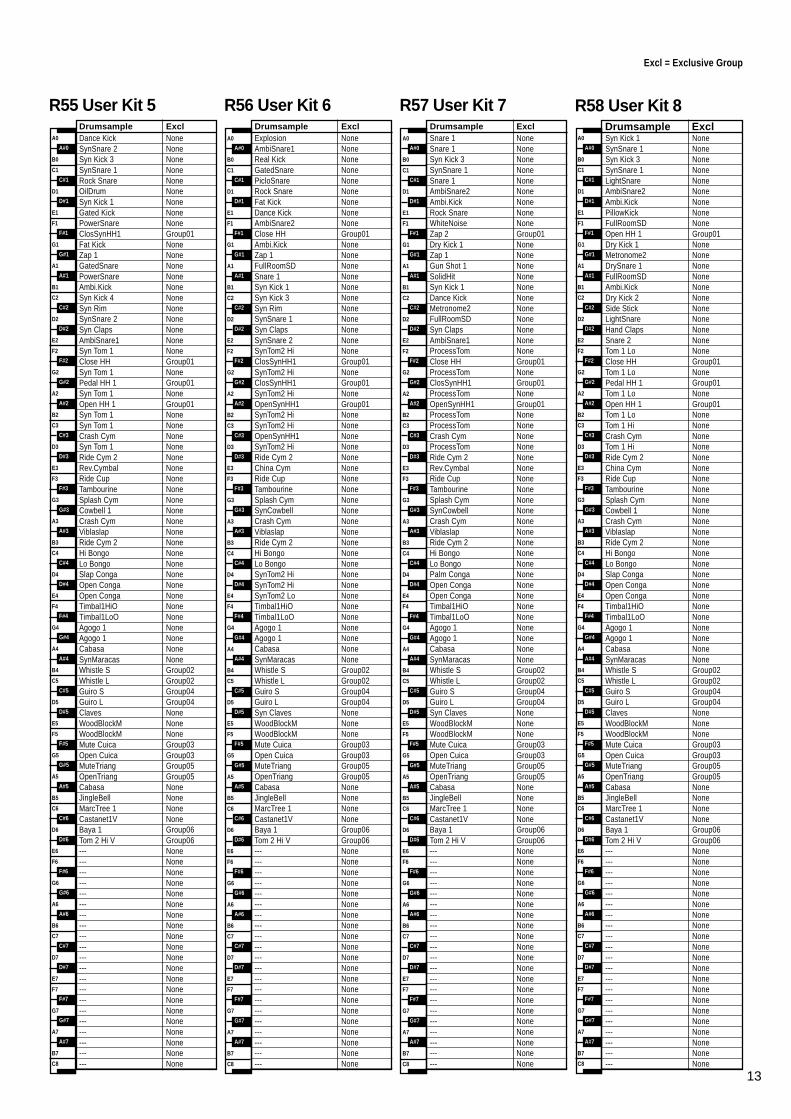
Excl = Exclusive Group
13
Drumsample Excl Drumsample Excl Drumsample Excl Drumsample ExclA0
B0
C1
D1
E1
F1
G1
A1
B1
C2
D2
E2
F2
G2
A2
B2
C3
D3
E3
F3
G3
A3
B3
C4
D4
E4
F4
G4
A4
B4
C5
D5
E5
F5
G5
A5
B5
C6
D6
E6
F6
G6
A6
B6
C7
D7
E7
F7
G7
A7
B7
C8
A#0
C#1
D#1
F#1
G#1
A#1
C#2
D#2
F#2
G#2
A#2
C#3
D#3
F#3
G#3
A#3
C#4
D#4
F#4
G#4
A#4
C#5
D#5
F#5
G#5
A#5
C#6
D#6
F#6
G#6
A#6
C#7
D#7
F#7
G#7
A#7
A0
B0
C1
D1
E1
F1
G1
A1
B1
C2
D2
E2
F2
G2
A2
B2
C3
D3
E3
F3
G3
A3
B3
C4
D4
E4
F4
G4
A4
B4
C5
D5
E5
F5
G5
A5
B5
C6
D6
E6
F6
G6
A6
B6
C7
D7
E7
F7
G7
A7
B7
C8
A#0
C#1
D#1
F#1
G#1
A#1
C#2
D#2
F#2
G#2
A#2
C#3
D#3
F#3
G#3
A#3
C#4
D#4
F#4
G#4
A#4
C#5
D#5
F#5
G#5
A#5
C#6
D#6
F#6
G#6
A#6
C#7
D#7
F#7
G#7
A#7
A0
B0
C1
D1
E1
F1
G1
A1
B1
C2
D2
E2
F2
G2
A2
B2
C3
D3
E3
F3
G3
A3
B3
C4
D4
E4
F4
G4
A4
B4
C5
D5
E5
F5
G5
A5
B5
C6
D6
E6
F6
G6
A6
B6
C7
D7
E7
F7
G7
A7
B7
C8
A#0
C#1
D#1
F#1
G#1
A#1
C#2
D#2
F#2
G#2
A#2
C#3
D#3
F#3
G#3
A#3
C#4
D#4
F#4
G#4
A#4
C#5
D#5
F#5
G#5
A#5
C#6
D#6
F#6
G#6
A#6
C#7
D#7
F#7
G#7
A#7
A0
B0
C1
D1
E1
F1
G1
A1
B1
C2
D2
E2
F2
G2
A2
B2
C3
D3
E3
F3
G3
A3
B3
C4
D4
E4
F4
G4
A4
B4
C5
D5
E5
F5
G5
A5
B5
C6
D6
E6
F6
G6
A6
B6
C7
D7
E7
F7
G7
A7
B7
C8
A#0
C#1
D#1
F#1
G#1
A#1
C#2
D#2
F#2
G#2
A#2
C#3
D#3
F#3
G#3
A#3
C#4
D#4
F#4
G#4
A#4
C#5
D#5
F#5
G#5
A#5
C#6
D#6
F#6
G#6
A#6
C#7
D#7
F#7
G#7
A#7
Explosion NoneAmbiSnare1 NoneReal Kick NoneGatedSnare NonePicloSnare NoneRock Snare NoneFat Kick NoneDance Kick NoneAmbiSnare2 NoneClose HH Group01Ambi.Kick NoneZap 1 NoneFullRoomSD NoneSnare 1 NoneSyn Kick 1 NoneSyn Kick 3 NoneSyn Rim NoneSynSnare 1 NoneSyn Claps NoneSynSnare 2 NoneSynTom2 Hi NoneClosSynHH1 Group01SynTom2 Hi NoneClosSynHH1 Group01SynTom2 Hi NoneOpenSynHH1 Group01SynTom2 Hi NoneSynTom2 Hi NoneOpenSynHH1 NoneSynTom2 Hi NoneRide Cym 2 NoneChina Cym NoneRide Cup NoneTambourine NoneSplash Cym NoneSynCowbell NoneCrash Cym NoneViblaslap NoneRide Cym 2 NoneHi Bongo NoneLo Bongo NoneSynTom2 Hi NoneSynTom2 Hi NoneSynTom2 Lo NoneTimbal1HiO NoneTimbal1LoO NoneAgogo 1 NoneAgogo 1 NoneCabasa NoneSynMaracas NoneWhistle S Group02Whistle L Group02Guiro S Group04Guiro L Group04Syn Claves NoneWoodBlockM NoneWoodBlockM NoneMute Cuica Group03Open Cuica Group03MuteTriang Group05OpenTriang Group05Cabasa NoneJingleBell NoneMarcTree 1 NoneCastanet1V NoneBaya 1 Group06Tom 2 Hi V Group06--- None--- None--- None--- None--- None--- None--- None--- None--- None--- None--- None--- None--- None--- None--- None--- None--- None--- None--- None--- None--- None
Snare 1 NoneSnare 1 NoneSyn Kick 3 NoneSynSnare 1 NoneSnare 1 NoneAmbiSnare2 NoneAmbi.Kick NoneRock Snare NoneWhiteNoise NoneZap 2 Group01Dry Kick 1 NoneZap 1 NoneGun Shot 1 NoneSolidHit NoneSyn Kick 1 NoneDance Kick NoneMetronome2 NoneFullRoomSD NoneSyn Claps NoneAmbiSnare1 NoneProcessTom NoneClose HH Group01ProcessTom NoneClosSynHH1 Group01ProcessTom NoneOpenSynHH1 Group01ProcessTom NoneProcessTom NoneCrash Cym NoneProcessTom NoneRide Cym 2 NoneRev.Cymbal NoneRide Cup NoneTambourine NoneSplash Cym NoneSynCowbell NoneCrash Cym NoneViblaslap NoneRide Cym 2 NoneHi Bongo NoneLo Bongo NonePalm Conga NoneOpen Conga NoneOpen Conga NoneTimbal1HiO NoneTimbal1LoO NoneAgogo 1 NoneAgogo 1 NoneCabasa NoneSynMaracas NoneWhistle S Group02Whistle L Group02Guiro S Group04Guiro L Group04Syn Claves NoneWoodBlockM NoneWoodBlockM NoneMute Cuica Group03Open Cuica Group03MuteTriang Group05OpenTriang Group05Cabasa NoneJingleBell NoneMarcTree 1 NoneCastanet1V NoneBaya 1 Group06Tom 2 Hi V Group06--- None--- None--- None--- None--- None--- None--- None--- None--- None--- None--- None--- None--- None--- None--- None--- None--- None--- None--- None--- None--- None
Syn Kick 1 NoneSynSnare 1 NoneSyn Kick 3 NoneSynSnare 1 NoneLightSnare NoneAmbiSnare2 NoneAmbi.Kick NonePillowKick NoneFullRoomSD NoneOpen HH 1 Group01Dry Kick 1 NoneMetronome2 NoneDrySnare 1 NoneFullRoomSD NoneAmbi.Kick NoneDry Kick 2 NoneSide Stick NoneLightSnare NoneHand Claps NoneSnare 2 NoneTom 1 Lo NoneClose HH Group01Tom 1 Lo NonePedal HH 1 Group01Tom 1 Lo NoneOpen HH 1 Group01Tom 1 Lo NoneTom 1 Hi NoneCrash Cym NoneTom 1 Hi NoneRide Cym 2 NoneChina Cym NoneRide Cup NoneTambourine NoneSplash Cym NoneCowbell 1 NoneCrash Cym NoneViblaslap NoneRide Cym 2 NoneHi Bongo NoneLo Bongo NoneSlap Conga NoneOpen Conga NoneOpen Conga NoneTimbal1HiO NoneTimbal1LoO NoneAgogo 1 NoneAgogo 1 NoneCabasa NoneSynMaracas NoneWhistle S Group02Whistle L Group02Guiro S Group04Guiro L Group04Claves NoneWoodBlockM NoneWoodBlockM NoneMute Cuica Group03Open Cuica Group03MuteTriang Group05OpenTriang Group05Cabasa NoneJingleBell NoneMarcTree 1 NoneCastanet1V NoneBaya 1 Group06Tom 2 Hi V Group06--- None--- None--- None--- None--- None--- None--- None--- None--- None--- None--- None--- None--- None--- None--- None--- None--- None--- None--- None--- None--- None
R55 User Kit 5
Dance Kick NoneSynSnare 2 NoneSyn Kick 3 NoneSynSnare 1 NoneRock Snare NoneOilDrum NoneSyn Kick 1 NoneGated Kick NonePowerSnare NoneClosSynHH1 Group01Fat Kick NoneZap 1 NoneGatedSnare NonePowerSnare NoneAmbi.Kick NoneSyn Kick 4 NoneSyn Rim NoneSynSnare 2 NoneSyn Claps NoneAmbiSnare1 NoneSyn Tom 1 NoneClose HH Group01Syn Tom 1 NonePedal HH 1 Group01Syn Tom 1 NoneOpen HH 1 Group01Syn Tom 1 NoneSyn Tom 1 NoneCrash Cym NoneSyn Tom 1 NoneRide Cym 2 NoneRev.Cymbal NoneRide Cup NoneTambourine NoneSplash Cym NoneCowbell 1 NoneCrash Cym NoneViblaslap NoneRide Cym 2 NoneHi Bongo NoneLo Bongo NoneSlap Conga NoneOpen Conga NoneOpen Conga NoneTimbal1HiO NoneTimbal1LoO NoneAgogo 1 NoneAgogo 1 NoneCabasa NoneSynMaracas NoneWhistle S Group02Whistle L Group02Guiro S Group04Guiro L Group04Claves NoneWoodBlockM NoneWoodBlockM NoneMute Cuica Group03Open Cuica Group03MuteTriang Group05OpenTriang Group05Cabasa NoneJingleBell NoneMarcTree 1 NoneCastanet1V NoneBaya 1 Group06Tom 2 Hi V Group06--- None--- None--- None--- None--- None--- None--- None--- None--- None--- None--- None--- None--- None--- None--- None--- None--- None--- None--- None--- None--- None
R56 User Kit 6 R57 User Kit 7 R58 User Kit 8
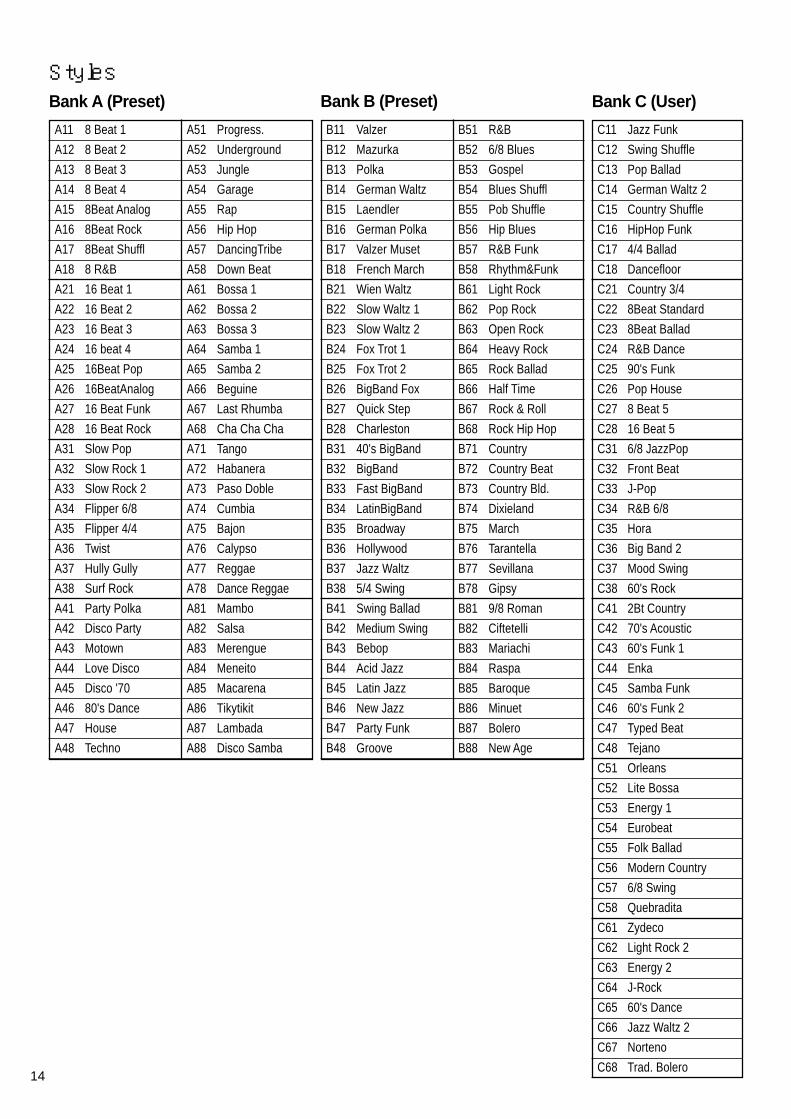
14
StylesBank A (Preset)
C11 Jazz Funk
C12 Swing Shuffle
C13 Pop Ballad
C14 German Waltz 2
C15 Country Shuffle
C16 HipHop Funk
C17 4/4 Ballad
C18 Dancefloor
C21 Country 3/4
C22 8Beat Standard
C23 8Beat Ballad
C24 R&B Dance
C25 90's Funk
C26 Pop House
C27 8 Beat 5
C28 16 Beat 5
C31 6/8 JazzPop
C32 Front Beat
C33 J-Pop
C34 R&B 6/8
C35 Hora
C36 Big Band 2
C37 Mood Swing
C38 60's Rock
C41 2Bt Country
C42 70's Acoustic
C43 60's Funk 1
C44 Enka
C45 Samba Funk
C46 60's Funk 2
C47 Typed Beat
C48 Tejano
C51 Orleans
C52 Lite Bossa
C53 Energy 1
C54 Eurobeat
C55 Folk Ballad
C56 Modern Country
C57 6/8 Swing
C58 Quebradita
C61 Zydeco
C62 Light Rock 2
C63 Energy 2
C64 J-Rock
C65 60's Dance
C66 Jazz Waltz 2
C67 Norteno
C68 Trad. Bolero
Bank B (Preset)
A51 Progress.
A52 Underground
A53 Jungle
A54 Garage
A55 Rap
A56 Hip Hop
A57 DancingTribe
A58 Down Beat
A61 Bossa 1
A62 Bossa 2
A63 Bossa 3
A64 Samba 1
A65 Samba 2
A66 Beguine
A67 Last Rhumba
A68 Cha Cha Cha
A71 Tango
A72 Habanera
A73 Paso Doble
A74 Cumbia
A75 Bajon
A76 Calypso
A77 Reggae
A78 Dance Reggae
A81 Mambo
A82 Salsa
A83 Merengue
A84 Meneito
A85 Macarena
A86 Tikytikit
A87 Lambada
A88 Disco Samba
A11 8 Beat 1
A12 8 Beat 2
A13 8 Beat 3
A14 8 Beat 4
A15 8Beat Analog
A16 8Beat Rock
A17 8Beat Shuffl
A18 8 R&B
A21 16 Beat 1
A22 16 Beat 2
A23 16 Beat 3
A24 16 beat 4
A25 16Beat Pop
A26 16BeatAnalog
A27 16 Beat Funk
A28 16 Beat Rock
A31 Slow Pop
A32 Slow Rock 1
A33 Slow Rock 2
A34 Flipper 6/8
A35 Flipper 4/4
A36 Twist
A37 Hully Gully
A38 Surf Rock
A41 Party Polka
A42 Disco Party
A43 Motown
A44 Love Disco
A45 Disco '70
A46 80's Dance
A47 House
A48 Techno
B11 Valzer
B12 Mazurka
B13 Polka
B14 German Waltz
B15 Laendler
B16 German Polka
B17 Valzer Muset
B18 French March
B21 Wien Waltz
B22 Slow Waltz 1
B23 Slow Waltz 2
B24 Fox Trot 1
B25 Fox Trot 2
B26 BigBand Fox
B27 Quick Step
B28 Charleston
B31 40's BigBand
B32 BigBand
B33 Fast BigBand
B34 LatinBigBand
B35 Broadway
B36 Hollywood
B37 Jazz Waltz
B38 5/4 Swing
B41 Swing Ballad
B42 Medium Swing
B43 Bebop
B44 Acid Jazz
B45 Latin Jazz
B46 New Jazz
B47 Party Funk
B48 Groove
B51 R&B
B52 6/8 Blues
B53 Gospel
B54 Blues Shuffl
B55 Pob Shuffle
B56 Hip Blues
B57 R&B Funk
B58 Rhythm&Funk
B61 Light Rock
B62 Pop Rock
B63 Open Rock
B64 Heavy Rock
B65 Rock Ballad
B66 Half Time
B67 Rock & Roll
B68 Rock Hip Hop
B71 Country
B72 Country Beat
B73 Country Bld.
B74 Dixieland
B75 March
B76 Tarantella
B77 Sevillana
B78 Gipsy
B81 9/8 Roman
B82 Ciftetelli
B83 Mariachi
B84 Raspa
B85 Baroque
B86 Minuet
B87 Bolero
B88 New Age
Bank C (User)
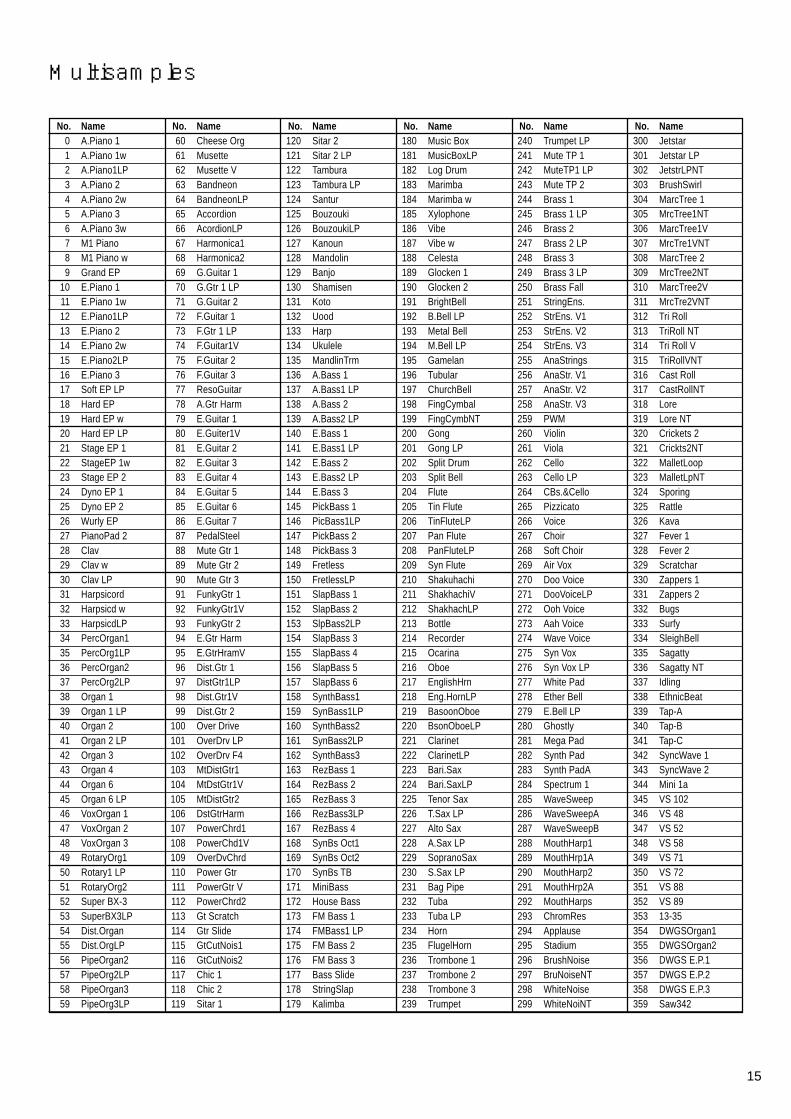
15
Multisamples
No. Name0 A.Piano 11 A.Piano 1w2 A.Piano1LP3 A.Piano 24 A.Piano 2w5 A.Piano 36 A.Piano 3w7 M1 Piano8 M1 Piano w9 Grand EP
10 E.Piano 111 E.Piano 1w12 E.Piano1LP13 E.Piano 214 E.Piano 2w15 E.Piano2LP16 E.Piano 317 Soft EP LP18 Hard EP19 Hard EP w20 Hard EP LP21 Stage EP 122 StageEP 1w23 Stage EP 224 Dyno EP 125 Dyno EP 226 Wurly EP27 PianoPad 228 Clav29 Clav w30 Clav LP31 Harpsicord32 Harpsicd w33 HarpsicdLP34 PercOrgan135 PercOrg1LP36 PercOrgan237 PercOrg2LP38 Organ 139 Organ 1 LP40 Organ 241 Organ 2 LP42 Organ 343 Organ 444 Organ 645 Organ 6 LP46 VoxOrgan 147 VoxOrgan 248 VoxOrgan 349 RotaryOrg150 Rotary1 LP51 RotaryOrg252 Super BX-353 SuperBX3LP54 Dist.Organ55 Dist.OrgLP56 PipeOrgan257 PipeOrg2LP58 PipeOrgan359 PipeOrg3LP
No. Name60 Cheese Org61 Musette62 Musette V63 Bandneon64 BandneonLP65 Accordion66 AcordionLP67 Harmonica168 Harmonica269 G.Guitar 170 G.Gtr 1 LP71 G.Guitar 272 F.Guitar 173 F.Gtr 1 LP74 F.Guitar1V75 F.Guitar 276 F.Guitar 377 ResoGuitar78 A.Gtr Harm79 E.Guitar 180 E.Guiter1V81 E.Guitar 282 E.Guitar 383 E.Guitar 484 E.Guitar 585 E.Guitar 686 E.Guitar 787 PedalSteel88 Mute Gtr 189 Mute Gtr 290 Mute Gtr 391 FunkyGtr 192 FunkyGtr1V93 FunkyGtr 294 E.Gtr Harm95 E.GtrHramV96 Dist.Gtr 197 DistGtr1LP98 Dist.Gtr1V99 Dist.Gtr 2
100 Over Drive101 OverDrv LP102 OverDrv F4103 MtDistGtr1104 MtDstGtr1V105 MtDistGtr2106 DstGtrHarm107 PowerChrd1108 PowerChd1V109 OverDvChrd110 Power Gtr111 PowerGtr V112 PowerChrd2113 Gt Scratch114 Gtr Slide115 GtCutNois1116 GtCutNois2117 Chic 1118 Chic 2119 Sitar 1
No. Name120 Sitar 2121 Sitar 2 LP122 Tambura123 Tambura LP124 Santur125 Bouzouki126 BouzoukiLP127 Kanoun128 Mandolin129 Banjo130 Shamisen131 Koto132 Uood133 Harp134 Ukulele135 MandlinTrm136 A.Bass 1137 A.Bass1 LP138 A.Bass 2139 A.Bass2 LP140 E.Bass 1141 E.Bass1 LP142 E.Bass 2143 E.Bass2 LP144 E.Bass 3145 PickBass 1146 PicBass1LP147 PickBass 2148 PickBass 3149 Fretless150 FretlessLP151 SlapBass 1152 SlapBass 2153 SlpBass2LP154 SlapBass 3155 SlapBass 4156 SlapBass 5157 SlapBass 6158 SynthBass1159 SynBass1LP160 SynthBass2161 SynBass2LP162 SynthBass3163 RezBass 1164 RezBass 2165 RezBass 3166 RezBass3LP167 RezBass 4168 SynBs Oct1169 SynBs Oct2170 SynBs TB171 MiniBass172 House Bass173 FM Bass 1174 FMBass1 LP175 FM Bass 2176 FM Bass 3177 Bass Slide178 StringSlap179 Kalimba
No. Name180 Music Box181 MusicBoxLP182 Log Drum183 Marimba184 Marimba w185 Xylophone186 Vibe187 Vibe w188 Celesta189 Glocken 1190 Glocken 2191 BrightBell192 B.Bell LP193 Metal Bell194 M.Bell LP195 Gamelan196 Tubular197 ChurchBell198 FingCymbal199 FingCymbNT200 Gong201 Gong LP202 Split Drum203 Split Bell204 Flute205 Tin Flute206 TinFluteLP207 Pan Flute208 PanFluteLP209 Syn Flute210 Shakuhachi211 ShakhachiV212 ShakhachLP213 Bottle214 Recorder215 Ocarina216 Oboe217 EnglishHrn218 Eng.HornLP219 BasoonOboe220 BsonOboeLP221 Clarinet222 ClarinetLP223 Bari.Sax224 Bari.SaxLP225 Tenor Sax226 T.Sax LP227 Alto Sax228 A.Sax LP229 SopranoSax230 S.Sax LP231 Bag Pipe232 Tuba233 Tuba LP234 Horn235 FlugelHorn236 Trombone 1237 Trombone 2238 Trombone 3239 Trumpet
No. Name240 Trumpet LP241 Mute TP 1242 MuteTP1 LP243 Mute TP 2244 Brass 1245 Brass 1 LP246 Brass 2247 Brass 2 LP248 Brass 3249 Brass 3 LP250 Brass Fall251 StringEns.252 StrEns. V1253 StrEns. V2254 StrEns. V3255 AnaStrings256 AnaStr. V1257 AnaStr. V2258 AnaStr. V3259 PWM260 Violin261 Viola262 Cello263 Cello LP264 CBs.&Cello265 Pizzicato266 Voice267 Choir268 Soft Choir269 Air Vox270 Doo Voice271 DooVoiceLP272 Ooh Voice273 Aah Voice274 Wave Voice275 Syn Vox276 Syn Vox LP277 White Pad278 Ether Bell279 E.Bell LP280 Ghostly281 Mega Pad282 Synth Pad283 Synth PadA284 Spectrum 1285 WaveSweep286 WaveSweepA287 WaveSweepB288 MouthHarp1289 MouthHrp1A290 MouthHarp2291 MouthHrp2A292 MouthHarps293 ChromRes294 Applause295 Stadium296 BrushNoise297 BruNoiseNT298 WhiteNoise299 WhiteNoiNT
No. Name300 Jetstar301 Jetstar LP302 JetstrLPNT303 BrushSwirl304 MarcTree 1305 MrcTree1NT306 MarcTree1V307 MrcTre1VNT308 MarcTree 2309 MrcTree2NT310 MarcTree2V311 MrcTre2VNT312 Tri Roll313 TriRoll NT314 Tri Roll V315 TriRollVNT316 Cast Roll317 CastRollNT318 Lore319 Lore NT320 Crickets 2321 Crickts2NT322 MalletLoop323 MalletLpNT324 Sporing325 Rattle326 Kava327 Fever 1328 Fever 2329 Scratchar330 Zappers 1331 Zappers 2332 Bugs333 Surfy334 SleighBell335 Sagatty336 Sagatty NT337 Idling338 EthnicBeat339 Tap-A340 Tap-B341 Tap-C342 SyncWave 1343 SyncWave 2344 Mini 1a345 VS 102346 VS 48347 VS 52348 VS 58349 VS 71350 VS 72351 VS 88352 VS 89353 13-35354 DWGSOrgan1355 DWGSOrgan2356 DWGS E.P.1357 DWGS E.P.2358 DWGS E.P.3359 Saw342
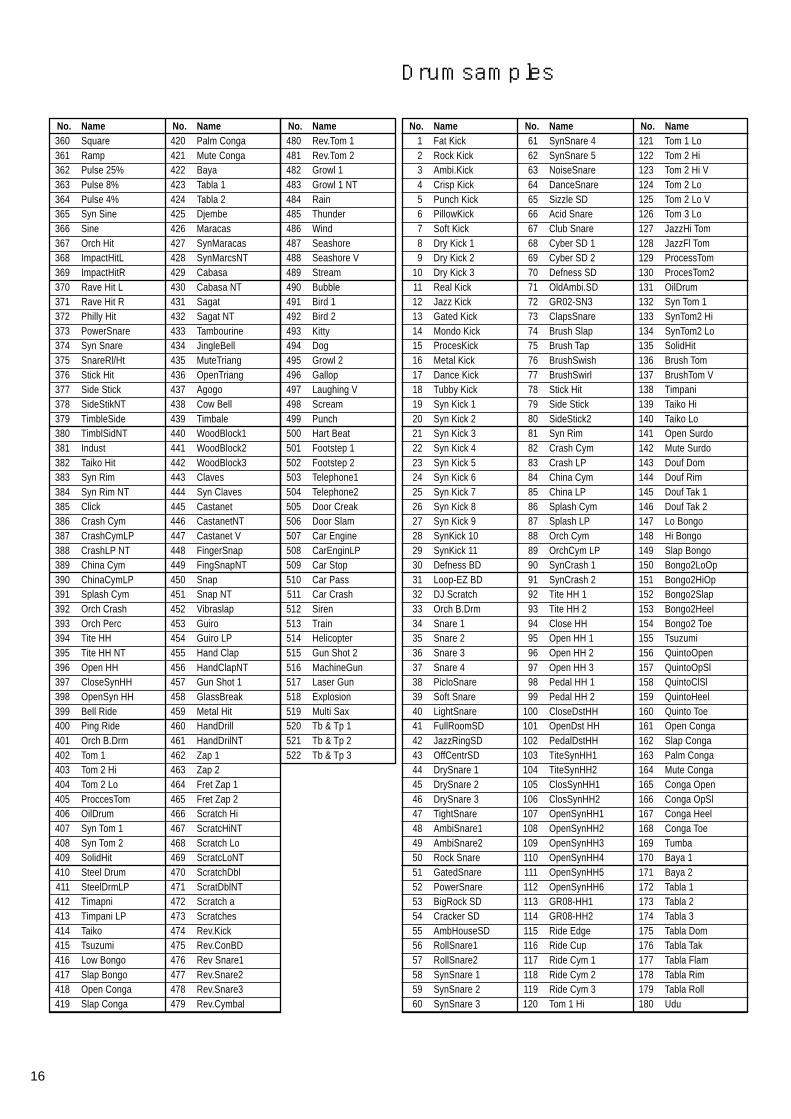
16
No. Name121 Tom 1 Lo122 Tom 2 Hi123 Tom 2 Hi V124 Tom 2 Lo125 Tom 2 Lo V126 Tom 3 Lo127 JazzHi Tom128 JazzFl Tom129 ProcessTom130 ProcesTom2131 OilDrum132 Syn Tom 1133 SynTom2 Hi134 SynTom2 Lo135 SolidHit136 Brush Tom137 BrushTom V138 Timpani139 Taiko Hi140 Taiko Lo141 Open Surdo142 Mute Surdo143 Douf Dom144 Douf Rim145 Douf Tak 1146 Douf Tak 2147 Lo Bongo148 Hi Bongo149 Slap Bongo150 Bongo2LoOp151 Bongo2HiOp152 Bongo2Slap153 Bongo2Heel154 Bongo2 Toe155 Tsuzumi156 QuintoOpen157 QuintoOpSl158 QuintoClSl159 QuintoHeel160 Quinto Toe161 Open Conga162 Slap Conga163 Palm Conga164 Mute Conga165 Conga Open166 Conga OpSl167 Conga Heel168 Conga Toe169 Tumba170 Baya 1171 Baya 2172 Tabla 1173 Tabla 2174 Tabla 3175 Tabla Dom176 Tabla Tak177 Tabla Flam178 Tabla Rim179 Tabla Roll180 Udu
Drumsamples
No. Name360 Square361 Ramp362 Pulse 25%363 Pulse 8%364 Pulse 4%365 Syn Sine366 Sine367 Orch Hit368 ImpactHitL369 ImpactHitR370 Rave Hit L371 Rave Hit R372 Philly Hit373 PowerSnare374 Syn Snare375 SnareRl/Ht376 Stick Hit377 Side Stick378 SideStikNT379 TimbleSide380 TimblSidNT381 Indust382 Taiko Hit383 Syn Rim384 Syn Rim NT385 Click386 Crash Cym387 CrashCymLP388 CrashLP NT389 China Cym390 ChinaCymLP391 Splash Cym392 Orch Crash393 Orch Perc394 Tite HH395 Tite HH NT396 Open HH397 CloseSynHH398 OpenSyn HH399 Bell Ride400 Ping Ride401 Orch B.Drm402 Tom 1403 Tom 2 Hi404 Tom 2 Lo405 ProccesTom406 OilDrum407 Syn Tom 1408 Syn Tom 2409 SolidHit410 Steel Drum411 SteelDrmLP412 Timapni413 Timpani LP414 Taiko415 Tsuzumi416 Low Bongo417 Slap Bongo418 Open Conga419 Slap Conga
No. Name420 Palm Conga421 Mute Conga422 Baya423 Tabla 1424 Tabla 2425 Djembe426 Maracas427 SynMaracas428 SynMarcsNT429 Cabasa430 Cabasa NT431 Sagat432 Sagat NT433 Tambourine434 JingleBell435 MuteTriang436 OpenTriang437 Agogo438 Cow Bell439 Timbale440 WoodBlock1441 WoodBlock2442 WoodBlock3443 Claves444 Syn Claves445 Castanet446 CastanetNT447 Castanet V448 FingerSnap449 FingSnapNT450 Snap451 Snap NT452 Vibraslap453 Guiro454 Guiro LP455 Hand Clap456 HandClapNT457 Gun Shot 1458 GlassBreak459 Metal Hit460 HandDrill461 HandDrilNT462 Zap 1463 Zap 2464 Fret Zap 1465 Fret Zap 2466 Scratch Hi467 ScratcHiNT468 Scratch Lo469 ScratcLoNT470 ScratchDbl471 ScratDblNT472 Scratch a473 Scratches474 Rev.Kick475 Rev.ConBD476 Rev Snare1477 Rev.Snare2478 Rev.Snare3479 Rev.Cymbal
No. Name480 Rev.Tom 1481 Rev.Tom 2482 Growl 1483 Growl 1 NT484 Rain485 Thunder486 Wind487 Seashore488 Seashore V489 Stream490 Bubble491 Bird 1492 Bird 2493 Kitty494 Dog495 Growl 2496 Gallop497 Laughing V498 Scream499 Punch500 Hart Beat501 Footstep 1502 Footstep 2503 Telephone1504 Telephone2505 Door Creak506 Door Slam507 Car Engine508 CarEnginLP509 Car Stop510 Car Pass511 Car Crash512 Siren513 Train514 Helicopter515 Gun Shot 2516 MachineGun517 Laser Gun518 Explosion519 Multi Sax520 Tb & Tp 1521 Tb & Tp 2522 Tb & Tp 3
No. Name1 Fat Kick2 Rock Kick3 Ambi.Kick4 Crisp Kick5 Punch Kick6 PillowKick7 Soft Kick8 Dry Kick 19 Dry Kick 2
10 Dry Kick 311 Real Kick12 Jazz Kick13 Gated Kick14 Mondo Kick15 ProcesKick16 Metal Kick17 Dance Kick18 Tubby Kick19 Syn Kick 120 Syn Kick 221 Syn Kick 322 Syn Kick 423 Syn Kick 524 Syn Kick 625 Syn Kick 726 Syn Kick 827 Syn Kick 928 SynKick 1029 SynKick 1130 Defness BD31 Loop-EZ BD32 DJ Scratch33 Orch B.Drm34 Snare 135 Snare 236 Snare 337 Snare 438 PicloSnare39 Soft Snare40 LightSnare41 FullRoomSD42 JazzRingSD43 OffCentrSD44 DrySnare 145 DrySnare 246 DrySnare 347 TightSnare48 AmbiSnare149 AmbiSnare250 Rock Snare51 GatedSnare52 PowerSnare53 BigRock SD54 Cracker SD55 AmbHouseSD56 RollSnare157 RollSnare258 SynSnare 159 SynSnare 260 SynSnare 3
No. Name61 SynSnare 462 SynSnare 563 NoiseSnare64 DanceSnare65 Sizzle SD66 Acid Snare67 Club Snare68 Cyber SD 169 Cyber SD 270 Defness SD71 OldAmbi.SD72 GR02-SN373 ClapsSnare74 Brush Slap75 Brush Tap76 BrushSwish77 BrushSwirl78 Stick Hit79 Side Stick80 SideStick281 Syn Rim82 Crash Cym83 Crash LP84 China Cym85 China LP86 Splash Cym87 Splash LP88 Orch Cym89 OrchCym LP90 SynCrash 191 SynCrash 292 Tite HH 193 Tite HH 294 Close HH95 Open HH 196 Open HH 297 Open HH 398 Pedal HH 199 Pedal HH 2
100 CloseDstHH101 OpenDst HH102 PedalDstHH103 TiteSynHH1104 TiteSynHH2105 ClosSynHH1106 ClosSynHH2107 OpenSynHH1108 OpenSynHH2109 OpenSynHH3110 OpenSynHH4111 OpenSynHH5112 OpenSynHH6113 GR08-HH1114 GR08-HH2115 Ride Edge116 Ride Cup117 Ride Cym 1118 Ride Cym 2119 Ride Cym 3120 Tom 1 Hi
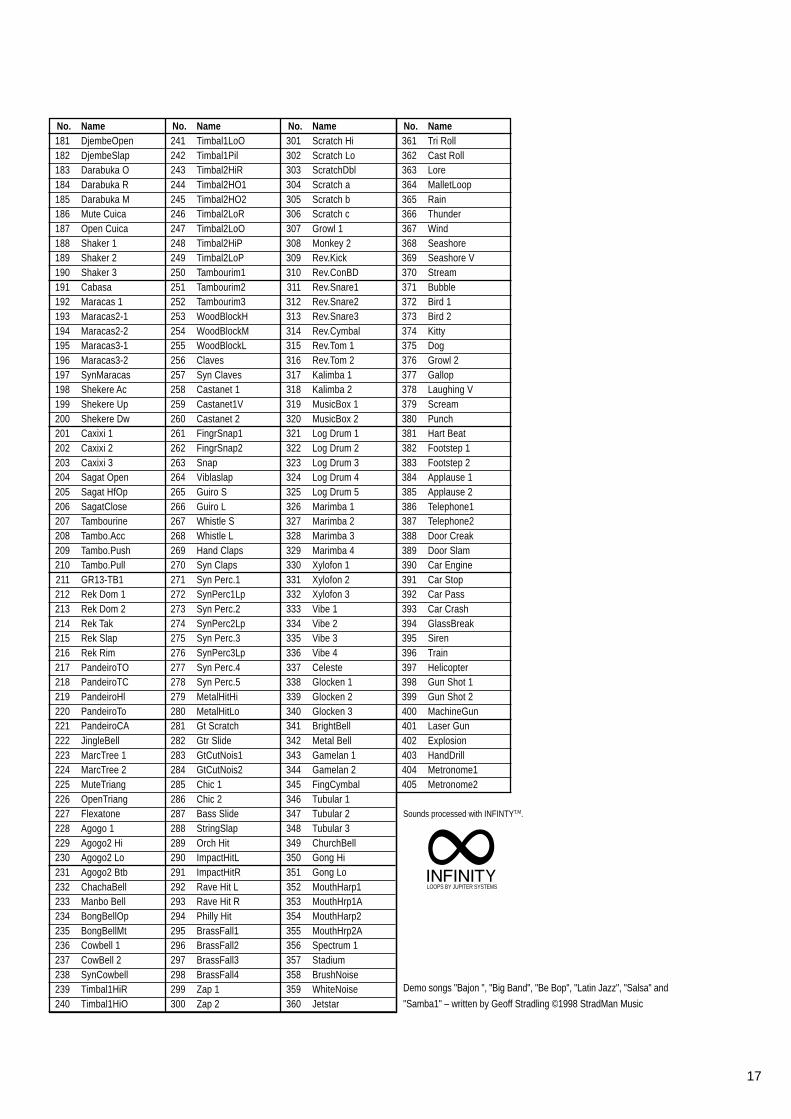
17
No. Name181 DjembeOpen182 DjembeSlap183 Darabuka O184 Darabuka R185 Darabuka M186 Mute Cuica187 Open Cuica188 Shaker 1189 Shaker 2190 Shaker 3191 Cabasa192 Maracas 1193 Maracas2-1194 Maracas2-2195 Maracas3-1196 Maracas3-2197 SynMaracas198 Shekere Ac199 Shekere Up200 Shekere Dw201 Caxixi 1202 Caxixi 2203 Caxixi 3204 Sagat Open205 Sagat HfOp206 SagatClose207 Tambourine208 Tambo.Acc209 Tambo.Push210 Tambo.Pull211 GR13-TB1212 Rek Dom 1213 Rek Dom 2214 Rek Tak215 Rek Slap216 Rek Rim217 PandeiroTO218 PandeiroTC219 PandeiroHl220 PandeiroTo221 PandeiroCA222 JingleBell223 MarcTree 1224 MarcTree 2225 MuteTriang226 OpenTriang227 Flexatone228 Agogo 1229 Agogo2 Hi230 Agogo2 Lo231 Agogo2 Btb232 ChachaBell233 Manbo Bell234 BongBellOp235 BongBellMt236 Cowbell 1237 CowBell 2238 SynCowbell239 Timbal1HiR240 Timbal1HiO
No. Name241 Timbal1LoO242 Timbal1Pil243 Timbal2HiR244 Timbal2HO1245 Timbal2HO2246 Timbal2LoR247 Timbal2LoO248 Timbal2HiP249 Timbal2LoP250 Tambourim1251 Tambourim2252 Tambourim3253 WoodBlockH254 WoodBlockM255 WoodBlockL256 Claves257 Syn Claves258 Castanet 1259 Castanet1V260 Castanet 2261 FingrSnap1262 FingrSnap2263 Snap264 Viblaslap265 Guiro S266 Guiro L267 Whistle S268 Whistle L269 Hand Claps270 Syn Claps271 Syn Perc.1272 SynPerc1Lp273 Syn Perc.2274 SynPerc2Lp275 Syn Perc.3276 SynPerc3Lp277 Syn Perc.4278 Syn Perc.5279 MetalHitHi280 MetalHitLo281 Gt Scratch282 Gtr Slide283 GtCutNois1284 GtCutNois2285 Chic 1286 Chic 2287 Bass Slide288 StringSlap289 Orch Hit290 ImpactHitL291 ImpactHitR292 Rave Hit L293 Rave Hit R294 Philly Hit295 BrassFall1296 BrassFall2297 BrassFall3298 BrassFall4299 Zap 1300 Zap 2
No. Name301 Scratch Hi302 Scratch Lo303 ScratchDbl304 Scratch a305 Scratch b306 Scratch c307 Growl 1308 Monkey 2309 Rev.Kick310 Rev.ConBD311 Rev.Snare1312 Rev.Snare2313 Rev.Snare3314 Rev.Cymbal315 Rev.Tom 1316 Rev.Tom 2317 Kalimba 1318 Kalimba 2319 MusicBox 1320 MusicBox 2321 Log Drum 1322 Log Drum 2323 Log Drum 3324 Log Drum 4325 Log Drum 5326 Marimba 1327 Marimba 2328 Marimba 3329 Marimba 4330 Xylofon 1331 Xylofon 2332 Xylofon 3333 Vibe 1334 Vibe 2335 Vibe 3336 Vibe 4337 Celeste338 Glocken 1339 Glocken 2340 Glocken 3341 BrightBell342 Metal Bell343 Gamelan 1344 Gamelan 2345 FingCymbal346 Tubular 1347 Tubular 2348 Tubular 3349 ChurchBell350 Gong Hi351 Gong Lo352 MouthHarp1353 MouthHrp1A354 MouthHarp2355 MouthHrp2A356 Spectrum 1357 Stadium358 BrushNoise359 WhiteNoise360 Jetstar
LOOPS BY JUPITER SYSTEMS
Sounds processed with INFINTYT.M.
No. Name361 Tri Roll362 Cast Roll363 Lore364 MalletLoop365 Rain366 Thunder367 Wind368 Seashore369 Seashore V370 Stream371 Bubble372 Bird 1373 Bird 2374 Kitty375 Dog376 Growl 2377 Gallop378 Laughing V379 Scream380 Punch381 Hart Beat382 Footstep 1383 Footstep 2384 Applause 1385 Applause 2386 Telephone1387 Telephone2388 Door Creak389 Door Slam390 Car Engine391 Car Stop392 Car Pass393 Car Crash394 GlassBreak395 Siren396 Train397 Helicopter398 Gun Shot 1399 Gun Shot 2400 MachineGun401 Laser Gun402 Explosion403 HandDrill404 Metronome1405 Metronome2
Demo songs "Bajon ", "Big Band", "Be Bop", "Latin Jazz", "Salsa" and
"Samba1" – written by Geoff Stradling ©1998 StradMan Music
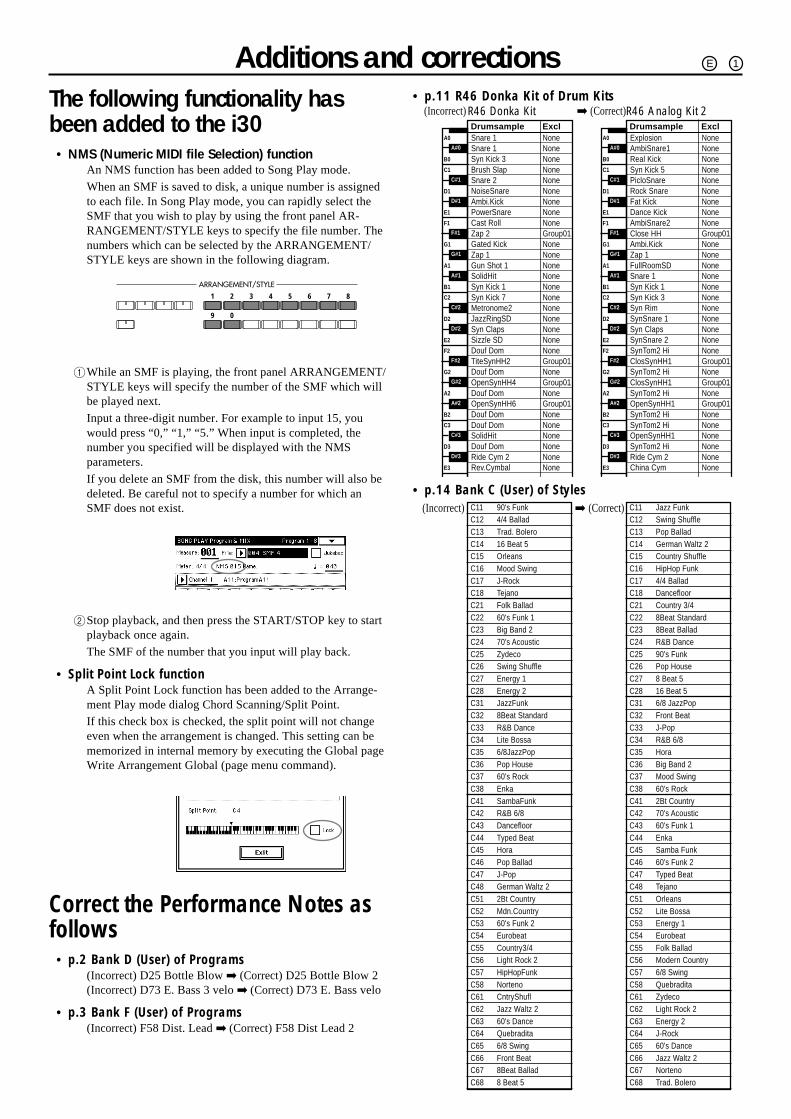
C11 90's FunkC12 4/4 BalladC13 Trad. BoleroC14 16 Beat 5C15 OrleansC16 Mood SwingC17 J-RockC18 TejanoC21 Folk BalladC22 60's Funk 1C23 Big Band 2C24 70's AcousticC25 ZydecoC26 Swing ShuffleC27 Energy 1C28 Energy 2C31 JazzFunkC32 8Beat StandardC33 R&B DanceC34 Lite BossaC35 6/8JazzPopC36 Pop HouseC37 60's RockC38 EnkaC41 SambaFunkC42 R&B 6/8C43 DancefloorC44 Typed BeatC45 HoraC46 Pop BalladC47 J-PopC48 German Waltz 2C51 2Bt CountryC52 Mdn.CountryC53 60's Funk 2C54 EurobeatC55 Country3/4C56 Light Rock 2C57 HipHopFunkC58 NortenoC61 CntryShuflC62 Jazz Waltz 2C63 60's DanceC64 QuebraditaC65 6/8 SwingC66 Front BeatC67 8Beat BalladC68 8 Beat 5
C11 Jazz FunkC12 Swing ShuffleC13 Pop BalladC14 German Waltz 2C15 Country ShuffleC16 HipHop FunkC17 4/4 BalladC18 DancefloorC21 Country 3/4C22 8Beat StandardC23 8Beat BalladC24 R&B DanceC25 90's FunkC26 Pop HouseC27 8 Beat 5C28 16 Beat 5C31 6/8 JazzPopC32 Front BeatC33 J-PopC34 R&B 6/8C35 HoraC36 Big Band 2C37 Mood SwingC38 60's RockC41 2Bt CountryC42 70's AcousticC43 60's Funk 1C44 EnkaC45 Samba FunkC46 60's Funk 2C47 Typed BeatC48 TejanoC51 OrleansC52 Lite BossaC53 Energy 1C54 EurobeatC55 Folk BalladC56 Modern CountryC57 6/8 SwingC58 QuebraditaC61 ZydecoC62 Light Rock 2C63 Energy 2C64 J-RockC65 60's DanceC66 Jazz Waltz 2C67 NortenoC68 Trad. Bolero
R46 Analog Kit 2R46 Donka Kit
Snare 1 NoneSnare 1 NoneSyn Kick 3 NoneBrush Slap NoneSnare 2 NoneNoiseSnare NoneAmbi.Kick NonePowerSnare NoneCast Roll NoneZap 2 Group01Gated Kick NoneZap 1 NoneGun Shot 1 NoneSolidHit NoneSyn Kick 1 NoneSyn Kick 7 NoneMetronome2 NoneJazzRingSD NoneSyn Claps NoneSizzle SD NoneDouf Dom NoneTiteSynHH2 Group01Douf Dom NoneOpenSynHH4 Group01Douf Dom NoneOpenSynHH6 Group01Douf Dom NoneDouf Dom NoneSolidHit NoneDouf Dom NoneRide Cym 2 NoneRev.Cymbal None
Explosion NoneAmbiSnare1 NoneReal Kick NoneSyn Kick 5 NonePicloSnare NoneRock Snare NoneFat Kick NoneDance Kick NoneAmbiSnare2 NoneClose HH Group01Ambi.Kick NoneZap 1 NoneFullRoomSD NoneSnare 1 NoneSyn Kick 1 NoneSyn Kick 3 NoneSyn Rim NoneSynSnare 1 NoneSyn Claps NoneSynSnare 2 NoneSynTom2 Hi NoneClosSynHH1 Group01SynTom2 Hi NoneClosSynHH1 Group01SynTom2 Hi NoneOpenSynHH1 Group01SynTom2 Hi NoneSynTom2 Hi NoneOpenSynHH1 NoneSynTom2 Hi NoneRide Cym 2 NoneChina Cym None
Drumsample ExclA0
B0
C1
D1
E1
F1
G1
A1
B1
C2
D2
E2
F2
G2
A2
B2
C3
D3
E3
A#0
C#1
D#1
F#1
G#1
A#1
C#2
D#2
F#2
G#2
A#2
C#3
D#3
Drumsample ExclA0
B0
C1
D1
E1
F1
G1
A1
B1
C2
D2
E2
F2
G2
A2
B2
C3
D3
E3
A#0
C#1
D#1
F#1
G#1
A#1
C#2
D#2
F#2
G#2
A#2
C#3
D#3
Additions and correctionsThe following functionality hasbeen added to the i30
• NMS (Numeric MIDI file Selection) functionAn NMS function has been added to Song Play mode.
When an SMF is saved to disk, a unique number is assignedto each file. In Song Play mode, you can rapidly select theSMF that you wish to play by using the front panel AR-RANGEMENT/STYLE keys to specify the file number. Thenumbers which can be selected by the ARRANGEMENT/STYLE keys are shown in the following diagram.
1 2 3 4 5 6 7 8
9 0
1While an SMF is playing, the front panel ARRANGEMENT/STYLE keys will specify the number of the SMF which willbe played next.
Input a three-digit number. For example to input 15, youwould press “0,” “1,” “5.” When input is completed, thenumber you specified will be displayed with the NMSparameters.
If you delete an SMF from the disk, this number will also bedeleted. Be careful not to specify a number for which anSMF does not exist.
2Stop playback, and then press the START/STOP key to startplayback once again.
The SMF of the number that you input will play back.
• Split Point Lock functionA Split Point Lock function has been added to the Arrange-ment Play mode dialog Chord Scanning/Split Point.
If this check box is checked, the split point will not changeeven when the arrangement is changed. This setting can bememorized in internal memory by executing the Global pageWrite Arrangement Global (page menu command).
Correct the Performance Notes asfollows
• p.2 Bank D (User) of Programs(Incorrect) D25 Bottle Blow ➡ (Correct) D25 Bottle Blow 2(Incorrect) D73 E. Bass 3 velo ➡ (Correct) D73 E. Bass velo
• p.3 Bank F (User) of Programs(Incorrect) F58 Dist. Lead ➡ (Correct) F58 Dist Lead 2
• p.11 R46 Donka Kit of Drum Kits(Incorrect) ➡ (Correct)
• p.14 Bank C (User) of Styles(Incorrect) ➡ (Correct)
E 1
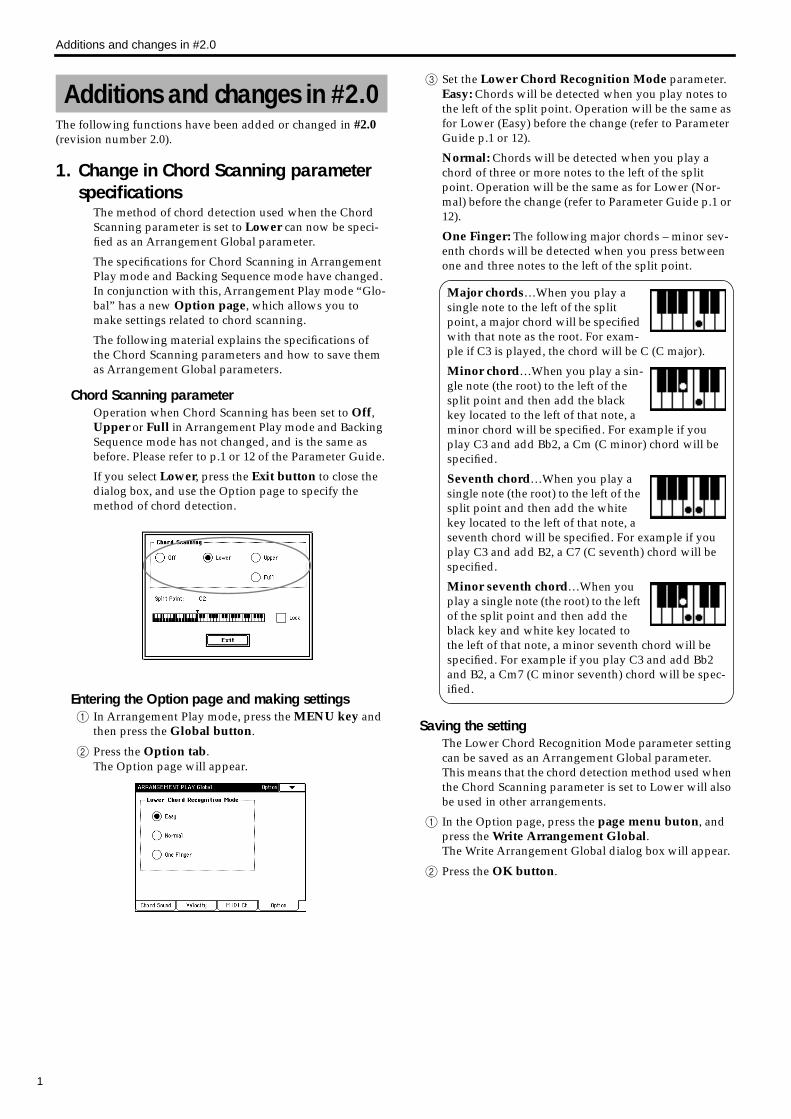
Additions and changes in #2.0
1
The following functions have been added or changed in
#2.0
(revision number 2.0).
1. Change in Chord Scanning parameter specifications
The method of chord detection used when the Chord Scanning parameter is set to
Lower
can now be speci-fied as an Arrangement Global parameter.
The specifications for Chord Scanning in Arrangement Play mode and Backing Sequence mode have changed. In conjunction with this, Arrangement Play mode “Glo-bal” has a new
Option page
, which allows you to make settings related to chord scanning.
The following material explains the specifications of the Chord Scanning parameters and how to save them as Arrangement Global parameters.
Chord Scanning parameter
Operation when Chord Scanning has been set to
Off
,
Upper
or
Full
in Arrangement Play mode and Backing Sequence mode has not changed, and is the same as before. Please refer to p.1 or 12 of the Parameter Guide.
If you select
Lower
, press the
Exit button
to close the dialog box, and use the Option page to specify the method of chord detection.
Entering the Option page and making settings
1
In Arrangement Play mode, press the
MENU key
and then press the
Global button
.
2
Press the
Option tab
.The Option page will appear.
3
Set the
Lower Chord Recognition Mode
parameter.
Easy:
Chords will be detected when you play notes to the left of the split point. Operation will be the same as for Lower (Easy) before the change (refer to Parameter Guide p.1 or 12).
Normal:
Chords will be detected when you play a chord of three or more notes to the left of the split point. Operation will be the same as for Lower (Nor-mal) before the change (refer to Parameter Guide p.1 or 12).
One Finger:
The following major chords – minor sev-enth chords will be detected when you press between one and three notes to the left of the split point.
Saving the setting
The Lower Chord Recognition Mode parameter setting can be saved as an Arrangement Global parameter. This means that the chord detection method used when the Chord Scanning parameter is set to Lower will also be used in other arrangements.
1
In the Option page, press the
page menu buton
, and press the
Write Arrangement Global
.The Write Arrangement Global dialog box will appear.
2
Press the
OK button
.
Additions and changes in #2.0
Major chords…When you play a single note to the left of the split point, a major chord will be specified with that note as the root. For exam-ple if C3 is played, the chord will be C (C major).
Minor chord…When you play a sin-gle note (the root) to the left of the split point and then add the black key located to the left of that note, a minor chord will be specified. For example if you play C3 and add Bb2, a Cm (C minor) chord will be specified.
Seventh chord…When you play a single note (the root) to the left of the split point and then add the white key located to the left of that note, a seventh chord will be specified. For example if you play C3 and add B2, a C7 (C seventh) chord will be specified.
Minor seventh chord…When you play a single note (the root) to the left of the split point and then add the black key and white key located to the left of that note, a minor seventh chord will be specified. For example if you play C3 and add Bb2 and B2, a Cm7 (C minor seventh) chord will be spec-ified.
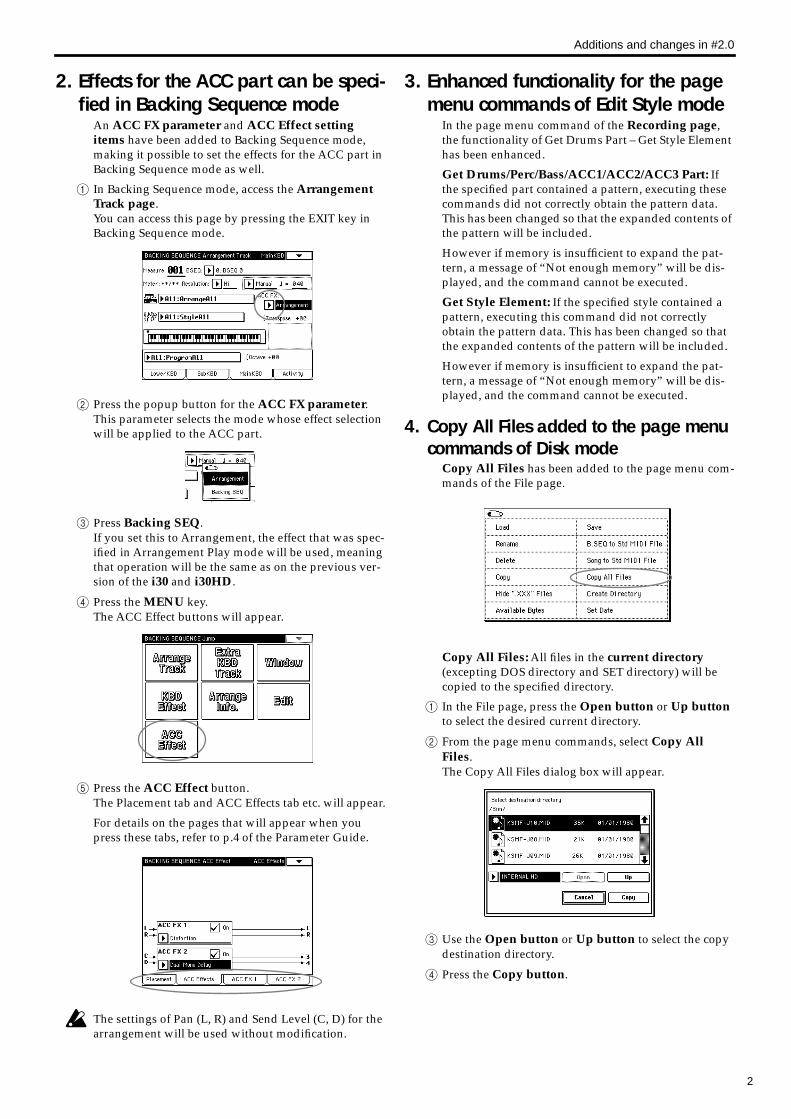
Additions and changes in #2.0
2
2. Effects for the ACC part can be speci-fied in Backing Sequence mode
An
ACC FX parameter
and
ACC Effect setting items
have been added to Backing Sequence mode, making it possible to set the effects for the ACC part in Backing Sequence mode as well.
1
In Backing Sequence mode, access the
Arrangement Track page
.You can access this page by pressing the EXIT key in Backing Sequence mode.
2
Press the popup button for the
ACC FX parameter
.This parameter selects the mode whose effect selection will be applied to the ACC part.
3
Press
Backing SEQ
.If you set this to Arrangement, the effect that was spec-ified in Arrangement Play mode will be used, meaning that operation will be the same as on the previous ver-sion of the
i30
and
i30HD
.
4
Press the
MENU
key.The ACC Effect buttons will appear.
5
Press the
ACC Effect
button.The Placement tab and ACC Effects tab etc. will appear.
For details on the pages that will appear when you press these tabs, refer to p.4 of the Parameter Guide.
The settings of Pan (L, R) and Send Level (C, D) for the arrangement will be used without modification.
3. Enhanced functionality for the page menu commands of Edit Style mode
In the page menu command of the
Recording page
, the functionality of Get Drums Part – Get Style Element has been enhanced.
Get Drums/Perc/Bass/ACC1/ACC2/ACC3 Part:
If the specified part contained a pattern, executing these commands did not correctly obtain the pattern data. This has been changed so that the expanded contents of the pattern will be included.
However if memory is insufficient to expand the pat-tern, a message of “Not enough memory” will be dis-played, and the command cannot be executed.
Get Style Element:
If the specified style contained a pattern, executing this command did not correctly obtain the pattern data. This has been changed so that the expanded contents of the pattern will be included.
However if memory is insufficient to expand the pat-tern, a message of “Not enough memory” will be dis-played, and the command cannot be executed.
4. Copy All Files added to the page menu commands of Disk mode
Copy All Files
has been added to the page menu com-mands of the File page.
Copy All Files:
All files in the
current directory
(excepting DOS directory and SET directory) will be copied to the specified directory.
1
In the File page, press the
Open button
or
Up button
to select the desired current directory.
2
From the page menu commands, select
Copy All Files
.The Copy All Files dialog box will appear.
3
Use the
Open button
or
Up button
to select the copy destination directory.
4
Press the
Copy button
.
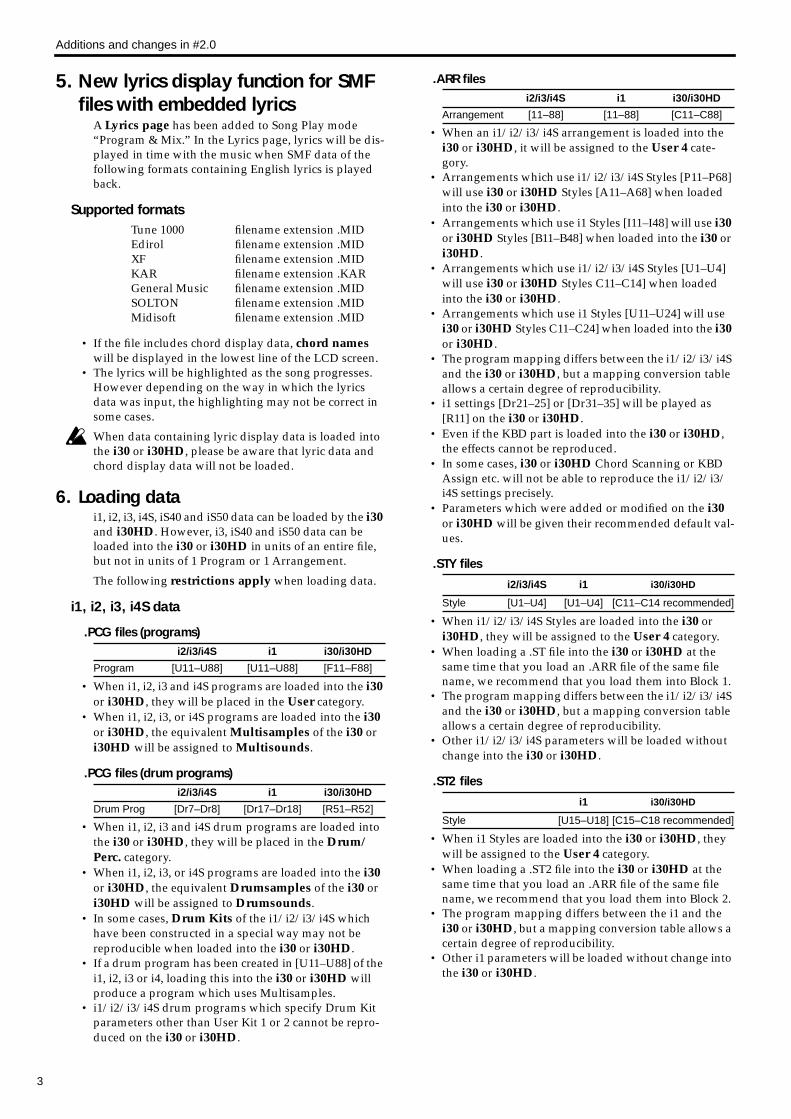
Additions and changes in #2.0
3
5. New lyrics display function for SMF files with embedded lyrics
A
Lyrics page
has been added to Song Play mode “Program & Mix.” In the Lyrics page, lyrics will be dis-played in time with the music when SMF data of the following formats containing English lyrics is played back.
Supported formats
• If the file includes chord display data,
chord names
will be displayed in the lowest line of the LCD screen.
• The lyrics will be highlighted as the song progresses. However depending on the way in which the lyrics data was input, the highlighting may not be correct in some cases.
When data containing lyric display data is loaded into the
i30
or
i30HD
, please be aware that lyric data and chord display data will not be loaded.
6. Loading data
i1, i2, i3, i4S, iS40 and iS50 data can be loaded by the
i30
and
i30HD
. However, i3, iS40 and iS50 data can be loaded into the
i30
or
i30HD
in units of an entire file, but not in units of 1 Program or 1 Arrangement.
The following
restrictions apply
when loading data.
i1, i2, i3, i4S data
.PCG files (programs)
• When i1, i2, i3 and i4S programs are loaded into the
i30
or
i30HD
, they will be placed in the
User
category.• When i1, i2, i3, or i4S programs are loaded into the
i30
or
i30HD
, the equivalent
Multisamples
of the
i30
or
i30HD
will be assigned to
Multisounds
.
.PCG files (drum programs)
• When i1, i2, i3 and i4S drum programs are loaded into the
i30
or
i30HD
, they will be placed in the
Drum/Perc.
category.• When i1, i2, i3, or i4S programs are loaded into the
i30
or
i30HD
, the equivalent
Drumsamples
of the
i30
or
i30HD
will be assigned to
Drumsounds
.• In some cases,
Drum Kits
of the i1/i2/i3/i4S which have been constructed in a special way may not be reproducible when loaded into the
i30
or
i30HD
.• If a drum program has been created in [U11–U88] of the
i1, i2, i3 or i4, loading this into the
i30
or
i30HD
will produce a program which uses Multisamples.
• i1/i2/i3/i4S drum programs which specify Drum Kit parameters other than User Kit 1 or 2 cannot be repro-duced on the
i30
or
i30HD
.
.ARR files
• When an i1/i2/i3/i4S arrangement is loaded into the
i30
or
i30HD
, it will be assigned to the
User 4
cate-gory.
• Arrangements which use i1/i2/i3/i4S Styles [P11–P68] will use
i30
or
i30HD
Styles [A11–A68] when loaded into the
i30
or
i30HD
.• Arrangements which use i1 Styles [I11–I48] will use
i30
or
i30HD
Styles [B11–B48] when loaded into the
i30 or i30HD.
• Arrangements which use i1/i2/i3/i4S Styles [U1–U4] will use i30 or i30HD Styles C11–C14] when loaded into the i30 or i30HD.
• Arrangements which use i1 Styles [U11–U24] will use i30 or i30HD Styles C11–C24] when loaded into the i30 or i30HD.
• The program mapping differs between the i1/i2/i3/i4S and the i30 or i30HD, but a mapping conversion table allows a certain degree of reproducibility.
• i1 settings [Dr21–25] or [Dr31–35] will be played as [R11] on the i30 or i30HD.
• Even if the KBD part is loaded into the i30 or i30HD, the effects cannot be reproduced.
• In some cases, i30 or i30HD Chord Scanning or KBD Assign etc. will not be able to reproduce the i1/i2/i3/i4S settings precisely.
• Parameters which were added or modified on the i30 or i30HD will be given their recommended default val-ues.
.STY files
• When i1/i2/i3/i4S Styles are loaded into the i30 or i30HD, they will be assigned to the User 4 category.
• When loading a .ST file into the i30 or i30HD at the same time that you load an .ARR file of the same file name, we recommend that you load them into Block 1.
• The program mapping differs between the i1/i2/i3/i4S and the i30 or i30HD, but a mapping conversion table allows a certain degree of reproducibility.
• Other i1/i2/i3/i4S parameters will be loaded without change into the i30 or i30HD.
.ST2 files
• When i1 Styles are loaded into the i30 or i30HD, they will be assigned to the User 4 category.
• When loading a .ST2 file into the i30 or i30HD at the same time that you load an .ARR file of the same file name, we recommend that you load them into Block 2.
• The program mapping differs between the i1 and the i30 or i30HD, but a mapping conversion table allows a certain degree of reproducibility.
• Other i1 parameters will be loaded without change into the i30 or i30HD.
Tune 1000EdirolXFKARGeneral MusicSOLTONMidisoft
filename extension .MIDfilename extension .MIDfilename extension .MIDfilename extension .KARfilename extension .MIDfilename extension .MIDfilename extension .MID
i2/i3/i4S i1 i30/i30HD
Program [U11–U88] [U11–U88] [F11–F88]
i2/i3/i4S i1 i30/i30HD
Drum Prog [Dr7–Dr8] [Dr17–Dr18] [R51–R52]
i2/i3/i4S i1 i30/i30HD
Arrangement [11–88] [11–88] [C11–C88]
i2/i3/i4S i1 i30/i30HD
Style [U1–U4] [U1–U4] [C11–C14 recommended]
i1 i30/i30HD
Style [U15–U18] [C15–C18 recommended]
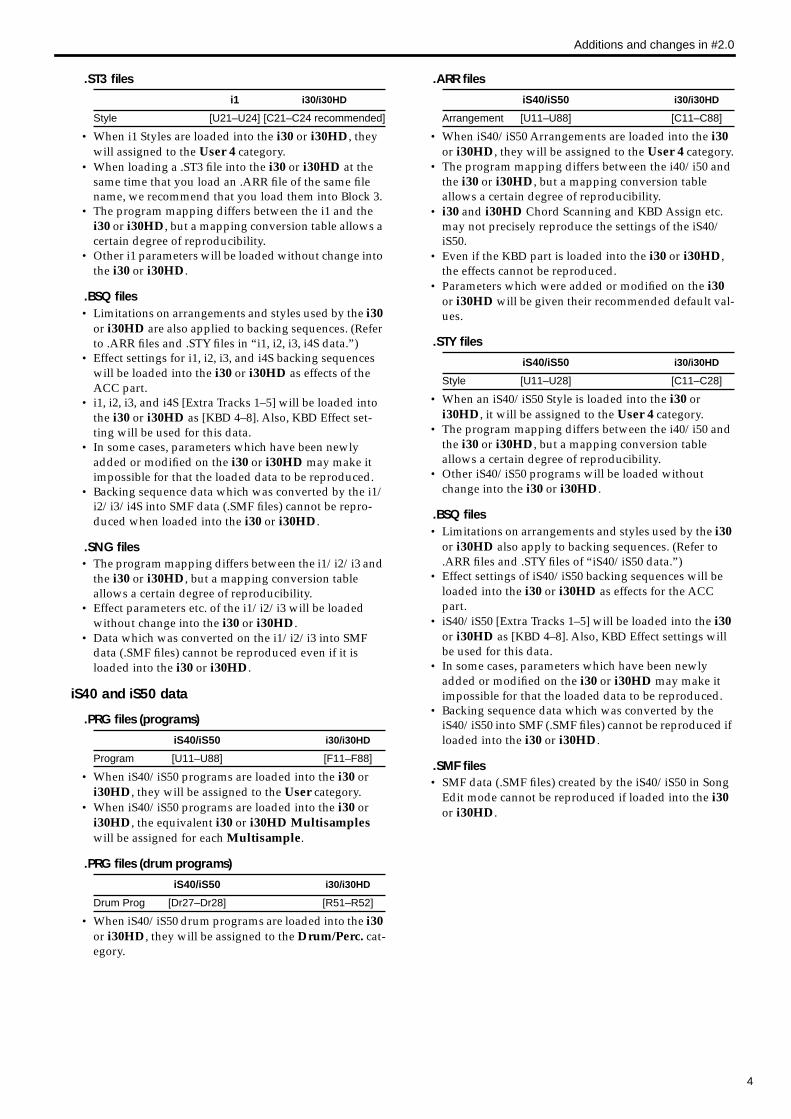
Additions and changes in #2.0
4
.ST3 files
• When i1 Styles are loaded into the i30 or i30HD, they will assigned to the User 4 category.
• When loading a .ST3 file into the i30 or i30HD at the same time that you load an .ARR file of the same file name, we recommend that you load them into Block 3.
• The program mapping differs between the i1 and the i30 or i30HD, but a mapping conversion table allows a certain degree of reproducibility.
• Other i1 parameters will be loaded without change into the i30 or i30HD.
.BSQ files• Limitations on arrangements and styles used by the i30
or i30HD are also applied to backing sequences. (Refer to .ARR files and .STY files in “i1, i2, i3, i4S data.”)
• Effect settings for i1, i2, i3, and i4S backing sequences will be loaded into the i30 or i30HD as effects of the ACC part.
• i1, i2, i3, and i4S [Extra Tracks 1–5] will be loaded into the i30 or i30HD as [KBD 4–8]. Also, KBD Effect set-ting will be used for this data.
• In some cases, parameters which have been newly added or modified on the i30 or i30HD may make it impossible for that the loaded data to be reproduced.
• Backing sequence data which was converted by the i1/i2/i3/i4S into SMF data (.SMF files) cannot be repro-duced when loaded into the i30 or i30HD.
.SNG files• The program mapping differs between the i1/i2/i3 and
the i30 or i30HD, but a mapping conversion table allows a certain degree of reproducibility.
• Effect parameters etc. of the i1/i2/i3 will be loaded without change into the i30 or i30HD.
• Data which was converted on the i1/i2/i3 into SMF data (.SMF files) cannot be reproduced even if it is loaded into the i30 or i30HD.
iS40 and iS50 data
.PRG files (programs)
• When iS40/iS50 programs are loaded into the i30 or i30HD, they will be assigned to the User category.
• When iS40/iS50 programs are loaded into the i30 or i30HD, the equivalent i30 or i30HD Multisamples will be assigned for each Multisample.
.PRG files (drum programs)
• When iS40/iS50 drum programs are loaded into the i30 or i30HD, they will be assigned to the Drum/Perc. cat-egory.
.ARR files
• When iS40/iS50 Arrangements are loaded into the i30 or i30HD, they will be assigned to the User 4 category.
• The program mapping differs between the i40/i50 and the i30 or i30HD, but a mapping conversion table allows a certain degree of reproducibility.
• i30 and i30HD Chord Scanning and KBD Assign etc. may not precisely reproduce the settings of the iS40/iS50.
• Even if the KBD part is loaded into the i30 or i30HD, the effects cannot be reproduced.
• Parameters which were added or modified on the i30 or i30HD will be given their recommended default val-ues.
.STY files
• When an iS40/iS50 Style is loaded into the i30 or i30HD, it will be assigned to the User 4 category.
• The program mapping differs between the i40/i50 and the i30 or i30HD, but a mapping conversion table allows a certain degree of reproducibility.
• Other iS40/iS50 programs will be loaded without change into the i30 or i30HD.
.BSQ files• Limitations on arrangements and styles used by the i30
or i30HD also apply to backing sequences. (Refer to .ARR files and .STY files of “iS40/iS50 data.”)
• Effect settings of iS40/iS50 backing sequences will be loaded into the i30 or i30HD as effects for the ACC part.
• iS40/iS50 [Extra Tracks 1–5] will be loaded into the i30 or i30HD as [KBD 4–8]. Also, KBD Effect settings will be used for this data.
• In some cases, parameters which have been newly added or modified on the i30 or i30HD may make it impossible for that the loaded data to be reproduced.
• Backing sequence data which was converted by the iS40/iS50 into SMF (.SMF files) cannot be reproduced if loaded into the i30 or i30HD.
.SMF files• SMF data (.SMF files) created by the iS40/iS50 in Song
Edit mode cannot be reproduced if loaded into the i30 or i30HD.
i1 i30/i30HD
Style [U21–U24] [C21–C24 recommended]
iS40/iS50 i30/i30HD
Program [U11–U88] [F11–F88]
iS40/iS50 i30/i30HD
Drum Prog [Dr27–Dr28] [R51–R52]
iS40/iS50 i30/i30HD
Arrangement [U11–U88] [C11–C88]
iS40/iS50 i30/i30HD
Style [U11–U28] [C11–C28]
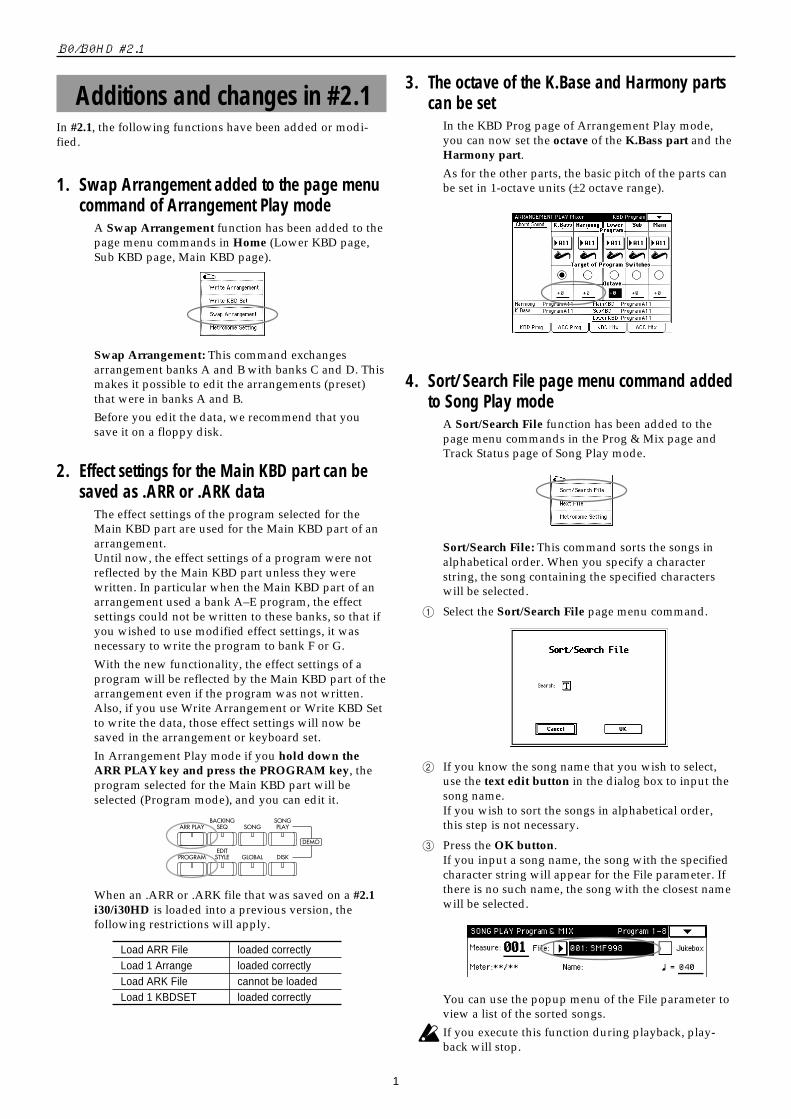
1
i30/i30HD #2.1
Additions and changes in #2.1In #2.1, the following functions have been added or modi-fied.
1. Swap Arrangement added to the page menucommand of Arrangement Play mode
A Swap Arrangement function has been added to thepage menu commands in Home (Lower KBD page,Sub KBD page, Main KBD page).
Swap Arrangement: This command exchangesarrangement banks A and B with banks C and D. Thismakes it possible to edit the arrangements (preset)that were in banks A and B.
Before you edit the data, we recommend that yousave it on a floppy disk.
2. Effect settings for the Main KBD part can besaved as .ARR or .ARK data
The effect settings of the program selected for theMain KBD part are used for the Main KBD part of anarrangement.Until now, the effect settings of a program were notreflected by the Main KBD part unless they werewritten. In particular when the Main KBD part of anarrangement used a bank A–E program, the effectsettings could not be written to these banks, so that ifyou wished to use modified effect settings, it wasnecessary to write the program to bank F or G.
With the new functionality, the effect settings of aprogram will be reflected by the Main KBD part of thearrangement even if the program was not written.Also, if you use Write Arrangement or Write KBD Setto write the data, those effect settings will now besaved in the arrangement or keyboard set.
In Arrangement Play mode if you hold down theARR PLAY key and press the PROGRAM key, theprogram selected for the Main KBD part will beselected (Program mode), and you can edit it.
When an .ARR or .ARK file that was saved on a #2.1i30/i30HD is loaded into a previous version, thefollowing restrictions will apply.
Load ARR File loaded correctlyLoad 1 Arrange loaded correctlyLoad ARK File cannot be loadedLoad 1 KBDSET loaded correctly
3. The octave of the K.Base and Harmony partscan be set
In the KBD Prog page of Arrangement Play mode,you can now set the octave of the K.Bass part and theHarmony part.
As for the other parts, the basic pitch of the parts canbe set in 1-octave units (±2 octave range).
4. Sort/Search File page menu command addedto Song Play mode
A Sort/Search File function has been added to thepage menu commands in the Prog & Mix page andTrack Status page of Song Play mode.
Sort/Search File: This command sorts the songs inalphabetical order. When you specify a characterstring, the song containing the specified characterswill be selected.
1 Select the Sort/Search File page menu command.
2 If you know the song name that you wish to select,use the text edit button in the dialog box to input thesong name.If you wish to sort the songs in alphabetical order,this step is not necessary.
3 Press the OK button.If you input a song name, the song with the specifiedcharacter string will appear for the File parameter. Ifthere is no such name, the song with the closest namewill be selected.
You can use the popup menu of the File parameter toview a list of the sorted songs.
If you execute this function during playback, play-back will stop.
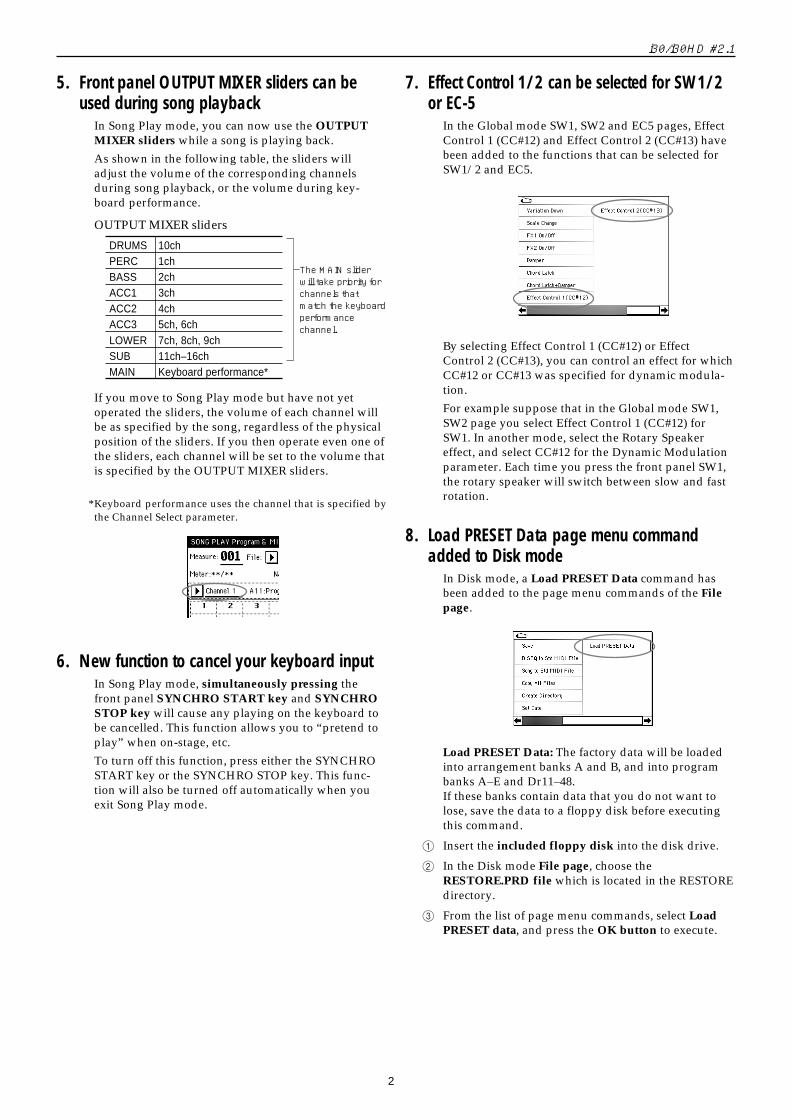
2
i30/i30HD #2.1
5. Front panel OUTPUT MIXER sliders can beused during song playback
In Song Play mode, you can now use the OUTPUTMIXER sliders while a song is playing back.
As shown in the following table, the sliders willadjust the volume of the corresponding channelsduring song playback, or the volume during key-board performance.
OUTPUT MIXER sliders
DRUMS 10chPERC 1chBASS 2chACC1 3chACC2 4chACC3 5ch, 6chLOWER 7ch, 8ch, 9chSUB 11ch–16chMAIN Keyboard performance*
If you move to Song Play mode but have not yetoperated the sliders, the volume of each channel willbe as specified by the song, regardless of the physicalposition of the sliders. If you then operate even one ofthe sliders, each channel will be set to the volume thatis specified by the OUTPUT MIXER sliders.
* Keyboard performance uses the channel that is specified bythe Channel Select parameter.
6. New function to cancel your keyboard inputIn Song Play mode, simultaneously pressing thefront panel SYNCHRO START key and SYNCHROSTOP key will cause any playing on the keyboard tobe cancelled. This function allows you to “pretend toplay” when on-stage, etc.
To turn off this function, press either the SYNCHROSTART key or the SYNCHRO STOP key. This func-tion will also be turned off automatically when youexit Song Play mode.
The MAIN slider will take priority for channels that match the keyboard performance channel.
7. Effect Control 1/2 can be selected for SW1/2or EC-5
In the Global mode SW1, SW2 and EC5 pages, EffectControl 1 (CC#12) and Effect Control 2 (CC#13) havebeen added to the functions that can be selected forSW1/2 and EC5.
By selecting Effect Control 1 (CC#12) or EffectControl 2 (CC#13), you can control an effect for whichCC#12 or CC#13 was specified for dynamic modula-tion.
For example suppose that in the Global mode SW1,SW2 page you select Effect Control 1 (CC#12) forSW1. In another mode, select the Rotary Speakereffect, and select CC#12 for the Dynamic Modulationparameter. Each time you press the front panel SW1,the rotary speaker will switch between slow and fastrotation.
8. Load PRESET Data page menu commandadded to Disk mode
In Disk mode, a Load PRESET Data command hasbeen added to the page menu commands of the Filepage.
Load PRESET Data: The factory data will be loadedinto arrangement banks A and B, and into programbanks A–E and Dr11–48.If these banks contain data that you do not want tolose, save the data to a floppy disk before executingthis command.
1 Insert the included floppy disk into the disk drive.
2 In the Disk mode File page, choose theRESTORE.PRD file which is located in the RESTOREdirectory.
3 From the list of page menu commands, select LoadPRESET data, and press the OK button to execute.