Kodak NexPress Dimensional Printing System CREATIVE And ... · CREATIVE And fIlE pREpARATIon...
16
CREATIVE AND FILE PREPARATION GUIDELINES Kodak NexPress Dimensional Printing System
Transcript of Kodak NexPress Dimensional Printing System CREATIVE And ... · CREATIVE And fIlE pREpARATIon...
CREATIVE And fIlE pREpARATIon guIdElInEs
Kodak NexPress Dimensional Printing System
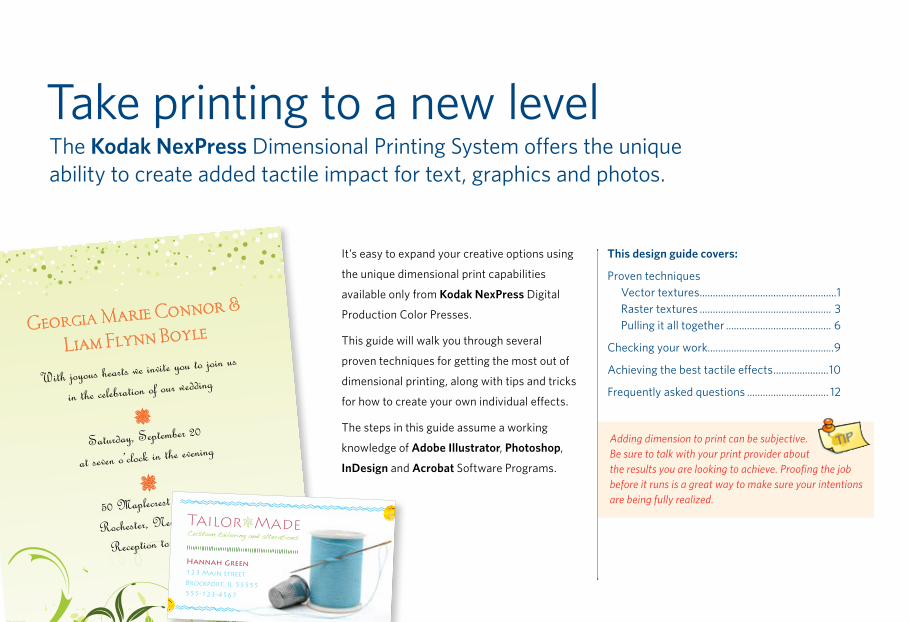
The Kodak NexPress Dimensional Printing System offers the unique ability to create added tactile impact for text, graphics and photos.
Take printing to a new level
It’s easy to expand your creative options using
the unique dimensional print capabilities
available only from Kodak NexPress Digital
Production Color Presses.
This guide will walk you through several
proven techniques for getting the most out of
dimensional printing, along with tips and tricks
for how to create your own individual effects.
The steps in this guide assume a working
knowledge of Adobe Illustrator, Photoshop,
InDesign and Acrobat Software Programs.
This design guide covers:
Proven techniques Vector textures ....................................................1 Raster textures .................................................. 3 Pulling it all together ........................................ 6
Checking your work................................................9
Achieving the best tactile effects .....................10
Frequently asked questions ............................... 12
Adding dimension to print can be subjective. Be sure to talk with your print provider about the results you are looking to achieve. Proofing the job before it runs is a great way to make sure your intentions are being fully realized.
With joyous hearts we invite you to join us
in the celebration of our wedding
p
Saturday, September 20
at seven o’clock in the evening
p
50 Maplecrest Drive
Rochester, New York
Reception to follow
Georgia Marie Connor &
Liam Flynn Boyle
TailorjMade
Hannah Green123 Main StreetBrockport, IL 55555555-123-4567
Custom tailoring and alterations
TEChnIquE 1
These techniques will help you quickly and easily add dimension to print jobs.
Proven techniques
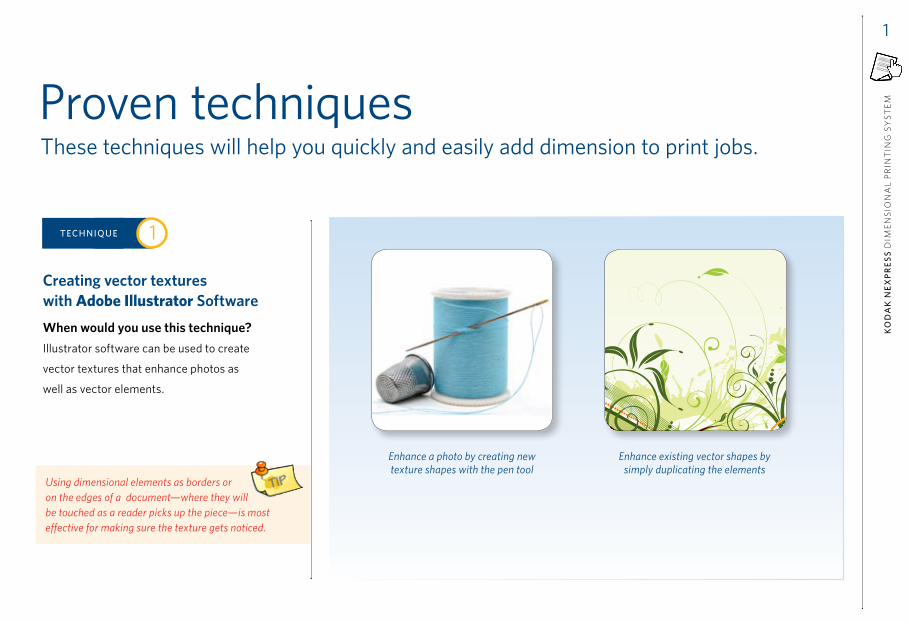
Creating vector textures with Adobe Illustrator Software
When would you use this technique?
Illustrator software can be used to create
vector textures that enhance photos as
well as vector elements.
Using dimensional elements as borders or on the edges of a document—where they will be touched as a reader picks up the piece—is most effective for making sure the texture gets noticed.
Enhance a photo by creating new texture shapes with the pen tool
Enhance existing vector shapes by simply duplicating the elements
ko
da
k n
ex
pr
es
s d
ime
ns
ion
al
PR
inT
inG
sY
sT
em
2100
2500
3000
3600
1

3. Create a new spot color swatch
a. Name the swatch “NexPress DryInk raised clear”
b. Designate it as “Spot”
c. Set the color to CMYK: 0 | 75 | 100 | 0
4. Select any vector objects you want to be dimensional.
5. Change the objects’ fill (and/or outlines) to the new “NexPress DryInk raised clear” swatch
Anything that is 100% “NexPress DryInk raised clear” will result in the highest possible dimension. Anything that is white will have no dimension.
6. Make sure the only swatches remaining in your file are “NexPress DryInk raised clear” and white
Note: If you want some of the objects to pop out more than others, adjust their percent of “NexPress DryInk raised clear” in the swatches palette. The lower the tint value, the less dimension the object will have.
7. Save your file: “myfilename_raisedClear.eps”
2 Proven techniques: Creating vector textures with Adobe Illustrator Software
Get started by creating a new file or opening a source image:
1. Place source photo or graphic on bottom layer for reference, if necessary (this layer will need to be removed from the final file)
2. Create vector texture by:
a. Creating and duplicating simple shapes
b. Using pen tool to outline items
c. Using the pencil or paintbrush tools to create hand-drawn texture
If you have another image you will be placing the vector work on top of, it is best to make both files the same height and width to ensure proper alignment.
NexPress DryInk raised clear
ko
da
k n
ex
pr
es
s d
ime
ns
ion
al
PR
inT
inG
sY
sT
em
2100
2500
3000
3600
TEChnIquE 2
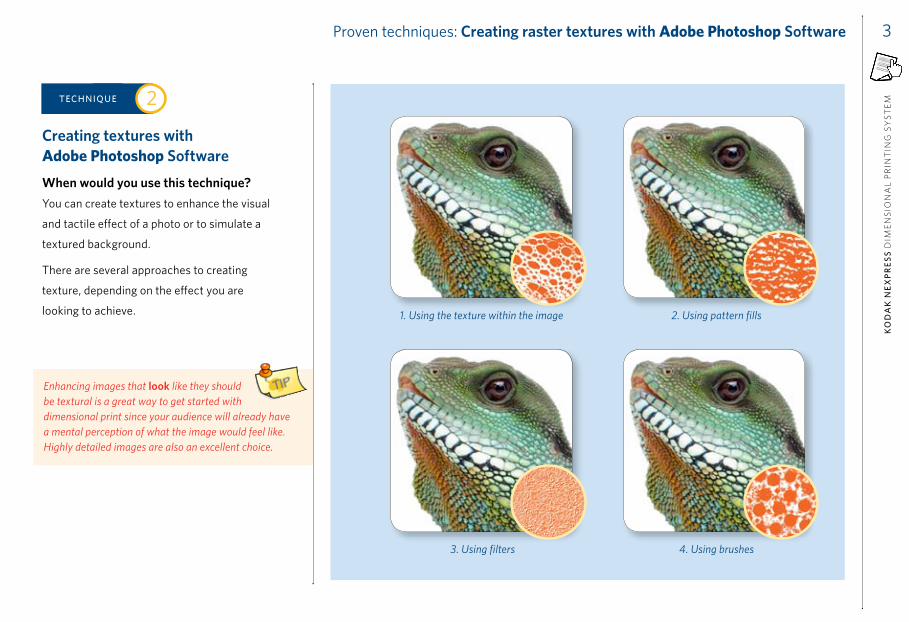
Creating textures with Adobe Photoshop Software
When would you use this technique?
You can create textures to enhance the visual
and tactile effect of a photo or to simulate a
textured background.
There are several approaches to creating
texture, depending on the effect you are
looking to achieve. 1. Using the texture within the image
3. Using filters
2. Using pattern fills
4. Using brushes
Enhancing images that look like they should be textural is a great way to get started with dimensional print since your audience will already have a mental perception of what the image would feel like. Highly detailed images are also an excellent choice.
Proven techniques: Creating raster textures with Adobe Photoshop Software 3
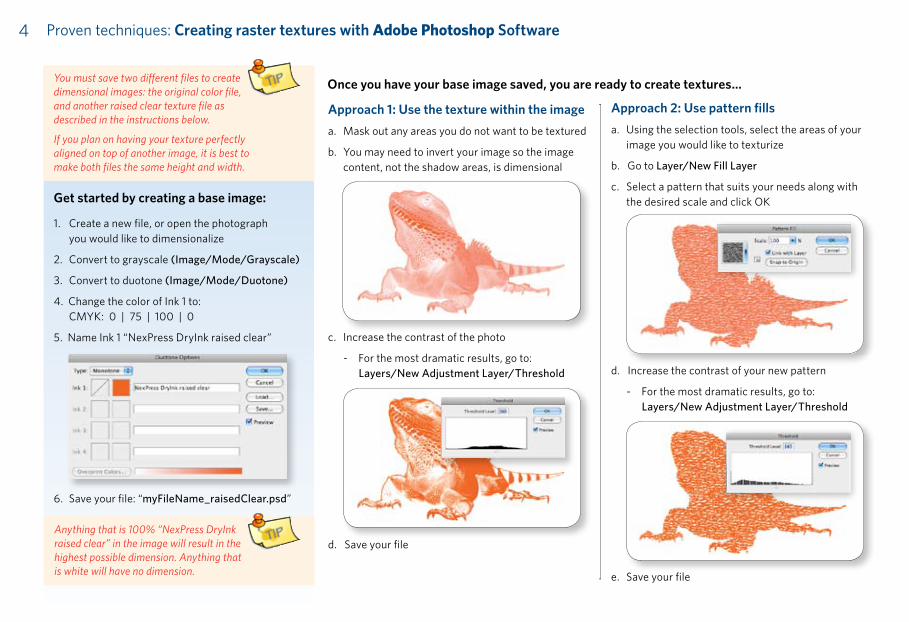
Approach 1: Use the texture within the image
a. Mask out any areas you do not want to be textured
b. You may need to invert your image so the image content, not the shadow areas, is dimensional
c. Increase the contrast of the photo
- For the most dramatic results, go to: layers/new Adjustment layer/Threshold
d. Save your file
Approach 2: Use pattern fills
a. Using the selection tools, select the areas of your image you would like to texturize
b. Go to layer/new fill layer
c. Select a pattern that suits your needs along with the desired scale and click OK
d. Increase the contrast of your new pattern
- For the most dramatic results, go to: layers/new Adjustment layer/Threshold
e. Save your file
Get started by creating a base image:
1. Create a new file, or open the photograph you would like to dimensionalize
2. Convert to grayscale (Image/Mode/grayscale)
3. Convert to duotone (Image/Mode/duotone)
4. Change the color of Ink 1 to: CMYK: 0 | 75 | 100 | 0
5. Name Ink 1 “NexPress DryInk raised clear”
6. Save your file: “myfilename_raisedClear.psd”
4 Proven techniques: Creating raster textures with Adobe Photoshop Software
Once you have your base image saved, you are ready to create textures…You must save two different files to create dimensional images: the original color file, and another raised clear texture file as described in the instructions below.
If you plan on having your texture perfectly aligned on top of another image, it is best to make both files the same height and width.
Anything that is 100% “NexPress DryInk raised clear” in the image will result in the highest possible dimension. Anything that is white will have no dimension.
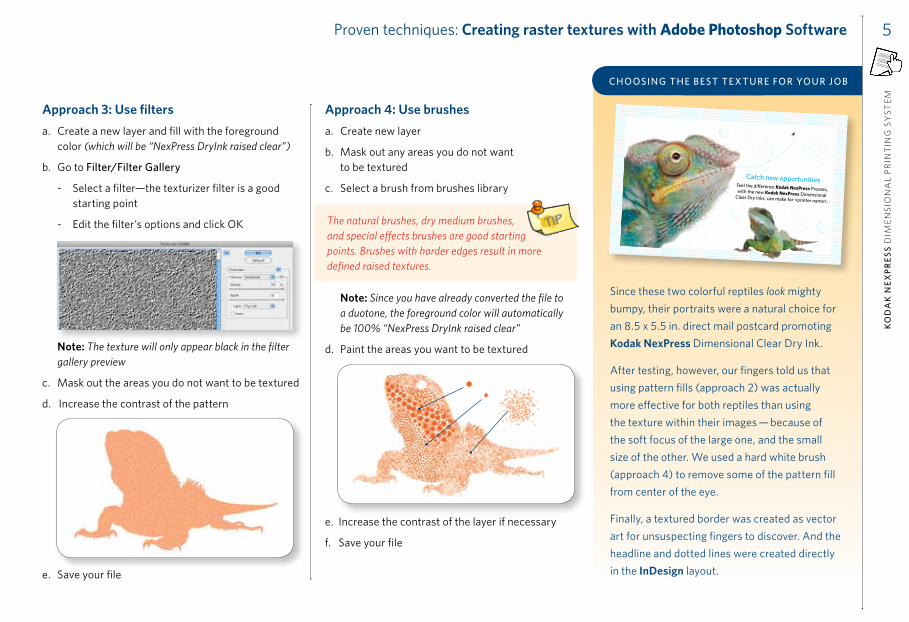
Approach 4: Use brushes
a. Create new layer
b. Mask out any areas you do not want to be textured
c. Select a brush from brushes library
Note: Since you have already converted the file to a duotone, the foreground color will automatically be 100% “NexPress DryInk raised clear”
d. Paint the areas you want to be textured
e. Increase the contrast of the layer if necessary
f. Save your file
Approach 3: Use filters
a. Create a new layer and fill with the foreground color (which will be “NexPress DryInk raised clear”)
b. Go to filter/filter gallery
- Select a filter—the texturizer filter is a good starting point
- Edit the filter’s options and click OK
Note: The texture will only appear black in the filter gallery preview
c. Mask out the areas you do not want to be textured
d. Increase the contrast of the pattern
e. Save your file
ChoosIng ThE bEsT TE xTuRE foR youR job
Proven techniques: Creating raster textures with Adobe Photoshop Software
The natural brushes, dry medium brushes, and special effects brushes are good starting points. Brushes with harder edges result in more defined raised textures.
Since these two colorful reptiles look mighty
bumpy, their portraits were a natural choice for
an 8.5 x 5.5 in. direct mail postcard promoting
Kodak NexPress Dimensional Clear Dry Ink.
After testing, however, our fingers told us that
using pattern fills (approach 2) was actually
more effective for both reptiles than using
the texture within their images — because of
the soft focus of the large one, and the small
size of the other. We used a hard white brush
(approach 4) to remove some of the pattern fill
from center of the eye.
Finally, a textured border was created as vector
art for unsuspecting fingers to discover. And the
headline and dotted lines were created directly
in the InDesign layout.
ko
da
k n
ex
pr
es
s d
ime
ns
ion
al
PR
inT
inG
sY
sT
em
2100
2500
3000
3600
5
feel the difference Kodak NexPress presses, with the new Kodak NexPress dimensional Clear dry Inks, can make for <printer name>.
Catch new opportunities
pullIng IT All TogE ThER
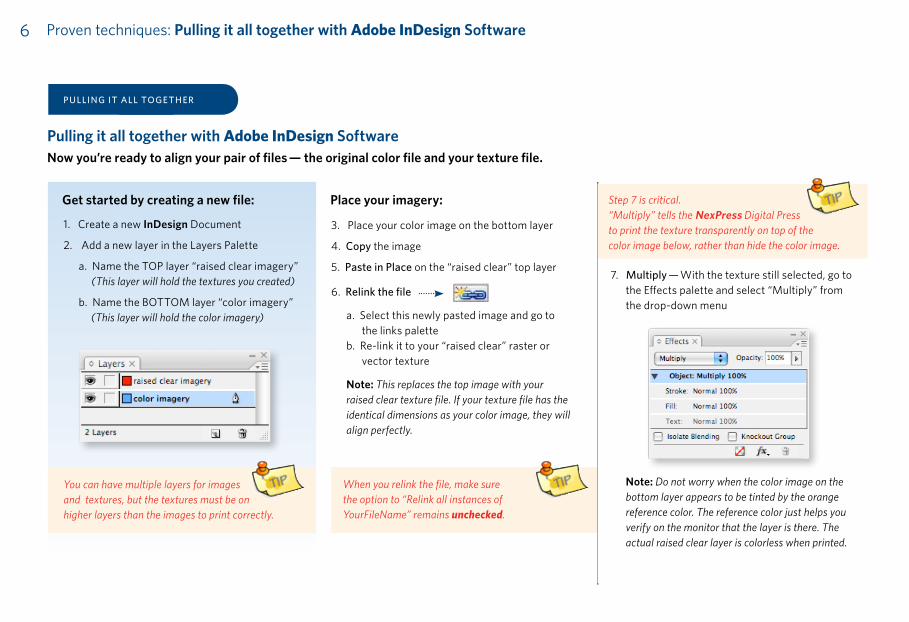
Step 7 is critical. “Multiply” tells the NexPress Digital Press to print the texture transparently on top of the color image below, rather than hide the color image.
6 Proven techniques: Pulling it all together with Adobe InDesign Software
1. Create a new InDesign Document
2. Add a new layer in the Layers Palette
a. Name the TOP layer “raised clear imagery” (This layer will hold the textures you created)
b. Name the BOTTOM layer “color imagery” (This layer will hold the color imagery)
Pulling it all together with Adobe InDesign SoftwareNow you’re ready to align your pair of files — the original color file and your texture file.
You can have multiple layers for images and textures, but the textures must be on higher layers than the images to print correctly.
Get started by creating a new file:
7. Multiply — With the texture still selected, go to the Effects palette and select “Multiply” from the drop-down menu
Note: Do not worry when the color image on the bottom layer appears to be tinted by the orange reference color. The reference color just helps you verify on the monitor that the layer is there. The actual raised clear layer is colorless when printed.
3. Place your color image on the bottom layer
4. Copy the image
5. paste in place on the “raised clear” top layer
6. Relink the file
a. Select this newly pasted image and go to the links palette b. Re-link it to your “raised clear” raster or vector texture
Note: This replaces the top image with your raised clear texture file. If your texture file has the identical dimensions as your color image, they will align perfectly.
When you relink the file, make sure the option to “Relink all instances of YourFileName” remains unchecked.
Place your imagery:

pRoduCTIon noTEs
Go over the proposed job with your print •provider. If it is your first job with dimensional printing, allow some additional time for test prints and client approvals.
If your draft copy or layout is liable to change, •consider waiting to put all the textures in place. Conversely, plan on some additional final production time to be sure that your textures are exactly where you want them.
Adding additional layers to isolate each texture •as well as its related color element has three big benefits — those layers can be hidden while you work on other page elements, they can be locked to prevent inadvertently selecting and moving them, and you can turn the texture layers off before creating a reference PDF for your clients to proof.
Any elements on layers above a texture will •knock the texture out (i.e. cause it to not print where they overlap).
Proven techniques: Pulling it all together with Adobe InDesign Software
Double check that you have a “NexPress DryInk raised clear” spot color in your InDesign swatches palette. It will show up automatically if you have relinked to your texture file correctly.
8. Adding dimensional typography:
a. Add 2 new layers in the Layers Palette—
- Name the TOP layer “raised clear text”
- Name the BOTTOM layer “color text”
b. On the “color text” layer, layout your text as you normally would
c. Once you are confident there will be no changes made to the text:
- Select the entire text frame you would like to make dimensional - Copy the text frame - paste in place on the “raised clear text” top layer
d. With the copied text still selected, go to the Swatches palette and change the text’s fill (and/or stroke) to the “NexPress DryInk raised clear” swatch
e. Multiply—Keep the entire “raised clear” text box selected and go to the Effects palette. Select “Multiply” from the drop-down menu.
Make sure both text layers are placed above the existing “raised clear imagery” and “color imagery” layers.
ko
da
k n
ex
pr
es
s d
ime
ns
ion
al
PR
inT
inG
sY
sT
em
2100
2500
3000
3600
7
8 Proven techniques: Pulling it all together with Adobe InDesign Software
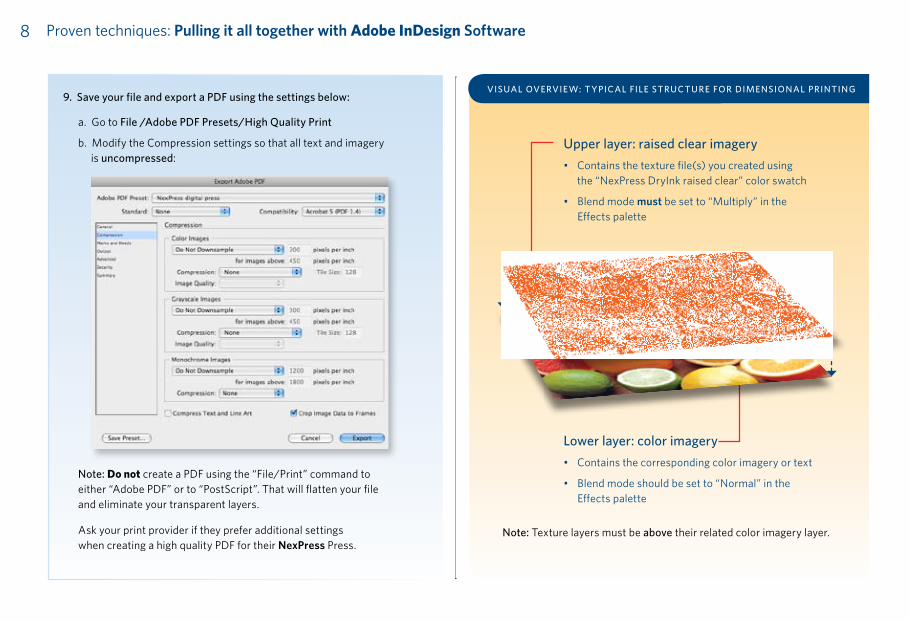
a. Go to file /Adobe pdf presets/high quality print
b. Modify the Compression settings so that all text and imagery is uncompressed:
note: Do not create a PDF using the “File/Print” command to either “Adobe PDF” or to “PostScript”. That will flatten your file and eliminate your transparent layers. Ask your print provider if they prefer additional settings when creating a high quality PDF for their NexPress Press.
9. save your file and export a pdf using the settings below:VIsuAl oVERVIEw: T ypICAl fIlE sTRuCTuRE foR dIMEnsIonAl pRInTIng
upper layer: raised clear imagery
Contains the texture file(s) you created using •the “NexPress DryInk raised clear” color swatch
Blend mode • must be set to “Multiply” in the Effects palette
lower layer: color imagery
Contains the corresponding color imagery or text •
Blend mode should be set to “Normal” in the • Effects palette
note: Texture layers must be above their related color imagery layer.
ChECKIng youR woRK
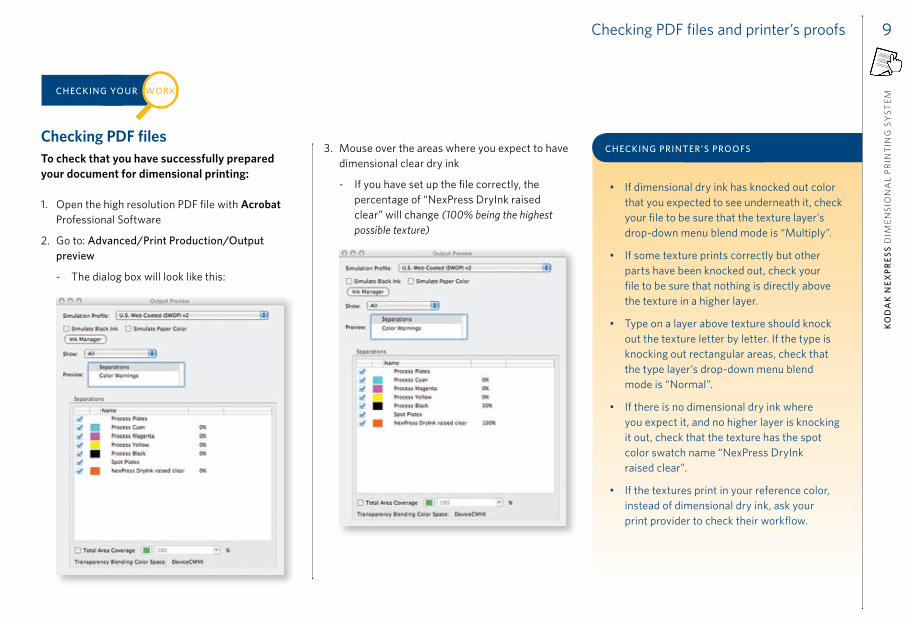
ChECKIng pRInTER’s pRoofs3. Mouse over the areas where you expect to have dimensional clear dry ink
- If you have set up the file correctly, the percentage of “NexPress DryInk raised clear” will change (100% being the highest possible texture)
Checking PDF files and printer’s proofs
Checking PDF filesTo check that you have successfully prepared your document for dimensional printing:
1. Open the high resolution PDF file with Acrobat Professional Software
2. Go to: Advanced/print production/output preview
- The dialog box will look like this:
If dimensional dry ink has knocked out color •that you expected to see underneath it, check your file to be sure that the texture layer’s drop-down menu blend mode is “Multiply”.
If some texture prints correctly but other •parts have been knocked out, check your file to be sure that nothing is directly above the texture in a higher layer.
Type on a layer above texture should knock •out the texture letter by letter. If the type is knocking out rectangular areas, check that the type layer’s drop-down menu blend mode is “Normal”.
If there is no dimensional dry ink where •you expect it, and no higher layer is knocking it out, check that the texture has the spot color swatch name “NexPress DryInk raised clear”.
If the textures print in your reference color, •instead of dimensional dry ink, ask your print provider to check their workflow.
ko
da
k n
ex
pr
es
s d
ime
ns
ion
al
PR
inT
inG
sY
sT
em
2100
2500
3000
3600
9
10 Achieving the best tactile effects
The texture that we think our fingers feel depends on what our eyes see.
Achieving the best tactile effects
Create different sizes and variations of your textures and ask your printer to run a test sheet. Then, you can let your fingers decide.
Our eyes see much more detail than our fingers
can feel, so the best texture for a project
isn’t necessarily a replica of the image that is
underneath it. Scale, height, and density are
factors you should take into consideration
when preparing the best texture for your image.
Here are some experiments with scale and
height to get you started.
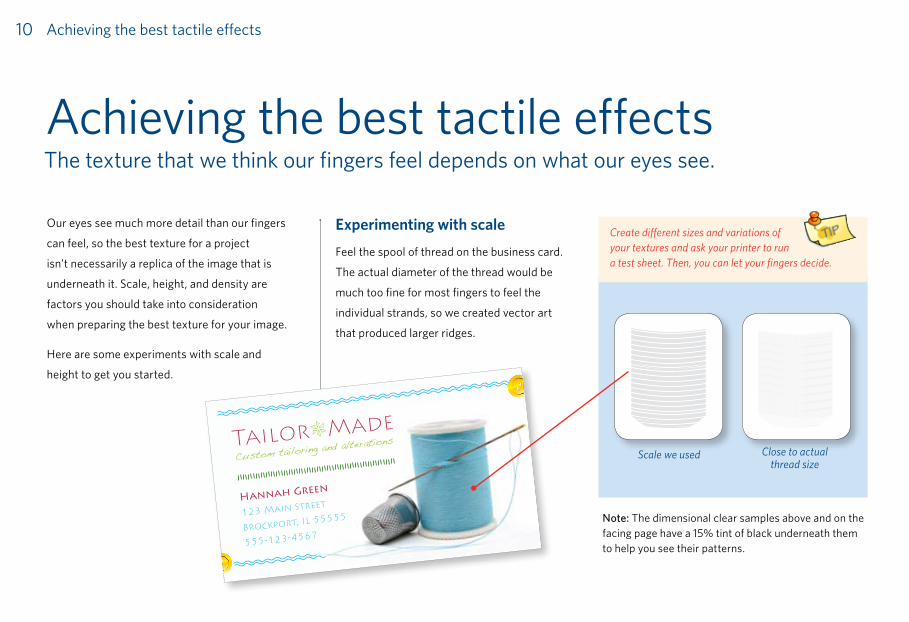
Experimenting with scale
Feel the spool of thread on the business card.
The actual diameter of the thread would be
much too fine for most fingers to feel the
individual strands, so we created vector art
that produced larger ridges.
Scale we used Close to actual thread size
note: The dimensional clear samples above and on the facing page have a 15% tint of black underneath them to help you see their patterns.
TailorjMade
Hannah Green
123 Main Street
Brockport, IL 55555
555-123-4567
Custom tailoring and alterations
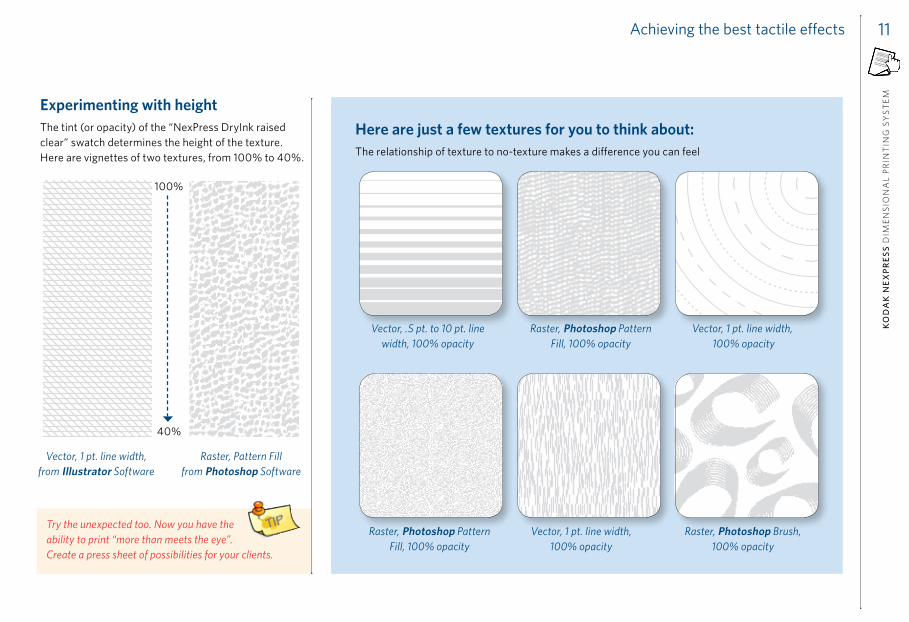
Achieving the best tactile effects
Raster, Pattern Fill from Photoshop Software
Vector, 1 pt. line width, from Illustrator Software
Experimenting with height The tint (or opacity) of the “NexPress DryInk raised clear” swatch determines the height of the texture. Here are vignettes of two textures, from 100% to 40%.
Try the unexpected too. Now you have the ability to print “more than meets the eye”. Create a press sheet of possibilities for your clients.
Vector, 1 pt. line width, 100% opacity
Raster, Photoshop Pattern Fill, 100% opacity
Vector, .5 pt. to 10 pt. line width, 100% opacity
Raster, Photoshop Pattern Fill, 100% opacity
Vector, 1 pt. line width, 100% opacity
Raster, Photoshop Brush, 100% opacity
Here are just a few textures for you to think about: The relationship of texture to no-texture makes a difference you can feel
100%
40%
ko
da
k n
ex
pr
es
s d
ime
ns
ion
al
PR
inT
inG
sY
sT
em
2100
2500
3000
3600
11
Frequently asked questions
12 Frequently asked questions
Kodak NexPress Digital Production
Color Presses typically print four process
colors — CMYK. In addition, a fifth imaging unit
can print a variety of other NexPress Dry Inks
inline. This gives designers the ability to add
unique watermarks and protective coatings, or
provide extra security and authentication marks,
match special colors, or add dimensional coating.
Why must the color swatch for dimensional printing be named “NexPress DryInk raised clear”?
The exact name, including capital letters,
is very important. That swatch name is
recognized by the NexPress Press, which
then assigns dimensional clear dry ink to the
correct layers and sets other important press
parameters. The press also alerts the operator
if dimensional clear dry ink is not in the fifth
imaging unit when needed.
Could another “reference color” be used instead of light orange?
Yes, we used CMYK: 0 | 75 | 100 | 0 because
it’s rarely used, and it’s transparent enough to
see through on a monitor. Whatever color you
choose, be consistent! Use the identical color in
all Illustrator, Photoshop and InDesign Files to
avoid multiple reference colors coming into your
production file when you assemble the job.
How much dimensional clear dry ink can be used on a sheet?
One or both sides of a sheet can have dimensional
printing. We recommended that you do not cover
more than 40% of any side with dimensional
clear dry ink.
Does dimensional clear dry ink affect color matching?
If you are matching critical colors (corporate logo
colors for example), talk with your print provider
about using a Kodak NexPress Intelligent Color
Solution in the fifth imaging unit, and forgo using
dimensional clear dry ink.
Will dimensional printing add protection against scuffing in the mail?
Yes, but we don’t recommend flooding a page
with dimensional dry ink. A better solution is to
ask your print provider to flood the page with
NexPress Clear Dry Ink. If they also have a Kodak
NexPress Glossing Unit they can produce a high
gloss finish that rivals laminates and UV, and is
easily recyclable.
Can dimensional clear dry ink produce tinted varnish-like effects?
Yes. Traditional tinted varnish effects, such as
seals, stamps and graphics reproduced in very
light tints with dimensional clear over them can
be very effective. Try CMYK: 3 | 0 | 10 | 0 as
a typical light tint. You can also create a tinted
varnish effect that has a silver metallic look by
using a 15% tint of black under the dimensional
dry ink. See the sample textures on page 11.
Can there be layers in the final file on top of the dimensional clear layer?
Yes, but the text, images or graphics on those
layers will knock out any dimensional clear dry
ink directly below them.
Are pages with dimensional dry ink recyclable?
Yes. Unlike some other thermographic
processes, pages printed with Kodak NexPress
Dry Inks, including Clear and Dimensional Clear,
are easily recycled.
Can common substrates be used?
Yes. 150-350 g/m2 uncoated papers and 150-
250 g/m2 coated papers are recommended for
dimensional dry ink.
Frequently asked questions
Can other software programs create dimensional print files?
It will if your program allows you to assign
a spot color named “NexPress DryInk raised
clear” to your textures on the top layer, “multiply”
that layer with color artwork on a lower layer,
and produce a layered high-quality PDF. Talk with
your print provider about testing the file on their
Kodak NexPress Digital Production Color Press.
Can dimensional dry ink be printed without any color underneath it?
Yes. Graphics, and patterns like the “linen”
texture below, are effective all by themselves.
ko
da
k n
ex
pr
es
s d
ime
ns
ion
al
PR
inT
inG
sY
sT
em
2100
2500
3000
3600
13
Produced using Kodak Technologies. For more information, visit www.kodak.com/go/dimensional
© Kodak, 2008. Kodak and NexPress are trademarks of Kodak.
Subject to technical change without notice.
Printed on a Kodak nexpress Digital Production Color Press with the Kodak nexpress Intelligent Dimensional Coating Solution
U.DP.218.1108.en.01