(Kodak) Dental Xray & Imaging Software
52
A Radford Heath Dental Centre Guide. www.radfordheath.com Page 1 07/08/2007 Carestream (Kodak) Dental Xray & Imaging Software: Trophy® Windows.
Transcript of (Kodak) Dental Xray & Imaging Software

A Radford Heath Dental Centre Guide.
www.radfordheath.com Page 1 07/08/2007
Carestream (Kodak)
Dental Xray & Imaging Software: Trophy® Windows.
A Radford Heath Dental Centre Guide.
www.radfordheath.com Page 2 07/08/2007
Terms & Conditions
The following terms and conditions apply to anyone using this guide:
We reserve the right to make changes and improvements to the information given in this guide at any time, and without notice.
All trademarks used are acknowledged as being the properties of their respective owners. The Panoramic Xray image used throughout this guide comes courtesy of Kodak (Trophy).
Disclaimer
Radford Heath Dental Ceramics provide the information in this guide in good faith for the general interest of its users only. This is a simple pictorial guide and by no means a definitive one and is not meant to substitute Kodak’s (Trophy) own help instructions. Should problems arise whilst using your equipment always use the help files provided with your software or seek advice from your Kodak representative or their support team: www.kodak.com ([email protected]).
Whilst every effort has been made to ensure that the content is free of any errors, and is as accurate as possible, all information is provided 'as is' without guarantee or warranty of any kind.
You use the content at your own risk and assume full responsibility to judge whether it is accurate or complete before using it for whatever purpose.
All necessary safety precautions must be taken according to the relevant Health and Safety regulations and NRB guidelines. You must be qualified to use radiation equipment.
In no event shall Radford Heath Ltd be liable for any consequential, incidental or direct damages suffered in the course of using the content from this guide.
We are not responsible for the content or reliability of any linked web sites and we do not necessarily endorse the views expressed within them.
We do not accept responsibility for any virus contracted as a result of visiting any linked web site and will not be liable for any loss, damage, costs, expenses or claims suffered or incurred by any person as a consequence of the presence of any virus or similar item on any web site.
Copyright
All text and graphics in this guide are copyrighted: © Radford Heath Ltd (unless otherwise indicated). Save to the extent expressly permitted below, the context of these pages may not be reproduced or transmitted or be made available on a network in whole or in part without the prior consent of Radford Heath Ltd. These pages may be downloaded or printed for your personal and private use provided that you make no alteration to any of these pages and you do not use any part of the pages in any work or publication in whatever medium stored.

A Radford Heath Dental Centre Guide.
www.radfordheath.com Page 3 07/08/2007
Contents
Terms & Conditions .........................................................................................2 Disclaimer ....................................................................................................2 Copyright......................................................................................................2
Contents ..........................................................................................................3 General Information .........................................................................................5 Who is Trophy? ............................................................................................5 Kodak Support..............................................................................................5 What should you have in front of you? .........................................................5 What does it all mean? .................................................................................7 How you start and stop the Trophy® Windows system?...............................7
Help .................................................................................................................8 Menu Bars........................................................................................................9 The Main Trophy® Window Menu Bar..........................................................9 The Patient Record Menu Bar ......................................................................9 The 'Pano' ﴾Panoramic﴿ Menu Bar................................................................9 The Control Panel Menu Bar ......................................................................10 The 'STV' Menu Bar ...................................................................................10
Windows ........................................................................................................11 The Main Trophy® Window........................................................................11 A Patient’s record .......................................................................................11 Create a new patient record....................................................................11 Add a picture ID to a patient record. .......................................................12 Find an existing patient record................................................................12 Access images stored in a patient’s record.............................................13
The Patient Record Window.......................................................................14 Access the patient’s image history..........................................................14 Select an image from the patient’s history. .............................................15 Pano toolbar Sharpness filter. ..............................................................16 Pano toolbar Highlight ..........................................................................17 Pano toolbar Measurements.................................................................17 Pano toolbar Edit Annotations. .............................................................18 Pano toolbar Display Annotations.........................................................19 Pano toolbar Relief filter. ......................................................................19 Pano toolbar Isodensity dots.................................................................20 Pano toolbar Densitometric analysis.....................................................21 Pano image Control panel contrast.......................................................21 Pano image Highlight on Panoramic with contrast changed. ................23 Pano image Control panel Optiview......................................................24 Pano image Control panel Negative image. .........................................24 Pano image Control panel Negative image with highlight. ....................25 Pano image Control panel Colour image. .............................................25 Pano image Menu bar options. .............................................................26 RVG image How to take one. ...............................................................27

A Radford Heath Dental Centre Guide.
www.radfordheath.com Page 4 07/08/2007
STV image How to take one using Dürr’s Intraoral wireless camera ...28 STV image How to save image.............................................................29 STV image Retrieval via dental arch window........................................30 STV image Retrieval via patient history list...........................................31 STV image Add comments. ..................................................................32 STV image Menu bar options. ..............................................................33 Importing external images into patient records .......................................33
The Full Screen Window................................................................................36 Full Screen with highlight. ..........................................................................37
Trophypan Screen Window............................................................................38 Support ..........................................................................................................41 Preferences................................................................................................41 Define path to Trophy® database...............................................................41 Trophy® Windows preferences. .................................................................42 Trophypan® preferences............................................................................44 Print preferences. .......................................................................................45 Trophy Windows Software Licences...........................................................46
Trophy® Windows Viewer ﴾TWV﴿ ..................................................................47 Troubleshooting .............................................................................................49 Abbreviations .................................................................................................52

A Radford Heath Dental Centre Guide.
www.radfordheath.com Page 5 07/08/2007
General Information
Who is Trophy? Trophy is Trophy Radiologie SA of France (http://www.trophy.fr/gb/). Trophy Radiologie SA was acquired by Kodak in October 2003 as part of PracticeWorks. It is now Carestream as of May 2007. For the full product description please visit the Carestream Health web site at: http://www.kodakdental.com/en/gbIndex.html
Kodak Support Our UK representative Tel: +44 (0)1905 356118 (Mr. Tony Hulbert). Kodak (UK) Help Line Tel: 0800895113. Kodak Support (Europe) Email: [email protected]
What should you have in front of you?
(Option1) The Dürr VISTACam® intraoral camera is at hand, along with the foot pedal (which you have positioned for ease of operation).
(Option2) The Trophy® Elitys® Xray Arm/Equipment has been turned on and the Trophy® RVGU (Ultimate) sensors (Large and/or Small) have been plugged into the small computer "HUB". Once the sensors are connected, the hub should have a small light glowing indicating that the hub's port is active, and the "New RVG Image" icon on the patient's record menu bar (Trophy Windows) should glow red...

A Radford Heath Dental Centre Guide.
www.radfordheath.com Page 6 07/08/2007
(Option3) That your Trophypan® Panoramic DPT or OPG Xray Equipment is switched on. *Switch on the OPG before the PC or else you get an error code on the PC screen.
(Option4) You have a digital camera (DICOM compliant)...And of course, your PC is powered up with MSWindows XP running!

A Radford Heath Dental Centre Guide.
www.radfordheath.com Page 7 07/08/2007
What does it all mean? Other abbreviations may be found in the appendix, but here are some general terms:
RVG RadioVisioGraphy® Intraoral digital radiography
Trophy Elitys®
STV Intraoral colour camera image
Dürr VISTACAMCL®
PANO Panoramic Extraoral digital radiography Trophy
Trophypan®
CEPH Cephalometric One shot extraoral digital radiography
Trophypan®
DIG Digital Twained/Scanned images
﴾imported image﴿
TIF Tagged Image File Format
Trophy had its own proprietary image format that utilized TIFF.
How you start and stop the Trophy® Windows system? To start or launch the Trophy® software, double click the Trophy® Windows icon.
To exit Trophy® either: Click on the Exit button or Close the window by clicking the small X square in the top right of the window.
A Radford Heath Dental Centre Guide.
www.radfordheath.com Page 8 07/08/2007
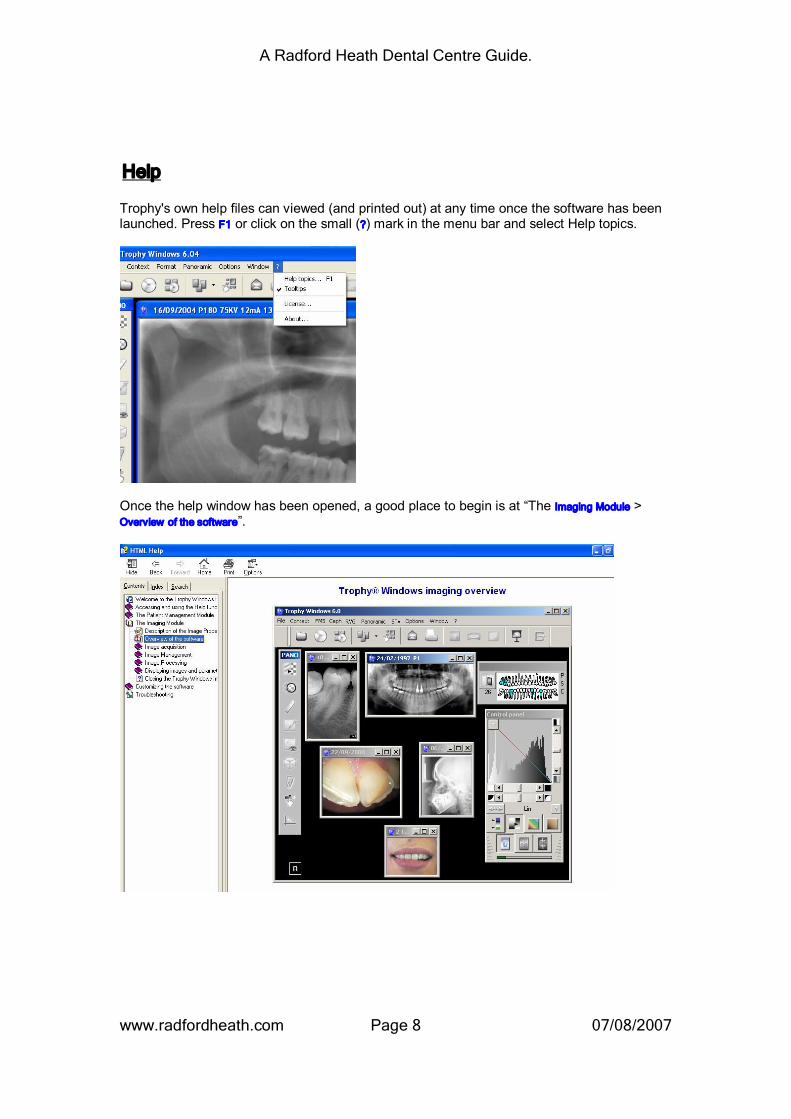
Help
Trophy's own help files can viewed (and printed out) at any time once the software has been launched. Press F1 or click on the small (?) mark in the menu bar and select Help topics.
Once the help window has been opened, a good place to begin is at “The Imaging Module > Overview of the software”.
A Radford Heath Dental Centre Guide.
www.radfordheath.com Page 9 07/08/2007
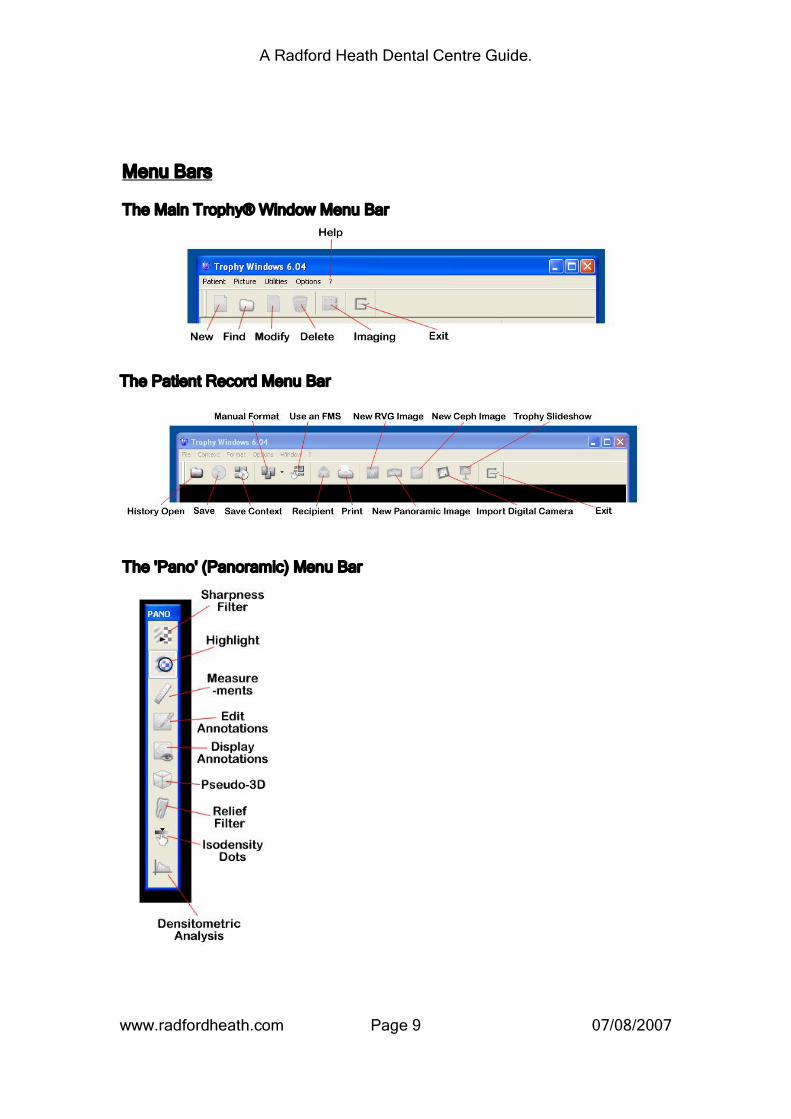
Menu Bars
The Main Trophy® Window Menu Bar
The Patient Record Menu Bar
The 'Pano' ﴾Panoramic﴿ Menu Bar

A Radford Heath Dental Centre Guide.
www.radfordheath.com Page 10 07/08/2007
The Control Panel Menu Bar
The 'STV' Menu Bar

A Radford Heath Dental Centre Guide.
www.radfordheath.com Page 11 07/08/2007
Windows
The Main Trophy® Window
A Patient’s record
Create a new patient record. Enter patient details in the fields provided.

A Radford Heath Dental Centre Guide.
www.radfordheath.com Page 12 07/08/2007
Add a picture ID to a patient record.
Find an existing patient record.

A Radford Heath Dental Centre Guide.
www.radfordheath.com Page 13 07/08/2007
Access images stored in a patient’s record.
A Radford Heath Dental Centre Guide.
www.radfordheath.com Page 14 07/08/2007
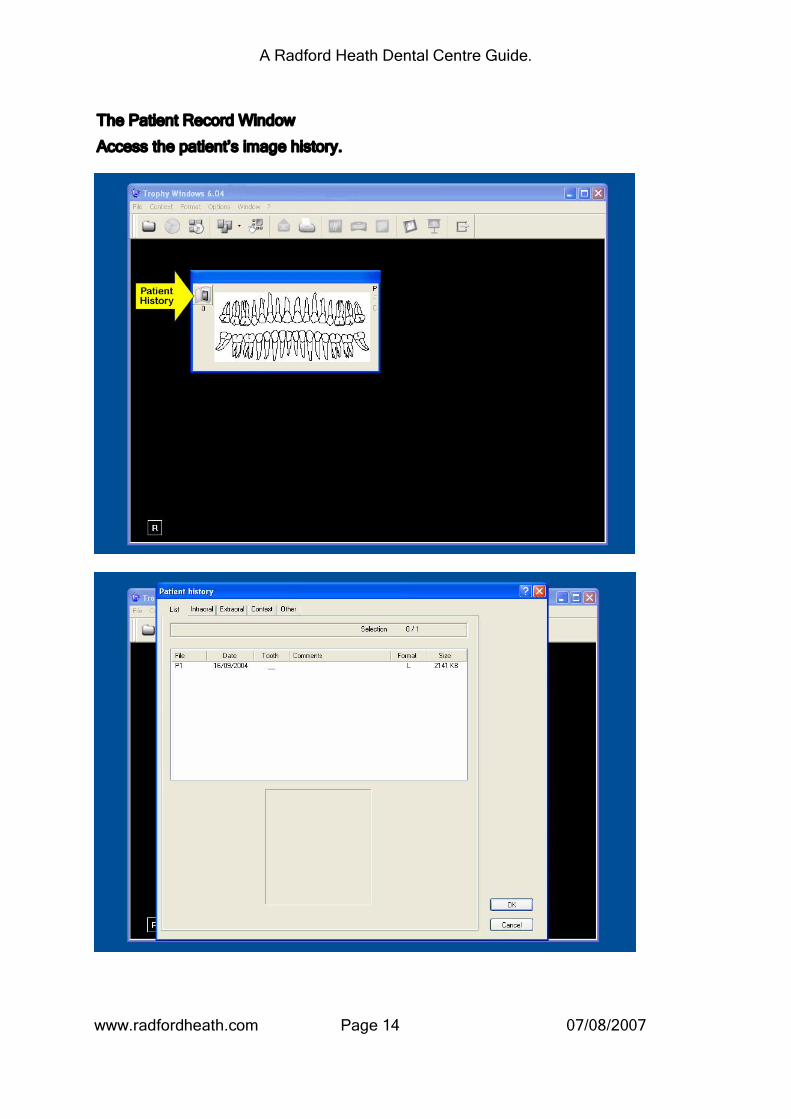
The Patient Record Window
Access the patient’s image history.
A Radford Heath Dental Centre Guide.
www.radfordheath.com Page 15 07/08/2007
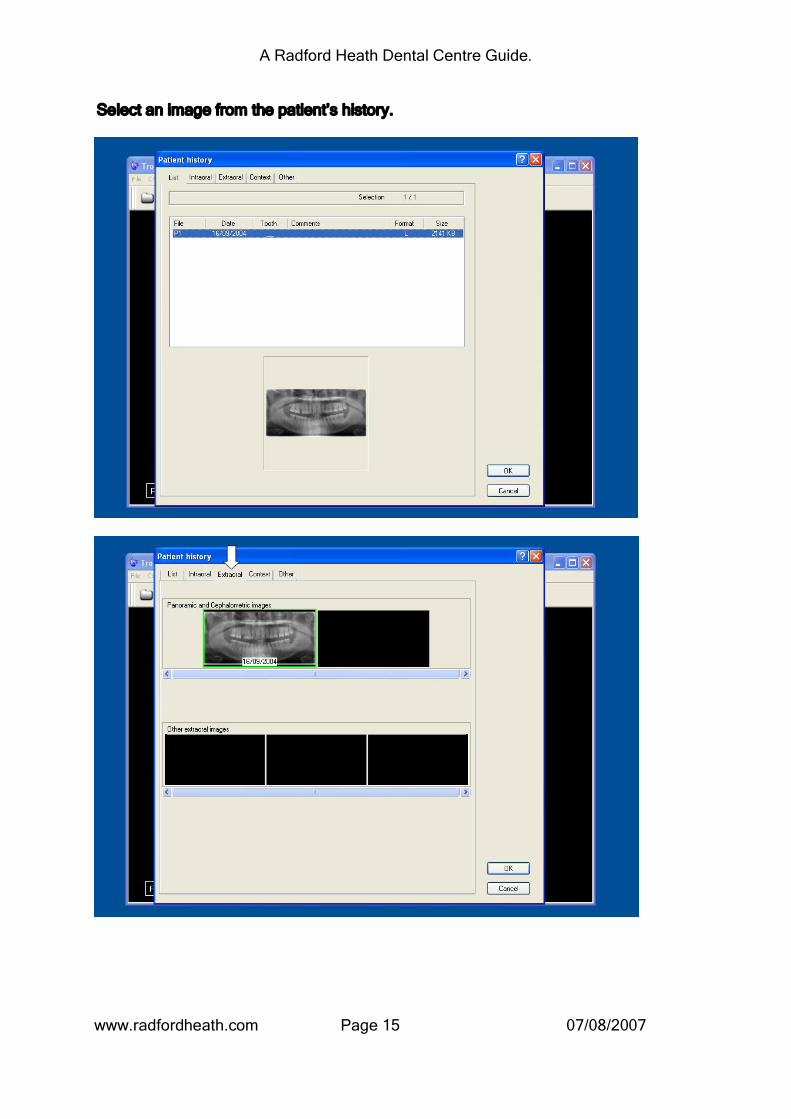
Select an image from the patient’s history.
A Radford Heath Dental Centre Guide.
www.radfordheath.com Page 16 07/08/2007
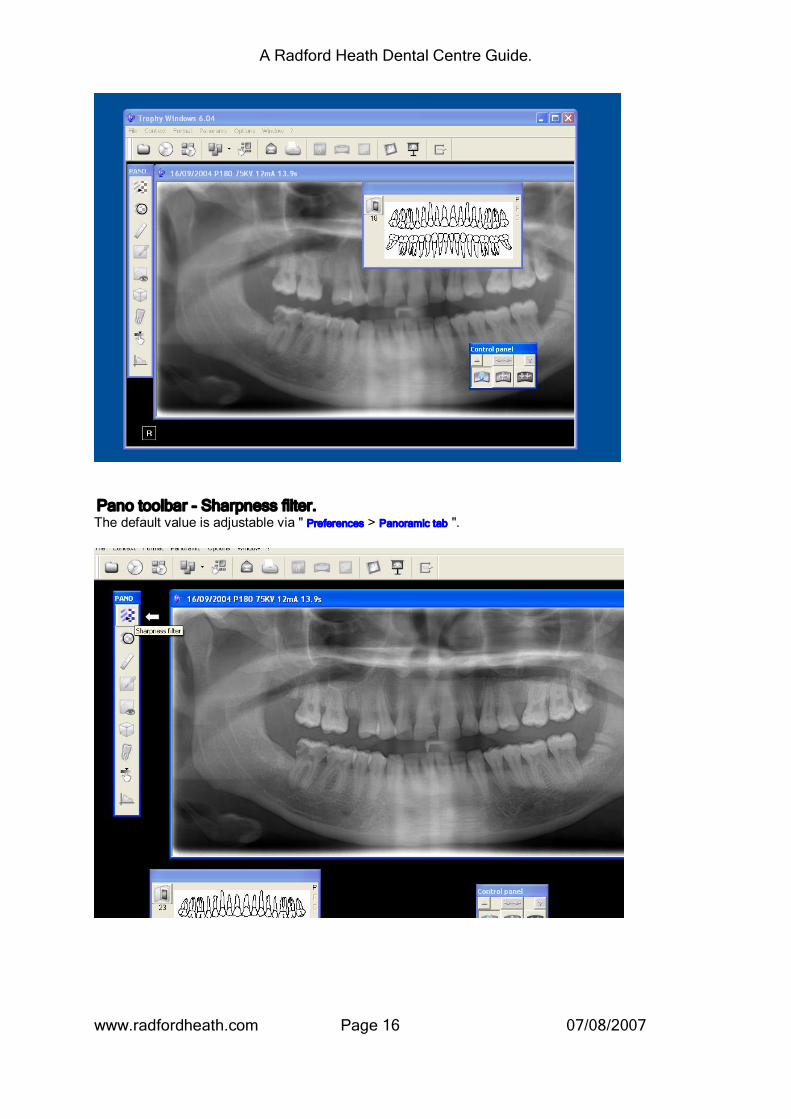
Pano toolbar Sharpness filter. The default value is adjustable via " Preferences > Panoramic tab ".

A Radford Heath Dental Centre Guide.
www.radfordheath.com Page 17 07/08/2007
Pano toolbar Highlight Also, see "Highlight on Panoramic with contrast changed". Simply apply pressure on the leftmouse button, move the mouse around, and hover over the desired location.
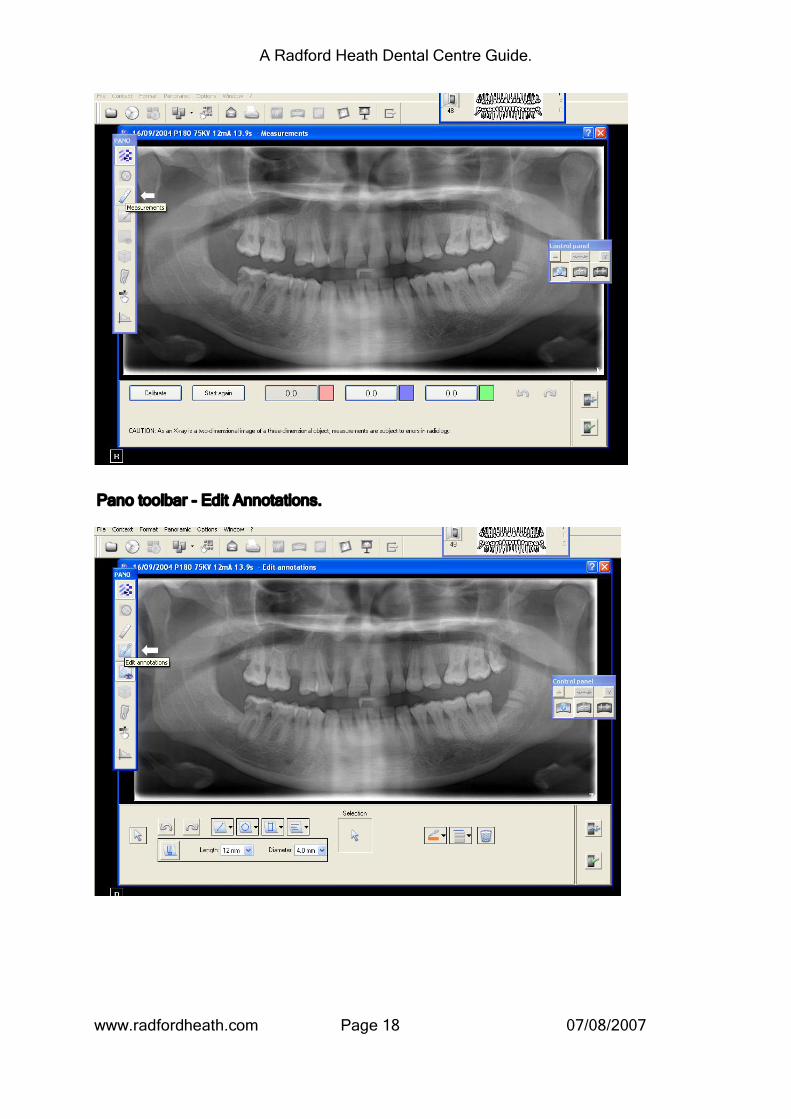
Pano toolbar Measurements. “By virtue of the magnification of a panoramic image, any measurement taken on the image must be subject to a correction factor. Whilst taking into account this magnification, it is still possible to take measurements on the xray image. A measuring function is available in the Trophy Windows software. The software function can be calibrated by placing in the patient’s mouth an object of known size (a steel ball for example). It is then only necessary to record the size of the referenced object in the software program. In this way, the measurements are calibrated in relation to this object. Warning: the calibration is only valid in the area in the immediate vicinity of the referenced object”
(Reference taken from: Trophy’s online information at http://www.trophypan.com).
To use the calibrate feature: Click the Calibrate button. Using the mouse, take measurement (point A to point B) of the object to be used as the reference (e.g. steel ball). Enter the known value of the reference object into the calibrate window (e.g. if the steel ball is 5mm, enter 5 using the calibrate function’s ‘calculator’ pad. Once the reference value is entered into the calibrate pad select the green tick to save this value. Subsequent measurements taken during this session (on this image only) will take into account the correction factor. Use the ‘Start again’ button to clear the measurements taken (the correction factor remains in place). Use the ‘Erase all’ button to reset the correction factor (then perform 14 above). Use the close button to exit the measurements function (Note: the correction factor will be lost on closure of this window i.e. it is not saved).
Important: All measurements are represented in a 2D (2Dimentional) plane (Xaxis and Yaxis). To calculate measurements on the Zaxis (front to back or depth) a CAT scan is recommended.
A Radford Heath Dental Centre Guide.
www.radfordheath.com Page 18 07/08/2007
Pano toolbar Edit Annotations.
A Radford Heath Dental Centre Guide.
www.radfordheath.com Page 19 07/08/2007
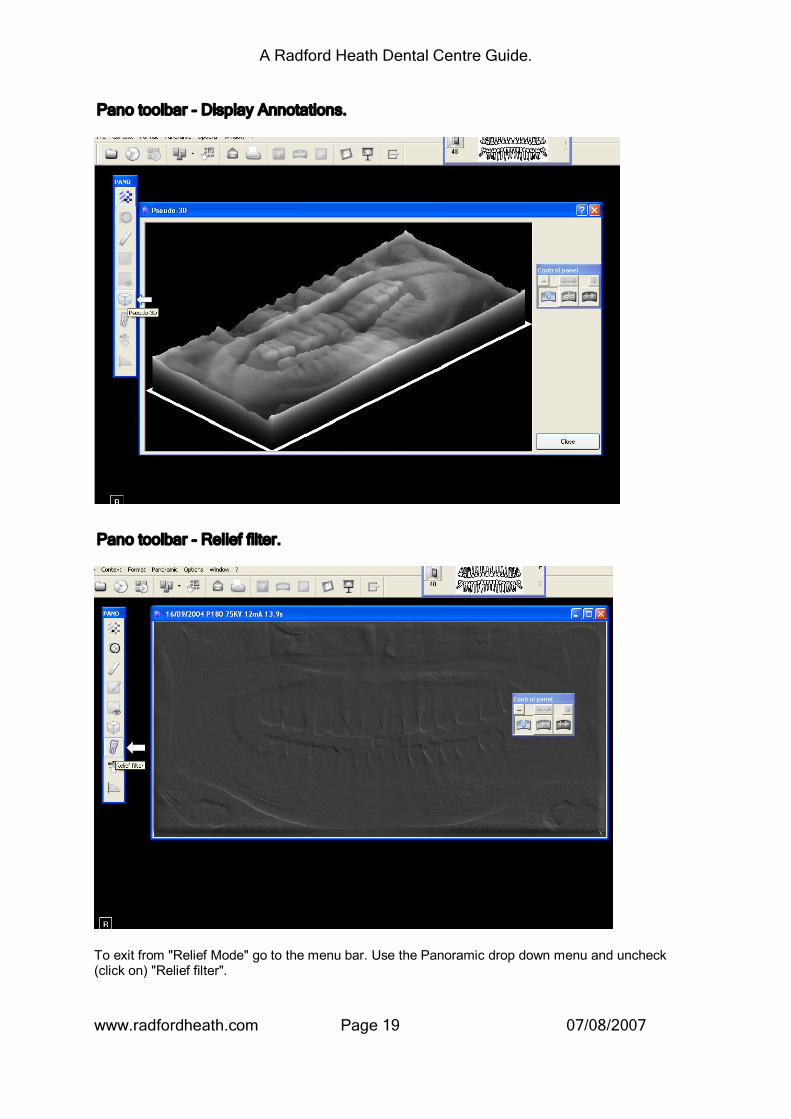
Pano toolbar Display Annotations.
Pano toolbar Relief filter.
To exit from "Relief Mode" go to the menu bar. Use the Panoramic drop down menu and uncheck (click on) "Relief filter".

A Radford Heath Dental Centre Guide.
www.radfordheath.com Page 20 07/08/2007
Pano toolbar Isodensity dots.

A Radford Heath Dental Centre Guide.
www.radfordheath.com Page 21 07/08/2007
Pano toolbar Densitometric analysis.
Pano image Control panel contrast. Note the changes in contrast over the next three pictures.

A Radford Heath Dental Centre Guide.
www.radfordheath.com Page 22 07/08/2007

A Radford Heath Dental Centre Guide.
www.radfordheath.com Page 23 07/08/2007
Pano image Highlight on Panoramic with contrast changed.

A Radford Heath Dental Centre Guide.
www.radfordheath.com Page 24 07/08/2007
Pano image Control panel Optiview.
Pano image Control panel Negative image.

A Radford Heath Dental Centre Guide.
www.radfordheath.com Page 25 07/08/2007
Pano image Control panel Negative image with highlight.
Pano image Control panel Colour image.

A Radford Heath Dental Centre Guide.
www.radfordheath.com Page 26 07/08/2007
Pano image Menu bar options.

A Radford Heath Dental Centre Guide.
www.radfordheath.com Page 27 07/08/2007
RVG image How to take one.
First: In order to take an intraoral Xray (RVG) image you will have plugged in the required "ultimate sensor" (small or large) into the hub and have noted that the sensor is active and ready for use by virtue of the fact that the menu bar indicator is glowing red instead of grey.
Second: The sensor has been sheathed and positioned in the patient's mouth using the correct RINN positioners.
Third: The ELITYS Xray arm has been switched on and positioned at the correct angle to the patient's target tooth/teeth.
Fourth: The sensor is in the required elevation. The exact rotational elevation can be noted and changed by using the small dot on the sensor and screen. Depressing the button on the sensor's cable remote (on the cable) first activates the RVG acquisition window and timer (see below), then by depressing it again will rotate the sensor's image 90 degrees. Press again to rotate the image in steps of 90 degrees. The timer 'arms' the Xray trigger for 40 seconds to allow you to take an image.
Fifth: Standing the recommended distance away from the Xray source, use the wall mounted remote to adjust the Xray outputs and trigger the Xray generator.
Sixth: Save the image. Refer to the Trophy Windows help file section: The Imaging Module > Image acquisition > Acquisition of RVG images for guidance on saving RVG images directly to a patient's tooth record.

A Radford Heath Dental Centre Guide.
www.radfordheath.com Page 28 07/08/2007
STV image How to take one using Dürr’s Intraoral wireless camera
First: Start (or launch) Trophy Windows software. Select the patient that you are going to take pictures of from the patient list. Bring up their patient record window.
Second: Pick up the VISTACam Intraoral camera (the light will come on if all is well).
Third: Click once on intraoral camera foot pedal. This will start a new "STV" window on the PC screen. Direct the camera at the object (tooth/teeth) that you wish to see. The image should appear on screen. Focus (or IFC Iris Focus Control) can be adjusted on the VISTACam stem by twisting the bevelled collar. The marking indicate the following:
Smiley Face Extra oral image ﴾Full oral portrait with maximum light﴿ Teeth Intra oral images ﴾13 teeth﴿ Magnifying glass Macro intra oral images ﴾maximum enlargement, high
resolution﴿.
Fourth: Once you have the image focused correctly, click the foot pedal once again. The image will freeze on the screen. At this point you can save the image, close and discard it, or take another picture by again depressing the foot pedal (another window will open leaving you with two image windows).

A Radford Heath Dental Centre Guide.
www.radfordheath.com Page 29 07/08/2007
STV image How to save image.
There are several ways that you can save the image: Rightclick the mouse on the image itself and a menu will pop up.
Leftclick and hold the button down (the mouse arrow will turn into a tooth) then (still holding the button down) drag the tooth across to the dental arch window.

A Radford Heath Dental Centre Guide.
www.radfordheath.com Page 30 07/08/2007
Then fill in the details that associate the image with a particular tooth/set of teeth etc. Note: The "S" stands for STV or intraoral. The number will associate the image with a particular tooth and the colour in the dental arch window will change to green.
STV image Retrieval via dental arch window.

A Radford Heath Dental Centre Guide.
www.radfordheath.com Page 31 07/08/2007
STV image Retrieval via patient history list.
A Radford Heath Dental Centre Guide.
www.radfordheath.com Page 32 07/08/2007
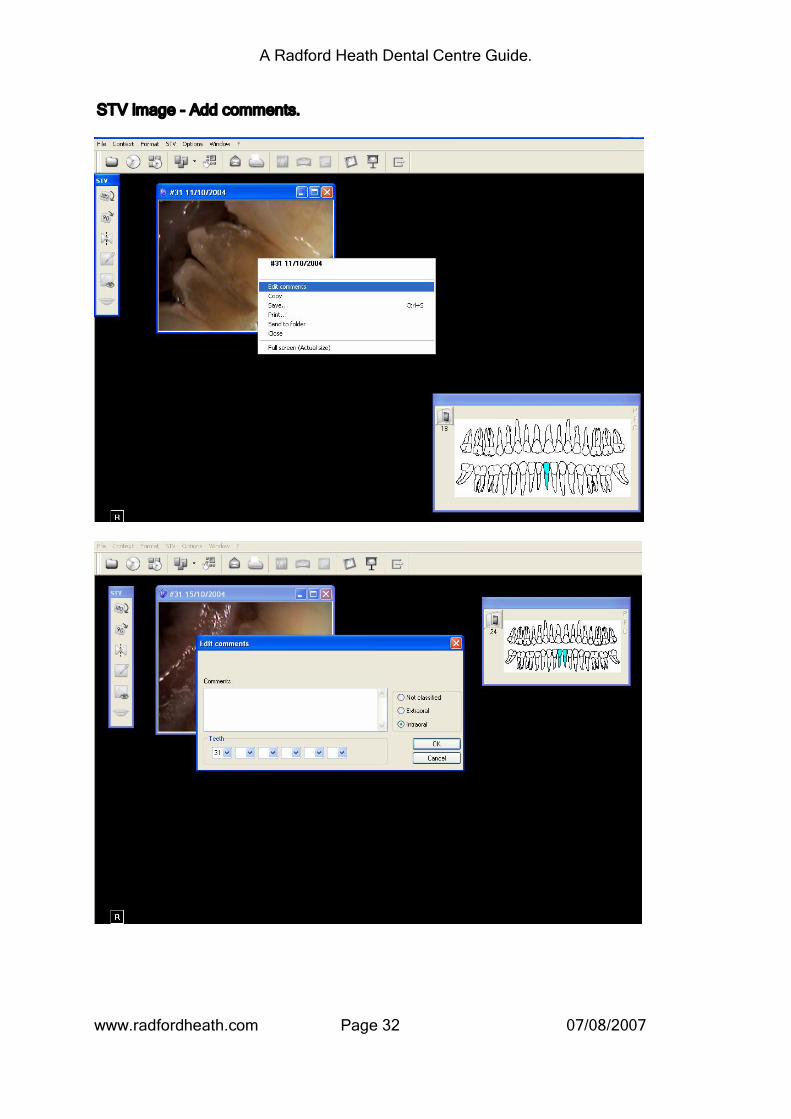
STV image Add comments.
A Radford Heath Dental Centre Guide.
www.radfordheath.com Page 33 07/08/2007
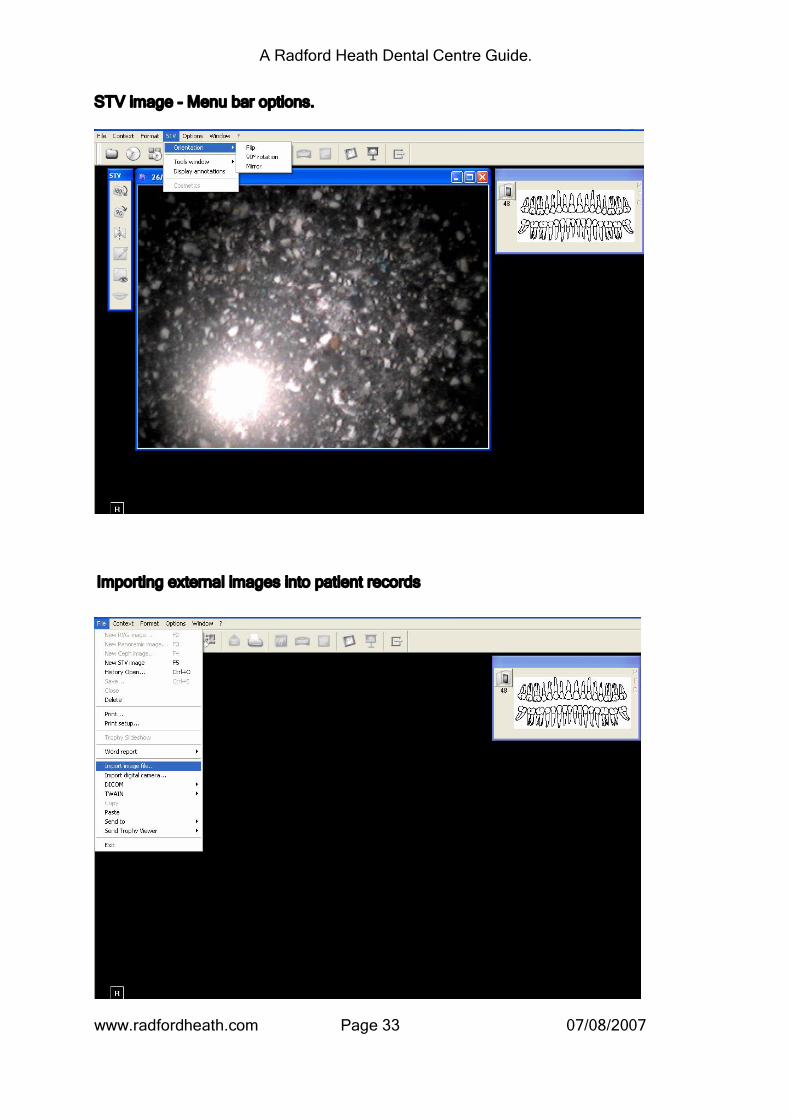
STV image Menu bar options.
Importing external images into patient records

A Radford Heath Dental Centre Guide.
www.radfordheath.com Page 34 07/08/2007
Importing external images into patient records ctd.

A Radford Heath Dental Centre Guide.
www.radfordheath.com Page 35 07/08/2007
Importing external images into patient records ctd.
A Radford Heath Dental Centre Guide.
www.radfordheath.com Page 36 07/08/2007
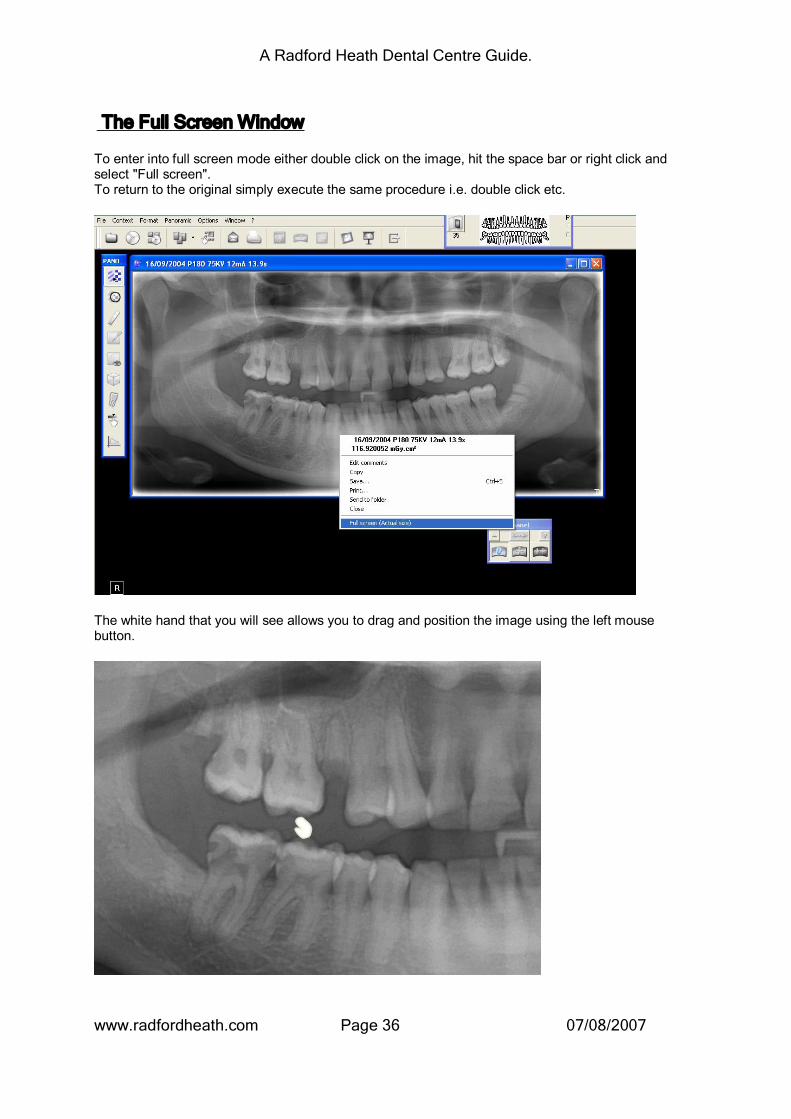
The Full Screen Window
To enter into full screen mode either double click on the image, hit the space bar or right click and select "Full screen". To return to the original simply execute the same procedure i.e. double click etc.
The white hand that you will see allows you to drag and position the image using the left mouse button.

A Radford Heath Dental Centre Guide.
www.radfordheath.com Page 37 07/08/2007
Full Screen with highlight.
Again, the size of the highlighted area can be adjusted via the slider above the control menu. Return to the original size and you will be able to adjust this before returning to full screen mode.
A Radford Heath Dental Centre Guide.
www.radfordheath.com Page 38 07/08/2007
Trophypan Screen Window
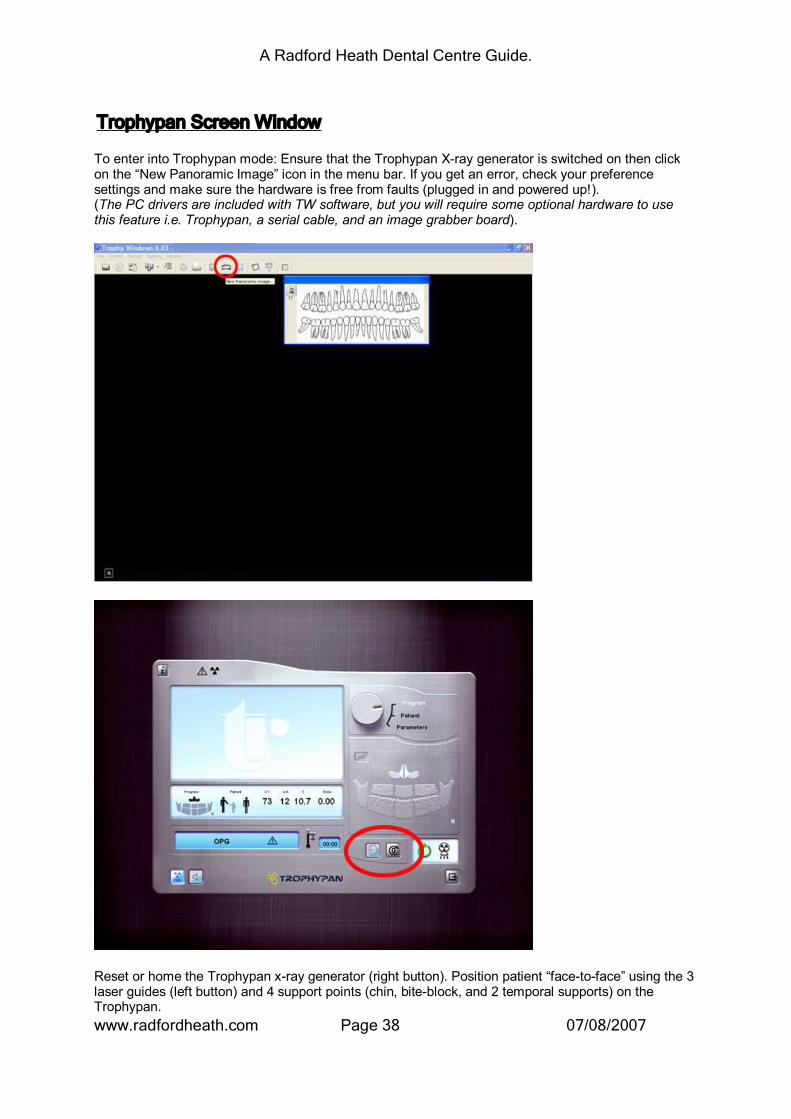
To enter into Trophypan mode: Ensure that the Trophypan Xray generator is switched on then click on the “New Panoramic Image” icon in the menu bar. If you get an error, check your preference settings and make sure the hardware is free from faults (plugged in and powered up!). (The PC drivers are included with TW software, but you will require some optional hardware to use this feature i.e. Trophypan, a serial cable, and an image grabber board).
Reset or home the Trophypan xray generator (right button). Position patient “facetoface” using the 3 laser guides (left button) and 4 support points (chin, biteblock, and 2 temporal supports) on the Trophypan.
A Radford Heath Dental Centre Guide.
www.radfordheath.com Page 39 07/08/2007
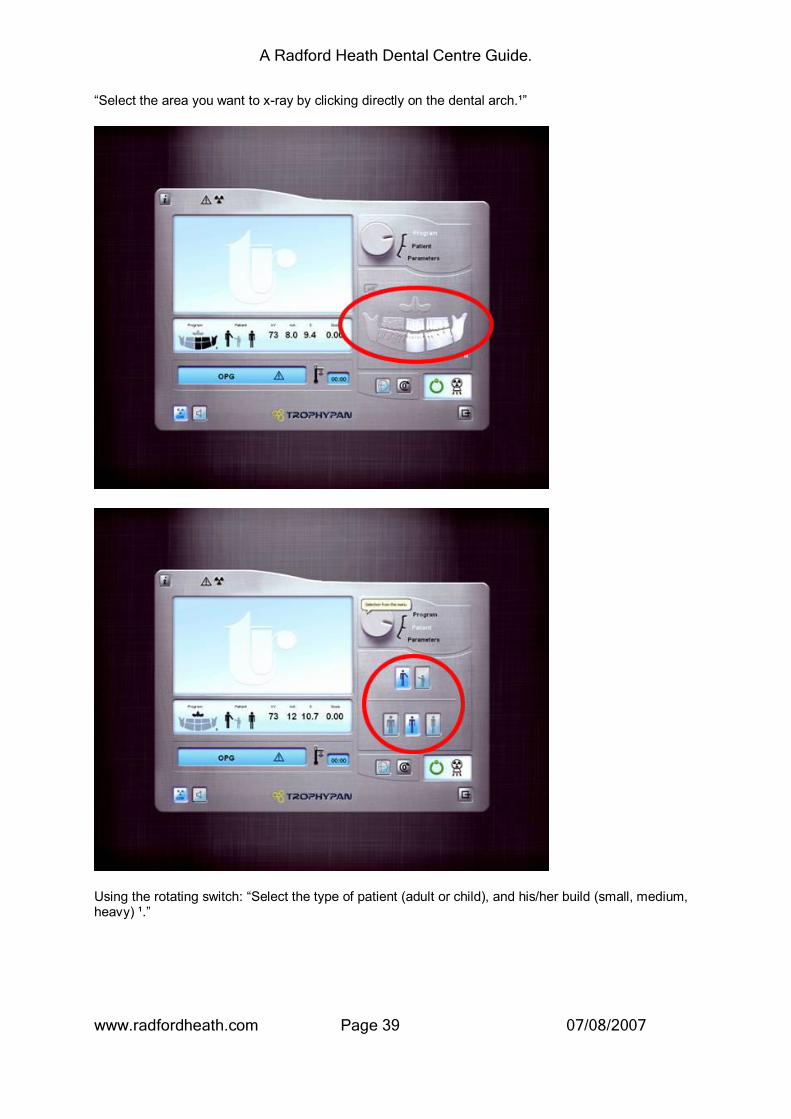
“Select the area you want to xray by clicking directly on the dental arch.¹”
Using the rotating switch: “Select the type of patient (adult or child), and his/her build (small, medium, heavy) ¹.”

A Radford Heath Dental Centre Guide.
www.radfordheath.com Page 40 07/08/2007
Using the rotating switch: “The exposure parameters are automatically displayed as a function of the selections made. You can then modify them temporarily or store them as a default parameter¹.”
¹ Quote from Trophy’s Trophypan brochure.

A Radford Heath Dental Centre Guide.
www.radfordheath.com Page 41 07/08/2007
Support
When the software is set up for the first time, your Trophy® support personnel will help configure the required settings.
Preferences
Define path to Trophy® database.

A Radford Heath Dental Centre Guide.
www.radfordheath.com Page 42 07/08/2007
Trophy® Windows preferences.

A Radford Heath Dental Centre Guide.
www.radfordheath.com Page 43 07/08/2007

A Radford Heath Dental Centre Guide.
www.radfordheath.com Page 44 07/08/2007
Trophypan® preferences. Panoramic (Trophypan) settings: The panoramic acquisition should be set to COM1 (or to match the position of the serial lead that is plugged into the PC).
The default panoramic image contrast can be set via the same panoramic tab.

A Radford Heath Dental Centre Guide.
www.radfordheath.com Page 45 07/08/2007
Print preferences. Find the printer options tab via the patient record window. Use the drop down menus to select the required printer.
Intraoral camera settings (“Options > Settings” selected from menu bar. Note: Intraoral camera must be active and foot pedal must have been depressed).
A Radford Heath Dental Centre Guide.
www.radfordheath.com Page 46 07/08/2007
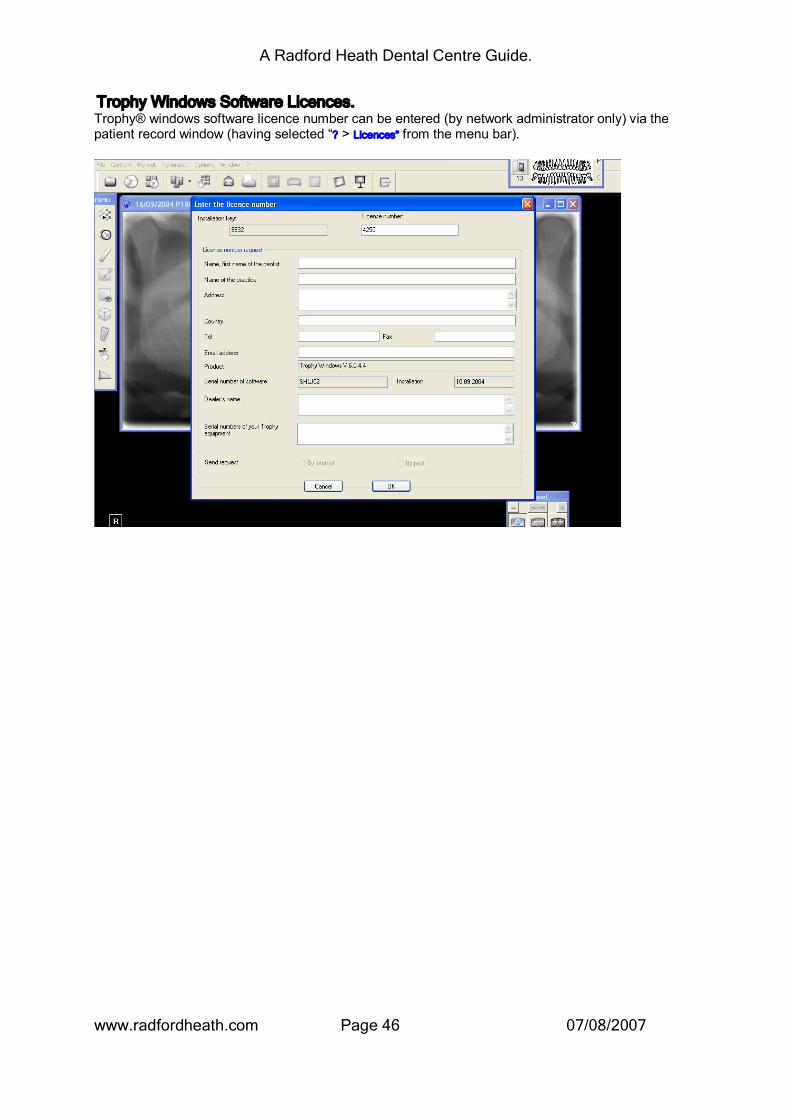
Trophy Windows Software Licences. Trophy® windows software licence number can be entered (by network administrator only) via the patient record window (having selected “? > Licences” from the menu bar).

A Radford Heath Dental Centre Guide.
www.radfordheath.com Page 47 07/08/2007
Trophy® Windows Viewer ﴾TWV﴿
The free TWV program allows individuals who do not have access to the full Trophy® Windows software to view Trophy® images. Typically, images that have been sent via Email can be viewed. The viewer twv.exe 1.536Kbits (in zipped form is 648Kbits in size) can be emailed along with the Trophy® .TIF images from the patient record window.
The TWV shares some of the basic menu items as the full Trophy® version.

A Radford Heath Dental Centre Guide.
www.radfordheath.com Page 48 07/08/2007
And there is a highlight or magnify function as well (leftclick mouse button)
Rightclick gives image properties such as patient name, date, and xray strength. The control panel buttons set the negative image, colour image, and sepia image properties, all which come with an adjustable brightness and contrast sliders that can be reset with the double arrow button.
A Radford Heath Dental Centre Guide.
www.radfordheath.com Page 49 07/08/2007
Troubleshooting
This section has been included to show users some of the types of faults that may be experienced whilst using Trophy Windows and its associated hardware. To avoid long periods of down time always consult your Kodak ﴾Trophy﴿ representative or Kodak support team if you have concerns, errors or faults. It is better to be safe than sorry!
RVG DRIVERS – You will find all drivers for RVG sensors located on your Trophy Software Installation CD, in a folder such as /Drivers/Rvg_usb6_win2k/. As far as I know, to date there is no web site that allows you to download old, new, or updated RVG drivers. If you do not have the original installation CD, you will need to contact your installation engineer or Kodak Support directly – I hope this helps?
Fault Symptoms Fault Fixed Intra oral camera image not appearing on monitor. Instead, I have blue screen in the Trophy patient window.
Video settings in Trophy software not set. With the blue window on screen go to menu bar and select Options > Video Settings. Set Video Connector = Y/C and Video Standard = PAL.
Unable to save any Trophy patient information. Get unavailable to access network drive.
Checked all network connections and server folder permissions. This fault was due to a partially connected network switch cable. Files could be saved once the connector was pushed in fully.
Unable to print xray images from computer. First, the printer had to be switched on. Then the option to send prints to the printer had to be set in the Trophy patient record window. Set via menu bar Options > Preferences > Printer Tab. Use the drop down menu’s to direct prints to the printer of your choice (for black/white, colour, and large prints). Result was successful
Unable to receive Trophy TIF image as email attachment.
Found Outlook Express to be set to prevent opening of certain types of attachments. This is changeable via Tools > Options > Security tab. Deselect the option “Do not allow attachments to be saved or opened that could potentially be a virus”. Could then save and view the attachment. Reset Outlook security back to its original settings.
Unable to use the intraoral Xray sensor.
When the sensor are plugged into the hub, a window pops up saying new RVG6 hardware has been detected that requires a new driver.
The RVG acquisition sensor icon remains grey.
When the driver installation process is started, an error window then appears requiring the user to be part of the administrator group before installation can continue.
Fault type 1: I logged out of user session the logged on as the administrator. I started up Trophy s/w and opened a patient’s record. I removed and reinserted the RVG sensor into the hub. The light on the hub came on next to the USB plug indicating the hub port is active. A window popped up saying a driver was required. I pressed the next button. I selected the radio button option to load not using windows update. I pressed the next button. A Microsoft driver warning popped up – I selected ‘continue anyway’ option. The PC then found the driver on the hard disk and the Xray sensor became recognised. The Sensor icon changed to red, indicating

A Radford Heath Dental Centre Guide.
www.radfordheath.com Page 50 07/08/2007
everything was ready.
Fault type 2: I logged out of user session the logged on as the administrator. I started up Trophy s/w and opened a patient’s record. I removed and reinserted the RVG sensor into the hub. The light on the hub came on next to the USB plug indicating the hub port is active. A window popped up saying a driver was required. I pressed the next button. I selected the radio button option to load not using windows update. I pressed the next button. A Microsoft driver warning popped up – I selected ‘continue anyway’ option. The PC tried to find the driver on the disk but failed. As a result, the Xray sensor still did not work. I tried a spare sensor in the same hub port. This time it worked ok. It appears that the sensor is faulty and will need replacing.
Fault type 3: Similar to fault type 2 above but the spare sensor also failed to find the RVG drivers. I launched Windows Device Manager and expanded in the Sound, video and games controllers. In the list was the RVG – 6 – USB controller/driver, which I deleted. I restarted the PC and launched Trophy Windows again. I plugged the sensor into the hub and the window popped up saying a driver was required. I used the same procedure, as in fault type 2 above, to find the drivers (load locally from disk) and the PC found the drivers and installed them. The sensor then worked ok.
We replaced one of our Trophy Ultimate sensors with a new Kodak RVG6000 sensor. On trying to use the sensor our PC could not find a correct USB hardware driver. All our other equipment was the same so we assumed that there was a new or different driver that had to be associated with this RVG6000 sensor.
Seemingly, it should work with the original driver because only the housing of the sensor is different. It has Kodak printed on it instead of Trophy. Suggested procedure from Kodak Support: If you have the Software CD available, unplug and reinsert the sensor into the hub. A window will pop up saying a driver is required. Just put the installation CD into the PC drive and navigate to Drivers/Rvg_usb6_win2k/. I tried this but it still failed when I tried it first time with the CD: 1)When the hardware wizard poppedup, I chose the option to load automatically using windows update one time only – this failed. 2)When the hardware wizard poppedup, I chose the option to load automatically using windows update every time – this failed. 3)When the hardware wizard poppedup, I chose the option to load not using windows update – this passed. The way we have the network set up is that client PCs are blocked access to the internet. This is what causes the first two options to timeout, as

A Radford Heath Dental Centre Guide.
www.radfordheath.com Page 51 07/08/2007
they require access to the web. They would not have found the driver this way. The last option (3) did not need the internet and therefore enabled me to search the local PC media, and quickly found the file on the CD.
Intermittently unable to use the intraoral Xray sensor. When the sensor is plugged into the hub, the RVG acquisition sensor icon sometimes remains grey.
This took me a while to figure out. Sure enough on occasion, (I “fixed” this several times only to have to return many times more) neither sensor type (large or small) would work in any of the 4 ports available. Interestingly the driver was not showing to be an issue. The hub lights were on leading me to believe that the hub was ok too. After a week of troubleshooting, I found the problem to be a loose fitting power unit for the hub. We have a power strips (surge protected) which lie in behind the PC base units. It is possible that the PC base unit had been moved (for cleaning?) and had knocked the plug for the hub. Once reinserted fully into the power strip all was well again.
With the RVG sensor plugged into the hub the acquisition icon turns red indicating it is ready to receive xray burst, but there is no power on the remote wall mounted panel so unable to trigger xray burst.
The Elitys xray arm has a power button on its wall unit. When this unit is switched off, no xrays can be triggered. Once on, the remote wall unit powers up and enables you to take an xray.
As part of a referral case, I sent off some Trophy images (.ceph, .pano, .rvg) to another surgery. The dentist was unable to view them using his own version of Trophy Viewer or Trophy Windows.
First, the recipient was unfamiliar with manipulating PC files so making the task somewhat difficult. As a result, I have written a simple installation guide that in future will accompany such images (also available via www.radfordheath.com) The second was the main problem: The recipient’s version of Trophy Windows (v5.06) does not allow execution of later versions of trophy files (i.e. earlier versions of Trophy Windows can not view file types of .ceph, .sc, .rvg etc from Trophy Windows v6.04). I emailed our Trophy Windows Viewer (v6.04) and the recipient was able to view the images. Later versions of the Trophy windows software are backwards compatible.
With the RVG sensor plugged into the hub and activating the remote Xray trigger a small audible sound can be heard and no image capture is possible. This happens intermittently in no particular pattern.
Recorded some error codes from the remote wall panel when the fault occurred: 0.083 – This fault was rectified by delaying finger release on the trigger button on the wall unit.
Not able to launch the Trophypan software. Error displayed: “Panoramic Error – Cannot open serial link.” Other users are able to use the machine though.
The general preferences for the panoramic system had not been configured for the new user. Using the new user’s ID I went to Options > Preferences > Panoramic Tab – I then set the serial link to COM1 rather than COMPCI.

A Radford Heath Dental Centre Guide.
www.radfordheath.com Page 52 07/08/2007
Abbreviations
A B C Ceph Cephalometric images
CAT – Computerized Axial Tomography ﴾or CT Scan﴿ D DICOM ﴾International standard format for transferring images﴿ E F A FMS ﴾Full Mouth Status﴿ is a static representation of several RVG
images G H I J K L M N NRB National Radiation Board O OPG Orthopantomograph® P Panoramic images Q RVG RadioVisioGraphy® ﴾Digital Radiography﴿ SS TV images SC Cosmetic Image file extension STV Endobuccal Camera ﴾for intraoral "shots"﴿. I suspect it stands for
Sony TV as Sony makes the CCD sensors﴿ but that is a guess. TMJ TemporoMandibular Joints U V WX Y Z