
KO Module Manual - Indian Entrepreneursindianentrepreneurs.org/SANGRAM LIBRARY/5 SANGRAM...
57
State Bank of India User Manual For FI Gateway KO Services .
Transcript of KO Module Manual - Indian Entrepreneursindianentrepreneurs.org/SANGRAM LIBRARY/5 SANGRAM...

State Bank of India
User Manual For
FI Gateway KO
Services
.
Contents:
1. Sub KO Creation
2. Sub KO Creation -> Create Sub KO
3.Sub KO Creation -> Authorize sub KO
4.SBI other services -> change transaction password
5.SBI other services -> change logon password
6.Money Transfer -> Menu
7.Customer Creation -> Menu
8.Customer Creation -> Customer Details
9.Finger Print Capturing Confirmation
10.Customer Creation -> Continue Customer Creation
11.Customer Creation -> Print Account Opening Form
12.Customer Creation -> SHG Creation
13.PassBook issue-> ID card generation
14.Customer Creation -> Re-upload Customer Photo
15.Customer Login ->
16.Customer Login -> Transactions -> Deposit
17.Customer Login -> Transactions -> Withdraw
18.Customer Login -> Transactions -> Balance enquiry
19.Customer Login -> Transactions -> Add Beneficiary
20.Customer Login -> Transactions -> Fund Transfer
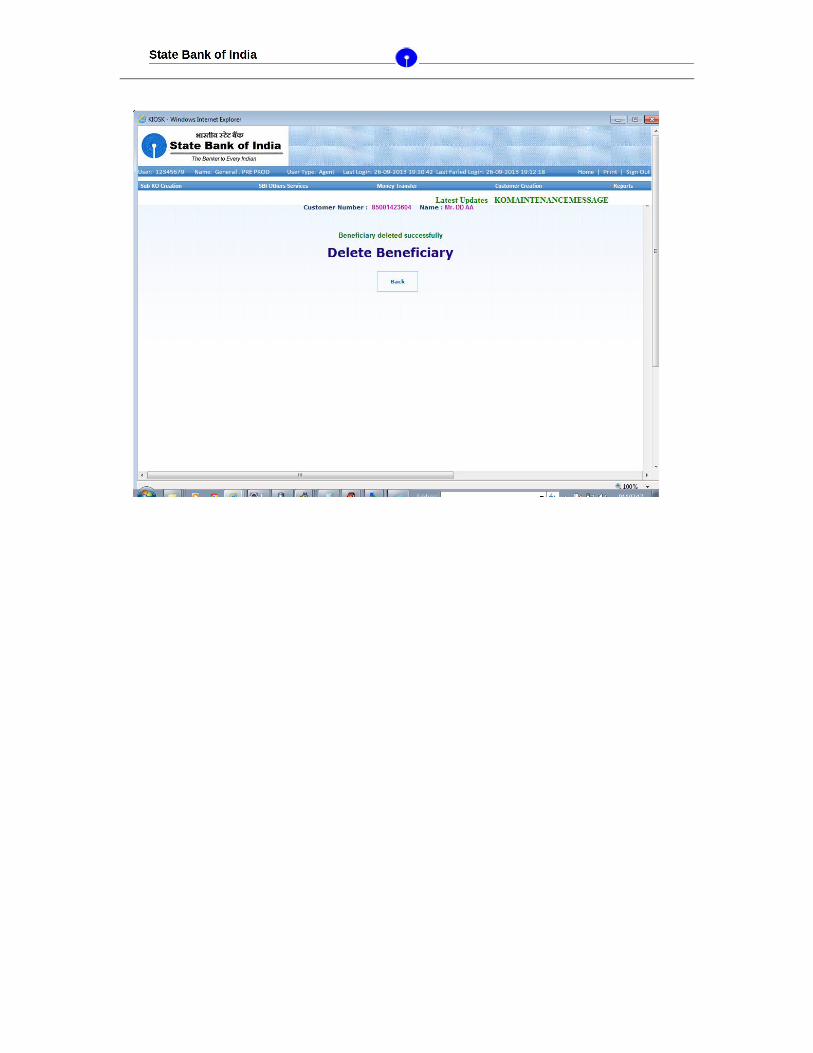
21.Customer Login -> Transactions -> Delete Beneficiary
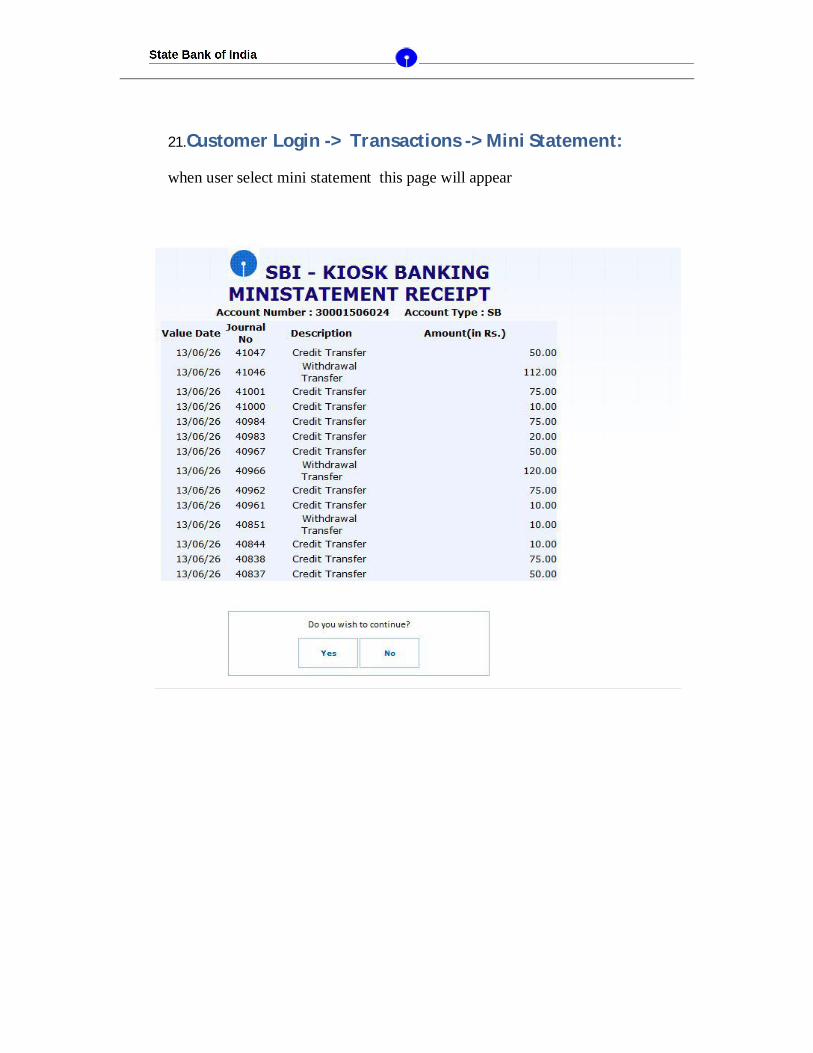
22.Customer Login -> Transactions -> Mini Statement
23.Customer Login -> Transactions -> STDR account open
24. Reports → BF Activity
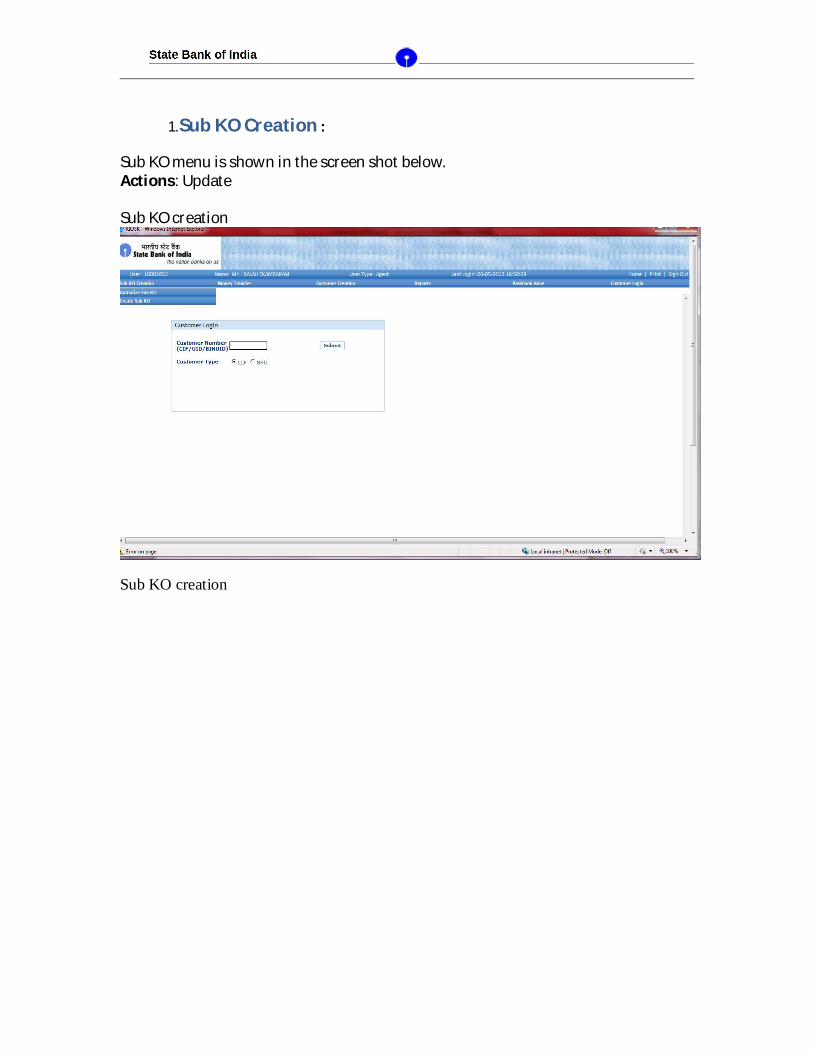
1.Sub KO Creation :
Sub KO menu is shown in the screen shot below.Actions: Update
Sub KO creation
Sub KO creation
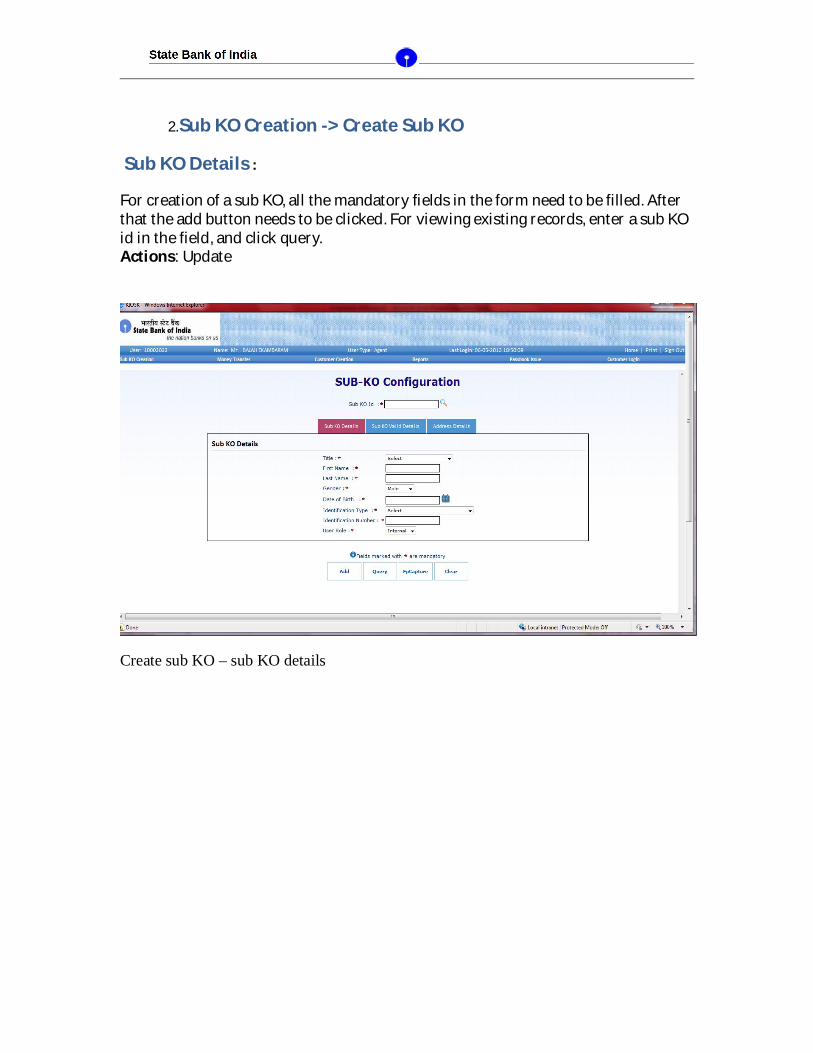
2.Sub KO Creation -> Create Sub KO
Sub KO Details :
For creation of a sub KO, all the mandatory fields in the form need to be filled. After that the add button needs to be clicked. For viewing existing records, enter a sub KO id in the field, and click query.Actions: Update
Create sub KO – sub KO details
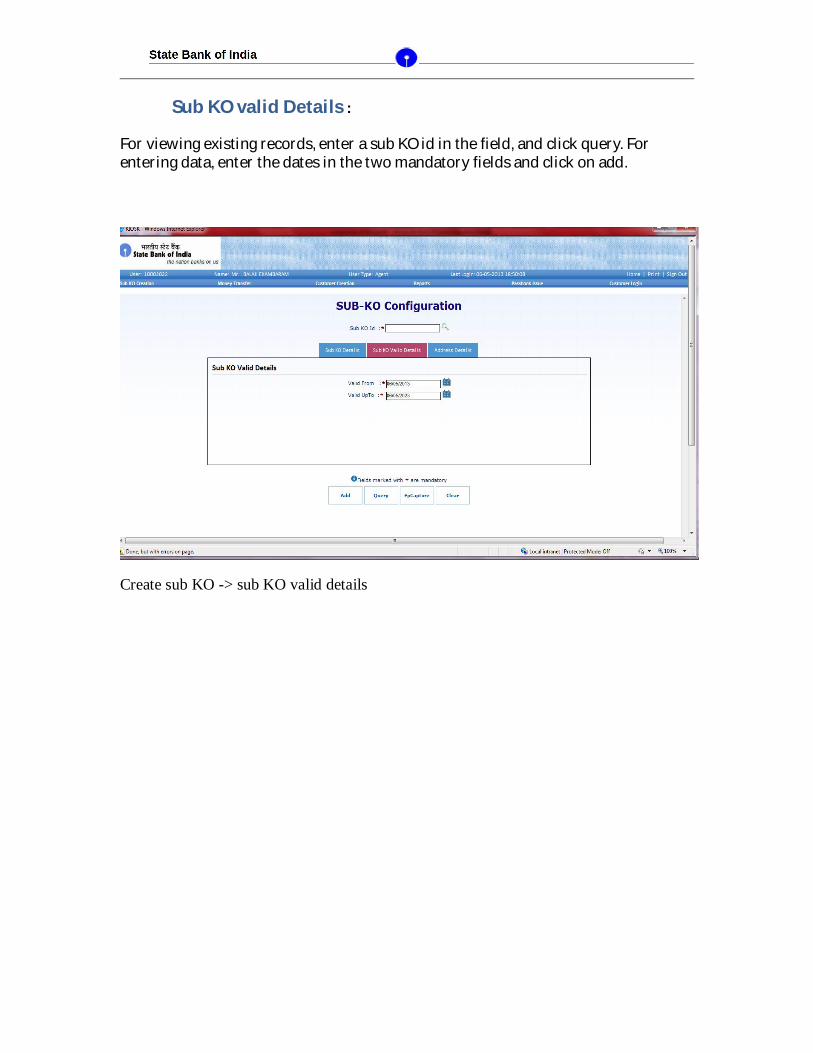
Sub KO valid Details :
For viewing existing records, enter a sub KO id in the field, and click query. For entering data, enter the dates in the two mandatory fields and click on add.
Create sub KO -> sub KO valid details
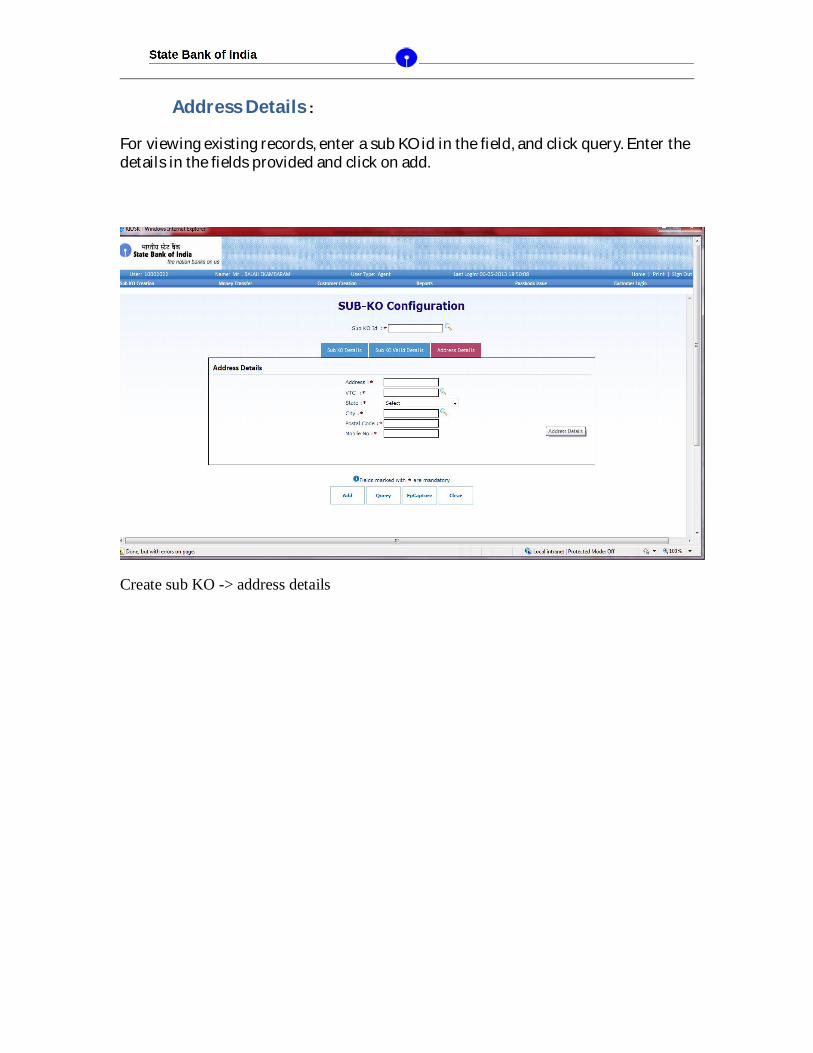
Address Details :
For viewing existing records, enter a sub KO id in the field, and click query. Enter the details in the fields provided and click on add.
Create sub KO -> address details

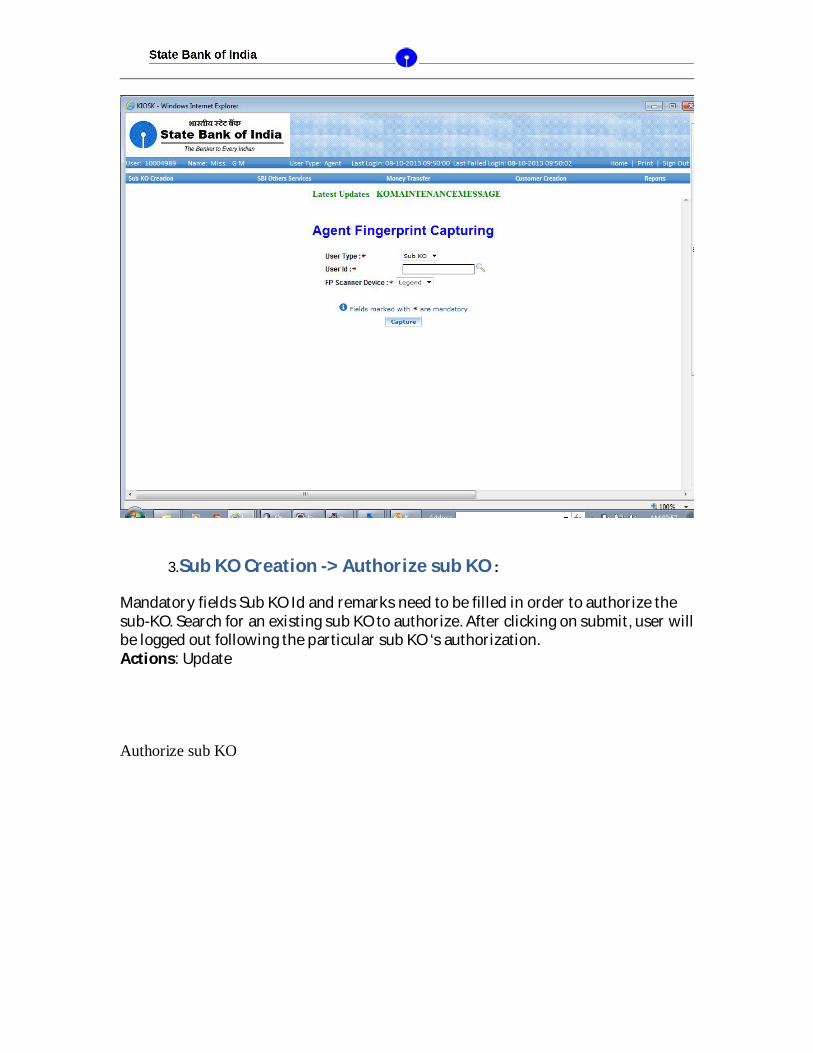
3.Sub KO Creation -> Authorize sub KO :
Mandatory fields Sub KO Id and remarks need to be filled in order to authorize the sub-KO. Search for an existing sub KO to authorize. After clicking on submit, user will be logged out following the particular sub KO ‘s authorization.Actions: Update
Authorize sub KO

4.SBI other services -> change transaction password:
The transaction change password page lets the user to enter the current pass-word and the new password (twice) in order to successfully change the pass-word.
Actions: Change password

4.SBI other services -> change logon password:
The logon change password page lets the user to enter the current password and the new password (twice) in order to successfully change the password.
Actions: Change password
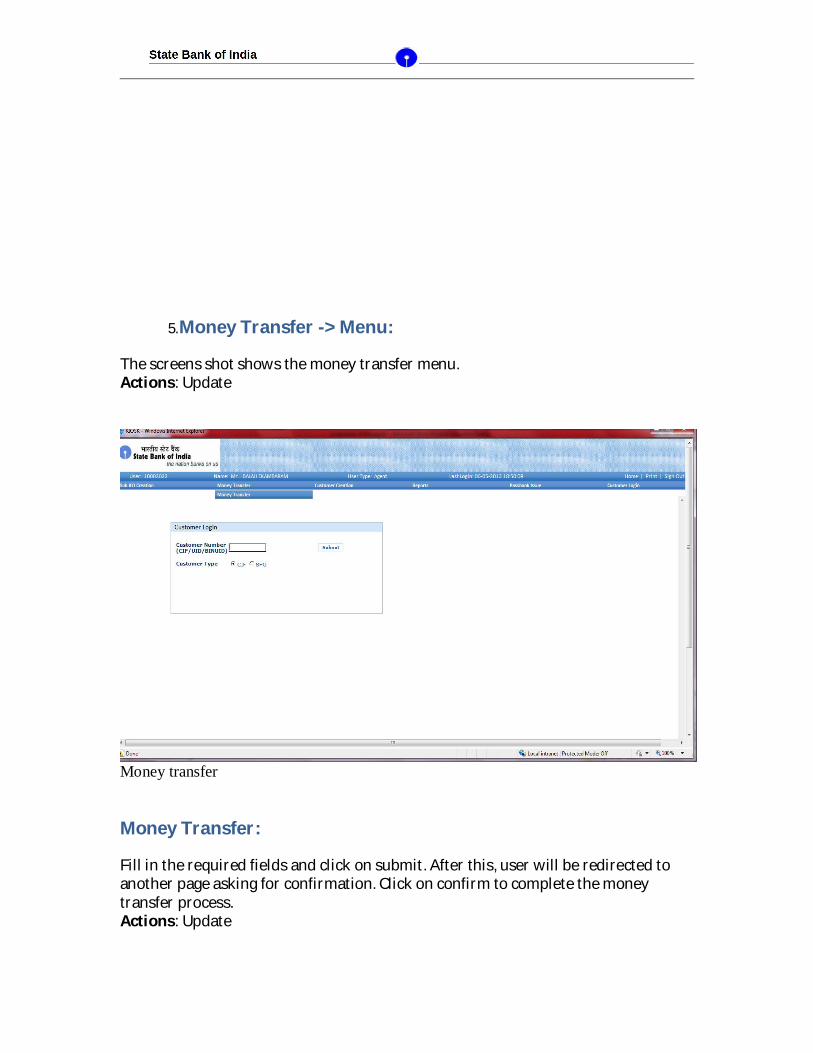
5.Money Transfer -> Menu:
The screens shot shows the money transfer menu.Actions: Update
Money transfer
Money Transfer:
Fill in the required fields and click on submit. After this, user will be redirected to another page asking for confirmation. Click on confirm to complete the money transfer process.Actions: Update
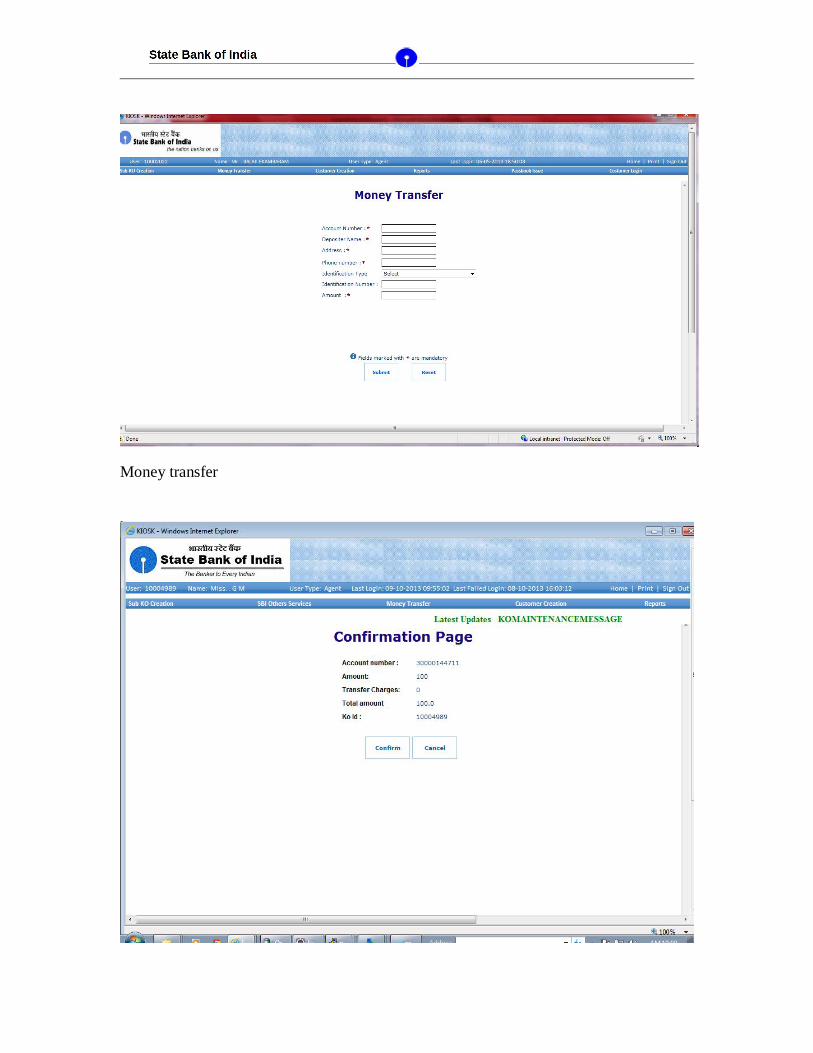
Money transfer
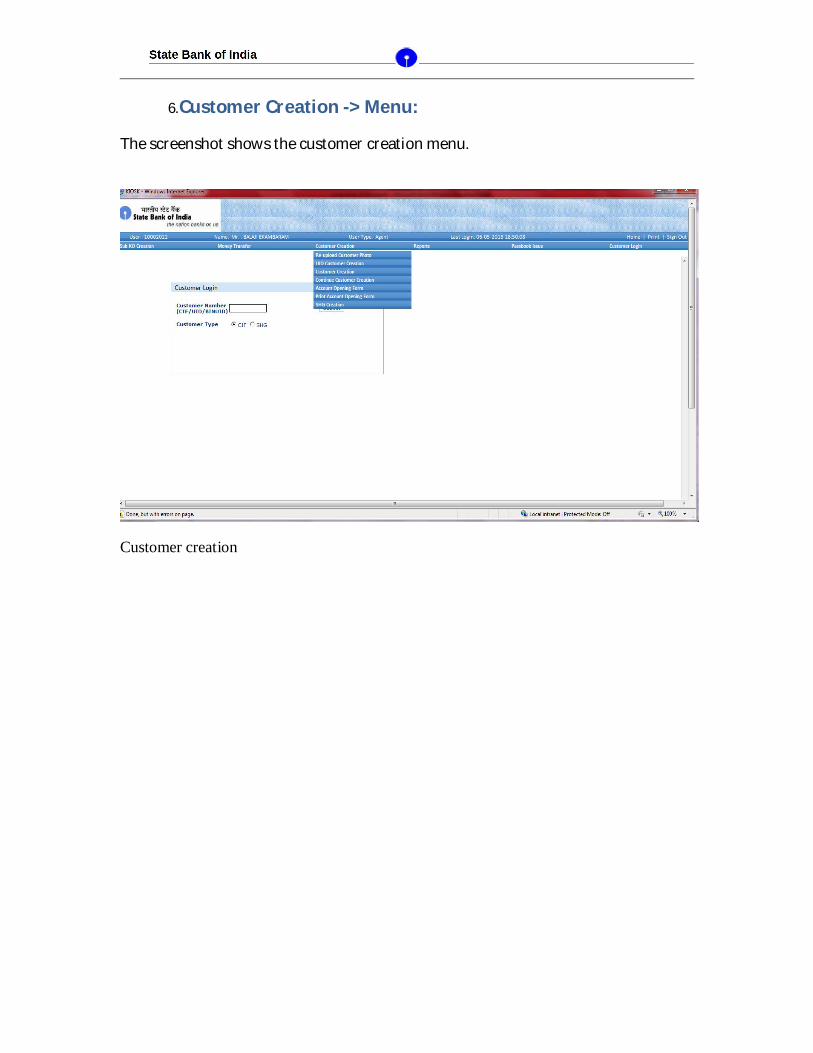
6.Customer Creation -> Menu:
The screenshot shows the customer creation menu.
Customer creation
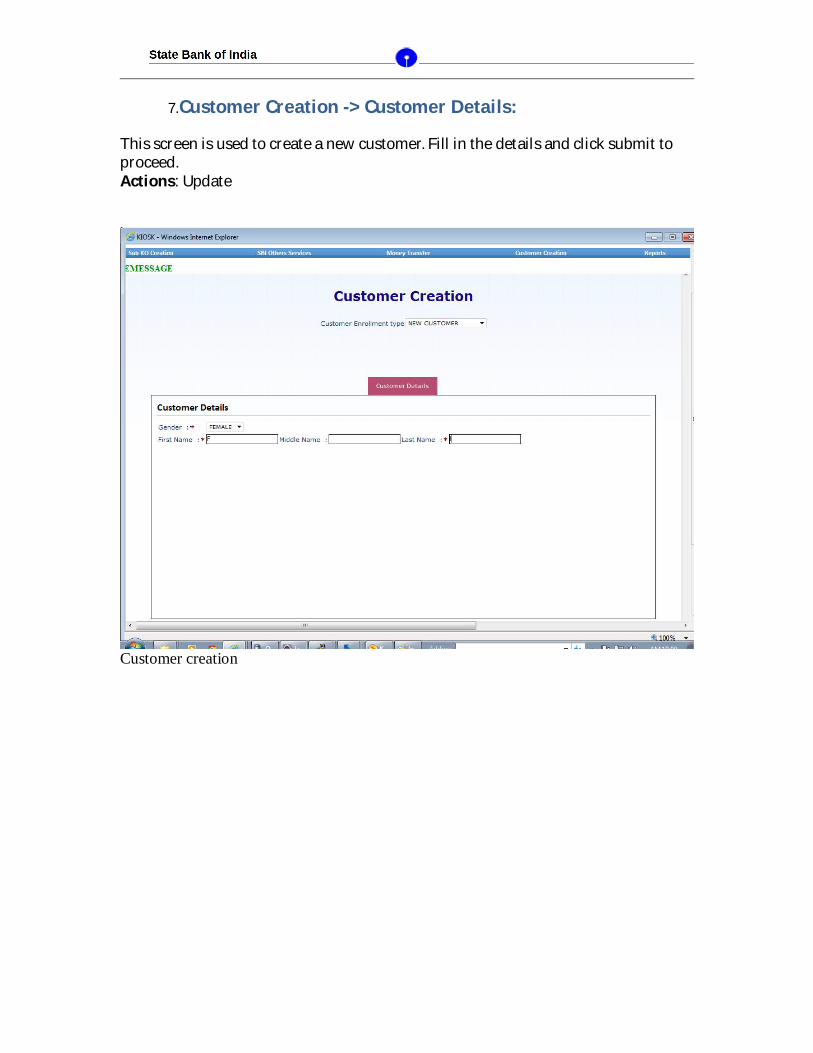
7.Customer Creation -> Customer Details:
This screen is used to create a new customer. Fill in the details and click submit to proceed.Actions: Update
Customer creation
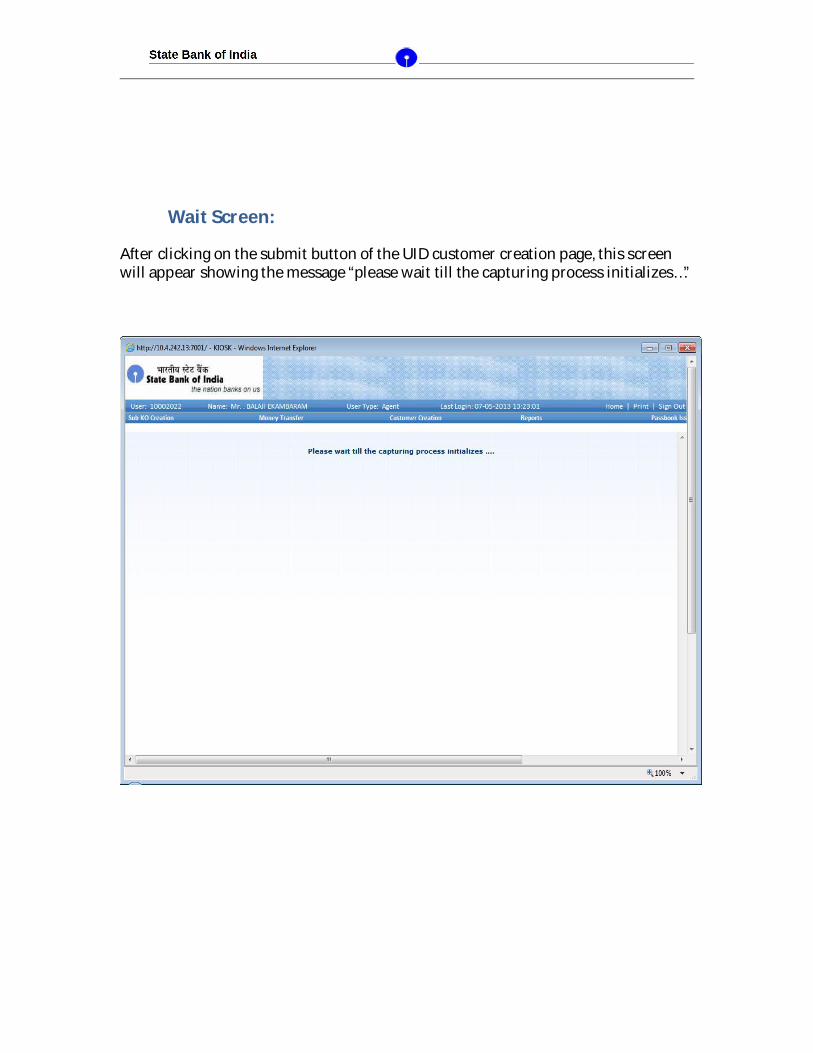
Wait Screen:
After clicking on the submit button of the UID customer creation page, this screen will appear showing the message “please wait till the capturing process initializes…”

Initializing device (fingerprint capture):
An alert box will appear showing the message “initializing device”. Click on ok to continue.
Initializing device

Finger Print Capturing Process:
Click on capture to activate the device. When the device gets activated, put and press the selected finger on the device to get the finger prints.
Finger print capturing process

Finger Print Capturing Confirmation:
There would be a “success” status against the selected finger thus informing that the finger print of that particular finger is captured. Click on continue to move ahead with the same process again.
Finger print capturing confirmation
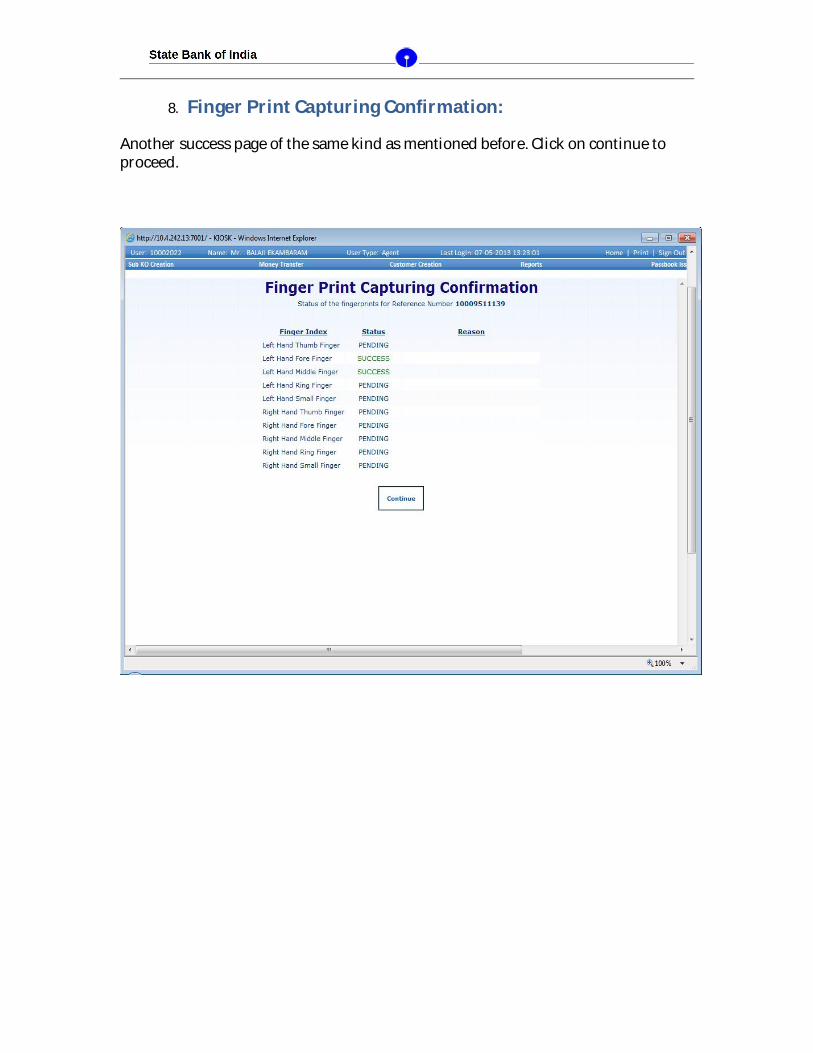
8. Finger Print Capturing Confirmation:
Another success page of the same kind as mentioned before. Click on continue to proceed.
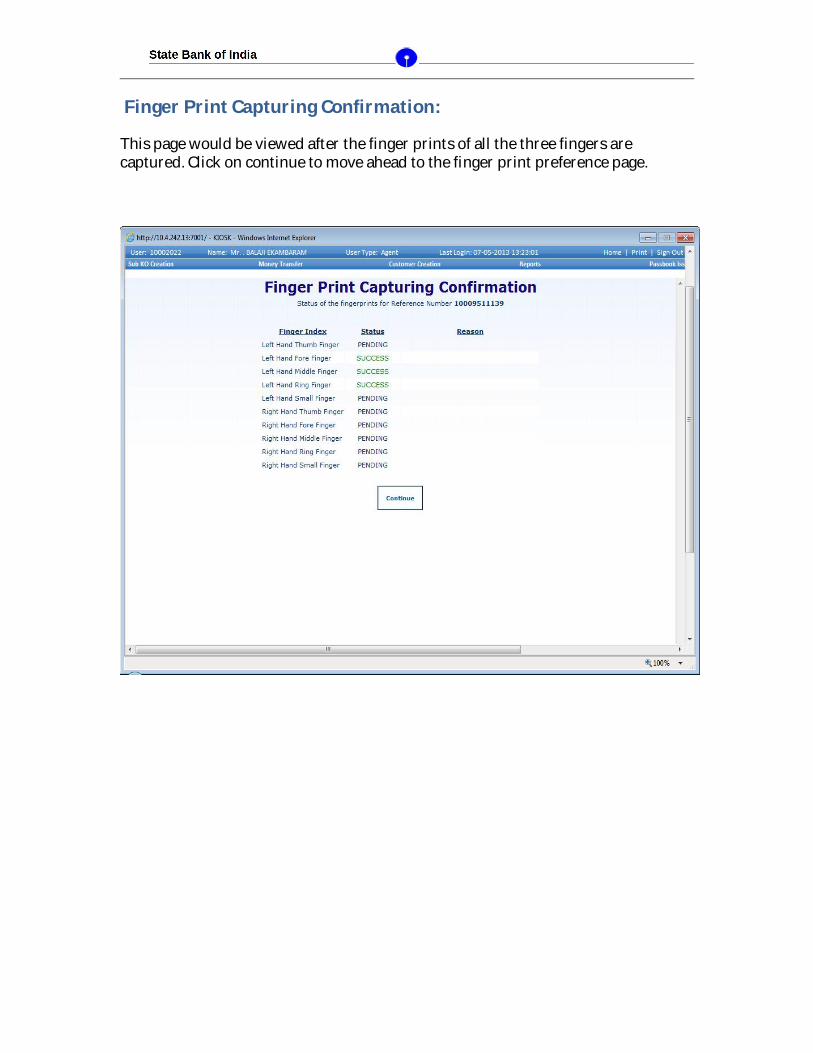
Finger Print Capturing Confirmation:
This page would be viewed after the finger prints of all the three fingers are captured. Click on continue to move ahead to the finger print preference page.
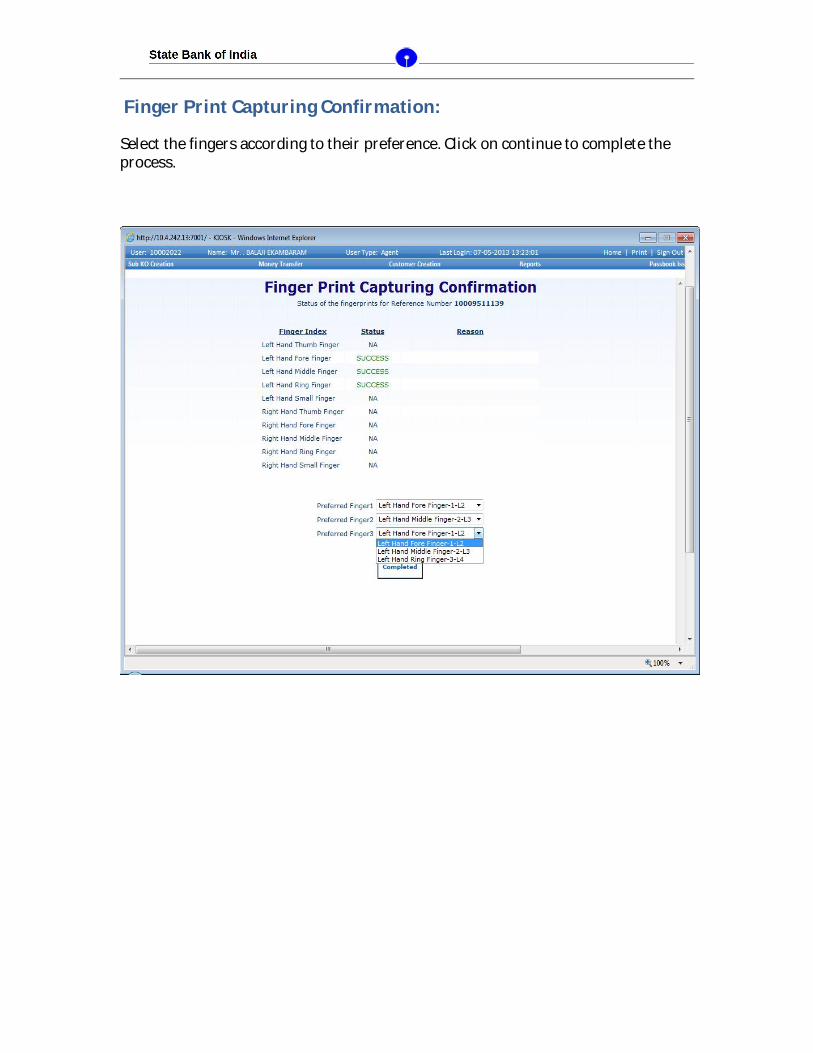
Finger Print Capturing Confirmation:
Select the fingers according to their preference. Click on continue to complete the process.
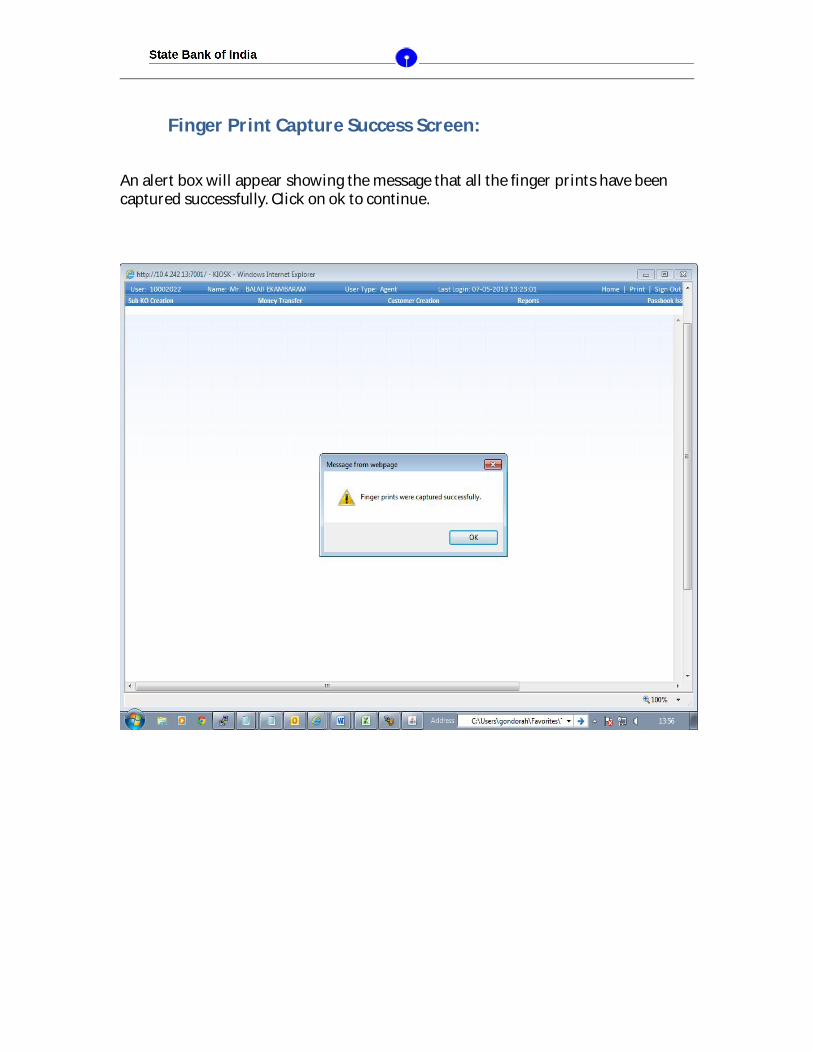
Finger Print Capture Success Screen:
An alert box will appear showing the message that all the finger prints have been captured successfully. Click on ok to continue.

Customer Details:
To continue with the rest of the customer creation process, fill in the details properly in the form that would appear as shown. After filling this up click on the other tab “Nominee details” to continue
Customer details

Nominee Details:
After clicking on the tab “nominee details” the below shown page will appear. Fill in the details and click on submit. This is meant to provide all necessary details of a nominee.
Nominee details

Other Details:ATM details
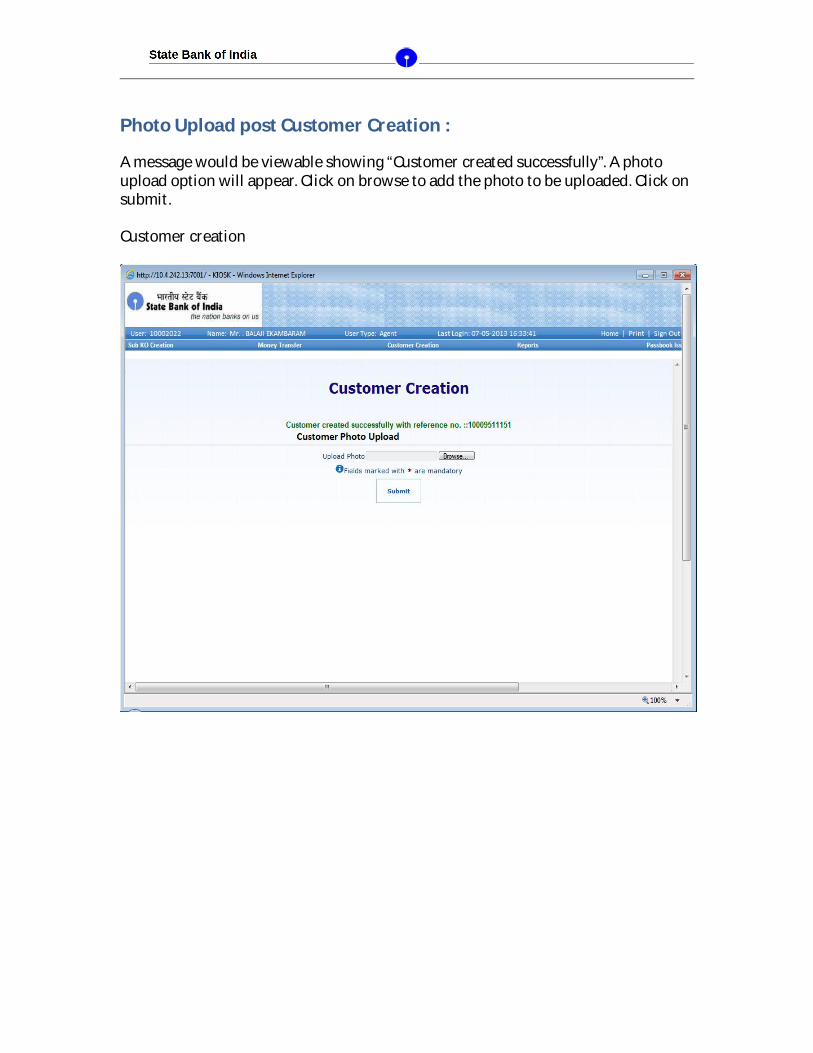
Photo Upload post Customer Creation :
A message would be viewable showing “Customer created successfully”. A photo upload option will appear. Click on browse to add the photo to be uploaded. Click on submit.
Customer creation
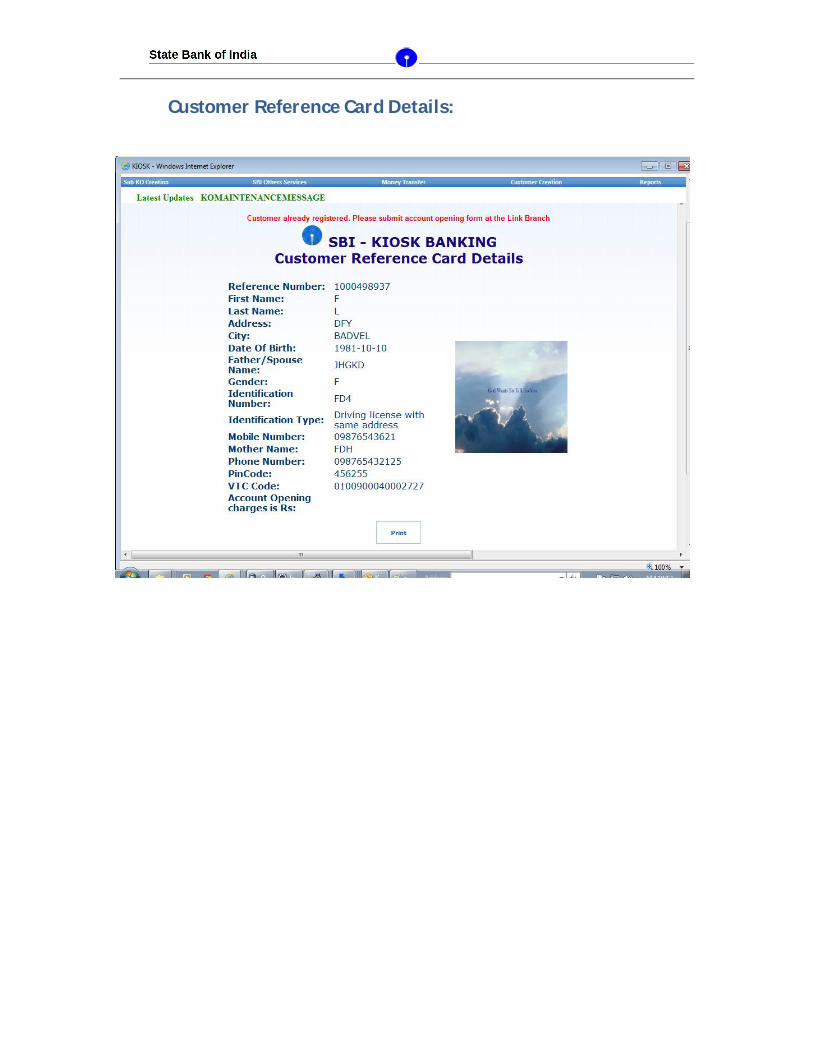
Customer Reference Card Details:
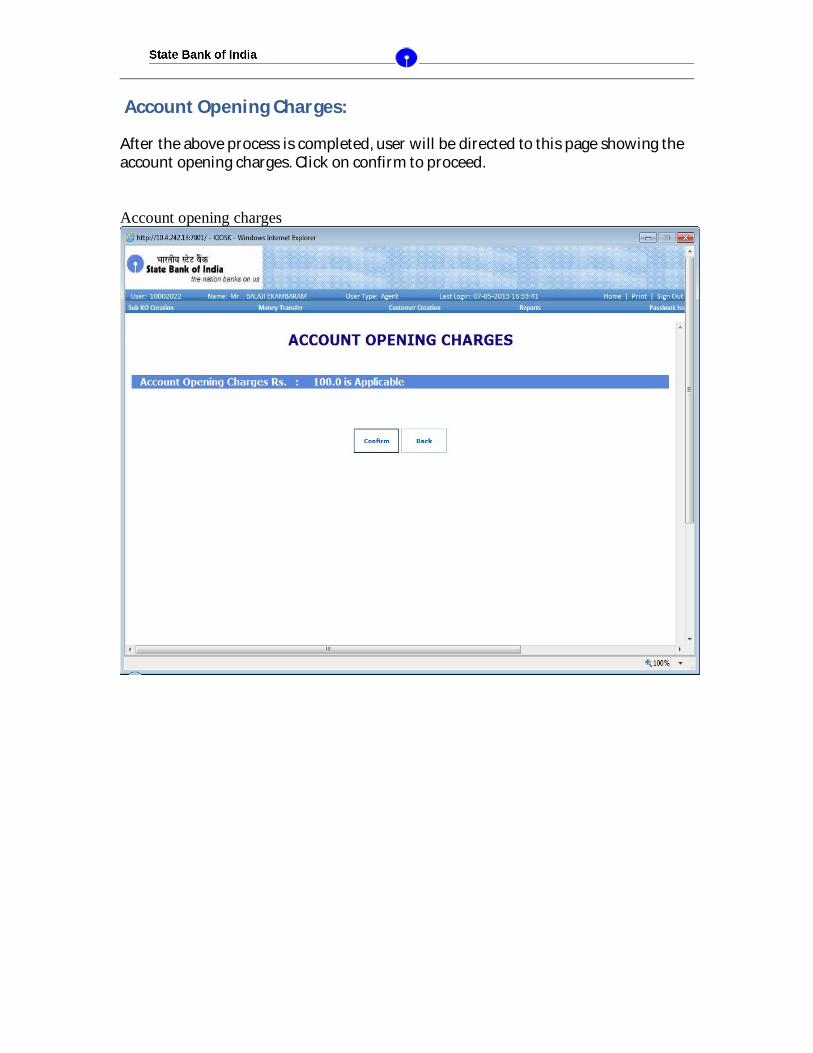
Account Opening Charges:
After the above process is completed, user will be directed to this page showing the account opening charges. Click on confirm to proceed.
Account opening charges
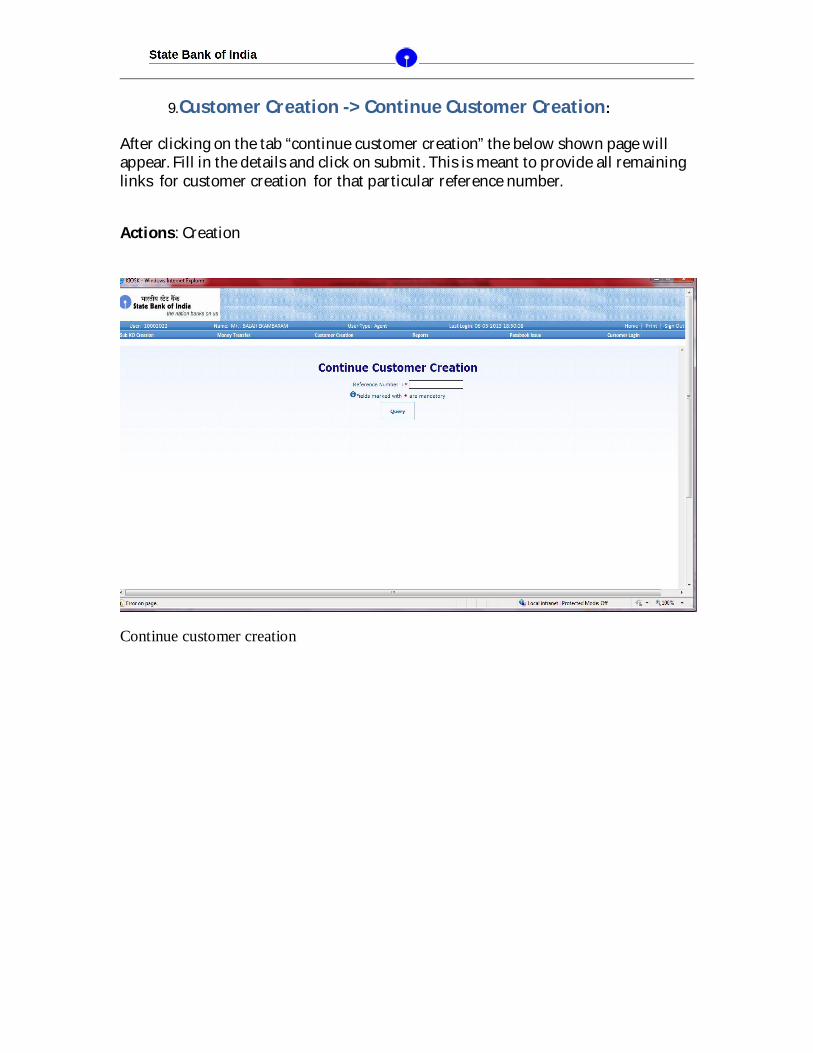
9.Customer Creation -> Continue Customer Creation:
After clicking on the tab “continue customer creation” the below shown page will appear. Fill in the details and click on submit. This is meant to provide all remaining links for customer creation for that particular reference number.
Actions: Creation
Continue customer creation

10.Customer Creation -> Print Account Opening Form :
After clicking on the tab “print account opening form” the below shown page will appear. Fill in the details and click on query. This is meant to provide account opening form of a customer.Actions: fetch
After fill reference number this page will appear:
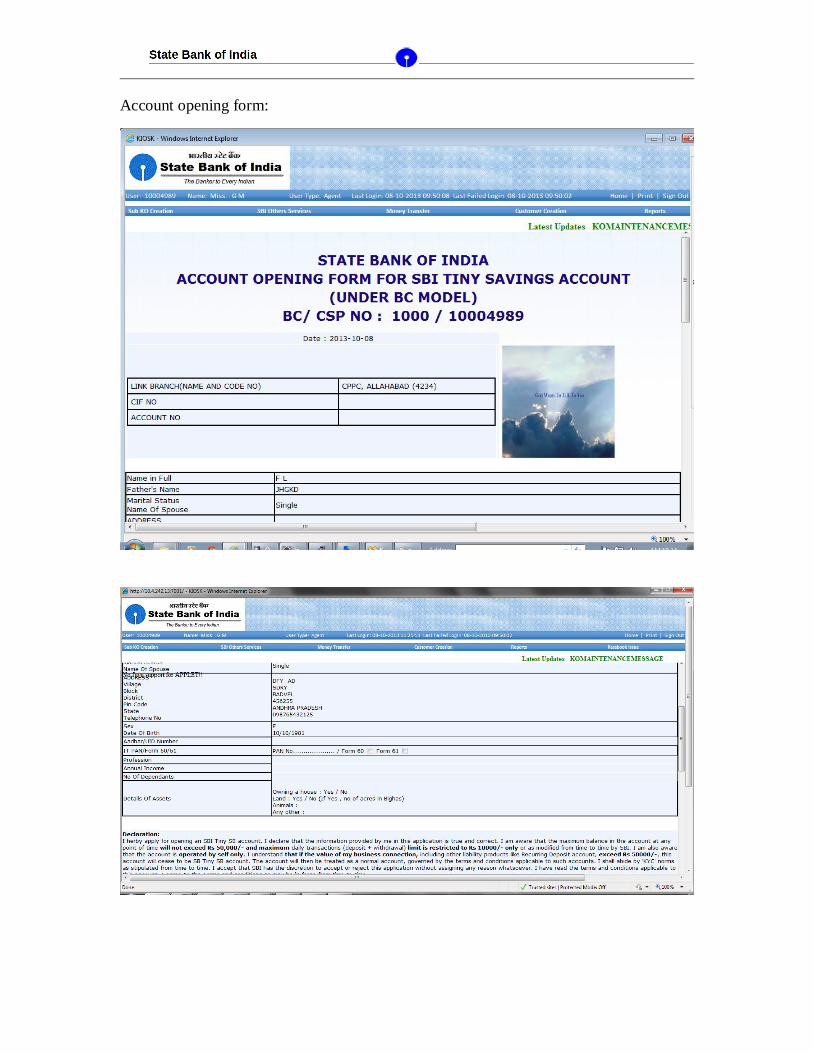
Account opening form:


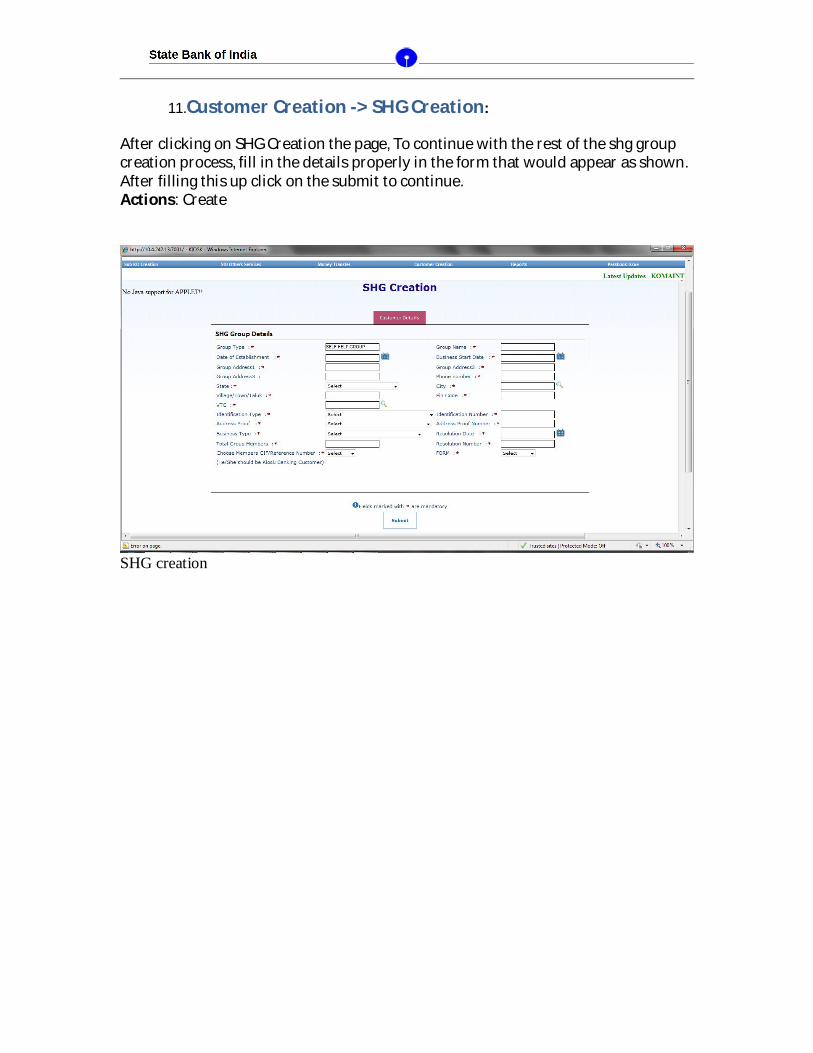
11.Customer Creation -> SHG Creation:
After clicking on SHG Creation the page, To continue with the rest of the shg group creation process, fill in the details properly in the form that would appear as shown. After filling this up click on the submit to continue.Actions: Create
SHG creation

After that customer should enter the two or three reference number for signatories and then click on submit button for completing the shg group creation.
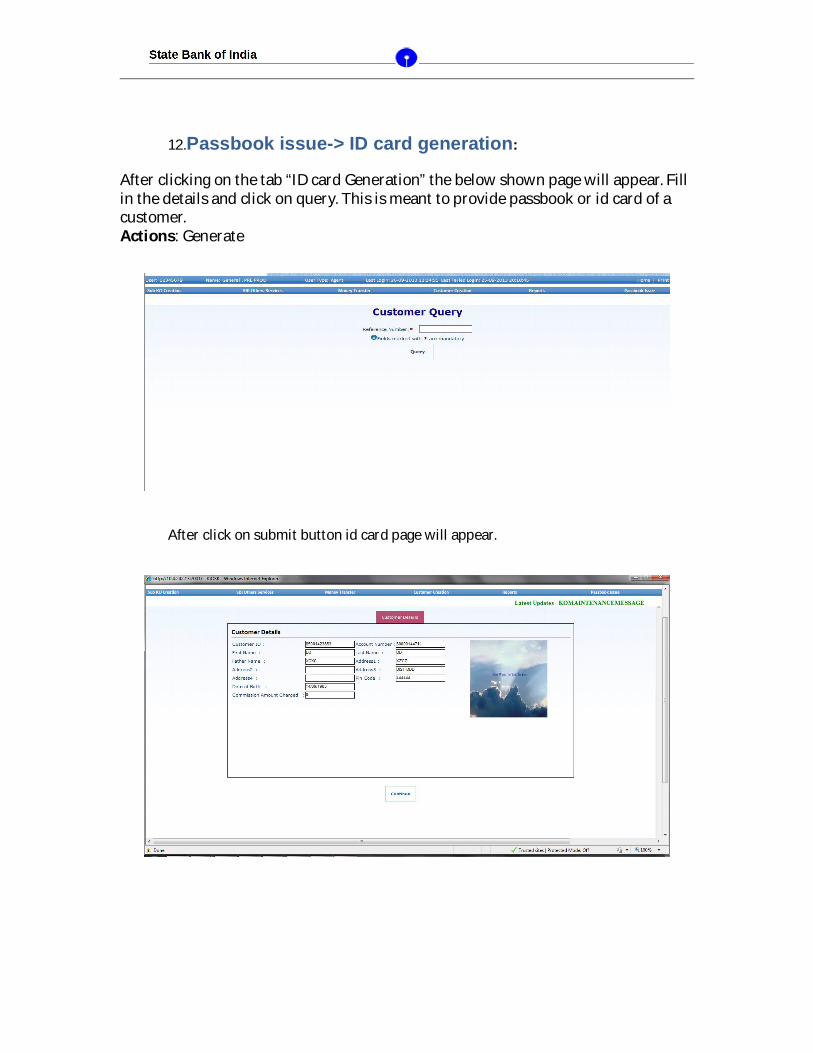
12.Passbook issue-> ID card generation:
After clicking on the tab “ID card Generation” the below shown page will appear. Fill in the details and click on query. This is meant to provide passbook or id card of a customer.Actions: Generate
After click on submit button id card page will appear.
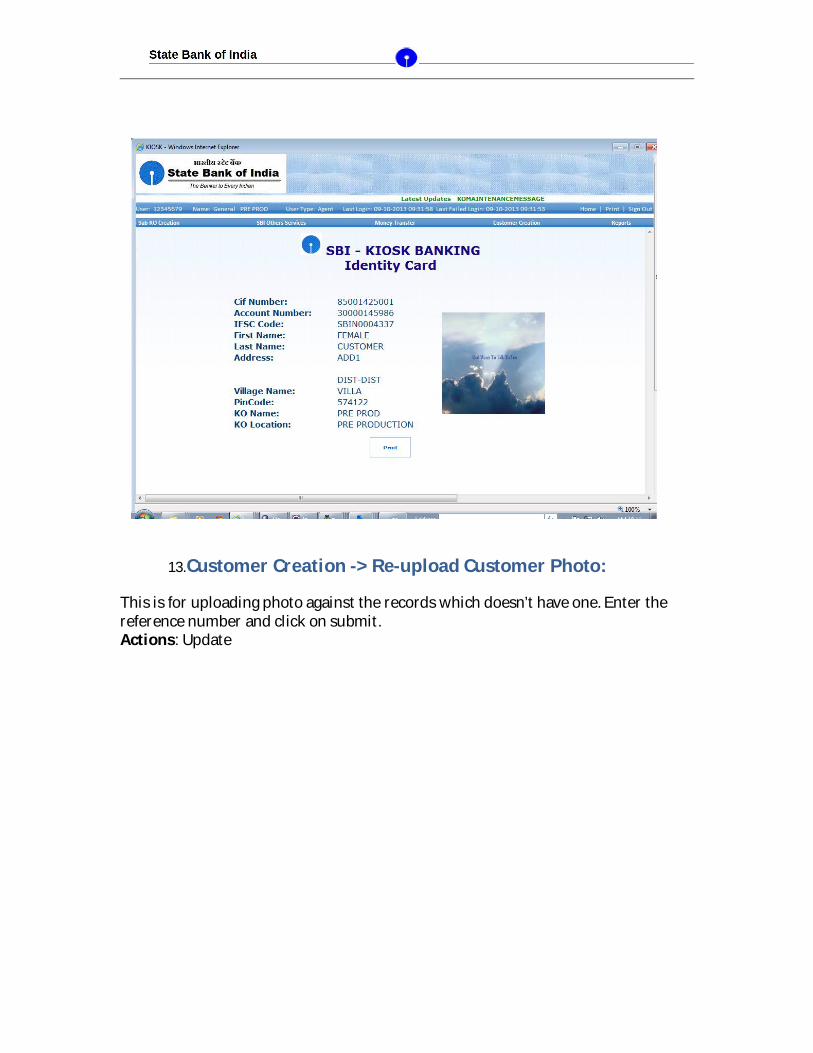
13.Customer Creation -> Re-upload Customer Photo:
This is for uploading photo against the records which doesn’t have one. Enter the reference number and click on submit.Actions: Update
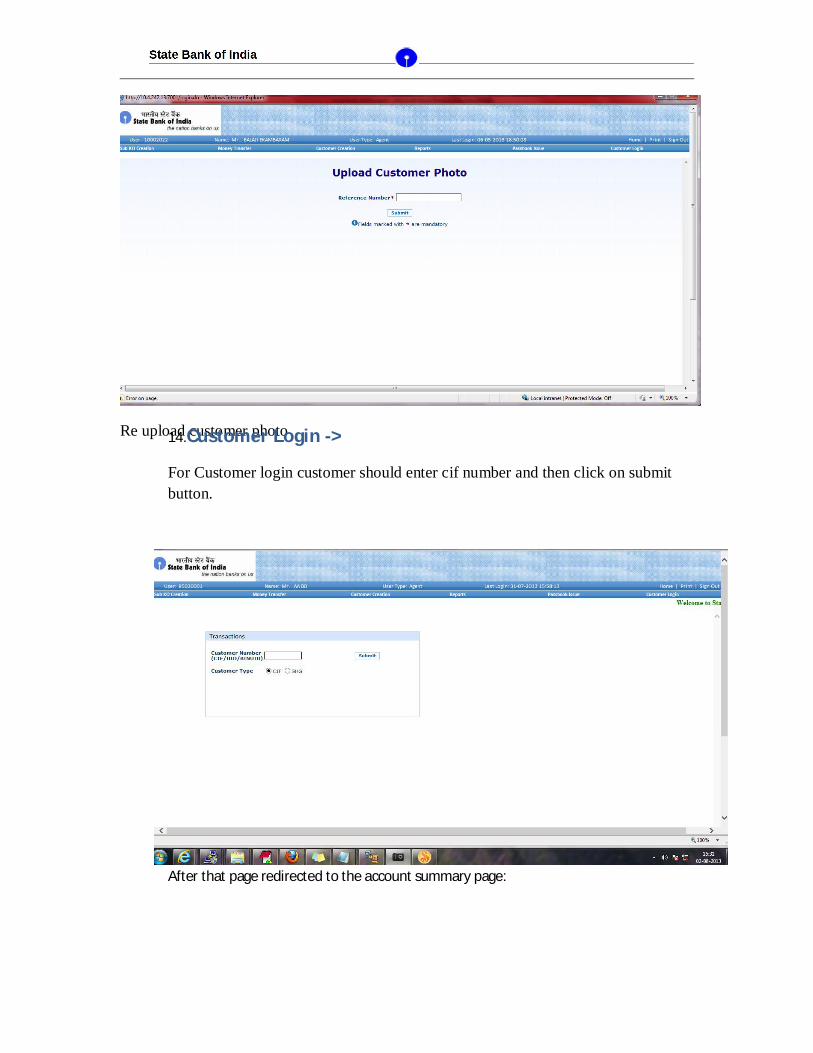
Re upload customer photo14.Customer Login ->
For Customer login customer should enter cif number and then click on submit button.
After that page redirected to the account summary page:
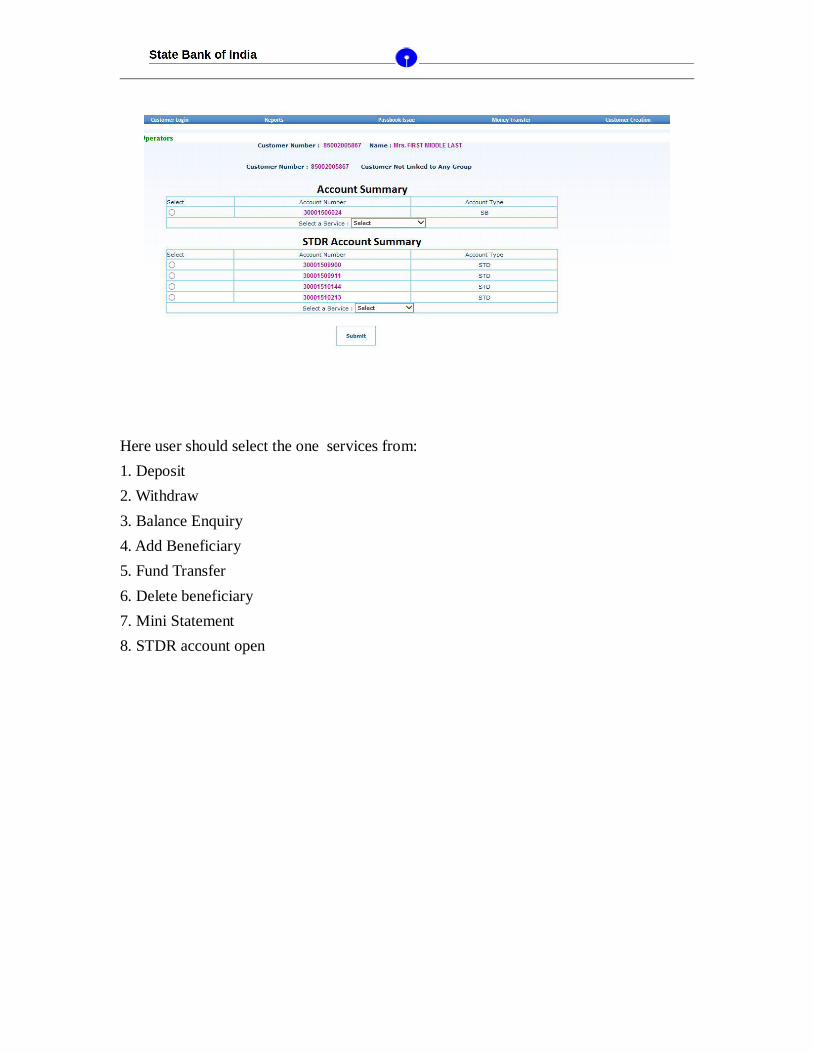
Here user should select the one services from:1. Deposit2. Withdraw3. Balance Enquiry4. Add Beneficiary5. Fund Transfer6. Delete beneficiary7. Mini Statement8. STDR account open

15.Customer Login -> Transactions -> Deposit:
Denomination screen for cash deposit
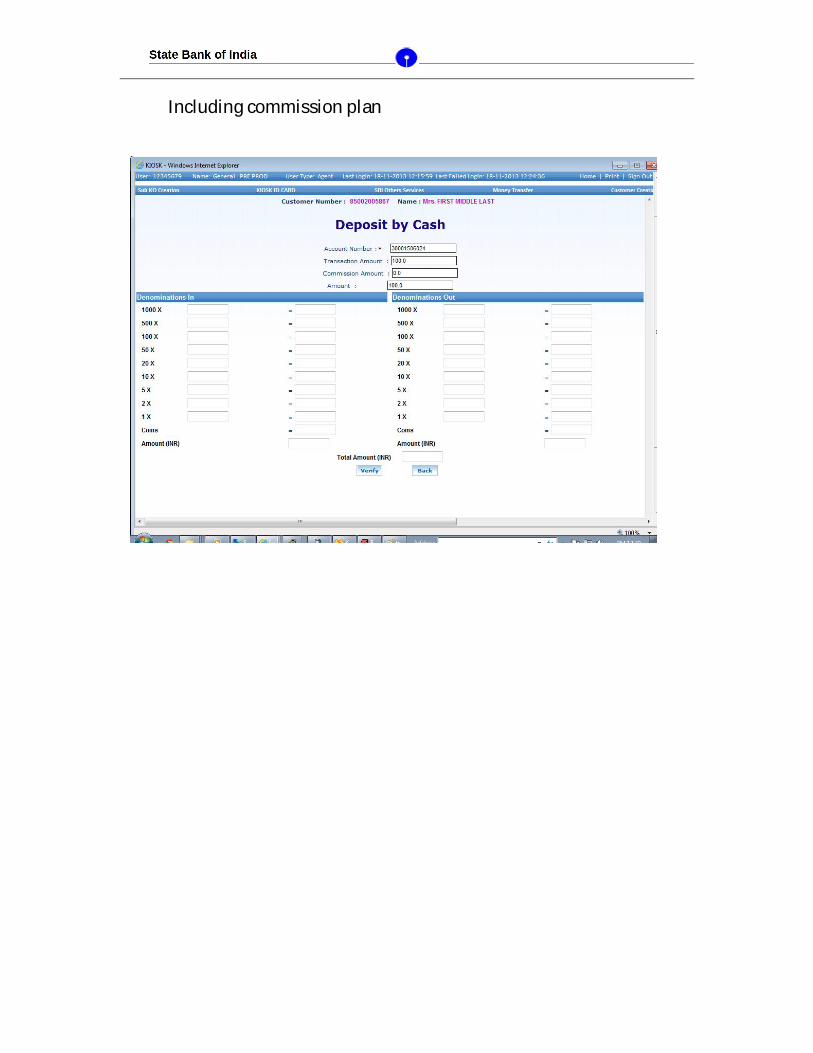
Including commission plan

Verification Page: before confirmation of deposit or any other transaction user should verify with Finger print capture again and it verify with the database.
confirmation page:
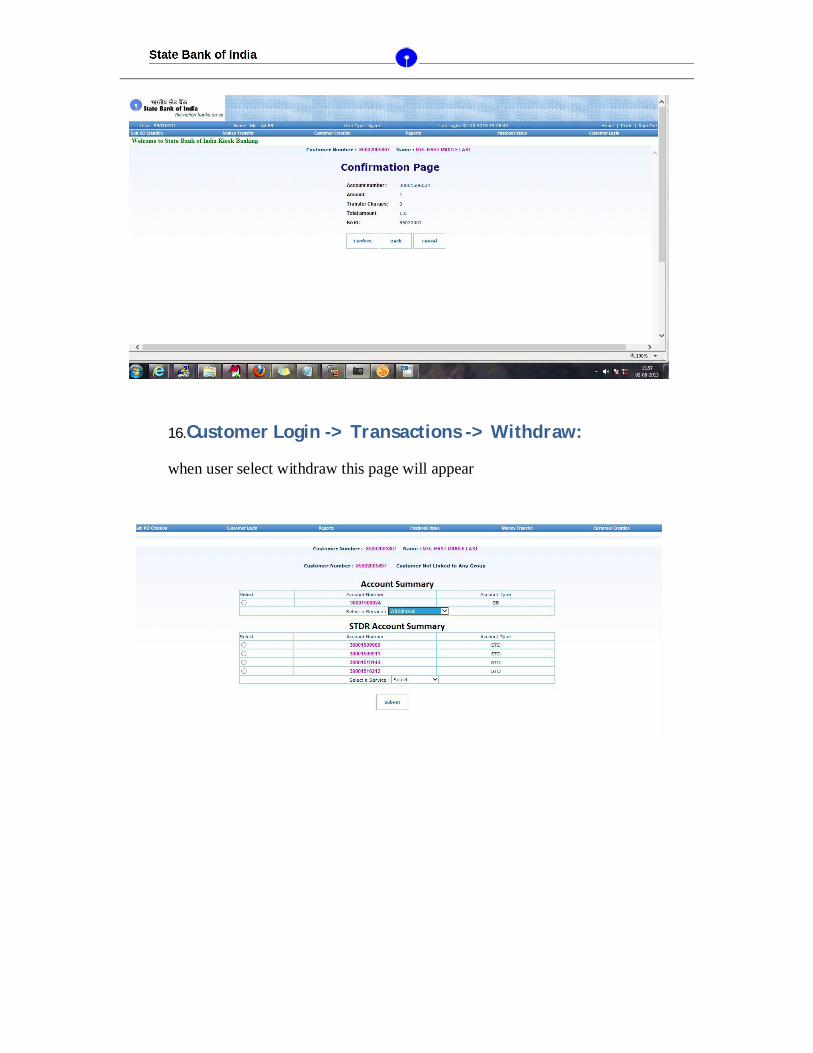
16.Customer Login -> Transactions -> Withdraw:
when user select withdraw this page will appear
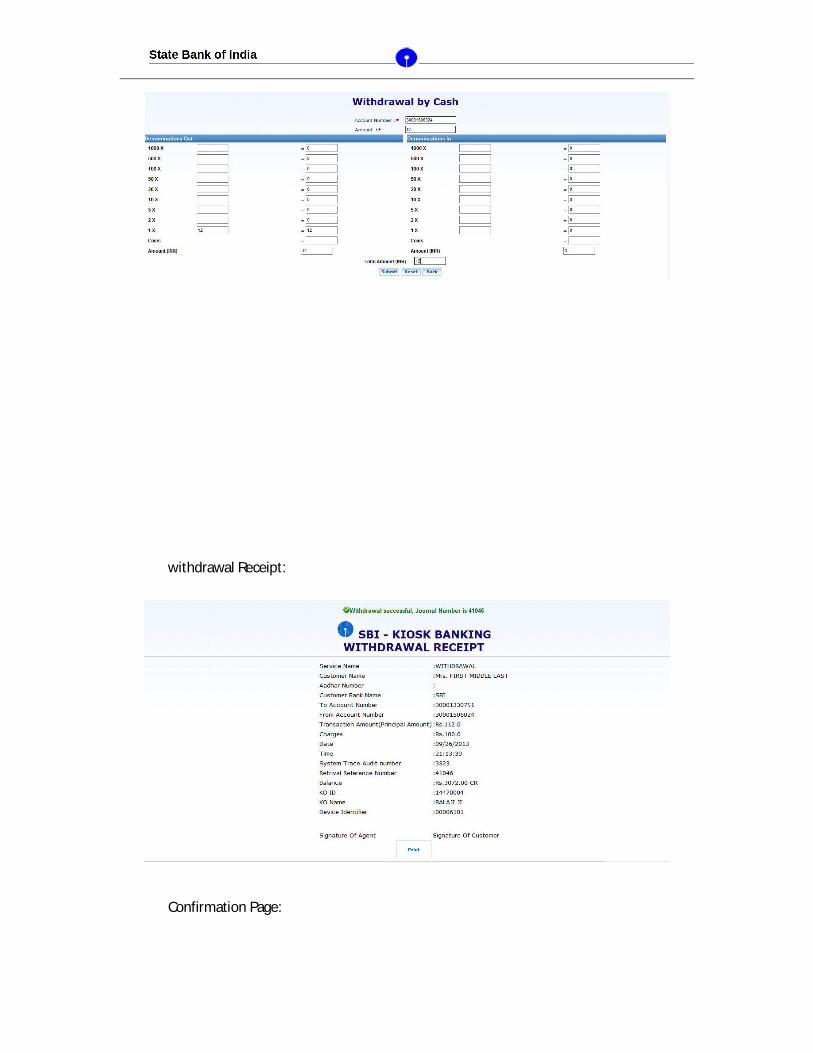
withdrawal Receipt:
Confirmation Page:
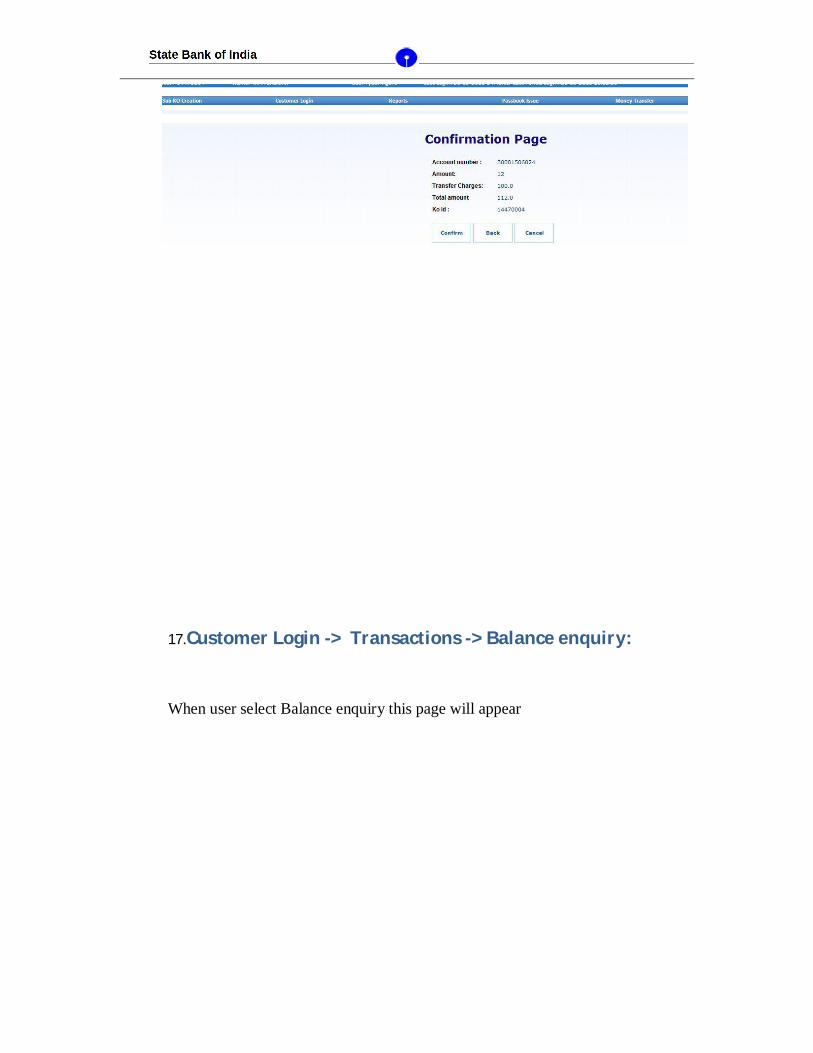
17.Customer Login -> Transactions -> Balance enquiry:
When user select Balance enquiry this page will appear
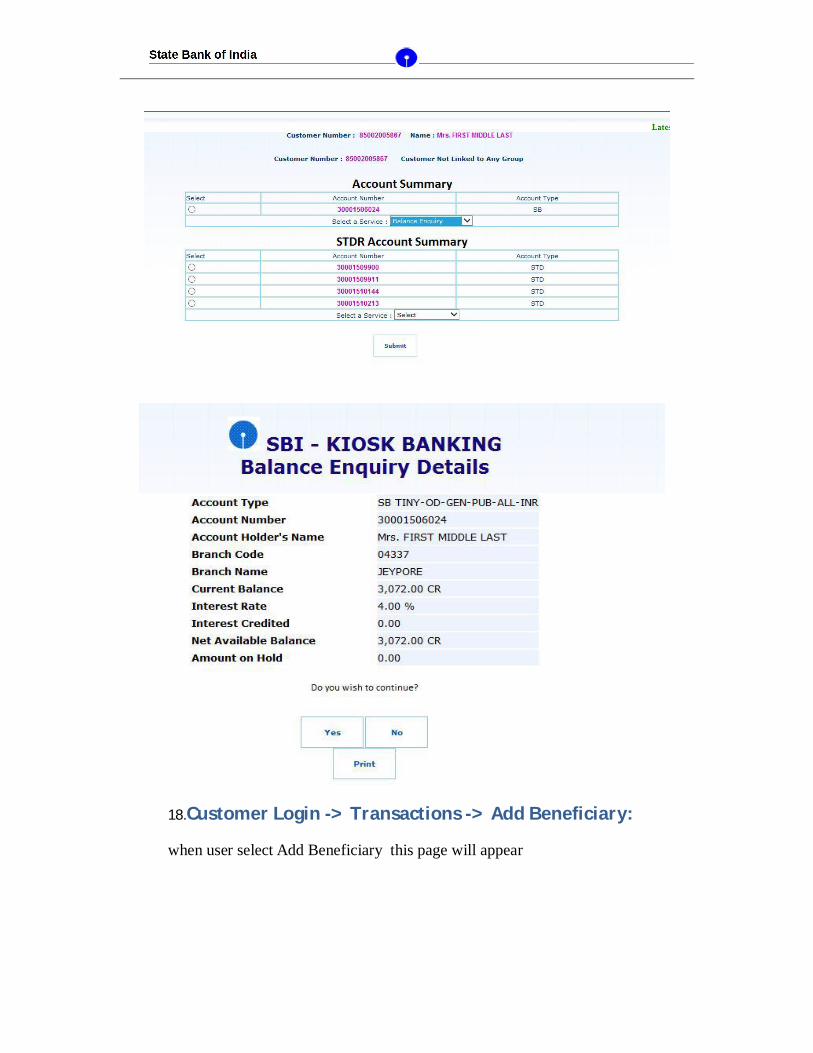
18.Customer Login -> Transactions -> Add Beneficiary:
when user select Add Beneficiary this page will appear
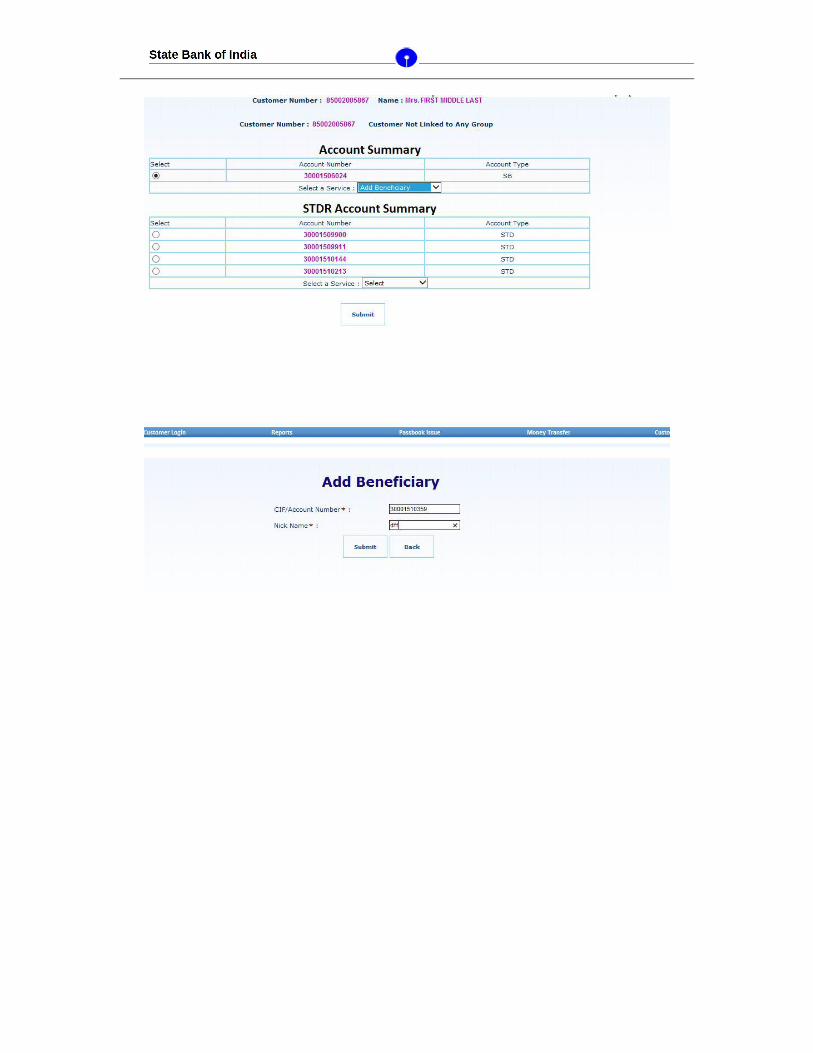
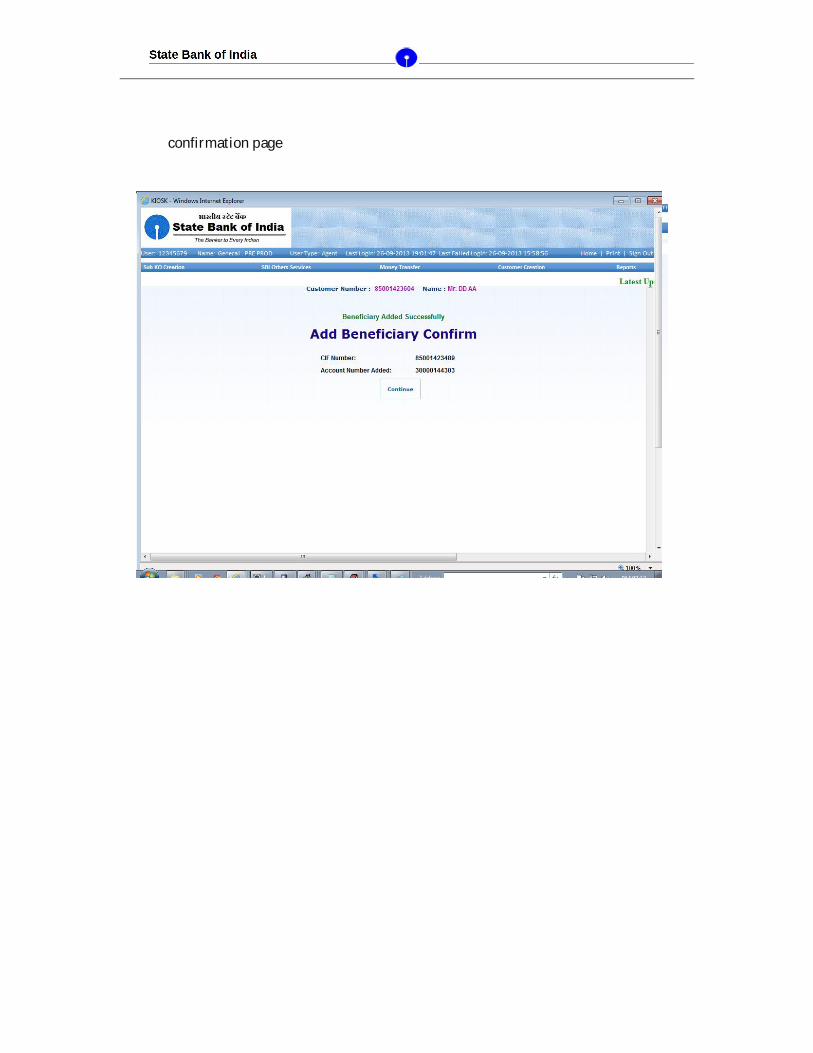
confirmation page
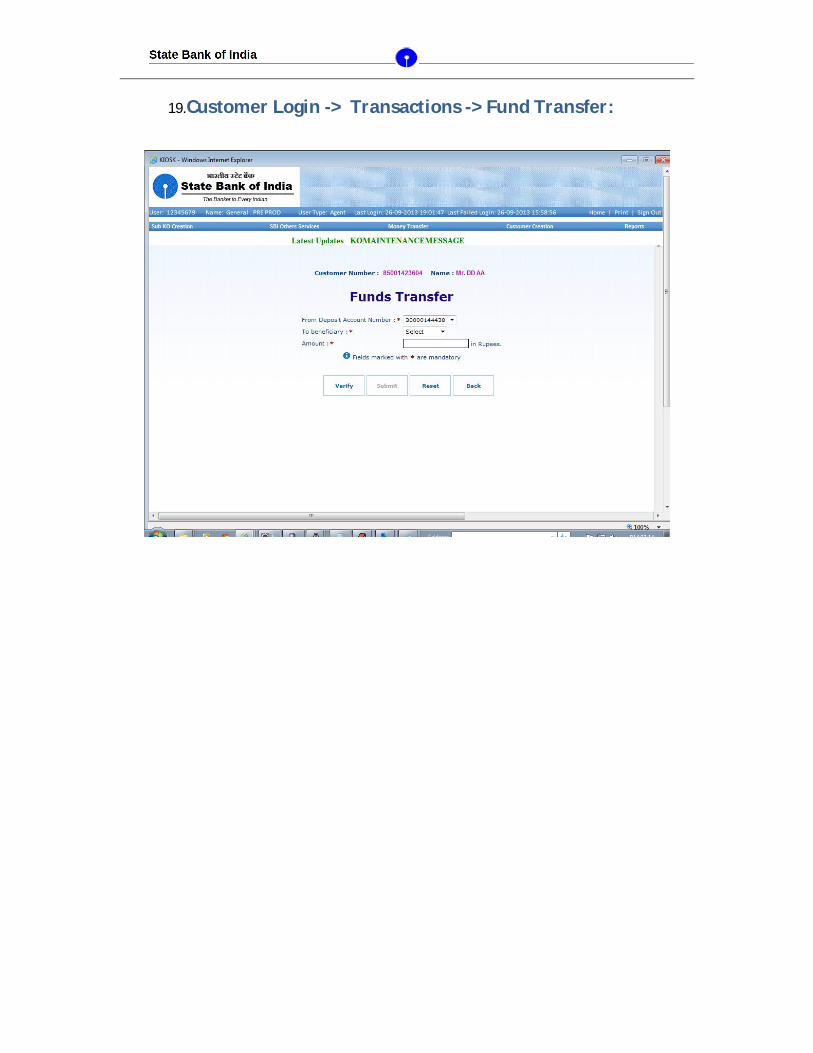
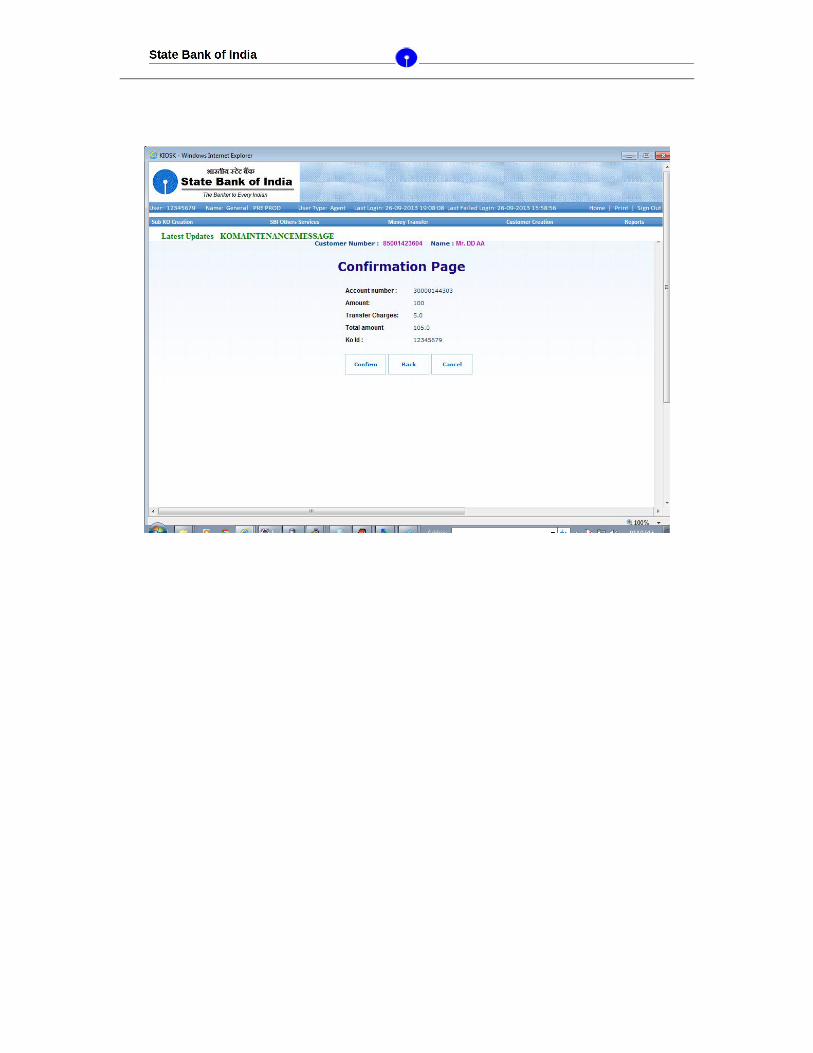
19.Customer Login -> Transactions -> Fund Transfer:
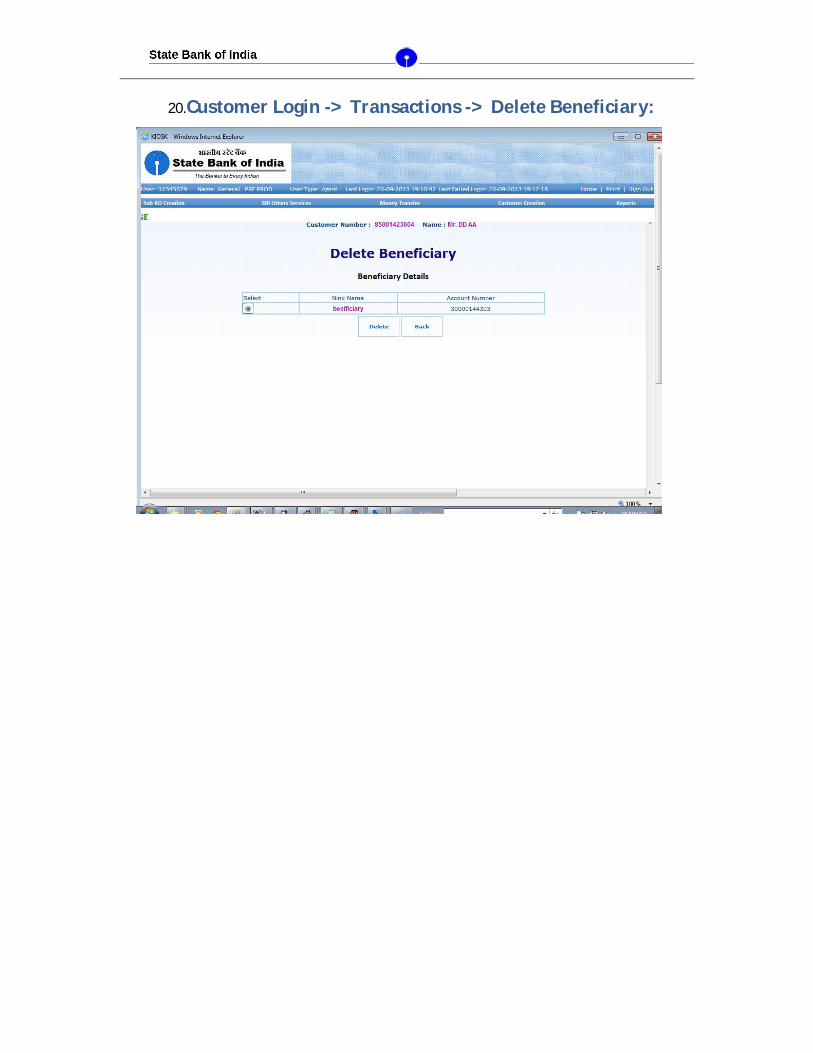
20.Customer Login -> Transactions -> Delete Beneficiary:
21.Customer Login -> Transactions -> Mini Statement:
when user select mini statement this page will appear
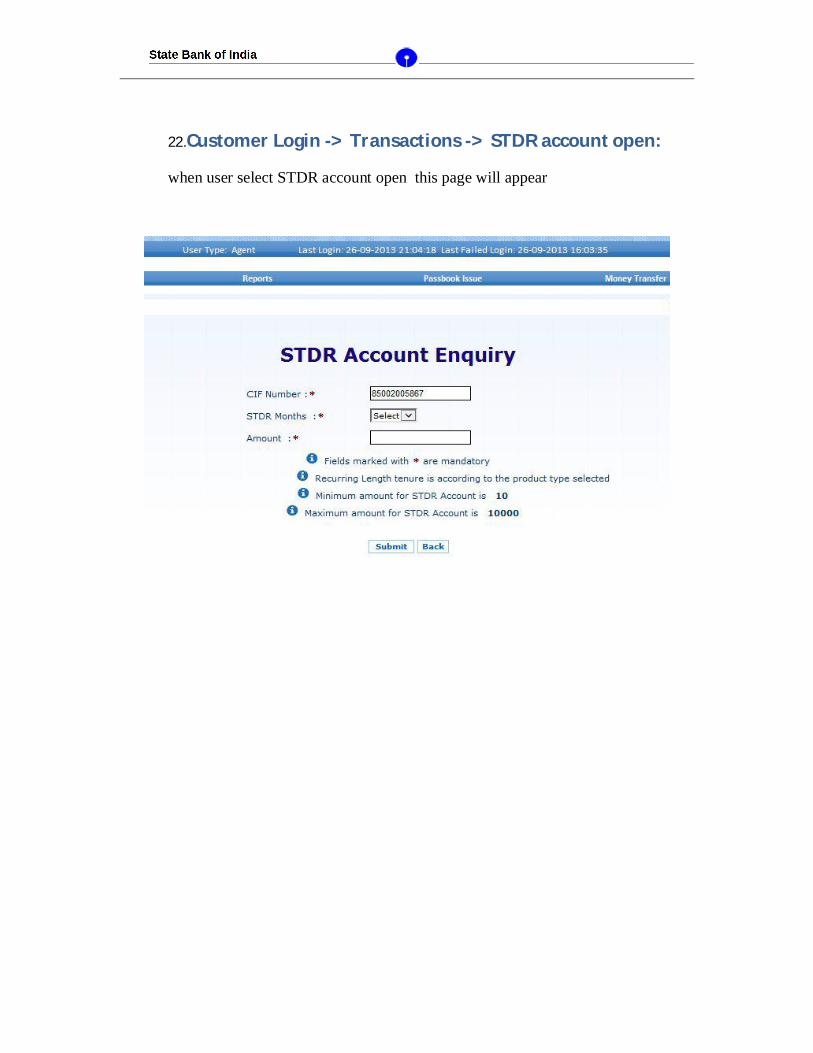
22.Customer Login -> Transactions -> STDR account open:
when user select STDR account open this page will appear
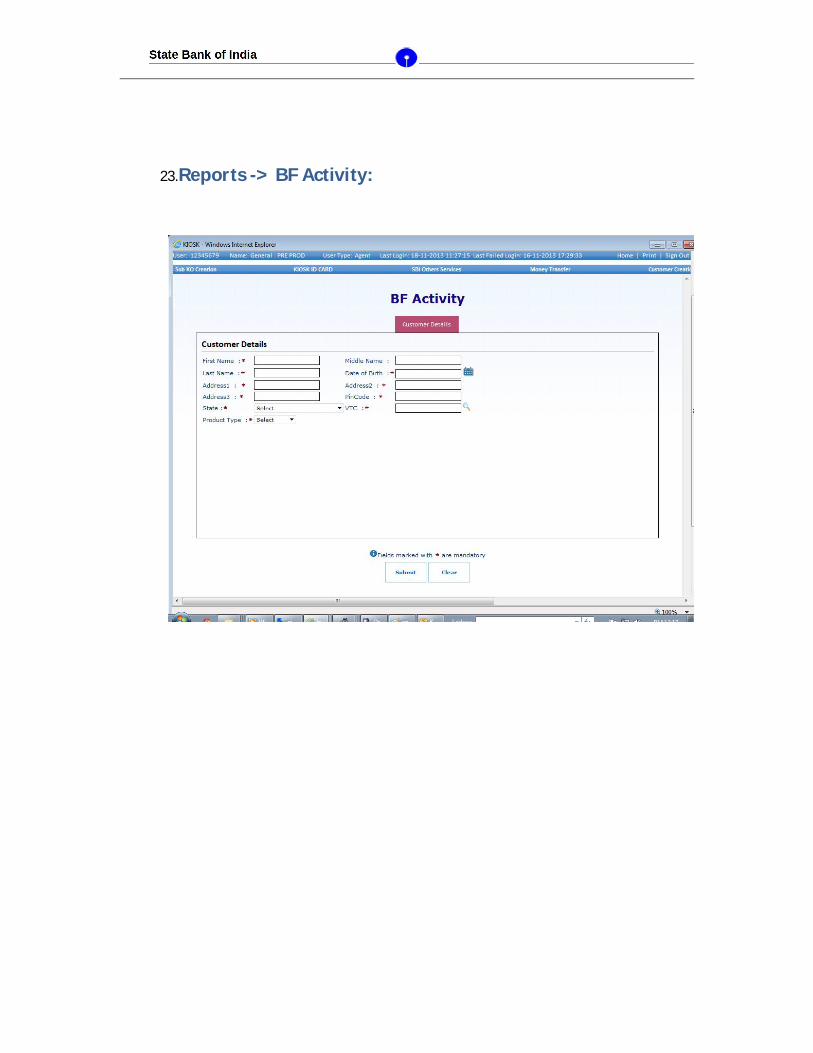
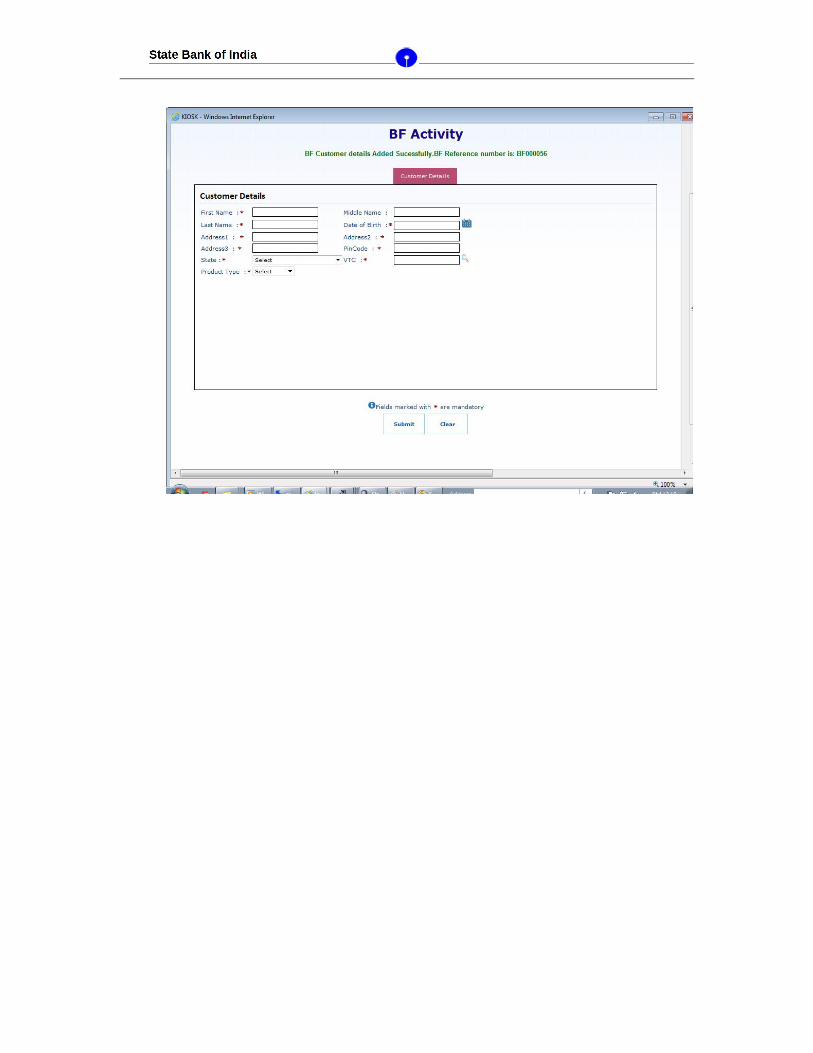
23.Reports -> BF Activity:


![Getting People Logged[IN] for Mobile](https://static.fdocuments.net/doc/165x107/55d05088bb61ebc41d8b46a2/getting-people-loggedin-for-mobile.jpg)