Knitters Trio knitting needle holder sewing pattern · Find free patterns, tutorials, how-to...
7
Knier's Trio by Karen Costello Soltys ShopMartingale.com
Transcript of Knitters Trio knitting needle holder sewing pattern · Find free patterns, tutorials, how-to...

Find free patterns, tutorials, how-to videos, weekly sales, and more at ShopMartingale.com.
Knitter's trio 1
Knitter's Trioby Karen Costello Soltys
ShopMartingale.com

Find free patterns, tutorials, how-to videos, weekly sales, and more at ShopMartingale.com.
Knitter's trio 2
Your knitting friends are sure to love this little treasure trove of knitting goodies. You can easily customize the double-pointed needle roll, circular-needle hanger, and ditty bag to reflect your friends’ favorite colors. This group is easy to complete and requires just a little fabric, so in an afternoon or two you can whip up a chic gift on a budget.
~Karen
Finished needle hanger: 1" x 24", excluding hanger3 Finished needle roll: 7½" x 8½" when opened, excluding flap 3
Finished ditty bag: 7½" x 4¾" x 1½"
Materials for the TrioYardage is based on 42"-wide fabric. Materials are
sufficient to make all three projects.
½ yard of green polka-dot fabric for needle roll and
bottom of ditty bag
ł yard of floral print for needle hanger, needle roll,
and top of ditty bag
1 fat eighth of turquoise silk for ditty-bag lining
Š to 1 yard of 20"-wide lightweight fusible interfacing
(optional)*
1 yard of 1"-wide cotton webbing for needle hanger
1 yard of Š"-wide green polka-dot grosgrain ribbon
for needle hanger
1 yard of ½"-wide green polka-dot sheer ribbon for
needle-roll tie and ditty-bag zipper pull
2 metal rings (D, O, or rectangular) with 1"-wide
opening for needle hanger
7" zipper for ditty bag
Ruler and chalk pencil
*Use interfacing if the fabrics are limp or very lightweight,
such as the floral print and silk lining fabrics shown here.
Purchase the larger amount if you will be adding interfac-
ing to the green polka-dot fabric as well.
CuttingFrom the floral print, cut:
1 strip, 3" x 27", for needle hanger
2 rectangles, 7" x 8", for needle roll
2 rectangles, 4" x 8", for ditty bag
From the green polka-dot fabric, cut:
2 rectangles, 8" x 9", for needle roll
1 rectangle, 5" x 8", for needle roll
2 rectangles, 3½" x 7½", for needle roll
1 rectangle, 5" x 8", for ditty bag
From the turquoise silk fabric, cut:
1 rectangle, 8" x 11½"
From the fusible interfacing, cut:
2 rectangles, 6½" x 7½", for floral print in needle roll
2 rectangles, 3½" x 7½", for floral print in ditty bag
1 rectangle, 8" x 11½", for silk lining in ditty bag
© 2011 by Martingale
Bonus project from Sew the Perfect Gift: 25 Handmade Projects from Top Designers
19021 120th Ave. NE, Ste. 102Bothell, WA 98011 USA
800.426.3126
www.ShopMartingale.com
Register at ShopMartingale.com to get a free subscription to the Stitch This! blog. You'll get free patterns, tutorials,
how-to videos, giveaways, and the first word on sales.

Find free patterns, tutorials, how-to videos, weekly sales, and more at ShopMartingale.com.
Knitter's trio 3
Making the Circular-Needle HangerInterfacing is not needed for this project, since the cotton
webbing will stabilize the hanger.
1. Press under ¼" along one long edge of the 3" x 27"
floral-print strip.
2. Trim the cotton webbing so that it is 1" shorter than the
floral strip (26").
3. Lay the floral strip, right side down, on your worktable.
Lay the cotton webbing on top of the floral strip, plac-
ing the webbing ½" from the top edge of the fabric.
Wrap the fabric around to the center of the webbing,
covering the raw edge of the fabric with the pressed-
under edge. Pin in place. Machine stitch along the
length of the covered webbing to secure the fabric. ①4. Slip one end of the covered webbing through a metal
ring. Fold under the unsewn end, and then fold again
to hide the raw edges. Machine stitch across all
layers to secure. ②
5. Slip one end of the 36" length of Š"-wide ribbon
through the ring in the same manner. Stitch in place
through all layers over the previous stitching. The rest
of the ribbon is hanging free at this point.
6. To make the loops or openings for needle storage,
place a spacer, such as a thick piece of cardboard,
wooden ruler, or stack of small Post-it notes, between
the ribbon and the webbing. (Karen used the second
metal ring as a spacer.) Using a zipper foot, stitch the
ribbon to the webbing, sewing close to the spacer.
Remove the spacer, slip it between the loose end of
the ribbon and the webbing, and repeat. Continue in
this manner until you have made at least 15 openings
to hold needles. ③7. When you’ve finished sewing ribbon loops, insert the
unfinished end of the webbing and ribbon through the
second metal ring and stitch in place as for the top
end of the hanger. If you have a lot of leftover web-
bing, you can trim it before stitching the bottom ring.
8. If desired, use the leftover ribbon to tie a bow at the
top of the hanger.
¼"
½"➊
➋
Stitch close to spacer.
➌
Find free patterns, tutorials, how-to videos, weekly sales, and more at ShopMartingale.com.
Knitter's trio 4
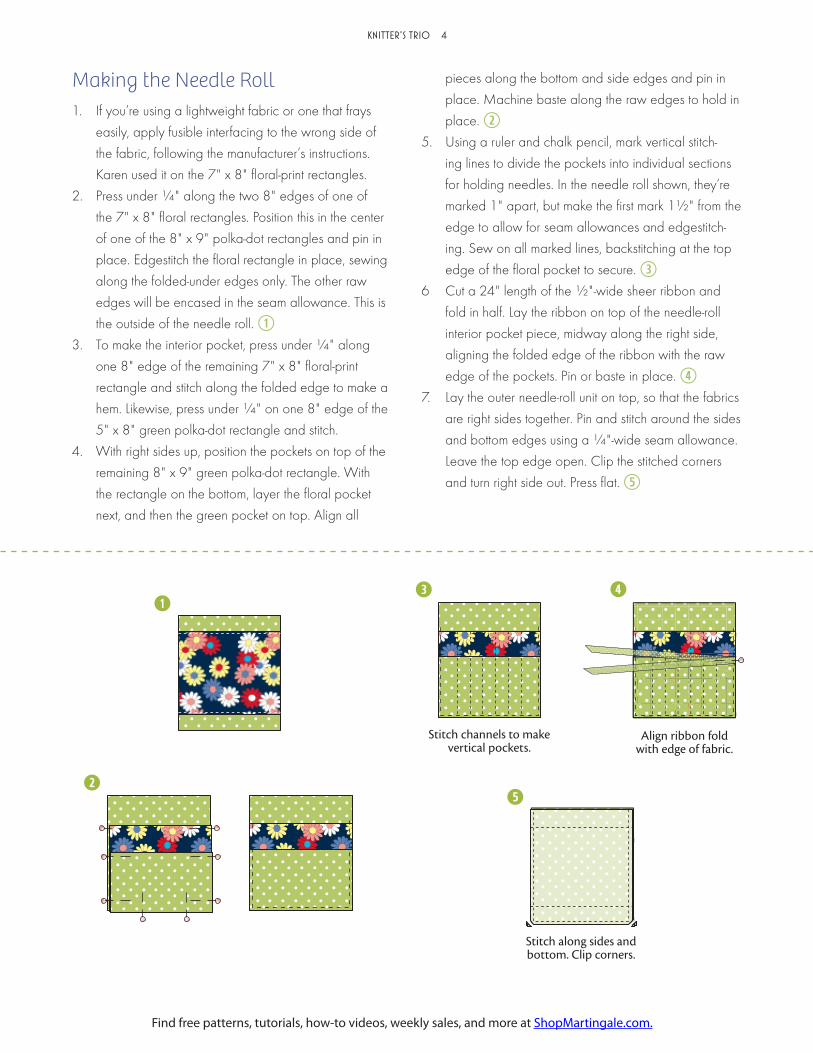
Making the Needle Roll1. If you’re using a lightweight fabric or one that frays
easily, apply fusible interfacing to the wrong side of
the fabric, following the manufacturer’s instructions.
Karen used it on the 7" x 8" floral-print rectangles.
2. Press under ¼" along the two 8" edges of one of
the 7" x 8" floral rectangles. Position this in the center
of one of the 8" x 9" polka-dot rectangles and pin in
place. Edgestitch the floral rectangle in place, sewing
along the folded-under edges only. The other raw
edges will be encased in the seam allowance. This is
the outside of the needle roll. ①3. To make the interior pocket, press under ¼" along
one 8" edge of the remaining 7" x 8" floral-print
rectangle and stitch along the folded edge to make a
hem. Likewise, press under ¼" on one 8" edge of the
5" x 8" green polka-dot rectangle and stitch.
4. With right sides up, position the pockets on top of the
remaining 8" x 9" green polka-dot rectangle. With
the rectangle on the bottom, layer the floral pocket
next, and then the green pocket on top. Align all
pieces along the bottom and side edges and pin in
place. Machine baste along the raw edges to hold in
place. ②5. Using a ruler and chalk pencil, mark vertical stitch-
ing lines to divide the pockets into individual sections
for holding needles. In the needle roll shown, they’re
marked 1" apart, but make the first mark 1½" from the
edge to allow for seam allowances and edgestitch-
ing. Sew on all marked lines, backstitching at the top
edge of the floral pocket to secure. ③6 Cut a 24" length of the ½"-wide sheer ribbon and
fold in half. Lay the ribbon on top of the needle-roll
interior pocket piece, midway along the right side,
aligning the folded edge of the ribbon with the raw
edge of the pockets. Pin or baste in place. ④7. Lay the outer needle-roll unit on top, so that the fabrics
are right sides together. Pin and stitch around the sides
and bottom edges using a ¼"-wide seam allowance.
Leave the top edge open. Clip the stitched corners
and turn right side out. Press flat. ⑤
➊
➋
Stitch channels to makevertical pockets.
➌
Align ribbon foldwith edge of fabric.
➍
Stitch along sides and bottom. Clip corners.
➎
Find free patterns, tutorials, how-to videos, weekly sales, and more at ShopMartingale.com.
Knitter's trio 5
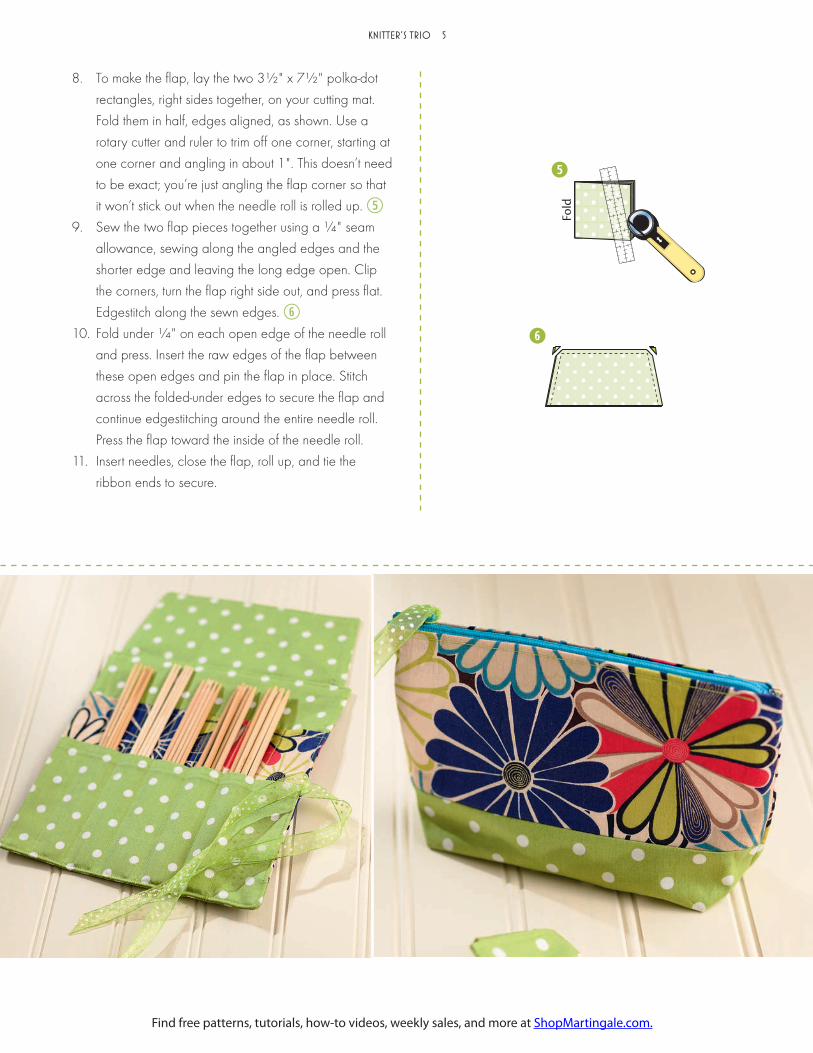
8. To make the flap, lay the two 3½" x 7½" polka-dot
rectangles, right sides together, on your cutting mat.
Fold them in half, edges aligned, as shown. Use a
rotary cutter and ruler to trim off one corner, starting at
one corner and angling in about 1". This doesn’t need
to be exact; you’re just angling the flap corner so that
it won’t stick out when the needle roll is rolled up. ⑤9. Sew the two flap pieces together using a ¼" seam
allowance, sewing along the angled edges and the
shorter edge and leaving the long edge open. Clip
the corners, turn the flap right side out, and press flat.
Edgestitch along the sewn edges. ⑥10. Fold under ¼" on each open edge of the needle roll
and press. Insert the raw edges of the flap between
these open edges and pin the flap in place. Stitch
across the folded-under edges to secure the flap and
continue edgestitching around the entire needle roll.
Press the flap toward the inside of the needle roll.
11. Insert needles, close the flap, roll up, and tie the
ribbon ends to secure.
Fold
➎
➏

Find free patterns, tutorials, how-to videos, weekly sales, and more at ShopMartingale.com.
Knitter's trio 6
Making the Ditty Bag1. If you’re using a lightweight fabric or one that frays
easily, apply fusible interfacing to the wrong side of
the fabric, following the manufacturer’s instructions.
Karen used it on the 4" x 8" floral-print rectangles and
the turquoise silk-lining piece. Use a ¼" seam allow-
ance unless otherwise noted.
2. Press under ½" along one 8" edge of the two 4" x 8"
floral-print rectangles. Insert the zipper by stitching the
folded edges to the zipper tape using a zipper foot
and leaving the zipper coils exposed. Begin and end
stitching even with the zipper pull and stop. Leave the
tails of the zipper tape unsewn. ①3. Sew the 5" x 8" green polka-dot rectangle to the
floral rectangles from step 1 along the 8" edges.
Press the seam allowances open and open the zipper
before proceeding to the next step. ②4. Pin the side seams of the bag with right sides together,
matching the seam allowances of the floral and
polka-dot fabrics and pinning the ends of the zipper
tape out of the way. Stitch. Press the seam allowances
open as best you can. ③
5. With the bag still inside out, fold the bag so that one
of the side seams is centered along the bag and the
corner comes to a point, as shown. Stitch across the
corner, sewing about ¾" from the corner. Repeat for
the other corner. This will give the bag a flat bottom so
that it can stand up when complete. ④6. To make the lining, fold the 8" x 11½" silk rectangle
in half, right sides together, with the 8" ends aligned.
Sew the side seams. Fold the lining as in step 5 and
stitch across the corners in the same manner.
7. Insert the lining into the bag, wrong sides together.
Pin at the side seams to keep things aligned, and then
turn under ¼" along the top edge of the lining and
hand stitch the lining to the inside of the bag (along
the zipper tape). Be sure to sew far enough from the
zipper coil so that the zipper will open and close
without catching on the lining.
8. To make a zipper pull, cut a 5" length of the ½"-wide
sheer ribbon and thread it through the zipper tab. Tie
in a knot and trim the ends at a 45° angle.
➊
➋
Stitch side seams.
➌
¾"
Fold bag so side seam is centered and stitch across corner.
➍

See all of the projects from Sew the Perfect Gift at ShopMartingale.com.
Gift giving just got a lot more fun!Find 25 handmade gift ideas in Sew the Perfect Gift