Knee Replacement Surgery: A Patient’s Guide to Recovery
44
Knee Replacement Surgery: A Patient’s Guide to Recovery
Transcript of Knee Replacement Surgery: A Patient’s Guide to Recovery

Knee Replacement Surgery: A Patient’s Guide to Recovery


Total Knee Replacement
Patient Education Booklet

Table of ContentsIntroduction
Welcome ...........................................................................................1Your Healthcare Team ......................................................................1Understanding Your Knee .................................................................3
Before You Come To The HospitalPreparing For Surgery (Weeks In Advance) ........................................6Preparing Your Home ........................................................................9Pre-Operative Knee Exercises .........................................................12
Your Surgery And Hospital StayDay Of Surgery And Admission To The Hospital ..............................16Pre-Operative Area .........................................................................17Operating Room ............................................................................17Post Anesthesia Care Unit (PACU) ...................................................18Transfer To The Orthopaedic Unit ...................................................18Diet ................................................................................................19Pain Management ...........................................................................19Home Medications ..........................................................................21Anticoagulants (Blood Thinners) .....................................................21Rehabilitation In The Hospital- Physical Therapy ............................21
Exercise Program .......................................................................22Transfer Training: ......................................................................24Gait Training..............................................................................27
Rehabilitation In The Hospital- Occupational Therapy ....................28
Discharging From The HospitalHome Care Rehabilitation ...............................................................29Outpatient Physical Therapy ...........................................................29Incision Care ..................................................................................30Medications ...................................................................................31Managing Constipation ...................................................................32Discontinuing The On-Q Pain Pump At Home .................................32When To Call Or See Your Doctor ..................................................33Your New Knee Is Different… ..........................................................33Providing Feedback… .....................................................................34Adaptive Equipment Suppliers ........................................................35Total Joint Replacement Website References ...................................36

1
INTRODUCTION
WELCOMEWelcome to the Santa Rosa Memorial Hospital’s Center for Bone and Joint Health. We are very pleased that you have chosen us for your knee replacement surgery and our team is committed to making your recovery a comfortable and successful one. Please feel free to reach out to your Total Joint Replacement Patient Navigator at 707-523-BONE, any time during this process to help answer questions that you may have.
Our patients and families have found it helpful to learn as much as they can before surgery. Our goals are for you to feel confident with your decision to have surgery and to become educated on your procedure so that you have the best possible outcome. This informational booklet has been prepared as a resource to help you understand your knee replacement. It will explain what to plan for and expect before, during, and after your hospital stay. You will learn about your daily routine while in the hospital, as well as exercises, incision care, medications, therapies, and much more.
We urge you to read and refer to this resource frequently as well as share it with your family or caregiver. Please bring this booklet with you each time you are scheduled to see your surgeon, as well as when you come to the hospital for surgery.
YOUR HEALTHCARE TEAMDuring your stay in the hospital, a team will work with your surgeon to help you through your recovery. The team has been specifically trained for orthopaedic care and includes the following members:
2
Anesthesiologist
You will meet your anesthesiologist prior to your surgery and your anesthesiologist will continue to follow you during your hospital stay. Your anesthesiologist may perform a peripheral nerve block before surgery for pain control. Any questions or concerns regarding the nerve block can be addressed by your anesthesiologist.
Hospitalist
Our hospitalists support the medical needs of our orthopaedic patients. If your primary care physician does not have privileges at Santa Rosa Memorial Hospital and you have other health issues such as diabetes, hypertension, or heart disease, it is likely your orthopaedic surgeon will request a hospitalist consultation.
Nursing Staff
Our orthopaedic nursing staff will educate, support, and guide you. They will coordinate your daily activities and help you with mobility, treatments, personal care, pain management and discharge planning.
Physical Therapists
Physical therapists will tailor an exercise program to your specific needs. They will work with you to strengthen your new knee and supporting muscles. They will also instruct you in mobility with a walker or crutches, transfer techniques, and stair climbing.
Occupational Therapists
Occupational therapists will teach you how to do daily tasks as independently as possible, following the precautions outlined by your doctor. Examples of these tasks include dressing, personal hygiene, and kitchen chores.
Case Managers and Home Care Liaison
Case Managers and the Home Care Liaison will work closely with you to help you handle your hospital stay and plan your discharge. They

3
will also work with your family and friends to identify the support they can offer while you recover. They will provide you with the information on community resources available and help you meet your discharge care needs.
You may also come in contact with other healthcare professionals, including dietary, pastoral care, and respiratory care.
UNDERSTANDING YOUR KNEE
A Healthy Knee
The knee is the largest and most complex joint in the body. It is a hinge like joint consisting of three bones: the femur (thigh bone), the tibia (shin bone), and the patella (kneecap). All of the parts that make up the knee joint are supported by cartilage, ligaments, and muscles. Cartilage acts as a cushion between the femur and the tibia and is lubricated by synovial fluid. Ligaments and muscles provide the side-to-side stability.

4
The Arthritic Knee
In an arthritic knee, the cartilage cushion wears out and the surfaces of the bones become rough and irregular. Arthritis is the most common cause of knee joint deterioration. Arthritis is any degenerative condition of the joint cartilage resulting in pain and inflammation, causing reduced motion and difficulty with walking.
A Prosthetic Knee (Your New Knee)
Your damaged knee joint can be replaced with new smooth surfaced components, which make up a prosthetic knee. During knee replacement surgery, the damaged bone and cartilage surfaces from the knee joint are removed. The upper part of the prosthesis, or femoral component, is metal (cobalt chromium), and fits on the end of your thigh bone. The lower part, or tibial component, is a metal-backed tray (cobalt chromium or titanium) which fits on top of your shin bone. The tibial insert component is made of a plastic material called polyethylene. Finally, the patellar component is a polyethylene

5
plastic piece that covers the underside of your knee cap, giving it a new smooth surface. These new surfaces fit together, just as a normal knee does, and allows your knee to bend and straighten smoothly.
Why is Surgery Needed?
Surgery may be recommended for many reasons, the most common of which are:
• To alleviate pain• To restore lost function• To correct deformity• To improve quality of life
Knee prosthesis durability can vary from patient to patient because each patient’s body places slightly different stresses on the new knee. However, the average patient can expect to obtain greater mobility and freedom from pain, which in turn will improve one’s quality of life.

6
BEFORE YOU COME TO THE HOSPITAL
PREPARING FOR SURGERY (WEEKS IN ADVANCE)After you and your surgeon agree that surgery is the best option for your condition, your surgeon’s office will schedule your surgery and provide instructions.
In some cases, your surgeon will also require that you obtain medical clearance prior to your surgery. Your primary care physician may perform this clearance and/or you may need clearance by your cardiologist or other medical specialist. You will also be asked to complete lab work, and EKG and possibly other diagnostic tests prior to surgery. Often times your surgeon will also request that you get dental clearance.
After you are scheduled for surgery, please contact the Total Joint Replacement Patient Navigator at 707-523-BONE to reserve a seat in Santa Rosa Memorial Hospital’s Pre-Operative Total Joint Replacement Class. The class will provide you and your family a clear explanation of what will happen during your hospital stay. Knowing what is going to be done will make the process run more smoothly for you. You will learn many helpful hints to speed up your recovery. The class also provides an opportunity to ask any questions you may have.
Additional Preparations:
• Preparing mentally and physically for surgery is an important step towards a successful result. Have a positive mental attitude.
• The use of nicotine products (i.e., cigarettes, cigars, gums, or patches) has been shown to increase complications after surgery. It inhibits bone and wound healing by decreasing blood flow to the surgical site. These products can also increase the risk of blood clots (DVT). Thus you should stop these products prior to surgery.

7
• Please reduce your alcohol consumption prior to surgery.
• Excellent nutritional and hydration status before and after surgery is important for good health and progress. Good nutrition is a balance of calories, protein, fiber, and iron. Each of these is very important. Calories are always important after having surgery. Protein is important because it helps to rebuild muscles, repair tissues, fight infection and aids healing. Rebuilding the muscles and tissue around your new knee will help the joint to heal properly.
• Unless you are told otherwise, continue to take medications already prescribed by your physician, except for the following:
○ Fish Oils should be discontinued 2 weeks prior to surgery.
○ Anti-inflammatory medications (Advil, Ibuprofen, Motrin, Feldene, Naprosyn or Aleve) should be discontinued 7 days prior to surgery.
○ Consult with your physician regarding Aspirin products. Patients with cardiac stents should continue to take their Aspirin (81mg). Your physician or cardiologist should also discuss plans to stop any blood thinners you take regularly (Plavix, Coumadin, Xarelto, etc.) They should provide a specific stop date and any other special instructions (e.g. need for blood thinning injections once pills have stopped).
• Constipation is sometimes a problem following surgery for a variety of reasons. Increasing fiber and fluid intake will help to eliminate this problem. Stool softeners and/or laxatives are also recommended prior to surgery. Do not arrive to the hospital for your surgery constipated.
• Iron helps carry oxygen to blood cells, so it is important to increase iron intake prior to surgery. Oftentimes your physician will prescribe an iron supplement and/or advise eating iron rich foods for six weeks following surgery.
• You may wish to review and plan your post-hospital care with your Total Joint Replacement Patient Navigator, (707-523-

8
BONE), prior to admission. If you have specific needs while hospitalized or once discharged, or if you need to discuss your discharge destination options (home versus skilled nursing facilities), please reach out to your Patient Navigator. We are here to help facilitate your options and help you make decisions in a more informed way.
• Arrange your transport to and from the hospital. Patients are discharged from the hospital at 10:30am.
• Before your admission, please complete the Advance Health Care Directive form authorizing another person, designated by you, to make decisions with your physician about your care, should this become necessary.
• Within a couple days before surgery, the E.A.S.E. (Early Admission Surgical Evaluation) nurse will call and talk to you about your surgery date and time, review your lab work, allergies, medications, and follow-up with any questions that you may have. The E.A.S.E nurse will also inform you of when and where you will arrive at the hospital the morning of your surgery. You will be instructed on when to stop eating and drinking and what medications you should take. Any medications that you are instructed to take the morning of surgery, take with a couple sips of water only.
• You will be provided antimicrobial cleansing scrubs called Chlorhexidine Gluconate Cloths (CHG) at the Total Joint Preoperative Class. If you are not able to attend the Total Joint Class, please contact your Patient Navigator and a set of CHG cloths will be mailed to you. Use the first set of six cloths the night before surgery. A second set of six cloths will be given to you at Santa Rosa Memorial Hospital on the day of your surgery.
• Durable Medical Equipment (DME): Please obtain all necessary equipment prior to your surgery (i.e. walker, crutches, cane, commode or elevated toilet seat, ice machine) and adaptive equipment (i.e. reacher, sock-aid, long handled sponge, long handled shoe horn, leg lifter). Your surgeon’s offices can assist you with obtaining this equipment. Insurance coverage for reimbursement of DME can vary, and out of pocket expenses

9
are incurred. Adaptive equipment can be purchased at the Total Joint Replacement class, the hospital’s gift shop and/or your local medical equipment supply store. It is not necessary to bring this equipment with you to the hospital (other than the ice machine).
PREPARING YOUR HOMEYou will find it helpful to prepare your home prior to surgery so that it is safe when you return. The following information is designed to assist you with this.
• Remove throw rugs from the floor. These can cause you to trip and fall.
• Remove or relocate electrical cords which are in the walking paths.
• Put frequently used items where they can be reached easily. Remember it may be painful or unsafe to bend down or reach up to get things.
• Before surgery, prepare and freeze meals that can be easily heated.
• Check stair railings to make sure they are secure.• Consider first floor options (temporary). If your bathroom isn’t
on the main floor, do you have access to a portable commode? If you don’t have a bedroom on the first floor, do you need to rent a hospital bed?
• Pick out a chair to sit in when you come home. A good chair is firm with arms and seat height at least 18 inches from the floor, but one that allows your feet to be flat on the floor.
• Watch for pets that may throw you off balance.• Use a long handled reacher to pick items off the floor.
Walkways
• Remove throw rugs whenever possible to avoid tripping.• If you can’t remove throw rugs, use rugs with nonskid backing to
avoid slipping.• Make the transition between types of flooring (such as wood
floor to carpeted floor) as even and secure as possible to prevent

10
tripping.• Avoid waxing wood or linoleum floors, to prevent slipping.
Stairs
• The rise between steps should ideally be no more than five inches. If necessary, ramps can be rented short term.
• Make sure handrails are well anchored (or install handrails) on both sides of the stairway.
• Nonskid treads can be placed on wooden stairs to prevent slipping.
• Make sure carpeting on stairs is secure.
Furniture Layout
• Arrange furniture so that pathways are not cluttered.• Chairs and tables need to be sturdy and stable enough to
support a person leaning on them.• Pad any furniture with sharp edges and corners.• Chairs with arm rest and high backs provide more support when
sitting and more leverage when getting in and out of a chair.• Bed/chairs should be 18-21 inches from the floor.
Lighting
• Be sure that your lighting is ample to prevent falls and assure that you can read medication labels and instructions easily.
• Light switches should be immediately accessible upon entering a room.
• Good lighting for hallways, stairs, and bathrooms is especially important. Keep a nightlight on in your bathroom.
Toilet
• Use an elevated toilet seat or commode to ease getting on and off the toilet. (If needed, please purchase your elevated toilet seat or commode prior to surgery.)
• Install grab bars around the toilet if you need more support getting on and off the toilet.

11
Bathtub
• Install skid-resistant strips or a rubber mat.• Use a bath seat if it is difficult to stand during a shower or too
difficult to get up out of the tub.• Install grab bars on the side of the tub or shower for balance.• Do not use the soap dish or towel bar for balance, as these can
pull out of the wall easily.
Doors
• Avoid locking bathroom doors, or use only locks that can be opened from both sides when you may need assistance in the bathroom.
Kitchen Safety
• Store frequently used items at waist level. Use a reacher or grabber to get items that are not at eye level.
• Before surgery, consider preparing and freezing meals that can be easily heated.

12
PRE-OPERATIVE KNEE EXERCISES• Start these exercises beginning today until the day prior to
surgery. The stronger and more limber you are prior to surgery, the more successful your recovery will be. If these exercises cause too much pain/discomfort in the joint, then please just familiarize yourself with the exercises.
• Perform each exercise ten times daily. Practice with both legs.• Also walk as much as is comfortable with an assistive device as
needed.
1) Ankle Pumps — This exercise is done frequently during the day to promote good circulation and to assist in the prevention of blood clots. This is a simple exercise in which you pump your ankles up slowly and down slowly, performing many repetitions.
2) Quad Sets (thigh tighteners)—These exercises strengthen the quadriceps muscle on the front of your thigh. These muscles give your knee stability and keep your knees from buckling while you are walking. This exercise is done by tightening your thigh until the back of your knee is flat on the bed, and holding this straight leg position for the count of 5 seconds.
13
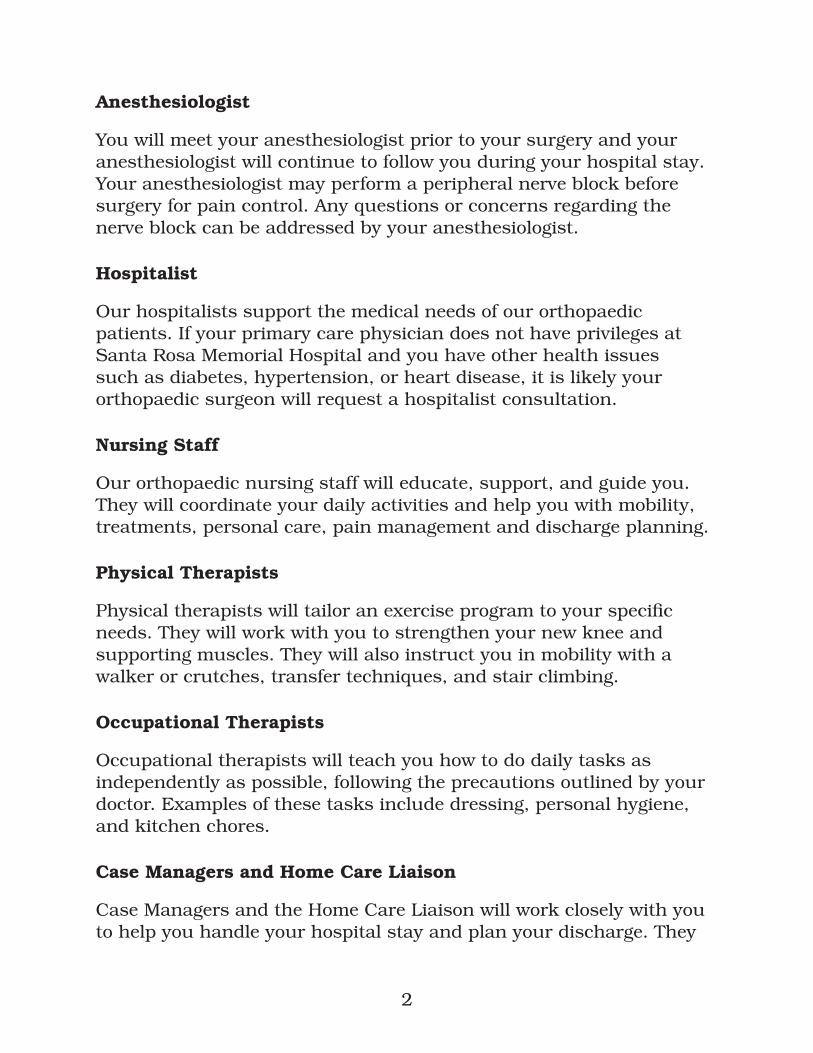
3) Hamstring Sets (back of thigh tighteners)—This exercise will strengthen the muscles located on the back of your thigh. This is done by bending the knee very slightly and pushing down with the heel into your bed, again holding for the count of 5.
4) Gluteal Sets (buttock pinches)—This exercise strengthens the gluteus maximus, which is a very important muscle for walking. This is done by pinching your buttocks together and holding the contraction for the count of 5.

14
5) Heel Slides — These exercises will help your knee motion and strength while alleviating a lot of the tightness you may experience. This is done by sliding the heel of your “pre-operative” leg up under your buttock until your ankle is directly beside your knee.
6) Short Arc Quads — These exercises strengthen the quadriceps muscle on the front of your thigh. Place a big towel or bolster under the knee of your “pre-operative” leg, then keep your knee on the bolster while raising your foot up to the ceiling until your operated leg is completely straight. Slowly return your foot back down to the starting position.

15
7) Straight Leg Raise — This exercise strengthens the front of your knee and thigh. First, perform a quad set and a gluteal set on that side and hold these throughout the entire exercise. Raise your “pre-operative” leg toward the ceiling only until your leg is approximately 6-8 inches off the ground, then slowly lower to the starting position and relax all muscles before continuing. Bending the opposite knee helps reduce back strain.
8) Standing Heel Raise — While holding onto a supportive surface, rise up onto toes lifting both heels off the ground. Hold for 5 seconds. Slowly return to the starting position. Repeat 10 times.

16
9) Standing Knee Bending — While holding onto a supportive surface, bend your surgical knee so that your foot rises towards your buttock. Hold for 5 seconds. Slowly return to starting position. Repeat 10 times.
10) Standing Hip/Knee bending — While holding onto a supportive surface, lift your operative leg up towards the ceiling, bending the hip and knee. Hold for 5 seconds. Slowly return to starting position. Repeat 10 times.

17
11) Standing Terminal Knee Extension — While holding onto a supportive surface, bend your operated knee slightly. Slowly pull back your knee by tightening your thigh muscles, straightening your knee. Hold for 5 seconds. Slowly return to starting position. Repeat 10 times.
12) Standing Mini Squat — While holding onto a supportive surface, slightly bend both knees to about a 45 degree angle. Hold for 5 seconds. Slowly return to standing position. Repeat 10 times

18
YOUR SURGERY AND HOSPITAL STAY
DAY OF SURGERY AND ADMISSION TO THE HOSPITAL
• At Home: Use the second pack of CHG cleansing cloths on your operative knee. Take your medications as previously instructed by the E.A.S.E. nurse, with a couple sips of water only.
• Arrival Time: 2 hours before surgery or the time given by the E.A.S.E. nurse.
• What to Wear: Wear simple, loose and comfortable clothing. Do not wear any jewelry. Also leave money and other valuable possessions at home. We cannot be responsible for lost possessions.
• What to Bring: A pair of slip-on shoes, loose fitted clothing, bathrobe, toiletries (toothbrush/paste, hairbrush, deodorant, etc.). If you wear a hearing aid, dentures, glasses or contact lenses, please bring them (as well as containers) with you. If you have sleep apnea, please bring your CPAP machine. Do not bring any of your own medications.
• When you arrive at the hospital: Park in the front parking lot or in the visitor area in the parking garage and proceed to the admitting office (to the left of the main lobby). Sign your name on the admissions sign-in clipboard and indicate that you are present for surgery at a specified time. Your support person will assist in checking you in and may remain with you until you go to surgery.
• Your family may wait in the surgery waiting room, if they wish. After your procedure, the physician will contact your family in this waiting area to discuss your surgery and your condition. Family and friends can then wait in the Orthopaedic waiting room until you return to your room.

19
PRE-OPERATIVE AREAThis area is designed to prepare patients before they enter the operating room. An intravenous (IV) infusion of fluid may be started. In this procedure, a tiny plastic tube or “catheter” is placed in your vein (usually in the arm) as a means to administer fluid and medication. Your nurse will complete the admission process.
Your surgical team will take your latest information and perform some additional safety cross checks and tasks. They will review the surgical consent with you and have you sign the actual consent paperwork.
Your anesthesiologist will discuss any pertinent medical history, allergies, or any previous experiences you have had with anesthesia. This is also the time period where a peripheral nerve block will be discussed and may be placed by your anesthesiologist.
Your surgeon will also greet you in this pre-operative area and answer any questions that you may have. Your surgeon will confirm your identity, review, and then sign your surgical site with a surgical marker. These steps are an important part of the process designed to increase patient safety.
Members of the operating room staff will recheck that all of the appropriate paperwork and tasks have been performed. They will then escort you on the gurney down the hall and into one of the operating rooms.
OPERATING ROOM Your knee replacement surgery generally takes 1-2 hours, but the approximate elapsed time from operating room to post-anesthesia care unit is about 2 ½ -3 hours. After your procedure, your surgeon will speak with your family in the surgical waiting room.

20
POST ANESTHESIA CARE UNIT (PACU)After surgery you will be transferred to the PACU where you will be closely monitored until you are ready to be transferred to the nursing unit. Here, your vital signs (blood pressure, respirations, and heart rate) will be checked frequently, you will receive pain medication if needed, you may receive oxygen, and your incision and dressings will be checked. When the anesthesiologist determines that you are sufficiently recovered, you will be transferred to the Orthopaedic Unit.
Family is not allowed into the PACU, however, they can gather your belongings and take them over to the Orthopaedic Unit to meet you in your private room.
TRANSFER TO THE ORTHOPAEDIC UNITOnce you arrive to your private room on the Orthopaedic Unit, vital signs will continue to be monitored, an assessment will be completed by your nurse, and you will begin post-surgery exercises. Post-surgery exercises are:
1) Deep Breathing/Incentive Spirometry—This exercise involves taking 10 slow deep breaths in a row and should be performed every 30 minutes while you are awake. It is important to perform deep breathing exercises after surgery to rid your airway and lung passages of mucus.
2) Foot Pumping—This exercise involves moving your feet up and down vertically 10 times in a row every 30 minutes while you are awake. Early movement can help prevent blood clots from forming.

21
DIETAfter surgery, you will be given ice chips to satisfy your thirst. Your physician will advance your diet from liquids to solid foods, as you are able to tolerate them. You will be provided a daily menu to fill out. We do have many diets that can be ordered (diabetic, low salt, gluten free, cardiac, and vegetarian/vegan). If you need assistance with completing the menu selections or have any specific dietary needs, please let us know.
PAIN MANAGEMENTAfter surgery, you will experience varying degrees of pain and discomfort. This is normal and will improve each day. Keeping your pain under control is very important to your recovery. It will help you eat better, sleep better and get around easier. We ask that you pay close attention to your level of pain and use the following pain scale to communicate with your nurse:
0 1 2 3 4 5 6 7 8 9 10No Pain Moderate Pain Worst Possible Pain
Your orthopaedic care team will help you with your pain management. However, pain management begins with you! Please don’t hesitate to request pain medication as you need it. Do your best to describe the pain, pinpoint its location and intensity. Your surgeon will select the most appropriate pain medication for you. It is best to stay “ahead of” the pain, taking your pain medication at consistent intervals throughout the day and night. Pain management is a multi-faceted approach. The methods of pain management following a knee replacement are:
• Femoral or Saphenous Nerve Block- Your anesthesiologist may perform a nerve block as part of the pain management regimen. A nerve block is an injection of a long acting numbing medication (Ropivicaine) into the mid to upper aspect of the thigh area on the surgical extremity. This procedure can be compared to receiving Novocaine injections for dental work. The medication numbs the front portion of the knee and temporarily can weaken

22
the quadriceps or thigh muscles. There are two ways that the anesthesiologist can administer the nerve block, either a single shot nerve block or a continuous nerve block by inserting a tiny catheter into your thigh area and then connecting the catheter to a pump that continually administers the Ropivicaine medication. The pump can remain in place for 2-5 days. We will instruct you specifically on how to discontinue the nerve block catheter if you will be going home with the pump.
• Local injections during surgery- Your surgeon might inject a combination of medications directly into the tissue of the surgical site during the procedure. This injection will help manage pain at the back of the knee, where the nerve block does not take effect.
• Oral Medications- Your surgeon’s goal is to manage your pain with oral pain medications immediately after surgery. Oral pain medications, can be very effective for pain management in conjunction with the nerve block. Often times, an anti-inflammatory medication will be ordered as well. Your surgeon will provide you with a triplicate prescription for narcotic pain medication upon your discharge from the hospital. All triplicate prescriptions must be taken to the pharmacy for filling, and may not be ordered over the phone.
• Cold Therapy- The application of cold has been shown to reduce swelling and pain associated with inflammation around the surgical site. Ice packs or a cold therapy unit (ice machine) can be used. If using ice packs, apply for 15-20 minute intervals every 3 to 4 hours. If using a cold therapy machine, place wrap on knee and utilize 1 hour on, 1 hour off. Be sure to place a protective barrier (i.e. thin towel) between your knee and the ice pack/cold therapy wrap, and perform a periodic skin check. If you already own or will be purchasing an ice machine, please bring it with you on the day of surgery (with your name on it).

23
HOME MEDICATIONSAny medications that you have been taking prior to coming to the hospital may be resumed with an order from your physician. It is important that you provide the hospital with a comprehensive list of your home medications, for your surgeon to review when ordering postoperative mediciations. You will not be allowed to take your own home medications during your stay in the hospital, as only your nurse will be able to administer hospital medications as ordered by the phy-sician.
ANTICOAGULANTS (BLOOD THINNERS)After total knee replacement surgery, blood clots (DVT) may form in the veins of your legs. In rare cases, these blood clots can travel to your lungs (pulmonary embolism). To prevent and reduce the incidence of clot formation, your surgeon may order an anticoagulant, in addition to mechanical devices (calf pumps) and early mobilization (ankle pumps and ambulation). Depending on your past medical history, your surgeon will prescribe one of the following anticoagulants: Aspirin, Coumadin, Lovenox or Xarelto. You will be provided a prescription by your surgeon. It is important to follow all prescribed instructions.
REHABILITATION IN THE HOSPITAL- PHYSICAL THERAPYYou will be seen by a physical therapist on the day of surgery, generally a few hours after you arrive on the Orthopaedic Unit, and then twice a day sessions the subsequent days. Your physical therapist will instruct you in an exercise program to increase range of motion and strength. They will educate you on joint positioning, safety with transfers, gait training, and stair negotiation. Your support team or “coach” is welcome to be present during the physical therapy sessions to learn how to assist you at home. Ultimately, your motivation and participation with physical therapy is a vital element in the speed and success of your long-range rehabilitation.
24
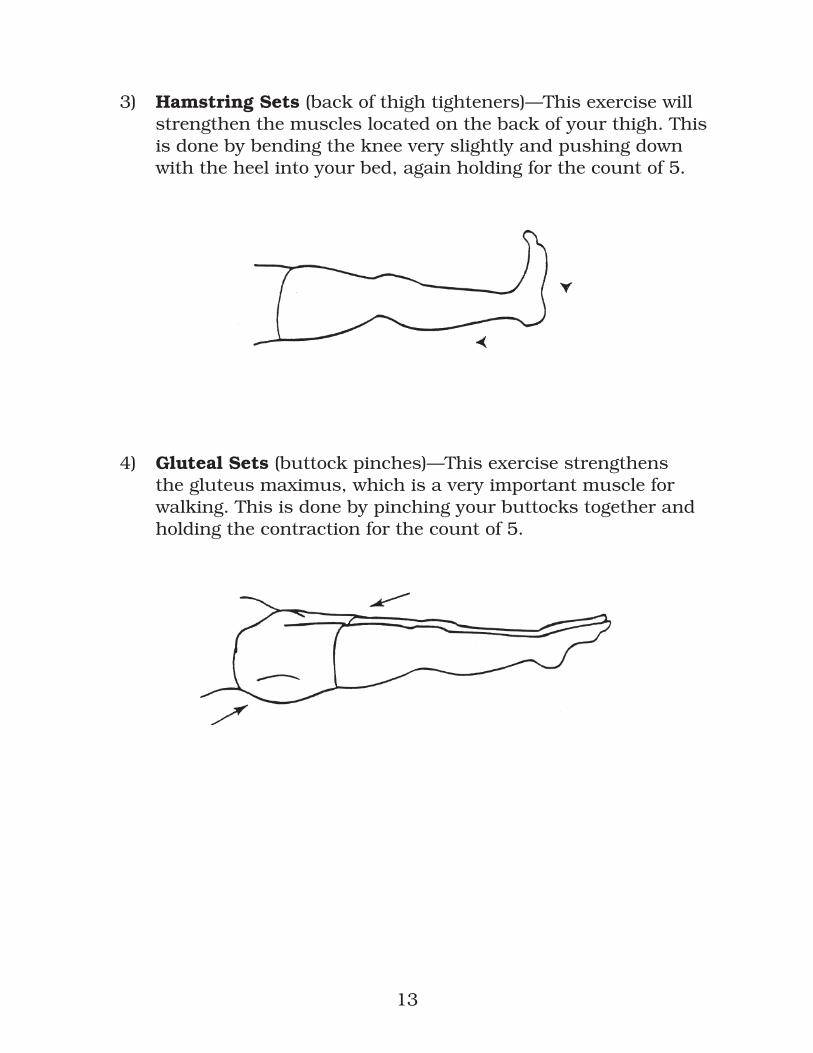
EXERCISE PROGRAMYour physical therapist will instruct you on your post-operative home exercise program. The goal is to improve the overall strength of your surgical leg, minimize swelling and obtain full range of motion of the knee (both extension and flexion). In order to tolerate your exercise program and gain the greatest benefit from your therapy sessions, it is important that your pain be adequately controlled. In addition to the exercises presented on page 12, you will be instructed on these exercises:
1) Hip Abduction—Lie on back, slide operative leg out to side. Keep toes pointed up and knee straight. Slide operative leg back to midline.
2) Sitting Knee Extensions—Sit on a firm chair with both feet flat on the floor. Lift your foot slowly until your leg is completely straight, and then bend your knee as far as possible.

25
3) Knee Flexion Stretch—Sit up straight in a chair and plant your feet so that you feel a slight stretch in your new knee. Keep feet planted while you scoot your body forward in the chair. Hold stretch for 20–30 seconds. Scoot further forward if able.
4) Knee Extension Stretch—While lying in bed, place a towel roll or pillow under the ankle of your involved side. Allow your leg to straighten as much as possible. Lay in this position for 30 minutes to one hour, twice a day. You will feel a strong pulling behind the knee. Don’t worry, this is normal and what is desired to attain full knee extension.

26
TRANSFER TRAINING:The purpose of transfer training is to teach you how to get in and out of bed, chairs, and commodes safely. Your physical therapist will instruct you on transfer training and will teach your family or “coach” how to assist.
Getting Out of Bed
• Move one leg to edge of bed. Then move the other leg forward to edge of bed.
• Pivot your hips, using your elbows to help push yourself to a sitting position.

27
• Sit on the edge of the bed.• Reach for the walker handles with one hand at a time, but do not
pull yourselve up with the walker. Bear weight on your new knee as instructed by your Physician or Physical Therapist.
Getting into Bed
Just the reverse of getting out of bed but make sure that you start to sit down only when you feel the back of the bed behind you.
Getting Out of a Chair, Wheelchair or Commode
• When attempting to stand from a sitting position, scoot your hips forward to the edge of the bed or chair.
• Using your arms, push down on the armrest of the chair to push yourself up.
• As you stand, shift your weight onto your good knee and grasp the hand grips of the walker.
• Do not pull yourself up with the walker; this may cause you to fall backwards.
• Once you are standing, reach for the handles of the walker and take a few moments to get your balance before taking a step.

28
Getting into a Chair or Commode
• When sitting down, slowly walk back towards the chair or commode until you feel the back of your legs against it. Keep leg on operated side slightly out in front of your body.
• Reach back for the arm rests and slowly lower yourself into the chair. Do not hold onto the walker while lowering yourself slowly so that you do not “plop” into the chair.

29
GAIT TRAININGYour physical therapist will assist you out of bed and onto your feet with the use of a walker. You will be allowed to bear full weight on the operated extremity during ambulation. If desired, you can progress to crutches. The rehab department has walkers/crutches for patients to use while in the hospital. If you would like your personal walker/crutches sized appropriately by your physical therapist, have your family member bring it in on the day of discharge. Your physical therapist will also instruct you on stair climbing (if necessary).
Walking on Level Terrain
• Pick up or roll the walker and place it a comfortable distance in front of you with all four legs on the floor. This is usually at arm’s length ahead of you.
• Move your leg on the operated side forward first toward the walker, then take a step with your other leg, bringing it slightly past the operated side.

30
• Do not take such big steps that you are too close to the walker. There should be a space between you and the walker at all times. If you are too close to the walker, it may cause you to tip or fall backwards.
• Hold your head up and look straight ahead. It is tempting to watch your feet, but this is more tiring and you may run into something.
• Be sure to walk slowly…never rush your walking.
Stair Negotiation / Climbing
• When going upstairs, the non-operative leg (“good” leg) goes up the stair first, and then the operative (“bad” leg) goes second.
• You can be instructed on negotiating stairs using the handrails, walker, crutches or cane.
• When going downstairs, the assistive device goes first, then the operative (“bad” leg) goes second and the non-operative (“good” leg) goes last.
REHABILITATION IN THE HOSPITAL- OCCUPATIONAL THERAPYYou will be seen by an occupational therapist after your surgery. Your occupational therapist will educate you on safety in the home, and instruct you in activities of daily living (bathing, dressing, etc.) Your support team or “coach” is welcome to be present during the occupational therapy sessions to learn how to assist you at home.
DISCHARGING FROM THE HOSPITALThe majority of total joint replacement patients go directly home after a 1 to 2 day hospital stay, with either “in-home” or outpatient physical therapy. A skilled nursing facility is not an automatic option. Per Medicare guidelines, medical criteria need to be met to qualify for skilled nursing facilities. Your case manager will discuss this with you in more detail. All discharge destination options need to be determined before surgery.

31
A daily discharge class is instructed by the Total Joint Replacement Patient Navigator. The class is intended for the patient’s spouse/family members/friends in order to educate them on how to best care for you at home. The class is held Monday-Friday, 10:00-10:30AM in the Orthopaedic Unit conference room.
HOME CARE REHABILITATION24-48 hours before being discharged home from the hospital, you will be evaluated by the physical and occupational therapists in what exercises to continue at home. They will also teach exercises to strengthen your arms since good upper body strength is important to use the walker effectively. They will assess your home situation and identify any problems that might arise.
Exercises to Perform at Home
It is very important for you to continue at home the exercises you have been doing in the hospital. These exercises will help you achieve the best outcome after your total knee replacement. Exercise is important because it improves circulation, promotes healing, and decreases pain.
1) Foot Pumping—continue these 10 times several times a day for six weeks or until your doctor tells you to stop.
2) Breathing exercises with your incentive spirometer—continue these 10 times several times a day until your doctor tells you to stop.
3) Walking—3 to 4 times a day with your walker. 4) Knee bending, muscle strengthening and stretching. Continue
these several times a day until your doctor tells you to stop.
OUTPATIENT PHYSICAL THERAPYOften times, patients will not need homecare rehabilitation and will instead go home and begin outpatient physical therapy. Outpatient physical therapy is typically prescribed 2-3 times per week. Your surgeon’s office will assist you with selecting a therapy clinic and

32
making your first appointment.
INCISION CARE• Staples- If your knee incision was closed with staples, they
will be removed by either your surgeon’s medical assistant or your homecare physical therapist usually 10-14 days post-operatively. After staple removal, leave the incision uncovered unless instructed otherwise. If you have steri-strips applied to the incision, do not peel them off, let them fall off naturally.
• Dermabond “glue”- If your incision was closed with Dermabond “glue”, your incision will be examined at your first post-operative appointment with your surgeon. Keep your incision clean and dry at all times.
• Bandage change procedure:
1. Wash your hands thoroughly.2. Remove old dressings and throw away.3. Visually check your incision for any signs of unusual
drainage (yellowish/cloudy, + odor).4. Redress wound with 4x8 gauze pads and stockinet.
• When to shower: If you discharged home with an On-Q pump, you may not shower until the nerve block catheter has been removed.
1. All other patients may shower if your incision is kept dry.2. Cover your incision with saran wrap or a clean plastic
garbage bag. 3. Do not take tub baths or soak in a hot tub or swimming
pool until your incision is completely healed, and staples are removed, about 4-6 weeks post-operatively.
• Bruising and swelling are normal after surgery and vary from one individual to the next. Bruising and swelling can continue to increase over the first two weeks post-operatively and can travel up as high as your groin area and down to your toes. Continue to do your exercises and walk, with frequent rest breaks to elevate your operative extremity throughout the day. Elevation

33
must be above the heart level to be effective, otherwise gravity still pulls fluid into the extremity.
• It is normal to feel numbness or decreased sensation around the surgical incision, and this will likely improve over time.
MEDICATIONS Your physician may give you some prescriptions when you leave the hospital. These may include blood thinners and narcotics. The narcotics cannot be called into the pharmacy. A triplicate prescription needs to be brought into the pharmacy to be filled.
• Anticoagulant (blood thinners) - Your surgeon most likely prescribed a blood thinner for you to continue at home (Xarelto, Lovenox, Coumadin or Aspirin). Follow prescribed instructions.
• Narcotics (pain pills) - Take your pain medication as prescribed by your surgeon.
• Remember to take the pain pills at the prescribed intervals (example: every 4 hours) so that the pain doesn’t become too severe. In the event that the pain medication does not work or you are experiencing unpleasant side effects (nausea/vomiting, constipation), contact your surgeon’s office.
• Home medications: Resume your home medications as instructed by your physician.

34
MANAGING CONSTIPATIONConstipation is a common side effect of taking narcotics and limited activity after a joint replacement surgery. Follow these guidelines to prevent constipation:
• Increase your fluid intake, drink 8 glasses of fluid daily.• Increase your fiber intake. Choose whole grain breads and
cereals, fresh fruits, vegetables, and beans. • Continue to take stool softeners twice daily. Stop the stool
softener if you start to experience loose or watery stools. If you continue to have constipation symptoms, you can take Milk of Magnesia, which is a mild oral laxative, or try Magnesium Citrate, which is a much stronger oral laxative. Dulcolax suppositories are also an option. All of these medications are available over-the-counter at a pharmacy.
DISCONTINUING THE ON-Q PUMP AT HOMEIf you went home with the On-Q pump in place, please refer to the separate instructional handout. You may not shower while the On-Q pump catheter is still in place.

35
WHEN TO CALL OR SEE YOUR DOCTOR Contact your surgeon sooner if you experience any of the following symptoms:
• Fever over 101° F. Lower temperatures are not unusual and usually do not indicate problems.
• Drainage from your incision. A small amount of yellowish or pinkish drainage is normal. Contact your surgeon if you have a large amount of drainage that has saturated through your bandage and/or clothing, if the drainage is yellowish/cloudy, or has an odor.
• Redness, swelling or warmth around your incision.• Increased swelling in thigh, calf or ankle that does not go down
with elevation. • Increased pain/tenderness in the calf.• Chest pain and/or problems with breathing, call “911” or go to the
nearest hospital ER.
YOUR NEW KNEE IS DIFFERENT…Recovery from surgery takes time. You will likely feel tired and fatigued for several weeks, and this is a normal response. It is also not uncommon to have a poor appetite. It is important to plan periods of rest throughout the day, in between continuing your physical therapy program, taking your medications, and following your surgeon’s instructions. Hard work and a positive attitude will help your recovery from surgery be a successful one!

36
PROVIDING FEEDBACK…On behalf of Santa Rosa Memorial Hospital and your orthopaedic surgeon and care team, we would like to thank you for choosing to have your surgery at the Center for Bone and Joint Health. We hope that you find this educational booklet helpful on your journey to recovery. If, at any time, you have questions regarding any step of this process, please feel free to reach out to your Total Joint Replacement Patient Navigator at 707-523-BONE.
Feedback from our patients has been a critical component in building our Center for Bone and Joint Health. We listen, respond and seek to constantly improve so that we can achieve a positive experience and excellent outcomes. We look forward to hearing your feedback in a variety of means…
• Patient satisfaction phone survey conducted by Professional Research Consultants (PRC)
• Phone consultation with the Total Joint Patient Navigator, 707-523-BONE
• Written correspondence to Santa Rosa Memorial Hospital’s President, Todd Salnas
Todd Salnas, PresidentSanta Rosa Memorial Hospital1165 Montgomery DriveSanta Rosa, CA [email protected]
Thank you!

37
ADAPTIVE EQUIPMENT SUPPLIERSApria Healthcare3636 North Laughlin Road, #190Santa Rosa, CA 95403(707) 543-0979Fort Bragg (707) 961-1770Ukiah (707) 468-9242Lakeport (707) 994-1236
Pacific MedicalChris Torres, Rehab Consultant(209) 338-8268 cell(707) 546-3045 fax
R A Medical Company407 East Perkins StreetUkiah, CA 95482(707) 463-0160
Redwood Empire Medical Supply 6620 Redwood Drive Rohnert Park, CA 94928(707) 585-6800
Ron Andrews Medical Company 117 Carlos DriveSan Rafael, CA 94903(707) 575-1840
Sonoma Surgical 4975 Sonoma Highway 12Santa Rosa, CA 95409(707) 539-5151
Liberty Health (CPM rentals)888 44th StreetOakland, CA 94608(415) 244-1263
North Coast MedicalFunctional Solutions Catalog(800) 235-7054www.ncmedical.com

38
TOTAL JOINT REPLACEMENT WEBSITE REFERENCES
The Arthritis Foundation www.arthritis.org
The American College of Rheumatology www.rheumatology.org
Depuy Orthopaedics www.depuy.com
Zimmer Orthopaedics www.zimmer.com
Blood Guys: blood auto transfusion process www.bloodguys.com
Total Knee Replacement- provides educational tutorial and videos www.nlm.nih.gov/medlineplus/kneereplacement.html www.edheads.org/activites/knee
American Association of Hip and Knee Surgeons www.aahks.net/care-for-hips-and-knees/

39

Serving All of Sonoma CountyOrthopaedic Services Are Provided at the Following Locations:
Santa Rosa Memorial Hospital 1165 Montgomery Drive Santa Rosa, CA 95405 707-523-BONE (2663)
Santa Rosa Memorial Hospital Outpatient Rehabilitation – Montgomery Campus 1170 Montgomery Drive Santa Rosa, CA 95405 707-542-4704
St. Joseph Orthopedic & Sports Medicine Clinic 1255 North Dutton Ave., Suite BSanta Rosa, CA 95404707-547-4618
West Sonoma County Hand and Physical Therapy Clinic 968 Gravenstein Hwy. SouthSebastopol, CA 95472707-824-8018