MEP-BIM process for designing project Origin, Suspended Ceilings, Provisions for Voids
C-Form Suspended Ceilings 123
Generate specifications at www.knauf.co.ukGenerate specifications at www.knauf.co.uk
122 C-Form Suspended Ceilings
Knauf C-Form Suspended CeilingsInstallation ProceduresKnauf Ceiling systems are designed to be simple and fast to install. Knauf Technical Services are on hand should you have any questions or unusual situations to deal with.
GeneralThe Knauf C-Form Suspended Ceiling system must be installed in accordance with Knauf’s recommendations and the recommendations of BS 8212: 1995 and BS 8000: Part 8: 1994.
When creating an airtight space, methods for the reduction of potential ‘ceiling lift’ should be considered. For further advice contact Knauf Technical Services.
Perimeter Fixing 120mm Knauf ‘U’ Channel – Perimeter Support Channels should be secured to the walls at the required heights, at maximum 600mm centres and 50mm from the ends of channels. The top of the channel should align with the underside of the upper Knauf ‘C’ Channel.
Knauf ‘U’ Channel – Perimeter Support channels forming the perimeter do not need to be mechanically fixed together.
Suspension 2Select the fixing centres suited to the ceiling loading. See page 121.
Fix Knauf Soffit Cleats to the structural soffit with suitable fixings. Choose either Knauf Angle Section or the flexible Knauf Strap Hanger and fix to the Knauf Soffit Cleat. When creating a shallow ceiling void, Knauf Universal Brackets can be used.
Upper ‘C’ Channels 3 The centres of the upper Knauf ‘C’ Channels depend on the loading requirements. See page 121.
Knauf Angle Section or Knauf Strap Hanger should be fixed staggered to either side of the Knauf ‘C’ Channel with two Knauf Wafer Head Jackpoint Screws. The upper ‘C’ Channels should lie on the upper flange of the 20mm Knauf ‘U’ Channel –Perimeter Support.
Lower ‘C’ Channels 4,5,6The lower Knauf ‘C’ Channels should be positioned at 450mm centres within the perimeter channels to coincide with the abutments of the boards, which will be fixed later.
Connect the lower ‘C’ Channels to the upper ‘C’ Channels by means of Knauf Channel Intersection Connectors. These connectors fit over the upper ‘C’ Channels and snap-fix into the lower ‘C’ Channels.
InsulationOnce the upper and lower Knauf ‘C’ Channels have been connected and before the boarding has started, the specified Knauf insulation should be inserted above the upper ‘C’ Channels, if required. Care should be taken to ensure that the insulation is fitted neatly without gaps at abutments or between different rolls.
Movement Control JointsCreate movement control joints where ceiling runs exceed 10m, coinciding where possible with movement joints in the surrounding structure.
Boarding 7,8All boards should be offered up to the ceiling grid with the decorative face of the boards outwards and secured with Knauf Screws at maximum 230mm centres. Fixing centres should be reduced to 150mm at ends and perimeter.
Boards should be mounted at 90° to the direction of the ceiling channels.
Once Knauf Plasterboards have been installed, spray apply Knauf Readymix plaster to finish ceiling ready for decoration.
123
3.
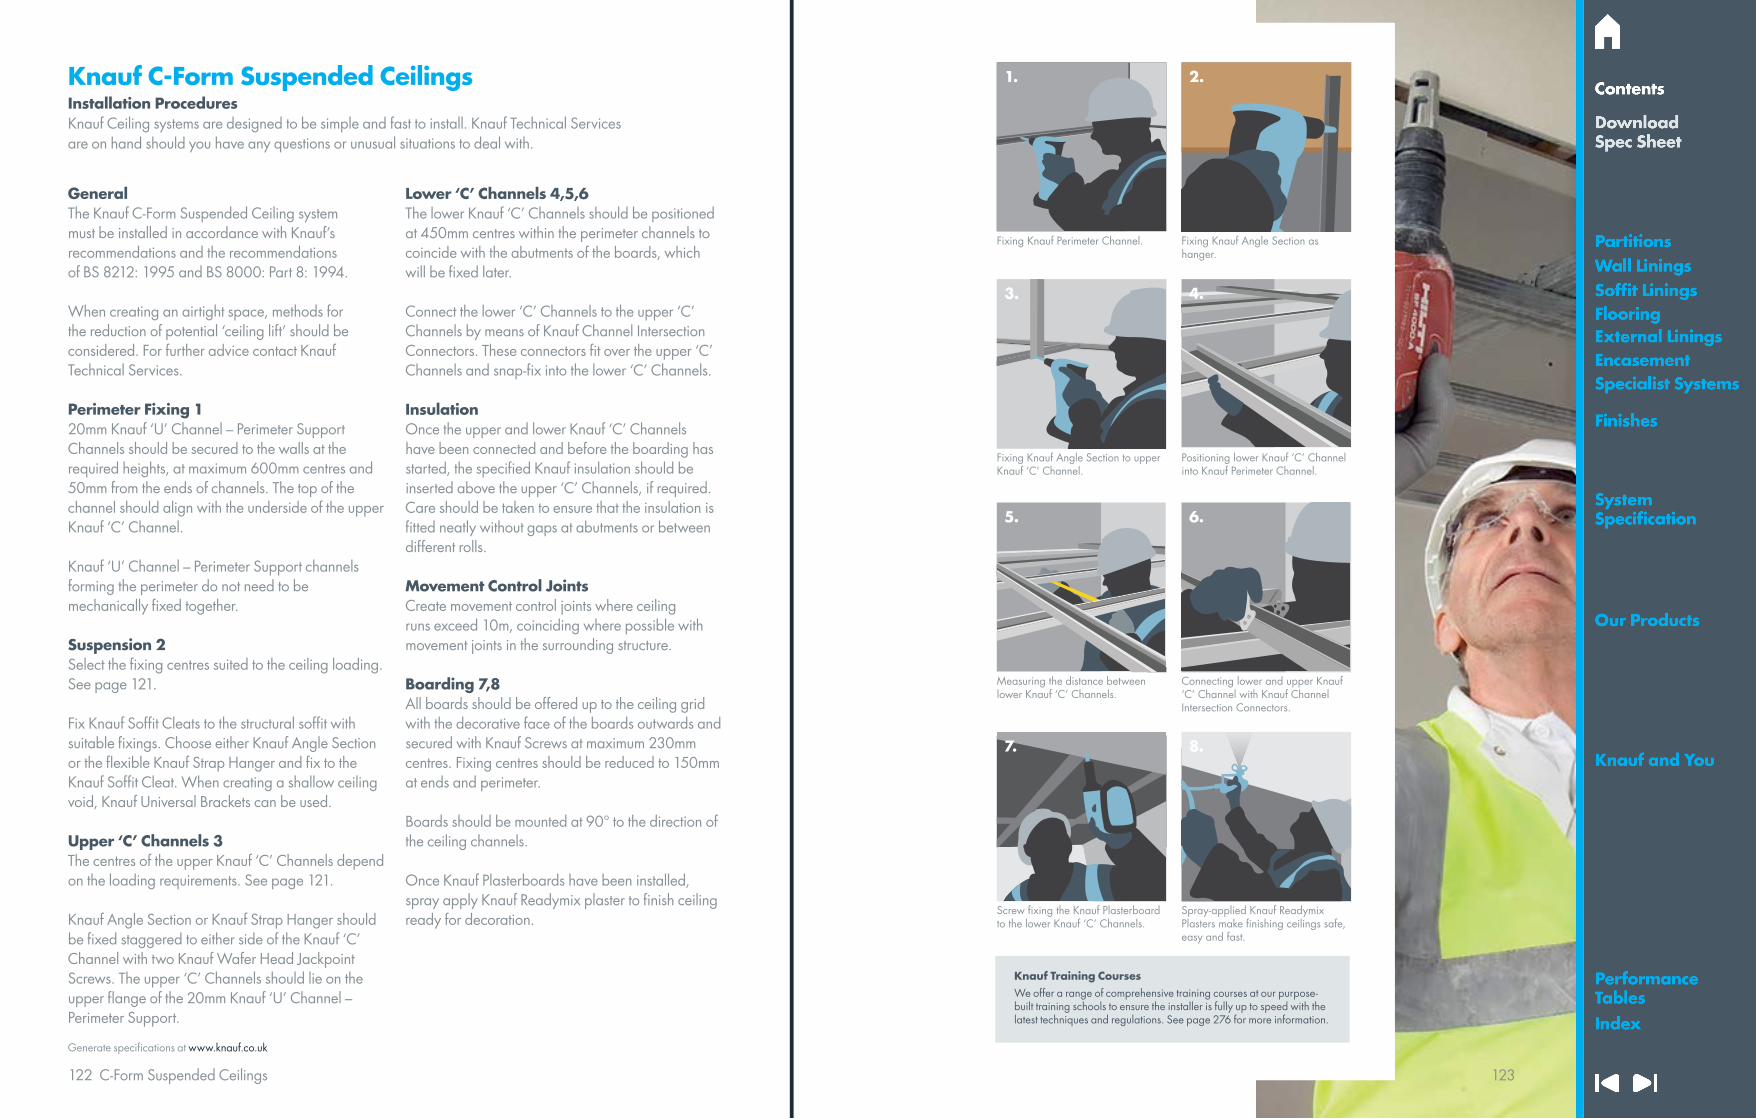
Fixing Knauf Angle Section to upper Knauf ‘C’ Channel.
5.
7.
Measuring the distance between lower Knauf ‘C’ Channels.
Screw fixing the Knauf Plasterboard to the lower Knauf ‘C’ Channels.
4.
Positioning lower Knauf ‘C’ Channel into Knauf Perimeter Channel.
6.
8.
Connecting lower and upper Knauf ‘C’ Channel with Knauf Channel Intersection Connectors.
Spray-applied Knauf Readymix Plasters make finishing ceilings safe, easy and fast.
Fixing Knauf Angle Section as hanger.
2.
Fixing Knauf Perimeter Channel.
1.
Knauf Training CoursesWe offer a range of comprehensive training courses at our purpose- built training schools to ensure the installer is fully up to speed with the latest techniques and regulations. See page 276 for more information.