KEEP IT SIMPLE, SETUP (KISS) with Precision Gauges & Tools
13
KEEP IT SIMPLE, SETUP (KISS) ™ with Precision Gauges & Tools
Transcript of KEEP IT SIMPLE, SETUP (KISS) with Precision Gauges & Tools

KEEP IT SIMPLE, SETUP (KISS)™
with Precision Gauges & Tools
For more details & how-to videos visit MusicNomadCare.com 32
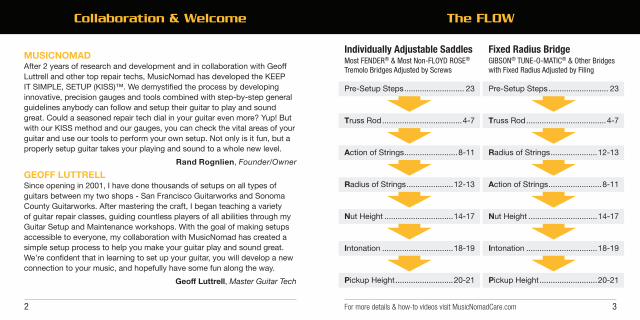
MUSICNOMADAfter 2 years of research and development and in collaboration with Geoff Luttrell and other top repair techs, MusicNomad has developed the KEEP IT SIMPLE, SETUP (KISS)™. We demystified the process by developing innovative, precision gauges and tools combined with step-by-step general guidelines anybody can follow and setup their guitar to play and sound great. Could a seasoned repair tech dial in your guitar even more? Yup! But with our KISS method and our gauges, you can check the vital areas of your guitar and use our tools to perform your own setup. Not only is it fun, but a properly setup guitar takes your playing and sound to a whole new level.
Rand Rognlien, Founder/OwnerGEOFF LUTTRELLSince opening in 2001, I have done thousands of setups on all types of guitars between my two shops - San Francisco Guitarworks and Sonoma County Guitarworks. After mastering the craft, I began teaching a variety of guitar repair classes, guiding countless players of all abilities through my Guitar Setup and Maintenance workshops. With the goal of making setups accessible to everyone, my collaboration with MusicNomad has created a simple setup process to help you make your guitar play and sound great. We’re confident that in learning to set up your guitar, you will develop a new connection to your music, and hopefully have some fun along the way.
Geoff Luttrell, Master Guitar Tech
Collaboration & Welcome The FLOW
Fixed Radius BridgeGIBSON® TUNE-O-MATIC® & Other Bridges with Fixed Radius Adjusted by Filing
Pre-Setup Steps ........................... 23
Truss Rod ....................................4-7
Radius of Strings .....................12-13
Action of Strings ........................8-11
Nut Height ...............................14-17
Intonation ................................18-19
Pickup Height ..........................20-21
Individually Adjustable SaddlesMost FENDER® & Most Non-FLOYD ROSE® Tremolo Bridges Adjusted by Screws
Pre-Setup Steps ........................... 23
Truss Rod ....................................4-7
Action of Strings ........................8-11
Radius of Strings .....................12-13
Nut Height ...............................14-17
Intonation ................................18-19
Pickup Height ..........................20-21
For more details & how-to videos visit MusicNomadCare.com 5
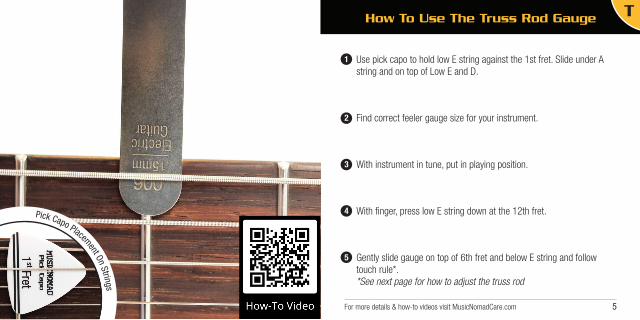
How To Use The Truss Rod Gauge
1 Use pick capo to hold low E string against the 1st fret. Slide under A string and on top of Low E and D.
2 Find correct feeler gauge size for your instrument.
3 With instrument in tune, put in playing position.
4 With finger, press low E string down at the 12th fret.
5 Gently slide gauge on top of 6th fret and below E string and follow touch rule*.
*See next page for how to adjust the truss rod
T
Pick Capo Placement On Strings
For more details & how-to videos visit MusicNomadCare.com 7
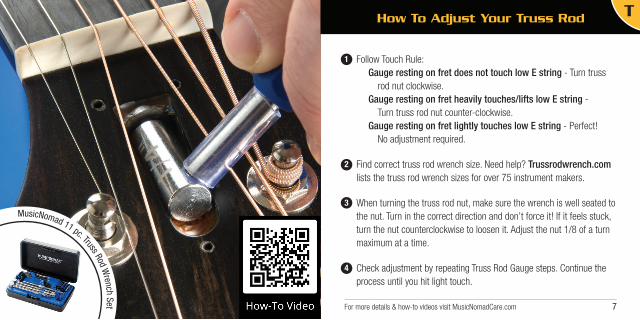
How To Adjust Your Truss Rod
1 Follow Touch Rule: Gauge resting on fret does not touch low E string - Turn truss rod nut clockwise.
Gauge resting on fret heavily touches/lifts low E string - Turn truss rod nut counter-clockwise.
Gauge resting on fret lightly touches low E string - Perfect! No adjustment required.
2 Find correct truss rod wrench size. Need help? Trussrodwrench.com lists the truss rod wrench sizes for over 75 instrument makers.
3 When turning the truss rod nut, make sure the wrench is well seated to the nut. Turn in the correct direction and don’t force it! If it feels stuck, turn the nut counterclockwise to loosen it. Adjust the nut 1/8 of a turn maximum at a time.
4 Check adjustment by repeating Truss Rod Gauge steps. Continue the process until you hit light touch.
T
MusicNomad 11 pc. Truss Rod Wrench Set
For more details & how-to videos visit MusicNomadCare.com 9
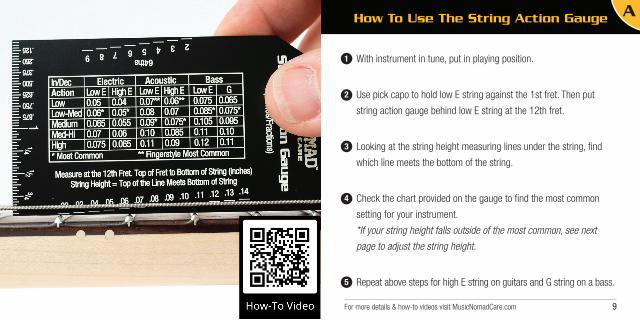
How To Use The String Action Gauge
1 With instrument in tune, put in playing position.
2 Use pick capo to hold low E string against the 1st fret. Then put
string action gauge behind low E string at the 12th fret.
3 Looking at the string height measuring lines under the string, find
which line meets the bottom of the string.
4 Check the chart provided on the gauge to find the most common
setting for your instrument.
*If your string height falls outside of the most common, see next
page to adjust the string height.
5 Repeat above steps for high E string on guitars and G string on a bass.
A
For more details & how-to videos visit MusicNomadCare.com 11
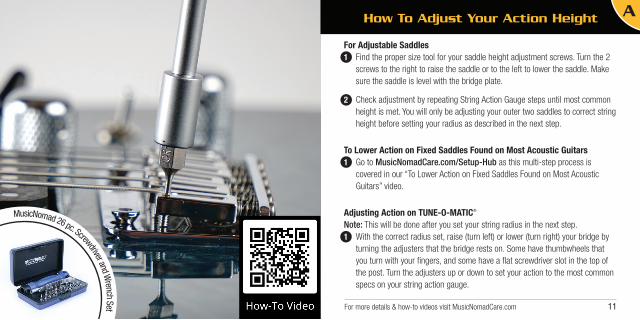
How To Adjust Your Action Height
For Adjustable Saddles1 Find the proper size tool for your saddle height adjustment screws. Turn the 2
screws to the right to raise the saddle or to the left to lower the saddle. Make sure the saddle is level with the bridge plate.
2 Check adjustment by repeating String Action Gauge steps until most common height is met. You will only be adjusting your outer two saddles to correct string height before setting your radius as described in the next step.
To Lower Action on Fixed Saddles Found on Most Acoustic Guitars1 Go to MusicNomadCare.com/Setup-Hub as this multi-step process is
covered in our “To Lower Action on Fixed Saddles Found on Most Acoustic Guitars” video.
Adjusting Action on TUNE-O-MATIC®
Note: This will be done after you set your string radius in the next step.1 With the correct radius set, raise (turn left) or lower (turn right) your bridge by
turning the adjusters that the bridge rests on. Some have thumbwheels that you turn with your fingers, and some have a flat screwdriver slot in the top of the post. Turn the adjusters up or down to set your action to the most common specs on your string action gauge.
A
MusicNomad 26 pc. Screwdriver and Wrench Set
For more details & how-to videos visit MusicNomadCare.com 13
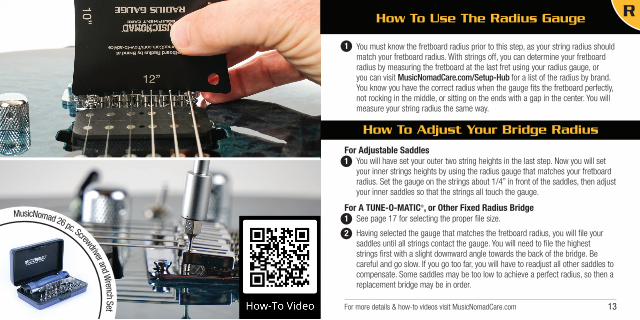
How To Use The Radius Gauge
How To Adjust Your Bridge Radius
1 You must know the fretboard radius prior to this step, as your string radius should match your fretboard radius. With strings off, you can determine your fretboard radius by measuring the fretboard at the last fret using your radius gauge, or you can visit MusicNomadCare.com/Setup-Hub for a list of the radius by brand. You know you have the correct radius when the gauge fits the fretboard perfectly, not rocking in the middle, or sitting on the ends with a gap in the center. You will measure your string radius the same way.
For Adjustable Saddles 1 You will have set your outer two string heights in the last step. Now you will set
your inner strings heights by using the radius gauge that matches your fretboard radius. Set the gauge on the strings about 1/4” in front of the saddles, then adjust your inner saddles so that the strings all touch the gauge.
For A TUNE-O-MATIC®, or Other Fixed Radius Bridge1 See page 17 for selecting the proper file size.
2 Having selected the gauge that matches the fretboard radius, you will file your saddles until all strings contact the gauge. You will need to file the highest strings first with a slight downward angle towards the back of the bridge. Be careful and go slow. If you go too far, you will have to readjust all other saddles to compensate. Some saddles may be too low to achieve a perfect radius, so then a replacement bridge may be in order.
R
MusicNomad 26 pc. Screwdriver and Wrench Set
For more details & how-to videos visit MusicNomadCare.com 1514
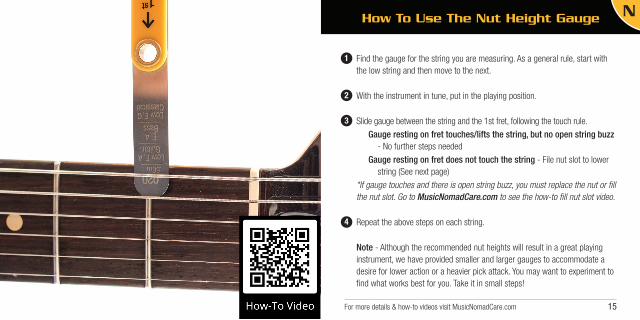
How To Use The Nut Height Gauge
1 Find the gauge for the string you are measuring. As a general rule, start with the low string and then move to the next.
2 With the instrument in tune, put in the playing position.
3 Slide gauge between the string and the 1st fret, following the touch rule.
Gauge resting on fret touches/lifts the string, but no open string buzz - No further steps needed
Gauge resting on fret does not touch the string - File nut slot to lower string (See next page)
*If gauge touches and there is open string buzz, you must replace the nut or fill the nut slot. Go to MusicNomadCare.com to see the how-to fill nut slot video.
4 Repeat the above steps on each string.
Note - Although the recommended nut heights will result in a great playing instrument, we have provided smaller and larger gauges to accommodate a desire for lower action or a heavier pick attack. You may want to experiment to find what works best for you. Take it in small steps!
N
For more details & how-to videos visit MusicNomadCare.com 1716
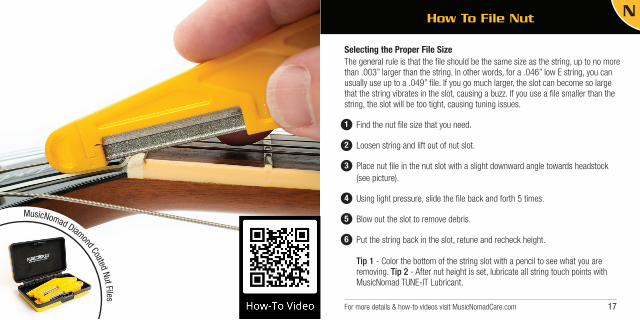
How To File Nut
Selecting the Proper File Size The general rule is that the file should be the same size as the string, up to no more than .003” larger than the string. In other words, for a .046” low E string, you can usually use up to a .049” file. If you go much larger, the slot can become so large that the string vibrates in the slot, causing a buzz. If you use a file smaller than the string, the slot will be too tight, causing tuning issues.
1 Find the nut file size that you need.
2 Loosen string and lift out of nut slot.
3 Place nut file in the nut slot with a slight downward angle towards headstock (see picture).
4 Using light pressure, slide the file back and forth 5 times.
5 Blow out the slot to remove debris.
6 Put the string back in the slot, retune and recheck height.
Tip 1 - Color the bottom of the string slot with a pencil to see what you are removing. Tip 2 - After nut height is set, lubricate all string touch points with MusicNomad TUNE-IT Lubricant.
N
MusicNomad Diamond Coated Nut Files
For more details & how-to videos visit MusicNomadCare.com 1918
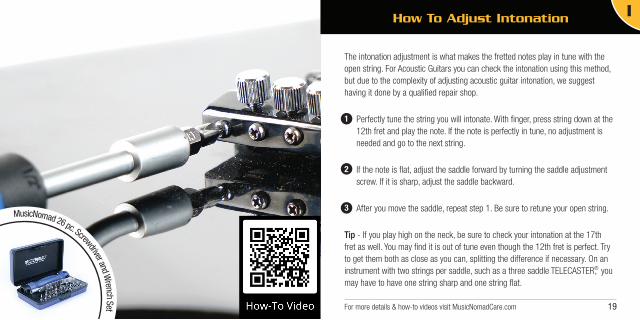
How To Adjust Intonation
The intonation adjustment is what makes the fretted notes play in tune with the open string. For Acoustic Guitars you can check the intonation using this method, but due to the complexity of adjusting acoustic guitar intonation, we suggest having it done by a qualified repair shop.
1 Perfectly tune the string you will intonate. With finger, press string down at the 12th fret and play the note. If the note is perfectly in tune, no adjustment is needed and go to the next string.
2 If the note is flat, adjust the saddle forward by turning the saddle adjustment screw. If it is sharp, adjust the saddle backward.
3 After you move the saddle, repeat step 1. Be sure to retune your open string.
Tip - If you play high on the neck, be sure to check your intonation at the 17th fret as well. You may find it is out of tune even though the 12th fret is perfect. Try to get them both as close as you can, splitting the difference if necessary. On an instrument with two strings per saddle, such as a three saddle TELECASTER®, you may have to have one string sharp and one string flat.
I
MusicNomad 26 pc. Screwdriver and Wrench Set
For more details & how-to videos visit MusicNomadCare.com 2120
MusicNomad 26 pc. Screwdriver and Wrench Set
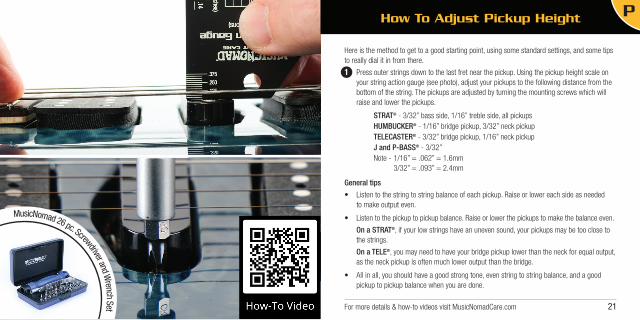
How To Adjust Pickup Height
Here is the method to get to a good starting point, using some standard settings, and some tips to really dial it in from there.
1 Press outer strings down to the last fret near the pickup. Using the pickup height scale on your string action gauge (see photo), adjust your pickups to the following distance from the bottom of the string. The pickups are adjusted by turning the mounting screws which will raise and lower the pickups.
STRAT® - 3/32” bass side, 1/16” treble side, all pickups HUMBUCKER® - 1/16” bridge pickup, 3/32” neck pickup TELECASTER® - 3/32” bridge pickup, 1/16” neck pickup J and P-BASS® - 3/32” Note - 1/16” = .062” = 1.6mm 3/32” = .093” = 2.4mm
General tips
• Listen to the string to string balance of each pickup. Raise or lower each side as needed to make output even.
• Listen to the pickup to pickup balance. Raise or lower the pickups to make the balance even.
On a STRAT®, if your low strings have an uneven sound, your pickups may be too close to the strings.
On a TELE®, you may need to have your bridge pickup lower than the neck for equal output, as the neck pickup is often much lower output than the bridge.
• All in all, you should have a good strong tone, even string to string balance, and a good pickup to pickup balance when you are done.
P
For more details & how-to videos visit MusicNomadCare.com 2322
Other Helpful Info Pre-Setup Steps
Use MusicNomad’s TheGuitarTracker.com to keep track of your setup information by guitar.
Visit MusicNomadCare.com for instructional videos on all these steps and more.
Our Story: Combining our passions for cleaning & helping independent musicians, Music Nomad Equipment Care delivers professional grade products to restore, maintain & protect your instrument. We bring together talent from around the world to help in making the best products for musicians. Every purchase automatically contributes money to help independent musicians through our giving back initiatives. Learn more at www.MusicNomadCare.com.
FENDER®, FLOYD ROSE®, GIBSON®, TUNE-O-MATIC®, STRAT®, HUMBUCKER®, TELECASTER®, J-BASS® and P-BASS®and all other third party brand names are trademarks of their respective owners. Music Nomad LLC is not affiliated with those owners, nor claims ownership of those marks.
1 Remove strings with MusicNomad GRIP Cutter.
2 With MusicNomad Radius Gauge, measure and make a note of the fretboard radius as you will need this info when you measure your string radius in the setup process.
3 Tighten all screws, including tuning machine bushings with MusicNomad Guitar Tech Tool Set.
4 Polish frets with MusicNomad FRINE Fret Polish.
5 Clean and condition fretboard with MusicNomad F-ONE Oil.
6 Clean body and neck with MusicNomad Cleaners.
7 Put new strings on with MusicNomad GRIP Winder.
You Are Now Ready To Start The Setup.

24
www.MusicNomadCare.com