Keenan Operators Manual - keenanservice.com minimum moving parts ensure a ... 9 Parts list 37 ......
52
MODELS: D3D.K/KBH4-EN/1007 - Rev.4 OPERATORS manual Klassik 80, 100, 115, 140, 170, 200 Klassik Bale Handler 100, 140, 170, 200 Model shown is the Klassik Bale Handler 140
Transcript of Keenan Operators Manual - keenanservice.com minimum moving parts ensure a ... 9 Parts list 37 ......

MMOODDEELLSS::
D3D.K/KBH4-EN/1007 - Rev.4
OPERATORSmanual
KKllaassssiikk 8800,, 110000,, 111155,, 114400,, 117700,, 220000
KKllaassssiikk BBaallee HHaannddlleerr 110000,, 114400,, 117700,, 220000
Model shown is the Klassik Bale Handler 140

usin
g th
e m
anua
lMost sections of the manual apply to both the Keenan Klassik and the
Keenan Klassik Bale Handler machines and all models. Sections which do
not apply to both machines will be clearly stated in the heading and the
text.
Notes:
There are 3 different types of notes.
The Keenan Klassik and the Keenan Klassik Bale Handler machines are
subject to International patents including the following:
European: E0,833,558 USA: 5,967,433
Japan: Pending Canada: Pending
Australia: 691418 New Zealand: 305943
South Africa: 96/3148
WARNING:Texts with this symbol contain safety information.They warn you of serious dangers, possiblyinvolving accident or injury.
CAUTION:Texts with this symbol draw your attention to apossible risk of damage to your Keenan Klassik. Failure to observe the information contained in acaution may invalidate your warranty.
Note:Texts with this heading give general information which improve the operation orefficiency of your Keenan Klassik.
WA R N I N G N OT E S
1
WARNING:Read the safety section (section 3) before attempting to operate the machine.

The Keenan Klassik is a TMR feeder with adifference.The original Keenan mixer wagon becamea market leader due to its reliability anddurability, founded on simplicity, fastefficient mixing and feed out and lowhorse power requirements. The KeenanKlassik built on these capabilities byadding the ability to chop and present in aconsistent fashion, time and time again.This ability is the cornerstone of theKeenan System, delivering improvedefficiency and profitability on the farm.More recently, the Bale Handler modelshave introduced the ability to handle balesof all sizes and types.The minimum moving parts ensure arobust machine with high mechanicalefficiency. Simple routine maintenanceand correct operation will deliver manyyears of service. However in the event ofunforeseen problems, Keenan’s world classservice means you can be assured of aprompt resolution.
intr
oduc
tion
The Keenan Klassikis the cornerstoneof the KeenanSystem, deliveringimproved efficiencyand profitability onthe farm.
2
K L A S S I K A N D K L A S S I KB A L E H A N D L E R
This manual has been designed to presentthe information you need to operate andmaintain your machine. If you requirefurther assistance or information, pleasecontact your System Specialist. Telephonenumbers are listed on the back cover ofthis manual.
SECTION CONTENTS PAGEUsing the manual and Introduction 1
1 Warning signs 32 Operating Principles 43 Safety 74 Weighing system 115 Operating the Klassik and Klassik Bale Handler 126 Maintenance 227 Maintenance checklist 328 Standard specifications 369 Parts list 3710 Troubleshooting 4211 Warranty 4612 E.C. declaration of conformity / CE Certification 48
T H E K E E N A N

3
war
ning
sig
ns1. WARNING S IGNS
Read OperatorsManual
Before usingmachine
Danger from flyingobjects
Keep a safedistance fromthis machine
Stay clear of sharpblade
Do not open orremove safety
guards while thefeeder is
connected to thetractor
Shut off engine andremove key before
performingmaintenance or
repair work
Never reach intoRotating auger
Do not ride onplatformor ladder
Danger, bladesinside mixer
Do not standbetween tractor
and mixer-wagonwhile in operation

The Klassik’s main operating functions are weighing, chopping / mixing and
feeding out.
WEIGHINGThe Klassik electronic weighing system allows the exact quantity of individual
materials to be loaded into the mixing chamber for accurate rationing.
Individual loads can be weighed or successive loads accumulated to give total
weight of feed. See Section 4 and the readout manual for more detailed
information.
CHOPPING / MIXINGLoad ingredients in sequence recommended by your Keenan system
specialist, or as detailed in Section 5 (Operating procedures).
For non bale handler models, ensure bales are broken up prior to loading. For
bale handlers, wait until bale is taken in completely before adding further
bales.
As a general rule, material should be tumbling freely when mixing. If not then
the machine is overloaded.
Mixing is carried out by a centrally-mounted rotor fitted with 6 angled paddles
revolving at 5 - 10rpm. The paddle imparts a shearing action, sweeping the
feed ingredients onto the strategically placed knives to produce a consistent
and thorough mix with all types of materials, including baled silage/hay,
straw, roots and liquids.
wei
ghin
g
4
2 . O P E R AT I N G P R I N C I P L E S
CAUTION:For bale handler models, do not load more than one baleat a time.
chop
pin
g
CAUTION:Overloading will seriously affect machine performance andlife, and will invalidate your warranty.
The angled paddles help mixing by sweeping the material from end to end.
The placement of the blades ensures the materials reach optimum
size/length, without grinding it down and destroying the all important ‘scratch
factor’ of the forages.
Mixing time will be determined by the required chop length. Follow
procedures contained in this manual or consult your Keenan TMR specialist for
further information.
Root crops can be washed in machines fitted with a ‘beet grid’ by adding
water to the load. When the process is complete, the grid can be opened
and the water drained away.
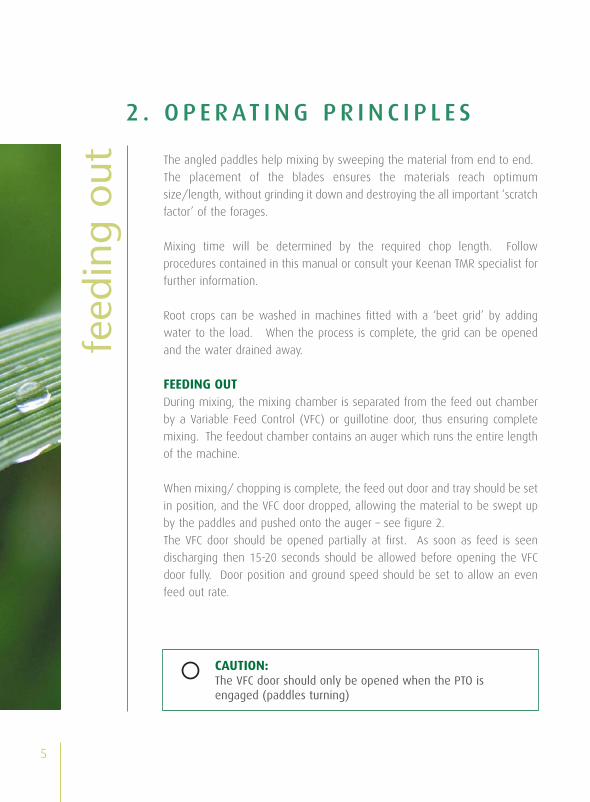
FEEDING OUTDuring mixing, the mixing chamber is separated from the feed out chamber
by a Variable Feed Control (VFC) or guillotine door, thus ensuring complete
mixing. The feedout chamber contains an auger which runs the entire length
of the machine.
When mixing/ chopping is complete, the feed out door and tray should be set
in position, and the VFC door dropped, allowing the material to be swept up
by the paddles and pushed onto the auger – see figure 2.
The VFC door should be opened partially at first. As soon as feed is seen
discharging then 15-20 seconds should be allowed before opening the VFC
door fully. Door position and ground speed should be set to allow an even
feed out rate.
5
feed
ing
out
2 . O P E R AT I N G P R I N C I P L E S
CAUTION:The VFC door should only be opened when the PTO isengaged (paddles turning)

MAINTENANCE
A properly operated and maintained Keenan mixer will give years of trouble
free operation. Regular maintenance of the machine is essential both for
long machine life and to meet warranty requirements. Refer to
instructions in maintenance section of this manual. Weekly cleaning of
machine is advised to prevent corrosion to the mixer body from old feed.
SAFETYThe Keenan has been designed to reduce risk to a minimum. However, as with
any machine, careful observation of safety procedures is necessary to prevent
accidents.
See inside for further details on each section. If you have any further questions
please contact your local Keenan centre for advice.
Figure 1
mai
nten
ance
2 . O P E R AT I N G P R I N C I P L E S
6
WARNING:Read the safety section (section 3) before attempting tooperate machine.

The Klassik has many safety features built into its design but ultimately, safe
operation requires the vigilance of the operator and an understanding of
potential safety hazards.
The Klassik is designed to be used as a mixer/chopper wagon for mixing
animal feeds. It should not be used for any other purpose which will affect
its performance or safety.
The following safety points are general guidelines. Given the wide variety of
possible operating conditions other safety risks may exist which are not
captured in the list over.
7
safe
ty3 . S A F E T Y
WARNING:The operator is responsible for the safe operation of themachine at all times. This machine should only be operatedby one person at all times. There is no noise significantemission from the feeder, as the noise emission will bemuch lower than the tractor noise emission.
Figure 2.

safe
ty
8
a. Always park the feeder on level ground and apply the handbrakewhen not in use.
b. Do not exceed 15km/hr (10mph) when in transit. Local road trafficlaws will apply when machine is in transit on public road.
c. Exercise extreme caution when on the road for other road users.d. Do not stand on the ladder whilst feeder is in transit and the feeder
should never be used for the transport of people, animals or objects.e. Do not stand between tractor and feeder during use. f. Use only a PTO shaft with a properly fitted safety guard and shear bolt.g. Always connect the PTO shaft with the shear bolt end to the mixer-
wagon. The operating speed of the PTO is 540 rpm and the direction ofrotation is marked on the front cover. Always use a well maintainedPTO shaft and keep safety covers in good condition.
h. Ensure all trailing leads, hoses etc are well clear of the PTO.i. Do not operate PTO in ”ground speed mode”.j. Make sure all covers/guards are fitted and locked closed with the keys
provided. Never remove guards when the feeder is connected to atractor. Ensure that the engine of the tractor is stopped and PTO shaftdisconnected before carrying out service or maintenance work - especially when removing trapped objects from the machine.
k. Ensure the feeder and the immediate area surrounding it is clear ofpeople, especially children, before commencing operation. Ensure thatthere is sufficient visibility for the operator to observe all danger zonesand that the tractor is equipped with mirrors to enable operator to seeboth sizes of the machine in operation.When connecting the tractor to the feeder only connect using the ringhitch on the feeder to ensure safe coupling. Ensure that the hitch isconnected properly to the tractor and that all pins and clips areproperly installed. Then connect the PTO shaft in the correct fashionand then connect the hydraulic hoses ensuring that the functionsmatch the indicated valve on the tractor.When disconnecting always ensure that the stand or jack is used tosecure the machine in the park position and ensure that the handbrakeis properly applied before driving tractor away from the feeder. Ensurethat all hoses and cables are disconnected before driving away.
3 . S A F E T Y

l. Load only from the side indicated (auger chamber side) using suitableequipment.
m. Standing level with or above the machine in order to loadmanually is not permitted. Loading should be carried out withsuitable equipment.
n. Regularly inspect all chains (at least weekly), sprockets and movingparts for wear and check all nuts and bolts for tightness.
o. The ladder on the rear of the feeder is to be used as a viewing pointfor the mixing chamber. It should not be used as a means of access tothe mixing chamber or onto the body of the feeder. It is strictlyforbidden to climb on the upper brim of the machine body.
p. Routine cleaning should be carried out using a power hose, with thebeet grid open eliminating any reason to climb into the mixingchamber.
q. The top knife should always be fitted with the supplied guard beforeroutine cleaning or maintenance is carried out. The machine issupplied with a top knife guard which should be removed and storedin the pocket of the front guard, before using the machine.
9
safe
ty3 . S A F E T Y
Figure 3. Top Knife Protection

safe
ty
10
r. It is recommended that only Keenan trained and qualified main-tenance personnel enter the mixing chamber. In the case of an untrained person entering the mixing chamber, at the very minimum,the following precautionary safety guidelines should be strictly adhered to at all times.
1. Ensure the PTO is removed.2. Apply the mixer wagon handbrake and disconnect
the tractor on level ground.3. Use a suitable ladder for access to and from the
mixer wagon.Note: The viewing ladder is only used for viewing and not for access to the mixing chamber.
4. Personnel should make themselves familiar with thelocation of all potential hazards before entering themachine, in particular the location of the top knifeand body blades.
5. Use suitable Personnel Protective Equipment.
If the person intending to enter and work within the machine is notconfident about doing so safely, then they should contact a KeenanService Person to complete the work.
s. SODAGRAIN. Additional safety instructions and warnings are included
in the sodagrain leaflet which should be read carefully before soda
treating grain.
When finished treating grain, clean out any remaining material in the
mixing and/or auger chamber by loading in 200-300 Kg of silage or
50 Kg of straw and unloading in the normal manner.
WARNING:Failure to follow the safety guidelines above may lead tothe risk of accident or injury.
3 . S A F E T Y

The weighing system is designed to be simple to operate, accurate and robust.
It consists of four load cells connected to an indicator unit (readout box) at the
front of the machine. The system uses 12 volt DC power from the tractor.
The indicator unit can be rotated for visibility during loading and from the
tractor cab. Loads are displayed in kilograms or lbs with scale increments of
5kg/10lbs. The unit is capable of measuring up to 20 tonnes (44000lbs).
The system is maintenance free being fully electronic with no moving parts.
All components are sealed against moisture and dust and are resistant to frost
and corrosion.
The indicator unit may vary with model and region. A separate manual is
supplied for your indicator unit, which you should refer to for specific
operating instruction.
INSTRUCTIONS FOR ELECTRONIC READOUT BOX ARE CONTAINED
IN A SEPARATE MANUAL
11
safe
ty4 . W E I G H I N G S Y S T E M
CAUTION:Although the weigh-box and connections are sealed againstmoisture, it is advised to protect or remove the weigh-boxand the weigh-bar plugs when power washing the mixerwagon.

set-
up
12
The simplicity of the Klassik design is reflected in its low power requirement.
The power required varies, depending on the mix used, the dry matter and the
amount of chopping required.
If a tractor is at its limit during mixing this will translate into extra strain on
moving parts, as there will be surges in power as the engine recovers during
certain parts of the mix.
A tractor that has sufficient power will provide a much smoother drive to the
mixer-wagon during all stages of operation. Machines fitted with a
planetary/reduction gearbox will reduce the power requirements accordingly.
5.1 SET-UP
I. Ensure machine is level when hitched up.
II. The PTO shaft should be attached with the shear bolt
end coupled to the mixer-wagon. Make sure that the PTO
guard is in good condition and well secured.
III. Connect the following hydraulic lines from the machine
to double acting spool valves, using the colour coding
as indicated on the front of the machine.
• Variable feed control door
• Feed out tray / door
• Wash gate (if fitted)
• Bale handler Creel (if fitted)
IV. Connect the line from the brakes to a single acting valve.
5 . O P E R AT I O N
CAUTION:Do not operate PTO in “ground speed” mode. Reversing thedrive on your machine will cause serious damage.

V. Examine the mixing chamber to ensure that;
• All blade covers have been removed
• All spare parts and foreign objects have been removed
• No damage has taken place during transport.
VI. Fit the weigh-box to the plate on the swinging arm and
attach the display cable from the junction box. Ensure the
power lead from the weighing system is connected to the
tractor battery via a direct fused line or place a 12v battery
in the side box and connect with crocodile clips.
Test by switching on the weigh box, then zero the scales.
Stand on the back of the ladder and check the display with your
known weight.
set-
up
Figure 4. Photograph illustrates a well mixedration showing consistent fibre length andintegration of forages and grains
5 . O P E R AT I O N
13

set-
up
VII. With the tractor running, check that the VFC door
opens fully and closes completely. Similarly check the
movement of the feedout tray. Engage the PTO and
check the turning of the paddles. The initial turning of
the paddle rubbers against the side of the Klassik will
generate a lot of initial noise but this will decrease as
the paddle rubbers become more pliable.
As a general rule engine speed during loading should
be as low as possible without the risk of stalling the
tractor. See guidelines on loading and mixing
procedures.
5 . O P E R AT I O N
14
Figure 5. Loading of baled material (non bale handler models)
Load thisside only

mix
er w
agon
cap
acity
5 . O P E R AT I O N
15
5.2 MIXER WAGON CAPACITY
Due to the diversity of the materials available for feed purposes and theKlassik’s ability to incorporate a wide range of feed types into the ration thecapacity of the machine will vary. Ensure that overloading is avoided at alltimes as mix quality will be seriously affected and potential machine damagemay result.
Overloading must be avoided because:• The mix will not be homogenous (evenly mixed), so you
don’t get the maximum benefit from the machine.• Mechanical failure will result. Due to the nature of the
loading this may occur at load levels below that necessaryto break the shear bolt.
The overall amount of material that can be chopped/mixed in one loaddepends on the following;
• Machine size.• Overall dry matter of the TMR.• The chop length and quality of the material added.• The loading procedure and loading order of the
materials used (this has a major effect on machinecapacity e.g. the addition of straw first or last).
• Tractor H.P rating.
CAUTION:The machine can be overloaded long before the shear boltbreaks. Therefore not breaking shear bolt is not an indicationthat the machine is not being overloaded.

load
ing
& m
ixin
g5 . O P E R AT I O N
16
5.3 LOADING & MIXING
Note: The unique tumbling action of the machine is what carries out the mixing.If the machine is overloaded or loaded in the wrong order, or insufficient timeis allowed for proper chopping, then this tumbling action will not take place. Inaddition to reducing mix quality, it increases the horsepower requirements andreduces the life of the machine.
The effectiveness and speed of chop is determined by;
• The number of effective (sharp and intact) blades in the Klassik. • The dry matter of the material to be added.• The amount of pre chopping of material.• The loading sequence.• The total amount of material to be chopped.• The density of the bale.
CAUTION:Overloading will seriously affect machine performance andlife, and will invalidate your warranty.

load
ing
your
kla
ssik
5 . O P E R AT I N G T H E K L A S S I K
17
LOADING YOUR KEENAN KLASSIK
GENERAL
• Park on level ground.
• Ensure variable feed control door (VFC) is closed.
• Do not start PTO when VFC door is open.
LOADING AND MIXING SEQUENCE
• Load feed as close as possible to the loading side of the unit.
• Load concentrate feeds in the centre.
• Load forages to the front, back and centre of the unit in
alternate grabs during the mixing process.
• Remove all twine, wrap or polythene from bales.
• Round or square bales should be spilt or broken into 4 pieces minimum.
Use front grab or forks as required.
• Load in the order shown below.
• Mixing time will depend on chop length required.
• Stop PTO before moving to feed out area.
Loading your Keenan Klassik Decal
Water, liquid feeds 1st
Straw 2nd
Minerals, Protein All at 1200-1400 RPMmeals, Pulps, Cereal 3rd 6-8 RPMgrains
Grass silage 4thMaize silage, cerealsilage
Feed Ingredients Load Order Paddle RPM Tractor EngineSpeed RPM
5th

load
ing
your
kla
ssik
bal
e ha
ndle
r
5 . O P E R AT I N G T H E K L A S S I KB A L E H A N D L E R
18
LOADING YOUR KEENAN KLASSIK BALE HANDLER
GENERAL• Park on level ground. • Ensure variable feed control door (VFC) is closed. • Do not start PTO when VFC door is open.
LOADING AND MIXING SEQUENCE• Set paddles running at 5-6 RPM for all bale types. • Load round bales to the centre of the unit with the flat end towards the
top knife. • Allow sufficient time for previous bale to clear before adding more. • Add ingredients in order shown below:
• Mixing time will depend on chop length required.• Stop the PTO and move to the feed out area.
Round or squarebales of silage, hayor straw
Water, Liquid feeds 2nd
Minerals, Protein All at 1100-1300RPMmeals, Pulps, Cereal 5-6 RPMgrains, Moist feeds
Grass silage 4thMaize silage, cerealsilage
CAUTION:Do not load more than one bale at a time.
Feed Ingredients Load Order Paddle RPM Tractor EngineSpeed RPM
1st
3rd
5th
Loading your Keenan Klassik Bale Handler Decal

inst
ruct
ions
5 . O P E R AT I N G T H E K L A S S I KB A L E H A N D L E R
19
Specific instructions for bale handler models
1. The creel should be raised before loading the bales.
2. The bale should always be loaded in the centre of the machine so that
it gets the maximum agitation from the 6 paddles.
3. The bale should be loaded against the creel, effectively the bottom of
the bale should be sitting on top of the top knife. This is the
recommended procedure, but for certain materials used, this procedure
may be altered at the point of commission or service by Keenan
personnel to achieve the optimum performance.
4. The bale should be held in this position and gently dropped to rest on
the tines so that as the bale is being loaded, the paddles are hitting it
and cutting some sections off the bale. The idea is the bottom of the
bale is cut off so that the bale sits flat on tines and prevents the light
density bales from rolling to either end of machine and also decreases
intake time
5. After 15-20 seconds the bale can be released and the loader moved
away taking care not to pull the bale away from the knife. The loader
can be withdrawn back to the loading side rubber and left there.
6. After the paddle has sliced away some of the bottom of the bale, the
bale itself will be turned over by the paddles and the process of
loosening the bale will begin. If the bale is tightly wound then this
part of the process will take longer than if the bale is loose.
7. As the bale loosens up the paddle will start to take in sections of
material by cutting it against the top knife. Once the bale has turned
over and started to fall apart the loader can be removed and the next
bale fetched and the wrapping removed.
8. If the bale shows signs of being hard to break up or is not getting
enough agitation by the paddles do not press the bale down with the
loader. A gentle lift of the bale and reposition is all that is required.

inst
ruct
ions
5 . O P E R AT I N G T H E K L A S S I KB A L E H A N D L E R
20
Specific instructions for bale handler models
9. The standard chopping times for different materials for a round 4x4
(120 cm) bale are as follows:
Straw 6-8 minutes (140 kg)
Hay 4-6 minutes (300 kg)
Wet silage (up to 20% DM) 2 minutes (700 kg)
Dry silage (20- 30% DM) 2–4 minutes (500 kg)
Very dry silage (over 35 %) 4-6 minutes (400 kg)
10. These times are achievable if the bale is loaded in the correct position
and the loading method as described above is followed. These times
may vary slightly depending on the tightness of the bale and the
behaviour of the bale when being chopped.
11. When loading big square bales the method is to load the bale so that
the sections lie across the tines so as to prevent the sections falling
through the gap in the tines. The easiest way to do this is to load the
bale in two halves in the loader (one half in each side of the bucket)
and flick the sections out onto the tines. In this way the sections will
remain up on the tines for longer and get a better chop against the
top knife. If loaded the other way the sections will tend to fall through
the tines and cause additional stress on the chopping mechanism.
12. The key to the successful operation is that the bale remains on top of
the cradle for long enough for all the pre-chopping to take place
against the serrated top knife. This ensures that the amount of further
chopping within the mixing chamber is reduced and though it may
take a while for the bale to be taken in during all this time the
material that has already been cut from the bale is being processed
within the chamber.

was
hing
& c
hop
pin
g5 . O P E R AT I O N
21
5.4 WASHING AND CHOPPING ROOT CROPS
With the machine stopped add the root material to be washed and chopped.
Ensure that there are no stones or foreign objects hidden in the roots.
1. Add water at approximately 300kg (650 pounds) per
tonne of material to be chopped. Rotate the machine
for 1-2 minutes at 6-8 revs.
2. Park the machine on an incline, open the wash gate
and allow the water to drain off.
3. It may be necessary to repeat No 2 if materials being
chopped are particularly dirty.
4. Chop the materials by running the machine at 10+ revs.
If small quantities of material are to be washed and chopped best results are
obtained by washing and chopping sufficient material to supply two days feed.
5.5 FEEDING OUT
1. Ensure that the VFC door is still closed.
2. Re-engage the tractor PTO and with paddles running at
6-8 rpm allow the TMR to loosen and tumble for
15-20 seconds.
3. Open the VFC door partially, once TMR is seen on the
feedout tray allow 15-20 secs before opening door fully.
4. Select a ground speed to feed out at an even rate
along the feed area.
5. When feed out is complete, close the guillotine door
and always disengage the PTO before attempting to
make right turns away from the shed.
CAUTION:Never drop VFC door before engaging PTO - serious damagemay be caused as a result of sudden load being put on theauger. Disengage the PTO before turning corners.

was
hing
& c
hop
pin
g
6 . M A I N T E N A N C E
22
The Klassik has been designed for optimum performance with a minimum
of maintenance.
Chains and bearings and grease points have been kept to a minimum
without compromising function. All components are of high quality and
provide excellent durability.
Regular routine maintenance will ensure your Klassik gives you the best
results with a minimum of problems.
6.1 CHAINS
1. Each week check the chains and adjust the tension accordingly.
The primary drive chain is adjusted by turning the adjuster nut on
the drive gearbox to remove excess slack, and to prevent sagging
or whipping when under loaded. The final adjustment is applied
by adjusting the tensioner spring on the chain links attached to
the body. 35mm (1.5”)
deflection from a straight line
is advised.
Do not over tighten, or
damage to the bearings will
result. The secondary drive
chain is adjusted
automatically.
WARNING:Prior to carrying out any maintenance on the machine, alwaysdisconnect the P.T.O. and hydraulic hoses from the tractor.Observe safety precautions at all times, read Section 3 onsafety before attempting to work on the machine. Themaximum allowable pressure in the hydraulic circuit is 170 barand flow rates of 40 litres/min are used. Replacement hosesshould comply with DIN EN 853. When replacing hydraulichoses wear suitable protective equipment.
Figure 6. Chain Joiner Link

2. Each week liberally apply 445 synthetic grade oil to
both drive chains (if not available use universal grade).
Do not use grease as it is totally unsuitable for this
application (it does not lubricate the vital internal parts
of the chain).
3. After each season remove both chains by removing the
joiner links - see diagram - and wash off all dirt and oil
using paraffin. Dry the chains before soaking
overnight in oil. Refit.
chai
ns6 . M A I N T E N A N C E
23
CAUTION:Failure to oil the chain will reduce working life by 90%. Chaindamage is not covered by factory warranty. See warrantysection for more details.
Table. 1
Model 80 100 115 140 170 200Primary DriveChainLinks 53.5 59 53.5 59 59.5 59.5Pitch (mm) 31.75 31.75 31.75 31.75 38.1 38.1Pitch (inches) 1.25 1.25 1.25 1.25 1.5 1.5Chain Length(mm)Chain Length(inches)Secondary DriveChainLinks 53 57.5 53 57.5 59.5 59.5Pitch (mm) 44.45 44.45 44.45 44.45 50.8 50.8Pitch (inches) 1.75 1.75 1.75 1.75 2 2Chain Length(mm)Chain Length(inch)
3397.25 3746.5 3397.25 3746.5 4533.9 4533.9
133.75 147.5 133.75 147.5 178.5 178.5
4711.7 5111.75 4711.7 5111.75 6045.2 6045.2
185.5 201.25 185.5 201.25 238 238
ASA100 ASA100 ASA100 ASA100 ASA120 ASA120
ASA140 ASA140 ASA140 ASA140 ASA160 ASA160

grea
sing
6 . M A I N T E N A N C E
6.2 GREASING
1. Bearings - Each week apply grease to the five
bearings with nipples. The five bearings are as follows;
a. Two main bearings at the rear of the Keenan Klassik (A + B).
b. Two main bearings on the front and rear of the gearbox drive
shaft (C + D).
c. One bearing on the front of the main rotor shaft (E).
2. Grease Nipples - Each week apply grease to all points with
grease nipples (up to 14). The points are as follows;
a. 2 bushes on the jockey sprockets (F & G).
b. 4 bushes on the guillotine door lifting rams.
c. 4 nipples on the tandem axle (2 on each side) if fitted.
d. 4 nipples on the elevator arms, if fitted.
e. See section 6.2 point 5 on bale handler.
f. Single axle brake levers at the back of the brake drum (both
sides).
g. Grease pivot points on sprung axle.
3. Front auger bearing – (Point H) - each year remove
top cover and pack with grease.
4. VFC door - Check the VFC door is able to move freely
each day and grease as appropriate. The recommended
grease is “Ceran FG” supplied by TOTAL Lubricants, or
similar food and feed industry grade grease.
24

grea
sing
6 . M A I N T E N A N C E
25
Figure 7.
Figure 8.

grea
sing
6 . M A I N T E N A N C E
26
Figure 9.

bale
han
dler
6 . M A I N T E N A N C E F O RB A L E H A N D L E R
27
5. BBaallee HHaannddlleerr There are no grease points fitted to the bale handler attachment.The simplicity of design and the use of self lubricating bushesremoves the need for weekly greasing. However, on a monthlybasis, check the rubber buffer for signs of damage or cracks whichmay affect shock absorption.
Ensure the tine pivot bolts are kept tight to prevent prematurewear of the self lubricating bushes. The tines should betightened such that they just drop under their own weight andthere is no sideways movement. This should be checked weekly.
Figure 10.

6.3 ELEVATORSAn elevator system requires regular maintenance in order to achieveoptimum performance. Every week the elevator needs to be checked tomake sure that the belt is running straight and not wearing unevenly onone side. If the belt is not running straight then adjust the tension bytightening the tensioner nut on the side and run again to check.The elevator surface needs to be kept clean at all times in order to avoidfeed building up and falling into the rollers during operation. Do not allowold feed to build up on the sides of the belt.Each week ensure that all the bearings are greased as per sketch.Ensure that the elevator is free moving in each direction sideways and thereis no feed caught in the slideways.Replace belts and side rubbers when they become worn otherwise elevatorwill not function properly.
6.4 SHEAR BOLTThe following are the recommended shear bolts to be used with the Klassikmachine - See Table 3. To avoid confusion all shearbolts are colour coded asper Table 2 below.
Note: When using a reduction gearbox always use a T50 PTO shaft witha M8 x 55 x 4.6 shear bolt for all machines to prevent damage to thegearbox.
6 . M A I N T E N A N C E
28
elev
ator
ssh
ear
bolt Figure 11.
Grade Colour
4.6 Green
6.8 Yellow
8.8 Red
Table. 2

6.5 NUTS AND BOLTS1. After the first day, and regularly thereafter, inspect the
wheel nuts.2. After the first week, and each week thereafter, check
all nuts and bolts, including the bearing nuts for tightness.
General Torque
Table. 3
6 . M A I N T E N A N C E
CAUTION:Failure to use the correct grade shear bolt can result in overloadfailure of the machine and will invalidate your warranty.
29
Machine type Shaft Shear Bolt
FP80, 100, 115 T50 M8 x 65 x 8.8
FP140 T60 M10 x 65 x 6.8
17S, 17L, 200 T60 M10 x 65 x 8.8
Planetary Box T50 M8 x 55 x 4.6
Stud / Bolt Type FT/LBS N.M.
M18 200 270
M20 260 350
M22 335 450
shea
r bo
ltnu
ts &
bol
ts
Table. 4

tyre
s 6.6 TYRES
1. Each week check the tyres for wear and damage.
2. Each week check the tyre pressures. Optimum tyre pressures are
shown in Table 4.
This information is given as guidance. If in doubt please contact Keenan
service.
6 . M A I N T E N A N C E
30
WARNING:When refitting and re-inflating tyre/wheel assemblies, a safetycage should be used to prevent possible injury. Incorrectly fittedtyres are dangerous. Please make sure tyre repairs are carried outby experienced tyre fitters.
Type Bar PSI30 x 11.5 - 14.5 8.0 118305 / 55 R 22.5 7.5 110245 / 70 R 19.5 8.5 125285 / 70 R 19.5 8.5 125400 / 60 - 15.5 4.7 70385 / 55 R 22.5 9.0 132385 / 65 R 22.5 (6 & 8 stud) 5.5 81385 / 65 R 22.5 (10 stud) 9.0 132445 / 65 R 22.5 6.0 88
Table. 5

6.7 WHEELS
1. Each year, lever off the hub cap, remove the split pin and castle nut
and remove the hub.
2. Check the seals, bearings, brake shoes, springs, studs and all other
internal parts.
3. Replace worn parts, re-grease and refit.
Note: When re-fitting wheels, screw crown nut until resistance is felt (do not
overtighten). Turn hub for several revolutions to ensure it is completely
bedded. Release crown nut 1/6 of a revolution, check for movement in hub,
and if none, re-fit split pin. For non standard wheels or any not specified on
this list please contact Keenan for details of pressures.
Changing a Wheel:
Park the feeder on level ground and apply the handbrake.
Fit chocks to the opposite wheel to prevent machine movement during the
operation.
Loosen the wheel nuts with a wrench but do not remove the nuts at this
stage. Jack the machine underneath the axle until the bottom of the wheel is
off the ground.
Remove the nuts completely and slide off the wheel.
Refit the wheel ensuring that the centre of the wheel is properly located on
the hub and hand tighten the wheel nuts.
Lower the machine again, and tighten the nuts to the recommended torque
using suitable equipment.
Check the wheel nuts again for tightness after 1 hour of use and again on a
weekly basis.
whe
els
6 . M A I N T E N A N C E
31

mai
nten
ance
che
cklis
t DAILYCleaning: Clean all old feed from around body to prevent damage to paintand corrosion.VFC door: Before using the machine, check that the door opens and shutsfully and operates smoothly.
Weekly (40 hrs)PTO input shaft: Grease the universal joints (2 nipples) and the sliding halfshafts (smear grease on surfaces).Drive (gear) box: Grease the drive input-shaft bearings (2 nipples).Rotor Bearings: Grease the front and rear rotor bearings (2 nipples).Feed discharge auger: Grease the auger’s rear shaft end-bearing (1nipple). (NB. the auger shaft’s front end-bearing is sealed and does notneed routine lubrication but should be repacked annually).Tandem Axles: All tandem and bogie axles and suspension (includingsteering axles) are fitted with grease nipples on pivots and bushes. Thesemust be greased weekly.Elevator: Each week grease the bearings at each end of the elevator belts.There are 2 on each side of the elevator - See figure 11 page 28, (4 nipplesin total) and check elevator belt for cracks or tears and tension. Grease allpivots.Guillotine door: Grease the door hydraulic cylinders (4 nipples) and theslide plates (smear grease on surfaces with a food and feed industry typegrease).Drive chains: Apply universal-type oil liberally. Check both chain tensionersare adjusted correctly. See maintenance section on pages 22 and 23.Wheels and Tyres: Check that tyres are inflated at the recommendedpressures and wheel nuts are tight.
7 . C H E C K L I S T
32

MonthlyBale Handler tine buffer: Check for cracks, splits or degradation.Blades: Blades must be kept sharpened. This will have to be done withouttaking the temper (over heating) from the blades. If the machine isoperated with blunt blades it will cause major stress on the drive system.Blades may have to be replaced when it is not practical to sharpen them.Tandems and Steering Axles: After the first use and at six monthlyintervals thereafter, suspension and axle U-bolts should be torqued to thespecified table, see Table 6. Steering axles should also be examined forwear and condition. Further information is available from Keenan Service onrequest.
mai
nten
ance
che
cklis
t7 . C H E C K L I S T
33
U-Bolt Diameter (mm) Tightening Torque (Nm)18 23022 45024 50027 600
Table. 6

mai
nten
ance
che
cklis
t Monthly (continued)
7 . C H E C K L I S T
34
WARNING:Due to hazards involved in entering the mixing chamber it isrecommended that all blade replacement is carried out by aKeenan authorised service agent who is specially trained todo this. Contact your local agent (see back cover for details).
U Bolt Position On Axles - Figure 12.

6 MonthlyWheels and Hubs: Remove and inspect the hub units. Replace worn parts,regrease and re-fit.
Yearly (end of season)Drive chains: Remove both chains; wash off all dirt and old oil, usingparaffin, then dry. Soak both chains in oil overnight; or longer, if possible.Auger Shaft Front Bearing: Remove and pack with grease.Machine: Before storage, wash the complete machine, then grease or oil allweekly lubrication points as above. Open the drain bung in the mixingchamber. Check the tyre pressures. Store the machine under cover or undera tarpaulin, if possible.Electronic indicator: If the machine is to be stored, remove the indicatorunit from the machine and keep in a dry place. Lightly grease the load cellcable connector end, then protect it with a plastic bag or tape.
mai
nten
ance
che
cklis
t7 . C H E C K L I S T
35
CAUTION:Although the weigh-box and connections are sealed againstmoisture, it is advised to protect or remove the weigh-box andthe weigh-bar plugs when power washing the mixer wagon.

spec
ifica
tions Standard Specifications
Item and Description: Item and Description:
8 . S P E C I F I C AT I O N S
36
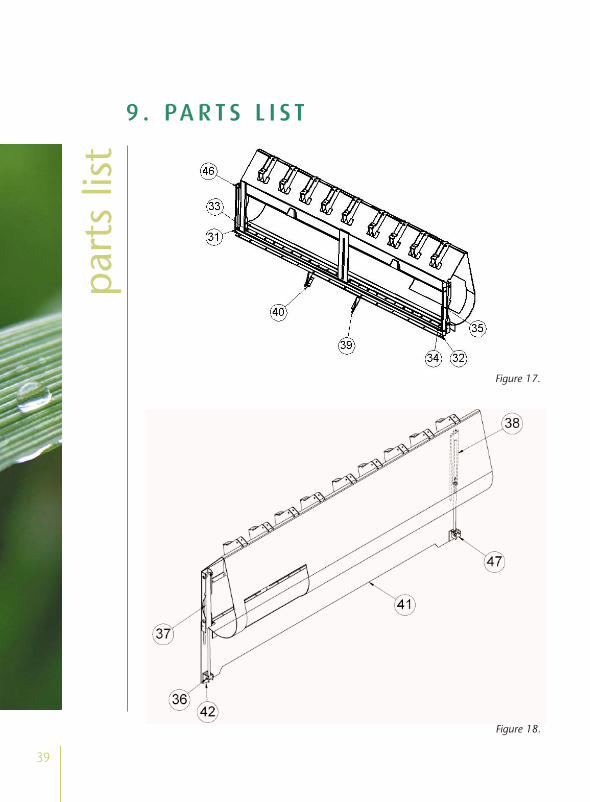
1 Main Drive Sprocket2 Front Rotor Bearing3 Front Auger Bearing4 Input Spline Shaft5 Auger Drive Sprocket6 Auger Stub Shaft including 11
Tooth Sprocket7 Front Box Assembly8 Gearbox (unit)9 Bottom Jockey Arm (Complete unit)10 Top Jockey Arm (Complete unit)11 Gearbox Adjuster (Unit)12 Primary Chain Tensioner13 Primary Chain14 Secondary Chain15 Front Rotor Stub Shaft16 End Paddle Flange for Rotor17 Centre Paddle Flange for Rotor18 Paddle Rubber19 Paddle Rubber Retainer20 Rotor Unit21 Rotor Seal Rubber (Braided)21a Rotor Seal Retainer22 Rotor Seal Rubber23 End Paddle Block
24 Centre Paddle Block26 End Creel27 Main Creel28 Top Knife Assembly29 Auger Seal Rubber30 Auger Seal Retainer31 Rubber Seal For Body32 Rubber Seal Retainer for Body33 Rubber Seal for Auger top and
bottom34 Rubber seal Retainer for Auger Top
and bottom35 Front and Rear VFC End Slide Seals36 V.F.C. Door Bottom Ram Pin37 Front V.F.C. Door Ram (Small)38 Rear V.F.C. Door Ram (Big)39 Body Blades (Front)40 Body Blades (Rear)41 V.F.C. Door (Guillotine door)42 Bolt On Bottom Ram Bracket, Front43 Angled Paddle for FP (front)44 Angled Paddle for FP (rear)46 Front & Rear VFC Slide Seal Retainer47 Bolt On Bottom Ram Bracket, Rear48 Rear Rotor and Auger Bearing
9 . PA R T S L I S T
MODEL 80 100 115 140 170 200S/Axle Tandem S/Axle Tandem S/Axle Tandem
Unladen kgs. 4,550 5,220 5,520 6,750 7,150 8,530 8,930 10,130 11,230
weight lbs. 10,022 11,498 12,159 14,868 15,749 18,789 19,670 22,313 24,736
Payload kgs. 2,500 3,000 2,750 3,800 3,800 5,500 5,500 6,500 8,000
lbs. 5,507 6,608 6,057 8,370 8,370 12,115 12,115 14,317 17,621
Max Gross kgs. 7,050 8,220 8,270 10,550 10,950 14,030 14,430 16,630 19,230
weight lbs. 15,529 18,106 18,216 23,238 24,119 30,903 31,784 36,630 42,357

par
ts li
st
Figure 13.
Figure 14.
9 . PA R T S L I S T
37

par
ts li
st9 . PA R T S L I S T
38
Figure 15.
Figure 16.
par
ts li
st9 . PA R T S L I S T
39
Figure 18.
Figure 17.

par
ts li
st9 . PA R T S L I S T
40
Figure 19.
Figure 20. Bale Handler Parts List

bale
han
dler
par
ts li
st Bale handler parts list:
9 . PA R T S L I S T
41
Item No: Qty: Description:1 1 Bale handler end creel plate, rear2 1 Bale handler end creel plate, front3 2 Bale handler creel guide arm4 1 Bale handler creel curved plate assembly5 2 Sliding creel guide holder6 2 R-Clip7 2 Bale handler curved creel ram8 9 M12 x 25 bolts9 9 Bale handler arm stopper10 9 Bale handle arm11 2 M16 x 110 bolts12 2 M16 Locknuts13 4 M20 x 110 bolts14 4 M20 Locknuts15 2 M16 x 120 bolts16 2 M16 Locknuts17 6 M10 x 30 Set Screws18 6 M12 Flat Washers19 6 M12 Locknuts
Not shown1 Hydraulic hose kit2 Steel hose assembly4 Serrated 1 metre blade8 3/8” Rubber Hose Holder Clamp Block (double)5 12L Steel Hose Holder Clamp Block (double)2 3/8”male to 3/8”female hydraulic adaptor T-piece2 25mm Extra Long Rubber (front)2 25mm Extra Long Rubber (rear)

guid
e1 0 . T R O U B L E S H O OT I N G
42
P R O B L E M S O L U T I O N
1. Weigh display will not work properly
2. VFC door does not move
3. VFC door drops during mixing
4. Excessive shearbolt breakage
• Check section on weighing, see pages 44 and 45.
• Check hydraulic hoses and that valves are open.
• Check tractor hydraulic oil level• Check ram condition and pins
are secure.
• Insufficient hydraulic pressure - check spool valve on tractor or fit non return valve in line.
• Check ram for signs of leakage.
• Machine overloaded. • Driving chain too loose - check
condition and adjust.• VFC door is opened too fast -
open feed out door slowly at first then open fully.
• Turn paddle a few turns before opening feedout door to avoid huge load on machine - especially after feed has settled in body of machine.
• Run machine slower.• For non bale handler models -
never load bales directly downon paddle in one go - always chop up into at least 4 pieces.
• For bale handler models tineheight may be set too low orbuffers may be damaged.

guid
e1 0 . T R O U B L E S H O OT I N G
43
P R O B L E M S O L U T I O N
5. Noisy operation
6. Feed is not mixed properly.
7. Feedout is too slow.
8. Horsepower requirement is too high.
9. Machine is not chopping fast enough.
• Oil chains liberally - adjust tension on chains.
• Grease all nipples.
• Insufficient mixing time.• Loading materials in wrong
order.• Not enough time given for
chopping.• Overloading of machine.
• Check condition of paddle rubbers.
• Slow down tractor ground speed.
• Reduce engine revs to give paddle more time to push material into auger.
• Material is not chopped enough.
• Check chopping blades and top knife for sharpness.
• Machine overloaded.
• Blades blunt.• Not enough material in
body - not heavy enough - try adding more material or in case of hay/ straw add water or a fork of silage to weigh it down.
• Machine overloaded.

guid
e1 0 . T R O U B L E S H O OT I N G
44
Keenan troubleshooting tips on weighingIf you experience problems in the operation of the Weighing System, read
through this Troubleshooting section first before contacting KEENAN SERVICE.
Reading Drifting
If the reading on the Indicator is drifting or does not stay steady, the most
likely cause of the problem is dampness/moisture in or around the Indicator
or cables. Please follow these steps to locate and correct the problem.
Disconnect the cables on the indicator box. Ensure they are
labeled correctly for reconnection. Check both the plug on
the cable and the connector on the Indicator for dampness
and/or corrosion of the terminals. If any dampness is found
dry it off thoroughly with a hair drier. If corrosion is found
on the terminals then clean thoroughly. Reconnect cable
and test.
Check for loose wiring or dampness. Some machines are
fitted with a junction box. The procedure as detailed above
applies.
Check Weighcell plugs for dampness and also check Weighcell
cables for any breaks and/or dampness.
If the above measures do not rectify the problem then contact KEENAN
SERVICE for further assistance.

System Weighing Inaccurately
If you suspect that the system is weighing inaccurately, check all four
weighcells to make sure that they are mounted correctly. If the bolt through
the weighcell has come loose or broken, the weighcell can turn upside-down
resulting in that weighcell giving an inaccurate reading. (As you face the back
of the machine the cable should be to the Right Hand Side of each of the rear
Weighcells. As you face the front of the machine the cable should be to the
Right Hand Side of each of the front Weighcells.)
If a Weighcell is turned upside-down, remove the bolt M10 x 90 (for the
FP170 and FP200 use M20 x 130) and turn the Weighcell.
To check that the system is weighing correctly, get some known weight (e.g.
A bag of fertiliser) and place it on each corner of the machine in turn. You
should get the same reading for each corner. If one corner returns a
significantly different reading from the other three then this points to a faulty
weighcell on that corner.
Indicator will not Switch ON
Check the power cable thoroughly and make certain that you are getting
power from the tractor to the display. The fuse for the display is located inside
the cabinet but do not disassemble display as to do so may cause serious
damage. It is extremely rare for this fuse to be blown so if there is power
feeding to the display and it is still not working contact your Keenan service
agent. The fuse located at the bottom panel of the indicator is for the external
alarm and nothing to do with the display.
45
guid
e1 0 . T R O U B L E S H O OT I N G

war
rant
y
46
Richard Keenan & Co. Ltd. ("the Company") shall undertake to correct by repair or
replacement only at the Company‘s option, any defect of material or workmanship,
which occurs in any of its products as listed herein within the following warranty period.
This Warranty is for the benefit of the initial owner as notified to the Company.
Standard Warranty period from date of commissioning is 12 months unless otherwise
agreed in writing between the company and the owner. This Warranty shall cease to
apply on any resale of the equipment by the initial owner.
The Warranty shall not apply to:
A Any machine used by a third party, who will not have had instruction in the correct
use of the machine by an official representative of the Company.
B Any machine which has sustained damage through general wear and tear or neglect
or use for which the machines were not intended to be used by the Company.
C Bearings, sprockets, chains and other wearing parts unless clear evidence of
immediate working failure which is directly attributable to such parts can be furnished.
D Any consumable or perishable parts such as knives, blades, rubber seals, hydraulic
components, shear-bolts, brake liners, electric components and running gear, unless clear
evidence of immediate working failure which is directly attributable to such parts can be
furnished.
E Any machine on which the identification marks have been removed or altered.
F Any machine that has not received effective routine maintenance using recommended
Keenan products as laid down in the operators manual.
G Any machine that has received repairs or modifications by persons unauthorised by
the Company.
H Any machine fitted with spurious or non-genuine spare parts and attachments, or
spare parts or attachments not approved by the Company.
I Any machine damaged in transit whilst being loaded or unloaded on premises other
than those owned by the Company.
1 1 . WA R R A N T Y

J Parts which may be defective or which may have failed and which are not retained
on site pending further investigation by the Company. Such parts may need to be
inspected in situ by a Company representative.
K Any machine damaged or any damage incurred prior to the machine being
commissioned by an authorised representative of the Company.
The sole and exclusive claim against the Company made by the person specified
above shall be for the repair or replacement of defective parts without prejudice to
any rights pursuant to the Liability for Defective Products Act, 1991. No other claim,
including, but not limited to, for incidental, direct or indirect or consequential
damages or for lost profits, lost sales, lost business, lost savings, loss of goodwill or
loss of reputation or any other loss of whatever nature however sustained shall be
available.
This Warranty constitutes the only warranty made by the Company and supersedes
and overrides all oral and written statements or representations made by any
Company representative or dealer or any other agreement, arrangement, practice,
custom or understanding between the parties.
Any claim under the Warranty must be promptly notified to the Company at the
address on the invoice.
In the event of the machine being loaned to or hired by a third party warranty cover
is not transferable unless given in writing and signed by a Director of Richard Keenan
& Co.
This Warranty shall be construed in accordance with Irish law and shall be subject to
the exclusive jurisdiction of the Irish Courts.
PRODUCT CHANGES AND IMPROVEMENTS
Due to our policy of continuous improvement, Richard Keenan & Co. reserve the right
to make changes in design, to add improvements or to otherwise modify any of its
products without incurring any obligation on products previously supplied.
war
rant
y1 1 . WA R R A N T Y
47

1 2 . E C D E C L A R AT I O NO F CO N F O R M I T Y
48
EECC DDeeccllaarraattiioonn ooff CCoonnffoorrmmiittyy.. In accordance with Directive 98/37/EC.
MMaannuuffaaccttuurreerr:: Richard Keenan & Co. Ltd.,Borris,Co. Carlow,Ireland.
Certifies that the Keenan Klassik complies with the essential safetyrequirements of the Directive 98/37/EC.
To conform to these essential health and safety requirements, the provisionsof the following harmonised standards were particularly considered.
EN ISO 12100-1, EN ISO 12100-2, EN294, EN 1152, EN349, EN703, EN1553(MRL app. IIA), ISO 11684, ISO 12140
Date: 29th August 2003
Signed:
James Greene, Managing Director

N OT E S
49

N OT E S
50

UK OfficeRichard Keenan (UK) Ltd
6th Street, National Agricultural Centre,Stoneleigh Park, Kenilworth,
Warwickshire CV8 2RL, England.Tel. Administration: 024 766 98200
Fax: 024 766 98273Nutrition Feedline: 024 76698270
24 hr Service: 024 766 90903website: www.keenansystem.com
Australia OfficeKeenan PTY
1/109 Breen Street Bendigo,Victoria, 3550, Australia.
Tel: 0354 42 3333/1800 817207Fax: 0354 41 3633
German OfficeKeenan GmbH,Postfach 1305,
48663 Ahaus, Germany.Tel: 02561 449380 Fax: 02561 4493858
Service Hotline: 0700 533 626 767Service Office: 02561 449 380
email: [email protected]: www.keenan.de
French OfficeKeenan France SARL,Z.A. des Rolandières,Rue des Rolandières,
35120 Dol-de-Bretange, France.Tel. 0299 480254 Fax: 0299 480577
email: [email protected]
HHeeaadd OOffffiicceeRRiicchhaarrdd KKeeeennaann && CCoommppaannyy LLiimmiitteedd
Borris, Co. Carlow, Irelandtel. +353 (0) 59 9771200 fax. +353 (0) 59 9771227
email: [email protected]: www.keenansystem.com
USA OfficeKeenan USA
PO Box 7PA 17309, USA.
Toll Free: 1-800-710-5620Service: Contact Keenan USA or call your local Keenan Dealer
website: www.keenansystem.com