JUNOG1WS07—Working with the JUNO-Gi's BOSS Insert...
9
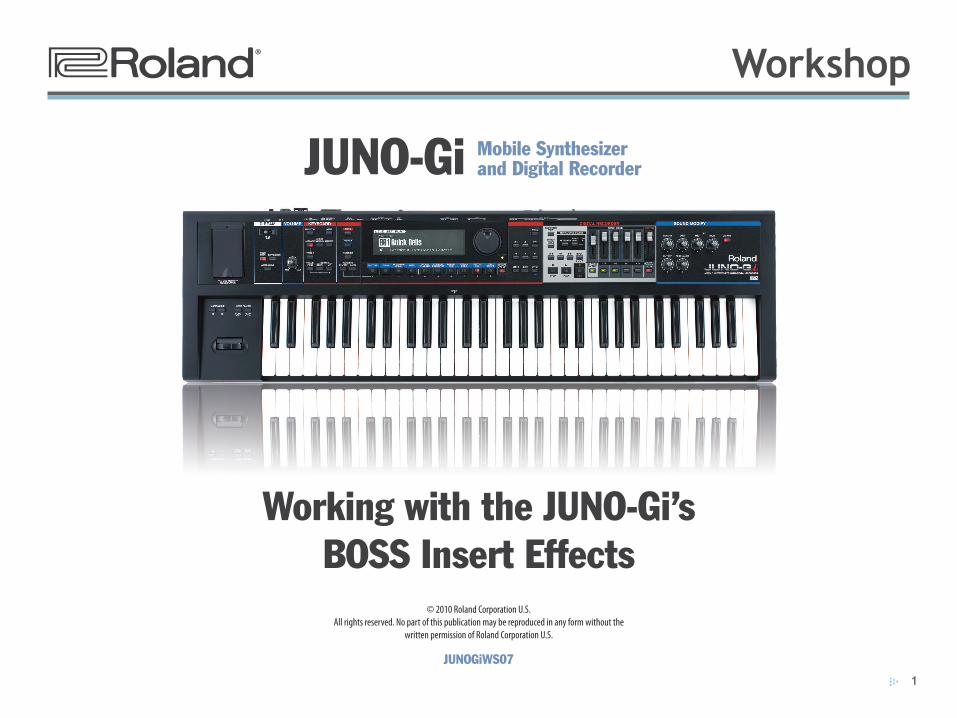
1 ®ÂØÒňΠ® Workshop Working with the JUNO-Gi’s BOSS Insert Effects © 2010 Roland Corporation U.S. All rights reserved. No part of this publication may be reproduced in any form without the written permission of Roland Corporation U.S. JUNOGiWS07 JUNO-Gi Mobile Synthesizer and Digital Recorder
Transcript of JUNOG1WS07—Working with the JUNO-Gi's BOSS Insert...
1
®ÂØÒňή Workshop
Working with the JUNO-Gi’s BOSS Insert Effects
© 2010 Roland Corporation U.S.All rights reserved. No part of this publication may be reproduced in any form without the
written permission of Roland Corporation U.S.
JUNOGiWS07
JUNO-Gi Mobile Synthesizerand Digital Recorder

2
About the JUNO-Gi Workshop Booklets
The Roland JUNO-Gi Mobile Synthesizer with Digital Recorder is an affordable, portable, perfect instrument for performers and songwriters. It’s got a top-of-the-line sound engine and over 1300 exciting new sounds. The onboard digital recorder allows you to record and develop your songs, with dedicated faders and acclaimed BOSS GT-class effects. With USB MIDI capabilities and its instant MIDI Controller mode, the JUNO-Gi also fits nicely into any computer-based recording system. Finally, the JUNO-Gi sports a versatile USB song player for playing backing tracks onstage.
Each JUNO-Gi Workshop Series booklet focuses on one JUNO-Gi topic, and is intended as a companion to the JUNO-Gi Owner’s Manual.
This booklet requires JUNO-Gi Operating System v1.01 or higher. You can download the latest JUNO-Gi O.S. for free from www.RolandUS.com.
About This Booklet
The JUNO-Gi brings together both Roland and BOSS technologies in a single instrument. As part of its built-in digital recording studio, the JUNO-Gi offers pro-level BOSS effects that can be used on mics and instruments connected to the JUNO-Gi, and on your recorded tracks. This booklet discusses the digital recorder’s BOSS effects in depth.
Understanding the Symbols in This Booklet
Throughout this booklet, you’ll come across information that deserves special attention—that’s the reason it’s labeled with one of the following symbols.
A note is something that adds information about the topic at hand.
A tip offers suggestions for using the feature being discussed.
Warnings contain important information that can help you avoid possible damage to your equipment, your data, or yourself.
Understanding the JUNO-Gi’s Effects
Though the JUNO-Gi is packed with high-quality effects, this booklet is concerned mostly with the JUNO-Gi digital recorder’s BOSS effects. Even so, it’s important to understand that the JUNO-Gi actually contains two completely separate, multi-processor effects systems.
Digital Recorder Effects
The digital recorder has a virtual rack of three effect processors you can use for recording and playing back your songs.
The words “effect” and “effects” are often abbreviated as “FX.”
When You’re Recording
During recording, you can run mics, instruments, and connected devices—or the JUNO-Gi’s keyboard—through the BOSS Insert FX, capturing the result on a track. (You can, of course, also record without effects if you like.)
The Using the JUNO-Gi’s Live Audio Inputs and BOSS Effects Workshop booklet describes using the BOSS Insert FX onstage with mics, instruments, and devices connected to the JUNO-Gi’s rear-panel GUITAR/MIC or LINE AUDIO INPUT jacks.

3
Live Set Effects
Though they’re not what we’re covering in this booklet, for completeness sake, you should also know about the second complete effect system built into the JUNO-Gi—the effects you can apply to the tones in its live sets. You’ve got:
• two synth multi-effects—each of which can use one of 79 Roland effect algorithms. (Algorithms are the mathematical formulas that create digital effects.)
• a chorus effect—that can add a shimmering quality to your tones.
• a reverb effect—for making your tones sound like they’re occurring in a physical space of your choice.
The Owner’s Manual discusses the live set effects starting on page 48.
Insert vs. Loop Effects
It’s helpful to understand that there are two different ways in which you can add an effect to an unprocessed, or “dry,” audio signal coming from a mic, instrument, or device. You can add effect processing to the sound using
• an insert effect • a loop, or send-and-return, effect.
What’s an Insert Effect?
A insert effect—like the JUNO-Gi’s BOSS Insert FX—acts as a detour: An audio signal goes through the insert effect, has effect-processing added to it, and then comes out of the insert effect and continues on its way—to a track in the case of the JUNO-Gi’s digital recorder. Within the insert effect, you can adjust the balance between the original sound and the processed sound.
The key thing to remember is that what comes out of the insert effect replaces the original dry signal.
Mic, instrument, or device
Mix of dry sound and effect
While recording, you may find that listening to your mic or instrument through reverb—which adds some ambience to the sound—makes the experience more natural, musical, and fun. The JUNO-Gi allows you to do this without actually committing to the reverb by recording it on your track.
When You’re Playing Back
After recording, you can use the BOSS Insert FX again by sending an individual track or stereo pair of tracks, the built-in rhythm track, or the entire mix through the BOSS Insert FX.
You can also send as many tracks as you like through the recorder’s dedicated reverb effect processor—we explained how to do this on page 14 in the Meet the JUNO-Gi Workshop booklet. Page 117 of the JUNO-Gi Owner’s Manual explains the reverb settings with which you can customize the reverb for your purposes.
As we discussed on page 12 of the Workshop booklet The Digital Recorder—Getting Serious, you can combine V-Tracks by “bouncing” them. As you bounce, you can use the BOSS Insert FX and reverb, locking in your effects on the resulting V-Tracks.
When you’ve finished mixing your song, you can add the final touches using the JUNO-Gi’s mastering tool kit effect. You can read up on it starting on page 120 in the Owner’s Manual. (The topic of mastering itself is covered on page 118 of the Owner’s Manual.)

4
What Are You Up To, Anyway?
Since the JUNO-Gi lets you use the BOSS Insert FX at various stages of the song-creation process, the first thing you’ll need to do is let the JUNO-Gi know how you want to use the BOSS Insert FX, as follows.
1 If it’s not already visible, press RECORDER VIEW once or twice to display the RECORDER screen.
2 Press 6 (EFFECT) to display the INSERT FX screen.
3 Press 4 (LOC) to display the INSERT FX LOCATION screen.
The Location parameter assigns the BOSS Insert FX to the desired job. You can set it to
• INPUT <NORMAL>—This is the default setting. With this setting, the BOSS Insert FX processes audio coming into the JUNO-Gi’s rear-panel MIC/GUITAR or LINE AUDIO INPUT jacks for recording onto a track or stereo pair of tracks.
• INPUT <REC DRY>—With this setting, audio coming into the JUNO-Gi doesn’t go through the BOSS Insert FX, and gets recorded onto a track or stereo pair of tracks without an effect.
When Location’s set to either INPUT <NORMAL> or INPUT <REC DRY>, the BOSS Insert FX can simultaneously process the JUNO-Gi’s keyboard sound. We’ll get into how to do this in a little bit.
The digital recorder’s mastering effect is also an insert effect through which the JUNO-Gi’s stereo mix takes a detour in the way to the JUNO-Gi mastering tracks or outputs.
An insert effect is applied to one thing at a time. The JUNO-Gi provides plenty of flexibility so that you can use the BOSS Insert FX on different things at different stages of in the recording process—recording, bouncing, mixing, and so on—but only one thing at a time.
The Reverb is a Loop Effect
The digital recorder’s Reverb processor is a loop effect. With a loop effect, a copy is made of the original sound, and the copy is sent through the reverb as the original signal continues on its way. After reverb’s added to the copy, the processed signal is then blended in with the dry signal—you retain separate control over the dry and effected sounds.
With a loop effect, the processed signal is added to the original sound—it doesn’t replace it.
A major advantage of a loop effect is that you can use it on multiple signals simultaneously by sending copies of each signal into the effect at the same time.
Moving On...
That’s enough in the way of conceptual stuff. Now let’s get into the details of using the JUNO-Gi’s BOSS Insert FX processor.
Mic, instrument, or device
Dry sound + Reverb
Copy

5
Using the BOSS Insert FX For Recording
In the JUNO-Gi, you can record
• audio coming into the JUNO-Gi—from a mic or instrument connected to the rear-panel GUITAR/MIC jack, or from an instrument or device connected to the rear-panel left and right LINE jacks.
• the JUNO-Gi’s own live sets—as you play them from the JUNO-Gi keyboard.
You can use the BOSS Insert FX on both of these audio signal types, though you set them up a little differently.
You can use the BOSS Insert FX on both signals at the same time since the incoming and keyboard audio travel together on an input bus to a recorder track, and the BOSS Insert FX processes the entire bus.
A bus is a pathway down which one or more signals can travel to a common destination, such as a digital recorder track.
Processing Incoming Audio with the BOSS Insert FX
If you want to apply the BOSS Insert FX to your incoming audio only—and not to the JUNO-Gi’s live sets at the same time—make sure the KEYBOARD button in the REC SOURCE SELECT area isn’t lit. If it is, press it a few times until it’s not.
1 In the digital recorder’s REC SOURCE SELECT area, press the AUDIO INPUT button to light it and display the AUDIO INPUT SELECT screen.
On this screen, you can select the audio input you want to record—or just hear if you’re performing. Select the desired input by pressing the number button beneath it.
• TRACK 1–8—With this setting, the BOSS Insert FX is applied only to the selected track. Use this when you’re bouncing or mixing.
• TRACKS 1/2–7/8— With this setting, the BOSS Insert FX is applied exclusively to the selected stereo pair of tracks. This is also for bouncing and mixing.
• RHYTHM—Use this setting to run the digital recorder’s rhythm track through the BOSS Insert FX when you’re mixing.
• MASTER—This setting causes the BOSS Insert FX to process the song’s entire stereo mix when you’re bouncing or mixing.
4 Press EXIT when you’re done to exit the INSERT FX LOCATION screen.
Turning Effect Processors On and Off
The JUNO-Gi provides a quick way to turn off the BOSS Insert FX and reverb. This is particularly helpful when you’re hearing something that sounds wrong and want to troubleshoot it by listening carefully to your incoming audio or recorded tracks without effects.
1 If it’s not already visible, press RECORDER VIEW once or twice to display the RECORDER screen.
2 Press 6 (EFFECT) to display the INSERT FX screen.
3 Press 6 (SWITCH) to display the RECORDER EFFECT SWITCH window.
4 Press
• 1 (INSFX)—to toggle the BOSS Insert FX on and off.
• 2 (REVERB)—to toggle the reverb on and off.
5 Press EXIT when you’re done to close the RECORDER EFFECT SWITCH window.

6
Processing Live Sets with the BOSS Insert FX
If you want to be sure you’re recording the keyboard cleanly—without any stray audio from the JUNO-Gi’s inputs—make sure the AUDIO INPUT button isn’t lit. If it is, press it a few times to un-light it.
1 In the digital recorder’s REC SOURCE SELECT area, press the KEYBOARD button to light it and display the KEYBOARD INPUT window.
When the KEYBOARD button’s lit, you can record a live set being played on the JUNO-Gi’s keyboard with or without the BOSS Insert FX. (The live set’s own effects are always recorded in either case.)
2 Make your choice by pressing the number buttons under the display to light the desired option onscreen. Press
• 1 (KEYBOARD)—to record the JUNO-Gi’s live set without the BOSS Insert FX. The live set’s own effects will still be recorded.
• 2 (KEYBOARD + INS FX)—to apply the BOSS Insert FX to the sound of the live set being played on the keyboard.
Using the BOSS Insert FX for Bouncing
You can use the BOSS Insert FX when you bounce tracks in the digital recorder. We explain how to do this starting on page 13 of the Workshop booklet The Digital Recorder—Getting Serious. For an explanation of what bouncing is, see page 12 of the same Workshop booklet.
Using the BOSS Insert FX for Mixing
When you’re mixing your song, you can set the BOSS Insert FX to process any of your tracks, the rhythm track, or the entire mix by setting the Location parameter—explained starting on page 4—as desired.
2 Press
• 1 (GUITAR)—to record a guitar or other electric instrument connected to the JUNO-Gi’s GUITAR/MIC jack.
When you’re recording guitar, make sure the rear-panel PHANTOM switch is set to GUITAR (Hi-Z).
• 2 (MIC)—to record a mic connected to the JUNO-Gi’sGUITAR/MIC jack.
If you’re recording with a condenser mic that requires power, make sure the rear-panel PHANTOM switch is set to ON. If it doesn’t, be sure to set the switch to OFF to avoid damaging the mic.
• 3 (LINE)—to record audio from a device connected to theJUNO-Gi’s LINE jacks.
• 4 (USB SONG)—to record a song being played by the JUNO-Gi’s USB Song Player.
• 6 (USB AUDIO)—to record audio from a computer connected via USB to the JUNO-Gi.
See the Using the JUNO-Gi with a Computer Workshop booklet to learn about installing the necessary drivers for exchanging audio with a computer.
3 Press EXIT to leave the AUDIO INPUT SELECT screen when you’re done.
Once you’ve selected your input, set your level as described starting at the bottom of page 19 of the Meet the JUNO-Gi Workshop booklet.
Guitar hum making you crazy? A quick way to toggle off your audio input is to press the lit AUDIO INPUT button to turn it off.
7
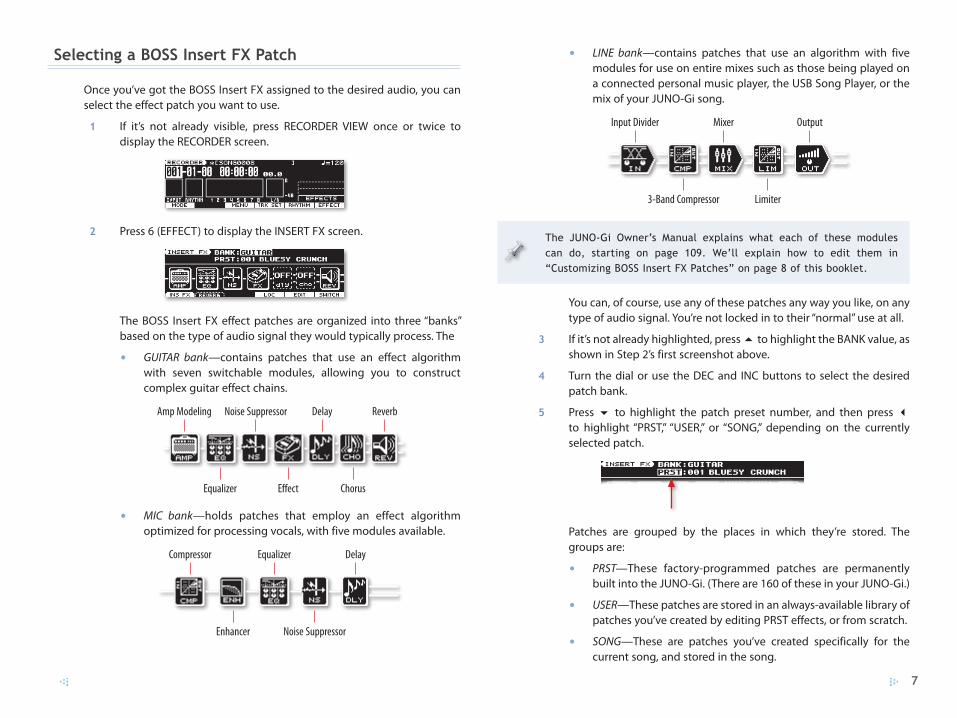
• LINE bank—contains patches that use an algorithm with five modules for use on entire mixes such as those being played on a connected personal music player, the USB Song Player, or the mix of your JUNO-Gi song.
Input Divider
3-Band Compressor Limiter
OutputMixer
The JUNO-Gi Owner’s Manual explains what each of these modules can do, starting on page 109. We’ll explain how to edit them in “Customizing BOSS Insert FX Patches” on page 8 of this booklet.
You can, of course, use any of these patches any way you like, on any type of audio signal. You’re not locked in to their “normal” use at all.
3 If it’s not already highlighted, press 5 to highlight the BANK value, as shown in Step 2’s first screenshot above.
4 Turn the dial or use the DEC and INC buttons to select the desired patch bank.
5 Press 6 to highlight the patch preset number, and then press 3 to highlight “PRST,” “USER,” or “SONG,” depending on the currently selected patch.
Patches are grouped by the places in which they’re stored. The groups are:
• PRST—These factory-programmed patches are permanently built into the JUNO-Gi. (There are 160 of these in your JUNO-Gi.)
• USER—These patches are stored in an always-available library of patches you’ve created by editing PRST effects, or from scratch.
• SONG—These are patches you’ve created specifically for the current song, and stored in the song.
Selecting a BOSS Insert FX Patch
Once you’ve got the BOSS Insert FX assigned to the desired audio, you can select the effect patch you want to use.
1 If it’s not already visible, press RECORDER VIEW once or twice to display the RECORDER screen.
2 Press 6 (EFFECT) to display the INSERT FX screen.
The BOSS Insert FX effect patches are organized into three “banks” based on the type of audio signal they would typically process. The
• GUITAR bank—contains patches that use an effect algorithm with seven switchable modules, allowing you to construct complex guitar effect chains.
Amp Modeling
Equalizer Effect
Delay
Chorus
ReverbNoise Suppressor
• MIC bank—holds patches that employ an effect algorithm optimized for processing vocals, with five modules available.
Compressor
Enhancer Noise Suppressor
DelayEqualizer
8
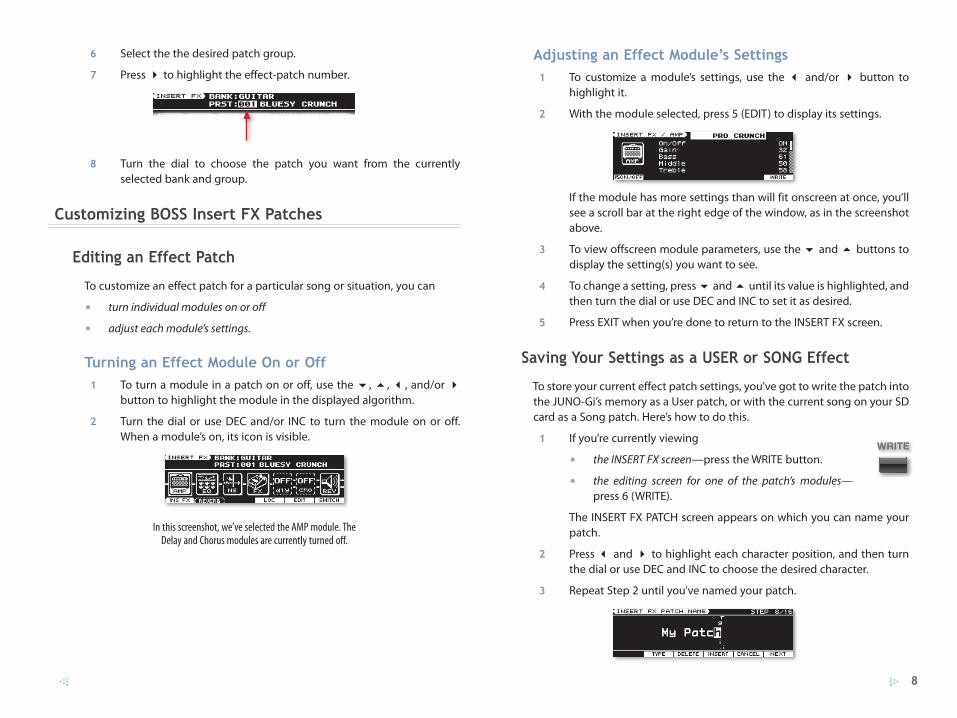
6 Select the the desired patch group.
7 Press 4 to highlight the effect-patch number.
8 Turn the dial to choose the patch you want from the currently selected bank and group.
Customizing BOSS Insert FX Patches
Editing an Effect Patch
To customize an effect patch for a particular song or situation, you can
• turn individual modules on or off
• adjust each module’s settings.
Turning an Effect Module On or Off
1 To turn a module in a patch on or off, use the 6, 5, 3, and/or 4 button to highlight the module in the displayed algorithm.
2 Turn the dial or use DEC and/or INC to turn the module on or off. When a module’s on, its icon is visible.
In this screenshot, we’ve selected the AMP module. The Delay and Chorus modules are currently turned off.
Adjusting an Effect Module’s Settings
1 To customize a module’s settings, use the 3 and/or 4 button to highlight it.
2 With the module selected, press 5 (EDIT) to display its settings.
If the module has more settings than will fit onscreen at once, you’ll see a scroll bar at the right edge of the window, as in the screenshot above.
3 To view offscreen module parameters, use the 6 and 5 buttons to display the setting(s) you want to see.
4 To change a setting, press 6 and 5 until its value is highlighted, and then turn the dial or use DEC and INC to set it as desired.
5 Press EXIT when you’re done to return to the INSERT FX screen.
Saving Your Settings as a USER or SONG Effect
To store your current effect patch settings, you’ve got to write the patch into the JUNO-Gi’s memory as a User patch, or with the current song on your SD card as a Song patch. Here’s how to do this.
1 If you’re currently viewing
• the INSERT FX screen—press the WRITE button.
• the editing screen for one of the patch’s modules—press 6 (WRITE).
The INSERT FX PATCH screen appears on which you can name your patch.
2 Press 3 and 4 to highlight each character position, and then turn the dial or use DEC and INC to choose the desired character.
3 Repeat Step 2 until you’ve named your patch.

9
You can easily convert a User patch into a Song patch, or vice versa, by loading the patch or the song in which it resides, and re-saving the patch in the desired group.
The End
We hope you’ve found this workshop helpful. Keep an eye out for other JUNO-Gi Workshop booklets available for downloading at www.RolandUS.com.
4 Press 6 (NEXT) to display the INSERT FX screen where you choose a location for your patch.
5 To save it in
• the JUNO-Gi’s User library—so it can be used in any song, press 1 (USER) so the onscreen label’s highlighted, if it isn’t already.
• the current song—so it’s stored on your SD card along with the song, press 2 (SONG) so it’s highlighted.
6 Turn the dial or use DEC and INC to choose a location within the selected memory area in which to save your patch.
If there’s a patch already stored in the location you choose, it’ll be replaced by the new patch if you continue. Be sure there’s nothing in the location you wish to keep before proceeding, or choose another location.
7 Press 6 (WRITE) to proceed, or 5 (BACK) if you’d like to make a last-minute change to the patch’s name.
The JUNO-Gi asks if you’re sure you want to proceed.
8 Press 5 (EXEC) to finish saving your patch, or 6 (CANCEL) if you don’t want to continue.
If you press 5 (EXEC) in Step 8, the JUNO-Gi briefly displays
Insert FX Write...
followed by:
Insert FX Write... Completed!