Jeff Batt eLearning Brothers Product Development Manager
75
Jeff Batt eLearning Brothers Product Development Manager B.Y.O.L.: Titanium - Create Mobile Training as a Native App Using Javascript Jeff Batt eLearning Brothers Product Development Manager
-
Upload
kessie-garrett -
Category
Documents
-
view
29 -
download
3
description
B.Y.O.L.: Titanium - Create Mobile Training as a Native App Using Javascript. Jeff Batt eLearning Brothers Product Development Manager. Jeff Batt eLearning Brothers Product Development Manager. My Approach. www.kinetic-media.com. twitter.com/jeffbatt01. www.youtube.com/jeffbatt01. - PowerPoint PPT Presentation
Transcript of Jeff Batt eLearning Brothers Product Development Manager

Jeff BatteLearning Brothers
Product Development ManagerB.Y.O.L.: Titanium - Create Mobile Training as a Native App Using Javascript
Jeff BatteLearning Brothers
Product Development Manager

www.kinetic-media.com
www.youtube.com/jeffbatt01 twitter.com/jeffbatt01
My Approach
• How to guy - Focus on how you use the tools
• Everyone is on a different level - I’m starting at the beginning
• Tutorials about everything will be found on my blog (www.kinetic-media.com)

Download Files
Files to download: http://kinetic-media.com/downloads-titanium/

Session Objectives
• What is Appcelerator Titanium?• Where to get Titanium
• Windows and views
• Creating labels
• Creating image views
• Creating a button
• Creating a switch
• Adding interactivity
• Creating tables
• Adding interactivity in tables
• Playing sound
• Playing video
• Swiping events

Differences between Titanium & Phonegap
Appcelerator TitaniumjQuery Mobile & Phonegap

Alloy VS Classic
VS
Alloy Classic

Alloy - MVC
index.xml
index.jsindex.tss

Starting a New Project

Starting a New Project
Classic:Alloy:

Creating a Window
Classic Code:app.js
//Establish the window and colorvar window = Titanium.UI.createWindow({
backgroundColor:'red'});
//Open the windowwindow.open();

Creating a Window
Alloy Code:index.xml
<Alloy><Window class="container">
</Window></Alloy>
index.tss
".container": {backgroundColor:"red"
}

Windows and Views
Window 1
View 1
View 2
View 3

Different Types of Views
Window 1
Image View
Table View
Scroll View
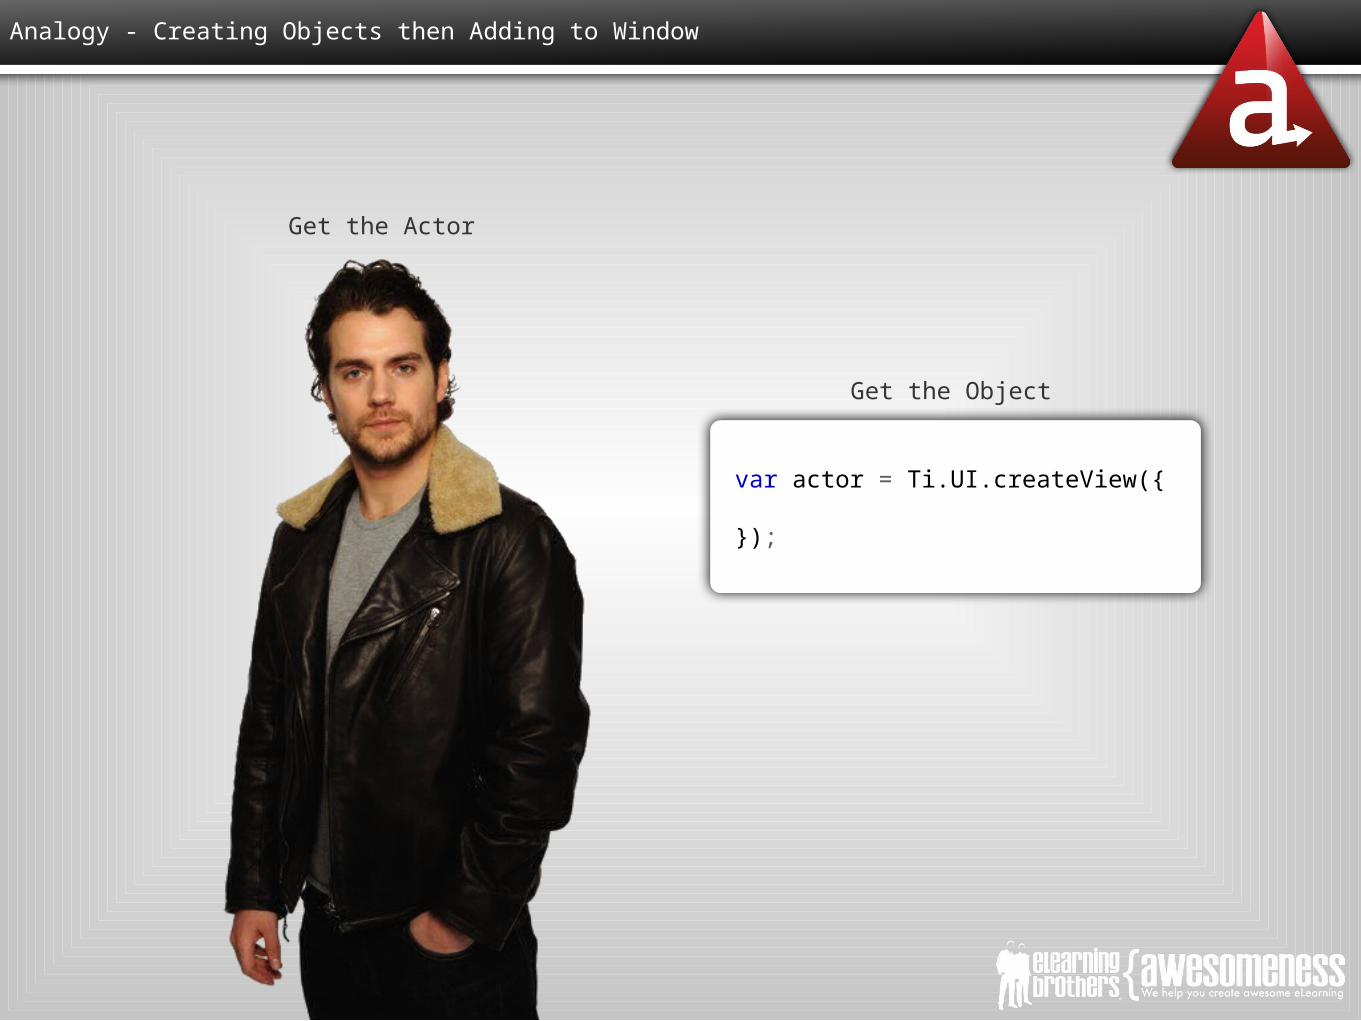
Analogy - Creating Objects then Adding to Window
Get the Actor
var actor = Ti.UI.createView({
});
Get the Object

Analogy - Creating Objects then Adding to Window
Add Attributes to Actor- Makeup- Costume
- etc
var actor = Ti.UI.createView({backgroundColor:'red',width:100,height:100,top:20
});
Add Attributes to the Object- Width- Height
- etc

Analogy - Creating Objects then Adding to Window
Add the actor to the stage/camera
var actor = Ti.UI.createView({backgroundColor:'red',width:100,height:100,top:20
});
window.add(actor);
Add object to the window or view
image.addEventListener('click', function(){alert('This is a test');
})

Analogy - Creating Objects then Adding to Window
<Alloy><Window class="container">
<ImageView id="actor" onClick="doClick" image="images/Checkmark.png" />
</Window></Alloy>
XML - Get the Actor
function doClick(e) { //Tell the actor what to do}
JS - Script what the actor does
TSS - Define Attributes
"#actor":{top: 10,width: 260,height: 95
}

Creating a View
Classic Code:app.js
//Create the view and it's attributes
var view1 = Ti.UI.createView({backgroundColor:'red',width:100,height:100,top:20
});
//Add the view to the window or view
window.add(view1);

Creating a View
Alloy Code:index.xml
<Alloy><Window class="container">
<View id="view" /></Window>
</Alloy>
index.tss
".container": {backgroundColor:"white"
},
"#view": {backgroundColor:"red",width: 50,height: 50,top: 10
}

Adding Objects to a View
Classic Code:app.js
//Create the view and it's attributesvar view1 = Ti.UI.createView({
backgroundColor:'red',width:100,height:100,top:20
});
//Create the object and its attributesvar view2 = Ti.UI.createView({
backgroundColor:'black',width: 20,height: 20,top: 10
});
//Add the second object to the view not the windowview1.add(view2);
//Add the view to the window or viewwindow.add(view1);

Adding Objects to a View
Alloy Code:index.xml
index.tss
<View id="view"><View id="view2"></View>
</View>
"#view": {backgroundColor:"red",width: 50,height: 50,top: 10
}
"#view2": {backgroundColor:"black",width: 20,height: 20,top: 5
}

Adding Content to Views - Creating Labels
Classic Code:app.js
//This is the code to create a labelvar label1 = Ti.UI.createLabel({
color:'#999',text:'This is a text',font:{fontSize:20, fontfamily:'Helvetica Neue'},textAlign: Ti.UI.TEXT_ALIGNMENT_CENTER,width: Ti.UI.SIZE, height: Ti.UI.SIZE,
})
//You then add your label to the window or viewwindow.add(label1)

Adding Content to Views - Creating Labels
Alloy Code:index.xml
index.tss
<Label id="label1">This is a text</Label>
"#label1": {top: 30,textAlign: Ti.UI.TEXT_ALIGNMENT_CENTER
}
"Label": {width: Ti.UI.SIZE,height: Ti.UI.SIZE,color: "#000"
}

Adding Content to Views - Creating Labels
Alloy Code (Option 2):index.xml
<Label id="label1" color="#900" text="A simple label" textAlign="Ti.UI.TEXT_ALIGNMENT_CENTER"top="30" width="Ti.UI.SIZE" height="Ti.UI.SIZE" />

Adding Content to Views - Image View
Classic Code:app.js
//Create the image and point to the file in a folder
var image = Ti.UI.createImageView({image: 'images/Checkmark.png',
//You can also add position or other attributes})
//Add the image to the window or view
window.add(image);

Adding Content to Views - Image View
Alloy Code:index.xml
index.tss
<ImageView id="image" image="images/Checkmark.png" />
"#image": {
}
**NOTE** Alloy assets have to be within the assets folder

Adding Event Listeners
Classic Code:app.js
var image = Ti.UI.createImageView({image: 'images/Checkmark.png',
})
window.add(image);
image.addEventListener('click', function(){alert('This is a test');
})

Adding Event Listeners
Alloy Code:index.xml
index.js
<ImageView id="image" onClick="doClick" image="images/Checkmark.png" />
function doClick(e) { alert("This is a test");}

Adding Content to Views - Creating a Button
Classic Code:app.js
var button = Ti.UI.createButton({title:'Click Me',top: 10,width: 100,height: 50
});
window.add(button);
button.addEventListener('click', function(){alert('You clicked me')
})

Adding Content to Views - Creating a Button
Alloy Code:index.xml
index.js
<Button id="button" onClick="doClick" title="Click Me" />
function doClick(e) { alert("This is a test");}
index.tss
"#button":{top: 10,width: 100,height: 50
}

Adding Content to Views - Creating a CUSTOM Button
Classic Code:app.js
var button = Ti.UI.createButton({title:'Click Me',
//Establish Up imagebackgroundImage:'images/btn_up.png',
//Establish Selected imagebackgroundSelectedImage: 'images/btn_down.png',top: 10,width: 260,height: 95
});
window.add(button);
button.addEventListener('click', function(){alert('You clicked me')
})

Adding Content to Views - Creating a CUSTOM Button
Alloy Code:index.xml
index.js
<Button id="button" onClick="doClick" title="Hello"/>
function doClick(e) { alert("Hello");}
index.tss
"#button":{backgroundImage: 'images/btn_up.png',backgroundSelectedImage: 'images/btn_down.png',top: 10,width: 260,height: 95
}**NOTE**
Alloy assets have to be within the assets folder

Adding Content to Views - Creating a Switch
Classic Code:app.js
var basicSwitch = Ti.UI.createSwitch({value:true,
})
window.add(basicSwitch);
basicSwitch.addEventListener('change', function(){alert('Switch Value: ' + basicSwitch.value)
})
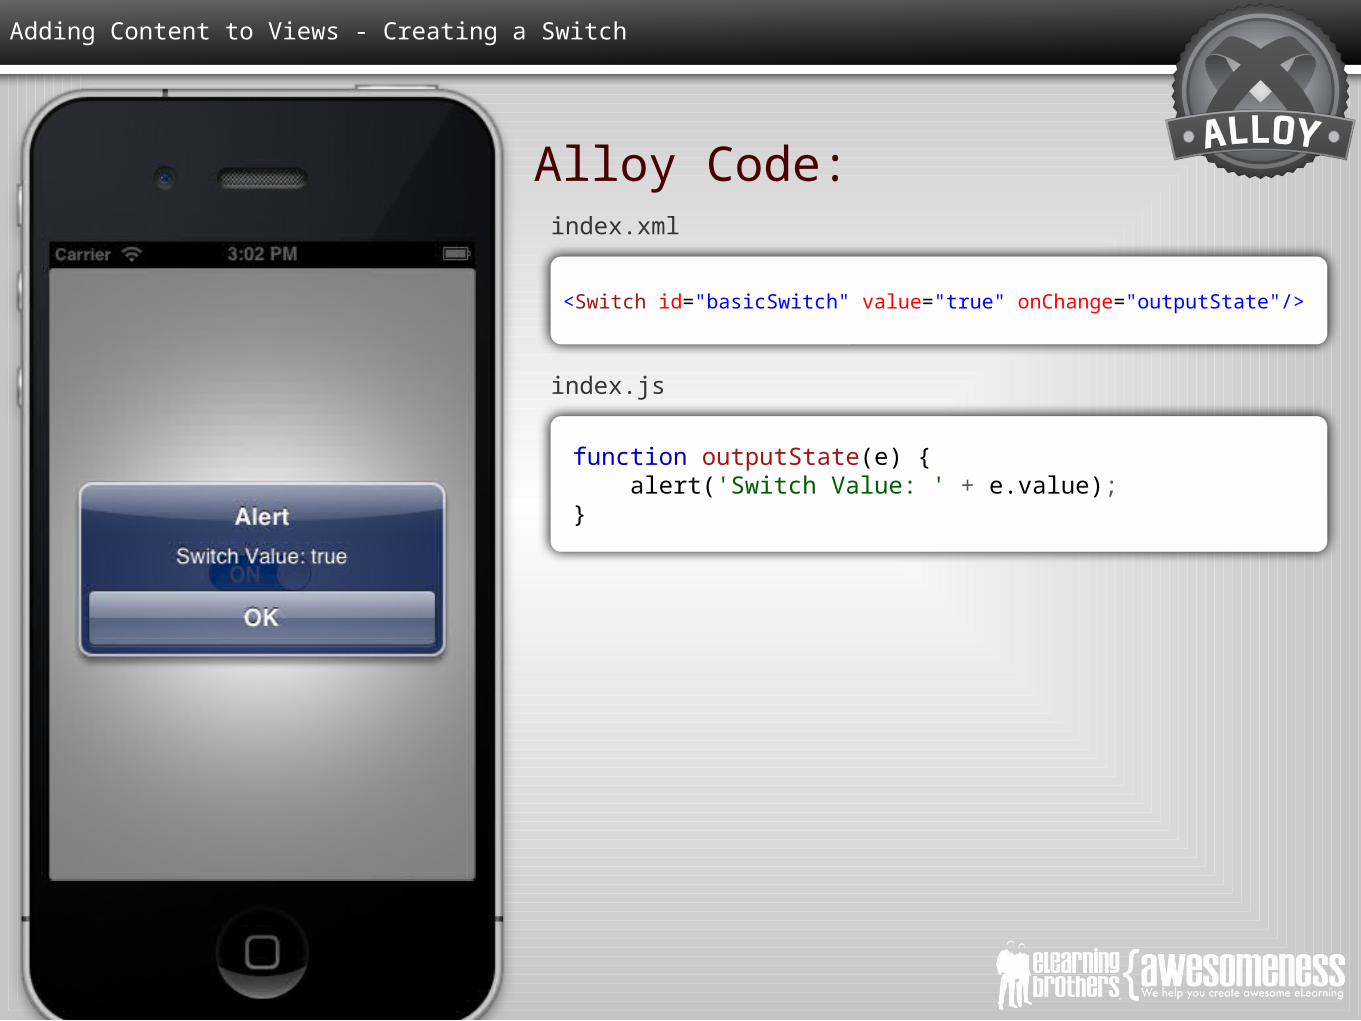
Adding Content to Views - Creating a Switch
Alloy Code:index.xml
index.js
<Switch id="basicSwitch" value="true" onChange="outputState"/>
function outputState(e) { alert('Switch Value: ' + e.value);}

Adding Content to Views - Creating a Text Field
Classic Code:app.js
var textField = Ti.UI.createTextField({borderStyle: Ti.UI.INPUT_BORDERSTYLE_ROUNDED,color:’#336699’,top: 10, left: 10,width: 250, height: 60
})
window.add(textField);

Adding Content to Views - Creating a Text Field
Alloy Code:index.xml
index.tss
<TextField id="textField" />
"#textField": {borderStyle: Ti.UI.INPUT_BORDERSTYLE_ROUNDED,color: "#336699",top: 10, left: 10,width: 250, height: 60
}

Creating Tables
Classic Code:app.js
var tableData = [ {title:'Apples'}, {title: 'Bananas'}, {title: 'Bananas'}, {title: 'Potatoes'} ];
var table = Ti.UI.createTableView({data: tableData
})
window.add(table);

Creating Tables
Alloy Code:index.xml
<TableView id="table"><TableViewRow title="Apple"/><TableViewRow title="Bananas"/><TableViewRow title="Carrots"/><TableViewRow title="Potatoes"/></TableView>

Adding Events to Tables
Classic Code:app.js
table.addEventListener('click', function(e){if(e.index == 0){
alert('You clicked 1')} else if (e.index == 1){
alert('You clicked 2')}
})
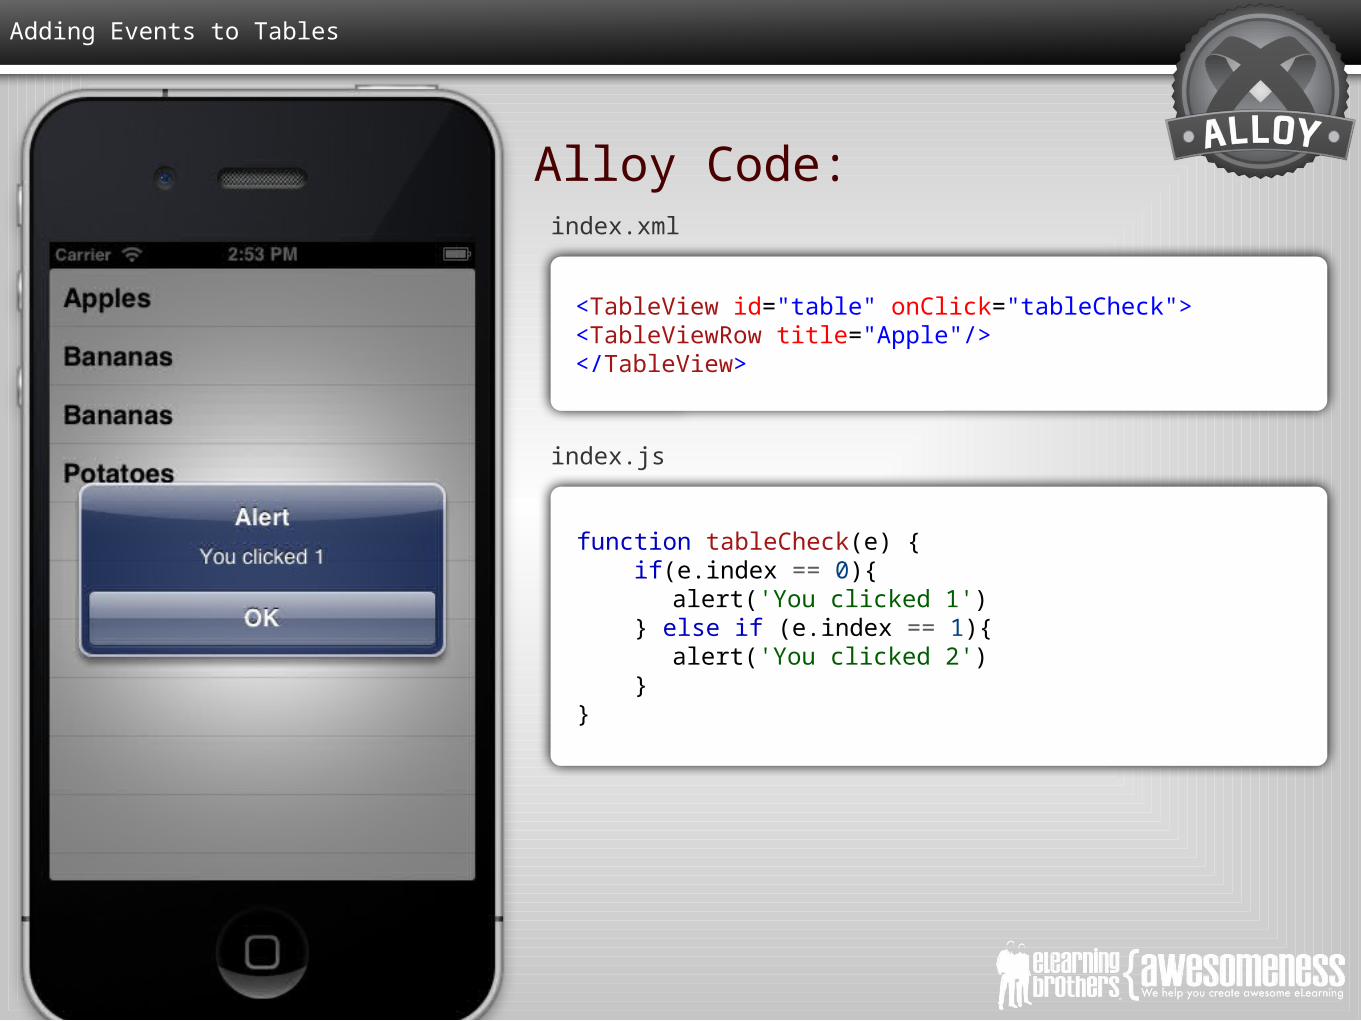
Adding Events to Tables
Alloy Code:index.xml
index.js
<TableView id="table" onClick="tableCheck"><TableViewRow title="Apple"/></TableView>
function tableCheck(e) { if(e.index == 0){ alert('You clicked 1') } else if (e.index == 1){ alert('You clicked 2') }}

Creating Tables Sections
Classic Code:app.js
var sectionFruit = Ti.UI.createTableViewSection({headerTitle: 'Fruit'});sectionFruit.add(Ti.UI.createTableViewRow({title:'Apples'}));sectionFruit.add(Ti.UI.createTableViewRow({title:'Bananas'}));
var sectionVeg = Ti.UI.createTableViewSection({headerTitle: 'Veggies'});sectionVeg.add(Ti.UI.createTableViewRow({title:'Carrots'}));sectionVeg.add(Ti.UI.createTableViewRow({title:'Potatoes'}));
var table = Ti.UI.createTableView({data: [sectionFruit, sectionVeg]
})
window.add(table);

Creating Tables Sections
Alloy Code:index.xml
<TableView id="table"><TableViewSection id="sectionFruit" headerTitle="Fruit">
<TableViewRow title="Apple"/><TableViewRow title="Bananas"/></TableViewSection><TableViewSection id="sectionVeg" headerTitle="Vegetables"><TableViewRow title="Carrots"/><TableViewRow title="Potatoes"/></TableViewSection></TableView>

Creating Tabs
Classic Code:app.js
var tabsGroup = Titanium.UI.createTabGroup();
//Create the Win1var win1 = Titanium.UI.createWindow({
backgroundColor:'red'});
var tab1 = Titanium.UI.createTab({icon: '/images/44-shoebox.png',title: 'Reference',window: win1
});
var win2 = Titanium.UI.createWindow({backgroundColor:'green'
});
var tab2 = Titanium.UI.createTab({icon: '/images/46-movie-2.png',title: 'Sample',window: win2
});
tabsGroup.addTab(tab1);tabsGroup.addTab(tab2);
tabsGroup.open();

Creating Tabs
Alloy Code:index.xml
<TabGroup><Tab title="Tab 1" icon="KS_nav_ui.png">
<Window id="window1" title="Tab 1"><Label>I am Window 1</Label>
</Window></Tab><Tab title="Tab 2" icon="KS_nav_views.png">
<Window id="window2" title="Tab 2"><Label>I am Window 2</Label>
</Window></Tab>
</TabGroup>
index.tss
"#window1":{backgroundColor:"white"
},"#window2":{
backgroundColor:"white"}

Creating a Web View
Classic Code:app.js
var webView = Ti.UI.createWebView({url:'http://www.kinetic-media.com/jquery'
});
window.add(webView);

Creating a Web View
Alloy Code:index.xml
<WebView id="webview" url="http://www.kinetic-media.com/jquery" />

Creating a Scroll View
Classic Code:app.js
var scrollView = Ti.UI.createScrollView({ contentWidth: '80%', contentHeight: 'auto', showVerticalScrollIndicator: true, showHorizontalScrollIndicator: false, height: '80%', width: '80%'});
var view = Ti.UI.createView({ backgroundColor:'#336699', borderRadius: 10, top: 10, height: 2000, width: 1000});
scrollView.add(view);window.add(scrollView);

Creating a Scroll View
<ScrollView id="scrollView" showVerticalScrollIndicator="true" showHorizontalScrollIndicator="true" height="80%" width="80%">
<View id="view" backgroundColor="#336699" borderRadius="10" top="10" height="2000" width="1000" />
</ScrollView>
Alloy Code:index.xml

Creating a Scrollable View
Classic Code:app.js
var win = Ti.UI.createWindow();
var view1 = Ti.UI.createView({ backgroundColor:'#123' });var view2 = Ti.UI.createView({ backgroundColor:'#246' });var view3 = Ti.UI.createView({ backgroundColor:'#48b' });
var scrollableView = Ti.UI.createScrollableView({ views:[view1,view2,view3], showPagingControl:true});
win.add(scrollableView);win.open();

Creating a Scrollable View
<ScrollableView id="scrollableView" showPagingControl="true"> <View id="view1" backgroundColor="#123" /> <View id="view2" backgroundColor="#246" /> <View id="view3" backgroundColor="#48b" /></ScrollableView>
Alloy Code:index.xml

Playing Sound
**NOTE** Classic assets have to be within a folder
Classic Code:app.js
var player = Ti.Media.createSound({url:'audio/start_race.mp3'
})
player.play();

Playing Sound
**NOTE** Alloy assets have to be within the assets folder
Alloy Code:index.xml
index.js
<Button id="button" onClick="doClick" title="Hello"/>
var player = Ti.Media.createSound({url:'audio/start_race.mp3'
})
player.play();

Playing Sound in a Function
Classic Code:app.js
image = Ti.UI.createImageView({image: 'images/Checkmark.png'
})
var player = Ti.Media.createSound({url:'audio/Wrong.mp3'
})
window.add(image);
image.addEventListener('click', function(){player.play();
});
**NOTE** Classic assets have to be within the a folder

Playing Sound in a Function
Alloy Code:index.xml
index.js
<Button id="button" onClick="doClick" title="Hello"/>
var player = Ti.Media.createSound({url:'audio/Wrong.mp3'
})
function doClick(e) { player.play();}
**NOTE** Alloy assets have to be within the assets folder
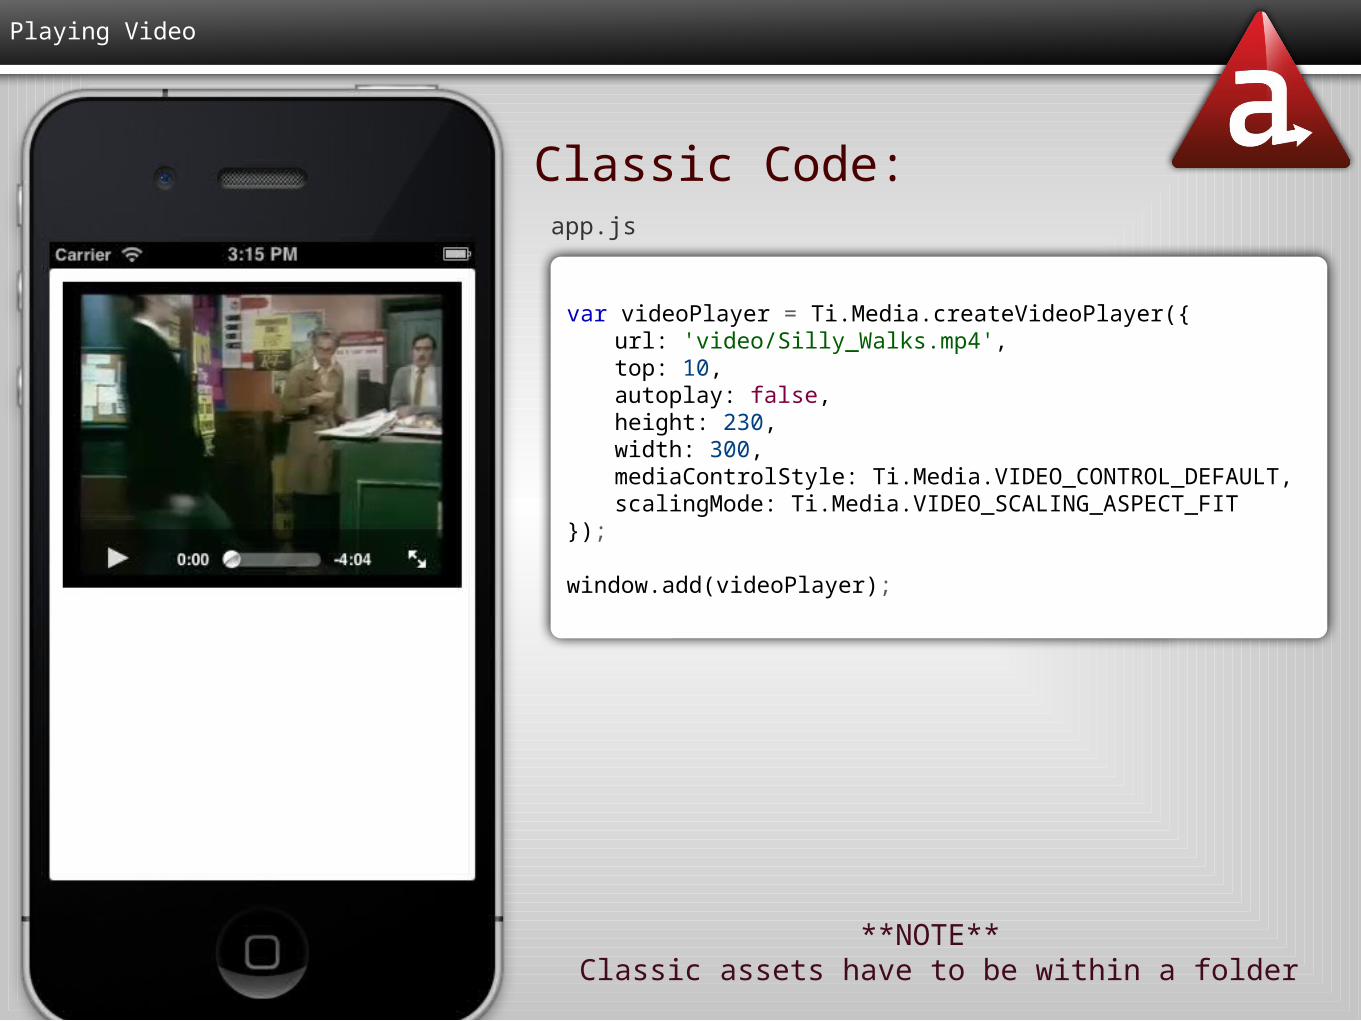
Playing Video
Classic Code:app.js
**NOTE** Classic assets have to be within a folder
var videoPlayer = Ti.Media.createVideoPlayer({url: 'video/Silly_Walks.mp4',top: 10,autoplay: false,height: 230,width: 300,mediaControlStyle: Ti.Media.VIDEO_CONTROL_DEFAULT,scalingMode: Ti.Media.VIDEO_SCALING_ASPECT_FIT
});
window.add(videoPlayer);

Playing Video
Alloy Code:index.xml
index.tss
**NOTE** Alloy assets have to be within the assets folder
<VideoPlayer id="videoPlayer" ns="Ti.Media" url="video/Silly_Walks.mp4" autoplay="true" />
"#videoPlayer": {top:2,height:300,width:300,backgroundColor: 'black'
}
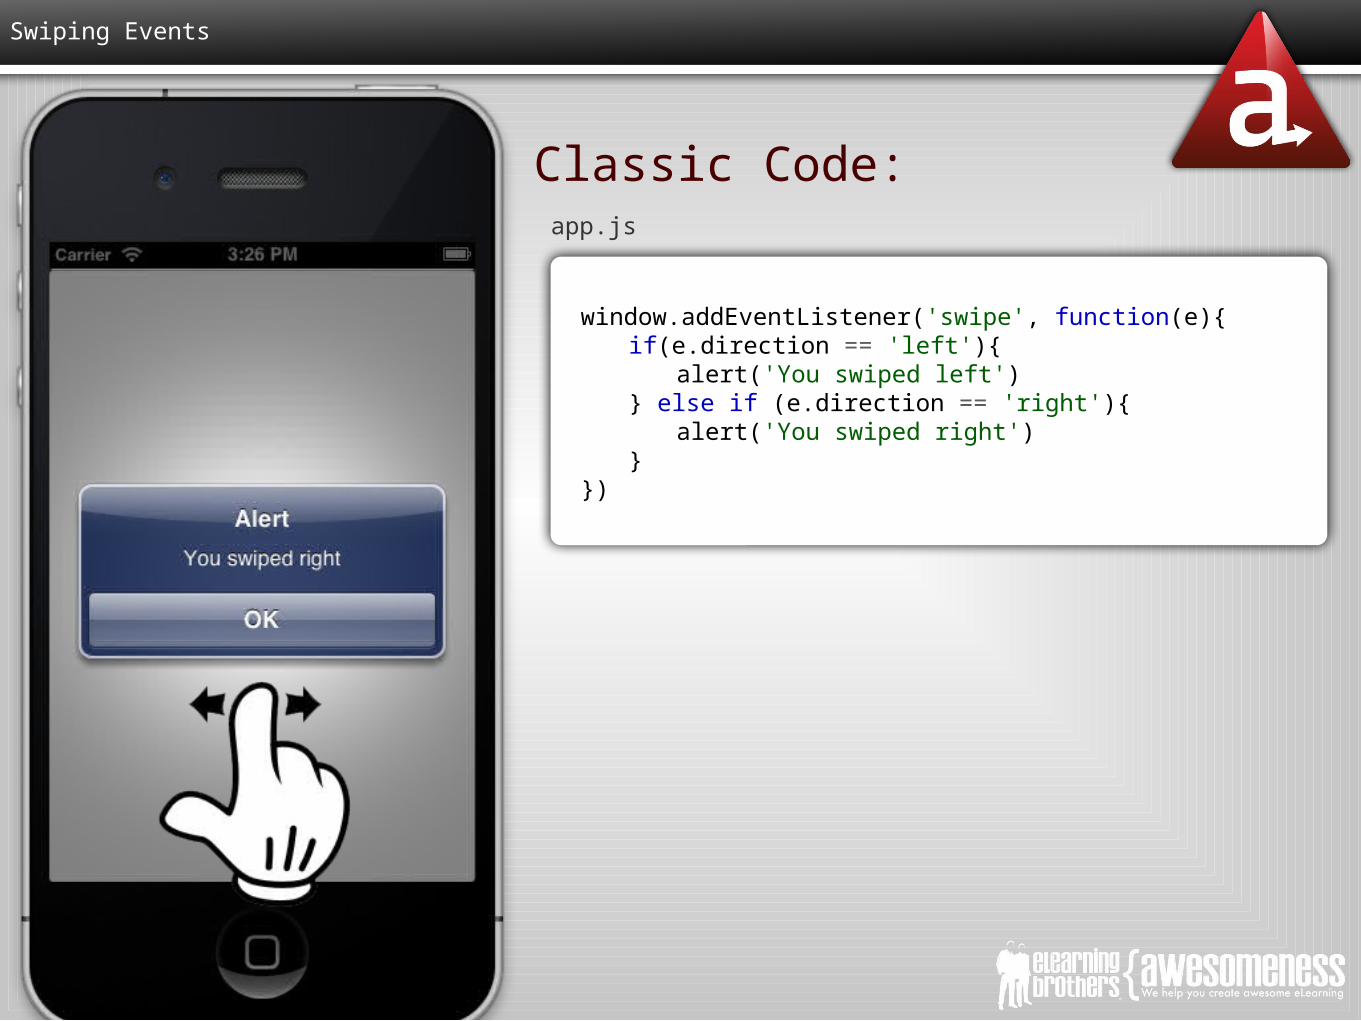
Swiping Events
Classic Code:app.js
window.addEventListener('swipe', function(e){if(e.direction == 'left'){
alert('You swiped left')} else if (e.direction == 'right'){
alert('You swiped right')}
})

Swiping Events
Alloy Code:index.xml
index.tss
<Alloy><Window class="container" onSwipe="swipeEvent">
</Window></Alloy>
function swipeEvent(e){if(e.direction == 'left'){
alert('You swiped left')} else if (e.direction == 'right'){
alert('You swiped right')}
}

Two Finger Tap
window.addEventListener('twofingertap', function(e){alert('Two fingers')
})
Classic Code:app.js

Two Finger Tap
<Window class="container" onTwofingertap="twoFingers">
</Window>
Alloy Code:index.xml
index.js
function twoFingers(){alert("Two fingers");
}

Shake Events
Classic Code:app.js
Titanium.Gesture.addEventListener('shake', function(e){alert('Stop shaking me')
})

Shake Events
Alloy Code:index.js
Titanium.Gesture.addEventListener('shake', function(e){alert('Stop shaking me')
})

Toolbar
var window = Titanium.UI.createWindow({ backgroundColor:'#336699', title:'Main Window'});
var send = Titanium.UI.createButton({ title: 'Send', style: Titanium.UI.iPhone.SystemButtonStyle.DONE,});
var camera = Titanium.UI.createButton({ systemButton: Titanium.UI.iPhone.SystemButton.CAMERA,});
var cancel = Titanium.UI.createButton({ systemButton: Titanium.UI.iPhone.SystemButton.CANCEL});
var flexSpace = Titanium.UI.createButton({ systemButton:Titanium.UI.iPhone.SystemButton.FLEXIBLE_SPACE});
var toolbar = Titanium.UI.iOS.createToolbar({ items:[send, flexSpace, camera, flexSpace, cancel], bottom:0, borderTop:true, borderBottom:false});
window.add(toolbar); window.open();
Classic Code:app.js

Toolbar
Alloy Code:index.xml
<Alloy> <Window class="container"> <Toolbar platform="ios" bottom="0" borderTop="true" borderBottom="false" barColor="#000">
<!-- The Items tag sets the Toolbar.items property. --> <Items> <Button id="send" title="Send" style="Ti.UI.iPhone.SystemButtonStyle.DONE" /> <FlexSpace/> <Button id="camera" systemButton="Ti.UI.iPhone.SystemButton.CAMERA" /> <FlexSpace/> <Button id="cancel" systemButton="Ti.UI.iPhone.SystemButton.CANCEL" /> </Items>
<!-- Place additional views for the Toolbar here. -->
</Toolbar>
<Label id="label">I am Window 1</Label> </Window>
</Alloy>

Tabbed Bar
Classic Code:app.js
var window = Titanium.UI.createWindow({backgroundColor:'#ffffff'
});
var bb1 = Titanium.UI.iOS.createTabbedBar({ labels:['One', 'Two', 'Three'], backgroundColor:'#336699', top:50, style:Titanium.UI.iPhone.SystemButtonStyle.BAR, height:25, width:200});
window.add(bb1);
window.open();

Tabbed Bar
Alloy Code:index.xml
<Alloy> <Window class="container"> <TabbedBar id="bb1" platform="ios" backgroundColor="#336699" top="50" height="25" width="200" style="Titanium.UI.iPhone.SystemButtonStyle.BAR">
<Labels>
<Label> One</Label> <Label> Two</Label> <Label> Three</Label>
</Labels>
</TabbedBar> </Window> </Alloy>

Picker
app.js
Ti.UI.backgroundColor = 'white';var win = Ti.UI.createWindow({ exitOnClose: true, layout: 'vertical'});
var picker = Ti.UI.createPicker({ top:50});
var data = [];data[0]=Ti.UI.createPickerRow({title:'Bananas'});data[1]=Ti.UI.createPickerRow({title:'Strawberries'});data[2]=Ti.UI.createPickerRow({title:'Mangos'});data[3]=Ti.UI.createPickerRow({title:'Grapes'});
picker.add(data);picker.selectionIndicator = true;
win.add(picker);win.open();
// must be after picker has been displayedpicker.setSelectedRow(0, 2, false); // select Mangos
Classic Code:

Toolbar
Alloy Code:index.xml
<Alloy> <Window class="container"> <Picker id="picker" top="50" selectionIndicator="true" useSpinner="true"> <PickerColumn id="column1"> <PickerRow title="Bananas"/> <PickerRow title="Strawberries"/> <PickerRow title="Mangos"/> <PickerRow title="Grapes"/> </PickerColumn> <!-- Picker shorthand notation --> <Column id="column2"> <Row title="red"/> <Row title="green"/> <Row title="blue"/> <Row title="orange"/> </Column> </Picker> </Window></Alloy>

Custom Alerts
Classic Code:app.js
var window = Titanium.UI.createWindow({backgroundColor:'#ffffff'
});
var dialog = Ti.UI.createAlertDialog({message: 'The file has been deleted',ok: 'Okay',title: 'File Deleted'
});
window.addEventListener('click', function(e){ dialog.show();});
window.open();

Custom Alerts
Classic Code:app.js
var window = Titanium.UI.createWindow({backgroundColor:'#ffffff'
});
var dialog = Ti.UI.createAlertDialog({cancel:1,buttonNames: ['Confirm', 'Cancel', 'Help'],message: 'The file has been deleted',title: 'File Deleted'
});
window.addEventListener('click', function(e){ dialog.show();});
dialog.addEventListener('click', function(e){if(e.index === e.source.cancel){
Ti.API.info('The cancel button was clicked');} else if (e.index === 1){
Ti.API.info('The help button was clicked');}
});
window.open();

Opening Up Another Page - Part 1
Classic Code:app.js
var window = Titanium.UI.createWindow({ backgroundColor:'#336699', title:'Main Window'});//Add button to first windowvar b3 = Titanium.UI.createButton({ title:'Open New Win', width:200, height:40, top:110});window.add(b3);
//Event listener to open new windowb3.addEventListener('click', function(){ var w = Titanium.UI.createWindow({ backgroundColor:'#336699', title:'New Window', barColor:'black', url:'new_window.js' }); w.open();}); window.open();

Opening Up Another Page - Part 2
Classic Code:new_window.js
var win = Ti.UI.currentWindow; var label = Ti.UI.createLabel({ color:'#fff', text:'test label on new window', font:{fontSize:20,fontFamily:'Helvetica Neue'}, textAlign:'center', width:'auto', top: 20});
label.addEventListener('click', function(){win.close();
}) win.add(label);

Opening Up Another Page - Part 1 XML
Alloy Code:index.xml
<Alloy><Window class="container">
<Label id="label" onClick="showWin1">I'm Window 1</Label></Window>
</Alloy>
win2.xml
<Alloy><Window id="container">
<Label id="thelabel" onClick="closeme">I'm Window 2</Label></Window>
</Alloy>

Opening Up Another Page - Part 2 TSS
Alloy Code:index.tss
".container": {backgroundColor:"white"
},"#Label": {
width: Ti.UI.SIZE,height: Ti.UI.SIZE,color: "#000"
}
win2.tss
"#container":{backgroundColor: "#000"
},"#thelabel":{
height: Ti.UI.SIZE,width: Ti.UI.SIZE,color: "#fff"
}

Opening Up Another Page - Part 3 JS
Alloy Code:index.js
function showWin1(e) { var w=Alloy.createController('win2').getView(); w.open();}
$.index.open();
win2.js
function closeme(){$.container.close();
};