Java for Absolute Beginners - itbook.storeStarting with Java 9, a new concept was introduced:...
34
1 © Iuliana Cosmina 2018 I. Cosmina, Java for Absolute Beginners, https://doi.org/10.1007/978-1-4842-3778-6 Appendix JDK 11 was released on September 25, 2018. Aside all novelties already covered in this book, there was also the news that developers had been suspecting since the introduction of modules. Java is still free, but the Oracle JDK isn’t. Developers can use the Oracle JDK to learn, but applications that are deployed in production will require a license. The work-around is to use the an OpenJDK build (https://jdk.java.net/11/), but this does not come with Oracle support. Still JDK 11 is a major release that will benefit from long term support and if you are curious about the Oracle terms of use, you can read them at www.oracle.com/technetwork/java/javase/terms/license/javase- license.html. The Java world has changed, but Oracle restrictions will only cause the market to provide more options. Companies like Zulu and IBM will probably develop their own JDKs and provide support for JDKs that Oracle won’t. Probably more companies will emerge to provide cheaper support and open source JDKs. Now that access to an important resource has been restricted, humanity will do what it does best—become creative to get access to it or develop similar resources. Either way, diversity will be blooming in the following years for the Java Open Source Community, and I can barely wait to see what is coming. The purpose of this appendix is to gracefully end the book and to cover more advanced details regarding Java modules that might not be suitable for a Java beginner developer right at the start of the book. It contains an extended version of Chapter 3 covering configuration of Java modules in a complex project; good, bad, and recommended practices working with modules; and the multimodule Gradle structure of the project and a section about nested classes, that completes Chapter 4. The code snippets mentioned in this appendix are already part of the project associated with the book. Enjoy! www.itbook.store/books/9781484237779
Transcript of Java for Absolute Beginners - itbook.storeStarting with Java 9, a new concept was introduced:...
1© Iuliana Cosmina 2018 I. Cosmina, Java for Absolute Beginners, https://doi.org/10.1007/978-1-4842-3778-6
AppendixJDK 11 was released on September 25, 2018. Aside all novelties already covered in
this book, there was also the news that developers had been suspecting since the
introduction of modules. Java is still free, but the Oracle JDK isn’t. Developers can use
the Oracle JDK to learn, but applications that are deployed in production will require a
license. The work-around is to use the an OpenJDK build (https://jdk.java.net/11/),
but this does not come with Oracle support. Still JDK 11 is a major release that will
benefit from long term support and if you are curious about the Oracle terms of use, you
can read them at www.oracle.com/technetwork/java/javase/terms/license/javase-
license.html.
The Java world has changed, but Oracle restrictions will only cause the market
to provide more options. Companies like Zulu and IBM will probably develop their
own JDKs and provide support for JDKs that Oracle won’t. Probably more companies
will emerge to provide cheaper support and open source JDKs. Now that access to an
important resource has been restricted, humanity will do what it does best—become
creative to get access to it or develop similar resources. Either way, diversity will be
blooming in the following years for the Java Open Source Community, and I can barely
wait to see what is coming.
The purpose of this appendix is to gracefully end the book and to cover more advanced
details regarding Java modules that might not be suitable for a Java beginner developer
right at the start of the book. It contains an extended version of Chapter 3 covering
configuration of Java modules in a complex project; good, bad, and recommended
practices working with modules; and the multimodule Gradle structure of the project and
a section about nested classes, that completes Chapter 4. The code snippets mentioned in
this appendix are already part of the project associated with the book. Enjoy!
www.itbook.store/books/9781484237779
2
A.1 Chapter 3: Introducing Modules (Advanced Version)Starting with Java 9, a new concept was introduced: modules. It groups and encapsulates
packages. Implementation of this new concept took more than 10 years. The discussion
about modules started in 2005 and it was proposed to be implemented for Java 7. Under
the name Project Jigsaw an exploratory phase started in 2008. Java developers hoped a
modular JDK would be available with Java 8, but only in Java 9 it was made possible, after
three years of work (and almost seven of analysis). Apparently, this is why the official
release date for Java 9 was postponed to September 2017.1
Modules represent a new way to aggregate packages. A module is a way to group
them together and configure more granulated access to package contents.
A module is a uniquely named, reusable group of packages and resources (XML
files) described by a file named module-info.java. This file contains the following
information.
• the module’s name
• the module’s dependencies (that is, other modules this module
depends on)
• the packages it explicitly makes available to other modules (all other
packages in the module are implicitly unavailable to other modules)
• the services it offers
• the services it consumes
• to what other modules it allows reflection
• native code
• resources
• configuration data
In theory, module naming resembles package naming and follows the reversed-
domain- name convention. In practice, make sure the module name does not contain
any numbers and that it reveals clearly what its purpose is.
1 The full history of the Jigsaw project can be found here: http://openjdk.java.net/projects/jigsaw/
Appendix
www.itbook.store/books/9781484237779

3
The module-info.java file is compiled into a module descriptor, which is a file
named module-info.class that is packed together with classes into a plain old JAR
file. The location of the file is in the root sources directory, outside of any package. For
the example introduced earlier, a module-info.java was added and the new project
structure is depicted in Figure A-1.
Figure A-1. Structure of a Java 9 project
Like any file with a *.java extension, the module-info.java gets compiled into a
*.class file. As the module declaration is not a part of Java object types declaration,
module is not a Java keyword, so it can still be used when writing code for Java object
types. For package the situation is different, as every Java object type declaration must
start with a package declaration. Just take a look at the SimpleReader class declared next.
package com.apress.bgn.ch3;
public class SimpleReader {
private String source;
...
}
So what does this actually mean? Where is the module, and what is it? Well, in
simple projects that are made of one root directory with sources, modules do not have
to physically delimit or organize sources somehow.2 They are defined by the contents of
the module-info.java file. So, starting with Java 9, Figure 3-4 (from the short version of
Chapter 3) evolves into Figure A-2.
2 Unless you rename directories containing sources for a module to the module name that is. Having actual directories for modules is unavoidable, when the sources in the root directory of a project must be split into different modules.
Appendix
www.itbook.store/books/9781484237779
4
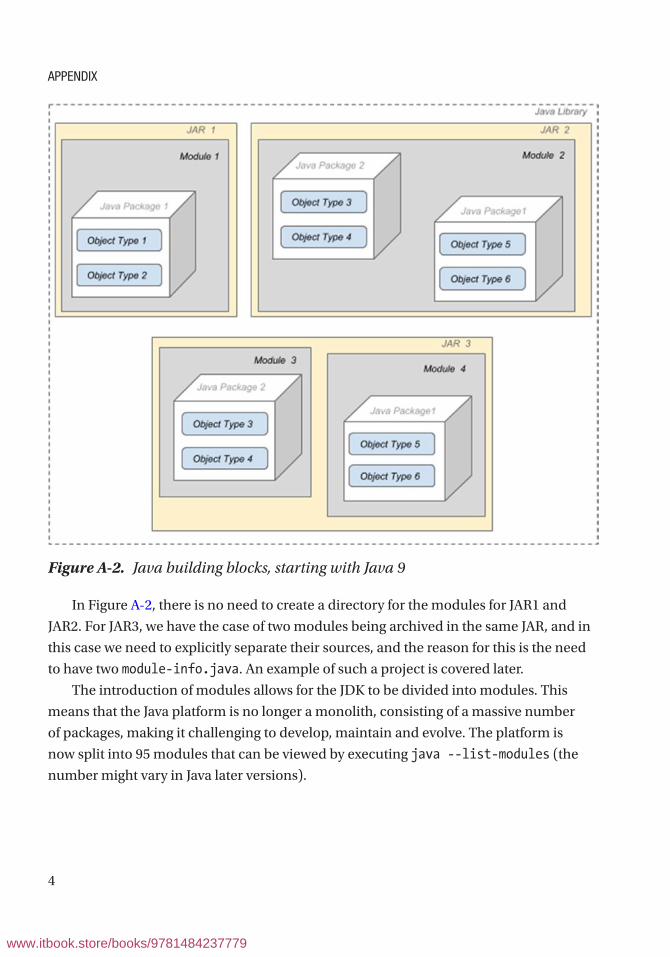
In Figure A-2, there is no need to create a directory for the modules for JAR1 and
JAR2. For JAR3, we have the case of two modules being archived in the same JAR, and in
this case we need to explicitly separate their sources, and the reason for this is the need
to have two module-info.java. An example of such a project is covered later.
The introduction of modules allows for the JDK to be divided into modules. This
means that the Java platform is no longer a monolith, consisting of a massive number
of packages, making it challenging to develop, maintain and evolve. The platform is
now split into 95 modules that can be viewed by executing java --list-modules (the
number might vary in Java later versions).
Figure A-2. Java building blocks, starting with Java 9
Appendix
www.itbook.store/books/9781484237779

5
$ java --list-modules
java.base@11
java.compiler@11
java.datatransfer@11
java.desktop@11
...
Each module name is followed by a version string @11, in the listing, which means
that the module belongs to Java 11.
So, if a Java application does not require all modules, a runtime can be created only
with the modules that it needs, which reduces the runtime’s size. The tool to build a
smaller runtime customized to an application needs is called jlink and is part of the
JDK executables. This allows for bigger levels of scalability and increased performance.3
Another benefit of introducing modules is stronger encapsulation which in turns
leads to better integrity. Before Java 9, a lot of platform classes could be used and code
could be tied to them, which lead to dependencies on legacy code and difficulty to
migrate to another Java version. When writing Java code, you notice that most Java
object types that you use come from packages such as java.*... or javax.*.... Those
packages represent the core of the Java Platform and contain classes intended for
public use. But the JDK also contains other packages that contain classes that were not
intended for external use, and that are used to implement JDK internal behavior, like the
sun.* packages. Until Java 9, they could be imported and the classes within them used,
just like any other package. Starting with JDK 9, the internal APIs are encapsulated and
are made inaccessible by default to prevent a developer from tying an implementation to
a specific JDK version.
Let’s skip ahead and define a module, and let’s go through all the configurations we
might need for one. But before that, let’s add one more package to the chapter03 project
so we have enough material to play with, so the project structure now is depicted in
Figure A-3.
3 How to use jlink is not an object of this book. The focus of the book is learning the Java programming language, thus the technical details of the Java platform will be kept to a minimum, just enough to start writing and executing code confidently.
Appendix
www.itbook.store/books/9781484237779

6
The contents of the module-info.java can be as simple as the name of the module
and two brackets.
module chapter.three {
}
How to Configure ModulesWithin those brackets, different module directives may be declared, using one of the
following keywords.
• requires
• exports
• module
• open
• opens... to
• provides ... with
• transitive
We’ll go over all of them in this section and give examples, so that when you start
writing java code, you know how to declare your modules correctly.
Modules can have dependencies. For our example classes inside the module
chapter.three need access to packages and classes in module chapter.zero. Declaring
a module dependency is done my using the requires keyword.
Figure A-3. Java 9 project with two packages and one module
Appendix
www.itbook.store/books/9781484237779

7
module chapter.three {
requires chapter.zero;
}
The dependency is an explicit one. But there are also implicit dependencies.
For example, any module declared by a developer implicitly requires the java.base
module. This module defines the foundational APIs of the Java SE Platform, and no Java
application could be written without it.
Declaring a module as required, means that the module is required at compile time
and runtime. If a module is required only at runtime, the requires static keywords are
used to declare the dependency. Just keep that in mind for now, it will make sense when
we talk about web applications.
But is it enough to declare our module as dependent of another? Does this mean
that the dependent module can access all public types(and their nested public and
protected types) ? If you are thinking not, you are right. This is of course, because the
module it depends on, must be configured to expose its contents. How can that be done?
In our case, we need to make sure module chapter.zero gives access to the required
packages. This is done by customizing the module-info.java for this module by adding
the exports directive, followed by the necessary package names.
module chapter.zero {
exports com.apress.bgn.ch0;
}
By doing this, we have given access to the com.apress.bgn.ch0 package to any
module that requires this module as a dependency. What if we do not want that?
! if you were curious and read the recommended Jar Hell article, you noticed that one of the concerns of working with Java sources packed in Jars, was security. Because, even without access to Java sources, by adding a Jar as a dependency to an application, objects could be accessed, extended and instantiated. So, aside from providing a reliable configuration, better scaling, integrity for the platform and improved performance, the goal for introduction of modules was better security as well.
Appendix
www.itbook.store/books/9781484237779

8
What if we want to limit the access to module contents only to the chapter.three
module? This can be done by adding the to keyword followed by the module name to
the exports directive.
module chapter.zero {
exports com.apress.bgn.ch0 to chapter.three;
}
More than one module can be specified to have access by listing the desired modules
separated by comma.
module chapter.zero {
exports com.apress.bgn.ch0 to chapter.three, chapter.two;
}
All good and well, but we can go even one step further. What if module chapter.
three requires access to a class defined in a module that is a dependency of chapter.
zero? In technical language this is called a transitive dependency, because it is more
practical to use a dependency that is already there, instead of declaring it again. Modules
support this, and the term to declare such a dependency is (as you probably suspected):
transitive.
For this scenario, we’ll make our module chapter.zero depend on external
module of the LOG4J (Apache Log4j 2), that is a simple library for logging of application
behavior.4 But we also want any module depending on chapter.zero to use classes in
the org.apache.logging.log4j module. In this case, the contents of the module-info.
java for module chapter.zero becomes
module chapter.zero {
requires transitive org.apache.logging.log4j;
exports com.apress.bgn.ch0 to chapter.three;
}
4 More details here https://logging.apache.org/log4j/2.x/
Appendix
www.itbook.store/books/9781484237779

9
By using requires transitive we have given read access to module org.apache.
logging.log4j to our chapter.three. This means that object types in chapter.three
can de declared by making use of object types defined in packages exported by module
org.apache.logging.log4j.
And this is where simple, and sort-of understandable things end. There are a few more
module directives to cover, which are a little more difficult to grasp, but you can return to
this chapter when you have a little more understanding of Java. So, here it goes...
In Java, there is a feature named reflection. Reflection is the process of inspecting
a package and access information of all its contents including private members. You can
imagine that maybe this is not such a good thing, especially in a productive application
that requires higher levels of security. Plus, such a feature makes it useless to have so
many types of accessors, right? Up to Java 9, this is how things were in Java, and using
reflection lead to problems included in the Jar Hell category. By introducing modules,
reflection can be restricted. This means that reflection is no longer possible unless the
module is configured to allow it. There are three forms of the same directive that can
configure access using reflection.
• open is used at module declaration level and allows reflective access
to all packages within it.
open module chapter.zero {
requires transitive org.apache.logging.log4j;
exports com.apress.bgn.ch0 to chapter.three;
}
• opens is used inside the module declaration to selectively configure
access through reflection only to certain packages.
module chapter.three {
requires chapter.zero;
opens com.apress.bgn.ch3.helloworld;
}
Appendix
www.itbook.store/books/9781484237779
10
• opens ... to is used inside the module declaration to selectively
configure access through reflection only to certain packages and to
a specific module. It’s a little difficult to give an example here, but
let’s imagine this project uses Spring Boot,5 which uses reflection to
instantiate objects of types defined in our chapter.three module.
module chapter.three {
requires chapter.zero;
requires spring.boot;
requires spring.web;
requires spring.context;
requires spring.boot.autoconfigure;
opens com.apress.bgn.ch3.helloworld to spring.core;
}
Aside from opening a package or a module for reflection the directives also provide
access to the package’s (respectively all packages in the module) public types (and their
nested public and protected types) at runtime only.
There are two directives left to cover: uses and provides that are difficult to explain
here, since they make more sense after you have dug into Java a little. But let’s give it a
try, and you can return to this chapter later. Module declarations that contain directives
provides or provides... with are named service providers because these modules provide a service implementation.
Java has a class named java.util.ServiceLoader that can modularize an
application and load implementations of a service. What is a service in this case? A java
object type that defines only a contract and that service providers need to provide a
concrete implementation for.
! A service is modeled in Java using an object type. it is called an interface, and is covered in Chapter 4. An interface can be compared with the earliest specification version for a car before being built, it covers what it should do, but not how. When the car is being built, it is the implementation part; that is when the how is decided. And cars do the same things, but in different ways depending on
5 A very popular framework written in Java is Spring, Spring Boot is used to build production-ready Spring applications. More about it here: https://projects.spring.io/spring-boot/
Appendix
www.itbook.store/books/9781484237779

11
their type of engine, for example. So an electric car has a different implementation (under the hood) for the braking function(during braking electric cars also recharge their battery) than a diesel based car.
Assuming the service needed to be implemented is named NakedService, a module
with a class that provides an implementation for it is declared as follows.
module chapter.one {
requires chapter.zero;
provides com.apress.bgn.ch0.service.NakedService
with com.apress.bgn.ch1.service.Provider;
}
By using the provides declarative like that, this module just became a service
provider.
The module that uses the service with the java.util.ServiceLoader class is
called a service consumer and to declare the fact that a service consumer uses
an implementation of that service contains the following directive in its module
configuration file.
module chapter.three {
requires chapter.zero;
uses com.apress.bgn.ch0.service.NakedService;
}
You would ask now, but what is the difference from normally accessing module
contents? Well, if you noticed, there is no requires chapter.one directive in the
module configuration file depicted previously. Why? Because when using services it is
only needed to have the module that provides the service type as a dependency in the
classpath. So, this way module chapter.three does not really care who provides the
implementation, and as long as it is there is retrieved by the java.util.ServiceLoader.
Why is this important? Because it decouples an application and removes explicit
dependencies on concrete implementation(the module-info.java for module chapter.
three does not need to explicitly declare a dependency on module chapter.one). This is
the Java simple way to support Inversion of Control.
Appendix
www.itbook.store/books/9781484237779

12
! This book introduces you into the core components of programming, which are data structures, algorithms, design patterns, and the most common coding principles. They are explained as they come up in the book, so there is no predefined order or sequence that you should expect.
To explain inversion of control, dependency injection must be explained. The action performed by any program (not only Java) is the result of interaction between its interdependent components, usually named objects. dependency injection is a concept that describes how dependent objects are connected at runtime by an external party. Take a look at Figure A-4. it describes two types of relationships between objects, and how those objects “meet” each other.
Figure A-4. Object relationships and how they meet
So, object A that needs an object of type B to perform its functions, thus A depends on B. Object A can directly create the object B - case (1), composition or retrieves a reference to an existing object itself - case (2), aggregation, but this ties them up together.
dependency injection allows severing that tie by using an external party to provide an object of type B to the object of type A - case (3), still aggregation, but with no direct ties and a twist.
Appendix
www.itbook.store/books/9781484237779

13
Inversion of control is a design principle in which generic reusable components are used to control the execution of problem-specific code, as in retrieving dependencies. Thus, you can say that the java.util.ServiceLoader is an dependency handler used to perform dependency injection and thus it was designed following the inversion of control principle.6
This is where the under the hood section ends. I hope it has given you enough
understanding of Java’s organization of code and the reasons behind it, and that you
continue reading the book and experimenting with code confidently.
A.2 Java Typical Application DesignLet’s consider a banking web application. It is probably complex, right? A lot of code has to
be written to handle user requests, process banking transactions, and saving and retrieving
data. Can you imagine how this code is organized? Most applications have three basic
layers: presentation, services, and data access. Figure A-5 depicts this common structure.
6 also known as the Hollywood Principle: “Don’t call us, we’ll call you”.
Figure A-5. The three most common layers of a Java application
Appendix
www.itbook.store/books/9781484237779
14
In the most simple applications, each layer is represented by a subproject or module,
that contains all the code used to perform a group of related operations. For example: all
code in the presentation layer implements functionalities for interaction with the user,
processing user requests and transforming them into calls for layers under it. So before
there were Java modules, java projects were themselves organized as multimodule
projects. And that is why in IntelliJ IDEA there is a tab called Modules.
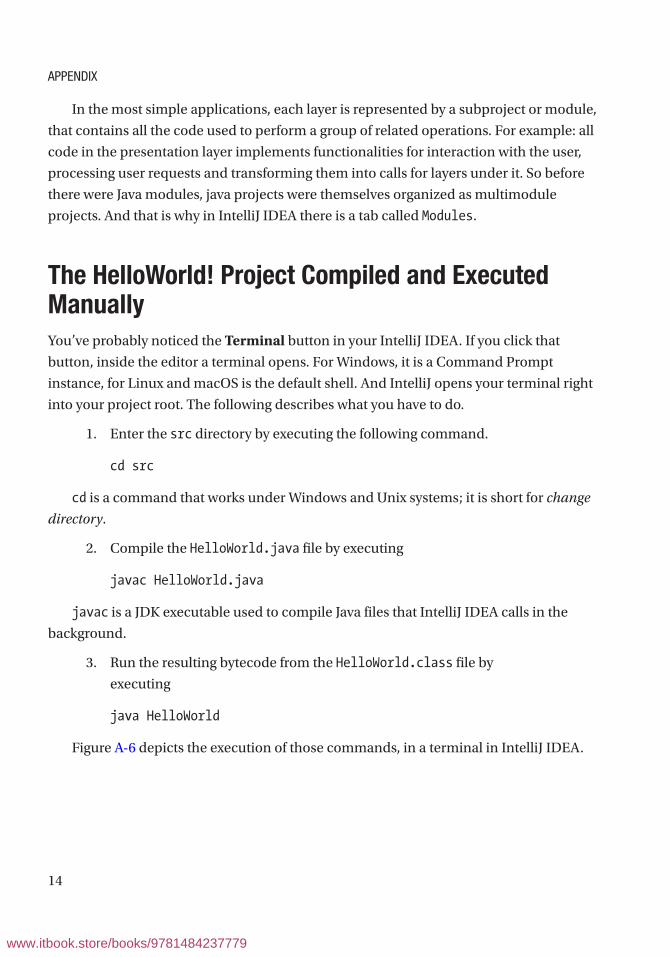
The HelloWorld! Project Compiled and Executed ManuallyYou’ve probably noticed the Terminal button in your IntelliJ IDEA. If you click that
button, inside the editor a terminal opens. For Windows, it is a Command Prompt
instance, for Linux and macOS is the default shell. And IntelliJ opens your terminal right
into your project root. The following describes what you have to do.
1. Enter the src directory by executing the following command.
cd src
cd is a command that works under Windows and Unix systems; it is short for change
directory.
2. Compile the HelloWorld.java file by executing
javac HelloWorld.java
javac is a JDK executable used to compile Java files that IntelliJ IDEA calls in the
background.
3. Run the resulting bytecode from the HelloWorld.class file by
executing
java HelloWorld
Figure A-6 depicts the execution of those commands, in a terminal in IntelliJ IDEA.
Appendix
www.itbook.store/books/9781484237779

15
Looks simple, right? And it is simple, because no packages or Java modules were
defined. But wait, is that possible? Well, yes. If you did not define a package, the class
is still part of an unnamed default package, which is provided by default by the JSE
platform for development of small, temporary, educational applications, like the one
you are building. So let’s make our project a little bit more complicated and add a named
package for our class to be in.
Putting Class HelloWorld in a PackageIn the creation menu, there is a Package option. So, right-click the src directory and
select it. A dialog window appears where you have to enter the package name. Enter com.
sandbox. In Figure A-7, the dialog windows is depicted, and even if the package is already
created, we introduced the same name again to show you how the IDE warns you that
you are trying to create a package with the same name.
Figure A-6. Manually compile and run the HelloWorld class in a terminal inside IntelliJ IDEA
Appendix
www.itbook.store/books/9781484237779

16
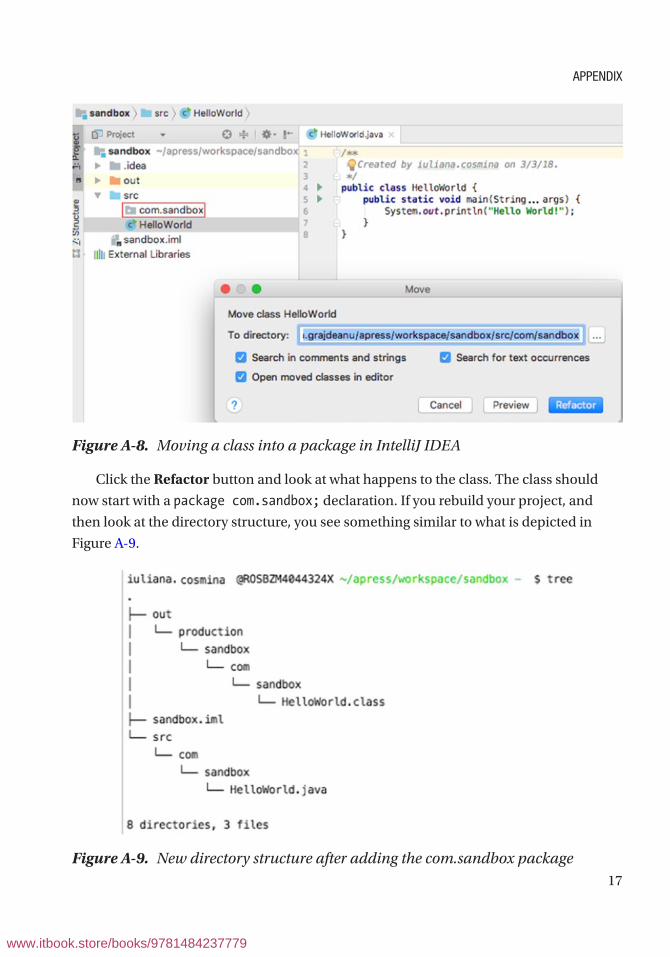
So, we created the package, but the class is not in it. Well, the way to get it there is to
select it and drag it into it. A dialog window for moving the class will appear, because the
editor has to modify the class to make it to belong to the package by adding a package
statement. And it requires your approval for the operation. Figure A-8 depicts this dialog
window.
Figure A-7. Create package in IntelliJ IDEA
Appendix
www.itbook.store/books/9781484237779
17
Click the Refactor button and look at what happens to the class. The class should
now start with a package com.sandbox; declaration. If you rebuild your project, and
then look at the directory structure, you see something similar to what is depicted in
Figure A-9.
Figure A-8. Moving a class into a package in IntelliJ IDEA
Figure A-9. New directory structure after adding the com.sandbox package
Appendix
www.itbook.store/books/9781484237779
18
If you compile and execute the class manually, you have to consider the package
now, so your commands will change to
~/sandbox/src - $ javac com/sandbox/HelloWorld.java
~/sandbox/src - $ java com/sandbox/HelloWorld
Hello World!
But things do not end here, because we still have Java modules. So, what about
that? How is our code running without a module-info.java file? Well, there is a
default unnamed module, and all JARs, modular or not, and classes on the classpath
are contained in it. This default and unnamed module exports all packages and reads
all other modules. Because it does not have a name it cannot be required and read by
named application modules. Thus, even if your small project seems to work with JDKs
with versions bigger or equal to 9, it cannot be accessed by other modules, but it works
because it can access others. (This ensures backward compatibility with older versions of
the JDK.) This being said, let’s add a module to our project.
Configuring the com.sandbox ModuleConfiguring a module is as easy as adding a module-info.java under the src directory.
In Figure A-6, in the menu listed there is a module-info.java option and if you select
that, the IDE generates the file for you. All is well and fine, and if you do not like the
module name that was generated, you can change it. I changed it to com.sandbox to
respect the module naming convention mentioned in the modules section.
/**
* Created on 3/3/18.
*/
module com.sandbox {
}
What happens now that we have a module? Not much from the IDEs point of view.
But if you want to compile a module manually you have to know a few things. I compiled
our module using the following command.
Appendix
www.itbook.store/books/9781484237779

19
~/sandbox/src/ - $ javac -d ../out/com.sandbox \
module-info.java \
com/sandbox/HelloWorld.java
! "\" is a macOS/Linux separator. On Windows, write the whole command on a single line or replace "\" with "^".
Let me explain what I did there. The following is the syntax to compile a module.
javac -d [destination location]/[module name] \
[source location]/module-info.java \
[java files...]
The result of executing that command is that under the out directory, a directory
named com.sandbox is created—the module name. Under this directory, we’ll have the
normal structure of the com.sandbox package. The contents of the out directory are
depicted in Figure A-10.
Figure A-10. Java module com.sandbox compiled manually
As you have noticed in this example, the module does not really exist until we compile
the sources, because a Java module is more of a logical mode of encapsulating packages
described by the module-info.class descriptor. The only reason the com.sandbox
directory was created is that we specified it as argument in the javac -d command.
Appendix
www.itbook.store/books/9781484237779

20
We have a compiled module, what do we do with it? We try to run the application.
sandbox/ - $ java --module-path out \
--module com.sandbox/com.sandbox.HelloWorld
Hello World!
The following is the syntax to execute a modular application.
java --module-path [destination location] \
--module [module name] /[package name].HelloWorld
Hello World!
Regarding the module name, doesn’t it seem a little redundant? To me, it sure
looks like it, which is why I prefer not to create directories for modules unless I have
more of them under src directory. And we also have to talk about the standard naming
conventions for modules. That is also another thing that might give developer headaches
if they want to create directories for modules. In multiple blog articles, and even in the
Oracle Magazine from September 2017, this is recommended.7 But do not worry about
it for now, the sources of the book contain modules with simple names and the module
configuration is already in place for you.
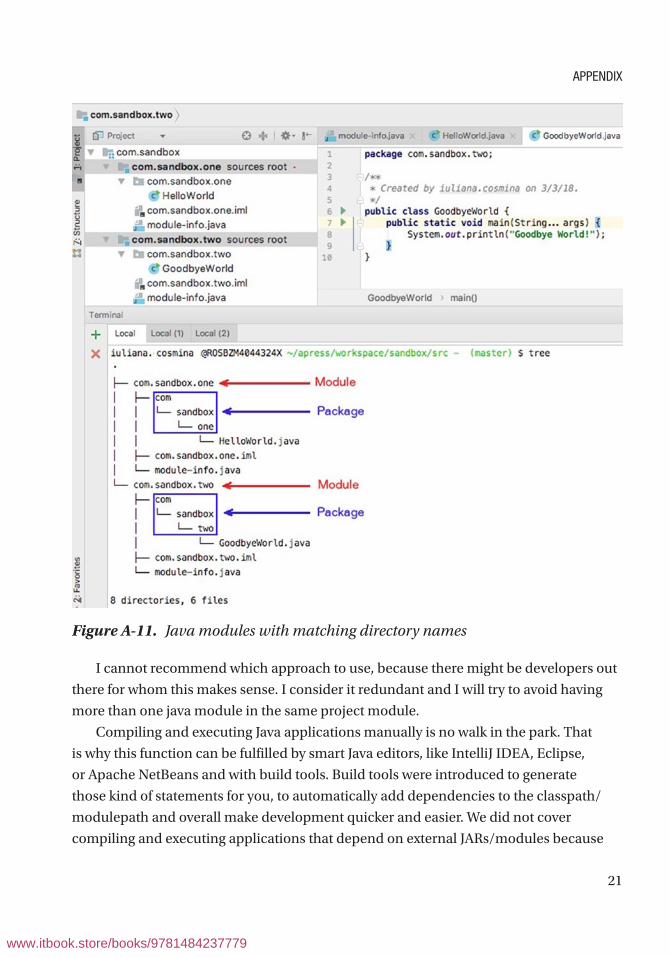
Let’s give it a try. Let’s create two modules, one named com.sandbox.one and one
named com.sandbox.two, create directories for their sources too. Figure A-11 shows how
the project structure looks in this case. You can see that even the IDE is puzzled about it,
because the project view has changed into something that does not resemble what was
depicted in the previous figures.
7 Oracle Magazine edition from September 2017 can be accessed here: http://www.javamagazine.mozaicreader.com/SeptOct2017#&pageSet=29&page=0
Appendix
www.itbook.store/books/9781484237779
21
I cannot recommend which approach to use, because there might be developers out
there for whom this makes sense. I consider it redundant and I will try to avoid having
more than one java module in the same project module.
Compiling and executing Java applications manually is no walk in the park. That
is why this function can be fulfilled by smart Java editors, like IntelliJ IDEA, Eclipse,
or Apache NetBeans and with build tools. Build tools were introduced to generate
those kind of statements for you, to automatically add dependencies to the classpath/
modulepath and overall make development quicker and easier. We did not cover
compiling and executing applications that depend on external JARs/modules because
Figure A-11. Java modules with matching directory names
Appendix
www.itbook.store/books/9781484237779
22
that is not the scope of this book. But if you are really interested in this, the Internet is
great and helpful. And now that we made it clear that manual compiling and execution
of Java applications is a pretty much a no-go (it’s possible, but not worth the effort), let’s
start talking about Java build tools.
Java Projects Using Build Tools, Mostly GradleMaven is a build automation tool used primarily for Java projects. Although Gradle is
gaining ground, Maven is still one of the most used build tools. Tools like Gradle and
Maven are used to organize the source code of an application in interdependent project
modules and configure a way to compile, validate, generate sources, test and generate
artifacts automatically. An artifact is a file—usually a JAR—that is deployed to a Maven
repository. A Maven repository is a location on a HDD where JARs get saved in a special
directory structure.
The discussion about build tools must start with Maven,8 because this build tool
standardized a lot of the terms we used in development today. For example, for big
projects that can be split into multiple parts—sub-projects—that can be compiled and
archived in separate JARs, we call a subproject a module, because the XML element to
declare a subproject as a child of a project is called <module .../>.
A Maven build produces one or more artifacts, such as a compiled JAR, a “sources”
JAR and even “test” jar if the module has test classes in it. Maven introduced a way to
uniquely identify artifacts. Each artifact has a group ID (usually a reversed domain
name, like com.sandbox), an artifact ID (just a name), and a version string. Maven
projects are configured using one or more pom.xml files, one for the parent project and
one or each of its modules (subprojects/children/modules). In the following code
snippet, you can see a simplified version of a parent project pom.xml file.
<?xml version="1.0" encoding="UTF-8"?>
<project ...>
<groupId>com.sample</groupId>
<artifactId>parent-maven</artifactId>
<version>1.0-SNAPSHOT</version>
8 We won’t mention Ant, which is the first Java build tool that is still hanging around because of legacy code. More about it at https: //ant.apache.org/
Appendix
www.itbook.store/books/9781484237779
23
<packaging>pom</packaging>
<modules>
<module>child-01</module>
<module>child-02</module>
</modules>
...
</project>
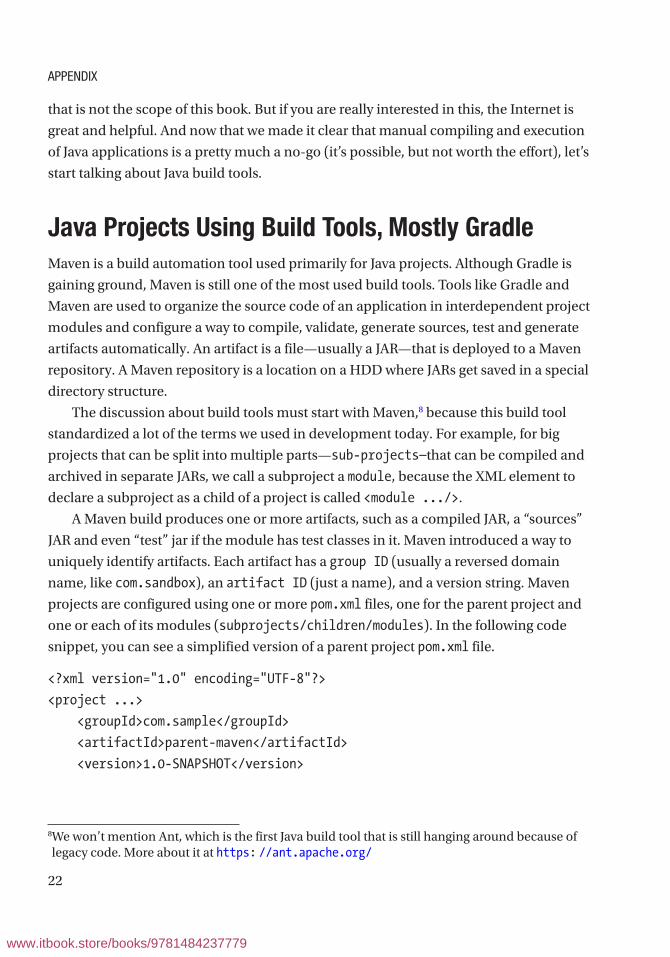
This file has the minimum elements needed to understand how the project
is organized. You can see that the project is identified uniquely by the values of
elements: <groupId> , <artifactId> and <version>. And under them, you can see its
subprojects (modules). Look at Figure A-12. Is that the same structure you imagined
after seeing that file?
Figure A-12. Maven multimodule project structure
Maven also requires the project structure to look a certain way; it introduced a
standard for this that has taken over the Java development world. Figure A-13 shows the
structure of the parent-maven project and one of its modules child-01.
Appendix
www.itbook.store/books/9781484237779

24
Figure A-13. Maven module structure
Now, let’s explain! Project parent-maven is called a multimodule project because it
is made up of more than one module (child-01 and child-02 here). The modules are in
fact subprojects that are compiled and archived into JARs. Each module is represented
by a directory containing the sources, resources, tests, and a Maven configuration file.
The directories are located under the parent-maven directory. It’s not a must for them to
be there, but it definitely makes it clear that they are parts of a bigger project.
Subproject child-01 is a module of project parent-maven. The content of this
directory gets built into an artifact, thus it definitely contains Java code in there. Its
internal structure can be explained as follows.
• The src directory contains the sources of this module that are
grouped in two categories stored under two directories: main and test
Appendix
www.itbook.store/books/9781484237779
25
• the main directory contains source and resource files that get built
into the artifact
– The java directory contains packages declarations, with their classes and
module-info.java files
– The resources directory contains any type of text files (*.properties,
*.XML, *.JSON, etc.) that are read by classes declared into the java
directory(configuration and data).
• The test directory has an identical internal structure as main, only
the classes in its java directory are Java test classes, used to test the
classes defined in main\java and the resources directory contains
files on any text type filled with test data and test configurations. This
module can be built into an artifact and its name will have *-tests
as a suffix. Such artifacts are used as dependencies by other modules
that contain tests that use the API defined in their test dependency.
The Maven way to identify artifacts and the internal structure of projects and
multimodule projects have become the standard for Java applications. Gradle, the next
best thing when it comes build tools for Java applications, has embraced them both.
Gradle is preferred nowadays for a number of reasons, but the one you hear mentioned
the most is that configuration files are written in Groovy and the configuration for big
projects can be reduced a lot. (Maven uses XML with strict rules for configuration, and
for big projects the configuration files tend to become complex and unreadable).9
For example, to declare a parent project with two modules, like the one listed for
Maven, with Gradle, you just need a settings.gradle file containing the following.
rootProject.name = 'parent-gradle'
include 'child-01'
include 'child-02'
9 The Maven project was presented as a case-study; it is a real and working project that can be found on GitHub at https://github. com/iuliana/gradle-vs-maven. If you are curious, you can take a look.
Appendix
www.itbook.store/books/9781484237779

26
And a build.gradle file containing
allprojects {
version = '1.0-SNAPSHOT'
}
The settings.gradle and the build.gradle file are both Groovy scripts. Only one
settings.gradle script is executed in each build (in comparison to the build.gradle
script in multiproject builds), which is why this is the proper place in which the project
structure is defined. You can see that even with two configuration files, the syntax is still
greatly reduced and easier to read.
Gradle was chosen as the go-to build tool for the sources attached to this book.
A multimodule project can be downloaded from GitHub, and build in the command line
or imported into IntelliJ. This approach makes sure that you get quality sources, which
can be compiled in one go. It is also practical, because I imagine you do not want to
load a new project in IntelliJ every time you start reading a new chapter. Also, it makes
it easier for me to maintain the sources and adapt them to a new JDK, and with Oracle
releasing so often, I need to do this quickly.
The project that you use to test the code written in this book (and write your own
code if you want to) is called java-bgn.10 It is a multimodule Gradle project. The first
level of the project is the java-bgn project, that has a configuration file named build.
gradle. In this file, all dependencies and their versions are listed. The child projects, the
ones on the second level, are the modules of this project. And we call them child projects
because they inherit those dependencies and modules from the parent project. In their
configuration files, we can specify what dependencies are needed, from the list defined
in the parent. And these modules are a method of wrapping up together sources for each
chapter and that is why these modules are named chapter00, chapter01, and so forth.
If a project is big and needs a lot of code to be written, the code is split again in another
level of modules. Module chapter05 is such a case, and is configured as a parent for the
projects underneath it. Figure A-14 shows how this project looks like loaded in IntelliJ
IDEA, and module chapter05 is expanded so you can see the third level of modules.
Each level is marked with the corresponding number.
10 The project will be renamed to “java-for-absolute-beginners” when the book is officially released, to help with search engines indexing.
Appendix
www.itbook.store/books/9781484237779

27
Figure A-14. Gradle multimodule-level structure
Appendix
www.itbook.store/books/9781484237779
28
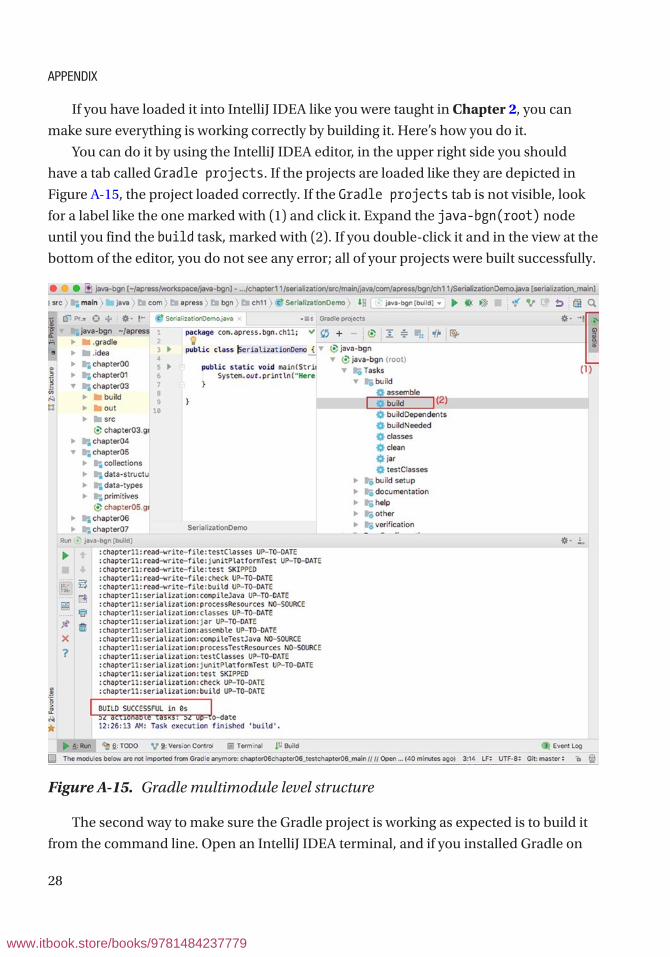
If you have loaded it into IntelliJ IDEA like you were taught in Chapter 2, you can
make sure everything is working correctly by building it. Here’s how you do it.
You can do it by using the IntelliJ IDEA editor, in the upper right side you should
have a tab called Gradle projects. If the projects are loaded like they are depicted in
Figure A-15, the project loaded correctly. If the Gradle projects tab is not visible, look
for a label like the one marked with (1) and click it. Expand the java-bgn(root) node
until you find the build task, marked with (2). If you double-click it and in the view at the
bottom of the editor, you do not see any error; all of your projects were built successfully.
Figure A-15. Gradle multimodule level structure
The second way to make sure the Gradle project is working as expected is to build it
from the command line. Open an IntelliJ IDEA terminal, and if you installed Gradle on
Appendix
www.itbook.store/books/9781484237779

29
the system path as explained in Chapter 2 just type gradle clean build and hit Enter.
In the command line, you might see some warnings, if the Gradle plugin for supporting
Java modules is still unstable when this book reaches you, but as long as the execution
ends with BUILD SUCCESSFUL everything is all-right.
Aside from the sandbox project, all the classes, modules, and packages mentioned in
this section are part of this project. The chapter00 and chapter01 do not contain classes
specific to those chapters. I just needed them to construct the Java module examples.
IntelliJ IDEA sorts modules in alphabetical order, so the naming for the chapter modules
was chosen this way so they are listed in the normal order that you should work with them.
Nested classes (advanced version)Nested classes are a special type of class that are declared in the body of other classes.
Nesting classes is a practice of writing code used to group together classes that logically
are linked because they share the same purpose. It also increases encapsulation, hiding
from the outside world classes that are used in a limited context. Also, if done properly,
nesting classes leads to more readable and maintainable code.
As you’ve already learned, top-level classes are classes defined in files named after
them. A top-level class’s body can contain two types of nested classes declarations.
The non-static nested class is declared inside the body of a top-level class, outside any method body – these types of classes are named inner classes, and they
can only be instantiated by using an instance of the top-level class. In the following code
snippet, class NotStaticNested is declared inside the body of class TopWithNested. If the
class is public it can be accessed from any package; if there is no accessor defined, it is
limited to the package its top-level class is declared in. In other words, the accessibility
settings are inherited from the class in which it is declared.
package com.apress.bgn.ch0;
public class TopWithNested {
public class NotStaticNested {
NotStaticNested() {
System.out.println("I am non-static nested!");
}
}
}
Appendix
www.itbook.store/books/9781484237779

30
As instantiation of the inner class can only be done using an existing instance of the
top-level class, the syntax is quite ... strange. In the next code snippet you can see the twn
instance being created first, and then the NotStaticNested constructor being called on
it, in a manner similar to the way methods are usually called.
package com.apress.bgn.ch0;
public class NestedDemo {
public static void main(String... args) {
TopWithNested twn = new TopWithNested();
TopWithNested.NotStaticNested nsn = twn.new NotStaticNested();
}
}
The full class name includes the top-level class name when the class is instantiated
outside of the top-level class. Another interesting thing about inner classes is that they
cannot have nested members. This is because static members are instantiated when the
program starts, but an inner class cannot be created until an instance of the enclosing
class is created.
Inner classes have access to other members of the enclosing class, even if they are
declared private; thus its methods can use fields of the enclosing class to do its own
processing. To see this in action, a field of type StringBuilder will be added to the
TopWithNested class. Both classes will add texts to it when their constructors are called.
package com.apress.bgn.ch0;
public class TopWithNested {
private StringBuilder topLevelSb = new StringBuilder();
public class NotStaticNested {
NotStaticNested() {
topLevelSb.append("calling NotStaticNested()\n");
}
}
public TopWithNested() {
topLevelSb.append("calling TopWithNested()\n");
}
Appendix
www.itbook.store/books/9781484237779
31
public String getStringContents() {
return topLevelSb.toString();
}
}
In the next code snippet, the statements to test the previous implementation are
depicted.
...
TopWithNested twn = new TopWithNested();
TopWithNested.NotStaticNested nsn = twn.new NotStaticNested();
System.out.println(twn.getStringContents());
...
And because of what I’ve explained so far, when running the previous statements,
the following output is expected:
calling TopWithNested()
calling NotStaticNested()
Let’s get creative here: what do you think will happen if we declare an inner class
inside an interface? Is it even possible? Yes it is, but under the hood, the compiler
modifies the inner class by adding the static modifier—because anything that is not
a method skeleton or a default method, or private method in an interface, is by default
public and static. So a nested class declared in an interface is not actually an inner
class, but an static nested class. This can be easily checked by opening the class file
generated by the Java compiler. In the next snippet, you can see the declaration of the
NotStaticNested inside the InterfaceWithNested class.
package com.apress.bgn.ch0;
public interface InterfaceWithNested {
class NotStaticNested {
NotStaticNested() {
System.out.println("I am non-static nested!");
}
}
}
Appendix
www.itbook.store/books/9781484237779

32
And here are, the contents of the InterfaceWithNested.class:
package com.apress.bgn.ch0;
public interface InterfaceWithNested {
public static class NotStaticNested {
NotStaticNested() {
System.out.println("I am non-static nested!");
}
}
}
The static nested class is declared inside the body of a top-level class, or interface, outside any method body. These types of classes are associated with the
enclosing class in the same way static methods and variables are. A static nested class
interacts with other static methods and fields of the enclosing class. Its behavior is the
same as the class enclosing its declaration, and declaring static nested classes is usually
done because of packaging convenience. The following code snippet contains a static
nested class declaration and a sample of the syntax to instantiate that class.
package com.apress.bgn.ch0;
public class StaticNestedDemo {
static class NestedClass {
public NestedClass(){
System.out.println("calling NestedClass()!");
}
}
public static void main(String... args) {
new StaticNestedDemo.NestedClass();
}
}
When used outside of the enclosing class, the name of the class must be prefixed
with the name of the enclosing class. As for where this class can be accessed from, the
normal rules for accessors on top-level classes apply.
Appendix
www.itbook.store/books/9781484237779

33
Similar to nested classes, local classes are declared inside the bodies of methods
of a top-level class. They are limited to the context of the block they are declared in,
and that is the only place they can be instantiated and used. When necessary, although
discouraged because of the possible complexity of the resulting code, a full-blown class
can be declared inside a method body (static or non-static). Local classes are non-static
and cannot define or declare any static members. When a local class is declared in a
static method, it can access other static members of the enclosing class. In addition, a
local class has access to all variables declared within the same block.
package com.apress.bgn.ch0;
public class LocalClassDemo {
private static int i = 10;
public static void main(String... args) {
int j = 5;
class Local {
public Local() {
System.out.println("calling Local();");
System.out.println(" and I can access i = " + i);
System.out.println(" and I can access j = " + j);
}
}
new Local();
}
}
When declared by implementing an interface on the spot, they are named
anonymous classes because they have no name. The statement to declare such a class is
both an implementation on the spot of an interface and an instantiation. In the following
code snippet an anonymous class is created in the body of the constructor for the
TopWithNested class by implementing the java.langRunnable interface; the resulting
instance is used to create a thread object.
Appendix
www.itbook.store/books/9781484237779
34
package com.apress.bgn.ch0;
public class TopWithNested {
public TopWithNested() {
Runnable anon = new Runnable() {
@Override
public void run() {
System.out.println(Thread.currentThread().getId() +
": I am an anonymous instance! ");
}
};
Thread t = new Thread(anon);
t.run();
}
public static void main(String... args) {
new TopWithNested();
}
}
Lambda expressions can compact the previous code, but for a better understanding
of nested classes, the expanded code was necessary. The entire body of the constructor
can be reduced to the following inline statement, and the underlined part of it represents
the declaration and instantiation of the anonymous class.
...
new Thread(() -> System.out.println(Thread.currentThread().getId()
+ ": I am anonymous instance! ")).run();
...
Local classes should be used when their implementation does not affect the
readability, maintainability and testability of the enclosing class. In additoon, access to
variables of the enclosing method and to static fields of the enclosing class might lead
to problems like shadowing when these classes declare fields and methods that share
a name. I recommend this article https://docs.oracle.com/javase/tutorial/java/
javaOO/localclasses.html from the official Oracle documentation to learn more about
the problems that might emerge when using local classes.
Appendix
www.itbook.store/books/9781484237779