Japanese Sword Arts 101 · PDF filesword correctly, there never need be fear that it will slip...
15
Published by www.sword-buyers-guide.com Page 1 Japanese Sword Arts 101 Basic Drawing and Cutting Techniques of JSA Originally Written by Darren McNamara as an article for the SBG Sword Forum Edited for ebook format by Paul Southren An SBG Publication www.sword-buyers-guide.com (c) 2008 - All Rights Reserved This ebook is freeware and you are welcome to distribute, give away or otherwise share (though not sell) to anyone you wish on the condition that none of the material within is changed or edited in any way.
Transcript of Japanese Sword Arts 101 · PDF filesword correctly, there never need be fear that it will slip...
Published by www.sword-buyers-guide.com Page 1
Japanese Sword
Arts 101
Basic Drawing and Cutting Techniques of JSA
Originally Written by Darren McNamara as an article for the SBG Sword Forum
Edited for ebook format by Paul Southren
An SBG Publication
www.sword-buyers-guide.com
(c) 2008 - All Rights Reserved
This ebook is freeware and you are welcome to distribute, give away or otherwise share (though not
sell) to anyone you wish on the condition that none of the material within is changed or edited in
any way.
Published by www.sword-buyers-guide.com Page 2
In the Beginning...
It is hard to know where to start this.
As this is not my first study of a sword
related art, I do not want to confuse
people or mix traditions by sounding
too definitive about my text or reasons.
I have been studying various types of
Kenjutsu for 18 years now on and off,
along with other Japanese traditional
weapons arts, however until now have
just looked at myself as a student and
probably always will.
The handling tips I refer to here are
based my learning’s from the Shinto
ryu school of swordsmanship, and are
only a guide for those with an interest
in the subject that may not have a
sword school in their area.
Nothing else replaces true instruction
by a highly dedicated teacher or
instructor, but please look at this as
just a taste of what you could learn
with proper one on one tuition.
This was also inspired by the amount of cheaper katanas that are available on the
market nowadays and the rather young or inexperienced hands (sometimes!) that seem
to be obtaining them. If this prevents just one accident
from mishandling a sharpened blade then it has been
worthwhile.
After all, the Japanese have all these formalities and
doctrines so unnecessary harm does not befall any
practitioner who wishes to train correctly. I will try to
simplify it as much as possible, however may use the
odd Japanese phrase here or there for want of a better
English word of the same meaning.
Every move or stance we use while training is highly
tried and sequenced to lessen any shortfall that may
occur to the teacher, student or even a bystander that may be too close to the moment.
This is not a guarantee though, and I can assure you many accidents still occur due to
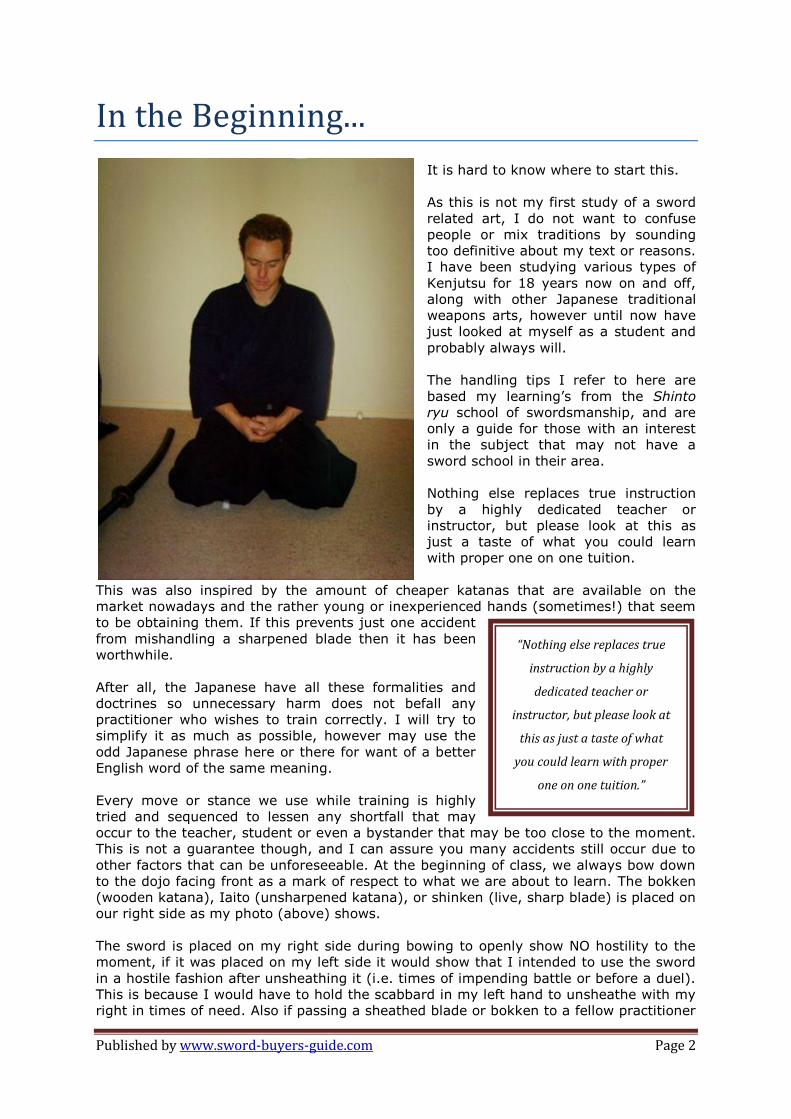
other factors that can be unforeseeable. At the beginning of class, we always bow down
to the dojo facing front as a mark of respect to what we are about to learn. The bokken
(wooden katana), Iaito (unsharpened katana), or shinken (live, sharp blade) is placed on
our right side as my photo (above) shows.
The sword is placed on my right side during bowing to openly show NO hostility to the
moment, if it was placed on my left side it would show that I intended to use the sword
in a hostile fashion after unsheathing it (i.e. times of impending battle or before a duel).
This is because I would have to hold the scabbard in my left hand to unsheathe with my
right in times of need. Also if passing a sheathed blade or bokken to a fellow practitioner
“Nothing else replaces true
instruction by a highly
dedicated teacher or
instructor, but please look at
this as just a taste of what
you could learn with proper
one on one tuition.”
Published by www.sword-buyers-guide.com Page 3
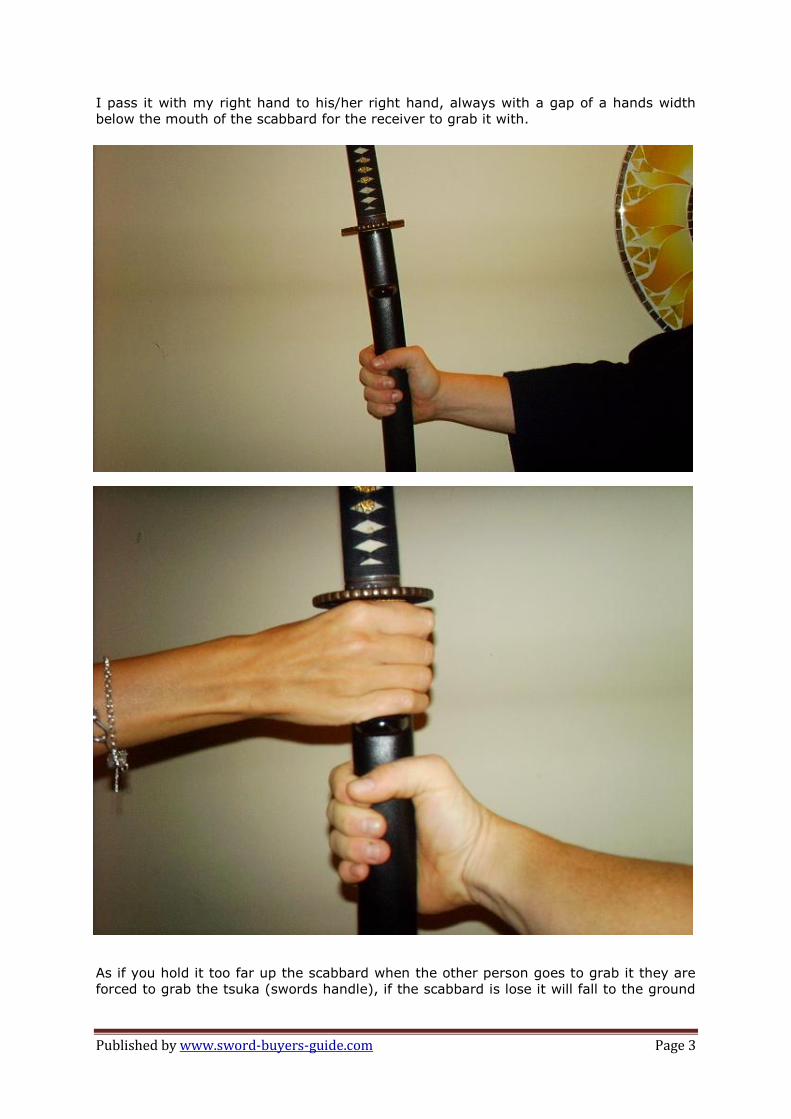
I pass it with my right hand to his/her right hand, always with a gap of a hands width
below the mouth of the scabbard for the receiver to grab it with.
As if you hold it too far up the scabbard when the other person goes to grab it they are
forced to grab the tsuka (swords handle), if the scabbard is lose it will fall to the ground

Published by www.sword-buyers-guide.com Page 4
injuring your fellow practitioners toe or foot, possibly breaking the scabbard, and making
a loud noise.
The reason we practice this pass-over technique with bokken as well, is that we use a
bokken as a pretence for using a live-blade so must treat it with the same respect.
After rising from the bow to begin our class, we pick the sword up with our right hand as
such, with our thumb over the tsuba (hilt-guard).
Published by www.sword-buyers-guide.com Page 5
This is for the obvious reason that we only want the blade to come out when we actually
want it to come out and some swords do sit loosely in their scabbards after they have
been drawn in and out too many times.
The left hand then lips the obi (sword belt) over a little for the sword and scabbard to
then be inserted into your respective belt.
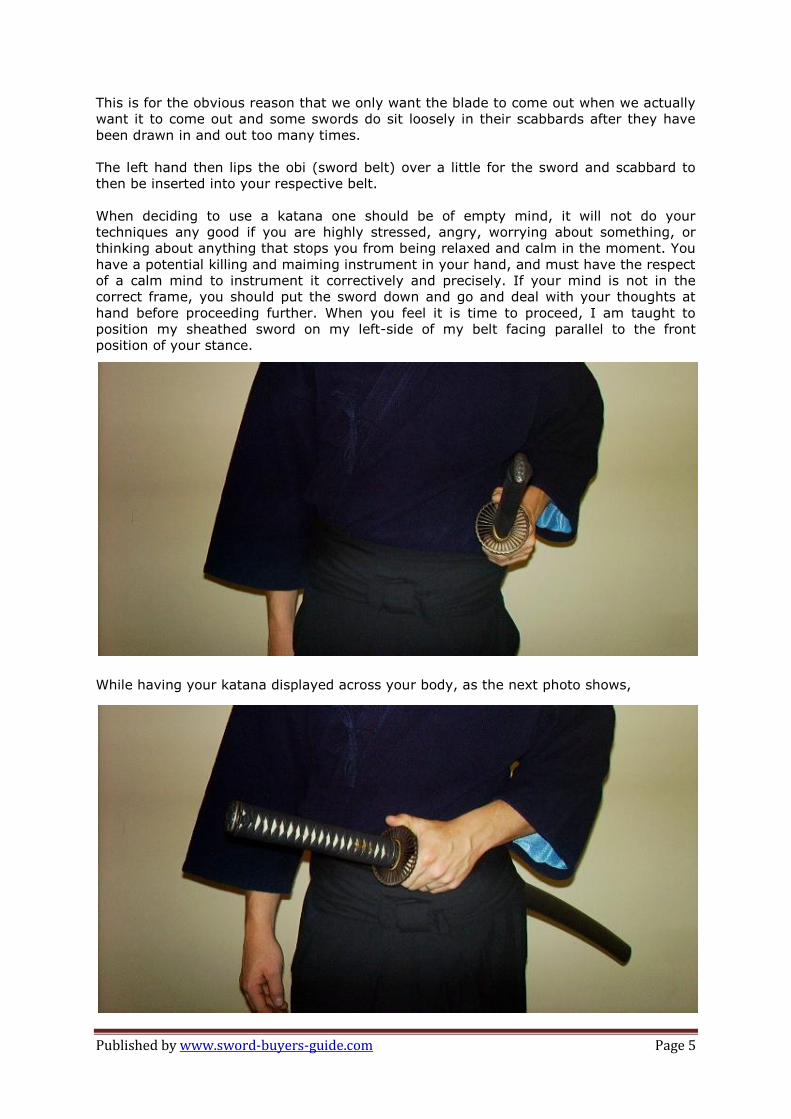
When deciding to use a katana one should be of empty mind, it will not do your
techniques any good if you are highly stressed, angry, worrying about something, or
thinking about anything that stops you from being relaxed and calm in the moment. You
have a potential killing and maiming instrument in your hand, and must have the respect
of a calm mind to instrument it correctively and precisely. If your mind is not in the
correct frame, you should put the sword down and go and deal with your thoughts at
hand before proceeding further. When you feel it is time to proceed, I am taught to
position my sheathed sword on my left-side of my belt facing parallel to the front
position of your stance.
While having your katana displayed across your body, as the next photo shows,

Published by www.sword-buyers-guide.com Page 6
may look nice and remind you of a samurai, however if you were to draw the blade
quickly at this point, you would slash or bash your fellow practitioner on your right, in
the face or chest! This method of positioning your sword on your left facing front was
also used by the Roman army, as marching in Phalanx formation means one has to take
care of who is around you when drawing any blade. After all, it is counter-productive to
kill or maim your own troops by accident. This method in positioning also makes your
sword’s length harder to see on your person than the classic sword carrying samurai
position.
When ready to draw the blade from its scabbard, your left thumb should already be
securing the blade (as explained earlier) in place, bring your right hand up to the swords
handle and grip it securely. Slowly release your thumb to be now holding the mouth of
your scabbard with your left hand rather securely, whilst drawing the blade from
scabbard in an upwards motion.
Published by www.sword-buyers-guide.com Page 7
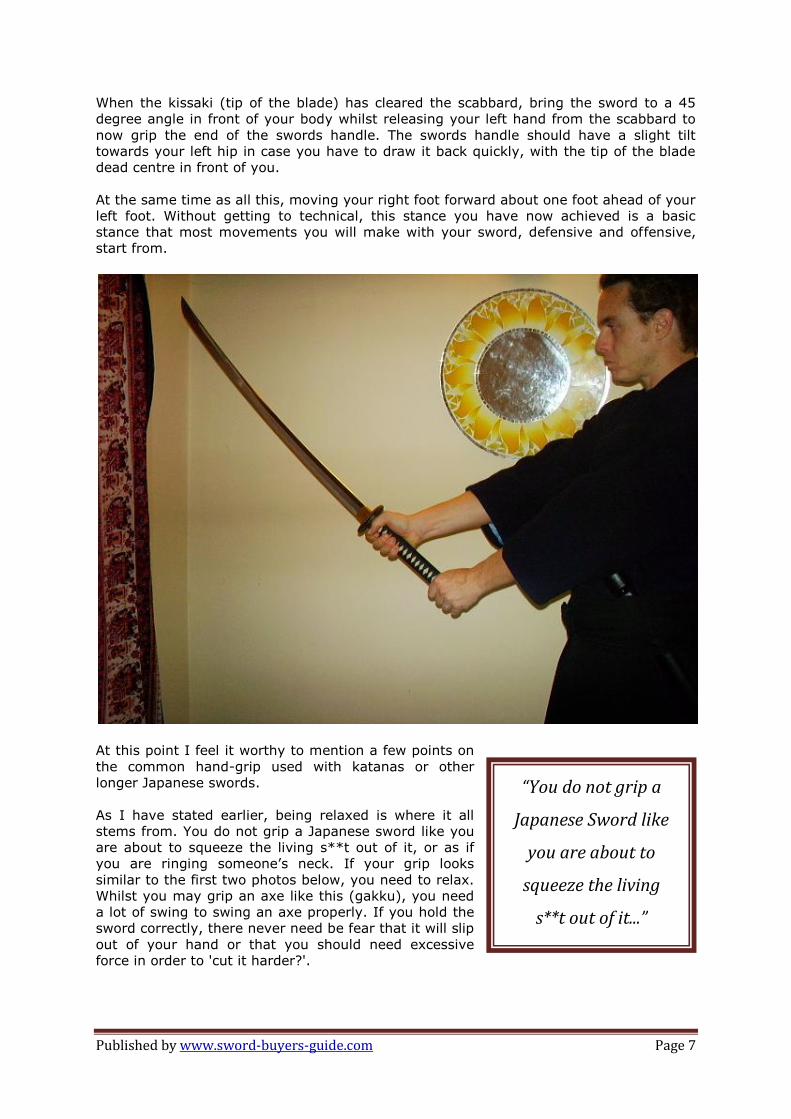
When the kissaki (tip of the blade) has cleared the scabbard, bring the sword to a 45
degree angle in front of your body whilst releasing your left hand from the scabbard to
now grip the end of the swords handle. The swords handle should have a slight tilt
towards your left hip in case you have to draw it back quickly, with the tip of the blade
dead centre in front of you.
At the same time as all this, moving your right foot forward about one foot ahead of your
left foot. Without getting to technical, this stance you have now achieved is a basic
stance that most movements you will make with your sword, defensive and offensive,
start from.
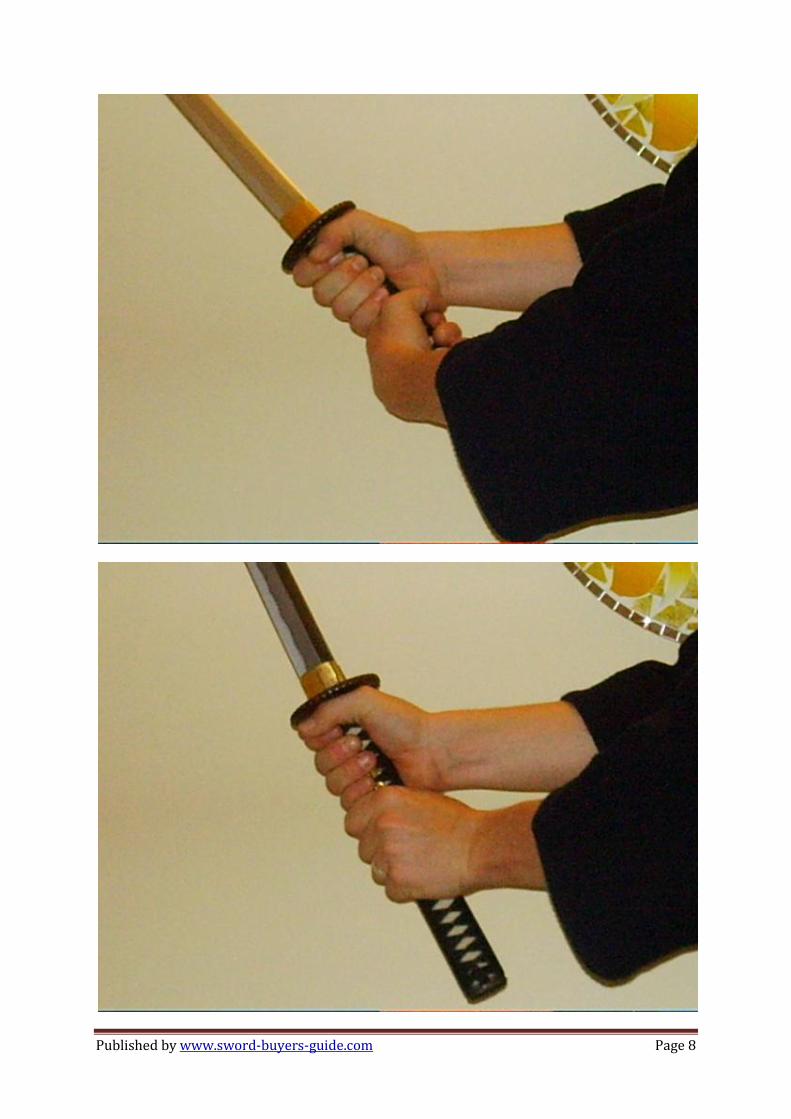
At this point I feel it worthy to mention a few points on
the common hand-grip used with katanas or other
longer Japanese swords.
As I have stated earlier, being relaxed is where it all
stems from. You do not grip a Japanese sword like you
are about to squeeze the living s**t out of it, or as if
you are ringing someone’s neck. If your grip looks
similar to the first two photos below, you need to relax.
Whilst you may grip an axe like this (gakku), you need
a lot of swing to swing an axe properly. If you hold the
sword correctly, there never need be fear that it will slip
out of your hand or that you should need excessive
force in order to 'cut it harder?'.
“You do not grip a
Japanese Sword like
you are about to
squeeze the living
s**t out of it...”
Published by www.sword-buyers-guide.com Page 8
Published by www.sword-buyers-guide.com Page 9
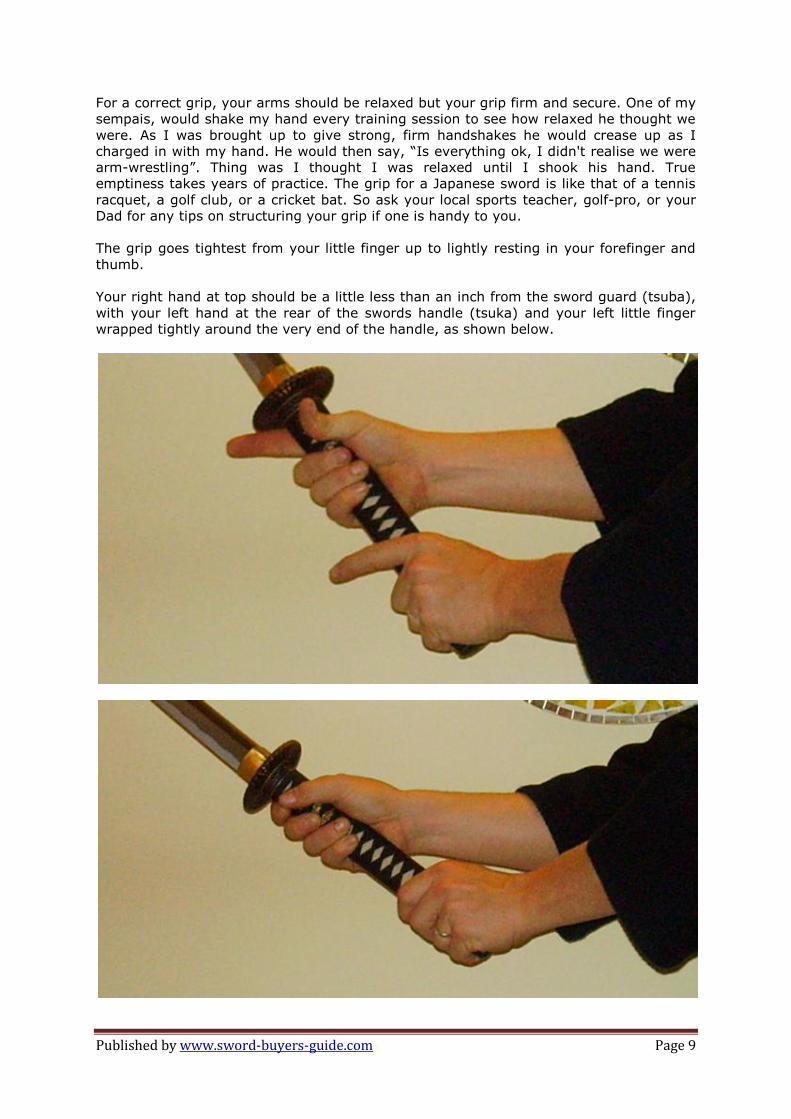
For a correct grip, your arms should be relaxed but your grip firm and secure. One of my
sempais, would shake my hand every training session to see how relaxed he thought we
were. As I was brought up to give strong, firm handshakes he would crease up as I
charged in with my hand. He would then say, “Is everything ok, I didn't realise we were
arm-wrestling”. Thing was I thought I was relaxed until I shook his hand. True
emptiness takes years of practice. The grip for a Japanese sword is like that of a tennis
racquet, a golf club, or a cricket bat. So ask your local sports teacher, golf-pro, or your
Dad for any tips on structuring your grip if one is handy to you.
The grip goes tightest from your little finger up to lightly resting in your forefinger and
thumb.
Your right hand at top should be a little less than an inch from the sword guard (tsuba),
with your left hand at the rear of the swords handle (tsuka) and your left little finger
wrapped tightly around the very end of the handle, as shown below.
Published by www.sword-buyers-guide.com Page 10
Many of you have probably seen scenes in Japanese movies where disgraced Yakuza cut
off their little finger’s digit as a penance for a misdeed.
This was to make the disgraced gangster unable to hold a sword correctly and then
directly need to rely on their organization more for defence. The next offence would then
require the next finger up from the little one to be cut off and so on, until eventually you
developed the nickname Stumpy or had to commit seppuku. Probably the latter though.
From your current position, you could proceed with a thrust or to adjust into Jodan, or
maybe ahso. Stepping forward with your left foot about one foot ahead of your right, for
Jodan you raise your sword above your head.
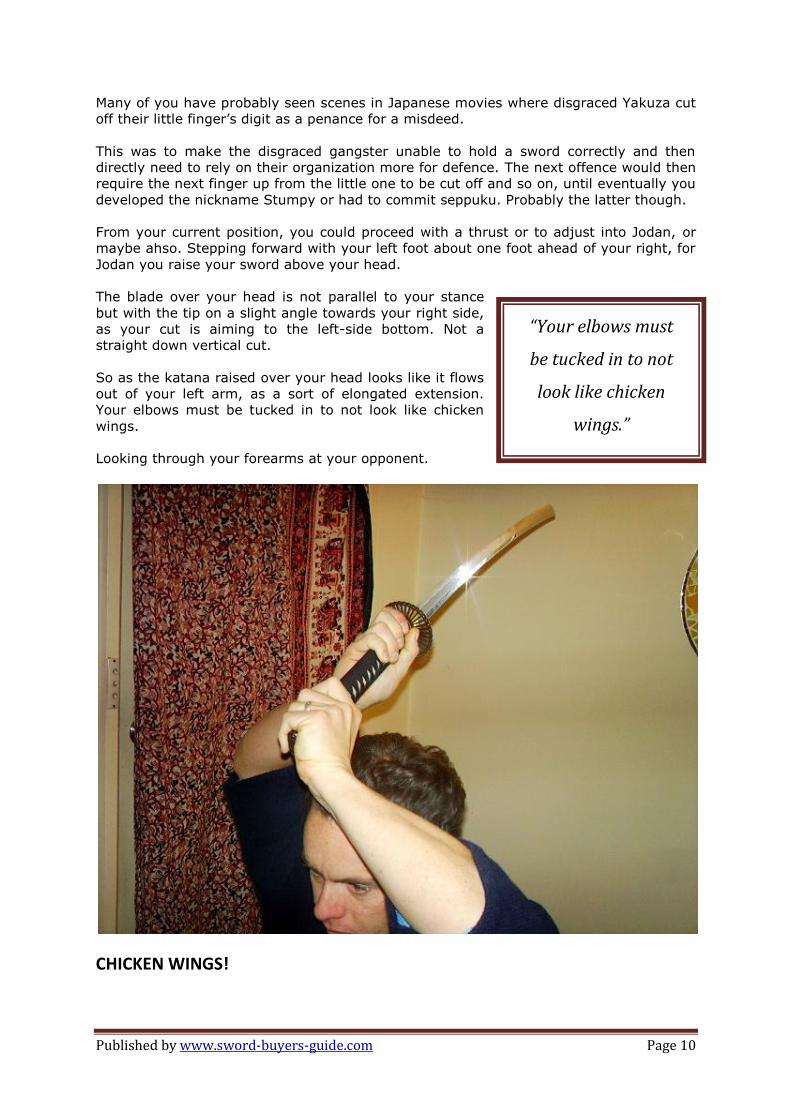
The blade over your head is not parallel to your stance
but with the tip on a slight angle towards your right side,
as your cut is aiming to the left-side bottom. Not a
straight down vertical cut.
So as the katana raised over your head looks like it flows
out of your left arm, as a sort of elongated extension.
Your elbows must be tucked in to not look like chicken
wings.
Looking through your forearms at your opponent.
CHICKEN WINGS!
“Your elbows must
be tucked in to not
look like chicken
wings.”
Published by www.sword-buyers-guide.com Page 11
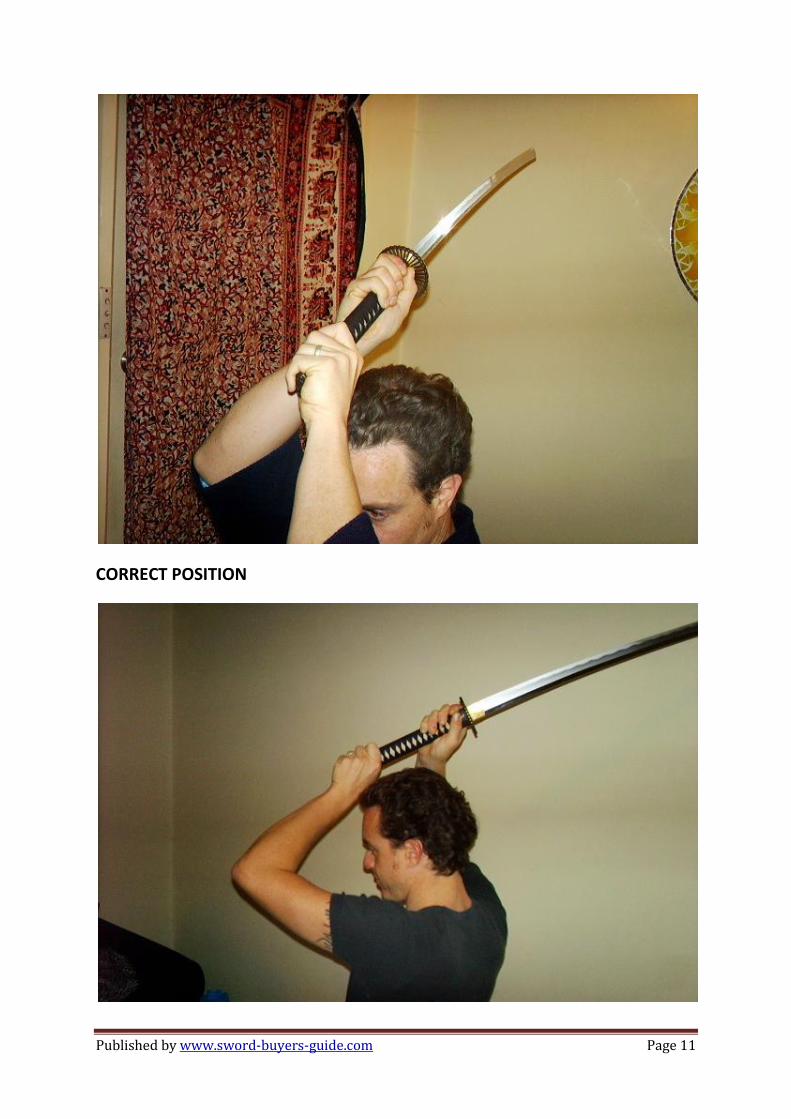
CORRECT POSITION
Published by www.sword-buyers-guide.com Page 12
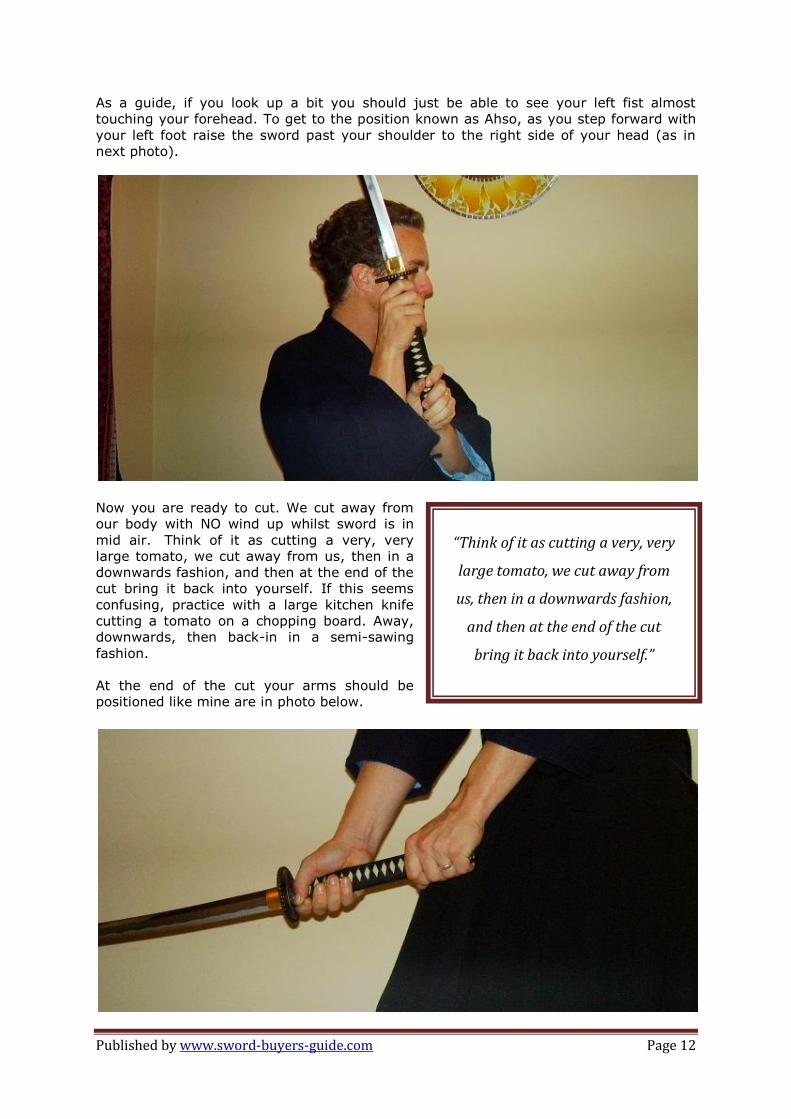
As a guide, if you look up a bit you should just be able to see your left fist almost
touching your forehead. To get to the position known as Ahso, as you step forward with
your left foot raise the sword past your shoulder to the right side of your head (as in
next photo).
Now you are ready to cut. We cut away from
our body with NO wind up whilst sword is in
mid air. Think of it as cutting a very, very
large tomato, we cut away from us, then in a
downwards fashion, and then at the end of the
cut bring it back into yourself. If this seems
confusing, practice with a large kitchen knife
cutting a tomato on a chopping board. Away,
downwards, then back-in in a semi-sawing
fashion.
At the end of the cut your arms should be
positioned like mine are in photo below.
“Think of it as cutting a very, very
large tomato, we cut away from
us, then in a downwards fashion,
and then at the end of the cut
bring it back into yourself.”
Published by www.sword-buyers-guide.com Page 13
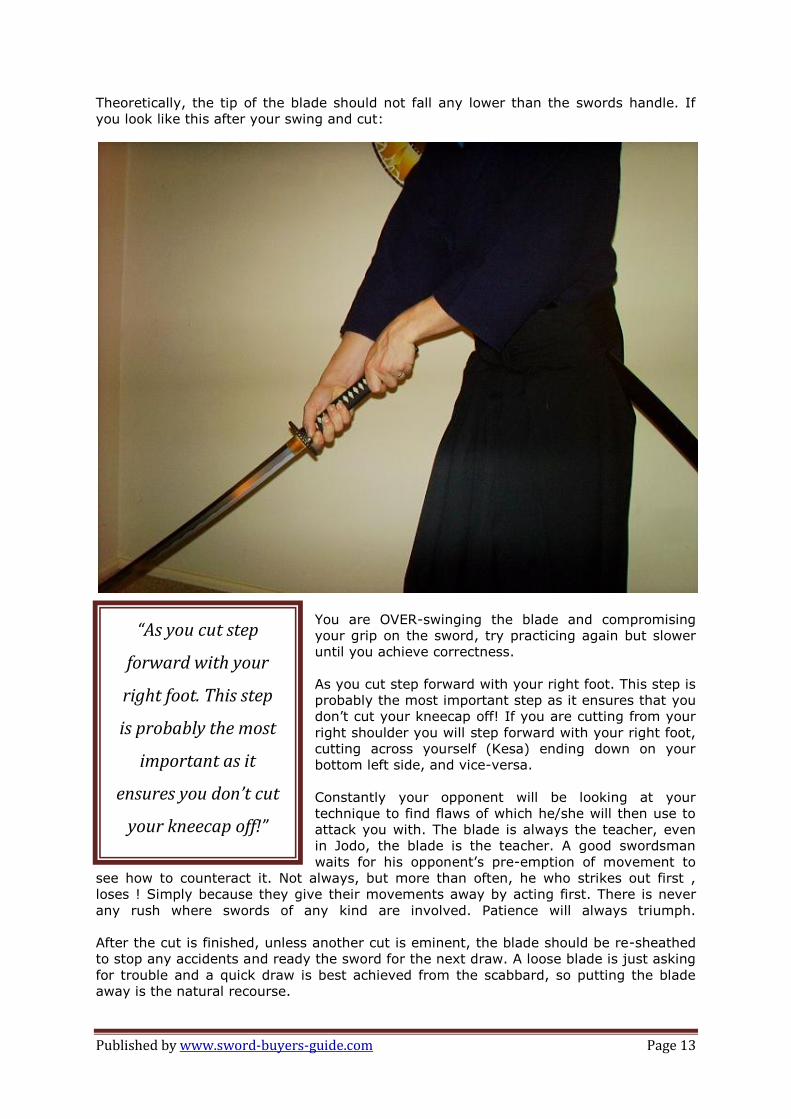
Theoretically, the tip of the blade should not fall any lower than the swords handle. If
you look like this after your swing and cut:
You are OVER-swinging the blade and compromising
your grip on the sword, try practicing again but slower
until you achieve correctness.
As you cut step forward with your right foot. This step is
probably the most important step as it ensures that you
don’t cut your kneecap off! If you are cutting from your
right shoulder you will step forward with your right foot,
cutting across yourself (Kesa) ending down on your
bottom left side, and vice-versa.
Constantly your opponent will be looking at your
technique to find flaws of which he/she will then use to
attack you with. The blade is always the teacher, even
in Jodo, the blade is the teacher. A good swordsman
waits for his opponent’s pre-emption of movement to
see how to counteract it. Not always, but more than often, he who strikes out first ,
loses ! Simply because they give their movements away by acting first. There is never
any rush where swords of any kind are involved. Patience will always triumph.
After the cut is finished, unless another cut is eminent, the blade should be re-sheathed
to stop any accidents and ready the sword for the next draw. A loose blade is just asking
for trouble and a quick draw is best achieved from the scabbard, so putting the blade
away is the natural recourse.
“As you cut step
forward with your
right foot. This step
is probably the most
important as it
ensures you don’t cut
your kneecap off!”

Published by www.sword-buyers-guide.com Page 14
Bring your left hand up again to hold the mouth of the scabbard, while turning the sword
on a horizontal angle with the right hand and placing it above the scabbard ready for re-
entry to the scabbard, as photo below.
Slowly, at first,’ wipe’ the blade down your left hand directing it with your left thumb and
lightly with your left forefinger until you reach the tip of the blade (kissaki). Then again
with the two fingers mentioned on your left hand, gently direct it in and down your
scabbard. Obviously the more times you practice this the more confident you get. I find
myself now hardly using my forefinger at all with just a little push of my thumb to get it
in.
Published by www.sword-buyers-guide.com Page 15
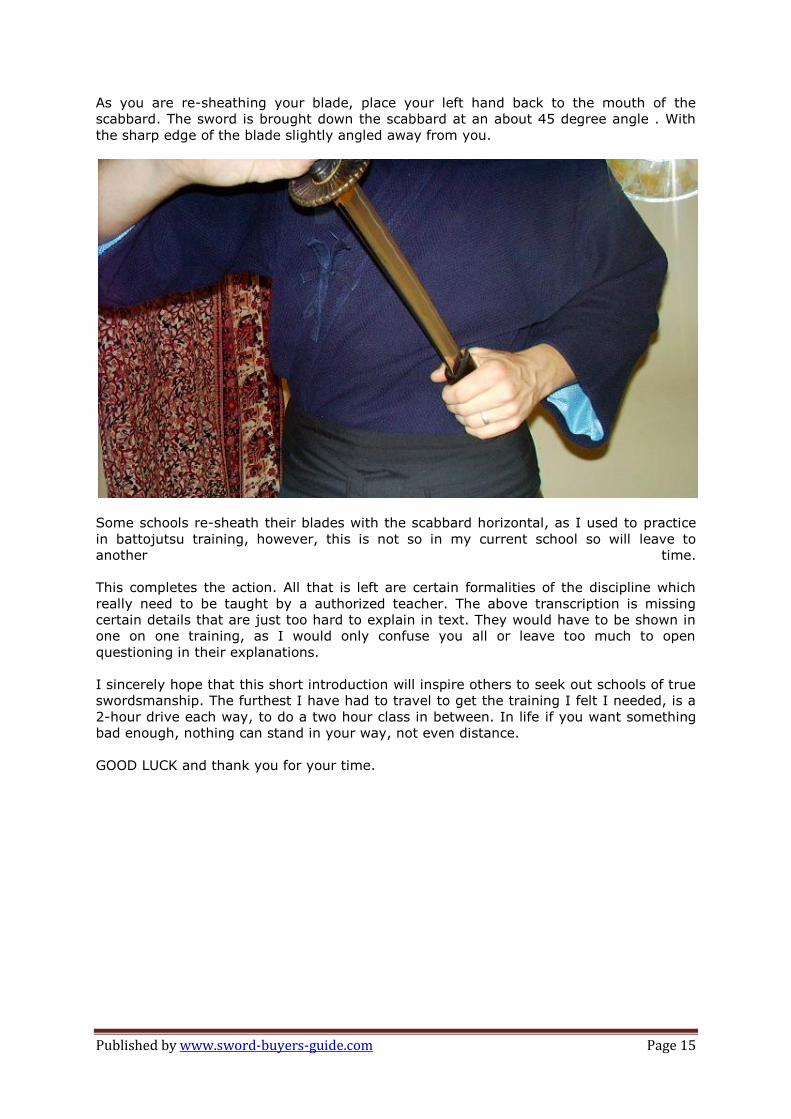
As you are re-sheathing your blade, place your left hand back to the mouth of the
scabbard. The sword is brought down the scabbard at an about 45 degree angle . With
the sharp edge of the blade slightly angled away from you.
Some schools re-sheath their blades with the scabbard horizontal, as I used to practice
in battojutsu training, however, this is not so in my current school so will leave to
another time.
This completes the action. All that is left are certain formalities of the discipline which
really need to be taught by a authorized teacher. The above transcription is missing
certain details that are just too hard to explain in text. They would have to be shown in
one on one training, as I would only confuse you all or leave too much to open
questioning in their explanations.
I sincerely hope that this short introduction will inspire others to seek out schools of true
swordsmanship. The furthest I have had to travel to get the training I felt I needed, is a
2-hour drive each way, to do a two hour class in between. In life if you want something
bad enough, nothing can stand in your way, not even distance.
GOOD LUCK and thank you for your time.