Jamieson-Style “Hollowing Rig” rig.pdf · Jamieson-Style “Hollowing Rig” ...From Home Depot...
10
Jamieson-Style “Hollowing Rig” ...From Home Depot and WalMart? Cost: $53.62 I've included the parts, part numbers, cost, and Home Depot stock numbers for all the parts used in this rig. I created a table showing the parts needed, and extended the cost. I also bought two cutting tips from Woodcraft for about $34 which I will mount on my tol bar stock if they ever arrive. Meanwhile, I inserted my Trent bosch hollowing tool. Adding the cutting tips brings the total to $88.62. The Bosch tool is $30 for a grand total of123.62. I can use it one handed with very little pressure. Keeps me from getting tired or going to bed with aching arms from holding the hollower in my hand. It's pretty straightforward and only took me a couple of hours to build. WARNING: Make sure all your cuts on the tube stock are S-Q-U-A-R-E, especially the laser support column.
Transcript of Jamieson-Style “Hollowing Rig” rig.pdf · Jamieson-Style “Hollowing Rig” ...From Home Depot...

Jamieson-Style “Hollowing Rig”
...From Home Depot and WalMart?Cost: $53.62
I've included the parts, part numbers, cost, and Home Depot stock numbers for all the parts used in this rig. I created a table showing the parts needed, and extended the cost.
I also bought two cutting tips from Woodcraft for about $34 which I will mount on my tol bar stock if they ever arrive. Meanwhile, I inserted my Trent bosch hollowing tool. Adding the cutting tips brings the total to $88.62. The Bosch tool is $30 for a grand total of123.62.
I can use it one handed with very little pressure. Keeps me from getting tired or going to bed with aching arms from holding the hollower in my hand. It's pretty straightforward and only took me a couple of hours to build. WARNING: Make sure all your cuts on the tube stock are S-Q-U-A-R-E, especially the laser support column.
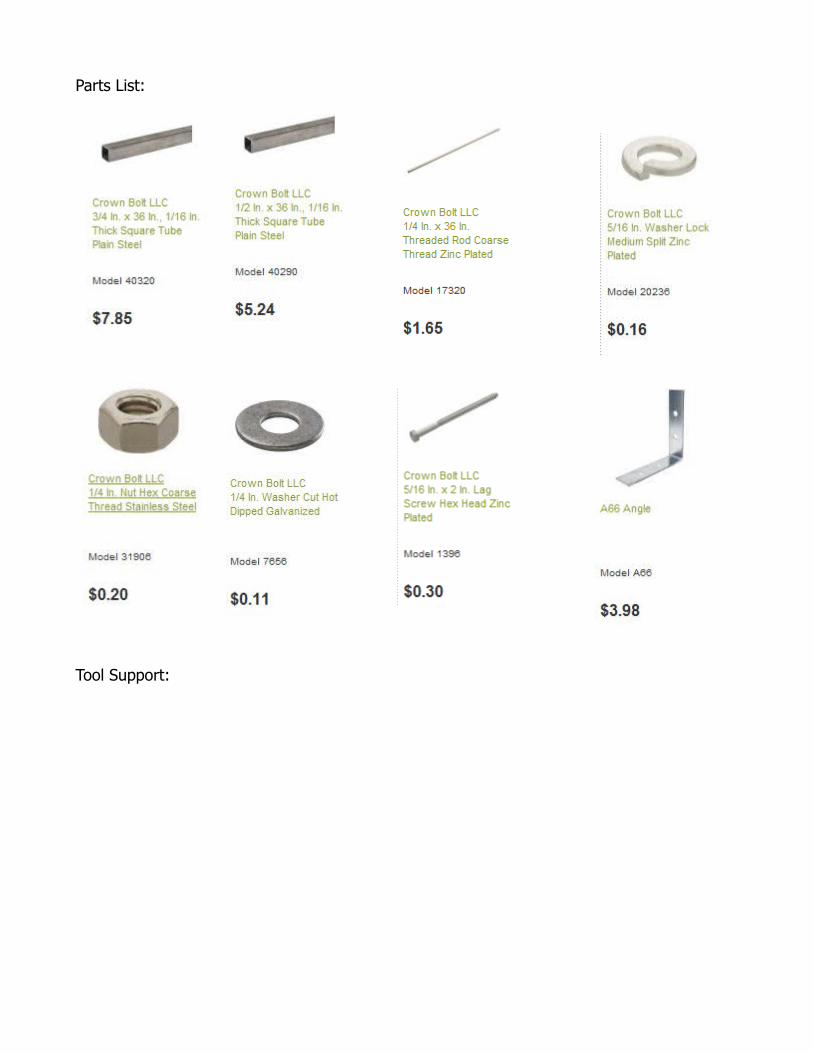
Parts List:
Tool Support:
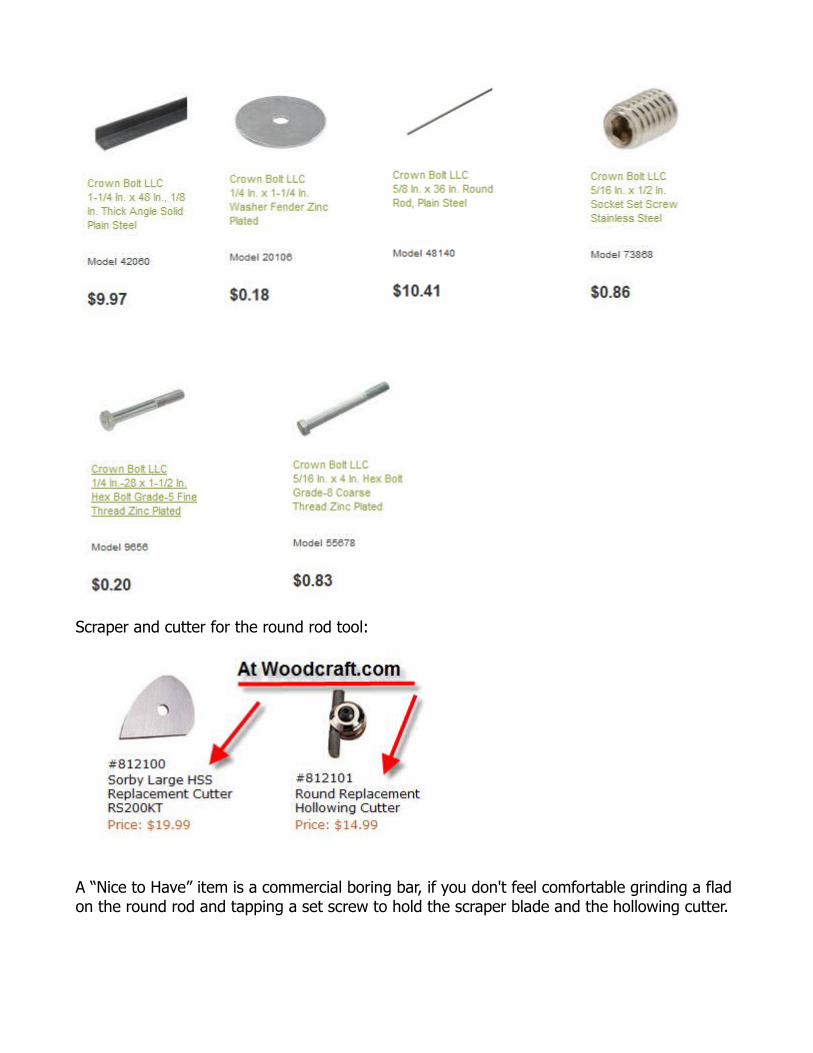
Scraper and cutter for the round rod tool:
A “Nice to Have” item is a commercial boring bar, if you don't feel comfortable grinding a flad on the round rod and tapping a set screw to hold the scraper blade and the hollowing cutter.
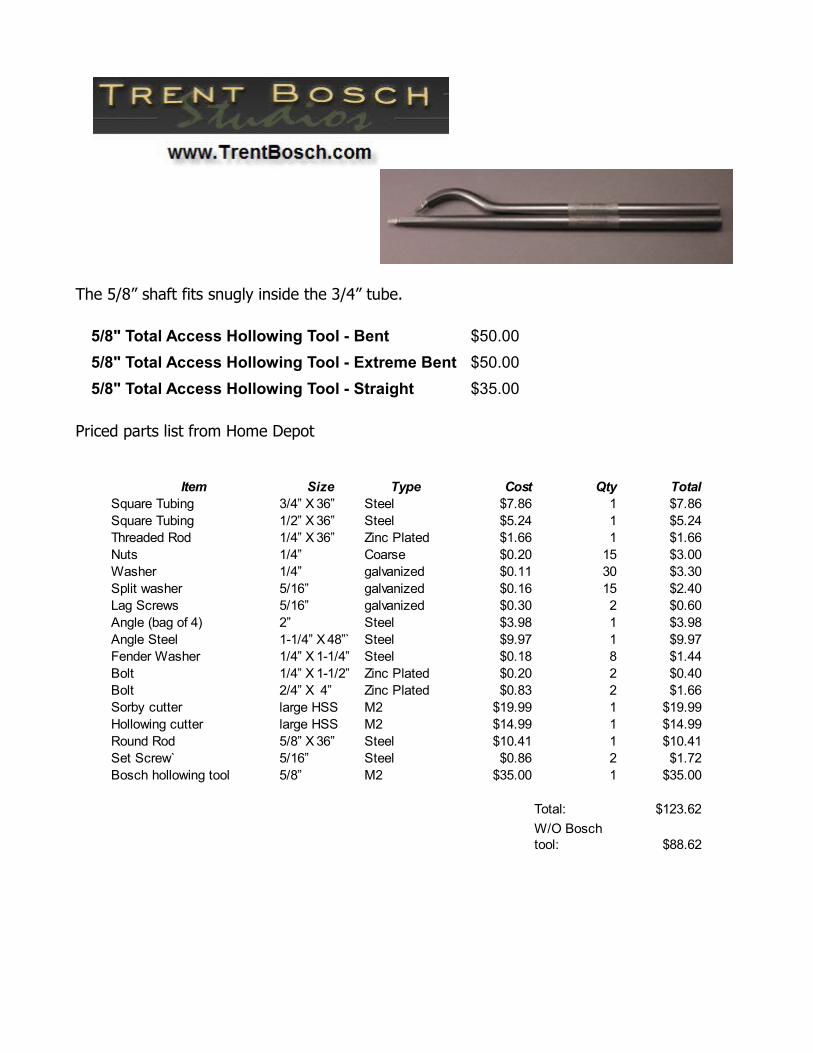
The 5/8” shaft fits snugly inside the 3/4” tube.
5/8" Total Access Hollowing Tool - Bent $50.005/8" Total Access Hollowing Tool - Extreme Bent $50.005/8" Total Access Hollowing Tool - Straight $35.00
Priced parts list from Home Depot
Item Size Type Cost Qty TotalSquare Tubing 3/4” X 36” Steel $7.86 1 $7.86Square Tubing 1/2” X 36” Steel $5.24 1 $5.24Threaded Rod 1/4” X 36” Zinc Plated $1.66 1 $1.66Nuts 1/4” Coarse $0.20 15 $3.00Washer 1/4” galvanized $0.11 30 $3.30Split washer 5/16” galvanized $0.16 15 $2.40Lag Screws 5/16” galvanized $0.30 2 $0.60Angle (bag of 4) 2” Steel $3.98 1 $3.98Angle Steel 1-1/4” X 48”` Steel $9.97 1 $9.97Fender Washer 1/4” X 1-1/4” Steel $0.18 8 $1.44Bolt 1/4” X 1-1/2” Zinc Plated $0.20 2 $0.40Bolt 2/4” X 4” Zinc Plated $0.83 2 $1.66
large HSS M2 $19.99 1 $19.99Hollowing cutter large HSS M2 $14.99 1 $14.99Round Rod 5/8” X 36” Steel $10.41 1 $10.41Set Screw` 5/16” Steel $0.86 2 $1.72Bosch hollowing tool 5/8” M2 $35.00 1 $35.00
Total: $123.62
$88.62
Sorby cutter
W/O Bosch tool:
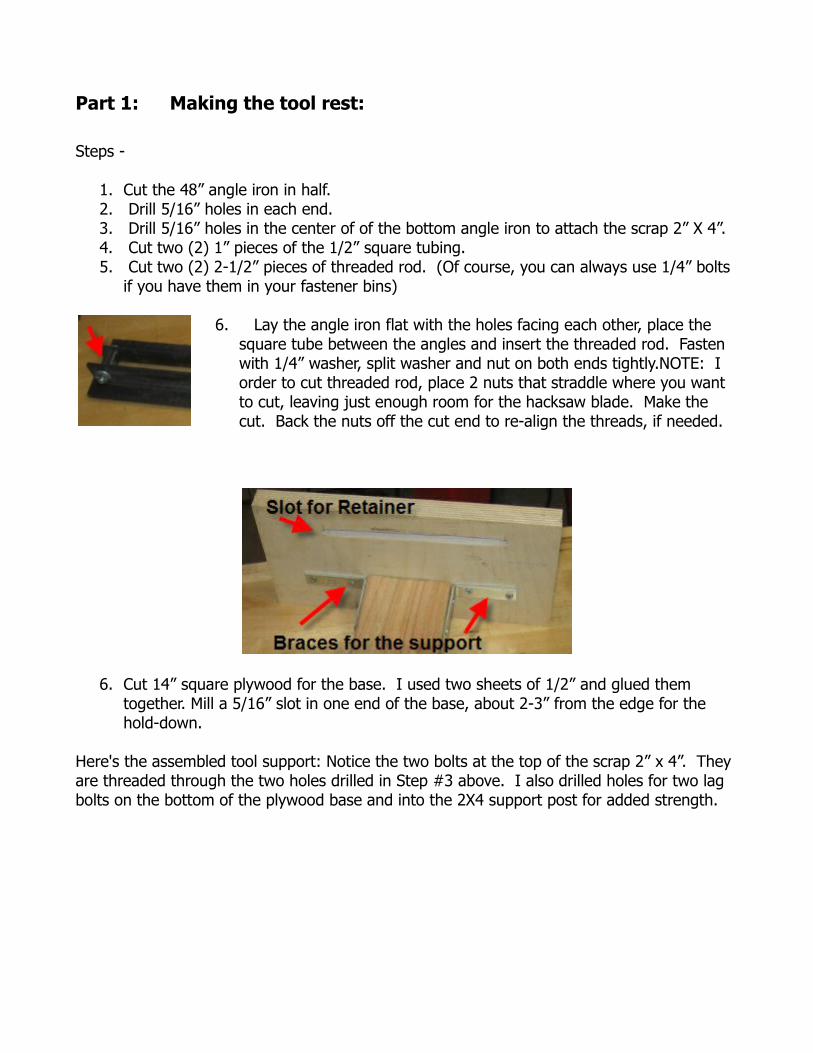
Part 1: Making the tool rest:
Steps -
1. Cut the 48” angle iron in half.2. Drill 5/16” holes in each end. 3. Drill 5/16” holes in the center of of the bottom angle iron to attach the scrap 2” X 4”.4. Cut two (2) 1” pieces of the 1/2” square tubing.5. Cut two (2) 2-1/2” pieces of threaded rod. (Of course, you can always use 1/4” bolts
if you have them in your fastener bins)
6. Lay the angle iron flat with the holes facing each other, place the square tube between the angles and insert the threaded rod. Fasten with 1/4” washer, split washer and nut on both ends tightly.NOTE: I order to cut threaded rod, place 2 nuts that straddle where you want to cut, leaving just enough room for the hacksaw blade. Make the cut. Back the nuts off the cut end to re-align the threads, if needed.
6. Cut 14” square plywood for the base. I used two sheets of 1/2” and glued them together. Mill a 5/16” slot in one end of the base, about 2-3” from the edge for the hold-down.
Here's the assembled tool support: Notice the two bolts at the top of the scrap 2” x 4”. They are threaded through the two holes drilled in Step #3 above. I also drilled holes for two lag bolts on the bottom of the plywood base and into the 2X4 support post for added strength.
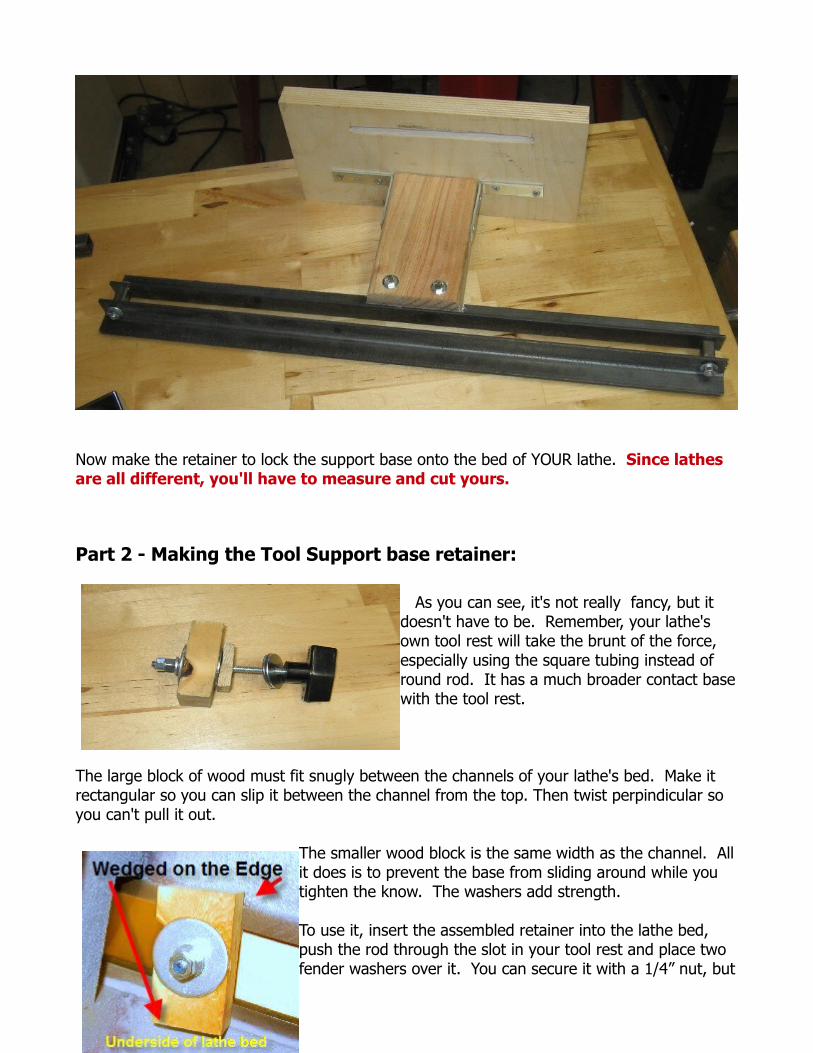
Now make the retainer to lock the support base onto the bed of YOUR lathe. Since lathes are all different, you'll have to measure and cut yours.
Part 2 - Making the Tool Support base retainer:
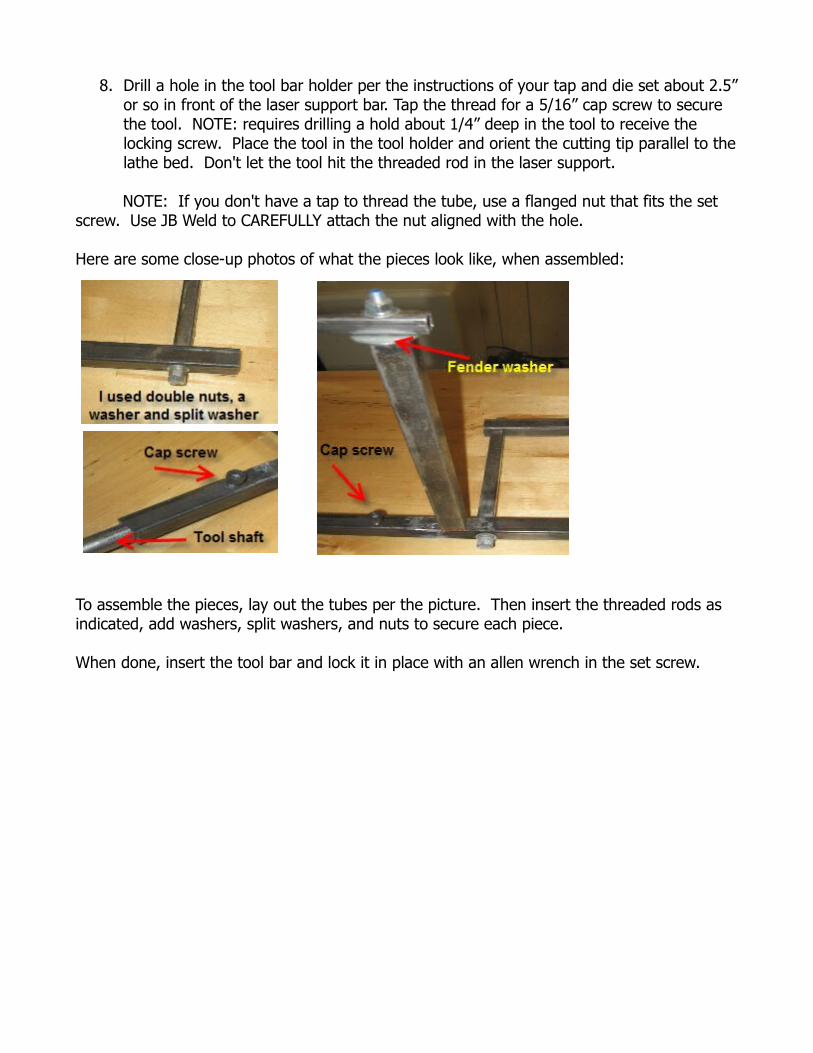
As you can see, it's not really fancy, but it doesn't have to be. Remember, your lathe's own tool rest will take the brunt of the force, especially using the square tubing instead of round rod. It has a much broader contact base with the tool rest.
The large block of wood must fit snugly between the channels of your lathe's bed. Make it rectangular so you can slip it between the channel from the top. Then twist perpindicular so you can't pull it out.
The smaller wood block is the same width as the channel. All it does is to prevent the base from sliding around while you tighten the know. The washers add strength.
To use it, insert the assembled retainer into the lathe bed, push the rod through the slot in your tool rest and place two fender washers over it. You can secure it with a 1/4” nut, but

I had a spare 1/4” knob around, so I used it. Once assembled and tightened, it is rock steady.
Part 3 - Making the Tool holder and Outrigger:
Note: The mid-braces and the laser arm are 1/2” square tube. The 24”, 18”, and 10” pieces are 3/4” squarel tube.
Steps:
1. Cut the square tubes to size per the above photo.2. Cut threaded rod for the outrigger braces, 3/4” + 3/4” + 6” + 1” + 1” = 9-1/2”3. Cut threaded rod for the laser support, 10” + 1/2” + 3/4” + 1” + 1” = 13-1/4”4. Tape the outrigger and the tool bar holder tightly together, or secure using good
clamping pressure.5. Drill 5/16” holes through both pieces so they will align properly.6. Drill a 5/16” hole for the laser support (10” piece) in the top and bottom of the tool
bar holder.7. Drill a 1/4” hole in the top and bottom of the 1/2” square tube laser holder
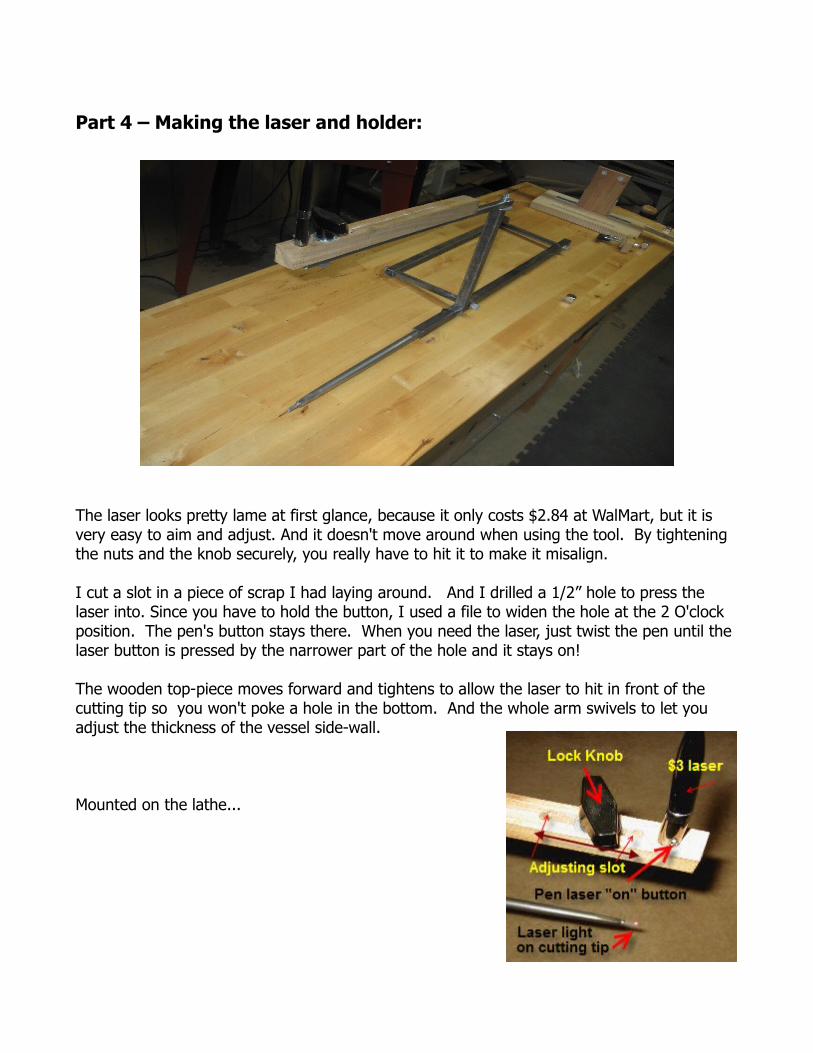
8. Drill a hole in the tool bar holder per the instructions of your tap and die set about 2.5” or so in front of the laser support bar. Tap the thread for a 5/16” cap screw to secure the tool. NOTE: requires drilling a hold about 1/4” deep in the tool to receive the locking screw. Place the tool in the tool holder and orient the cutting tip parallel to the lathe bed. Don't let the tool hit the threaded rod in the laser support.
NOTE: If you don't have a tap to thread the tube, use a flanged nut that fits the set screw. Use JB Weld to CAREFULLY attach the nut aligned with the hole.
Here are some close-up photos of what the pieces look like, when assembled:
To assemble the pieces, lay out the tubes per the picture. Then insert the threaded rods as indicated, add washers, split washers, and nuts to secure each piece.
When done, insert the tool bar and lock it in place with an allen wrench in the set screw.
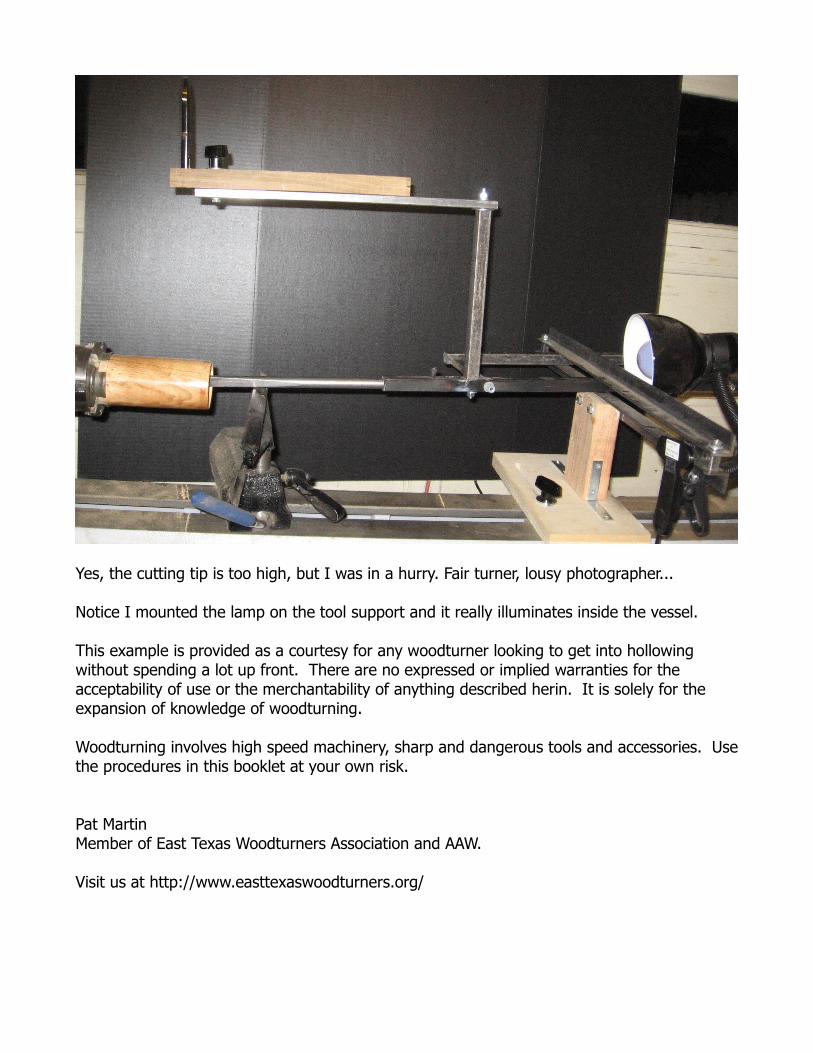
Part 4 – Making the laser and holder:
The laser looks pretty lame at first glance, because it only costs $2.84 at WalMart, but it is very easy to aim and adjust. And it doesn't move around when using the tool. By tightening the nuts and the knob securely, you really have to hit it to make it misalign.
I cut a slot in a piece of scrap I had laying around. And I drilled a 1/2” hole to press the laser into. Since you have to hold the button, I used a file to widen the hole at the 2 O'clock position. The pen's button stays there. When you need the laser, just twist the pen until the laser button is pressed by the narrower part of the hole and it stays on!
The wooden top-piece moves forward and tightens to allow the laser to hit in front of the cutting tip so you won't poke a hole in the bottom. And the whole arm swivels to let you adjust the thickness of the vessel side-wall.
Mounted on the lathe...
Yes, the cutting tip is too high, but I was in a hurry. Fair turner, lousy photographer...
Notice I mounted the lamp on the tool support and it really illuminates inside the vessel.
This example is provided as a courtesy for any woodturner looking to get into hollowing without spending a lot up front. There are no expressed or implied warranties for the acceptability of use or the merchantability of anything described herin. It is solely for the expansion of knowledge of woodturning.
Woodturning involves high speed machinery, sharp and dangerous tools and accessories. Use the procedures in this booklet at your own risk.
Pat MartinMember of East Texas Woodturners Association and AAW.
Visit us at http://www.easttexaswoodturners.org/