IUS Ceramics Manual - The...
43
IUS Ceramics Manual Table of Contents Community Safety Respirators / Dust Masks MSDS Sheets First Aid Kit Clay How to use the Soldner Mixer Clay Body Recipes Studio Equipment Extruder Slab Roller Potter’s Wheels Kilns Electric Kilns Loading/Stacking Programming the Computer/Starting the Kiln Electric Kiln Safety Bailey Gas Kiln Loading and Stacking Lighting the Kiln Shutting down the Kiln Gas Test Kiln Loading and Stacking Lighting the Kiln Shutting down the Kiln Wood Kiln Wood kiln firing logs Spring 2014 firing - click here for the .pdf of this kiln log Fall 2013 firing - click here for .pdf of this kiln log Wadding Cone Packs for wood firing Shelf Arrangement Bricking up the door Proper Attire for Stoking the Kiln Firing the kiln off Where to get Wood Cleaning the wood kiln
Transcript of IUS Ceramics Manual - The...

IUS Ceramics Manual Table of Contents
Community Safety
Respirators / Dust Masks MSDS Sheets First Aid Kit
Clay How to use the Soldner Mixer Clay Body Recipes
Studio Equipment Extruder Slab Roller Potter’s Wheels
Kilns Electric Kilns
Loading/Stacking Programming the Computer/Starting the Kiln Electric Kiln Safety
Bailey Gas Kiln Loading and Stacking Lighting the Kiln Shutting down the Kiln
Gas Test Kiln Loading and Stacking Lighting the Kiln Shutting down the Kiln
Wood Kiln Wood kiln firing logs
Spring 2014 firing - click here for the .pdf of this kiln log Fall 2013 firing - click here for .pdf of this kiln log
Wadding Cone Packs for wood firing Shelf Arrangement Bricking up the door Proper Attire for Stoking the Kiln Firing the kiln off Where to get Wood Cleaning the wood kiln

Kiln Wash Misc. Kiln Stuff
Refractory Bricks Kiln Logs Fusion Tests
Mixing Plaster Glaze
How to apply glaze How to read the Wall of Color How to mix glaze
How to use a hydrometer Cone 10 “Shop” Glazes
Mackenzie White IUS Celadon Rutile Green Rutile Blue Monica’s Seafoam Cushing Satin Matte Black Liz Kraus Shino Iron Saturate Jeff’s Long Beach Blue Temple’s Persimmon Steve’s Copper Red Missouri Straw Steven Hill Clear Iron Oxide Stain Burnt Umber Stain
Misc. Cone 10 Glazes Other Shop Tools
Circular Saw Drill Press Handheld Grinder Orbital Sander Bench Grinder Handheld Drill
Helpful links Websites

Community The IUS Ceramics studio is a community of people working to become better artists and better people. If you enrolled in a ceramics course, you are a member of that community and therefore, it is your responsibility to help maintain and support a positive working environment. As you may have noticed, a group clay studio is much different from many other art studios. Nearly everything is shared - we all use the same kilns, the same kiln shelves, the same glazes and materials, the same wedging tables, even the clay itself is often recycled between many people. Because of this, we are all collaborators - someone else may load your piece in the kiln, someone else probably made the glaze you applied to your piece, someone else might have made the clay you are using, and someone else might fire your work for you. This is a great thing actually - isn’t it inspiring knowing that you are a part of something much bigger than yourself?! It IS inspiring! And it is something we will value and support because this community of people helps support us in our search to achieve our creative goals! While the faculty in ceramics can certainly help foster a supportive creative environment, it is ultimately the responsibility of the students to create and maintain a supportive work environment for the WHOLE group. The culture of the ceramics studio is yours, and its's easy to take a part in building it. Here are some things you can do:
Be curious and enthusiastic about learning things! Not only for yourself, but for your classmates.
Contribute to the dialogue! Whether you are in a formal critique or informal
discussions in the studio, contribute by offering thoughtful perspectives and constructive criticism.
Be an active learner and researcher! Seek out information that will help your work
technically AND conceptually.
Commit yourself to personal improvement! Always strive to make yourself a better person.
Be proactive in soliciting feedback from others! You and your work will be better for it.

Some things to get (and keep) you going … “Nobody tells this to people who are beginners, I wish someone told me. All of us who do creative work, we get into it because we have good taste. But there is this gap. For the first couple years you make stuff, it’s just not that good. It’s trying to be good, it has potential, but it’s not. But your taste, the thing that got you into the game, is still killer. And your taste is why your work disappoints you. A lot of people never get past this phase, they quit. Most people I know who do interesting, creative work went through years of this. We know our work doesn’t have this special thing that we want it to have. We all go through this. And if you are just starting out or you are still in this phase, you gotta know its normal and the most important thing you can do is do a lot of work. Put yourself on a deadline so that every week you will finish one story. It is only by going through a volume of work that you will close that gap, and your work will be as good as your ambitions. And I took longer to figure out how to do this than anyone I’ve ever met. It’s gonna take awhile. It’s normal to take awhile. You’ve just gotta fight your way through.” - Ira Glass
Richard Feynman on “Beauty”: http://youtu.be/cRmbwczTC6E Chris Staley on “Learning to Learn”: http://youtu.be/s_QOt4Z08JA Write a manifesto, like this one:
Become your own revolution. Your creativity is your birthright. When people try to chase or laugh or stamp it out of you, smile and
ignore. You don’t know who you are until you know what you can do. Practice deliberately. You have to fail in order to grow. Push at the edges of what you understand, and listen to intuition. That’s when you become a
visionary. The more you educate yourself, the more intuitive you become. Mistakes can open the way to the real art. Feed your head. You are the sum of your influences. Your art is not an airplane. If it crashes and burns, you can just walk away. You are not as alone as you think. Really. The creative life is not a hobby but a constant state of mind. Interestingness lives on the edges and deep in the intersections, where ideas bang together and
things change to other things. There is a place where the world and your soul intersect, otherwise known as your audience. Part of learning to do the work is learning to navigate the fear and anxiety before they navigate you.
This takes practice. Go there. And then go deeper. Real art makes you vulnerable, but that’s where the power is. Aim to seduce instead of conquer. In the end, you love or you die. Love is better.

Safety Dust is usually the biggest concern when working in the ceramics studio. To minimize the creation of dust, wet mop the floors rather than dry sweeping them. Use a wet sponge to wipe down the tables instead of the hand brooms. Whenever possible, use water to dampen a surface prior to cleaning it, as this will keep the dust from getting into the air. If it appears dusty, always wear a dust mask. If there is ever any concern with safety in the studio, ask Brian Harper, Associate Professor of Ceramics and Ceramics Area Head. If there is something that needs immediate attention, call IUS Police at 812-941-2400.
Respirators / Dust Masks Whenever you use any dry materials or you are sanding or grinding, ALWAYS wear a dust mask. Make sure the mask has a rating of at least P95. If you are using a standard dust mask with elastic straps, the mask MUST have TWO straps. If it only has one strap, it may not have enough filtration to protect you.
P95 dust mask
P100 respirator
A dust mask like the one to the left above is enough to protect you against the most common occurrences of dust exposure. If you think you may pursue ceramics beyond an introductory level, it is recommended that you purchase a P100 respirator. A P100 respirator filters a higher amount of particulates out of the air and has replaceable filters. Most hardware stores have respirators for about $35. Before purchasing a respirator, always look for the filter rating - it should say "P100" somewhere on it.
MSDS Sheets The Material Safety and Data Sheets are located in a labeled binder in the glaze mixing room - right across the room from the door. Every material in the ceramics studio has a corresponding data sheet on it, so if you ever have any questions about the health risks of a given material, use that as your resource.
First Aid Kit There is a first aid kit located on the shelf next to the extruder to the left of the sink in the main studio area. It is well stocked with basic items such as band-aids, antibiotic ointment, etc, however if the first aid kit is not sufficient, call IUS Police at 812-941-2349. Obviously, if you are seriously hurt, stop looking at this and call 911!!
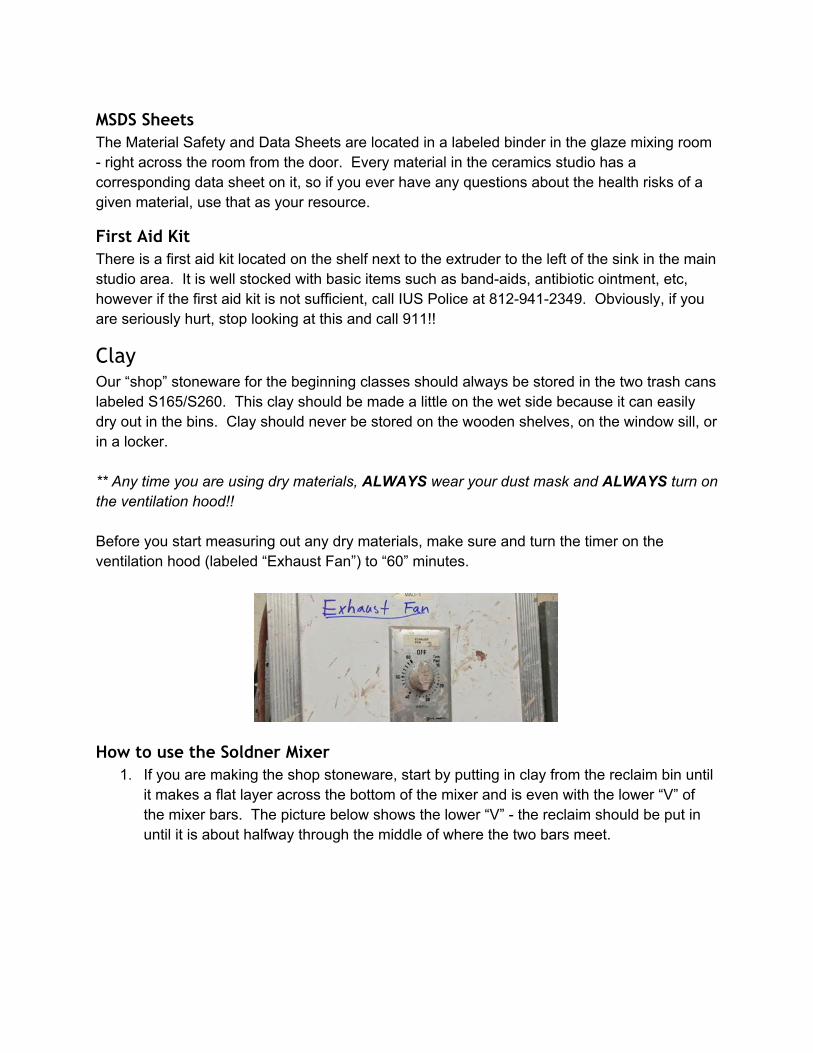
Clay Our “shop” stoneware for the beginning classes should always be stored in the two trash cans labeled S165/S260. This clay should be made a little on the wet side because it can easily dry out in the bins. Clay should never be stored on the wooden shelves, on the window sill, or in a locker. ** Any time you are using dry materials, ALWAYS wear your dust mask and ALWAYS turn on the ventilation hood!! Before you start measuring out any dry materials, make sure and turn the timer on the ventilation hood (labeled “Exhaust Fan”) to “60” minutes.
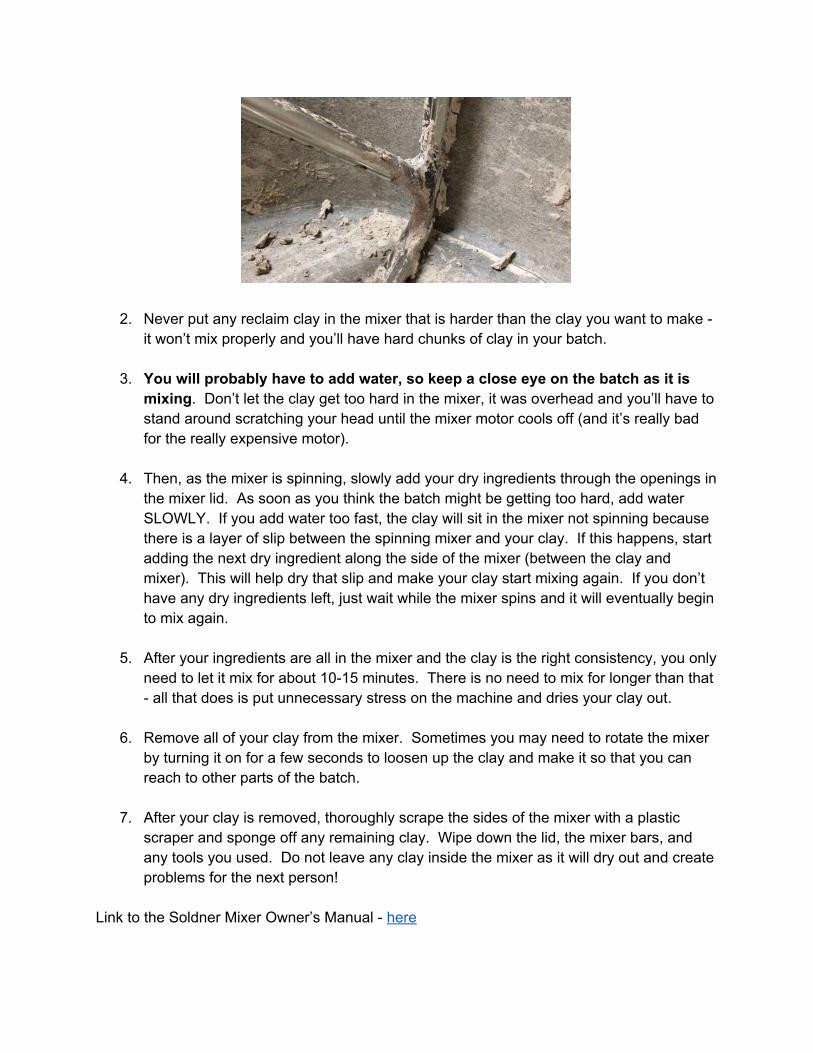
How to use the Soldner Mixer 1. If you are making the shop stoneware, start by putting in clay from the reclaim bin until
it makes a flat layer across the bottom of the mixer and is even with the lower “V” of the mixer bars. The picture below shows the lower “V” - the reclaim should be put in until it is about halfway through the middle of where the two bars meet.
2. Never put any reclaim clay in the mixer that is harder than the clay you want to make - it won’t mix properly and you’ll have hard chunks of clay in your batch.
3. You will probably have to add water, so keep a close eye on the batch as it is
mixing. Don’t let the clay get too hard in the mixer, it was overhead and you’ll have to stand around scratching your head until the mixer motor cools off (and it’s really bad for the really expensive motor).
4. Then, as the mixer is spinning, slowly add your dry ingredients through the openings in
the mixer lid. As soon as you think the batch might be getting too hard, add water SLOWLY. If you add water too fast, the clay will sit in the mixer not spinning because there is a layer of slip between the spinning mixer and your clay. If this happens, start adding the next dry ingredient along the side of the mixer (between the clay and mixer). This will help dry that slip and make your clay start mixing again. If you don’t have any dry ingredients left, just wait while the mixer spins and it will eventually begin to mix again.
5. After your ingredients are all in the mixer and the clay is the right consistency, you only
need to let it mix for about 10-15 minutes. There is no need to mix for longer than that - all that does is put unnecessary stress on the machine and dries your clay out.
6. Remove all of your clay from the mixer. Sometimes you may need to rotate the mixer
by turning it on for a few seconds to loosen up the clay and make it so that you can reach to other parts of the batch.
7. After your clay is removed, thoroughly scrape the sides of the mixer with a plastic
scraper and sponge off any remaining clay. Wipe down the lid, the mixer bars, and any tools you used. Do not leave any clay inside the mixer as it will dry out and create problems for the next person!
Link to the Soldner Mixer Owner’s Manual - here

Clay Body Recipes IUS Stoneware for All Uses (by volume, following the directions above for using reclaim) Hawthorn Bond ………………… 3 parts Goldart (yellow bag) ………….... 2 part OM #4 Ball Clay ………………… 1 part Custer Feldspar ………………... ½ part Silica ……………………..……... ½ part Redart …………………..………. ¼ part Medium Grog …………………… ¼ part Fine Grog ………………………... ¼ part
IUS Stoneware for Throwing (by volume, following the directions above for using reclaim) Hawthorn Bond ………………… 3 parts Goldart ……………….………….. 2 part OM #4 Ball Clay ………………… 1 part Custer Feldspar ………………... ½ part Silica ……………………………... ½ part Redart ……………………………. ¼ part
Scott Goldberg Brown Stoneware c10 (x 2 for an empty mixer) Hawthorn Bond ....... 47 GoldArt .................... 23 OM #4 ..................... 20 Redart ....................... 5 Custer Feldspar ........ 4
Equal Parts Porcelain EPK ........................ 25 OM 4 Ball Clay ....... 25 Custer Feldspar ..... 25 Silica ...................... 25 NOTES: This is a tried and true recipe. It is very common in ceramics studios throughout the country. It may be a bit short at first, so it will benefit from sitting for a little while between mixing and using. It is a grey when wet and an off white when fired in reduction to cone 10. In wood fire, it can flash a glassy orange color.
Equal Sparts Porcelain EPK ........................ 25 OM 4 Ball Clay ....... 25 Custer Feldspar ..... 12.5 Minspar…………….12.5 Silica ...................... 25 NOTES: This clay body is a derivative of the equal parts recipe. However, to achieve more coloration effects from the wood kiln the feldspars have been split 50/50 with a potash feldspar and a soda feldspar. Hence the name ‘Equal Sparts Porcelain’. This body does yield more flashing of orange to yellow orange in the wood kiln. It also achieves

more grey coloration in areas due to carbon trapping. Also, the added fluxing power of the soda feldspar enabled this body to create a very nice glassy exterior surface without any glaze. This body works well in low areas of the kiln near cooling coal beds to bolster the carbon trapping tendencies.
Tim Mather Porcelain c10 Tile 6 Clay .............. 38.5 OM4 Ball Clay ........ 19.2 Silica ...................... 19.2 Custer Feldspar ..... 23.1
Black Stoneware c10 Barnard Clay ........... 6 Hawthorn Bond ..... 47 Redart .................... 10 OM 4 Ball ............... 18 Goldart ................... 23 NOTES: This is not exactly a "black" stoneware (most black stonewares aren't), it is more dark brown. This clay will acheive a range of different colors depending on which temperature it is fired too. The higher the temp, the darker the color.
Matt Long Porcelain c10 Tile 6 ...................... 31 EPK ....................... 15 Custer .................... 25 Silica ...................... 15 OM4 Ball Clay ......... 6 Pyrophyllite .............. 8 Bentonite ................. 5 NOTES: This is white firing porcelain that is good for throwing. It is not as good for sculpture. The pyrophyllite and bentonite add to the body's plasticity.
Studio Equipment
Extruder Make sure and thoroughly clean the extruder with a wet sponge after you use it!! To clean the extruder dies and the parts that are removable from the extruder, take them to the sink and thoroughly wash them there. Never use clay that is too stiff as it can put too much pressure on the extruder handle. Watch Brian’s instructional video on how to use the extruder here.

Slab Roller The slab roller is a great tool for rolling out even thickness slabs. The boards underneath the large roller control the thickness of the slab, so put what you think are the right amount of boards in there and roll a small test slab. If it is too thin, remove a board. If it is too thick, add a board. ALWAYS have a piece of canvas underneath your clay! Make it is big enough and make sure it doesn’t lay over the guide rails of the slab roller!! ALWAYS make sure the roller is not rolling over any canvas! The metal from the roller should always be directly in contact with the metal guide rails. When you are rolling, leave the thick canvas stretched over the roller. If you are rolling a lot of slabs or very thin slabs, you’ll find it easier to add another piece of canvas between the top of the clay and the canvas stretch over the roller. Watch Brian’s instructional video on how to use the slab roller here.
Potter’s Wheels If you would like to use the potter’s wheels, you MUST clean them after each use. This includes the splash pans, the floor, the benches, and any other area you got dirty while throwing. Once the splash pans are washed, put them back on the wheel they came from. Here are Brian’s instructional videos on throwing:
Wedging Centering and Throwing a Cylinder Throwing and Trimming Bowls Mugs and Handles Throwing and Trimming Plates Making Lidded Vessels
Kilns As of May 2014, the IUS Ceramics studio has 9 kilns - each of which need regular maintenance and upkeep. If you have any questions about a kiln, ask. There are no dumb questions when it comes to the proper operation of a kiln.
Electric Kilns The electric kilns at IUS Ceramics are used for bisquing, low-fire glazing, and cone 6 oxidation. Never fire an electric kiln hotter than cone 6, it is really bad for the elements in the kiln and will degrade the kiln quickly.
Loading/Stacking
Unless you have extenuating circumstances, always fire a full a full kiln, so make sure you have enough work to fill the kiln.
If it is a bisque kiln, always make sure the work is bone dry. If it is cool to the touch, it is not bone dry.
Handle the work VERY carefully. USE TWO HANDS when picking up bone dry work! The bottom of each electric kiln should have two shelves already placed in the kiln with
1” posts between them on the floor of of the kiln. This maintains proper circulation in the kiln.
In a bisque firing, work can touch each other, but never the walls of the kiln or the elements.
In a low-fire glaze firing, all the work must be fired on a patty and be stilted if necessary.
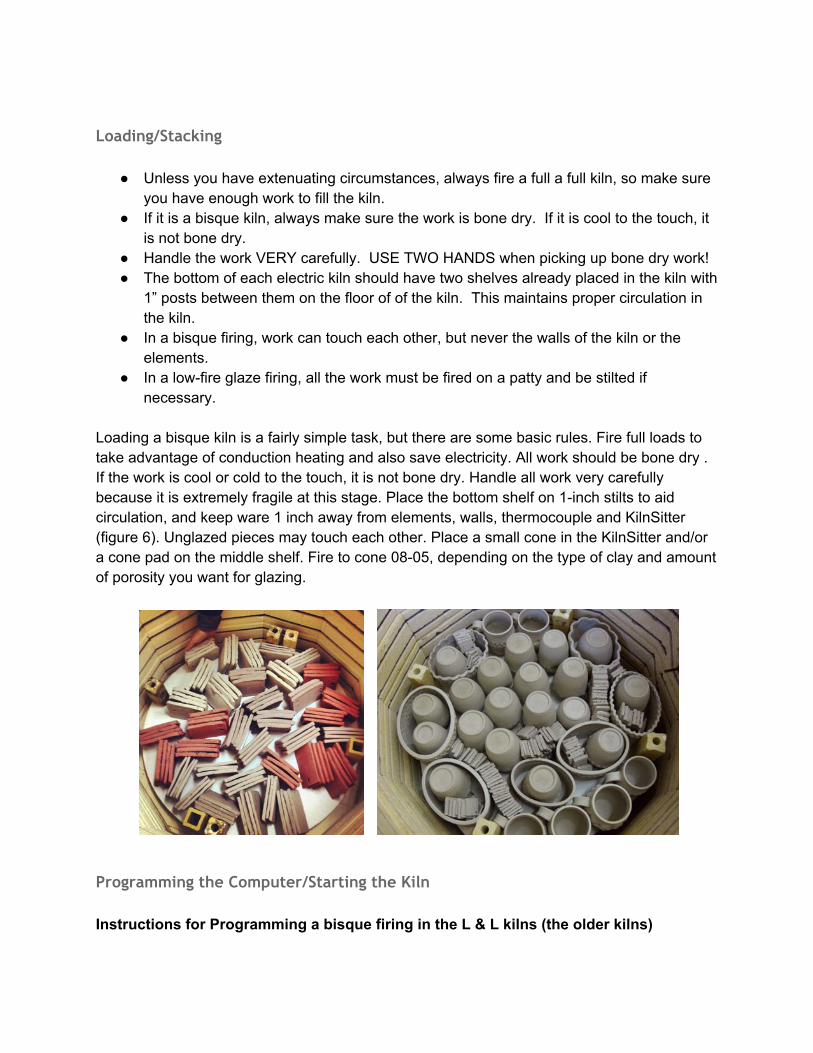
Loading a bisque kiln is a fairly simple task, but there are some basic rules. Fire full loads to take advantage of conduction heating and also save electricity. All work should be bone dry . If the work is cool or cold to the touch, it is not bone dry. Handle all work very carefully because it is extremely fragile at this stage. Place the bottom shelf on 1-inch stilts to aid circulation, and keep ware 1 inch away from elements, walls, thermocouple and KilnSitter (figure 6). Unglazed pieces may touch each other. Place a small cone in the KilnSitter and/or a cone pad on the middle shelf. Fire to cone 08-05, depending on the type of clay and amount of porosity you want for glazing.
Programming the Computer/Starting the Kiln Instructions for Programming a bisque firing in the L & L kilns (the older kilns)

1. The computer will most likely be flashing "CPLT" with some numbers from the last firing. If this is the case, push “STOP” once so that it is flashing "IdLE"
2. Next, push the "Slow Bisque" button, then “ENTER” 3. Enter a cone number. We usually bisque at cone 06. Make sure and enter “06”, not 6
... There's a BIG difference! Then hit “ENTER” 4. The computer will next ask you for a top temperature HOLD time, this should be "0.00"
for a bisque. Hit “ENTER” 5. Now the computer will begin flashing "IdLE" again. DO NOT start the kiln yet, you
don't have a preheat on it! 6. Push the "Preheat" button. It will flash "HLd". Now enter the time keeping in mind that
numbers to the left of the decimal point are hours. Always preheat a group bisque firing for at least 8 hours. This should look like "8.00". Then press “ENTER”
7. ALWAYS review your firing schedule by pressing "Review Prog". The first few things that flash across the screen are the most important: S-bc (slow bisque), then PRHT (with the number of hours, 8.00 for a bisque), then CONE 06.
8. Close the lid, lower the ventilation hood so that it is close to the top of the kiln but not touching it, turn on the fan (switch on the wall behind the kiln).
9. Press “START”. You should see "--ON--" and hear the elements clicking on and off. 10.Record your firing in the log sheets on the clipboards behind each kiln.
The L & L kilns have Dynatrol computer systems that control the firing schedules. Here’s the link to the Dynatrol “how-to” instructions for our L & L kilns: http://www.hotkilns.com/sites/default/files/pdf/dynatrol-basic-operation_1.pdf Instructions for Programming a bisque firing in the Skutt kilns (the newer kilns) ** need to do this **
Electric Kiln Safety Never try and service the kiln yourself. If there is something wrong with it, contact the
ceramics professor Do not touch heating elements with anything since they carry high voltage. Do not place any combustibles within 12 inches of any surface of the kiln. Make sure and turn the ventilation hood fan on and lower it over the kiln when firing
and cooling the kiln. The ventilation should be as low as possible over the kiln without actually touching the kiln.
Never add extra insulation around a kiln to conserve energy. Extra insulation can cause the wiring and the steel case to overheat.
Remove all tripping hazards. Keep the power cord out of the way. Do not fire with cracked shelves. They can break during firing, which could damage
the ware inside the kiln. Store kiln shelves in a dry area. If you smell burning plastic, turn the kiln off. Examine the wall outlet and power cord for
signs of burning.
Never wear loose-fitting clothing around a hot kiln. Do not open a kiln until it has cooled to room temperature. Pots may break from
thermal shock. NEVER place anything on the kiln lid!! Always keep unsupervised children away from the kiln. Do not place any objects under or around the kiln stand.
Ceramics Arts Daily resource on electric kilns: http://ceramicartsdaily.org/firing-techniques/electric-kiln-firing/ten-basics-of-firing-electric-kilns/ Kiln Manuals for our electric kilns: L & L: http://www.hotkilns.com/sites/default/files/pdf/BookJupiterAuto%209-26-11.pdf Skutt: http://skutt.com/images/5780/KilnMaster-Manual.pdf Instructional videos on programming a Skutt kiln can be found here L & L kiln website: http://www.hotkilns.com/ Skutt website: http://skutt.com/
Bailey Gas Kiln
Loading and Stacking
When unloading, do not remove the very last shelf (the floor) unless there is a problem and something needs to be fixed. If they need to be kiln washed, wash the shelves in place.
Always have softbrick “baffle bricks” in place so that the flame doesn’t char the work around the burner ports.
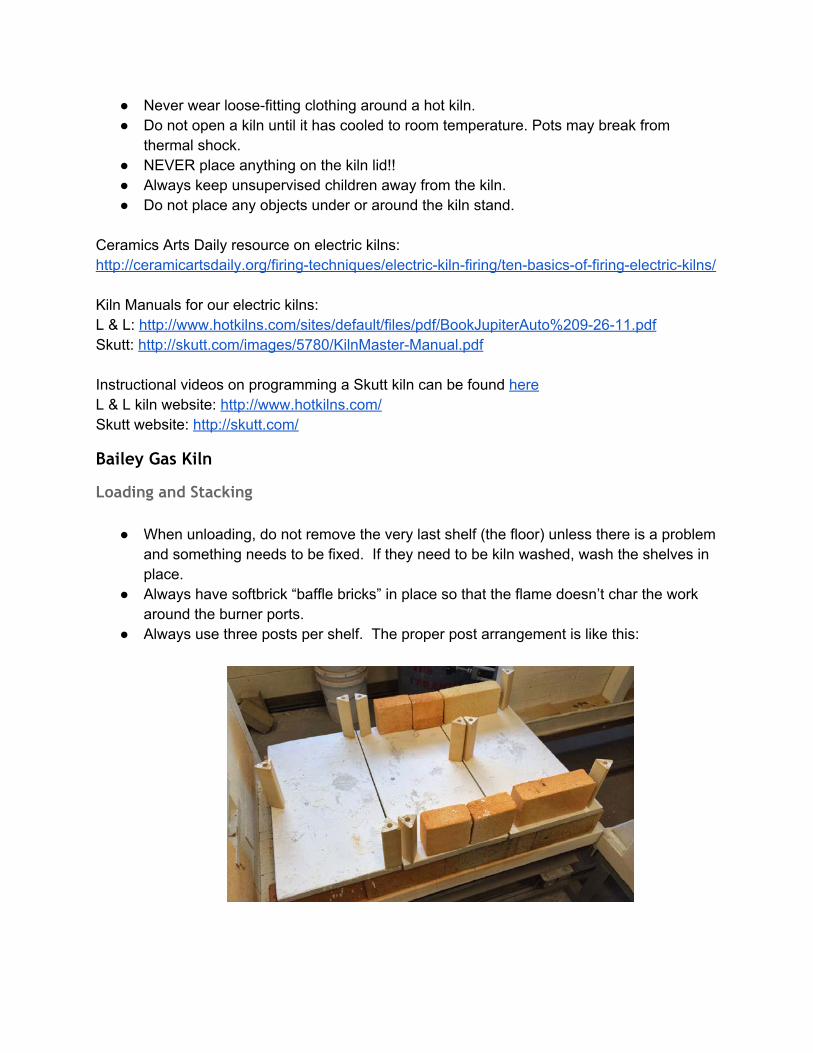
Always use three posts per shelf. The proper post arrangement is like this:
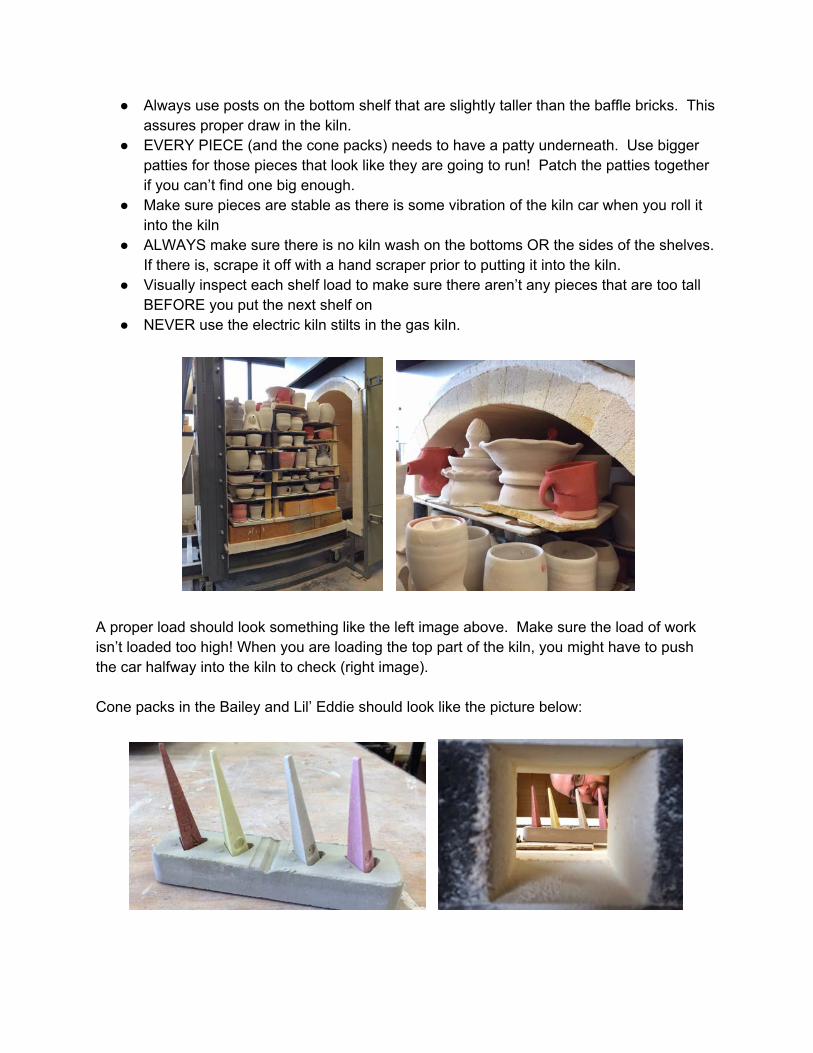
Always use posts on the bottom shelf that are slightly taller than the baffle bricks. This assures proper draw in the kiln.
EVERY PIECE (and the cone packs) needs to have a patty underneath. Use bigger patties for those pieces that look like they are going to run! Patch the patties together if you can’t find one big enough.
Make sure pieces are stable as there is some vibration of the kiln car when you roll it into the kiln
ALWAYS make sure there is no kiln wash on the bottoms OR the sides of the shelves. If there is, scrape it off with a hand scraper prior to putting it into the kiln.
Visually inspect each shelf load to make sure there aren’t any pieces that are too tall BEFORE you put the next shelf on
NEVER use the electric kiln stilts in the gas kiln.
A proper load should look something like the left image above. Make sure the load of work isn’t loaded too high! When you are loading the top part of the kiln, you might have to push the car halfway into the kiln to check (right image). Cone packs in the Bailey and Lil’ Eddie should look like the picture below:

Use cones, 08, 8, 9, 10. Line them up so that the 08 is all the way to left, then the 8, 9, 10 (left to the right). If you are using the grey cone plaques, line up the widest side of each cone toward the small dot on the cone plaque. Make sure that each cone is sitting in the cone pack at a slight angle. Carefully check the cone pack placement in the kiln to make sure you will be able to clearly see the cones - including when they are bending! Never put them too close to the peephole, as this can cool them down and give you an improper reading of the temperature. Helpful resource on using cone plaques: http://www.ortonceramic.com/wp/wp-content/uploads/plaques.pdf If you are wondering what is the right angle, take one of the cones out and stand it up on the table - the bottom of each cone is cut so that it stands at the angle it should be in the kiln. Make sure there is a patty under each cone pack!! The 08 with melt over the cone pack and get stuck to the shelf. If you are loading the Bailey, we use two cone packs (one in the bottom and one in the top). In the Lil’ Eddie (test gas kiln) we just use one in the middle of the kiln. When you close the kiln door, only SLIGHTLY tighten the black door hinges!! Just a loose half turn is enough to tighten the door. During firing, the bricks in the kiln will expand and if the door hinges are too tight, the bricks will be too tight inside the kiln and can crack.
Lighting the Kiln 1. Go outside of the kiln room and flip the "INSIDE" switch to the ON position. If the green
light does not come on, turn the "service" key 90 degrees to the right and release it. The green light should turn on then.
2. On the kiln, push the "ON" button on the Main Power control panel 3. Open the damper to 4” 4. Open the burner port covers 5. Make sure the two small gas valves for the burners are in the OFF position
(perpendicular to the gas line) 6. Open the large yellow gas valve just below the power panel, so that it is parallel to the
gas line. 7. Push the "RESET" button right below the ON/OFF switch. You should hear a click,
then hear the blower fan turn on. 8. Light the LEFT SIDE pilot burner first. Do this by holding down the Baso valve (red
button on the left side. Using a click start barbeque lighter, lit the pilot burner. Only the pilot burner should light. Hold the Baso valve down until pilot stays lit. If the pilot goes out when you release the Baso valve, repeat this step, but hold down the Baso valve longer. It usually takes about 30-60 seconds.
9. Repeat Step #8 for the right side pilot.

10. Open the air valve slightly (usually to .9 on the air gauge). The large red valve on the large green plastic pipe is the air valve control for both burners.
11. Turn the main burners on with the “FIRST STAGE GAS” valve. The “Second Stage Gas” valve is only used when firing with the aid of the computer controller.
12. Adjust the burners so that they are firing below the first line on the gauge. You MUST stay with the kiln for about about 5 minutes to make sure the burners aren’t burning back into the base of the burner. If the flames turns very orange and there is little or no blue color in it, it is burning back. Immediately turn the burner off and let the flame extinguish. After the flame has gone out, turn the burner back on and either turn the gas up a little, the air up a little, or both.
13. Check the burners often in the beginning of the firing to make sure they are not burning back or blowing out. If you have the air turned up too high, you will hear a high speed fluttering sound and the flame will be skipping away from the end of the buner. If this is happening, just turn the air valve down a little bit.
14. Don’t forget to fill out a kiln log!!
Shutting down the Kiln When you have decided the kiln is the proper temperature (for a cone 10 firing, this is between 2250 and 2270 on the digital pyrometers readout), follow these steps to shut down the kiln.
1. Turn the "first stage gas" valve to the off position. Both gas valves on the small yellow gas line should be off now (perpendicular to the gas line they are located on)
2. Now turn the large red air valve to the off position (perpendicular to its line) 3. Turn the large yellow gas valve below the main control unit to the off position
(perpendicular to the large steel gas line) 4. Close the damper 5. Close the covers over the burner ports - these are small rectangular pieces of kiln
shelves resting on the angle iron just beneath the burner. Wear the longer welding gloves when doing this as the area around the burner is very hot.
6. Push the “off” button on the main control unit 7. Turn the ventilation switch on the wall (at the bottom left corner of the large window) to
the off position. 8. LEAVE all other room ventilation on 9. Go outside the kiln to the large white safety control unit in the loading dock area and
turn the “inside” switch to the off position. The green light above the switch should now be off.
10. Go back in and double check that the above steps have been completely. 11. Fill in the last post on the kiln log for your firing.
Gas Test Kiln The small test kiln is affectionately known as “Lil’ Eddie”. It is a great kiln to learn how to fire a cone 10. It can fire very quickly, sometimes as fast as cone 10 in 6 hours, so be careful in the beginning.
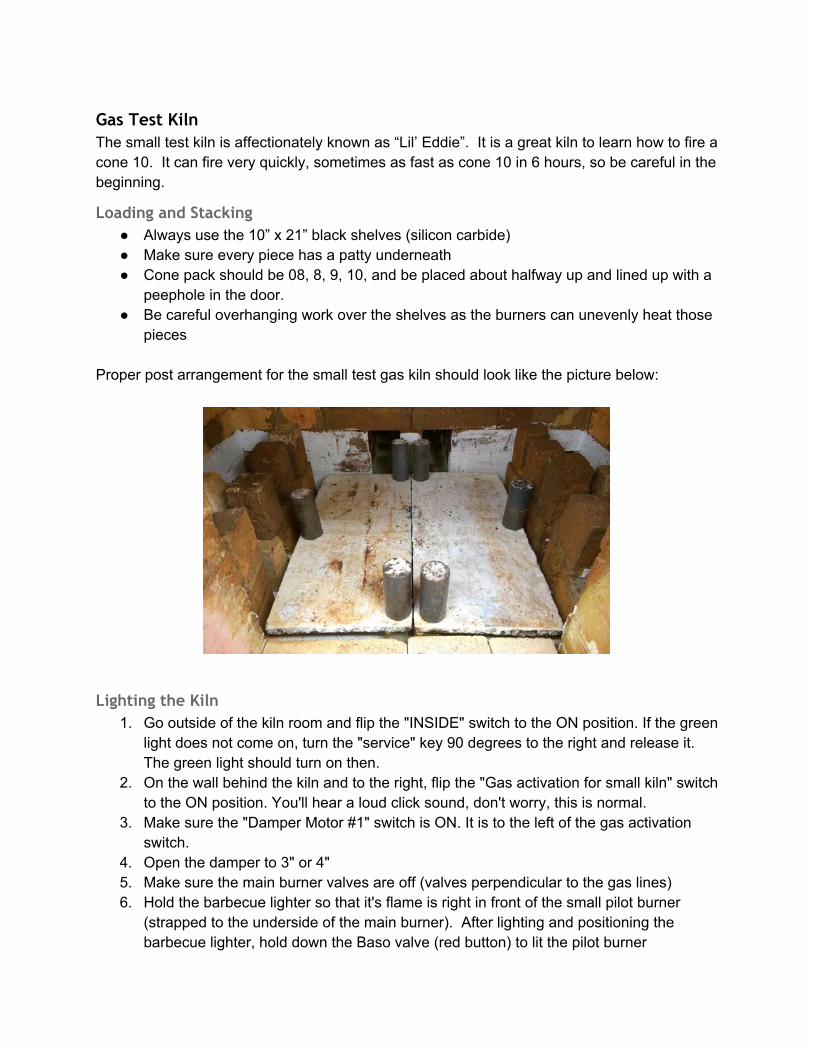
Loading and Stacking Always use the 10” x 21” black shelves (silicon carbide) Make sure every piece has a patty underneath Cone pack should be 08, 8, 9, 10, and be placed about halfway up and lined up with a
peephole in the door. Be careful overhanging work over the shelves as the burners can unevenly heat those
pieces Proper post arrangement for the small test gas kiln should look like the picture below:
Lighting the Kiln 1. Go outside of the kiln room and flip the "INSIDE" switch to the ON position. If the green
light does not come on, turn the "service" key 90 degrees to the right and release it. The green light should turn on then.
2. On the wall behind the kiln and to the right, flip the "Gas activation for small kiln" switch to the ON position. You'll hear a loud click sound, don't worry, this is normal.
3. Make sure the "Damper Motor #1" switch is ON. It is to the left of the gas activation switch.
4. Open the damper to 3" or 4" 5. Make sure the main burner valves are off (valves perpendicular to the gas lines) 6. Hold the barbecue lighter so that it's flame is right in front of the small pilot burner
(strapped to the underside of the main burner). After lighting and positioning the barbecue lighter, hold down the Baso valve (red button) to lit the pilot burner

7. When the pilot burner ignites, remove the barbecue lighter while still holding down the Baso valve. You'll need to hold down the Baso valve for about 30 seconds. If the pilot goes out when you release the Baso valve, repeat this step holding the Baso valve down longer until the pilot stays lit after you release the valve. The
8. Repeat steps 6 and 7 to light the other pilot. 9. The main burners are controlled independently at each burner (yellow valve on the
right side, red valve on the left)
Shutting down the Kiln When you have decided the kiln is the proper temperature, follow these steps to shut down the kiln.
1. Turn off both gas valves. When they are off, they should be perpendicular to the gas lines.
2. Close the damper 3. Turn off the “Gas Activation” switch to the right of the large vertical gas line on the wall 4. Leave the room ventilation system running 5. Go outside the kiln to the large white safety control unit in the loading dock area and
turn the “inside” switch to the off position. The green light above the switch should now be off. ** Make sure the the large gas kiln is not firing. If it is, leave the switch in the “ON” position.
6. Go back in and double check that the above steps have been completely. 7. Fill in the last post on the kiln log for your firing.

Wood Kiln ALWAYS notify IUS Police prior to lighting the kiln. Tell them how long you will be firing and when they are likely to see any smoke coming out of the kiln. Their phone number is 812-941-2400. Prepping, loading, firing, unloading, and cleaning the wood kiln is all about TEAMWORK. For a firing to be successful, you must work as a team to get the kiln ready and have a good firing. Some points worth noting:
You must sign up for shifts BEFORE the loading of the kiln. If you do not help fire, your work will not get into the kiln
The loading is a delicate, precise task - it takes time. Be patient. It is one of the most critical parts of a successful firing because it determines much of the “look” of the finished work. Sometimes there is work left over that didn’t get in - this is normal. We try to get everyone’s work in the kiln, but sometimes we can’t. It’s life.
Because of the size of the kiln, often there is just one person inside the kiln loading - help them out by rolling wads, getting pieces, kiln washing, etc. There are ALWAYS things to do around the wood kiln, so just ask.
During your firing shift, pay attend to the kiln. Wood kilns never respond well to lots of changes quickly, so stay focused and learn to read the signals the kiln gives you.
When on shift, help will anything you can. If someone is stoking the front of the kiln, help them by opening the stoke door or handing them wood.
COMMUNICATE. When side stoking, you must communicate with each other to maintain a good stoking rhythm. If you see something that doesn’t look right, communicate that to others on shift.
Always get a good amount of REST in between shifts. The whole point of having shifts is so that people do not become exhausted, so your job when not on shift is to rest until you are on shift next. Accidents are much more common when people are tired and not able to concentrate.
Wood kiln firing logs
Spring 2014 firing - click here for the .pdf of this kiln log
Fall 2013 firing - click here for .pdf of this kiln log
Wadding Wadding should be made in advance of the loading of the wood kiln, but only by a few days. If the wadding clay sits too long, it will begin to mold and smell horrible. Wadding recipe: (by volume)

2.5 Fireclay 1.5 Grog 1 Sawdust 1 Alumina Hydrate Using a large flat mixing tub (like kind used for hand mixing concrete) dry mix the materials with your hands and WEARING YOUR RESPIRATOR! After you feel it is mix well enough, add water until it is at the consistency of clay. Mix the wadding so that it is a little on the wet side as it often dries out during the loading. The sawdust often continues to absorb moisture as well, so sometimes it can dry out a little more after you finish mixing it. It should be slightly crumbly, but still stick together enough to easily roll it into a ball or a coil.
Cone Packs for wood firing The cones we usually use in the wood kiln are: 08, 6, 8, 9, 10, 11, 12. It’s best to have each cone pack the same so you don’t get confused during the firing. Also, having the cone 12 still standing in the middle and the back when you’re firing gives you something to see when you are trying to locate the cones at the end of the firing when the kiln is really hot. Use the wadding clay to make the cone packs - if the wadding clay is too crumbly, just add about half high fire stoneware with the wadding. It helps to make the cones have a slight arc to them so they are more stable during the firing. Remember that things often move around in the loading during a wood fire, so it helps if your cones are sturdy! Always make a small cup of clay at the front of the cone pack for the 08 to melt into. To check the proper angle to put the cones in, hold one down on the table before you put them into the cone pack - the bottom of the cones are cut so that it will show you the proper angle for them to be in while in the pack.
Shelf Arrangement The back row of shelves uses the small silicon carbide shelves (the black shelves). Position them side by side so that the long dimension aligns with the front and back of the kiln. Leave

a gap of a few inches between the shelves and while loading, overhang work into this space. Tri-post this section. Proper positioning of the back shelves should look like this:
Always remember to put the small brick “extensions” to the air intakes for the side stoke holes. They are made with two half soap bricks and whole brick. Also, DON’T FORGET THE CONE PACKS! There is a cone pack peep hole on the right side of this section. You can also put a cone at the very top of the load and check it through the top exit flue hole in the back wall. In the picture below, notice the cone pack at the very top of the kiln.
The picture above shows the proper placement of the middle stack of shelves in the wood kiln. For this section, use the smaller toilet bowl shelves (16”x24”). Leave a slight gap (about an inch or two) between the back of the shelf and the side stoke air extensions. Tri-post this section.
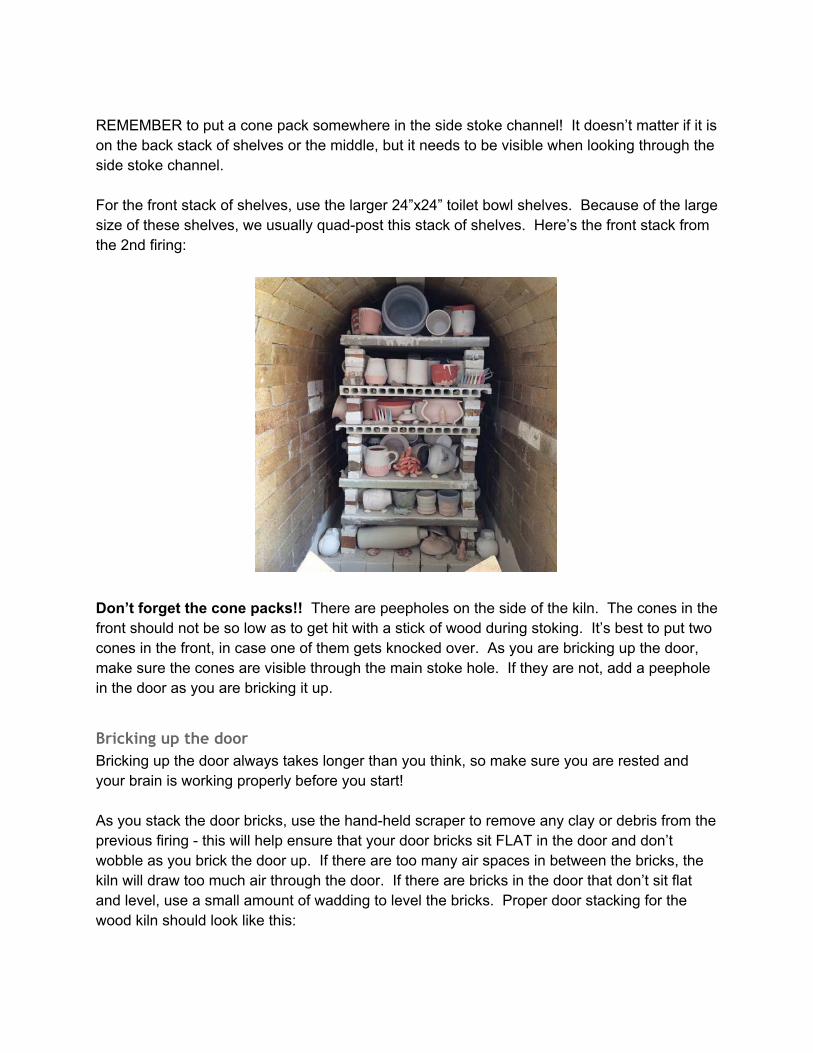
REMEMBER to put a cone pack somewhere in the side stoke channel! It doesn’t matter if it is on the back stack of shelves or the middle, but it needs to be visible when looking through the side stoke channel. For the front stack of shelves, use the larger 24”x24” toilet bowl shelves. Because of the large size of these shelves, we usually quad-post this stack of shelves. Here’s the front stack from the 2nd firing:
Don’t forget the cone packs!! There are peepholes on the side of the kiln. The cones in the front should not be so low as to get hit with a stick of wood during stoking. It’s best to put two cones in the front, in case one of them gets knocked over. As you are bricking up the door, make sure the cones are visible through the main stoke hole. If they are not, add a peephole in the door as you are bricking it up.
Bricking up the door Bricking up the door always takes longer than you think, so make sure you are rested and your brain is working properly before you start! As you stack the door bricks, use the hand-held scraper to remove any clay or debris from the previous firing - this will help ensure that your door bricks sit FLAT in the door and don’t wobble as you brick the door up. If there are too many air spaces in between the bricks, the kiln will draw too much air through the door. If there are bricks in the door that don’t sit flat and level, use a small amount of wadding to level the bricks. Proper door stacking for the wood kiln should look like this:
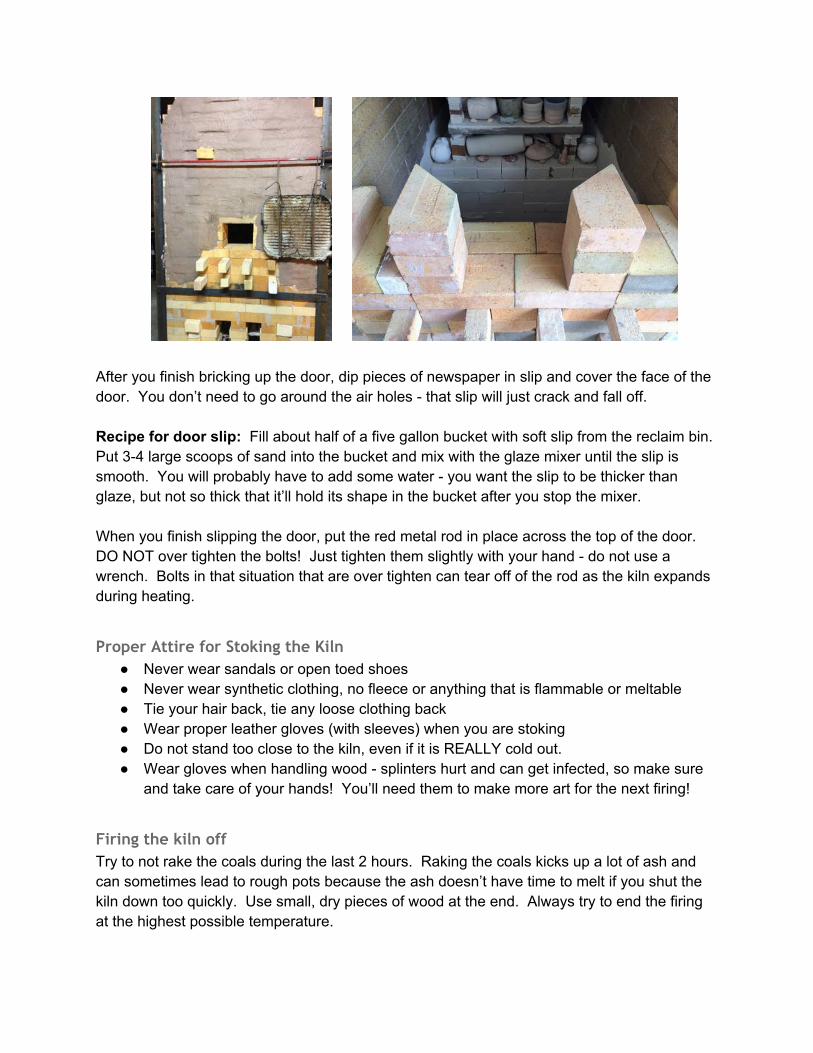
After you finish bricking up the door, dip pieces of newspaper in slip and cover the face of the door. You don’t need to go around the air holes - that slip will just crack and fall off. Recipe for door slip: Fill about half of a five gallon bucket with soft slip from the reclaim bin. Put 3-4 large scoops of sand into the bucket and mix with the glaze mixer until the slip is smooth. You will probably have to add some water - you want the slip to be thicker than glaze, but not so thick that it’ll hold its shape in the bucket after you stop the mixer. When you finish slipping the door, put the red metal rod in place across the top of the door. DO NOT over tighten the bolts! Just tighten them slightly with your hand - do not use a wrench. Bolts in that situation that are over tighten can tear off of the rod as the kiln expands during heating.
Proper Attire for Stoking the Kiln Never wear sandals or open toed shoes Never wear synthetic clothing, no fleece or anything that is flammable or meltable Tie your hair back, tie any loose clothing back Wear proper leather gloves (with sleeves) when you are stoking Do not stand too close to the kiln, even if it is REALLY cold out. Wear gloves when handling wood - splinters hurt and can get infected, so make sure
and take care of your hands! You’ll need them to make more art for the next firing!
Firing the kiln off Try to not rake the coals during the last 2 hours. Raking the coals kicks up a lot of ash and can sometimes lead to rough pots because the ash doesn’t have time to melt if you shut the kiln down too quickly. Use small, dry pieces of wood at the end. Always try to end the firing at the highest possible temperature.

1. After you have put in your last stoke, begin mudding up the peepholes around the kiln. Use the same slip and newspaper technique you used to mud the door up
2. Let the wood in the front of the firebox burn for a bit and “clear” the chamber. This usually takes about 15 minutes. During this time, you can work on mudding the holes, but always leave a small hole open (at least) in the front of the kiln to allow air in to burn that wood.
3. Never close the damper before you are done mudding the holes. As soon as you close the damper, REALLY hot air will push through any opening in the kiln .. this makes it REALLY uncomfortable to mud the holes!
4. Use gloves when you mud the holes!! 5. Remove ANY combustible materials from around the kiln. Stack all extra wood,
remove any loose paper, side stoke wood, etc. Remember, the kiln shed always burns down in the cooling!!
6. CLEAN the kiln area thoroughly! I know you’re tired and exhausted, but muster up the strength to clean the area so when people come by in the morning it looks respectable!
7. Notify any others on the subsequent shifts that they don’t need to come in. 8. Always double check that all of the air holes are mudded and the damper is closed!
Don’t assume someone else will double check! 9. Lock the kiln pad. If it’s late, look the building. 10. Drive home CAREFULLY. Remember, driving while exhausted is just as bad as
driving while intoxicated!!
Where to get Wood Lowell Anderson (for seasoned split wood) - 502-507-3196. Lowell is the guy who has supplied wood for the first two firings. He also supplies wood for the U of L wood kiln. $90 per rick. Gary from Ace Hardware - He has a supplier of wood that has agreed to sell us ricks of wood through Ace Hardware. He said he’d sell a rick for $50. His number is 812-945-6633 J & J Pallet (for preheat and side stoke wood) - Call Jeff Anderson at 502-379-9484. He can arrange a pickup time. Then call the IUS Facilities Services department and have them go pick it up with a truck and trailer. You’ll have to cut it when you get it to the kiln, so make sure and leave enough time to cut and stack it. A log splitter can be rented at Home Depot for 24 hours for about $100. Remember, this kiln works best with wood that is split to about a 3-4” diameter. Remember that you need to have SEASONED wood. This means wood that has been cut at least a year ago. Seasoned wood should have “checks” in the ends of the cut pieces (small drying cracks), the bark should be starting to fall off, and the wood should make a “sharp”

sound when it is split. It’s ALWAYS better to have too much wood than not enough, so make sure you have a contingency plan for extra wood or dryer wood. Split and stack wood in the kiln pad in advance so that it can thoroughly dry out if it is wet. The kiln needs AT LEAST 3 ricks. Usually, we buy 3 ricks and then get some extra wood for preheat and side stoke.
Cleaning the wood kiln When unloading the wood kiln, always leave the ashes from the coal bed in the kiln until the next firing - they are still hot and can ignite the trash cans! There will be significant amounts of ash dust on the shelves and floor of the kiln, so always wear a dust mask when unloading. Scrape the shelves with the hand scraper to get most of the ash and wads off of the shelves. If there is anything stuck to the shelves that won’t come off with a hand scraper, use the 4 ½” handheld grinder with a masonry grinding wheel to carefully remove it. It is very easy to break kiln shelves, so using a chisel on the shelves should only be in specific circumstances (sometimes to get the wadding off), otherwise, stick to hand scraping and grinding. When you are done cleaning the shelves, kiln wash them. Sometimes you may need 2 coats of kiln wash. Then, when the kiln wash is dry, stack them like this next to the kiln. Make sure and put pieces of wood underneath them so the shelves don’t get wet.
Kiln Wash This kiln wash recipe is by VOLUME. Always use this recipe, do not use any kiln wash in the studio that has silica as an ingredient because it will glass over in the wood kiln. 50 Alumina Hydrate 50 EPK Use the same size cup, scoop, or small bucket to measure this out by volume. Put the dry material in a clean bucket, dry mix it with the glaze mixer (clean it off so that it does not have
glaze on it). Mix dry until the material in the bucket is all the same color. Add water and mix until it is smooth and has the consistency of heavy cream, not thick like pudding. It shoudl flow easily when you brush it onto a shelf.
Misc. Kiln Stuff Orton Cone Chart with temperatures: http://www.ortonceramic.com/wp/wp-content/uploads/Orton-Wall-Chart-F.pdf Our main supplier of bricks at IUS Ceramics is Louisville Firebrick. Most of the brick that built the wood kiln were purchased from there and were manufactured at their plant about 30 minutes outside of Louisville. As of Oct/2013, we were paying $1.65 for a 2 1/2 hard brick straight. They can also supply any of your other kiln building needs, such as ceramic fiber, castable refractory, lintels, soft brick, etc. Larkin Refractory in Georgia is another popular supplier of brick for ceramic artists and they have very competive pricing, however, in order to benefit from that pricing, you have to purchase the brick in a sizable quantity to make it offset the shipping costs (hard bricks weigh about 9 lbs each).
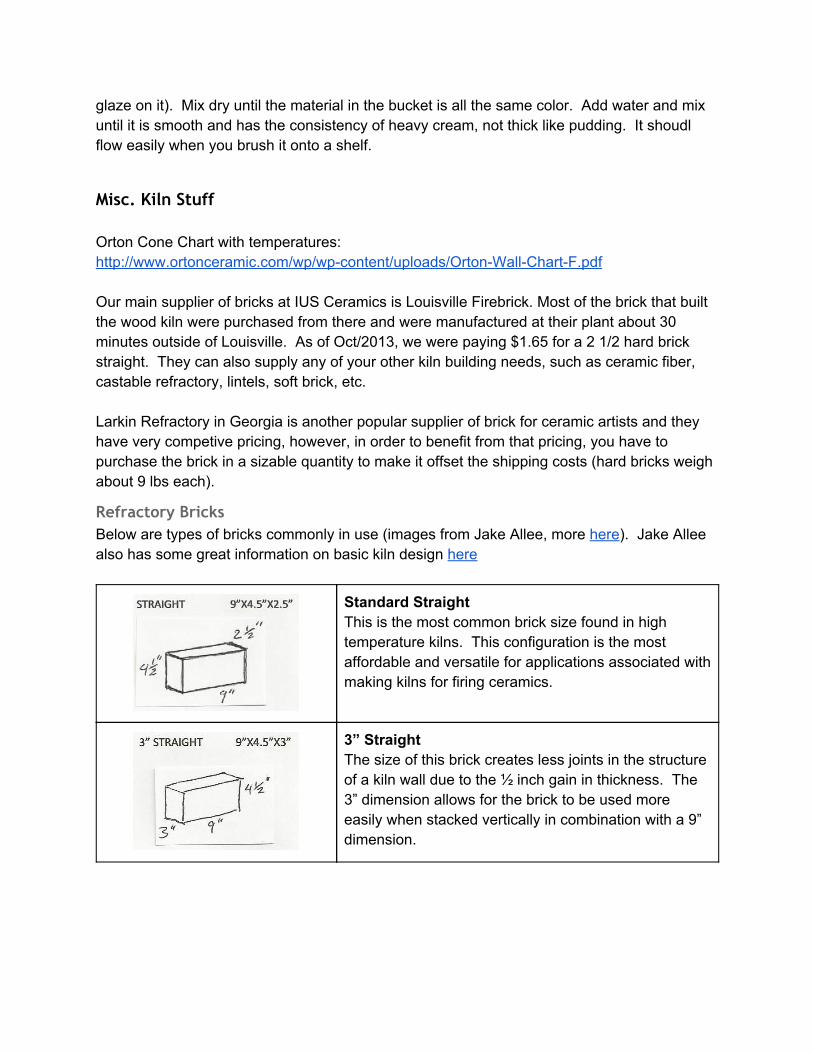
Refractory Bricks Below are types of bricks commonly in use (images from Jake Allee, more here). Jake Allee also has some great information on basic kiln design here
Standard Straight This is the most common brick size found in high temperature kilns. This configuration is the most affordable and versatile for applications associated with making kilns for firing ceramics.
3” Straight The size of this brick creates less joints in the structure of a kiln wall due to the ½ inch gain in thickness. The 3” dimension allows for the brick to be used more easily when stacked vertically in combination with a 9” dimension.
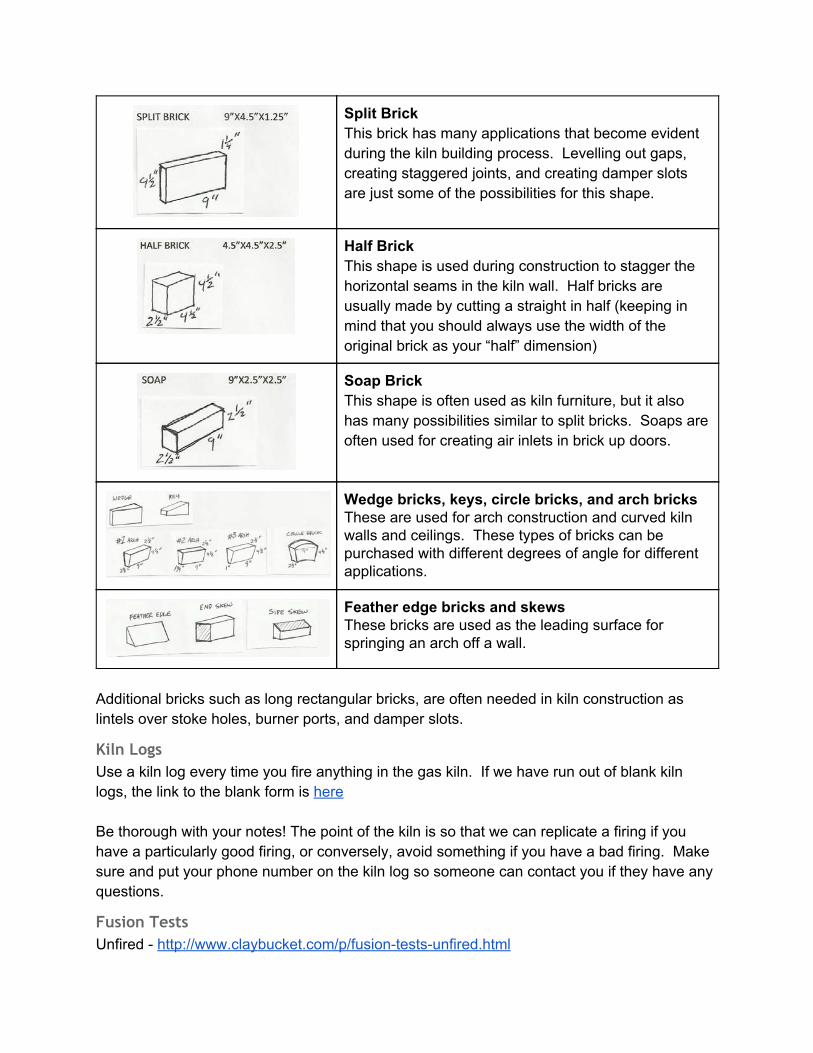
Split Brick This brick has many applications that become evident during the kiln building process. Levelling out gaps, creating staggered joints, and creating damper slots are just some of the possibilities for this shape.
Half Brick This shape is used during construction to stagger the horizontal seams in the kiln wall. Half bricks are usually made by cutting a straight in half (keeping in mind that you should always use the width of the original brick as your “half” dimension)
Soap Brick This shape is often used as kiln furniture, but it also has many possibilities similar to split bricks. Soaps are often used for creating air inlets in brick up doors.
Wedge bricks, keys, circle bricks, and arch bricks These are used for arch construction and curved kiln walls and ceilings. These types of bricks can be purchased with different degrees of angle for different applications.
Feather edge bricks and skews These bricks are used as the leading surface for springing an arch off a wall.
Additional bricks such as long rectangular bricks, are often needed in kiln construction as lintels over stoke holes, burner ports, and damper slots.
Kiln Logs Use a kiln log every time you fire anything in the gas kiln. If we have run out of blank kiln logs, the link to the blank form is here Be thorough with your notes! The point of the kiln is so that we can replicate a firing if you have a particularly good firing, or conversely, avoid something if you have a bad firing. Make sure and put your phone number on the kiln log so someone can contact you if they have any questions.
Fusion Tests Unfired - http://www.claybucket.com/p/fusion-tests-unfired.html

Cone 06 - http://www.claybucket.com/p/fusion-tests-cone-06.html Cone 6 oxidation - http://www.claybucket.com/p/fusion-tests-cone-6.html Cone 10 reduction - http://www.claybucket.com/p/fusion-tests-cone-10.html
Mixing Plaster 1. Make SURE your mold is completely ready BEFORE you start mixing.
No undercuts Cottle boards properly supported Everything coated with mold soap Check with your Fearless Leader to make sure!!
2. Measure the LENGTH, WIDTH, and HEIGHT in inches to determine the volume of plaster needed. - follow this formula: length x width x height = volume in cubic inches - now that you know the volume of plaster you need follow this guide:
Volume of mixed plaster needed:
Measure this much water in quarts:
Measure this much dry plaster in ounces:
40 0.5 1.40
80 1 2.85
160 2 5.70
240 3 8.55
320 4 11.40
400 5 14.25
480 6 17.10
560 7 19.95
640 8 22.80
720 9 25.65
800 10 28.25
3. Make sure water is about 70 degrees.
4. Sift the dry plaster into the water. Do not drop large clumps of plaster into the water.

5. Let the plaster soak in the water for 3 MINUTES.
6. Mix the plaster for 3-5 MINUTES – plaster should feel like heavy cream
7. Pour the plaster into the mold and vibrate the table and mold to remove air bubbles.
8. IMMEDIATELY clean the HECK out of the mixing bucket. Use the water hose and a green
scrub pad. Pour EVERYTHING into the dumpster. Do not take any plaster into the studio OR
the clay mixing room. For God’s sake, never into the clay mixing room. All extra plaster, all
water from cleaning plaster buckets, goes INTO THE DUMPSTER. Plaster that gets into the
sinks will harden in the pipes and the only way to get it out is to jackhammer the pipes out of
the concrete .. DEFINITELY not cool.
9. Wait about 20-40 minutes before removing the cottle boards.
10. IMMEDIATELY clean everything that even remotely applies to you in the room:
Among other things, you should clean this stuff: cottle boards table floor brushes buckets scale measuring devices plaster bag shurform
Glaze The IUS Ceramics Studio has a comprehensive handbook with detailed notes on every material used in the studio. It is a available for download here: IUS Ceramics Clay and Glaze Materials Handbook
How to apply glaze Glazes, slips, washes, and stains must be mixed thoroughly before using. Even if a
glaze has been sitting for a few minutes between usage, it must be stirred again to insure that all materials are in uniform suspension.
Glaze buckets must be kept closed (lids securely on) whenever not in use to avoid evaporation and contamination of glazes (many glazes look similar in the liquid state).
Always use a clean damp sponge to wipe down your pieces before you glaze them. This removes dust and minimizes the possibility of the glaze crawling when fired. Also use a piece of silicon carbide shelf to grind down any sharp or ragged edges before glazing.
Before applying glaze, always check the consistency. If it seems too thick, check it by dipping a bisque test tile into it. A single layer of glaze (held in the bucket for about 3-5 seconds) should produce a layer of glaze about the thickness of your thumbnail. If confusion persists, check with Mr. Ceramics – and never thin out a glaze before first checking with Mr. Ceramics.
Pouring and dipping are good methods to use whenever possible as they minimize messy layered dripping of the glaze. Always remember to allow excess glaze to run off a corner or specified edge of a piece until all dripping ceases. You may also apply glazes by brushing or spraying.
If you need to spray the glaze on, you must do this on the back dock (the Annex). Remember that sprayed glaze always looks thicker than it is. Try and remind yourself of the thumbnail thickness test. It is imperative that you clean the sprayer immediately after use so as not to allow the glaze to harden inside the spray gun. Always wear a mask when spraying.
In most cases, the interior of a pot should be glazed first. Any drips can be removed with a damp sponge before applying glaze on the exterior.
A layer of glaze should always be applied to the inside of the foot ring (on pots) to make sure the glaze compression is uniform. Flat-bottomed pieces obviously can’t be glazed this way.
Glazes tend to run more when applied thickly and when layered with other glazes or washes. Keep this in mind when glazing and keep an eye on the thickness as it develops on your pieces. If your glaze application cracks significantly when drying, you can be sure that your glaze is too thick. In this case, wash off all glaze and thoroughly dry the bisqued object before re-glazing.
Glaze on the base and bottom of your object must be wiped off thoroughly (at least 1/8 to ¼ inch from bottom)
Never leave even a teeny weeny mess for someone else to clean up – this includes the floor, sink, and tables. Always return glaze buckets (with the lid on) to their proper storing place
How to read the Wall of Color Behold the Wall of Color …
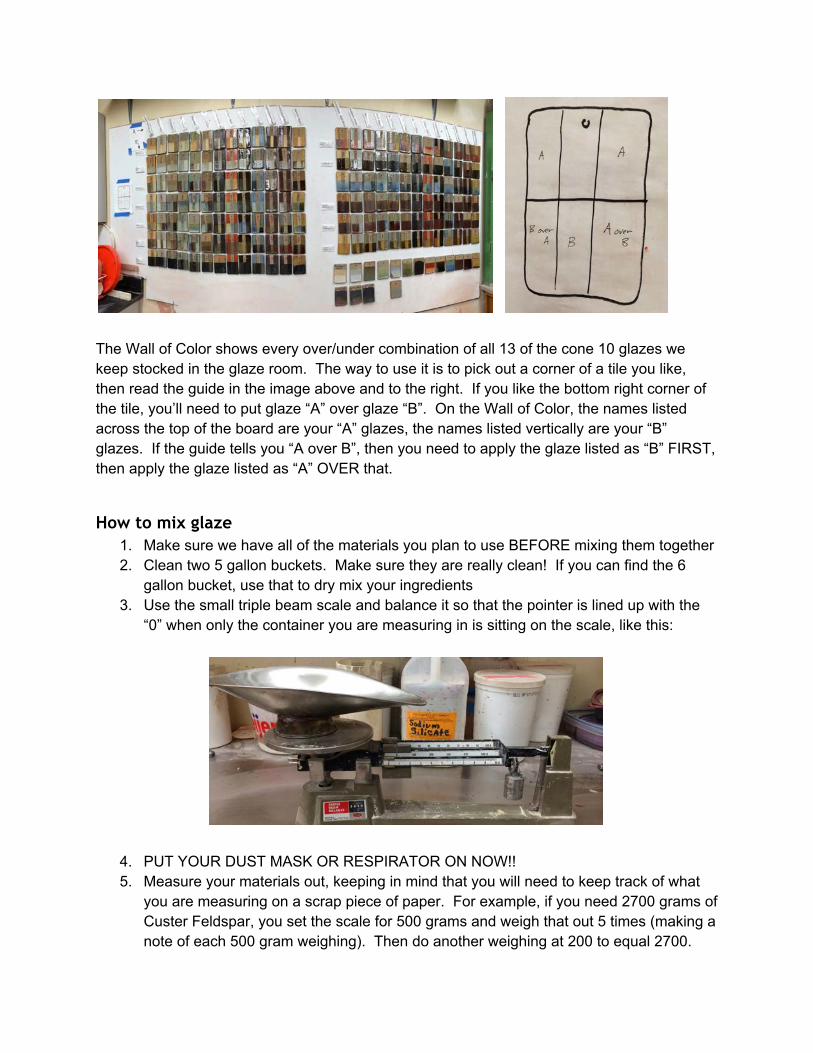
The Wall of Color shows every over/under combination of all 13 of the cone 10 glazes we keep stocked in the glaze room. The way to use it is to pick out a corner of a tile you like, then read the guide in the image above and to the right. If you like the bottom right corner of the tile, you’ll need to put glaze “A” over glaze “B”. On the Wall of Color, the names listed across the top of the board are your “A” glazes, the names listed vertically are your “B” glazes. If the guide tells you “A over B”, then you need to apply the glaze listed as “B” FIRST, then apply the glaze listed as “A” OVER that.
How to mix glaze 1. Make sure we have all of the materials you plan to use BEFORE mixing them together 2. Clean two 5 gallon buckets. Make sure they are really clean! If you can find the 6
gallon bucket, use that to dry mix your ingredients 3. Use the small triple beam scale and balance it so that the pointer is lined up with the
“0” when only the container you are measuring in is sitting on the scale, like this:
4. PUT YOUR DUST MASK OR RESPIRATOR ON NOW!! 5. Measure your materials out, keeping in mind that you will need to keep track of what
you are measuring on a scrap piece of paper. For example, if you need 2700 grams of Custer Feldspar, you set the scale for 500 grams and weigh that out 5 times (making a note of each 500 gram weighing). Then do another weighing at 200 to equal 2700.
6. Put all of your dry materials into one bucket. 7. Dry off the glaze mixer on the end of the drill and use that to dry mix the materials until
it looks like it’s all the same color. 8. Add water, mixing as you add it. Keep in mind that it’s much easier to ADD water than
take it out! 9. Put the rotary sieve on the other clean bucket and sieve the glaze into that bucket. 10. Clean the first bucket out, then sieve the glaze back into the first bucket. Sieving the
glaze twice helps to mix the glaze thoroughly. You may need to add some water as the sieving process sometimes makes the glaze thicker.
11. Thoroughly clean the sieve and any tools you used to mix the glaze. 12. Follow the directions below to make sure you add the right amount of glaze.
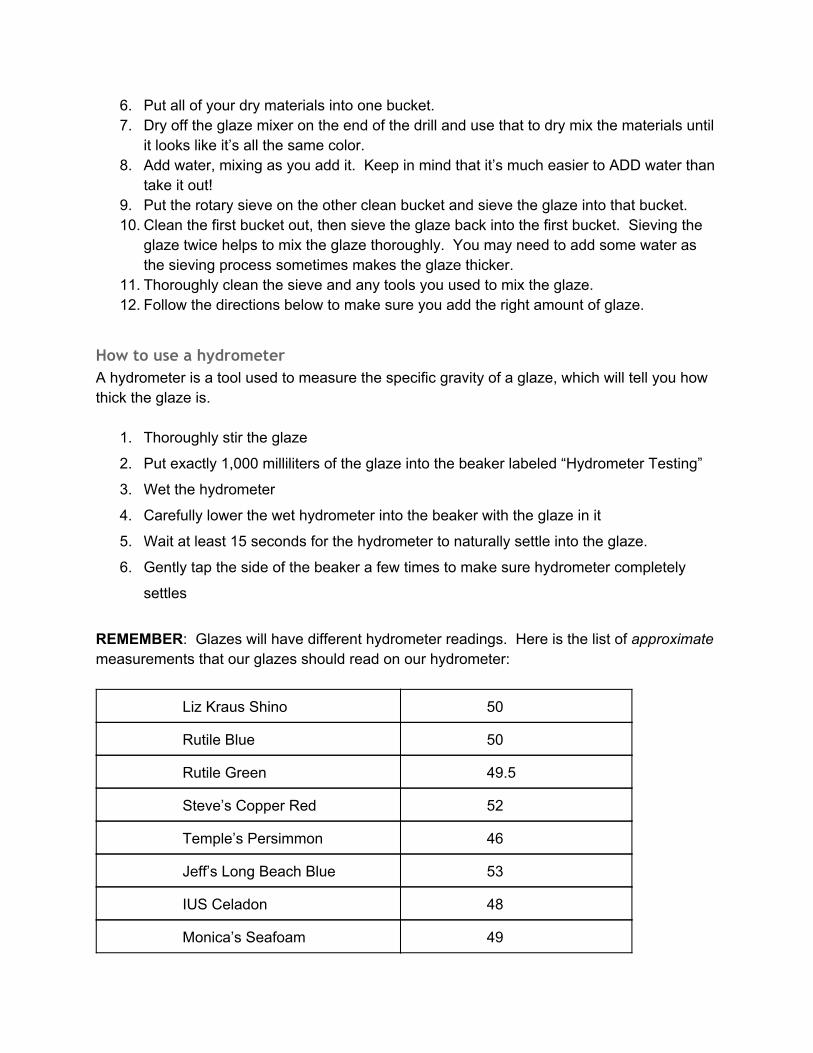
How to use a hydrometer A hydrometer is a tool used to measure the specific gravity of a glaze, which will tell you how thick the glaze is.
1. Thoroughly stir the glaze
2. Put exactly 1,000 milliliters of the glaze into the beaker labeled “Hydrometer Testing”
3. Wet the hydrometer
4. Carefully lower the wet hydrometer into the beaker with the glaze in it
5. Wait at least 15 seconds for the hydrometer to naturally settle into the glaze.
6. Gently tap the side of the beaker a few times to make sure hydrometer completely
settles
REMEMBER: Glazes will have different hydrometer readings. Here is the list of approximate measurements that our glazes should read on our hydrometer:
Liz Kraus Shino 50
Rutile Blue 50
Rutile Green 49.5
Steve’s Copper Red 52
Temple’s Persimmon 46
Jeff’s Long Beach Blue 53
IUS Celadon 48
Monica’s Seafoam 49

Iron Saturate 48
Missouri Straw 32
Mackenzie White 50
Steven Hill Clear 49
Cushing Satin Black 52.5
Horsley’s Satin Matte White 50
- When testing, if the number on the hydrometer is higher than listed above, add a little water and repeat the testing process until the hydrometer reads the correct number. - If the number is lower than listed above, make a note on the bucket to have someone screen some water off the top of the liquid amount. (This of course has to be done AFTER the glaze has settled – usually after a day or so has gone by without anyone stirring the glaze) After screening some water off, then repeat the testing process until the hydrometer reads the proper number. Here’s a Ceramics Arts Daily article on how to make your own hydrometer: http://ceramicartsdaily.org/clay-tools/making-clay-tools/how-to-make-a-floating-stick-hydrometer-for-the-cost-of-a-milkshake/
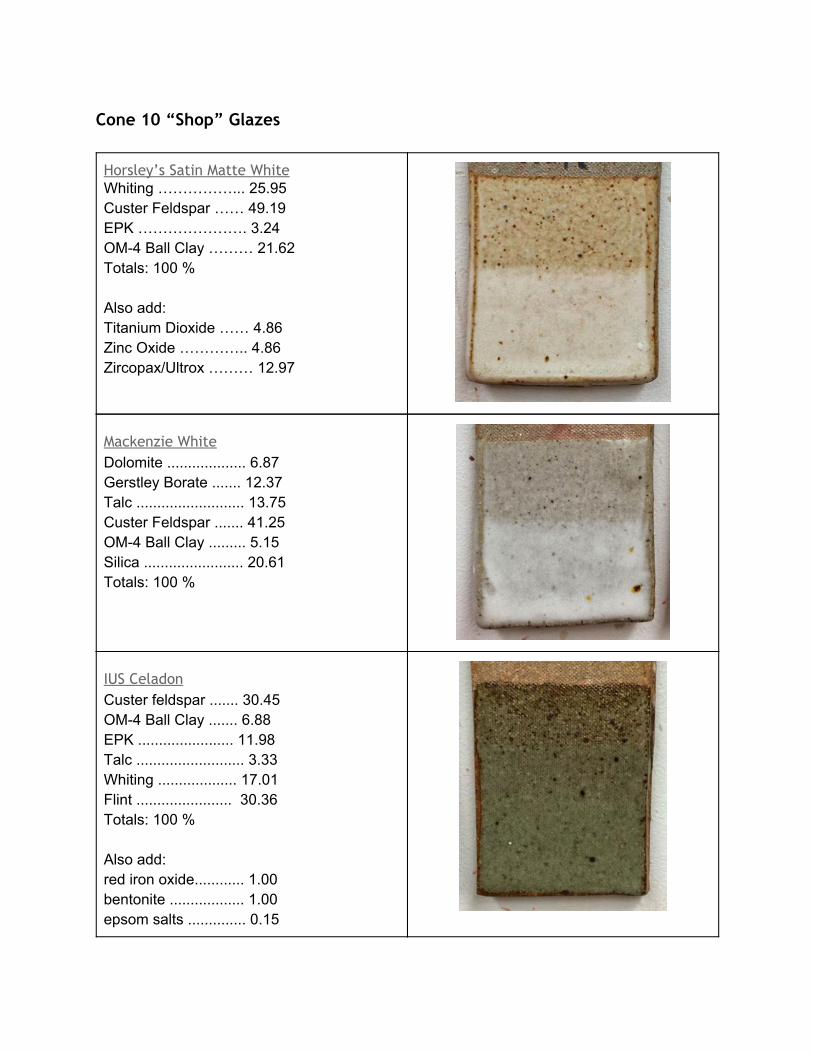
Cone 10 “Shop” Glazes
Horsley’s Satin Matte White Whiting ……………... 25.95 Custer Feldspar …… 49.19 EPK …………………. 3.24 OM-4 Ball Clay ……… 21.62 Totals: 100 % Also add: Titanium Dioxide …… 4.86 Zinc Oxide ………….. 4.86 Zircopax/Ultrox ……… 12.97
Mackenzie White Dolomite ................... 6.87 Gerstley Borate ....... 12.37 Talc .......................... 13.75 Custer Feldspar ....... 41.25 OM-4 Ball Clay ......... 5.15 Silica ........................ 20.61 Totals: 100 %
IUS Celadon Custer feldspar ....... 30.45 OM-4 Ball Clay ....... 6.88 EPK ....................... 11.98 Talc .......................... 3.33 Whiting ................... 17.01 Flint ....................... 30.36 Totals: 100 % Also add: red iron oxide............ 1.00 bentonite .................. 1.00 epsom salts .............. 0.15
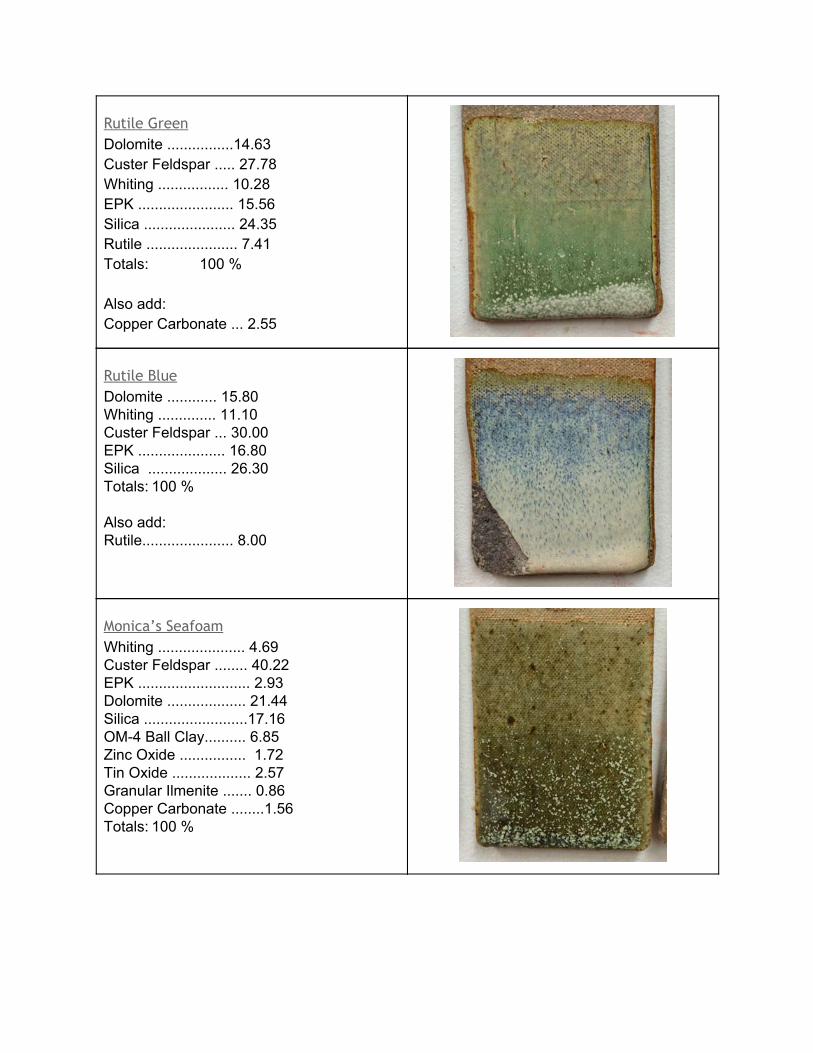
Rutile Green Dolomite ................14.63 Custer Feldspar ..... 27.78 Whiting ................. 10.28 EPK ....................... 15.56 Silica ...................... 24.35 Rutile ...................... 7.41 Totals: 100 % Also add: Copper Carbonate ... 2.55
Rutile Blue Dolomite ............ 15.80 Whiting .............. 11.10 Custer Feldspar ... 30.00 EPK ..................... 16.80 Silica ................... 26.30 Totals: 100 % Also add: Rutile...................... 8.00
Monica’s Seafoam Whiting ..................... 4.69 Custer Feldspar ........ 40.22 EPK ........................... 2.93 Dolomite ................... 21.44 Silica .........................17.16 OM-4 Ball Clay.......... 6.85 Zinc Oxide ................ 1.72 Tin Oxide ................... 2.57 Granular Ilmenite ....... 0.86 Copper Carbonate ........1.56 Totals: 100 %
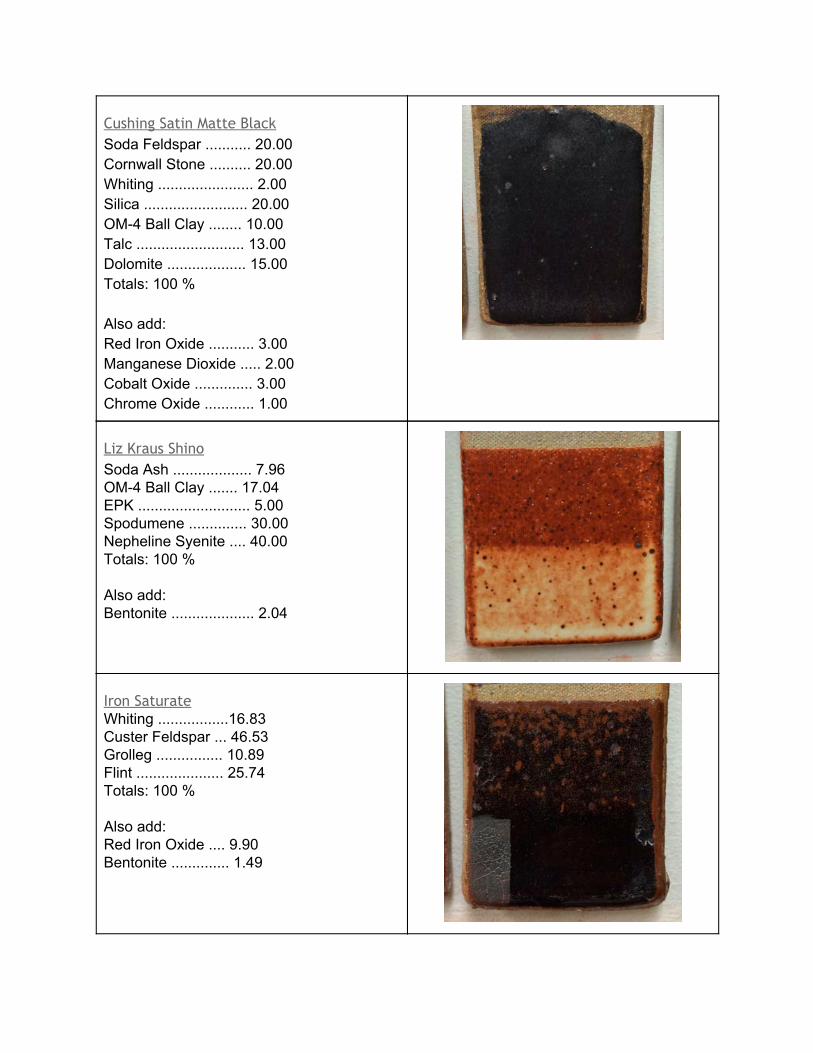
Cushing Satin Matte Black Soda Feldspar ........... 20.00 Cornwall Stone .......... 20.00 Whiting ....................... 2.00 Silica ......................... 20.00 OM-4 Ball Clay ........ 10.00 Talc .......................... 13.00 Dolomite ................... 15.00 Totals: 100 % Also add: Red Iron Oxide ........... 3.00 Manganese Dioxide ..... 2.00 Cobalt Oxide .............. 3.00 Chrome Oxide ............ 1.00
Liz Kraus Shino Soda Ash ................... 7.96 OM-4 Ball Clay ....... 17.04 EPK ........................... 5.00 Spodumene .............. 30.00 Nepheline Syenite .... 40.00 Totals: 100 % Also add: Bentonite .................... 2.04
Iron Saturate Whiting .................16.83 Custer Feldspar ... 46.53 Grolleg ................ 10.89 Flint ..................... 25.74 Totals: 100 % Also add: Red Iron Oxide .... 9.90 Bentonite .............. 1.49
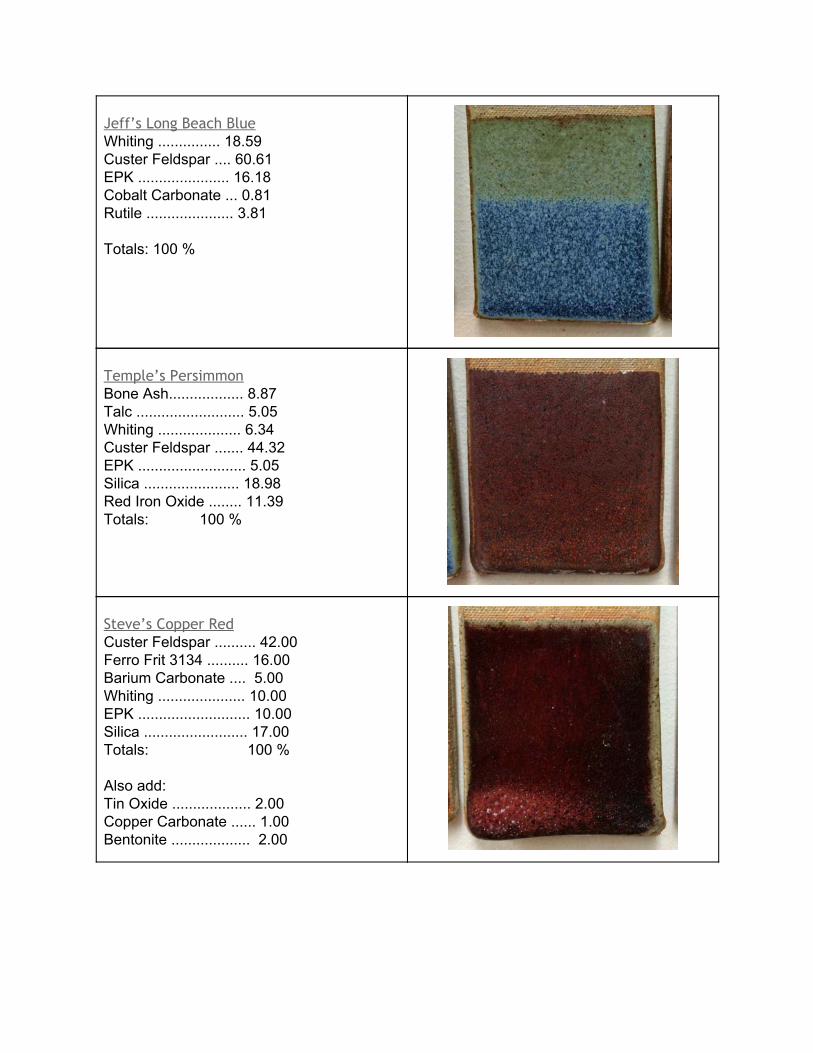
Jeff’s Long Beach Blue Whiting ............... 18.59 Custer Feldspar .... 60.61 EPK ...................... 16.18 Cobalt Carbonate ... 0.81 Rutile ..................... 3.81 Totals: 100 %
Temple’s Persimmon Bone Ash.................. 8.87 Talc .......................... 5.05 Whiting .................... 6.34 Custer Feldspar ....... 44.32 EPK .......................... 5.05 Silica ....................... 18.98 Red Iron Oxide ........ 11.39 Totals: 100 %
Steve’s Copper Red Custer Feldspar .......... 42.00 Ferro Frit 3134 .......... 16.00 Barium Carbonate .... 5.00 Whiting ..................... 10.00 EPK ........................... 10.00 Silica ......................... 17.00 Totals: 100 % Also add: Tin Oxide ................... 2.00 Copper Carbonate ...... 1.00 Bentonite ................... 2.00
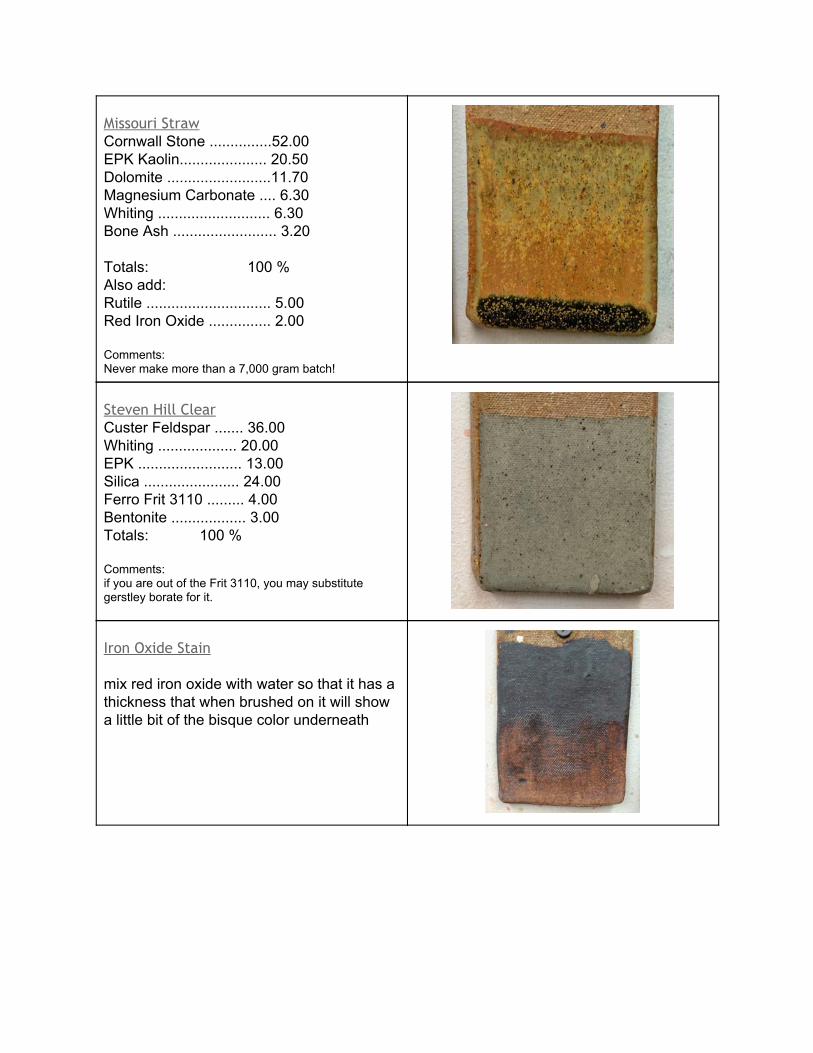
Missouri Straw Cornwall Stone ...............52.00 EPK Kaolin..................... 20.50 Dolomite .........................11.70 Magnesium Carbonate .... 6.30 Whiting ........................... 6.30 Bone Ash ......................... 3.20 Totals: 100 % Also add: Rutile .............................. 5.00 Red Iron Oxide ............... 2.00 Comments: Never make more than a 7,000 gram batch!
Steven Hill Clear Custer Feldspar ....... 36.00 Whiting ................... 20.00 EPK ......................... 13.00 Silica ....................... 24.00 Ferro Frit 3110 ......... 4.00 Bentonite .................. 3.00 Totals: 100 % Comments: if you are out of the Frit 3110, you may substitute gerstley borate for it.
Iron Oxide Stain mix red iron oxide with water so that it has a thickness that when brushed on it will show a little bit of the bisque color underneath
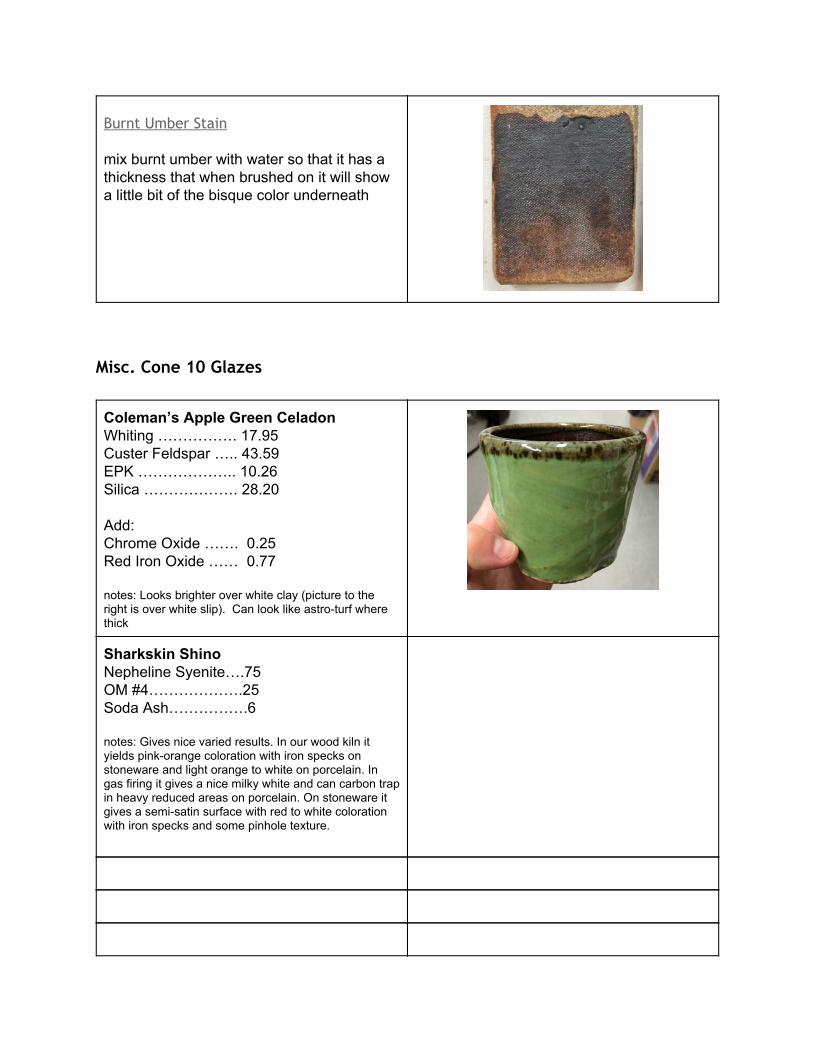
Burnt Umber Stain mix burnt umber with water so that it has a thickness that when brushed on it will show a little bit of the bisque color underneath
Misc. Cone 10 Glazes
Coleman’s Apple Green Celadon Whiting ……………. 17.95 Custer Feldspar ….. 43.59 EPK ……………….. 10.26 Silica ………………. 28.20 Add: Chrome Oxide ……. 0.25 Red Iron Oxide …… 0.77 notes: Looks brighter over white clay (picture to the right is over white slip). Can look like astro-turf where thick
Sharkskin Shino Nepheline Syenite….75 OM #4……………….25 Soda Ash…………….6 notes: Gives nice varied results. In our wood kiln it yields pink-orange coloration with iron specks on stoneware and light orange to white on porcelain. In gas firing it gives a nice milky white and can carbon trap in heavy reduced areas on porcelain. On stoneware it gives a semi-satin surface with red to white coloration with iron specks and some pinhole texture.
Other Shop Tools The following safety tips are to serve are reminders. Never use any of the power tools if you haven’t been trained to use them. There are no dumb questions when it comes to these tools, so if you have ANY questions, ask before you use!!
Circular Saw Keep your finger off the trigger (switch) until you are ready to make a cut. Never cut a board in the middle that is just lying on two sawhorses, it will sag or
collapse about two-thirds of the way through the cut and bind the saw, causing kickback.
Always have a safe place to put your saw. Never set it down on the blade guard or drop it on the ground. Always lay a saw on the side the blade is on (not blade up).
Don't stand on the cord. When you run out of cord, the saw could kick back and cut you. All of the area where you are using a saw should be clean, leaving nothing that could cause you to trip and fall while carrying or using a circular saw.
Set the blade depth of the saw blade to the thickness of the board to be cut plus one-eighth inch.
Place the nose (front) of the saw base on the board to be cut, with the blade about one-quarter-inch from the board, align the blade with the mark as straight as you can.
Start the motor and slowly push the saw forward until it just touches the board. If you are a little off the mark, back the saw up one-eighth inch (while it is still running) and the vibration of the saw will let you go to the left or right to line up the blade with the mark.
Push the saw slowly through the board and let the saw do its job. Do not crowd the saw (push it too fast). You will feel when the saw has cut through the board, because they will both move, only slightly, but you will see and feel them separate.
Now, take your finger off the trigger and do not move the saw. Let the motor and blade come to a complete stop. Never lift or move a saw from a cut while it is still running. This is the most important thing to remember.
Drill Press Do not wear loose clothing or jewelry while operating a drill press. Confine long hair
with a cap or hair net. Wear eye protection while drilling. Keep all guards in place. Keep work space around the drill press clean. Turn off power before making adjustments. Don’t use excessively long bits or bits with feed screws.
Secure bit by tightening the drill chuck. Remove the chuck key before the drill press is turned on.
Clear the drill press table of all tools, metal, rags, etc. before drilling. If the material being drilled begins to spin, stop the machine and free the material. When drilling all the way through, make sure the bit goes through the center of the
table or use a scrap board so the bit will not strike the table. Secure all work in a drill press vise or with a clamp before drilling. When unsure about a special clamping setup, have the instructor check it first. Never hold material by hand while drilling. Never attempt to stop a revolving piece of work in the drill press by hand.
Handheld Grinder Never use a grinder without a guard. If an abrasive wheel breaks while rotating, it can
cause a serious injury. Wear safety glasses or goggles, or a face shield (with safety glasses or goggles) to
protect against flying particles. Gloves, aprons, metatarsal safety boots, and respiratory protection may be required, depending on the work.
Ensure the floor around the work area is clean. Do not use wheels that are cracked or those that excessively vibrate. Do not operate grinder on wet floors. Use both hands when holding the grinder. Keep the power cord away from the grinding wheel and the material being ground. Avoid using grinders near flammable materials. Do not clamp portable grinders in a vise for grinding hand-held work. Do not force wheels onto a grinder that is the wrong size or change mounting hole
sizes. Do not tighten the mounting nut excessively. Do not put the grinder on the floor or working surface until the wheel has stopped
turning.
Orbital Sander Check the condition of the cord strain reliever and power cord. If any damage is
present make sure it is repaired before using the random orbit disk sander. Wear safety glasses at all times while using the random or bit disk sander. Wear a respirator or good quality dust mask when using the random orbit disk
sander. Never allow the rotating sanding disk to touch the electrical cord or any part of the
body. Electrical shock or a serious cut may result. Do not lay the random orbit disk sander down while the disk is still rotating. When sanding do not hold the random orbit disk sander in a position where the
sanding dust is thrown toward the user or other workers in the area. Do not wear loose clothing, rings, or bracelets while operating the orbit disk sander.
Have a firm grip on the barrel and handle before turning the random orbit disk sanders switch to on.
Unplug the random orbit disk sander before changing sandpaper or making any adjustments.
Do not operate the random orbit disk sander while standing in a wet or damp area.
Bench Grinder Always wear eye protection (safety glasses or a face shield). Tie back any loose clothing or hair. Remove rings, watch and other jewelry and roll up
sleeves. Make sure the wheel guards are in place. Grinding creates heat; don't touch any
portion of the workpiece until you are sure it has cooled. Adjust the spark guards to be close to the wheel, and re-adjust these spark guards as
the wheels wear down to a smaller diameter Stand to one side of the wheel when turning on power Tool rests should be adjusted close to the wheels and thoroughly tightened in place so
they cannot shift position while in use Inspect the wheels before turning on the power. DO NOT use wheels that have been
chipped or cracked. When grinding, use the face of the wheel only. DO NOT use a wheel that vibrates. Shut off the power and do not leave guards as the wheels wear down to a until the
wheel has come to a complete stop and the work area is clean when finished using machine.
Handheld Drill If it is a corded drill you should always check the plug to make sure it is not damaged
in anyway. Look for cuts,tears and frays. If the cord is messed up in anyway you should not use the drill.
Turn the drill off every time you set it down. Even if it is only for a second. Never walk around with the drill while it is turned on. Only use drill bits that are made to fit the drill you are using. Drill bits that are made for
other drills may not fit correctly. Wear goggles when using a drill. They will prevent dust and wood pieces from hurting
your eyes. Check all wood before you begin drilling. Look for nails and other metals that could fly
out and cause injury. If you are going to be doing a large amount of drilling it will benefit you to wear a face
mask. This will prevent you form beathing in to much wood dust. Never carry a drill by the power cord. Turn off drill before changing drill bits.

Helpful links
Websites Artaxis.org Ceramic Field Guide Linda Arbuckle - Handouts The Internet for Artists - advice from Steve Lambert IUS Academic Calendar
![Antropologia culturale [ 135143 ] - sociologia.unitn.it · Corso di Laurea Sociologia (2008) standard 6 IUS/09, IUS/09 Corso di Laurea Servizio Sociale (2008) standard 6 IUS/09, IUS/09](https://static.fdocuments.net/doc/165x107/5c66766709d3f2d8348c338e/antropologia-culturale-135143-corso-di-laurea-sociologia-2008-standard.jpg)