ItemTracker Barcoding Capabilities -...
19
ItemTracker Software Ltd. 1 ItemTracker Barcoding Capabilities Customer Requirement Handle External Barcodes (barcodes created outside ItemTracker) ItemTracker has the ability to track samples (items) which have barcodes that were created outside of ItemTracker. For example, some tubes come with preprinted barcodes on them. Or you may use a separate program to print barcodes and stick them onto the tubes. In whatever way the external barcodes were created, they can be associated with samples that you create in ItemTracker. ItemTracker Functionality ItemTracker allows you to associate externally created barcodes with samples (items) that you create within ItemTracker. This can be done either when creating items: or later after the items have been created, through data import: See figure below.
Transcript of ItemTracker Barcoding Capabilities -...
ItemTracker Software Ltd. 1
ItemTracker Barcoding Capabilities
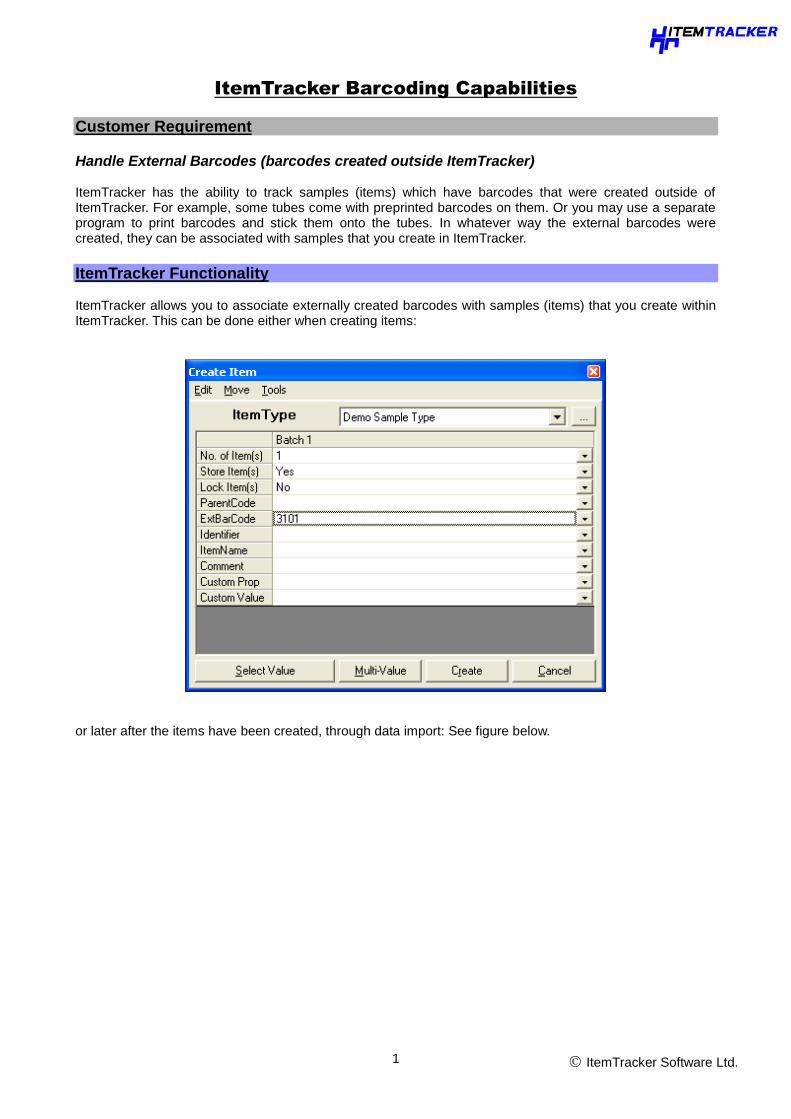
Customer Requirement Handle External Barcodes (barcodes created outside ItemTracker) ItemTracker has the ability to track samples (items) which have barcodes that were created outside of ItemTracker. For example, some tubes come with preprinted barcodes on them. Or you may use a separate program to print barcodes and stick them onto the tubes. In whatever way the external barcodes were created, they can be associated with samples that you create in ItemTracker.
ItemTracker Functionality ItemTracker allows you to associate externally created barcodes with samples (items) that you create within ItemTracker. This can be done either when creating items:
or later after the items have been created, through data import: See figure below.
ItemTracker Software Ltd. 2
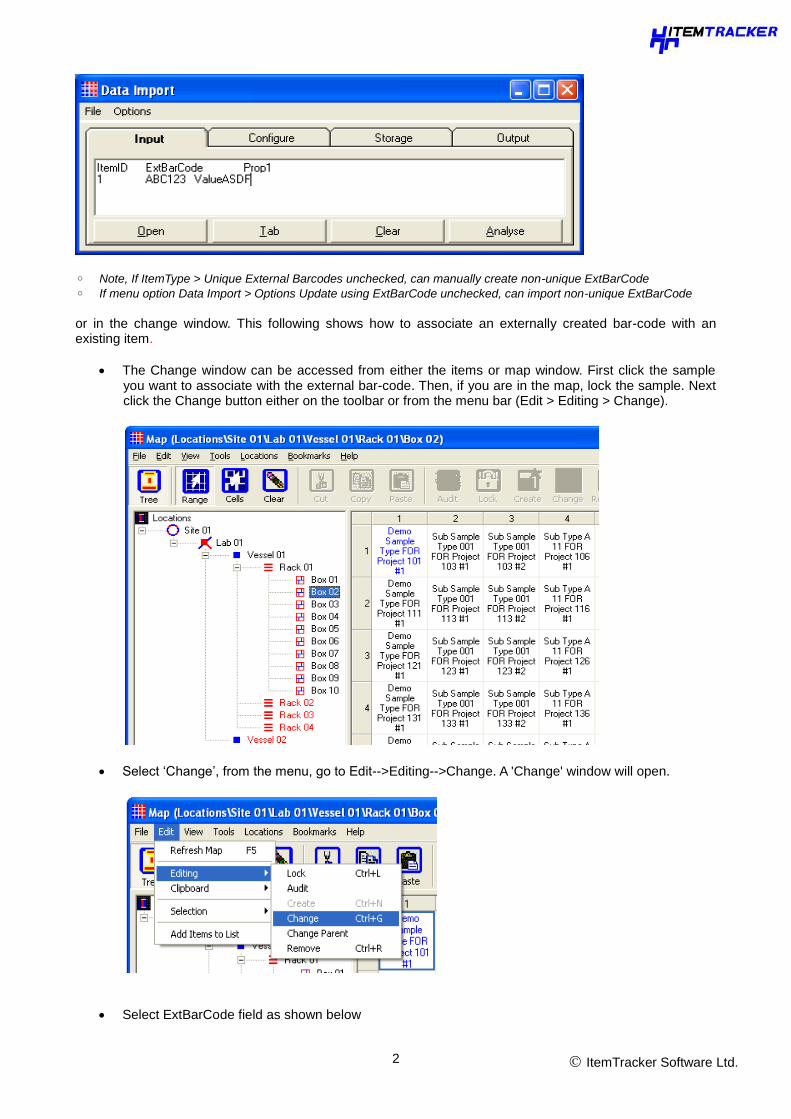
◦ Note, If ItemType > Unique External Barcodes unchecked, can manually create non-unique ExtBarCode
◦ If menu option Data Import > Options Update using ExtBarCode unchecked, can import non-unique ExtBarCode
or in the change window. This following shows how to associate an externally created bar-code with an existing item.
The Change window can be accessed from either the items or map window. First click the sample you want to associate with the external bar-code. Then, if you are in the map, lock the sample. Next click the Change button either on the toolbar or from the menu bar (Edit > Editing > Change).
Select „Change‟, from the menu, go to Edit-->Editing-->Change. A 'Change' window will open.
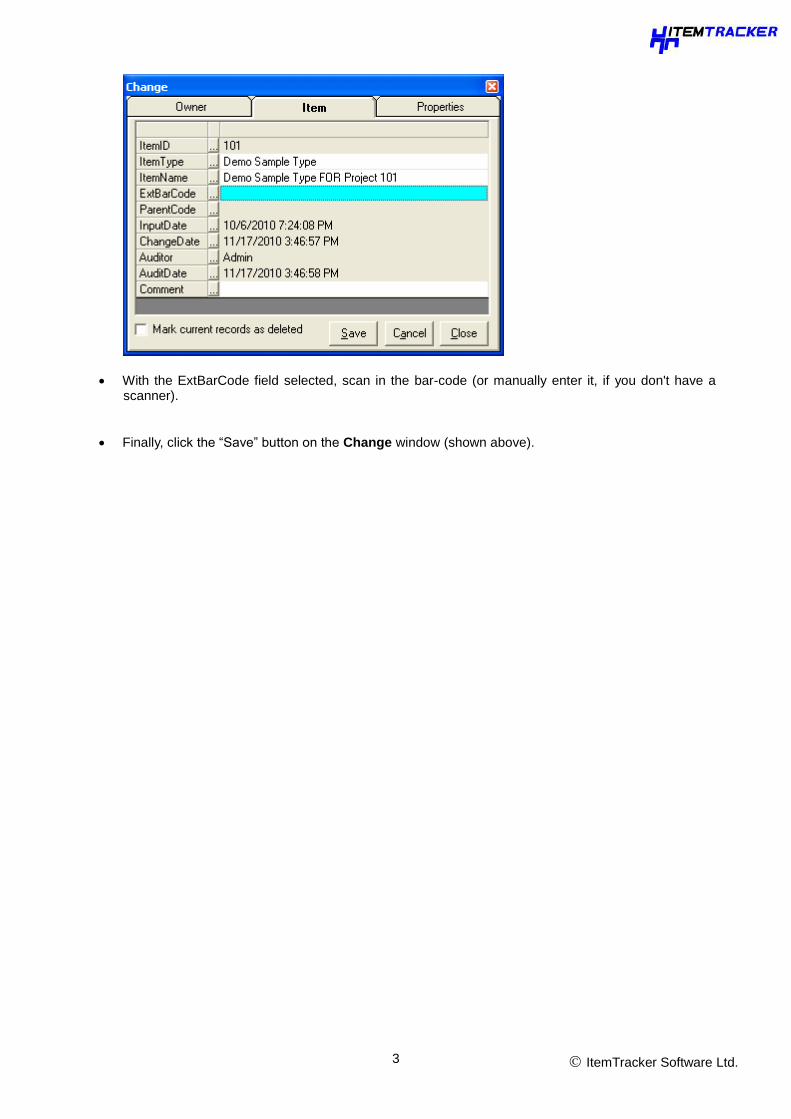
Select ExtBarCode field as shown below
ItemTracker Software Ltd. 3
With the ExtBarCode field selected, scan in the bar-code (or manually enter it, if you don't have a scanner).
Finally, click the “Save” button on the Change window (shown above).
ItemTracker Software Ltd. 4
Customer Requirement
Scanning Barcodes (Locating samples by scanning) ItemTracker has the facility to locate Items in the Map and the Items window via scanning the physical bar-code.
ItemTracker Functionality Once a sample is highlighted in the Map or the Items window, then all the associated information (history, properties etc.) can be displayed. There is a range of barcodes that ItemTracker can accept, for example the ItemTracker barcode, ExtBarCode, Storage Part Name and Owner Barcode.
Scan and Highlight
Scan and Highlight is used when you want to scan a barcode that belongs to a sample, storage part or owner. The functionality to perform Scan and Highlight is available from the Items, Owners and Map windows.
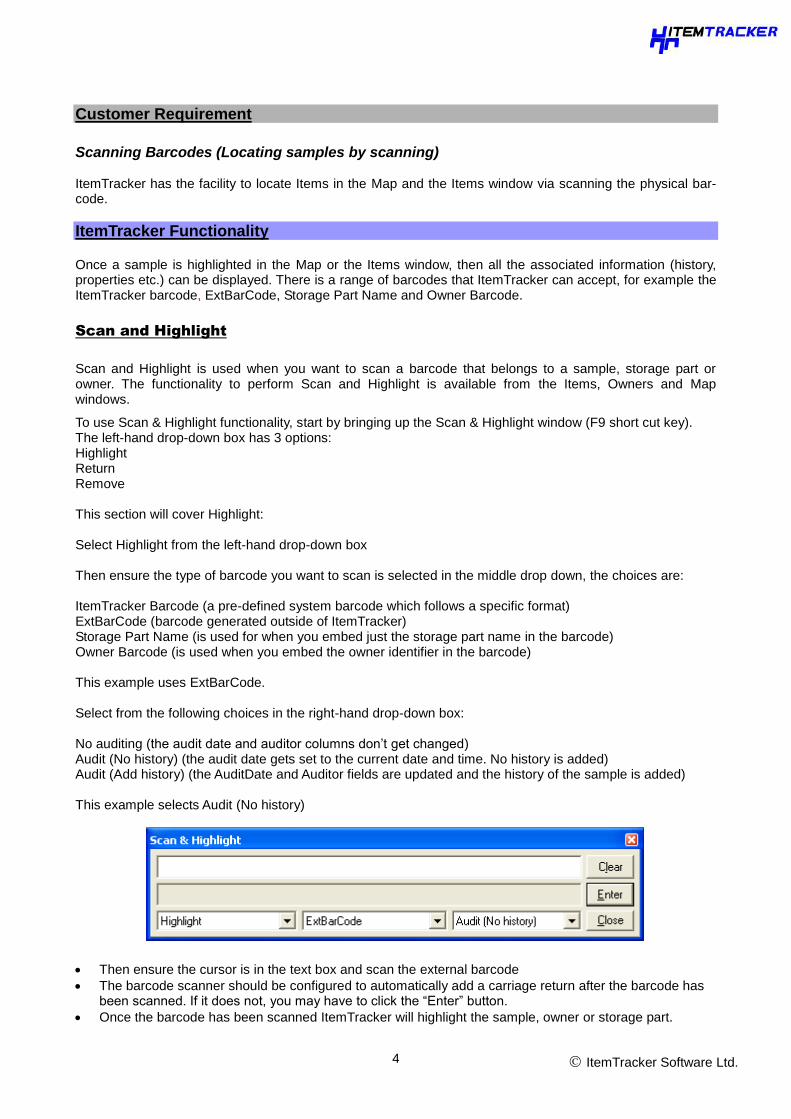
To use Scan & Highlight functionality, start by bringing up the Scan & Highlight window (F9 short cut key). The left-hand drop-down box has 3 options: Highlight Return Remove This section will cover Highlight: Select Highlight from the left-hand drop-down box Then ensure the type of barcode you want to scan is selected in the middle drop down, the choices are: ItemTracker Barcode (a pre-defined system barcode which follows a specific format) ExtBarCode (barcode generated outside of ItemTracker) Storage Part Name (is used for when you embed just the storage part name in the barcode) Owner Barcode (is used when you embed the owner identifier in the barcode) This example uses ExtBarCode. Select from the following choices in the right-hand drop-down box: No auditing (the audit date and auditor columns don‟t get changed) Audit (No history) (the audit date gets set to the current date and time. No history is added) Audit (Add history) (the AuditDate and Auditor fields are updated and the history of the sample is added) This example selects Audit (No history)
Then ensure the cursor is in the text box and scan the external barcode
The barcode scanner should be configured to automatically add a carriage return after the barcode has been scanned. If it does not, you may have to click the “Enter” button.
Once the barcode has been scanned ItemTracker will highlight the sample, owner or storage part.
ItemTracker Software Ltd. 5
Scan and Return
The Return option is for when you have removed a sample from storage and then want to scan and return it to storage.
As with the procedure for Scan and Highlight on the previous page, start by bringing up the Scan & Highlight window (F9 short cut key). The left-hand drop-down box has 3 options: Highlight Return Remove This section will cover Return: Select Return from the left-hand drop-down box Make the selections as required from the middle and right-hand drop-down box
Then ensure the cursor is in the text box and scan the barcode Once the barcode has been scanned ItemTracker shows the following message: „Do you want to return the item to its previous shown location‟ Select Yes > Retrieve > Item is placed in its previous location in the Map Or select No > Scan & Highlight window reappears
Scan and Remove
The Remove option is for when you want to mark an item as deleted.
As with the procedure for Scan and Highlight on the previous page, start by bringing up the Scan & Highlight window (F9 short cut key). The left-hand drop-down box has 3 options: Highlight Return Remove This section will cover Remove: Select Remove from the left-hand drop-down box Make the selections as required from the middle and right-hand drop-down box Then ensure the cursor is in the text box and scan the barcode Once the barcode has been scanned ItemTracker shows the following message: „Do you want to remove scanned item from storage?‟ If Yes is selected then this marks the item as deleted
ItemTracker Software Ltd. 6
Customer Requirement
Storing samples by scanning (Scan and Store) Sometimes it is desirable put items into storage by selecting a range of storage and then simply scanning the barcode on each item. For example, samples may be arriving in the near future but with all the data already available. Items can therefore be created in ItemTracker, with their details entered, but not assigned to storage. Barcode labels can be pre-printed and then attached to samples as they arrive. The Scan & Store functionality can then be used to easily put them into storage.
ItemTracker Functionality
Scan and Store
Selection of locations in the map and using the scan and store functionality allows the storing of multiple samples into storage to be accomplished easily.
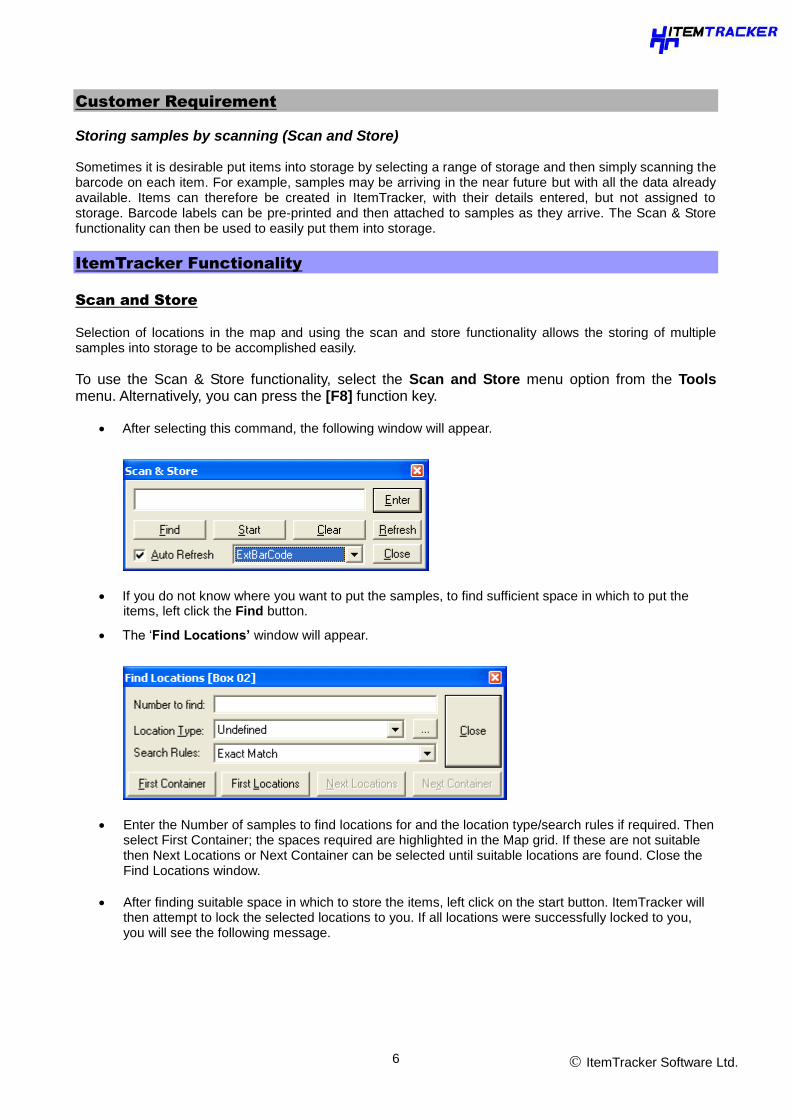
To use the Scan & Store functionality, select the Scan and Store menu option from the Tools menu. Alternatively, you can press the [F8] function key.
After selecting this command, the following window will appear.
If you do not know where you want to put the samples, to find sufficient space in which to put the items, left click the Find button.
The „Find Locations’ window will appear.
Enter the Number of samples to find locations for and the location type/search rules if required. Then select First Container; the spaces required are highlighted in the Map grid. If these are not suitable then Next Locations or Next Container can be selected until suitable locations are found. Close the Find Locations window.
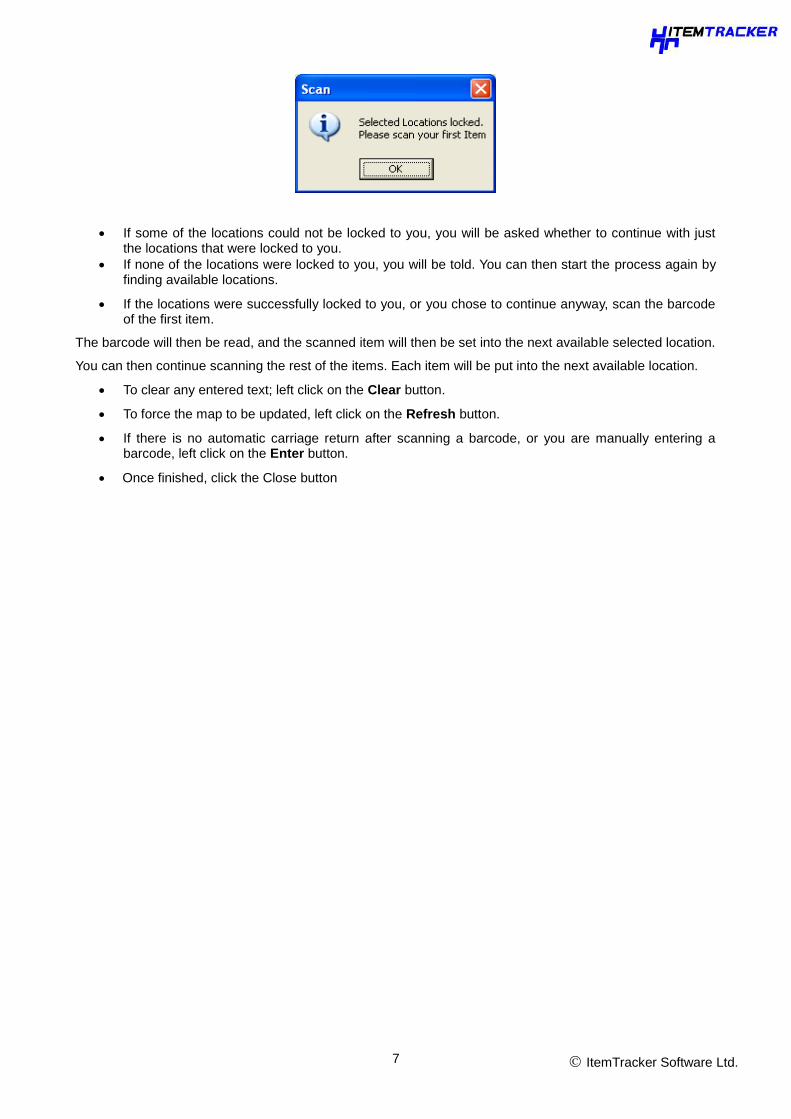
After finding suitable space in which to store the items, left click on the start button. ItemTracker will then attempt to lock the selected locations to you. If all locations were successfully locked to you, you will see the following message.
ItemTracker Software Ltd. 7
If some of the locations could not be locked to you, you will be asked whether to continue with just the locations that were locked to you.
If none of the locations were locked to you, you will be told. You can then start the process again by finding available locations.
If the locations were successfully locked to you, or you chose to continue anyway, scan the barcode of the first item.
The barcode will then be read, and the scanned item will then be set into the next available selected location.
You can then continue scanning the rest of the items. Each item will be put into the next available location.
To clear any entered text; left click on the Clear button.
To force the map to be updated, left click on the Refresh button.
If there is no automatic carriage return after scanning a barcode, or you are manually entering a barcode, left click on the Enter button.
Once finished, click the Close button
ItemTracker Software Ltd. 8
Customer Requirement Create barcode label templates
Labels consisting of one or more text and/or barcode elements can easily be created in ItemTracker from either the Map, Item or Owner windows.
ItemTracker Functionality
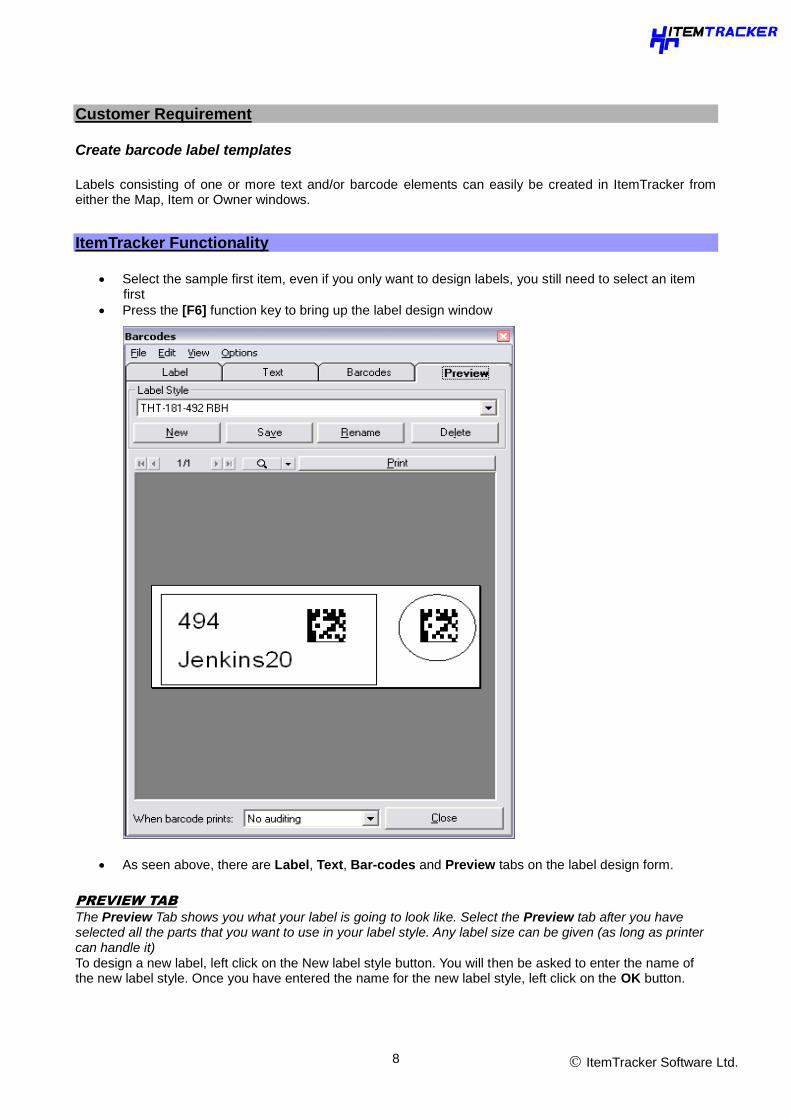
Select the sample first item, even if you only want to design labels, you still need to select an item first
Press the [F6] function key to bring up the label design window
As seen above, there are Label, Text, Bar-codes and Preview tabs on the label design form.
PREVIEW TAB
The Preview Tab shows you what your label is going to look like. Select the Preview tab after you have selected all the parts that you want to use in your label style. Any label size can be given (as long as printer can handle it) To design a new label, left click on the New label style button. You will then be asked to enter the name of the new label style. Once you have entered the name for the new label style, left click on the OK button.
ItemTracker Software Ltd. 9
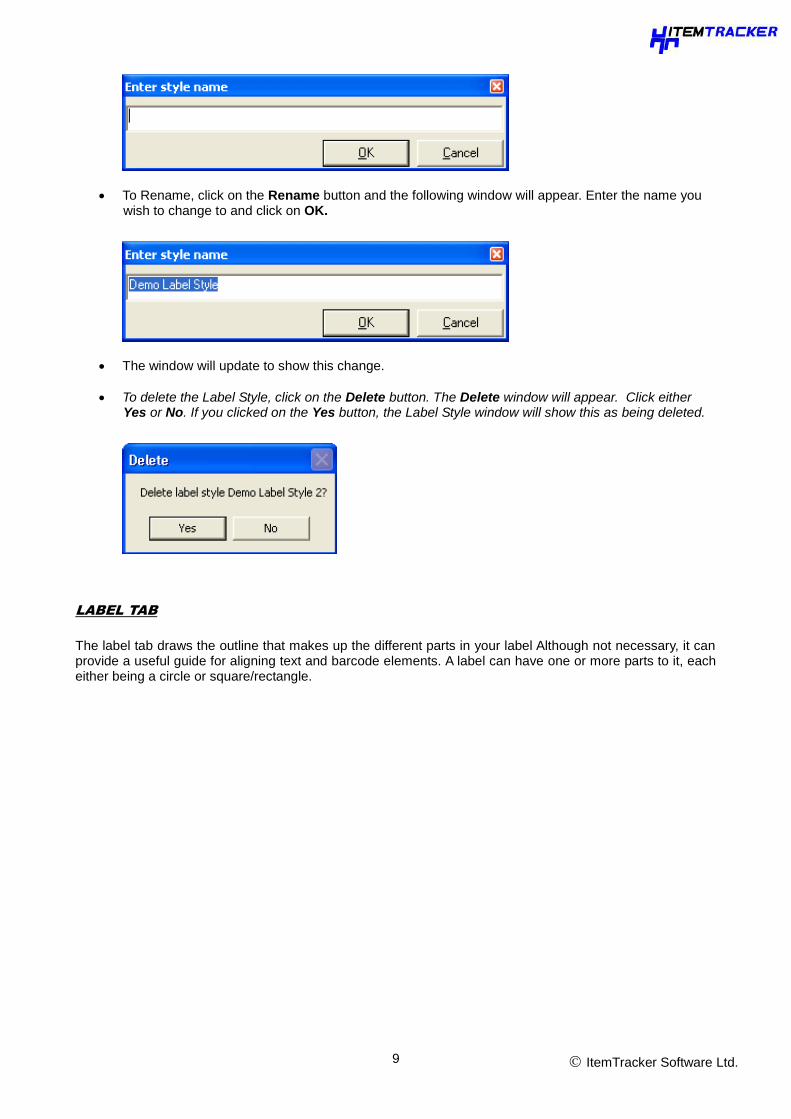
To Rename, click on the Rename button and the following window will appear. Enter the name you wish to change to and click on OK.
The window will update to show this change.
To delete the Label Style, click on the Delete button. The Delete window will appear. Click either Yes or No. If you clicked on the Yes button, the Label Style window will show this as being deleted.
LABEL TAB
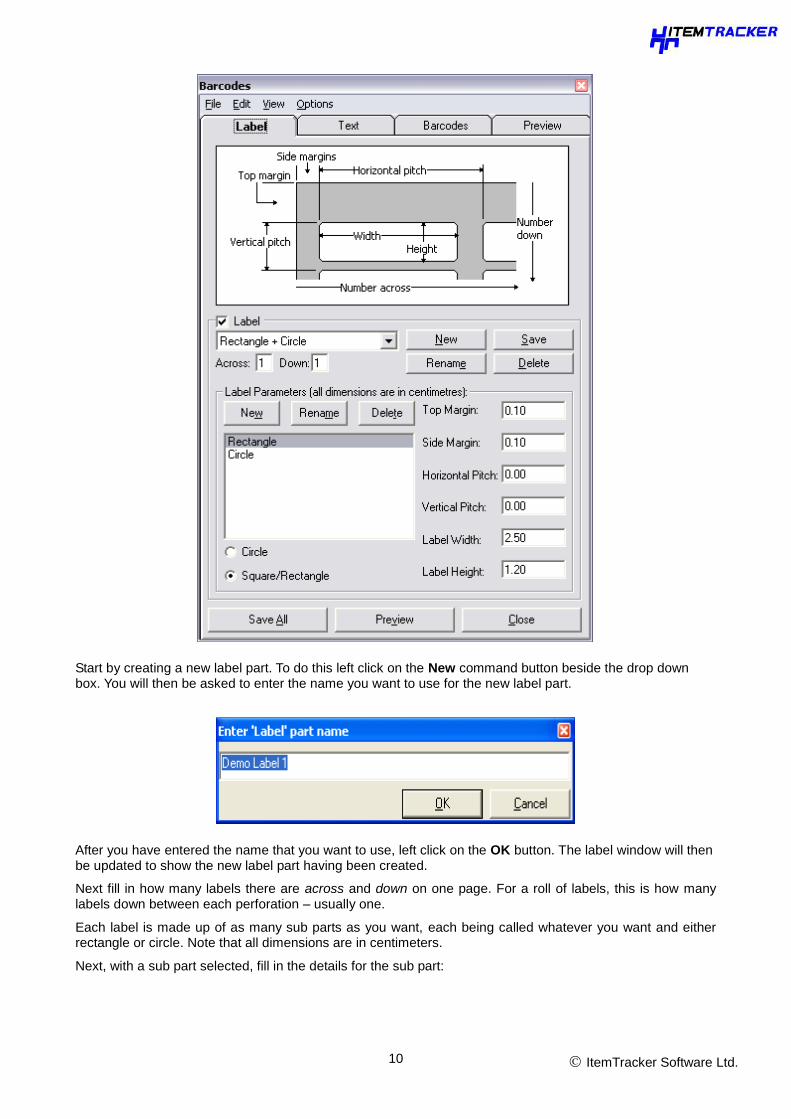
The label tab draws the outline that makes up the different parts in your label Although not necessary, it can provide a useful guide for aligning text and barcode elements. A label can have one or more parts to it, each either being a circle or square/rectangle.
ItemTracker Software Ltd. 10
Start by creating a new label part. To do this left click on the New command button beside the drop down box. You will then be asked to enter the name you want to use for the new label part.
After you have entered the name that you want to use, left click on the OK button. The label window will then be updated to show the new label part having been created.
Next fill in how many labels there are across and down on one page. For a roll of labels, this is how many labels down between each perforation – usually one.
Each label is made up of as many sub parts as you want, each being called whatever you want and either rectangle or circle. Note that all dimensions are in centimeters.
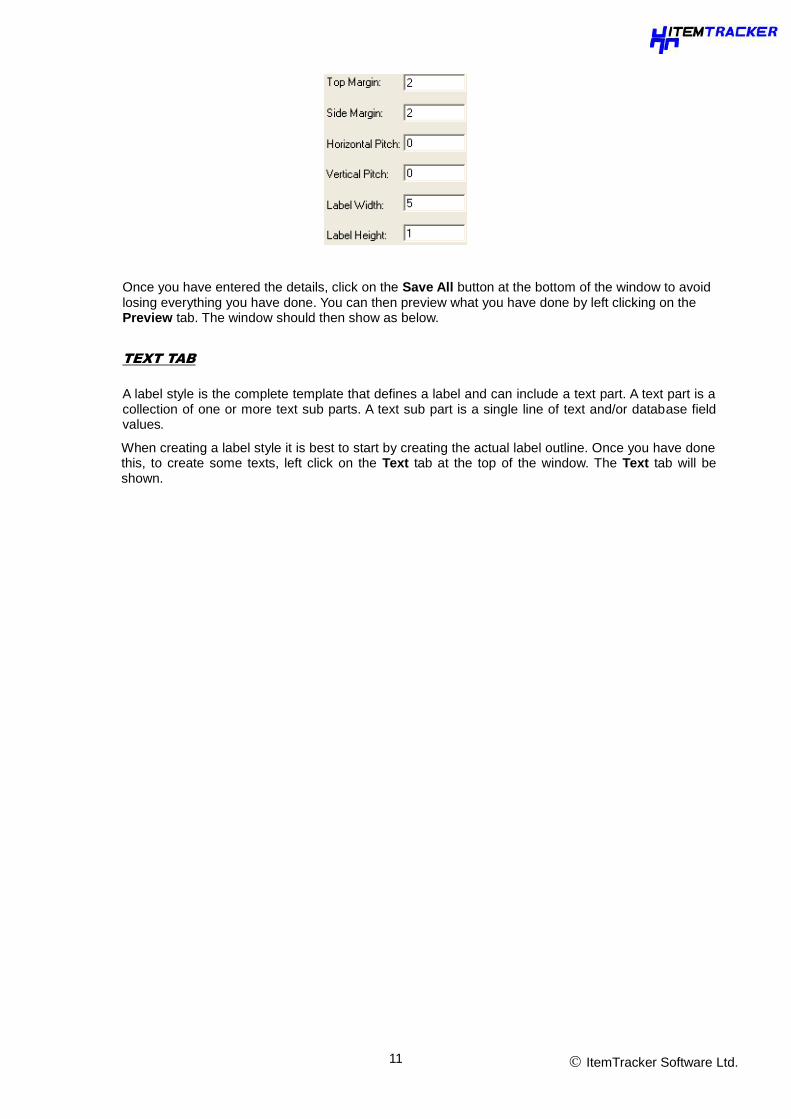
Next, with a sub part selected, fill in the details for the sub part:
ItemTracker Software Ltd. 11
Once you have entered the details, click on the Save All button at the bottom of the window to avoid losing everything you have done. You can then preview what you have done by left clicking on the Preview tab. The window should then show as below.
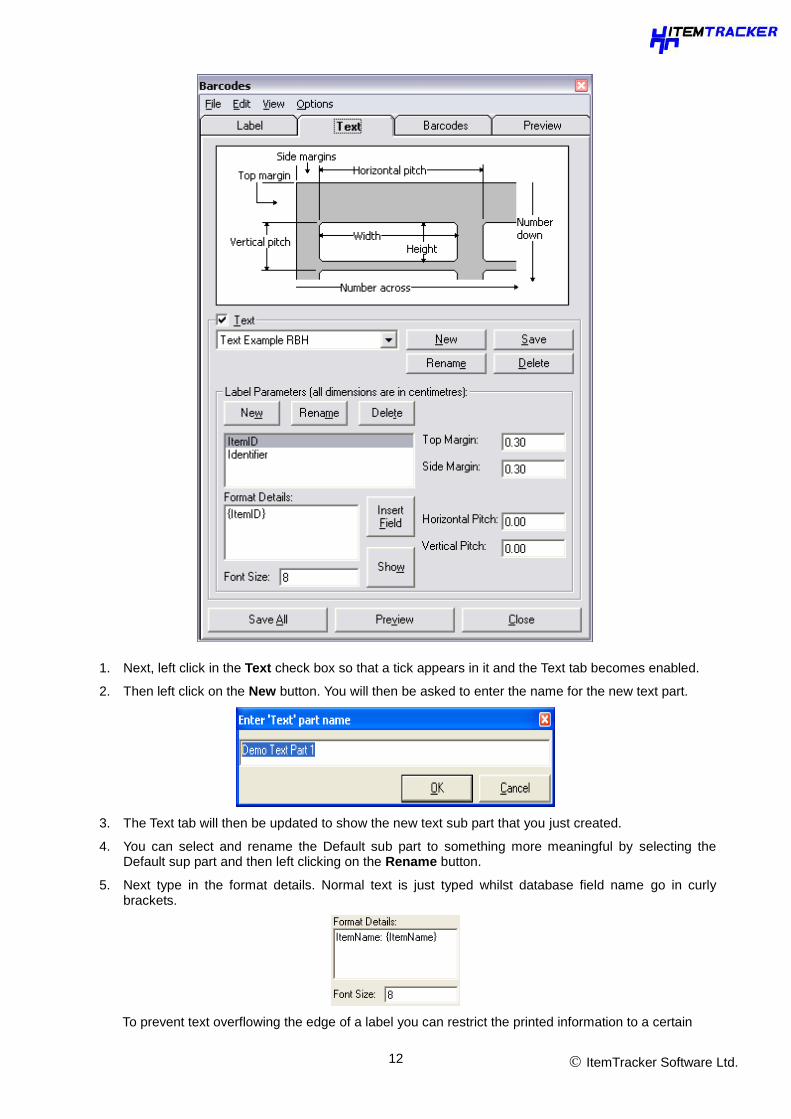
TEXT TAB
A label style is the complete template that defines a label and can include a text part. A text part is a collection of one or more text sub parts. A text sub part is a single line of text and/or database field values.
When creating a label style it is best to start by creating the actual label outline. Once you have done this, to create some texts, left click on the Text tab at the top of the window. The Text tab will be shown.
ItemTracker Software Ltd. 12
1. Next, left click in the Text check box so that a tick appears in it and the Text tab becomes enabled.
2. Then left click on the New button. You will then be asked to enter the name for the new text part.
3. The Text tab will then be updated to show the new text sub part that you just created.
4. You can select and rename the Default sub part to something more meaningful by selecting the Default sup part and then left clicking on the Rename button.
5. Next type in the format details. Normal text is just typed whilst database field name go in curly brackets.
To prevent text overflowing the edge of a label you can restrict the printed information to a certain
ItemTracker Software Ltd. 13
number of characters, e.g. to restrict ItemName to 15 characters you would have {ItemName/L15}
6. Also, set the font size that you want to use.
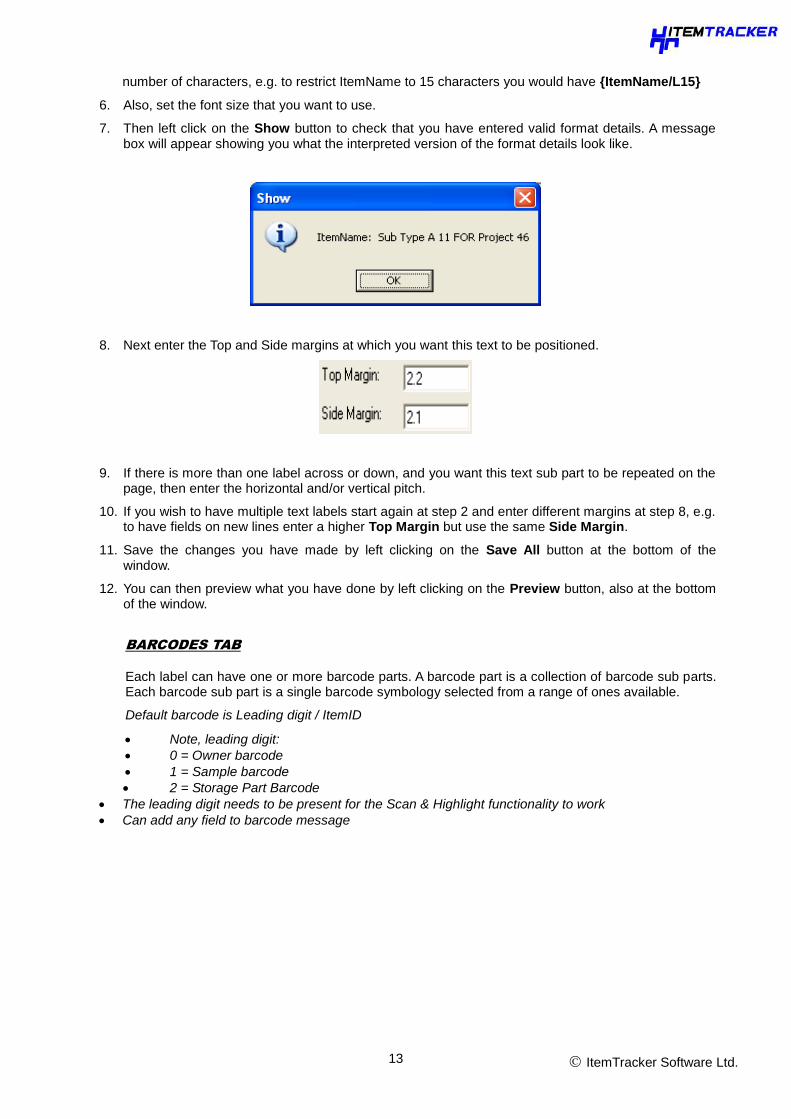
7. Then left click on the Show button to check that you have entered valid format details. A message box will appear showing you what the interpreted version of the format details look like.
8. Next enter the Top and Side margins at which you want this text to be positioned.
9. If there is more than one label across or down, and you want this text sub part to be repeated on the page, then enter the horizontal and/or vertical pitch.
10. If you wish to have multiple text labels start again at step 2 and enter different margins at step 8, e.g. to have fields on new lines enter a higher Top Margin but use the same Side Margin.
11. Save the changes you have made by left clicking on the Save All button at the bottom of the window.
12. You can then preview what you have done by left clicking on the Preview button, also at the bottom of the window.
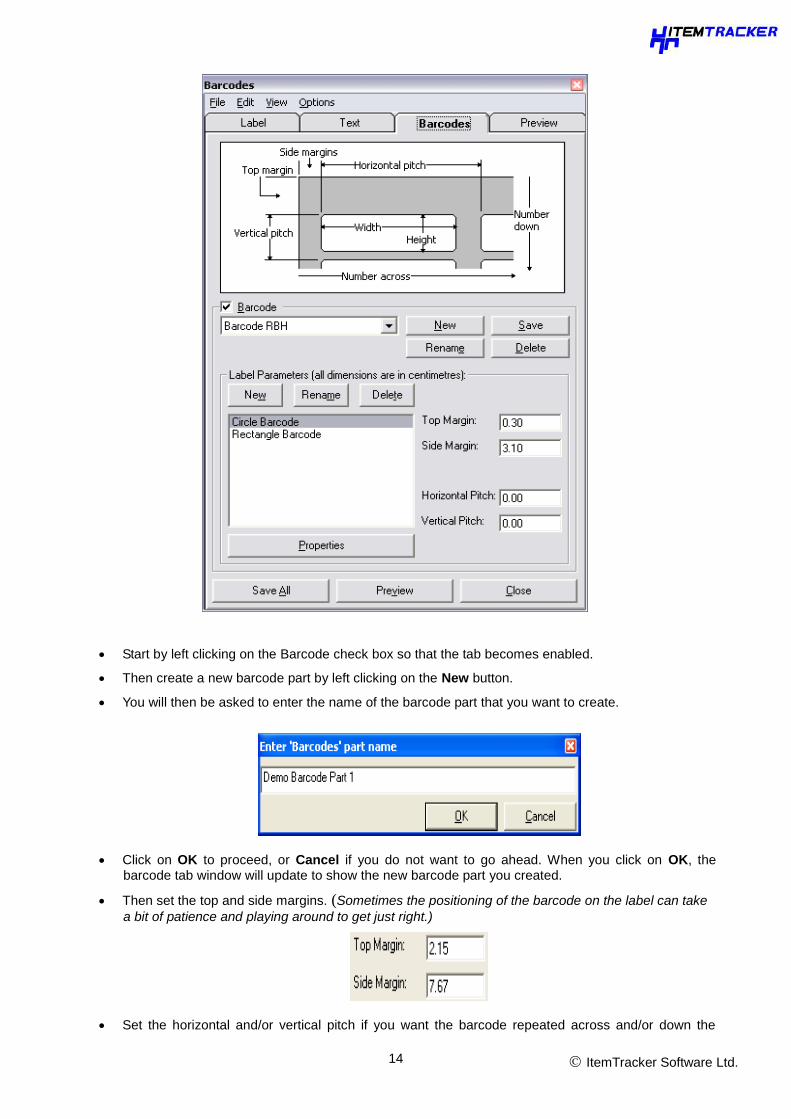
BARCODES TAB
Each label can have one or more barcode parts. A barcode part is a collection of barcode sub parts. Each barcode sub part is a single barcode symbology selected from a range of ones available.
Default barcode is Leading digit / ItemID
Note, leading digit:
0 = Owner barcode
1 = Sample barcode
2 = Storage Part Barcode
The leading digit needs to be present for the Scan & Highlight functionality to work
Can add any field to barcode message
ItemTracker Software Ltd. 14
Start by left clicking on the Barcode check box so that the tab becomes enabled.
Then create a new barcode part by left clicking on the New button.
You will then be asked to enter the name of the barcode part that you want to create.
Click on OK to proceed, or Cancel if you do not want to go ahead. When you click on OK, the barcode tab window will update to show the new barcode part you created.
Then set the top and side margins. (Sometimes the positioning of the barcode on the label can take
a bit of patience and playing around to get just right.)
Set the horizontal and/or vertical pitch if you want the barcode repeated across and/or down the
ItemTracker Software Ltd. 15
page. Setting this will only have an affect if the selected label is defined as being more than across and/or down.
After you have set these values, left click on the Save All button at the bottom of the window to save your changes.
You can then preview what you have done by left clicking on the Preview button, also at the bottom of the window.
ItemTracker Software Ltd. 16
Customer Requirement Printing labels from ItemTracker
Labels can be created from the Map, Items or Owners window, after selecting the item for which you want to print a bar code. You must select an item first, even if you just want to design labels.
ItemTracker Functionality
Start by first selecting an item.
If you don‟t first select an item, you will receive the following message.
To print labels from the Map window, select Tools > Barcoding > Print Labels > Sample Labels or Storage Labels.
Similarly, to create labels from the Items window, select Tools > Print Labels.
To create labels from the Owners window, select Tools > Print labels.
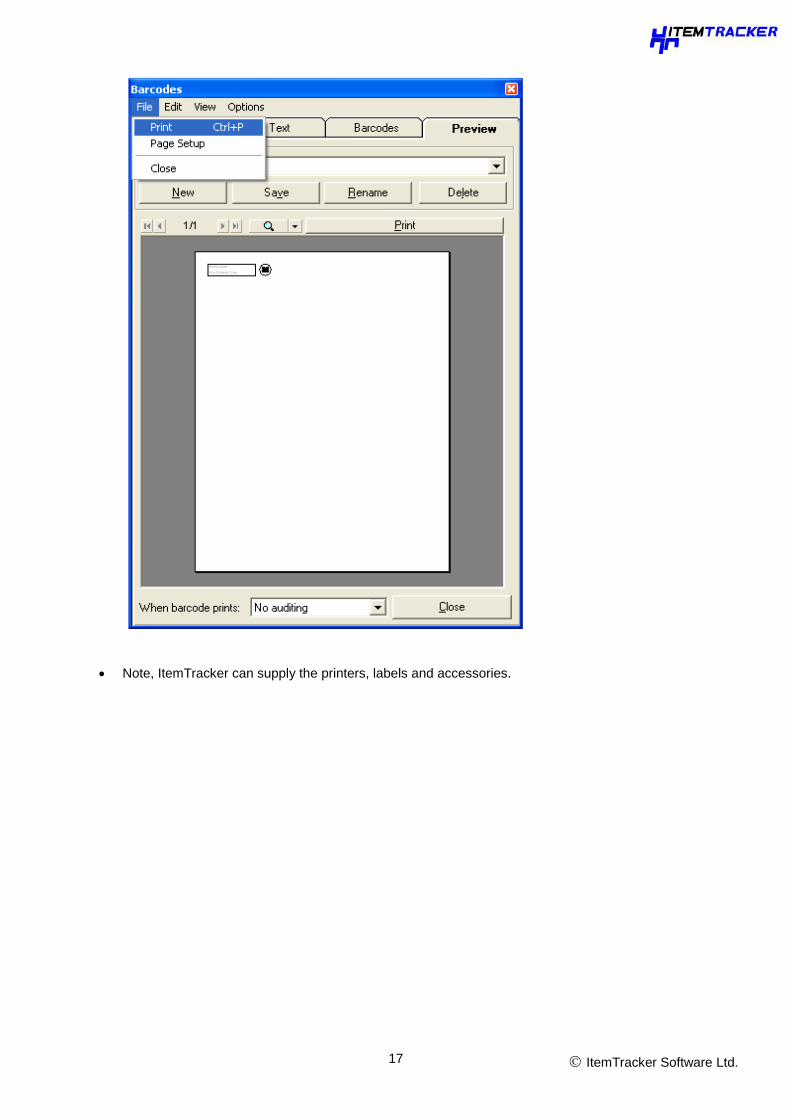
The Barcodes window will appear. This window is the same that appears when you select Tools > Print Labels for the Map, Items and Owners windows. See below
ItemTracker Software Ltd. 17
Note, ItemTracker can supply the printers, labels and accessories.
ItemTracker Software Ltd. 18
Customer Requirement Barcoding functionality in ItemTracker The Scan and Highlight menu option provides functionality to find and highlight a scanned item. To use this function, select Scan and Highlight from the Tools menu.
ItemTracker Functionality Can positively identify from Map window or Items window:
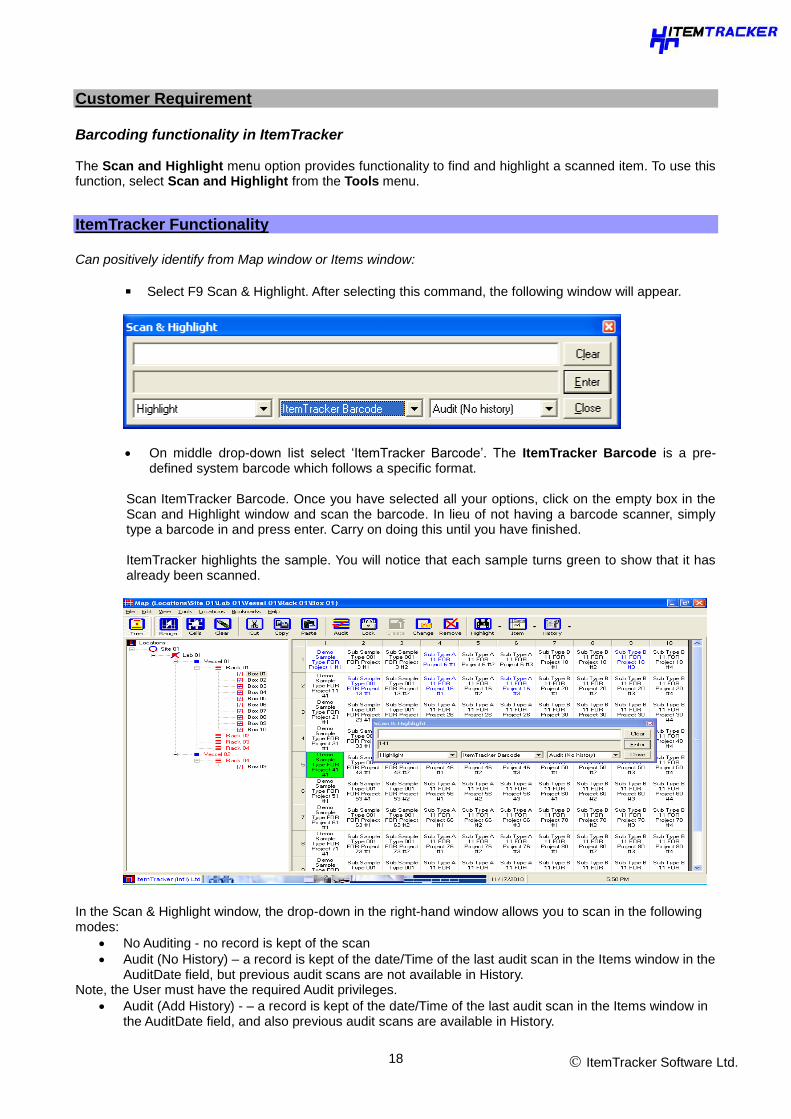
▪ Select F9 Scan & Highlight. After selecting this command, the following window will appear.
On middle drop-down list select „ItemTracker Barcode‟. The ItemTracker Barcode is a pre-defined system barcode which follows a specific format.
Scan ItemTracker Barcode. Once you have selected all your options, click on the empty box in the Scan and Highlight window and scan the barcode. In lieu of not having a barcode scanner, simply type a barcode in and press enter. Carry on doing this until you have finished. ItemTracker highlights the sample. You will notice that each sample turns green to show that it has already been scanned.
In the Scan & Highlight window, the drop-down in the right-hand window allows you to scan in the following modes:
No Auditing - no record is kept of the scan
Audit (No History) – a record is kept of the date/Time of the last audit scan in the Items window in the AuditDate field, but previous audit scans are not available in History.
Note, the User must have the required Audit privileges.
Audit (Add History) - – a record is kept of the date/Time of the last audit scan in the Items window in the AuditDate field, and also previous audit scans are available in History.
ItemTracker Software Ltd. 19
Note, the User must have the required Audit privileges.