
IronKey EMS On-Prem 7 - DataLocker.com · PASSWORD FOR THE SETUP DEVICE IF ... select the network...
14
Last Updated June 2017 IronKey™ EMS On-Prem 7.1 Quick Start Guide
Transcript of IronKey EMS On-Prem 7 - DataLocker.com · PASSWORD FOR THE SETUP DEVICE IF ... select the network...

Last Updated June 2017
IronKey™ EMS On-Prem 7.1Quick Start Guide

2
System RequirementsRequirement Description
Database Microsoft SQL Server 2005, Microsoft SQL Server 2008, or Microsoft SQL Server 2012, Microsoft SQL Server Express 2005, Microsoft SQL Server Express 2008, Microsoft SQL Server Express 2012
Note: Only the default database instance is sup-ported. IronKey EMS On-Prem does not support named instances.
Host system requirements in ESXi environment
vSphere ESXi version 5.0 or higher (the ESXi version must support the Guest OS CentOS v6.6—the OS on which IronKey EMS On-Prem is installed). See the VMware Compatibility Guide for more information.
Host machine must meet the minimum system requirements for this version in addition to mini-mum ESXi requirements provided by VMware. See VMware product documentation for more details: http://www.vmware.com
Note: You must have VMware vSphere ESXi already installed and set up on your host before you install IronKey EMS On-Prem. Information on installing ESXi is outside the scope of this guide, see VMware product documentation.
Ethernet physical network adapter
1Gb or faster
Memory 4GB physical RAMPhysical datastore space
70GB available space
Host system requirements in VMware Workstation 12 Player environ-mentVMware Workstation 12 Player (or higher)
Host machine must meet the minimum system requirements for this version in addition to minimum requirements provided by VMware. See VMware product documentation for more details: http://www.vmware.comNOTE: You must have VMware Workstation 12 Player already installed and set up on your host before you deploy IronKey EMS On-Prem. Informa-tion on installing VMware Workstation is outside the scope of this guide, see VMware product documentation.

3
Requirement Description
Operating system Windows Server 2008 or Windows Server 2012Ethernet physical network adapter
1Gb or faster
Memory 4GB physical RAMHard Disk 30GB free disk space required; 60GB recom-
mended

4

5
Installation WorksheetComplete this worksheet to speed up installation.
IRONKEY EMS ACCOUNT NUMBER (from Welcome Email)
DATABASE SERVER IP OR FQDN
DOWNLOAD LINK TO IRONKEY EMS ON-PREM SERVER OR PASSWORD FOR THE SETUP DEVICE IF YOU RECEIVED A SERVER KIT(from Welcome Email)
DATABASE PORT
CLI USERNAME (from Welcome Email)
DATABASE USERNAME & PASSWORD(required: db_owner privileges)
CLI PASSWORD (from Welcome Email)
DATABASE NAME (example: ent_server)
HOST NAME (to be assigned to IronKey EMS On-Prem)
SITE NAME FOR SSL CERTIFICATE(FQDN of server used on certificate)
DNS SERVER IP SSL CERTIFICATE FILE & CERTIFICATE CHAIN FILE (Save a backup copy of these files in a secure location)
STATIC IP ADDRESS (assigned to IronKey EMS On-Prem)
IP OR FQDN FOR SYSLOG SERVER (Optional)
SUBNET MASK (for IronKey EMS On-Prem)
PRIMARY SYSTEM ADMIN EMAIL AND USERNAME
DEFAULT GATEWAY IP (for IronKey EMS On-Prem)
SECONDARY SYSTEM ADMIN EMAIL AND USERNAME
NTP SERVER IP OR FQDN (optional)
SMTP SERVER IP OR FQDN(check if your SMTP required a password)

6
Before StartingTo speed up your installation, gather the following information and resources:
� Any required network (DNS, Gateway, IP assignment, SMTP, and NTP) information to set up a new machine in your data center.
� Database administration access for your Microsoft SQL Server—required to install an instance of the database.
� Access to the network, systems, and ports that the above components will require.
� An SSL website certificate for a valid public domain from an approved certificate authority (VeriSign, RSA Security Inc., Thawte, GoDaddy, Comodo, Entrust.net, GeoTrust, Valicert, Visa, BeTrusted, Aba.com, AddTrust, Baltimore, DST, GTE, GlobalSign, Sonera, TC TrustCenter)
� A host computer with network capability and sufficient configuration (disk, memory) required to support the software you will install (see the System Requirements section)
� The Welcome Email sent to you by Customer Service at DataLocker.
� IronKey EMS On-Prem software downloaded or received in the Server Kit.
This installation takes about an hour if all of the above items are ready.

7
Install IronKey EMS On-PremBefore installing the Server, give the IronKey_EMS_OnPrem_v71.bak file, located in the Utils folder of the server download (or on the Setup device if you received the Server Kit), to your database administrator to set up the database.
IronKey EMS On-Prem provides two options for installing the server:
» VMware vSphere ESXi environment» VMware Workstation 12 Player environment
Choose the option that corresponds to your operating environment.
Deploy IronKey EMS On-Prem in vSphere ESXi environment
Steps1 If you received IronKey EMS On-Prem as a download, go to step 3.
If you received the IronKey EMS On-Prem Server Kit, insert the Setup deviceinto the USB port of the host computer. If you do not see a prompt tounlock the device, in a file manager, go to My Computer and double-clickthe IronKey icon, then double-click IronKey.exe.
2 Enter the Setup device password, and then click the Unlock button. TheControl Panel opens. The password is the same as your account number,which you received in the Server Kit and in the Welcome Email.
3 Login to the VMware vSphere ESXi server using VMware vSphere ESXiClient. You will be asked for the IP address/name of the host as well as theUsername and Password.
4 In vSphere Client, click File, Deploy OVF Template.
Note: If you have multiple Resource Pools in your ESXi environment, choosethe Resource Pool to which you want to deploy the Server, and then clickFile, Deploy OVF Template. If you do not select a Resource Pool, you willbe prompted to do so later in the setup.
5 On the Deploy OVF Template screen, click Browse. Navigate to theIronKey_EMS_OnPrem OVA folder from the server download file(or on the Setup device if you received the Server Kit) and select theIronKey_EMS_OnPrem.ova file, then click Next.
6 Click Next after verifying the details of the IronKey EMS On-Prem virtualmachine template.
7 On the Name and Location screen, enter a virtual machine name that isunique to your ESXi inventory and click Next.
8 If prompted to select a Resource Pool, select it and click Next.

8
Steps9 Select the destination storage for the virtual machine files. This screen will
not display on ESXi servers with a single datastore. Click Next.
10 On the Disk Format screen, it is recommended that you choose the Thin Provision option to reduce the install time and to minimize disk space usage.
Click Next.11 On the Network Mapping screen, select the network that you want
IronKey EMS On-Prem to use from the Destination Networks list box. This screen will not display on ESXi servers with only one VM network. Click Next.
12 Verify the installation options and click to enable the Power on after deployment check box.
Click Finish. If you do not enable the Power on after deployment check box, you must start the VM manually after the deployment is completed.
13 An installation status dialog box will display to indicate how much time is left in the install process. Total time will vary depending on the ESXi CPU and the server disk throughput.
14 When the Deployment Completed Successfully dialog box displays, click Close.
Deploy IronKey EMS On-Prem to VMware Workstation 12 Player
Steps1 If you received IronKey EMS On-Prem Server as a download, go to step 3.
If you received the IronKey EMS On-Prem Server Kit, insert the Setup device into the USB port of the host computer. If you do not see a prompt to unlock the device, in a file manager, go to My Computer and double-click the IronKey icon, then double-click IronKey.exe.
2 Enter the Setup device password, and then click the Unlock button. The Control Panel opens. The password is the same as your account number, which you received in the Server Kit and in the Welcome Email.
3 Start VMware Workstation Player. On the Welcome screen, select Open a Virtual Machine.

9
Steps4 Navigate to the IronKey_EMS_OnPrem OVA folder of the IronKey EMS
On-Prem server download file (or on the Setup device if you received the Server Kit), select the IronKey_EMS_OnPrem.ova file, and then click Open.
5 On the Import Virtual Machine screen, do the following: • Type a name for the IronKey EMS On-Prem virtual machine, for example
“IronKey_EMS”.• Provide a path to the location where the VM will be stored or click
Browse to navigate to the storage location. Click Import. By default the VM is powered off after it’s imported.
6 To start the IronKey EMS On-Prem VM, select it from the list and click Play virtual machine.
TIP: You can also start the Server by right-clicking the Server and choosing Power On or double-clicking the Server.NOTE: You may see a warning about binary translation incompatibility if the “Virtualization Technology” setting is disabled in the BIOS of the host system. This is because IronKey EMS On-Prem uses a 32-bit operating system and this feature is not supported with a 32-bit OS. To avoid seeing the warning when you start the Server, do one of the following:• Click the Do not show this hint again check box if you do not require
the Virtualization Technology setting to be enabled in the BIOS. Then click OK.
• Enable the Virtualization Technology setting in the BIOS. The warning will not display the next time you start IronKey EMS On-Prem.
7 Select IronKey EMS On-Prem and press ENTER to start the server.
8 At the IronKey EMS Command Line Interface (CLI) for IronKey EMS On-Prem, log in using the CLI username and password provided in your Welcome Email.
You will be required to change your login password. The password requirements are:• 10 character minimum• 1 uppercase letter• 1 lowercase letter• 1 digit• 1 special character

10
Configure IronKey EMS On-Prem
Steps1 Start the IronKey EMS On-Prem VM if not already running.
» ESXi environment: Right-click the Server and choose Power, Power On.
» VMware Workstation 12 Player environment: Right-click the Server and choose Power On.
2 Log in to the Command Line Interface (CLI) shell using the CLI user and CLI password from your Welcome Email. The first time you log in, you will be required to change the password.
3 Set the host name:network hostname myhost.domain.com
4 Configure a static IP address:network interface static <static IP> <IP mask> <Gateway>
5 Add the DNS name server:network dns add <DNS server IP>
6 Add the NTP server:sysconf ntp addserver <NTP server IP or FQDN>
If no NTP server is available, set the time (GMT) using the sysconf time command. IronKey EMS On-Prem will show the correct time once you set the date or add the NTP server.
7 Configure the SMTP server:sysconf smtp set <SMTP server IP or hostname:port>
Answer Y or N to the authentication question.Does the relayhost <SMTP_server> require authentication (y/n)?
8 Configure the database server information:application database configure <DB server IP or hostname> <port ID> <DB username> <DB password> mssql <Database Name>
9 Set the URL of the server as it will be accessed by devices:application siteName set <site name>
10 Concatenate your private key and your SSL certificate into a single file, and then name the file: server.crt Name the certificate chain file: issuer.crt Use a Secure Copy (SCP) utility (e.g. command-line PSCP or GUI-based WinSCP) to copy the files to: /upload
11 Install the certificates:application certificate install

11
Steps12 Enable HTTPS:
application SSL enable
13 Start the application server:service start appserver
Set up your IronKey EMS accountSteps1 Go to: https://<application siteName>/enterprisesetup
(where <application siteName> is the value you entered in step 10 of the “Configure IronKey EMS On-Prem” procedure)
From your Welcome email, copy the 10-digit account number (in the format XXXXX-XXXXX) and paste it into the IronKey EMS Account Number box.
Click Enter.
2 In the License Request page, copy the string from the text box on the left and email it to: [email protected]
Check your email for a message from Customer Service. This may take 24-48 hours to complete.
3 On the License Request page, copy the license key from the Customer Service email and paste it into the text box on the right.
Click Enter.
4 Select the check box to confirm that you are authorized to set up your organization’s IronKey EMS account.
Click Continue.
5 On the Create an online account for the first and second System Administrators page, enter an email address and the First and Last name of the first and second System Administrator.
Click Continue.
6 On the Create the Default User Policy page, click Create Policy to open the policy setup.
NOTE: The Default User Policy will be applied to the 1st and 2nd System Admin when they activate their online account.
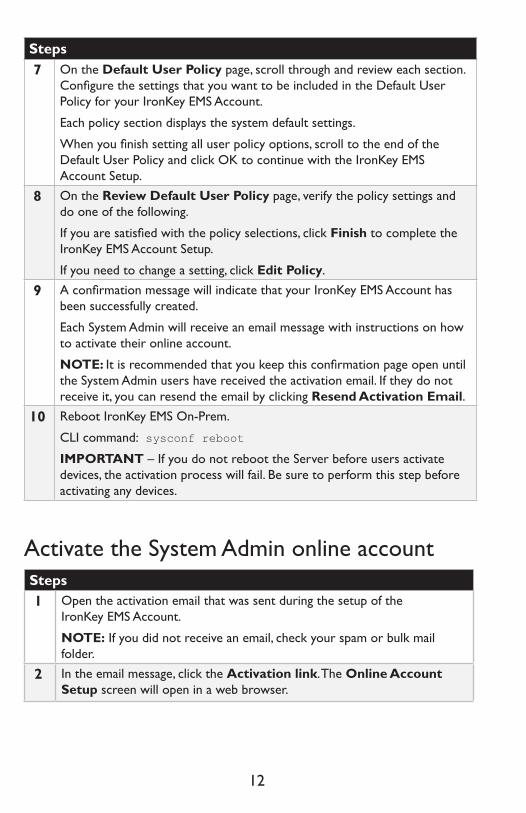
12
Steps7 On the Default User Policy page, scroll through and review each section.
Configure the settings that you want to be included in the Default User Policy for your IronKey EMS Account.
Each policy section displays the system default settings.
When you finish setting all user policy options, scroll to the end of the Default User Policy and click OK to continue with the IronKey EMS Account Setup.
8 On the Review Default User Policy page, verify the policy settings and do one of the following.
If you are satisfied with the policy selections, click Finish to complete the IronKey EMS Account Setup.
If you need to change a setting, click Edit Policy.
9 A confirmation message will indicate that your IronKey EMS Account has been successfully created.
Each System Admin will receive an email message with instructions on how to activate their online account.
NOTE: It is recommended that you keep this confirmation page open until the System Admin users have received the activation email. If they do not receive it, you can resend the email by clicking Resend Activation Email.
10 Reboot IronKey EMS On-Prem.
CLI command: sysconf reboot
IMPORTANT – If you do not reboot the Server before users activate devices, the activation process will fail. Be sure to perform this step before activating any devices.
Activate the System Admin online accountSteps1 Open the activation email that was sent during the setup of the
IronKey EMS Account.
NOTE: If you did not receive an email, check your spam or bulk mail folder.
2 In the email message, click the Activation link. The Online Account Setup screen will open in a web browser.

13
Steps3 On the Online Account Setup screen, do the following:
• In the Username text box, create a user name for your account.• In the Password text box, create an account password and confirm
the password. Passwords are case-sensitive and must comply with the password policy defined during the IronKey EMS Account setup.
• Select a question from the Secret Question list box or create your own secret question.
• In the Answer to Secret Question text box, provide the response to the secret question. The secret question will be used to verify your identity if you have to reset your password.
Click Create Account.
A confirmation message will display to indicate that you have successfully created your online account.
4 To log in to the management console, enter your IronKey EMS credentials (Username and Password) and click Log in.
5 On the Access Code page, follow the instructions onscreen to retrieve and paste the Access Code in the field provided, and then click the Submit button.
A Welcome page will appear with information and instructions on next steps.
6 If you are the first System Admin to activate your online account and access the Admin Console, the Welcome page will prompt you to create the Default Device Policy. Click the Create Default Device Policy button to continue.
NOTE: If you are the second System Admin to activate your online account, you will not be prompted to create the Default Device Policy. The management console will appear as soon as you close the Welcome page.
7 On the Default Device Policy page, scroll through and review each section. Configure the settings and applications that you want to be included in the Default Device Policy for your IronKey EMS Account.
Each policy section displays the system default settings and lists the devices to which these settings apply.
IMPORTANT: In the “Password Policy” section, under “General Password Settings”, configure the “Max Failed Unlock Attempts” setting with a balance of security and end-user convenience in mind. If the user exceeds the maximum, the device will “self-destruct” and all data will be permanently lost. The drive can no longer be used. D300M and Sentry EMS devices do not self-destruct but will reset to a factory state, erasing all onboard data.

14
Steps8 When you finish setting all device policy options, scroll to the end of the
Default Device Policy and click Save.
9 The management console will open in your web browser. You can now start adding users and managing your IronKey EMS account.
This product provides warranty and compliance agreements as noted at http://support.datalocker.com.
NOTE: DataLocker is not liable for technical or editorial errors and/or omissions contained herein; nor for incidental or consequential damagesresulting from the furnishing or use of this material. The information provided herein is subject to change without notice.The information contained in this document represents the current view of DataLocker on the issue discussed as of the date of publication.DataLockercannot guarantee the accuracy of any information presented after the date of publication. This document is for information purposes only.DataLocker makes no warranties, expressed or implied, in this document. DataLocker, and the DataLocker logo are trademarks of DataLockerInc. and its subsidiaries. All other trademarks are the property of their respective owners. ™ is a registered trade mark of KingstonTechnologies, used under permission of Kingston Technologies. All rights reserved..© 2017 DataLocker Inc.. All rights reserved.IronKey EMS On-Prem Server v7.1.0.0 software – June 2017. IK-EMS-QSG01-6.0
See the IronKey EMS On-Prem Setup Guide and the AdminGuide for more information.


![Ironkey EMS On-Prem Setup Guide · [ ] EMS License Request created and sent to DataLocker Customer Service [ ] License Key from DataLocker Customer Service entered in On-Prem [ ]](https://static.fdocuments.net/doc/165x107/5f0a10857e708231d429d82b/ironkey-ems-on-prem-setup-guide-ems-license-request-created-and-sent-to-datalocker.jpg)


