
IRIS Payroll
14
1 IRIS. Look forward IRIS Payroll Guide to setting up IRIS myePayWindow October 2020
Transcript of IRIS Payroll

1
IRIS. Look forward
IRIS Payroll
Guide to setting up IRIS
myePayWindow
October 2020

2
IRIS. Look forward
Contents
Dear Customer, .............................................................................................................................. 3
What is IRIS myePayWindow? ....................................................................................................... 4
What will IRIS myePayWindow do for me? .......................................................................................... 4
Steps to setting up and using IRIS myePayWindow ................................................................... 5
How to setup an IRIS myePayWindow account .......................................................................... 6
Payroll Department Account ................................................................................................................. 6
Registration .......................................................................................................................................................... 6
How to Publish to myePayWindow .................................................................................................................... 8
How the Payroll Department views the published payslips/P60s/P45s ................................. 10
How to create an IRIS myePayWindow Employer User Account ............................................. 11
To add an Employer User:.................................................................................................................... 11
Employer User Activation ..................................................................................................................... 12
Employee User Activation .................................................................................................................... 12
User - Optional Security ....................................................................................................................... 13
Further Guidance ......................................................................................................................... 13
3
IRIS. Look forward
Dear Customer,
Welcome to your guide to setting up and using the myePayWindow.
The Guide contains instructions on setting up the cloud portal for the following elements:
1. myePayWindow Payslips, P60s, P45s and Pension letters

4
IRIS. Look forward
What is IRIS myePayWindow?
IRIS myePayWindow is a payroll self-service portal, used to securely exchange documents and
deliver payroll information to employers and employees, every single payroll cycle. Employers
and employees can view the published documents, in a secure online portal, using their own
separate login details.
There are three different myePayWindow accounts available:
▪ Payroll Department
▪ Employer
▪ Employee
What will IRIS myePayWindow do for me?
▪ Process and distribute payslips, Automatic Enrolment communications, P45s and P60s
simply, securely, and efficiently
▪ Allows employees to access payslips, P45s, P60s and pension letters from any location
and device
▪ Allows you to customise your client/employee portal to your corporate colours and logos
so clients recognise your branding, not your software vendor
▪ Quick and easy to setup – invitation emails sent in bulk, allowing users to register from
their preferred device
▪ Increases Automatic Enrolment administration efficiency
▪ Reduces carbon footprint, demonstrating an environmentally friendly solution
▪ Reduces communication distribution costs including printing, postage, and processing
▪ Fully secure online portal, complete with Industry-standard SSL, 2-factor authentication,
and encryption during transit
▪ GDPR compliant
▪ Employees have 24/7 access to current and historic communications
▪ Free IOS, Android and Windows Phone apps available for employees to securely view
their own pension communications on tablets or smartphones
Note: Every company needs to have a Payroll Department User. This is in effect the
‘admin user’, who has full access and can view all payroll companies, as well as
configuring privileges to suit all other users.
Once you have created the Payroll Department user you can publish from payroll.

5
IRIS. Look forward
Steps to setting up and using IRIS myePayWindow
Create your IRIS myePayWindow account
Check employees have valid email addresses
Enter your IRIS myePayWindow login details in payroll, or when prompted
(at first attempt to publish)
Publish documentation from within payroll
Use the IRIS myePayWindow portal to manage communications to your
employees

6
IRIS. Look forward
How to setup an IRIS myePayWindow account
Payroll Department Account
The Payroll Department account is where the ‘main user’ can see and add clients/employers and
their employees. They can also create additional staff users, along with their access privileges
and client groups.
Registration
1. Once you have signed up for the IRIS myePayWindow Payroll Department account, you will
receive an email invitation. Click the link to the portal to start the registration process
2. Go through the on-screen prompts to verify your identity, give consent and setup the
account
3. Enter all details accurately including date of birth and secret key. The first user will receive
authentication details from IRIS, with every subsequent user being created by a payroll
department user (who is responsible for sharing the information with invited users)
4. You can then set up your Username and Password
The username is a minimum of 6 characters
The password is a minimum of 8 characters – 1 upper case, 1 lower case, 1 special and 1
numeric

7
IRIS. Look forward
5. Click Register
6. An Account Activation email will be sent containing an activation link, if this link is not used
within 24 hours the registration will need to be restarted from the invitation email link
Click on the activation link, this will take you to the login screen where you can log in using
your username and password to complete the registration process
8
IRIS. Look forward
How to Publish to myePayWindow
1. Log into IRIS Payroll. From the Company menu select Company Details | Open IDs.
From the myePayWindow section, select Use myePayWindow
(Please Note: once you have done this, you will no longer be able to use IRIS
OpenPayslips)
2. When you are ready to Publish, (in this example we will use payslips) go to Reports, select
the required Pay Frequency and then choose Print Payslips
3. Highlight the payslip output and click Select (you can choose any payslip for this function
as myePayWindow will use its own payslip template). Please Note: bespoke payslip
templates are not available in myePayWindow
4. The payslips will be previewed to screen, from the myePayWindow section on the toolbar,
click Publish
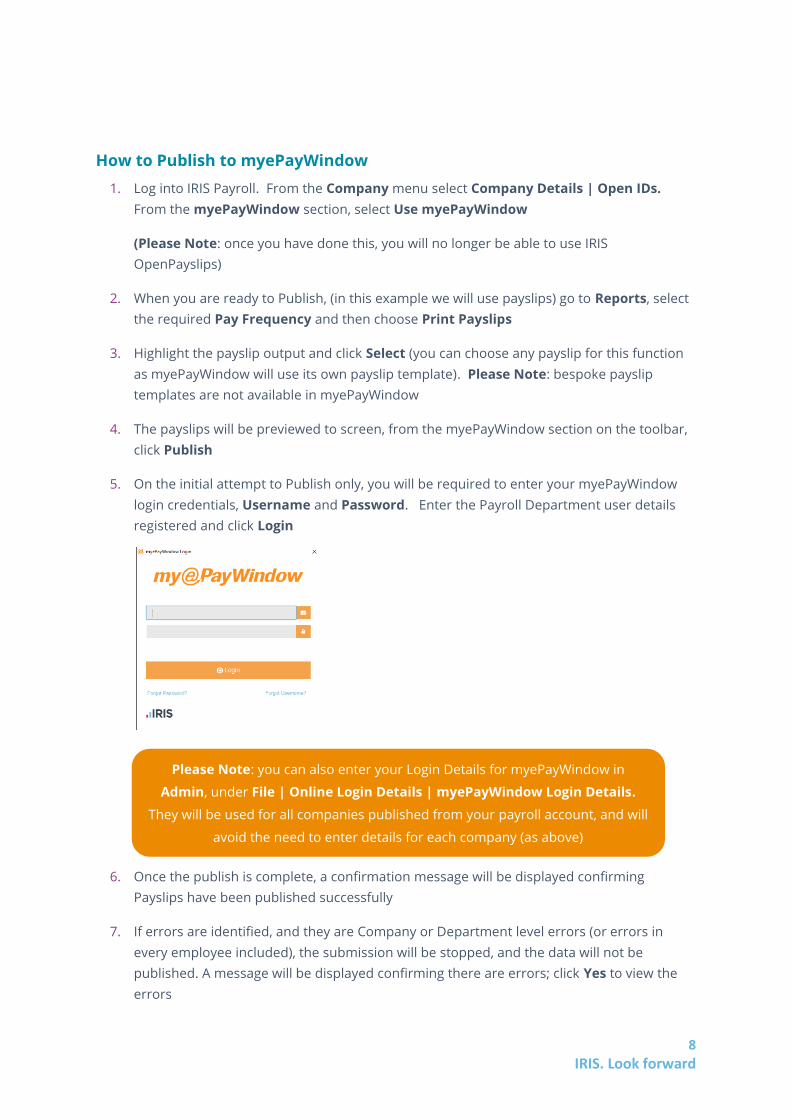
5. On the initial attempt to Publish only, you will be required to enter your myePayWindow
login credentials, Username and Password. Enter the Payroll Department user details
registered and click Login
6. Once the publish is complete, a confirmation message will be displayed confirming
Payslips have been published successfully
7. If errors are identified, and they are Company or Department level errors (or errors in
every employee included), the submission will be stopped, and the data will not be
published. A message will be displayed confirming there are errors; click Yes to view the
errors
Please Note: you can also enter your Login Details for myePayWindow in
Admin, under File | Online Login Details | myePayWindow Login Details.
They will be used for all companies published from your payroll account, and will
avoid the need to enter details for each company (as above)

9
IRIS. Look forward
8. If errors are relating to some employees, a message will be displayed at the end of the
publishing process. Again, click Yes to view the errors and a myePayWindow Errors screen
will be displayed and will show the Error Source and Error Description
9. Error Source will show:
▪ The Company name if it is a company level error
▪ The Department name if it is a department level error, or
▪ The Employee number if it is an employee level error
10. Once the errors have been resolved, you can republish
11. Once submission is complete, a success message will be displayed
12. The publish process will create the employer and employees with the relevant published
documents
13. Log into myePayWindow to set up an Employer user account. As already mentioned, the
employer (company) has been created during the publish from payroll
14. Employees are invited automatically (unless you have deselected this default option in
myePayWindow). Employee accounts are generated automatically when documents are
published, which will include recent leavers. If auto invites is not activated, you will need
to send the invites out
15. Employees can then setup their accounts to view/download their published
documentation
16. Employer Users must be invited manually in myePayWindow once the publish process is
complete
Please Note: if you do not Publish from payroll (as in the steps above) on your
first login, there will be no Employer information in MyePayWindow

10
IRIS. Look forward
How the Payroll Department views the published
payslips/P60s/P45s
To view the published payslips/pension letters/P60s/P45s:
1. Go to the myePayWindow website at https://www.myepaywindow.com/ and log in with
your registered username and password
2. Select Employers and choose the relevant Employer
3. Choose the document type from ePayslips, Pensions, P60 or P45, by default this will be
ePayslips
4. Select the required date and click on the view icon
5. Choose an employee and click on the + sign to expand the individual
6. For example, click on the + sign, this will give you the option to view or download
7. Click View to display the details on screen
8. You can then use the Previous or Next buttons to scroll through the documents – in this
example, the payslips

11
IRIS. Look forward
How to create an IRIS myePayWindow Employer User
Account
The Employer User Account is where a client/employer can see all the employee documents and
data published, subject to the privileges setup by the Payroll Department User.
To add an Employer User:
1. In myePayWindow, from the side menu select Employers
2. Click on the relevant Name
3. Select Administration
4. Then Add User
5. Enter the details for the new user – by default the Privileges will be All Employers – Full
Access. Highlight All Employers – Full Access and click Add
6. From the Administration | Users tab, you can see the new user. Click on the name to
view Notifications, My Settings, Edit, Invite/Reinvite or Delete. Select Invite/Re-invite
to send the invitation to the new user
7. A confirmation message will be displayed asking if you are sure, click Invite. The Status
for the user will change to INVITED
Please Note: Payroll Department User enters the DOB and creates a Secret Key.
This information must be shared with the Employer user so they can use it in the
setup process. These details must be entered accurately as they are validated

12
IRIS. Look forward
Employer User Activation
1. After the Payroll Department User has
followed the steps above to create an
Employer User, the new user will receive an
Employer Invitation email
2. From the email, select the link Click here to
Register
3. A myePayWindow will open where you
need to enter your details to verify your
identity (the Secret Key is created by the
Payroll Department User who will also provide the DOB)
4. Enter the details and click Verify your identity
5. This will open the Give consent tab. Read the Data Protection, Terms and Conditions and
Privacy Policies and when you are happy, click I agree
6. From the Set-up account tab, enter the Username and Password you would like. You will
need to enter the Password again in the Confirm Password field
7. Click Register
8. A further email will be received with an account activation link. This link is valid for 24
hours, if it is not used within 24 hours, the registration will need to be restarted from the
invitation email link. Select the link to activate your account
9. Login into myePayWindow with the Username and Password you created. This will open
myePayWindow on the Employer Dashboard
Employee User Activation
When the initial Publish process takes place, all employees with a valid email address within
Employee details will receive a myePayWindow invitation.
The employee has 20 days to complete the registration, if this time limit lapses a new invitation
will need to be sent
Please Note: Automatic Invitation is the default setting and invites all employee
users, this can be disabled in myePayWindow under Administration | Details by
deselecting Enable Automatic Invitation
Please Note: Only strong passwords are allowed. These must include at least
one capital, one lower case, one number and one special character, and must
have between 8 and 20 characters

13
IRIS. Look forward
User - Optional Security
To enhance your security, 2 forms of optional user security can be used in addition to the
username and password configured.
▪ 2 step authentication (2SA) – this requires a memorable word to be setup. The user is
then required to enter 2 random characters from this word each time they log-in to gain
access to their account
▪ 2 factor authentication (2FA) – this requires a smartphone ‘Authenticator App’. Each time
a user logs in, they will additionally need to enter a code generated by the authenticator
app to gain access to their account
The additional authentication can be set up by the individual user under the My Settings/My
Account pages. Use the drop-down menu to choose either 2SA or 2FA and click Save.
If you enforce 2SA for your users, they will be asked to create a memorable word, this can only
contain letters and digits and can be between 6 and 12 characters.
The memorable word can be reset by click on the ‘Forgot Memorable Word’ link.
For further information on 2SA and 2FA, please see the Employer Portal User Guide.
Further Guidance
There is a comprehensive guide to the myePayWindow Employer Portal and a myePayWindow
Employee Guide, these can be found here:
MyePayWindow Employer Portal Guide
MyePayWindow Employee Guide
Note: if you enter the incorrect information, after 3 attempts the account will
be locked. You need to wait an hour before the user can re-enter the
requested characters from the memorable word or contact their
Bureau/Employer to unlock the account

14
IRIS. Look forward
Useful numbers
HMRC online service helpdesk HMRC employer helpline
Tel: 0300 200 3600
Fax: 0844 366 7828
Email: [email protected]
Tel: 0300 200 3200
Tel: 0300 200 3211 (new business)
Contact Sales (including stationery sales)
For IRIS Payrolls For Earnie Payrolls For IRIS Payroll Professional
Tel: 0344 815 5656
Email: [email protected]
Tel: 0344 815 5676
Email: [email protected]
Tel: 0345 057 3708
Email: [email protected]
Contact Support
Your Product Phone E-mail
IRIS PAYE-Master 0344 815 5661 [email protected]
IRIS Payroll Business 0344 815 5661 [email protected]
IRIS Bureau Payroll 0344 815 5661 [email protected]
IRIS GP Payroll 0344 815 5681 [email protected]
IRIS GP Accounts 0344 815 5681 [email protected]
Earnie or Earnie IQ 0344 815 5671 [email protected]
IRIS Payroll Professional (formerly Star) 01273 715300 [email protected]
IRIS is a trademark.
© IRIS Software Group Ltd 11/2019.
All rights reserved.