iPhone 6S Display Assembly Replacementodrepairservices.com/wp/PDF/iPhone6SFDA.pdf · cross-check by...
16
iPhone 6S Full Display Assembly Replacement Werx Parts www.werxparts.com Page 1 of 16 iPhone 6S Full Display Assembly Replacement INTRODUCTION Use this guide along with the Werx Repair Mat to replace the cracked or broken screen on your iPhone 6S. Follow Werx Repair Mat Steps 1,2,5 to disassemble. Reverse steps for re-assembly. Use this guide to strip and replace your iPhone 6S front panel. It will show you how to remove the home button, front-facing camera and sensor assembly, LCD shield plate, and home button ribbon cable. TOOLS: IMPORTANT Take your time! The repair takes about 20-30 minutes. Remember that you will be handling fragile parts, so be gentle! Most screws are different sizes so keep them organized. Werx Repair Mat
-
Upload
duongxuyen -
Category
Documents
-
view
216 -
download
0
Transcript of iPhone 6S Display Assembly Replacementodrepairservices.com/wp/PDF/iPhone6SFDA.pdf · cross-check by...
iPhone6SFullDisplayAssemblyReplacement
WerxParts www.werxparts.com Page1of16
iPhone 6S Full Display Assembly Replacement
INTRODUCTION Use this guide along with the Werx Repair Mat to replace the cracked or broken screen on your iPhone 6S. Follow Werx Repair Mat Steps 1,2,5 to disassemble. Reverse steps for re-assembly. Use this guide to strip and replace your iPhone 6S front panel. It will show you how to remove the home button, front-facing camera and sensor assembly, LCD shield plate, and home button ribbon cable. TOOLS: IMPORTANT Take your time! The repair takes about 20-30 minutes.
Remember that you will be handling fragile parts, so be gentle!
Most screws are different sizes so keep them organized.
Werx Repair Mat
iPhone6SFullDisplayAssemblyReplacement
WerxParts www.werxparts.com Page2of16
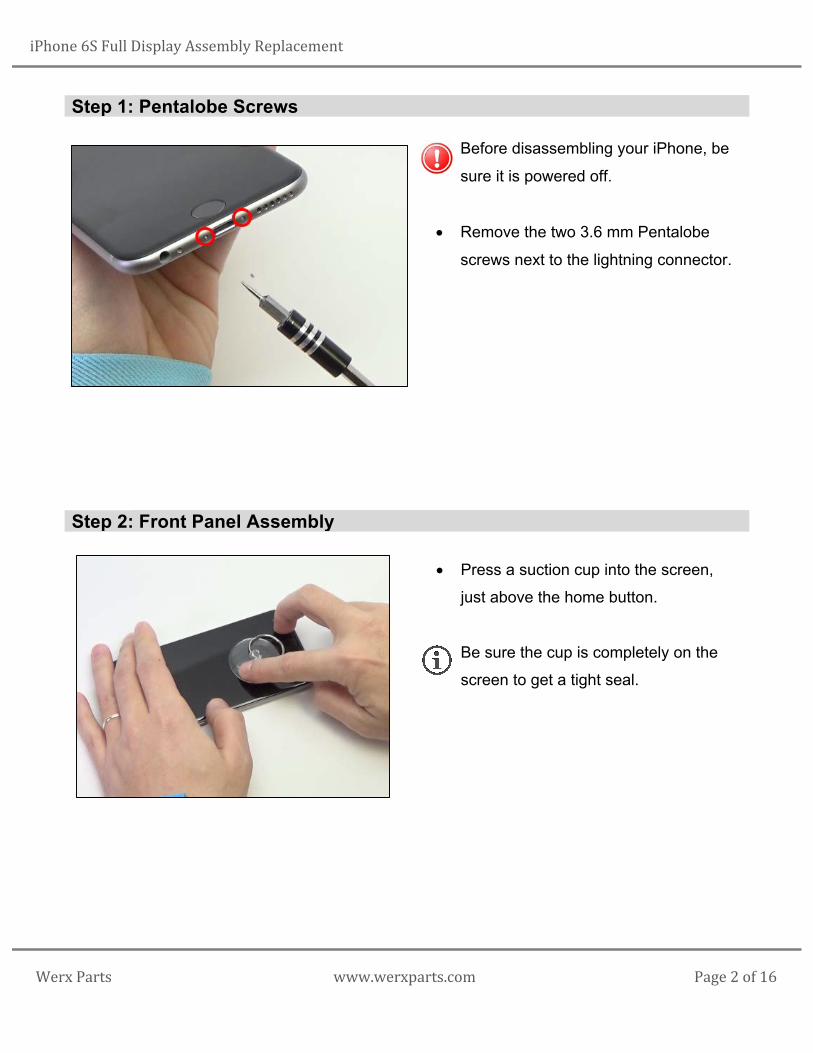
Step 1: Pentalobe Screws
• Before disassembling your iPhone, be
sure it is powered off.
• Remove the two 3.6 mm Pentalobe
screws next to the lightning connector.
Step 2: Front Panel Assembly
• Press a suction cup into the screen,
just above the home button.
Be sure the cup is completely on the
screen to get a tight seal.
iPhone6SFullDisplayAssemblyReplacement
WerxParts www.werxparts.com Page3of16
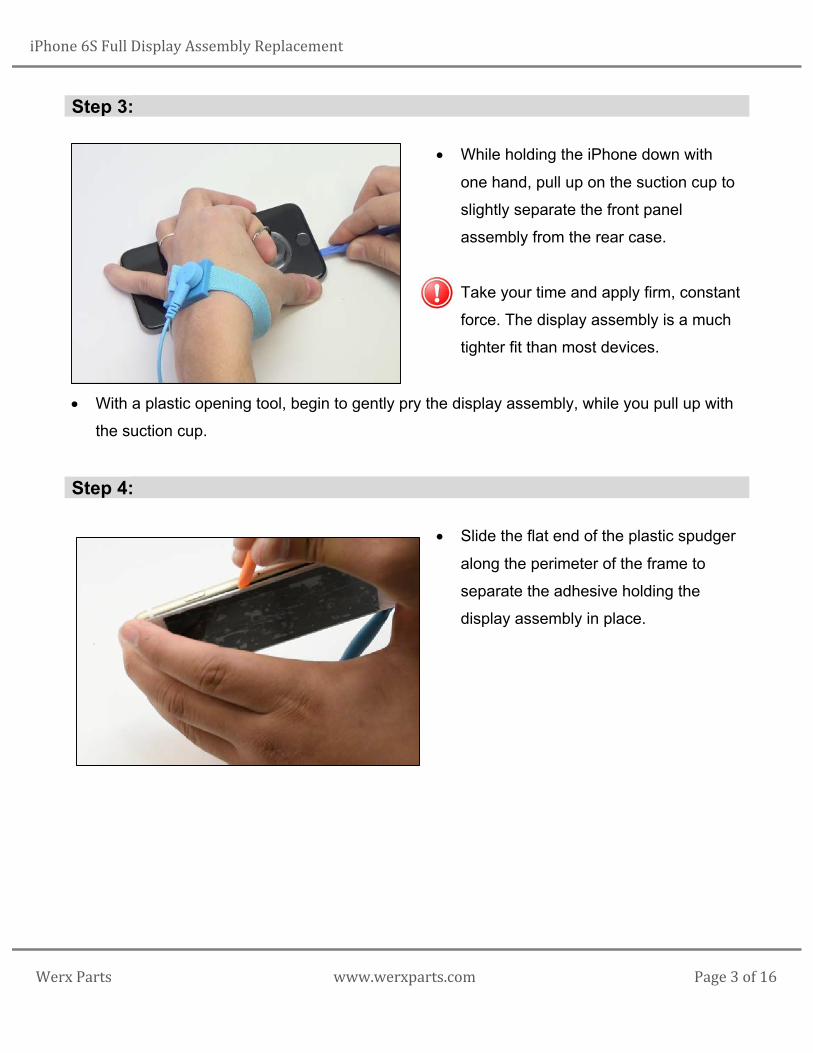
Step 3:
• While holding the iPhone down with
one hand, pull up on the suction cup to
slightly separate the front panel
assembly from the rear case.
Take your time and apply firm, constant
force. The display assembly is a much
tighter fit than most devices.
• With a plastic opening tool, begin to gently pry the display assembly, while you pull up with
the suction cup.
Step 4:
• Slide the flat end of the plastic spudger
along the perimeter of the frame to
separate the adhesive holding the
display assembly in place.
iPhone6SFullDisplayAssemblyReplacement
WerxParts www.werxparts.com Page4of16
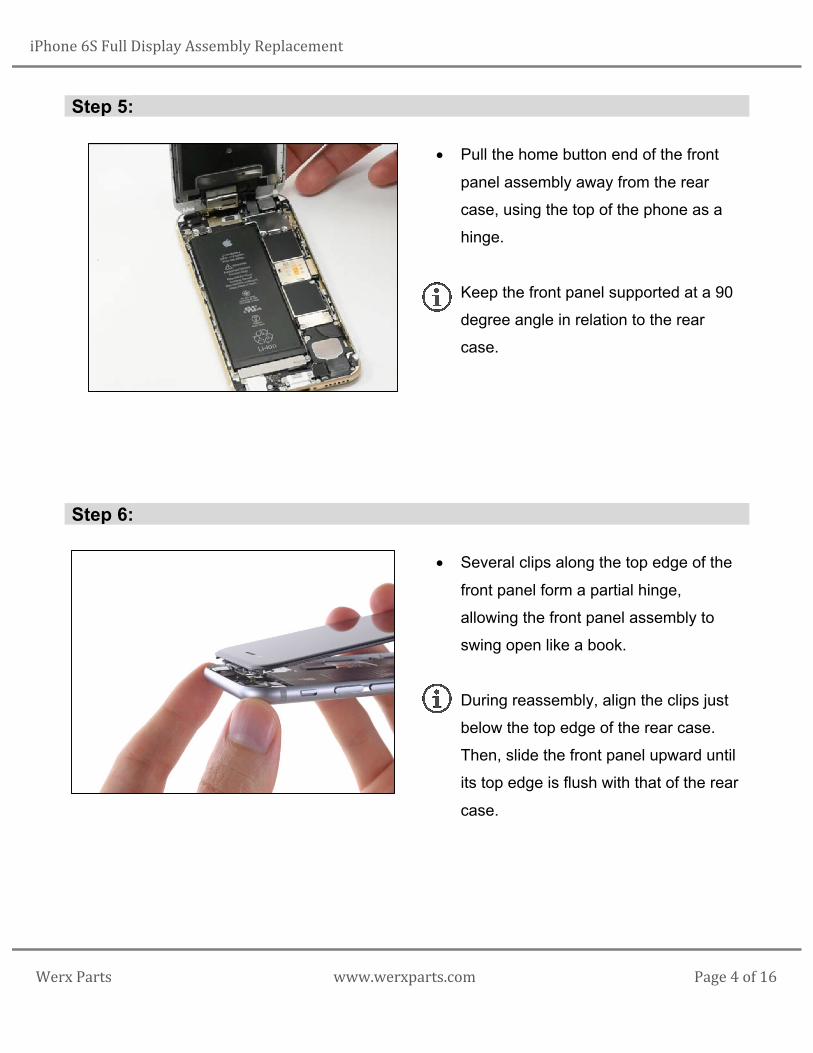
Step 5:
• Pull the home button end of the front
panel assembly away from the rear
case, using the top of the phone as a
hinge.
Keep the front panel supported at a 90
degree angle in relation to the rear
case.
Step 6:
• Several clips along the top edge of the
front panel form a partial hinge,
allowing the front panel assembly to
swing open like a book.
During reassembly, align the clips just
below the top edge of the rear case.
Then, slide the front panel upward until
its top edge is flush with that of the rear
case.
iPhone6SFullDisplayAssemblyReplacement
WerxParts www.werxparts.com Page5of16
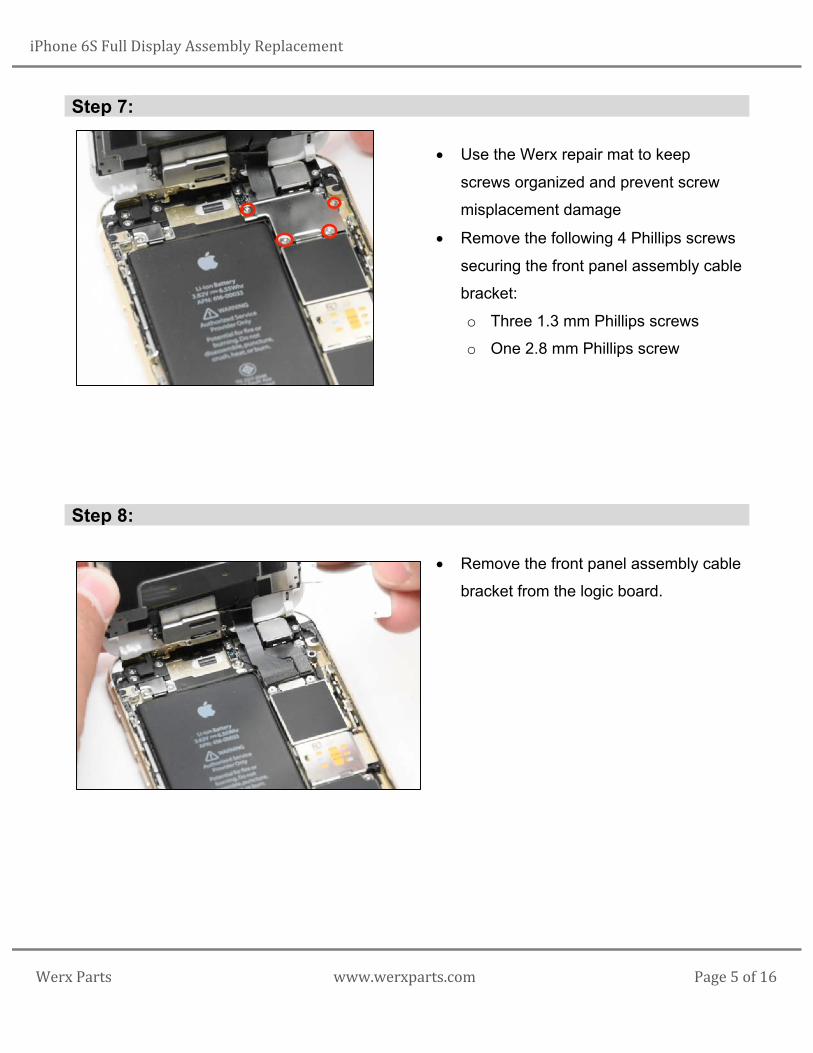
Step 7:
• Use the Werx repair mat to keep
screws organized and prevent screw
misplacement damage
• Remove the following 4 Phillips screws
securing the front panel assembly cable
bracket:
o Three 1.3 mm Phillips screws
o One 2.8 mm Phillips screw
Step 8:
• Remove the front panel assembly cable
bracket from the logic board.
iPhone6SFullDisplayAssemblyReplacement
WerxParts www.werxparts.com Page6of16
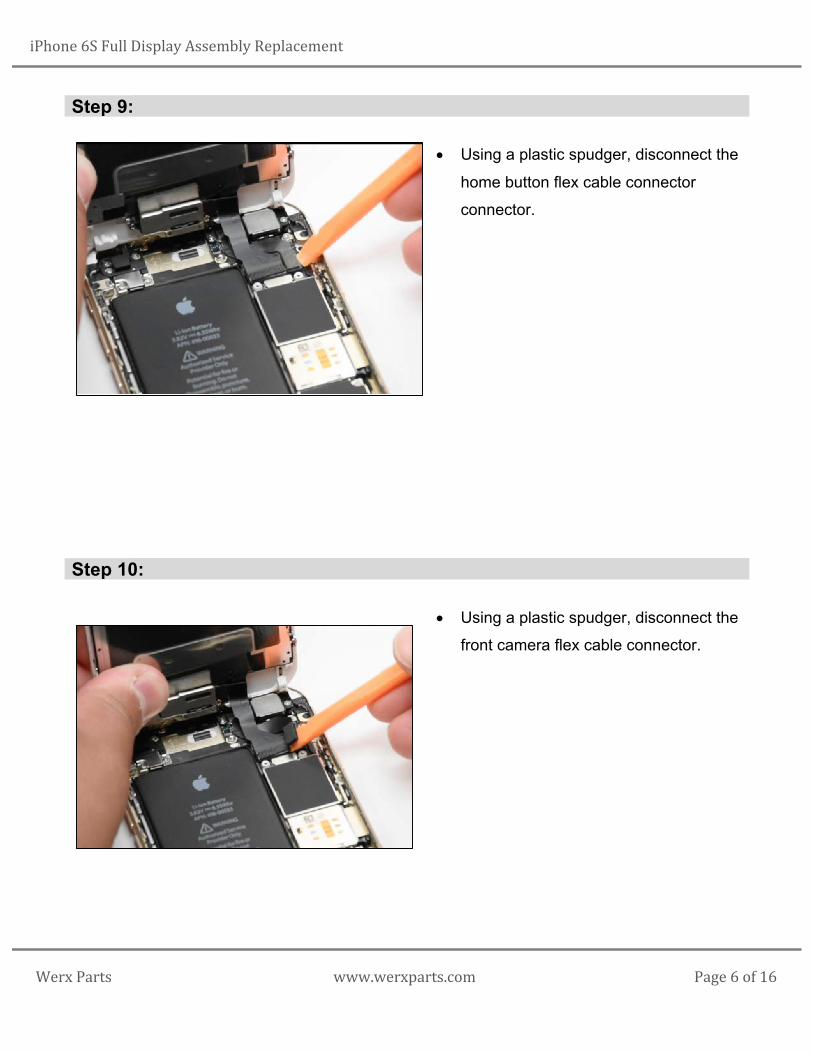
Step 9:
• Using a plastic spudger, disconnect the
home button flex cable connector
connector.
Step 10:
• Using a plastic spudger, disconnect the
front camera flex cable connector.
iPhone6SFullDisplayAssemblyReplacement
WerxParts www.werxparts.com Page7of16
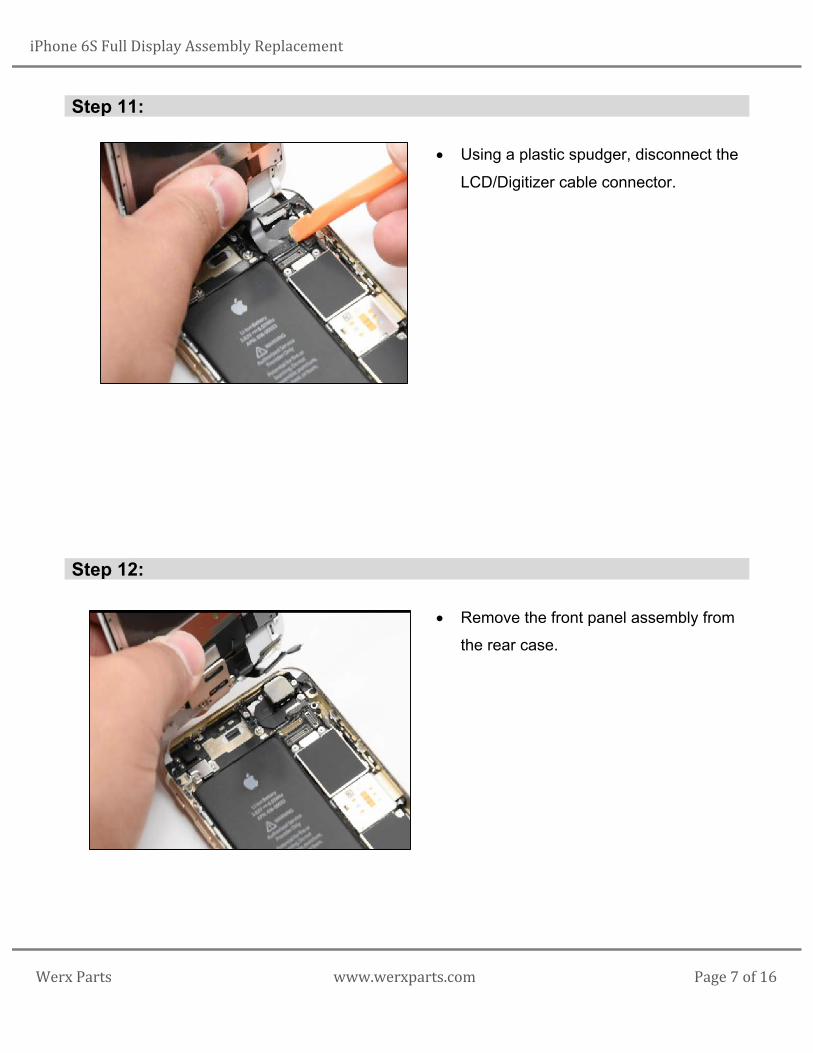
Step 11:
• Using a plastic spudger, disconnect the
LCD/Digitizer cable connector.
Step 12:
• Remove the front panel assembly from
the rear case.
iPhone6SFullDisplayAssemblyReplacement
WerxParts www.werxparts.com Page8of16
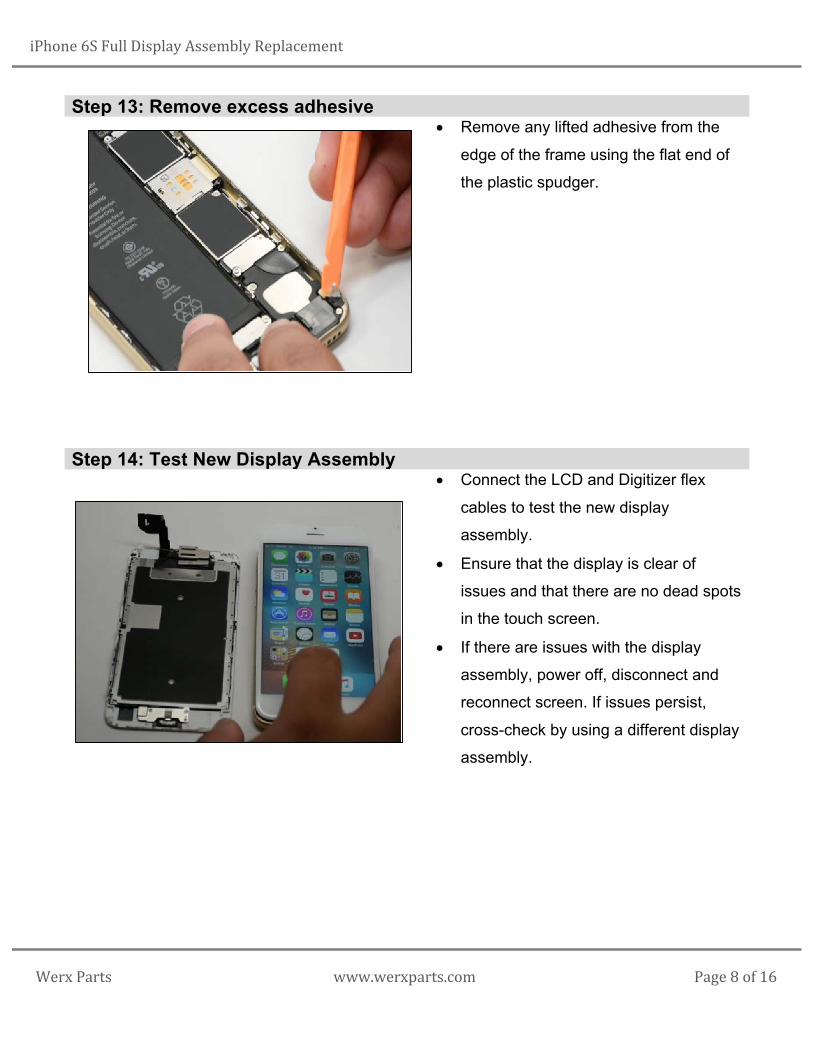
Step 13: Remove excess adhesive • Remove any lifted adhesive from the
edge of the frame using the flat end of
the plastic spudger.
Step 14: Test New Display Assembly • Connect the LCD and Digitizer flex
cables to test the new display
assembly.
• Ensure that the display is clear of
issues and that there are no dead spots
in the touch screen.
• If there are issues with the display
assembly, power off, disconnect and
reconnect screen. If issues persist,
cross-check by using a different display
assembly.
iPhone6SFullDisplayAssemblyReplacement
WerxParts www.werxparts.com Page9of16
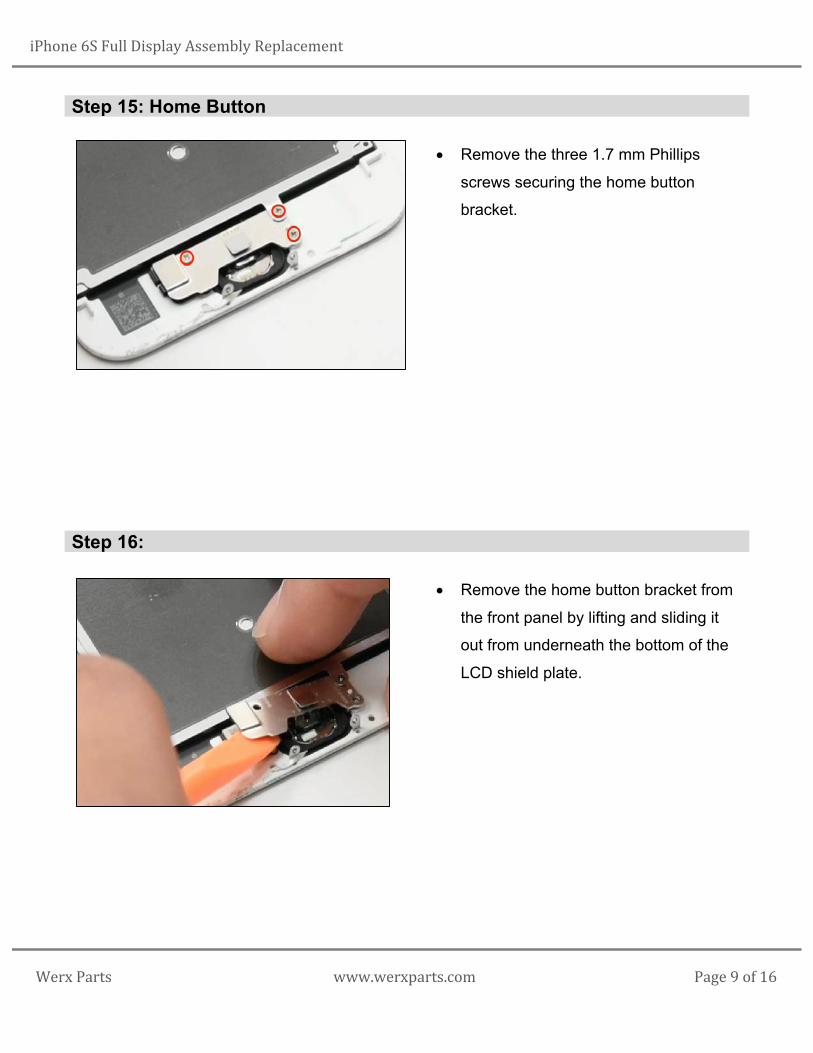
Step 15: Home Button
• Remove the three 1.7 mm Phillips
screws securing the home button
bracket.
Step 16:
• Remove the home button bracket from
the front panel by lifting and sliding it
out from underneath the bottom of the
LCD shield plate.
iPhone6SFullDisplayAssemblyReplacement
WerxParts www.werxparts.com Page10of16
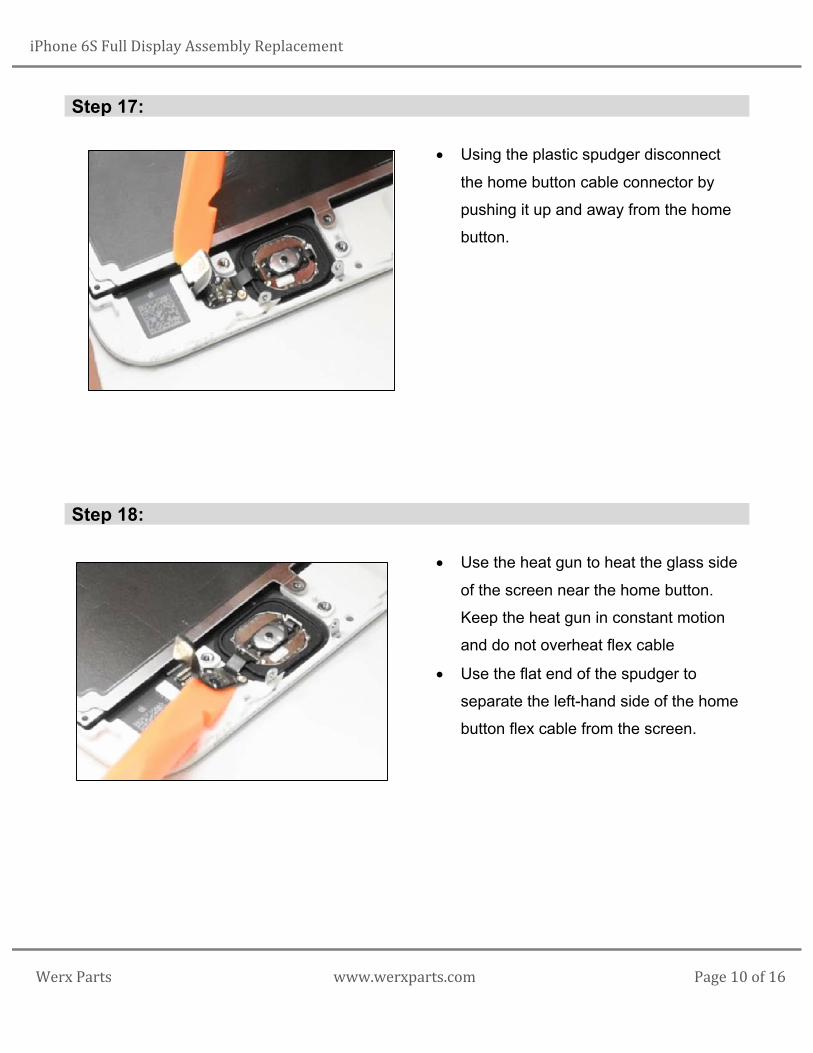
Step 17:
• Using the plastic spudger disconnect
the home button cable connector by
pushing it up and away from the home
button.
Step 18:
• Use the heat gun to heat the glass side
of the screen near the home button.
Keep the heat gun in constant motion
and do not overheat flex cable
• Use the flat end of the spudger to
separate the left-hand side of the home
button flex cable from the screen.
iPhone6SFullDisplayAssemblyReplacement
WerxParts www.werxparts.com Page11of16
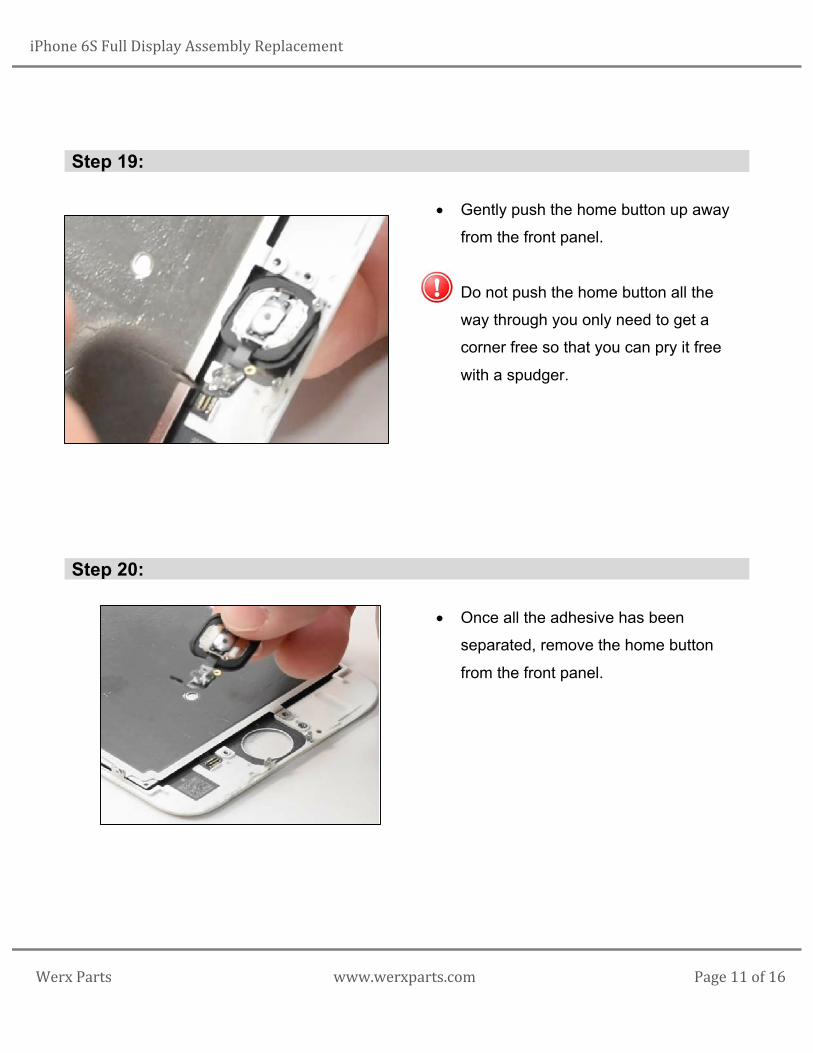
Step 19:
• Gently push the home button up away
from the front panel.
Do not push the home button all the
way through you only need to get a
corner free so that you can pry it free
with a spudger.
Step 20:
• Once all the adhesive has been
separated, remove the home button
from the front panel.
iPhone6SFullDisplayAssemblyReplacement
WerxParts www.werxparts.com Page12of16
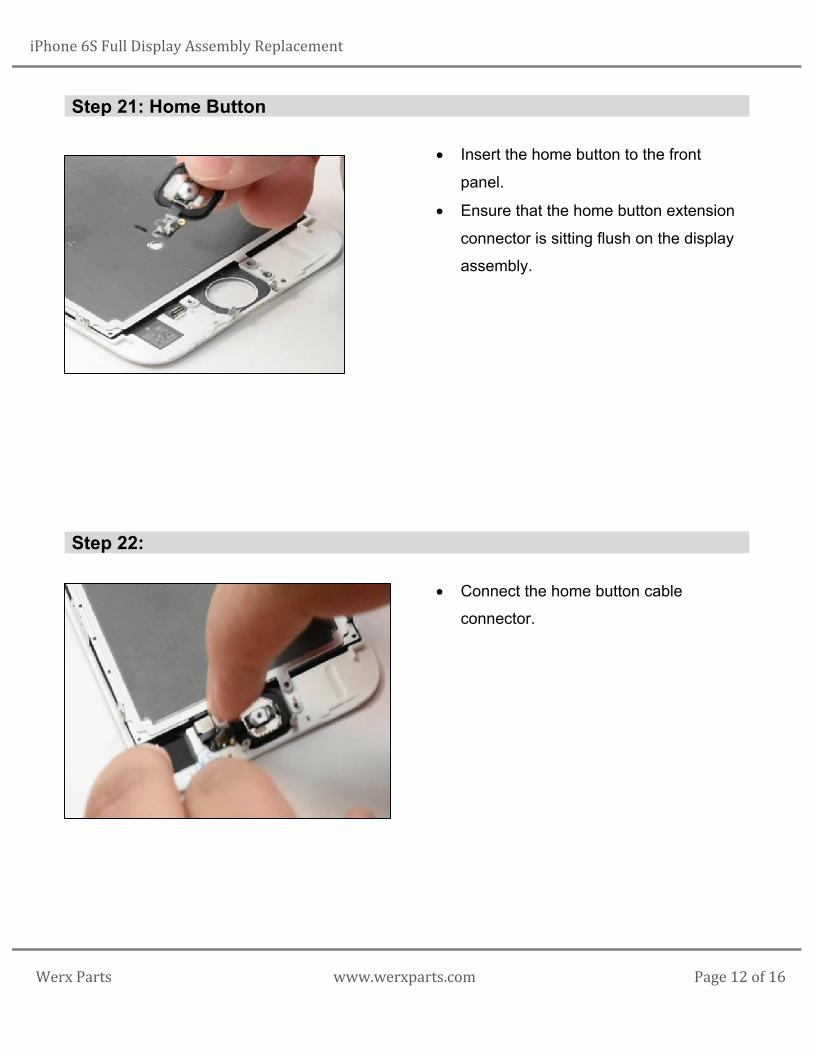
Step 21: Home Button
• Insert the home button to the front
panel.
• Ensure that the home button extension
connector is sitting flush on the display
assembly.
Step 22:
• Connect the home button cable
connector.
iPhone6SFullDisplayAssemblyReplacement
WerxParts www.werxparts.com Page13of16
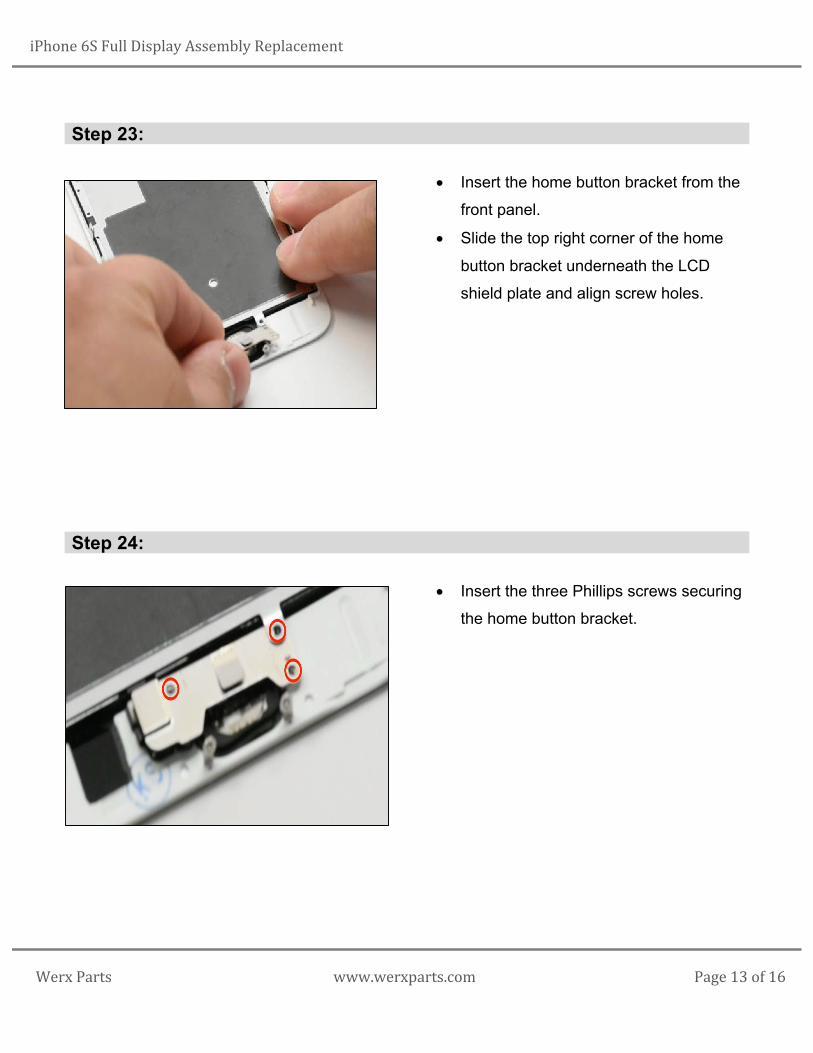
Step 23:
• Insert the home button bracket from the
front panel.
• Slide the top right corner of the home
button bracket underneath the LCD
shield plate and align screw holes.
Step 24:
• Insert the three Phillips screws securing
the home button bracket.
iPhone6SFullDisplayAssemblyReplacement
WerxParts www.werxparts.com Page14of16
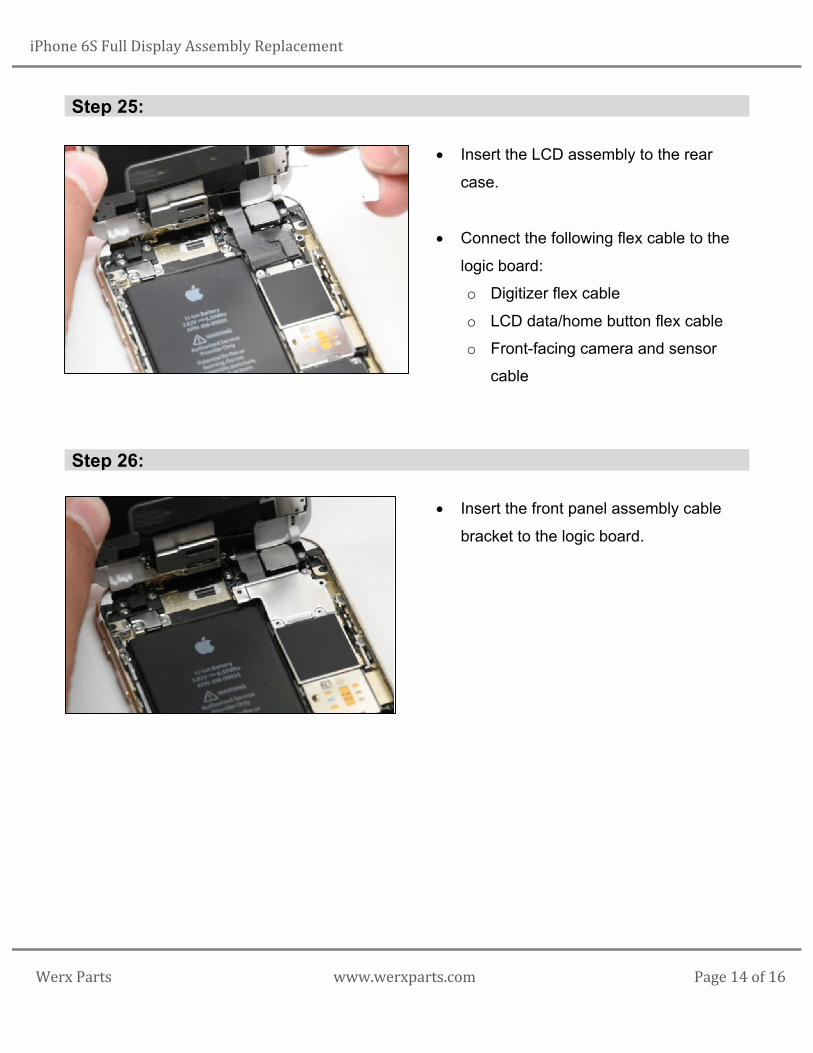
Step 25:
• Insert the LCD assembly to the rear
case.
• Connect the following flex cable to the
logic board:
o Digitizer flex cable
o LCD data/home button flex cable
o Front-facing camera and sensor
cable
Step 26:
• Insert the front panel assembly cable
bracket to the logic board.
iPhone6SFullDisplayAssemblyReplacement
WerxParts www.werxparts.com Page15of16
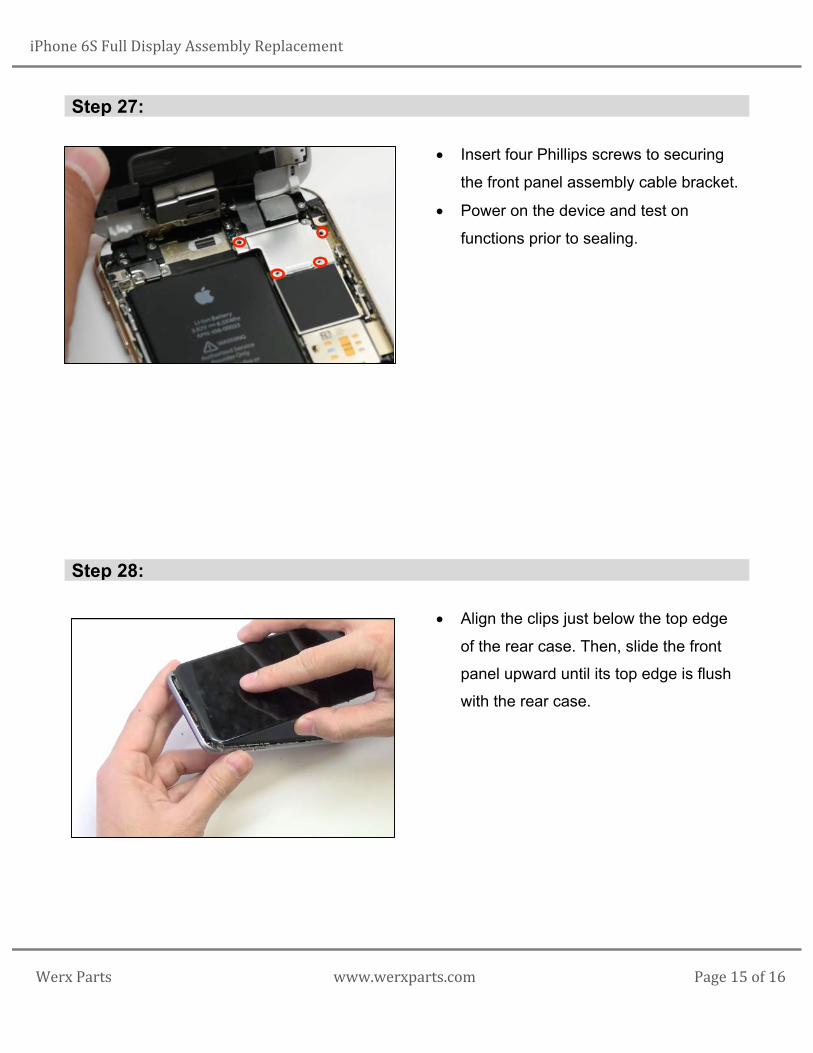
Step 27:
• Insert four Phillips screws to securing
the front panel assembly cable bracket.
• Power on the device and test on
functions prior to sealing.
Step 28:
• Align the clips just below the top edge
of the rear case. Then, slide the front
panel upward until its top edge is flush
with the rear case.

iPhone6SFullDisplayAssemblyReplacement
WerxParts www.werxparts.com Page16of16
Step 29:
• Run your fingers along the sides being
sure the assembly slips evenly into the
frame.
Step 30: Pentalobe Screws
• Insert the two Pentalobe screws next to
the lightning connector.