IP65 Weatherproof Fluorescent Fittings WPF118 / WPF136 ...
2
INSTALLATION INSTRUCTIONS A guide for qualified electricians IP65 Weatherproof Fluorescent Fittings WPF118 / WPF136 / WPF158 / WPF170 WPF218 / WPF236 / WPF258 / WPF270 Ballast - EEI = A2 These instructions are provided as a guideline to assist you. PLEASE READ THESE INSTRUCTIONS BEFORE INSTALLATION AND RETAIN FOR FUTURE REFERENCE CLEANING: Clean this light fitting only with a soft dry cloth. Disconnect the power and clean the exterior only of this fitting with a moist (not wet) cloth. The diffuser may be removed and washed in a mild detergent solution. Make sure it is completely dry before putting back on your fitting. Do not use any chemical or abrasive cleaners. LAMP REPLACEMENT: • Switch off the electricity at the mains. • Loosen the clips around the fitting and remove the diffuser - see diagram installation instructions inside for details. • Twist the fluorescent tube through 90° and pull it out of the slots in the lampholders. • Slide the new tube into the slots and turn through approximately 90° until it clicks into place making sure it is of the same type and wattage as stated on the lamp detail label. • Re-fit the diffuser ensuring that it is correctly seated in the soft foam gasket and that all of the clips are properly snapped home. • Restore the power and switch on. REPLACEMENT LAMP TYPE: • 18W requires 1 or 2 x suitable 18W G13 T8 600mm energy saving fluorescent tubes (not incl.) • 36W requires 1 or 2 x suitable 36W G13 T8 1200mm energy saving fluorescent tubes (not incl.) • 58W requires 1 or 2 x suitable 58W G13 T8 1500mm energy saving fluorescent tubes (not incl.) • 70W requires 1 or 2 x suitable 70W G13 T8 1800mm energy saving fluorescent tubes (not incl.) EVENTUALLY, YOU MAY WANT TO REPLACE THIS PRODUCT : Regulations require the recycling of Waste from Electrical and Electronic Equipment (European “WEEE Directive” effective August 2005—UK WEEE Regulations effective 2nd January 2007). Environment Agency Registered Producer: WEE/GA0248QZ. WHEN YOUR PRODUCT COMES TO THE END OF ITS LIFE OR YOU CHOOSE TO REPLACE IT, PLEASE RECYCLE IT WHERE FACILITIES EXIST - DO NOT DISPOSE WITH HOUSEHOLD WASTE. IF YOU EXPERIENCE PROBLEMS: If you believe your product is defective, please return it to the place where you bought it. Our Technical Team will gladly advise on any Eterna Lighting product, but may not be able to give specific instructions regarding individual installations. Pack contents: Weatherproof fluorescent fitting & diffuser clips Fixing Kit: Hanging clips 2 Hanging hooks 2 Grommet 1 IP65 gland 1 Wall plugs 4 Fixing screws 4 Washers 4 Gear tray retaining straps 2 36W fittings shown 874/2012 WPF Range Email: [email protected] / [email protected] Visit our website: www.eterna-lighting.co.uk Made in China Issue 0816
Transcript of IP65 Weatherproof Fluorescent Fittings WPF118 / WPF136 ...

INSTALLATION INSTRUCTIONSA guide for qualified electricians
IP65 Weatherproof Fluorescent Fittings
WPF118 / WPF136 / WPF158 / WPF170 WPF218 / WPF236 / WPF258 / WPF270
Ballast - EEI = A2These instructions are provided as a guideline to assist you.
PLEASE READ THESE INSTRUCTIONS BEFORE INSTALLATION AND RETAIN FOR FUTURE REFERENCE
CLEANING:Clean this light fitting only with a soft dry cloth.
Disconnect the power and clean the exterior only of this fitting with a moist (not wet) cloth.
The diffuser may be removed and washed in a mild detergent solution. Make sure it is completely dry before putting back on your fitting.
Do not use any chemical or abrasive cleaners.
LAMP REPLACEMENT:• Switch off the electricity at the mains.
• Loosen the clips around the fitting and remove the diffuser - see diagram installation instructions inside for details.
• Twist the fluorescent tube through 90° and pull it out of the slots in the lampholders.
• Slide the new tube into the slots and turn through approximately 90° until it clicks into place making sure it is of the same type and wattage as stated on the lamp detail label.
• Re-fit the diffuser ensuring that it is correctly seated in the soft foam gasket and that all of the clips are properly snapped home.
• Restore the power and switch on.
REPLACEMENT LAMP TYPE:• 18W requires 1 or 2 x suitable 18W G13 T8 600mm
energy saving fluorescent tubes (not incl.)
• 36W requires 1 or 2 x suitable 36W G13 T8 1200mm energy saving fluorescent tubes (not incl.)
• 58W requires 1 or 2 x suitable 58W G13 T8 1500mm energy saving fluorescent tubes (not incl.)
• 70W requires 1 or 2 x suitable 70W G13 T8 1800mm energy saving fluorescent tubes (not incl.)
EVENTUALLY, YOU MAY WANT TO REPLACE THIS PRODUCT:Regulations require the recycling of Waste from Electrical and Electronic Equipment (European “WEEE Directive” effective August 2005—UK WEEE Regulations effective 2nd January 2007). Environment Agency Registered Producer: WEE/GA0248QZ.
WHEN YOUR PRODUCT COMES TO THE END OF ITS LIFE OR YOU CHOOSE TO REPLACE IT, PLEASE RECYCLE IT WHERE FACILITIES EXIST - DO NOT DISPOSE WITH HOUSEHOLD WASTE.
IF YOU EXPERIENCE PROBLEMS:If you believe your product is defective, please return it to the place where you bought it. Our Technical Team will gladly advise on any Eterna Lighting product, but may not be able to give specific instructions regarding individual installations.
Pack contents:Weatherproof fluorescent fitting & diffuser clips
Fixing Kit:Hanging clips 2 Hanging hooks 2 Grommet 1 IP65 gland 1 Wall plugs 4 Fixing screws 4 Washers 4 Gear tray retaining straps 2 36W
fittings shown
874/2012
MODELNO.WPF Range
Email: [email protected] / [email protected]
Visit our website: www.eterna-lighting.co.uk Made in ChinaIssue 0816
STEP 1
STEP 2
STEP 3
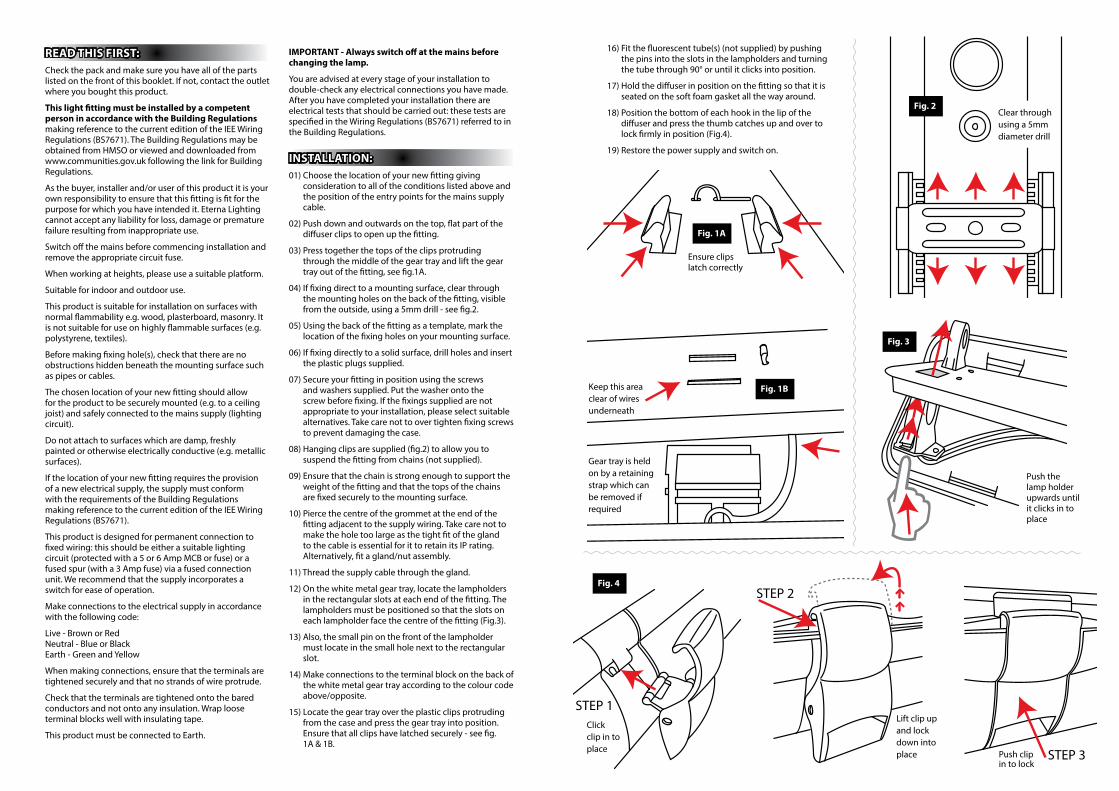
16) Fit the fluorescent tube(s) (not supplied) by pushing the pins into the slots in the lampholders and turning the tube through 90° or until it clicks into position.
17) Hold the diffuser in position on the fitting so that it is seated on the soft foam gasket all the way around.
18) Position the bottom of each hook in the lip of the diffuser and press the thumb catches up and over to lock firmly in position (Fig.4).
19) Restore the power supply and switch on.
READ THIS FIRST:Check the pack and make sure you have all of the parts listed on the front of this booklet. If not, contact the outlet where you bought this product.
This light fitting must be installed by a competent person in accordance with the Building Regulations making reference to the current edition of the IEE Wiring Regulations (BS7671). The Building Regulations may be obtained from HMSO or viewed and downloaded from www.communities.gov.uk following the link for Building Regulations.
As the buyer, installer and/or user of this product it is your own responsibility to ensure that this fitting is fit for the purpose for which you have intended it. Eterna Lighting cannot accept any liability for loss, damage or premature failure resulting from inappropriate use.
Switch off the mains before commencing installation and remove the appropriate circuit fuse.
When working at heights, please use a suitable platform.
Suitable for indoor and outdoor use.
This product is suitable for installation on surfaces with normal flammability e.g. wood, plasterboard, masonry. It is not suitable for use on highly flammable surfaces (e.g. polystyrene, textiles).
Before making fixing hole(s), check that there are no obstructions hidden beneath the mounting surface such as pipes or cables.
The chosen location of your new fitting should allow for the product to be securely mounted (e.g. to a ceiling joist) and safely connected to the mains supply (lighting circuit).
Do not attach to surfaces which are damp, freshly painted or otherwise electrically conductive (e.g. metallic surfaces).
If the location of your new fitting requires the provision of a new electrical supply, the supply must conform with the requirements of the Building Regulations making reference to the current edition of the IEE Wiring Regulations (BS7671).
This product is designed for permanent connection to fixed wiring: this should be either a suitable lighting circuit (protected with a 5 or 6 Amp MCB or fuse) or a fused spur (with a 3 Amp fuse) via a fused connection unit. We recommend that the supply incorporates a switch for ease of operation.
Make connections to the electrical supply in accordance with the following code:
Live - Brown or Red Neutral - Blue or Black Earth - Green and Yellow
When making connections, ensure that the terminals are tightened securely and that no strands of wire protrude.
Check that the terminals are tightened onto the bared conductors and not onto any insulation. Wrap loose terminal blocks well with insulating tape.
This product must be connected to Earth.
IMPORTANT - Always switch off at the mains before changing the lamp.
You are advised at every stage of your installation to double-check any electrical connections you have made. After you have completed your installation there are electrical tests that should be carried out: these tests are specified in the Wiring Regulations (BS7671) referred to in the Building Regulations.
INSTALLATION:01) Choose the location of your new fitting giving
consideration to all of the conditions listed above and the position of the entry points for the mains supply cable.
02) Push down and outwards on the top, flat part of the diffuser clips to open up the fitting.
03) Press together the tops of the clips protruding through the middle of the gear tray and lift the gear tray out of the fitting, see fig.1A.
04) If fixing direct to a mounting surface, clear through the mounting holes on the back of the fitting, visible from the outside, using a 5mm drill - see fig.2.
05) Using the back of the fitting as a template, mark the location of the fixing holes on your mounting surface.
06) If fixing directly to a solid surface, drill holes and insert the plastic plugs supplied.
07) Secure your fitting in position using the screws and washers supplied. Put the washer onto the screw before fixing. If the fixings supplied are not appropriate to your installation, please select suitable alternatives. Take care not to over tighten fixing screws to prevent damaging the case.
08) Hanging clips are supplied (fig.2) to allow you to suspend the fitting from chains (not supplied).
09) Ensure that the chain is strong enough to support the weight of the fitting and that the tops of the chains are fixed securely to the mounting surface.
10) Pierce the centre of the grommet at the end of the fitting adjacent to the supply wiring. Take care not to make the hole too large as the tight fit of the gland to the cable is essential for it to retain its IP rating. Alternatively, fit a gland/nut assembly.
11) Thread the supply cable through the gland.
12) On the white metal gear tray, locate the lampholders in the rectangular slots at each end of the fitting. The lampholders must be positioned so that the slots on each lampholder face the centre of the fitting (Fig.3).
13) Also, the small pin on the front of the lampholder must locate in the small hole next to the rectangular slot.
14) Make connections to the terminal block on the back of the white metal gear tray according to the colour code above/opposite.
15) Locate the gear tray over the plastic clips protruding from the case and press the gear tray into position. Ensure that all clips have latched securely - see fig. 1A & 1B.
Keep this area clear of wires underneath
Fig. 1A
Fig. 1B
Ensure clips latch correctly
Gear tray is held on by a retaining strap which can be removed if required
Fig. 4
Lift clip up and lock down into place Push clip
in to lock
Click clip in to place
STEP 1
STEP 2
STEP 3
STEP 1
STEP 2
STEP 3
STEP 1
STEP 2
STEP 3
Fig. 2Clear through using a 5mm diameter drill
Fig. 3
Push the lamp holder upwards until it clicks in to place