IP Phone 1120E User Guide - CS1000IP Phone 1120E User Guide Chapter 2 Entering and editing text You...
25
BCM Business Communications Manager Document Status: Standard Document Version: 03.01 Document Number: NN40050-104 Date: November 2006 IP Phone 1120E User Guide
Transcript of IP Phone 1120E User Guide - CS1000IP Phone 1120E User Guide Chapter 2 Entering and editing text You...

BCMBusiness Communications Manager
Document Status: Standard
Document Version: 03.01
Document Number: NN40050-104
Date: November 2006
IP Phone 1120E User Guide

Copyright © Nortel Networks Limited 2006, All rights reserved.
The information in this document is subject to change without notice. The statements, configurations, technical data, and recommendations in this document are believed to be accurate and reliable, but are presented without express or implied warranty. Users must take full responsibility for their applications of any products specified in this document. The information in this document is proprietary to Nortel Networks.
Trademarks
Nortel, the Nortel logo, and the Globemark are trademarks of Nortel Networks.Microsoft, MS, MS-DOS, Windows, and Windows NT are registered trademarks of Microsoft Corporation.All other trademarks and registered trademarks are the property of their respective owners.

Contents 3
IP Phone 1120E User Guide
Contents
Chapter 1About the Nortel IP Phone 1120E . . . . . . . . . . . . . . . . . . . . . . . . . . . . . . . . . . 5
Basic Features . . . . . . . . . . . . . . . . . . . . . . . . . . . . . . . . . . . . . . . . . . . . . . . . . . . . . . . . 5
Telephone Controls . . . . . . . . . . . . . . . . . . . . . . . . . . . . . . . . . . . . . . . . . . . . . . . . . . . . 7
Telephone Display . . . . . . . . . . . . . . . . . . . . . . . . . . . . . . . . . . . . . . . . . . . . . . . . . . . . 11
Chapter 2Entering and editing text . . . . . . . . . . . . . . . . . . . . . . . . . . . . . . . . . . . . . . . . 13
Entering text using the telephone dialpad . . . . . . . . . . . . . . . . . . . . . . . . . . . . . . . . . . 13
Entering text using the USB keyboard . . . . . . . . . . . . . . . . . . . . . . . . . . . . . . . . . . . . . 13
Chapter 3Configuring options. . . . . . . . . . . . . . . . . . . . . . . . . . . . . . . . . . . . . . . . . . . . 15
1. Preferences . . . . . . . . . . . . . . . . . . . . . . . . . . . . . . . . . . . . . . . . . . . . . . . . . . . . . . . 15
1. Display Settings . . . . . . . . . . . . . . . . . . . . . . . . . . . . . . . . . . . . . . . . . . . . . . . . 15
2. Language . . . . . . . . . . . . . . . . . . . . . . . . . . . . . . . . . . . . . . . . . . . . . . . . . . . . . 15
2. Local Diagnostics . . . . . . . . . . . . . . . . . . . . . . . . . . . . . . . . . . . . . . . . . . . . . . . . . . 16
1. IP Set&DHCP Information . . . . . . . . . . . . . . . . . . . . . . . . . . . . . . . . . . . . . . . . . 16
2. Network Diagnostic Tools . . . . . . . . . . . . . . . . . . . . . . . . . . . . . . . . . . . . . . . . . 16
3. Ethernet statistics . . . . . . . . . . . . . . . . . . . . . . . . . . . . . . . . . . . . . . . . . . . . . . . 16
4. IP networks statistics . . . . . . . . . . . . . . . . . . . . . . . . . . . . . . . . . . . . . . . . . . . . . 16
5. USB device information . . . . . . . . . . . . . . . . . . . . . . . . . . . . . . . . . . . . . . . . . . . 16
3. Network Configuration . . . . . . . . . . . . . . . . . . . . . . . . . . . . . . . . . . . . . . . . . . . . . . . 17
4. Lock Menu . . . . . . . . . . . . . . . . . . . . . . . . . . . . . . . . . . . . . . . . . . . . . . . . . . . . . . . . 17
Chapter 4Telephone setup. . . . . . . . . . . . . . . . . . . . . . . . . . . . . . . . . . . . . . . . . . . . . . . 19
Language choice . . . . . . . . . . . . . . . . . . . . . . . . . . . . . . . . . . . . . . . . . . . . . . . . . . . . . 19
Ring Type . . . . . . . . . . . . . . . . . . . . . . . . . . . . . . . . . . . . . . . . . . . . . . . . . . . . . . . . . . 19
Call log . . . . . . . . . . . . . . . . . . . . . . . . . . . . . . . . . . . . . . . . . . . . . . . . . . . . . . . . . . . . . 19
Time offset . . . . . . . . . . . . . . . . . . . . . . . . . . . . . . . . . . . . . . . . . . . . . . . . . . . . . . . . . . 19
About your programmable buttons . . . . . . . . . . . . . . . . . . . . . . . . . . . . . . . . . . . . . . . 20
Memory buttons . . . . . . . . . . . . . . . . . . . . . . . . . . . . . . . . . . . . . . . . . . . . . . . . . . 20
Program memory buttons . . . . . . . . . . . . . . . . . . . . . . . . . . . . . . . . . . . . . . . . . . . 20
Making a call . . . . . . . . . . . . . . . . . . . . . . . . . . . . . . . . . . . . . . . . . . . . . . . . . . . . . . . . 21
Answering a call . . . . . . . . . . . . . . . . . . . . . . . . . . . . . . . . . . . . . . . . . . . . . . . . . . . . . 22
While on an active call . . . . . . . . . . . . . . . . . . . . . . . . . . . . . . . . . . . . . . . . . . . . . . . . . 22
Placing a call on hold . . . . . . . . . . . . . . . . . . . . . . . . . . . . . . . . . . . . . . . . . . . . . . 22
Using handsfree . . . . . . . . . . . . . . . . . . . . . . . . . . . . . . . . . . . . . . . . . . . . . . . . . . . . . 22

4 Contents
NN40050-104NN40050-104
Using a headset . . . . . . . . . . . . . . . . . . . . . . . . . . . . . . . . . . . . . . . . . . . . . . . . . . . . . . 22
Muting the Microphone . . . . . . . . . . . . . . . . . . . . . . . . . . . . . . . . . . . . . . . . . . . . . . . . 22
Accessing External Server Applications . . . . . . . . . . . . . . . . . . . . . . . . . . . . . . . . . . . 23
5
IP Phone 1120E User Guide
Chapter 1About the Nortel IP Phone 1120E
The Nortel IP Phone 1120E brings voice and data to the desktop by connecting directly to a Local Area Network (LAN) through an Ethernet connection.
Basic FeaturesYour IP Phone 1120E supports the following:• four user-defined feature keys with labels and indicators• four soft keys
• graphical, high-resolution LCD display, backlit, with adjustable contrast• high-quality speaker phone• volume control keys for adjusting ringer, speaker, handset, and headset volume• six specialized feature keys:
— Quit— Directory— Message/Inbox— Shift/Outbox— Services— Copy
• six call-processing fixed keys: — Mute— Handsfree— Goodbye— Expand to PC— Headset— Hold
• gigabit Ethernet ports• built-in gigabit Ethernet switch for shared PC access• headset jack with an On/Off key
Note: In this guide, user-defined feature key labels appear beside the keys, and soft key labels appear directly above the keys.
Note: Some IP Phone 1120E phones are not configured to support soft key functionality. Consult your system administrator.

6 Chapter 1 About the Nortel IP Phone 1120E
NN40050-104NN40050-104
• USB port to support a keyboard or mouse
• automatic network configuration• hearing-aid compatibility
Note: Powered downstream 1.1-complaint USB hubs are supported, including USB 2.0 hubs, if they offer USB 1.1 backwards compliancy.
Caution: Do not plug the IP Phone 1120E into a regular telephone jack. This results in severe damage to the IP Phone. Consult your system administrator to ensure that you plug your telephone into a 10/100/1000BaseT Ethernet jack
Caution: The IP Phone 1120E is designed for use in an indoor environment only.

Chapter 1 About the Nortel IP Phone 1120E 7
IP Phone 1120E User Guide
Figure 1 shows the IP Phone 1120E.
Figure 1 IP Phone 1120E
Telephone Controls
Note: Some IP Phone 1120E phones are equipped with optional key caps. Text in parentheses indicates labels appearing on the key caps, for example, (Services).
Soft keys are located below the display area. The LCD label above each key changes based on the active feature.
The Feature key is located on the bottom left of the display area and is used for accessing different phone options such as changing the ring type (Feature *6)
Handsfree key
Handset
User-defined feature keys
High-resolution graphical display screen
Navigation keys
Services keyCopy key
Quit/Stop key
Message/Inbox keyShift/Outbox keyDirectory key
Hold key
Expand to PC key
Headset key
Goodbye keyVolume control
Dialpad
Soft keysSpeaker
Feature Status Lamp*
*Note: If supported by your server, the Feature Status Lamp provides a user-defined alert. Contact your system administrator to find out if this feature is available for you.
Mute key
Visual Alerter/Message Waiting indicator
Fwd
Feature
8 Chapter 1 About the Nortel IP Phone 1120E
NN40050-104NN40050-104
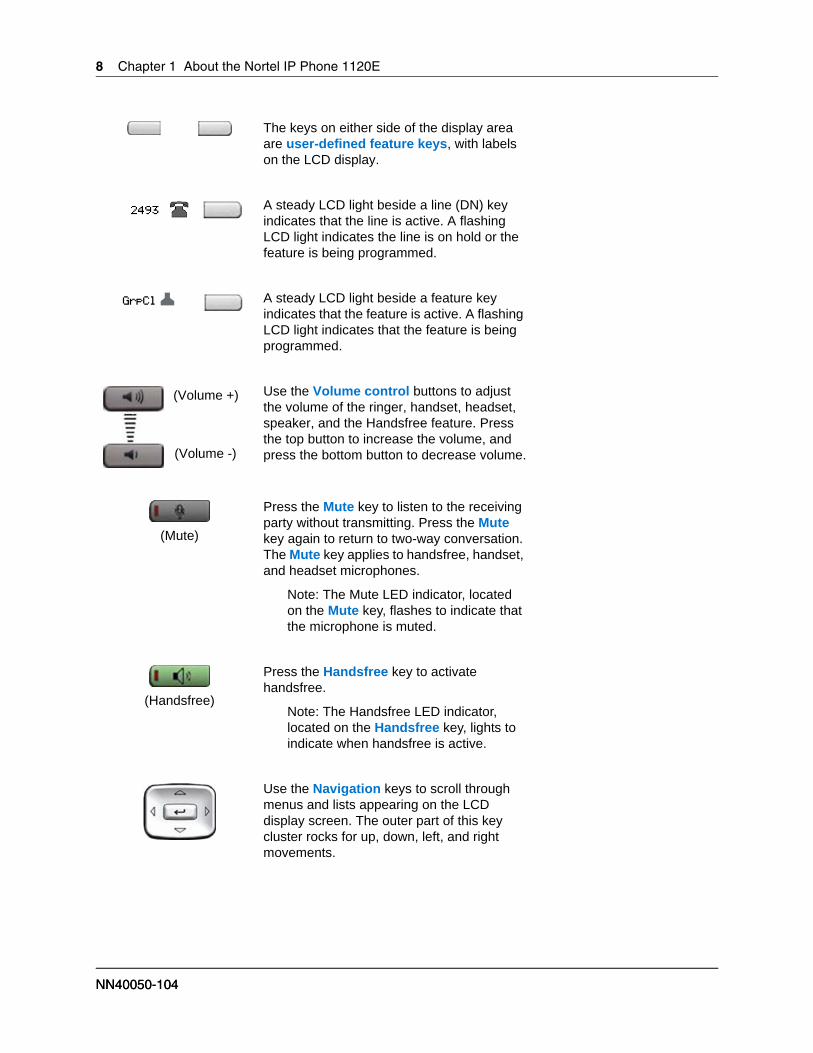
The keys on either side of the display area are user-defined feature keys, with labels on the LCD display.
A steady LCD light beside a line (DN) key indicates that the line is active. A flashing LCD light indicates the line is on hold or the feature is being programmed.
A steady LCD light beside a feature key indicates that the feature is active. A flashing LCD light indicates that the feature is being programmed.
Use the Volume control buttons to adjust the volume of the ringer, handset, headset, speaker, and the Handsfree feature. Press the top button to increase the volume, and press the bottom button to decrease volume.
Press the Mute key to listen to the receiving party without transmitting. Press the Mute key again to return to two-way conversation. The Mute key applies to handsfree, handset, and headset microphones.
Note: The Mute LED indicator, located on the Mute key, flashes to indicate that the microphone is muted.
Press the Handsfree key to activate handsfree.
Note: The Handsfree LED indicator, located on the Handsfree key, lights to indicate when handsfree is active.
Use the Navigation keys to scroll through menus and lists appearing on the LCD display screen. The outer part of this key cluster rocks for up, down, left, and right movements.
GrpCl Z
(Volume +)
(Volume -)
(Mute)
(Handsfree)

Chapter 1 About the Nortel IP Phone 1120E 9
IP Phone 1120E User Guide
Use the Send/Enter key, at the center of the Navigation key cluster, to confirm menu selections.
In most menus, you can use the Send/Enter key instead of the Select soft key.
Press the Hold key to put an active call on hold. Tap the flashing line (DN) soft key to return to the caller on hold.
Use the Expand to PC key to access external server applications.
Press the Headset key to answer a call using the headset or to switch a call from the handset or handsfree to the headset.
Note: The Headset LED indicator, located on the Handsfree key, lights to indicate that the headset is in use.
Use the Goodbye key to terminate an active call.
When a message is waiting, the red Visual Alerter/Message Waiting indicator flashes. Also, when the ringer sounds, this indicator flashes.
When your IP Phone 1120E firmware is being updated, the blue Feature Status Lamp indicator flashes.
Note: To find out if additional features are supported, contact your administrator.
Press the Copy Key to copy entries to your Personal Directory from other lists, such as the Caller List, Redial List, and Corporate Directory.
(Hold)
(Expand)
(Headset)
(Goodbye)
(Copy)
10 Chapter 1 About the Nortel IP Phone 1120E
NN40050-104NN40050-104
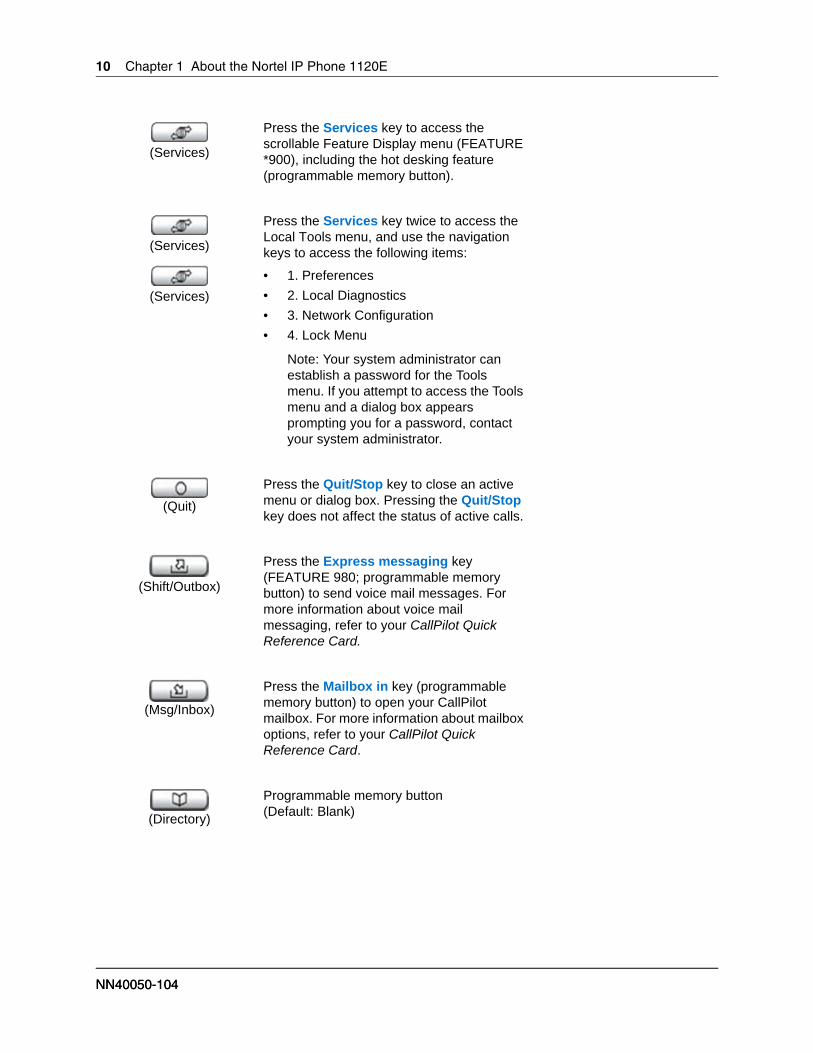
Press the Services key to access the scrollable Feature Display menu (FEATURE *900), including the hot desking feature (programmable memory button).
Press the Services key twice to access the Local Tools menu, and use the navigation keys to access the following items:
• 1. Preferences• 2. Local Diagnostics• 3. Network Configuration• 4. Lock Menu
Note: Your system administrator can establish a password for the Tools menu. If you attempt to access the Tools menu and a dialog box appears prompting you for a password, contact your system administrator.
Press the Quit/Stop key to close an active menu or dialog box. Pressing the Quit/Stop key does not affect the status of active calls.
Press the Express messaging key (FEATURE 980; programmable memory button) to send voice mail messages. For more information about voice mail messaging, refer to your CallPilot Quick Reference Card.
Press the Mailbox in key (programmable memory button) to open your CallPilot mailbox. For more information about mailbox options, refer to your CallPilot Quick Reference Card.
Programmable memory button(Default: Blank)
(Services)
(Services)
(Services)
(Quit)
(Shift/Outbox)
(Msg/Inbox)
(Directory)

Chapter 1 About the Nortel IP Phone 1120E 11
IP Phone 1120E User Guide
Telephone DisplayYour IP Phone 1120E has three display areas:• The upper display area provides labels for the four user-defined feature keys.• The middle display area contains single-line information for items such as caller number,
caller name, feature prompt string, user-entered digits, date and time information, and telephone information.
• The lower display area provides labels for the four soft keys.Figure 2 shows an idle LCD screen.
Figure 2 IP Phone 1120E LCD screen
Upper display areaUser-defined
feature key labels
Lower display areaSoft keys
Middle display areaDate/time display
Call party informationFeature status information
Options informationDirectories information
42888 2348
10/30 4:30pm
AutoDial47678
Trans Conf Forward More...

12 Chapter 1 About the Nortel IP Phone 1120E
NN40050-104NN40050-104
13
IP Phone 1120E User Guide
Chapter 2Entering and editing text
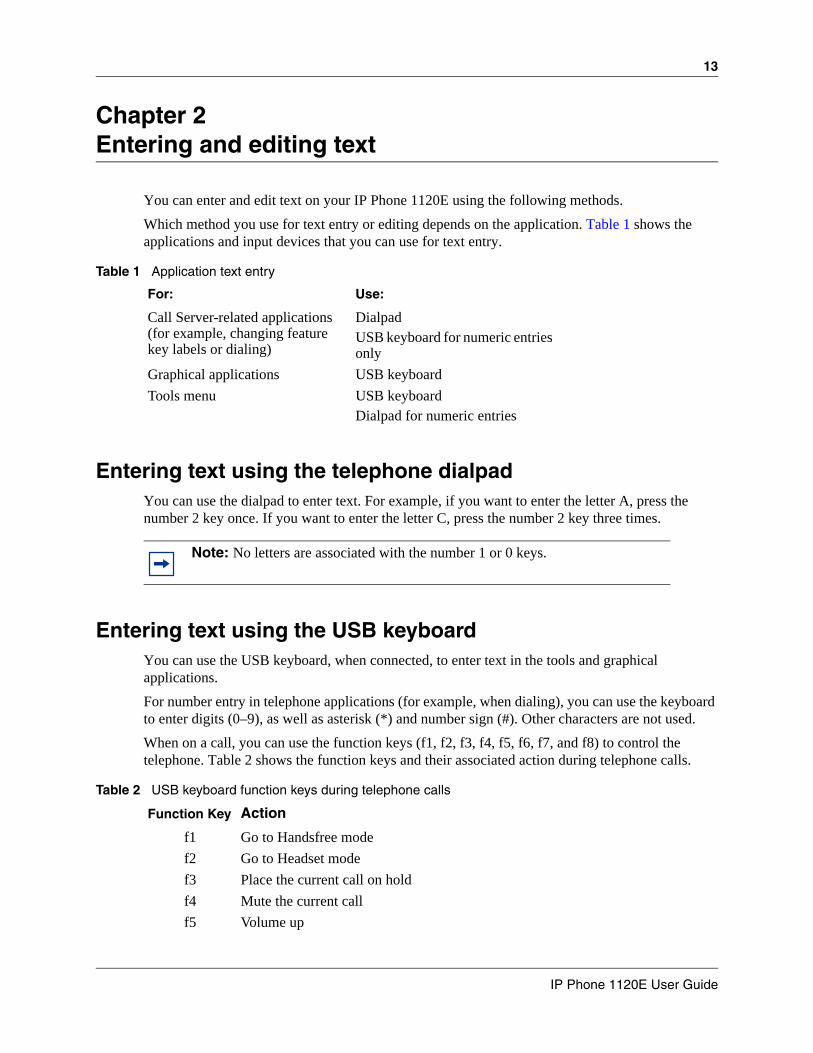
You can enter and edit text on your IP Phone 1120E using the following methods.Which method you use for text entry or editing depends on the application. Table 1 shows the applications and input devices that you can use for text entry.
Table 1 Application text entry
Entering text using the telephone dialpadYou can use the dialpad to enter text. For example, if you want to enter the letter A, press the number 2 key once. If you want to enter the letter C, press the number 2 key three times.
Entering text using the USB keyboardYou can use the USB keyboard, when connected, to enter text in the tools and graphical applications. For number entry in telephone applications (for example, when dialing), you can use the keyboard to enter digits (0–9), as well as asterisk (*) and number sign (#). Other characters are not used.When on a call, you can use the function keys (f1, f2, f3, f4, f5, f6, f7, and f8) to control the telephone. Table 2 shows the function keys and their associated action during telephone calls.
Table 2 USB keyboard function keys during telephone calls
For: Use:
Call Server-related applications (for example, changing feature key labels or dialing)
DialpadUSB keyboard for numeric entries only
Graphical applications USB keyboardTools menu USB keyboard
Dialpad for numeric entries
Note: No letters are associated with the number 1 or 0 keys.
Function Key Action
f1 Go to Handsfree modef2 Go to Headset modef3 Place the current call on holdf4 Mute the current callf5 Volume up

14 Chapter 2 Entering and editing text
NN40050-104NN40050-104
f6 Volume downf7 Copyf8 Quit

15
IP Phone 1120E User Guide
Chapter 3Configuring options
Your IP Phone 1120E has both local and server-based options. Two methods are available to navigate in the Local Tools menu:• Follow the prompts on screen.• Where a menu entry has a number in front of it, you can select that entry by pressing the
associated key on the dialpad. For example, when you are in the Local Tools menu, you can access 2. Local Diagnostics by pressing the 2 key on the dialpad.
Doube-press the (Services) key to open the Local Tools Menu and access the following options:
1. PreferencesUse the Preferences menu item to configure local preferences.
1. Display SettingsUse the Contrast tool to alter the physical settings of the display. Use the Sleep tool to control how long the display remains lit if the phone is inactive.
1 Double-press (Services) to open the Local Tools menu.
2 Press the 1 key on the telephone dialpad to open the 1. Preferences menu, and press the 1 key on the telephone dialpad to open the 1. Display Settings menu.
3 Press the Up/Down navigation keys to scroll and select either Contrast or Sleep. Press the Select soft key.
4 Press the Up/Down navigation keys to increase or decrease the value.
5 Press the Exit soft key.
2. LanguageUse the Language tool to select the language used on your phone.
1 Double-press (Services) to open the Local Tools menu.
2 Press the 1 key on the telephone dialpad to open the 1. Preferences menu, and press the 2 key on the telephone dialpad to open the 2. Language menu.
3 Press the Up/Down navigation keys to scroll and highlight the desired language (for example, German [Deutsche]).
4 Choose one of the following:
Note: Many of the options discussed in this section are for administrator use only. Do not make any changes unless instructed by an administrator.

16 Chapter 3 Configuring options
NN40050-104NN40050-104
• Press the Select soft key to save the desired language and return to the Telephone Options menu.
• Press the Cancel soft key to keep existing configurations.
5 Press the Exit soft key. Changes are saved automatically.
2. Local Diagnostics
1. IP Set&DHCP InformationThe Network Configuration tool is used to view reports about IP set and DHCP operation. This tool is for administrator use only.
2. Network Diagnostic ToolsThe Network Diagnostic Tools menu contains tools that are used to diagnose network problems. This menu is for administrator use only.
3. Ethernet statisticsThe Ethernet statistics tool is used to view reports about Ethernet operation. This menu is for administrator use only.
4. IP networks statisticsThe IP networks statistics tool is used to view reports about network operation. This menu is for administrator use only.
5. USB device informationThe USB Devices tool provides information about any Universal Serial Bus (USB) devices that you connect to your phone. Your IP Phone 1120E automatically detects USB devices when you connect them to the USB port in the back of the telephone.
1 Double-press (Services) to open the Local Tools menu.
2 Press the 5 key on the telephone dialpad to select 5. USB Devices. USB Device information is displayed.
3 Press the Return soft key.
Chapter 3 Configuring options 17
IP Phone 1120E User Guide
3. Network ConfigurationThe Network Configuration tool displays information that was configured when the telephone was installed. This tool is for administrator use only.
4. Lock MenuThe lock menu tool is used by the system administrator to protect the Local Tools menu items from accidental or unwanted changes.The lock menu tool is not available on all systems. If the menu entry appears dimmed, it is not enabled on your phone. Contact your administrator to find out of this feature is available for your use.

18 Chapter 3 Configuring options
NN40050-104NN40050-104

19
IP Phone 1120E User Guide
Chapter 4Telephone setup
Language choiceSelect the Primary Language for the telephone display. Choose one of the following three options:
• Press Feature *501. Select the Alternate Language for the telephone display.
• Press Feature *502. Select the Alternate Language 2 for the telephone display.
• Press Feature *503. Select the Alternate Language 3 for the telephone display.
Ring Type Select the ring type for your telephone:
1 Press Feature *6.
2 Press 1, 2, 3, 4, or Next to hear the different ring types.
3 Press OK to store the ring type.
Call log Press Feature *812 and use the navigation keys to scroll through and edit the call log.
Time offsetWhen your IP Phone 1120E is located in a different time zone than your system, the display shows the system time instead of the local time. The Time Offset feature allows you to adjust the time that appears on the display. Before you begin, calculate the time difference, in hours, between the server time and local time.
To change the time that appears on your telephone display to local time, use the following steps:
1 Press Feature *510.
2 Press Change.
3 Press * to switch between adding or subtracting time.
Note: For more information about the features available to your telephone and how to use them, refer to the Telephones Feature Card.

20 Chapter 4 Telephone setup
NN40050-104NN40050-104
4 Using the dialpad, enter the number of hours between local time and system time.
5 Press OK.
About your programmable buttonsYour System Administrator assigns the four programmable buttons as line, intercom, or memory buttons. The label for each button appears on the display next to the button. For more information, see your System Administrator.
Memory buttons
These are buttons that are not assigned as line or intercom buttons. Memory buttons store internal and external phone numbers or features to give you one-touch dialing or feature activation.
Program memory buttons
You can program a memory button with a new phone number or feature.
External autodial
1 Press Feature *1.
2 Press a memory button.
3 Dial the external phone number.
4 Press OK to store the phone number.
Internal autodial
1 Press Feature *2.
2 Press a memory button.
3 Dial the extension number.
4 Press OK to store the extension number.
Note: Press # to enter half-hour increments.
Note: It may take up to 1 minute for the change to appear on the display.

Chapter 4 Telephone setup 21
IP Phone 1120E User Guide
Features
1 Press Feature *3.
2 Press a memory button.
3 Press Feature and enter the feature code.
4 Press OK to store the feature code.
Erase memory buttons
1 Press Feature *1.
2 Press a memory button.
3 Press OK to erase the phone number saved on the button.
Making a callThere are many ways to place a call depending on your telephone programming and the type of call.
Making external calls using line soft keys
1 Lift the handset.
2 Tap a line soft key.
3 Dial the external telephone number.
Making external calls using intercom soft keys
1 Lift the handset.
2 Tap an intercom soft key, and enter a line pool access code.
3 When you hear an external dial tone, dial the external telephone number.
Making internal calls using intercom soft keys
1 Lift the handset.
2 Tap an intercom soft key.
3 Dial the extension number.
Contact your system administrator for a list of extension numbers.
Note: Contact your system administrator for a list of line pool codes. When entering a line pool access code on PRI lines, you do not hear a dial tone.

22 Chapter 4 Telephone setup
NN40050-104NN40050-104
Answering a callWhen your telephone rings and the light flashes, or when an intercom or line soft key indicator flashes:
• Lift the handset.
OR
• Press the line or intercom soft key with the flashing S indicator before you lift the handset.
While on an active call
Placing a call on hold
Calls are put on hold automatically when you switch from one line to another.
• While on a call, press (Hold). TheSindicator for the line on hold flashes.
• To retrieve a held call, tap the line soft key with the flashing Sindicator.
Using handsfreeHandsfree is not available on all phones. Contact your administrator to find our if this feature is available for your use.
• Press (Handsfree) to make or answer a call.
• To switch to handsfree when you are on a handset call, press (Handsfree) and replace the handset. Lift the handset to switch back.
• To switch to handsfree when you are on a headset call, press (Handsfree) Press (Headset) to switch back.
Using a headsetYou must have a headset installed on your telephone to use this feature.
• Press (Headset) to activate the headset mode. When the (Headset) light is on, press a line or intercom soft key to make a call.
• To switch to your headset when you are on a handset call, press (Headset) and replace the handset. Lift the handset to switch back.
• To switch to your headset when you are on a Handsfree call, press (Headset). Press (Handsfree) to switch back.
Muting the MicrophoneYou can use (Mute) on handset, handsfree, or headset calls.

Chapter 4 Telephone setup 23
IP Phone 1120E User Guide
• While on a call, press (Mute) to turn the microphone off. The (Mute) button lights when the microphone is off.
• Press (Mute) again to turn the microphone on.
Accessing External Server ApplicationsUse External Server Applications to access a variety of applications directly from your IP Phone 1120E.
To find out what features and services are available, contact your system administrator. Depending on what is available on your system, your phone can provide information; for example, local news and weather, stock market information, or traffic reports.
For more information about the External Server Applications, consult the Nortel IP Phone External Server Applications User Guide.

24 Chapter 4 Telephone setup
NN40050-104NN40050-104

Index 25
IP Phone 1120E User Guide
Index
CCopy Key 9
copyright 2
EExpand to PC key 9
GGoodbye key 9
HHandsfree / Speaker key 8
Headset key 9
Hold key 9
LLine (DN) key 8
MMessage waiting indicator 9
Mute key 8
NNavigation keys 8
PProgrammable line/feature keys 8
Rregulatory information 2
SSoft keys 7
Ttrademarks 2
VVolume control 8
Volume control bar 8